Shelving built in: How to DIY Built In Shelves
How to DIY Built In Shelves
Photo: Tony Carrick
Sometimes a home’s natural architectural features offer a place to get creative, allowing you to make use of what would otherwise be wasted space. An alcove around a fireplace or entertainment center provides the perfect place to add shelving for storage and display.
Since these architectural features already provide the supporting framework, often all that’s left to do is add the shelves. What’s more, this project can be completed with tools most DIYers have in their workshop. This guide shares the steps to complete this simple addition of DIY built-in shelves.
Tools & Materials
- Pencil
- Tape Measure
- Birch plywood for shelves
- 1x2s for shelf supports
- 1x3s for shelf facing
- Stud finder
- See full list «
- Cordless drill
- Wood glue
- 2-inch wood screws
- Finish nails
- Finish nailer or hammer with nail set
- Paint and paint supplies
- Safety glasses
- Table saw or circular saw
- Chop saw or circular saw
- Solid white caulk
- Caulk gun
STEP 1: Plan your shelves.
Assess the alcove and determine how many shelves you want to add. Consider what you’d like to put on the shelves, and make sure there is enough spacing between each shelf to fit those books, knickknacks, and family photos. Consider using uneven spacing by including some shelves that are further apart to accommodate large books and some that are closer together to feature smaller decorations.
Advertisement
Once you’ve figured out the number and spacing of the shelves, decide how deep to make the shelves. While the shelves can be as deep as the alcove, setting the shelves back from the opening a few inches may create a more appealing look.
Photo: Tony Carrick
STEP 2: Take measurements.
Use a tape measure to measure the width and depth of the opening to determine the size of each shelf. Use a pencil to mark the location of the shelves on each side of the alcove.
In a perfect world, everyone’s home would be perfectly square. Alas, that is rarely the case, even with newer homes. Walls can curve or be slightly out of square with the floor, affecting the space between two opposing walls from floor to ceiling. By taking individual measurements for each shelf, you can account for these discrepancies and ensure a good fit when you install each shelf.
STEP 3: Purchase wood.
Now that you know how many shelves you’re building and have taken measurements, you’ll need to decide what type of wood to use. While hardwood makes for durable and beautiful shelving, you’ll pay a premium for it. Hardwood can cost two or three times as much as softwood. Unless you’re planning on staining the DIY storage shelves to allow the natural grain to show, hardwood isn’t worth the cost. While solid pine boards are much more affordable, pine is softer, making it more susceptible to dents.
If painting the shelves, the most affordable option is 3/4-inch-thick birch plywood. Birch plywood is cheaper than solid hardwood, but it has a hardwood veneer that gives it better dent-resistant characteristics than soft pine. You can even stain it if you want. And, if you face the shelves with 1x3s, you don’t need to worry about possible ragged edges of plywood being visible.
Advertisement
In addition to the wood for the shelving, you’ll also need 1×2 and 1×3 boards to create the shelf supports. Purchase enough 1x2s to create supports on the sides and back of each shelf and enough 1x3s to face each shelf.
Pro Tip: If planning to paint the shelves, reduce the amount of time you need to spend sanding, priming, and painting by purchasing pre-primed dimensional lumber for the 1×3 shelf facing and 1×2 supports.
Photo: Tony Carrick
STEP 4: Cut and install the supports.
Cut three 1x2s for each shelf. Two of the 1×2 supports should match the depth of the shelf while the third should match the width.
Use a stud finder to locate the studs behind the drywall on all three sides of the niche at the location of each shelf and use a pencil to mark two separate stud locations for each support. Use a level to make sure your marks are level.
Hold each wood support in place and use a cordless drill to make pilot holes through each support and the wall, using the marks for the stud locations as a guide. Attach each support to the wall using wood glue and 2-inch wood screws or drywall screws. Wipe up any excess glue with a rag.
Pro Tip: Studs run from floor to ceiling. Once you locate a stud for one shelf support, use a level to mark the stud locations for the above and below supports.
STEP 5: Cut and attach each shelf.
Use the measurements you took from Step 2 to cut each shelf using either a circular saw or a table saw. Remember to wear safety glasses, and cut each shelf to the specific measurements you took in Step 2 to account for any discrepancies in the width of the alcove.
Pro Tip: DIYers often consider painting to be the final step in a carpentry project. When it comes to built-in shelving, painting the shelves and the supports when they are flat on a garage floor is much easier and faster than painting them after they’re installed in the alcove. Paint each board and support, and then touch them up after they’re installed.
Advertisement
Use wood glue and finish nails to attach each shelf to their corresponding supports. When fitting the shelves, make sure the outer edge of the shelf fits flush to the outer edge of each support. This will make it easier to attach the 1×3 facing boards in the next step.
Pro Tip: Label the shelves as you cut them to correspond to their position in the built-in to avoid mixing them up when you transport them for installation.
Photo: Tony Carrick
STEP 6: Attach the facing.
After the shelving supports and shelves are installed, it’s time to install the facing for the shelves. Measure the width of the shelf and cut each 1×3 using either a circular saw or chop saw.
Again, it’s important to measure for each piece and cut each piece to size as the width of the shelves will likely vary slightly due to inconsistencies in the walls. Use glue and finish nails to attach the facing, making sure to wipe up any excess glue.
Photo: Tony Carrick
STEP 7: Add finishing touches.
Complete the project by filling any nail or screw holes with wood filler. Sand the wood filler and paint the sanded areas as well as any areas that need a touch-up. Once the paint is dry, caulk around all the edges of the shelves with a solid white caulk to close any gaps and give the shelving a finished built-in look.
Pro Tip: Oil-based paint can take up to a week to cure while latex paint can take up to 30 days to fully harden. Avoid placing items on the shelves until they have fully cured to prevent objects from sticking to the paint and damaging the finish.
Photo: Tony Carrick
STEP 8: Considerations for built-ins.
Alcoves and niches in the walls of a home are a perfect place for built-in shelving, transforming what is typically wasted space into a useful place to store and display items.
Advertisement
By using the existing framework of the home, you can add shelving without having to construct an entire bookcase. All you need is a sheet or two of plywood, a few lengths of dimensional lumber, fasteners, and some basic carpentry tools.
20 Beautiful Living Rooms With Built-In Shelving
Introduction
By
Lauren Flanagan
Lauren Flanagan
Lauren Flanagan is an interior design expert with over 15 years of experience writing, editing, and producing articles for renowned Canadian publications and shows for HGTV on home decor. She worked in high-end home decor retail before discovering her passion was to share what she knew in publications and on television.
Learn more about The Spruce’s
Editorial Process
and
Lacey Ramburger
Lacey Ramburger
Lacey Ramburger is a personality assessment expert based in Kansas City, Missouri, with more than five years of experience. Her areas of expertise include Zodiac, Myers-Briggs, and the Enneagram. She is the author of the book “Being Whole” and dozens of articles on personality assessments and relationships.
Learn more about The Spruce’s
Editorial Process
Updated on 01/11/22
The Spruce / Christopher Lee Foto
Living room built-ins can add style and personality as well as storage. And because built-ins can be designed to cater to your household’s specific needs, the options are virtually endless. If you want to create closed storage, an open display area, or call attention to specific details custom built-ins can offer the perfect solution.
-
01
of 20Maximize Space
Morse Design
A-frame houses can pose certain complications when trying to decorate and maximize space.
 The angle of the walls can make it difficult to use prefab cabinets without causing a visual break. In this case, custom living room built-ins can provide an excellent solution. We love how these built-ins create a stunning book collection but aren’t so tall that they block the gorgeous half circle windows—everything works together.
-
02
of 20Built In Bar
Design: Marie Flanigan Interiors/Photography: Julie Soefer
Entertainment centers aren’t the only built-ins to continue to gain popularity—home bars are quickly catching up. While they used to be relegated to dining rooms, basements, and less populated areas of the home, they can now often be found front and center in the living room, as seen in this example by Marie Flanigan Interiors.
-
03
of 20Keep it Classic
Kendall Wilkinson Design
Traditional white built-ins with open shelving are so versatile that they can fit into just about any style of living room.
Choosing a simple cabinet style will ensure that if your tastes change and you decide to redecorate, the built-ins will always fit in.
-
04
of 20Customize Your Own Size
LeClair Decor
When it comes to living room built-ins, there’s no need to always build from floor to ceiling. In this case, designed by LeClair Decor, built-in cabinets were installed about halfway up the wall, on either side of a mantel. They manage to maximize the available space while framing the focal point and not blocking any light.
Creative Ways to Showcase a Vintage Collection
-
05
of 20Tall and Narrow
Light and Dwell
Sometimes less is more, especially in rooms where there isn’t a lot of wall space. As demonstrated by Light and Dwell, tall, narrow built-ins can help frame a fireplace and reinforce a focal point while still providing some display or storage space. Accent lighting or deep contrast helps draw the eye to where it’s supposed to go.
-
06
of 20Go Bold
Kendall Wilkinson Design
Bring some life to your built-ins by painting them a bright or bold color, such as this design by Kendall Wilkinson Design. While the style of these units is fairly straightforward and traditional, the vibrant blue color gives them a sense of playfulness.
-
07
of 20Entertainment Center
Maite Granda
Add drama to a living room with sleek and modern built-ins designed around entertaining. Media centers have been popular for quite a while, so transforming a simple stand into a built-in with plenty of shelving makes perfect sense. The matte black color of this version in a living room by Maite Granda provides a sophisticated setup that does the trick.
-
08
of 20Make Artwork the Focal Point
Design: Marie Flanigan Interiors/Photography: Julie Soefer
This living room from Marie Flanigan Interiors is a stunning example of how to make art the focal point by using built-ins.
Floor to ceiling tan units frames either side of a large portrait, with matching blue scones coming out the side of each shelving structure to add extra light. The result is a calm, inviting living room that holds plenty of storage without being a huge distraction.
-
09
of 20Wrap Around
Kendall Wilkinson Design
The beauty of built-ins is that they can be customized to suit a home’s or homeowner’s specific needs. In this room from Kendall Wilkinson Design, the shelves wrap around the corner, providing plenty of storage and display space. The contrasting color manages to create a focal point in the midst of all the shelves. Additionally, a blank area was left above the desk to create a simple workspace—further proof of how customizable installed shelving can be.
-
10
of 20Get Colorful
LeClair Decor
You don’t have to stick with neutral colors when working with a built-in. This living room by LeClair Decor implements a fun tertiary color scheme, and the shelving is painted the exact same shade of purple as walls to match.
The light mounted above the shelving allows for a small spotlight for moments you want the display to shine—the entire setup is easily customizable to suit whatever you’re feeling that day.
-
11
of 20Keep It Neutral
Mary Patton Design
Create a contemporary look with a classic neutral color scheme. The lack of hardware and decorative embellishments keep the look clean, and the combo of floating shelves and closed lower cabinets painted white leaves the area feeling spacious and full of possibility.
-
12
of 20Architectural Detail
Whittney Parkinson
Don’t be afraid to add a little decorative detail to the living room built-ins. The back of this unit has a shiplap detail that adds a subtle rustic vibe. In this case by Whitney Parkinson, the detail is architectural, but things like paint and wallpaper can also be used to great effect.
-
13
of 20Wall to Wall
LeClair Decor
Honestly, is there really such a thing as too much storage? These customized built-ins stretch across the entire back wall, though the crisp white color makes the room feel refreshing rather than cramped.
The simple style with open shelving at the top and closed cabinets at the bottom provide plenty of space to store or display whatever you’d like—and with plenty of room to do so.
-
14
of 20Two Tone
Kendall Wilkinson Design
Customization of built-in shelves doesn’t have to stop with the measurements. Painting built-ins so that they contrast or compliment other colors in the room is a great way to add interest to a room and create a focal wall.
-
15
of 20A Warm Embrace
Whittney Parkinson
Traditional built-in cabinets in a warm chestnut color help give this living room a comforting and comfortable atmosphere. To create a look like this, make sure that the built-in cabinets are a solid extension of the room. They act like an embrace, framing the seating arrangement and creating a sense of warmth.
-
16
of 20Small Arches
Morse Design
Not everything has to be big to be useful.
This set of small arched built-ins add the perfect amount of shelf space on either side of the fireplace. The matching color for both the lower cabinets, mantle, and shelving creates a cohesive feel.
-
17
of 20Floating Shelves
Ashley Montgomery Design
Floating shelves make the built-in process that much simpler. Pieces of wood can be custom cut to fit a variety of spaces regardless of height or width. This living room designed by Ashley Montgomery combines a white-painted brick fireplace with wooden floating shelves and deep blue lower cabinets—a modern dream.
-
18
of 20Customize Your Shelf Size
Amy Lefernik at Interior Impressions
When we think of shelving, we often picture having the exact same style and size happening on each level—but that doesn’t have to be the case. This built-in has a range of sizes to fit different types of decor, rather than having the same size and shape throughout.
This subtle shift creates visual interest and is ultimately more convenient to ensure the things you want on display can actually fit.
-
19
of 20Built-In Seating
Jessica Nelson Design
The term”built-in” doesn’t just refer to shelving. Seating can also be a component. This gorgeous nook (with storage underneath) creates a picturesque view to sit and read by the window. The two arched built-in shelves on either side complete the look.
-
20
of 20Short and Sweet
Amy Lefernik at Interior Impressions
Ultimately, built-ins should be created to fit the preferences and needs of the homeowner. While for some, that may mean floor-to-ceiling options, for others with smaller living rooms, something short and sweet does the trick. This small built-in is nestled right on top of the fireplace, almost serving as its own vertical extension (rather than keeping the shelving on the sides for a wider appearance). A few books, some small decor items, and the television are all right at home.
 The angle of the walls can make it difficult to use prefab cabinets without causing a visual break. In this case, custom living room built-ins can provide an excellent solution. We love how these built-ins create a stunning book collection but aren’t so tall that they block the gorgeous half circle windows—everything works together.
 Choosing a simple cabinet style will ensure that if your tastes change and you decide to redecorate, the built-ins will always fit in.

 Floor to ceiling tan units frames either side of a large portrait, with matching blue scones coming out the side of each shelving structure to add extra light. The result is a calm, inviting living room that holds plenty of storage without being a huge distraction.
 The light mounted above the shelving allows for a small spotlight for moments you want the display to shine—the entire setup is easily customizable to suit whatever you’re feeling that day.
 The simple style with open shelving at the top and closed cabinets at the bottom provide plenty of space to store or display whatever you’d like—and with plenty of room to do so.
 This set of small arched built-ins add the perfect amount of shelf space on either side of the fireplace. The matching color for both the lower cabinets, mantle, and shelving creates a cohesive feel.
 This subtle shift creates visual interest and is ultimately more convenient to ensure the things you want on display can actually fit.

12 DIY Floating Shelves
Manufacture of shelves for books, dishes and storage of documents according to your order –
Modern individual racks are created conceptually at the design stage for the dimensions and goals of the future owner.
Catalog of individual shelving units
Design solutions for your choice
Vitti furniture manufacture presents a catalog of book and technical shelving units made to measure.
Bookcase (shelving)
Functional and durable multi-section bookcase for arranging books on specific topics. nine0003
SHK-0012
Solid oak cabinet (rack) for books
Strict and concise cabinet for storing books, dishes and personal items in a dark glossy design.
SHK-0013
High rack for books and dishes
Tall and compact cabinet for storing dishes and personal belongings in the interior of a family apartment.
STG-0011
Technical sectional rack
Large-sized multi-sectional rack (shelving system) for organizing a technical warehouse. nine0003
STG-0001
Shelving for wine cellar
Presentation shelving for commercial wine cellar for wine, cognac and other spirits.
STG-0002
Compact wine rack
Mini commercial display rack for wine, cognac and other spirits.
STG-0003
Living room bookcase
Convenient white bookcase in a matt finish for organizing storage of dishes, books, photographs in the interior of the living room. nine0003
STG-0004
Rack
Visually simple and concise cabinet-rack for storing special-purpose accessories.
STG-0005
Dish rack
Compact rack for storing dishes, books, personal items in a limited space.
STG-0006
Shelf for writing utensils
Compact shelving for writing utensils for personal use in the interior of an apartment or a country house. nine0003
STG-0007
Rack for personal items
Compact and tall matt rack for writing materials for personal use in the interior of an apartment or a country house.
STG-0008
Shelving for storing goods
Technical shelving for storing things and goods in a warehouse.
STG-0009
Choose rack
Production of combined racks to order
-
Modern individual racks are created at the design stage according to the dimensions and goals of the Customer: for household tasks (storage of books, dishes and personal belongings), for office and business interiors (classification and storage of documents), for commercial purposes (storage of finished products). nine0003
Consult
Vitti
individual furniture photo gallery
-
Photo #1.
Individual built-in shelving in the interior of the Stalinist apartment -
Photo #2. Corner frame for shoe rack in wardrobe
-
Photo #3. Wardrobe shelving doors
-
Photo #4. Drawers for personal belongings in wardrobe
-
Photo #5. Pattern for the top bar of the rack in the wardrobe
-
Photo #6. Illumination above the rack
-
Photo #7. Ceiling bookshelf
-
Photo #8. Built-in bookcase
-
Photo #9. Shelving for cosmetics in a beauty salon
 Individual built-in shelving in the interior of the Stalinist apartment
 Shelves from Vitti 9 furniture collection0007
-
Solid wood of high quality, German fittings (GmbH), excellent assembly according to European standards and compliance with all the Customer’s style requirements, compliance with production standards and architectural supervision during installation at the facility – this is a guarantee of the quality of individual Vitti furniture.
See collection

Vitti Furniture Quality Assurance
-
Service warranty for maintenance – 2 years from the date of installation (delivery and acceptance) of the furniture set at the Customer’s site. nine0003
This is a guarantee of the quality of Vitti furniture made in Russia.
Warranty conditions
Benefits of individual furniture Vitti
-
The Russian furniture company Vitti provides quality service for customers when ordering individual furniture:
- Original design project for each Customer.
Quality work begins with the detailing of furniture sketches in the interior. nine0006 - Operational estimate of the cost of the project.
Preliminary assessment during the inspection of the object. Accurate estimate according to the estimate. - Selection of materials for individual furniture according to the Customer’s budget.
Comfortable furniture and status premium class – the choice is yours. - Warranty period – 2 years.
Long-term warranty on the basis of author’s supervision of order execution. - German accessories for the reliability of fasteners, locks and locks. nine0092
Consult
- Original design project for each Customer.

Vitti custom furniture of your choice: style and dimensions for your home.
Open catalog
Custom-made shelving in Mitino t:+7-925-140-90-97
Skip to content
Rack can be attributed to the universal built-in furniture, the relevance of which is growing every year. In this model, there are no back and side walls, since it is built into a specially prepared niche. The requirements for a niche are quite simple – the surfaces must be even. Such a model will be cheaper due to material savings. nine0003
The main part of the cabinet is formed by numerous shelves attached to the side walls.
Rack saves space and effort when cleaning!
We will make a project of any complexity
Types of racks
Such furniture is suitable for storing various things. Its use is determined by the purpose of the room where it is located.
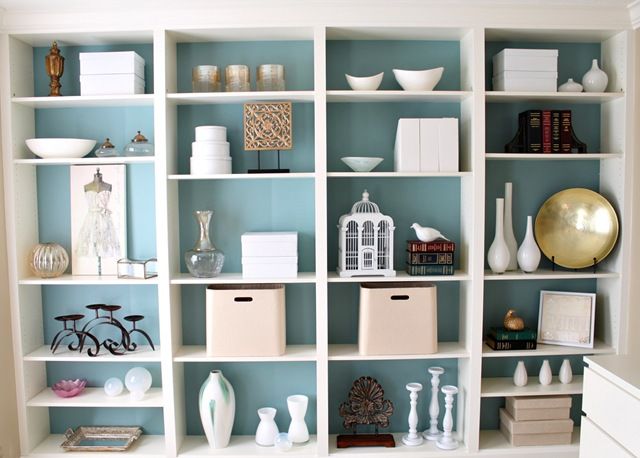
Shades and colors of materials are selected so that they are combined with the decoration of walls, floors, ceilings and echo the interior idea, the overall style ensemble. In the world of design, all colors and shades are used for products such as interior shelving
The fewer shelves and blank walls in the design of the rack, the more it seems weightless, unpretentious and stylish. If the rack is designed to decorate the space, then its shelves are not cluttered with objects. Non-standard shelves will be equipped under the stairs, in the niches of the walls, in the attic rooms, where the ceiling hangs at an angle or on balconies, loggias.
A small or narrow hallway will be functionally complemented by a narrow shelving attached to the wall. In small spaces, it is important to save space in a high traffic area. Floor models in such hallways are not used. Mounted options here are most suitable. If the corridor is spacious or the hallway looks like a square hall, then the rack can occupy the entire wall or half of it. Such designs can be combined with a shoe rack, a mirror stand and a seat. nine0003
Mobile shelving unit
A through shelving unit in the living room will look unusual, delimiting the space right next to the doorway between the hallway and the living room. One side of such an installation can be decorated with frosted or transparent glass. Any living room will look beautiful with shelving. It is easy to place decorative figurines, vases, books, framed photographs, periodicals, correspondence in it. You can even build in a TV, music or game center. nine0003
The convenience of a shelving unit in the bedroom lies in its mobility. If the model is not heavy, then if necessary, it can always be rearranged to another place. Functionally, its purpose is exactly the same as that of the chest of drawers. Neatly folded towels, linens and other accessories that can be displayed are stacked on shelves. The lower tiers can be made with baskets with linen covers, in which all sorts of little things are usually stored. An open organizer is suitable for Scandinavian-style bedrooms, hygge or Provence style. nine0003
Wardrobe shelving unit
However, shelving is most widely used in dressing rooms. The upper part of the rack is given over to stacking things of the outgoing seasons on its shelves. Medium levels are for clothes that can be worn now. The lower shelves are convenient for shoes, accessories (gloves, umbrellas). Scarves, stoles and hats are best stored higher. The bookcase can be combined with two units – a full-length mirror and a large space like a wardrobe, where a hanger rod is mounted. All together makes a single stylish design. Separate pantries, utility rooms will be less functional if cabinets are installed there, rather than shelving.