House foundation building steps: 5 Steps To Building A House Foundation
How to Build a House Foundation? 7 Steps Guide
Insulated Concrete Form (ICF) foundations provide a structurally sound house’s bedrock, effectively transferring all the structure’s loads into the ground. An ICF foundation also firmly anchors a building or home, protecting it against extreme winds, earthquakes, and severe winds. ICF foundations also provide many other benefits, such as: energy-efficiency, durability, fire-resistance, reduced insurance rates, and ease of installation.
The double layer of continuous insulation and the high thermal mass of an ICF foundation provides a continuous air barrier with an R-value above 22, keeping a building warm in the winter and cool in the summer. ICF foundations can cut thermal conduction losses by about half.
With the application of a compatible waterproofing and/or dampproofing membrane and and a reliable drainage system, ICF protected foundation walls will eliminate moisture intrusion, which causes structural damage and unhealthy mold. ICF’s also resist termites with an application of Polyguard Products, Inc. or 650 XTP or 650 XTM membranes. Moisture and pest resistance tremendously minimizes the need for maintenance and repair of a structure.
ICF foundations provide passive fire protection, containing or slowing the spread of a fire.
The exceptional integrity of ICF foundations may lower a homeowner’s insurance premiums.
ICF foundations, particularly those constructed with Fox Blocks, tremendously benefit builders since they are fast and straightforward to build, saving both time and money. ICFs are a modular product providing over 5.3 square feet of wall per block. The insulation stays in -place eliminating any form stripping or additional labor. Temperature-resistant ICF is able to handle concrete pouring into below-grade ICFs with ambient temperatures as low as -5° F (-15° Celsius), only protecting the top of the form with insulating blankets.
ICF foundation walls, like Fox Blocks, install fast and efficiently, saving time and money by lowering labor costs, eliminating the need for some subcontractors, and hastening project completion time. After placing the footings, building an average size ICF foundation should take less than a week. This includes continuous insulation, fastening strips, air barrier and vapor retardant and the addition of the waterproofing or dampproofing systems.
A Fox Blocks ICF foundation costs 20% less than either a poured concrete wall or a concrete block foundation.
1. Prepare the Footing Trench
Excavate a trench of undisturbed soil or required bearing capacity to accommodate the footers around the perimeter of the home or building site. In cold regions, you want the footings below the frost line — this prevents the frost in the winter from getting below the footers and lifting the house.
2. Build the Footings
Properly installed footings of a foundation will ensure a home’s strength and durability. The ICF footings distribute all the loads from the house to the ground.
Local building codes mandate requirements for foundation footings; however, many local code authorities use the 2018 International Building Codes (IBC) and 2018 International Residential Codes (IRC) as the model codes, modified to suit local conditions and legal requirements. ICF manufacturers may have engineering tables for the design of footing sizes following code design criteria.
The complexity of designing footings and foundation requires a qualified local structural engineer. They can specify the load requirements and footing sizing for the location of your project. A qualified structural engineer understands all the components that ensure strong footings:
- Code Compliance
- Soil Bearing Capacity and Soil Type
- Structure Loading
- Moisture Control
- Proper Reinforcing
- Frost Lines
Steps to Building Strip Footings for an ICF Foundation
Depending on the footing depth, you can use wood to form the footing. For foundation areas prone to water retention, add a drain tile system around the perimeter — this keeps the foundation dry after completing construction.
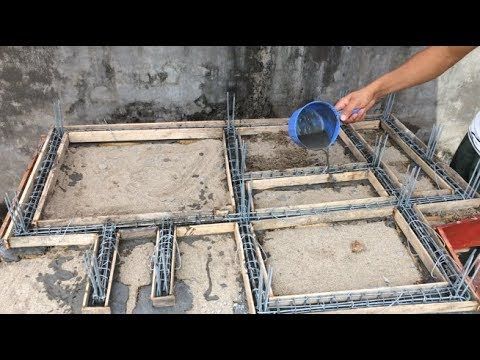
Place the horizontal rebar, as per engineering design, in the trench. During placement of concrete insert the vertical dowels in the concrete, spaced at 48″ on center and protruding approximately 16″ + about the concrete. The vertical dowels provide lateral support to the foundation wall as well as connect the ICF concrete to the footing.
Pour concrete directly into the trench and footing formwork. Then, screed and level the concrete. After the concrete cures, remove the wood forms, if used.
Some projects involve changes in elevation, requiring steps in the footings. For ICF construction the height of the steps should match the ICF coursing height which is typically 16″. This eliminates cutting block for the whole perimeter.
For projects on bedrock, a footing may not be required. The ICF blocks may be sculpted to match the surface contours of the bedrock. Vertical dowels are still required.
Last, place gravel around the footings to encourage drainage. You can now begin installing the ICF foundations wall to the footings.
3. Installing the ICFs
Begin installing the foundation with the L-shaped corner ICFs. With each course laid, alternate the long side of the corner, creating a bonding pattern. Then, lay the straight blocks towards the center of each wall segment.
Use HV clips on the corner’s webs to connect the blocks, pulling them tight. Place horizontal rebar, as per engineering design, in the clips within the block cavity, at the top of the internal webs. The clips hold the rebar, eliminating the need for wire tying.
After completing 2 block courses, use a level to confirm a horizontal level foundation wall. If not, trim to level out the wall. Once the first two courses are level and set to the building dimensions, continue laying blocks in a running bond, overlapping the courses so that interlocking blocks lock the joints from above and below. Continue this process and stack the blocks to the full height of the foundation.
After 3 or 4 courses, the installation of the alignment, bracing and scaffolding system will be required.
4. Preparing for the Concrete Pour
Tall foundation walls require anchor bracing to hold the wall straight and plumb until the concrete sets. The bracing also provides a safe framework to support scaffolding.
Place foam along the blocks’ bottom to hold them down, keeping the bottom of the wall set on the building lines.
Prepare inserts, such as anchor bolts floor tie straps, hangers, etc. for inserting into the concrete at the top of the wall.
The pouring of concrete requires an experienced concrete person to ensure the wall’s highest quality and integrity. Improper concrete pouring can cause a blowout, resulting in delays. Furthermore, while placing the concrete, insufficient vibrations can lessen the home’s strength, along with its resistance to air, moisture, and insect intrusion.
Using a boom or line pump, begin to place the concrete into the blocks. Apply four-feet lifts of concrete at a time, giving the concrete time to set up — this eliminates the downward pressure that can blow out the blocks.
Follow manufacturer’s specifications for concrete mix design, consolidation and placement. Talk to the local ready-mix supplier about the concrete mix design for ICFs.
Vibrate the concrete during the pour to remove air pockets in the wall.
Concrete placement in a foundation would be completed in a continuous pour bottom to top of wall. Cold joints are not structural sound in a foundation wall.
6. Level the Concrete
Level off the concrete until even with the block top, then wet set anchor bolts into the concrete block top. The mudsills and top plates need to be installed and levelled, let concrete set before tightening anchor bolts.
7. Remove the Bracing
The final step is to remove the bracing and clean up the interior of the structure. Once the foundation is set and the bracing removed, you can move on to installing the waterproofing and/or dampproofing, floor system, above grade walls and interior finishes.
Building a solid house foundation with ICF requires qualified and experienced professionals that understand the complexities and challenges of pouring concrete. Contractors are recommended to complete the Primary installer Training provided by Fox Blocks on the Integrated Learning Center website. A properly built Fox Blocks ICF foundation ensures superior energy-efficiency, and moisture-, disaster-, and pest-resistance compared to a traditional poured foundation. Fox Blocks also creates excellent indoor environmental quality.
Contact a Fox Blocks professional today to help answer your technical questions concerning ICF foundations, connect you with a distributor, or review your ICF foundation plans for cost estimating.
8 Foundation Construction Steps | House Foundation Construction Steps
After detailed planning and designing of construction work by the architect and structural designer, the next step to start actual construction work on site.
Generally, most of the construction work begins with foundation construction. Foundation construction is the most critical work among all activities on the construction sites. Foundation is the main base and support for all the above structures.
Foundation construction is a crucial stage as the dimensions of the foundation have to be entirely right because otherwise, the future spaces will be affected. The depth of foundation depends on the type of soil, and the site conditions decide the design of the foundation.
The foundation layout and excavation depth details are prepared by the structural designer and approved by the Architect.
Post Contents
What is Foundation?
Foundation is the bottom-most part of any structure, which has the primary function is to take load coming from upper components and safely transfer it to the below soil. Generally, foundations are of two types, namely shallow foundation, and deep foundation.
Shallow foundations are suitable up to a depth up to 1.5m and deep foundations extended up to hard strata below the ground surface having a depth of more than 1.5m.
A shallow foundation is constructed for a structure that has a horizontal spread more than vertical height. A deep foundation is most suitable for high-rise buildings like a skyscraper or a castle built on very weak.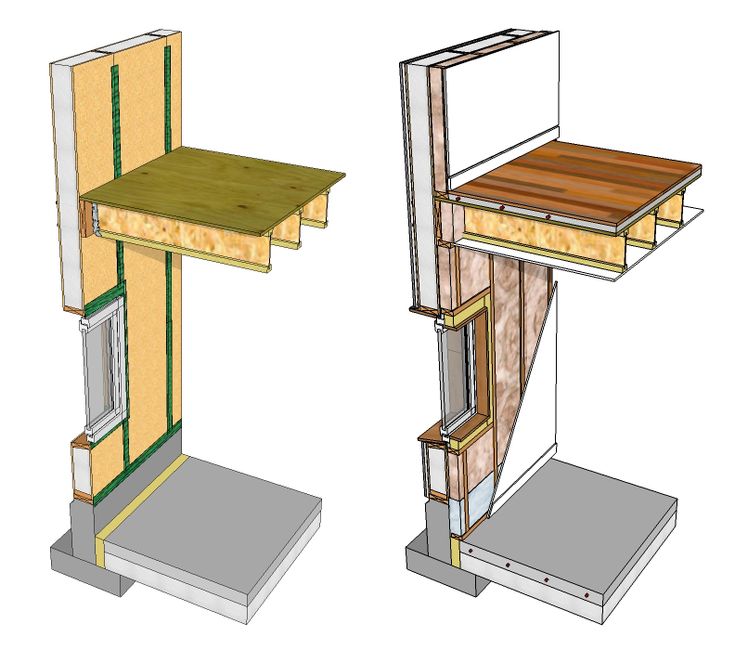 If any structure is to be extended vertically in the future, then a deep foundation must be suggested.
Width of Foundation/Footing
Structural Design is the main component to consider before laying Foundation/Footing. For small buildings such as houses, flats, school buildings, etc not having have not more than two storeys, the width of the foundation should be as given below,
- For one brick thick wall, the footing should not be less than 75 cm in width.
- It should not be less than 1 meter in terms of width for one and a half brick wall.
The Function of Foundation
- Foundation provides the main base for any structure.
- It provides stability and strength to the main building structure.
- Foundation provides a level surface for the construction of substructure.
- It distributes the structural load evenly into the ground.
- Foundation reduces the load intensity within the safe bearing capacity of the soil.

- It safe the soil movement effect is resisted and prevented.

Read More: 15+ Types Of Drawings In Construction
Foundation Construction Steps
Following are the steps in foundation construction,
1. Foundation Layout
Foundation Construction Layout Plan
The Contractor has to follow the foundation layout drawing for excavation prepared by the structural designer and approved by the Architect. As per the foundation layout plan marking is done on-site, and the Architect cross-checks the dimensions.
Foundation marking should give extreme importance. If there is any mistake can b brought to the Architect’s and contractor notice, So that they quick action to rectify the error.
Foundation Layout on Ground
2. Excavation
Once the final foundation layout marking has approved, the excavation can begin. Start excavation work and continuously check the work process. Never excavate soil beyond the depth specified by the architect in the drawing.
Foundation Construction Excavation
In chase deep foundation like pile foundation, the depth of foundation not specified, but it is up to hard strata is given. As excavation work progress, check if there is a requirement of providing support to a soil against collapse.
3. Filled up Soil
If construction is to be done on lakes or low-lying areas, it may have a lot of filled up soil. In such type of filled up ground excavation must be done till the firm ground is reached. This will obviously increase the depth of foundation and consequently, the cost of the foundation will be very high. But, Never compromise on this.
Always make sure that building foundation resting on hard strata if it means you have to go 15 feet down because otherwise, it will affect the stability and strength of the house.
4. Excavation Trenches/Pits
The excavation details depend on the construction method that you have decided to adopt, the load-bearing-wall system, or the column-beam-frame structure system.
In the case of a load-bearing structure, trenches are excavated along the wall. If it is framed structure, then excavation is done below every column up to the footing base. All work should be done as per drawings and instructions are given by architects and structural designers.
Read More: What Is The Strongest Foundation For A House
5. Anti-termite Treatment
Anti-Termite Treatment
Before starting foundation construction, make sure that the trenches and excavated areas have been given the anti-termite treatment by the Contractor. This anti-termite treatment ensures protection against termites and other pests from underground, in the future
6. Foundation Construction
Once Excavation work is done for foundation, the next step is to Start the foundation construction.
- Load bearing structure foundation: A bed of concrete (PCC) is laid at the base of trenches and over it, the brick or stone masonry is constructed in accordance with the foundation details provided by the structural designer.
- Column-beam frame structure system: In this system column footing is constructed in the trench. There are different types of footing used in building construction like spread footing, pad footing, Trapezoidal column footing, Mat foundation, etc.
- In this case of isolated pad footing, steel bars tied together according to the structural engineer’s specifications are placed at the bottom of the footing pit. Column steel bars are also tied in place with the help of a bonding wire. Column formworks are erected around it for pouring concrete.
- Pouring concrete: Before pouring concrete in the formwork architect and structural designer have approved the steel details and the quality of work, the concrete can be poured. Concrete for pouring can prepare on-site or the contractor may opt for ready mix concrete (RMC) if there are very large footings and large requirements of concrete.
- Plinth Beam: After the column is constructed up to the Plinth beam level, the plinth beam is erected for the walls of the house to rest on.
 Concrete for pouring can prepare on-site or the contractor may opt for ready mix concrete (RMC) if there are very large footings and large requirements of concrete.
7. Curing of Foundation
Immediate curing of concrete components is an essential task on any construction site. If the Curing of concrete is not done properly, cracks can appear and even the strength and life of the building components can be affected. Curing ensures sufficient water is available for the chemical reaction which provides strength to concrete.
Curing of Concrete
The chemical reaction during curing: There are two types of chemical reaction that take place in concrete one that releases heat during the process (Exothermic) and another that absorbs heat (Endothermic).
The process of mixing cement with water is an exothermic reaction due to the presence of limestone. Because of this heat production, the water in the mortar or concrete mix evaporates even before the compound gains strength.
For a structure to achieve maximum strength the chemical reactions in cement compound must go on and this can happen only in the presence of water and at ambient temperature. Hence, it is required to supply extra water content and the ambient temperature and this is achieved by regular curing.
It is important in any foundation construction to start curing process as early as possible.
8. Starting the Curing Process
Curing should always start to the very next day after the concrete has been poured. In the earlier stages, concrete elements absorb water more, but after a week, the water required will be much less.
In case there is excessive water runoff on a concrete surface, when water is poured on new construction, curing should be stopped. As the outside temperatures are higher the more amount of curing is required.
Curing schedule: Concrete element curing should be done at least twice a day through three times is better. Ensure that you’re Contractor given this job to a specified person so that it is not forgotten.
Requirement of Good Foundation
Good Foundation is need of a structure because of following reasons,
- Foundation form the base of any Structure, the whole stability of the structure is dependent on the foundation. Even a minor error might take a destructive form. Hence a good foundation with precise construction is recommended.
- The structure might undergo settlement during its life span. Settlement of Structure is defendant on the Foundation, such that a good foundation can avoid a differential settlement.
- A good foundation can guard any form of damage or distress transfering the load evenly to soil.
- Care is taken that the site for laying foundation must not undergo any stress or affected because of future works in surrounding.
- One of the requirement of Good Foundation is that it should be capable of transmiting dead as well as live load to the soil beneath.
What is the Purpose of The Foundation?
Any Foundation of Structure serves the following Purposes,
- Stability to a structure is provided by the means of foundation. A good and sound foundation ensures the better stability of the structure.
- Foundation is meant to transfer the dead as well as live load efficiently to the soil.
- Foundation laid in proper manner provides a reliable base for the further construction of the substructure as well as superstructure.
- Foundations maintain the stability of the structure during natural calamities such as earthquakes and floods and protect it from collapsing.
- Differential settlement of structure can be avoided which might cause the tilting of structure.
FAQs:
Foundation Construction
Steps in Foundation Construction
Foundation layout
Excavation
Filled up Soil
Excavation Trenches/Pits
Anti-termite Treatment
Foundation Construction
Curing of Foundation
Starting the Curing Process
Foundation Construction Process
Foundation marking on ground
Excavation of foundation
Filled up Soil
Excavation Trenches/Pits
Anti-termite Treatment to ground
Formwork and steel placement
Concreting in footing
Curing of Foundation
House Foundation Construction Steps
following are house foundation construction steps,
1. layout of the column
2. Marking of the footing trench
3. Excavation of foundation trenches
4. Leveling the foundation base
5. PCC work in the foundation
6. Footing formwork and concreting work
7. Curing of Footing
8. Removal of formwork
9. Backfilling the trenches
10. Starting the above-ground construction
You May Also Like:
- Raft Foundation (Mat Foundation) | Types & Advantages
- Caisson Foundation – Its Types & Application
- 25+ Types of Pile Foundations & Their Application
- Floating Foundation – Principles, Construction Steps
Foundation Construction [PDF]: Depth, Width, Layout, and Excavation
🕑 Reading time: 1 minute
Procedure for construction of foundation starts with a decision on its depth, width, and marking layout for excavation and centerline of foundation. Foundation is the part of the structure below the plinth level in direct contact of soil and transmits the load of superstructure to the ground.
Generally, it is below the ground level. If some part of the foundation is above ground level, it is also covered with earth filling. This portion of the structure is not in contact with air, light, etc., or to say that it is the hidden part of the structure.
Footing is a structure constructed in brickwork, masonry, or concrete under the base of a wall or column for distributing the load over a large area.
Contents:
- Depth of Foundation
- Width of Foundation / Footings
- Procedure for Construction of Foundation
- Foundation Design Precautions
- Concrete and Mortar Ratio for Foundation
- Safe Bearing Capacity Soil
- Foundation Excavation Precautions
- Demarcation/layout Procedure
- Advantages Marking Pillars to Layout Buildings
- Disadvantages Construction Execution without Layout
- Equipment For Layout Setting
- FAQs on Foundation Constructions
Depth of Foundation
Depth of foundation depends on following factors:
- Availability of adequate bearing capacity.
- Depth of shrinkage and swelling in case of clayey soils due to seasonal changes, which may cause considerable movements.
- Depth of frost penetration in case of fine sand and silt.
- Possibility of excavation nearby
- Depth of groundwater table
- The minimum practical depth of foundation should not be less than 50 cm. To allow removal of topsoil and variations in ground level.

Hence the best-recommended depth of foundation is from 1.00 meter to 1.5 meter from the original ground level.
Width of Foundation / Footings
The width of footings should be laid according to structural design. For light loaded buildings such as houses, flats, school buildings, etc, have not more than two storeys, the width of the foundation is given below:
- The width of the footing should not be less than 75 cm for one brick thick wall.
- The width of the footing should not be less than 1 meter for one and a half brick wall.

Procedure for Construction of Foundation
The processes executed in the foundation works are given below:
- Excavation of earthwork in trenches for foundation.
- Layout cement concrete.
- Lay the footing in case of raft or column construction.
- Lay Anti termite treatment.
- Lay Brickwork up to the plinth level.
- Lay damp proof course on the walls.
- Refilling of earth around the walls
- Refilling of earth in the building portion up to the required height according to the plinth level.
Fig.1: Excavation for Foundation of WallFig.2: Concrete in foundationFig.3: Concrete and Brickwork in Foundation of WallFig.4: Concrete and Brickwork in Foundation Refilling
Foundation Design Precautions
- A foundation should be designed to transmit combined dead load, imposed load, and wind load to the ground.
- The net loading intensity of pressure coming on the soil should not exceed the safe bearing capacity.
- Foundation should be designed in such a way that settlement to the ground is limited and uniform under the whole of the building to avoid damage to the structure.
- The whole design of the foundation, superstructure, and characteristics of the ground should be studied to obtain the economy in construction work.

Concrete and Mortar Ratio for Foundation
- The cement concrete 1:8:16 is generally used in the foundation of walls in construction work.
- In the case of column raft cement concrete, 1:4:8 is the best-recommended ratio for it in the foundation.
- For brick masonry, cement mortar 1:4 to 1:6 is used as a loading condition.
In the case of column and raft footings up to plinth level, cement concrete 1:2:4 or1:1.5:3 are used.
Safe Bearing Capacity Soil
Dry coarse and well-graded dense sand have maximum shear resistance and maximum bearing capacity. In general, submerged soil and clay have less bearing capacity.
Foundation Excavation Precautions
The depth and width of the foundation should be according to structural design.
- The minimum depth of the foundation is 1 meter in case the design is not available.
- Check the length, width, and depth of excavation with the help of centerline and level marked on the marking pillars.
- Dump the excavated material/ earth at a distance of 1 meter from the edges.
- Start excavation work when the soil is dry.
- Arrange a water pump to pump out rainwater.
- Compact the bottom layer of the foundation.
- There should be no soft places in the foundation due to roots etc.
- Dugout any soft/ defective spots, and fill the excavated area with concrete/ hard material
Fig.5: Excavation for Foundation where Root of Tree ExistsFig.6: Excavation of Wall in Foundation Foot RemovedFig.7: Pit of Root Filled with Hard MaterialFig. 8: Excavation of Foundation of Wall with a Patch of Soft SoilFig.9: Excavation of Wall Foundation with Soft Soil RemovedFig.10: Pit of Soft Soil Filled with Hard Material
Demarcation/layout Procedure
The following procedure is recommended for the demarcation of a building:
- Mark the baseline on the ground from the centerline of the road, or a permanent building nearby. This line helps to mark out the front of a building.
- Use a side structure, road, first baseline, or plot boundary to mark side baselines of the building.
- Fix temporary pegs at the centerline of walls/columns on both sides of walls and columns in front and backside.
- Fix peg at the centerline of walls/columns on both sides of the walls and columns on the left and right side of the building front.
- Check diagonals of the square or rectangle formed after fixing pegs.
- Construct marking pillars with pegs at a distance of 1.5 meters to 2 meters, and plaster their top surface.
- Mark center line on the top of marking pillars with the help of thread (Soot) or with the Theodolite in big projects and the diagonal, and check other dimensions.
- Level marked pillars on all corners of the building.
- Mark the foundation of walls/columns according to drawing on the ground with the help of centerline marked on the marking pillars.
- Use chalk powder to mark the foundation trench on the ground.
- Excavate the foundation of the walls /columns up to the required level, and check the excavation with the help of centerline and level marked pillars to avoid any complication later on.

Fig.11: Excavation for Foundation Under Wall
Advantages Marking Pillars to Layout Buildings
- It saves time for measuring and setting the point again and again at the time of construction.
- It increases the efficiency of mason and foreman for doing their jobs.
- Accuracy can be checked at any time at any step.
- If any mistake is found, it can be easily be rectified at an early stage. It is very difficult to rectify the mistake later.
- Cross-check can be done by a senior engineer in minimum time.
- Qualitative work is maintained.

Disadvantages Construction Execution without Layout
At some sites of work the contractor brings steel pieces, erects the same on the ground, and start the work of excavation. In due course these steel pieces are just discarded. Thus no proper reference point is available while doing further jobs.
- It involves extra time for measuring the offset again and again.
- Accuracy can not be checked at an early stage and it will be very difficult to rectify the same in later stages.
- It involves wastage of time and money while doing rectification. This also leads to bad quality of work.
Equipment For Layout Setting
- Leveling Instrument
- Long Nails
- Hammer
- Right Angle
- Steel Tape
- Thin Cotton Thread
- Bricks
- Cement
- Screen Sand
- Lime Powder
- Theodolite
FAQs on Foundation Constructions
What is the layout of the foundations?
Layout is a process of marking the location of foundation of new buildings on the ground.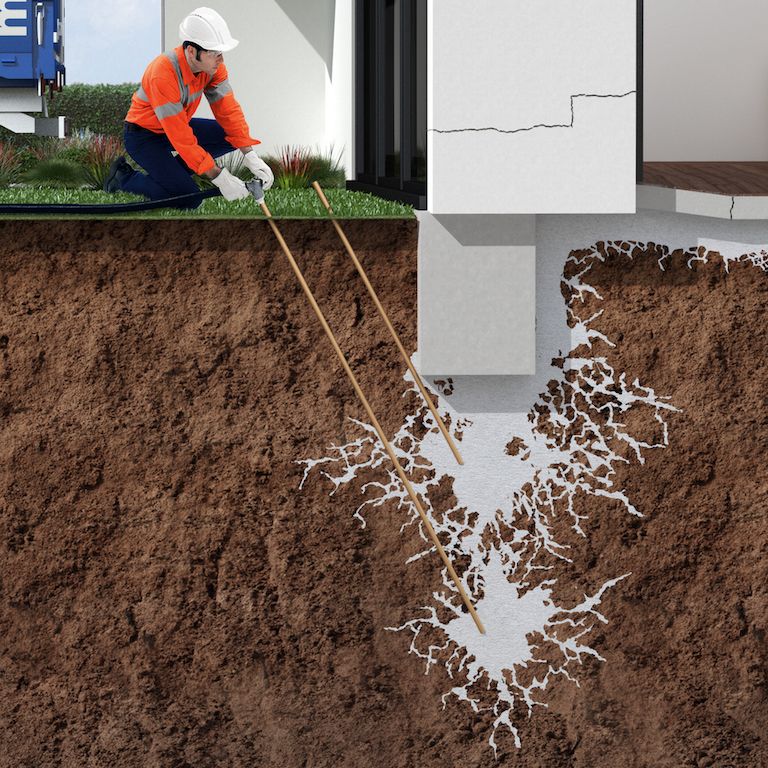
What is the standard depth of foundations?
Standard depth of simple footing or foundation is 1.5m.
What are the factors influence the depth of foundations?
- Adequate bearing capacity.
- Frost penetration depth.
- Groundwater table
- Depth of shrinkage and swelling.
- Nearby excavations.
What are the materials tools and equipment used in building layout?
- Leveling Instrument
- Long Nails
- Hammer
- Right Angle
- Steel Tape
- Thin Cotton Thread
- Bricks
- Cement
- Screen Sand
- Lime Powder
- Theodolite
What are the benefits of the foundation layout?
- Saves time for measuring and setting the point again and again at the time of construction.
- Increases the efficiency of mason and foreman.
- Check accuracy at any time at any step.
- Rectify mistakes, if present, at an early stage.
- Cross-check can be done by a senior engineer in minimum time.
- Qualitative work is maintained.

Pouring a Foundation
After selecting a contractor, there are 7 key steps to pouring a foundation:
(click each item for detailed description)
-
Excavation
-
Footings (Formwork and Concrete Pour)
-
Walls (Formwork and Concrete Pour)
-
Waterproofing
-
Drainage Pipe/ Weeping Tile
-
Backfill
-
Pouring/Finishing Concrete Floor
We generally allow for 4-5 days to complete your foundation.
Please note that several steps to pouring a foundation take place on the same day.

Weather may play a role in determining the total length of a job.
Day 1: Excavation
The hole is dug using an excavator. If you have not already hired a excavator, we will recommend a excavator who we have worked with in the past. The hole must be bigger than the area of the foundation in order to accommodate the workers who will be pouring
your foundation.
Day 2: Pour the Footings
The footings are created using forms, place on undisturbed ground. The footing is always wider than the concrete walls. Also a number of smaller footings to support various posts inside the home are also usually poured at this time.
The footings receive the load of the house through the load-bearing walls and posts. The type and size of footing is based on a number of factors including soil conditions, size of the house and slope of the site. There are three kinds of footings:
wall, column and stepped. Wall footings support walls. Column footings support posts which in turn support beams that support floors for instance. On steeply sloped sites, steeped footings are used to keep the footing
Day 3: Pour the Concrete Walls
Before we pour the walls, we will strip the footings – this means that we will remove the forms, now that the concrete foots have dried and cured, Like the footings, forms are used for poured concrete walls. M&C Foundation Forming uses Resi-ply
forms from
R. Desilets Concrete Forms and Accessories. We are also a Dealer and Distributor for
R. Desilets, providing Concrete Forms and Accessories to our industry partners throughout Atlantic Canada.
Day 4: Stripping Walls, Waterproofing, Installation of Drainage Pipe
Again the forms are taken off and the concrete walls are cured before the next step. After stripping your wall, we will apply a vital part of your foundation: Waterproofing.
Waterproofing must not be confused with Damproofing. Whereas Damproofing will aid in reducing moisture from penetrating your walls and foundation, Water Proofing completely retracts water, thus eliminating any water from seeping into your walls or
foundations. The application of this product produces a thick sticky tar-like substance, which cures and acts as an impenetrable membrane, ensuring a dry basement for many, many years to come.We use Tremco Products – specifically Tuff n Dri
and Watchdog systems. For more information, please visit our section on Waterproofing.
There are several different terms for this process, but they all mean the same thing, and Installing the drainage tile is absolutely essential to maintaining a dry foundation. This “weeping tile” draws water away from the foundation,
and ensures that any water that seeps into the soil will drain away from the foundation, thus preventing moisture or water damage to your basement.
Day 5 (If necessary): Pouring Concrete Floor and Backfilling Around Foundation
You’re almost finished building the base of your home!
After the drainage pipe has been installed and the waterproofing system has been applied, the concrete floor is poured.
In the days that follow, several other steps will take place in the construction of your new home, leading to the installation of the subfloor. Once the installation of this subfloor has been completed, the area around your foundation will be backfilled.
The soil that is put back is graded such that it slopes away from the foundation, again to ensure water flows away from the wall. This is the last stage of constructing your foundation and basement.
If the idea of building a new home from the ground up terrifies you, just imagine: Before long, you will be sitting in your dry, cozy rec room, watching the Stanley Cup Finals while the blizzard rages on outside your window, and all of your hard
work, building the home of your dreams, will have paid off!!
Home/Office Basement Foundation Construction Los Angeles
Contents
- What is basement foundation Construction?
- What is the Purpose of The Foundation?
- Requirement of Good Foundation
- Types of basement foundation
- 1. Slab House Foundation
- 2. Building the Basement Foundation
- 3 Foundation for a Garage
- 1.
- Factors to Consider in Basement foundation design
- 1. Waterlogged ground
- 2. Soil conditions
- 3. Effects and after-effects of construction
- 4. Cost and speed
- 5. The effect of construction on the adjoining structures
- How To Build A House Foundation?
- 7 Steps for building Strong Foundation of House Or Office
- 1. Start Building Foundations by Marking Out a Level Datum Point
- 2. Calculate Material to be Removed for Building Foundations
- 3. Use String Lines to Mark Out Your Building Foundations
- 4. Mark Out the Trenches for Your Building Foundations
- 5. Mark All Corners of the Building Foundations
- 6. Start Digging The Foundation Trenches
- 7. Introduce Depth Pegs and Pour
- Frequently Asked Questions
- How much does the basement foundation cost?
- Do all houses need foundations?
- How deep should the foundation of a house be?
- What is the cheapest way to build a foundation?
- Related
 Slab House Foundation
Building a strong building that can provide earthquake resilience is the first and foremost requirement of the construction companies in the city of Los Angeles. To do so they have adopted many advanced techniques.
Our experts break down the process of laying down a strong foundation for commercial and residential buildings and the details are discussed in this post you will learn how to build a house and office basement foundation step by step guide.
Before we move on, there are few queries that need your attention before we discuss the topic in depth.
- What are the steps to building a basement that can provide earthquake safety?
- How do you build a basement foundation in an already constructed building?
- How do you lay a concrete foundation for a commercial complex?
- What are the 3 types of foundation recommended for the Los Angeles Buildings?
- How to choose the best construction contractor in Los Angeles for constructing the concrete base for a house?
Browse Our Other Content Related to Basement Construction
- Basement & Foundation Waterproofing Los Angeles
- Basement Expansion & Construction Los Angeles
Answering the above questions and preparing you to understand your new home’s construction needs and the urgent need to repair a building with a weak foundation is outlined in this post.
What is basement foundation Construction?
Before going further lets first understand the difference of construction and development of Basement. The basement construction takes care of the structural details like water leakage, electric connections, and building foundation. In this post we are talking about the construction. While the basement development is focused on designing the space.
If you’re planning a basement extension to make more room for your family. In some case, you need permission of local government authority to plan a basement in Los Angeles county, California. Read our Planning Permission For a Basement Extension post to get more information about it.
Laying down the foundation of a building is the most complex construction. Every building must have a solid basement foundation especially in an earthquake-prone place like Los Angeles.
The basement foundation covers almost the entire area of the constructed structure. Measuring the right dimensions and leaving the enough space , the depth of foundation, all are essential activities.
For this, you need to hire a construction company in Los Angeles where professional engineers can come out with optimized basement construction types.
Let’s get to know the reasons to focus on the basement foundation Construction.
What is the Purpose of The Foundation?
The basement foundation for any office or home depends mainly on the load of the building. In Los Angeles, architects like to take more precautions so that new construction can be saved from natural disasters. The purpose of focusing on the foundation are:
- A good and sound foundation ensures the better stability of the structure by increasing the life of the structure..
- The basement foundation is done to balance the load efficiency.
- In the case of commercial buildings and multiplexes, the foundation is left open from all sides to make arrangements for electricity, water, and sewage fittings. Nowadays, continuous monitoring is done to repair the damage immediately.
- The design and construction support the building and avoids the tilting of the structure during natural calamities.

Requirement of Good Foundation
Good Foundation is the need of a structure because of the following key factors:
- As the soil gaps increase with time, any concrete structure is likely to get affected by it. A good design of the basement provides better binding. Even a minor error might take a destructive form. Hence a good foundation with precise construction is recommended.
- The structure might undergo settlement during its lifespan. Settlement of Structure is defendant on the Foundation, such that a good foundation can avoid a differential settlement.
- Care is taken that the site for laying the foundation must not undergo any stress or be affected because of future works in the surrounding area.
Types of basement foundation
There are three general types of basement foundations. Let’s see each of them one by one:
1. Slab House Foundation
A secure concrete footing beneath the ground provides a base that is extended a few feet above the surface for the house to rest on.
Since Los Angeles is an earthquake-prone area, the depth is kept more depending on the load of the building.
Also the water level stability and binding of soil as well as the slab slope are the various factors that are considered wisely.
2. Building the Basement Foundation
A wall is constructed from cinder blocks for the foundation of a home. Excavation can begin after footing and foundation size calculations are determined. Pressure-treated lumber is used to build forms for the footings and rebar is installed within the forms to reinforce the concrete.
The forms are staked into the ground to remain in place when the concrete is poured. It is critical that the top of the forms are level. When the footing concrete has healed, the forms are removed.
The next step depends on the type of foundation being built. Courses of cinder block and mortar can be added until the top of the foundation is reached or a concrete wall might be cast using wooden forms similar to the process used to make the footings. It is essential that these walls are plumb and level.
Clean and porous backfill is used in the space between the excavated earth and the completed sides of the foundation. At the surface level, the ground is graded to slope away from the house.
3 Foundation for a Garage
The overview of how to build a foundation for a house is similar to what is necessary to build a foundation for commercial structures. If you are planning to build a garage in the basement area which is commonly used for office buildings , following steps are followed:
- Layout the area for the foundation and mark the perimeter.
- Remove the underground utilities present before construction
- Dig out dirt for the footings and slab according to the plans while following building and safety codes.
- Build forms for the footings and for the slab. Install rebar and then pour concrete footings.
- When footings have cured, pour the concrete for the slab into the prepared location.

Factors to Consider in Basement foundation design
Building a basement foundation with appropriate size and dimensions is a lot of responsibility as the entire structure is standing on it. No doubt the architect or contractor which you hire will do the best but here are some factors that we have discussed to give an overview of considerable factors:
1. Waterlogged ground
Water leakage is the main cause of damage in the basement, it makes the foundation weaker . If the remedies are not done then the entire building might collapse.. This can be huge financial loss. The moisture from the basement starts moving to the main structure at a slow enough pace.
The remedy includes layering stones and constructing a raised platform. It’s not impossible to build in a waterlogged area. You can consult a contractor like Lux Construction Group, Los Angeles who are specialized to do this work.
Find Us On Google Map:
Lux Construction Group – Remodeling For Dentists, Doctors, Urgent Care & Radiology
2. Soil conditions
Different types of soil can make or break your foundation. For example, loam, rock and sand or gravel make up for good, foundation-friendly soil. On the other hand, peat, clay, or silt are bad options because they tend to change their structure of shift, which can cause cracks in the foundation, which in turn weakens the whole structure.
So you can recognize the soil type and go for the appropriate construction that can add value to the structure by laying a solid basement.
3. Effects and after-effects of construction
Once the basement is ready, it becomes important that you preserve the same conditions till the entire construction work is completed. In many cases, the heavy work in the building like the steelwork or drilling might cause damage.
Therefore, for the construction, especially a multistoried office building, you need to hire a construction company that has experienced engineers who can take care of such things during the construction. Building the basement with utmost care and then maintaining it , both are equally important.
4. Cost and speed
One of the biggest problems is the understanding of the people while constructing a new house. To save a few dollars, some might agree to compromise on the quality of material used in basement construction. In the worst case, they might even avoid digging to the recommended height.
Remember, in a city like Los Angeles, it’s risky to take such steps. So, basement construction should not be compromised for the sake of higher cost. Moreover, you have another solution.
You can hire an experienced contractor like lux construction group who can manage to build the entire building in a budgeted way using their practical experience.
5. The effect of construction on the adjoining structures
Make sure you understand the risks your construction can pose for the adjoining structures. Excavations can cause damage to the foundations of nearby buildings.
Dewatering and vibration can have similarly harmful effects, so you need to account for those as well. If your work is done in a haphazard manner, it might harm the nearby buildings.
To avoid tilting of buildings during earthquakes, the owners must opt for advanced and high-quality construction material for the basement without any compromise.
To have a safe house or office, it’s better to take precautions than bearing the great loss by ensuring safe construction of the basement area.
How To Build A House Foundation?
Once you have purchased the land and are thinking of building a new house or office, you can go for an inspection of the area by the experts who can suggest the best strategy. The actual work starts by laying the foundation.
The house foundation is going to be built in 5 main steps:
- Ground leveling and watering
- Preparing the area by applying solutions like termite treatment, soil binding and so on
- Building a frame on the covered area.
- Mixing and pouring the concrete
- Finishing touches by building solid walls and boundaries.
7 Steps for building Strong Foundation of House Or Office
There are more details on each step below, let’s take a look.
1. Start Building Foundations by Marking Out a Level Datum Point
Note : A datum point is a point of reference from which further measurements can be made. The point can be based on the finished floor level, an existing building or a benchmark.
The first step is to locate a datum point for the existing building. However, for new builds, this will be marked on the plan as a fixed point such as a manhole cover or a marker in the road or pavement.
The datum point is important: all your height measurements are relative to this point, so any errors could cause problems later on, particularly if there is a height restriction placed on the building.
2. Calculate Material to be Removed for Building Foundations
In a basement foundation, clearing the ground and removing the unwanted material present in your area costs a lot. Taking the exact estimation of the task would help you in planning your finances. For the same reason, people like to do the construction in stages. Spending time at this stage and letting your land gets prepared for construction is a wise step. Otherwise, later on, any treatment related to soil would be costlier.
3. Use String Lines to Mark Out Your Building Foundations
Start marking out the walls, starting with one corner point. Start marking out for the walls. Set up timber hurdles at the end of each wall, out of the way of where the digger will need to be. These carry the string lines that represent the wall faces of your building. Where space is limited, use corner pins instead and set up the hurdles after the concrete is in.
4. Mark Out the Trenches for Your Building Foundations
Use marker paint to mark out your footings. Begin lining up your footings by referring to your datum point. When it comes to extensions, never assume an existing building is square; pick the side you need to be square to and set up a line, then square off that line.
5. Mark All Corners of the Building Foundations
Once you have two lines set up at 90°, all other measurements can be taken from this point, with all corners and junctions marked. A lot of digger drivers are quite happy for you to mark ‘center of dig’ lines, but you may prefer to mark both sides of the trenches.
Check the width of your walls and allow 150mm on both sides, then use a string line as a guide to mark the trenches with marker paint.
6. Start Digging The Foundation Trenches
Now you’re ready to start digging. Have your site level set to the depth you need to dig and check it often. Ultimately it is down to the building control inspector to decide how far down you need to go; they will inspect at this stage and advise.
7. Introduce Depth Pegs and Pour
Once Building Control has visited, you are ready to pour the footings. You should place depth pegs in the trenches to show you how deep to fill, but you may find that marking the sides of the trenches with marker paint also works well, with a final once over with the site level and a concrete rake to get them to spot on — the more accurate you can be with your levels the easier (and cheaper) the next stage will be
Frequently Asked Questions
How much does the basement foundation cost?
A typical 1,200-square-foot house foundation costs $6,900 to $16,200 for a concrete slab, or about $40,000 for a full basement (unfinished). A floating slab for a mobile home runs $4,600 to $14,000, while a standard 24’ x 24’ (2-car) garage foundation costs $3,100 to $4,800. However, the final cost depends on the area where construction is to be done.
Do all houses need foundations?
In the city of Los Angeles, it is recommended to have foundations as the area is earthquake-prone. The foundation can ensure a concrete structure with more resilience. It protects the structure from turbulence and tilting during earthquakes.
How deep should the foundation of a house be?
The depth of the foundation depends on the type of soil and the second factor is the load on the basements. The shape or area size also matters. In Los Angeles, it is recommended to have a deep foundation starting from 750 ft. to 1.5 Ft.
What is the cheapest way to build a foundation?
Among the three basic types of foundation building, the concrete slab is the cheapest solution. However, a practical situation needs to be considered. it is not the matter of building a cheap foundation and later on spending extra on repairing it. So, the architects recommend not to choose the cheap foundation but to choose the most suitable one.
Further Reading
- Soft-Story Retrofit Solutions For Building Resilience
- Commercial Building Renovation Checklist
- What Are The Best Dental Clinic Renovation & Remodeling Practices?
- Do I Need Planning Permission For a Basement Extension!
Starting with a strong foundation
At Homes by Taber, we strive to create functional, beautiful and high-quality homes that are built to last—and for each and every home, that starts with building the strongest foundation possible that is compatible with Oklahoma soil.
The foundation is the lowest load-bearing component of your home, holding up its weight and keeping everything in place. A well-laid foundation acts as an anchor between framing and the ground below, which helps protect your home from natural disasters and water damage—and creates the much-needed stability a home requires to endure decades of wear.
While laying the foundation is the beginning step of almost every home building process, not all foundations are created equal. Construction Manager Kendrick Hartman has been with Homes by Taber for over seven years, but has about 20 years of total experience in the home building industry—so he knows a thing or two about proper building practices. Kendrick offered some insight into the different types of foundations, the pros and cons of each and why we use the type that we do.
What type of foundation does Homes by Taber use?
Oklahoma City Region:
The base of every Homes by Taber house begins with a footing and stem wall foundation, which consists of three main steps and is a pricier option compared to some other foundation options, which is why some builders choose to go with another foundation. However, this is not an area to cut corners on.
“This style of foundation is very labor-intensive and is more costly than some other options available,” Kendrick said, “but it’s not an area you want to go cheap on in construction when you’re building someone’s biggest investment. It takes multiple steps, so more time, more concrete, and more labor. But it’s all just a part of our Proudly Overbuilt promise.”
A footing and stem wall foundation starts once your lot is leveled, and a footprint of the home is outlined. First, the team digs a trench that’s 18 inches wide and 24 inches deep along the entire outline of the home, and then adds rebar pins. The footing is then created by filling this trench with concrete.
Once the footing is cured, the next step is to place rebar dowels vertically where the stem walls will be placed—the typical stem wall is 6 inches thick and 14 to 24 inches high. Concrete is then poured again, surrounding the dowels. The combination of vertical dowels and cured, rebar-reinforced footings keep the stem wall from shifting.
Lastly, before the concrete slab is poured the interior of the stem walls are filled with sand and a moisture barrier is installed to prevent water from entering through the concrete into the home. A third concrete pour is then done over the moisture barrier to create the floor.
The three separate concrete pours, with rebar reinforcement, is what makes this technique so sturdy—especially in Oklahoma, where the red clay soil can cause lots of problems for homes with improper foundations.
“It’s tried and true,” Kendrick said. “Builders have been using footing and stem wall foundations for a long time, and we know how it holds up over the years. Earthquakes are a more recent phenomenon in our area, and homes with this foundation that were built 20 years ago are withstanding the increased ground movement. ”
”
What are the other foundation types that area builders use?
Foundation style popularity varies by region, building type and other factors, but there are other styles that are commonly used by builders in Oklahoma.
The first option other builders opt for is a pier and beam grade foundation. They follow the same general principles as the footing and stem wall foundation, but the footing itself is different and that is where the issues can arise from this option. Instead of digging the trench around the entire perimeter of the home, separate holes are dug around the perimeter that will hold the vertical rebar. A stem wall is formed on top, so the rebar goes through the stem wall straight into the piers. This type of foundation is a much cheaper option because it requires less materials, which in turn provides less support for the structure. According to Robert Zahl, a tenured Oklahoma engineer, cutting costs with a pier grade beam foundation will, “ultimately lead to a more significant expense to the homebuyer for subsequent repairs. ”
”
The City of Edmond has outlawed this foundation in the Edmond City Limits, but some builders choose to use it in order to save on costs.
Homes by Taber has seen how this foundation option has affected homes in this region and has decided to include it in their homes so their homeowners are protected from faulty foundations.
“There’s not a lot of required inspection for it, making it easy for builders to cut corners on the width and depth of the piers. It also doesn’t hold up well in clay soils, because there’s not a container for the rebar to withstand movement,” says Kendrick.
Additionally, pier and grade beam foundations run the risk of washout. Because the stem wall doesn’t go all the way down to a solid footing, the dirt and sand that is under the foundation can wash away—leaving the foundation exposed to severe moisture and insect damage. Zahl asserts, “It seems that whoever decided that this system was a good way for builders to save money in the construction of a house overlooked the fact that the continuous portion of the foundation system, and not just the piers, needs to be below the frost line,” which helps ensure moisture stays out of the foundation.
This is a picture of a home in Oklahoma that had this inferior foundation installed by another builder, provided by Zahl:
If you’re curious as to whether a home has a pier and grade beam foundation, it’s easy to tell. Just look for the exposed concrete around the perimeter of the home. This is an easy to identify indicator that the home is built on this subpar foundation.
This is a picture to demonstrate this exposed foundation, provided by Zahl:
What drives Homes by Taber’s choice of foundation?
Just like every other step in the buying and building process, Homes by Taber always puts our homeowners first—which is why we take the extra time and effort to use the footing and stem wall technique for our foundations.
Most homeowners don’t know much about foundations, but it’s literally the backbone of every single home we build. Our other talented team members won’t cut corners or take the easy way out—they’re dedicated to creating a long-lasting, durable end product for each and every homeowner. We’re focusing on the future of our homes and the people who live in them, and ensuring they have a strong foundation to last for decades to come.
There’s a reason thousands of Oklahomans have come to trust Homes by Taber with their new-construction home needs. Our team is always looking to improve our building practices, focusing on providing homeowners with the highest quality of home and highest quality of customer service.
If you’re looking for a new-construction home in Oklahoma City or Tulsa, trust Oklahoma’s Favorite Builder. Browse our thoughtfully designed communities, personalize a floor plan from the comfort of your computer or check out our inventory of quick move-in homes.
To learn more about our industry-leading building practices to to schedule a tour of one of our model homes, give us a call at (405) 285-5105 or fill out an online form.
Stages of building a strip foundation for a house
Strip foundations are the most common, but not applicable on all soils. To begin the construction of such a foundation, it is necessary to carefully examine the soils and decide how thick and how high the tape should be.
In this article, we will describe in detail all stages of the construction of a strip foundation, from digging a trench, reinforcement, formwork and ending with pouring concrete.
Ground geology under foundation
This is the most important stage by which the following data are determined:
- Soil type and its design resistance.
- Freezing depth.
- Groundwater level.
- The degree of heaving of the soil and its uniformity.
After geology, you can start designing the foundation itself.
Project preparation
Depending on the architectural solution, that is, the initially planned building, the weight of the house is determined, including the weight of the foundation, snow, wind and payload. The type of foundation, in our case, tape, can be buried and shallow.
The next step is to determine the parameters of the foundation itself, namely:
- Foundation width.
- Recessed height.
- Above ground height.
- Whether drainage is required.
To determine the width of the foundation, it is necessary to divide the weight of the house by the footprint of the foundation, and the resulting value should be less than the calculated soil resistance by 20%.
To increase the footprint of the foundation, a widening (heel) is made, which distributes the load over a larger area.
We wrote about this in more detail in our previous article – how to calculate the weight of a house.
Depth of laying the foundation strip
For a deep foundation, the laying depth should be 20 cm lower than the freezing depth.
For an approximate depth of a shallow foundation, see the table.
Height of the above-ground part of the foundation
- The maximum height of the above-ground part of the strip foundation must not exceed four widths of the foundation strip.
- Above ground must be smaller than below.
- The optimal height of the above-ground part is 40-50 cm.
Marking the site
According to the finished project, it is necessary to carefully measure all the corners of the future foundation and set the pegs. The stakes are placed along the outer and inner perimeter of the foundation, a cord is stretched between the stakes, defining the contours for digging the foundation trench.
Foundation excavation
At this stage, a trench is being dug, the depth of which should be suitable for the foundation project, taking into account the sand cushion and formwork. There are two ways to dig a trench: with a tractor using a narrow bucket, and manually (with shovels). The tractor will cope much faster, but with shovels it turns out smoother and more accurate.
Sand/gravel pad and film
The sand pad is made about 20 cm thick, wetted with water and well compacted.
Further, a film is laid in the trench, which serves as an additional waterproofing, does not allow the concrete to dry out quickly, and prevents soil from entering the concrete during pouring.
Reinforcing frame for foundation
In some cases, it will be much more convenient to first tie the frame in the trench, and only then expose the wooden formwork.
Stages of reinforcing the frame:
- Stones or bricks 5-6 cm high are laid at the bottom of the trench, the task of which is to raise the reinforcement cage in order to create a protective layer of concrete from below.
- Further, longitudinal reinforcements are laid out on the bottom, not rods, previously bent at the corners.
- Next, pre-made clamps are put on the bottom row of reinforcement, they are also frames, they are also transverse reinforcement.
- Clamps and a row of lower reinforcement are tied with knitting wire.
- If the tape height is greater than 80 cm, then structural rows of reinforcement, one row or more, are added.
- Next, the upper longitudinal bars of the reinforcement are added to the frame, L-shaped clamps at the corners and connected with wire.
- To provide a protective layer of concrete on the sides of the foundation, special plastic rings are used to help hold the frame in position.

We strongly advise you to read our article on the calculation of strip foundation reinforcement, which describes in detail all the nuances of selecting reinforcement and corner reinforcement schemes.
Formwork for the foundation
The formwork is knocked down from wooden boards, and reinforced with many bars, which additionally rest against the ground on pegs. Also, to strengthen the formwork, metal wire ties are used, or studs are tightened in plastic tubes.
The installation of the formwork must be approached very responsibly, since liquid concrete has a large bursting force, especially if the height and width of the formwork are large. Quite often, formwork bursts for inexperienced builders, and concrete flows to the ground. To avoid this situation, reinforce the formwork as much as possible. And remember that more concrete pressure is created at the bottom.
Do not forget about the installation of sleeves for communications (water, sewerage).
Concrete pouring
It is very important that the foundation be cast in situ, and to achieve this condition, it is necessary to pour concrete into the trench in one go. Manually, with a concrete mixer, this is unlikely to be achieved, therefore it is better to order the delivery of ready-made concrete in mixers.
- The time between delivery of concrete trucks must not exceed two hours.
- Pouring is best done in layers, pulling the concrete around the entire perimeter.
- For a more plastic (liquid) concrete mix, ask to add a plasticizer to the mixer.
- Excess water in concrete lowers grade strength, increases shrinkage cracks and increases the number of pores in concrete, making it less moisture resistant. Avoid excess water during the kneading process.
- An internal vibrator must be used during pouring to compact the concrete and expel air.
- Try to level the plane of the foundation strip as much as possible.
- During the week it is necessary to spill the surface of the foundation with water, this will avoid shrinkage cracks and help the concrete gain brand strength. We also recommend covering the tape with foil.

Foundation ready. It remains to perform vertical and horizontal waterproofing, as well as an insulated blind area, which reduces the depth of freezing and removes excess water from the foundation.
About how long the foundation should stand, we wrote a separate article, which discusses options for settling from 10 days to six months.
Stages of foundation construction
Any construction starts with planning.
Development of the project allows at the initial stage:
- select the construction technology;
- determine the area and number of storeys of the future house;
- calculate the weight of the structure and the load on the foundation;
- choose a suitable roof for the house, taking into account the climatic features of the area;
- calculate the required amount of building and finishing materials, as well as the estimated cost of the finished house.
The correctness of the calculations is a guarantee of the quality and durability of the building. This work is best left to professionals.
1.1 Foundation
The foundation is the main part of any building, because it bears the main load of the structure. Columnar foundations are considered reliable enough for frame houses that are light in weight.
Peculiarities of laying a columnar foundation:
- Using a level and construction cord, mark the site.
- Marks for the formation of pillars are placed in such a way as to distribute the load of the structure as evenly as possible.
- Poles will be installed at the corners of the house, at wall intersections and other high traffic areas. The maximum distance between reference points must not exceed 2 m.
- The next step is to dig the trenches and install the formwork. To give the pillars the necessary strength, steel reinforcement is used.
- After the concrete has been poured, the foundation is left to cure for several weeks.
- Before erecting walls, tie beams are laid on the pillars. This is necessary to combine the pillars into a single structure.
1.2 Plinth
To protect the space under the house from rainwater from the outside, the plinth is closed with a cap.
To finish the plinth of a columnar foundation, use:
- facing brick;
- special plinth siding;
- flat slate with clinker, decorative or natural stone cladding.
Plinth siding looks like brick or masonry. The advantage of this finishing option can be considered the most complete set of panels with additional elements.
The use of finishing strips, flashings, slopes, internal and external corners allows you to close the plinth without gaps and complete the facade.
Basement siding installation technology:
- a wooden crate is mounted on the foundation;
- external and internal corners are fixed in compliance with the vertical level;
- panels are mounted in the corner elements.
1.3 Walls
The next stage of construction is the construction of the load-bearing frame. The foundation surface is leveled and covered with a layer of waterproofing, after which the lower frame trim is mounted.
Structure assembly sequence:
- When installing the lower trim, the bars are connected together and fixed to the foundation. To do this, use self-tapping screws, anchors, wooden dowels.
- The floor beams are laid out at a distance of 50 cm from each other and attached to the bottom trim. After that, a rough floor is mounted from the edged board.
- The vertical racks of the frame are installed at a distance of the width of the basalt wool slabs or other insulation. First, corner posts with additional braces are mounted, after which the remaining posts are installed around the entire perimeter of the frame.
- Installation of the upper trim is carried out according to the same technology as the installation of the lower base of the frame.
- The frame structure is reinforced with diagonal braces for greater stability. The next step is the installation of enclosing structures for window and door openings.
- A heater is inserted between the vertical posts and sewn up from the outside and inside with wall material – plywood or OSB panels.

1.4 Roof
The appearance and height of the roof depend on whether the house has an attic floor. The truss structure will be supported by vertical racks of the frame or the upper trim of the attic walls. In this case, additional insulation of the roof will be required.
The best option for a frame house is a gable roof. This design is lightweight and reliably protects the building from wind, rain and snow. When calculating the slope of the roof, the snow and wind loads characteristic of the area should be taken into account.
Slopes less than 30 degrees will cause snow to linger on the roof and create a greater load , while slopes greater than 50 degrees will increase side load. Strong winds can cause deformation and partial destruction of the roof. Indicators of 35-45 degrees are considered optimal – such a roof looks beautiful, and snow does not linger on it.
Stages of building a private house: from start to finish
-
2020-01-06
2020-01-06
Ask a Question
Would you like to know more about the service? – ask us!
Residents of progressive megacities, tired of the regular hustle and bustle, are thinking about finding a country house.
A cozy family nest on its own plot must certainly meet all the requirements and not yield
city apartments in terms of comfort. You can choose a ready-made template cottage in one of the newfangled
settlements. But it is better to build your own unique private house from scratch, taking into account personal wishes and
preferences. A variety of materials and technologies allows you to relatively quickly build a country villa in
any stylistic direction. But first you should familiarize yourself with the rules for selecting the territory, the stages
construction of a private house and the intricacies of its design.
Selection of a suitable site and documentation
Inexperienced developers make their first mistakes at the stage of site selection. Some do not take into account the target
purpose and quadrature of the future building. Others forget to check ownership, presence/absence
arrests, etc. So that during the construction and further design of a country house there are no unforeseen
situations, recommends choosing a site, focusing on the following criteria:-
Dimensions of the territory. The optimal ratio between the dimensions of the site and the building is 10:1. That is, for
building a house with an area of 80 sq. m. you will need +/- 8 acres of land.
-
Location. The most desirable square meters for residents of megacities – located in the features
cities or distant places. A popular option is the suburbs 10-15 minutes away. -
Transport system. Before buying a building site, owners of their own cars should
make sure of
the presence of a complex of roads (bridges, tunnels), as well as in their adequate condition. The ideal option is a decoupling
at different levels. If there is no private transport, pay attention to nearby stops
public transport (buses, trains, etc.). -
Infrastructure. Schools, hospitals, kindergartens,
the shops,
salons, pharmacies, post offices and cultural and entertainment centers. So, sections with a step
accessibility to the main infrastructure units will always be a priority.
-
Geodesy of the territory. When arranging water supply and choosing the foundation of a future country house, it is important
geodetic conditions – the presence of a slope and its angle, type of soil, depth of groundwater, and so on. -
Communications. The most successful option is a plot with the ability to connect to a centralized
heating, sewerage, electricity, water and gas supply. In the absence of at least one of the factors, the costs
for the construction site will increase significantly due to the independent implementation of engineering networks. -
Environmental factor. Any industrial facilities (mining, processing, manufacturing and
etc.) in
the area may cause deterioration of the ecological state of the environment. While abundant green
plantings and natural water bodies will be a factor in favor of buying land.
Preparation of documentation before the start of construction of a country house
For the construction of a private house, a plot not intended for state needs, allocated for individual
construction. The owner must have ownership of the land, and the square of the territory must be completely
correspond to the one stated in the cadastral passport. It is important to find out before the time of purchase whether there are any litigations and
whether the site has been seized. And only after that to conclude a contract of sale with further registration in
land registry.The construction of a private house starts only after receiving a package of necessary permits.
Among them:- permission to connect to central networks;
- technical conditions for connecting to the necessary communications;
- project development permits;
- building permit after approval of the project, etc.
In the absence of any document from the mandatory list, the developer may be subject to an impressive fine or
demolish the structure, regardless of what stages of construction of a country house have already been completed.
Drawing up a construction budget
The issue of financing is usually resolved before the start of the first work. From the possibilities of the developer in the first place
depends on the quadrature of the future private house, the techniques used and the materials used. construction budget
The average residential building consists of several main items of expenditure. These include:- digging a foundation pit and laying a foundation – 15-30%;
- forcing the box (rafter system, internal and external walls, roof) – 35%;
- building insulation, windows and doors – 15%;
- engineering works (wiring, heating, equipment and devices, communications) – 15%;
- interior decoration of a country house – 20%.
Given the stages of construction of a private house and a number of factors inherent in them, the budget may change in one way or another.
side. So, the simple form of the structure, the presence of a large number of windows and a small
the number of internal walls, the replacement of the second floor with an attic room, the absence of complex external decor,
standard projects of country houses instead of individual ones.At the same time, there are many factors that cause cost overruns. That is:
- development of a personal project by professionals;
- presence in the project of loggias, cellars, balconies;
- excessively high ceilings;
- abundance of small rooms in the layout;
- the complex shape of the facades and the unusual configuration of the roof;
- finishing houses on a turnkey basis.
Keep in mind! Independent construction of a building with experience and knowledge is a guarantee of budget savings.
Payment
repair and construction services will add at least 30% to the amount.
Design as a stage of construction
Design is an important stage in the construction of a country house. It is at this time that the breakdown of the site is made with
determination of places for future objects, squaring, number of floors, layout and appearance are decided
private house. To successfully create or select a project, it is important to know a few key principles:-
For a comfortable family stay in a country house, at least 30 sq.m. should fall on one member.
space. -
The layout should include two zones: day (kitchen, dining room, hallway, living room) – closer to the exit from
at home, night (bedroom, nursery, etc.) – away from the exit or on the second floor. Day zone traditionally
larger and more spacious night.
-
A convenient and practical option for a small family is a square one-story house with an area of 90-120 sq.m. For
increasing the quadrature is not worth sacrificing meters of the site, it is better to drive out the attic or the second floor. -
Part of the utility rooms are recommended to be lowered into the basement (on the ground floor). But only if
when the depth of groundwater allows such manipulation. -
On the second floor, it is better to have rooms that are rarely visited and provide relative silence.
In most cases – bedrooms and offices.
At the design stage, technologies and materials are also selected, and estimates are calculated. Do this kind of work
only an experienced developer with a strong theoretical and practical base can independently. To competently
to build a dream country house, it is better to entrust the drafting of the project to qualified specialists. And since
development of an individual project is an expensive pleasure; you can always buy a ready-made standard sample.
Selection of materials for the walls of the house
All stages of building a private house are important, but the choice of materials and the method of building a box depends
strength and durability of housing, as well as the final cost of the object. When deciding on the material, it is worth considering
following:-
Estimated speed and ease of erection. Walls of foam and gas blocks are built enough
fast. In comparison with them, brickwork is a long and painstaking task. Takes a little time to distill
profiled timber boxes. It will take longer to tinker with a natural log house. Record holder – monolithic
concrete walls, for which formwork is laid in full height. It is also filled with a solution. -
Cycles of residence. If the family plans to live in a country house year-round, it is recommended
choose a “warm” material with high strength characteristics and a sufficient level of thermal insulation.
If you need a house for seasonal living, you can stay on SIP panels. -
Building weight. The decision about the foundation depends on the choice of material for the walls. heavy box of
only a solid capital foundation can withstand a brick. While the gas-block structure can be
drive out on a simple tape. -
Environmental indicator. The safest today are wooden houses made of galvanized or
profiled timber. With high-quality external and internal processing, the building will stand for decades without
changes. A cheaper substitute is a frame country house. But the service life of such
correspondingly shorter. -
Cost. Different materials will cost the builder completely different money. If stone and brick
– serious financial investments. That cellular concrete is a more budgetary option for resources.
Keep in mind! Most often, the cost of material for walls is proportional to the duration of trouble-free operation.
private house. The decision to save on the box can serve as a bad lesson for the developer. At what stage
building a house can cut the budget, read on.
Clearing the territory and the procedure for building a private house
The main stages of the construction of a country house begin with a breakdown of the site according to the project and carrying out
land works. The developer determines the territory for the construction of the house, as well as the places of outbuildings, a septic tank,
wells, etc. They also delimit the recreation area and the garden, indicate the location of flower beds, garden paths,
car parking. The site is leveled, freed from stumps and large plants, allocate space (preferably under
canopy) for building materials.Earthworks include the following stages of building a private house:
- well drilling;
- septic tank device;
- digging a trench or excavation;
- underground communications;
- laying of cleaning and drainage system;
- foundation bay
The appropriate type of foundation is usually determined by a number of factors: the depth of groundwater, the presence of a basement,
soil properties, the weight of the future private house. The heavier the object, the stronger and more solid it must be.
foundation. For a small one-story cottage made of panels, a columnar or tape one is suitable. For massive
houses on floating soil will have to choose a monolithic filler. The cost of the second significantly exceeds the cost of
the first, but at the same time allows you to save money in the future. Since a monolithic foundation can be excellent
subfloor of the first floor.At what stage of building a house can you additionally take care of strength and durability? Of course, on
foundation installation stage. To do this, the base is poured immediately upon completion of earthworks on a 20 cm pillow and
reinforced with metal reinforcement.
Walls, roof, trim
According to safety requirements, the foundation must stand without load for at least 1 year. But only
after that, you can start building walls. To exclude the possibility of moisture ingress from outside, between
a layer of waterproofing is laid on the base and wall. To ensure a comfortable stay in a country house
outside lay sound, heat and vapor barrier. At the same time, the thickness of the outer walls must also be sufficient,
and on the internal partitions you can save a little.At the next stage, proceed to the installation of the roof:
- install the truss system;
- perform heat, hydro and vapor barrier;
- mount the crate;
- cover the roof with the selected material (ondulin, tiles, metal tiles, slate, etc. ).
When the box is completely rebuilt, installers begin to insert windows and doors. Interior decoration of a private house
can be completely natural (expensive), or synthetic (more budgetary). Choice dictated by taste
the preferences of the owner and his financial capabilities. The list of interior works includes: wall decoration and
ceilings, floor installation and installation of flooring. Along the way, they connect devices and communications,
checking all systems, arranging furniture and completing the improvement with individual interior elements.
Putting the house into operation
Whatever the order of construction of a private house, the final phase is always the same – the delivery of the building in
operation. To do this, the developer needs to timely apply to the authorities providing control
commission. The latter, in turn, carefully examines and inspects the object, signs the act and issues to the developer
certificate of ownership.
If you have enough knowledge and experience in the construction of residential buildings, you can safely get down to business. If you
Doubt your abilities, recommends ordering a turnkey cottage repair. A fair and qualified
KSU Nordwest will always help you in the implementation of housing plans.Related materials:
Features of building houses from foam blocks / Choosing a foundation / Secrets of construction / How much does it cost to build a house
Author: Foreman-profi
Rate the article:
Order service
Fill out an application on the website. We will certainly contact you to clarify the details.
Share link:
Back to list
Stages of building a house, an article about the stages of building a private house
Building your own home is the dream of many people. Information about the building materials used in the main stages of the construction of a country house is necessary.
Not the last role is played by a properly selected piece of land. Someone wants to live in the city, but in a spacious house without neighbors behind the wall, while someone happily moves to remote villages. In any case, when purchasing a site, you should pay attention to the development of infrastructure, transport accessibility, the availability of communications and the convenience of their summing up.
An important role in the construction of a house is played by the type of soil. Select a building site on the site. Take a garden drill or a shovel, make a hole to the depth of the future foundation. Every 50-70 centimeters, take out a piece of earth. The samples should then be rubbed in the hand, or moistened, or guided dry. Thus, it can be visually determined.Soil type according to its characteristics (feel when rubbed in the hand/wet condition/dry condition).
- sandy (loose/non-sticky, no plasticity/flowability).
- sandy loamy (easily rubbed between the fingers / there is a slight stickiness and plasticity / lumps crumble without problems).
- dusty (similar to flour, when rubbed it turns into dust / plasticity is practically absent / lumps are loose, easily crumble).
- loamy silty (sand particles are not felt / has stickiness, plasticity; can roll into a thin (diameter 1-2 mm) cord / lumps crumble into small particles upon impact).
- loamy (sand is felt / plastic, sticky; can roll into a cord (diameter 1-4 mm), which breaks when bent; when squeezing a rolled ball, a cake is formed with cracks along the edges / lumps almost completely crumble upon impact, the rest can be easily crushed) .
- clayey (feels like a homogeneous powder / very soft, sticky, plastic; a rolled ball turns into a cake without cracks at the edges; easily rolls into a long cord, 1.5 mm in diameter or less, which does not break when bent / lumps are very hard, with large crushed with difficulty).
Second stage: building a house
Now you need to decide on the type of foundation for the future home. This choice depends on many factors: the type of soil, the depth of groundwater flow, the number of storeys of the building, the material of the walls, the purpose of the building, the financial volume for the selected object.
Consider the types of foundations and their purpose.
Tape – the most common type of foundation, which is used in almost all construction. Particularly suitable for a private house. It is important to correctly determine the parameters of such a foundation, which depend on the types of soil and the mass of the future structure.
There are several types of strip foundations:
- monolithic is cast entirely from cement mortar, which includes cement, sand, crushed stone and water. It is important to put reinforcement in such a foundation.
- is prefabricated from reinforced concrete blocks. In this case, lifting equipment will be required, since the blocks are very heavy. Then the whole structure is fastened together by pouring the solution into the grooves that are in each product.
- rubble is made against the walls of the trench. To do this, stones (but) are first laid, cracks are filled with rubble, rammed and poured with concrete.
The slab foundation consists of one large slab. It is applied at the close course of ground waters. You can lay the finished slab from the factory or pour it directly on site using rebar, mesh and scrap metal. On such a foundation, you can immediately make a floor without using additional logs.
Piling is used for heaving, floating and moving soils. This type of foundation is the only possible one with such indicators. To install piles, pile driving equipment is required, although some craftsmen make such a foundation with their own hands.
The column foundation is suitable for building a light frame structure in which a basement is not planned.
Also suitable for a wooden house. Such a base is made of wood or stone. The next step in the construction of the house is the erection of walls. In stone or frame construction, there is a variety of materials that are designed for a particular type of building.
Stone houses are built from natural and artificial stone.
Natural stone is expensive and less effective than artificial stone. Such material is suitable for luxurious mansions of respectable persons. Artificial are all those made by man.The most common:
- solid brick – a fairly durable building material. Allows you to build houses in several floors. It has a high thermal conductivity, so the average wall thickness is 1–1.5 meters. The house turns out to be heavy and requires a more massive foundation. The construction of walls is slower due to the small size of the brick. A lot of seams are formed, which is an additional “cold bridge”. However, many prefer this particular building material.
- ceramic block – lighter than solid bricks. It has hollow cavities inside, so it allows you to build walls with a smaller thickness. It is recommended to use special foam instead of cement to avoid “cold bridges” and additional insulation.
- aerated concrete block is made from cellular concrete. Light and warm, which allows you to build houses without additional insulation. You just need to follow the technological processes and correctly draw up a project. Fastened with special glue. Noise insulation leaves much to be desired, so the walls should be plastered.
- expanded clay concrete block is a durable, fairly warm, but heavy material. Attractive for its price, which reduces the cost of building walls. Does not absorb moisture and does not interfere with the movement of air. The walls of the house should not be left without exterior decoration for more than 2 seasons. In this case, the strength of the structure is reduced.
There are thermal blocks, cinder blocks, gas silicate blocks, wood concrete, etc.
It all depends on the desire and financial capabilities.
Wooden houses are very popular. In such and breathe easily, and live comfortably. You can do without interior decoration. Wood always looks good.Log house – an expensive type of wooden house, but beautiful and environmentally friendly. The disadvantage of such houses is shrinkage. An average of 10 cm per year. Cracks should be monitored. Requires professional builders. It is flammable, prone to decay, and therefore requires special processing.
Timber has the same problems as a log cabin, so the wood should be bought with the right moisture content and entrust the assembly work to specialists.
Glued profiled timber is the best you can buy for wooden walls. Such a house will not shrink and will not have to use additional processing or insulation measures. It is important to choose the right wall thickness for your region.
Frame houses are becoming more and more popular every year. It is generally accepted that such a house is less expensive to build than a bar or block.
You can build it yourself, saving on paying builders, which attracts many. In fact, in regions with high lumber prices, such a house will not bring significant savings. Yes, and you should choose a quality heater. Needs good ventilation. The only indisputable plus is that the house is relatively light and does not require excessive foundation costs. Combined houses are also made. Basically, the first floor is built of stone, the second is made of frame. Houses made of vulture panels are also popular, but more often for the construction of summer cottages.
Roof and roof
Upon completion of the laying of the walls, the next stage of the construction of house is underway – the construction of the roof. It is worth taking a responsible approach to its design and the choice of roofing material.Gable – the easiest option and very popular. Under such a roof, you can make an attic or a good attic.
Shed – the cheapest and less functional.
It was mainly done on country houses or outbuildings, but recently it has also appeared on residential elite houses. The hip roof has three varieties.
- in the first case, it looks like a gable, only instead of gables there are two slopes – hips, in which windows can be located.
- the second type – half-hip – something between a gable and a hip.
- third – hipped roof. It is also called a four-slope. All slopes are connected at one point. Suitable for square houses.
Depending on the chosen project, the roof can be mansard, broken, multi-gable, combined, domed and conical. It can be covered with a soft roof or slate, metal profiles and even reeds.
There are several types of roofing material.
- flexible tile – strong, durable, comfortable material. Does not rot or corrode. Does not absorb moisture, silent in the rain. It has an acceptable cost and ease of installation.
- ceramic tile has fire resistance, low thermal conductivity. Does not absorb moisture. Durable (up to 100 years).
- slate roofing is the most reliable, strong and durable (up to 200 years) coating. Slate prices are high, due to the production of natural stone. Ideal for luxury housing.
- metal tile – light steel profiled sheet. Easy to mount. It has poor sound insulation, which is noticeable when hail or rain falls. Attractive variety of colors.
- asbestos-cement sheets (slate) – frost-resistant material, absorbs noise from precipitation, service life up to 40 years. A slate roof has a significant weight, which should be taken into account when designing a truss system.
The roof can be made from steel seam roofing, and from roofing copper, but here, as you like. The main thing is that in such a house it is cozy and comfortable for its inhabitants. Remember that warm air rises. The main heat of the house comes out through the roof. From here it follows that the attic floor or attic (depending on the type of roof) should be well insulated.
The construction of a private house can be carried out with the help of a trusted construction company, a reliable team of builders, or you can do it yourself. It all depends on the desire, experience and financial wealth.
Stages of building the foundation of a house
The basis of any building is the foundation. The life of the building depends on its quality. The construction of the foundation is carried out in stages.
Each of them has its own requirements, for the fulfillment of which it is necessary to have certain knowledge and skills. Most often, developers are far from construction and do not know how to build a house. In this case, it is better to contact a construction company that has the necessary specialists for each stage in its staff.
A reliable company engaged in construction and construction services in Kyiv and the Kyiv region is the company “KievNovBud”. The company employs high-class specialists, and there are licenses for all the work provided.
You can order a construction team to perform some individual work, but after watching a video about what turnkey construction is, we can conclude that this is a good offer. In addition, if there are financial problems, different options for the cost of construction are possible, depending on the degree of readiness of the facility. After the preparation of the construction site, the construction of the foundation begins. There are the following stages of foundation construction:
- Design.
- Markup.
- Land works.
- Formwork erection.
- Reinforcement.
- Fill.
- Waterproofing and backfilling.
In order to understand the degree of complexity of construction, you need to understand each stage of the construction of the foundation.
Designing
This is one of the most important stages of construction, although many novice developers do not pay attention to it and treat it negligently, which results in big problems in the future.
An incorrectly chosen foundation may not withstand the load, and this threatens with additional costs for its repair and strengthening. It is at the design stage that the question of what the foundation of the future house will be is decided. First of all, geological research is carried out: the properties of the soil, the depth of freezing, the mobility of the soil, the depth of groundwater are studied. Even if a typical design is used, these studies are very important. The foundation specified in the project may not be suitable for a cottage under construction due to the characteristics of the soil. In this case, you will have to choose another one that will become a reliable foundation for the house.
The depth and thickness of the foundation depends on the properties of the soil and the proximity of groundwater, and accordingly its cost is laid. After watching a video about how much a house costs, you can calculate the estimate and lay the amount of money necessary for the construction of the foundation.
The estimate indicates the type and quantity of material used. Marking out
After designing, mark out the foundation. This is a simple step, but it is with it that construction begins. Before marking, the site must be cleared of debris, leveled in height. Usually 10 cm of soil is removed. If there is no basement in the future house, then it is enough to set the pegs in the future corners of the house, at the intersection of load-bearing walls and partitions, and then pull the rope between them. Trenches will be dug along the rope. If a basement is planned in the house, then you need to dig a foundation pit.
When marking, it is necessary to maintain the correct geometry of the future structures according to the project. To do this, the first peg is first driven in, and then, using a level, pegs are installed in all corners of the house and at the junction of future walls and piers. To make sure the geometry is correct, you need to measure the diagonals. If the angles are right, then the diagonals must be equal.
Earthworks
The foundation phase includes earthworks. At this stage, trenches are dug along a stretched rope of such depth and width as provided for by the project. Typically, trenches are dug with a depth of 0.5 to 1.2 m and a width of 0.4 to 0.7 m. A foundation of this size can withstand a 1-2 storey brick house. If a strip foundation is being dug, then it can be dug out with a shovel. The section inside the trench should be a rectangle. For digging a pit, you will need special equipment.
Calculate the total area of the sole to determine the required width. For this, the weight of the house (Weight) is calculated, which includes the weight of building materials and internal arrangements. Then you need to calculate the critical load on the soil (Ngr), which depends on the type of soil. Thus, the area of the sole is calculated by the following formula:
S=Weight/Load*1.1
Added to the total area of 10% (1.1) for reliability. Given the area of the sole, it is not difficult to calculate the width.
To do this, you need to calculate the total length of the strip foundation and divide the area of \u200b\u200bthe sole by the resulting value: Width=S/Length of the strip
The buried strip foundation must rest on soil that is below the local frost depth. These indicators can be taken from the reference literature. Thus, the depth of the foundation consists of the depth of soil freezing, to which 10-20 cm is added for the pillow device.
The strength of the foundation depends on the weight of the structure. For brick houses, a more powerful foundation is needed, since the walls in this case are heavy and there will be a large load. Walls made of gas blocks and ceramic blocks are much lighter than brick walls, this is one of the advantages of these materials. The trenches for such houses are smaller in width than for brick buildings. If the house is multi-storey, and the ground is weak, then piles can be used. This is specified in the project.
To increase the bearing capacity of the soil, a pillow is made before pouring the foundation.
For its device, sand, crushed stone, gravel, broken bricks are used. The height of the pillow is approximately 15 cm. When laying, the material must be watered all the time to eliminate internal voids. Formwork
Formwork is used to shape the foundation, so it must be level. For a shallow foundation, trench walls can be used as formwork, and the upper part can be made from timber and boards of various types of wood. The most commonly used pine, as it is an inexpensive material. The formwork must be strong enough to withstand the pressure of the concrete during pouring. It can be made of wood, metal, slate and other suitable materials.
If the foundation is installed in a pit, then a more complex formwork is mounted, most often metal. The cost of such formwork is quite high. With self-pouring, the foundation is cheaper, but the need to build serious formwork increases its cost. It is more profitable to use ready-made blocks. In this case, a concrete base with a thickness of about 1.
2 m is first poured, and then blocks are placed on it. With the use of blocks, the foundation is more reliable and faster built. Reinforcement
For reliability, the foundation must be reinforced. For this, a three-dimensional frame is constructed from reinforcement. Its dimensions depend on the internal dimensions of the formwork, as a rule, the reinforcing cage is several centimeters smaller and is placed inside the concrete after pouring.
For correct reinforcement, some rules must be observed:
- Reinforcing bars must be laid along the foundation closer to the top and bottom edges. Thus, they better resist the forces bending the tape.
- After a certain distance, transverse and vertical rods are arranged.
- When assembling a structure from reinforcement, connections are made using wire or welding. It is preferable to use wire rather than welding, since a rigid foundation will not be able to respond properly to ground movements, cracks will appear in it.
- For the frame, you need to use reinforcement of different diameters from 12-16 mm. Reinforcement with a large diameter is laid along the length, and with a smaller diameter it is used for height and width.
First, the individual frame elements are assembled, and then they are placed in the formwork and connected with wire. You can see how the formwork with a frame is erected by the specialists of the KievNovBud company if you visit the facilities under construction. By these objects, one can judge the quality of work that is performed at a high professional level. It is built according to building codes, not only the foundation, the stages following it are also performed with high quality.
Concreting
At the stage of concreting, the issue of concrete production should be resolved. If the amount of work is small, then concrete can be prepared independently using a concrete mixer right on the construction site. If the entire base of the building is being concreted, then it is better to order ready-made concrete and pour it using a deep vibrator.
It is better to use the second option and order ready-made concrete, as it is made by professionals, so all the necessary proportions are observed. In addition, it will reduce the labor intensity of construction work. The working life of concrete is 3 hours, so you need to have time to meet the time. Before pouring the concrete, pour water over the pad and timber formwork so that they do not absorb moisture from the concrete. Concrete should be poured in layers 15-20 cm thick. Each layer should be well compacted so that there are no voids. Concrete should be poured in a continuous way, not allowing the layers to dry out, otherwise, over time, the foundation will crack in layers.
Formwork can be removed one week after pouring. During solidification in hot weather, the foundation should be periodically watered with water and preferably covered with burlap, plastic wrap or other material so that the upper layers do not dry out and cracks do not appear. The foundation is ready to withstand loads after 28 days.
Waterproofing and backfilling
Waterproofing is a very important step in foundation construction, as it affects the durability of the structure. It protects the foundation from moisture penetration, this is especially important where there is a small depth of groundwater. Waterproofing can be done after the formwork has been removed. To do this, the foundation walls are coated with mastic and then covered with several layers of waterproofing material. As a waterproofing material, roofing material, isol, steklogidroizol are used.
At the final stage of foundation construction, voids are backfilled layer by layer with coarse sand or heaving soil. These jobs are usually done by hand.
This completes the foundation steps. Thus, it is clear that the construction of the foundation is a laborious and responsible stage of construction, since the reliability and longevity of the future structure will depend on the quality of the work performed. Therefore, the construction of the foundation should be carried out by specialists.
The KievNovBud company can guarantee the high quality of fundamental works, which can be confirmed by finished objects that have been built for a long time and tested by time for reliability. Stages of foundation construction: pouring the foundation in stages
The construction of a house begins with the construction of the foundation, and the stronger it is, the longer the life of the house will be. This is due to the fact that a solid foundation will not give a subsidence, will not allow cracks to appear in the walls and, accordingly, the house will be in good condition for many years. Therefore, it is important to withstand all stages of foundation construction, because each of them is important, from design to formwork dismantling. Despite the ease of manufacture of the solution, there is a technology for its exposure, which must be observed, so that the branded strength of the concrete is gaining only after 28 days.
Carefully observing all the stages of pouring the foundation and using high-quality materials, you can be sure of its strength.
They are divided mainly into project development, preparatory work, foundation construction and maintenance. Let’s consider each stage in detail in order to understand what types of work it implies. Technology for building the foundation of a tape-type house
As mentioned above, it doesn’t matter if a construction company works on the site or the foundation is being built with your own hands, it all starts with a project. A place is selected that is studied in detail. The soil should not have drops, and therefore the top layer of the earth must be cut off, if it is present on the site. Further work must be performed in a certain sequence, which we will consider below.
Marking
Do-it-yourself foundation construction is impossible without marking. According to the project, wooden pegs are installed on a leveled plot of land, which determine the corners of the building. A cord is stretched between them, which marks the boundaries of the future trench on the ground.
Naturally, the pegs need to be placed and the cord pulled from its inside and outside. Digging a trench
First you need to go deep 20-25 centimeters to mark the place where the trench will be. Then you need to remove the markings from the pegs and the cord so that they do not interfere, and go deeper by 80-100 centimeters. The width of the trench is calculated depending on the estimated mass of the future house, so that the strip foundation has an adequate margin of safety.
Pad preparation
Under any strip foundation, the construction steps include creating a pad at the bottom of the trench. It is made of gravel and sand in layers. Each layer is approximately 15 centimeters. You need to start with gravel, and make the top layer of sand. After laying each layer, it must be watered and compacted as much as possible. This compaction increases the bearing capacity of the pillow, which has a positive effect on the strength of the foundation.
Setting the formwork
The formwork is placed on the ground on the sides of the trench. Formwork is made mainly from boards or special plywood. Spacers are placed between the inner and outer wall, which allows you to create a solid structure. It should be borne in mind that the lower the viscosity of the mortar used, the more airtight the formwork device should be. All joints fit perfectly to each other so that water does not leave the solution before the hydration of the cement begins.
Installation of metal reinforcement
The strip foundation construction technology provides for the presence of a reinforced mesh. It is made of reinforcement with a diameter of 8-10 millimeters, depending on the width and height of the foundation. Metal rods are connected to each other by means of a knitting wire. The reinforcement is installed in such a way that it does not touch the bottom of the trench and does not extend beyond the formwork.
Foundation pouring
For the construction of a strip foundation, cement grades M200 – M400 are required, depending on the mass and purpose of the future house.
The larger the estimated mass, the higher the brand of cement is taken. You can make a concrete solution both independently and buy it ready-made. It is necessary to lay the solution, like a pillow – in layers up to 20 centimeters thick. After laying, it is necessary to bayonet the mixture with a metal rod to prevent the formation of voids at the intersection of the reinforcement bars. Foundation maintenance
After finishing work, wait 3-3.5 hours for the mortar to set. Then the surface of the foundation should be sprinkled with sawdust or sand to slow down the evaporation of water. The fact is that only in the presence of water the process of cement hydration proceeds. Therefore, care for it was also included in the stages of construction of the strip foundation. In the cold season, it must be insulated or heated so that the water does not freeze, and in the summer it is necessary to water the concrete several times a day. After a few days, the formwork can be dismantled, but the foundation must stand for 28 days before walls can be built on it.
Waterproofing
This stage is important because it allows you to protect the foundation from moisture. After the concrete has been treated with mastic or protected with special waterproofing materials, moisture will not be absorbed into the concrete from the ground and, accordingly, destroy it, reducing its bearing capacity. Thus, waterproofing is a guarantee that soon cracks will not appear on the walls due to subsidence.
Stages of construction of a monolithic foundation
A monolithic foundation, unlike a strip foundation, is considered a more complex engineering structure. It requires large financial costs, more accurate calculations and a lot of time to implement the project. But there are also advantages of such a solution – a high bearing capacity and the ability to use the resulting surface as a subfloor. In addition, such a foundation is suitable for any type of soil, the main thing is to correctly calculate its parameters and the expected drawdown.
The technology of a monolithic foundation is available to everyone, the main thing is to build the formwork correctly, as well as use cement of the appropriate brand. Consider the stages of building a monolithic foundation: - Calculation of the bearing capacity of the foundation. The peculiarity of the soil is taken into account and the optimal technology is selected. In particular, when building a multi-storey building, an in-depth construction of a foundation with your own hands is required. A slab built simply on the surface of the ground will not withstand the load of the mass of several floors.
- Execution of the marking of the area allocated for the construction of the foundation. It is enough to install the guides in the corners and stretch the cord between them.
- Pit preparation is carried out manually or with the involvement of special equipment, which depends on financial capabilities and the level of deepening. The deeper the plate is located, the more soil needs to be removed.
- Cushion device at the bottom of the pit. Alternately pour several layers of gravel and sand. Each layer is watered and compacted.
- Formwork device. To perform this work, you must use special shields that you can rent or make your own construction from boards, metal or plywood.
- Waterproofing with thermal insulation. If the foundation is not deepened, waterproofing can be omitted. But insulation is necessary so that heat does not leave the house through the floor. For this purpose, special thermal insulation materials are used.
- Base reinforcement. The more competently the reinforcement is performed, the more guarantees that the degree of shrinkage of the foundation will be minimal, and it will less often require major repairs. It is recommended to use a factory-made reinforcing mesh for the construction of a monolithic foundation.
- Concrete pouring. It is worth mentioning right away that the monolithic foundation is poured immediately to get a solid slab.
-
Dimensions of the territory. The optimal ratio between the dimensions of the site and the building is 10:1. That is, for
 A variety of materials and technologies allows you to relatively quickly build a country villa in
 m. you will need +/- 8 acres of land.


 Payment
 And since
 If the family plans to live in a country house year-round, it is recommended
 Different materials will cost the builder completely different money. If stone and brick
 The site is leveled, freed from stumps and large plants, allocate space (preferably under
 Since a monolithic foundation can be excellent
 ).
). 
 Not the last role is played by a properly selected piece of land.

 In this case, lifting equipment will be required, since the blocks are very heavy. Then the whole structure is fastened together by pouring the solution into the grooves that are in each product.
  Also suitable for a wooden house. Such a base is made of wood or stone.
 It all depends on the desire and financial capabilities.
  You can build it yourself, saving on paying builders, which attracts many. In fact, in regions with high lumber prices, such a house will not bring significant savings. Yes, and you should choose a quality heater. Needs good ventilation. The only indisputable plus is that the house is relatively light and does not require excessive foundation costs.
  It was mainly done on country houses or outbuildings, but recently it has also appeared on residential elite houses.
  Does not absorb moisture. Durable (up to 100 years).
 You can order a construction team to perform some individual work, but after watching a video about what turnkey construction is, we can conclude that this is a good offer. In addition, if there are financial problems, different options for the cost of construction are possible, depending on the degree of readiness of the facility.
  An incorrectly chosen foundation may not withstand the load, and this threatens with additional costs for its repair and strengthening. It is at the design stage that the question of what the foundation of the future house will be is decided.
  The estimate indicates the type and quantity of material used.
 To do this, you need to calculate the total length of the strip foundation and divide the area of \u200b\u200bthe sole by the resulting value:
  For its device, sand, crushed stone, gravel, broken bricks are used. The height of the pillow is approximately 15 cm. When laying, the material must be watered all the time to eliminate internal voids.
  2 m is first poured, and then blocks are placed on it. With the use of blocks, the foundation is more reliable and faster built.
 It is better to use the second option and order ready-made concrete, as it is made by professionals, so all the necessary proportions are observed. In addition, it will reduce the labor intensity of construction work. The working life of concrete is 3 hours, so you need to have time to meet the time.
 The KievNovBud company can guarantee the high quality of fundamental works, which can be confirmed by finished objects that have been built for a long time and tested by time for reliability.
  They are divided mainly into project development, preparatory work, foundation construction and maintenance. Let’s consider each stage in detail in order to understand what types of work it implies.
  Naturally, the pegs need to be placed and the cord pulled from its inside and outside.
 The larger the estimated mass, the higher the brand of cement is taken. You can make a concrete solution both independently and buy it ready-made. It is necessary to lay the solution, like a pillow – in layers up to 20 centimeters thick. After laying, it is necessary to bayonet the mixture with a metal rod to prevent the formation of voids at the intersection of the reinforcement bars.
 The technology of a monolithic foundation is available to everyone, the main thing is to build the formwork correctly, as well as use cement of the appropriate brand. Consider the stages of building a monolithic foundation:
