Cottage kitchen extensions: Cottage extension ideas – 10 cute cottage additions
Cottage extension ideas – 10 cute cottage additions
Country is supported by its audience. When you purchase through links on our site, we may earn an affiliate commission. Here’s why you can trust us.
(Image credit: Oakwrights)
These cottage extension ideas will make these charming but sometimes space-challenged homes more conducive to modern living. A sensitive and well-thought through cottage addition can make the world of difference to the way you use your home, while also adding value.
However, it is vital to ensure that you do not compromise your cottage’s original charm, preserving fireplaces and rustic features. ‘Sometimes just adding on a very modest extension, such as filling in the side-return, and reconfiguring the room’s layout, can be transformative’ says Period Living editor, Melanie Griffiths.
So if you’re wondering where to start with designing a cottage extension, we’ve rounded up a host of ideas to get you started, from modern glass box extensions to traditional thatched designs.
See: Cottage decorating ideas – charming ways to get a characterful look
1. Opt for oak for a traditional and sensitive cottage addition
(Image credit: Future/Photoword LImited)
‘Extending a cottage with an oak frame has many advantages – not only does a green oak frame provide character, texture and an ageless charm, but it also suits most styles of cottage and is inherently flexible.’ says Merry Albright, creative director at Border Oak .
‘Oak framed extensions are also self supporting and so can be designed to sit against the host house without needing complicated or expensive “tying in” from a structural perspective. This can be crucial as load bearing or disrupting the structure of an older cottage can be a step into the unknown with significant cost implications.’
2. Create contrast with a modern glass box cottage extension
(Image credit: Fiona Walker-Arnott)
It is often assumed that cottage extensions should seamlessly blend in to the original. However, this is difficult to achieve and very rarely results in an invisible joining of old and new. Instead, it is becoming more popular, both for homeowners and planners, to opt for ultra-modern glazed designs that showcase how the property has evolved over time.
This stunning addition to a 400 year old cottage shows a clear separation between old and new. By replicating the architecture of the cottage’s gable end, this sleek, modern glazed design still pays homage to the original house’s elegance. Plus, as it is attached by a simple glazed link, it can also easily be removed in the future without impacting the historic home.
This feature was created by H&G’s sister brand, Period Living magazine
Subscribe to Period Living for more inspiration Period Living is the UK’s best-selling period homes magazine. A subscription provides you with all you need to know about caring for and improving a traditional house and garden.
(Image credit: Living Oak/Mark Hazeldine)
A two-story cottage extension is a more significant addition which may need permission before building works begins. However, it can completely transform your home providing an extra bedroom, ensuite or upstairs bathroom – all of which will add value to your cottage in the long run as well as making it a much more versatile space.
See: Cottage bedroom ideas – design inspiration for cozy restful spaces
4. Create a kitchen perfect for entertaining
(Image credit: Sola)
Cottage kitchens are renowned for being small, dark and unwelcoming, so transform yours into a bright and airy space with a simple cottage extension. If your kitchen faces the garden, extending outwards or into a side return is relatively straightforward and will make a huge difference to the usability of the space.
Adding floor to ceiling glazing and patio doors floods the space with light and will create an ever-changing feature wall as you look onto the garden outside.
For cottage kitchen ideas, don’t miss our inspiring image gallery.
(Image credit: David Salisbury)
You don’t need to have a huge garden to introduce a glazed extension to your home. This small yet striking orangery features and impressive Victorian-style domed roof lantern, which floods the room with natural light and makes a beautiful entrance to this home.
6. Make the most of a cottage garden with glazing
(Image credit: Oakwrights)
Adding a conservatory, orangery or garden room is a popular way to create more space in a home, and a suitable option for enlarging a wide range of properties. Often considered a more straightforward alternative to a typical cottage extension, a glazed addition can be completely separate or a fully open-plan, and can serve as a kitchen, living or dining area.
‘Is it in character with the host building and neighbouring area?’ says Karen Bell creative director at David Salisbury . ‘Is it proportionate to the host building and, where you are building on the boundary, does it adhere to the height restrictions. In my experience, if a design looks right then it will usually be viewed favourably by the planners.’
See: Cottage garden ideas – pretty ways to embrace rustic style outdoors
(Image credit: Apropos)
Modern in style, this glass-box linking cottage extension creates unity between the original 16th-century cottage and the more contemporary brick and wood outbuilding. The harmony between old and new is mirror through the décor and vintage pieces displayed in the linking room.
‘The trend for adding large areas of glass continues with the mix of old and new grabbing the attention’ says Ryan Schofield, managing director at Thames Valley Window Company.
See: Kitchen extension ideas – inspiration and expert design advice
8.
 Create a seamless cottage addition by matching materials
(Image credit: Future)
‘When your house was originally constructed, it was intended to be the finished article, perfectly placed next to the surrounding properties and garden. But living standards have evolved so dramatically, that extending can sometimes be the only way to secure a home’s future for decades, and hopefully centuries, to come,’ says Period Living editor, Melanie Griffiths.
Create a seamless addition by using the same materials and techniques for creating the new build that were used to construct your original home. You can hardly tell that this cottage was extended, but it provides valuable extra space.
9. Take in splendid views with a glazed cottage extension
(Image credit: Future/Jeremy Phillips)
The stunning views are one of the main attractions of buying a home in the countryside. Yet cottages also have modest-sized windows and so don’t make the most of the glorious surroundings. Adding a glazed extension not only floods the space with light but also offers panoramic views. Pick an aluminium design as it offers slim sight-lines, letting you make the most of the scenery, whatever the weather.
10. Consider adding a porch for a more welcoming entrance
(Image credit: Future)
Create a striking entrance for your home by adding a porch. This small extension creates a focal point to the front of your cottage while also adding an extra space, stopping shoes and dirt being traipsed into your home.
Be sure to opt for a design that complements your home. Here, it is nearly impossible to notice that this porch is a later addition, and the bargeboard and finals add a beautiful cottage flair.
See: Front porch ideas – pretty ways to create a strong first impression
Should I hire an architect for my cottage extension?
It is definitely a good idea to hire a skilled house designer or architect with experience of cottage extensions who will be able to look at your home and suggest layout and design ideas that might not have occurred to you previously.
They will also have experience of working with the local planning department and be familiar with all the rules and regulations, so will bring more than just architectural experience to the project.
You may think you can save money by coming up with a design yourself – and if you are adding a very modest extension you might make a success of it – but errors can be phenomenally expensive, so professionals are usually worth the cost.
Having graduated with a first class degree in English Literature four years ago, Holly started her career as a features writer and sub-editor at Period Living magazine, Homes & Gardens’ sister title. Working on Period Living brought with it insight into the complexities of owning and caring for period homes, from interior decorating through to choosing the right windows and the challenges of extending. This has led to a passion for traditional interiors, particularly the country-look. Writing for the Homes & Gardens website as a content editor, alongside regular features for Period Living and Country Homes & Interiors magazines, has enabled her to broaden her writing to incorporate her interests in gardening, wildlife and nature.
15 period home kitchen extensions
Real Homes is supported by its audience. When you purchase through links on our site, we may earn an affiliate commission. Here’s why you can trust us.
(Image credit: Douglas Gibb)
Join our newsletter
Get the best home decor ideas, DIY advice and project inspiration straight to your inbox!
Thank you for signing up to Realhomes. You will receive a verification email shortly.
There was a problem. Please refresh the page and try again.
By submitting your information you agree to the Terms & Conditions and Privacy Policy and are aged 16 or over.
Looking for period home kitchen extensions to inspire your own project? If your current kitchen simply isn’t big enough to include all the elements you would like, then adding an authentic, period-style kitchen extension could give enough space to create the perfect heart of the home.
As well as being practical, it is critical that the design enhances the look of your house. This could mean that your extension is traditional, and in-keeping with the style and materials of the original architecture. Alternatively, it could mean adding a contemporary, minimalist, light-filled addition that will show how your property has evolved over time. Don’t forget, that if single storey and to the rear of the property, your kitchen extension may not need planning permission.
We’ve rounded up a selection of our favourite period home kitchen extension designs below to offer plenty of inspiration when coming up with your own design.
Find out even more practical advice and more kitchen ideas on our design page.
1. A period kitchen extension for a farmworker’s cottage
(Image credit: Future/Darren Chung)
- Planning your kitchen extension from scratch? Check our guide for practical advice and expert guidance.
When Nick Wigg and wife Jenny Larvin moved into this three-bedroom former farmworker’s cottage near Uttoxeter, Staffordshire their first task was the demolition of an ugly 1960s block and render ground-floor bathroom extension at the back of the house.
Elizabeth’s plans included a stone kitchen extension, breakfast room, porch and pantry, with an extra bedroom on the first floor and a new bathroom upstairs in place of one of the existing bedrooms. Nick built all the kitchen cabinets to Jenny’s designs, drawing out their positions on the architect’s plans for the extension. By reusing the stones and using as many recycled or freecycled materials as possible, they significantly reduced the carbon footprint of the building as well as bringing down the cost of the extension.
Read more about how bring down the cost of your own extension here.
(Image credit: Future/Darren Chung)
2. A period home kitchen extensions makes this Georgian kitchen perfect for a family of five
(Image credit: Douglas Gibb)
When Kerry and Thomas Bell first saw the cottage it was in poor condition. ‘It had been a council property for many years, and hadn’t been updated in the meantime,’ says Kerry. ‘Inside, it was a garish mixture of blue and yellow, and the living room and kitchen were tiny’. It was here that the plans began for a complete renovation of the home.
The kitchen, which is in an 1850’s extension, has doubled in size since the couple knocked down the wall to the dining room. Kerry lined the walls with tongue-and-groove panelling and designed the open shelving, adding wrought-iron hooks from Screwfix. Simple cream kitchen cabinets from Howdens are teamed with two inherited wooden dressers for additional storage.
3. An open plan remodel of a Victorian villa
(Image credit: Malcom Menzies)
With its open-plan kitchen, practical layout and a studio in the garden, this Victorian villa is the ideal place for ceramicist Gemma Wightman to combine work and family life. The kitchen-diner extension was one of the home’s main selling points. The owner had tried to sell it before, but took it off the market and in the meantime had completed this conservatory-style kitchen extension and loft conversion – lovely light spaces, or at least they were once Gemma had painted over the dark walls with some soft tones of white and grey.
‘The kitchen was dominated by a massive island, in a dark-mahogany colour, that took up most of the room,’ she says. But conscious of her budget and keen to upcycle, Gemma got a local carpenter to cut the island in half and remodel it into the run of units now fitted around the Aga and window, and make doors to match the existing cupboards around the sink. A lick of paint across all the units and some new pale grey quartz worktops, and the kitchen was transformed for family life.
4. Small extension transforms kitchen into a useable space
(Image credit: Malcolm Menzies)
Extending just two metres into the garden, and removing a cupboard and some boxed-in pipework, has improved the flow of the kitchen. Rococo wanted the kitchen to be family friendly. The previous owners had completed a side-return extension to the kitchen, but the only way into the room was through the old dining room and down a couple of steps. Rococo had a cupboard removed to allow for a new door to the kitchen from the hall, and the result is a much more useable space.
5. Glazed extension makes the most of stunning landscape setting
The owners set out to renovate the house and convert its barn as sympathetically as possible to its 18th Century origins while adhering to modern energy conservation requirements.
(Image credit: Jeremy Phillips)
Proving that contemporary kitchen extensions can enhance period buildings, the design clever glass-box design by Paul Crosby of Crosby Granger Architects ensures that the room is not visible from the road, but gives views across the spectacular Kentmere Valley.
The contemporary space at the back of the house replaces an incongruous 1980s kitchen extension. Andrew explains the thinking behind the new room: ‘Old photos of the house showed that there was always some sort of extension here. This simple, single storey reveals the old rear wall of the building.’
Find out how to plan and design a glass extension in our guide.
6. An oak frame period home kitchen extension to a Victorian cottage
Located in a conservation area, this Victorian semi-detached cottage was completely renovated, with a green oak frame extension added to the ground floor to increase the living space. As the cottage is next to the village church and surrounded by listed buildings, natural materials such as oak, slate and weatherboard have been used as they will weather softly over time to ensure the extension is a sensitive addition.
A glazed wall and roof lights overhead ensure there’s plenty of natural light – if light is something that’s important to you, have a look at our light filled extension design ideas gallery. Find out more about building an oak frame extension in our guide.
A similar oak frame kit would cost in the region of £20,000 at Border Oak
7. A bespoke orangery kitchen-diner for a listed home
Keen to create an open-plan space where the whole family could cook and eat together, the owners of this Grade II-listed detached property chose to add a traditional orangery-style kitchen extension to their home.
The 7m x 6.5m space features two glazed roof lanterns above the kitchen and dining areas, solid wall sections to accommodate the kitchen units and elegant arched doors leading out to the adjoining patio area. The timber cladding to the roof structure is painted in Putty for an elegant, traditional feel.
Use our guide to the best orangery ideas to help you plan your orangery.
Similar orangery-style kitchen extensions start from £40,000 at Vale Garden Houses
8. A Victorian open-plan extension with corner glazing
Even a small kitchen extension to a period home can create enough space for a more flexible open-plan kitchen, as in this Victorian house in east London. The simple glazed addition overlooking the garden is the ideal size for a family dining area alongside the bespoke kitchen.
The Classic Painted kitchen in Farrow & Ball’s Teresa’s Green has been combined with a Leather Tigris Sand composite worktop and whole-stave oak worktop on the island that echoes the wooden design of the dining table.
The kitchen is by Roundhouse Designs , with prices starting from £35,000
9.
 A practical kitchen in a glazed extension
Though typically used to provide an additional living area, a conservatory can provide a wide variety of other functions. This aluminium and glass structure from Marston & Langinger incorporates both a kitchen and dining area, and floor-to-ceiling glazing creates a good flow between indoors and out, making the most of the lovely views. The large mirror on the back wall also creates the illusion of even more space and light.
Find out how to add a conservatory or sunroom with our helpful guide.
Glazed extension from Marston and Langinger provides an ideal kitchen and dining area – perfect for entertaining
(Image credit: Marston and Langinger)
10. An Arts and Crafts home reinvented to make the most of light and space
(Image credit: James Balston)
In large period home kitchen extensions, a central kitchen island can offer a practical work area as well as creating a focal point in the space.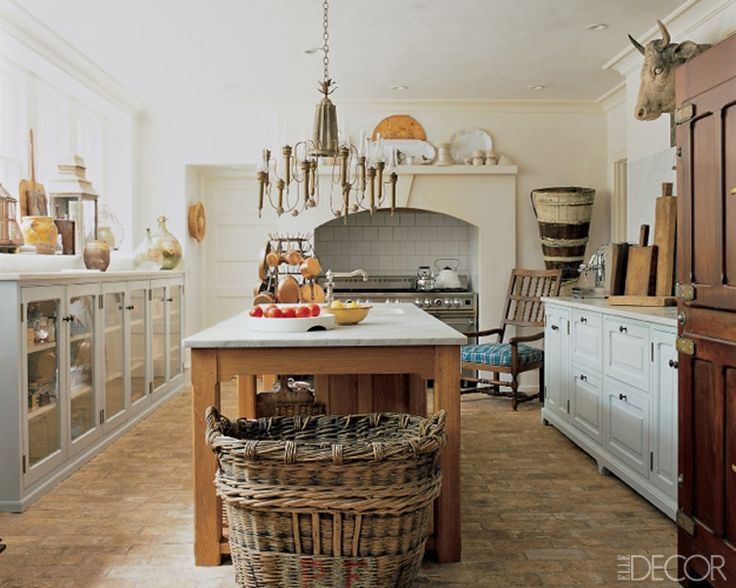 Opting for a curved design helps to soften the overall scheme, with the overhang at one end of the island making the perfect spot for a breakfast bar. The solid oak cabinetry has been teamed with sleek worktops creating an eye-catching effect.
Use our guide to the best types of kitchen worktop to help you choose the right ones for your new kitchen.
11. A modern extension floods this Victorian kitchen with light
(Image credit: Brent Darby)
Adding a period home kitchen extension that brings in plenty of natural light opens up the possibility of choosing bolder colours on your units without the worry of the space feeling dark and enclosed.
A large Crittall window and two skylights flood the extended kitchen come dining space with light. Reclaimed parquet flooring also helps to zone the cooking and dining areas, and also brings extra warmth to the space.
A window mimicking the original style was added to the extension to complement the house’s period character, while mix-and-match Mid-century and traditional chairs create a relaxed, contemporary feel.
Although a scaled-back version of the original design, the finished space has transformed family life.
12. A VICTORIAN OPEN-PLAN EXTENSION WITH CORNER GLAZING
The kitchen is by Roundhouse Designs , with prices starting from £35,000
(Image credit: Roundhouse)
Even a small kitchen extension to a period home can create enough space for a more flexible open-plan kitchen, as in this Victorian house in east London. The simple glazed addition overlooking the garden is the ideal size for a family dining area alongside the bespoke kitchen.
The Classic Painted kitchen in Farrow & Ball’s Teresa’s Green has been combined with a Leather Tigris Sand composite worktop and whole-stave oak worktop on the island that echoes the wooden design of the dining table.
Find out more about designing a small kitchen in our guide.
13. The benefits of bi-folds in a kitchen extension
Expect to pay from £18,000 for a similar kitchen at Rencraft
(Image credit: Rencraft)
Adding bi-fold doors to your period home kitchen extension is the ideal way to join your new space to the garden area or terrace.
In this Edwardian property, the owners opted for a hand-painted design with an kitchen island unit in a dark blue that contrasts beautifully with the paler shade used for the cupboards around the walls, the Corian worktops and the wood flooring. A secret door, which you could be forgiven for thinking opens into a larder cupboard, actually provides access to a utility room.
To create a seamless transition between the spaces, opt for the same flooring indoors and out, though make sure you choose a textured, non-slip design for the exterior area. Find out more about choosing the best kitchen flooring in our guide.
14. A colourful oak frame country kitchen extension
Prices for a similar kitchen start from £30,000 at Murray & Murray
Traditional oak frame kitchen extensions are ideal for period properties as the exposed oak beams will add instant warmth and character to a space, as shown in this Grade B-listed steading conversion in Scotland. Complementing the timber used for the structural framework, the wooden kitchen features matching solid oak worktops, a breakfast bar and dining table, with the colourful units painted in a mixture of French Gray , Brinjal and Green Smoke , all from Farrow & Ball.
Find out more about adding an oak frame extension to your home.
15. An industrial inspired period home kitchen extension
(Image credit: Neptune)
In large period home kitchen extensions, a central kitchen island can offer a practical work area as well as creating a focal point in the space. Opting for a curved design helps to soften the overall scheme, with the overhang at one end of the island making the perfect spot for a breakfast bar. The solid oak cabinetry has been teamed with sleek worktops creating an eye-catching effect.
Use our guide to the best types of kitchen worktop to help you choose the right ones for your new kitchen.
More extension ideas:
- How to design a single storey extension
- How to design the perfect kitchen extension
- How to create a traditional family kitchen
Beth first started working on Real Homes as a sub-editor over 15 years ago. Since then she has worked on 4Homes, Grand Designs and as a freelancer, before returning to Real Homes for the third time. She is Acting Editor on the magazine and always has a makeover project of some kind on the go.
20 beautiful and achievable kitchen extension ideas
/
Fifi McGee
Beautiful and achievable kitchen extension ideas – Credit: @thelondonhomefix
Our UK home renovation community is buzzing, and great kitchen extension ideas are flowing like water! If you haven’t read why we decided to ditch our kitchen extension for a more modest build it could give you some real food for thought.
Being big on renovations that doesn’t stop us checking out kitchen extension ideas all the time for our clients and our community. Plus, so many members of our renovation course and Home Design Lab online courses are undertaking kitchen extensions. We’re seeing their plans, and wow are they great! We’re particularly inspired by other home renovators who are branching out of house boundaries with incredible kitchen extensions to maximise space and dining decor opportunities.
If you’re starting your kitchen extension soon, you might want to check out the advice that a Reno Club member shared the other day, it’s another piece of pesky admin to know about!
idea for Period beams in kitchen extension – IMAGE: @lottieshousebuild
1. Add period character with new beams
New kitchen extensions are the perfect opportunity to play with old period features such as the beams in this ceiling structure. Whilst the pitched roof itself embraces modern Velux windows, the character-filled exposed wood beams dictate the divine decor for the entire room without making the overall space feel too enclosed.
As a bonus, this kind of feature also makes for a great styling opportunity with lamps and dried foliage so work with what you’ve got. Styling can often be forgotten and left until the kitchen extension is finished, but we advise our Home Design Lab students to work on their styling plans as early as possible – it shouldn’t be just an afterthought and the course is showing people why and how.
Glass side return idea in a kitchen extension idea – IMAGE: @mycasainteriors
2. A classic side return kitchen extension
Here’s a social space if ever we’ve seen one! Maximising the space they’ve got to work with, this Richmond home has extended sideways with an angled glass roof so light streams into the multi-functional kitchen area.
The combination of a buttery yellow casual sofa and luscious foliage balances out a classic kitchen extension design in contrasting white and midnight blue tones, making the whole room feel design-forward yet relaxed. While they’ve got plenty of room to work with, this could absolutely be achieved if you have a narrower space, minimising the kitchen island and opting for a smaller lounge space. It’s so hard to visualise how something like a kitchen extension will look once it’s built but there are very clear and simple steps you can take to visualise space. Our online courses and tools go into detail on how to visualise options before investing, it’s such a crucial part to getting your renovation right.
idea for a Kitchen extension with a loft lantern – IMAGE: @littleharrowdenehouse
3. Use a roof lantern for added extension decor
When it comes to picking the right natural light source for your kitchen extension, a roof lantern can be a gorgeous way of letting light in through a pitched structure. The angles involved here elevate an ordinary ceiling shape and also make for an ideal styling opportunity such as the pendant lighting and rustic dried foliage used in this kitchen extension.
We love how the centralised light source matched the kitchen island position perfectly for optimum working space.
idea for glass-filled kitchen extension – IMAGE: @hollins.house
4. Open the kitchen up with glass on multiple sides
Light and airy are both top priorities when it comes to kitchen extensions to make sure your new space adds as much as possible to your existing kitchen. This home has capitalised on the privacy of the side lane as well as the gorgeous stone wall and tall trees so that the extension almost feels like it’s floating with all the outside elements.
Using glass in the skylights, as a whole side wall and in full-width windows works to brilliant effect here. This idea can also work beautifully with period kitchens to give a visual twist.
Long and narrow layout idea in a kitchen extension – IMAGE: @house. by.the.park
5. Go long on a narrow rear kitchen extension
In layouts where you’re looking to maintain as much garden space as possible whilst still extending to create your dream kitchen, going for a narrow extension shape can give you the best of both worlds.
Choosing a long, narrow shape for your kitchen extension layout can also be really handy in maximising cabinet space and squeezing in your integrated white goods without pesky corners causing practicality issues. We love how the roof angled down slightly on the end to create a softer space with no dark corners to be seen.
L-shaped kitchen extension idea with dining area – IMAGE: @thenewfrontwall
6. L-shaped kitchen diner extension
If you love the idea of having an island and a dining table in your kitchen extension, could you opt for an L-shaped design? Jo of @thenewfrontwall has optimised natural light sources and chosen a delectable countryside-inspired wallpaper print to surround her dining area.
She’s combined this with a luscious leafy wall panel and natural wood flooring from the kitchen all the way out into the dining extension to carry the country theme through. Bringing the outdoors inside is a marvellous way of welcoming guests into your entertaining space. We also really appreciate the wall radiator, because comfort comes first in a home extension.
Kitchen extension with supporting wall as feature idea – IMAGE: @thewickerpighome
7. Tile a supporting wall for an unusual splash back
Depending on the structure of your home, you might find yourself in the situation where keeping a supporting wall is a necessary part of your kitchen extension. And that needn’t detract from your space at all. We love how this home has the supporting pillar with a tiled splash back to make the basin area even more practical and it adds so much more to the space in terms of styling too. Hanging storage is also a super idea for extra wall space.
Plan your kitchen extension with me! Free 3 day email series
-
How to avoid common (and expensive!) design mistakes
-
I’ll show you the easy technique I use to bring cohesion
-
…and you’ll learn the 3 curveballs to watch out for when you’re designing your room!
idea for a Large skylight in a kitchen extension – Image: @thelondonhomefix
8. Supersize the light in your kitchen extension
A kitchen extension is the perfect opportunity to open up your living space beyond the perimeter of the same old four walls. In this light-filled masterpiece, Audrey and Mike have opted for a supersized skylight with big large sliding doors. They’ve reflected the airy feel in kitchen decor choices, working with light-toned flooring, pastel blue woodwork and crisp white countertops complimented by gold hardware. The decor and furniture ideas here can be replicated in kitchens big and small. A light colour palette can make a world of difference in terms of how big a space feels. If you’re looking for kitchen ideas on a budget, colour works wonders.
idea to incorporate a supporting beam in a kitchen extension – IMAGE: @house_on_the_crescent
9. Make a feature out of a supporting beam
Structural necessities needn’t be a negative part of your kitchen extension. This home has embraced the steel girder both as a visual anchor for the kitchen island but also to coordinate the colour scheme and decor. No matter what your style is, you can always work practical features into something aesthetically pleasing and make the most of what you’ve got. After all, the things that make your kitchen extension unique should be valued.
Kitchen extension idea with bifold doors – IMAGE: @white_location
10. Bifold doors transform the size and feel of your extension
Sometimes, bigger really is better. Bifold doors can totally transform a kitchen extension as you’re not only extending structurally but they open the space up visually too. We recommended them in our post about semi detached extension ideas but any property benefits from them – from terraced to detached. Weather permitting, you can virtually extend your kitchen into your garden by folding the doors back and therefore benefitting from the joys of nature too. Even when it’s too chilly to open them up, you’ve got the visual extension and the beauty of the garden in the winter months brought into your social hub.
idea Bare bricks in a kitchen extension – IMAGE: @thelondonhomefix
11.
 Keep a bare brick finish on one wall to change it up
Part of the key to a really great extension is how it works with your existing structure. Whether you want to contrast materials or blend them seamlessly, keeping one wall with a bare brick finish can be an interesting way of working different textures into your space and serves as a reminder to the structural elements of your new kitchen extension.
This idea works particularly well when coordinating with other textured elements such as a wood floor or thriving greenery.
Get help with your project with our renovation online course
↓
Idea for a kitchen island in an extension – IMAGE: @katyebh
12. A large, square kitchen extension design
Katy’s instagram is one of our favourite sources of home decor ideas at the moment. Her Berkshire kitchen decor channels refined country cottage elegance which pairs perfectly with the pitched roof of her kitchen extension. Note how the sloping ceilings emulate that intimate cottage feel. Carrying the cabinet colour palette through to the dining chairs and dresser ties the large space together on both sides, emphasising the cosiness of her kitchen diner extension. This renovation goes to show just how much of an impact the shape of an extension has on the room it creates, decor aside. If you’re looking for kitchen diner ideas, make sure to take a peak.
Window and skylight idea for a kitchen extension – IMAGE: @brush_up_dress_down
13. Add windows wherever there is space
Sometimes opening your space up with windows can make such a unique difference to your kitchen extension. This home has squeezed in a floor to ceiling window in the corner and another little rectangular window above the shelf on the adjoining wall which light streams through in that golden time of day. What a beautiful way to play with windows and let in extra natural light.
We really like how the shiny kitchen island countertop amplifies the extra light and the shades here compliment soft, natural lighting to make it all work beautifully.
kitchen extension idea for a pitched roof – IMAGE: @bungalow_fifty8
14. An eclectic, pitched roof kitchen diner extension
Welcome to interior decor trend mix and match heaven! We see a gorgeous Belfast sink, divine industrial shelf next to the exposed brick feature wall, some delectably touchable textiles, thriving houseplants and dark wood tones. Rachel’s kitchen diner extension is oh so inviting and ultimately cosy. We love the new take on extension light sources where she’s chosen to pop windows into the spare space between eaves and and functional kitchen space. Very clever. The extra brightness has allowed her to play with darker decor tones and accessories in abundance. Keep scrolling for more extended diner kitchen ideas…
Idea for kitchen extension with matched materials – IMAGE: @house_of_capes
15.
 Match materials for synchronicity with your extension
Regardless of your vision for interior decor when thinking about how to plan a kitchen, it seriously pays off to coordinate the material you use outside, especially if you’re going for more than one extension on your overall property. This home uses a brick and metal scheme perfectly and carries it both through into the garden and up into the loft extension for maximum impact.
You can take this idea a step further by coordinate the interior decor in line with the exterior too.
a corner-shaped kitchen extension idea – IMAGE: @archer.t.j
16. A kitchen extension on a corner brings amazing zoning
In her simply stunning Shrewsbury home, Tina has kept the kitchen in the main house structure and worked the breakfast bar around into the extension which zones the areas off nicely. Moving through, she set up the dining table in a communal social space in the heart of the extension opening out through supersized sliding doors onto a spacious garden. Decor wise, she’s meshing chic rustic pieces with luscious textiles and striking wall prints in every spare space but sticking with clean white walls and a uniform floor throughout. Her home, as a whole, is positively bursting with decor ideas! We love it!
Glass side kitchen extension – IMAGE: @harvey_home_eclectic
17. Make light of extending both ways by using glass
This home has gone for the double whammy of extending their kitchen both to the read and to the side and to great effect. Whilst this can often detract from natural light in the existing space, they have combatted it tactfully by installing large-scale windows into the walls, roofs and as an exterior Crittall-style door feature.
Coordinating the materials you use for each of these glass features can really tie the kitchen extension together and we love how the panelling on the side wall amplifies the shapes above it.
Crittall door ideas in a kitchen extension – IMAGE: @fallowgrey
18. Install a Crittall door kitchen extension
This is another renovator to take huge home inspiration from. The possibilities are endless with a standard rear extension as Emily proves. Emily has combined classic Crittall doors with carefully placed overhead skylights to create a warm yet open space. Continuing the tonal wood panelling through from kitchen cabinetry to a panel-backed dining bench, she’s working with organic timber and slightly darker painted tones but balancing the palette out with simple prints and splashes of brilliant white. Extra points for the brushed metal hardware, a superb way to keep light bouncing around the room from the extension inwards.
Kitchen extension idea for stone lovers – IMAGE: @jade. doutch
19. A stone lovers kitchen diner extension
Welcome to a gloriously rustic and raw kitchen diner extension renovation. Jade is embracing the bare bones of her original structure by making features of drystone pillars and bare wood beams. Working with that, she’s maximised the vibe by bringing in lots of industrial wood and metal surfaces, all ties together with sumptuously dark cabinetry and a cosy Belfast sink.
The Scandi colour choices are reflected throughout her gorgeous home, giving her so much potential to work with softer highlights like textiles and lighting. Speaking of lighting, look closely at the electrical layout in this room. It’s got a great mix of task and overhead lighting which likely creates a lot of variable levels of light to play with depending on the atmosphere you want to create. Genius!
Idea for a double storey extension with a kitchen – IMAGE: @joatnumber26
20.
 A double storey extension
Last but absolutely not least, we’re pleased to introduce you to the ultimate double storey home extension – how beautiful is this?! Jo has built out, up and to the side to create the most social of spaces. She’s revamped the existing kitchen space, taken the dining area into a glass cocoon on the side and left plenty of space for a lounge looking onto the garden. We’re big fans of the exposed brick wall and parquet flooring. And take a look at that delicious dining table, spot any similarities? 😉
So, what do you think? Which one would you go for? Or do you have any special shapes, structural necessities or design complications to work around? How have you made the most of your unique property? We’d love to hear more about your kitchen extension so join the conversation!
Need help with your kitchen extension?
Join my free 3 day email masterclass and learn:
-
How to nail your renovation layouts
-
The secret to a cohesive home (it’s so easy your jaw will drop)
-
How to visualise your decisions + prevent costly mistakes 😉
Other posts you might like
32 Kitchen extension ideas – to maximise the potential of your space
Ideal Home Newsletter
The Home Of Great Ideas For More Than 100 Years
Thank you for signing up to . You will receive a verification email shortly.
There was a problem. Please refresh the page and try again.
By submitting your information you agree to the Terms & Conditions and Privacy Policy and are aged 16 or over.
Looking for beautiful kitchen extension ideas? Our showcase of light and bright kitchen extension ideas will inspire and help you create your perfect scheme, transforming a cramped layout into an inviting modern space for cooking, dining and family time.
One of the most popular building projects for homeowners, the kitchen extension can create a big open-plan living space for cooking, dining and lounging.
A must-have in new properties and one of the top remodelling projects in period homes, the generous open-plan kitchen is now the epicentre for modern living. There are several ways to scale-up space, from combining adjoining rooms or adding a conservatory to building a completely new room or digging out the basement. Be under no illusions, all options require time and money but, once the dust has settled, it’s a decision many celebrate.
Do you need kitchen extension ideas and planning advice? READ: Kitchen extensions – how to design, plan and cost your dream space
Kitchen extension ideas
A kitchen extension has the potential to totally transform your home. But it’s a big expense, and one that requires a lot of thought and consideration. As well as boosting your home’s floor space, a cleverly-conceived project also has the potential to increase your home’s resale value – making it a wise investment.
1. Create a thoughtful layout
(Image credit: Studio Varey/Alexandria Hall)
Architects Studio Varey transformed this charming semi-detached North London home with a sleek new kitchen extension. A newly open-plan ground floor houses a modern kitchen /dining space, extending out into the back garden, that takes inspiration from orangery ideas with its large skylight.
‘The new space is filled with natural light from both the large skylight positioned over the dining table, as well as the expansive glass doors that allow this family to bring the outside in and maximise the home’s connection to the garden’ say the design experts. The kitchen design features composite countertops and a large run of tall cupboards, which have created over 50 per cent more usable storage, a key request for this family home.
2. Form a relationship with the outside
(Image credit: Future PLC/Chris Snook)
The kitchen is the ideal place to add a glass extension with folding doors to open the indoor space to the outdoors. This form of extension is ideal for preventing a small kitchen from feeling enclosed. This Edwardian house features a modern rear extension which allows the kitchen-dining area to seamlessly flow into the beautiful garden beyond.
3. Envision how the space is best used
(Image credit: Future PLC/Colin Poole)
The main objective with this kitchen extension was to create a spacious kitchen with the island and dining table taking centre stage. ‘We used Resi , an architecture practice, to secure planning permission,’ explains this homeowner. ‘We produced several different layouts on graph paper, detailing the dimensions for the space needed – for things like walking between the island and kitchen units. And what might be required for the seating area.’
‘It was a fairly straightforward design using planed structural timber, double-glazed panels and power-coated aluminium capping. In fact, it was probably cheaper than a slate and Velux alternative and allows plenty of light to flood in.’ The combination of a glazed pitch roof and large steel-style windows and doors provide a bright, airy feel to the kitchen.
4. Mix materials
(Image credit: Future PLC/Colin Poole)
Use a mix of materials to get the best from your kitchen extension. Allow a brick extension to extend the space, retaining structure and warmth within the framework. But pair the brick with steel framed doors that offer an airy feel, allowing the outside to integrate with the indoor space. Further use of glass with a roof lantern adds a contemporary edge to the design, that floods the main kitchen area with natural light.
5. Create a multi-purpose space
(Image credit: Future PLC/David Giles)
At the planning stages work with your architect to create a space that can provide the perfect balance for your lifestyle. A smart kitchen extension that can seamlessly integrate cooking, dining and socialising is a great way to use the space – especially when working from a small floor plan. Using larger furniture pieces to help create the different zones is an ideal solution, to save on structural divisions
6. Make the walls retract
(Image credit: Future PLC)
Consider an extension that allows a seamless fusion of outside and inside dwellings. Sliding doors, which all but disappear, are the best way to completely open the space up. Making the new configuration a welcome extension of both the kitchen and the garden. Aside from having the freedom to unit the spaces in summer, in winter the glass structure allows maximum light capacity – to keep the space feeling open and airy, ideal in smaller kitchens.
7. Double the size by repurposing a side return
(Image credit: Future PLC/Veronica Rodriguez)
Use redundant space from a side return to create extra space for an open-plan kitchen and dining area. The extra footage will allow adequate room for a more comfortable living arrangement. The extension also opens up the possibility to put in skylights and doors across the back to create a further sense of openness.
8. Use glass to balance the light
(Image credit: Future PLC/Polly Eltes)
This period village house is enhanced by a contemporary glass extension and modern interior. Extending out a few metres beyond the boundary wall is enough to completely open the ground floor space. Where the garden is at a higher level to the ground floor the use of glass across the entire rear extension helps to ensure the sunken space isn’t dark and enclosed.
9. Adapt the space to fit the new normal
(Image credit: Future PLC)
Our homes have never had to work harder to incorporate our growing needs. Kitchens have always been considered the heart of the home – and in 2021 they are very much so, as they become home offices, restaurants, classrooms and more. Not to say how we live now will stay, but designers are most definitely sensing this will influence how we use the space in the future. An extension can pave the way for a reconfigured layout that complements your ‘new normal’ lifestyle.
10. Use extended glass panels to let the light in
(Image credit: Future PLC/Colin Poole)
Lose a wall by installing glass panels and folding/sliding doors for a space that opens up completely to the garden beyond. This smart extension doesn’t go out further, it uses the space vertically to flood the room and incorporate the garden.
Pick and position wall and base units by thinking about the outside space too. Here the honeyed tones cabinetry helps to draw the eye up and out, while the lower cupboards are grounded by a darker hue. All the design aspects work in tandem to open up the space, without having to make a larger footprint for extending. A high traffic throughway will need a hardwearing floor so choose a durable dark-tiled version.
11. Unify the ground floor through thoughtful decor
(Image credit: Future PLC/Polly Eltes)
Extend your kitchen thoughtfully by extending your decor from room to room, so one living space flows seamlessly through to the next. This elegant open-plan kitchen space uses a coordinating colour palette with the sitting room at the front of the house. Along with light fittings and flooring choices that feel at harmony with a living room decor.
12. Put safety first when thinking of the layout
(Image credit: Future PLC/Chris Snook)
Essential if you have small children in the house, the most efficient and safest layout will route traffic away from your oven and hob to ensure kids aren’t likely to get themselves under your feet and into danger when you’re moving hot pans around the room. Make the fridge accessible but don’t put it at the very heart of the room. Try placing it to one side, nearest the entrance to the room, so children can help themselves to drinks without venturing into the cooking space.
13. Incorporate structural elements
(Image credit: Future PLC)
Instead of trying to hide structural steel beams, turn them into part of the design. In this instance the black patio window frames and black steel beam bring balance and interest to this simple white kitchen.
14. Create a viewing room
(Image credit: Future PLC/Brent Darby)
If you have extended into your garden space, make the most of lovely views. Let the windows be the star of your decorating scheme and wherever possible place furniture where it can oversee your outdoor space.
Keep a decorating scheme pared back, and simple so the view is always foremost. Go for matching neutrals across the board with simple decorative touches, a reclaimed table and eclectic chairs. Use glass wall lights for added character at night time.
15. Be brave with clashing colour
(Image credit: Future PLC/Lizzie Orme)
Your newly reconfigured kitchen is the ideal place to use colour. But be sure to thinking about the long-life factor. Love pink, the colour of the moment but scared it will date quickly? Why not experiment with a small section of the wall above the tiles? After all, it’s not a huge deal if you decide to change it at a later date. The key is using a clever combination of materials to create a colour clash. Dilute block colour in a kitchen by separating bold shades with patterned tiles, different shades on cabinets and through accessories.
16. Make storage attractive and accessible
(Image credit: Future PLC/Colin Poole)
Don’t want to waste time rummaging for things in the backs of cupboards? Create an open shelving system, like the one in this U-shaped kitchen idea, and you’ll have utensils, cookery books and other items that you frequently use to hand when you need them.
17. Welcome warmth with brick
(Image credit: Future PLC/David Parmiter)
If you’ve built a new wall or relocated one as part of your extension leaving the bricks exposed on the inside will give your kitchen character and warmth. Reclaimed bricks look best as the irregularity of colour and texture will pick up other tones in your cabinetry and flooring.
18. Extend out with a side return
(Image credit: Future PLC/David Giles)
Extending out to the side is a good option if you live in a semi-detached or detached home, as it doesn’t mean using garden space. You may lose side access to your garden though, and planning permission can be trickier as it will be determined by how close you are to you neighbour’s boundary.
For period terraced homes the path or back garden to the side of a kitchen at the rear, called the side return can be extended into to create a kitchen that runs the full width of the house. Remember, though, to consider how light will then reach the rooms the new space will extend over. You can also combine rear and side extensions for a stunning wrap-around kitchen.
19. Consolidate storage
(Image credit: Future PLC/Richard Gadsby)
Plan your kitchen extension storage with care. If you have the space, it pays to keep cupboards to a specified area rather than have them dotted all around.
In this impressive extension, base and wall units have been banked together on a single wall and long, full-width island. This not only keeps everything close to hand at the busy, business end of the space, but allows you to co-ordinate your colour scheme – in this case, a dark-grey matt paint finish.
Want more kitchen ideas? READ: Kitchen cabinets – what to look for when buying your units
20. Use a peninsula as a divider
(Image credit: Future PLC/James French)
Define the different functions of your extension with well placed units. If you have extended out into your garden from the back wall of your house, the line of the old wall will quite often make a natural dividing point for the new extension.
Here, a rigid steel joist and window mark the spot. The worktop below houses a sink, a couple of cupboards and a mini breakfast bar and divides the working kitchen from the dining and sitting area overlooking the garden.
21. Consider glazed doors
(Image credit: Future PLC/James Merrell)
In larger extensions with high ceilings you may feel you need more than furniture to divide up an open-plan space. These full-height sliding glazed doors are a revelation, adding smart, defined verticals to the design and marking a change of function between kitchen and living areas without screening anything from view.
Low-hanging pendants and fabulously tall storage emphasise the height of this space, with cornflower blue paintwork and slate wall tiles uniting the decorative elements.
22. Build in, build out
(Image credit: Future PLC/Amanda Turner)
Enjoy the freedom to fit out a room from scratch. Plan your new extension carefully and in a perfect world you will end up with a room that balances practicality and beauty.
Every appliance and every ounce of storage will occupy its ideal spot. This kitchen uses a false wall to house built-in ovens, open shelving and upright and overhead cupboards, while the hob, sink, wine cooler and supersized drawers have been incorporated into a stand-alone island.
Looking for more kitchen decor inspiration? READ: Kitchen lighting – everything you need to know
23. Unite a multifunctional space with materials
(Image credit: Future PLC/Alistair Nicholls)
Use a single material throughout an extended space to keep the feel orderly, contained and open. This extension features a country kitchen with breakfast bar, a seating area and separate dining space.
Decoratively, this could be a messy arrangement, but the use of wood throughout brings its own settled order. From the fitted shelves and larder unit at the back of the room, through to the impressive breakfast bar at the centre and out to the low coffee table, farmhouse dining table and mismatched chairs inspired by shabby chic decorating ideas, the warm wood tones unite the scheme. Pops of vibrant colour on soft furnishings and ceramics to add to the fun.
24. Seek out and follow the light
(Image credit: Future PLC/Paul Raeside)
In a kitchen extension, position a dining table where the maximum light falls. In this space, which lacks conventional windows, roof lights bring drama and atmosphere to the table. An adjustable, wall-hung pivot light adds a modern touch.
Look for furniture that fits the space you have as exactly as possible. This table is the width of two place settings and no more, allows room for chairs to move in and out and is the perfect length to make full use of the room’s dimensions.
25. Unify with a theme
(Image credit: Future PLC/Colin Poole)
Integrate your extended space by using a single decorating scheme throughout. Pick calm, soothing and co-ordinating colours that will lift and lighten the feel. For a fresh, coastal vibe, go for a powder blue backdrop. Match woodwork and cabinetry with cream Shaker-style doors for a sense of continuity – in this space, built-in cupboard doors are painted to match the units. In a similar way, use oak for worktops, tabletops and seats and blue striped fabric for seat pads and kitchen linen.
26.
 Let architecture lead function
(Image credit: Future PLC/David Merewether)
Consider the features of a building when designing your kitchen space, whether you are extending into a side return or looking for bungalow extension ideas.
Set aside the space under a glazed roof for dining – this space also has a square bay, perfect for enjoying garden views – and keep the original space for more functional tasks, such as cooking and food preparation.
Choose a cream palette to link the spaces together and warm up with oak worktops and a matching butcher’s block.
27. Adopt multifunction living
(Image credit: Future PLC/Rob Sanderson)
Plan well and a large kitchen extension has all the makings of the perfect open-plan living space. Create distinct and separate zones for cooking, dining and relaxing, but ensure continuity with a neutral shade throughout.
Use a central island to divide the room and make cooking social by adding a breakfast bar. Position the dining table adjacent to patio doors to get the best view and a comfortable armchair in one corner for enjoying the new-found light.
Need some kitchen inspiration and advice? READ: Kitchen worktops – everything you need to know
28. Temper the new by referencing the old
(Image credit: Future PLC/David Still)
When designing and decorating a new extension, always keep the style and period of your home in mind. Pick up on any period architectural features and incorporate design elements of any adjacent rooms into your new space.
In a large, multifunctional area emphasise continuity by using freestanding cupboards or sideboards as feature cabinetry. Choose finishes that reflect the mix of old and new, such as the mahogany and Shaker-style designs used here.
(Image credit: Future PLC/Nicholas Yarsley)
Whatever type of extension you choose, be sure to reflect that design in your kitchen scheme. Let the architectural style and shape inspire your choice and positioning of cabinetry and furniture.
In this home an impressive seven-metre-long workstation mirrors the run of roofline windows above, creating a balanced design that is also a practical solution to providing naturally lit worktops.
Enhance the visual impact with a strong matt colour and the storage potential by including cupboards.
30. Pick simple but strong colour schemes
(Image credit: Future PLC/Fraser Marr)
The modern extension will increase the light levels in a property, so be adventurous with colour in your new kitchen. Working against a white or neutral backdrop, make a strong statement with a black gloss central island and black modern stools that create crisp, clean-lined silhouettes.
Use gunmetal-finish patio door frames to tie in with stainless-steel appliances. Complement and uplift the scheme with a bright yellow splashback and matching pendant lights that draw the eye upward to impressive roof lights. This will simplify and streamline the scheme, particularly in a smaller extension.
Love these kitchen extension ideas? READ: How to build an extension – everything you need to know
31. Blur the boundaries
(Image credit: Future PLC/Richard Gadsby)
Use an extension to continue your kitchen space outside. Choose floor tiles that allow a continuous flow from kitchen to patio, giving the illusion of one large room.
Use the white of your cabinets and kitchen walls on external brickwork, masonry and planters. Create an outdoor cooking area that has all the features of a kitchen rather than a barbecue, including a worktop positioned to continue the run of the kitchen version inside.
32. Colour code kitchen zones
(Image credit: Future PLC/David Giles)
Make large, open-plan spaces work by using colour to define different functions. Try white, handleless cabinetry for a practical, easy-to-maintain cooking and food preparation area.
Introduce a contrast shade on a breakfast bar island to signpost the change of function, but keep the worktop white to indicate that this is a dual-function surface. For dining, go unfinished wood – in keeping with its proximity to the patio, this table and chairs could be mistaken for garden furniture.
Unify the whole with timber flooring, a wooden sideboard and a row of wooden bar stools.
How much does a kitchen extension cost?
Keep a close eye on your budget. Start by allocating a project fund for your architect to work with. If you let them know your key goals – a bespoke kitchen, for example – they’ll be able to tweak other aspects of
the scheme to help bring it all in on budget. Set aside between £1,100 and £1,300 sq m for small, single-storey schemes or £1,300-£1,500 sq m for two-storey extensions. Allow at least £2,500 sq m for large-scale
projects or those featuring high-spec materials.
We’ve all seen Grand Designs when the budget suddenly spirals out of control. It’s a good idea to ring-fence a 10 per cent contingency fund, just in case. If you budget properly and use trusted tradespeople you won’t need to access the extra money, but better to be safe than sorry. Plus it can go towards furnishing the new space.
Do I need planning permission for a kitchen extension?
While many extension schemes can be achieved under permitted development rights, anything that’s pushing the boundaries in terms of design is likely to require formal consent from your local authority. Likewise, if you live in a conservation area or area of outstanding natural beauty, you will need planning permission to go ahead.
Working with an architect or planning consultant can increase your chances of success at this stage as they will be aware of local planning policy. It can also help to find similar extensions on your street, as these can serve as a precedent for your project.
A single-storey rear extension is often the most planning permission-friendly extension project, and can often be achieved under permitted development. Keep in mind the balance between house and garden, as swallowing up too much garden may be detrimental to the properties value. A simple side extension is also planner-friendly and can widen a narrow kitchen without stealing precious outdoor space. Side-returns are a common choice for terraced properties, which often have a half-width kitchen tacked onto the rear.
Building a basement kitchen is significantly more expensive than extending outwards. Converting an existing basement will be cheaper. This type of extension is popular where outdoor space is often limited, but it also works if you want to preserve the proportions of a building or retain all of the garden. It’s wise to use a specialist basement firm (try The British Structural Waterproofing Association, thebswa.plus.com, for accredited contractors).
Related: Kitchen lighting ideas – to deliver the right brightness levels as and where you need it
Will you be using these kitchen extension ideas?
Additional words, expert advice to answer key questions, by Rebecca Foster
Beautiful ideas for kitchen extensions
Beautiful ideas for kitchen extensions | loveproperty. com
com
Beautiful ideas for kitchen extensions
Gallery View|
Expand View
Open up your space with a kitchen extension
Whether you have big ideas for an extension that creates a fabulous new kitchen-diner or more modest plans to convert the garage into a sunny breakfast room, a kitchen extension will add space and potential value to your property. Take a look at these practical kitchen extension ideas that will open up the hub of your home.
Highlight structural features
Dittrich Hudson Vasetti
Depending on your building and type of kitchen extension, a steel joist (RSJ) may be necessary to reinforce ceilings. This kitchen extension with side return addition by Dittrich Hudson Vasetti has embraced the use of steel posts and beams by leaving them exposed and painted yellow to provide a striking visual and contemporary feature.
Convert a garage
Merseyside Builders
You don’t have to start from scratch when it comes to kitchen extensions. This small but perfectly formed kitchen-diner was once an integral garage. Merseyside Builders have converted this single garage into a light-filled and inviting galley kitchen.
Go for a pitched roof
Instagram / @bungalow_fifty8
A kitchen extension that has room for a central dining table can create a traditional and inviting vibe. @bungalow_fifty8 has added an extension to her bungalow which features a pitched roof to combine height, light and homely looks. The roomy space allows the owner to fill it up with funky kitchen furniture that looks contemporary rather than cluttered.
Slice out the light
Second Nature
Many Victorian homes have a patch of land to the side, known as a side return, creating an L-shaped garden. Extending to the side and rear – known as a wraparound extension – can revolutionise this type of property for modern living. Clever kitchen unit positioning in this side return extension leaves room for dining, living and play areas. The ‘sliced out’ glass roof and door makes the space look ultra-contemporary.
Be budget friendly
Second Nature
It is easy to spend a fortune planning, building and perfecting that dream kitchen extension, but it doesn’t always have to be the case. By thinking outside the box you can add that extra square footage for less than you might think. An extension of fewer than three metres doesn’t always need planning permission and by pinning or toothing a structure to an existing wall can save time and money on building costs. Budget kitchens can look super high-end and vinyl flooring is an easy lay alternative to tiles and real wood.
Set a social scene
Dittrich Hudson Vasetti
Think about your kitchen needs at the planning stage. If you like to cook and entertain then go for an extension that has a large island for social cooking and has the wow-factor to keep guests talking as they spill out onto a seamless connecting terrace. Architects, Dittrich Hudson Vasetti, made sure this side extension was perfectly in tune with the main barn and installed an eco-friendly grass roof too.
Split the level
Sometimes it’s necessary to dig below floor level for foundation stability or to increase ceiling height. The design can achieve stunning results like this large kitchen-diner which has been given new depths thanks to the split-level arrangement.
Add colour the Scandi way
Papilo Bespoke Kitchens
Vibrant bespoke cabinetry in mustard yellow adds a splash of colour to this contemporary box-style kitchen extension. The oak veneer adds warmth while the stylish stainless steel countertops complete the professional vibe. The oversized lamps echo the black door frames and finish off the stylish Scandinavian look perfectly.
Lose the walls
Make your kitchen extension hold more than just the cooking area by creating a large and modern open-plan living room for the whole family to enjoy. Use the new space with lots of natural light to place the units and dining space and keep the living area inviting and cosy with complementary yet inviting tones.
Install sky lights
Lighting is a key kitchen extension component to generate a social and entertaining atmosphere. Skylights and bi-fold doors in the dining area will ensure lots of natural daylight. Come evening, the ambience becomes inviting with beautiful metallic pendant lights over the island having a huge overall impact on the room.
Go for glass
Ungar Architects
A glass box kitchen extension allows light to flood into the space allowing views of the garden beyond. Including bi-fold doors will blend inside and out. Before this glass extension by Ungar Architects the ground floor or this coach house had no visibility of the garden at all so what a difference this glazed lightwell has made!
Hone in on a view
Carpenter Oak
By going up a level, the outlook can be breathtaking. Here, a run of kitchen units to one side allows space for a dining table and living area that serves as a viewing platform. Curvaceous beams are in keeping with the surroundings and echo the lines of boats sailing river. To achieve panoramic views Carpenter Oak added timber frames that project out of the boathouse which are supported on oak brackets.
Double the height
Rotpunkt
Incorporating a new kitchen with a two-storey extension will, of course, double the return in terms of your property’s value. And, with the help of an architect, you can unlock your home’s potential. Here, a modern kitchen has been given double the light with a spectacular glass wall to maximise space. The clustered hanging pendant lights gives the room glamour and wow that finishes the luxurious look.
Think broken plan
Kutchenhaus
This small kitchen box extension lends itself perfectly to broken plan living that is a trend growing in popularity. A Crittall-style glass partition separates the space from the living area without shutting it off completely. Chevron flooring creates a seamless continuation into the new space from the living room.
Enlist an architect
David Stanley Architects + Romy Grabosch: Adelina Iliev Photography
This Victorian semi-detached extension project creates a light and open kitchen/living space by improving the accessibility to the garden. The architect added a striking black timber cladding that frames the glass walls to complete the contemporary look.
Blur boundaries
Hub Kitchen Design
If built at the rear, floor-to-ceiling, bi-folding doors will continue your kitchen out to the garden. Then, think about the positioning of wall and base units to enhance the room’s outward flow.
Stock up on storage
Make the most of the new area you have by maximising cupboard and storage space. Modern gloss units are smart and sleek and a neutral scheme creates a calming atmosphere. A clever narrow window acting as a quirky splashback makes an attractive extra light source.
Aluminium can be striking
John Lewis
The perfect marriage between glass and aluminium can achieve striking architectural results. The super strong metal can be moulded to any shape and replace an entire supporting wall if needed, which will give you an incredibly light room that connects you to the outdoor space.
Expose a wall
Fritz Fryer
Exposed brickwork creates a custom focal point and adds warmth to stark white ceilings and adjacent walls. Team with industrial extras like these stylish pendant lights and bar stools for a rustic urban vibe.
Retreat to rustic
John Lewis
Floral patterns paired with simple wooden furniture creates a homely, timeless and modern country feel. Plus, uplifting structural plants fill an open space with greenery and boosts air quality, too.
Enjoy a social scene
Team 7 at Wharfside
This bespoke oak kitchen extension has two key standout features; a glazed wall that opens out into the garden and a clever wall of built-in storage and appliances. A breakfast bar is another great way to make your kitchen a sociable and relaxed space.
Install diner seating
De Rosee Sa
A glazed roof positioned over the dining space is practical and inviting. Built-in, diner-style seating looks comfortable and professional, plus it keeps a walk-way clear to enter the garden.
Bring down the walls
De Rosee Sa
A large rear kitchen extension can maximise the potential for a beautifully spacious open-plan home. Warm wood floors throughout teamed with soft-toned furniture keeps the look coherent and calming.
Call in the curves
Savvy Kitchens
A custom-crafted curved oak kitchen island creates a magnificent showpiece in this large family kitchen extension. The sleek, handleless doors, opened via a lip at the bottom, ensure a clean run of units. Two colour-coordinated pendant lights finish the high-end look.
Take shade
Hillarys
Once complete, you won’t be changing your state-of-the-art extension for a while. But if you need a quick up-date, blinds can help dress your windows and offer an instant change of scene. Geometric prints on opaque fabrics are stylish and refreshing.
Make room for an island
This calm and tranquil extension has overcome the need for a support pillar by nestling it within a beautiful kitchen island. Reclaimed oak blends beautifully with the attractive Shaker-style, sleek white quartz worktops and artisan bar stools.
Good things come in small packages
@katyebh / Instagram
Dove grey handmade units and walls free of cupboards maximise the sense of space in this small and perfectly formed kitchen. A mini kitchen island is an exact fit and the Velux roof windows mean light streams from above.
Create a lasting impression
Neptune
Invest in elements that won’t fall out of favour. Complementary shades of grey are neutral and calming and quality wood cabinets will remain durable and timeless for years to come.
White never dates
Neptune
White is the go-to choice for a classic design but to prevent the room from looking stark use tactile elements such as an exposed stone wall, upholstered dining chairs and hanging pendant lights.
Dare to be different
Wren Kitchens
Don’t be afraid to follow your kitchen fantasy. Chic gloss units paired with gentle tones of pale pink, copper and gold have a delicate charm that’s contemporary yet feminine.
Divide and conquer
Wren Kitchens
A practical peninsula work surface and unit makes an attractive natural divide in a kitchen-diner extension. It can also double your storage space or become a handy breakfast bar and the layout works really well for the cook’s much-desired ‘golden triangle’ of sink, cooker and the refrigerator.
Optimise space
kitchensbymilestone.co.uk
When space is at a premium every bit counts. Choose unfussy features that will incorporate your storage and appliance needs. Are there elements that could be multipurpose? The window seat in this cosy urban kitchen extension doubles as a dining bench and fits snuggly into the corner.
Stick with tradition
Boarder Oak
A kitchen extension completed by a specialist craftsman can double a cottage kitchen’s light and space using materials that will preserve a home’s heritage and character. This classic farmhouse kitchen has been given a new breakfast and utility area while preserving its country tone.
Be tech savvy
Hammonds Kitchens
Create a sense of drama with tomorrow’s tech. Handleless units, clever use of LED lights and stainless steel appliances create a distinctly futuristic look. Ultra modern extras like a double oven, wine chiller and induction hob add to the sense of sci-fi fun.
Reach for the sky
Woodworks
When designed in keeping with a period property, traditional walnut-fronted cabinetry will offer time-honoured style that doesn’t have to feel dark. Here, the finish is balanced by light from a stunning orangery-style glazed roof.
Turn to the dark side
Hammonds
Of course, white kitchens are still the most popular cabinet choice but dark blue kitchens are giving the old favourite a run for its money. Teamed with fresh white walls and countertops a smart navy scheme can transform a modest kitchen extension into something sensational.
Be in the frame
Boarder Oak
Love a modern look but live in an older property? Mixing contemporary elements with existing features could be the perfect compromise. Oak beams are typical of barn conversions but when teamed with contemporary bi-folding doors the finish is fresh and luxurious.
Tick the tile box
John Lewis of Hungerford
Inject strong personality into a large space with refreshing feature tiles in zingy colours and interesting patterns. Then, tie the scheme together with yellow pendant lights. The distinctive wall mural sticker makes a striking and unique finish.
Work the kitchen triangle
Magnet Kitchens
Don’t forget to include the golden triangle for optimum efficiency. The theory is a kitchen’s three main work areas; sink, cooktop, and refrigerator should form (you guessed it) a triangle. Here is a stunning example of on-trend two-toned units and a stylish pale herringbone flooring.
Raise a room with a view
Anglian Windows
Rear extensions usually benefit from views of the garden. If possible place furniture where users can appreciate the scenery, while a neutral decorating scheme won’t overshadow your enjoyment of the great outdoors, whatever the weather.
Loved this? See more beautiful kitchen ideas to inspire your next project
18 August 2020
Interiors
See more on this topic
 comments.length && !vm.isLoading”>
Be the first to comment
Do you want to comment on this article?
You need to be signed in for this feature
20 Small House Extension Ideas That Will Make a Big Impact
Homebuilding is supported by its audience. When you purchase through links on our site, we may earn an affiliate commission. Here’s why you can trust us.
(Image credit: Fraser Marr)
The best small house extension ideas don’t just add new space, they transform existing rooms and layouts.
Savvy designs for porches, side-return additions and rear extensions can all lighten undue stress put on awkward floorplans while reimagining existing spaces, such as lofts and garages, can add value to any size of home.
Here’s 20 ideas for building an extension that’s small, but mighty.
1. Know What You Want When Looking at Small House Extension Ideas
(Image credit: c/o Create Bespoke)
If you’re only looking to add a little, try not to get carried away by sprawling, bank-breaking images for inspiration. Narrowing down where you would like to add a small bit of extra space can make initial searches into designs, styles and ideas far more productive.
This typical terrace house in London was carefully extended to the side in order to create picture windows for a greater connection to the long garden.
Also, the same types of bricks were replicated in the new space, tying it in seamlessly with the original house in an utterly contemporary way.
2. Remember That The Simplest Ideas Can be the Most Effective
(Image credit: Darren Chung)
When building an extension to a house, especially one you have inhabited for some time, it can be tempting to want to make huge changes. However, often small strategic extensions can unlock the property’s potential more effectively (and for a smaller cost).
When extending this semi-detached house, a small sympathetic lean-to side addition was added, creating much-needed extra room for storage, a new cloakroom and utility which seamlessly alleviated other high-traffic and cluttered areas.
(MORE: Extensions for Every Budget)
(Image credit: Kasia Fiszer)
Looking for more inspiration?
Check out our photo gallery for Small Kitchen Extension Ideas — it’s packed with great designs, advice and top tips.
In love with their Victorian terrace but desperate for a change from the dark, dingy and cold kitchen it came with, the homeowners of this extension delicately added a side return extension to provide the extra space they were looking for.
Rooflights and a stylish kitchen have created a new heart of the home and thanks to the homeowner’s DIY efforts, the whole project came in at £45,000.
4. Get Creative with a Small House Extension Ideas
(Image credit: Richard Chivers c/o D-Haus)
Inspired by a curved brick wall in the garden that was used to store bikes, The D-Haus Company knocked through and extended into the small garden space, adding a bright and innovative kitchen space.
Enlarging the back door opening to make way for a striking pivot door and installing a large skylight above the dining table has further transformed the space.
5. Try Extending Living Spaces into the Garden
(Image credit: Fraser Marr)
Rethinking the layout of the original kitchen of this terrace has created a more useful kitchen/living area without needing to sacrifice garden space.
During the building works, the homeowner carefully planned a new garden design and landscaped the outdoor space himself so when the large bifolding doors are stacked back they open onto a tranquil Japanese-inspired space that provides further living opportunities.
6. Keep an Eye on the Budget with a Small House Extension
(Image credit: David Barbour)
Keeping an eye on finances during any sized extension is the key to a successful project, especially with materials shortages inflating expenses at every turn.
(MORE: How Much Does an Extension Cost?)
7. Let a Small House Extension Enhance Existing Spaces
(Image credit: French + Tye c/o MW Architects)
The downfall of many larger extensions is that the shiny new space because the central hub for all goings-on in the house, leaving other areas underused and neglected.
This creative micro-extension (just 7m2) achieved everything a bigger extension would – a modern open plan living, kitchen and dining space with views out to the garden– but without the cost of major structural works.
The money was smartly reallocated by MW Architects for bespoke joinery and high quality, frameless glazing which creates transformative throughviews throughout the ground floor, not just in the new space.
8. A Basement Might be the Solution to a Small House Extension
(Image credit: French + Tye c/o Paper House Project)
Turning your eye downwards to create new space can be a great idea where plot size is limited or where a loft conversion or rear extension is not possible due to height and size restrictions.
This rather clever scheme by design practice Paper House Project excavated the ground around an uninhabitable cellar to create a new kitchen. The stepped courtyard and expanded lightwell brings light in, while a small porch extension replaced a dated lean-to.
9. Add a Small Lean-to Side Return Extension
(Image credit: David Barbour)
Building into the slender strip of space alongside terraced or semi-detached houses is tricky to get right but can make a massive improvement.
While only taking up a small amount of usually wasted space to the rear, a side return extension offers potential to reorganise warren-like layouts.
A key consideration to make is natural light. This small extension by Archer and Braun Architects utilises a fixed picture window, a large rooflight and contrasting pivot door to connect the kitchen to the outdoors.
(MORE: How to Transform a Semi-detached Home)
10. Look to the Front for Small Extension Ideas for Semi-detached Houses
(Image credit: c/o Shomera Architecture)
This previously converted garage was largely demolished to make way for a new space designed by Shomera Architecture . The extension added around 8m2 to the front of the house, with a newly constructed bay window and zinc roof that ties into the existing house.
To achieve a similar look, be sure to consider thermal efficiency standards for garage conversions and, if you want to build over a garage, check to make sure the foundations are suitable to carry extra load.
11. Give the Exterior a Make-over When Adding a Small House Extension
(Image credit: Juliet Murphy c/o The Gentleman Architect)
While respecting the original materials of this terrace house, The Gentleman Architect designed a small side-return extension and dormer loft conversion which truly makes an impact.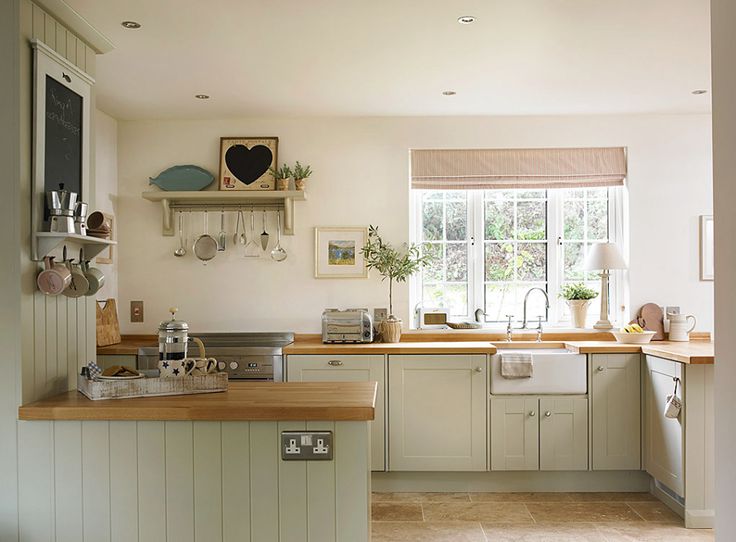
The Corten cladding to both additions elevates the existing house and makes the house feel as one. Large format sliding doors further help to modernise the previously dated property.
12. Consider a Small Garden Room Extension
(Image credit: Vale Garden Rooms)
Whether the purpose is as a new sitting room or home office, creating a garden room or outbuilding is without a doubt a great, and sometimes cost-effective, way to increase space.
While similar projects as this gorgeous addition by Vale Garden Houses start at £35,000, alternatives can start at £10k — more than a shade cheaper than paying to demolish and rebuild walls!
(Image credit: Jeremy Phillips)
When renovating this cottage, the homeowners chose to simultaneously convert the derelict granary barn which sat adjacent. By linking with a small glazed extension, their design married old and new effortlessly.
14. Replace Solid Roofing with Glass to Make Small Spaces Feel Bigger
(Image credit: Simon Maxwell)
By pairing flat rooflights with clerestory windows, what could have been a dark and pokey transition from some space to the next feels light and spacious in this semi-detached extension.
(MORE: Window Styles)
15. Add a Porch for a Charming Small House Extension
(Image credit: Anglian Home Improvements)
Porches are an incredibly practical way to extend a home, without the cost or labour associated with bigger projects. Adding a small addition like this can often be completed under Permitted Development (within limitations) but can add some handy square footage to the floorplan and improves kerb appeal.
This gable end porch by Anglian Home Improvements creates the perfect spot not just to rummage around for keys, but also to house pesky boots and coats.
16. Think About the Costs of a Small House Extension
(Image credit: Malcom Menzies)
Eager to add space but also keep to their budget, the owners of this terrace chose to retain their kitchen’s position and add a small dining area adjacent.
Internal windows and existing door frames were also updated so their costs for demolishing the existing structure were reduced.
Also, by opting for a smaller extension, the garden remains a decent size while pergola make great use of the courtyard area.
17. Going up with a Small Roof Terrace Extension
(Image credit: Chris Snook)
For city-dwellers tired of having postage stamp sized gardens – or worse, no outdoor area at all – a roof terrace extension could be just the ticket.
18. Build a Living Room Extension
(Image credit: Darren Chung)
Create a separate sanctuary space with a new extension, like this addition to a medieval cottage.
Acting as a cosy retreat from the main house, the new room has been sensitively incorporated into the original build with timber cladding.
19. Creating a Porch with a Difference
(Image credit: Simon Ellis c/o Syte Architects)
This glass box extension was designed as a twist on a conventional porch. Built on a brick platform to create a view of the garden, the structural glass box costs £16,000 from Cantifix .
20. Extending into the Loft
(Image credit: Simon Maxwell)
Going up, rather than out, can be a cost-effective way to adding space, but not all loft spaces are suitable and require a dormer or mansard extension to add some needed head height.
This unassuming bungalow was transformed into a four-bed family home by Sketch Architects .
Assistant Editor Amy began working for Homebuilding & Renovating in 2018. She has an interest in sustainable building methods and always has her eye on the latest design ideas. Amy has interviewed countless self builders, renovators and extenders about their experiences for Homebuilding & Renovating magazine. She is currently renovating a mid-century home, together with her partner, on a DIY basis, and has recently fitted her own kitchen.
Homebuilding & Renovating Newsletter
Get the latest news, reviews and product advice straight to your inbox.
Thank you for signing up to Homebuilding. You will receive a verification email shortly.
There was a problem. Please refresh the page and try again.
By submitting your information you agree to the Terms & Conditions and Privacy Policy and are aged 16 or over.
Adding a kitchen to a frame house
Adding a kitchen to a frame house
Some time after moving into the house, the owners of country houses want to have as much free space as possible and plan to increase the area of their own housing.
The smartest and fastest way to implement such a plan would be to build a kitchen attached to the house. The frame is built in construction and the difficulties generally do not appear, but do not yet require special building skills.
If the project is not the most complex, then it can be built in a fairly short time period. The main thing is that you apply a step-by-step plan, which will describe the construction features of the house and how to create a frame extension. How exactly to choose the type of frame extension to the house, what building materials to use, and what other technology options and what recommendations are for each construction stage.
Contents:
- 1 Frame extension to the house
- 1.1 Details
- 1.2 Choice of the base
- 1.3 Installation of the floor covering
- 1.4 Installation of the extension
- 1.5 Fixing to wooden construction
- Roof
- 1.8 Foundation
, , then the step-by-step instructions provide not just work on the preparation of estimates and project coordination of the future construction. There are many nuances that are important to consider. Before agreeing on the project and building the frame extension, it is important to choose what kind of goal you are pursuing with new construction work. From the appointment of an extension in a country house, expense items may change – perhaps you need vapor insulation, installation of window frames, plumbing, and also qualified craftsmen.
Frame-type veranda
The simplest frame extension in terms of implementation and spending is a summer-type veranda or a terrace for relaxing in the summer season. Due to seasonal operation, the premises do not need huge investments. The alignment is carried out minus high quality insulation and membranes for moisture insulation.
Summer kitchen
If the veranda is used as a summer kitchen, construction will begin with the fact that you will lay engineering communications at the initial stage. It should be noted moisture resistant OSB and high quality tiles in order to fully avoid getting wet when installing a summer kitchen.
Living area
A frame extension for a house can be used as an additional living area in an existing housing, for example, with one or even a couple of living rooms. In this case, the structure will need additional insulation in order to reduce the cost of heating the room, choosing the most solid type of foundation and performing work for moisture insulation.


Outbuilding
An extension for an old house of additional utility rooms, which will require competent and timely laying of engineering communications at the construction stage. In this case, on the draft floors, you can not cover the boards. Sheathe the extension only on the outside on poles and racks.
Please note that the choice of the type of frame extension for the house is extremely important in order to ensure perfect docking with the already built walls, base and roof for the old country house.
If we do not attach importance to the similarity of the structures of the two buildings, shrinkage or even distortion of the house, cracks and future structural failure may occur. First of all, you should start by choosing a base and knowing how to use the bottom trim. Logs in the extension must be connected competently and thoroughly with the foundation of a capital private house.
Details
Selection of base
The type of foundation you will build will also depend on the further use of the frame structure. In the future, ideally, the base of the main house should correspond to the extension. The choice of the type of foundation for the frame extension with your own hand will largely depend not only on the characteristics of the already built house made of wood, but also on the natural conditions and the quality of the soil at the place where you will be building. The basic list of materials used in order to attach a kitchen to a wooden house:
- Metal rods.
- Wooden piles and beams.
- Stone.
- Bricks.
- Concrete.
Please note that when choosing the type of foundation, it is important to take into account the depth of the main structures. When building a massive or multi-storey extension, the recesses must be made more than 0.7 meters.
The main types of base that are chosen when building a frame extension with their own hands are:
- Pile-grillage.
- Columnar, made of blocks.
- Pile.
- Slab.
- Tape.

If you are planning a two-story building (or one that is massive), it is important to opt for a strip foundation. When using it in the construction of a frame extension with your own hands, we suggest that you follow the following step-by-step instructions:
- It is important to mark the territory using high-precision drawings. Doing this by means of pegs and a stretched rope between them. The marking form indicates the location of the trench for the future strip base.
- Digging up the soil to the depth of the already installed foundation for the house, or to the depth that is raised for building, depending on the size. The bottom of the trench needs to be covered with gravel, which, for perfect laying, should be tamped as best as possible.
- From boards (wood) prepare the formwork in order to pour the concrete solution. Its height should be equal to the highest point for the future base. An extremely important point will be that you need to do waterproofing work along the general perimeter of the future foundation, and also lay metal reinforcement to give strength.
- The installed formwork (or rather, 1/3) is poured with concrete mortar, which was previously prepared until completely solidified. In the future, the remaining cement will be poured with the removal of air bubbles using a special vibrator or by tapping the formwork walls with a hammer.
 An extremely important point will be that you need to do waterproofing work along the general perimeter of the future foundation, and also lay metal reinforcement to give strength.
 Please note that the upper casting part must not only be leveled at the same level, but also covered with a film for more thorough drying. To prevent the appearance of cracks, we recommend light wetting of the treated surface.
Installing the flooring
We learned exactly how to attach a frame extension with a high quality base to the house, and now we will figure out how to install the floor. There are a couple of methods for installing the floor. Concrete floors will be the best option for attaching a strip base – which provides maximum structural stability. The soil inside the already placed base must be dug to a depth of 0.35 meters. The bottom of the resulting trench, as well as the foundation trench, should be covered with gravel and sand, or a layer of expanded clay of 0.2 meters should be covered in order for the insulation to be of the highest quality. If the extension for the house is framed, then beacons are installed by means of a level for the future pouring of a cement floor screed, on which tiles, wooden flooring, or flooring are laid, which corresponds to the purpose of the room. It will be easier to lay a floor heating system in a cement screed, if you are planning one.
It is more environmentally friendly and economical to install a wood floor. It is used to lay floors from beams installed on top of a waterproofing membrane. The timber beams will be fixed to the base by means of special anchor bolts. Corner floor beam connections mounted along the common perimeter of the base of the frame extension to the house are produced according to the type of lock fastenings. After that, the transverse beams of the floor are installed, and layers of insulating material and the finishing floor covering for the extension are also laid.
Installation of an extension
More precisely, we will tell you further how to install a kitchen extension to the house using video and photos (these are reports from real objects). In short, then the frame extension to the house made of wood with one’s own hand and its most important part will be the basis, is installed in this way:
And now for the mounting.
Fixing to a wooden building
One of the main points in building a frame type extension to a house made of wood is to connect it to the built house. Install racks at a distance of 0.59meters for further insulation with mineral wool, the dimensions of which are 0.6 meters, which makes it possible to fully insulate the extension. The thickness of the insulation material is always determined by how the building will be applied. If the selected materials do not match, then the depth of the base or other technical characteristics, then it is important to build an expansion joint at the junction of the bases of the old private house and the new extension.
Work can be done in two ways:
- Laying roofing material between the parts of the base, if their parts are vertical and even.
- Laying of foamed polyethylene and expanded polystyrene at the joints with filling the upper part with sealant and a special closing strip.

Now about the roof.
Roof
If you choose the most simple type of roof – single-pitched, then the installation of floors will occur very quickly:
- The rafters are installed at an angle – from the roof slope of a house made of wood to vertical beams with a protrusion of at least 0.3 meters.
- Lay OSB sheets, plywood or frequent rows of lathing for the last installation of the roof covering, which extends to the sides by 0.3 meters.
- But the final touch will be the installation of the selected type of roof – iron sheets, slate, metal tiles, which are attached to special screws.
- Inside, the roof is insulated with mineral wool sheets, which are laid between the rafters, where the distance will be slightly less than the insulation.
- Insulation is masked by sheathing with OSB sheets and at the end with decorative elements.

Insulation
One of the last stages of construction is the process of insulating the house extension, and it also depends on the purpose for the future extension. If it is not intended for permanent residence, then it is important to choose the most economical type of insulation material, or work to preserve heat in the room is not carried out at all – when choosing summer-type construction. In other cases, insulating layers are laid not only when installing the roof and floor, but also when rack-mounted sheathing the OSB frame with sheets. Wallboard cake made from:
- Covers from the inside.
- Films for vapor barrier.
- Insulation layer.
- Wind insulation material.
- Exterior trim.
Insulation of a frame-type extension for a house can be done with mineral wool from an average price category, or expensive ecowool, but treated and environmentally friendly against fires and rodents inside a frame house.
Cladding
Attaching a kitchen to a frame house is a great idea, but the finishing work in the frame extension will be the final construction stage. They depend not only on the purpose of the premises, but also on the expenses that the owner of the house may bear. But when choosing an installation, it is also important to take into account the type of foundation laid, and the reliability of the supporting beams – the coatings are heavy and greatly reduce their service life of the frame panel house.
You can make a choice with your own hands, studying in detail the expanses of the Internet. Popular and natural materials in a small extension area are best suited for giving. It is important to pay special attention to material compliance surveys in order to create a single space and can be easily shared with a friend.
 youtube.com/embed/UJOYv8h4Svs?feature=oembed&wmode=opaque” frameborder=”0″ allow=”accelerometer; autoplay; clipboard-write; encrypted-media; gyroscope; picture-in-picture” allowfullscreen=””>
projects, photos, recommendations. How to build a summer kitchen with your own hands A simple summer kitchen with your own hands
( 18
ratings, average: 4.36
of 5)
Summer residents are looking forward to the coming of summer. For them, this is an opportunity to move from the city to their suburban area and dig in the beds. Fans of country rest also love summer. In warm weather, they have the opportunity to relax outdoors in the forest or on the banks of the river and enjoy wonderful picnics with friends. People who own summer cottages use them not only to grow vegetables and herbs, but also spend time communicating with family and friends. The best place for holding such meetings is a summer kitchen arranged in a suburban area.
Summer kitchen in the country: projects
When a person decides to arrange a summer kitchen in the country, then before starting work, he, of course, has many thoughts on how to arrange a summer kitchen so that it turns out perfect. It must be said that it will become ideal only if, with all seriousness, the owner of the suburban area approaches its construction and carefully thinks over the design
, as well as pay serious attention to the design and choose the right location, while not forgetting the purpose of this room. Thus, if you are going to build a summer kitchen, then you need to answer the following questions:
Why do you need a summer kitchen at your summer cottage? Do you plan to make a large number of blanks for the winter in the summer? How often will you visit your dacha with friends and have picnics? How many people will be in this room at the same time? Do you plan to be there only in summer?
The type of construction of this room, which the owner of the summer cottage chooses, will largely depend on its location. Will it act as a separate room or will it be attached to the house? Or maybe the summer kitchen will act as a structure that is adjacent to the outbuildings located on the territory of the summer cottage? You need to decide from which side the wind hits your site and the sun shines. It is also necessary to give answers to the questions: what climatic conditions
prevail in your area where your dacha is located.
When the design and construction of a summer kitchen is carried out, even in this case, despite the non-global nature of this structure, the financial costs for the construction of this object play a decisive role. Even if you plan to build an economy class room, then in this case you will be able to make sure that after the construction work is completed, this room will look stylish and attract attention. To do this, you need to connect your imagination, and besides this, show all your talents and skills when organizing a summer kitchen and creating its design.
When you have answered all the questions above, which may be very simple for many, you will be able to understand how your summer kitchen project will end up:
If you have already identified a separate room for your summer kitchen at your summer cottage, then you should know that, in accordance with fire safety standards, it should be located no closer than 7 m from other buildings. At the same time, the minimum size of the plot should be at least 0.10 ha.
Do-it-yourself open summer kitchen in the country house
If the summer cottage is located in a climatic zone that is characterized by favorable conditions for human life, and you have already chosen a place on your site that you consider optimal for placing a summer kitchen, then in this case you can choose an open structure
of this facility. This is a very simple option in terms of implementation. In this case, you will get as close to nature as possible when you spend your holidays in the courtyard of the house in such a summer kitchen. The number of walls in such a kitchen with a stove can vary from 1 to 3. Some projects of open summer kitchens are completely devoid of them.
Quite often, such structures have only one wall, which provides a connection between this structure and another extension. As a roof of a summer kitchen made of bricks with a stove, a canopy can act or shelter people in the room from the weather, a structure made of lightweight aluminum can. Structures of an open type are distinguished by ease in the process of construction, and, in addition, a small amount of money spent by the owner on the construction of such a structure.
Closed summer kitchen at the dacha
For people whose place of residence is a zone of risky agriculture, where frequent rains occur
, strong winds prevail, and early frosts often occur, the best choice would be to build a closed summer kitchen. A structure of this type should also be chosen by people who prefer to spend holidays in their summer cottage in winter.
Summer kitchens with this type of stove can be attached to another room or can be a separate building. It represents a full-fledged house, which has heating, as well as gas, electricity and other conditions that provide a comfortable life. As additional buildings in the summer kitchen, a fireplace, utility room or cellar can act. If in winter you do not need a separate kitchen on your site, then in this case the water from the heating system must be drained, and then the windows and doors should be tightly closed.
How to build a summer kitchen with your own hands: materials
Materials such as stone and wood
will perfectly fit into the summer kitchen project on your site. However, it should be noted that other materials can be found on the market today, the characteristic qualities of which are lightness and high strength. They are popular with many private developers. First of all, they are chosen because they are reliable, and, in addition, when they are used in the construction process, convenience is provided to the developer. Such materials include PVC, polycarbonate sheets, as well as polystyrene foam boards and aluminum profiles.
Stone mansions
For the construction of a summer kitchen with a stove, stone can be used as the main material. Using this material, popular in our time, you can build walls, and, in addition, use it to lay out the floor. granite, marble can be used as building material
, and also use slate and limestone, which will look great in the interior. A real fireplace or an artificial one will look attractive in this room if you line it with stone. It is ideal to use tiles for this work that are able to withstand bad weather conditions, and besides that, the negative factors common to the kitchen – stains, debris and other negative points.
Concrete is best used for enclosed structures. This material has been used for a long time and is distinguished by a rather diverse range of colors. If a kitchen with a stove next to the house is built of stone, then it is quite acceptable to use wood elements or combinations of other materials in the design.
The main advantage of stone is that it is a durable material
and is convenient for construction work. However, it also has certain disadvantages. One of them is that the cost is quite high. For this reason, if you have a strong desire to carry out the construction work of your stone summer kitchen with a stove and a gazebo, you will have to allocate a serious construction budget for this business.
Wood elegance
If you do not have enough financial resources to build a brick kitchen with your own hands next to the house, then you can use wood, which is a more affordable material. However, in order for the construction of this material to last for a long time, it is necessary to process the natural material using special compounds.
This treatment will protect the wood from such unpleasant processes as aging, rotting, fungus infection
. A much simpler task is to carry out construction work with wood. Structures erected from this material, including a gazebo, will seem light and elegant to you. In addition, they will provide a special aroma of wood in the summer kitchen, especially after rainy weather.
Modern materials
They can also be used for a summer kitchen with barbecue. You can buy them even if the owner of the summer cottage allocated a small budget for the construction. Their feature is high strength when used in construction work. As such materials are:
- drywall;
- lining panels;
- plywood.
Most often, in order to complete the design of the flooring, use parquet or laminate
. With a small budget, preference is given in favor of linoleum. For the manufacture of kitchen walls with a gazebo, bricks, tiles are used, wallpapers of various types are chosen, or siding is used, which is an excellent material for exterior wall decoration. For roofing, the best solution is corrugated board or metal tiles.
Summer kitchen interior design
It should be said that there are a large number of design options for a summer kitchen with a barbecue at their summer cottage. The owner must make a choice in favor of the one that he likes best. However, in order not to get confused when choosing the design of the summer kitchen being built with a stove and a gazebo, we want to give some useful tips
.
Conclusion
Many people in our country have summer cottages. However, not everyone wants to work on them in the beds. Many have a desire to use their summer cottage as well as a place of rest
. In order to create comfortable conditions in the country for relaxation and a comfortable stay, a device such as a summer kitchen is suitable. There you can spend time with friends, as well as relax during hot hours and cook. There are several options for its device.
This facility may be open or closed. In addition, it can act as a separate room or be an extension to the main house, or be located on the site in the form of an extension. When building a summer kitchen with a barbecue, a variety of materials
. You can give preference to stone and brick, or opt for lightweight materials, such as wood, polycarbonate. Here you need to proceed from your financial capabilities, as well as from what you want to get in the end.
In the warm season, especially during the conservation period, the presence of a summer kitchen greatly facilitates the cooking process and makes it more enjoyable. For construction, it is not necessary to hire specialists – all stages can be completed independently. If you choose the right materials, the summer kitchen will not cost too much, which is of great importance for the economical owner.
Summer kitchens can be open or closed. Both species are widely used in suburban and suburban areas. To decide which type to opt for, you should study all the advantages and disadvantages of such buildings.
Closed kitchen
This kitchen has windows, doors and a roof like a complete home. There are options combined with a bathhouse or a summer shower, a cellar, a workshop, with an attached veranda for eating and relaxing. Usually, light materials are chosen for construction and they do not insulate the building, so the room is not used in winter. At the same time, there are kitchens made of bricks and foam blocks, which are more durable and can be insulated if necessary.
Benefits of enclosed structures:
- a closed kitchen requires more materials and is therefore more expensive;
- the project will require additional calculations;
- the construction process is more laborious and lengthy.
This option is more suitable for country houses where the owners live permanently. But in the country, which is empty in winter, the construction of a closed kitchen is not always justified.
Open kitchens are built according to the principle: a concrete or tiled base, supporting pillars along the perimeter, a canopy roof. Under the canopy, a stove, a kitchen table, and benches are installed. Sometimes the kitchen is made without a canopy if it is used exclusively for cooking on vacation on clear days. The building material for an open kitchen is most often wood, brick, natural stone.
Summer kitchen project with barbecue
Benefits:
- do not use the room during the cold period;
- no protection against wind and insects;
- poor protection against rain and dampness;
- food must not be left.
- all the furniture that will be there must be hidden for the winter in closed, dry rooms, otherwise it will quickly rot.
Where to build
The layout of the kitchen matters a lot. The utility yard and cesspools should be as far away as possible, but communications, on the contrary, are closer. You will have to supply water to the kitchen, connect electricity, so it is best if the building site is near the house. You can not choose a place in the lowland, otherwise the floor will be damp. A closed kitchen can be attached to the house, and it is better to place an open one in a garden or near a pond, away from the road.
Construction of an open kitchen
There are many options for building an open kitchen, but the main stages are always the same: marking and preparing the place, laying the foundation, installing bearing supports, installing the roof and interior arrangement of the room.
For work you will need:
- level;
- shovel;
- pegs and twine;
- tape measure; sand and gravel;
- cement mortar;
- pieces of rebar;
- timber 150×150 mm;
- circular saw;
- drill;
- screwdriver;
- hammer and nails;
- metal squares;
- self-tapping screws;
- boards 25 mm thick;
- primer.
Step 1. Marking
The selected area is cleared of all unnecessary and the sod is removed. One of the corners of the building is determined and a peg is driven into the ground, and then the width and length of the platform for the kitchen are measured from it. Beacons-pegs are placed in each of the corners and a twine is pulled between them. Check the correct markings on the diagonals – they must be the same length. After that, inside the markup, the soil is selected to a depth of 15-20 cm, leveled and rammed.
Step 2: Pouring the foundation
The bottom of the pit is covered with an even layer of sand, leveled, well compacted. If necessary, communication pipes are laid along the bottom, crushed stone is poured from above. A reinforcing mesh is laid, metal rods 20 cm high are inserted at the corners of the site, formwork from boards is installed around the perimeter. The height of the formwork above the ground should be about 10 cm; using a level on the inside of the formwork, mark the line for pouring the solution so that the site is even. Knead and pour it into the formwork, guided by the markup. The communication pipes are closed with plugs, otherwise the solution may get inside. The surface is leveled with a rule, after which the foundation is left until it dries completely.
Also, the foundation for the kitchen can be made of a columnar type using bricks. The marking is carried out similarly to a monolithic foundation, after which square-shaped pits are dug up to a depth of 50 cm. The bottom of the pits is covered with sand and rammed, then a metal bar is inserted, around which brickwork is made. The height of the foundation columns is checked by level. If necessary, the columns are leveled with an additional layer of cement.
The lower trim of the beam will be attached to the reinforcement bars, which is joined using the “paw” method. The beam is laid on roofing material, previously glued with bitumen to each column. Logs of the subfloor from the edged board are mounted on the lower trim.
Step 3: Install the load-bearing supports
Holes are drilled in the lower ends of the timber for reinforcing bars protruding from the foundation. The front racks are made 20 cm higher than the rear ones, so that it is more convenient to mount the canopy. The bars are installed at the corners of the site, leveled, and then fixed to the base with metal plates on anchor bolts. Along the upper edge, the pillars are connected with a strapping of timber, and horizontal jumpers are mounted at a height of 70-80 cm from the floor.
Table. Roof slope depending on the coverage
| Roof material | Weight sq. m (without base), kg | Approximate life, years | Roof pitch, deg. |
|---|---|---|---|
| Black steel sheet | 3-5 | 20-25 | 16-30 |
| Galvanized steel | 3.5-6 | 30-40 | 16-30 |
| Ruberoid | 4-13 | 13-15 | 4-27 |
| Roof tiles | 40-50 | 60 and over | 30-45 |
| Asbestos cement | 14-20 | 40-45 | 27-50 |
Step 4 Install the canopy
Primer-treated boards are nailed to the upper trim along the width of the structure every 50 cm. Internal joints must be reinforced with metal squares so that the canopy does not disperse in strong winds. A waterproofing material is laid on top of the boards, thin laths are stuffed and sheets of slate or 9 are laid.0005
Step 5: Installing the floor
The best solution would be tiling. It is not afraid of moisture, is easily cleaned of dirt, easily tolerates temperature changes. Wooden flooring in an open kitchen quickly becomes unusable under the influence of atmospheric moisture, cracks from the sun, is damaged by insects, and therefore requires regular maintenance. So, take the tile, tile adhesive, notched trowel and start laying the floor. Lay out the tiles from the corner: apply a little solution to the back surface, apply to the floor and level.
In the photo – porcelain tiles for the street
To make the seams as smooth as possible, special plastic crosses are used, which are inserted at the joints. Laying is constantly controlled by the level, otherwise the coating will be uneven. If installation or a barbecue is planned in the kitchen, it is not necessary to veneer the floor under them. After completion of work, the seams are cleaned of dust and residues of the solution, and then rubbed with a special mixture.
Step 6. Arrangement of the kitchen
For greater comfort, the space between the floor and horizontal lintels can be sheathed with boards or covered with wooden figured gratings, leaving the doorway free. They install a stove, benches and a table, supply electricity and water. In conclusion, wooden surfaces are stained and varnished or painted, protecting the wood from environmental influences.
Construction of a closed kitchen
Closed kitchens are also very diverse, but the most convenient and easy to implement is a frame structure made of timber on a columnar foundation. For sheathing, it is recommended to use lining or OSB boards.
.
In the process of work you will need:
- circular saw;
- jigsaw;
- drill and screwdriver;
- building level;
- shovel;
- hammer;
- tape measure;
- dry planed timber 100×100 mm;
- boards 25 mm thick;
- long cord and pegs for beacons;
- roofing felt;
- cement mortar;
- construction studs;
- mining;
- nails and screws;
- sand.

Step 1. Marking the area
The selected area needs to be prepared: level the hills, remove tall grass, stones, debris. Now you need to determine where the facade line will be located, and put 2 beacons on it. The distance between the pegs is equal to the length of the facade. Perpendicular to this line, the length of the side walls is measured from each beacon and marks are also placed. A cord is pulled between the beacons, and diagonals are measured in the resulting rectangle. If they are equal, the markup is correct. In the center of each side of the future kitchen and at the intersection of the diagonals, it is also necessary to drive in pegs – these are marks for intermediate pillars.
Step 2: Preparing the Foundation
Dig holes with a shovel in places marked with pegs to a depth of 40 cm; the dimensions of the pit should correspond to two cinder blocks laid flat. The walls and bottom of the pits are leveled, a 10 cm layer of sand is covered and rammed. 2 lower cinder blocks are laid on the sand, covered with a solution, a construction pin is inserted in the center so that it rises about 25-30 cm above the soil surface. Then the second row of the cinder block is placed on top across the first, again the solution and the third row. Finished poles must have the same height and be located on the same level.
Step 3: Mounting the bottom rail
The lower trim consists of two rows of timber, knocked together. All bars are generously coated with used oil, paying special attention to cuts, and then dried. In the beams of the lower row, you need to make holes for the studs, and in the upper row, cut grooves for the floor beams. The depth of the grooves corresponds to half the thickness of the beam, and the width is equal to the thickness of the crossbar.
Pieces of roofing material are laid on top of the posts, putting them directly on the studs. The lower bars are applied to the pillars, the location of the stud is marked, holes of the appropriate diameter are drilled. Then they are laid on the foundation, the studs are threaded into the holes and the nuts are tightened. The ends of the studs should not protrude above the surface of the beam, on the contrary, it is better when they are slightly recessed into the tree. Check the strapping with a level around the entire perimeter to avoid distortions. Now you need to lay the top row of beams, nail them, insert the floor beams into the grooves. For greater reliability, it is better to strengthen the internal joints with metal plates with screws.
Step 4. Summer kitchen – log house
Such a summer kitchen has a beautiful appearance, is environmentally friendly and retains heat well inside the room. However, it is extremely important to treat the material with fire-retardant impregnation in order to exclude the possibility of wood damage by insects.
It is worth remembering that the log house will shrink for several years, so it is not recommended to additionally sheathe the walls of the summer kitchen.
In order for the walls to be even inside the room, each log along its entire length is hewn with a planer or grinder. At the ends of the logs, grooves are cut for joining (the “paw” method). This method was not chosen by chance. Firstly, the logs will be used without residue, and secondly, even if the corner joint has a small gap, this will not affect the functionality and convenience of the summer kitchen.
To build a crown, lay two logs opposite each other. We put two more perpendicularly on them. We adjust this square to a single plane so that it clearly lies horizontally on the lower trim of the future summer kitchen. Next, the following logs are marked, cut down and laid, between which we lay a heater, for example, moss or felt.
Openings for doors and windows of the summer kitchen will be cut down in the future. The double-glazed windows themselves and the front door, together with the components, will be installed after the completion of the roof installation process. We bring to your attention a photo report on the construction of a summer kitchen 7×3 m.
Video – Cutting “in the paw”
Step 5 Mounting the roof
Roof trusses are knocked down from boards with a section of 150×50 mm, reinforced inside with spacers and mounted to the upper trim. The ends should protrude beyond the perimeter of the walls by 10-15 cm. The distance between the trusses is approximately 1.5 m. The roof elements are fastened to the trim using metal plates and bolts. After installing the rafters, a ridge is stuffed along the trusses, and then the roof frame is sheathed with boards. A corrugated board, slate or other roofing material is laid on the crate.
Roof covered with onduline
Wrong windows installed
| Summer kitchen 7×3 m | Project |
|---|---|
| Kitchen height | Height from floor to ceiling: 2. 15 m. (+-5 cm). Skate height: 1.5 m (+-5 cm) 15 m. (+-5 cm). Skate height: 1.5 m (+-5 cm)
|
| Support-columnar blocks (one bedside table measuring 400x400x4000 mm consists of four cement blocks measuring 200x200x400, interconnected with a sand-cement mixture). | |
| Base tie | Unplaned timber with a section of 100x150mm. The harness is laid in 1 row on the edge. |
| Floor boards | Rough timber 40×150 mm. with a laying step of 700 mm. |
| Log house | Profiled beam 90×140 mm, natural humidity |
| Log house assembly | The frame is assembled on metal dowels (nails 200 mm). |
| Corner assembly | Corner assembly in “warm corner” |
| Interventional insulation | Linen jute is laid between the rows |
| Partitions | Partition bar 90×140 natural humidity. |
| Floor | Double floor: draft floor: edged board 20 mm; finished floor: grooved floorboard 36 mm. (chamber drying). (chamber drying). It is insulated with KNAUF mineral wool 50 mm., ONDUTIS insulation is laid in 2 layers. |
| Ceiling beams | Rough timber 40×100 mm. with a laying step of 700 mm. |
| Ceiling | The ceiling is hemmed with softwood clapboard (kiln dried). The ceiling is insulated with 50 mm KNAUF mineral wool, ONDUTIS insulation is laid. |
| Truss structure | Block 40×100 mm. with a laying step of 1000 mm. |
| Roof battens | The batten is made of 20 mm edged board. (through the board). |
| Terrace | |
| According to the design of the kitchen – gable. | |
| Gables | Sheathed with clapboard of coniferous species (chamber drying). Ventilation grilles are installed in the kitchen gables (prevent the formation of condensate). |
| Celestials and cornices (roof overhangs) | Sewn up with clapboard of softwood (chamber drying). Overhang width: 350 – 450 mm (4 linings). Overhang width: 350 – 450 mm (4 linings).
|
| Roof material | Ondulin, color to choose from: red, brown, green. |
| Windows | Wooden with double glazing, installed according to the project. The size of window blocks is 1×1.2 m. Casing bars (swarms) are installed in the openings. |
| Doors | Paneled. Casing bars (swarms) are installed in the openings. |
| Room decoration | All corners and joints in the kitchen are closed with a plinth; window, doorways are surrounded by a platband. |
| Terrace | Support poles with compensation lifts (jacks) are installed for shrinkage. Terrace finishing: railings – carved, balusters – chiselled. Steps are installed at the entrance. |
Step 6. Arrangement of the kitchen
When the basic processes are completed, you should come to grips with the interior arrangement of the kitchen. The walls can be sheathed with plastic or, since the frame sheathed with plywood does not look very aesthetically pleasing. Then they install a stove, a sink, connect electricity and water, and arrange kitchen furniture. On this, the construction of a closed kitchen can be considered completed.
Video – DIY summer kitchen
At the dacha, you simply need a room where in the warm season you could cook dinner or do conservation for the winter. And even if there is a large house on the site, every hostess simply dreams of a summer version of a closed-type kitchen.
But how inexpensively to make such a design with their own hands, users will learn by reading this article.
Features and types of buildings
Closed summer kitchen is a full-fledged detached building with running water and electricity. A great place for receiving guests in the warm season, family dinners and friendly gatherings in the evenings. This is the right solution for regions with rainy summers and early frosts. However, it is not worth using such a design in winter, unless the owners have worried about heating in advance.
Such a kitchen can be an independent building or an extension to the main house, utility block or bathhouse. It can be equipped with a fireplace, barbecue or oven.
An interesting layout option is a kitchen-house with a terrace or a veranda. All the necessary kitchen appliances and equipment are compactly placed inside, and a dining area is formed under the canopy.
In the villages, a variety of buildings with a cellar and barbecue is preferred. But you need to take into account the fact that the walls of the basement will become the upper part of the foundation of the kitchen, so they must be made of the most durable material.
It is important to note that if there is no possibility to conduct electricity on the territory of the site, then the right decision would be to purchase a generator that runs on diesel fuel, which will provide light for both the building and kitchen appliances.
The erection of a closed type structure is a laborious process that requires precise calculations and drawings of every detail of the building.
Designing a project with the correct dimensions will speed up construction and help avoid mistakes.
Site selection and structural design
The initial stage in the construction of a summer kitchen in a summer cottage is the choice of location, and then the design of all its components. And so that the result of the work does not disappoint, you need to remember a few features.
The best options for building materials
The choice of building materials directly depends not only on the period of operation, the preferences of the owners, but also on financial capabilities. But today there are many practical examples of successful combinations of cheap materials with more expensive ones.
During the construction of a summer building, the following are most in demand:
- bricks;
- concrete;
- polycarbonate;
- natural stone;
- corrugated board;
- wood;
- lining;
- aluminium.

We must not forget that the summer cottage should emphasize the beauty of the future construction, so it would be appropriate to lay paths of gravel or tiles, plant flowers and perennial shrubs. And if there are financial opportunities to build an artificial pond.
If the area is surrounded by a brick fence, it is good to build a kitchen from the same material or using natural stone. Such a structure is not afraid of the influence of the external environment and will stand for a single decade.
It is much easier to make a prefabricated indoor kitchen from timber. Such a project will be less expensive, but every detail of the building will require constant care and processing. In addition, wood wears out much faster than brick or stone.
For flooring use:
- laminate;
- parquet;
- linoleum;
- decorative tiles.
The roof can be covered with:
- corrugated board;
- soft roofing;
- metal tiles.

Exterior cladding of the building with siding elements will give the kitchen a modern look.
Foundation laying
Having decided on the place and formed the design of the structure, it is necessary to start building the foundation of the building.
When planning an open version of the summer kitchen, one could simply make a small depression in the ground over the entire area of the future structure, fill it with sand. Give time to stand a little, and lay out a layer of bricks or boards. But the basis of a closed kitchen should be a durable and solid foundation that requires phased laying.
If the flooring is to be made of decorative tiles, the work surface must first be sanded or a smooth cement screed.
Photo: monolithic foundation ready for construction
Wall construction
If the owners of the summer kitchen plan to use it in late autumn during the first frosts, you need to take care of strong walls so that the room inside does not freeze under the influence of low temperatures. Therefore, in such cases, it is better to build masonry half or a whole brick thick.
Photo: Bricklaying process with lace
Wooden building enthusiasts will assemble the walls much faster. Their basis will be a frame made of timber. And as fastening elements it is better to use metal corners and self-tapping screws. The outer part of the walls can be sheathed with a thin layer of boards.
Interior finishing is done with plasterboard, plastic, clapboard or plaster.
Roof installation
The roof of a closed kitchen should be durable and practical. Therefore, when purchasing materials for its installation, you can opt for.
Various types of summer kitchens allow you to build this structure in almost any house in various areas. Kitchens are either closed or open. The simplest open-type summer kitchen is a terrace equipped with all necessary kitchen equipment and kitchen furniture. Closed summer kitchens are a veranda, closed partially or entirely.
Closed summer kitchen in the country house (photo)
Whatever the design of the open summer kitchen, it is traditionally divided into two main zones – a place for cooking and a living-dining room. The minimum set for the “culinary zone” includes a stove, oven or grill-fireplace, cabinets and shelves for kitchen utensils and utensils, a work surface or cutting table and a sink.
Summer kitchens, equipped in buildings separate from the house, can also be open or closed according to the constructive solution.
Summer kitchen in the form of a house in the photo
It can be an open summer kitchen in the country or a kitchen in the form of a light frame house (often not heated), although it happens that such a house is built of brick and even equipped with a fireplace or stove.
An open kitchen is a building without walls, when the effect of free space is visually created. Such a kitchen may have a canopy or a roof on pillars, or not have a roof at all, being at best under the branches of a sprawling tree.
In this case, there is a feeling of complete unity with nature.
The open kitchen can be built as a porch or pergola. Its main elements are kitchen furniture (table, benches, chairs), a sink and a stove for cooking.
The main advantage of open kitchens, in addition to unity with nature, is that they do not need to be ventilated and they are not hot in summer.
Usually, when building an open kitchen, the supports and the roof are made of wood, and natural and artificial stone are used for the foundation.
If a stove is being built, it is usually lined with stone as well. Small cash costs make the arrangement of an open-type summer kitchen inexpensive.
In addition, the construction does not involve complex work and the use of equipment, so building such a summer kitchen is also quite simple in technical terms. So we can safely say that this is a good option for beginner builders.
All outdoor summer kitchens have the same benefits:
- insignificant costs of building materials during construction;
- much faster and easier construction;
- no need for expensive earthworks and roofing;
- cooking outdoors in summer is always more pleasant than indoors;
- a great opportunity for both family outdoor recreation and celebrations with a large number of guests;
- use of barbecue, barbecue or grill for cooking meat dishes;
- minimum fire hazard of such structures;
- Significantly lower overall project cost than a closed kitchen.

Summer kitchens of an open type also have disadvantages, which include:
- inability to use the kitchen during the cold season, as well as in windy weather and during heavy rain;
- unprotected working area of the kitchen from dust, which requires additional efforts during cleaning;
- attacks of mosquitoes and other insects in the evening;
- not being able to leave food overnight because it could be stolen by animals or birds;
- impossibility to leave equipment and valuables that attract thieves overnight;
- impossible to use as additional housing even in summer;
- the need to hide furniture and other interior items during the rain, as well as to put them away for the winter;
- fulfillment of only one function – as a place for cooking and eating in the fresh air.
A summer kitchen with a closed veranda is very similar to an ordinary small house with walls, a roof, windows and a door. This makes it possible to use them in any weather and, if heating is provided (although this is usually not done), even in winter.
Closed kitchen on the veranda (photo)
Closed kitchen on the veranda in the country house, in addition to its main function, can be used as an overnight stay for guests, a hunting lodge, and in winter – as a storage room. Such a summer kitchen with an open terrace is usually built from plasterboard, clapboard or plywood, and more durable structures designed for many years are built from brick, foam blocks or stone.
Look at the kitchen veranda in the photo, which illustrates a successful layout:
The main advantages of the closed building are:
- protection of the room from dust, wind, precipitation and insects, so you will not have to clean here as often as it is required in open kitchens;
- if there is heating, the building can be used in winter;
- the ability to safely leave groceries, appliances and other valuables in the closed kitchen at night, especially if the room is locked;
- use as a guest house;
- Possibility of combining with other additional premises – sauna, cellar, workshop or garage.

The main disadvantages of a closed summer kitchen with an open veranda are the features of operation:
- more building materials and more complex construction, including labor-intensive work that requires the involvement of assistants and equipment;
- the need for careful drafting, as well as the calculation of the foundation, truss system and other components of the building, as in the construction of a house;
- a significant increase in the cost of construction in general and a longer construction period.
In addition to general information, it is worth considering in more detail the varieties of open and closed summer kitchen options.
For example, a summer kitchen-veranda is built as an extension to a country house. When erecting it, it should be borne in mind that, like any extension, it should become a harmonious continuation of the house, fit into its design solution and at the same time retain its main function – to be a kitchen and a dining-living room, and not become a hallway.
The construction of a summer kitchen in the form of a veranda should begin with laying the foundation. Its depth should be equal to the depth of the foundation of the house, so that the extension does not come off in winter. Then the frame for the walls is installed, the outer skin is made and the shed roof is covered.
Ideally, the cottage and porch should have the same roof covering, but if the veranda is added later, its roof or canopy should be combined with the main roof both from an aesthetic point of view and from a technical standpoint (so that there is no leakage during rain, etc. .).
To make the kitchen-porch more light and airy, you can install large hinged windows or glaze the entire front or side parts.
The open-plan kitchen is a terrace-like structure due to a significant extension of the porch. In this case, support beams are installed along the wall of the house, on which an inclined canopy is laid on top.
If the terrace is on a well-leveled site and there are no problems with water accumulation, the floor can be laid directly on the ground – it can be just a paving slab. To protect the terrace from any bad weather (rain, wind, etc.) will allow side partitions (both capital and decorative) or, for example, waterproof curtains. You can build pergolas and decorate them with climbing plants or plant a hedge of shrubs that will decorate the terrace and provide a pleasant coolness on hot summer evenings.
When constructing a summer kitchen-gazebo, one cannot do without a columnar or strip foundation. Racks of a frame made of brick, stone or timber are installed on it at the corners, and then the whole structure is fixed with a roof made of light roofing material, such as ondulin, bituminous sheets, etc. Buildings of this type are more than all other types of summer kitchens suitable for installing a barbecue, barbecue in them or stoves.
In such a kitchen it is also very convenient to process harvested crops without fear of wind or rain and without worrying about cleanliness and ventilation of the room from kitchen aromas.
Openings between the counters of such a summer kitchen can be left open or sewn up one of the walls to install kitchen cabinets and shelves. You can arrange pergolas with climbing plants, decorate openings with textile curtains, lattice wooden panels.
Sliding or removable partitions can be provided, as well as roller blinds to open them in good weather.
Other summer kitchen options can be formed on the basis of existing ones, for example, if the gazebo is glazed or hinged windows are made, it can also serve in the cold season, especially if the kitchen is equipped with a fireplace or stove.
Such variants of summer kitchens in the country as a house are almost a full-fledged dwelling, therefore, its construction requires more effort in comparison with the same gazebo. Here you will need a reliable foundation (preferably monolithic), walls, a reliable roof, you will need to install windows and doors. But such a house will be multifunctional.
In addition to the kitchen, it is possible to equip a cellar in it, then the construction will need to start with digging a foundation pit, and the walls of the cellar will become the foundation for the ground part of the building. The house can be supplemented with a terrace or veranda, which in this case will serve as an outdoor living room with a dining area with a large table, chairs, benches, armchairs, and cooking will take place inside the house.
Summer kitchen with cooking equipment on the photo
A summer kitchen in a country house must have cooking equipment. Usually, electric or gas stoves are used for everyday cooking, but some summer residents choose a more exotic option – a wood-burning stove, fireplace, barbecue or barbecue, which should be made of refractory bricks. And in this case, you should think in advance about the fire safety of the entire structure and a high-quality ventilation system. Such types of hearth not only make the summer kitchen cozy, but also contribute to significant savings – while firewood is burning in the stove, food is not only cooked, but the room is also warmed up. Well, talking about how tasty and healthy food cooked on an open fire and fresh air is completely superfluous.
When planning to equip the kitchen with a fireplace, barbecue or barbecue, it must be taken into account that in this case the room should be as ventilated as possible. You can make such a focus temporary or permanent. For example, there are collapsible models of barbecues and barbecues, which, with the onset of cold weather, can be safely stored away until the next summer season.
If it is planned to build a summer kitchen in the form of a house, it is possible to fold a solid refractory brick oven in it – with various compartments and additional devices.
A kitchen with a sauna in the photo
Recently, complex structures have become very popular, including, in addition to the summer kitchen, other country buildings, such as a bathhouse, a terrace, a hunting lodge, etc. Depending on the desire of the owners, a combination of such structural elements can be anything, and they are all built on the same common foundation. At the same time, the amount of materials required for the construction of structures is reduced, which allows significant savings in construction. For example, a common roof is much cheaper than the roof of several separate buildings. There is also no need to lay many paths connecting various buildings on the site, since in this case all objects will be in one place.
As a result, it will be more profitable to build a complete structure in many respects than to build disparate premises. In addition, a complex designed in the same style and built from matching materials will look much more attractive from the outside than several separate structures built at different times and from various materials.
In this case, energy resources for heating are saved, and in general, the organization of electrification, water supply and sewerage is simplified. Finally, less land will be required for construction than several buildings, and in general it will be much more convenient to move from one room to another if they are all under the same roof.
There are several options for complex buildings. For example, one of them is a summer kitchen in the form of a house with a barbecue and a veranda, in which the owners can not only have a good time themselves, but also meet guests. The house can be made as one- or two-room, in which case the second room can be used as a guest room. Light comfortable furniture can be placed on the veranda to have breakfast, lunch and even dinner in the summer, and during rain or cool weather, the dining room can be moved inside the house. Naturally, the roof for the entire structure should be the same.
Another option is a summer kitchen with barbecue and gazebo. In this case, it is also possible to do everything under one roof. The gazebo can be open or glazed, and the summer kitchen can also be closed or open. The choice of the best option depends only on the imagination of the owner and his budget.
Another popular option is a summer kitchen with a stove and a sauna, which can be used not only in summer, because both the kitchen and the sauna can be heated with a stove all year round. Often, the beauty of using a bath can be felt in winter, when the temperature contrast in the bath and on the street is the greatest, which causes an inexpressible feeling.
Video: Variants of summer kitchens
No matter how convenient and thoughtful the arrangement of a country house would be, it is rare that a country house is complete without a do-it-yourself summer kitchen. From early spring to deep autumn cold, most of the cooking, harvesting, processing and conservation of the harvest takes place in the summer kitchen. Here they prepare food for the whole family, relax in the summer in the evening hours, so the kitchen can rightly be called the central place in the country.
How to find the right solution for a summer kitchen
There are about as many projects and options for a summer country kitchen as there are cottages themselves. Often, to save money, the owners choose the simplest schemes for an open summer kitchen in the form of a rebuilt gazebo or terrace. The summer kitchen is usually used as an auxiliary room in order to rid the house of smells and hot air flows from the stove, and the owners and guests from the suffocating atmosphere in summer sometimes. Most of the room is closed from rain and sun with awnings and false walls, but all the same, open summer kitchens, very beautiful and elegant in the pictures, actually remain inhabited only three or four months a year. In the cool and rainy season, the open summer kitchen turns into a country shed for inventory, and the owners have to move into the house, forgetting about outdoor recreation.
From a practical point of view, closed summer kitchens in the country are more convenient. Properly selected dimensions and arrangement of space will ensure comfortable conditions in the kitchen room no worse than in the open version. The kitchen area in the country house is a living organism, in which everything is important, from the location of the building to the nuances of the interior, every detail must be considered, drawn on paper and even look at the photos of the projects of the closed summer kitchen in the country, given in available sources.
Initially, before putting the main idea of the project on paper, formulate for yourself options for solving the most fundamental technical problems:
Tip!
The most rational solution would be to plan a summer kitchen at the design stage of a country house and the location of the main buildings.
In this case, two buildings can be made on the same foundation and even with a common wall, which greatly simplifies and reduces the cost of construction estimates.
Where to build a closed kitchen
it is needed on the leeward side, closer to the well, away from the septic tank or drain pit.
There are few options for the location of the closed summer kitchen:
Important!
A closed kitchen, unlike an open version, will require a full-fledged foundation that holds a relatively massive structure of the building.
The construction of a remote closed kitchen costs a little more, but there are no problems with leveling the foundations and roofs of the two buildings, moreover, the design of the summer kitchen can be made completely different from the main summer cottage building.
In such a room, you can put a small gas stove with a propane tank, which will be enough to heat the room and cook food for the family.
We build a closed kitchen with our own hands
The arrangement of a closed-type summer kitchen is selected depending on the climate and whether the cottage is used from November to March. For the middle lane and northern latitudes, it can be advised to build a closed kitchen in the form of an extension to the cottage from a foam block, on a solid foundation. Foam concrete walls perfectly retain heat in the room, even with a significant temperature difference, and during the summer heat they work like a thermos.
For the southern regions, a wooden frame structure with a large glazing area and, importantly, high ceilings will be more convenient. Such a closed kitchen device provides excellent ventilation, even if the walls are finished with drywall or OSB boards. In addition, in the summer heat it is much more pleasant to be in a wooden house than in a building made of concrete, stone or corrugated board.
Foam block summer kitchen
The technology for building a closed summer kitchen made of foam concrete is practically the same as the construction scheme for any other small-sized foam concrete outbuildings. The material for the kitchen box will cost an order of magnitude cheaper, and with proper design, even independent heating will not be required, a small cast-iron stove-stove will suffice.
It will be possible to start a closed kitchen not earlier than in the fourth or fifth year of completion of the dacha construction. We make the foundation for the kitchen room in the same way as for the cottage. Most often, this is a low-depth strip foundation, reinforced with steel reinforcement, which will need to be connected to the steel frame of the cottage’s foundation. At the same time, it will be necessary to lay channels for the sewer pipe and water supply.
The floor in the closed kitchen must be insulated by backfilling with expanded clay under the concrete screed or by laying sheet XPS. If the dimensions of the closed kitchen box do not exceed 3×4 m, then the number of reinforcing bar belts can be reduced to two, one each in the upper and lower wall trim.
In about half a year, the box will settle, and it will be possible to lay the roof, insert windows, and perform decorative finishing. A closed summer kitchen of this type in the autumn-winter period can be used as an additional room for flowers and seedlings. In a similar way, you can build a closed kitchen, taken out separately from the main building of the cottage. But in practice, such projects are implemented less frequently, since they cost much more than an extension.
The internal walls can be covered with sand-cement plaster, and the ceiling can be sewn up with plasterboard, painted with a water-based emulsion, as in the living quarters of a summer house, but not everything is so simple. Any experienced summer resident will confirm that the interior design of a closed summer kitchen is seriously different from a regular kitchen:
Important!
In the stone room of the closed summer kitchen, you can easily build a fireplace or a wood-burning stove. Often, for the sake of being able to use a brick or stone stove with wood in the summer, a summer kitchen is built in the country.
Taking into account the fact that in a relatively short period of harvesting, harvesting and conservation simply a huge amount of gas and electricity is spent, this solution will help to save a lot on energy resources.
In addition, an extension to the house can be carried out on a pile or column basis, due to docking with the bearing wall of the cottage, it is possible to provide the necessary rigidity of the box without the use of traditional foam concrete reinforcing belts. If you assemble an extension from a steel profile, then the walls can be made entirely of glass, or in this case from a double-glazed window, as in the photo.
Closed combined and wooden summer kitchens
It is not necessary to build a summer kitchen box entirely of stone and foam concrete. Often, a full-fledged foundation and part of the walls are built from concrete and brick to the level of window openings. The rest of the walls from the middle are made using frame technology from a metal profile, steel pipes or wooden beams. Such designs allow you to build a brick oven or install a cast-iron firebox, abandon the ceiling, and make the roof with a large angle of inclination of the gable roof.
High ceilings guarantee a comfortable stay in the kitchen at any time of the year, in the summer heat and winter cold.
Closed kitchen designs are not limited to stone and combined buildings. It makes no sense to build a closed-type catering unit from stone and brick if the dacha is used only in the spring and summer seasons. It is easier and cheaper to assemble a frame or completely wooden version, it will be cheaper and more convenient.
One of the most popular solutions is to use closed wooden arbors for summer cottages. This simplifies the development of the layout of the summer kitchen and reduces the cost of designing the building. We can cite as an example one of the most popular Finnish buildings on the project “Villa Albatros”, often used as a summer wooden house, a closed wooden arbor, and of course, a summer kitchen.
The advantages of using such a scheme are obvious:
- The construction of the summer kitchen building is almost entirely made of pine boards and timber. This simplifies construction, allows you to assemble a box of premises in a matter of days;
- Closed kitchen has a huge glass area. In good weather, open windows allow you to get the atmosphere and conditions in the indoor summer kitchen at a level comparable to outdoor areas and sheds;
- The foundation is made of piles, asbestos-cement pipes. In one fell swoop, the problem of waterproofing and insulation of a closed building is solved by backfilling with expanded clay and a laid sheet of extruded polystyrene.
 This simplifies construction, allows you to assemble a box of premises in a matter of days;
 Please note!
The octagonal shape of the building is very well chosen. In addition to optimal use of the internal space, the rounded side walls give additional stability to the frame structure, even in open, well-ventilated summer cottage areas.
The unusual shape of the walls requires the use of a special form of strapping and joists under the plank floor, such as shown in the diagram. The roof of the structure has to be assembled from separate eight slopes, but the original dome technology, as in the video:
The floor inside the enclosed space of the summer kitchen can be left with a plank, lay a laminated OSB board or linoleum. If a wooden beam and a board treated with an antiseptic and preservative are used for the summer kitchen, then there are no problems with removing excess moisture in the atmosphere of the room. Otherwise, after a few months, the wood will begin to intensively absorb water and deform with the formation of cracks and crevices.
If necessary, the closed summer kitchen can be insulated along the outer surface of the walls using the traditional technology shown in the diagram. Mineral felt is laid on the walls, a plaster mesh is attached and a layer of soil and decorative plaster is applied. The corners and the plinth are lined with artificial stone.
In a similar way, you can make a decorative finish in the style of a Danish house, when the surface of the kitchen walls is finished with waterproof plasterboard, and the elements of the planks and beams of the frame, the ceiling are left open, as in the photo.
Interesting solutions in the construction of a closed kitchen
Often, when building a summer kitchen, you have to look for original solutions to the most painful problems associated with the arrangement and layout of the premises. Perhaps, from the point of view of design, such buildings are not masterpieces of design, but in practical terms, without a doubt, these are the most convenient and thoughtful solutions.
Optimal location of the stove in a closed kitchen
For example, fire safety regulations require the removal of barbecues, barbecues, Finnish braziers with an open flame of the firebox at least two meters away from wooden and flammable materials. If you need to install a brazier with an exhaust hood in the summer kitchen, then the easiest way to do this is according to the scheme shown in the photo.
The design of the closed kitchen is made in the form of an extension to the frame cottage. This solution allows you to perform summer construction is very light and rigid. The strength of the frame installed on the pile foundation is sufficient to make one of the side walls in the form of a glass panel for the entire height of the ceilings. The main problem is that a heavy stove or fireplace wall with a chimney was taken outside the summer building and lined with natural stone and painted corrugated steel sheet.
Traditionally, a wood-burning stove requires some modifications to the interior of the summer kitchen, for example, walls and ceilings are usually clad in wood in the style of log cabins or timber. The area around the stove in the project must be laid out with non-combustible materials, especially in the area where the chimney adjoins the floor beams and in front of the ash pan and firebox.
An excellent option can be considered the arrangement of a summer kitchen in the country with an electric stove and oven. The availability of electricity is critical for processing and storing food, but the light in the country house can disappear for many hours, so often there is a gas oven with a cylinder in the interior along with a microwave and a conventional electric oven. In addition, experienced summer residents know that it is difficult to preserve and process harvested crops with an electric stove in the country house into salads and jam due to the low heat output.
Variants of glazing and interior of a closed summer kitchen
In summer heat, a closed kitchen in a country house can turn into a real hell if the size of the windows and the operation of the ventilation systems leave much to be desired. The simplest solution involves installing four to five windows for a timber frame building instead of the traditional two window openings.
The sashes can be opened in ventilation mode or thrown wide open, depending on the weather conditions and the air temperature in the country house.
In addition, the traditional stone enclosed kitchen has always been inferior to the open plan in terms of illumination and the amount of sunlight penetrating into the room. Today, for a modern dacha and summer kitchen, the maximum amount of natural light is becoming an unrecognized standard in the construction of summer country houses.
Regardless of whether the closed kitchen is attached to the dacha or is designed as a separate building, the larger the window, the greater the comfort inside the building. In this case, it is important not only to glaze the closed kitchen, but to correctly position the window openings in the structure of the building.
Traditionally, the summer closed kitchen in the country is divided into two main areas – dining and working. The place where family members are located for lunch or relaxing over a cup of tea should be as open to sunlight as possible. It does not make sense to equip the working area with large windows, because due to high humidity and temperature changes, the glass will regularly fog up with condensate and fumes from everything that is cooked on the stove.
In addition, it is important to correctly install the window for the brick stove, if there is one in the summer room. Such a window is placed to take air from outside the kitchen in cold weather in order to avoid drafts and heat loss inside the room.
For small summer kitchens, often combined with a closed porch, as an exception, the size of the windows can be increased to the maximum.
For a summer kitchen combined with a gazebo and a dining room, the size of the windows is increased to the maximum, the larger the room, the more difficult it is to achieve a good level of illumination. The window can reach the basement and occupy more than half of the wall surface.
The interior and interior design of the summer kitchen turns out to be very nice, the decoration of which uses tinted wood and natural stone. Often, such solutions are resorted to if the summer kitchen is part of a summer house built from timber or rounded logs.
For more traditional stone and frame buildings, clapboard or decorative plaster is used on the inside. Part of the walls adjacent to the stove or stove can be lined with tiles or ceramic mosaics.
To get rid of the shortcomings inherent in closed and open schemes of the summer catering unit, often combined options are built in the country, in which part of the walls and window frames are removable. At the same time, the walls, floor and ceiling are insulated, and after the return of the removed glazing, such rooms are easily converted into a closed or winter version.
Conclusion
The most unusual and practical of all closed-type summer kitchens can be called a building in the country, assembled from a 20-foot sea container, photo. In such a room it is difficult to be in the heat, but in spring and autumn the building fully lives up to expectations. If the site for the future dacha was just purchased and does not have full-fledged buildings suitable for temporary use, like a kitchen, such a closed building can simultaneously serve as a storage place for inventory and some accessories, even a scooter or walk-behind tractor. Subsequently, it is enough to overlay the room with bricks, make a full-fledged stove and sewerage, and you can perfectly cook dinners and preserve fruits – vegetables in the country for many more years.
130 photos of the best extension options
When for some reason it becomes necessary to increase the living space of a country house, the easiest and most economical way to do this is to build a frame extension to the house. Its main advantage lies in the fact that it can be erected on its own in the shortest possible time and no serious carpentry tool skills are required.
In order for the building to turn out not only useful, but also beautiful, it is better to familiarize yourself in advance with how it should be built.
Review content:
- Purpose of the extension
- What material to choose for the walls of the extension?
- Extension made of high-quality SIP panels
- Photo of the extension to the house
Purpose of the extension
To avoid the transformation of the extension in the future, it is advisable to carefully consider all the details of the structure being built even during planning. First of all, it is important to decide what is the purpose of the do-it-yourself extension to the house.
The first and most common option is an additional room. In fact, building another room according to the scheme will be similar to building a house with a small area. The main thing is not to forget each of the structures of the new building should be properly insulated so that the heating of the room is effective and in the future it is simply to avoid heat loss.
This is not the moment on which you can save, as well as on the insulation of the foundation and the implementation of waterproofing, because otherwise mold will form on the walls and dampness will simply make it impossible even for a short stay in the room.
Please note! Wooden windows for summer cottages are presented here at the most affordable prices. Here you can perform calculations and place an order for windows.
The second option is a bathroom or kitchen. After looking at the photo of the extension to the house, you probably already understood that in this case the main thing is to bring all the necessary engineering communications in advance before starting the construction of the foundation.
It is also necessary to insulate well the places where sewer and water pipes pass through the foundation. An important point: in order to save money, it is better to carry out all the work during construction.
![]()
Another popular option for an extension is a veranda. It can be open type or glazed. Most often used for recreation in the summer. Due to the fact that usually the building is not additionally heated, the structure is quite easy in terms of construction.
All that is needed is a roof on supports and decking with walls. When building a veranda, an important point is that it must necessarily be combined in size, materials used for construction and style with the house.
What material should I choose for the outbuilding walls?
Thinking about how to make an extension, first of all, you need to think about what materials will be used for the walls. With panel or frame technology, as a rule, this is a sandwich:
- Wind protection, i.e. external waterproofing film
- Stone wool or Styrofoam sandwiched between OSB sheets
- Vapor barrier membrane for internal protection
If you are interested in expensive methods, then you can masonry from any lightweight blocks. It can be foam or aerated concrete. When purchasing foam concrete blocks for a developer without any building practice, it is worth considering that this material has its own characteristics:
Firstly, in almost 90% of cases, even the walls made today from the most expensive foam concrete will be covered with a large number of small cracks in the future.
Secondly, all facades will need to be plastered with pre-selected compositions directly on the grid.
When choosing walls from various foamed concretes, it is worth paying attention to the fact that for any roofing materials, such as ceramic / slate tiles, all of them are not strong enough. For this reason, the ideal option for sheltering a building is corrugated board or ondulin.
Outbuilding made of quality SIP panels
Today, one of the most budgetary options for self-construction is an extension to the house, made of popular SIP panels, which have standard sizes. During construction, a number of nuances should be taken into account.
All screw piles with a wooden grillage, that is, the beam is always fixed in specially designated heads with large nails.
It is provided that all communications must be removed inside the panels, that is, the wiring of engineering systems here is of a hidden type.
Due to the fact that the roof lathing and ceilings are made of the same material, an equal resource is provided for all load-bearing structures.
There are no cold bridges, which guarantees the rational location of the entire heating circuit in the future extension.
Since this material is self-supporting and structural, according to the description, the timber used to perform their mandatory joining does not serve as the load-bearing frame of the house. It will be possible to achieve strength and absolute rigidity of the completed structure only after the installation of the last of the panels.
In conclusion, it is worth noting that extensions consisting of several floors are rare, so, as a rule, a minimum amount of sawn timber is spent on makeshift scaffolding.
And finally, an important point: it is better to legalize an extension to your house in advance in order to avoid unwanted dismantling in the future if the decision of the relevant authorities suddenly turns out to be not positive.
Photo of extension to the house
-
Do-it-yourself observation pit
-
Options and examples of redevelopment of a one-room apartment
-
Redevelopment of a two-room Khrushchev
-
Projects of a bath with a terrace and houses
Summer kitchens for summer cottages – photos, types, advantages, building a summer kitchen with your own hands
Summer kitchens function as a small garden house, a gazebo with barbecue, a cozy seating area or a full-fledged dining room. They can become a favorite pastime of your relatives, friends and household.
Modern veranda kitchen
Stone summer kitchen with tiled roof
Art Nouveau outdoor gazebo
Outdoor gazebo in the center of the garden
Original wooden roof summer kitchen
Kitchen-dining room in the Gothic style with stone walls and arched windows
Benefits and features of the summer kitchen
Summer kitchens are equipped by the owners of suburban and summer cottages when landscaping their backyard. They can act as an extension to the house, combined with a veranda, in the event that the area of \u200b\u200bthe site is small. But usually they are always located separately from residential buildings and other outbuildings.
Stone in the walls and floor of the kitchen gazebo
Kitchen-dining room with lounge area
Veranda-dining room with wooden mesh walls
Closed summer kitchen with glass panoramic windows
The advantages of summer kitchens include: or wood harmonizes perfectly with residential buildings).
The only drawback of the summer kitchen is the restrictions on operation in the winter. For the comfort of using the kitchen-dining room at sub-zero temperatures, its additional external and internal insulation is required, as well as equipment with a wood-burning stove or an electric stove. You can find out the prices for summer kitchens in our catalog or order a kitchen according to an individual project.
Summer kitchen with pergola
Outdoor dining room with a beautiful view of the lawn
Wooden annex kitchen
Provence style open kitchen-veranda
Classic summer kitchen decoration
Veranda overlooking the plot
Swedish-style summer kitchen-dining room 9002 Stone 9002 finishing the walls and floor of the summer kitchen
A separate summer kitchen makes it possible to take the cooking process outside the residential building during the warm season. This structure is especially relevant during the season of active conservation, since it allows you to avoid the appearance of excess fumes in the room and increases the comfort of the household.
Depending on the design option, it is possible to equip a sufficiently spacious summer kitchen with a stove to receive a large number of friends, relatives and acquaintances.
Types of summer kitchens
There are many design options and classifications of summer kitchens, but the two largest are two groups:
- Open.
- Closed.
Art Nouveau lounge area
Summer terrace with pergola
The combination of stone and wood in the decoration of the summer kitchen
Open kitchen-dining rooms are simple and affordable. They are ideal for enjoying nature, but cannot be used during the cold season and in adverse weather conditions. To equip an open kitchen-veranda, wooden furniture is usually used, cooking equipment – a skewer, barbecue, barbecue or oven.
To protect against wind, rain and scorching sunlight, outdoor summer kitchens are equipped with special roller blinds, partitions or sliding structures made of fabric, bamboo, straw. They can cover walls from one, several or all sides. But this version of the design of the kitchen-gazebo will not save you from autumn bad weather.
Lounge area with sliding glass windows
Kitchen-living room with a magnificent view of the garden
There are also many closed-type gazebos. Usually, a veranda of a residential building is allocated for their arrangement or a separate extension is built. Typically, such kitchens are small houses with floor-to-ceiling glass windows, which move apart in the hot season. In winter, closed summer kitchens are heated by a stove.
Veranda kitchens can be built using different building materials:
- Brick.
- Wood.
- From timber.
Please note! Plastic and metal are not suitable for the construction of a summer gazebo-dining room, as they create a strong greenhouse effect.
Choosing the location of the summer kitchen
An important stage in the development of a summer kitchen project made of timber, wood, brick or stone is the competent selection of the future location of the building. The speed and ease of construction, as well as the comfort of further operation of the gazebo-dining room, depend on this.
Cozy summer kitchen in rustic style
When choosing the location of the kitchen, you should consider:
- Availability of communications (water supply, sewerage for drains, electrical wiring, gas).
- Distance from the carriageway, rural road (protection from dust, exhaust gases, noise).
- Location of cesspools, compost heaps and other objects with a strong specific odor.
- Distance from trees, shrubs and tall grass (to ensure a high level of fire safety), flammable structures, residential buildings, outbuildings.
Panoramic glazing of the summer kitchen
Please note! When choosing the location of the summer kitchen, it is important to take into account the natural environment. The windows of the gazebo-dining room should preferably overlook a garden, a beautiful pond or any other natural object.
Building a summer kitchen with a do-it-yourself oven
Building a summer dining-kitchen with knowledge of the technology and the nuances of construction will not cause problems. Since it is a simple structure, many summer residents can even cope with the construction on their own.
Construction stages of the summer kitchen:
- Construction of the foundation.
- Erection of walls, enclosing structures, roofs.
- Interior and exterior decoration, decor.
- Arrangement.
If during the construction of the kitchen-gazebo the walls are built from light building materials (stone, foam concrete, brick), then the arrangement of a full-fledged foundation is not required. In this case, a small pit with a depth of no more than 10-15 cm breaks out along the perimeter of the future building, after which it is covered with sand and carefully compacted.
Slabs are laid along the perimeter of the foundation. To prevent sewage, rainwater and pollution from entering the gazebo, the floor of the structure rises 15-20 cm above the ground.
Lightweight foundation construction
Please note! In an open-type summer kitchen, the floor must be arranged at a slight slope (preferably 3-5 degrees), this will help prevent the accumulation of rainwater and the destruction of the structure of the building (for example, when the boards swell or decompose).
When building a gazebo-kitchen of a closed type with stone, brick or heavy walls made of timber, it is worth choosing between columnar and strip foundations. To do this, a pit with a depth of 50 cm breaks out along the perimeter of the building, a formwork with reinforcement is laid, a layer of sand cushion and crushed stone, and cement mortar is poured.
Pillar foundation
When constructing an open summer kitchen with or without an open type oven, a wooden frame is constructed. In the absence of a full-fledged foundation, wooden poles are buried along the perimeter of the building; for greater reliability, the recesses are fixed with concrete mortar.
Next, beam elements are installed, connected with metal corners. From the inside and outside, the summer kitchen is sheathed with decorative finishing material (for example, clapboard, siding panels, plastic, plywood or boards treated with special water-repellent impregnations).
If there is a full-fledged strip or column foundation, when constructing a summer kitchen, a strong and reliable frame made of timber is laid, the points of attachment of which to the foundation are fixed with metal corners. In the future, the construction of walls and other enclosing structures repeats the above process.
Also suitable for wall construction:
- Brick.
- Stone.
- Foam and aerated concrete blocks.
For a summer kitchen, it is rational to equip a shed roof, located at a slight slope. To do this, it is enough to build one wall of the building a little higher than the opposite. When choosing a roofing material, it is worth giving preference to corrugated board, bituminous tiles, polycarbonate, slate, metal tiles, seam roofing.
Tip! For an open-type summer kitchen, it is advisable to select a lightweight polycarbonate roof structure.
Design and equipment of the summer kitchen
It is necessary to select the design and design of the summer kitchen based on the landscape design of the infield. In style, it should correspond to the main residential building. Structures made of timber or wood look very harmonious in one area.
When equipping summer kitchens, special attention should be paid to the stove, especially when arranging a closed-type veranda-dining room. It is usually located in the work area. An economical option is an electric or gas stove, but it is better to give preference to the construction of a brick barbecue, barbecue or a full-fledged wood-burning stove.
Summer kitchen stove
When choosing a stove, consider the following:
- The hearth should be located away from the table and other furniture. Usually it is placed behind a small partition, and when it is located outdoors, it is important to take into account the wind rose.
- When building a stove, a chimney must be provided. It provides good traction and removal of combustion products to the outside.
- Next to the hearth, it is desirable to install working furniture (cupboard for dishes, a table with a cutting surface, a small refrigerator for food storage).
When designing the interior of the summer kitchen, it is necessary to provide for the supply of main communications. Cold water supply and sewerage are not required by all summer residents, and it is important to supply electricity in the first place. Ordinary light bulbs or garden lanterns can be used to illuminate the gazebo and work area.
Please note! When placing lighting elements in an open-type summer kitchen, it is necessary to select moisture-resistant models of lanterns, which will prevent the occurrence of a fire or a short circuit. Along the perimeter of the summer kitchen, you can place LED lamps with rechargeable batteries, which do not require electricity to operate.
You can find out the prices for summer kitchens in our catalog or order a kitchen according to an individual project.
The choice of furniture for the summer kitchen
For arranging a summer kitchen, especially an open type, a soft furniture set is not appropriate. A more practical option is wood furniture with a special moisture-proof impregnation, wicker or rattan. Such a set will not only be used by the owners for a long time, but will also perfectly complement the interior.
The main piece of furniture in the summer kitchen is the table, which can be round, square or rectangular. Benches, chairs, benches or small sofas are installed around it, which for comfort can be supplemented with pillows, soft blankets or other textile attributes.
Kitchen block with stone walls
Please note! Instead of ordinary furniture, the summer kitchen can be decorated with non-standard items – stumps or logs
The summer kitchen will be complemented by bamboo curtains or partitions, which not only reliably protect from the scorching sun, but at the same time do not create the effect of a steam room and stuffiness. The interior of the kitchen-dining room is perfectly complemented by flowerpots with indoor flowers.
A summer kitchen with an oven is an ideal place for a relaxing holiday with friends or family members, a pleasant pastime away from the hustle and bustle of a big city, and enjoying the beauty of nature. It will be the best decoration of any personal plot!
It is profitable to order a summer kitchen in St. Petersburg!
See also:
Gazebo with windows
For the arrangement of a personal plot, more and more often, its owners choose closed gazebos with windows. They are ideal for relaxing retreats, parties and family dinners. And when
Construction of a turnkey summer kitchen
Summer kitchen is indispensable in any country house and suburban area. It is a wonderful comfortable place for outdoor recreation on warm summer days, enjoying the beauty of the surrounding landscape,
Beautiful gazebos: photos, varieties
A beautiful gazebo in the garden or on a country plot is not only a great addition to landscape design, but also a wonderful place for summer holidays. The gazebo can be used for pleasant
Summer kitchen in the country (65 photos)
Cooking in a small kitchen is not a pleasant occupation. Hot air, tightness, constant lack of free space make the cooking process difficult and sometimes unbearable. There is only one way out – to build a separate spacious summer kitchen in the country house, where there is enough space not only to accommodate the working, but also the dining area, with a large and comfortable dining table. About which summer kitchen is most in demand today, and whether it is possible to build it yourself using standard projects and a regular photo, later in our article.
What is a summer kitchen
A summer kitchen in a country house is a building attached to the house or a separate building designed for cooking and relaxing. Depending on the choice of materials and the method of insulation, it can be used both during the warm season and constantly.
The type of construction of the summer kitchen can be open and closed. In the first case, the walls of the building are completely or partially absent. They can be replaced by light curtains or sliding partitions. The closed type has solid walls and windows that reliably cover the kitchen from rain and wind.
Summer kitchen with an attached outdoor terrace
For an experienced carpenter, it will not be difficult to build a rain canopy over the summer kitchen on your own
A summer kitchen with a simple project can be safely erected in just one summer. This will require basic construction skills, the necessary material and tools. Well, for safety net, it is desirable to have one or two assistants, since some types of work will be carried out at height.
Important! Before you start building an object, you need to find a suitable place for it. Not only the aesthetic, but also the practical side of the issue will depend on how correctly this will be done.
Choosing a place for construction
When choosing a suitable place, first of all, you need to consider that the kitchen should not be too remote at home. And the point is not even that it will be easier and cheaper to bring communications, but that it should be within walking distance from the main building. After all, you must admit that every day it is not very convenient to go to cook breakfast, lunch and dinner on the opposite side of the site.
In addition, next to the summer kitchen, there should be no sources with an unpleasant odor. These include a country toilet, an aviary, sheds and cages with animals, fertilizer pits, compost heaps, sewer wells, septic tanks, etc.
Summer kitchen projects with barbecue or brazier use a special way
A modern summer kitchen should be as functional and comfortable as possible.
If there is a tree on the site, it is advisable to plan the summer kitchen in close proximity to it. On hot days, a table and chairs can be placed under its dense crown. It’s no secret that breakfast in the fresh air is doubly pleasant.
However, being carried away by the planning of the future building, one should not forget about the fire safety rules, the neglect of which can lead to not the best consequences.
An open flame in the summer kitchen is allowed if it is at least 8-10 meters away from combustible buildings.
![]()
Deciding on the kitchen project (photo)
In order for the cooking extension to be practical, functional and comfortable, as well as to have an attractive appearance, it is important to choose the right project for it, in which all the nuances and design features will be painted to the smallest detail.
In addition, it is important that the kitchen organically fit into the overall building and does not disturb the surrounding landscape, so it is advisable to choose the same materials for its construction as for the house itself. So you will achieve perfect harmony between the two buildings.
Summer kitchen project with a gable roof
Wooden summer kitchen with a barbecue area
Small wooden summer kitchen with a shed roof
If desired, the summer kitchen can be divided into an open and closed area
Kitchen project with an outdoor terrace and a barbecue area
5 As you may have noticed, many summer kitchen projects whose photos are posted in the article have an original and non-standard design.
This suggests that today the aesthetic component is no less important than the functional one.
Do-it-yourself building construction
When the place and project for the summer kitchen are chosen, you can safely start building it. Like any building, the construction of a summer kitchen is carried out in four stages:
- Marking the site and pouring the foundation.
- Erection of walls (if provided by the project) or supporting pillars.
- Roof construction.
- Interior and exterior finishes.
Foundation
Since this structure is relatively light, there is no need to pour a capital foundation. It is quite possible to get by with tape or pile screw, the main thing is that the process of mixing and pouring concrete is carried out in compliance with the technology.
Important! For those who later do not want to mess with the floor, a foundation made of a monolithic slab is perfect, the upper base of which will be the floor.
![]()
A site with neatly laid paving slabs is perfect as a base for building a summer kitchen
Building a glass summer kitchen may not require a foundation at all. First, a marking is made on the site, which is marked on the plane with fixed pegs with a rope stretched between them. Next, a foundation pit is dug (depth 40-60 cm), along the perimeter of which formwork from boards or moisture-resistant plywood is installed on both sides. Then, in order to avoid heaving of the soil, a backfill is made of compacted seeded sand and crushed stone. Before concrete is poured, reinforcement is lowered into the trench and tied with wire using a special hook. The foundation must stand for at least 30 days. If you are lucky with the weather, you can start construction in 2 weeks.
Monolithic foundation. Having previously marked the site, a foundation pit is dug to a depth of 15-20 cm. To strengthen the soil and protect the slab from groundwater, geotextiles are laid at the bottom of the pit, on top of which a sand cushion is made. Further, the sand is well leveled and tightly compacted by a tamping machine. It remains to put the formwork, tie the reinforcing cage, pour the concrete solution. After complete drying, a reliable and high-quality base for the summer kitchen is ready.
Strip foundation
Monolithic foundation
Important! If you plan to use an open type of summer kitchen, it is recommended to make a slab from a monolithic foundation with a slight slope of 1.5º-2º so that rainwater can flow down it on its own.
Walls and roof
If the walls of the summer kitchen are wooden, their construction begins with the construction of a frame, which is made of metal or wooden bars.
- Large (support) posts are installed in the corners – 200 × 200 mm in size, and additional ones between them – 150 × 150 mm in size.
- Top tie beams are placed on the support bars, which will also serve as the basis for installing the rafters.
- After the rafters are installed, from 50×50 mm bars.
a crate and a counter-lattice are made.
- Further, the entire structure is treated with a special composition against fungus and mold, after which the roofing material is installed.
Beautiful summer kitchen with a beautiful view of the garden
Stylish design of a modern summer kitchen made of natural materials
Attaching a small shed to the kitchen, you get additional space ideal for this type of building. With such walls, the building can be used year-round, the main thing is to make their high-quality insulation from the inside.
An indisputable advantage is that summer kitchen facade made of logs, facing bricks or decorative stone does not require additional finishing. Extra costs come down only to the fact that the wood needs to be sanded and painted, and the stone and brick must be protected from moisture.
Unusual summer kitchen with a terrace, the photo of which is striking in its beauty
Design of a summer kitchen in an ultra-modern style
Original design of a summer kitchen made of dark brick
Summer kitchen made of logs with large floor-to-ceiling windows
If you wish, you can place a swing near the summer kitchen where you can relax and unwind after a meal
Deciding on the facade design , you need to pay attention not only to its shape, size, and functional component, but also to the design of the building.
For a summer residence, it is very important that the style of the outbuildings correspond to the general layout of the entire site as a whole.
This does not mean that the building should be a kind of clone of the main building. Rather, on the contrary, they should not replace, but complement each other, creating common stylistic touches.
No newfangled device can compare with a real Russian oven
Summer kitchen made in a classic style
A wonderful combination of white and red bricks
Particular attention in the summer kitchen should also be paid to the working and dining area, where everything should be as rational and efficient as possible. comfortable. Competently organize the space will help you placed below photo of summer kitchens , which clearly demonstrates how beautifully and correctly design various areas.
The work area is an important element in the interior. Try to make it comfortable and practical
A successful combination of natural stone and steel in the design of the summer kitchen
Beautiful, light and relaxed interior of the summer kitchen attached to the house
Clean air has a beneficial effect not only on health, but also on human appetite
- Furniture .
Using upholstered furniture in an open-type summer kitchen is not a good idea. In most cases, it is made of foam rubber, which absorbs moisture well. Therefore, it is better to use wooden or plastic benches and chairs with removable cushions. Also, various types of wicker furniture will fit well into the interior, which goes well with any finishing materials. For example, a rattan chair or a wicker chair will look very nice. If a closed type of kitchen is used, then the flight of fancy should not be limited by anything. In this case, you can use any furniture, including upholstered.
- Lighting . Proper lighting of the summer kitchen in the country, regardless of its size, is an important stage of repair work. A chandelier suspended in the center or a single lamp cannot always cope with the task assigned to it. To illuminate all zones, it is desirable to use more than one type of lighting. Above the working area, it is appropriate to place spotlights in tandem with an LED strip, and hang a large chandelier above the table.