How to use hip runners roofing: Hip Runners | Ridge Runners Roofing
Pair of Hip Runners only £43.84
Delivery
For delivery to mainland UK.
How much does delivery cost?
Delivery charges will vary and will depend on the manufacturer, weight, size and delivery location. The cost is automatically calculated when you add items to the shopping basket.
How long will I wait for my delivery?
The estimated delivery times are shown on each product page, we will email you each step of the way to keep you informed. The majority of products can be delivered within 3-5 working days.We will advise you if the delivery period is different from than stated on our website. Please note that, due to Coronavirus, deliveries may take longer than advertised.
Do you offer NEXT DAY delivery?
We currently offer next day delivery on certain brands. If you have a particular item that you require quicker than the guide on our website, please contact our sales team on 01858 455055 during office hours, they will be able to confirm whether a quicker delivery is possible.
What if my delivery doesn’t turn up on time?
Please contact our sales office on 01858 455055 or email [email protected] and we will advise on the status of your order. While we make every effort to ensure orders are delivered by the date required, we cannot guarantee availability from the manufacturer or the manufacturer’s delivery schedules.
Do you offer FREE Delivery if I spend a substantial amount?
Not as standard, we show the delivery charges separate once you go to the checkout so it is clear what you are paying for the products and delivery costs. If you are ordering larger quantities please contact our sales team who will be able to confirm if this is possible.
Do you deliver on Weekends?
Not as standard, our deliveries are made Monday to Friday. If you do need an urgent Saturday delivery please contact our sales team on 01858 455055 during office hours who will be able to confirm. This will incur a premium charge if possible.
Do you deliver to Northern Ireland/Channel Islands/The Scottish Highlands/Isle of Wight?
Some suppliers/couriers will deliver to these areas but not all, please contact our sales team on 01858 455055 or email [email protected] during office hours for confirmation. If we are able to deliver the product you require, additional transport costs will apply, we will be able to confirm this to you. These additional costs are based on the manufacturer, distributor or courier providing the shipping on our behalf.
Are there separate delivery rules for Republic of Ireland post-Brexit?
We can deliver to the ROI but will need a customers EORI reference before we can process an order, if you need a delivery to a business address. This is for business addresses only. Please note, any inbound additional customs fees have to be paid by the customer on receipt of delivery, Roof Giant are not liable for these additional costs.
What should I do when my order arrives?
Please check your order as soon as it arrives to ensure it is as requested, and to check for any damage or items missing. All damages/items missing should be reported to the driver and signed for as damaged/and or missing. Please contact Roof Giant within 24-48 hours with full details to enable us to inform the supplier.
Orders signed for “unchecked” will be deemed to have been received in good condition with no guarantee of replacement or refund. As soon as the order has been delivered to your requested delivery address, the risk of any damage or loss passes to you.
Do additional charges apply if I am not in to receive the order?
All delivery charges are based on the customer being able to accept the goods, please make sure you are at the delivery address to avoid any additional charges chargeable by the manufacturer, distributor or courier responsible for re-delivery.
What happens if we have a failed delivery?
Roof Giant will always update you if a delivery date changes. Should the delivery fail because there is no one available to accept the order please note a re-stock and failed delivery charge may apply. Please contact Roof Giant to discuss re-delivery and charges that apply. Please note these are set by the supplier and not Roof Giant therefore will be passed on to you the customer.
What if my delivery doesn’t turn up on time?
Due to current issues across the UK logistics and courier network, some deliveries can take longer than normal which is, unfortunately, impacting customers across the UK.
We always aim to deliver on the delivery date we provide and ship goods within the lead times advertised at the time of purchase on our website. These are subject to change due to availability. We cannot accept responsibility for any delays that are outside of our control, provided we deliver the goods within a reasonable period. If we can’t deliver your items within this reasonable period, you have the right to cancel your order for a full refund, including any delivery charges. Some exemptions apply to bespoke or made to order goods.
We cannot accept liability for any personal damages resulting from delays of the goods, including compensation for lost work and exceptional hire charges in relation to delays. We strongly advise all customers to not schedule or start work before they are in receipt of the goods due to the current logistics issues.
Is customer tracking available?
Some of our manufacturers, distributors, couriers can offer this service. Please ask Roof Giant for more information on whether this is available against the goods ordered.
If I order multiple items will I receive just 1 delivery?
If your order consists of more than 1 item you may receive more than one delivery, depending on stock availability some orders maybe split to enable you to avoid delaying the start of your project. We will keep you updated on your order or you can contact Roof Giant directly via phone/email/live chat.
I live on a narrow street with limited access with over hanging trees, will this affect my delivery?
Please confirm any delivery restrictions at the time of order, we will need to ensure any restrictions/extra delivery requirements can be addressed prior to processing.
I have a large order being delivered to kerbside only, do I need to make any additional arrangements to move the goods?
Yes you do, this type of delivery means your goods will be dropped at the kerb therefore you need to make arrangements to move the goods onto your property where is safe to store.
Can I collect from you?
No, not currently. However you may be able to arrange collection from one of our manufacturers/distributors. If you would like to discuss please contact Roof Giant on tel no/email/live chat ”
ridge tile tool or jig ?
-
-
#1
hi can anyone tell me of a tool or jig to assist in fitting ridge tiles to the roof especially on the hips
Any links to such things would be very helpful
thanks col
Sponsored Links
noseall
-
-
#2
do you work with machine turning tools like lathes by any chance colw1?
we use a builders line, or indeed a builders ‘eye’ to get things straight.
a hipped ridge will follow the contour of the roof, which is rarely straight. it will normally end up with a slight ‘kick’ at the eaves.
the intended line should be straight though.
Roofer
-
-
#3
This is what you need.
Nige F
-
-
#4
Roofer said:
This is what you need.

Click to expand…

£50 I could knock them up in my garage out of scrap ..What about a Hip Iron @ the eaves?
Sponsored Links
Roofer
-
-
#5
We actually make them up on site out of battens
-
-
#6
how do you do this with the batterns e. g any pics
alpcon
-
-
#7
Get 2 long batons and adjust them so they are parallel and the ridge tiles will fit inside then use some more baton to fix them together top and bottom but you will have to use a number of off cuts fixed to the long lengths at each end before you attach the end pieces. This is so the end pieces giving you the correct width sit above the ridge tiles otherwise you will not be able to lay in the top and bottom tiles
I know you are thinking what so I will try and sort out a diagram for you
shaun m
-
-
#8
colw1 said:
hi can anyone tell me of a tool or jig to assist in fitting ridge tiles to the roof especially on the hips
Any links to such things would be very helpful
thanks colClick to expand.
 ..
..
hi if you get two lenghs of batten and strap them the same distance as your ridge ,hip tiles lay them so you have the same distance apart and thay will keep you level all the way up your hips ,and the same for your ridge thay do make one but it is the same as two battens and less expencive … shaun m
leeg27
-
-
#9
colw1 said:
hi can anyone tell me of a tool or jig to assist in fitting ridge tiles to the roof especially on the hips
Any links to such things would be very helpful
thanks colClick to expand.
 ..
..
Hi there i work for a company who manufactures the roof jig which you are looking for which are a very simple and easy way to install ridges or hips to your roof…..
cannonfoder
-
-
#10
http://www.roofingsupplies4u.co.uk/…tools/product/473-ridge-hip-runners-pair.html
-
-
#11
A bit fussy but another method would be:
one roofer at the top of the hip with a hip tile, set the hip tile and mark both sides on the field tiles.
Another roofer at the foot of the hip does the same.
Snap chalk lines from top marks to bottom marks, and keep your work inside the chalk lines.
It will also work, of course, on a ridge.
leeg27
-
-
#12
hip runners are ok if you can get a nice straight set of timber the ridge jig that the company i work for use and many local roofing companies we have supplied to love them easy to set up and even a monkey could use them..
DIYnot Local
If you need to find a tradesperson to get your job done, please try our local search below,
or if you are doing it yourself you can find suppliers local to you.
Select the supplier or trade you require, enter your location to begin your search.
Plumber / Gas EngineerElectricianBuilderDecoratorBuilders’ MerchantPlumbers’ MerchantTile SupplierFlooring Supplier
Are you a trade or supplier? You can create your listing free at DIYnot Local
Project Of The Year Winners 2021
Posted On: April 1, 2022
Ludowici is pleased to announce the winners of our annual Project of the Year contest
We asked for submissions of the best projects with any recent use of our product—residential, educational, new construction, renovation, & more. Winners have been chosen by an internal Ludowici panel and popular vote based on factors relating to appearance, uniqueness, complexity, and craftmanship. The following are the Winners and Runners-up for each Project of the Year category.
RESIDENTIAL NEW CONSTRUCTION
winner
PRIVATE RESIDENCE | ATLANTA, GA
Project Name: Private Residence
Project Location: Atlanta, GA
Architect: D. Stanley Dixon Architect
Product: Provincial Shingle Tile
Color(s): Strata Gray Impressionist
Photo Gallery
RESIDENTIAL RENOVATION
winner
Stathopoulous-Farmakidis Residence | akron, oh
Project Name: Stathopoulous-Farmakidis
Project Location: Akron, OH
Installer: Precision Construction & Roofing
Product: Greenwich Shingle Tile
Color(s): SO/M1M13 Green Spots
RUNNER UP
PRIVATE RESIDENCE | PALM BEACH, fl
Project Name: Private Residence
Project Location: Palm Beach, FL
Installer: Carpenters Roofing & Sheet Metal
Product: Scandia Barrel Tile; Custom CC Button Hip Starters
Color(s): Custom Gloss: 147-05G/30GT1 SM LT-MD Spots
PHOTO GALLERY | FEATURED ARTICLE
PROJECT STORY
Ludowici had the honor of working with entertainment banker, entrepreneur and close friend of Martha Stewart, Lisbeth Barron, to re-design a stunning new roof fit for her Palm Beach abode. Lisbeth’s issue arose when her current waterfront cement roof needed replacement due to fading and weathering after only 20 years. Cue our own Color Designer & Ceramic Engineer to the rescue! Beautiful glossy terra cotta with a hint of gold speckle was chosen with a color permanent guarantee of 75 years. Wanting something different and unique, a total of four sample orders and 20 different colors shipped for review, until the customer got the exact color she wanted. See the full transformation from faded to fabulous on Martha’s blog HERE.
RESIDENTIAL HISTORIC RENOVATION
winner
PRIVATE RESIDENCE | Evanston, IL
Project Name: Private Residence
RUNNER UP
PRIVATE RESIDENCE | NASHVILLE, TN
Project Name: Private Residence
Project Location: Nashville, TN
Architect: Five.13 Architecture
Installer: Above All Roofing
Product: LudoSlate
Color(s): Antiqued Pewter
PROJECT STORY
The original French Mansard style residence was built circa 1930 on a hillside site with a wonderful view of the rolling hills nearby. Although the house had been updated periodically, it once again needed some attention. Recent improvements made to the residence include interior layout and finish renovations, a front porch addition, a rear porch / colonnade addition with an upper level terrace above, replacing wood windows and doors with thermally broken double pane steel windows and doors, adding large skylights, replacing the entire mansard roof system with Ludowici Ludoslate on the steep portions and flat lock copper on the flat upper parts, as well as extensive landscape and hardscape improvements.
The owners wanted the new roofing material to be attractive, appropriate for the 1930s Mansard style, and enduring, selecting Ludowici’s LudoSlate in Antiqued Pewter. Another reason this particular tile was selected is because of the lighter weight compared to natural slate or other comparable tile products, which placed less load on the existing structure. Some of the transitions, corners and terminations on a Mansard style roof with multiple dormers are challenging to design and implement in the field. Several on site meetings between the architect, moisture consultant, contractor and installer were held to review these conditions and determine the best way forward. The result is quite stunning and is a major feature of the residence.
COMMERICAL NEW CONSTRUCTION
winner
Rancho San Juan High School
Project Name: Rancho San Juan High School
Project Location: Salinas, CA
Architect: Kasavan Architects | Builder: Dilbeck and Sons. Inc.
Designer: Peter Kasavan, FAIA | Installer: Platinum Roofing, Inc.
Product: LudoSlate | Color(s): Slate Gray
Photography: Brett Drury Architectural Photography
PROJECT STORY
Built in the Salad Bowl of the World, this new high school embodies the working heritage that helped build the valley and is grounded in the industrial aesthetic of the barns, greenhouses and steel processing structures with antecedents in the 19th century steel frame construction of the Spreckels Sugar Factory. The clock tower reflects an historic agricultural water tower that had been on this site for generations. This historic water tower was preserved and moved to a nearby nonprofit training center. The two-story classroom building reduced the site needs from 50 to 40 acres and locates all students and staff close to campus services. Classrooms line a double-loaded corridor with ample room for circulation, sitting and lockers. Neither corridor level required any heating or air conditioning.
With recessed porch-like entries, display windows and “street” lights, the corridors are like neighborhood streets. Elevator towers and “roofs” over the lockers function as visual “buildings” contributing to this streetscape effect. Windows optimize daylighting, broad views, operable glazing. Zoned lighting controls turn off lights where not needed. Sunlight and heat gain are mitigated with exterior louvers and shed roofs. First floor corridors are finished with polished concrete eliminating the need for floor coverings, cleaning products and future replacement waste.
Materials include recycled content and recyclable materials -steel superstructure, metal studs, metal ceilings and metal siding. The clay tile roof uses copper flashing and is expected to be maintenance-free and last a century or more. The appearance is consistent with the industrial aesthetic, is beautiful, has extremely low maintenance requirements and is durable with a very long serviceable lifespan. Eco friendly and recyclable, they are a very green choice. The project uses over 150,000 sq. ft. of tile. The building design minimized the need for foot traffic over a very large area of roof tiles during construction and for maintenance or repairs by incorporating the following features:
- Located roof mounted equipment in mechanical towers
- Utilized copper flashing and aluminum gutters to maximize serviceable life of components integrated with roof tile installation.
- Specified high performance and quality aluminum frame clerestory windows to minimize need for service.

AWARDS
American Institute of Architects, Monterey Bay Chapter (AIAMB), Honor Award for Design Excellence 2019.
Coalition for Adequate School Housing (CASH) and the AIA California Council (AIACA),Leroy F. Greene Design and Planning Awards Award of Honor 2020.
RUNNER UP
Boston College Schiller Institute for Integrated Science & Society
Project Name: Boston College Schiller Institute for Integrated Science & Society
Project Location: Chestnut Hill, MA
Architect: Payette Architect
Builder: Suffolk Construction
Installer: Gilbert & Becker Co., Inc.
Product: Classic 14″
Color(s): Custom Boston College Blend
PROJECT STORY
Boston College is a strong supporter of Ludowici with tile covering most of the campus.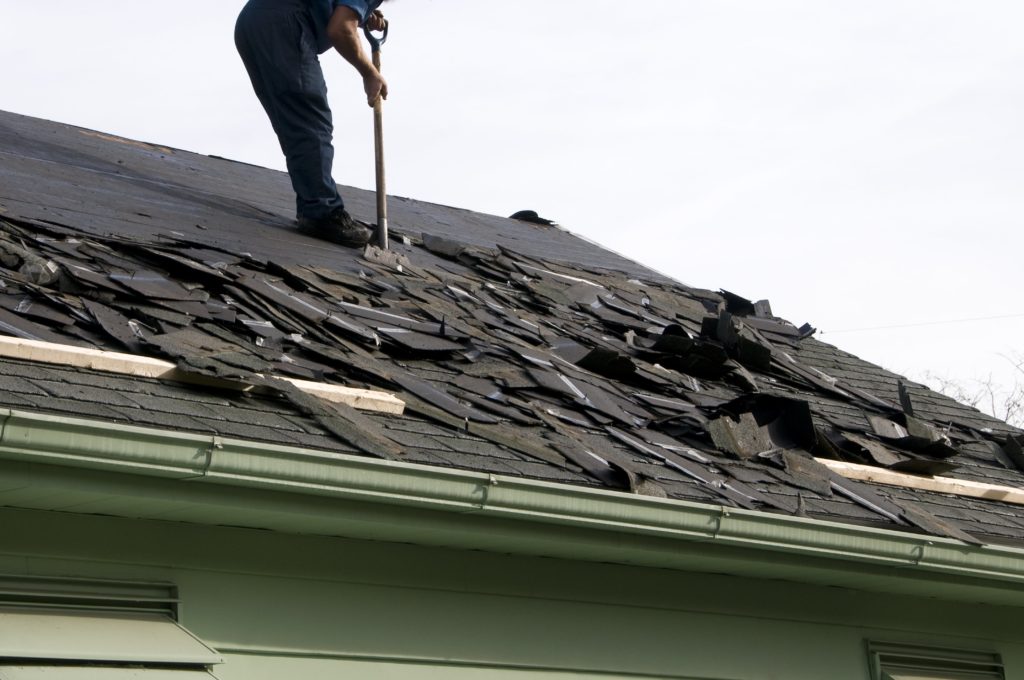 The Classic 14″ Interlocking tile blends well with the architecture of their buildings. The Schiller Institute for Integrated Science & Society is a new Building on Campus which received funding from Phil Schiller of Apple. Phil is an Alumni of Boston College, class of 1982. The building’s height is 70′ with a roof slope of 26/12.
COMMERICAL RENOVATION
WINNER
Madeira Condominium | MARCO ISLAND, FL
Project Name: Madeira Condominium
Project Location: Marco Island, FL
Roofing Consultant: G. Batista & Associates
Installer: Best Roofing Services, LLC
Product: Spanish 18
Color(s): Dark Terra Cotta Impressionist
RUNNER UP
Pequot Library | SOUTHPORT, CT
Project Name: Pequot Library
Project Location: Southport, CT
Architect: Pirie Associates
Builder: Kronenberger & Sons
Installer: Sound Renovation
Product: Spanish 13
Color(s): Clay Red
PROJECT STORY
While the Library’s programs and services have made it a literary and cultural beacon, Pequot’s Special Collections of rare books, manuscripts, and archives make it truly unique. They were assembled initially by Virginia Marquand Monroe (1837-1926) and her associates, the Rev. William Holman (1852 – 1936) and Mary Catherine Hull Wakeman (1813 – 1896). They focused the first collection efforts on Early Americana. In addition to funding the remarkable steel stacks holding Pequot’s circulating collection, which feature three Tiffany windows, Mrs. Wakeman made significant purchases that continue to distinguish Pequot’s Special Collections today, including Epistola de insulis nuper inventis (Christopher Columbus’ Letter of 1493) and the signatures of all signers of the Declaration of Independence. The Library was designed by noted American architect Robert H. Robertson (1849-1919) and opened in 1894. The first Library event was a performance with the Yale Glee Club.
COMMERICAL HISTORIC RENOVATION
WINNER
reynolda house | winston-salem, NC
Project Name: Reynolda House Museum of American Art
Project Location: Winston-Salem, NC
Installer: Baker Roofing
Product: Morando Closed Shingle / #118 Hip Roll, #211 Ridge,#168 Hip Starter
Color(s): 049-16M/M16 SM LT-MD Mist; M21 SM; M21/M16 SM LT-MD
Photo Gallery
PROJECT STORY
Nestled near Wake Forest University, the Reynolda House Museum is an big part of Winston-Salem, NC history. The iconic Ludowici green tile roof was chosen by lady of the house Katharine Smith Reynolds, wife to R. J. Reynolds of the R. J. Reynolds Tobacco Company. Commissioned by Mrs. Reynolds in the early 1900s, the house was built and completed by famed Winston-Salem architect Charles Barton Keen in 1917. This green roof and white facade shaped the trend in architecture of the affluent neighborhoods of Winston-Salem. The Reynolda House Museum has been with Ludowici to replicate the original green roof for replacement in spring of 2020. An exhibition about the project is on display in the museum, centered around Ludowici’s connected history to the home. Learn more about the project here: Restoring Reynolda’s Historic Roof
runner up
Vizcaya Museum & Gardens | miami, fl
Project Name: Vizcaya Museum & Gardens
religious
WINNER
ZION CHURCH | GOWRIE, IA
Project Name: Zion Church
PROJECT STORY
The client was interested in a lighter weight, historical, period appropriate, and long-term solution. Ludowici LudoSlate was a perfect fit. A variety of existing roofing products made this project unique to find a product that would enhance the overall aesthetics and tie in with the roof sections that were not being replaced. The church property, comprised of multiple building sections in a variety of shapes, was experiencing numerous leaks. Renaissance installed Ludowici LudoSlate clay tile on the various sections to consolidate the overall look.
runner up
FIRST PRESBYTERIAN CHURCH | BOISE, ID
Project Name: First Presbyterian Church
Project Location: Boise, ID
Installer: Renaissance Historic Exteriors
Product: LudoSlate
Color(s): Ash Gray
PROJECT STORY
The client was interested in a lighter weight, historical, period appropriate, and long-term solution. Ludowici LudoSlate was a perfect fit.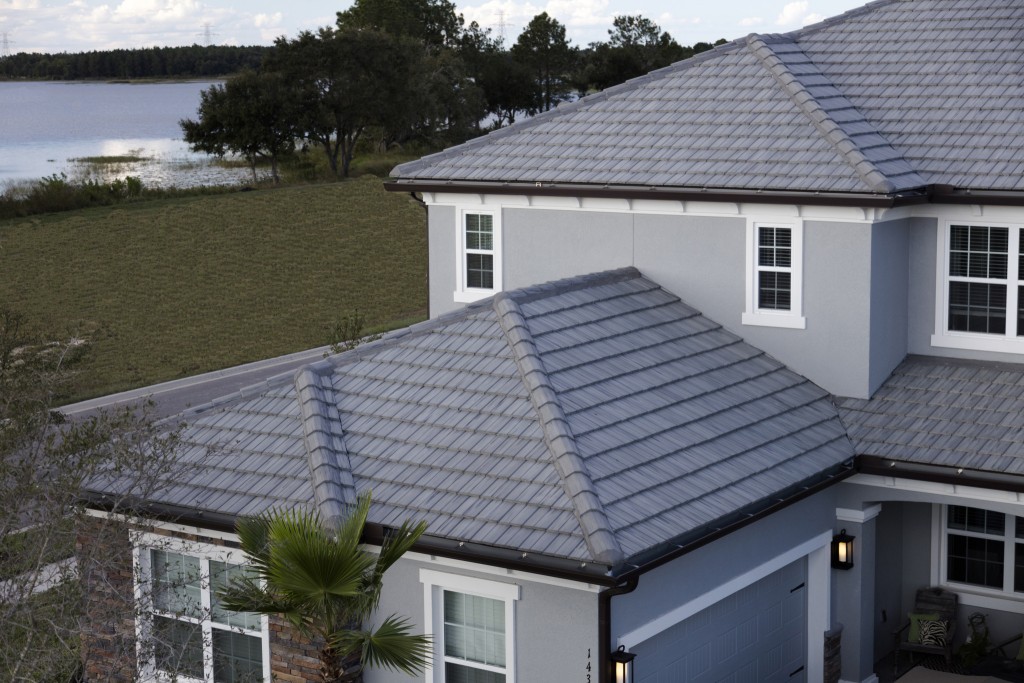 A variety of existing roofing products made this project unique to find a product that would enhance the overall aesthetics and tie in with the roof sections that were not being replaced. The church property, comprised of multiple building sections in a variety of shapes, was experiencing numerous leaks. Renaissance installed Ludowici LudoSlate clay tile on the various sections to consolidate the overall look.
UNIQUE APPLICATION
WINNER
French Normandy Residence | GREENWICH, CT
Project Name: French Normandy Residence
Project Location: Greenwich, CT
Architect: Charles Hilton Architects
Product: Custom cut façade tile laid sideways
Photography: Robert Benson Photography
Photo Gallery
This French Normandy-inspired residence features a plethora of Ludowici tiles placed randomly and intentionally to make up the decoration of the façade. The depth and variation of colors is as strategic as it is beautiful. See full write up HERE.
A Guide For Your Next Roofing Project
How Your Roof Can Survive Storms and Snow Damage
08 Mar, 2022
The number one cause of severe roof damage in the United States is storm damage. Strong winds can blow your roofing completely off, or merely loosen a few screws. Severe thunderstorms can generate heavy rain, hail, ice, and winds exceeding 100 mph all at the same time. It’s critical that your roofing system is prepared to withstand whatever mother nature throws at it. Rain Damage Your roof is responsible for keeping your home dry all year long. The most important aspect of a roof is that is waterproof. If your roof is in tip-top shape, most rainstorms shouldn’t be a problem for your roof. However, even a small rainstorm can exacerbate damage quickly if your roof is compromised. Washing Down Shingles – Water and wind washing over your shingles for hours at a time can cause harm to asphalt shingles by washing away granules, leaving them more susceptible to damage. Standing Water – If you don’t have adequate drainage, rain can get trapped on the roof, especially in the eaves or flat areas. Mold and Decay – Mold can grow quickly on a moist roof. Generally, decay and mold will start between the cracks and crevices of your roof, leading to expansion, deterioration, and insect damage. Damage to Supports – Sometimes rainstorm damage can actually start from the inside out.
 If you have areas where water seems to pool, it could be a sign of damage to the support underneath the roof. Gutter and Downspouts – Clogs and cracks in the gutters allow heavy rain to slosh down the side of your home, causing damage to your walls, siding, and foundation. Wind Damage Wind can cause several different types of damage to your roof. Particularly to the corners, the edges, and the ridgeline. When the wind picks up, these areas are especially susceptible to storm damage. Blow Off Shingles – The high winds can quickly pick up shingles that are loose or damaged. If the winds blow off shingles, it’s pretty easy to see the bare spot on your roof.
 Damaged Shingles – Even if you don’t have any missing shingles, your roof can suffer during a storm as your shingles get cracked, pulled, loosened, or curled. Punctures – High winds can pick up all kinds of things from the yard or surrounding areas and drop them on the roof. Even small items can cause damage when dropped from high winds. Damaged Flashing – The flashings are the areas around the chimney or other fixtures and are a high-stress point. These areas can be easily lifted by strong winds. Lost Granules – The surface of asphalt shingles are tiny granules that wear down over time.
 After a strong storm, your shingles can lose granules and be susceptible to further damage. Broken Limbs – Twigs, branches, and limbs from nearby trees can break off in high wings and fall onto the roof, causing damage to the surface. Hailstorm Damage Hail may be as tiny as a grain of rice or as big as a golf ball and anything outside is a target. Vehicles, siding, shingles, and gutters can all be damaged by hail. When hail breaks loose, your roof will take the majority of the storm damage. The Factors That Cause Hail Damage Size – Bigger is definitely not better when it comes to hail.
 Anything that is 1-inch or larger has the greatest negative impact. Smaller hail, pea-sized or smaller typically doesn’t cause significant damage unless your roof is previously compromised. Density – Hail is essentially giant ice balls that freeze together on their way down to the ground. As they fall, they grow larger and denser. The denser they are, the more damage they can cause on impact. How Hail Does Damage to Your Roof Hailstorms often cause storm damage that is so small, it seems insignificant at the time. If left unattended, the damage increases over time until you have a major roof leak the next time it rains. It Can Damage the Top Layer of Shingles – The most obvious way hail can harm your shingles is by tearing through them.
 This typically requires very large and sharp hailstones to cut straight through to the roof deck. Water Leakage Due to a Cracked Shingle Mat – Sometimes hailstorm damage is much less obvious. You can’t detect a cracked shingle mat from the ground. Up close, it looks like small crescent-shaped black lines that allow moisture through. Shingle Bruising – Shingle bruising occurs when small hailstones push the asphalt granules on the surface of your shingles further down into the shingle surface. Over time, the granules actually disappear and the shingle itself deteriorates. Granule Loss – The granules on your shingles can wash away with the combination of wind, rain, and hail.
.jpg) When this happens, your shingles will age much quicker and are more susceptible to subsequent damage. Hail Can Harm and Expose Fiberglass Roofing – Fiberglass is more commonly used for commercial buildings and is equally susceptible to hail. Hail can weaken and expose fiberglass roofing causing major damage. Heavy Snow and Ice Damage When an ice storm hits, you should always be prepared for the worst. Have a box of emergency supplies like candles or lanterns, radios, or blankets somewhere easily accessible in the event your home is struck by the storm. A snowy winter wonderland sounds like an ideal holiday setting, but the reality of heavy snow and thick ice isn’t always so cozy. Jack Frost can bring serious potential risks for your home. A Roof Collapse – It takes 48 inches of fresh snow to put a significant amount of stress on a roof.
When this happens, your shingles will age much quicker and are more susceptible to subsequent damage. Hail Can Harm and Expose Fiberglass Roofing – Fiberglass is more commonly used for commercial buildings and is equally susceptible to hail. Hail can weaken and expose fiberglass roofing causing major damage. Heavy Snow and Ice Damage When an ice storm hits, you should always be prepared for the worst. Have a box of emergency supplies like candles or lanterns, radios, or blankets somewhere easily accessible in the event your home is struck by the storm. A snowy winter wonderland sounds like an ideal holiday setting, but the reality of heavy snow and thick ice isn’t always so cozy. Jack Frost can bring serious potential risks for your home. A Roof Collapse – It takes 48 inches of fresh snow to put a significant amount of stress on a roof. Even if it snows more than 4-feet at once (which is rare), it is even more uncommon for this much snow to stay on the roof (typically it is blown or falls off) A roof collapse is possible but very rare. The states that typically see these snowfall amounts have reinforced roofing structures designed to handle heavy snowfall. An Icicle Disaster – Icicles aren’t idyllic or pretty, they are actually a sign of roofing issues. Ice dams occur when you get water freezers along the eaves of your roof. As this happens, it expands and damages your shingles, opens cracks, and pries off your gutters. The Expansion Cycle – Winter is the ideal time for making small problems much worse. If there is a crack in your roof from the fall, water seeps in and then freezes in the winter.
 The small crack can now expand making it much bigger, allowing in more moisture, and freezing again. This expansion cycle can occur all winter long. Chipped or Cracked Windows – In addition to the roof damage, snow and ice can cause window damage as well. Expansion, cracking, and punctures can occur in window casings, panes, and frames. Missing, Creased, or Split Shingles – Shingles can be easily harmed in a strong winter storm. Blizzards bring moisture, wind, and heavy snow that can crack, puncture or blow off shingles. What to Do After the Storm? Step 1: Call a Professional Do not get on the roof yourself to check for damage.
 You may find yourself making the current damage worse, hurting yourself, or both. Call a trained roofing contractor for a full inspection. A professional roofing contractor will conduct a thorough investigation of the following areas: Windows – The glass, vinyl trim, glazing, screens, skylights, and shutters are all susceptible to storm damage, particularly by hail. These areas should be checked and can be repaired alongside any roof damage. Shingles – The contractor will get on the roof and take a closer look for loose, cracked, or missing shingles that may need to be repaired. Gutters – The gutters should be inspected for clogs to ensure they are not full of limbs, leaves, or small branches that were blown in during the storm.
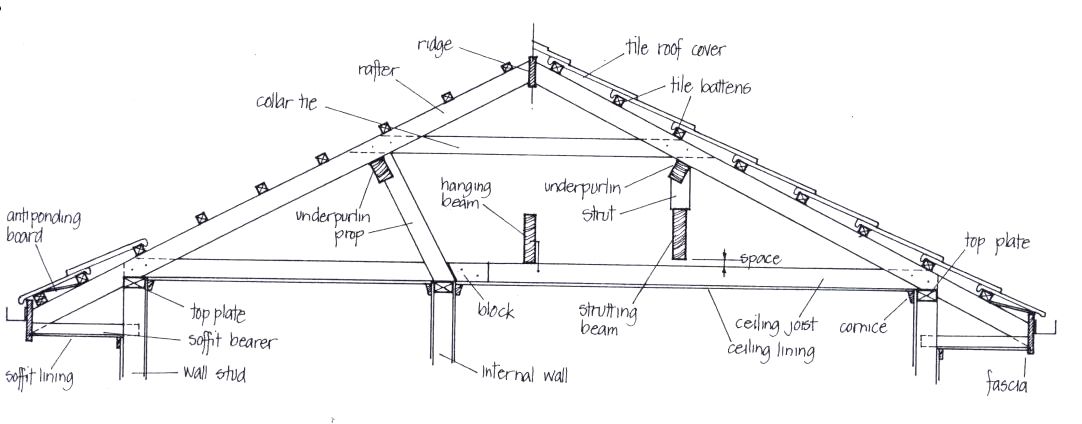 Exterior – The exterior of the home is susceptible to storm damage along the siding, paint, stucco, or trim. Your contractor should check the full exterior for any potential damage or discoloration that will need to be repaired. Step 2: Document Everything Once the storm has completely passed, and before any repairs are made, pull out your smartphone and document everything. Take both pictures and videos of the storm damage on your property from multiple vantage points. Step 3: Get Organized Sometimes you can’t wait for a contractor to come repair your roof, you have to cover broken windows with plywood or create a DIY fix to stop a leak.
 Keep records and receipts of anything you purchase organized so you can be reimbursed by the insurance company later. Step 4: Keep It Paperwork and proof of storm damage is critical when filing your insurance claim, don’t throw anything away until your claim is completely resolved. Step 5: Call Your Insurance Company Once you have evaluated the storm damage, taken photos and videos, and made any temporary repairs necessary to prevent further harm, call your insurance agent. Follow their instructions to file a claim and stay in touch with your agent throughout the process. How Do Storm Damage Insurance Claims Work? Your homeowner’s insurance policy is there for times like this.
 When storms cause damage to your home, your policy is designed to help pay for the repairs and get you back to where you started. When you file a claim, you are responsible for paying your deductible which may be anywhere from $500 to $5000. After this deductible, the insurance company issues payment based on your coverage and the work required to repair the home. How the Claims Process Works: The claims process can be overwhelming. A reputable roofing contractor can help you through each step to file the claim correctly and get all the coverage you’re entitled to. Do a Thorough Property Inspection While you can inspect your property from the ground, we don’t recommend getting on your own roof after a storm. Instead, contact a local professional roofing company for a full inspection.
 Choose a company that is local and reliable. You will likely receive many cold calls offering free roof inspections in your area, these can sometimes be storm-chasing contractors. Using a local contractor will ensure that any repair or replacement work done is of the highest quality with the best warranties from someone you can trust. Meet with Your Contractor After the inspection, discuss the findings with your contractor, share photos, and discuss your coverage. Be sure to share your concerns and ask your contractor any questions you may have. File Your Insurance Claim If you have enough damage to warrant filing an insurance claim, the insurance company will schedule an adjuster to inspect the property. Ensure that your roofing contractor will be present with the adjuster so they can advocate for you together.
 Meet with Your Adjuster The insurance adjusters have a specific checklist they will follow when determining the damage. Your roofing contractor can also make sure that the adjuster is aware of all damaged areas to maximize your claim value and ensure your repairs include all damage. Claim Approval It should only take a couple of days to get your claim approved and the roofing contractor can begin working. Start Home Repairing Project Once the claim is complete, you are ready to sign the contract with your roofing company and get your home on the schedule. The insurance company will provide payment directly to you and then you will be responsible for paying the roofing contractor.
 Don’t Get Swept Away in the Storm When it comes to storm damage, it only takes one strong pull from Mother Nature to wreak havoc on your property. Even if it’s a smaller storm, it’s better to be safe than sorry. A free roof inspection is a no-obligation way to get your roof checked after experiencing strong hail, wind, or heavy rains. The suction, pressure, and pulling of strong storms may cause more damage than you anticipated. Call in a local roofing expert to get your roof repaired before it is too late.
RussFast Dry Hip (5m) – Russell Roof Tiles
Installation Guide
Russfast Dry Hip is a robust 5 metre dry fix system designed to meet BS 5534 and provides a secure mechanical fixing of the hip tiles. It has dedicated fit components which give a high performance in all UK locations and aesthetically it gives an attractive neat solution.
Certification
Manufactured in accordance with the requirements of BS 5534 and BS 8612.
Compatibility
RussFast Hip (5m) is suitable for use with our full roof tile range and is fitted with our Universal Angle, Multi Ridge and Third Round ridge profiles.
Components in a 5m Box
| Item | No in Box |
| 5m RussFast unventilated Ridge Roll | x1 |
| RussFast Unions (Uni angle, Half Round, Multi Angle or Third Round) |
x10 |
| RussFast Union Clips | x10 |
| Hip Batten Connectors | x10 |
| 125 x 385mm Stainless Steel Screws | x10 |
Packaging & Pallet Quantities
| Boxes Per Pallet | Weight of Pallet |
| 81 | 154KG |
Russfast Dry Hip is a robust 5 metre dry fix system designed to meet BS 5534 and provides a secure mechanical fixing of the hip tiles. It has dedicated fit components which give a high performance in all UK locations and aesthetically it gives an attractive neat solution.
Certification
Manufactured in accordance with the requirements of BS 5534.
Compatibility
RussFast Hip (5m) is suitable for use with our full roof tile range and is fitted with our Universal Angle, Multi Ridge and Third Round ridge profiles.
Components in a 5m Box
| Item | No in Box |
| 5m RussFast unventilated Ridge Roll | x1 |
| RussFast Unions (Uni angle, Half Round, Multi Angle or Third Round) |
x10 |
| RussFast Union Clips | x10 |
| Hip Batten Connectors | x10 |
| 125 x 385mm Stainless Steel Screws | x10 |
Packaging & Pallet Quantities
| Boxes Per Pallet | Weight of Pallet |
| 81 | 154KG |
What Roofing Material Lasts The Longest?
Sep 12, 2018
Roofing material that lasts the longest are concrete, clay or slate tiles. These materials significantly outperform other natural products like wood shakes or any manufactured roofing materials including asphalt shingles and metal roofing. Although these materials have a good lifespan, they are not as durable.
If you are considering re-roofing your home, your investment in roofing materials has a direct correlation on how long you can expect your new roof to last. The longest-lasting roofing products are inherently extremely durable and may be a bit more costly.
How to choose the right roofing material
When buying a new roof, there are several different factors to take into consideration, including:
- Regional weather conditions
- The design of your building or home
- The amount of routine maintenance
- The quality of the roofing products you purchase
What materials are used for roofing?
According to the National Association of Home Builders, most roofing products are designed to last a minimum of several decades under normal weather conditions. Here’s a closer look at how the NAHB rates the longevity of different roofing materials:
- Asphalt Shingles: typically, asphalt shingles last about 20 years; however, higher-quality asphalt shingles are warrantied for up to 50 years. Expect to pay more for a premium, long-life product.
- Architectural Asphalt: these products last about 30 years on average
- Wood Shingles and Shakes: wood roofing has a target lifetime of 30 years, but it can last much longer under moderate weather conditions.
- Metal: The International Association of Certified Home Inspectors projects metal roofing to last between 40 to 80 years. The Metal Roofing Alliance gives a life expectancy of at least 40 to 60 years.
- Slate, concrete and clay tiles: each of these products is rated for a life expectancy of 100 years or more by both the NAHB and NACHI.
What roofing material lasts the longest?
Based on the above graph, it’s easy to see that the clay, metal and slate are the top runners for longevity. Here is why:
Clay/Concrete Roofing
In the right setting, clay roofing can be expected to hold up for a minimum of 50 years. With changes in concrete tie technology, they will last even longer. The concrete has been reformulated in a variety of ways to produce tiles that are both lighter and tougher, marking them nearly indestructible under normal roofing conditions. Most tile warranties cover the product for 50 years, and not many of them are being paid on due to poor quality or lack of durability.
Metal Roofing
Today’s metal roofs are even more durable than the hundred-year old homes and barns in rural areas that you may have seen. Getting 100 years of attractive use out of them is expected, and higher-quality finishes are keeping them looking great longer without fading and with little surface corrosion.
There is a renewal in metal roofing and every year it is gaining a large place in the market. Not only because they are one of the quietest roofing materials, but new designs are elegant and they are more affordable that many homeowners would expect.
Slate Roofing
Slate roofs have been popular in Europe for hundreds of years and many of the earliest are still in good condition. Slate is a form of stone. So, it is not subjected to deterioration, corrosion, insects, fire or damage from water or the sun. It is unsurpassed for durability and offers stunning good looks to make of the most luxurious homes and buildings. Simply put, slate roofing will outlast most of the structures it adorns and is considered to be the best roofing material.
If you are looking for a roof that is as efficient as it is durable, choose a roofing material that is clay/concrete, metal, or slate.
Are you in need of a roof replacement or assessment?
At Clemens Home Solutions, we offer a variety of roofing services to and around the Muncie area including:
- Complete tear-off of existing shingles and underlayments
- Inspection of existing roof decking to ensure no rotted or damaged wood
- Re-secure all roof decking as needed
- Gutter apron installed along all eaves
- T-drip edge along all rakes
- Ice and Water shield on all eaves, in all valleys, around all roof penetration, and on all slopes less than 4/12 pitch
- Synthetic Underlayment on the rest of the roof
- Starter shingles along eaves and rakes
- CertainTeed Landmark shingles or other quality shingle
- Step-flashing along all walls and raised penetrations
- New pipe boots
- Proper ventilation
- Hip and ridge cap
- Counter flashing on all exposed step-flashing
- Haul away all debris and clean gutters and ground around house completely
Looking to invest in a new roof for your home? Contact us to get a free estimate.
Need a more affordable option? Consider our financing options and give us a call if you’d like to get started: (765) 741-8214.
Schedule a Free Estimate
How to strengthen the hip roof
Home » Miscellaneous » How to strengthen the hip roof
Hip roof. The device, components and reinforcement of the hip roof
The most important element of the house, which affects the entire building, is the roof. Its design is selected, taking into account the weather conditions in your area and the materials that are used in construction. And, of course, the appearance of the roof is of great importance. Among all the structures, the hip roof deserves your attention most of all.
Content:
- Features and the design of the hip roof
- Valm roof varieties
- DIY Roof
Features and the design of the hip roof
Horger roof is particularly popular, since it is inherent in high strength characteristics, durability, durability, durability, durability, durability, durability, durability, durability. and original look. It is also worth noting its extraordinary configuration. The hip roof will be an excellent choice when arranging a residential attic floor, as it allows you to simplify the procedure for creating skylights.
In addition, the hip roof is streamlined. And thanks to this, it is not as much subject to destruction from wind loads as other structures. The ridge of the roof, in turn, is not undermined by gusts of wind. And you should pay attention to this property if you live in southern regions with strong winds.
Hip roof with four slopes. They slope on all sides of the building. Two slopes are lateral, like a classic roof structure. Two more, additional, are located between the two previous ones. In the hip roof, unlike the hipped variety, there is not one peak, but two. They are interconnected by a ridge.
Vertical pediments look like inclined triangular slopes. They are called hips. It turns out that two slopes in a similar design take the form of a trapezoid – along the long sides. And on the end – a triangular shape.
Hip roof structure consists of the following key elements:
- Ridge bar. It is this element that is the top point of the roof and its main bearing axis. In this place, all the faces are also connected. Most often, when erecting a hip roof, the center of the ridge coincides with the center of the entire roofing.
- Corner rafters. Rafter legs of the sloping type act as basic strength elements and connect the ridge beam and the corners of the building. For their cutting, boards are used, the thickness of which is equal to the thickness of the ridge. The rafter leg is attached to the ridge at one end, and the other end goes beyond the boundaries of the house. You will need four pieces, depending on the project.
- Short rafters. They may be different in length, but come out at the same angle. When determining their number, the area of \u200b\u200bthe roof is taken into account. Short rafters are connected at one end with angular rafter legs. And for others, they rely on the Mauerlat or the corner of the building, they are not attached to the ridge.
- Ordinary frame. The central intermediate rafters are installed at the ends of the ridge beam and are displayed on the load-bearing walls of the building. Their number is six, three on each side.
- Intermediate frame. Intermediate rafters start on the ridge, and the other side rests on the Mauerlat. They are not installed on the hips.
 And for others, they rely on the Mauerlat or the corner of the building, they are not attached to the ridge.
Varieties of hip roofs
Before installing a hip roof, you should understand what they are. If the construction with a hip breaks off above the level of the side slopes, then the roof is called Dutch. Also sometimes you can find the name Danish roof. This design is more difficult to build than the classic hip. However, old houses with a similar roof for decades, and sometimes much longer, stand unchanged.
There are also hipped hip roofs, the slopes of which take the same shape. There are simply no side slopes. The hips form the same angle. Hipped roofs are equipped exclusively for square-shaped houses.
You can also find various unusual broken hip roof variations. The design consists of slopes that are of different sizes and diverge at different angles. Complex broken hip roofs are rare, but they have the most spectacular appearance.
Do-it-yourself hip roof
The installation of a hip roof should begin with the design of such a structure. If you develop the scheme correctly, then it will be possible to assemble it yourself without involving additional workers.
Roof angle
The optimal roof pitch should be determined according to the climatic conditions in the area:
- The slope in windy areas should be as low as possible. So you can protect yourself from heavy loads on external walls.
- Increase the slope of the roof for areas where heavy snowfall occurs. So the snow will quickly melt off the roof.
- In areas where dry and hot weather prevails, the slope should be kept as low as possible. To forget about overheating forever, choose this indicator at the level of 2-5 °.
 To forget about overheating forever, choose this indicator at the level of 2-5 °.
 The angle of inclination is also recommended, depending on the roofing material:
- When using stacked material in pieces, for example, slate, create a roof at a minimum angle of 22°.
- For a hip roof made of rolled material, the angle of inclination will depend on the number of layers. If you plan to lay two layers, then the angle should be up to 15 °. If you will lay 3 layers, then make an angle of 2 to 5 °.
- When installing corrugated roofing, construct the roof at a minimum slope – provided that the joints are sealed from 12°.
- If you decide to lay metal tiles, make a minimum slope of 14°.
- For soft tiles, limit the slope of the hipped roof to 11°.
- When the roof is covered with ondulin, the angle reaches 6°.
- If you have chosen a membrane roof, remember that it is suitable for roofs that have any slope.
In addition, it is recommended to proportionally increase the slope of the hip roof if the total area and the amount of materials used in the work have increased. Therefore, if you are interested in savings, you should take this point into account when designing a hip roof.
Hip roof area
Please note that some factors are not included in the hip roof calculation:
- chimney dimensions;
- skylight dimensions;
- folds;
- non-roofing overhangs and parapets;
- the length of the slope,
- elements of the bars that protrude above the roofing;
- connections.
The roof area is determined in square meters. To carry out such calculations, you can use a special calculator that is easy to find on the net. With its help, the area of \u200b\u200bthe hip roof and the amount of building materials are determined.
To calculate the hip roof, you will have to remember the knowledge gained in geometry lessons. Since the hip roof has two vertices, its total area consists of the sum of the areas of the two side planes (trapezium) and the areas of the two hips (triangles): *h, where a is the base of the hip, h is the height of the hip plane.
Calculation of the truss system
Calculation of the hip roof truss system is a very important job. The rafters must withstand the roofing material, the loads created by wind and snow. Therefore, when calculating, take into account the weight of the materials used to create the roofing and finishing, the weight of the rafter system and the climatic conditions in your area.
For this job, prepare a measuring stick and mark all markings on it. So you get rid of inaccuracies in measurements. For the manufacture of rails, use plywood, which has a width of 5 centimeters. Also prepare a table showing the ratios of the length and placement of the rafter legs in order to achieve high accuracy in measurements.
Perform calculations in the following sequence:
- The length of the rafter leg is equal to the product of the corresponding coefficient.
- Mark the axis from the end of the building. Do on the top strapping.
- Calculate half the width of the ridge. So you find out the location of the first element of the rafter system.
- Attach the end of the staff to the marked line. Another – place along the line of the side wall. Here there will be a place for an intermediate rafter leg.
- To find out the length of the rafter, place one end of the beam on the roof eaves, and place the other on the outer corner of the load-bearing wall.
- Where to place the next central rafter, calculate as follows. Transfer the measuring rail to the edge of the side wall, leave marks on it for the future rafter system.
- Similar actions must be carried out on the three corners that remain. This is how the placement of the ridge and the ends of the intermediate rafter legs is calculated.
 Here there will be a place for an intermediate rafter leg.
 0003
- Measure the ground plan of the intermediate rafter leg using a measuring stick.
- Find the appropriate roof angle in the table. Do the product of these exponents.
- Measure the length of the rafter from where the pole is attached to the ridge.
- Determine the overhang length in the same way. Make the product of the corresponding coefficient by the horizontal projection.

Now let’s talk about the bevel part. Calculate the rafter leg as follows:
- Measure its length from the corner of the apartment building.
- Projection can be obtained by making squares of projections of an ordinary frame.
- Multiply the result by the correction. This will be the length of the corner rafter leg.
Mounting the rafter supports
Install the supports to support the ridge beam first:
- The bottom supports vary depending on the material used to build the house. In block-beamed or log houses, these functions are performed by the upper crowns of the log house. In buildings that are built using frame technology, the upper frame frame acts as a support. In brick houses, sloping rafter legs rest on the Mauerlat.
- Mauerlat is needed to distribute the load on external walls. To make it, take a beam of wood, which has a section of 100×100 mm. This element can be laid closer to the inner edge of the wall or in the center.
- To prevent the roof from being blown off by the wind, attach it with wire twists. Keep a step of 1000 mm while doing this.
- Keep certain distances so that you can freely inspect the mauerlat and rafters. From the attic floor to the Mauerlat should be at least 400 mm.
- The upper support for the system of slanting and diagonal rafter legs is a beam, the cross section of which is equal to the cross section of the diagonal rafters.
- The hip roof structure does not have brick gables that a gable roof has. Therefore, install racks under the ridge beam, which have a section of 100×100 mm. They are arranged in increments of 3-4 m, as shown in the photo of the hip roof.
- Support the stand on a bench. Lay it on an interior load-bearing wall or floor slab. In the first case, a board is used to make the bed, which has a section of 50×150 mm. In the second situation – a bar that has a section of 150×150 mm. Be sure to lay rolled waterproofing under the bed.


Installation of the rafter system
When installing the system of slanting and diagonal rafter legs of the hip roof, follow these instructions:
- The sloping rafters are attached to the inner corners of the walls, and the diagonal rafters to the outer ones. The length of the first is longer than conventional rafters, since they are assigned one and a half times a large load.
- The slanted rafters will support the shortened rafters. They are called rogues. They are usually made paired from two ordinary legs.
- Supports are installed under the diagonal rafters – one or two. For their manufacture, use racks of timber. The struts are placed at an acute angle of 45°.
- Intermediate rafter legs are supported from above by a ridge beam and from below by a mauerlat. When installing them, adhere to a step of 1.0-1.2 m. The sections of such legs must be chosen, depending on the beam scheme – one- or two-span, the pitch of the rafters created by the weight of the roof and the snow load. Remember that intermediate rafter legs should not be too long.
- Attach each second rafter to the load-bearing wall with twists. Make them from 2 wires that have a diameter of 4 mm. Connect the intermediate frame to the Mauerlat. Use a back brace for this.
- Angled rafters are known as sprigs. They are also often called half-legs, as they have a shortened length. On the one hand, the sparrows rely on the Mauerlat, on the other, on the diagonal leg. To evenly distribute the load from the corner legs to the slanted sprigs, they are attached to the diagonal ones in different places, according to the scheme of the hip roof.
- For symmetrical placement of all rafter legs, make marks on the ridge beam and the mauerlat. The most important point in the manufacture of the hip roof truss system is the competent connection of all elements in places where the central and diagonal rafters intersect. To do this, make cuts on the bars that have a double bevel.
 Remember that intermediate rafter legs should not be too long.
 Roof reinforcement and purlins
To make a hip roof structure durable and reliable, it is not enough just to make a strong truss system. It also needs to be strengthened:
- For reinforcement, a sprengel is placed in the corners – a beam that is thrown between the arms of the Mauerlat and forms an angle. These racks are designed to support the diagonal rafter legs. If the sprengel is located far from the corner, then it is recommended to attach a farm to it.
- Install posts on the ceiling, which are connected from above with a beam. It acts as a real support for the rafters and ensures an even distribution of the load on the building. Such racks serve as shelves.
- If the diagonal rafters are very long, then you should use twin beams instead of a single beam, as shown in the hip roof video.
- It is recommended to use wooden planks for creating the purlins. Also, bars with a section of 40 by 40 or 50 by 50 mm are suitable for this purpose.
- Pre-treat the wood with a protective compound, then dry thoroughly. It is better not to take raw boards for work, as they can cause deformation of the roofing.
- Lathing is placed perpendicular to the rafter legs. Rafters should be placed in a continuous layer. You can also install them in increments of 10-15 cm. The method of arranging the sheathing depends on the type of roofing material. For example, for a soft roof, the crate is only allowed to be solid.

Installation of the roofing cake
After installing the purlins on the hip roof, you can start arranging the roofing cake:
- First, lay a layer of waterproofing material to prevent water from entering under the roofing. Also, waterproofing will help to avoid the formation of condensate. Fix it to the rafters using a construction stapler. From above, reinforce with a counter-lattice, not forgetting about the gaps between the roofing and waterproofing material to create ventilation.
- The placement of vapor barrier and thermal insulation material will depend on the purpose of the attic. Determine whether it will be warm or cold. In a cold attic situation, insulate the floor because heat leakage from the living space is minimal. In the case of a warm attic, insulate the roof as well. Lay the insulation between the rafters. Then sheathe the back surface of the hip roof with construction paper. As a result, you will get a ceiling for the attic.
- A vapor barrier is often placed under the insulation. It is placed on top. Therefore, you should count on a large consumption of material.
- When choosing a roofing material, consider its appearance, strength characteristics, reliability and durability. Also pay attention to the weather conditions in the region and the angle of your roof.
- The hip roof is a classic design, so clay tiles will look great, which does not give in to deformation and does not fade.
- Take a closer look at other tile materials – bituminous and metal tiles. They have a budgetary cost, are distinguished by simple installation, are characterized by high rates of resistance to various kinds of damage and sound insulation.
- It is allowed to use sheet versions of metal profile roofing material. To achieve the most original hip roof look, consider copper cladding. This is an expensive material that increases the price of a hip roof. However, its cost is more than justified by environmental cleanliness and great endurance.
- Then work on covering the ridges and eaves, finishing the chimneys where they pass through the roof, making grooves and dormer windows. Pay special attention to the installation of snow retention elements, gutter systems and roof railings.
 In a cold attic situation, insulate the floor because heat leakage from the living space is minimal. In the case of a warm attic, insulate the roof as well. Lay the insulation between the rafters. Then sheathe the back surface of the hip roof with construction paper. As a result, you will get a ceiling for the attic.
Hip roofs are therefore very popular. Especially if you decide to build a small country house or cottage. Take a closer look at the hip roof when building an office building of a representative nature. In addition, such a design would be ideal for building original architecture with elevations, ledges and turrets. And also the hip roof is ideal when arranging the attic floor.
Hip roof design and construction
Hip roofs or so-called hipped roofs are a special type of roof that has a very gentle slope on the sides with a downward pattern towards the side walls.
The area where one section of a roof meets another section is considered “hipped” and a hipped roof usually has very uniform corners with no vertical end.
Hip roofs consist of four rafters, which are usually found on a ridge board located in the middle of the roof.
Considering the rectangular shape of most buildings, hip roofs will have two triangular sides and two trapezoidal sides; whereas, in the case of square buildings, hipped roofs more often face towards the top, forming a pyramidal structure.
Other names for hipped roofs – pyramidal roof and pavilion roofs; here are mansard roofs, as well as half-hipped roofs – small variations of simple hip roofs.
Hip roofs are more often used in complex architectural solutions, most often for bungalows, cottages and ranches.
These roofs add more qualities to houses, such as traditional design, strength and increased comfort. Hip roofs are considered to be one of the simplest designs in the hip roof category.
TOP ROOF CONSTRUCTION
Hip roofs can be designed over both square and rectangular buildings; The design of hip roofs can have triangular sides, as well as a combination of triangular and trapezoidal sides.
Some hip roof designs follow the shape of a pyramid, while others may have a more symmetrical structure.
Generally, three main factors influence the design or style of a hip roof:
- Eaves: Hip roofs with deep eaves that can help shade the window; this scheme helps to cool the inside of the house and ensures lower energy bills while reducing energy consumption.
- Strength: For areas where wind and cyclones are more common; Hip roof pitches are precision engineered to provide long lasting service.
- Style : Hip roofs are known for their unique style and graceful appearance, which add to the beauty of home construction.

HOW TO BUILD A SCREW ROOF
As discussed above, hip roofs have sloped sides, so they must be constructed with great precision and safety. Here are a few steps to help you build a hipped roof properly:
Step 1: Measurements:
One of the most critical and basic steps in the construction of a hip roof is the measurement before installation. This should be done by experienced people with a hip roof calculator; and you must take measurements for the width and length of the building, which will then be used to calculate the dimensions of the ridge board, as well as the length of the rafters.
Step 2: Cutting the rafters:
Once you have completed the measuring section, it is time to cut the rafters to these specifications. These parts will later be used to build the roof.
Step 3: Attaching the rafters to the ridge board:
The ridge boards act as a frame that rests on the roof; You need to start installation by attaching standard rafters to the desired side of the ridge boards.
You must continue this process until the hardness or strength of all ridge boards has increased and is consistent with their weight.
Step 4: Dimensions of the hip rafter:
Before proceeding with the construction of the hip roof, it is good to make sure that the corners are correctly aligned at the corners. For this type of calculation, you should use a square frame, which makes it easier to perform measurements.
Step 5: Continue attaching the rafters:
Now is the time to move on to attaching the rafters; Experts suggest starting on one side and trying to apply more pressure for each rafter adjustment on the board. This pressure will give you much better results.
Step 6: Trim the rafters:
Once the rafters are nailed on, trimming can begin so they can provide a perfect linear layout.
Step 7: Attaching the longitudinal rafters:
In this type of construction, the corner rafters are called hip rafters, and they must be connected to adjacent rafters that are already fixed.
Step 8: Attach the rafters and jack:
Once you’ve finished attaching the rafters, it’s time to install the jack rafters between the hipped rafters and the standard rafters.
It’s good to start with one part and then move on to the end; although this process is lengthy, if done correctly, it can certainly lead to long-term results.
In case you don’t have proper knowledge about this installation process, try to get expert support.
It is important to ensure accuracy because this can lead to skin, vent and drain connections between them.
If the roof also includes a chimney, then you need to go through some other procedures to help you build the perfect hipped roof.
HOW TO PROCESS A SCREW ROOF
Compared to the global roof framing, the hip roof framing is more complicated because it consists of four sides of variable length instead of two. The ridge board here is centered in both length and width.
Hip roofs typically come in a variety of sizes, which can be T- or L-shaped, and more complex framing may be required.
Here the roof is divided and also structured into different parts, and the main connection points are between the ridges and the rafters, so the central part of the roof needs a more precise framework.
Once these rafters are properly adjusted, jacks can be easily installed as well as conventional rafters. Thus, installing a hip roof requires experience in this area so that the finished structure can be designed with greater precision and safety for the home.
Construction of a hipped roof requires due attention to some basic factors such as dimensions, frame and rafter adjustment.
In case you are thinking about building a hip roof for a complex commercial or residential building, it is important to build an excellent hip roof framing plan.
The purpose of this plan is to show the change in direction and dimensions for the entire structure; This layout plan helps all members to work on different parts of the roof.
The size of the roof usually depends on the type of house and its dimensions; If you are trying to do the DIY procedure for the roof of your house, it is best to start with a pre-designed package of hipped roof guides.
This manual can help you ensure proper ventilation, cladding, gutters, drainage, insulation, chimney adjustment, and skylight protection.
Various hip roof kits can help you through this process with quality instructions.
Here you will get the best information if you are looking for how to build a hip roof frame. The hip extension angle on all sides should probably be 45 degrees, but other angles are acceptable in some cases.
- Let’s start with a rectangular building plan.
- Locate the center line in the middle section.
- Now draw a 45 degree line from each corner to the center line, which can help establish the location specifications for the rafters.
- Draw a ridge line between the intersection points of the hip rafters.
- Finally, calculate the distance between the rafters and lay them according to the roof plan.
- It’s a good idea to draw the correct diagrams on paper for designing hip roofs so that these drawings can help you plan correctly in the next steps.

Framing hip and gable roofs is not as difficult as framing hip roofs; here the roofs are built at an angle of 90 degrees:
- First of all, you need to design the layout of the building.
- Now draw the largest rectangle inside the building plan.
- Now draw center lines for all the rectangles that form inside.
- Draw a line at a 45 degree angle both outside and inside the corners and extend these lines until they intersect with the center line. These lines will indicate the location of the hipped rafters on the outside corners as well as on the valley rafters.
- The center line now helps connect the valley and the rafters.
- Draw solid lines to indicate the location of the tabs.
- Check the spacing between the different rafters and then build a similar roof frame plan.

Using these hip roof framing instructions, you can create a quality roof for your home that will protect you from all kinds of bad weather.
Hip roofs are considered to be the best choice for covering canopies with horizontal structures. Experts say this hipped-roof canopy generates the most profit both on the coast and in windy areas, and also provides a very attractive view of the property.
In most of these places you can find a square hip roof that gives the house a unique look with additional protection from the elements.
For those who want to make a proper analysis of the hip roof view plan, some numbers may help:
These images can provide a complete guide in terms of hip roof framing details; the best source for understanding such an important task is images.
It becomes easier to follow the procedures if we have a graphic for every aspect. Although there are many options for roofing styles that provide proper coverage for a home with added protection from adverse weather conditions.
Here are some advantages of hip roofs:
- Pyramid hip roofs are very preferred in mountain stations where heavy snowfall occurs in winter.
- Hip roofs usually have the same cladding on all sides, making it easier to install gutters.
- Hip roofs are also well-suited for warmer climates, as they provide ideal shade for houses on all sides, helping to keep the house cool.
- Hip roofs also have eaves in all directions, which help to provide complete protection for the house from the sun and other atmospheric problems.
- One of the most important advantages of hip roofs is their ability to provide water drainage; since all sides of the roof have the correct angle of inclination, there is no chance of water accumulation on these roofs.
- Helps create protection against roof collapse.
- 30 degree hip roofs are considered the best designs for long life.

Hip roofs have several disadvantages:
- One of the most notable disadvantages of hip roofs is their typical or complicated construction process.
- Hip roofs require a lot of labor and also require additional raw materials, which adds to the cost.
- They need maintenance from time to time to ensure a long service life.
If you are wondering how to build a hipped roof in a commercial or residential property, then this guide can help you a lot. It includes complete information about rafters, ridges, framing and design basics that can help people even on their own.
Hip roofs are considered better than gable roofs because they protect your home from all sides so that the interior structure can remain safe even in adverse weather conditions.
Hip roofs are not as vulnerable to high winds as gable roofs, so they are considered ideal for almost all environmental conditions. Typically, people start with a half-hip roof frame because it helps make the construction process easier for workers.
By properly selecting the hip roof frame before starting construction, it becomes easier for all workers to maintain perfect alignment at various angles to ensure proper connection of rafters and ridges.
The main design goal of a hip roof is to provide adequate protection for the home from all weather conditions with minimal maintenance requirements.
These roofs must be strong enough to withstand strong winds as well as snow because some areas are heavily affected by such environmental factors.
Other important considerations are that it should give more appeal to the house structure with some unique designs.
.
Hip Flexor Exercises: Strengthening Stretches
People who sit for long periods of time are at high risk of developing tight hip flexors. When the hip flexors are tense, a person may experience pain in the lower back and hips.
Tight hip flexors can also cause injury. Luckily, there are several stretches and exercises that relax and strengthen your hip flexors. With increased strength and flexibility, a person is less likely to experience pain or injury.
Share on Pinterest. The hips contain a lot of muscles, which means that they can be easily stretched or ill.
The human hip flexors are the muscles surrounding the ball and socket joints that connect the legs to the upper body.
These muscles are vital for the movement of the lower body.
The hip flexors, which are made up of five different muscles, are often an overlooked group of muscles.
Even exercise enthusiasts often skip exercises that strengthen and stretch these muscles.
The individual must keep the hip flexors well extended and strong to avoid injury or to prevent worsening of existing injuries.
A few stretches will improve flexibility and reduce the chance of hip flexor injury. Here are some hip flexor stretches:
Sitting Butterfly
The Sitting Butterfly stretch stretches the hips, thighs, and lower back. It is easy to perform from a seated position.
To perform this stretch:
- Sit up straight, tighten your abs.
- Squeeze the buttocks of each foot together while pushing the knees out.
- Pull your heels towards your body and relax your knees, allowing them to drop towards the ground.
- Hold for 20-30 seconds, breathing deeply.
Bridge Pose
Bridge Pose is a popular yoga pose. It stretches many parts of the legs, hips and back while lying down.
To perform this stretch:
- Lie on the ground with your arms at your sides.
- Pull your feet up to your buttocks and keep your feet on the ground.
- Engaging your core, lift your buttocks into the air and form a straight, curved line from knees to shoulders.
- Hold for about 30 seconds, lower and repeat.

Dove Pose
Another popular yoga stretch. Pigeon pose allows you to deeply stretch your hips. This pose is difficult to perform, so people should exercise caution when trying it for the first time.
To perform this stretch:
- Start with the top plank as if you were doing a push-up.
- Lift the left leg and extend the knee forward towards the left hand and push the foot towards the right hand.
- Move your extended right leg as far back as possible.
- Keeping your hips straight, lower your torso to the ground as far as possible.
- Change sides after a few seconds.
Share on Pinterest Many hip flexor exercises can be done at the gym, but they can also be done at home.
There are some good exercises you can do at home or at the gym.
These exercises strengthen the legs in general but target the muscles that make up the hip flexors.
To strengthen the hip flexor, a person can try the following:
Climbers
Climbers is a type of movement that a person performs from a plank position. Climbers mimic climbing rocks, hence the name.
Climbers:
- Start in regular plank with arms apart and feet shoulder width apart.
- Keep your hands firmly on the ground and pull your right knee towards your chest on the same side of your body.
- Then return to the starting position and repeat with the left leg.
Start with 5-10 repetitions and gradually increase them up to about 20-30.
Lunges
Lunges are an excellent exercise for strengthening the muscles of the legs and hips. People can perform lunges in a variety of ways, including forward, backward, and both ways. The simplest is the forward lunge.
For a forward lunge:
- Start in a standing position with legs slightly apart.
- Place your hands on your hips or let them hang straight down on either side of your body.
- Take a big step forward, making sure your heel touches the floor first.
- Bend the front knee until the thigh is parallel to the floor and the knee is over the ankle, while bending the other knee towards the ground.
- Return to starting position, pushing off the floor with your lead foot.
- Repetition, alternating sides.

For starters, a person can do 5 to 10 reps. However, a rep range of 20 to 30 is a good number to aim for.
Straight leg raises
Straight leg raises is another exercise that can be done while lying down and involves lifting one leg at a time. It’s easy to do but gives a good lower body workout.
To perform a straight leg raise:
- Start by lying on the ground with arms at your sides.
- Keeping your feet on the floor, bring them to your buttocks, forming a triangle with your knees.
- Alternately lift one leg, then the other, creating a straight line from hips to ankle.
Repeat 8 to 10 times on each leg.
Squats
Squats can work your leg muscles and engage your core at the same time. Squats have the added benefit of being highly flexible, meaning a person can adjust the intensity to suit their changing fitness needs.
To squat:
- Start in a standing position with your legs and arms slightly apart.
- Bend your knees and push your buttocks back.
- Jump down until your feet are roughly parallel to the floor, keeping your knees in line with your feet.
- Keep your abs tight and raise your arms to chest level.
- Repeat 10 to 30 times depending on fitness level.
As strength increases, people can add jumping balls or weights for an extra challenge.
Clamming
Clamming is a popular exercise among dancers who need strong thigh muscles to aid rotation. In the beginning, people can pray without resistance.
To perform the clam, a person must:
- Lie on his side with his legs folded on top of each other and slightly bent at the knees.
- Open the top elbow so that it points towards the ceiling.
- When opening your knee, keep your feet together and do not roll back on your lower thigh.
- Close the leg to end the repetition.
- Repeat 10 to 30 times on each side.

People who have been doing this exercise for a while can use therapeutic tape for additional resistance.
Hip Abduction and Abduction Machines
Individuals with gym access can find machines designed to strengthen the hip flexors. Often seated, these machines focus on squeezing the legs together or spreading them apart.
While focusing on the legs, these machines should not be skipped in the gym, as they can help strengthen the hip flexors.
Tight hip flexors can cause some potential problems in various parts of the body. Tight hip flexors can: urgent hip problems
Stretching and strengthening the hip flexors can help a person avoid complications in the future.
It is important that a person does not forget about these muscle groups during training. Neglect of the hip flexors can lead to additional problems and pain that can limit mobility and quality of life.
There are some simple exercises and stretches that can help a person maintain strong and healthy hips.
.
Hip Flexion Exercises: Strengthening and Stretching
Although not everyone can have the hips as mobile as Shakira, we can all benefit from strengthening the muscles that support this hinge joint. Our hips are not only responsible for the rocking dance moves we do from time to time, but they are also a vital area for runners, bikers and non-athletes alike.
Sitting most of the day – which almost all of us are guilty of – puts strain on the hip flexors. Tight hip flexors can cause lower back pain, hip pain, and injury.
And the hip problems don’t stop there. According to the American Academy of Orthopedic Surgeons, the number of hip replacements in the United States is on the rise. Their peak in adults is in early middle age.
To make sure you don’t break your body while moving – or just walking down the street – here are nine great hip flexor exercises that will keep your hip strong and flexible.
Try these stretches to relax your hip flexors and joints.
Seated Butterfly Stretch
This simple exercise will stretch your inner thighs, thighs and lower back. And you can do it while sitting!
- Sit on the floor with a straight back and tight abs.
- Press the soles of your feet together in front of you. Let your knees spread out to the sides.
- As you pull your heels towards you, relax your knees and let them come closer to the floor.
- Inhale deeply and hold this position for 10 to 30 seconds.
Dove Pose
This popular yoga pose is an advanced technique. Do it only if it is comfortable for you. Feel free to change the position.
- Start on the board.
- Lift your left leg off the floor and slide it forward so that the knee touches the ground next to the left hand and the foot next to the right hand. Your flexibility determines exactly where your knees and toes fall.
- Move your right leg as far back as possible, keeping your hips square, and lower yourself to the floor and elbows, lowering your upper body as low as possible.
- Hold the stretch without letting your chest drop. As soon as you feel that you have stretched well, switch sides.

Bridges
It’s amazing what you can do lying down. Like that bridge pose!
- Lie on your back, arms at your sides, feet flat on the floor, knees bent. Try to place your feet so that your toes touch your heels.
- Press with your heels and lift your hips from the floor to the ceiling, squeezing your buttocks. Try to bring your shoulders as close together under your body as possible.
- Hold the position for a few seconds before returning to the starting position, then repeat several times. Don’t forget to breathe!
Try these exercises to strengthen your hip flexors.
Lunges
- From a standing position, look straight ahead and take a big step forward with your right foot.
- Bend your extended knee and shift your weight onto your front right leg. Continue to slowly lower yourself into a lunge until your left knee is hovering over or kissing the ground. The right knee should be directly above the right ankle.
- Return to a standing position. Repeat the pose with your left leg.
 The right knee should be directly above the right ankle.
 Mobile Climbers
Grab some sliding discs, paper plates or even hand towels – basically anything that slides. Get ready to climb!
- Stand on a wooden floor or other smooth surface.
- Place sliders under the balls of your feet in a push-up.
- Bring your right leg to your chest, alternating with your left leg, as normal climbers do.
- Move slowly at first, then increase the pace.
Skater Squat
This move is similar to the normal squat, but with a setting specifically targeted at your hips.
- Bend at the knees and hips, lowering the buttocks to the ground, while maintaining a straight back and a raised chest.
- After each squat, shift your weight onto your right or left foot while simultaneously moving your opposite leg to the side, toes pointing forward.
- Alternate legs each time.
- Lie on your back with your palms on your sides. In turn, stretch each leg up and lift it off the ground for about 2 seconds.
- Hold your leg at approximately a 45 degree angle. The opposite leg should be bent at the knee, the foot planted on the floor, and with the foot raised, the toe should point to the sky.
- Change legs and repeat 10 times on each leg.

Straight Leg Raises
Psoas Wall Hold
This exercise strengthens the deep hip flexor muscle known as the psoas, which can increase stride length and reduce injury. Win-win situation!
- From a standing position, bend your right knee and raise your hip to the sky.
- Balance on your left leg, keeping your right knee and thigh at hip level for approximately 30 seconds.
- Lower it slowly, then repeat on the left leg.
Hip flexion
- Lying on your back with legs straight, flat on the ground, slowly bring your knees (one at a time) to your chest.
- Pull it as close to your chest as possible without feeling any discomfort.
- Return to starting position and repeat with opposite leg.

Now that you’re armed with these stretching and strengthening exercises, practice them regularly. Remember, the stronger your hip flexors, the more likely you are to keep them injury-free off the operating table!
3 yoga poses for toned thighs
.
3 exercises to strengthen the hips before running
I confess that I did not fully understand the importance of strengthening the hips until I was forced to undergo a hip arthroscopy. It reminded me that our bodies, including the muscles around the hips, work synergistically – if one muscle is superior to another, problems await.
What about you? Are you too focused on your legs?
Athletes and trainees (especially runners), listen up! You may have managed to avoid hip strengthening exercises in the past, but running and exercising with weak hips is a disaster waiting in the wings.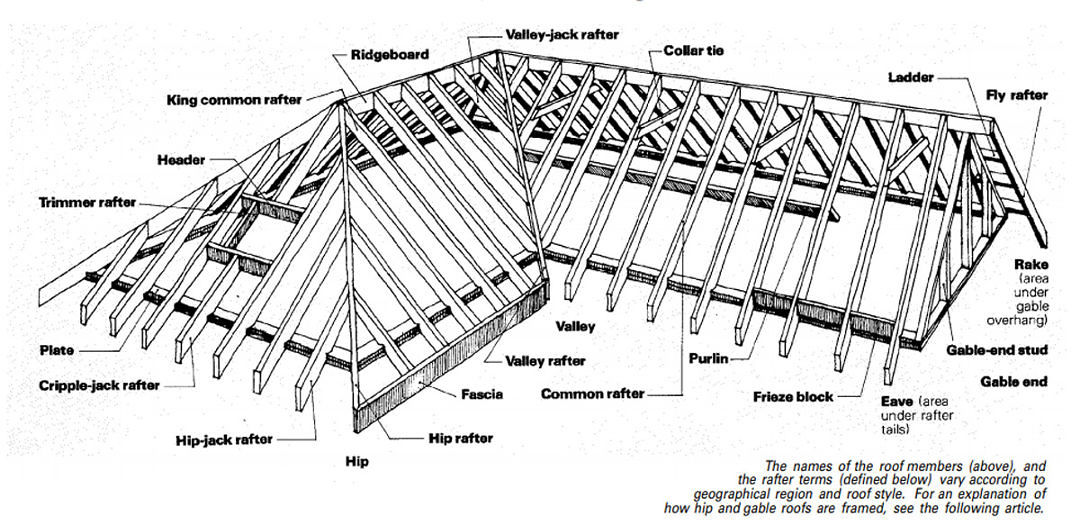 .. trust me, I know.
Here’s some information about why you should strengthen your hips for running and how to get started with some simple hip strengthening exercises.
Stop Looking at Your Feet
It’s no news to any avid runner that kicking plays an important role in running cadence, efficiency and ease. However, many experts agree that the focus on kicking distracts runners from understanding what is the starting point for great running technique – it’s all about the hips.
What is the starting point for improving running technique?
Focusing on the feet rather than the hips and torso causes runners to prioritize “moving at the end of the chain” rather than looking at the start and zone the start of the stride.
It seems like we should pay more attention to the hips and their ability to extend with control because hip weakness can compromise stability and create excess motion in the hips and knees. Achilles tendinopathy and plantar fasciitis.
Hip extension instead of flexion
Maintaining a neutral pelvis is important because the pelvis is the crossroads of forces in the body. If the pelvis falls out of position or the hips are tense, the torso and legs can no longer move effectively and negatively affect the gait when running.
The pelvis is the intersection of forces in the body.
When we run, the hips primarily determine the extension pattern, they then help the gluteus maximus create momentum in the mid and late stance and push us forward.
Unfortunately, if you have a relatively sedentary job, spend a lot of time in the saddle (triathletes) or spend a huge amount of time on your daily commute, your body gets used to static bending.
Why is this important?
Well, spending too much time on hip flexion won’t help you work on hip extension, which is vital to strong running form.
The Strong Alliance – Core and hips
When it comes to optimal running performance, your core is tied to your glutes and a weak core can quickly push your hips and pelvis forward. This ultimately limits hip extension and hinders your running. When you have a strong core (and no, that doesn’t always mean rocking abs), then your pelvis, hips, lower back, and legs work in unison.
Strong doesn’t always mean amazing six pack abs.
Need a better reason to work on your abs? Then consider that the core muscles help keep the torso upright, and when the core is weak, the hips, pelvis, and upper legs do not function optimally.
The runner whose hips cannot stay aligned while running is a perfect example of someone who hasn’t realized the importance of “hip core” or “deep hip stabilizers”. “Hip flexion” is due to a weak core-thigh connection and may simply be because your core doesn’t know when it’s time to “turn on” because it was never needed as all the work is being done compensating muscle groups!
In other words, lack of deep core strength leads to increased stress on the hips and buttocks, creating knots and tightness. This also leads to poor pelvic posture and lower back pain.
Thus, increased concentration on kicking, excessive sitting and a weak core will inevitably lead to complications in the hip area.
To combat this, start doing hip exercises at least 2-3 times a week to strengthen your hips for running. Also avoid sitting for long periods (does anyone have to stand on a table?) and don’t skip the plank after your run.
3 Easy Hip Strengthening Exercises for Running
If you’re not sure where to start strengthening your hips, here are 3 simple hip exercises to jump-start your program:
1. Single Leg Deadlift
Start with feet hip-distance apart, bend one leg slightly and kick the other leg back as you become parallel (or nearly parallel) to the floor.
Stand up, that’s 1 rep, do 2-3 sets of 12 on each leg.
2. Side Leg Raise
Engaging your obliques (external abs), external glutes (buttocks), and thighs, this exercise is sure to build your muscular strength and endurance.
Start on the floor, lying on one side with your lower arm extended and the other on your upper thigh. Then lift your top leg up and back down to the floor.
To make it harder, point the toes of the top foot toward the floor as the foot goes down and up (oops!).
Do 2-3 sets of 30 seconds on each side.
3. Single Leg Hip Bridge
This exercise is ideal for strengthening the lower back, buttocks and thighs.
Starting on your back with one leg bent and the other leg extended, with your bent leg lift your hips up until your back and buttocks form a straight line.
Then get down to the floor and repeat. Make sure your pelvis does not rotate as you lift, and that you exhale as you lift.
Don’t arch your back, make sure you pull your pelvis in with your tail and engage your body! Do 2-3 sets of 15 reps on each leg.
If you liked this post, don’t forget to share it so others can find it.
Or put your finger up!
I like this article You liked this article Thank you!
Please note that the information provided in the Polar Blog articles is not a substitute for individual medical advice. Before starting a new fitness program, consult your doctor.
.
How to make a hip roof
Its design is not only reliable, but also very aesthetic. Moreover, taking even the simplest version of it as a basis, you can diversify it with various elements that will become a kind of decoration for the whole structure and a sign of sophistication of style.
Do-it-yourself hip roof drawings
Do-it-yourself hip roof drawings of which you need to select or prepare in advance, can be done independently, but one master obviously cannot cope with such a volume and complexity of work.
What is a hip roof?
This is how the simplest hip roof looks like
The most common simple hip roof scheme consists of four slopes, two of which have the shape of a triangle – they are called “hips”. They are located at the ends of the building and connect the ridge with the cornice. Two frontal planes in the form of a trapezoid have a large area and a slope, which is also located from the ridge to the eaves.
Hip roof – top view
It should be noted that there are half-hip roofs – they are also referred to as the Dutch type. In this case, during construction, the cornices of the end slopes are located much higher than the front ones. Installation of such a roof, as a rule, is carried out in cases where a living space is arranged in its attic space.
And such a roof is called a half-hip roof
The basics of the hip roof construction
The traditional hip roof system consists of certain units and elements that are always mounted in the same way and are the basis for more complex roofs of this type. This figure shows just such a design, which includes the following parts:
Example scheme of a hip roof
1 – Corner rafter or rib is always placed at a lower angle than the same, but intermediate elements of the system. For such a roof structure, boards with a section of 50 × 150 mm are suitable for both side and intermediate rafters.
2 – Short rafter legs are fixed not on the ridge, but on the corner rafter board. They should have the same slope as the intermediate rafters.
3 – The ridge in this case has the same cross-sectional size as the rafter legs.
4 – Rafters that converge and join at the corners of the ridge on three sides are called central rafters.
5 – Intermediate rafters are the legs that connect the ridge and the strapping that runs along the top of the building and form a cornice.
In the following diagram, in addition to those already mentioned, you can see the arrangement of other structural elements.
Structural elements of the hip roof
- After the rafters, you can see the post that supports the ridge and is installed at the junction of two rafters and a ridge beam. These elements are not always used, sometimes they are simply replaced with other retaining parts, for example, in cases where the space under the roof must be free if it is planned to arrange a room in it.
- The tie is a fastening element for the rafters. Most often, it also plays the role of a floor beam.
- The filly is mounted to the installed rafter legs to increase the roof overhang, which will become a weather protection for the gap under the roof and the upper part of the walls.
- The wind beam is attached to the rafters obliquely on the side of the roof that is considered windy. Sometimes it is installed on both trapezoidal slopes.
- The rafter or short rafter is used only in the hip construction and is attached to the corner rafter.
- Mauerlat is present in any truss system and is a bar that is attached around the entire perimeter of the walls of the building.
- Sprengel is another part of the system, giving it rigidity and relieving the load from the walls. It is installed diagonally, relative to the corners of the building and fixed to the Mauerlat.
- Struts are installed at different angles to the rafter legs, depending on whether the attic will be used to create an additional room.
- Rib, diagonal or side rafters, can be installed either on one side of the roof or on both sides, depending on the intended design.
- Runs in this case are the distance between the fastening of the rafters to the ridge beam – it will depend on the weight of the selected roofing material and the expected snow load in the construction area.


Stages of hip roof installation
If a hip structure is chosen for the roof of the house, then work on it must be carried out in strict sequence:0003
- Every project starts with a truss system.
They always start with drawing a basic hip roof plan
- The next step is to calculate all the parameters that will depend on the width of the distance between the walls of the house and the presence of capital partitions inside the building.
- Further, according to the calculations, the necessary materials are purchased and the tools necessary for work are prepared.
- This is followed by preparation for tying the walls for the installation of the truss system – the flooring of the waterproofing material.
- Marking the walls for the installation of the truss system.
- The most important step is to install the entire system according to the project.
- The final stage is the installation of the roof.

Preparing the roof plan
The roof plan can be different – it will depend on the imagination and capabilities of the owner of the house, as well as on the location of the walls of the building. When drawing up the scheme, it is also necessary to take into account the fact that the more complex the roof structure is, the more material will be needed for it, and the installation of the system will take longer.
If the design is very complex, then the best option would be to seek the help of professionals who will help to correctly calculate the thickness and number of elements necessary for the reliability of the system. Of course, it will take some time to draw up such a project and certain financial resources will be spent, but it is better to use the development of specialists than to act at random and get an unreliable design.
System calculation
If a decision is made to rely on one’s own strength, then when making calculations, the following factors must be taken into account:
- Reliability of the load-bearing walls and foundation of the building over which the roof will be erected.
- Type of truss system (layered or hinged).
- Cross section of rafters and beams for other elements of the system.
- The angle of inclination of the slopes and the distance between the rafters.
- Dimensions of elements such as protrusions and openings for flue pipes, ventilation, windows.

To calculate the exact proportions of the structure, you can use formulas specially developed for this, which will make the roof reliable and durable. Designation of parameters in formulas:
S – total area of roof slopes;
h – system height from floor to ceiling;
d – length of lateral or diagonal rafter legs;
e – the length of the intermediate rafters;
a – the distance between the rafters along the length of the building;
α – angle of slope;
b – the distance between the rafters from the end hip side.
Formulas for calculating the device of a simple holly roof, are as follows:
- The skate height:
The skate height formula
- The length of the intermediate front rafters:
Determination of the length of the rafters
900
Hip rafter length
- Roof slope area:
Determining the area of the roof slopes
Having calculated the main parameters of the system, it is possible, based on them, to purchase materials for construction.
Materials for building a roof
To install the truss system, you will need not only well-dried quality wood, but also metal fasteners, as well as roofing nails, self-tapping screws and anchor bolts.
Metal fasteners for connecting structural elements of the system
- From metal elements, you will need to purchase corners and fasteners of various configurations that will help make the structure more reliable and strong.
Floating mount for joining rafters with mauerlat
One of them is a sliding mount. It is installed at the bottom of the rafters, thus securing them to the Mauerlat. By installing it, you can eliminate the risk of deformation of the roof system when the load-bearing walls shrink.
Floating fasteners will prevent the roof system from deforming when the walls shrink
Another long-used fastener is staples. They connect different parts of the system, for example, rafters and floor beams or Mauerlat, if the roof is being erected, for example, on a building that has already shrunk for a long time.
In some cases, you can get by with ordinary staples
- For the manufacture of wooden elements, you will need:
Particular attention – the quality of wood for mounting the system
– rafters and ridge are made of timber with a section of 50 × 150 mm. Builders involved in the construction of roof systems recommend installing the entire system from timber or boards with the same cross section – this guarantees the strength and reliability of the building;
– a crate of boards is stuffed on top of the rafter system, the cross section of which should be 25 × 150 mm.
When choosing wood for the rafter system, you can rely on a table compiled specifically for this. It shows the permissible length of rafters (in meters) from coniferous wood (larch, spruce, cedar, pine), depending on its quality, beam cross-section and the average snow load in the region.
 30
30  48
48 - In addition, it will be necessary to buy roofing material, insulation and vapor barrier film, which is laid on the rafters under the crate. A soft coating is traditionally chosen as a roofing material for a hip roof structure – it is easier to fix it on a complex configuration of such a truss system. Under such a roof it will be necessary to make plywood flooring.
- You also need to purchase an antiseptic compound for wood treatment before starting installation.
- It may be necessary to use 4 mm diameter steel wire to secure some of the elements to the load-bearing wall.

Prices for various types of timber
Timber
Tools for work
In advance, you need to prepare not only all the necessary materials, but also tools, since without them the work will not be possible. To install the truss system you will need:
Roofing tools
- Hammer, preferably with a nail puller.
- Electric screwdriver.
- Mallet – rubber or wooden mallet. It is necessary for some operations for leveling and fitting wooden elements.
- Wooden rail, 1.5-1.7 m long, for bringing individual nodes to the same level.
- Marker or pencil.
- Electric jigsaw, hacksaw and power saw.
- Building level, plumb.
- Tape measure and ruler.
- Chisel for gouging grooves.
- Planer – it is better to have both a regular and an electric version, since it is more convenient to work with a conventional tool at a height, and large planes can be processed below with an electric one.

Installation work
The figure shows a simplified diagram of the hip roof, which can be used as a reference when installing the system.
Simplified installation diagram
The work is carried out in stages and without any haste, with careful consideration of each step, since the design of the hip roof is quite complex.
The first step is to prepare the wood by treating it with an antiseptic solution and drying it well. When the material is ready, you can proceed with the installation of the system.
- Installation of the system begins with the installation and fixing of the mauerlat along the perimeter of the bearing walls. It must be laid on a layer of waterproofing material.
 It must be laid on a layer of waterproofing material.
 The Mauerlat is installed on the anchors
- After the Mauerlat is installed, markings are made on it, according to the previously made calculations. To make the marking as accurate and noticeable as possible, bright markers are used or beacons are driven in in certain places.
It is very important that the distances marked on one wall are identical to the markings on the opposite wall, otherwise the floor beams and other elements will be laid unevenly.
The key to success is the correct marking
- Next, the floor beams are laid. They can be mounted on walls next to the Mauerlat or on a fixed beam below the wall surface.
Installation of floor beams
- Then the mauerlat is fastened with ties, which help to relieve the load from the load-bearing walls.
Puffs between opposite Mauerlat bars
- After the floor beams are laid, experienced craftsmen advise to cover them with a deck of boards, without fixing them to the beams. Such flooring is needed for comfortable and safe work.
 Such flooring is needed for comfortable and safe work.
 Temporary decking is recommended on top of the floor beams for ease of work.
- The next step is to install the posts. They are fixed on puffs or floor beams.
- Racks are fastened from above with a ridge beam, and rafter central legs are attached to it from the end hip sides of the roof.
- Next, the intermediate rafters are marked and screwed from the frontal roof slopes.
Installing studs and rafters on the front sides of the roof
- This is followed by diagonal rafters that connect the ridge and corners of the building. If necessary, additional racks are installed under them.
Fitting the diagonal rafters
- The diagonal rafters are fitted with rafters or short rafters. They are installed at the same distance between them as the intermediate ones.
- Depending on the design, other supporting or reinforcing elements, such as struts or trusses, as well as a wind beam, can be built into it.
- If the rafters are installed and end on the mauerlat, then they are extended with additional elements – “fillies”, they will create a canopy over the wall.

Roofing material decking
The structure of the roofing “pie” of the hip roof
- ventilation pipes, there is an entrance to the attic room or an exit to the balcony. They are framed with additional slats, stuffing them around the perimeter of the planned openings.
- Then the roofing “pie” is mounted on the truss system. The work is carried out in the following sequence:
- On top of the rafters, a vapor barrier film is stretched and fixed
- Further, on top of it, laths of the crate are screwed onto the rafters.
- Insulation is laid between the slats, which is covered with windproof materials (for example, dense polyethylene film).
- Then the counter batten is fixed.
- The next step will depend on which coating material is chosen. If, for example, a metal tile is used, then it can be screwed directly to the rails of the counter-lattice. When choosing a soft roof, it is imperative to lay plywood or OSB sheets under it.

Complicated nodes of the hip roof system
I would like to focus on the complex nodes of the truss system, the installation of which always raises many questions.
– using metal corners installed on both sides of the rafter leg;
– nails driven at an angle through the rafter into the mauerlat;
– special staples;
– sliding fasteners.
Several ways of joining roof parts and assemblies
- The connection of the rafter legs on the ridge beam can also be done in different ways:
– by laying them on top of each other above the beam and fixing them together with bolts;
– a device on the rafters of special recesses for rigidity when installing them on the ridge;
– adjusting the rafters at the selected angle on the ridge and fastening them with wooden or metal plates on both sides.
- Another very difficult knot is the connection of the ridge beam with the rafters. These elements must have reliable mating and fastening, since the durability of the hip side of the roof depends on this.
Ridge and rafter connector
— The ridge beam is laid on the racks and fastened on both sides with boards.
— Diagonal rafters are cut at the desired angle and fastened to the ridge beam and intermediate rafter. In the same way, the second rafter is mounted, going to the other corner of the house.
Prices for various types of rafter fasteners
Rafter fasteners
Video: hip roof construction secrets
If there is no experience in erecting such a complex architectural element of a building as a roof, then it is recommended to use the help of qualified specialists. Moreover, this moment applies not only to the hip roof structure, but also to all the others, since any type of this structure has its own characteristics with complex connecting nodes.
It must be remembered that the long-term service life of the entire structure will depend on the reliability of the coating of the house, so its construction must be taken with the utmost responsibility.
Design and construction of a hip roof
Hip roofs or so-called hip roofs are a special type of roof that has a very gentle slope on the sides with a downward pattern towards the side walls.
The area where one section of a roof meets another section is considered “hipped” and a hipped roof usually has very uniform corners with no vertical end.
Hip roofs consist of four rafters, which are usually found on a ridge board located in the middle of the roof.
Considering the rectangular shape of most buildings, hip roofs will have two triangular sides and two trapezoidal sides; whereas, in the case of square buildings, hipped roofs more often face towards the top, forming a pyramidal structure.
Other names for hipped roofs – pyramidal roof and pavilion roofs; here are mansard roofs, as well as half-hipped roofs – small variations of simple hip roofs.
Hip roofs are more often used in complex architectural solutions, most often for bungalows, cottages and ranches.
These roofs add more qualities to houses, such as traditional design, strength and increased comfort. Hip roofs are considered to be one of the simplest designs in the hip roof category.
TOP ROOF CONSTRUCTION
Hip roofs can be designed over both square and rectangular buildings; The design of hip roofs can have triangular sides, as well as a combination of triangular and trapezoidal sides.
Some hip roof designs follow the shape of a pyramid, while others may have a more symmetrical structure.
Generally, three main factors influence the design or style of a hip roof:
- Eaves: Hip roofs with deep eaves that can help shade the window; this scheme helps to cool the inside of the house and ensures lower energy bills while reducing energy consumption.
- Strength: For areas where wind and cyclones are more common; Hip roof pitches are precision engineered to provide long lasting service.
- Style : Hip roofs are known for their unique style and graceful appearance, which add to the beauty of home construction.

HOW TO BUILD A SCREW ROOF
As discussed above, hip roofs have sloped sides, so they must be constructed with great precision and safety. Here are a few steps to help you build a hipped roof properly:
Step 1: Measurements:
One of the most critical and basic steps in the construction of a hip roof is the measurement before installation. This should be done by experienced people with a hip roof calculator; and you must take measurements for the width and length of the building, which will then be used to calculate the dimensions of the ridge board, as well as the length of the rafters.
Step 2: Cutting the rafters:
Once you have completed the measuring section, it is time to cut the rafters to these specifications. These parts will later be used to build the roof.
Step 3: Attaching the rafters to the ridge board:
The ridge boards act as a frame that rests on the roof; You need to start installation by attaching standard rafters to the desired side of the ridge boards.
You must continue this process until the hardness or strength of all ridge boards has increased and is consistent with their weight.
Step 4: Dimensions of the hip rafter:
Before proceeding with the construction of the hip roof, it is good to make sure that the corners are correctly aligned at the corners. For this type of calculation, you should use a square frame, which makes it easier to perform measurements.
Step 5: Continue attaching the rafters:
Now is the time to move on to attaching the rafters; Experts suggest starting on one side and trying to apply more pressure for each rafter adjustment on the board. This pressure will give you much better results.
Step 6: Trim the rafters:
Once the rafters are nailed on, trimming can begin so they can provide a perfect linear layout.
Step 7: Attaching the longitudinal rafters:
In this type of construction, the corner rafters are called hip rafters, and they must be connected to adjacent rafters that are already fixed.
Step 8: Attach the rafters and jack:
Once you’ve finished attaching the rafters, it’s time to install the jack rafters between the hipped rafters and the standard rafters.
It’s good to start with one part and then move on to the end; although this process is lengthy, if done correctly, it can certainly lead to long-term results.
In case you don’t have proper knowledge about this installation process, try to get expert support.
It is important to ensure accuracy because this can lead to skin, vent and drain connections between them.
If the roof also includes a chimney, then you need to go through some other procedures to help you build the perfect hipped roof.
HOW TO PROCESS A WATRON
Compared to the global roof frame, the hip roof frame is more complicated because it consists of four sides of variable length instead of two. The ridge board here is centered in both length and width.
Hip roofs typically come in a variety of sizes, which can be T- or L-shaped, and more complex framing may be required.
Here the roof is divided and also structured into different parts, and the main connection points are between the ridges and the rafters, so the central part of the roof needs a more precise framework.
Once these rafters are properly adjusted, jacks can be easily installed as well as conventional rafters. Thus, installing a hip roof requires experience in this area so that the finished structure can be designed with greater precision and safety for the home.
Construction of a hipped roof requires due attention to some basic factors such as dimensions, frame and rafter adjustment.
In case you are thinking about building a hip roof for your complex commercial or residential building, it is important to build an excellent hip roof framing plan.
The purpose of this plan is to show the change in direction and dimensions for the entire structure; This layout plan helps all members to work on different parts of the roof.
The size of the roof usually depends on the type of house and its dimensions; If you are trying to do the DIY procedure for the roof of your house, it is best to start with a pre-designed package of hipped roof guides.
This manual can help you ensure proper ventilation, cladding, gutters, drainage, insulation, chimney adjustment, and skylight protection.
Various hip roof kits can help you through this process with quality instructions.
Here you will get the best information if you are looking for how to build a hip roof frame. The hip extension angle on all sides should probably be 45 degrees, but other angles are acceptable in some cases.
- Let’s start with a rectangular building plan.
- Locate the center line in the middle section.
- Now draw a 45 degree line from each corner to the center line, which can help establish the location specifications for the rafters.
- Draw a ridge line between the intersection points of the hip rafters.
- Finally, calculate the distance between the rafters and lay them according to the roof plan.
- It’s a good idea to draw the correct diagrams on paper for designing hip roofs so that these drawings can help you plan correctly in the next steps.
Framing hip and gable roofs is not as difficult as framing hip roofs; here the roofs are built at an angle of 90 degrees:
- First of all, you need to design the layout of the building.
- Now draw the largest rectangle inside the building plan.
- Now draw center lines for all the rectangles that form inside.
- Draw a line at a 45 degree angle both outside and inside the corners and extend these lines until they intersect with the center line. These lines will indicate the location of the hipped rafters on the outside corners as well as on the valley rafters.
- The center line now helps connect the valley and the rafters.
- Draw solid lines to indicate the location of the tabs.
- Check the spacing between the different rafters and then build a similar roof frame plan.

Using these hip roof framing instructions, you can create a quality roof for your home that will protect you from all kinds of bad weather.
Hip roofs are considered to be the best choice for covering canopies with horizontal structures. Experts say this hipped-roof barn generates the most profit both on the coast and in windy areas, and also gives a very attractive look to the property.
In most of these places you can find a square hip roof that gives the house a unique look with additional protection from the elements.
For those who want to make a proper analysis of the hip roof view plan, some numbers may help:
These images can provide a complete guide in terms of hip roof framing details; the best source for understanding such an important task is images.
It becomes easier to follow the procedures if we have a graphic for every aspect. Although there are many options for roofing styles that provide proper coverage for a home with added protection from adverse weather conditions.
Here are some advantages of hip roofs:
- Pyramid hip roofs are very preferred in mountain stations where heavy snowfall occurs in winter.
- Hip roofs usually have the same cladding on all sides, making it easier to install gutters.
- Hip roofs are also well-suited for warmer climates, as they provide ideal shade for houses on all sides, helping to keep the house cool.
- Hip roofs also have eaves in all directions, which help to provide complete protection for the house from the sun and other atmospheric problems.
- One of the most important advantages of hip roofs is their ability to provide water drainage; since all sides of the roof have the correct angle of inclination, there is no chance of water accumulation on these roofs.
- Helps create protection against roof collapse.
- 30 degree hip roofs are considered the best designs for long life.

Hip roofs have several disadvantages:
- One of the most notable disadvantages of hip roofs is their typical or complicated construction process.
- Hip roofs require a lot of labor and also require additional raw materials, which adds to the cost.
- They need maintenance from time to time to ensure a long service life.
If you are wondering how to build a hipped roof in a commercial or residential property, then this guide can help you a lot. It includes complete information about rafters, ridges, framing and design basics that can help people even on their own.
Hip roofs are considered better than gable roofs because they better protect your home from all sides so that the interior structure can remain safe even in adverse weather conditions.
Hip roofs are not as vulnerable to high winds as gable roofs, so they are considered ideal for almost all environmental conditions. Typically, people start with a half-hip roof frame because it helps make the construction process easier for workers.
By properly selecting the hip roof frame before starting construction, it becomes easier for all workers to maintain perfect alignment at various angles to ensure proper connection of rafters and ridges.
The main design goal of a hip roof is to provide adequate protection for the home from all weather conditions with minimal maintenance requirements.
These roofs must be strong enough to withstand strong winds as well as snow because some areas are heavily affected by such environmental factors.
Other important considerations are that it should give more appeal to the house structure with some unique designs.
.
Creating pitched and gable roofs manually
The information in this article applies to:
QUESTION
How do I create hipped, and gable roofs using manual roofing tools?
ANSWER
Master Architect allows you to automatically create a variety of roofs, including hip and gable roofs. However, in some situations it’s easier to create a roof manually. In this tutorial, we’ll show you how to set the default options for building a roof, how to manually draw roof planes to create a hipped roof, and how to create roof planes for a gable roof.
To create a hip roof
- Select Build > Wall > Straight Exterior Wall from the menu and draw four connecting walls to form a closed area. This example draws a simple rectangle.
- Select Build > Roof > Build Roof from the menu to open the Build Roof dialog box.
This dialog also serves as the default dialog for roofs – the settings here apply to both manually drawn roof planes and automatic roofs.
- In the Roof panel of the Build Roof Plane dialog box:
- Select Build > Roof > Roof Plane from the menu.
- Starting on the left side of the plan, click and drag the baseline down along the outer surface of the wall frame layer.
- When Object Snap is enabled, the software will automatically snap the roof plane baseline to this point.
- Release the mouse button and click inside the room to locate the ridge and create the roof plane.
- Repeat this process for the three remaining sides of the building.
- Click on the top right side roof plane to select it. Note that the edit handle displayed on the edge you clicked is larger than the edit handles on the other three edges, indicating that this is the selected edge.
- Click edit button Join roof planes .
- Then click on the top side of the right roof plane to join the two edges together.
- Repeat this process to join adjacent edges of the remaining roof planes.
- Click on the ridge edge of the top roof plane to select it.
- Click edit button Roof plane connection .
- Click the crest of the lower roof plane to connect them together.
- Click on the ridge of the roof plane on the right side of the plan.
- Click edit button Join roof planes .
- Click the right edge of the top roof plane.
- Repeat this process for the roof plane on the left side of the building.


To create a gable roof
- Select Build > Wall > Straight Exterior Wall and draw four connecting walls to form a closed area. Again, this example uses a simple rectangle.
- Follow the steps in step 3 above to create two roof planes on opposite sides of the building.
- Click the edge of the bottom roof plane ridge to select it.
- Press edit button Join roof planes .
- Click the ridge edge of the top roof plane to connect them together.
- Select View > Temporal Dimensions and make sure that the checkbox next to Temporal Dimensions is selected. If not, click this menu item to enable the display of temporary dimensions.
- Click the right side of the top roof plane to select it.
- Left click on the temporary dimension between the edge of the roof plane and the wall.
- Enter -18 inches in the text box. 18 shows the desired gable projection .
- In this example, it is important to use a negative number. This tells the program to move the edge of the roof plane to the opposite side of the wall, rather than keep it on the same side.
- Repeat for the left edge of the upper roof plane.
- With object snap enabled , drag the left and right sides of the bottom roof plane so that they snap to the corresponding sides of the top roof plane. As you drag each edge outward, move the cursor to the side edge of the top roof plane.
The program will find the edge and snap the currently selected edge to it.
- Repeat the same on the opposite side.
 Again, this example uses a simple rectangle.
 .
Attention! | Cloudflare
Why do I need to complete a CAPTCHA?
Completing a CAPTCHA proves you are human and gives you temporary access to a web resource.
What can I do to prevent this from happening in the future?
If you use a private connection, such as at home, you can run an antivirus scan on your device to make sure it is not infected with malware.
If you are in an office or on a public network, you can ask your network administrator to run a network scan for misconfigured or infected devices.
Another way to prevent this page from appearing in the future is to use the Privacy Pass. You may need to download version 2.0 right now from the Firefox Add-ons Store.
.
How to make a barn roof frame with your own hands [Step by Step]
Ready to build a barn? Just wondering what kind of roof to build and how does it all fit together? When to start? Don’t worry; we’ve all been there. Angles, length, slopes are all part of the design and construction of the roof.
To make things easier, we’ve put together a how-to guide for creating a pitched roof frame, with step-by-step guidance for some of the most popular pitched roof designs. We’ll give you some tips and tricks to make building easier, as well as help you understand some building terms.
So pour yourself a drink, relax and enjoy our little guide. We hope we will answer all your questions.
Factors Affecting Shed Roof Design
Types of Roofing Materials
Plywood or OSB are the most common materials used for roof sheathing. It must comply with local regulations for thickness (at least 3/8 inch), which also depends on the distance between the rafters or trusses.
The slope of the roof determines the roofing material you can use. Asphalt shingles can be installed in increments of 2 to 12 or more . Special shingles are available for 2/12, but it is better to use other materials. If the roof is less than 2/12, it must be metal or covered with a rubber membrane.
You’ve invested a lot of sweat and money building your canopy, so protect your investment with felt paper, ice protection and a drip edge. They may not be needed in the shed, but they will extend the life of the roof and protect whatever you store in the shed.
Climate
Where you build affects the slope of the roof and structure. Snow load, wind force, rain and heat are all climatic factors that affect the roof. Most roof structures can be made to work in any climate, just be aware that they may incur higher costs to build.
The higher the snow load potential, the higher the slope should be (4/12 or better). Rain can accumulate on a low-slope roof, rot cedar and asphalt shingles, and find or enlarge cracks, causing leaks. Wet shingles can lead to moss formation, which will also decompose them.
Strong prevailing wind or gusts usually means lower windward slope to reduce wind force. The roof of the hodgepodge is designed for coastal winds. In hot and dry climates, a low pitched roof often has good ventilation and insulation.
Type of canopy
Different roof styles match certain structures. If all the walls are the same height, a Gable, Hip, and Gambrel roof will work well. If you need a high and low side, a Saltbox, Skillion, or shed roof will work.
If you need a lot of useful attic/storage space, a Gambrel roof or barn is the best choice. If you need height or storage on one side but not on the other, Saltbox is the perfect option. A gable or hipped roof will give a higher storage center or height.
The Skillion or Shed roof is a shed roof that runs from a high wall to a lower wall. The slope determines whether it is a Skillion roof (greater than 6/12) or a shed roof. This allows a lot of storage space on one wall and less on the other.
Common roofing terms explained
- Slope
Measures rise in inches for each foot of horizontal distance: 3 inches rise for a 12 inch (3/12) run.
- Pitch
Roof height compared to total roof span, usually expressed in feet (6 feet to 18 feet or 8:16). Span is the distance from one truss supporting wall to another truss bearing wall.
- Corner
Used to cut the rafter where it meets the ridge beam and to cut the bird’s mouth against the wall. It is measured from the horizontal line of the wall to the sloping rafter using a span lift: an angle of 14° gives a slope of 3/12, 4/12 is an angle of 18.2°, and 6/12 is an angle of 26.6°.
- Ridge
Top edge where two roof slopes or decks meet.
- Ridge beam
Transfers the load of the roof to the ends of the gable or stud and supports the ridges of the rafters on the ridge.It can be under the rafters for support, or the rafters can be tied to it for support.
- Ridge board
This is a board that supports the top end of the rafters, maintains spacing and helps the roof structure work as a tie system.
- Clamps
Horizontal bar that helps hold two opposing rafters together and therefore the roof; often located on 1/3 – 1/2 of the rafters between the ridge and the ceiling.
-
Birdsmouth whether to cut a notch into the rafters where it rests on the top plate of the supporting wall; it helps transfer the force of the roof to the wall and makes it easier to securely attach the rafter to the wall.
- Rafter length
The distance from the ridge beam to the wall, it is calculated using the total rise over the entire span (Pythagorean theorem). If it has an overhang, it is added after calculating the length of the rafter.
How a roof withstands snow loads
A roof can usually withstand snow loads in excess of its rating, depending on inflow area, duration and inertia. The closer the rafters are together, the thicker their depth, the more collar tie is used, and the greater the slope, the better they can handle the snow load. Also, the greater the slope, the greater the force of gravity for the roof to shed snow.
The inflow area is the maximum distance between the rafters: 12″ means a 6″ inflow area, 16″ is an 8″ inflow area, and 24″ is a 12″ inflow area. The greater the distance between the rafters, the greater the snow load each rafter carries.
Duration is the time that snow remains on the roof before it melts, evaporates or slides off; it is usually short-term, so the damage is less than with year-round accumulation.
Inertia is based on the time it takes snow to collect on the roof. The moment of inertia is large as snow accumulates over hours, days, or even weeks. So the roof has time to adapt to the load.
What is the difference between slope and slope
Slope measures the height of a roof, its total rise compared to the total distance the roof covers from side to side or span, in feet. This is the ratio. If the ridge beam or peak is 6 feet above the horizontal height of the wall; is the overall growth. Span is the total distance from one rafter support wall to the other rafter support wall; usually double the run of the rafter. For example, if the lift is 6 feet and the span is 24 feet, the pitch would be 6/24 or 1/4.
Pitch is the ratio of the rise of the rafter along the length, usually measured in inches or fractions. The horizontal distance from the support wall to the center line under the ridge beam is the run. The vertical distance from the top plate to the top of the ridge beam is the rise. It compares the distance in inches for each horizontal leg or run. A 6″ climb compared to a 12″ run is a 6/12 incline.
The pitch is more suitable for building construction and calculation of material requirements, and the slope is more suitable for roof construction.
Sloped roof types
There are 3 main types of roofs; flat, gentle slope and steep slope – Gambrel is a combination of low and steep slope.
Flat Roof – has a slope of 2/12 or less, usually covered with metal or membrane. Very little or no wind, but snow or rainwater falls very slowly; a special drainage system may be required.
Low Slope – 2/12 to 4/14 pitch, usually tiled or steel. The impact of the wind is less, but snow, rain and debris fall slowly.
Steep slope – more than 4/12 slope and covered with tiles or steel. It must withstand more wind force, but rain, snow and debris more quickly.
Building Code Requirements
The Building Code identifies acceptable materials for various roof slopes, styles and climates. It details all factors of roof construction, even ventilation. However, it does not solve the leakage problem.
The Building Code also details the requirements for areas with significant snowfall. It often includes requirements for a steeper roof slope. You may also need stamped truss blueprints. Or you may need a thicker wood material for truss construction. Some areas also specify height requirements from ground level to eaves. The impact on neighboring buildings or properties is also often taken into account.
It is best to consult your local building authority before starting work. Make sure your structure matches the requirements of the code.
Differences between rafters and trusses
Rafters and trusses are used to create a roof structure. The main difference is that the truss is manufactured in a factory to technical standards. He often uses smaller elements to form a network of support triangles. Rafters are usually made at the construction site from a beam of greater thickness. The cuts for tying to the ridge beam and the bird’s mouth to the wall are made individually, collar ties are added.
Ridge Beam Rafter
- 2×6 or larger planks cut at an angle to fit a full length ridge beam or higher. to the top panel of the wall.
Rafter for sloped, sloped or sloped
- Runs through the top slab of a low wall over the top slab of a high wall. They often have recesses on both walls and protrude beyond load-bearing walls to form a cornice. These are usually 2×6 boards, but can be thicker depending on slope, snow load, and span.
Trusses
- Typically manufactured to engineering standards. They have a diagonal top member that forms the roof slope and a bottom member that runs along the roof span. The top and bottom are connected by smaller details that form connecting triangles. The triangles transfer the load from the roof deck to the walls or supports.
When to use trusses and when to use rafters?
- Use rafters for smaller span projects and trusses for larger span projects. Rafters are better suited to an open loft or vaulted ceiling and do not need to be ordered in advance. Historically, rafters ran the same distance as modern trusses, but today cost is the main factor. Calculate the material cost to build a truss roof, then call a truss company (or two or three) for a quote on the same truss roof. Don’t forget to factor in the cost of shipping and using a crane to lift the trusses to the roof (if necessary). The further away you are from a truss manufacturer and a crane, the higher the cost, so rafters may be a better option.
Which is better: rafters or trusses?
- Depends on what you are building, as properly built rafters have the same structural integrity as a truss. Rafters replace trusses because they cover wider spans more easily. Often they are cheaper, as they are made from smaller lumber than rafters.
Because the trusses are assembled on site, they arrive ready to install, saving time. However, they need to be ordered weeks and sometimes months in advance. Rafters are great for sheds or garages, or even small extensions to your home, and don’t need to be ordered ahead of time.
Which option is faster and safer?
- Rafter is faster for smaller projects. However, for larger buildings, pre-ordered trusses arrive on time and can be installed in a day or two. It can take weeks or months for skilled carpenters to build rafters for the same project.
- Both trusses and rafters are safe for roof construction. However, security is a matter of human knowledge, planning and error. The length and weight of the rafters can easily be handled by one person in the shed. But a house truss may require 2 or 3 workers or a crane. Not reinforcing walls or putting a hand or foot in the wrong place is human error; knowledge and planning prevent mistakes.
Framing Most common roof types
Gable roof
The gable roof of the barn can be built with 1 x 6 ridge board rafters or using trusses. A lot depends on the size of the structure and the loft, attic or height above sea level desired. A simple gable pitched roof is often built with 2×4 or 2×6 timber for the rafters and 2×4 for the collar ties. The rafters are angle cut at the end of the ridge and are serrated with the birdsmouth where it meets the top plate of the supporting wall.
Building trusses on site is easy for a barn. Rafters are cut at an angle to each other instead of a ridge board. The ceiling beam spans from the retaining wall to support the wall and sit on the walls. This is the corner cut where it meets the rafters. Use triangular or square gussets cut from ½” thick shell to connect the 3 truss pieces together. Remember to extend the rafters beyond the walls for the eaves and cut the ends so that they are parallel to the walls for the cladding.
Gambrel Roof
A Gambrel shed roof requires significantly more angle cuts than a gable roof, but provides more storage space in the attic. DIY trusses are a lot easier than building a truss system or even buying pre-made trusses.
To make your own truss corner, cut the 2 x 4 pieces for the top slope to the desired length. Then cut the bottom slope of the 2×4 pieces so that they connect with the top piece and move to the top plate. Make triangular gussets using ½” plywood to attach 4 pieces to form a truss. A 2×4 or 2×6 (or heavier) ceiling beam connects the bottom of the truss where it sits on the top plate. The size of the floor beam depends on the span and what you plan to store in the attic.
Salt Box Roof
The single pitched salt box roof is constructed similarly to the double pitched roof, except that one roof pitch is longer than the other because the retaining walls are of different heights. The ridge is offset from the center and closer to the higher wall.
The rafters are cut at an angle to meet the ridge board and have a bird’s mouth notch where they meet the supporting walls. The tie rod is often connected to the short piece on the top plate and then run horizontally to the long sloping piece. Most pieces are made from 2×4 or 2×6 lumber.
Skillion – Shed Roof Frame
Skillion and Shed roofs are formed by 2×4 or 2×6 (or thicker) single sided rafters extending from low wall to high wall. If you plan on using a cornice to protect your barn walls, make sure you add the extra length when measuring the rafters.
I like to cut the “bird’s mouth” where the rafters rest on the high wall and low wall and extend them at both ends to form a cornice. I also cut each end vertically for cladding and block or secure the rafters to prevent twisting under snow load .
Shed roof framing
Shed roof means it is attached to an existing structure. The top end of the rafters is mounted on a ledger plate attached to the existing wall. The lower part is done in the same way as a Skillion or shed roof. Cut out the bird’s mouth where it sits on the low wall and extend it past the wall for a cornice.
Hip roof
The hip roof provides good protection against snow, rain and leaves and can be made with trusses or rafters. When using rafters, ordinary rafters are attached to a shortened ridge board that does not run along the entire length of the building. Trim the end of the comb with a beveled angle, and on the supporting wall of the top plate with a birdsmouth notch.
Regular rafters usually come from each end of the ridge board with the same cut at an angle and a “bird’s mouth” where it sits on the end walls. Four hip rafters are cut at an angle to fit between the two perpendicular common rafters at the end of the ridge board. The lower end is notched to better sit on the corner of two walls.
Shorter rafters or jacks are cut at an angle to attach to the hip rafters and are notched for the wall. All rafters have the same 12″, 16″ or 24″ center distance. Even though there are a lot of corners and cutouts to cut, this is a fairly simple yet attractive roof.
Flat Roof Frame
The flat roof slopes from 1/8″ to 2/12″. It’s not ideal for snow or heavy rain, but modern materials and proper drainage have helped. If you’re building a flat roof, try to make it slope in different directions towards gutters or gutters; imagine a flat hipped roof. Due to load or weight, it is recommended to consult your local building department. Also, if recommended, use thicker building materials.
How to create a shed roof framing – step by step instructions
Framing a shed roof is similar to framing a wall. The cladding board is the bottom plate and the ridge board is the top plate. Keep it simple and remember; it’s a barn! Stick to the basics of simplistic design and use sizes that don’t cause waste. Sheathing comes in 4×8 sheets and lumber is a multiple of 2 feet. The most even awnings are ideal, even if you need eaves on all sides. You may need to cut a 4×8 sheet in half, but minimal waste means less expense.
Building trusses or rafters for a garden shed is quite simple. If it is a barn or garage, the trusses made are cheaper. Lay out the rafter or truss structure and determine the required angles, jaws or gussets. Cut out a piece or pieces of the pattern, check for fit, then cut, assemble and frame the roof.
Safety first
Thousands of construction accidents occur every year. Whether it’s stepping on a nail, twisting while carrying a load, cutting off a finger with a special saw, falling broken bones down a ladder, or surfing a rooftop on wet planking, unable to withstand the impact. Most accidents are avoidable, and usually it’s just human negligence.
- Ladders make it easier and safer to reach the height of rafters or trusses. Tie up the ladder, use stands to stabilize it, make sure it is on a firm, level surface and does not kink.
- Safety goggles required on the construction site. Sawdust, nail splinters, and flying debris are some of the hazards you need to protect your eyes from; cheap way to minimize risk.
- Safety shoes are always a good idea. Sandals or joggers can be light and comfortable, but step on a nail or slip a truss into place and you’ll feel it.
- Work gloves protect against cuts and cuts, and some even improve grip on nails and wood.
- A safety line and harness is a good idea when working on a roof. Make sure you tie it to something that won’t leave or where it will be untied because it gets in the way.
Choose your roofing material.
- Use 2×4 timber for truss construction and 1/2″ plywood for gussets.
- Make rafters out of 2 × 6 timber or more so that the rafters do not damage the rafters. The thicker wood also makes it easier to insulate if you want.
Determine Climb
Multiply the climb in one foot by the total slope run.
For example, :
To build a shed roof on a 4″ x 8″ shed, I need to know where to attach the ledger plate. The ledger is where the rafters will be attached to the existing building. Using the slope, I can calculate how high the ledger should be from the top of the sloped wall.
For a 3/12 grade, multiply the total footage by the incline: 4 feet of run X 3 inches of ascent equals 12 inches. The ledger board should be 12 inches above the top of the side walls.
Define Mileage
Run distance from one supporting wall to centerline of canopy for gable roof. For a skillion or shed, this is the distance from one supporting wall to the others.
For a 4 x 8 foot slope in the example of Determine height span is the width of the building or 4 feet.
Calculate Heights
The pitch is the total elevation from the vertical at the top of the wall to the top of the ridge, compared to the total span from back wall to back wall.
To determine the slope of our example 4″ x 8″ canopy, compare the total climb in feet with the total span in feet, or in this case, running. The total rise is 12 inches or 1 foot and the span is 4 feet, so the slope would be 1/4, or “a quarter-slope roof”.
- The greater the slope of the roof, the better it will allow snow, ice and rain to pass through. It is also easier to insulate a roof with a large slope.
- Minimum roof pitch is 1/8 inch of rise per foot of span
- Asphalt or composite shingles require a minimum pitch of 2/12, steel roofing requires a pitch of 3/12 or higher, and roll roofing requires 2/12 pitch and more.
- The best spacing for shingles is 4/12 to 12/12. However, the higher the pitch, the greater the force of the wind it must withstand. 4/12 – 8/12 is the best.
- Metal roofing is a good choice for snowy climates. It is more waterproof than shingles, distributes snow load better, metal lasts longer and often sheds snow faster so ice/snow guards may be required.
Darker colors attract solar energy and heat, which helps to shed snow faster.
Shed roof frame with common rafters
Determine the length of the common rafters in the barn
Common rafter refers to all rafters that are identical in the construction of a particular roof. After you make a sample rafter, all (or most) are cut to match. To find the length of a regular rafter, you can use a construction calculator, a free online calculator, or elementary math using the Pythagorean formula.
Horizontal distance from the ridge to the outer supporting wall introductory, in feet. The slope required is the lift over the run, multiply the run in feet by the run you want and you get the total lift in inches. Convert so both are either feet or inches and use the formula and do the math…twice to make sure.(lift x lift) + (run x run) then find the square root of the combined numbers and you get the length of the rafters from the ridge to the wall.
For our 4 x 8 foot slope example, the total lift is 1 foot and the total run is 4 feet. 1 × 1 + 4 × 4 = 17. The square root of 17 (√17) is 4.123 feet, or 49.477 inches, or 49-15/32 inches +/-.
Lumber sizing and O.C. Distance
Add the length of the eaves to the length of the rafters and you get the total length of the regular rafter. Remember that when choosing the length of the dimensional beam to use, you need to add the ridge angle plus the thickness of the wall to cut. For sizing lumber and O.C. Distances I use rafter span tables. For most sheds less than 20 feet wide with a 3/12 gable roof, a 2×6 16-inch centered siding, or 40 lb. live load, will do. If your rafter is less than 5 feet, use a 2×4 rafter in 16-inch increments.
In the 4×8″ canopy example, 2×4 rafters with 16″ centers can be used as they are less than 5 feet long. The length of the material will be determined by the overhang.
Determine how deep the Bird’s Mouth needs to be cut.
The Bird’s Mouth should not be located on the wall and should not exceed 1/3 of the depth of the rafter if it protrudes beyond the wall. Regulations generally require at least 1½ inches of rafters flush with the wall. Use a framing square to make a notch to match the slope of the roof. In a 2×4 wall with 2×6 rafters, a notch can be made for a 4″ seat.
For our 4’x8′ canopy example using 2×4 rafters, the depth of the bird’s mouth is limited to 1/3 of the depth of the rafter rule: i.e. approximately 1-3/16 inches.
Cut off the top plumb line
The top plumb line is made where the rafter meets the ridge board or opposite rafter. Use a framing square to mark the cutout on the roof slope. For a 3/12 pitch, align the square so that the outside of the short side is against the board 1/2 to 1 inch from the end. Rotate the long stem of the square until the 12″ mark on the outside is against the board. Double check that the 3” and 12” marks are on the edge and on one side of the board. Draw a line across the board where the outside of the short arm crosses the board. You may need to extend the line across the board. Use the saw and cut the line.
Measure the length of the rafters and mark the outer edge of the building
From the top of the corner, measure the length of the rafters given by the formula. Mark a rafter of this length. Using the framed square, draw a plumb line across the board at this mark; it should be parallel to the top plumb line. Where the plumb line marks the underside of the rafters is where they will meet the outside of the wall and that is where the “Bird’s Mouth” or Seat will end.
Mark and cut the bird’s mouth
Building codes usually state that you will need at least 1½ inches of rafters sitting on the wallboard. Align the frame square with the underside of the rafters at the slope. Move the 12″ beam of the square until the desired seat depth is reached on the plumb line, i. e. 12″ – 1½” = 10½”, so that the ascent and descent should be tied to the square to the underside of the rafters, plumb the line should intersect the outside of the long arm at a distance of 10½ inches. Draw a line from the plumb line to the 12″ mark and you will have cut lines for the bird’s mouth.
Marking and trimming the tail of the rafter
The tail of the rafter also forms a cornice. From the plumb line horizontally, the distance to the eaves. Using the framing square at the slope control points for the rise above the span at the top of the rafter, measure from the plumb line to the desired measure. Draw another parallel plumb line using a square. This is the end of your rafter. The size of the cladding determines the depth of the rafter end. Using a square, measure the bezel thickness at the final plumb line. Draw a horizontal line (90°) from the desired bezel thickness to the bird’s mouth. Cut a 90° angle to form the end of the rafter.
You now have a template for all common rafters.
Install the rafters
If the rafters are tied to a ridge board, mark it and the top plate of the retaining walls at intervals. Nail one rafter to the ridge board and then nail the opposite rafter in place. Work your way along the ridge as you install the remaining pairs of rafters. Align the bird’s mouth with the mark and secure in place with your fingernail.
Pro Note:
Place the rafters or trusses in 16″ increments, align them with the supporting wall studs. This will help the wall better withstand the load on the roof.
Methods for attaching rafters to the top plates:
Use 10d or 16d nails to nail the rafters to the top plate. I also usually add hurricane ties for extra wind protection. This adds to the cost but can make a difference if needed.
Shed roof with ridge frame
The ridge beam is thicker than the ridge board, so it is impossible to nail it to the rafter edge.
- Driving nails on both sides of the rafter into the beam is one option, but makes it difficult to keep the rafter in line.
- Rafter hangers – another option for attaching rafters to a ridge beam. Attach the hooks to the beam at the desired spacing and then attach the rafter to the hanger. Nail with 10d or 16d nails or use Simpson Strong-Tie designed for structural braces (my preference).
Roof framing with trusses
Another option is framing the roof with trusses instead of rafters. They can be made or made in advance, or you can make them yourself.
- To make trusses, make a truss plan or find it online or in print. I like to compose it; Sometimes it’s easier if the barn is an unusual size or shape.
- Cut out all the components of one truss, including the gussets, to hold it together. Clip the pieces together and make sure they fit – adjust if necessary. Disassemble and use the pattern pieces to lay out and cut out all the components for all the trusses.
- Assemble the trusses using ½” plywood inserts using 6d helical nails or ring shank nails.
- Place the trusses on top of each other to make sure they are all the same.
- Lift the trusses onto the top plates, lay them out according to the plan and attach them to the wall plates.
- Nail the trusses to the top plate using 16d helical or ring nails. Or, attach trusses to wallboard with Hurricane Brackets with 10d nails or Simpson Strong-Tie fasteners.
- Build the ends of the gable so that the top plate is 1½ inches lower than the top of the truss. Cut 2×4 lengths to nail to the last truss, go along the end of the gable, and extrude to form a cornice. Nail the cladding board to the ends of the 2 x 4 roof extensions.
Framing with metal staples
There are many metal staples on the market. Many are good, but some are better. I prefer Simpson Strong-Tie and structural brackets. They are readily available and have a good warranty.
Installing roof sheathing
Plywood or OSB is suitable for roof sheathing. Minimum thickness values are specified in building codes and regulations. I use 5/8″ for 16″ centers and 3/4″ for 24″ centers . Block or secure the rafters if they curve sideways. Use tongue and groove or H-clamps between trusses/rafters.
Start at the bottom corner and work along the roof with full sheets across the rafters or trusses. Use regular 8d or 10d nails. Move the second row half a sheet and finish the roof. Cut off the sheet to fill in the ends of the row. Don’t forget to leave room for ventilation on the ledge.
Be sure to check out my post on what type of plywood to use for a pitched roof.
Install the canopy roof felt
Roll out the first row of felt and staples in place or use a self-adhesive protective sleeve. Start at the edge of the sheathing. Lay on the next row and continue until the roof is covered. Use a stainless steel brace or self-adhesive roofing.
Install dripper
The dropper is nailed with 3/4 inch or more nails. It runs through the felt on the gables to prevent wind from blowing moisture under the felt. At the end, the “Bird’s Mouth” passes under the felt. Also overlap areas of the drip edge.
Installing the shingles
Start at the bottom corner and follow the manufacturer’s instructions. The first row of shingles is rotated so that the tabs rise up the roof and overlap the edge of the gutter by 3/8 inches. Use 1 ¼” nails 6″ from the edge of the drops to secure them in place. The second row completely covers the first row with protrusions covering the edge of the outflow. Each row is offset by 1/3 of the tiles.
Sounds like an article for another day!
I hope you found this article on creating a shed roof frame useful. Let us know your opinion. If you know someone who might find this article helpful, please share it.
Evgeny has been a DIY enthusiast for most of his life and loves creativity, inspiring others to create. He is passionate about landscaping, repair and woodworking.
.
choice of roofing and insulation material, features, advantages and disadvantages
Due to the unstable exchange situation, retail prices may change. We are trying to update prices as soon as possible.
The hip roof refers to four-pitched roofs with two slopes in the form of a trapezoid and two triangular. Due to its complex shape, it perfectly copes with its intended purpose and gives the structure an original appearance.
Features, advantages and disadvantages of a hip roof
The hip roof differs from analogues in the absence of vertical gables. The place of the vertical walls is occupied by slopes located at the ends of the triangle.
Due to this feature, the roof loses its real and visual volume. At the same time, the design successfully resists negative environmental factors, protects the building from wind and precipitation, regardless of their direction.
Types of hip roofs
Depending on the shape of the base, a hipped roof can be rectangular or square. In addition, it differs in types and designs.
Half hip roof
In this type of roof, part of the triangular slopes is combined with gables. The attic space is illuminated with vertical skylights. Based on the design features, the half-hip roof can be Dutch and Danish.
Hip
There is no ridge of the support beam. As a result, the diagonal ribs to which the rafters are attached are reduced to one point.
Hipped roofing prevails on buildings with a square box. The pitched roof of the gazebo gives comfort to the structure. When creating a roof of this type, the creation of a ridge joint becomes more complicated.
Classic
Classic 4-pitched roofs have a wide range of applications. In addition to residential buildings, such a roof can ideally protect a garage and other outbuildings where moisture penetration is highly undesirable.
Here, the diagonal ribs rest against the supporting ridge beam, and the overhangs have the same height. The pediments of a classic hip roof are characterized by the shape of a triangle, and the slopes correspond to a trapezoid.
All types of 4-pitched roofs have the following advantages:
- Thanks to the corner ribs connected at the ridge support beam, the rigid structure reliably resists deformation.
- Four slopes provide a quick release from precipitation and prevent the formation of a snow cap.
- Sloped surfaces withstand powerful winds regardless of direction.
- Overhangs, which end the roof slopes, protect the walls of the building from atmospheric precipitation along the entire perimeter.
- Eaves are less susceptible to breakage.
The envelope roof gives the house a unique charm, visually reduces it and makes it more comfortable.
Of the disadvantages of the hip roof, it should be noted:
- high cost . Compared to gable roofs, it is more difficult to install, which increases the cost by about a third;
- increased consumption of roofing materials . Which is justified by beveled edges and a corresponding increase in trimmings;
- usable space reduction . Inclined surfaces prevent the organization of a full-fledged attic or attic.
- problems with windows . Dormer windows installed on a hip roof require careful sealing of the connection between the frames and the roof. To avoid flooding the attic, in rainy weather, the windows should be kept closed.
How to correctly calculate the angles of the hip roof
When calculating the slope angles of a hip type roof, a number of external and internal factors are taken into account that exert a load on the structure:
- wind . With an increase in wind load, the slope of the slope increases, and for diagonal rafters, a material with a large cross section is selected;
- precipitation . If there is a large amount of precipitation in the region, steeper slopes provide an early release from snow and prevent the accumulation of moisture;
- roofing material . Each type requires an individual crate, which exerts a certain pressure on the rafter system;
- insulation .
The pitch of the rafters is directly related to the width of the heat-insulating layer, as well as to the type and section of wood (Table No. 1).
Table #1
Table No. 2 is used to calculate the angle of inclination depending on the type of roofing material.
Table number 2
After determining the angle of the slope, the laying of the rafters is calculated.
Calculate roof area
In order to calculate the hip roof, you need to calculate its area. The consumption of roofing materials depends on the area. In the calculation process, the roof is divided into simple geometric shapes. The final result is obtained by summing up the area of each of them (Table No. 3).
Table #3
Which wood is better to use for the roof
When building a roof, the lion’s share of the costs falls on wood, the choice of which determines the reliability and durability of the structure. For the supporting frame, coniferous wood (pine, spruce, larch) is most often used. Along with lightness and strength, it is easy to process and does not have a high price.
The wood used is divided into five grades (0–4). In the selected coniferous forest, knots, spots, cracks and signs of mold are practically absent. Each of these defects adversely affects the strength and resource. For the supporting structure, wood of the 1st grade is used. For racks and rafter legs, the second grade can be used. In the manufacture of elements that do not carry important functions, wood of the 3rd grade is acceptable.
In addition to solid wood, glued beams can be used in the construction of wooden structures. At a relatively high price, it is durable and resistant to deformation. In terms of strength indicators, glued timber of the 3rd grade corresponds to solid wood of the 1st grade.
Hinged roof installation procedure
Installation of a hip roof begins with the preparation of rafters. The complexity of the process is justified:
- by giving the rafter legs a given angle of inclination;
- conduits of various lengths;
- diagonal (sloping) rafters, subjected to significant load and to which increased requirements are put forward.
Laying and fixing the mauerlat
As a Mauerlat of a four-pitched roof, a bar made of wood of the 1st grade with a cross section of at least 100X100 mm is used. This element is mounted around the perimeter of the walls. Separate parts of the Mauerlat are overlapped, and many points (pre-installed studs) are used for fastening to the walls. The design is reinforced with metal brackets.
To ensure the waterproofing of the support beam, a roofing material is laid between it and the wall.
Installation of purlin
The run is a beam mounted parallel to the Mauerlat. It provides support to the rafter legs. As a rule, the installation of girders is typical for complex hip roofs with a large area.
Hipped hip roofs do not need runs, and the junction of the diagonal rafters is represented by a complex knot.
Stands and struts
With the help of racks, the support of the ridge beam is provided.
Mounting the ridge
The pressure of the entire roof is applied to the ridge. When mounting this element, it is necessary to maintain exact dimensions, which are checked in height and using a level.
Diagonal rafters
Diagonal rafters can be installed before and after the central ones. The lower parts of the rafter legs rest against the Mauerlat. For fastening, a notch or a support bar can be used.
Rafter or center rafter
The installation of ordinary rafters is similar to the installation of central ones, which, by their location, form the edge of a trapezoid. Mauerlat is used to support and fasten their lower part. The upper ends converge on a ridge beam. When installing ordinary rafters, special attention is paid to the same distance between them.
Jugglers
The installation of the sprockets completes the formation of the hip roof truss system. For their manufacture, only solid lumber is used. To connect them to a long rafter, cuts or a support beam are used. The design is reinforced with metal elements (corners).
Selection of insulation films and insulation
Almost any roof, including a hip roof, needs high-quality hydro and vapor barrier. In addition, insulation is also included in the roof insulation cake.
Vapor barrier
The vapor barrier of the roof is designed to protect the insulation from the harmful effects of evaporated water. Thanks to it, the formation of condensate and waterlogging of the heat-insulating layer is excluded.
As modern materials for vapor barrier, polypropylene film, film with aluminum foil membranes with different vapor permeability are used.
Among the most popular manufacturers of such materials are Tyvek, Juta, Folder, Delta, and others. In addition to protecting against steam, the products of these companies prevent the penetration of moisture and prevent heat loss.
Waterproofing
Waterproofing protects the building from the negative effects of precipitation. High-quality materials do not allow moisture to penetrate, even with significant temperature changes. Waterproofing prevents dampness of the walls and the formation of mold. Today, the previously widely used glassine and roofing felt are being replaced by polymeric materials.
The most widely used waterproofing materials are Tyvek, Izospan, Delta, Fakro, etc.
Insulation
Among modern heat-insulating materials for roofs, the most widely used foam or its liquid equivalent – penoizol, as well as mineral wool.
The first wins in terms of price and availability. While environmentally friendly mineral wool is guaranteed to retain heat, provides air circulation and allows you to insulate the most inaccessible places.
For which structures a hip roof is recommended
Hip roofs are relevant for both one-story buildings and high-rise buildings.
A multi-pitched roof effectively protects household and household buildings (garages, sheds, gazebos, etc.) from bad weather, gives individuality to private houses, and brings originality to the architecture of cities and private sectors.
Due to the design features, as well as the possibility of equipping the natural lighting of the under-roof space, the hip roof has become synonymous with the attic.
How to make an attic floor under a hip roof
Equipping the house with a multi-pitched roof, and planning to create an attic floor, the following nuances must be taken into account:
- Sloping roof surfaces reduce usable area.
- Sufficient illumination depends on the optimal arrangement of windows.
- Roof window frames must have increased tightness.
- If the roof windows are vertical, the roof must be equipped with suitable gables.
- Residential equipment needs increased thermal insulation.
Choice of roofing material
Each roofing material has its own characteristics, which can negatively affect both the comfort of residents and the structure. Therefore, its choice must be approached with special care.
Metal tile
Represented by galvanized steel sheets having the profile of a traditional tile. To increase resistance to negative environmental factors and extend the service life, it is protected by a polymer coating.
The metal tile is lightweight (1 m² / 3–5 kg) and easy to install. Produced in a wide range of colors.
Disadvantages: sound effects in the rain.
Soft roof
The soft roof at the base of the coating is laid with fiberglass covered with a layer of bitumen. Thanks to its flexibility, it can be easily laid on uneven surfaces. Excludes penetration of moisture, provides good sound insulation.
Disadvantages: requires additional lining during installation.
Composite tile
A material with a multilayer structure that combines the advantages of ceramic and metal tiles. Does not create difficulties during installation. Provides good heat and sound insulation. Composite tiles are resistant to moisture and fire.
Disadvantages: high installation cost.
Decking
Profiled sheets made of galvanized steel. To improve resistance to negative environmental influences, it can have a polymer coating. Differs in high durability on a bend. Provides quick installation. Does not create problems during repair.
Disadvantages: low sound insulation.
Ondulin
An exact copy of slate, which has an organic base (cellulose). Differs in simple and fast installation. Excludes penetration of moisture. Creates excellent sound insulation.
Weaknesses: is not resistant to fire.
Seam roof
Steel sheets with a smooth surface, the ends of which are made in the form of hooks. Provides relief from precipitation at minimum slope angles.
Seam roofing gives buildings originality. Can be mounted at low temperatures.
Disadvantages: needs insulation.
Hip roof – design features and calculation, roof rafter system
In the company “Artel-Stroy” you can order a hip roof device. About the design features, advantages and disadvantages of a hip roof and how to calculate the cost – read the article of our experts.
Design features
In the classic version , the hip roof structure consists of four slopes , two of which are triangular in shape, the other two are trapezoidal. Each side of the roof is placed at an angle (pitched roof). The sides are connected at the top point – a ridge joint or just a ridge. Bottom ends on the same level.
The classic version of the hip roof is built for rectangular houses. For others, a half-hip Dutch roof was invented (some slopes are shortened, some have a “dormer” window), a half-hip Danish one (there is no ridge connection, the hips start lower).
Hip roof truss system
To equip a four-slope (hip) roof, a different rafter system is required: special elements are added to the standard gable roof system – triangular rafter legs.
Two slopes, located in the usual places, are called facade, the other two – end. The line in which they are connected (horse) has a length less than the length of the house.
The part of the ramp that extends beyond the house is called the overhang. It is lengthened by rafter legs or filly. The overhang protects the walls from moisture.
The hip roof triangular truss system is as strong and rigid as a gable roof. It can withstand the weight of the roofing cake, no matter what it consists of (covering in the form of sheets, rolls, modules).
Advantages and disadvantages
The hip roof has a number of advantages that distinguish it from other similar structures.
- Under-roof (attic) space can be used as living space (ceilings are quite high).
- Popular with architects as it gives the house a finished, perfect look. Ideal for decorating country cottages, townhouses, garden houses.
- Ideal for use in areas with strong gusts of wind (reduces the sailing effect – the roofing will not be blown off by the wind).
- It is possible to equip the slopes at a certain angle, depending on the climatic conditions. Steep ones are suitable for areas with high snow load. Gentle – for windy.
However, it is worth considering the disadvantages of the design. And they are mainly related to the financial issue.
- It is not possible to install ordinary windows, only “dormer” windows (a window in the roof). Auditory is not much different from the usual, but more expensive. And it is not always possible to install the option with a full size. Therefore, natural lighting inside is not enough.
- Increasing the angle of inclination of the slopes increases the consumption of material.
- Not everyone can make and install a hip roof structure on a house. You have to turn to professionals.
- Installation of a hip roof implies a reliable capital foundation under the house (due to the significant weight of the truss system).
Calculation of the hip roof
Preliminary calculation of the cost of the hip roof is reduced to the calculation of the cost of its elements. With the help of a computer program or an online calculator, it is much easier to find out the cost.
Slope angle
The program, in addition to the cost, also determines the optimal slope angle (depending on the weather conditions in the place of residence). By the way, it can also be determined independently – there are maps on which the entire territory of the country is divided into eight zones. Each has its own conditions: the strength of the wind, the abundance of precipitation. Locate the construction site on the map and define the zone. Find out recommendations for the angle of inclination of the slopes.
There are also recommendations for determining the optimum angle of inclination depending on the selected roofing material.
- For bitumen-based rolls, a slope of 0-3 degrees is chosen.
- When building a roof with tiles – 34 degrees.
- Corrugated asbestos cement sheets – 9 degrees.
- Clay tiles – 9.5.
- Steel sheets – 18.
- Slate and asbestos-cement boards – 26.5.
- Wooden roof – 39.
Ridge arrangement
The height of the ridge is calculated from the section of the roof. When the angles of inclination and the base (equal to the width of the house) are known, the formula is applied and the height of the ridge is determined.
Rafter system thicknesses
Lumber of different thicknesses is required to create a truss system. The thickness of the rafters, pillars, ridge is determined depending on the future load on the foundation: the weight of the roofing material, frame, attic floor, floors, plus temporary loads in the form of snow cover.
For example, the total load on the foundation of a brick house can be about 6.5 tons, of which 197 kg is the weight of the tiles. This is the load per 1 linear meter of the truss system. Depending on the load, the step at which the rafters should be installed is first determined: from 60 to 215 cm. According to the table, depending on the step and length of the rafters, the dimensions of the lumber are selected.
Order the installation of a hip roof in Lipetsk
Contact Artel-Stroy: our specialists have extensive experience in roofing and appropriate qualifications.