Insulation floorboards: How to insulate a floor and why it’s worth installing it
The Ultimate Guide to Making Your Home Warm and Inviting
Keeping a home warm and inviting, especially in winters, comes with a cost. It’s no surprise how heating and cooling costs can put a dent in your financials. After all, air conditioning and heating consume the most energy in an average household – 46 percent to be precise!
If merely thinking about your energy bills is enough to send a chill down your spine, it’s time to consider switching to insulated flooring. This will not just offer a warm surface underfoot but also improve your quality of life.
When it comes to insulating a living space, most home improvement contractors tend to prioritize exterior walls and attics. However, they often miss out on flooring, an important aspect of insulation projects.
An insulated surface works well with other elements used to warm up spaces like central heating and quick-sealed windows. The dead air in combination with an insulating surface like rubber flooring works as a poor conductor of heat, radiating warmth back into the room. Hence, it makes sense to invest in a surface that keeps the living space warm and brings down the heating costs.
Read our detailed guide on flooring insulation to warm up your dwelling and make it inviting for all.
How an Insulated Flooring Aids in Warming Up Spaces
Adding insulated flooring to your home is the smartest choice you can make. It not just keeps the rooms and the floor underfoot warm and comfortable but also reduces the heating and cooling bills.
1. It Prevents Heat Loss
Though most homes install an HVAC system (heating, ventilation, and air conditioning) or traditional boilers to warm up spaces, most of it escapes through the roof, walls, open gaps, and the flooring. Statistics shared by Metro Home Insulation reveals that 10 percent of home heating bills stem from uninsulated floors that tend to lose warm air.
Installing insulated surfaces creates a thermal envelope to the external environment, thereby reducing the escape of warm air and helping rooms retain heat. Because insulation holds up to temperature variations, less energy is needed to maintain the required temperature inside the house.
2. It Creates a Vapor Barrier and Keeps Moisture at Bay
Most floors like hardwood, wall-to-wall carpets, and cork are prone to moisture damage. This can further lead to bigger issues like mold and mildew. On the other hand, insulated, moisture-resistant, and anti-microbial surfacing like rubber helps create a vapor barrier, preventing moisture from creeping into the home.
Such barriers are especially beneficial for homes with cold basements that add to the chill inside homes.
3. It Keeps Pipes from Freezing
In freezing winters and frigid zones, pipes are prone to cracking or bursting because the water they carry often freezes. If your home has pipes beneath the flooring, you wouldn’t even notice or inspect the damage caused to pipes due to such frigid conditions.
Opting for an insulated or freeze thaw surface provides a layer of insulation between the pipes and the exterior conditions, thus offering extra protection to them.
4. It Reduces Cold Drafts
This is especially true for homes built above the ground or having a crawl space between the floor and the surface underneath. An insulating surface helps fill the potential air gaps and prevent the outside cold air from entering the home.
5. It Helps in Summer too!
Besides being a boon in the winters, insulated surfaces help control the interior temperature in the summer. The same principle of heat applies! An insulating surface like a cool rubber surface will not let the conditioned air escape, keeping the room at a lower temperature than the exteriors. This significantly reduces the need for constant air conditioning.
Various Flooring Options to Warm Up Spaces
Now that we understand how insulated surfaces keep rooms warm, let’s see the various flooring options that can be installed. There are a whole lot of flooring options available today; hence, it’s critical to know the pros and cons of each, allowing you to make a suitable decision.
Wall-to-Wall Carpeting
Carpets make a warm, soft, and luxurious surface underfoot. The surfacing also helps insulate the house as carpets have a higher R-value, the metric used to measure the level of insulation.
Being a poor conductor of heat, carpets tend to hold heat. Hence, adding a wall to wall carpet can lower the amount of energy it takes to keep a room cooled or heated. However, this type of insulated flooring has its limits.
Pros
- Instantly adds warmth and a luxurious appeal to a living space.
- Besides providing warmth, carpets are a safe surface to move on. Plus they offer adequate cushioning in case of a slip or fall, thus reducing the risk of serious injuries.
- Carpets also act as a sound barrier, reducing the transmission of noise through the rooms.
Cons
- Carpets are difficult to clean and maintain. It’s not an ideal flooring option for homes with kids and pets.

- It isn’t moisture and stain-resistant. So, think before you leave your glass of red wine unattended with kids playing around.
- Carpets often harbor pathogens, dirt, dust mites, hair, and other allergens which increase the risk of respiratory disorders and compromise indoor air quality.

Underlayment
Most homes with hardwood flooring use underlayment to add a layer of insulation between the subfloor and floor. So, materials that act as insulators, namely rigid foam, polyfoam, silicone, fiberglass, or rubber are used to keep the surface from getting cold in winter.
Underlayment is also coupled with radiant heat floors to add warmth to spaces.
Pros
- It is an energy-efficient way to warm up your space.
- Works with a variety of flooring materials, namely hardwood, ceramic, and laminate.
Cons
- The layer tends to compress or warp over time, making it less effective. This is especially true if the underlayment uses fiberglass as the insulating material.
- Underlayments are usually not moisture-resistant. This is an important consideration if you live in a heavy-rainfall area or have your piping system under the flooring.
- Whether you use rigid foam or fiberglass underlayment, the process of installation isn’t easy. Foam is difficult to work with while fiberglass needs protective equipment. All this may affect the time and effort taken to install an underlayment.
- Materials like foam are expensive, significantly increasing the cost of the flooring project.
 This is especially true if the underlayment uses fiberglass as the insulating material.
Radiant Heat Floors
Radiant heat floors have an under-the-floor heating system that luxuriously heats spaces. The system conducts heat through the flooring instead of the air. Hot air rises; so, these floors not only warm the surface under feet but the heat slowly drifts up, evenly distributing the warmth through the room.
There are two common types of radiant floor heating available today –
- Electric – the source of heat is electric wires spread out under the entire flooring.
- Hydronic – the source of heat is a network of hot water tubes buried underground.

Radiant heat floors are mostly used for stone, ceramic, concrete, and vinyl surfaces.
Pros
- The infrared waves rise from the floor and warm up the room, ensuring that heat is distributed through the room and not lost to surrounding surfaces. Since the room occupants heat up from their feet, they feel warm even at a lower temperature.
- Once installed, it’s quite easy to operate the system.
- Since the system is hidden, you can design your space freely.
Cons
- The initial cost of installation is high because they are difficult to install. Hence, they are more suited for smaller areas than large floor areas or the entire house.
- It is only feasible if you are completely removing your floors or building a house from scratch. It requires a constant flow of electricity or heated water from a boiler or a water heater. That translates into high utility bills.
- With this kind of flooring, the floor height of the room increases by at least ½ inch, depending on the type of system you install. Hence, the installer needs to adjust the height to account for the space needed to accommodate the heating system.
- Radiant heat floors are ineffective under carpets. The insulating properties of the carpet interfere with the heat flow and trap the heat in the carpet itself.
 That translates into high utility bills.
Rubber Surfacing
Rubber surfaces are a versatile flooring option that works best for indoor and outdoor spaces. However, one of the most noteworthy qualities of rubber is that it’s an excellent insulator. The tightly-bound electrons in rubber aren’t free to be shared with the neighboring atoms. This causes the electrons to slow down, eventually preventing the conduction of heat.
Besides, there are several other reasons why rubber is a great flooring choice for creating a warm and comfortable environment indoors. Let’s look at the pros and cons of installing this surfacing.
Pros
- It is an excellent insulator that doesn’t allow heat to escape. This keeps the interiors warm and cozy.
- It is a versatile flooring option that can be applied to almost any room in your house.
- It is durable and can withstand routine wear and tear.
- It is easy to install. Depending on the area, rubber flooring installations take less than 2 days to install.
- It is moisture and stain-resistant. So, you don’t have to stress about accidental spills.
- It is a high-traction and anti-fatigue surfacing option. Owing to its slip-resistant properties, rubber is an ideal option for homes with pets, kids, and seniors.
- It absorbs the impact of falls due to its cushioning effect. This greatly reduces the risk of serious injuries in case of an accident.
- It possesses noise-absorbing properties. It absorbs echoes and prevents the transmission of sound between rooms.
- It is inhospitable to pathogens like bacteria, viruses, and fungi. If you are looking for anti-microbial flooring, rubber is a perfect choice.
- Rubber surfaces are available in a variety of colors and design options. Modern rubber surfacing experts now offer customized surfacing that complements the existing decor.

Cons
- The initial cost of installation is high; however, the flooring pays for itself in the long term.
- Rubber flooring tends to emit a peculiar odor when newly installed. However, this smell fades with time and adequate airing.
Installing Rubber Floors Over Different Surfaces to Make the Space Warm
Rubber surfacing can be installed on a variety of surface types to add a cozy and inviting appeal to the room. Read on to know more!
A. Concrete
Flat concrete is the most ideal subfloor for installing rubber flooring as the result is a consistent and long-lasting surface that offers long-term returns. Concrete floors tend to be cold; hence, rubber surfacing is an excellent option if you are looking to warm up your interiors.
Rubber floors on a concrete subfloor also offer a comfortable and springy surface that’s perfect for all types of activities, including intensive activities like workouts at home.
Plus, EPDM rubber surfacing is devoid of seams and moisture-resistant; so, there is no chance for moisture or dirt to accumulate in the ridges. This saves you from mold problems that are quite common in wet areas of the house. Hence, rubber is a great surface for wet/humid areas like the bathroom, jacuzzi, mudroom, indoor pool decks, basements, and attics.
B. Ceramic Tiles
Another surface that works well for rubber flooring installation is ceramic tiles. However, ceramic tiles are fragile and also have grout lines. Hence, care should be taken to add a proper subflooring or padding to protect the tiles from damage and prevent the grout lines from showing on the rubber surface.
Therefore, it’s important to get a skilled rubber surfacing firm on the job. Only an experienced professional will pay attention to such details and offer a solution as per your requirements.
C. Hardwood
Hardwood is an elegant and attractive surface to have. However, it needs constant upkeep because it looks worn out very soon. So, if you want to warm up your room while adding an interesting appeal to it, try covering it with rubber surfacing.
If your hardwood was a high-quality one, consider adding a protective paper or craft paper underlayment before installing the rubber surface. This will prevent the rubber from staining the hardwood. That way, even if you plan to lift the rubber flooring in the future, your underlying hardwood surface will be elegant and attractive.
D. Carpet
Installing rubber surfacing on a carpeted floor can add warmth and coziness to the room. Plus, carpet and rubber flooring put together offers great comfort and cushioning underfoot. Such floors are ideal for living rooms, bedrooms, and dining areas where people tend to spend most of their time socializing or relaxing.
However, avoid combining these in areas where you expect a lot of activity, like your home gym and the kids’ playroom. Intensive workouts demand a firm ground with adequate shock-absorbing potential. Rubber surfacing on a carpet can make the subfloor uneven and unstable, thereby increasing the risk of falls and serious injuries.
Further, with kids jumping around and other intensive activities on, the top rubber flooring installed on the carpet may come apart or ripple over time, compromising the performance of the surface.
If you have a carpeted room where you are planning to do intensive activities, you have two choices –
Get rid of the carpet – This is the easiest and the most inexpensive option. This will offer an even and stable surface for the poured-in-place rubber flooring.
OR
Add a layer of plywood before installing the rubber floor – If ripping the carpet out is not an option, you can add a subfloor on it using plywood. Though this option is time and energy-consuming, it can help you alter the surface as per your needs.
Summing Up
Regardless of the season, stepping out of a bed or couch only to be greeted by a cold flooring isn’t welcoming for anyone. Plus, floorings are responsible for more loss of heat than you can ever imagine, thus adding to your utility costs.
Therefore, it’s crucial to add an insulating surface that will keep your living space warm while cutting energy costs. After comparing all the options shared above, you will surely agree that rubber surfaces are fit for purpose. If you are all set to rip out your existing floor in the name of a warm, cost-effective, energy-efficient, and anti-fatigue surface like rubber surfacing, get in touch with Rubcorp! Our team of experts knows how to deal with moisture, air sealing, and other aspects of making spaces warm and comfortable. Just call us or drop us a line at [email protected]. We are here to help!
Share this Post
Floor insulation information and advice
Benefits
- Save around £75 a year
- Reduce draughts
- Make your home warmer
The savings figures and information on this page are based on the April 2022 energy price cap. These are being reviewed and will be updated shortly in line with the government’s September decision to freeze average energy bills at £2,500 for two years from October 2022.
Insulating your ground floor is a great way to keep your property warm. Generally speaking, you only need to insulate the ground floor. If you’re on an upper floor, you don’t usually need to insulate your floor space.
However, you should consider insulating any floors that are above unheated spaces such as garages, as you could be losing a lot of heat through those.
See our guide to draught-proofing, or read on for more about floor insulation.
What type of floor do I have?
Many homes – especially newer ones – will have a ground floor made of solid concrete. This can be insulated when it needs to be replaced, or can have rigid insulation laid on top.
Older homes are most likely to have suspended timber floors. If you have air bricks or ventilation bricks on the outside wall(s) of your house that are below floor level, you probably have a suspended timber floor.
Do NOT block up air bricks in your walls. They are needed to help ventilate the space under your floor and stop your floorboards rotting.
If you have a basement or cellar beneath your house that you can get into safely, take a look down there to see what type of floor you have. If the floor is a suspended wooden floor, you will probably be able to see wooden joists and the undersides of the floorboards.
If you don’t have access to the space underneath your house, you will need to lift a corner of the carpet and underlay to have a look.
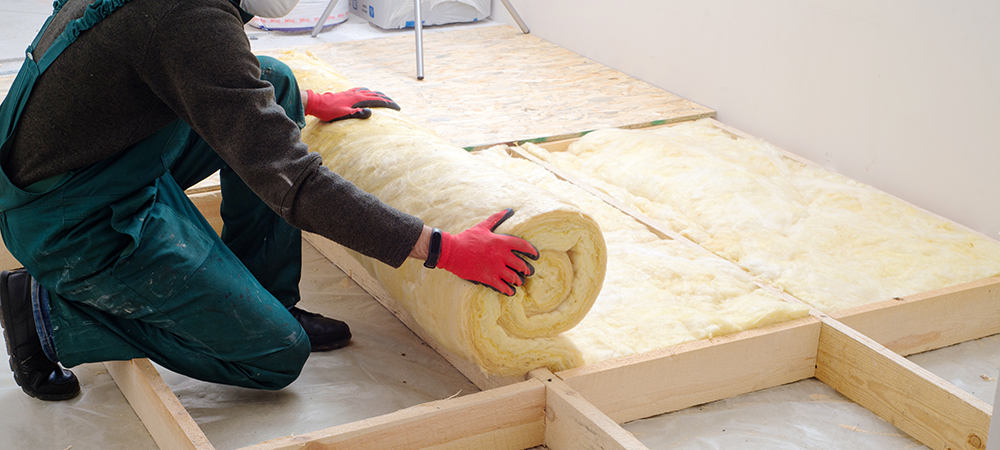
Timber floors can be insulated by lifting the floorboards and laying mineral wool insulation supported by netting between the joists. Insulating under the floorboards on the ground floor could save you about £75 a year in an average property, or up to £130 if you live in a detached house.
Alternatively, a recent innovation involves a robot applying spray foam insulation to the underside of the floorboards, which would avoid the need to take them up altogether.
How much can I save?
England, Scotland and Wales
Northern Ireland
DIY or professional?
Not all home insulation work has to be carried out by a professional; it may work out cheaper to do the smaller jobs yourself.
You can seal the gaps between floors and skirting boards to reduce draughts yourself quite easily, with a tube of sealant bought from any DIY store.
It’s even easier to insulate your timber floor if you have an unheated cellar or basement space underneath that you can get into. Check that the joists supporting the floorboards are in good condition and don’t show any signs of wet or dry rot.
If the joists are okay, you can fit insulation in between them and hold it in place with netting if necessary. The basement’s ‘ceiling’ should then have plasterboard fixed directly to the undersides of the joists, to provide fire resistance – and you can then fit more rigid insulation underneath the ‘ceiling’ to benefit from even more insulation.
Try to seal up any gaps between and around the floorboards when you put them back.
Rugs and carpets on the floor will also help your feet feel warmer, which might mean you don’t feel the need to put the heating on as much. We’ve got more information about energy saving home improvements here.
Professional floor insulation
If you don’t feel confident lifting your floorboards yourself, you can get a professional to do this as well as fit the insulation and replace the boards afterwards. Costs will vary depending on how big your house is and how easy the floorboards are to lift and replace.
For solid concrete floors, make sure that if they need to be replaced, your builder puts in insulation – you have to insulate a floor when it is replaced in order to comply with building regulations.
Solid floors are insulated using rigid insulation foam, which can be fitted either above or below the concrete. If the concrete is above the insulation it can sometimes store heat during the day, which helps keep the room warm at night. If the insulation is above the concrete the room will heat up more quickly in the morning.
You can still insulate your solid floor even if it doesn’t need replacing. Rigid insulation can be laid on top of the original floor, then chipboard flooring can be placed over it. This will raise the level of the floor, so you will need to make sure doors are trimmed shorter to make room for the insulation. Skirting boards and some electrical sockets may need to be moved.
Finding an installer
If you are looking for someone to insulate your floor, Energy Saving Trust recommends you look for an installer who is a member of the National Insulation Association.
If you want to insulate your floor as part of a bigger refurbishment job, you will probably want to use your existing builder.
Complying with building regulations
If you are adding extra insulation to your floors, the work will need to comply with the relevant building regulations for where you live. Although your installer will normally arrange this for you, it is your responsibility to comply.
If you live in England or Wales, the floor should achieve a U-value of 0.25 W/m2K or less, if possible. The U-value is a measure of how quickly heat will travel through the floor. To achieve this standard, you will normally need at least 70mm of high-performance foam insulation, or 150mm of mineral wool, but this will vary depending on floor type, shape and size.
If you are replacing at least half of a floor then you have to insulate to these standards whether you planned to or not.
For further information, and for regulations in Northern Ireland and Scotland, contact your local Building Control Office or Building Standards Department before starting work.
Further reading
A Best Practice Approach To Insulating Suspended Timber Floors
By Fintan Wallace
Thursday 14th February 2019
Fintan from our Technical Team discusses the thermal loss issues associated with suspended timber floors and outlines a best practice approach to tackling them.
At the turn of the 18th century, when construction techniques moved from boarded floors installed directly on the ground to suspended timber floors over a ventilated chamber, the innovation solved a significant problem. Previously, floor timbers had been prone to damp and rot thanks to their direct contact with the moist ground. Now, the free movement of air in the ventilated area between the ground and the floorboards ensured the timbers were not degraded in this way.
However, the new design technique created a different problem. The cold air under the floorboards protecting them from damp created draughts within the building and uninsulated, poorly sealed floors have made the floors of heritage properties thermally inefficient and difficult to heat ever since. In fact, heat loss through the floor can be far more significant than heat loss through either the walls or the ceiling, and yet these are often the main areas of focus for thermal improvements. Moreover, achieving a thermally efficient and airtight suspended floor by retrofitting an appropriate system comprising insulation, an airtightness membrane and a vapour control layer (VCL) can be relatively easy to achieve.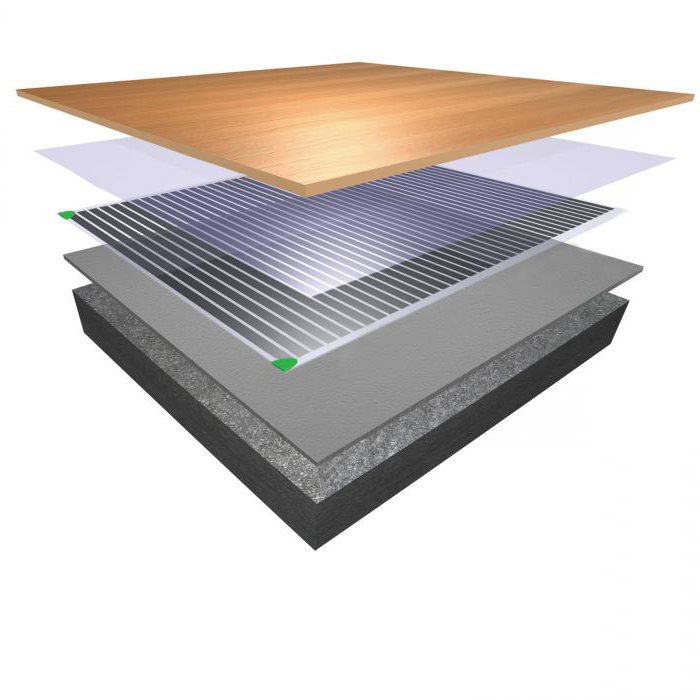 If specified and carried out to best practice standards, it can improve both comfort and energy efficiency without compromising the building fabric or aesthetics of the property.
Figure 1. A typical suspended floor construction with clear ventilated void. Source: Environmental Protection Agency, Ireland
How to Insulate
Figure 2. Suspended timber floor with floorboards removed
For most heritage properties, the most effective and appropriate way to insulate a suspended floor and improve its airtightness is to retrofit insulation beneath the floorboards, between the supporting joists (figure 2). See our detailed installation guide for more details.
This usually involves lifting the floorboards and, providing they are in sufficiently good condition, these can be reinstated when the thermal performance improvements have been carried out. Any compromised floorboards or joists can also be replaced as part of the retrofit project. In some cases, if the floor is accessible from below, it may also be possible to partially insulate the joists from underneath, which offsets thermal bridging through timber members, but this is not often the case. The size and depth of the crawl space below the suspended floor will vary and where there is bare earth under the building it may be advisable to apply a damp-proof membrane on the ground to aid humidity control within the crawl space. The most important consideration, however, is cross ventilation within the crawl space, which must be retained by ensuring that the air vents built into the walls are not compromised or obscured in any way. The depth of the insulation should be specified to ensure that the required level of thermal improvement is provided without affecting air movement through the crawl space.
Material Selection Pitfalls
As the improvements to the thermal performance of the floor will not be visible following the project, even if the bare floorboards are left exposed, the choice of materials is not affected by listed building consent. However, many of the more commonly used insulation materials available are not ideal for suspended floor improvements for various reasons.
Conventional foil-faced, impervious (non-breathable) PIR/PUR boards are commonly used in suspended floor upgrades and this can provide some thermal performance benefits, in the short term at least. However, this approach is not ideal, due both to the inflexibility of the insulation material and its inability to enable vapour to be absorbed and gradually dispersed.
Figure 3. Foil-faced rigid board in between older timbersFigure 4. Foil-faced insulation boards with expanding foam
As anyone who works with heritage properties will know, it is unlikely that the joists will be straight or even, making it difficult to match the contours of a rigid board insulation to the existing timbers. This can lead to gaps which allow air leakage (figure 3), therefore reducing the thermal performance of the insulation. If the gaps are large enough, they could even allow the sections of insulation board to fall through into the crawl space and onto the ground below, rendering the insulation ineffective. Often, this issue is addressed by using an expanding foam to fill the gaps (figure 4), but this solution may only be temporary as both the installation and the hardened foam lack flexibility, so any structural movement could cause gaps to recur. The non-breathability of these materials also means that, if any moisture should penetrate the floor structure over the building’s lifetime, it will struggle to dry out.
For a more flexible solution, mineral wool is also often used in preference to rigid board insulation as this can be packed neatly between the joists, supported by chicken wire or netting (figure 5). This solves the issue of heat loss through the gaps, but the insulating properties of the material may be reduced due to ‘wind-washing’ of cold air from the crawl space through the loosely structured fibres (figure 6). Substantial amounts of air movement into and through the insulation itself can severely compromise the level of thermal improvement that can be achieved with this approach.
Figure 6. Heat loss occurs when flexible insulation is installed without membranes
Best Practice Solution
Figure 7. Impact of air flow through fibrous insulations
For optimum results when addressing heat loss through a suspended timber floor, the specification needs to ensure that high levels of thermal performance delivered by the insulation material are combined with airtightness and moisture control, while at the same time facilitating a degree of breathability. Figure 7 shows the difference between loose fibrous insulation and the optimum approach shown on the right, achieved by protecting the fibrous insulation with membranes, similar to putting a gore tex jacket over a woolly jumper. In this way, the project achieves its objectives without inadvertently creating issues such as ‘wind-washing’ and secondary issues of damp, condensation and mould.
Ecological Building Systems have developed a proven system for thermal improvements to suspended timber floors, using a combination of advanced building fabric technologies and naturally hygroscopic insulation materials. The solution is robust enough to withstand structural movement and heavy footfall while working in unison with the existing structure, ensuring structural timbers remain in a dry, stable condition (figure 8).
Figure 8. Optimised wind-proofed, naturally insulated and air sealed suspended floor systemFigure 9. Installed Solitex Plus windtight breathable membrane
The system begins with the installation of Pro Clima Solitex Plus, a windtight breathable membrane that inhibits heat loss while allowing any residual moisture within the joists to disperse, thereby preventing the risk of damp, mould and rot. The membrane is draped up and over the joists to create a cradle to support the insulation material and has sufficient strength to do this throughout the service life of the installation with no risk of sagging (figure 9).
The Solitex Plus is secured in place over the joists with galvanised staples that are at least 10mm wide and 8mm deep. Staples should be used every 10-15cm along the lower edge of the joist. Then a timber batten should be installed over the top for maximum long-term strength and durability of the installation (figure 8).
The overlaps of each length of the membrane should be taped with Pro Clima Tescon Vana, then the perimeter edge of the membrane should be sealed to the walls with Pro Clima Contega Solido SL airtight tape. The wall will need to be primed first with Pro Clima Tescon Sprimer before the Solido SL tape is applied. Pro Clima Orcon F airtight sealant can be used to seal any difficult (very uneven) areas where tape is unsuitable.
As the membrane supporting the insulation is draped up and over the joists, you will need enough membrane to cover 1.5x the square meterage of the floor. For example, if the floor is 50m², you should buy 75m² (i.e. 50×1.5) of Solitex Plus or Fronta WA to make sure you have enough.
The ideal insulation material for use as part of this system is Thermo Hemp Combi Jute a natural, breathable and high performance insulation with hygroscopic properties that allows moisture to be released gradually, helping to offset the risk of condensation within the insulation layer. Thermo Hemp Combi Jute is flexible enough to be packed tightly between the joists and can be cut to size easily on site (figure 10). The high density of the material offsets any risk of slumping over time and the lack of proteins in its natural fibres ensure it is not attractive to insects as a food source. Another alternative is wood fibre insulation, such as Gutex Thermoflex, which also offers a dense material with hygroscopic properties.
Figure 10. Fitting natural insulation. Thermo Hemp Combi Jute installed between joistsFigure 11. Pro Clima DA airtight membrane installed over natural insulation
Once the natural, breathable insulation has been installed, an airtightness membrane is laid over the top (figure 11). For this we recommend the robust Pro Clima DA membrane, which is especially designed for use under foot. This prevents moisture and warm air escaping from the warm interior to the cold crawl space. Each section of Pro Clima DA should be overlapped and taped using Pro Clima Tescon Vana sealing tape.
The final and crucial element of the Ecological Building Systems solution is to seal the interface between the floor and wall (figure 12), where the Pro Clima DA membrane meets the perimeter walls, by using Pro Clima Contega Solido SL tape. The floorboards and the skirting boards can then be replaced, covering all the improvements that have been made. To summarise, this solution ensures energy bills are reduced and comfort levels are optimised, without compromising the character or integrity of the floor for decades to come.
For more detailed installation information on how to install underfloor insulation using this method, please see our best-practice installation guide.
Figure 12. Sealing the airtight layer prior to re-relaying finished floor covering
Frequently Asked Questions
I would like to upgrade my suspended timber floor insulation as part of the government Green Homes Grant. How do I go about doing this?
Regarding the Green Homes Grant scheme, as we understand it, this is only available via approved TrustMark installers who are registered to carry out work under the government scheme. At this stage, we believe there are a limited number of registered installers, but hopefully more will be added in time. To qualify for the grant, any materials would have to be purchased and installed via a registered installer. More details of registered TrustMark installers can be accessed via this link.
Can I install the system described in the blog myself?
This depends on the experience and tools available to you. Follow this guide for more detailed instructions. The most crucial element is to be conscious of all the intricate details and to execute the details with care. Often the best installations are in fact by homeowners who have taken time to install materials correctly. Of course, appropriate health and safety measures must be taken.
Can you recommend a local installer?
As a product supplier only, we don’t get involved with installation or work directly with installers of suspended timber floor insulation. However, if you are able to find a local joiner/builder that you’d like to work with, we’d be more than happy to confirm the details with them if that would help?
How do I know what size and thickness of Thermo Hemp Combi Jute insulation I require?
Thermo Jute is available in two different widths, either 375mm for joist centres that are around 400mm apart or 575mm for joist centres that are around 600mm apart. Thermo Hemp Combi Jute is available in different thicknesses. Standard thickness that we stock include 60mm, 100mm and 140mm in 370mm wide and 40mm, 60mm, 100mm in 580mm wide. We’re able to use a combination of these thickness to make up the total thickness required. The thickness of the insulation required is normally determined by the height of the floor joists, so if the height of the floor joist is 160mm, then we would recommend using 160mm of Thermo Hemp Combi Jute insulation to fully-fill the void. The total thickness could be a combination of 100mm and 60mm thicknesses on top of each other. For details on the other natural fibre insulations we supply, please refer to our Flexible Insulation category page.
What is the approximate per m² cost of the materials outlined in the blog?
Following best practice, as described in the blog, the average cost to UK customers for the Pro Clima airtight membranes, tapes and other products plus the natural breathable insulation needed to fully fill joists with 375mm wide 100mm thick Thermo Hemp Combi Jute, is approximately £43. 00 per m² excluding VAT and Delivery. This cost is based on UK prices in July 2022 and may be subject to change.
What is the best way to cut Thermo Hemp Combi Jute if I need to?
Thermo Hemp Combi Jute or other natural fibre insulations can be easily cut with a large serrated knife or a manual insulation saw like this Bahco Profcut. It can also be cut with a mechanical saw like this.
If I choose to not use either a top and/or bottom membrane, and only use Thermo Hemp Combi Jute or similar flexible insulation with netting to secure it, will I get similar insulation benefits?
We would always recommend the use of a wind tight breather membrane on the underside of the joists. Its purpose, similar to that of the netting is to support the insulation in the long term, however, where the membrane really comes into its own, is by being completely windtight and still fully breathable.
The Solitex Plus or Fronta WA external membrane will prevent any wind and air movement from underneath the joists from moving its way through the insulation, which will significantly reduce its thermal performance. Allowing air to move in and through the fibrous Thermo Hemp Combi Jute insulation means that the effective trapped pockets of insulating air are moved away and can result in a big drop off in thermal performance and comfort. This effect is called wind-washing.
Ideally with any building element, be it a roof, wall or floor, we would always recommend an airtight vapour control membrane on the warm side of the insulation. For floors, the robust DA membrane is most suitable as an airtight vapour control layer, the membrane also stops dust and debris falling into the insulation. With a windtight breathable membrane on the cold side, a robust airtight membrane on the warm side and the joist space fully-filled with Thermo Hemp Combi Jute fibrous insulation, the insulation has adequate support over the lifetime of the building and will achieve its best and optimal thermal performance.
Which way up should the membranes be installed?
For Solitex Plus, when installed on a suspended timber floor, there is no UV exposure, so the blue face should be positioned so it is the side that gets taped. This means, if the floorboards have all been removed and you install from above the floor, the printed blue side will face up (towards the interior of the room). Conversely, if the floorboards remain in-place and you install from within the crawl space underneath, the blue side will be facing down towards the earth. Taping should always be done onto the blue face as it is smoother and an ideal surface for airtight tape.
The same is true for the DA membrane or Fronta WA membrane; tape the side you can see and make sure you position it so that would be the dark green face for the DA or the black face of the Fronta WA.
A guide to underfloor insulation
About 10% of heat loss from an average home is through the ground floor.
If your floor isn’t already insulated, this could be a good move to help you cut your energy bills.
Not sure whether you already have floor insulation, or want to install it but don’t know how? Read on to find out more about floor insulation and what’s the right option for your home.
Do you need to insulate your floor?
There’s no point in investing in expensive floor insulation if you don’t need it, or if it’s unsuitable for your home, but how do you know one way or the other?
Whether you need floor insulation or not depends on your home and what kind of floors it has:
-
Older houses with ‘suspended floors’, which are in effect above a void, are likely to lose more heat through the floor.
-
Homes with
solid (concrete) floors, built since the 1930s, have less of a problem. Concrete floor insulation can, however, be installed and usually consists in a layer of solid insulation which is placed directly on the floor. -
Modern houses
tend to incorporate slabs of polystyrene insulation a few inches below the concrete floor surface, effectively reducing this type of heat loss.
Whatever your home, there’s still some kind of measure you can take to insulate your floor.

Four ways to insulate your floor
-
Draught-proofing
– simply use sealant or caulking to fill the gaps between your floorboards and between skirting boards and the floor. -
Add an insulating layer under your carpet or floor-covering
– try a fibreboard underlay or polyfoam board. -
A rug
– it’s not going to solve all your problems, but putting a rug on top of bare floorboards will help to block some draughts and keep your toes warm. -
Underfloor insulation
– if you have you an access hatch that allows you to get into the crawlspace (void) below the floorboards, this is a relatively easy process, if not you will have to take up the floorboards. You will need to use netting or wooden battens to hold the glass or mineral wool style insulation in place beneath the floorboards.Alternatively, it may be easier to use batts rather than blanket style insulation.
Batts typically also have the advantage of having a slightly higher R-value – the higher the R-value, the greater the insulator’s effectiveness. Sheep’s wool could also be considered, due to its breathability.
 Batts typically also have the advantage of having a slightly higher R-value – the higher the R-value, the greater the insulator’s effectiveness. Sheep’s wool could also be considered, due to its breathability.
One thing to remember, however, is the need for
ventilation. The void (or crawlspace) below the floorboards will have ventilation grills and these should not be blocked up, as floorboards may otherwise become damp and start to rot.
What else should you insulate in the home?
While floor insulation is a great way to save money, it is by no means the first form of insulation you should look at around your home.
Loft insulation
If your property has a roof with attic space then loft insulation is the first thing you should look at, particularly since an estimated 25% of the heat in your home is lost through the loft.
Loft insulation is cheap to buy, easy to install (you can even do it yourself) and can save you serious amounts of money over the years.
Even if you already have loft insulation in place it may be worth checking whether you have the recommended levels installed. The recommended depth for blanket-style insulation is between 250 and 270mm. If your loft insulation was installed some time ago there’s a good chance it’s less than that.
And even though loft insulation is cheap to buy and install, it’s also possible to receive grants towards your loft insulation.
Wall insulation
While significantly more expensive to install than loft insulation, wall insulation could save you even more money over the long term.
Wall insulation is typically divided into two types, depending on what type of home you have. Cavity wall insulation, typically suitable for homes built after 1930, consists of pumping insulation into the space between the outer and the inner walls. Solid wall insulation, for homes built earlier, insulates around the outer wall itself.
If your home was built more recently still there’s a good chance you will already have cavity wall insulation in place but now know about it.
The problem with this form of insulation is that you will usually need help getting it installed. For cavity wall for instance, holes have to be drilled into your wall through which the insulation material is pumped.
Luckily there are plenty of energy efficiency grants that will help you pay for the costs of wall insulation.
Draught-proofing
If installing proper insulation sounds like too much work don’t worry, there is a quick fix solution that could still save you money and energy and is cheap to buy and easy to do yourself.
Draught proofing is all about securing the cracks and spaces around typically areas of heat loss around the home. The most common culprits are windows and doors (and their frames), but you should also check for draughts around letterboxes and chimneys.
Luckily it’s also an easy problem to solve. Draught-proofing materials like draught-proofing strips can be placed around casements, or you can use putty or sealant in any clear cracks.
For the big gaps between the bottom of your door and the frame meanwhile you can buy brushes or hinged draught-excluders that can be easily attached. Similarly letterboxes can be sealed with flaps or brushes, like the EcoFlap.
For bigger gaps like chimneys you need specialised products. A chimney balloon is inflated and inserted up your chimney flue or, better still, if you don’t use your chimney you can simply have it capped off at the top.
How to Insulate Existing Floors | Home Guides
By SF Gate Contributor Updated October 18, 2021
An uninsulated floor allows unwanted cold air to enter your home from underground. This cold air brings down the temperature of your home, resulting in wasted energy and higher heating costs during the winter. Improve your home’s energy efficiency rating by adding insulation to your existing floor. In many cases, you can bring insulation up to recommended levels in just a few hours without the hassle and expense of removing your existing floor finishes.
First, inspect the condition of the floor and deal with any potential moisture problems before starting, recommends HomeTips.
If you’re working in an unfinished crawl space, cover the ground with plastic to reduce moisture problems with your insulation. Use 6 mm polyethylene or some other similar moisture barrier, and anchor the edges with bricks or stones.
Insulate an Existing Wood-framed Floor
-
1. Put on Protective Gear
Put on a dust mask and safety goggles to protect yourself when handling insulation.
-
2. Inspect the Floor Framing
Locate the trap door or access panel that allows you to enter the crawl space below your home, or simply enter your basement if you have one. Inspect your floor framing and measure the thickness of the existing insulation, if any.
-
3.
Calculate the Insulation Amount
Multiply the total inches of insulation by 3.2 to estimate the existing R-value of your floor. If you have 2 inches of insulation, your floor has an R-value of 6.4. Most homes require at least R-13, though homes in cold areas can benefit from more insulation. The EPA maintains a page on recommended R values. If you have too little space within your joists to add the amount of insulation you want to add, look for high-performance insulation products that offer a higher R-value per inch.
Calculate how much insulation to add. Assuming you currently have 2 inches of fiberglass, you’ll need to add at least 2 more inches to reach R-13. If you want to achieve a higher R-value, estimate how many inches you need to add to reach that number if each inch adds R-3.2 to the floor.
-
4. Install the Insulation
Cut your insulation to size using a utility knife. Place it into the space between your existing floor joists, relying on friction to hold it in place.
Add wire insulation hangers as needed to ensure a more secure hold.
 Calculate the Insulation Amount
 Add wire insulation hangers as needed to ensure a more secure hold.
Insulate Existing Concrete Floors
-
1. Cover Floor With Fapor Barrier
Cover the entire floor with a vapor barrier, such as 6 mm polyethylene sheeting. Overlap the seams of the vapor barrier by 6 inches and secure the seams with tape. Secure the edges of the plastic to the slab using construction caulk.
-
2. Measure and Create Furring Strips
Measure 16 inches from the face of one wall. Mark this measurement on the floor with chalk, then continue to make marks every 16 inches across the length of the floor. Place a length of 2-by-2-inch lumber on each of the marks you made to create wood sleepers, or furring strips. Use concrete screws to hold the sleepers in place.
-
3. Cut the Insulation
Cut rigid foam insulation to fit snugly between each sleeper.
Score and snap the foam using a utility knife. Add two layers of rigid foam to achieve the highest possible R-value in the smallest amount of space.Warning
Never compress insulation, as this reduces its effectiveness.
-
4. Cover the Insulation
Cover the entire surface with sheets of 3/4-inch plywood, lining up the edges of each sheet on the center of the sleepers. Stagger the joints between rows of plywood to improve floor stability. Nails the plywood to the sleepers using 6d nails every 12 inches.
Things You Will Need
 Score and snap the foam using a utility knife. Add two layers of rigid foam to achieve the highest possible R-value in the smallest amount of space.
References
- HomeTips.com: How to Insulate a Concrete Floor
- Energy Star: Recommended Levels of Insulation
Tips
- If you’re working in an unfinished crawl space, cover the ground with plastic to reduce moisture problems with your insulation. Use 6 mm polyethylene or some other similar moisture barrier, and anchor the edges with bricks or stones.
- If you have too little space within your joists to add the amount of insulation you want to add, look for high-performance insulation products that offer a higher R-value per inch.

Warnings
- Never compress insulation, as this reduces its effectiveness.
Adding Underfloor Insulation to Existing and Older Properties
- Home
- Energy Efficient Upgrades for Existing Houses
- Underfloor Insulation
Adding underfloor insulation to an older home with suspended timber floors is relatively easy to do. But as with so many things there is a right way and several wrong ways to do it.
Why do we have suspended timber floors?
In the past, floor timbers were often laid directly on top of the ground but this inevitably led to damp and rot in the timbers. To correct this suspended timber floors were introduced that raised the timbers above the soil and created a ventilated void below the floor construction. That way the timbers didn’t get wet from touching the ground and the ventilation (via the sub-floor vents) reduced the risk of condensation. But the downside is that they do tend to be draughty, and an uninsulated suspended timber floor can loose more heat than the walls or the loft area. Yet this is an area that is very often overlooked when it comes to upgrading the insulation in older properties.
Uninsulated Suspended Timber Floor
Why Add Underfloor Insulation?
- Because suspended timber floors are draughty! Most suspended timber floors comprise simply of floor boards laid on top of timber floor joists. These draughts are often reduced slightly by liners laid below timber or laminate floor finishes, but these will not stop the draughts completely as the edges are not typically taped to make them airtight.
- Well installed underfloor insulation will mean your house will heat up quicker and loose heat slower – provided the underfloor insulation is correctly installed.
- Correctly installed hygroscopic insulation in an older property’s suspended timber floor will absorb some of the water vapour within the property during periods of high humidity (reducing the risk of condensation and mould on interior surfaces such as walls and ceilings) and release this water vapour slowly when the humidity levels are low.
A Few Useful Terms to Understand
- Hygroscopic Insulation – easily absorbs water vapour from the air during periods of high humidity and then releases it again slowly when humidity levels drop.
- Hydrophobic Insulation – resistant to the absorption and release of water vapour.
- Vapour Barrier – prevents water vapour passing through it (although no material is 100% impermeable to water vapour, vapour barriers are as close as you’ll get).
- Vapour Control Layer – designed to allow controlled amounts of the water vapour in your home to pass through.
- Jointing Tape – used to provide an airtight seal at the joints of the tape.
You can get different types of tape for sealing joints to different materials.
- Wind wash – is the movement of unconditioned air around or through buildings in such a way as to diminish or nullify the intended thermal performance of the home. In this instance it is where the ventilation in the sub-floor area draws heat out of loose unshielded insulation.
What Can Go Wrong With Underfloor Insulation?
Worst case scenario you trap moisture from spills or interstitial condensation up against the timbers within hydrophobic insulation and in turn risk rotting the floor joists.
You spend a lot of time and money installing underfloor insulation incorrectly only to have it do very little because it has gaps around it negating the insulation properties.
You suffer from wind wash and loose a lot of the insulation properties.
You install the wrong type of insulation that is incapable of absorbing and then releasing water vapour or you don’t install the correct barrier products and sealing tapes.
So if you’re going to go to the hassle and expense of lifting all your floor boards and adding underfloor insulation, then surely it makes sense to do it correctly first time!
How do we Traditionally Add Insulation to Suspended Timber Floors?
The easiest way is to simply lift the floor boards and install the insulation between the floor joists (after you have fully checked them for damp and rot and carried out any necessary repairs). Then relay the floor boards and finish with your chosen floor finish.
Sounds simple, right? Wrong!
As with any form of insulation in your home, it’ll only work effectively if you use the correct type of insulation, protect it from moisture, wind washing (where the air movement via the sub-floor vents draws warmth out of the exposed insulation) and by making sure the installation is as airtight as possible.
Other Examples of Incorrect Ways to Insulate Suspended Timber Floors:
Some of the most common ways I see insulation installed below suspended timber floors in older properties may initially sound correct, but in reality aren’t that effective and can lead to other issues:
- Rigid Insulation boards (closed cell foil backed insulation sheets) cut and laid between the floor joists – the theory behind this sounds plausible, however floor joists in older properties don’t always run straight and so cutting the boards to fit tightly between the floor joists is a major pain, and if they’re not a tight fit the insulation won’t be efficient. Plus they have a closed cell structure so they won’t absorb and release the water vapour that will be present within your home as this type of insulation is hydrophobic rather than hygroscopic.
You could potentially seal the edges with spray foam, but that will set rigidly and if there is any movement to the floor you’ll get cracks and therefore air gaps. The foil back to the insulation boards is a vapour barrier (prevents water vapour passing through), provided the joints are correctly taped. However to reduce the risk of condensation internally you’re better to use a hygroscopic insulation material which can absorb and release water vapour, so a total (or as close as you can get to total) vapour barrier isn’t ideal.
 Plus they have a closed cell structure so they won’t absorb and release the water vapour that will be present within your home as this type of insulation is hydrophobic rather than hygroscopic.
Mineral wool or Fibreglass wool – this could be simply packed between the floor joists and supported by chicken wire stapled to the bottom of the floor joists. Sounds good right? These types can be packed in between the edges of the joists avoiding the issue with gaps but their structure is quite loose and can be affected by wind wash. They’re also going to be open to the elements so any spilled liquids from above and water vapour (leading to interstitial condensation) can penetrate the insulation reducing it’s insulation properties significantly. Plus wind washing reduces the effectiveness of the insulation.
Note: While mineral fibre and fibreglass wool are hydrophobic they will still allow moisture to pass through them. Water spills from above will pass through and will compress it (I speak from personal experience, despite what the suppliers may tell you).
The Correct Way to Add Underfloor Insulation.
To insulate the suspended timber floors in your existing home you need to consider three things:
- Thermal performance.
- Moisture control.
- Air tightness.
So you need a system that will hold the heat well, allow water vapour (but not liquids) to be taken in when the humidity levels are high and released again once the humidity levels reduce and provide a barrier to make the installation air tight. If you can achieve this you’ll avoid draughts and wind washing and get an insulation installation that performs well.
- The first step is to lift the floor boards to expose the floor joists and inspect and repair any defective joists etc. You could at this stage lay a vapour barrier on the clay surface below the floor (if you have clay/soil exposed) as this will reduce the risk of water vapour from the ground. Next lay a breathable airtightness membrane over the joists forming wells for the insulation to be installed between the joists. This will stop wind washing and allow any residual water vapour to escape.
Airtightness Membrane for Suspended Timber Floor Insulation
- Then install a high density (to avoid settlement over time) natural hygroscopic insulation product such as batts of sheep’s wool (but it will need to be treated to prevent moths and other insects eating it), wood fibre or Jute insulation (made from recycled cocoa and coffee bean bags) as these will regulate the water vapour by absorbing it when necessary and releasing is again slowly once humidity levels reduce.
Hygroscopic Insulation for Suspended Timber Floor
- Finally you will need to lay a vapour control layer on top of the underfloor insulation (this slows the passage of water vapour through to the insulation but does not stop it like a vapour barrier would). All the time ensuring the correct overlaps and the correct taping of all edges Including the joint between the floor and the walls. Then you can relay your flooring.
Correctly Insulated Suspended Timber Floor
Correctly Installed Suspended Timber Floor Insulation
Can Insulation be Added from Below?
This is a question I get asked a lot. So here’s a link to an article discussing the pros and cons of adding underfloor insulation from below.
Conclusion:
As you can see from above it isn’t really much more difficult to install underfloor insulation correctly. Provided you take your time and plan the installation of the breathable airtightness layer before starting (and ensure you leave a flap at the edges so that it can be taped to the walls). Then lay the insulation so that there re no gaps and again when laying the vapour control layer you’ll need to turn it up the wall at the edges and then taped.
If you can do this you’ll have a well insulated, breathable and airtight floor.
Next step is to do the same to your loft insulation and walls.
Types of floor insulation – Blog about construction
Symbols for different types of insulation on construction drawings: Waterproofing for non-pressure water. Insulation. Rules for applying dimensions and inscriptions to construction drawings.
Abbreviations used to designate types of painting and cladding of ceilings and walls. Abbreviations for floor types. Conditional colors for designation of engineering networks. Waterproofing for non-pressure waters1.
General designation for insulation2. Prelubrication 3. Klebemassa, covering layer 4.
Putty5. Tol without sprinkling6. Sealing tape with raw construction paper7.
Cloth sealing tape8. Sealing tape with metal foil9. Sealing tape with polymer film10.
Uncoated metal tape11. Thermoplastic polymer filmInsulation12. Heat and sound insulation13.
Stone fiber insulation material14. Glass fiber insulation material15. Wood fiber insulation material16.
Floor insulation is relevant today for premises of any purpose. If you do not lay a waterproofing layer on the floor, then even durable concrete can lose its performance over time due to moisture.
Contents
- 1 Tape waterproofing
- 2 Film insulation
- 3 Waterproofing with mastic
- 4 Floor waterproofing of a wooden house floor
- 5 Waterproofing on soil0042
- 6 Isolation of the wooden floor
- 7 insulation of the concrete floor
- 8 Thermal insulation value
- 9 Thermal insulation for a warm floor (electric): Types
- 10 Electric mats: Classes and pros
- 13 How to properly insulate the floor
Waterproofing tape
The floor can be insulated with adhesive materials. To do this, you can use glass roofing material, hydroisol, roofing material, fiberglass or hydrobutyl.
Laying the listed materials involves complex rules. So, the base will initially have to be leveled, after this stage the irregularities should not be more than 2 mm. At the next stage, the base will be primed with an emulsion made on the basis of bitumen.
Pasting is the final and main stage. It is important to ensure that the coating is not damaged. If the floor insulation is based on roofing material, then the coating will be durable, but it will have one drawback, which is a toxic smell.
Capillary floor protection requires the use of a mixture that includes Portland cement, chemically active ingredients, and quartz or silicate sand.
The compound must be applied to a slightly damp surface. The level of concrete strength is increased by 20%. An important characteristic is one feature, which is expressed in self-healing of cracks.
Film insulation
Floor insulation can also be represented by all kinds of film materials, the thickness of which is 0. 2-2 mm.
These materials may include PVC, cellulose acetate, synthetic rubber, and polypropylene. As a result, it is possible to obtain a coating with increased elasticity and excellent strength. But if you use additional reinforcement with fiberglass, it is possible to provide even more impressive insulation strength.
The described floor insulation, which has to be properly sized beforehand, must be installed around the perimeter of the room. At the same time, it is necessary to ensure the continuity of the coating and its entry to the surface of the walls. If there is a desire to waterproof the floor in an economical way, then PVC film can be used.
Waterproofing with mastic
Insulating a wooden floor is necessary, since wood is most susceptible to moisture, you can use mastic for this. It is an adhesive composition that is able to pair all kinds of materials with each other, in addition, it protects surfaces from destructive influences.
Previously, the most commonly used technology was applying bituminous mastic to the slab. The laid roofing material had joints that were processed with the same bitumen. Such a bituminous coating has significant disadvantages, one of which is expressed in the occurrence of cracks, which makes waterproofing not so effective.
If the floor insulation in the apartment is made with coating materials, then you will be able to complete the work in a short time, without much effort. Coating materials are easy to apply, but it must be remembered that after hardening they do not have special mechanical strength.
Waterproofing the floor of a wooden house
Insulating the floor of the first floor in a wooden house is a particularly important procedure for the preservation of building materials. Initially, it is necessary to pay attention to the insulation work in the foundation area. As a material for this, you can use the same roofing material.
Whereas after laying the subfloor, it is necessary to ensure the laying of a hydro-barrier, in the role of which it is permissible to use a dense polyethylene film. A prerequisite for this is the provision of a ventilated gap between the surface of the rough and finish flooring. Floorboards can be isolated from moisture by applying a polymer varnish to their surface, after which a decorative coating can be applied.
Floor waterproofing on soil
In private houses, the floor of the lower floors of which is on the ground, there is a need for waterproofing work.
The isolation of the floor from the ground at the first stage involves the compaction of the soil at the bottom of the excavation. Crushed stone is to be laid at the bottom of the pit, the grain size of which is 30-50 mm, the equipped layer should be 7-10 cm. Crushed stone should also be compacted.
Sand follows, the thickness of which must be the same. It is permissible to use any sand. After that, you can mount a wooden floor, equipped on logs, or cover a concrete screed.
Wooden floor insulation
Floor insulation from the ground implies, in the case of a wooden system, the need to install supports under the logs.
They can be made of brick or concrete. After the concrete has gained strength, its surface must be treated with a coating material. From above it is recommended to lay rolled insulation.
This will protect the joists at the junction points with the supports. After installing the log, you can proceed to the construction of a subfloor, which can be made of waterproof plywood, it will act as insulation. As an additional insulating layer, polyethylene can be used, which is covered with plywood.
Insulation of the floor of the first floor in this case requires laying material with an overlap of 15 cm. The joints must be glued using construction tape. Additionally, polyethylene foam can be used.
Concrete floor insulation
In order to insulate the concrete floor against the ground, after laying the “cushion” it is necessary to equip the rough screed.
After the concrete has gained strength, rolled waterproofing can be laid on its surface, which is laid in 2 layers. To do this, you can use roofing felt or roofing felt. The insulation on the floor is laid with a burner.
After that, you can lay the insulation and make another screed, which will already be finished. There is another alternative solution, which is to lay 200 micron polyethylene on the sand. The material is carefully glued in the area of \u200b\u200bthe joints.
A rough screed is installed on the surface of the film, the layer of which is 5-7 cm. In order to protect the concrete screed, the same roll materials can be used. From above, according to the above technology, thermal insulation is covered, and then a finishing screed is laid.
Insulation of a wooden floor, like any other, must be carried out, otherwise you will face a lot of problems after a while, for example, high humidity in the rooms, as well as the formation of fungus on the surface of the walls, etc.
The page is devoted to such a question as thermal insulation for underfloor heating (electric): types of heaters, minuses and pluses of electric mats, as well as the importance of penoplex, penofol and sheet cork in floor insulation.
Increasingly, owners of apartments and houses are installing electric underfloor heating as their main heating system.
This is due to the comfort that they create in the room and the efficiency of work, but for this to be true, it is necessary to adhere to the rules of installation.
One of the important components of the device is thermal insulation.
The value of thermal insulation
The energy consumption of the floor in operating mode and the reduction of heat loss to a minimum depend on it.
The main function of thermal insulation is:
- Prevention of heat loss through the subfloor. Thermal insulation under electric floor heating ensures uniform heating of all elements, with further heat transfer to the floor covering over the entire surface. Since there is a high-quality distribution of heat, this significantly reduces energy costs .It creates additional sound insulation, which is especially important in an apartment building.
 If there is an unheated room or soil under the floor, then thermal insulation eliminates the penetration of moisture and cold from below.
 If the electric underfloor heating insulation is selected and installed correctly, then the entire underfloor heating cake turns into a closed thermal zone in which heat is distributed in the right direction and in a uniform flow.
Thermal insulation for underfloor heating (electric): types
The modern market for heating systems offers ready-made heaters designed specifically for electric floors.
They are still few, but they meet all quality and safety standards:
Penofol is a type of polyethylene foam coated with a foil layer. The reflective surface is the main requirement when choosing thermal insulation, since it is it that directs heat waves towards the ceiling. The material is devoid of any pores, dense enough to withstand heavy loads, and there are 4 types: The foil surface is only on one side. Both sides of the material are covered with a reflector. The self-adhesive has foil on one side and special glue on the other. One side of the material is covered with polyethylene film and the other with foil. As a rule, the thickest (10 mm) is used when installing underfloor heating on balconies, verandas and loggias. Extruded polystyrene foam (foam) is the most popular insulation for electric underfloor heating.
This is due to its high strength and heat-insulating properties. Its structure does not change under the influence of high temperatures and does not emit harmful substances. It is especially good to lay an electric underfloor heating on foam plastic when it is necessary to minimize the thickness of the structure. Sheet cork is the highest quality, natural, durable, environmentally friendly heat-insulating material. It: does not rot; is fireproof; does not change its structure and volume when heated. The only disadvantage of cork sheets is their high cost.
These are the main types of thermal insulation that can even be laid under the screed. Choosing one of them, you need to focus on indicators such as strength, sheet thickness, durability and heat-insulating properties.
Electric mats: pros and cons
Heating mats are a new type of electric floor that has come to replace cable laying. Thanks to them, the whole process has been greatly simplified, which is primarily due to the peculiarity of their structure:
- Electric underfloor heating mats are sold in rolls 50 cm wide, and their length is limited only by the area of the room. They are based on a mesh substrate of Kevlar or fiberglass on which the cable is fixed. It is immediately laid with a “snake” in increments of 5 cm and an electric wire leads to it to connect the system to the thermostat.
There are heating mats that can be pitched between turns and, if necessary, cut into pieces of the desired length without damaging the cable.
The advantages of the heating mats are as follows:
- Easy installation, even faster if the substrate already has an adhesive backing.
 It is enough to remove the protective coating and lay the mats in the right direction. They are so thin (3 mm) that they practically do not affect the thickness of the floor. Heating mats are absolutely safe due to the materials from which they are made and are reliable. work. Since they do not require a screed to install, it is easy to repair such a system: it is enough to determine where the problem is, remove the floor covering, remove the adhesive layer and replace the damaged cable.
 When installing such a heating system, the use of thermal insulation is not necessary, although most craftsmen still use it to reduce energy costs during its operation.
Floor insulation in a country house is a necessary process.
Reliable and high-quality thermal insulation will keep the heat in the house for a long time, prevent condensation and mold, and help maintain a comfortable temperature in the room. Up to 20% of the heat from the house goes through the floor! Today, different heaters are made, which differ in cost, quality, strength and other parameters. Let’s look at what criteria you need to choose heaters.
How to choose insulation
Before choosing a material, you need to carefully study the characteristics and properties of the product. When choosing, the following parameters are taken into account:
High thermal insulation is the main criterion. After all, the main function of the insulation is to keep the heat in the room;Terms and conditions of operation. The longer the insulation lasts, the less often it will be necessary to make repairs and renew the coating; High strength.
The floor is constantly subjected to stress, so it is important that the material has high strength; Moisture resistance and vapor permeability. The material must be resistant to dampness and temperature extremes, this will avoid the formation of mold and rot, retain its original appearance and increase the service life. The water that accumulates in the insulation reduces thermal insulation by 15-20%; Safety and environmental friendliness are especially important if insulation is carried out in a wooden house.
Natural materials will preserve the ecological cleanliness of wood and will not disturb the healthy atmosphere of the room. In addition, the resistance of materials to fire must also be taken into account in order to ensure safety in case of fire; The weight of the material is a significant criterion if you do not plan to build a powerful and expensive foundation. In this case, you need a light insulation.
In addition, the choice is influenced by the speed and ease of installation, consumption and cost of insulation. You should also take into account climatic conditions, area and purpose of the room. Let’s take a closer look at the types of materials and find out which insulation is better to use for the floor in a private house.
Types of insulation
Expanded polystyrene is a common and popular type, which is characterized by low weight and easy installation, good thermal insulation and high strength. It effectively resists moisture, so the material can be used on the balcony, basement and other rooms with high humidity. However, expanded polystyrene is not recommended for wood floor insulation.
Penosiol is a liquid foam that is easy to pour into hard to reach places. Such material is used to seal seams and cracks in the early stages of building a house, as it fills air voids and prevents heat from escaping during further operation of the building. Penosiol is distinguished by light weight and easy installation, moisture resistance and strength.
Expanded clay is an affordable and inexpensive way to insulate. Rigid insulation is added to the concrete mixture or covered under gypsum fiber boards.
It has a porous structure and high thermal insulation, so the material is used in areas with cold climates and frosty winters. However, to ensure comfortable thermal insulation, 10-15 centimeters of material will be required. This not only increases material costs, but also reduces space.
Mineral fiberglass wool – cheap materials in the form of plates or rolls, which are often used for wood flooring. However, they have a large number of disadvantages, including a large moisture absorption.
As a result, the wool becomes damp and heavy, which shortens the life of the material. To avoid this problem, it is necessary to carry out additional ventilation and make ventilation gaps. In addition, such materials contain chemicals, which will violate the environmental safety of a wooden house.
Ecowool is an environmentally friendly loose material made on the basis of cellulose. A big plus is that ecowool is great for warming hard-to-reach places. However, it is not suitable for rooms with high humidity, as it is not resistant to moisture. Cork fiber is a light, soft and thin insulation, which is considered one of the best.
It is characterized by high thermal insulation and moisture resistance, durability and long service life. Such a fiber can be placed under a floor covering or used as an independent coating, which reduces the cost and time for arranging the floor. In the second case, the fiber is polished and coated with varnish or paint. The result is a natural, aesthetic, durable and warm floor that harmoniously looks in a wooden house.
The only disadvantage of this material is its high cost. Polystyrene concrete is a thin insulation that will reduce the cost of materials. It will take only 5 centimeters to organize good thermal insulation. In addition to maintaining heat, polystyrene concrete prevents the penetration of extraneous noise and provides reliable sound insulation. Any coating can be laid on the material layer.
In addition, it will create an even and smooth surface. Sawdust insulation is a cheap way of insulation, which is not recommended because of the fragility of the coating, instability to fire and moisture. In addition, various adhesives are often used in such materials, which violate the environmental friendliness of a wooden house. Foil insulation is a reliable and durable material that reflects heat back into the room, and does not keep it inside, like other heaters. Foil is durable and waterproof.
The advantage of this product is that it can be used for floor insulation in any type of premises (even in a bathhouse and sauna). By the way, it is not necessary to use only one type of material for floor insulation. A combination of several options, such as layers of foam or wadding and foil, will enhance thermal insulation and increase the life of the structure. When you decide which insulation to use for the floor, you can proceed with the installation.
How to properly insulate the floor
The method of insulation depends on the type of floor, because it can be wooden or concrete. Experts recommend making only wooden floors in wooden dachas and cottages, as they are environmentally friendly and do not violate the naturalness of the tree. Read more about arranging the floor in a country house at http://marisrub.ru/uslugi/vnutrennie-otdelochnye-raboty/otdelka-polov.
To insulate a wooden floor, logs are mainly used. In this case, the bars are laid at a distance of 60 centimeters, and the gaps are filled with boards, to which the insulation is hemmed.
It is important to carry out thermal insulation on both sides. A waterproofing layer is laid on top of the heat-insulating layer. If you are using foil, the reflective layer must be on the outside!
In addition to foil, glass wool and mineral wool, ecowool and cork fiber are suitable for wooden floors. But you can not use polystyrene foam! The thickness of the layers of insulation depends on climatic conditions. So, at an air temperature in winter of -15; -25 ° C, the thickness of the thermal insulation is at least 150 mm.
Styrofoam boards are used for concrete floors. First, a waterproofing material is placed on the dried concrete coating, a standard polyethylene film will do.
Next, lay the insulation, and then again the waterproofing. From above, the layers are poured with a concrete screed with a minimum height of 50 mm. It is possible to lay the flooring only after the concrete screed has completely hardened!
When insulating the floor, it is important to follow the installation technology and use only high-quality reliable materials. Otherwise, the service life of the structure will be reduced.
The heat will quickly leave and the room will become cold. Due to insufficient moisture resistance, mold and rot will appear in the house. To avoid such problems, seek the help of professionals!
Masters of the company “MariSrub” will select and calculate the appropriate materials for the house or bath, perform all types of work on insulation and flooring.
Sources:
- arx.novosibdom.ru
- fb.ru
- netholodu.com
- blog.marisrub.ru
Wooden floors. Complete renovation of the apartment.
 How a woman copes with repairs
Wooden floors
Question. Do I need thermal insulation for wooden floors?
A lot of heat escapes through wooden floors. The floors of the first floors are especially in need of thermal insulation.
To install insulation under a wooden floor, lift the floorboards, place the garden wire mesh loosely on the beams and staple them together. In the resulting “hammocks” you can lay roll insulation for attics or insulation slabs for walls. If the mesh sags, it must be tightened and sewn with brackets again.
To prevent moisture from the house from penetrating into the insulation and concentrating there, it can be covered with a layer of thick polyethylene sheet.
Then lay the boards back in place and nail them to the beams. Do not leave gaps in the joints between the ends of the boards.
When laying chipboard on concrete, sheet polyethylene is first placed on it, then solid polystyrene, and slabs connected in a tongue are laid on top.
Question. What does the preparation of wooden floors consist of?
First of all, the preparation of wooden floors consists of fixing loose planks. If wooden floors are laid on logs, it is necessary to lift the old floor covering and check the rigidity of fastening of all floorboards to the logs and level to check its flatness. Poorly nailed boards will creak underfoot, and bulging edges and warping may show through the new flooring. Lagging boards are attached with nails.
To achieve a smooth, even surface on a thin new floor, you can simply cover your existing plank floor with MDF boards.
Floor boards are laid in rows, with joints offset from row to row, and sewn to the fiberboard with pins every 150 mm.
Preparing plank floors for laying all types of ceramic tiles consists of covering them with top grade plywood.
If your old floorboards are uneven, you can clean them and repaint them without changing to a new finish. To do this, use a grinder to clean and smooth the old floorboards. First you need to roll the car at an angle of 45 ° to the left to the direction of the boards, then – at the same angle to the right.
Then you need to change the skin to medium-grain and roll the machine along the boards back and forth. Finish with fine-grained sandpaper.
For sanding areas around skirting boards and door sills where the drum of a large machine cannot reach, use a smaller machine, disc or belt.
In places inaccessible to machines, wood sanding is done manually with sandpaper.
Question. What are removable floor panels for?
Floorboards do not normally deteriorate from the wear and tear of walking on them, but because they are lifted up to access the pipes and cables underneath.
A removable panel can be created to access the utilities. To do this, you need to determine where the beams closest to the section of the floor you need pass. Then drill the initial hole and use an electric saw to make a cut near the beam at an angle of 45 °. Raise the end of the cut section and place a block under it. After that, you need to cut the board over the middle of the next beam and remove the section.
In order to put it in place, you need to nail one end to the beam, and nail the other, cut at an angle, with an oblique nail to the adjacent board. You can nail support bars to the side of the beams and nail the ends of the board to them or, better, screw them. Then the panel can be removed without damaging.
Question. How does preparation for painting the floor begin?
Preparation for painting begins with stirring the paint, because after a long period of storage it may become inhomogeneous. Stir better with a wooden spatula. It is desirable to use plastic containers.
If debris gets into the paint, it must be filtered through gauze or nylon. If a film has formed on the surface of the paint, it must be carefully removed from the walls of the can with a knife or spatula, without tearing or mixing. The removed film can be used to seal existing gaps.
To obtain a new color shade, it is necessary to gradually add a dye to the mixed paint, previously mixed in a separate bowl.
Question. How is wood flooring painted?
If the floors are new, never painted, they must first be oiled twice, and then the paint should be applied in two layers. The first layer should dry for a day, and the second – two days.
The direction of the brush movement must match the direction of the wood fibers. The paint layer should be even, without gaps and gaps, of the same thickness. The thickness of the layer depends on the amount of paint taken on the brush, and on the force of pressure. If you take too much paint, it will spread and streaks will remain. Excess paint is squeezed out on the edge of the dish. The brush should be held at an angle to the surface and not pressed too hard. Passages are made approximately the same length, in the same direction. It is not recommended to add a desiccant to speed up the drying of the paint, as this reduces the strength of the coating.
Painting with a roller is faster than painting with a brush. It is especially convenient for them to paint large areas and smooth surfaces. To make it even more convenient to work, the roller handle can be extended. Usually rollers are sold with a cover made of foam rubber or sheared sheepskin. Covers made of natural sheepskin or faux fur are much more practical.
Care must be taken to ensure that the roller is soaked with paint evenly and that it does not drip from it. To do this, it is rolled over the grate.
Staining starts from the corner in the direction “from you”. The first passes are made in the form of the letter “M”, capturing an area of \u200b\u200babout one meter. Then this square is painted over completely. Smears should be applied without lifting the roller from the surface. The pressure on the roller increases as the paint is used up.
All areas inaccessible to the roller are painted over with a brush so that there are no gaps.
Previously painted floors (if there are no gaps between the cracked floorboards) are painted once.
Painted floors can be varnished after drying. This will increase the life of the paint coating and add shine to the painted floor. If desired, the varnish can be applied in two layers.
Floors made of plywood, fibreboard (MDF) and chipboard (chipboard) are prepared for painting in the same way as new plank floors, but they need to be oiled once, as the second layer is not completely absorbed and will harden in waves on a surface.
Question. What materials are used to paint the floors?
For painting wooden floors, oil paints based on drying oil, ready to use, alkyd and oil-phenolic enamels, enamels based on polyurethanes and melamine-styrene resins are used.
All paints consist of three main components: pigment, binder and carrier.
The pigment gives color and opacity to paint.
The binder binds the pigment particles into a continuous film after the paint has dried, and also adheres the film to the surface. Synthetic resins are used as a binder, for example, alkyd, vinyl, polyurethane, etc.
The carrier makes the paint fluid and smooth when applied and evaporates after drying.
The ratio of pigment and binder in the paint determines the appearance that will be obtained after drying. If the pigment content is higher, then the paint will be duller. Matte, semi-gloss and glossy paints are available for sale.
Question. What else, besides regular paint, can be used on wooden floors?
Wooden floors can be coated with wood varnishes and varnishes.
Varnishes are usually paints without pigment. Some varnishes contain polyurethane resins and are solvent based. But it is better to use water-soluble acrylic varnishes, as they are more hygienic and environmentally friendly. Lacquers are transparent and tinted. Tinted varnishes give the wood an extra color and at the same time do not hide the natural texture.
Varnish has its own primer and undercoat. But when applying the first layer, you can add about 10% white spirit to it for solvent types or the same amount of water for acrylic types. It is better to apply the first layer not with a brush, but rub it into the wood with a rag that does not leave fibers. After the first layer has dried, lightly rub it with a fine sandpaper. Then remove the dust and now apply a second layer with a brush. After the second layer has dried, lightly rub it again with sandpaper and apply another layer.
Polishes for wood are designed for absorption. Therefore, they can subsequently be coated with a transparent varnish. This will improve the finish and increase the durability of the coating.
Polishes are available in both solvents and water. On sale there is a wide range of colors and shades for wood. Varnishes of the same type, different in color, can be mixed. To make the polish lighter, you can dilute it with water or mineral spirits.
Polishes must be applied quickly, bringing together the still wet edges of individual areas and avoiding layer upon layer, so as not to form darker spots.
Since water-based polish increases the grain on the surface of the wood, it changes the evenness of the color. To prevent this from happening, you first need to smoothly sand the surface, and then moisten it with a damp cloth, which will increase its fibers. After drying, these fibers must be removed with a very fine sandpaper, and then coated with polish.
This text is an introductory fragment.
Wooden frames
wooden frames
Wooden balcony frames do not have a wooden box, which is usually enclosed in window frames. This is their main difference. In addition, they are designed for mechanical and functional loading. Their designs can be very diverse.
Wooden stairs
wooden stairs
A wooden staircase is not just a functional structural element of a building, but an important part of the decor. The staircase complements the interior, and in some cases even creates it. Over time, wooden stairs can break. Regular
Wooden boards and slats
Wooden boards and slats
In the manufacture of a false ceiling, boards and slats are attached to a wooden frame. On some of them, a specially processed edge is pre-made, thanks to which docking is greatly facilitated. In addition, boards and slats have
Wooden doors
Wooden doors
Today, doors are made not only from wood. However, this material has not lost its relevance (Fig. 10). This is due not only to centuries-old traditions, but also to the fact that most people associate wood with comfort and warmth.
Rice. 10. Wooden
Wooden slats
Wooden slats
You can sheathe the walls of a balcony or loggia with a wooden lath. This will give the balcony a cozy and original look, reducing the sound and heat conductivity of that part of the apartment that adjoins directly to these rooms. The slats are attached horizontally or
Wooden floors
wooden floors
Question. Do I need thermal insulation for wooden floors? A lot of heat escapes through wooden floors. The floors of the ground floors are especially in need of insulation.
Ordinary wooden floors
Regular wood floors
Recently, wooden floors are becoming rarer and rarer. They are being replaced by more practical materials, such as linoleum, tiles, etc. The disadvantage of plank floors is that they have to be repaired more often than other types of floors. To
Ordinary wooden floors
Regular wood floors
Recently, wooden floors are becoming rarer and rarer. They are being replaced by more practical materials, such as linoleum, tiles, etc. The disadvantage of plank floors is that they have to be repaired more often than other types of floors. To
Old wooden windows
Old wooden windows
Old windows are usually painted with alkyd paints or enamels. Such windows need to be tinted regularly. With windows painted with alkyd paint, peeling paint is removed with a scraper, and the coating remaining on the frames is polished to a matt state. Frames
Symbols for various types of insulation | Norms and standards | Structural design
Symbols for various types of insulation on construction drawings: Waterproofing for non-pressure water. Insulation. Rules for applying dimensions and inscriptions to construction drawings. Abbreviations used to designate types of painting and cladding of ceilings and walls. Abbreviations for floor types. Conditional colors for designation of engineering networks.
| Free water waterproofing | |
| 1. Insulation general designation | |
| 2. Prelubrication | |
| 3. Klebemass, top coat | |
| 4. Putty | |
| 5. Uncoated | |
| 6. Sealing tape with raw construction paper | |
| 7. Sealing tape with fabric layer | |
| 8. Sealing tape with metal foil | |
| 9. Sealing tape with plastic film | |
| 10. Uncoated metal tape | |
| 11. Thermoplastic polymer film | |
| Insulation | |
12. Heat and sound insulation Heat and sound insulation |
|
| 13. Rock fiber insulation | |
| 14. Glass fiber insulation | |
| 15. Wood fiber insulation | |
| 16. Peat fiber insulation material | |
| 17. Styrofoam | |
| 18. Plug | |
| 19. Fibreboard with magnesite binder | |
| 20. Cement-based fibreboard | |
| 21. Gypsum boards | |
| 22. Gypsum boards | |
The required dimensions and inscriptions are applied to the drawings according to the following rules:
| Floor areas | Without deducting the opening area | |
| Ceiling areas | In m2 accurate to 0.01 m2 | |
| Wall areas | ||
| Window openings | ||
| Doorway areas | ||
| Floor types | ||
| Paintings or wall coverings | ||
| Painting or cladding ceilings |
Abbreviations for painting and cladding ceilings (II) and walls (C):
| ceilings | walls | |
| Lime paints | Pi | Si |
| Adhesive paints | PC | Sk |
| Mineral paints | Pm | See |
| Oil paints | Pms | SMS |
| Vegetable colors | Ex | Wed |
| Ceramic tiles | Pp | Sp |
| Wood paneling | front | SD |
| Clinker | Pkl | Skl |
| Wallpapers | To | Co |
Abbreviations for floor types (Pl):
1. |
Pll | Cast | 3. | Plm | Bridges |
| Plla | asphalt | Plmd | wooden checker | ||
| Plg | plaster | Plmg | granite or syenite stones | ||
| plc | xylolite | Plmsh | cinder slabs, etc. | ||
| Plt | terrazzo | 4. | Pld | Wooden | |
| Plc | cement, etc. | Pldd | softwood boards | ||
| 2. | Plr | From rolls and pieces | Pdb | beech floorboards | |
| Prr | rubber | Pldb | oak floorboards | ||
| Plrk | clinker | Plds | pine floorboards | ||
| Plrl | linoleum | Pldp | fir floorboards | ||
| Plra | asphalt slabs | Pldbp | beech parquet | ||
| Plrg | granite slabs | Pldp | oak parquet, etc. |
||
| Plri | limestone slabs | ||||
| Plris | artificial stone slabs | ||||
| Plrm | marble slabs | ||||
| Plrs | silicate boards | ||||
| Plrks | xylolite boards | ||||
| Plrkr | Ceramic tiles, etc. |
Conventional colors for designating utilities (DIN 2403):
| Par | red | ||||
| Superheated steam | red | white | red | ||
| Crumpled steam | red | green | red | ||
| Drinking water | green | ||||
| Hot water | green | white | green | ||
| Condensate | green | yellow | green | ||
| Pressurized water | green | red | green | ||
| Salt water, brine | green | orange | green | ||
| Process water, running water | green | black | green | ||
| Dirty water, waste water | green | black | green | black | green |
| Rock washing water | green | ||||
| Air | blue | ||||
| Hot air | blue | white | blue | ||
| Compressed air | blue | red | blue | ||
| Coal dust | blue | black | blue | ||
| Blast-furnace, purified and furnace gases | yellow | ||||
| Raw blast furnace and furnace gases | yellow | black | yellow | ||
| Producer gas | yellow | blue | yellow | ||
| Luminous gas | yellow | red | yellow | ||
| Methane | yellow | green | yellow | ||
| Petroleum gas | yellow | brown | yellow | ||
| Acetylene | white | yellow | white | yellow | |
| Carbon dioxide | yellow | black | yellow | yellow | yellow |
| Oxygen | yellow | blue | yellow | blue | yellow |
| Hydrogen | yellow | red | yellow | red | yellow |
| Nitrogen | yellow | green | yellow | green | yellow |
| Ammonia | yellow | purple | yellow | purple | yellow |
| Acid | orange | ||||
| Strong acid | orange | red | orange | ||
| Lye | purple | ||||
| Strong alkali | purple | red | purple | ||
| Oil | brown |
Ernst Neufert. Structural design / Ernst Neufert “BAUENTWURFSLEHRE”
Tags:
Norms and standards
Structural design. Ernst Neufert
Bauentwurfslehre. Ernst Neufert
Abbreviations and designations on construction drawings
Symbols and abbreviations on plans and sections
SYMBOLS FOR VARIOUS TYPES OF INSULATION | Architecture and Engineering
Symbols for different types of insulation on construction drawings: Waterproofing for non-pressure water. Insulation. Rules for applying dimensions and inscriptions to construction drawings. Abbreviations used to designate types of painting and cladding of ceilings and walls. Abbreviations for floor types. Conditional colors for designation of engineering networks.
| Free water waterproofing | |
1. Insulation general designation Insulation general designation |
|
| 2. Prelubrication | |
| 3. Klebemass, top coat | |
| 4. Putty | |
| 5. Uncoated | |
| 6. Sealing tape with raw construction paper | |
| 7. Sealing tape with fabric layer | |
| 8. Sealing tape with metal foil | |
| 9. Sealing tape with plastic film | |
| 10. Uncoated metal tape | |
| 11. Thermoplastic polymer film | |
| Insulation | |
| 12. Heat and sound insulation | |
| 13. Rock fiber insulation | |
| 14. Glass fiber insulation material | |
| 15. Wood fiber insulation | |
| 16. Peat fiber insulation | |
| 17. Styrofoam | |
| 18. Plug | |
| 19. Fibreboard with magnesite binder | |
| 20. Cement-based fibreboard | |
21. Gypsum boards Gypsum boards |
|
| 22. Gypsum boards | |
The required dimensions and inscriptions are applied to the drawings according to the following rules:
| Floor areas | Without deducting the opening area | |
| Ceiling areas | In m2 accurate to 0.01 m2 | |
| Wall areas | ||
| Window openings | ||
| Doorway areas | ||
| Floor types | ||
| Paintings or wall coverings | ||
| Painting or cladding ceilings |
Abbreviations used to designate the types of painting and cladding of ceilings (II) and walls (C):
| ceilings | walls | |
| Lime paints | Pi | Si |
| Adhesive paints | PC | Sk |
| Mineral paints | Pm | See |
| Oil paints | Pms | SMS |
| Vegetable colors | Ex | Wed |
| Ceramic tiles | Pp | Sp |
| Wood paneling | front | SD |
| Clinker | Pkl | Skl |
| Wallpapers | To | Co |
Abbreviations for floor types (Pl):
1. |
Pll | Cast | 3. | Plm | Bridges |
| Plla | asphalt | Plmd | wooden checker | ||
| Plg | plaster | Plmg | granite or syenite stones | ||
| plc | xylolite | Plmsh | cinder slabs, etc. | ||
| Plt | terrazzo | 4. | Pld | Wooden | |
| Plc | cement, etc. | Pldd | softwood boards | ||
| 2. | Plr | From rolls and pieces | Pdb | beech floorboards | |
| Prr | rubber | Pldb | oak floorboards | ||
| Plrk | clinker | Plds | pine floorboards | ||
| Plrl | linoleum | Pldp | fir floorboards | ||
| Plra | asphalt slabs | Pldbp | beech parquet | ||
| Plrg | granite slabs | Pldp | oak parquet, etc. |
||
| Plri | limestone slabs | ||||
| Plris | artificial stone slabs | ||||
| Plrm | marble slabs | ||||
| Plrs | silicate boards | ||||
| Plrks | xylolite boards | ||||
| Plrkr | Ceramic tiles, etc. |
Conventional colors for designating utilities (DIN 2403):
| Par | red | ||||
| Superheated steam | red | white | red | ||
| Crumpled steam | red | green | red | ||
| Drinking water | green | ||||
| Hot water | green | white | green | ||
| Condensate | green | yellow | green | ||
| Pressurized water | green | red | green | ||
| Salt water, brine | green | orange | green | ||
| Process water, running water | green | black | green | ||
| Dirty water, waste water | green | black | green | black | green |
| Rock washing water | green | ||||
| Air | blue | ||||
| Hot air | blue | white | blue | ||
| Compressed air | blue | red | blue | ||
| Coal dust | blue | black | blue | ||
| Blast-furnace, purified and furnace gases | yellow | ||||
| Raw blast furnace and furnace gases | yellow | black | yellow | ||
| Producer gas | yellow | blue | yellow | ||
| Luminous gas | yellow | red | yellow | ||
| Methane | yellow | green | yellow | ||
| Petroleum gas | yellow | brown | yellow | ||
| Acetylene | white | yellow | white | yellow | |
| Carbon dioxide | yellow | black | yellow | yellow | yellow |
| Oxygen | yellow | blue | yellow | blue | yellow |
| Hydrogen | yellow | red | yellow | red | yellow |
| Nitrogen | yellow | green | yellow | green | yellow |
| Ammonia | yellow | purple | yellow | purple | yellow |
| Acid | orange | ||||
| Strong acid | orange | red | orange | ||
| Lye | purple | ||||
| Strong alkali | purple | red | purple | ||
| Oil | brown |
Ernst Neufert. Structural Engineering / Ernst Neufert “BAUENTWURFSLEHRE”
Norms and Standards
Structural Engineering (Neufert)
ABBREVIATIONS AND SYMBOLS ON THE DRAWINGS
SYMBOLS ON PLANS AND SECTIONS
What to do if the floors creak in a house or apartment? — Articles “First Construction Center” in Perm
First Construction Center Saturn-R
/
Articles
/
What to do if the floors creak in a house or apartment?
-
Types of brickwork of the exterior walls of the house. Options for laying facing bricks
-
Types of facade panels for exterior decoration of a private house. Which facade panels are better to choose?
-
How to fix drywall joints. What is better to choose for sealing drywall joints
Unpleasant sounding flooring worries many owners of apartments, country houses, cottages and townhouses. Extraneous sounds can negatively affect the general emotional state and even act depressingly on family members. The creak of a wooden floor indicates that a lag needs to be replaced, a partial or major overhaul of the flooring. Most often this problem is old wooden floors, but there are cases when new floors begin to creak.
Extraneous sounds most often appear due to the destruction of the structure itself. The floors begin to creak due to the fact that the fasteners loosen over time, and the wooden bars holding the boards often rot and the floor structure sags. Cracks also often form in wooden floors, and due to temperature changes or high humidity in the room, deformation of the entire floor system can occur.
Floor squeak according to the type of dwelling
Apartment . In old houses, Khrushchev, Stalinka, the boards begin to creak, because the fasteners become loose over time and no longer provide a snug fit to the base. In a room where a new flooring is installed, an extraneous sound may appear due to an uneven base. Even a slight error or a small difference can lead to serious problems. A laminate floor can also creak due to the fact that there is no technical gap between the floor covering and the wall.
Private house. In a suburban building, natural wood floors can make unpleasant sounds due to the fact that the bars deformed over time, lost their original shape. High humidity often leads to the fact that the logs begin to rot and become brittle. As a result, the floor begins to sag in certain parts of the room, extraneous sounds appear when walking. In private houses, logs are recommended to be treated with a special antiseptic to prevent the appearance of fungal formations and ensure a long service life of the structure.
Wooden floors and parquet boards can creak for various reasons. To eliminate extraneous sound, it is necessary to identify problem areas. There may be one or several. In the latter case, a major overhaul of the entire floor may be required. In addition, when opening the floor surface, it is necessary to pay attention to the foreign smell of mold or fungus. If it is present, it will be necessary to dismantle the charged boards and install new ones.
Causes of extraneous sounds
-
Wooden board. Loosening of the lag can occur due to poor fixation of fasteners, nails or self-tapping screws. All this leads to friction of the boards and, as a result, to the appearance of an unpleasant rattle. Poor air exchange and excessive moisture can adversely affect the condition of the supporting bars.
-
Chipboard. Unpleasant sounds may occur due to the thinning of particle boards due to wear. Maybe add an extra layer. Deformation of the plates in some areas due to temperature changes can also lead to extraneous sounds.
-
Parquet. Wooden parquet flooring can creak due to poor air exchange and high humidity, which often leads to swelling of the planks. Third-party mechanical impact and increased load on the surface can lead to breakage of the ridge or groove.
If the parquet floor creaks completely around the perimeter in different areas, the base may have rotted and a complete re-laying is required. -
Laminate. An uneven base can cause boards to creak, so you need to make sure that there are no pits, bumps and strong drops in the place where the laminate is laid. Extraneous noise may occur due to the lack of a technological gap. Temperature fluctuations in a residential building can subsequently cause extraneous sounds. In addition, poor quality laminate, in particular locks, can lead to problems.
-
Linoleum. Most often, the new floor does not creak, as movement on linoleum does not cause extraneous sounds. Therefore, you need to pay attention to the state of the lag and bars, whether they are deformed or rotten.
 If the parquet floor creaks completely around the perimeter in different areas, the base may have rotted and a complete re-laying is required.
 Unfortunately, even new floors can creak in some cases. The reason for this may be the low quality of the floor structure, non-compliance with the manufacturer’s recommendations and other factors. When choosing a coating, it should be borne in mind that each material has its own load limit, permissible temperature conditions and humidity levels. Competent installation is also a guarantee of the absence of extraneous sounds and a guarantee of the durability of the floor system.
How to eliminate floor squeak?
-
Building foam . It is necessary to drill holes in the coating and then foam them. You can also pour foam into the cracks. The mounting foam will expand and harden, which will eliminate the movement of the floor and, as a result, eliminate extraneous sounds. It is considered one of the most effective ways. The disadvantage is that over time the foam can break down and the squeak will return again.
-
Fasteners. It is necessary to screw screws into all areas of the floor where extraneous sounds are observed. It is best to tighten the fasteners next to the old nails, so you will prevent the self-tapping screw from accidentally getting into engineering communications.
Hats must be well recessed into the floor system. -
Wedges. One of the most time-tested methods is the use of wedges. Usually pre-prepared wooden blocks with a sharp edge are driven into the cracks between the boards. It is recommended to pre-treat the wooden piece with an adhesive component. This is very painstaking work. When knocking out the wedges, care should be taken that the wooden wedge is installed flush with the floor system and does not protrude even a millimeter.
-
Special leveling compounds. Today, more modern methods of eliminating floor creaks are also used. These include the use of leveling compounds. With their help, you can carry out partial or complete repairs. The leveled base can subsequently be used for laying various types of floor systems. Its advantages include fast bonding, good water repellency and long service life.
 Hats must be well recessed into the floor system.
 If you are not satisfied with any of the presented methods, and you do not know what to do if the floors creak, watch this video on the Internet. Today you can find a lot of useful information on how to make partial or major repairs of the entire floor system with a minimum of financial and time costs. Do not forget about the soundproofing of the floor (especially in the apartment).
Online store “First Construction Center Saturn-R” offers a wide variety of self-leveling compounds for flooring. All building materials provide the most reliable adhesion to the base and high resistance to various types of deformation and destruction. Self-leveling compounds from trusted manufacturers will provide a reliable and exceptionally even coating. Subsequently, during operation, you will not be disturbed by creaking and other extraneous sounds.
Laminate or parquet: which is better?
In our time, the age of plastics and synthetic materials, the choice between laminate and parquet seems to be an easy one. From a practical and cost point of view, a laminated coating is more profitable, which means there is nothing to think about.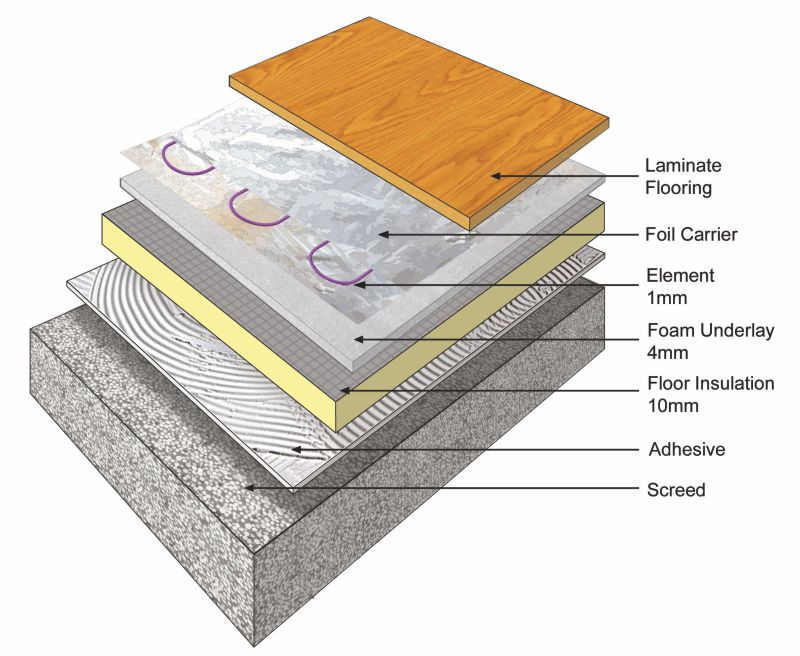 But, on the other hand, when you read other people’s reviews or analyze your own feelings in rooms where the floor is covered with parquet board, you understand that not everything is so simple. We will try to consider the issue of choosing the material for the floor as objectively as possible.
Laminate – affordable practicality
Modern technologies have perfected the laminating protective coating of the laminate. Here are the pluses that provided him with truly grandiose popularity.
Benefits of laminate
- It resists abrasion better than any other flooring. As evidenced by the test results for the taber test published by manufacturers.
- Laminate is extremely easy to install. All that is required is a good foundation.
- Laminate can be purchased for literally any room in the house, including the bathroom. It is worth noting that in the latter case, we need a waterproof laminate. There are options for a laminated coating that can withstand even a non-extinguished cigarette butt without harming the appearance.
- Huge variety of decors. Designers from leading manufacturers compete with each other to capture the attention of buyers. Natural wood pattern is only a part of the many decors that can be found on the market today.
- Laminate does not require any special care. Wet cleaning with a well-wrung cloth and a vacuum cleaner do not require any additional costs.
- Considerable service life. In our store you can buy laminate from leading European manufacturers that can serve for 20-30 years.

Laminate Disadvantages
Like any material, laminate has its weaknesses.
- If the surface is abraded, it cannot be repaired. Only a replacement.
- Poor sound insulation, which can be partly compensated by placing a layer of insulation under the laminate.
- Laminate floor is cold to the touch. It is enough to compare your feelings, standing with your bare foot on a floorboard of natural wood, so that the difference becomes clear.
- Finally, laminate is not a tree in the strict sense of the word. The décor often mimics the pattern of wood very closely, but take a closer look. It will become obvious that all the floorboards are absolutely identical, like twins. Boards made of natural material are rarely so similar.

Parquet board: equal in quality to parquet
The fundamental difference between parquet board and laminate is that it is really made of wood. To reduce the cost of the material, manufacturers go for a little trick. Only the upper layer of 4-6 mm is made from beautiful valuable rocks. This is what you see under a layer of clear varnish. However, there is no cheating. The lower, thicker layer is also made of wood, but, as a rule, of less valuable species.
Benefits of parquet board
- This is 100% wood with all the benefits of this amazing material. The parquet board is able to create in the room the same atmosphere that a natural wooden floor creates.
- The parquet board is warm to the touch. It’s nice to step on it with bare feet. Great material even for a child’s room.
- The floorboards are not identical. Each of them carries its own unique pattern. The presence of knots makes the picture even more natural.
- After abrasion of the varnish, the appearance of the material can be restored by sanding. You can do this 3-4 times for the entire life of the parquet board. And it can last up to half a century.
- This is an ideal covering for fitness rooms, as it is able to withstand significant mechanical stress. In gyms, parquet boards are laid on special logs. So you can use the elasticity of the floorboard.

Disadvantages and limitations of the parquet board
Inheriting the advantages of wood, the parquet board has also received family disadvantages from it.
- High vulnerability to moisture. Putting parquet in the bathroom will not work. A waterproof version of this material does not yet exist.
- Scratches and dents may appear on the floorboard surface from mechanical impacts.
- Care required. The parquet board is not as capricious as the parquet, but all the same, it will still have to be treated with special compounds from time to time to protect it from ultraviolet rays, moisture and other harmful phenomena.

What to choose?
Here we come to the main issue of the article. The answer will depend on the location you choose the flooring for.
- In a hallway or office with a large number of visitors, it is better to use laminate flooring. There is no equal to it in terms of wear resistance. Yes, and replacement if necessary will be inexpensive.
- In the bathroom, the choice is also defined – strictly waterproof laminate.
- Living room, nursery or bedroom. Here is the realm of parquet boards. If the budget allows, then treat yourself to a little real and natural in the synthetic atmosphere of a modern metropolis.
