Paint walls first or trim: Do You Paint Walls or Trim First? A Pro’s Advice
Do You Paint Walls or Trim First? A Pro’s Advice
Photo: istockphoto.com
Q: We’re gearing up to repaint my living room, but it’s been awhile since I’ve picked up a brush. Friends and family have given me conflicting advice about the best order for painting the wall and trim. If I want the cleanest lines, which would you recommend I do: paint walls or trim first?
A: Much like the infamous chicken-or-the-egg debate, pondering the question of whether to paint walls or trim first can lead you to think in circles. If you paint the trim first, you run the risk of the wall color splattering and having to touch it up again. On the other hand, if you paint the wall first, then the trim paint could bleed over and force you to go back and fix the wall color. The hotly debated issue doesn’t seem to have a definitive answer… So what should you do?
RELATED: The 8 Painting Mistakes Almost Everyone Makes
Pros admit that the order is more of a personal choice than a right or wrong way.
Certain people carefully paint the trim and then do the walls, figuring the painter’s tape will protect most of their handy work and if not they can touch it up later on. Others find it easier to paint in the larger areas and not worry if anything splatters onto the trim because it will be covered up when you eventually paint the trim. “It’s one of those catch-22s. I would almost argue it’s a bit of a preference. There are pros and cons either way you decide to tackle it,” explains Chip Gaines, former co-host of Fixer Upper and Visionary for the KILZ Brand of primers and paints. “For me, I paint a wall first, and then I come back in and I paint the trim.”
Advertisement
Painting the wall first is easier and efficient, especially for inexperienced painters.
This particular order allows do-it-yourselfers to be slightly sloppier when painting the walls without the job itself looking sloppy. The shortcut: Bring the wall color all the way up to the trim with your roller so that you then only need to “cut in”—i. e., use a paintbrush to get in close to the tight corners and crevices—when you paint the trim. When you know you’ll paint over any unintentional splatter on the trim next, why worry too much about precision?
If you paint the trim first, you can’t be as careless with your brush strokes. Since this coat is typically done in a high-gloss (and occasionally oil-based) paint, you don’t want to have swipes of this paint reach the wall where the sheen might show through the matte wall paint to be applied next. That means that you’ll have cut in twice: once for the first go around and again after painting the wall to fix any splatters or messy lines. It can be a painstaking job to steadily freehand brush, so only having to do it once is a big pro.
Plus, painting the walls first offers near-instant gratification.
When you step back and look at your newly painted walls, the difference is noticeable. You may be only halfway done, but the room already feels brighter or more cozy. It’s all to do with the size of your canvas; newly painted trim might be noticeable, but it won’t have quite the same impact as a coat of wall paint. Seeing these big results and being satisfied with your handiwork can give you the energy boost you need for the rest of the job.
Advertisement
Photo: istockphoto.com
Other painters swear by starting with the trim for how easy it makes painting the walls’ edges.
Gaines personally knows many professionals who start with the trim and finish with the walls. They find that it’s easier to cover the edges of baseboards, trim, and crown molding with painter’s tape once completely dry than covering walls’ perimeter with tape. Some also find it easier to cut in over the flat, wide walls than having to cut in on the more narrow (and often curved and creased) trim. If you have a steady hand and the time to dedicate to slowly painting the edges and corners, this might be the method for you.
Don’t want to do it yourself?
Get free, no-commitment estimates from pro painters near you.
Find local painters
+
Really, if you want clean lines, stop looking for other shortcuts.
The truth is, though, that the process and supplies you use are far more important for getting clean edges than the order in which you paint. As mentioned above, painting isn’t hard, but it is time-consuming. The urge to rush through as quickly as you can is how you wind up making sloppy mistakes. “Slow down, be patient, take your time,” says Gaines. “Even if it takes you a day longer than you hoped, you’ll be proud of the end product.”
More specifically, don’t even think about skipping the paint primer. One of the most important steps in the painting process, priming provides a smoother surface to paint, helps hold the top coat of paint, and you an overall better end result. Plus, with primer, you don’t have to worry about it splattering over onto the wall or trim! Every surfaced to be painted needs a coat.
Be sure to stock extra painter’s tape.
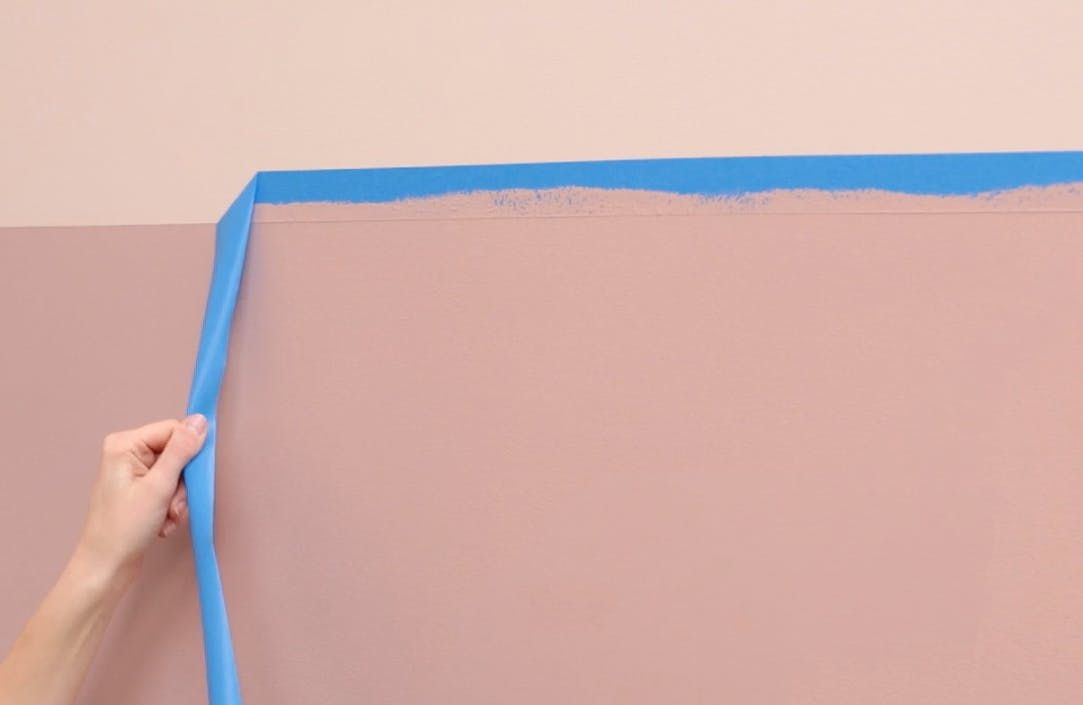
This might seem like an obvious staple to have on hand, but it’s worth reminding. Whichever surface you paint first, you’ll want to protect it from the second paint color you go to use by covering it with the gentle tape. Make sure that the tape’s edges are flat against the wall so paint can’t seep beneath it. One trick: Use a knife or 5-in-1 painter’s tool—a favorite of Gaines—to firmly press the edges down by gently pulling the blade along the length of the tape.
A paint edger can also help protect your trim when cutting in on the wall.
Available in a variety of sizes, the secret weapon replaces your usual cutting-in applicator when painting the area of a wall nearest the trim or baseboard. You find it in two types: roll-on and smear-on edgers.
- A roll-on edger looks just like an ordinary mini paint roller except with a shield on the end to prevent paint from splashing or dripping onto the trim (view example on Amazon).

- A smear-on edger is a flat, sturdy pad (often rectangular and with sharp corners) attached to a handle—no bristles to bend and swipe the trim (view example on Amazon).

Use either type as you would a regular brush or roller, and their design will guide your applicator in such a way that ensures straight lines. They’re especially useful for amateurs who haven’t nailed-down the technique for free-hand painting—help that’s certainly worth spending an extra $5 to $10 on.
Advertisement
And remember, if you do make a mistake, it’s just paint.
The good thing about this home improvement job is that the supplies you need don’t cost too much and all you need is just a little more paint to cover the mistake up.
Don’t want to do it yourself?
Get free, no-commitment estimates from pro painters near you.
Find local painters
+
Paint Trim or Walls First? Tips from the Pros
Professional painters share their secrets for producing a great-looking interior paint job.
 The work will go faster with less hassle too.
Every editorial product is independently selected, though we may be compensated or receive an affiliate commission if you buy something through our links. Ratings and prices are accurate and items are in stock as of time of publication.
1
/
11
Paint the Trim First, Then the Ceilings and Walls
Finally, the answer we’ve all been waiting for! Pro painting tips will usually tell you to follow a certain order when painting a room. They paint the trim first, then the ceiling, then the walls. That’s because it’s easier (and faster) to tape off the trim than to tape off the walls. And you certainly don’t want to tape them both off!
When painting the trim, you don’t have to be neat. Just concentrate on getting a smooth finish on the wood. Don’t worry if the door and trim paint gets slopped onto the walls. You’ll cover it later when painting walls. Once the trim is completely painted and dry (at least 24 hours), tape it off (using an ‘easy release’ painter’s tape), then paint the ceiling, then continue on to wall painting.
2
/
11
Roll Paint Along the Edges for Consistent Texture
When it comes to wall painting, corners and areas next to trim that are painted only with a brush have a noticeably different texture than the surrounding paint. To ensure the finished texture will be consistent in these areas, brush on the door and trim paint, then immediately roll it out before the paint dries.
Use a 3-in. trim roller with a nap that’s the same thickness that was used for the rest of the wall painting. Roll as close as you can without bumping the opposite wall or slopping paint onto the trim. Finish brushing on the paint and rolling it out in one area before moving on to the next section.
3
/
11
Prime and Texture Wall Patches to Avoid a Blotchy Finish
A common problem with wall painting is that freshly painted walls often look blotchy. The color is uniform, but the sheen isn’t consistent. This usually occurs over the holes and cracks you patched with a filler or drywall compound.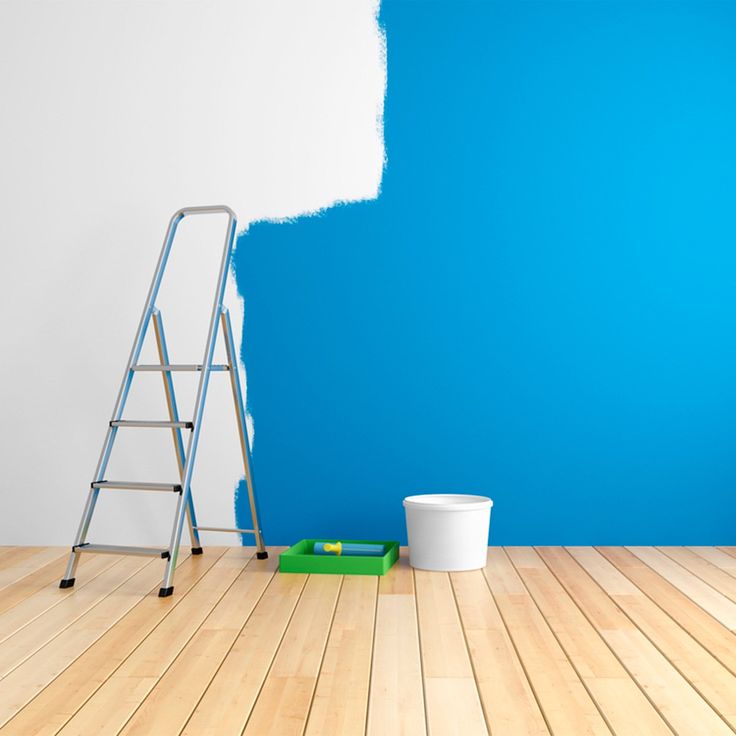 The porous fillers absorb the paint, dulling the surface (a problem called ‘flashing’). When light hits these dull spots, they stick out like a sore thumb. The smooth patch also stands out in contrast to the slightly bumpy texture of the rest of the wall. A quick coat of primer is all it takes to eliminate flashing and texture differences when wall painting.
Primer seals the patch so paint won’t sink in and look dull. To match texture, prime with a roller, feathering out the edges. Choose a nap thickness to match the surrounding wall texture (a 3/8-in. nap roller for smooth walls; 1/2-in. for textured).
4
/
11
Let Paint Dry, Then Cut the Tape Loose for a Perfect Edge
Once paint is dry, you can’t just pull the painter’s tape off the trim. Paint forms a film between the wall and the tape, and removing the tape tears pieces of dried paint off the wall. So before pulling off the tape, cut it loose.
Wait for the paint to completely dry at least 24 hours, then use a sharp utility knife or box cutter knife to slice through the film. Start in an inconspicuous area to make sure the paint is hard enough to slice cleanly. If you cut the paint while it’s still gummy, you’ll make a mess. As you cut the paint, pull up the tape at a 45-degree angle.
5
/
11
How To Avoid Lap Marks when Wall Painting
To avoid lap marks, roll the full height of the wall and keep a wet edge. Lap marks are those ugly stripes caused by uneven layers of paint buildup, a common problem when wall painting. They occur when you roll over paint that’s already partly dry. (In warm, dry conditions, latex paint can begin to stiffen in less than a minute!) The key to avoiding lap marks is to maintain a ‘wet edge,’ so each stroke of your roller overlaps the previous stroke before the paint can begin to dry.
To maintain a wet edge, paint an entire wall all at once. Start at one end, running the roller up and down the full height of the wall, moving over slightly with each stroke. Move backward where necessary to even out thick spots or runs. Don’t let the roller become nearly dry; reload it often so that it’s always at least half loaded. Keep the open side of the roller frame facing the area that’s already painted. That puts less pressure on the open side of the roller, so you’re less likely to leave paint ridges.
6
/
11
Feather Out the Paint Where You Can’t Keep a Wet Edge
When interior painting, you can’t cover large areas like ceilings, extra-tall walls or stairwells in single, continuous strokes, so the best way to minimize lap marks on these areas is to feather out the paint along the edges that you can’t keep wet. The thinner, feathered coat of paint will avoid the buildup that causes the lap mark.
To paint a large section without leaving lap marks, roll the nearly dry roller in different directions along the dry edge, feathering out the paint as you go. After completing the entire length of the wall or ceiling, move to the next section and paint over the feathered edges. For the second coat, apply the paint in the opposite direction. This crisscrossing paint application sharply reduces (if not eliminates) lap marks.
7
/
11
Use Cotton Drop Cloths Rather Than Plastic
When wall painting and trim painting, spills and spatters happen, regardless of how careful you are. It’s a lot easier to prepare for them than to wipe them out of your carpeting or off your wood floor later. All it takes is canvas drop cloths in your work area. The thick canvas stays in place, so you don’t need to tape it, and you can use it to cover any surface. Plastic drop cloths are slippery to walk on or set a ladder on and don’t stay in place. Even worse, paint spills on plastic stay wet, and they can end up on your shoes and get tracked through the house. Canvas is slippery on hard floors, so rosin paper is better over vinyl, tile and hardwood. Tape the sheets together and to the floor to provide a nonslip surface.
But even with canvas or rosin-paper drop cloths, large spills still need to get wiped up right away or they’ll seep through. Clean spills with paper towels or cloth rags. Likewise, if you splatter paint on any other surface, wipe it up immediately.
8
/
11
Sand Trim Between Coats for an Ultra-Smooth Finish
One coat of paint usually won’t hide the underlying color and sheen on trim. And if you don’t sand the surface smooth between coats, the finish may have a grainy texture. For a smooth trim paint finish, sand the trim before applying each coat of paint. Sand the trim with a fine-grit sanding sponge. Sponges get into crevices where sandpaper can’t go and apply even pressure. Then apply the first coat of paint, let it dry at least 24 hours, lightly sand it again for a completely smooth surface, and apply the second coat. After each sanding, vacuum the trim, then wipe it down with a tack cloth to remove the dust.
9
/
11
Mix Several Cans of Paint in a Large Bucket for Consistent Color
Paint color may vary slightly from one can to the next. If you have to open a new can in the middle of a wall, the difference may be noticeable. Mixing the paints together eliminates the problem. It’s best to estimate the amount of paint you’ll need and mix it in a 5-gallon bucket (a process called ‘boxing’). When wall painting coverage is difficult to estimate, add more rather than less. You can always pour the leftover back into cans.
For large wall painting jobs, use the bucket and a roller screen rather than a roller tray. It’s much faster to load your roller with the screen than to use a roller pan. Simply dunk it into the paint bucket, then roll it along the screen until it stops dripping.
10
/
11
Clean Dirty Surfaces So the Paint Can Form a Strong Bond
Paint dirty, oily surfaces and the paint will easily chip or peel off. So prep your walls before painting. Clean grimy areas with a deglosser or heavy-duty cleaner intended for pre-paint cleaning. They work well to clean painted, varnished or enameled surfaces to improve the adhesion of the new paint. They’re ideal for cleaning greasy or oily areas like kitchen and bathroom walls and removing hand marks around light switches and doorknobs.
Wipe on the cleaner in a circular motion using a lint-free cloth or abrasive pad. Start at the bottom and work up. After the surface is clean, fill in any nicks and holes, then sand them smooth before painting walls. Be sure to wear rubber gloves and eye protection.
11
/
11
Every product is independently selected by our editors. If you buy something through our links, we may earn an affiliate commission.
Originally Published: November 15, 2019
Painting Tips – Do You Paint the Walls or Trim First?: Nelson Greer
| greerpainting | Baseboards & Trim, Interior Painting, Residential Painting, Tips, Walls
Painting tips and tricks. Rather than just ornamentation, trims often give the room balance, character, and proportion. It also plays into your perception and makes the room appear larger.
But did you know that homeowners often overlook the trim and relegate it to an afterthought? When painted in the right shade, they can dramatically affect the room and enhance the design style.
The million-dollar question when painting a room is, between walls and trim, which one do you paint first?
This article takes you through the answer to the question along with a few painting tips and tricks, benefits, best colors, paints, the order of painting, and many more.
Which Comes First When Painting: Walls or Trim?
The walls and trim are usually two different surfaces hence have to be painted differently. But, which one do you paint first, the wall or trim? Generally, it depends on the situation at hand.
Paint the trim first when:
- You are planning on taping. Paint the trim first, and then you can tape them when painting the wall.
- You are cutting in and do not want to bother with a tape.
- The room is still under construction. You can save time by painting the trims first.

Paint the walls first when:
- You are in a hurry to paint the room.
- You aren’t sure about the wall color. Buy yourself time by painting the walls first. If you change the wall color, later on, you may have to change the trim too.
- You have help with painting. While it’s easy to paint the walls first with extra help, the trims need attention and skill.
Benefits of Painting Your Walls
Painting your home is much more than a weekend chore. The time and effort that goes into it are astronomical. However, it can have some surprising benefits:
- Paints protect your wall against moisture and wear and tear.
- A freshly painted wall is the easiest way to increase the value of the home without shelling out money on a remodel.
- A new coat of paint can give you an energy boost now that you are spending most of your time at home.
- Painted walls bring a dramatic change that can look aesthetically pleasing. They also cover the mark made by nails, dents, etc.

Expert Advice and Painting Tips: How to Paint Woodwork Trim
Your trim plays a significant part in the design and style of the room. With the below steps, you can paint easily for smooth results.
- For older houses, test the woodwork for the presence of lead. If the paint contains lead, you can remove them either via chemical paint strippers or encapsulation. You can also replace the existing woodwork.
- Sand the surface with 150-grit sandpaper. A palm sander helps you to sand flat surfaces and woodwork. Use flexible sanding blocks for contoured surfaces and those with a curve.
- Clean the surface with a soft, damp cloth.
- Push the nailheads below the surface and fill the nail holes with a wood filler. Do the same with dents and damaged areas.
- In the case of new trim, install them at this point.
- Place a drop cloth flush against the wall to catch the paint drips.
- Prime and paint the surface between the coats.
- After the first coat, wait the recommended time, lightly sand the surface, clean it up and then apply the second coat.
- Apply the second coat in the opposite direction to prevent lap marks.
- Make sure you paint in long strokes along the length of the trim.

Best Type of Paint for Interior Doors and Trim
Trim paints are either oil-based or acrylic-latex.
- Oil-based paint has a superior glass-like finish with very few brush marks. The thicker consistency makes it easier to fill in the holes and dents. But, it has a slow drying time and is also challenging to clean.
- Acrylic-latex paint is not as good but still gives a good finish. The glossy look and hard rock-like texture are also missing.
Best Finish for Trim
Doors and trims benefit from a gloss or semi-gloss finish since it helps to stand out from the flatter wall surfaces.
Glossy paints have a tight molecular structure making it difficult for dirt and debris to find their way inside. And for this reason, matte or flat are strictly avoided.
Best Brush to Paint Trim
The brush you choose depends on the size of the trim and also on the type of paint. Generally, painters prefer a 2-2.5 inch angled brush for trims.
Here are the top suggestions for painting trim:
- Purdy Clearcut Glide Brush
- Wooster Silver Tip Angle Sash Brush
- Richard Elegance Trim Brush
- Jen Manufacturing Inc. Poly Foam Brush
Which Is Better for Painting Trim: Spray, Roll, or Brush?
The quality and finish you get out of painting with a spray gun are much better than any paint job. However, its limitation is the skill and the prep, which eats up into the time. You may have to mask or tape the painted walls and floor to prevent overspray. A spray gun can be ideal for painting a room where the electrical fixtures and floor are yet to be installed.
A roller can leave behind drips and swipe marks, however careful you are. Use a roller on larger surfaces like the walls.
The brush is the better and also the classic option when it comes to trims. It is easier to paint without leaving brush marks; however, brush strokes may be a sign of better workmanship, especially in higher-end designer homes.
Time Needed to Paint Trim
Painting trim can be time-consuming work, especially window and door trim. The caulking and filling can take up your time. Considering the above, baseboards are pretty much easier and faster too.
A bedroom(15×15) with the main door trim, closet door trim, skirting boards, and two window trims should take about 2 hours to prep and prime and then 2-4 hours to paint. For an amateur, you may take anywhere from 4-6 hours to paint a bedroom.
Painting your living room may not be as time-consuming. In the end, it depends on the size and condition of the trims.
Cost to Paint the Trim
Most professional painters charge you by the hour, which may be $20 to $75 per hour. As such, painting trim for a 1,500-square-foot home can cost you $500 to $1,500, excluding the porch. The porch adds $500 to $2,000 to the final amount.
Detailed work on the molding and trim can nearly double the price.
Best Color for the Trim – Painting Tips
Be it the baseboards, crown molding, wainscoting, or window casing, trims bring out the best feature of your house. With trendy trim colors, you can hide flaws and refresh the look of your room.
The most popular and trendy trim colors of 2021 are:
- Black – creates an interesting contrast.
- Dark gray – with blue undertones, brings a sense of tranquility, primarily when used in the crown molding and wainscoting.
- Light taupe – adds warmth.
- Soft gray-beige – hides the dust and ideal for rooms with low traffic.
- White – intensifies the wall color.
Best White Paint for Trim – Painting Tips
Did you know that both Benjamin Moore and Sherwin Williams have more than 100 shades of white among them? While white is a classic color for trims, the right white makes all the difference between elegance and gauche.
Here is the best white paint in the market currently:
- Whitest White –
Sherwin Williams: Highly Reflective White SW (LRV 93) and Extra White SW7007
Benjamin Moore: Super White OC-152 and Decorator’s White OC-20
- Soft White –
Sherwin Williams: Alabaster SW7008, Snowbound SW7004
Benjamin Moore: White Dove OC-17, Chantilly Lace OC-65
Tips to Pick the Right Trim Paint Color
Picking out the right trim paint is mostly guesswork with multiple trips to the store. However, the painting tips from Nicole Gibbons, founder of Clare’s, simplifies the entire process making it easy to choose the paint.
- Your trim color should complement the wall paint. A warm white pairs well with other warm hues such as oranges, reds, and neutrals, while a neutral white suits blues and greens better.
- White is a classic color and pretty much never fails, but you can go for lighter walls and darker trims for a bolder look.
- A semi-gloss finish lasts long and is easy to clean. Moreover, it also reflects light in the room, making it seem bright and airy.
- While your trim color need not be the same, they need to be in the same color palette for a more cohesive look.
- Paint your trims first. Since they are more detail-oriented, you can go over and correct any imperfections.

Importance of Baseboards and Trim – Painting Tips
Though baseboards add to the aesthetic appeal of a room, it goes beyond just beauty and protects the drywall. Depending on your home, the baseboard plays an important role:
- Protects the wall against spills, structural and physical damage.
- It prevents the dust and dirt from falling inside the difficult-to-access cracks.
- Helps disguise crooked walls.
- Conceals expansion and contraction of hardwood floors.
Trim, on the other hand, adds depth and richness to any room. It is a design element that helps the design flow from one room to another, increasing its aesthetic appeal.
Painting Interior Doors, Trim and Walls the Same Color
Traditionally the trims would be of a different color, preferably white, to bring attention to the walls. However, if you are looking at a narrow or a small room, you may want to paint the ceiling, wall, and trim in the same color. Without the contrasting color to distinguish the surfaces, everything blends into one, making them disappear, and the room may appear spacious.
- If you still want a contrast, go with a slightly lighter shade or darker for the trim.
- Differentiate between the surfaces by painting the walls in a satin or eggshell finish and the trims in a semi-gloss finish.
Painting Tips to Help You Paint Trim and Walls
While painting can look easy, the real difficulty lies in getting a smooth, brush strokes-free wall. Here are a few painting tips from professional painters to help you get the work done quickly.
- Instead of a paint chip the size of a thumbnail, get a wall paint sample. Check the color at various times of the day before finalizing.
- Measure the walls and the ceiling to calculate the surface area to paint. A gallon of paint can cover 400 sq ft. With the above detail, a paint calculator should help you decide the paint cans needed to paint walls.
- Invest in good paint packed with pigments and enough resin to hold them together.
- Thoroughly clean the walls before painting.
- Use a carpet shield to protect the carpet and floor before painting.
- Your paint job is only as good as your brush. So, go for premium brands such as Wooster or Purdy.
- Choose your roller depending on the surface you are painting. A larger roller works the best for walls and helps to cover a lot of areas faster.
- Use a painter’s tape to shield and also for cutting in wall and ceiling.
- Either paint the trim or walls first. Never toggle back and forth.
 Check the color at various times of the day before finalizing.
How to Paint Baseboards for a Sharp Cut Line – Painting Tips
The tricky thing when painting baseboards is to get clean and sharp lines. While a painter may find it easier to cut with a brush, it may not be so for amateurs and DIYers. Here are some more painting tips and tricks to get your baseboards looking sharp, especially when painting the trim first:
- Prep the baseboard; Clean and dust it down with a sponge.
- If there’s space underneath the base, use caulk to seal it.
- Paint the baseboard and go over the caulk and the tape.
- After drying, use a knife to score the seam right where the base meets the floor and pull the tape.
- Tape the top of the baseboard; Use the baseboard paint over the junction.
- Again use the wall color on the walls and over the junction.
- Pull the tape when dry for a clean line.
Which Is Better: Masking Tape or Painter’s Tape?
Masking tape and painter’s tape both serve the same purpose. They prevent the paint from bleeding onto unwanted areas, such as carpeting and trim, and help you get a clean, straight-edge line. But the masking tape leaves residue when pulled after a certain amount of time, but the painter’s tape is designed to come off cleanly.
Unless you want to spend hours removing sticky residue, painter’s tape is the better option.
Efficient Way to Paint a Room –
Painting Tips
While there are many ways to paint a room, the secret lies in the little details. Here are a few trade secrets and painting tips shared by professional painters:
- Start by sanding; it removes the rough areas and helps the paint adhere.
- Use a degreaser to clean dirty walls.
- Your painting looks only as good as the products. Don’t skimp out on the paint and brush.
- Cover the furniture with a plastic sheet and tape it down.
- Use a tinted primer for a more vibrant finish and to prevent flashing.
- Tape off the woodwork and press it down with a putty knife to prevent bleeding.
- Run a screwdriver along the seams of the walls and the ceiling to scrape away the extra paint on the textures.
- Use canvas drop cloths instead of rags.
- Paint one wall first before moving to the next.
- Always have an extra bucket of paint or two.
- Take off the electrical outlet plates before painting.

Best Order to Paint a Room
For a quick and efficient session, you need to follow the order of painting for the best results. Here are some more painting tips to follow:
- Ceiling – By painting the ceilings first, you do not have to worry about overspray. Make sure you have a roller frame to avoid arm fatigue.
- Walls – Once the ceiling is dry, continue to the walls with at least two coats. Do not forget to prime the problem areas.
- Baseboards – Use a painter’s tape over the painted areas and then do the trim.
- Window and door frames – They are part of the trim and should be done next. Make sure to caulk and fill the dents and holes before painting.
- Door – Tackle the doors at last. With panel doors, use a sash and a roller for a flat door.
Things You Should Consider Before Painting a Room – Painting Tips
A new coat of paint can dramatically change the way a room looks and feels. It is indeed an inexpensive way of increasing the appeal without having to spend much.
Here are a few painting tips to consider before painting a room:
- Prep the room by wiping the walls, fill in the holes, tape over unnecessary portions and finally cover the floor with newspaper or drop cloth.
- Test the color of the paint both day and night before painting.
- Get bold; Do not stick with white and neutrals. Bolder colors can be refreshing.
- The finish makes or breaks the look; High gloss and semi-gloss paints look bright and are easier to clean and highlight the flaws in the wall or trim. On the other hand, a flat or matte finish can hide imperfections but gets damaged easily.
- Use a paint calculator to determine the number of paint cans you may need. There is nothing more frustrating than running for a new can in the midst of a paint job.
- Do not forget to prime. Priming helps the paint to adhere to the walls and especially when it comes to wall texture.
- To match textures, choose a nap thickness that matches the wall texture. For smooth walls, choose a nap thickness of 3/8″ and textured walls 1/2″ nap roller.
- Firstly, use a brush to lay the paint on and then use a roller to flatten the brush marks.
- Do not skimp on proper supplies.
Conclusion
In this article, you’ve learned a lot of helpful painting tips and tricks of the trade. Do you paint the trim or walls first? Always paint walls first. This way, you can tape the walls and paint the trims. If you are painting walls after trims, the latter can catch the drops from the walls and need touch-ups.
In case you are painting the room, follow the order of painting for a smooth transition and efficient work.
Moreover, do not forget to prep and prime the area you are painting. It helps the paint to go on smoothly. Two coats should do unless you have problem areas for which you may have to do touch-ups.
Don’t want to do it yourself? Get a professional to do it for you – contact Nelson Greer Painting Contractors for your FREE quote today. With over 220 years of experience in our company’s history, you’ll love what we can do with our professional painting contractors.
Other timely articles you may find helpful:
- Solved! Which Comes First: Painting the Wall or Trim?
- Painting Baseboards
Should You Paint Trim or Walls First?
Unless you’re painting everything the same color, you might be wondering what order you’re supposed to paint your walls and trim to get that professional, sleek, finished look. In fact, many contractors, designers, and homeowners ask themselves the same exact question: “Should I paint the walls or trim first?” Unfortunately, the answer isn’t that simple.
Whether it’s about personal preference or painting proficiency, there are pros and cons to both options. It’s a complicated question to answer because no matter which direction you choose to go, you will face some challenges. Painting your home is not supposed to be easy, so it’s essential that you have a thorough plan and that you diligently stick to it.
Pros and Cons of Painting Walls First
Painting your walls first may seem like the obvious answer, but it’s not always that straightforward. People have a tendency to overthink things, so let’s discuss the various pros and cons of starting with your walls.
Pros of Painting Walls First
Instant Gratification
Starting with your walls is more immediately gratifying than starting with the trim. After all, if you start with your walls, you’ll cover more area quickly. This can have an overall positive effect on how you feel about your progress and make it feel like you’ve accomplished a lot.
It’s Easier to Paint Your Walls
When you’re an inexperienced painter, starting with the walls is much easier than starting with trim. You can be a little sloppy when you’re painting the walls, but it won’t hurt the finished product. If you get some splashback on the trim while you’re painting, it’s not a big deal since you’ll be covering it up anyway.
Cons of Painting Walls First
https://www.clare.com/blogs/articles/how-to-paint-trim
Taping Wall Edges is More Difficult Than Taping Trim
When you start with the trim, it makes painting the delicate edges of the walls much more manageable. It all comes down to the difficulty of applying painter’s tape. When you paint the trim first, it’s much easier to cover those edges with tape than the floor, windows, and doors.
It Leaves Your Walls Vulnerable
After you’ve finished the walls and start to paint your trim, you have to be meticulous and pay careful attention. One wrong move, and you could accidentally splash paint on your already finished wall. Starting with your walls first ultimately leaves them vulnerable when you paint your trim, which might be something you’d like to avoid.
Pros and Cons of Painting Trim First
https://www.thespruce.com/paint-your-walls-like-a-pro-1104078
On the other hand, painting trim first seems like the obvious answer to some. Just like starting with your walls, there are advantages and challenges to this option, as well. Here are the pros and cons of painting the trim first:
Pros of Painting Trim First
It Makes the Wall’s Edges Easier to Paint
Many painters believe that starting with the trim makes the job easier in the long run. They claim that covering the trim, baseboards, and crown moulding with tape is much simpler than covering the edges of the walls. Regardless, you’re going to have to use painter’s tape to keep your painting job clean and mess-free, so it all comes down to which taping job is easier for you.
You Finish the More Difficult Part First
Painting trim is much more complicated than painting walls because you have to be super careful. It’s such a small area to cover, and there isn’t much room for error. If you start with the trim, you have a little more wiggle room. If you make a mistake and accidentally get paint on the walls, that’s not a problem since you’ll be painting over it, anyway.
Cons of Painting Trim First
Delayed Gratification
Starting with the trim means you’ll be able to get the more precise and challenging painting done first, but it also delays your gratification. Once you’re finished painting the trim, you won’t have covered much ground, so it’s much less satisfying than starting with your walls.
It Makes Painting Your Wall More Challenging
If you paint the trim first, you must be super careful when you start painting your walls. It’s much harder to be precise when you have to cover such a large surface area. As a result, it’s much easier if you leave the precision to painting your trim.
What About Pre-Painted Trim?
There’s no industry standard or correct answer when you’re trying to decide whether to paint your walls or trim first. Instead, it all comes down to your personal preference and which you think will cause the least number of challenges in the long run.
By installing pre-painted, pre-finished trim, you can avoid this decision altogether. Metrie Complete® is the patented solution that helps you transform a room faster, without the hassle of painting and finishing trim. Simply paint the walls first and install the new trim once everything dries. This solution eliminates almost every drawback listed for both sides and saves you a ton of work in the long run.
Find out where you can shop for Metrie Complete® today.
Paint Walls or Trim First? 3 Amazing Tips
You paint the trim first, but not using a brush! Here are 3 steps and 1 awesome secret (some pros don’t even know) on how to make this quick and easy (video included).
“The trim” is the answer to the question “Paint walls or trim first?” Why? It’s harder to cut a line on the woodwork. It just is. We (almost) always paint the trim before the walls: it saves us a lot of time. Read on and you’ll see why: baseboards, window/door frames, etc., are easy to touch-up at the end.
For our technique to work well, you need a very good brush to cut a straight line, see my favorite brush.
Why paint trim first?
The actual steps (and supplies) are just below but here’s the bottom line: it’s harder to cut a line when painting the woodwork: the wall cut is faster. We do this. Walls are last because when you goof and hit the freshly painted trim, it is easy to touch-up at the end! Ray Charles could do it. Would he paint walls or trim first? What’d I Say?
This is latex-only Purdy: the ‘angle cut’: nice for cutting walls, trim, and even window sash. The straight cut brush is below. We use both.
Some painters have a different take on this that I’ll explain at the bottom: they paint trim last and if done carefully is very good too, but that system has a flaw that mine does not.
With crappy tools, you get low quality and slow, frustrating work. Use a roller and brush: I’ll explain below.
For the roller, roller cover, etc., read our post on good painting tools: we point you to tools that last.
Room with painted walls and trim
1. Paint the Trim (completely finish it—it’s ok to get paint on the walls):
Key point: This requires a quality brush and roller set up. Many budget rollers and brushes SHED LINT and bristles… guess where the lint ends up? Yep.
Brush: We use a ‘latex-only’ Purdy which cuts a straight line almost by itself and which will last the home-owner a lifetime). Needless to say, quality paint is also a big key: better coverage, longer-lasting color, and washable. We recommend Kilz Tribute and it ships for free: wow. Other pages have all kinds of colors but this page is the gray/green palate.
Roller: A low-cost roller leaves lint in your wall and it feels like sandpaper. Ick. But for only a little more, you get a lifetime tool that’s easy to clean (read how to clean a roller easily). What do we use? This roller frame, (a.k.a. roller cage), used with this roller cover, I like ¾-inch for trim, (same or even longer nap for walls). Longer naps hold more paint, and the stipple pattern does not matter: you’ll tip the paint out with your brush. This roller covers really last and they fast!
We have a post on how to paint wood trim the way we do: and you thought we used a brush. It has a few tricks.
Optional: You won’t need to use tape with this method, but if you want to, use the green painters’ tape (special glue on tape does not pull off paint later and tape is water-resistant) But as you’ll see it’s not necessary, even for beginners. See tip on tape, below.
2. Paint the Walls (don’t worry about getting
a little wall paint on the fresh trim)
ROLL WALLS BEFORE BRUSHING: by rolling first, you leave no doubt about what area you need to brush later. Why is this faster?
If you brush first, you’ll brush a wider surface than you had to the other way around. Roll close and you’ll only have to brush a narrow strip next to the trim.
Rolling walls:
Cutting walls:
- Fully soak up a load of paint in your brush without dripping: Key to this: See my Purdy brush: I use one of these all day every day for 6 months, and it’s still got life. Purdy is a great company (company website). These babies can hold a lot more than dollar-store brushes (with the crappy thick bristles). We mostly only buy “latex-paint-only” brushes for latex paint. We rarely need brushes for oil and brushes that can do both are inferior for latex paint. A Purdy is for life (I do not work for Purdy! My reviews of products are from the love of the tools.)
- Big tip to ‘cut’ the wall paint faster: gently shake the brush low in the can to flick off the excess, then hold the brush over the can. Test this: Dip, shake and lift the brush up and stare at it. How long does it take to drip? That’s how long you have to get it to the trim w/o dripping (don’t shake it hard!) And certainly don’t scrape the brush on the side of the can: you lose your heavy load!
- Spread 80% of the paint that is in the brush over about a yard (a yard? yes). Don’t try to get the paint very close to the new trim just yet.
- When the paint is laid out, push and spread it into the edge/corner onto both the wall and trim. Fast right?
- Let the trim paint dry.
 Don’t try to get the paint very close to the new trim just yet.
3. Touch up the Trim
- Where you goofed, just hit the spots and make a nice line: Purdy brushes make this easy. We don’t need no stinking painter’s tape!
- Even if we did not paint the trim if we have the old trim color, we touch-up the trim. It sharpens the line for the ‘wow’ factor. Careful, because old trim can be faded.
Why you need a good brush when painting trim
Quality bristles magically find the corner. You don’t really need a super steady hand using a Purdy. Why “latex only” brushes? They last longer, hold more paint and cut better than bristles that also accept oil paints. If you might use oil later, there are Purdys that do both.
Advanced Professional Painter Tips
People are amazed by how fast we are at painting the trim. Secret: we use a roller everywhere we can. In fact, if I just finished a flat-paint ceiling in white (read about ceiling paint), and now I need to move to semi-gloss white, I won’t even clean the roller—just squeegee with my 5-in-1. Try it and you’ll see!
This is another reason why I answer “trim first” when I’m asked if we paint walls or trim first.
Read our post on what is the quality paint for walls.
Read our Easy Clean-up: best way to clean paintbrush, and how to clean paint rollers.
Last Tip… If You Use Tape:
Peel off the tape if you used it while the paint is still tacky, not fully dried.
Paint is a plastic film! Let it dry enough to firm up or it will ‘spit’ as you pull the tape. Do a test in an out of the way spot. Too wet and the tape spits paint…too dry and it can rip the new soft layer.
Summary of Paint Trim or Walls First:
We don’t use pans, but if you do, this is one of the few good kits.
- Paint the trim first—no need for tape
- Painter’s trick: we use a roller (the same 9-inch medium nap) and roll the paint onto walls to be painted and tip it smooth with a good brush
- Let dry, roll walls very close to trim and let that dry. This is a good time to caulk.
- Cut walls.
- We list all the painting tools you could need.
FAQ: Do You Paint trim or walls first?
— Which has easier clean-up: painting walls or trim first?
Surprise: you don’t have to clean the brush twice depending on color changes. If you do a white ceiling (flat) go right to the gloss with no cleaning (roller too). Just squeeze ’em out.
— What looks better: paint walls or trim first?
Same result. Even if we did not use this method, at the end of every interior room, we always hit the top of the baseboards (at least) with trim paint (whether we painted it or not (assuming it’s white) as it brings out the fresh white-ness and the clean line with the wall. People like it. “Wow”. Meh. Secrets.
This just bleu your mind, right?
Ask some painters “should I paint walls or trim first?” and they’ll say they will paint all walls first with the roller—no brushing, coming very close to the trim. Then they paint the trim while intentionally getting trim paint in the corners and on the freshly painted walls.
Then they just need to brush (cut) the wall paint at the end.
Works ok, fast. Again, as with my way, it’s faster and easier to cut the wall paint, not the trim. But…
A flaw in this method:
But what if the trim paint splatters on the freshly rolled walls? Will you see all the spots? Our way above is better and we’ve tried both many many times! Good luck!
Let us know in the comments if you are unclear about your situation and whether you think you should paint walls or trim first.
Video for painting the trim before the walls:
 youtube.com/embed/mqLtWoVchWk” frameborder=”0″ allowfullscreen=”allowfullscreen”/>
24 Tips to Help You Paint Trim and Walls Like a Pro
Ask just about any painting pro, and he’ll tell you that his trade has a real image problem. After all, everyone thinks they can paint—just watch how fast the color goes up on those done-in-a-day home-makeover shows. Grab a brush, a roller, and a couple gallons of latex, and you’re all set, right?
Not quite. “The truth is, it is easy to do things poorly,” says Rich O’Neil, who chairs a craftsmanship committee within the Painting and Decorating Contractors Association of America. There’s no substitute for learning the proper steps, taking time to do the job right, and improving your technique as you go.
24 Pro-Tips to Help You Paint Trim and Walls
But there are also a few tricks of the trade that homeowners can learn to ease the way. We’ve assembled a couple dozen of them on the following pages, gleaned from decades’ worth of accumulated wisdom from pros working from Seattle to Boston. Put their pointers to work, and you’ll notice a difference in your paint job years after the tape and tarps are put away.
Prepare for Your Paint Job
1. For A Bigger, Better Swatch, Get a Paint Sample
Don’t expect a thumbnail-size color chip from the paint store to give you a sense of how a color will look on the walls. Colors are relative to one another and the objects around them—like, say, that new leather sofa. Instead, make your own megaswatch.
Get a sample quantity of paint, brush two coats on a slab of foam core (its white surface acts like primer) at least three feet square, then put it up against the wall. You’ll get a much better sense of how your tint plays off your furniture and flooring. Eyeball the color at various times of the day and move it around the room to see how it looks in different light conditions.
2. How Many Paint Cans Do You Need?
Before you set out for the paint store, take a tape measure and figure out how much surface you need to cover—and don’t forget the ceiling. Measure the longest wall, and square that number for the ceiling.
For the walls, multiply the length of the longest wall by its height, then multiply that number by four. Double your numbers if you’re doing two coats. Or follow these steps to calculate how much you need; as a rule of thumb, one gallon covers about 400 square feet.
3. Invest in Premium Paint
Go for the good stuff. Why? Because cheap paint covers very well when it’s wet—the first, and in many cases last, time many people scrutinize their work—but not so well once it’s dry.
“There is only room for a gallon’s worth of stuff in the can,” says Seattle-based painter Doug Wold, owner of Queen Anne Painting. “If you add more cheap pigment, you take out more expensive resin—and that’s what holds it together.” Always apply two coats, and allow 2 to 3 hours between them.
4. No Muss, No Dust
Painting prep usually involves scraping, sanding—and dust-making. “You might be shocked at how far dust travels, and what small areas it can get into,” says Rich O’Neil, owner of Masterwork Painting, in Bedford, Massachusetts.
If you don’t want to invest in a spring-loaded-pole-style barrier system like that made by ZipWall, put plastic up around doorways that lead to the work area and over furniture. Skip the flimsy stuff: Clear, heavier-gauge sheeting (2 to 4 mil) is reusable, easier to fold and unfold, and less likely to rip. Secure it with painter’s tape.
5. A Clean Sweep
Many of us are so anxious to get the paint up that we don’t take the crucial first step of thoroughly cleaning the walls—especially in the kitchen, where they may be invisibly decorated with grease, oil, and food residue.
“If you don’t clean that off, you could be painting a greased cookie sheet,” says Doug Wold. “It ain’t gonna stick.” The same goes for the bathroom, the domain of airborne shampoo, hair spray, and cosmetics. Use a degreaser on tough areas; household cleanser should work elsewhere. Then rinse.
6. How to Paint Baseboard with Carpet
If you have to paint baseboards over carpet there are a few ways you can approach it. First, check to see if you might be able to remove the carpet’s tack strip and pull it back. If that’s not possible, you’ll likely need to paint with everything in place. You can use a carpet shield or paint shield to protect the carpet while painting. Alternatively, a more involved option is to remove the baseboard, paint it, then re-install it afterward.
Assemble Your Tools
7. The Mark of a Good Brush
Bristles should be “flagged”: tapered, split, and arranged in multiple lengths to form a slim tip. Synthetic ones—especially a mix of nylon and polyester, like DuPont’s Chinex—hold and release latex paints exceptionally well.
Pro2ProTip: It’s best to reserve natural bristles for oil-based finishes; water-based paints make them swell and lose their shape.
Unfinished hardwood handles are easier to grip with sweaty hands, and copper or stainless-steel ferrules won’t rust after you’ve washed the brush. You’ll want at least one 21/4-inch angled sash brush for cutting in trim, and one 3-inch brush for cutting in walls and ceilings.
Buy the best ones that you can find—a good brush will generally run you $12 to $15. “People think nothing of spending $10 to go to a movie,” says John Hone, owner of Hone Painting and Restoration in Caldwell, New Jersey. “But they put themselves through torture trying to paint with cheap equipment.”
8. Roller Size Matters
Your local home center or hardware store offers lots of standard 9-inch roller cages and covers for painting walls, but they’re not the only size to consider.
Small foam rollers are good for door panels and wainscoting, and 14- and even 18-inch rollers hold enough paint to allow you to cover a lot of area faster—handy if you have a high-ceilinged great room to get color on.
“Manufacturers make larger rollers, and there are people buying them,” says Chicago’s Mario Guertin, president of Painting in Partnership. “But only the educated ones.”
9. A Better Sandpaper
Look for black sandpaper coated with silicon carbide—it won’t gunk up as quickly as the standard-issue brown kind, so it’ll last longer.
Foam sanding sponges covered with the same stuff allow you to sneak into corners and evenly wrap around rounded trim—plus, they’re reusable. Just wring them out in the water to clean them, then use them damp to trap more of the dust.
Which grit to pick? Use a medium grit (100 or 120) when you’re prepping walls that are already in decent shape; a coarser 60 or 80 grit to take the edges off paint that is chipped or peeled. Very fine (200 or 220 grit) sandpaper is best for smoothing surfaces between coats of paint.
Painter’s Tape Tips
10. Let It Be Your Guide
Pros use miles of low-tack blue painter’s tape—mainly to protect surfaces, but also as a guide for cutting in walls or ceilings. “With older houses, flat surfaces can be so uneven you can’t be sure you are getting a crisp line if you paint over tape,” says Hone. “So just use it as a guide.”
Cut in up to the edge of the tape, but don’t cross over it. Bring your fully loaded brush within about 2 1/4 inches of the tape, but go very light on that last 1/4 inch closest to the tape. “When you do that, you have a fighting chance that the paint won’t wick under the tape’s edge,” says Hone.
11. The Perfect Stripe
Like the look of painted stripes? To put on a crisp band of color without any bleed, first lay down a line of blue painter’s tape, then run a small bead of latex caulk over the edge where the two colors will meet.
“Wipe down the caulk until you have a very thin layer on the wall,” says Portland, Oregon, painting contractor Dave Siegner. “Then peel off the tape, and paint up to the line of caulk.” The thin bead will seal off the dry surface better than any tape. A few hours later, peel off the caulk.
12. Score It
If you’ve masked off baseboards with painter’s tape, pull it off the same day as you apply the paint—but run a blade along it first, says Siegner. “Sometimes latex wall finishes are rubbery until they cure completely, and if they’re touching your tape you can pull away a piece of the paint from the wall when you go to remove it,” says Siegner.
Score the edge of the tape between the top of the baseboard and the wall with a putty knife held at a 45-degree angle.
Teaming Up with a Pro
13. Halfway Measures
If your budget is tight—and your painting skills are decent—ask a painting contractor if he would willing to talk about splitting the job with you. Brandt Domas, owner of Domas Fine Painting in Denver, Colorado, occasionally enters into such partnerships with homeowners.
“We may go in and strip the trim, then people will do the painting themselves,” he says. “Or we may go in and do the prep repairs, or the high areas. We don’t always have to say ‘It’s all or nothing.'”
14. A Little Help Here?
Pros always work with “wet edges.” Meaning they roll walls before the areas where they’ve cut in—or painted with a brush along the wall’s perimeter edges—have dried.
“It’s best to have one person cutting in and another rolling walls right behind her to avoid ‘banding’ around the edges of a room,” says painting contractor Jim Clark, who’s worked on many This Old House TV projects.
If you can’t lean on a buddy to help and you’re working alone, try to cut in only as much as you can roll while the paint remains wet.
Smoothen Out the Walls
15. Bust the Fuzz
There’s nothing more frustrating than seeing little squiggles of lint embedded in your freshly painted walls. To keep them at bay, wrap your hand in painter’s tape—sticky side out—and pat down new roller covers to catch any stray fibers.
16. Glob Patrol
Never dip the roller so far into the paint that the the roller arm gets wet—this is a recipe for drips. And at the start of each workday, strain your paint into a clean bucket, even if you’ve sealed the lid tightly overnight. “If you skip this step, you end up with coagulated pieces of paint—we call them boogers or snots—on the walls,” says Mark Casale of Hingham Painting and Decorating in Massachusetts. And nobody wants that.
17. Give Walls the Once-Over
To trap sanding dust on trim, you probably already know to run tack cloth—essentially, cheesecloth embedded with sticky resin—over it. But it’s also a good idea on walls. “I wrap tack cloth over the head of my pole sander and run it over the wall surfaces to pick up the dust,” says John Dee, a painting and decorating contractor based in Concord, Massachusetts.
Most hardware and paint stores carry tack cloth, but if you don’t have one, use a Swiffer or a microfiber dusting cloth instead. It’s not a bad idea to vacuum walls with a soft brush attachment, as well. Just be sure the vacuum has a HEPA filter to keep the dust from recirculating back into the room—and back onto your walls.
Paint Your Wall and Trim Properly
18. Do you Paint Trim or Walls First?
Many homeowners paint the walls first, then move on to the trim while they wait for the first coat to dry. Homeowners should think more strategically, says Rich O’Neil of Masterworks Painting. “Paint all the woodwork first—the first and second coats—then move onto the walls,” says O’Neil.
“If you toggle back and forth, your cutlines won’t be as sharp. When you do the woodwork first, you can ride the trim paint onto the walls a little, then cut over it in one go.”
19. Evenly Apply Your Coats
When applying your coats, don’t just focus on coverage, think about a uniform thickness as well. “Homeowners think that pro painters put on color, but they actually put on texture,” says Doug Wold of Queen Anne Painting.
On woodwork, align your strokes to follow the grain. Try to avoid “fat edges”—the goopy cornices of paint that can hang over the edges of a door—and rope marks left by overloaded rollers. “If you don’t hold the roller uniformly against the wall, it can leave a ridge—just like on a ski hill, when groomers leave little ridges between their tracks.”
20. Laying Off with Long Vertical Strokes
After you’ve rolled a section of the wall, make a series of long vertical strokes—moving in one direction, left or right—up the full length of the wall. This last step, called “laying off,” distributes the wet paint across the surface in a nice even layer.
21. How to Load a Brush
Good bristles pull paint up toward the top of the brush and the metal ferrule. To keep from overloading your brush, dip the bristles not more than halfway into the bucket. Then gently tap the bristle ends against both sides of the bucket to remove any excess. Or do as Mark Casale of Hingham Painting and Decorating does. “Dedicate half of the pot as your ‘wet’ side, using the handle as an imaginary dividing line.” Tap one side of the brush on this side of the bucket, then turn the brush untapped-side up.
To get the paint on the wall, Casale recommends setting the brush a few inches away from where you’re cutting in, then moving it in to the cut line and drawing it straight up until the brush starts to drag. Then draw it back down in a line to level it out. Finally, move the brush upward with a light stroke to “tip off,” smoothing out any brushstrokes.
Clean Sweep
22. Clean Up Accidental Drips
Should you accidentally drip water-based paint on your carpet, do not try to scrub it—the fastest way to embed the color in the fibers of the carpet. Instead, “keep the area wet, and blot it up,” says Tracey Kidd, of Kidd Painting in Mesa, Arizona.
“If you spill a lot, blot up as much as you can, dampen the area, and call a carpet-cleaning company.” If you keep the spot wet, a professional carpet cleaner should be able to get the whole spill up.
23. In Praise of the Comb-Over
A thoroughly cleaned brush will see you through more renovations than even the strongest marriage might endure. Thoroughly wash your brush, immediately after painting, with mild soap and warm water. Then, under the running faucet, draw a metal brush comb through the bristles to pull paint from the core and away from the metal ferrule.
Got some stubborn paint on the outside of the brush? Skip wire brushes, which can damage delicate bristles, and grab a nylon scrubbing pad from the kitchen sink to loosen it.
24. Clean Your Brush Properly
The pros call a worn-out brush a “club,” which is about as precise as it sounds. “If your brush is worn-out, or flared, it isn’t any good,” says Patrick Dallaire of August West and Company in Portland, Oregon.
When pros clean their brushes, they pat them dry, spin out excess moisture by rubbing the handle between their palms, then put them back in their original packaging to maintain their shape. Says Dallaire: “If you’re maintaining your grip—what we call a painter’s toolbox—you’re ahead of the game.”
Paint Color Selection
Picking the Right White
The single most popular paint color in the world might also be the most confounding. One problem is that there are just so many variations of the hue. But don’t assume they’re all the same. “If I were to lay some whites down side-by-side, you would immediately be able to see the differences,” says Ken Charbonneau, owner of Color Marketing Consultants in New York City.
“The first step in picking a white is deciding whether you want a warm white or a cool one. Warmer shades of white incorporate an undertone of yellow—think French vanilla ice cream—or a touch of rust, pink, or brown. Cooler whites, on the other hand, suggest a hint of blue, green, or gray. Choose one or the other based on the existing tones most prevalent in a room.” Take a look at your brown-leather sectional, or your cherry floors, or your oriental rug,” he says. “These things are there, don’t ignore them.”
More often than not, people lean to the warmer whites, which far outsell their crisper cousins. That said, there are those who prefer a cleaner, more modern white, says Becky Spak, a color-marketing specialist with Sherwin-Williams (a range of the company’s whites are shown at right). “Maybe they have a lot of stainless steel, or a more modern urban-loft look. Those are the folks who usually look to the cleaner, cooler whites.”
Repeat the Process with Any Other Color
Once you have the tonal family established, follow the same rules as any other color: Choose two or three shades, put up a row of sample swatches—be sure to do two coats of each, advises Spak—and eyeball them during the day and at night, with the lights on. Then go with your gut; odds are, one of your choices will either soften or complement the givens in the room.
Finally, consider staying ultra-stark on the often-overlooked surface overhead. A white with little or no undertone, or at most a slight gray cast, creates a neutral “sky” above and visually lifts the ceiling height. Says Charbonneau, “That’s really the place for the whitest white of them all.”
Decoding the Strip Chip
That’s what that narrow row of darker-to-lighter shades of one color is known as in the trade. The darkest shade anchors the card, then it is “let down” into lighter versions that contain less color pigment and more pure white.
So how come some colors start to look redder or bluer or somehow different as the shades get lighter? “That’s really a trick of the eye,” says Carl Minchew, director of color technology for Benjamin Moore. “It’s your perception of the color that changes. The color pigment remains the same.”
Color perception is influenced by several factors, including the quality of the light around you (is it yellowish incandescent light or bluer fluorescent light?) and the “simultaneous contrast” factor—what other colors surround the one you’re looking at? A white background will make very vibrant yellow look less bright but more intense. Against a mahogany surface, the same color will look lighter and brighter.
Paint colors tend to appear more intense on the wall than on a tiny little rectangle of paper, so the strip chip does allow you to preview what a deeper value might look like. And if you’re nervous about a given color, going one step lighter can be a safer bet—you’ll probably get something in between once it’s up on the wall.
If you’re really at a loss, try this: Find a strip where you can live with the darkest-color chip; then you know you’ll like the colors at the middle and the top of the range.
Tips from the Paint Doctor
Bruce Schneider knows paint. He worked as a pro for 12 years before taking over training for brush maker Purdy 17 years ago—and in his spare time heads up the apprenticeship program of the Finishing Trades Institute.
Here are a few tricks he’s learned along the way:
- To prevent paint spray on baseboards when rolling walls, wipe them down with a wet rag to keep spatter from sticking. When you’ve finished rolling, run the damp rag along baseboards once more to wipe away any droplets.
- Breathe out or hold your breath while cutting along the trim or where walls meet—”It’ll help you keep a straight line.” Up high, be sure to stand squarely on your ladder instead of overreaching.
- When cutting in on textured walls or ceilings, vibrate your hand a little to get bristle tips into uneven surfaces.
- To avoid fatigue, switch hands when cutting in—think of the brush as an extension of your arm. And don’t push too hard when you’re rolling.
- Finally, don’t run your brush or roller dry. “When you can see through the paint—what painters call ‘holidays’—you’ve gone too far.”
 When you’ve finished rolling, run the damp rag along baseboards once more to wipe away any droplets.
15 ideas for decorative panels with master classes – BurdaStyle.ru
1. Wooden panel with rope text: master class
Write and draw with the help of a rope what you want. The more textured the cord, the more expressive the result.
How to make shells: 7 unusual ideas
You will need:
– wooden plank;
– paint (e. g. acrylic) and brush or sponge;
– wood glue;
– cornstarch;
– thick textured rope;
– parchment or tracing paper;
– a piece of transparent polyethylene;
Hammer and small nails;
– a certain number of items that you will use as cargo;
— rubber gloves.
Storage ideas – interior baskets: 5 workshops
Sequence of work:
1. Wrap the board with tracing paper or parchment and draw/write the future pattern or inscription with a pencil.
2. Mix in a container about 200 ml of glue, 3 tablespoons of water and 3 tablespoons of starch. Shake well (e.g. with a whisk). Put on gloves and dampen the rope with this mixture.
3. Cover the board with the inscription with foil and lay out the inscription or drawing along the contour. Press down with improvised objects so that the rope does not move. Wait for the rope to dry.
4. Remove the dried rope – it should hold its shape. Paint the board and dry it. Nail the inscription to the board with nails.
Photo and source: hymnsandverses.com
DIY pillowcases for decorative pillows: 7 workshops
2. Botanical paper panels: master class
It looks very unusual, but it is done quickly and easily! A great option is a duet or trio of such panels.
You will need:
– for two paired panels – 2 sheets of colored paper in contrasting colors;
– scalpel or small dummy knife;
– Cardboard backing or cutting mat;
– sketch pencil;
– glue;
– 4 sticks to strengthen the upper and lower borders of the panel;
– lace for loop;
– 4 flat push pins.
How to sew a sofa cover: 3 tutorials
Work sequence:
1. Draw pencil sketches on sheets of the same color.
2. Cut out the pattern on the mat with a knife. Some parts can be cut out completely, and some can only be cut, so that the paper remains in place.
3. Glue two sheets together. For greater relief and expressiveness, the cut parts of the leaves can be bent, as shown in the photo.
4. Glue the strips on top and bottom.
5. Use the snaps on the back of the top bars to attach the cords and you’re done.
Photo and source: ohohdeco.com
DIY Jewelry Organizers: 11 Ideas with Workshops
3. Panel of woven napkins: master class
Take the napkins in the shape and size you like, paint them to your liking, choosing the colors that suit your interior.
You will need:
– 9 woven napkins;
– spray paint;
– masking tape.
Work sequence:
1. Cover those parts of the napkins that you will not paint over with masking tape. You can make different patterns.
2. Coat the napkins with spray paint. When the paint is dry, remove the tape.
3. It remains only to hang the decor on the wall.
Photo and source: designimprovised.com
How to hem tulle: tutorial, tips and video
4. Panel of a branch and colored threads: master class
A beautiful branch found in a forest or park, plus the remnants of threads, makes an unusual decorative element.
You will need:
– big branch;
– threads of different colors;
– scissors.
Work sequence:
1. Select the threads and the sequence in which you will select the colors. Cut them into equal pieces. Fold each in half and tie to a branch as shown in the photo.
2. When all the threads are tied, straighten them and trim the bottom with scissors.
3. It remains to make a loop and hang the work on the wall.
Photo and source: oleanderandpalm.com
We sew bed linen with our own hands: a selection of tips and master classes
5. Thread and braid mandala panel: master class
Use colored threads and braid — the result will depend on your imagination and selection of materials.
You will need:
– 3 long thin sticks;
– threads of different colors, thicknesses, textures, decorative braid;
– saw or jigsaw.
Work sequence:
1. Form the basis of the panel from the sticks.
2. Secure the center with thread.
3. Start braiding the sticks with thread as shown in the photo, changing the thread from time to time. Cut the threads, tie the ends and hide the knot on the wrong side of the panel.
4. When the job is done, saw off the remaining ends of the sticks.
5. Hang the panel on the wall.
Photo and source: simplygrove.com
6. Calendar Posters
If you really like the pictures from the “overdue” calendar, you can arrange them as a series of posters and hang them on the wall. As a rule, all illustrations for one calendar are made in the same style, and together they will look great.
Stock up on the required number of frames of the right size, cut out pictures from the calendar, paste them into frames and hang them on the wall.
Photo and source: thecreativityexchange.com
How to sew a sofa cushion in the shape of an ottoman
7. Paper patchwork
Wall panels can be made using the paper patchwork technique – it is easier than patchwork from fabric, and the effect is interesting and unusual.
You will need:
– frame with glass;
— scheme for patchwork;
– several sheets of colored and design paper;
– ruler, pencil, scissors and glue.
Operation sequence:
1. Select a scheme – for example, use this one.
2. Draw the diagram on the base sheet in actual size. Draw and cut out squares or other shapes from colored paper and glue them on the base sheet according to the diagram. When the sheet dries, the work can be inserted into the frame.
Photo and source: countryliving.com
How to choose and sew curtain tape: master class + video
8. String art panel
String art is a technique for creating images from threads that are stretched over carnations driven into the base. A detailed story about string art with an understandable master class is here.
Photo: countryliving. com
com
How to hem curtains: master class + video + life hacks
9. Scarf as a panel
A scarf or a scarf can also act as a panel – both with a bright pattern and with a monochrome pattern. Choose the one that suits your interior. In this case, the scarf is simply nailed to the wall at 4 corners. An option is to pull it on a wooden frame.
Photo: designsponge.com
How to sew a pillowcase for bed linen: master class + video
10. Panel-paintings from wallpaper
Remains of beautiful wallpaper act as paintings here. You can also use sheets of wrapping paper. Wallpaper or paper can be stretched onto a tablet bought in an artist’s store, secured from the inside with adhesive tape – it will already be good. For greater effect, “pictures” can be framed.
Photo: pinterest.com
Tatting: learning the basics and weaving a choker and bracelet
11.
 Fabric panels
A series of fabric panels stretched over panels can look very nice. You can use the leftover fabric or pick up something specially in the store. pull the fabric over wooden plates, securing it at the back with small nails or staples, a stapler.
Photo: pinterest.com
Japanese technique wrong: paintings of plants and flowers
12. Panel with “scales”: master class
This huge panel took 687 cardboard circles. Not the fastest job, but the result is impressive!
You will need:
– wooden board / board / thick cardboard for the base;
Lots of drawing paper or other heavy paper;
– circle template and scissors;
– pencil and ruler;
– glue or stapler;
– molding for decoration.
Work sequence:
1. First cut out the circles. Draw them on paper using a template and cut, cut. ..
..
2. Draw the base on strips with a width equal to the radius of the circle. Attach or glue the circles row by row, starting from the bottom.
3. When the entire base is filled, trim the parts of the circles that extend beyond it and fix the circles around the edges. Glue the molding on top.
Photo and source: twothirtyfivedesigns.com
Home decor and toys from a passionate needlewoman: instagram of the week
13. Wooden panel with a world map: master class
Such panels are now in trend – and they cost a lot of money in designer execution. With a little work, such a panel can be made with your own hands. The main thing is to be able to handle a hammer and have a little artistic ability.
You will need:
– panel boards, hammer and nails;
– paper, pencil, tracing paper;
– paint and brush.
Work sequence:
1. Assemble the base of the panel from the boards. Print on one large sheet or several regular maps of the world.
2. Transfer the drawing to tracing paper, and redraw from tracing paper to the boards, pressing with a pencil on the boards through the tracing paper to leave a mark.
3. All that remains is to carefully paint over the islands and continents along the contours.
Photo and source: themerrythought.com
Painting furniture: 5 main rules and a master class
14. Alphabet panel: master class
This panel is made up of volumetric letters-blanks – such are usually sold in shops for creativity. They are cardboard, foam, wooden – any will do, most importantly – voluminous.
You will need:
— blank letters;
– paint and sponge or spray paint;
– strong adhesive.
Work sequence:
1. Paint the letters and let them dry.
2. Now glue the letters side by side to form a panel.
Photo and source: blog.consumercrafts.com
Disposal of scraps and scraps of fabric: pizza patchwork technique
15. Panel-mosaic from scraps
A great way to create an original panel, while recycling small patches.
You will need:
– a tablet covered with thick paper;
– many different patches;
– scissors and glue.
Work sequence:
Iron the pieces of fabric and cut them into shreds – not necessarily the correct shape. Assemble a mosaic of patches by putting them on glue. Leave spaces between patches.
Photo and source: thecartbeforethehorse.blogspot.com
Damaged wallpaper repair: DIY repair
Damaged wallpaper repair: DIY repair.
Damage to the wallpaper can occur for various reasons: during the rearrangement, furniture was carelessly moved and caught on the wall, a pet sharpened its claws, non-compliance with recommendations for pasting wallpaper during repairs was made, and much more. The nature of the damage can also be different, ranging from small scratches to the appearance of a bubble in the middle of the wallpaper.
Photo: everything can be done by hand.
There are many reasons, but you need to somehow correct the detected defects, which can be done with your own hands. To fix each such damage, you need your own approach.
Small defects on the wallpaper.
For example, scratches on damaged wallpaper can be repaired like this.
Prepare your tools and supplies: PVA glue, a lint-free cloth, a fine brush, and a hair dryer.
Apply adhesive to a small scratch with a brush and press the area with a cloth to remove excess adhesive.
If the scratch is still visible, turn on the hair dryer and heat the area, then press down on the area of the damaged wallpaper until the area has cooled.
if the scratch is large, gently peel back the edge, coat the wallpaper with glue and repeat the steps described above. Instead of a brush, you can use a cotton swab to get to the furthest point of the scratch. Try to glue the entire surface of the damage with glue.
Photo: liquid wallpaper is also easy to repair.
The same method can be used if the edge of the wallpaper is hanging but not completely torn off.
Place it in place to see how it will look after gluing. If the result satisfies you, then glue this piece with glue and, smoothing it with a damp cloth, remove excess glue, you can also warm this place with a hairdryer. If performed correctly, there should be no trace of damage.
In case of more serious damage, when only an incomplete fragment of wallpaper remains, a patch must be made. Find a piece of wallpaper of the same color and pattern, place a piece of the cut wallpaper against the wall to match the pattern, and select a piece an inch larger than the damaged area. Cut it out, and if it is thin paper wallpaper, then carefully tear off the desired section of the wallpaper, as thin torn edges will stick better to the wallpaper and will be less noticeable on light wallpaper with a small pattern. Coat with glue and stick the wallpaper, smoothing it with a rag. It is necessary to press not hard so that the patch does not move. It should be borne in mind that you need to use specialized glue that matches the type of wallpaper. For example, repairing non-woven wallpaper for painting is done with one glue, and paper wallpaper with another. Otherwise, the patch may not stick or fall off after a short time.
If desired, the girls will also cope with the restoration.
Correction of serious defects on wallpaper.
If a larger piece of wallpaper is damaged, this area should be cut out and removed from the wall. If the damaged wallpaper does not lag behind the wall well, you can moisten it with water.
Find exactly the same wallpaper and adjust the pattern if necessary. Cut the wallpaper so that the new piece is five centimeters larger than the old piece.
Next, coat the wall and patch with glue, stick it, press it down and smooth it out so that no air bubbles remain. The edges of the patch overlap, therefore, with a sharp paint knife, we cut off the excess sections so that the cutout falls along the junction of the pasted wallpaper. Thus, the replaced area will practically not be visible.
The wallpaper has come off the wall.
If the wallpaper lags behind the adjoining wall with the ceiling or floor, you need to carefully bend the canvas and fix it in this position. Be careful not to tear the wallpaper further.
Now you need to find out why the wallpaper did not stick to the wall. Perhaps the wall was poorly prepared and the old plaster that had fallen off was not removed. Remove all crumbs and vacuum away dust and debris, then plaster the wall and wait for the plaster layer to dry.
If necessary prime the wall.
Now coat the wall and wallpaper, press the wallpaper against the wall and smooth it out to avoid voids under the wallpaper, remove all excess glue with a cloth. For strength, you can heat the joints with a hair dryer and press with a rag until the seams cool.
Armed with knowledge, one can cope even with such a difficult task.
Slits at the joints between the wallpaper.
Now let’s take a look at the case when there are gaps between the joints of the wallpaper. If during the repair you glued the wallpaper butt-to-butt. then a gap is possible at the joints, and therefore a gap may appear. If the wall is very different in color from the wallpaper, then it will look bad. You can prevent such a defect in advance and, having measured the wall, find out where the edges of the wallpaper will join. In those places, paint the wall with paint that matches the color of the wallpaper, a narrow stripe. This will mask possible gaps between the wallpaper.
If you have not foreseen this, then you can mask the defect by applying a one-color colored putty, the color of which matches the color of the wallpaper. It is necessary to smear the formed gaps with a finger, wipe it across the seams with a rag until the putty has dried, and wipe the stains on the wallpaper with a clean, dry rag.
Smooth out uneven joints with a special roller.
Preparing the walls before pasting.
To avoid such cases, it is necessary to carefully approach such a responsible matter as wallpapering. After all, wallpapers are glued for a long time, at least until they lose their appearance, become faded, from exposure to the sun or humidity in the room.
If you decide to restore the wallpaper, then remember: the first step is always to remove the old layer. Wet them with water, and they will more easily move away from the walls in large pieces. After removing the old wallpaper, prepare the wall for pasting.
It is necessary to remove all the paint, to which the wallpaper does not want to stick, clean and remove the putty, which crumbles and falls off.
It would not be superfluous to check the fastenings of sockets and switches located in the wall, fix and putty, so that subsequently the socket does not fall out in these places along with the wallpaper.
Check the corners of the room. if they are too uneven, smooth them with putty.
Use a primer designed for the wall material. In order for the wallpaper to adhere well to the wall, it must absorb moisture, otherwise the wallpaper will dry for a long time and may not stick to the wall.
Avoid drafts after pasting. The room should not be too hot. Wallpaper glue must match the type of wallpaper. For non-woven, one glue is used, for textiles – another, and so on. Do not use too hot glue, its temperature should not exceed thirty degrees. When repairing, constantly monitor the quality of your work, because fixing it right away is much easier than after the wallpaper has dried.
We recommend watching a tutorial video (how to restore wallpaper.
It remains to be hoped that you will be satisfied with the repair made by yourself, and various defects will not appear on the wall that can overshadow the joy of repair.
How best to glue peeled wallpaper.
 How to restore old wallpaper Special glue for gluing wallpaper joints
Giving it a cozy and tidy look, however, even small flaws, scuffs and damage that occur during their operation can spoil the whole situation, so even slightly damaged wallpapers need to be repaired.
Wallpaper can be damaged when rearranging furniture, one careless movement is enough to leave traces on the finish. Pets often harm even the most durable wallpaper. And, of course, the most common problems can arise from improper wallpapering, using the wrong consistency of glue, drafts after gluing, and so on.
Even freshly pasted wallpapers can be damaged by sharp objects. Then the question arises, what to do, how to repair torn wallpaper?
Should all the wallpaper in the room be changed or the damaged area repaired? Leaving everything as it is is ugly, and a cut or torn piece of wallpaper on the wall spoils the whole impression of the repair.
You can quickly and easily repair torn wallpaper on the wall, a torn piece of wallpaper is carefully glued with border glue or PVA glue
. The lagging flap must be unscrewed and smeared with glue, and then glued in place, then gently ironed, pressed, and the excess glue that protruded along the edges should be wiped off with a damp sponge. The room in which you are repairing must be isolated from drafts for a while until a piece of wallpaper dries.
There are situations when it is not possible to glue a damaged piece. In this case, it can be replaced with a suitable cut of wallpaper, the remnants of which you probably still have after the repair.
The procedure for repairing torn wallpaper is done in several steps
- It is necessary to take a piece of excess wallpaper and attach it to the damaged area, which must be closed, clearly aligning the pattern.
- Use a ruler and a knife to cut an even strip along the already pasted wallpaper and patch.
- Remove the damaged piece of wallpaper from the wall. Clean the wall of adhesive residue, it should be completely flat and smooth.
- Apply glue to a new piece of wallpaper, stick it to the cutout, line up the pattern. Residual glue must be removed.

If you do everything as described above, the wallpaper “patch” will be almost invisible against the general background.
How to repair a torn wallpaper if it is not possible to glue a new piece
But there are situations when it is impossible to glue a torn piece of wallpaper, but there is no replacement in the form of suitable wallpaper. Then you need to connect your imagination and not try to disguise the flaw, but, on the contrary, using design methods to highlight the affected area, for this you can come up with a lot of options. You can glue a piece of a different color or pattern, but so that they are in harmony with the old wallpaper. And, step by step, step by step, as described above, carefully paste the “patch” onto the damaged area. The edges need to be joined as accurately as possible, the insert can be additionally highlighted with a border.
Let’s move on to another repair option -.
If the edge of the wallpaper has moved away from the wall and bent, it must be glued. To do this, smear the edge of the wallpaper with glue and lay it against the wall, smooth it out and remove the remaining glue with a damp sponge.
In addition, you can repair torn wallpaper not only with the help of the parts left from the roll, many people use it for this purpose – a very unusual solution, but we will talk about this in this article.
Joints – this is the place where most often there are difficulties and the wallpaper lags behind the walls.
Let’s see why this happens, how to avoid it and, most importantly, how to glue the wallpaper at the joints if it has peeled off.
Such troubles are almost always caused by several factors:
- Incorrect wall preparation. Or its complete absence
- Wrong adhesive.
- Violation of pasting technology. Open windows, insufficient exposure under glue, etc.

If the joints have already moved away, then finding out the reasons will not give anything special, just these things must be taken into account for the future.
Now about what to do and how to paste wallpaper joints.
If the trouble occurred the next day after gluing, then everything you need should be at your fingertips (glue, rags, spatula, brush, brush). If the repair was a long time ago, then you will have to get it all from the pantry or get it somewhere else.
How to glue the wallpaper at the joints, if they have parted at the seams?
What to do – the wallpaper peels off at the joints? How to glue wallpaper at the joints?
There are several ways to eliminate this trouble:
1) before wallpapering, stick a special paper tape (ask in stores) at the wallpaper joining points. Wallpaper sticks better on paper than on a wall. But then there is a small side effect – the relief of the tape will stand out (especially on thin, non-woven, wallpaper. On thick, vinyl, it may not be noticeable).
2) special adhesives for gluing joints are now on sale. They stick wallpaper much stronger than conventional adhesives.
Wallpaper peeling at the joints is one of the most common repair defects. If you notice after pasting the wallpaper, you must immediately glue it, to do this, carefully bend the wallpaper and apply the glue under them with a thin brush, which was used when pasting the wallpaper on the wall. Press the wallpaper at the joints, smooth it so that there are no wrinkles and walk around the entire joint with a roller or a dry soft cloth.
If the wallpaper peels off a few months after the repair, first wet the wallpaper joint on the inside with a little water. After about five minutes, when the old glue is soaked, use a soft brush to remove pieces of loose putty from the walls from the back side. Then apply a thin layer of wallpaper paste on both the wall and the wallpaper, carefully trim the joints and blot the joint line with a sponge to remove excess glue. Then press well and smooth with a soft cloth.
Wallpaper can be glued with a special glue for wallpaper joints. Glue goes on sale in small tubes ready-made. It can be used for all types of wallpaper, does not spread, sticks quickly, becomes transparent after drying.
What to do, of course, to glue, you need to take glue (take PVA), it’s more reliable and you don’t need to dilute and soak, take a thin brush to smear deeper and clean a dry rag, take a seaming seam (ribbed) roller and repair ahead. They glued it, rolled it, blotted it, and the PVA glue holds everything better, the wallpaper will not lag behind, I generally recommend adding PVA glue to the finished wallpaper paste solution when you glue the wallpaper during repairs in approximately the proportion of 1 PVA to 10 wallpaper glue (strong accuracy is not important!) , then there will be no problems with lagging joints / edges.
Special glue for joints is sold in construction stores, it is usually produced in convenient tubes, it is enough to apply a thin layer of glue and press the wallpaper well against the wall, excess glue must be immediately removed with a soft cloth, otherwise the wallpaper will be damaged.
If it is not possible to buy such glue, then you can use any wallpaper glue (of course suitable for the type of wallpaper), coat the joints with a brush (I didn’t have a small one, so I cut the old large one) and carefully smooth out the gluing area.
If the wallpaper has moved away a little, take an ordinary medical syringe, draw glue into it, and carefully pierce small holes in the wallpaper and spray glue there, then rub the wallpaper at the joints with a cloth, the glue will be evenly distributed, and the hole is small – it will not be visible, nothing terrible. They did this already 100 times. In general, this is all from poor-quality wallpapering, for the future you need to glue it better. But still my method is working and very effective.
In stores, find a special glue, it’s called:
Wallpaper seam adhesive
I just recently glued the seams myself with such glue …
I bought this one:
I was quite satisfied with the work, but the price of glue turned out to be not small . ..
..
The tube has a thin spout, carefully move the wallpaper apart from both sides and apply a certain amount of glue into the opening, and then press down the wallpaper at the junction with something soft, you can use a rag …
If you have already pasted the wallpaper and the joints are protruding, try to gently smear the joint with glue for the ceiling plinth or PVA with a thin brush, press down the wallpaper well. Tape for joints can hardly be glued there, but in general the joints on the tape are of high quality. If you can glue the tape, then it will be perfect. The tape is self-adhesive, sticks easily, but for this you have to tear off the edges of the wallpaper a little.
Wallpaper at the joints can be glued with ordinary wallpaper glue, but the joints must be pressed well so that they no longer peel off. Take a brush and coat the joints of the strips well. After that, press them with a special roller for joints. If you do everything right and they dry well, then they will not bother you anymore.
More questions about your topic:
Leave a comment
Builder’s dictionary:: Repair questions:: Calculators:: Special equipment:: Miscellaneous
2006 — 2017 © user agreement:: contact with the site administration [email protected]
How to glue wallpaper at home
Wallpaper separated at the joints: how to seal the joints of non-woven coatings and others, video and photo
Many faced the problem when the joints are perfect when pasting the walls, and after drying, gaps appear between the sheets, which worsen the appearance of the coating. In fact, there are a number of reasons why the coating diverges, and in order to avoid unnecessary work, it is better to do everything right away in accordance with the technology. But if, nevertheless, the joints have diverged, then the problem can be solved in several ways, we will also consider them in this review.
In the photo – such a gap between the sheets significantly impairs the appearance of
Causes of diverging joints
In fact, there are a number of factors due to which cracks are formed on the surface, or even the sheets completely move away at the junctions. Only the right technology ensures that the butt-to-butt wallpaper does not come apart and peel off from the base. Consider the main causes of marriage in the workplace.
Peeling off the edge of the wallpaper at the attachment point together with putty
Poor preparation of the base leads to such results
It is very common to encounter a situation where the material peels off along the joint, and the material of the base finish is separated along with it.
This happens for the following reasons:
- The use of low-quality finishing materials, their adhesion to the base is quite low, therefore, during the work, the wallpaper paste soaks the material, and it is separated from the wall
. In this case, it is quite difficult to carry out repairs, because in order to achieve a good result, you need to putty the walls again. - Even if good materials were used, but the surface was not dedusted and primed with a reinforcing compound, the adhesive can cause the base to become soggy and deform
. Even if the surface seems very durable, do not forget about the primer – its price is low, but you will insure yourself against unpleasant surprises and time-consuming repairs. - Another common reason is the use of low-quality or inappropriate type of wallpaper glue
. Therefore, it is also not worth saving on this aspect, it is better to purchase a more reliable option, even if its cost is higher.
 Even if the surface seems very durable, do not forget about the primer – its price is low, but you will insure yourself against unpleasant surprises and time-consuming repairs.
 Poor edge finish when glued
Another common option, although avoiding such problems is quite simple:
- Firstly, when spreading sheets, special attention should be paid to the edges, they should be smeared very carefully, without gaps, but you should not apply too much composition, otherwise it will climb out of the seam.
- Secondly, in order to press the edges, it is best to use a special roller or wallpaper spatula, with their help you will not only fix the seam well, but also ensure an excellent fit of the joints.
Coating color too dark
Dark finishes deserve special attention
This problem is caused by the following factors:
- Big difference in color – very dark colors on a white base do not always match perfectly, which is why white stripes are visible.
- Uneven structure and large thickness also make it difficult to make the joints tight and invisible.

Tip!
The simplest solution to make the seams as visible as possible is to paint the stripes on the wall at the joints with dark paint to match the color of the wallpaper.
When pasting the wall on the seams will be the same tone, and the cracks will not be visible.
Violation of work technology
This problem is very common, so that it does not occur, it is worth remembering the following factors:
- The instructions that are written on the wallpaper label are mandatory to study, it is important to choose the type of glue that is recommended by the manufacturer, this guarantees an excellent result. The desire to save money can even lead to material damage.
- Most often, paper and textile wallpapers come off at the joints due to the fact that they were kept smeared with glue for too long and they got too wet. After drying, such coatings shrink – and as a result, cracks are obtained, which are quite difficult to eliminate.
- Consistency too thin, which causes the material to soak and then dry unevenly.
- If the wallpaper joint is made in the corner, then it is better to move it 10-15 centimeters, so you can combine the sheets much better.
 After drying, such coatings shrink – and as a result, cracks are obtained, which are quite difficult to eliminate.
 Remember!
Paper wallpaper belongs to the most budget segment, but it is they who are subject to the most significant deformations, since the base in them shrinks when dried, like the rest of the material.
Make sure you have the correct consistency when making your own glue
Troubleshooting
But sometimes it happens that the work has already been done and the joints of the wallpaper have parted – what to do in such a situation?
Let’s consider some of the simplest ways to fix the problem:
- If the gap is large, then the easiest way is to cut thin strips from the same wallpaper and paste them into the joint.
This is one of the most time-consuming, but also one of the most effective ways to fix the problem. But again, if the clearance is small, then this method will not work.
- If the wallpaper is white, then you can use putty, and if it is colored – sealants in the color of the coating. This will hide the flaws, but upon closer examination, the seams will be visible due to the uneven structure of the materials.

Colored crevices – one solution to the problem
- The easiest way to decorate the joint of different wallpapers is with some decorative element: a border, a cord, a special sticker for joints.
- If the edges have peeled off, but the putty has not come off, then the area is smeared with PVA glue, after which it is pressed with a rag and dried with a hairdryer, so the repair takes place in a matter of minutes. If the putty has also come off, then it is necessary to finish and prime the wall section before gluing.
Before starting work, use a spatula to fold back all loose parts
- If joints are visible on non-woven wallpaper, then the easiest way is to repair them with putty and paint the surface, so you can get rid of the cracks once and for all.

Conclusion
As you can see, the problem is much easier to prevent than to fix. And if you have to correct the poor-quality result of others, then this should be done carefully so as not to damage the surface even more – in this case, only re-gluing will help. The video in this article will help you better understand some of the features of this type of work.
Related Articles
Often, after a while, our repair ceases to look as attractive as at the very beginning. The plaster is crumbling, the wallpaper is peeling off in places. But this is not a reason to start a new repair, you can simply fix the old one and extend its life for a few more years.
Why is the wallpaper lagging behind the wall?
Most often, the reason is inaccurate adherence to the instructions for gluing. This is especially true for heavy types of wallpaper that require special glue and additional materials, such as paper strips at the joints.
Also, the reason may lie in insufficient quality surface preparation or uneven application of glue. The departure of wallpaper is sometimes due to the dampness of the room. In bathrooms and kitchens, the wallpaper peels off often and thickly. And what to do if the wallpaper has peeled off and we are not planning repairs yet?
How to glue loose wallpaper?
Timely restored wallpaper joints can save time and money. It is important to choose the right glue and tools. So, how to glue peeled wallpaper: you need a special glue, it is preferable to choose a well-known manufacturer. You will also need a small roller specifically for rolling joints.
Next, roll the sheets of wallpaper with a roller in the direction from the glued part to the joint. We remove the glue that has come out with a damp sponge. If you glue PVA, dry the seams with an additional hairdryer and then go over the roller again.
How to glue wallpaper at the joints
Let the wallpaper dry while avoiding drafts. Mini repair completed!
After the repair is completed, there is a slight euphoria – the tedious process is left behind. Over time, large and small flaws appear, for example, wallpaper begins to move away. Let’s figure out how to glue peeled wallpaper and return the finish to a presentable look, without the need for a full-scale repair. It is not always possible to catch the moment of the appearance of the first waves or lagging corners. Ideally, flaws should be fixed as soon as they are discovered. Mini repairs help to cope with troubles and not plunge again into a state of disorder and discomfort – companions of home improvement work.
Wall pasting is the final stage and the main type of repair during the cosmetic renovation of the interior. It is important not only to perfectly match the pattern and hide the joints. In order not to find unstuck stripes on the floor in the morning, you should learn more about the causes:
- Wall defects. Shells in the plaster and its shedding, cracks, even small ones, chips are eliminated without fail. Flaws will indicate themselves with bubbles, waves and other damage to the finish.
- Incorrectly selected adhesive. The composition is selected depending on the material from which the “facing” is made. Manufacturers indicate the type of adhesive composition required. Similar information is contained on the packaging of the composition itself. When buying, you can not pay attention to valuable information and face the fact that the results of the laborious process have come to naught.
- Poor wall preparation. The complex of preliminary works includes thorough cleaning of the surface, priming and leveling. The final finishing is started after the complete drying of a fresh layer of plaster or primer. If you rush to start work, this will adversely affect the quality of the finish. Problems may not appear immediately, but over time.
- Non-compliance with the rules for creating a microclimate in the room after gluing. The recommended temperature range is from 18°С to 30°С. Do not open windows and vents for several days. It is required to exclude drafts and prevent direct sunlight on the drying surface.
- Uneven layer of adhesive when applying compound. Leaks, insufficient impregnation with adhesive solution, especially at the edges, can cause unscheduled repairs.
 Flaws will indicate themselves with bubbles, waves and other damage to the finish.
 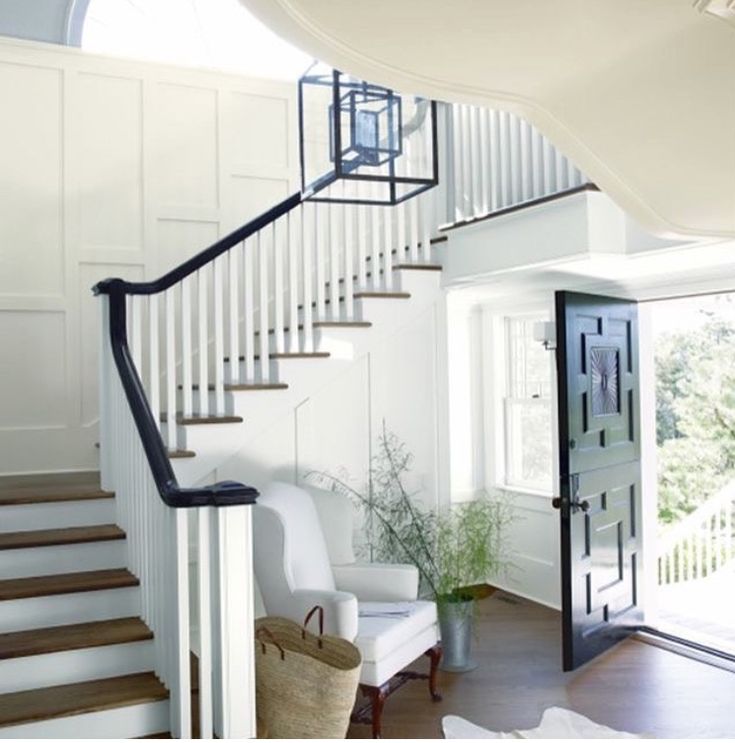 Do not open windows and vents for several days. It is required to exclude drafts and prevent direct sunlight on the drying surface.
 Shortcomings at the preparatory stage are fraught with problems after repair
Finishing the room does not tolerate neglect of trifles. Any of the risk factors leads to the need to pick up tools and arm yourself with patience.
Video educational program from the pros:
Important to know! Preliminary pasting with a special paper tape of the places where the edges and joints of the strips will be located prevents the backlog of finishing materials.
Time, drafts and pasting errors take their toll
Tools and accessories for work
The arsenal of assistants is almost the same as the set that was needed for pasting. This is a standard home master kit. However, for some devices you will have to go to a hardware store. Pasting peeled wallpaper has its own characteristics associated with a limited working area. The following tools are required:
- Adhesive. It can be a mixture that was used for decoration, or a special glue for wallpapering.
- Brush for applying the adhesive mixture. When restoring a small area, it is recommended to choose a tool with a narrow working part – it is more convenient for them to smear a small piece. If half a strip is peeled off, take an ordinary wallpaper brush.
- Rubber roller. It is necessary for “rolling out” the glued surface – the material is pressed with a roller and the wrinkles are smoothed out.
- Narrow spatula. It will be needed to prepare the wall – cleansing from the remnants of paper, crumbling plaster.
- Large volume syringe. An indispensable assistant in the elimination of bubbles.
- Hairdryer An ordinary household appliance may be needed to heat the glued fragments.

In addition, you need to prepare a few clean cloths and do not forget a container of water for wet cleaning.
The exact border of defects is checked with a spatula
Important to know! Over time, the wallpaper fades, when fresh fragments are pasted, the colors differ – the new elements look brighter. Therefore, the integrity of the already glued finishing material is restored.
Rubberized roller – an indispensable helper for a home master
What kind of glue to use when repairing
Not to repeat the same mistakes is one of the tasks to be solved when gluing peeled wallpapers. Responsible approach to the choice of the composition eliminates the need to repeat the procedure and allows you to eliminate damage at no extra cost. How to glue wallpaper that has peeled off?
Special wallpaper compositions
The range of adhesives intended for finishing materials is quite wide. Compositions are presented in all price segments. On the packaging, the manufacturer indicates what type of finishing materials the mixture is intended for.
Most often sold dry and prepared by yourself immediately before gluing. It should be noted that some products are intended for non-woven wallpaper, they cannot be used for paper, and vice versa.
Remaining glue after a major repair can be used for wallpaper that has peeled off, as long as the expiration date has not expired. Buying a whole pack for a small fragment or several sections is economically irrational. When restoring a large area, when you have to re-glue almost the entire strip, the cost of a new pack is fully justified.
PVA – pros and cons
Familiar from childhood, inexpensive and does not require special training, PVA is often used when deciding how to glue peeled wallpaper. The glue is applied to the paper over the entire area, the strip is pressed tightly against the wall and rolled several times. It would seem that the problem is solved. However, the risk of new ones is high:
- PVA has high adhesion and reliably glues surfaces, but is practically insoluble in water. The next repair will have to make a lot of effort to remove the remnants of the paper and completely clean the wall.
- In areas of impregnation, yellow spots with sharp contours may appear, which are especially noticeable on a light background.
- PVA is suitable for small areas, up to 5 cm. For larger repairs, other compounds are recommended.
Effects of PVA
Wallpaper Adhesive
Ideal for small areas, a good way to glue loose seams, top or bottom edges. Sold in finished form in any hardware store. The volume of the tube is small – from 50 to 100 ml. This takes the worry out of excess.
The nose is elongated and tapered, which makes it easier to apply in hard-to-reach areas and allows you to work out joints and corners with high quality. For a better connection, a roller is used, with which the glued strip is rolled to the wall.
It is recommended to choose an adhesive of trusted brands and pay attention to the annotation and advice of the manufacturer. Most products are universal and suitable for all types of wallpaper – paper, vinyl, non-woven, fabric. At the final stage, the glued places are heated with an ordinary hair dryer.
Popular compositions for removing minor defects
Why paste is a thing of the past
Universal home adhesive gained such high popularity in its time that many people still cannot refuse to use a viscous sticky substance. The main advantage of the paste is its low cost and quick preparation at home. This completes the list of benefits.
If wallpaper needs to be pasted, paste is no help. He is able to cope with clean paper, not impregnated with an adhesive mixture that has not hardened after drying. And then there is a high probability that an unpleasant surprise will await in the morning – stripes lying on the floor. To achieve a high-quality result, we use proven products from recognized manufacturers.
Important to know! So that the wallpaper does not tear in preparation for gluing, the edges are pre-soaked with water. Moisture will not prevent the glue from doing its job – reliably eliminate defects and return the interior to its original appearance.
How to glue wallpaper correctly
How to glue wallpaper that has peeled off? To solve this practical problem, appropriate skills and knowledge are required. Sticking a new strip on a clean surface is easier than repairing defects. You have to work in conditions of limited actions and perform labor-intensive operations if tears and waves go through the material.
How to glue corners and joints
As a rule, these are the most problematic areas, where defects in the finish appear most quickly. During the repair, it is important to understand how to glue the wallpaper end-to-end, so that later you do not have to deal with alterations. The best way is gluing with an overlap, when one strip overlaps the other.
This method works great when joining strips in corners where it is difficult to keep vertical when sticking heavy wet paper or vinyl. If this was not done on time and the joints fell behind, proceed as follows:
- Using a spatula, carefully lift the finishing material and advance until the edge of the plate rests on an undamaged area.
- Completely clean the wall – use a spatula to scrape off plaster and stuck pieces of paper. Then, at low power, they are vacuumed and wiped with a thick cloth, preferably made of lint-free cotton.
- Apply a suitable adhesive – preferably a special adhesive for gluing – to the entire peeled off surface, allow a little time for impregnation. It is important that the hard finish softens a little and becomes elastic.
- Press the area to be glued against the wall, starting from the inside and moving towards the corner or edge. Carefully level the coating, do not allow the formation of creases.
- Press down and smooth at the same time with a rubber roller to prevent blistering. The joints are carefully rolled, the roller is pulled to adjacent strips.
- Remove excess adhesive with a cloth.
- If necessary, dry with a hair dryer, do not open windows and exclude drafts until completely dry.

When gluing the edges, thoroughly coat the surface with adhesive
Wavy breaks
The occurrence of such defects is a direct indication that it is necessary not only to glue the peeled off area, but to replace the strip completely. This is one of the evidence that cracks appeared in the wall. The decision to re-glue a fragment entirely is fraught with the fact that the color of fresh wallpaper will be different – too noticeable and does not improve the interior. The following method is recommended:
- Carefully cut the swollen fold with a construction knife and smooth the edges.
- A small dry brush of medium hardness removes plaster particles and other elements. You can vacuum at low power to remove dust.
- If possible, prime a crack in the wall – this is possible only for surface flaws formed in the top layer of plaster.
- Glue the inside surface with glue – you will need a narrow brush or a special glue tool.
- Carefully press down and smooth the surface with a roller, trying to bring the edges together as much as possible so that the seam is not visible.
- Excess glue is removed with a dry cloth and do not open windows, doors until completely dry.
 You can vacuum at low power to remove dust.
 Such repair is a temporary measure, and is possible only in places hidden from view – under the table or behind the cabinet, behind the curtains.
Similar condition of finish is an indication for a facelift
Blisters
A common cause of blisters is careless application of the adhesive. The mixture is not enough for absolute adhesion. Over time, the paper or base of the material lags behind, and you have to glue the bubble.
Violating the integrity of the strip is undesirable – this can lead to defects in other places. Proceed as follows:
- Prepare a large syringe to inject the adhesive mixture into the bladder. The tip of the nozzle on the tube with universal glue for gluing is not suitable – the diameter of the tip is too large.
- Pierce the swelling with a needle and release the air. For this procedure, a rubber roller is useful.
- Insert the needle of a syringe filled with glue into the same hole and squeeze out the contents with a plunger. The approximate amount of the composition is preliminarily determined so that there is no excess.
- Smooth and press the glued area with a roller until the glue is completely distributed under the paper.
- Heat the surface with a hair dryer to improve adhesion and dry faster.
- If excess adhesive comes out, remove it with a cloth.
Techniques for removing bubbles
To eliminate extensive defects, apply techniques similar to wallpapering
Large areas
roller will not work.:no_upscale()/cdn.vox-cdn.com/uploads/chorus_asset/file/19586193/finishing_up.jpg) They resort to more effective ways to eliminate defects:
They resort to more effective ways to eliminate defects:
- The lagging part is separated from the wall. A spatula helps in the work, with which they check the border of the peeled off area.
- Completely clean the wall and the interior of the finish from plaster fragments, paper particles, dust, and other contaminants. It is acceptable to use a vacuum cleaner at low power.
- Appropriate type of wallpaper paste is applied evenly.
- Wait until the material softens and becomes elastic.
- Glue the peeled off part, starting from the bottom, the sheet is pressed.
- The glued areas are rolled with a roller, which is also driven from the bottom up or diagonally towards the joint – this way air will not remain, and it is easier to remove excess glue.
- After gluing, the strips are carefully rolled again.
- Remove excess adhesive and leave to dry, remembering that there should be no drafts.
The desire to glue peeled off wallpaper on your own can be both successful and lead to the need for a new cosmetic repair. The best solution is to contact the repair and finishing specialists. Experienced craftsmen quickly and efficiently eliminate defects, using proven methods and tools. Professionals guarantee the result – the wallpaper will last until the scheduled repair.
Damage to the wallpaper can occur for various reasons: during the rearrangement, furniture was carelessly moved and caught on the wall, a pet sharpened its claws, non-compliance was made during repairs, and much more. The nature of the damage can also be different, ranging from small scratches to the appearance of a bubble in the middle of the wallpaper.
There are many reasons, but you need to somehow correct the detected defects, which can be done with your own hands. To fix each such damage, you need your own approach.
Small defects on wallpaper
For example, scratches on damaged wallpaper can be repaired like this:
- prepare tools and materials: PVA, lint-free cloth, fine brush and hair dryer;
- smear a small scratch with glue with a brush and press this area with a rag, removing excess glue;
- if the scratch is still visible, turn on the hair dryer and heat the area, then press down on the area of the damaged wallpaper until the treated area has cooled;
- if the scratch is large, then carefully bend the edge, coat the wallpaper with glue and repeat the steps mentioned above. Instead of a brush, you can use a cotton swab to get to the furthest point of the scratch. Try to glue the entire surface of the damage with glue.
 Instead of a brush, you can use a cotton swab to get to the furthest point of the scratch. Try to glue the entire surface of the damage with glue.
 The same method can be used if the edge of the wallpaper is hanging but not completely torn off.
- Place it in place to see how it will look after gluing. If the result satisfies you, then glue this piece with glue and, smoothing it with a damp cloth, remove excess glue, you can also warm this place with a hairdryer. If performed correctly, there should be no trace of damage.
- In case of more serious damage, when only an incomplete fragment of wallpaper remains, a patch must be made. Find a piece of wallpaper of the same color and pattern, place a piece of the cut wallpaper against the wall to match the pattern, and select a piece an inch larger than the damaged area. Cut it out, and if it is thin paper wallpaper, then carefully tear off the desired section of the wallpaper, as thin torn edges will stick better to the wallpaper and will be less noticeable on light wallpaper with a small pattern. Coat with glue and stick the wallpaper, smoothing it with a rag. It is necessary to press not hard so that the patch does not move. Please note that you need to use a specialized adhesive that matches the type of wallpaper
. For example, repairs are done with one glue, and paper ones with another. Otherwise, the patch may not stick or fall off after a short time.
 Coat with glue and stick the wallpaper, smoothing it with a rag. It is necessary to press not hard so that the patch does not move. Please note that you need to use a specialized adhesive that matches the type of wallpaper
If desired, the girls will also cope with the restoration
Correction of serious defects on wallpaper
If a larger piece of wallpaper is damaged, this area should be cut out and removed from the wall. If the damaged wallpaper does not stick well to the wall, you can moisten it with water
.
- Find exactly the same wallpaper and adjust the pattern if necessary. Cut the wallpaper so that the new piece is five centimeters larger than the old piece.
- Next, glue the wall and the patch with glue, stick it, press it and smooth it so that there are no air bubbles left. The edges of the patch overlap, therefore, with a sharp paint knife, we cut off the excess sections so that the cutout falls along the junction of the pasted wallpaper. Thus, the replaced area will practically not be visible.
 The edges of the patch overlap, therefore, with a sharp paint knife, we cut off the excess sections so that the cutout falls along the junction of the pasted wallpaper. Thus, the replaced area will practically not be visible.
 The wallpaper has come off the wall
If the wallpaper lags behind the adjoining wall with the ceiling or floor, you need to carefully bend the canvas and fix it in this position . Be careful not to tear the wallpaper further.
.
- Now we need to find out why the wallpaper did not stick to the wall. Perhaps the wall was poorly prepared and the old plaster that had fallen off was not removed. Remove all crumbs and vacuum away dust and debris, then plaster the wall and wait for the plaster layer to dry.
- If necessary, prime the wall.
- Now smear the wall and wallpaper, press the wallpaper against the wall and smooth it to avoid voids under the wallpaper, remove all excess glue with a cloth. For strength, you can heat the joints with a hair dryer and press with a rag until the seams cool.

Slits at the joints between wallpaper
Now let’s take a look at the case when there are gaps between the joints of the wallpaper. If you are during the repair, then a pass at the joints is possible, and therefore a gap may appear. If the wall is very different in color from the wallpaper, then it will look bad . You can prevent such a defect in advance and, having measured the wall, find out where the edges of the wallpaper will join. In those places, paint the wall with paint that matches the color of the wallpaper, a narrow strip
. This will mask possible gaps between the wallpaper.
If you have not foreseen this, you can mask the defect by applying a one-color colored putty, the color of which matches the color of the wallpaper. It is necessary to smear the formed gaps with a finger, wipe it across the seams with a rag until the putty has dried, and wipe the stains on the wallpaper with a clean, dry rag.
Wall preparation before pasting
To avoid such cases, it is necessary to carefully approach such a responsible matter as wallpapering. After all, wallpapers are glued for a long time, at least until they lose their appearance, become faded, from exposure to the sun or humidity in the room.
- If you decide to restore the wallpaper, then remember: the first step is always to remove the old layer. Wet them with water, and they will more easily move away from the walls in large pieces. After removing the old wallpaper, prepare the wall for pasting.
- It is necessary to remove all the paint, to which the wallpaper does not want to stick, clean and remove the putty, which crumbles and falls off.
- It would not be superfluous to check the fastenings of sockets and switches located in the wall, fix and putty, so that subsequently the socket does not fall out in these places along with the wallpaper.
- , if they are too uneven, smooth them with putty.
- Use a primer designed for the wall material.
In order for the wallpaper to adhere well to the wall, it must absorb moisture, otherwise the wallpaper will take a long time to dry and may not stick to the wall. - Avoid drafts after pasting. The room should not be too hot. Wallpaper glue must match the type of wallpaper. For non-woven, one glue is used, for textiles – another, and so on. Do not use too hot glue, its temperature should not exceed thirty degrees.
When repairing, constantly monitor the quality of your work, because fixing it right away is much easier than after the wallpaper has dried.

It remains to be hoped that you will be satisfied with the repair made by yourself, and various defects will not appear on the wall that can overshadow the joy of repair.
Sometimes there are cases when the wallpaper peels off the walls. This can happen for completely different reasons. In this article we will tell you how to glue the lagged canvas, what can be used for this, and how to do it correctly.
Reasons for wallpaper stripping
In general, if the wallpaper is pulling away from the wall, it means that the surface has not been properly prepared. After all, many people forget that the wall must be puttied and treated with a primer, otherwise the result can be very deplorable. It can also be affected by improperly selected glue, which may be of poor quality, so be sure to check the expiration date before buying. Let’s take a closer look at the reasons for peeling off:
How to stick wallpaper that has peeled off
What tools are suitable
If you notice that the wallpaper has peeled off, try to glue it as soon as possible. For gluing you will need:
Glue the joints
If the wallpaper has come apart at the joints, don’t worry, it’s easy to fix. It is necessary to carefully move the edge of the canvas with a spatula and remove debris. Next, apply wallpaper paste along the joint and press the edge with a rubber roller. Remove the rest with a dry cloth.
If the canvas has moved away from the wall near the floor or ceiling, then take wallpaper paste. It must first be diluted with water and only then the canvas should be well lubricated. Wait about five minutes and then gently reattach the peeled off strip. Remember that the joints must be carefully treated with glue, as they play a big role in wallpapering.
Wallpapering after a cat
If your animal likes to peel off the coating, we recommend using more durable non-woven wallpaper or even using paint for finishing.
If a small area of wallpaper is damaged by a cat, it can always be glued or re-pasted. To do this, measure the damaged area that will have to be redone, and cut off the necessary part from the roll. Then remove the damaged coating from the wall and glue the prepared piece again.
How to re-glue a large area
If a large area or a whole strip is peeled off, proceed as follows: An instruction is always attached to the product, which says how you can and should glue such wallpapers, so always read it. Remember that when gluing such a coating, only walls should be treated with glue, the wallpaper itself is not smeared with glue.
To glue such material, you can use glue and a spatula. Apply glue to the joints and the wall and let it soak in, wait about ten minutes. For better adhesion, it is recommended to roll over the surface with a roller.
Can PVA glue be used? PVA after drying is very poorly soluble in water and therefore it will be extremely difficult to remove the coating before the next repair. Also, due to such a solution, yellow spots may appear. In construction stores, you can buy special PVA wallpaper glue, which is less concentrated than its universal counterpart, which does not leave unwanted stains, but it is not suitable for large pieces of wallpaper, as it does not prevent the canvas from slipping. It can be used for gluing corners, however, if the walls are not made of drywall. PVA glue and GKL are incompatible things.
How to paste wallpaper without glue
We recommend not experimenting, but still buying a special glue. As we have already seen, PVA is not suitable for gluing.:max_bytes(150000):strip_icc()/paint-walls-or-trim-first-3972509_hero-ff0904d6f5b44d04a9cf8b28259b33db.jpg) Many advise using flour to restore small areas, first diluting it with warm water. But we would not advise taking risks, because such a solution can only worsen the problem.
Many advise using flour to restore small areas, first diluting it with warm water. But we would not advise taking risks, because such a solution can only worsen the problem.
Drawing conclusions, we can say that you should not panic if your wallpaper peeled off. The main thing is to try to identify and immediately fix the problem by applying special glue. It is better not to use traditional methods and PVA, as you risk damaging the surface and the repair will have to be redone. Watch the following video, which shows in practice how to properly glue peeled wallpaper and joints:
Alex Kremer – Renovation and design of a two-room apartment » Page 22 » Every day read books online for free without registration
? Insert it into the hole and reinforce it by applying a coat of quick plaster, pressing it down with a cut-off.
? Press the first layer of plaster into the mesh with a steel trowel. Make grooves on the surface of the plaster and apply the last layer when the previous layer has set.
External corner patching
? Use a machinist’s chisel and hammer to pound the damaged plaster out of the corner, gouging it down to the brickwork if necessary.
? Drive two hardened nails into the wood shingles that will protrude about 300mm above and below the damaged area.
? Lay the plank over the damaged corner so that its edges are in line with the plastered surface on one side of the corner. Do not drive nails all the way.
? Use a trowel to close one side of the corner, even with the edge of the shingles. Leave the plaster to dry.
? Carefully move the shingle aside and stucco the other side of the corner, using the edge of the first patch as a guide. Be careful not to damage the corner when doing this.
? If there is a chance of damaging the corner, reinforce it before applying the plaster by nailing the metal corner protector. Then plaster each side of the repaired corner.
Chapter 6. Everything you need for wallpapering
Getting Started
If you are planning to wallpaper a room, there are a few things you need to know about this job before you start. First, you need to estimate how much wallpaper you need. Then you have to think about where is the best place to start. And you may need to level the walls first.
Wallpaper count
A standard wallpaper roll is 10.05 m long and approx. 530 mm wide. In a standard room, you can assume that you will need to get four total lengths from each roll. Measure the perimeter of the room, excluding large glass doors to the balcony or garden, and divide the result by the width of the roll to determine how many lengths you need. Divide this value by 4 to get the number of rolls.
Alternatively, simply measure the perimeter of the room and the height of the ceiling and use the table below to see how many rolls you need. Buy one extra roll to be on the safe side, and make sure they all have the same manufacturer’s lot number, and you’re sure they’re the same colors.
How to calculate the number of rolls Choosing where to start gluing a room
It’s usually best to start at a corner and work your way around the room from there, gluing one wall after another until you’re back to where you started.
However, if you’re wallpapering a particularly bold pattern, it’s best to try to focus the design on the main feature of the room. This could be the wall by the fireplace, if the room has one, or the wall between two windows.
If the room has a door next to the corner, start gluing next to the door and from there go all the way around the room.
Bonding paper
Tape paper is a strong, plain paper that is used for wall paper before decorative wallpaper is applied. It will hide the wall surfaces that are far from ideal, giving a better look to the decorative finish. It will also make it easier to wallpaper the room if the walls have uneven porosity. This is because fresh plaster has been laid in some areas. It can be applied horizontally or vertically. Always use a glue that is recommended for decorative wallpaper and let it dry for at least 12 hours before wallpapering over the paper.
Horizontal gluing
This gluing will avoid the risk of overlapping between the pasting paper and the decorative wallpaper.
Bring the wallpaper to the wall in folds and stick the first strip at ceiling level. Trim them at the corners at each end. Then glue the next strips below it, leaving a small gap between them. Cut the last strip to width just above the baseboard.
Repeat this on the other walls of the room.
Vertical paper
To ensure paper and decorative wallpaper do not line up, start by gluing half the width of the paper in one corner of the room, then continue gluing across the full width.
Wall gluing
This means applying a special filler to the walls, which you then allow to dry before you start gluing the wallpaper.
This procedure prevents drying too quickly and allows you to carefully place each glued sheet across the surface.
Use filler on bare plaster and painted paper-lined walls. You can sometimes use diluted wallpaper paste as it.
Overlay paper coloring
? Tape paper, pasted vertically, creates an ideal base for the subsequent painting of uneven walls.
? Use heavy paper (100 to 1200 grade). Close the joints by leveling them with a special roller, and lightly sand them with fine abrasive paper when the glue dries.
? Paint the walls with emulsion paint using a large brush or roller.
Cutting and pasting the wallpaper
If your wallpaper does not have a pattern to follow, it is best to cut each strip after you have pasted the previous one. In this way, you can avoid the risk of using wallpaper irrationally.
You will need:
• Wallpaper.
• Wallpaper glue.
• Glue bucket.
• Glue brush.
• Scissors for cutting wallpaper.
• Table for wallpapering.
Making glue
Buy enough glue to make several rolls of wallpaper. Add the recommended amount of water to the glue bucket and pour in the powder, stirring the solution vigorously with a large wooden spoon or similar object. This will avoid the formation of lumps in the glue. Leave it to stand for the recommended time.
Measuring and cutting wallpaper
Measure the distance between the ceiling and the top of the skirting board from your chosen starting point. Add another 100 mm to trim after the piece is pasted. Unfold the roll on the floor, press the free end and measure this distance on them. Draw a straight line across the wallpaper and cut along it with scissors. Mark the top (free end of the roll) on the wrong side of the wallpaper.
Application of adhesive
? Unroll the wallpaper on your gluing table and place a piece of wood across the roll end of the wallpaper. Trim the free end of the wallpaper along the edge of the table, and the edge along the edge of the table farthest from you.
? Start by applying the glue with a brush on the paper. Move towards the far end of the segment and towards the free end.
Tip:
If your brush doesn’t have a clip that you can use to hang it in the bucket, tie a string between the ends of the bucket handle to rest your brush on it.
? Now move the paper towards you so that the unglued edge lines up with the edge of the table closest to you. Apply more glue towards this edge. This will allow you not to stain the table and the outside of the wallpaper with glue.
? Once you’ve glued the unfolded part of the wallpaper, fold the glued end in folds and slide the piece down on the table so you can glue the rest of the wallpaper.
? When the entire piece is covered with glue, fold it in neat folds and leave it to soak for the time recommended by the instructions – usually 5 minutes. Now they are ready for gluing.
Applying the front strip
The most important thing to remember when wallpapering is that the corners are rarely right and straight, so they should never be used as a guide for wallpapering. Always begin gluing each wall by aligning the edge of the strip with the plumb line.
? Installation on a plumb line of the initial vertical line. If you start wallpapering in the corner of a room, measure the width of the wallpaper and subtract 25mm from that number. Hang your plumb line at that distance from the corner and make a series of pencil marks on the wall behind the plumb line. Connect these dots with a pencil and a ruler to get a straight vertical line along which you will paste the first strip of wallpaper.
How to remove a scratch on a refrigerator: steel-colored, at home
Repairs in the apartment have been made recently, and the wallpaper has already been damaged? No need to rush to re-glue the trellis.
If the wallpaper has damage that is very noticeable, do not rush to re-paste the wallpaper. Damage can be masked if you master a couple of rules for repairing wallpaper.
Pet scratches, rips, damage and toddler wall art can be easily disguised if you know a few simple ways to repair wallpaper.
Removing small defects on tapestries
In order to get rid of small scratches on wallpaper, you need PVA glue and a brush.
Small scratches on the wallpaper are not uncommon. They can appear in the most prominent place, spoiling the overall look of the living space. You can make damage invisible with ordinary PVA glue. In order to eliminate scratches on the tapestries, you will need:
- thick PVA glue;
- fine brush;
- 2 pieces of lint-free cloth;
- water;
- hair dryer
Coat all scratches on the surface of the wallpaper with a brush dipped in PVA. Dip a soft cloth in clean water and wring it out properly. With a damp cloth, wipe the remaining glue from the trellis, gently pressing the paper cover against the wall. Dry the damaged areas with hot air from a hair dryer, then press the wallpaper against the wall with a dry piece of cloth. Small scratches left by sharp objects or animal claws on the trellis disappear completely after such actions. It is very important to ensure that the fabric is lint-free, as lint can stain the paper surface.
If the scratches are deep, then the inside of the wallpaper must also be smeared with glue.
If the scratches on the walls are large and deep, you can try to mask them in exactly the same way, but while covering the defects with glue, you will need to slightly bend the paper edges and try to smear them with a brush on the inside. If this is not done, after such a repair, the wallpaper may lag behind the wall, and they will have to be repaired again.
Often, when people make repairs with their own hands, they have air bubbles under the wallpaper. Such walls look unaesthetic and pretty spoil the overall impression of the room. Experienced craftsmen know that you can remove air bubbles from under the paper wall covering with a blade and a conventional disposable syringe.
Make a tiny cut with a blade at the site of the bubble. In order for the air to completely come out of it, you need to press on the bubble with your fingers. Draw wallpaper paste into the syringe and inject it into the resulting cavity. Smooth out the problem area with a roller, remove the adhesive with a rag or sponge. When the restored areas are completely dry, the wall covered with trellises will become perfectly flat.
How to restore wallpaper fragments?
If a piece of wallpaper is torn off, it can be carefully glued back into place.
In apartments where there are small children, trellises can often be torn off. There is no need to panic if the baby, while exploring his living space, tore off a large piece of paper covering from the wall. If a piece of wallpaper that has been torn off remains, it can be easily glued back to the wall, making sure that its edges exactly coincide with the place of the break. The glued piece of trellis should be pressed firmly with a damp cloth, removing any remaining glue from its edges, and then dried with a hair dryer and level the restored surface with a dry rag or roller.
It is much more difficult if the torn piece of wallpaper has not survived. In this case, do-it-yourself repair of a damaged wall will take a little longer. In order to restore a damaged wall covering, you need to find exactly the same tapestries and cut a patch out of them. Usually, after the repair is completed, large pieces of wallpaper remain. They need to be kept in good condition, then in the future repairing the walls will not be a problem. In order to restore torn wallpapers, in addition to themselves, you need to prepare:
If there is no torn piece of wallpaper, then you need to take the same wallpaper and cut out the fragment.
Lay a piece of trellis face down on a flat and clean surface. With a simple pencil, with barely noticeable strokes, mark the boundaries of the patch on it, taking into account the pattern. Cut the wallpaper along the marked contour, coat with glue and attach to the damaged wall, matching the pattern. The glue must be chosen exactly the same as the old wallpaper was glued on, otherwise the patch may fall off over time (this is especially true for vinyl trellises). After the wall covering is glued, you need to smooth it with a rag, removing air bubbles and wiping the adhesive that has come out at the edges, then dry it with a hairdryer and smooth it again with a cloth.
Drawings left on the surface of the wallpaper by children do not decorate the room. Such damage requires the replacement of the damaged part of the trellis. In order to update a section of the wall, you should take:
- a cut of exactly the same paper sheet as on the wall;
- scissors;
- painting knife;
- water container;
- wallpaper paste;
- glue brush;
- roller, clean cloths.
Draw a paint knife along the wall, separating the damaged section of the wallpaper from the main sheet. After that, the cut out fragment of the trellis is torn off the wall. If the wallpaper is firmly glued, they can be pre-soaked with water, then they can easily move away from the surface.
A piece of wallpaper is laid out on a table or other flat surface. A patch is cut out of the tapestries, the dimensions of which are 5 cm larger than the fragment taken from the wall. Do not forget that the pattern on the cut out piece of wallpaper must exactly match the pattern on the wall.
Fragment of trellis on the inside is smeared with wallpaper glue and applied to the wall, which was also pre-coated with glue. Smooth the glued wallpaper from the center to the edges with a dry cloth or roller, trying to remove air bubbles from under the canvas. Since the patch was cut with an overlap, it must be removed. To do this, with a painting knife, the glued wallpaper is very carefully cut through the junction with the old canvas and the cut paper is removed. When the repaired section of the trellis dries, it will not stand out from the rest of the wall. Repaired wallpapers can last for several years, and they will look no worse than new ones.
How do I update my old wallpaper?
Depending on the quality of the material and its texture, old wallpapers can withstand restoration. This must be done very carefully, while using only proven methods and recipes.
The most popular methods are:
- Mechanical wallpaper cleaning. This way you can remove the dust that has accumulated in them for years.
- Use of special chemicals in wall care.
- If the case is absolutely critical, then the drawing can be restored.
- Re-pasting old wallpaper sheets to new ones in places that are most often seen by household members.
- Repainting walls in a different color with the right paint.
Important! It should be taken into account that the new coloring of the wall surface is fully consistent with the general atmosphere of the interior.
We update the wallpaper with mechanical cleaning and washing
A very effective way to clean wallpaper, including embossed wallpaper, is a washing vacuum cleaner. In this case, you should use a special nozzle that can slide even on the most complex relief surface.
Important! The nozzle of the vacuum cleaner should be washed and wiped dry every 4-7 square meters. meters of treated area.
During operation, flat or slightly embossed surfaces can be lightly moistened with a sprayer.
Important! This procedure must be done very carefully, as dust spots may form.
We use chemicals
The use of such products to update the wallpaper is a last resort, if the rest are powerless.
Important! If you have the choice between gluing a new canvas and using chemical compounds, then it is better to stop at the first option.
One of the most common causes of wallpaper aging is impregnation of the paper base with various substances. For example, in the kitchen it can be fumes coming from the stove. They fade and become darker from a layer of dirt. In this case, you can make a solution with isopropyl alcohol, window cleaner, and distilled water. Using a sprayer, apply this mixture to the surface and wipe with a microfiber cloth.
This mixture can also be used to remove stubborn odors. In this embodiment, the solution should be applied to a cotton napkin and applied to the wall surface, after which it should be ironed with a warm iron. After that, quickly remove the napkin and ventilate the room.
Important! If you are preparing a solution in order to remove a stubborn odor, then the rate of alcohol should be three times less.
Also an excellent solution for removing various types of dirt is the use of white clay and finely ground charcoal. This mixture must be put on a napkin and applied to the surface of the wall, and then heated with an iron.
Repairing small damages
Small defects in wallpaper include scratches, this is the most common household defect that occurs in almost everyone. Removing scratches does not require special skills, just prepare the right tool and use it.
To work on minor damage to the wallpaper, we need:
- PVA glue in a small bottle,
- adhesive wiping material, preferably a rag that does not leave fibers,
- glue brush,
- household hair dryer.
Scratches are not visible on all wallpapers, it all depends on their depth and texture of the material
The procedure for removing scratches is as follows:
- carefully apply PVA glue to the scratch using a thin brush,
- press the wallpaper to the wall in this place, using a cleaning material,
- remove the remaining glue,
- if necessary, heat the place where the glue was applied with a hair dryer, firmly press the wallpaper against the wall and wait for it to cool.
The steps above should be enough to fix a small scratch, but if it’s a big one, you’ll have to make things a little more difficult.
To eliminate a large scratch, it is necessary to slightly separate the wallpaper from the wall, gently smear the wallpaper, trying to get as deep as possible with a brush, press the smeared piece firmly, remove the adhesive residue and heat the work surface with a hairdryer.
A cotton swab can be used to work the adhesive deeper. In addition, it is important to apply glue to the entire surface of the wallpaper separated from the wall. Nuances play an important role, remember this.
The scratch on the wallpaper has been fixed, now let’s move on to gluing the edges of the wallpaper. It happens that the edge of the wallpaper has moved away from the wall and bent, something needs to be done.
We apply the above method, slightly modernizing it.
Still think your wallpaper looks bad on your walls
If the edge of the wallpaper that has come off in its shape clearly fits the bare wall where it used to hang, it is not torn, or it is torn slightly, and when connected to the wall, the general appearance of the wallpaper will be restored, then in this case it is enough to glue the edge back.
We carry out standard manipulations: carefully and thickly smear the edge with wallpaper paste, apply it to the wall and smooth it, remove the remaining glue with a rag and, if necessary, dry the area with a household hair dryer. Such a simple and quick wallpaper repair should restore the original appearance of the wallpaper.
If the loose edge of the wallpaper is torn, if it has a missing part, then a patch will have to be used in this place.
Making a patch involves using the same type of wallpaper that is pasted on the wall. Choose the pattern and color of the wallpaper, aligning them at the defect site. To use as a patch, we need a piece a couple of centimeters larger than the one that has come off the wall and is torn. This is done in order to successfully combine the old wallpaper and the new piece so that the seam is perfect.
In some cases it is easy to select a pattern, sometimes it is not.
Cut out this piece with scissors, or tear it off with your hands, in the case of repairing thin paper wallpapers. Torn edges on paper wallpaper stick very well, besides, after drying, on light wallpaper and wallpaper with a small pattern, such joints are practically not visible.
Next, we move according to the planned scheme: we apply glue to the inserted piece, and press it against the wall, we try to combine the pattern as clearly and beautifully as possible. Don’t apply too much pressure, as this will remove most of the adhesive and damage the seam.
The repair of such wallpaper is complicated by the noticeable texture of the material
With this type of wallpaper repair, it is worth choosing an adhesive according to the type of wallpaper, if your wallpaper is based on non-woven, then choose the appropriate adhesive, in principle, any adhesive is suitable for paper wallpaper. In addition, polymer glue can be used for repairs (glue on which ceiling tiles and ceiling plinth are glued) or construction PVA, but in this case the effect may be different.
Wrong choice of adhesive will allow the inserted piece to fall off again.
Ways to remove scratches from the refrigerator
There are several ways to remove scratches from the refrigerator:
- polishing with cleaning products;
- use of special transducer;
- applying baby oil to a scratch;
- rubbing in toothpaste free of crystals and granules;
- use of sandpaper;
- Purchase a special scratch repair kit.
Damage can be masked with pretty magnets, family photos, useful notes, etc. For more serious defects, specific parts may need to be replaced. In this case, it is recommended to seek help from the workshop. Expert advice will be needed when the owner of the equipment does not have the necessary experience in this matter and no idea how and how to repair a scratch on the refrigerator.
Expert advice is needed when the owner of the equipment does not have the necessary experience in this matter and no idea how and how to repair a scratch on the refrigerator.
Repairing major damage
If we are dealing not with a small scratch, but with a large area of damaged wallpaper, then we will have to cut this area from the wall and stick a patch. We try to cut an even figure on the wall, so it will be easier for us to fit the patch.
If a torn piece of wallpaper does not peel off the wall well, you can apply a special wallpaper remover or wet it with water in the old fashioned way.
![]()
Repair of the wallpaper section is carried out in several stages.
- The patch is made from the same wallpaper that is pasted on the wall. If you don’t have such rolls left, you can look into a hardware store with a piece cut off from the wall, perhaps such an article is still being produced, then you can buy the desired wallpaper roll.
- We cut out a patch a few centimeters larger than the damaged wallpaper cut off the wall, for their further proper joining.
- We apply wallpaper glue of the desired brand on the wallpaper and the wall, apply and smooth the patch, getting rid of unnecessary air, try to combine the pattern on the canvas.
- Since the glued patch is several centimeters larger than the empty space on the wall, it overlaps. We remove it with a sharp knife, cutting through the junction of the connection of the patch and the old wallpaper. Thus, we remove unnecessary overlap and create a perfect connection that will be almost invisible.
Your patch is now on the wall and hard to see when dry.
Wallpaper that has fallen off the walls
One of the most common types of wallpaper defects is peeling off the wall near the ceiling or floor. These are the most difficult areas when gluing, and often it is there that builders have a marriage in their work. To work with this marriage, it is necessary to take the edges of the wallpaper away from the wall in this place and try to study the cause of the peeling.
Try to manipulate the wallpaper as carefully as possible, remember that it can break at any time.
The main reasons for this peeling are:
- the wallpaper was pasted on fragile old plaster, which got wet and fell off when in contact with the adhesive,
- the wall was not primed and the wallpaper paste was completely absorbed into it,
- the consistency was not observed glue, it was liquid or did not fit this type of wallpaper at all,
- during pasting, strong humidity was allowed,
- during pasting the walls with wallpaper, there was a draft in the room.
In any case, now you can safely conclude that the wall for wallpapering will have to be well prepared.
The right choice of wallpaper paste will help to avoid many problems in the future.
We do everything in order.
- We remove all rubbish from under the wallpaper hanging on the wall: dust, dirt, old plaster.
- If necessary, lightly plaster the wall and allow it to harden.
- Priming fresh plaster with a special compound or wallpaper paste.
- We begin to restore the integrity of the canvas: apply glue to the walls and wallpaper, dock the piece that has gone away with the wall and other glued canvases nearby, press, smooth, remove air from under it, glue residue, wait for complete drying.
You can use a hair dryer to speed up the drying process, and by heating the joints, you can strengthen their contact with the wall and perfectly align. To achieve the desired effect, we press the joints against the wall and wait for complete cooling.
Recommendations of specialists
When ordering PVC window blocks from the installation company, you should immediately purchase the “First Aid Kit for Windows”. The set includes:
- window profile cleaner;
- mineral oil for fittings;
- silicone grease for seals;
- universal cloth;
- instructions for use.
This first aid kit can always help out at the right time, you don’t have to look for a cleaner in specialized stores.
Removing scratches in any of the above ways without proper experience is extremely risky. The process requires certain skills, so it is rare for beginners to remove a defect without a trace.
If you do not have complete confidence in your own abilities, it is better to entrust the repair of damage to professionals. They will not only be able to restore plastic frames to their original appearance, but will also help save money on the purchase of the necessary materials and tools.
Open seams between sheets
One of the most common wallpaper problems is open or poorly joined seams. Such a defect can be observed after gluing paper wallpaper, which can stretch a little under the influence of moisture. After drying, such stretched webs shrink, leaving a gap between the joints.
Such gaps are very noticeable on bright and dark wallpapers, which are strikingly different from gray base plaster or white finish. On light wallpaper, thin gaps between the seams are not so noticeable.
An example of a bad joint between sheets
Builders with experience, having found out what kind of wallpaper they will have to glue on the wall, can play it safe and paint the intended joints with a paint that matches the tone of the wallpaper being prepared for pasting.
But back to the problem, in our case, we need to fix an existing defect. This is done with the help of putty and color: a color is selected that matches the tone of the wallpaper, the putty is tinted and applied to the joints. The remains of putty before drying are removed with the help of wiping materials.
Once dry, the seams may be slightly visible at close range, but completely invisible from a distance. This method involves the complete masking of bad joints on the wallpaper.
Recommendations for preparing surfaces for wallpapering
Many defects in wallpaper could have been avoided at the very beginning of working with them – by gluing them to the wall. Properly prepared surface, following the instructions, the use of modern materials, all these factors would help you stick the wallpaper in earnest and for a long time.
Applying the final layer of plaster on the wall
We have prepared a number of important aspects to keep in mind when working with a finishing material such as wallpaper.
- Wallpaper repair is not complete without removing old, damaged layers, this must be done. A wallpaper remover and warm water will make the task easier, in this case there is a chance to remove the wallpaper with a single sheet.
Otherwise, use a spatula.
- The wall for wallpapering should always be prepared. Old plaster can fall off under the wallpaper, so it needs to be dismantled. The wallpaper also sticks badly to the paint, we sand it.
- Switches and sockets are important elements of space management in the room, they also need to be taken care of in advance. Strongly mounted in a box and plastered, they will not bring problems in the future.
- Walls in most of our houses are uneven, corners are no exception. Taking into account the fact that wallpapering in the corners is a complex and responsible process, you need to take care of this in advance and slightly tweak these places.
- The use of a primer is essential, match the primer to your wall material. The surface must absorb moisture, thereby allowing the adhesive to hold the wallpaper on the wall. Properly primed walls will speed up the drying process of the wallpaper and easily hold it on itself.
- The room to be wallpapered must be completely isolated from drafts, both during the wallpapering process and after, until it dries.
In addition, you do not need to allow excessive humidity and heat in the room.
- Wallpaper glue is selected according to the type and quality of the wallpaper, for light wallpapers we choose the simplest, for heavy ones – more concentrated, for paper – paper, for non-woven – non-woven. We breed glue in water at room temperature, do not boil it, and heating above 30 degrees will not do him any good.
- When working with wallpaper, try to pay attention to the little things, control the entire process of gluing, it is better to identify and correct shortcomings immediately than to restore or repair the wallpaper later.
Smooth and tidy wallpaper attracts attention
Using these tips, you can repair damaged wallpaper with your own hands, thus restoring its original beauty and grace. However, remember that most of the defects could have been avoided by properly pasting the wallpaper on the wall.
Damage to the wallpaper can occur for various reasons: during the rearrangement, furniture was carelessly moved and caught on the wall, a pet sharpened its claws, non-compliance with recommendations for pasting wallpaper during repairs was made, and much more. The nature of the damage can also be different, ranging from small scratches to the appearance of a bubble in the middle of the wallpaper.
Photo: everything can be done by hand
There are many reasons, but you need to somehow correct the defects found, which can be done by hand. To fix each such damage, you need your own approach.
We update wallpapers in radical ways
There are situations in which it is simply impossible to clean or update wallpapers using standard methods. But that doesn’t mean you have to despair. There are several methods by which you can update your wallpaper.
Water-based paint
This is quite a dramatic, but at the same time an easy way to freshen up a room and interior. Absolutely any wallpaper is suitable for painting, regardless of the pattern, relief, material or texture. Despite the fact that the water-based coloring mixture is the most versatile, some rules should still be followed.
- If you have any doubts about the appropriateness of painting, then test it on a small area that is not conspicuous.
- The layer must be thin, otherwise the wallpaper will get wet and completely deteriorate.
- Before painting, the surface must be prepared by removing dirt and loose pieces.
Important! When painting embossed textures, the roller should be taken with a long pile.
Partial replacement
To do this, you need to stick masking tape around the entire perimeter of the area to be replaced. Using a paint or stationery knife, you need to cut out a piece of old wallpaper canvas. Delete it. Stick on a new canvas.
Important! In order for the new site to look harmonious, use decorative overlays or strips from old wallpaper.
Damage to the wallpaper can occur for various reasons: during the rearrangement, furniture was carelessly moved and caught on the wall, a pet sharpened its claws, non-compliance was made during repairs, and much more. The nature of the damage can also be different, ranging from small scratches to the appearance of a bubble in the middle of the wallpaper.
There are many reasons, but you need to somehow correct the detected defects, which can be done by hand. To fix each such damage, you need your own approach.
Small defects on the wallpaper
For example, scratches on damaged wallpaper can be corrected as follows:
- prepare tools and materials: you need PVA glue, a lint-free cloth, a thin brush and a hair dryer;
- smear a small scratch with glue with a brush and press this area with a cloth, removing excess glue;
- if the scratch is still visible, turn on the hair dryer and heat the area, then press down on the area of the damaged wallpaper until the treated area has cooled;
- if the scratch is large, carefully peel back the edge, coat the wallpaper with glue and repeat the steps mentioned above. Instead of a brush, you can use a cotton swab to get to the furthest point of the scratch. Try to glue the entire surface of the damage with glue.
Correction of serious defects on wallpaper
If a larger piece of wallpaper is damaged, this area should be cut out and removed from the wall. If the damaged wallpaper does not lag behind the wall well, you can moisten it with water.
- You need to find exactly the same wallpaper and adjust the pattern if necessary. Cut the wallpaper so that the new piece is five centimeters larger than the old piece.
- Next, glue the wall and the patch with glue, stick it, press and smooth it so that there are no air bubbles left. The edges of the patch overlap, therefore, with a sharp paint knife, we cut off the excess sections so that the cutout falls along the junction of the pasted wallpaper. Thus, the replaced area will practically not be visible.
The wallpaper has moved away from the wall
If the wallpaper lags behind the adjoining wall with the ceiling or floor, you need to carefully bend the canvas and fix it in this position. Be careful not to tear the wallpaper further.
- Now you need to find out why the wallpaper did not stick to the wall. Perhaps the wall was poorly prepared and the old plaster that had fallen off was not removed.
Remove all crumbs and vacuum away dust and debris, then plaster the wall and wait for the plaster layer to dry.
- If necessary prime the wall.
- Now coat the wall and wallpaper, press the wallpaper against the wall and smooth it to avoid voids under the wallpaper, remove all excess glue with a cloth. For strength, you can heat the joints with a hair dryer and press with a rag until the seams cool.
Armed with knowledge, one can cope even with such a difficult task. If during the repair you glued the wallpaper joint to joint, then a gap at the joints is possible, and therefore a gap may appear. If the wall is very different in color from the wallpaper, then it will look bad. You can prevent such a defect in advance and, having measured the wall, find out where the edges of the wallpaper will join. In those places, paint the wall with paint that matches the color of the wallpaper, in a narrow strip. This will mask possible gaps between the wallpaper.
If you have not foreseen this, then you can mask the defect by applying a one-color colored putty, the color of which matches the color of the wallpaper. It is necessary to smear the formed gaps with a finger, wipe it across the seams with a rag until the putty has dried, and wipe the stains on the wallpaper with a clean, dry rag.
Smooth out uneven joints with a special roller
What to do with a loose corner?
1. Glue wallpaper with PVA glue.
This is how you can deal with the problem when a small corner has come off. It is enough to saturate the wallpaper with glue, and also smear the wall with it, then press firmly and smooth the corner.
If the wallpaper is peeling off at the seams, use a special adhesive to repair these areas.
Pictured: Pufas Uni-Fix Quick Repair Adhesive.
2. Take special glue for wallpaper repair.
A similar adhesive is available from hardware stores. It allows you to point-to-point repair of wallpaper that has diverged, for example, at the junction. For this, the tube has a special elongated narrow dispenser.
3. Impregnate the wall with primer and re-glue the sheet.
This repair is suitable if the corner has not just moved away from the wall, but most of the canvas has peeled off. Let the primer dry, then thoroughly saturate the wallpaper and wall with glue and gently stick the wallpaper to the wall with a roller.
Preparing the walls before wallpapering
To avoid such cases, it is necessary to carefully approach such a responsible task as wallpapering. After all, wallpapers are glued for a long time, at least until they lose their appearance, become faded, from exposure to the sun or humidity in the room.
- If you decide to restore the wallpaper, then remember: the first step is always to remove the old layer. Wet them with water, and they will more easily move away from the walls in large pieces. After removing the old wallpaper, prepare the wall for pasting.
- It is necessary to remove all the paint, to which the wallpaper does not want to stick, clean and remove the putty, which crumbles and falls off.
- It would not be superfluous to check the fastenings of sockets and switches located in the wall, fix and putty so that subsequently the socket does not fall out in these places along with the wallpaper.
- Check the corners of the room, if they are too uneven, smooth them with putty.
- Use a primer designed for the wall material. In order for the wallpaper to adhere well to the wall, it must absorb moisture, otherwise the wallpaper will dry for a long time and may not stick to the wall.
- Avoid drafts after pasting. The room should not be too hot. Wallpaper glue must match the type of wallpaper. For non-woven, one glue is used, for textiles – another, and so on. Do not use too hot glue, its temperature should not exceed thirty degrees. When repairing, constantly monitor the quality of your work, because fixing it right away is much easier than after the wallpaper has dried.
We recommend watching a tutorial video (how to restore wallpapers):
We hope that you will be satisfied with the repair made by yourself, and that various defects will not appear on the wall that can overshadow the joy of repair.
Causes
The causes of scratches or cracks on the frames of plastic windows occur when used carelessly. From marriage during production, to domestic troubles – a heavy thing accidentally dropped on the windowsill.
Major common occurrences.
- Careless transport. It is always worthwhile to carefully inspect the window before installation.
- Incorrect installation of the window structure. In this case, cracks may appear weeks or months later.
- Sloppy installation or plastering of slopes. Traces remain after using tools.
- Cracks from low temperatures appear when plastic production technology is not followed.
- Careless use. If a foreign object gets under the sash, when the window is closed, the window is skewed. Over time, a crack may appear along the weld.
- Improper maintenance. When using abrasive detergents, abrasions occur on the plastic.
- Children’s pranks or tricks of pets.
The question – how to remove a crack in plastic can be answered unequivocally – just replace the window or sash with a new one. And you can remove shallow scratches with your own hands.
Do-it-yourself budget bathroom renovation: real photos
Do-it-yourself budget bathroom renovation
If you want to make a cheap DIY bathroom renovation, then we will give you some tips, following which, an economical bathroom renovation will become a very real undertaking.
Let’s see what you can save on when renovating your bathroom, without a significant loss in the quality of the repair.
Where to start?
If you’ve figured out your budget for a bathroom renovation and find that you can’t afford a major renovation, don’t despair. After all, even the economy version of bathroom renovation can be very attractive in appearance. In addition, it will not be difficult to do it yourself, which will further reduce the cost of your repair.
Options for budget renovation in the bathroom
So, we have decided on the budget. Let’s figure out which jobs are the most expensive.
Replacement of plumbing and faucets.
If your plumbing is in good condition – great, it will save you a lot of money on bathroom renovations. If not, consider refurbishment. For example, a bathtub can be restored with acrylic. And the faucets are easy to disassemble and replace obsolete gaskets, clean them of limescale with ordinary vinegar. What we do not recommend saving on is hoses to mixers. A flood from a burst hose will cross out all the savings on repairs.
Replacement of communications.
Water and sewer pipes, fittings, heated towel rails, etc., are expensive in themselves. But the work on their laying also implies the chasing of the walls, or the ugly external laying of communications. Here it is already difficult to get off with cheap repairs in the bathroom. Therefore, we recommend considering the following options:
- If the pipes are not rotten and you are satisfied with their location, paint them with good enamel.
- You can also “sew up” communications in a plastic box, or in one made of moisture-resistant drywall.
How to make a frame from a metal profile, read our article “Frame for drywall”.
Ceiling repair.
A budget option for repairing the ceiling in the bathroom is to simply paint it with latex water-based paint. But this is the case if you have a flat ceiling. If you need to level it, then an inexpensive repair option would be:
- Plastering the ceiling, followed by puttying and painting
- Finishing the ceiling with plastic PVC panels
To plaster the ceiling, clean it of old paint or whitewash. Prime it well with a deep penetration primer. Apply plaster to the ceiling and level it with a plaster trowel. Let the solution dry a little and trim it with a grater again. After the plaster has dried, apply the primer again. After a few hours, you can start puttying. Apply putty in a thin layer starting from the edges or from a place free from putty. So you will not leave dents on the already applied fresh putty. Let it dry, smooth with an emery cloth or sandpaper. Apply primer and repeat the cycle again. Then the ceiling can be painted.
To finish the bathroom ceiling with plastic panels, it is necessary to use a galvanized metal profile to create a supporting frame. Do not use wooden slats for this purpose. In conditions of high humidity in the bathroom, they will rot very quickly.
Mark a horizontal line around the perimeter with a spirit level or spirit level. Attach a guide profile to it. Make a crate using a wide profile 60×27 mm. Fix the panels on it and glue the ceiling plinth.
Wall repair
The most budgetary and economical wall repair would be a simple painting. Paint should be applied to the prepared wall surface. To do this, the wall must be smooth, clean and primed. Don’t forget to apply penetrating waterproofing before painting. Choose a paint that is moisture resistant. Best latex or acrylic emulsion.
Another inexpensive option for finishing and repairing walls in the bathroom is PVC paneling. Here the sequence of actions is almost the same as in the case of the ceiling.
If you have good but old ceramic tiles on the walls, you can restore them instead of changing them. Today there is a lot of “chemistry” for the restoration of the surface of tiles and tile joints. The same option can be used for floor tiles.
Floor Renovation
If floor tiling isn’t your choice, there are other ways to economically renovate your bathroom floor.
For example, you can put linoleum on the floor. This is an inexpensive material, moisture resistant, quickly mounted.
You can also make a self-leveling floor. For more information on floor repair options, see our Floor Repair topic.
Totals
Let’s sum it up. Budget bathroom remodeling is a real undertaking, especially if you do it yourself. The main thing is to draw up a clear work plan and check its compliance with the budget for repairs. Leave a small reserve of finance for unforeseen cases. And feel free to get to work. And do not forget to share the result with us and our readers in the comments or in one of our groups on social networks. Easy repair for you.
Budget bathroom design
In this article we will look at how to create a budget bathroom design , how to save on repairs and what can be done for a minimal budget.
To begin with, let’s adequately evaluate the field of action and decide on the most necessary in our project: plumbing, bath or shower, lighting, dryer, etc.
Wall, floor and ceiling decoration
A budget option and the best in the budget bathroom design project, you can use tiles, pvc panels and stretch ceilings.
Finishing the bathroom with plastic panels
We select plumbing
Of course, you can’t save on plumbing, but it is possible to choose easier and cheaper.
Bathroom. In order to save money when choosing a bathroom, instead of cast iron, we recommend buying acrylic or steel, they have proven themselves in terms of wear resistance and maintenance.
Acrylic bath Acrylic bath Acrylic bath Acrylic bath
Toilet. We recommend purchasing not a hinged, but an ordinary floor-standing toilet. It is much cheaper. We advise you to study the manufacturers in detail, because in case of marriage, all your repairs are down the drain.
Floor standing toilet in bathroom design Floor standing toilet in bathroom design Floor standing toilet in bathroom design Wall hung toilet in bathroom design Wall hung toilet in bathroom design Wall hung toilet in bathroom design
Cost items that can be saved
- Delivery of materials
- Designer Services
- Builder Services
- Cheap Finishes
- Mid-Range Sanitary Ware
Budget Bathroom Design – Interior Options
Choose a design that costs less. An excellent option would be the style of minimalism, hi-tech and modern. These areas are characterized by a minimum of things and decor.
Bathroom design photo Bathroom design photo Bathroom design photo Bathroom design photo Bathroom design Bathroom design Bathroom design Bathroom design Bathroom design Bathroom design
Budget bathroom design pictured
How to make a budget bathroom renovation [5 real ideas]
A bathroom in a medium-sized apartment is a small room, but for a full-fledged modern renovation, you need to invest a considerable amount of money. The hygiene room is an important component of any house or apartment, each owner tries to bring maximum comfort into a small space. Unfortunately, the small footage does not allow wild imagination to roam. However, with the right approach to business, you can create a practical and functional design with a harmonious combination of all elements of the hygiene room.
Everyone knows that any repair takes a lot of effort and time. Often, households put off a troublesome event, not thinking about the consequences, finding different excuses. For example, when the financial condition improves or free time appears. The use of an unrenovated room brings daily discomfort. Naturally, it affects the mood from the very morning. It is even worse when, with prolonged tightening, a fungus occurs that does not affect the human body on the positive side. Therefore, if you see that a repair is needed, do not shelve it, roll up your sleeves and go ahead.
Economical renovation of the bathroom is quite possible for everyone
Bathroom, this room is not with a simple microclimate, high humidity and sudden temperature changes contribute to the occurrence of fungal manifestations. In order for the transformation of the hygiene room to be of high quality, it is required to purchase special materials that are not cheap. Many people cannot afford this option, and they need to find a way out, think carefully about how to save money.
Before starting preparations for repairs, the owner must decide on the design, because everyone wants to see a stylish and aesthetically beautiful interior. At the same time, one should not miss an important detail, in addition to an attractive interior and good functionality, it is necessary to take into account the duration of effective use after repair.
Today, with the help of a wide range of modern materials, it is quite possible to make an inexpensive, but quite stylish repair.
![]()
The repair budget is:
- Financing the transportation of purchased materials. The cost of ceramic tiles is quite expensive, to reduce investment, you can choose an economical option, for example – plastic panels.
- Plumbing takes the lion’s share of deferred savings, experienced craftsmen recommend not to skimp on the purchase of faucets, the functionality of plumbing equipment depends on this. Replacing a bathroom is another matter, a cast-iron one can be replaced with a more economical option – an acrylic or steel structure.
- A well-designed bathroom interior design project is the beginning of a successful renovation. But, the services of qualified designers carry costs. Therefore, you need to sit down and think carefully about the layout of the hygiene room, you can look at different offers on the Internet and create your own design, which you will save on.
- Finishing the ceiling in an economical way – purchase plastic panels or use a tension structure .
The second option is not only profitable, but also practical, this design is installed without dismantling the old coating, and this saves time for repairs.
- The last important and cost effective recommendation is to do the repair work yourself. Everyone knows that the services of qualified finishers are not cheap. Based on the entire budget for repairs, almost half can go for the services of professionals. It is expedient and cost-effective to do the work with your own hands, although you can’t do without the invitation of masters when performing complex tasks.
TIP: When choosing plumbing equipment, do not chase foreign brands, you can purchase excellent domestic products based on user reviews and recommendations from professional craftsmen.
Main bathroom renovation mistakes (1 video)
Do-it-yourself budget bathroom renovation + photo
Do-it-yourself bathroom renovation on a budget is a feasible task. The right strategy when choosing finishing materials and a clear idea of the progress of work will allow even with a modest budget to transform the bathroom without sacrificing quality.
Organization of the process
Good planning is the first step towards successful completion. Most of the work in the bathroom with a budget repair can be done by hand. Removing old coatings, dismantling plumbing or painting can be done even by a novice master.
But if experience in wall tiling is not enough, it is worth considering inviting specialists to separate areas of bathroom renovation. Do not overestimate your strengths and capabilities. Sometimes reworking your own mistakes will cost more than inviting the master initially.
When the bathroom renovation work is distributed, they move on to the choice of finishing materials. It is better to refuse well-known imported brands. A significant part of the cost is a fee for the brand, which, with a budget repair option, looks inappropriate. The cheapness of Chinese goods is also not the best option.
This applies to both bathroom finishing materials and sanitary ware. The combination of reasonable cost and good quality is a distinctive feature of the products offered.
An important condition for a qualitative result when carrying out budget repairs with your own hands is the observance of the technological process. If any stage of the work is in doubt, listen to the recommendations of experts, improvisation is inappropriate.
Bathroom redevelopment automatically increases the repair estimate by several times, so there is no need to talk about the budget option. Leave your ideas for moving walls or plumbing to another place until better times, when there will be no financial constraints.
The amount of preparatory work to remove the old lining depends on the choice of new materials. Sometimes this step can be avoided. Mandatory dismantling of plumbing is required if it is planned to replace it.
Wall decoration
Economic bathroom renovation includes several options for wall decoration:
- painting;
- installation of PVC panels;
- wallpapering, including self-adhesive film;
- tiling from the budget segment.
Each method has undoubted advantages and some negative points.
Painting
Wall painting is the leading cost-effective finish due to its ease of execution and low cost. A competent approach when choosing paint and high-quality wall preparation is the beginning of the path to success.
A project where the areas around the sink and bathtub are lined with inexpensive tiles or moisture-resistant PVC panels is characterized by greater efficiency.
Moisture resistance and antibacterial properties are a must when buying paint, otherwise it will not be possible to avoid the development of fungus and peeling of the coating in the bathroom. High performance characteristics against the background of budgetary cost are inherent in paints:
The absence of a pungent odor is an undoubted plus of water-based compositions, and silicone paints perfectly perform the function of a hydrobarrier. It is better to refuse the use of oil mixtures. After a short time after the repair, the walls of the bathroom will be covered with cracks.
4
When renovating a bathroom economically, keep in mind that paints with an attractive glossy effect accentuate any irregularities in the walls and make any imperfections more visible. Therefore, careful alignment of the walls is necessary. The advantage of gloss is the ability to visually enlarge the space of a small bathroom.
Bathroom walls often need to be stripped of old paint during renovations. This can be done in several ways:
- use a drill with a special grinding attachment;
- purchase paint remover, additional spatula and scraper will be needed during work;
- use thermal methods, when the old coating is heated with a building hair dryer or burner, and the swollen paint is scraped off with a spatula.
Naturally, at the end of the removal process and before the start of painting, the whole complex of measures is carried out: sealing cracks, eliminating protrusions, priming.
The photo shows a bathroom with a do-it-yourself budget renovation:
PVC panels
Bathroom walls can be repaired with PVC panels. At a cost, this will cost a little more than buying paint, but the method has two clear advantages:
- The appearance of a bathroom after a budget renovation using PVC panels, in terms of design, is incomparably better.
- Extensive wall surface preparation is not required.
The process of mounting panels does not contain complicated steps and is available for do-it-yourself. After calculating the need for the material, the formation of the crate is carried out. For these purposes, plastic profiles with clips are used. For economical bathroom renovation, wooden slats are also suitable. Pre-impregnation of the material with antiseptics will protect the slats from high moisture.
Wallpapering
There is also the option of renovating a bathroom with wallpaper, the main thing is to choose moisture-resistant products. The work is being carried out at a fast pace, the removal of the old coating is not required in all cases. There are 3 main types of wallpaper designed for use in the bathroom:
- Vinyl with non-woven backing. The price is quite high, the repair will require the purchase of special glue, which is not always advisable in an economy project. But high performance is the basis of popularity among consumers.
- Washable. Compared to vinyl copies, they are less practical, the cost of the product is correspondingly lower.
High quality and attractive appearance of the self-adhesive are accompanied by 3 negative points:
- A rather high cost of the product, which may not fit into the budget repair estimate.
- Bathroom walls require careful preparation, as any flaw under the self-adhesive wallpaper will be extremely noticeable.
- Quite a complex application process. The painstaking process takes much longer than standard pasting.
The photo below shows an economical repair bath:
Tiling
Budget repair also implies the use of tiles in wall cladding. The main thing is to choose an inexpensive product with decent quality. Solution Benefits:
- material resistant to temperature extremes;
- is not afraid of high humidity, withstands prolonged contact with water;
- washes well;
- is resistant to mechanical damage.
The following negative points can become an obstacle to use in the bathroom during budget repairs:
The best option when renovating a bathroom with a budget project is a combination of cladding. The area near the bathtub and sink is tiled, and for those less exposed to water, a simpler and more economical method of coating is chosen.
Ceiling finishing
The amount of work on budget ceiling finishing depends on its initial condition. It is enough to cover a flat surface with water-based paint or whitewash. A simple and quick process can be done by hand. It is recommended to remove a significant curvature or mask the communications of the bathroom with a suspended structure. Rack elements or PVC panels are suitable as a material.
Main advantages of choice:
- affordable price segment;
- simple veneering procedure;
- does not require perfect preparation of the bathroom ceiling surface;
- successfully mask wires and pipes;
- it is possible to mount built-in lamps.
The result of the budget repair is shown in the photo:
Floor covering
Finishing option depends on the repair estimate and the condition of the old bathroom flooring. Sometimes just refreshing the look of a tile is enough. To do this, you will need to remove the grout and pick up a new one that matches the color of the tile.
Quite easy and cheap to lay linoleum, but this measure will be temporary. The increased level of humidity in the bathroom provokes the development of mold on the linoleum.
Tiles are more practical when renovating a bathroom, even at a budget cost. Facing is carried out without dismantling the old tiles. The cost of labor and time will require a screed. To repair the bathroom floor, choose a tile with a rough texture to avoid slipping and not cause injury.
If you’re on a tight budget, the most economical option is to get a large size rubber mat that will cover the free space of the bathroom floor as much as possible. It can be changed much more often than any stationary coating, and a fresh look of the interior at minimal cost will be provided.
The nuances of choosing plumbing
Replacement of plumbing in the case of a budget repair is not always carried out. Sometimes they stop at the option of restoring the bath. There are several ways to update:
- Internal surface treated with two-component polyester enamel.
Most budget friendly.
- Restoration with liquid acrylic is more durable and cost effective.
- Sometimes both methods are unacceptable due to the deplorable state of the bath. An acrylic tab will save the situation, the fixation of which is carried out with a sealant.
Each method still involves financial costs, although they will be incomparably lower than the purchase of a new bowl.
If a budget renovation involves the purchase of new plumbing for the bathroom, consider the following options:
- Acrylic container. Located at the bottom of the price segment. Easy installation and easy maintenance are the key advantages of the product for the bathroom. A short service life and instability before mechanical damage are the main negative features.
- Cast iron is more practical. The cost is higher than acrylic counterparts.
- Steel bathtubs are between acrylic and cast iron products.
- If the presence of a bathtub in the bathroom is not important, you can consider installing a shower cabin.
But the repair will already go beyond the budget.
When replacing washbasins in the bathroom, choose between hook-on or stand-mounted equipment. The first option is more budgetary, the second has more aesthetics, as it successfully masks communications. The nuances of choosing plumbing and the preference of a domestic manufacturer were discussed in the first section.
Conclusion
Little things can embellish the interior of a bathroom after a budget renovation. An original curtain, decorative stickers and new accessories will enliven the design of the room. Communications are not left open, they will spoil the result of even the most expensive bathroom renovation. A budget way to quickly hide the functional elements of the decor is to form a plastic box. It will take a little time and costs, but the result will be obvious.
Budget bathroom renovation. What can you save on?
With the right approach, you can make an excellent and very inexpensive bathroom renovation. The secret is in the choice of materials and the independent execution of most of the work. What options exist and what nuances should be taken into account when renovating a bathroom on a budget?
Wall decoration
Among the most budget materials for bathroom wall decoration are:
- paint;
- PVC wall panels;
- self-adhesive film;
- inexpensive tiles.
The last option is the most practical. The tile withstands temperature changes, mechanical shocks, is durable, looks aesthetically pleasing and is easy to clean, incl. with detergents. But first you need to prepare the walls: remove the old coating, treat with fungicides if necessary, level.
Tile adhesive, which is not worth saving on, and grout will be added to the total costs. If laying tiles yourself is difficult, then the services of an invited worker will increase the cost of repairs. In order to save money, you can clad only the section of the wall to which the bathtub and sink adjoin (make an apron), and paint or wallpaper the rest.
The easiest thing to do is to paint the walls. Both men and women can handle this. But the paint is selected special, taking into account high humidity and temperature changes.
Usually oil or acrylic. The walls themselves need to be plastered. The paint layer is not thick enough to hide all the bumps and cracks.
Another easy and inexpensive finish is self-adhesive film . Its other name is self-adhesive wallpaper, but it is also called vinyl wallpaper impregnated with glue. The latter are more expensive, but in comparison with similar vinyl wallpapers without impregnation, they come out cheaper. Self-adhesive film is not afraid of moisture, has a wide choice of colors, already contains glue. It remains only to stick to a flat wall. If the surface is not prepared, then all the irregularities will become even more noticeable. You don’t have to wait for the glue to dry.
And the last material – PVC panels or lining . Cheap material, easy to install, well hides the flaws of the walls, is not afraid of moisture and decay. But it is easily deformed, does not withstand strong impacts, very cheap plastic can have an unpleasant odor and release harmful substances. The frame and fasteners are additionally purchased for the panels.
Bathroom floor
0012 linoleum and inexpensive tiles.
Linoleum is best considered as a temporary option if it is not possible to carry out a full repair. Due to constant contact with moisture, mold will grow under it over time. Therefore, it is better to choose without a base or monogenic.
In this respect, tiles are the most practical. But will require removal of the old coating, leveling screed, tile adhesive, grout and spacer crosses. While a sheet of linoleum can be placed on top of the old coating. Paying for a tiler will increase costs if you don’t want to lay the tiles yourself.
It is recommended to choose floor tiles with texture or rough. This will prevent slipping on wet floors.
Ceiling
If the ceiling is sufficiently even, without flaws, then it can be painted with matt waterproof paint, light water-based emulsion or simply whitewashed. The new white ceiling will immediately refresh the whole room. The work itself is not difficult, and whitewash paint is not expensive.
If the ceiling is curved or pipes pass through, it can be hidden behind a false ceiling made of plastic battens or panels.
This method has many advantages:
- price, ease of installation;
- is convenient for installing fixtures;
- panels will hide all communications and flaws.
Does not require pre-preparation of the ceiling in the form of leveling, etc.
Plumbing selection
The most inexpensive option for for the bathtub is acrylic. It costs less than cast iron, but it is easier to install and unpretentious in maintenance. The service life is not long, but the replacement often coincides with the new repair. A good choice for families with small children as it is not as traumatic when falling as cast iron. But he does not like the claws of pets.
You can pay attention to the size. The smaller the bath, the cheaper.
If cast-iron bathtub is whole , it suits everyone, but you don’t like the appearance (the enamel turned yellow and cracked), then you can cover it with liquid acrylic. Externally, the bathtub will be completely transformed, and the coating will be cheaper than replacing the bathtub, along with dismantling and installation work.
When the opportunity to soak in the bath is not essential, it can be to be replaced by compact shower enclosure . Some models have a high tray, which is used as a small bath.
There is a separate issue with the sink. At first, you can do without it.
There are two types:
The first option is cheaper, the second is more reliable and hides communications. However, if you build a cabinet on hooks under the sink, then it will not only hide pipes, but also household chemicals. The latter can also be stored under the bathroom if you build a plastic screen.
For the toilet bowl, as well as for the washbasin, it is recommended to choose domestic faience . It is cheaper than porcelain, but in general it is no worse.
Repair Tips
If the walls have been painted with oil paint, it must be knocked down. Otherwise, the plaster on such a surface will lie poorly and will not last long.
If it is not possible to replace the floor, the covering can be hidden under a large rubber mat. It is easy to match the color of the interior and, if necessary, replace it. At the same time, it perfectly hides all the flaws of the floor. The difference from linoleum is that the rug can be periodically removed, washed, and the floor itself will be ventilated.
After the removal of the old floor, it is recommended to install waterproofing. It perfectly restrains the average “flood”, which in the future will save you from litigation with neighbors from below and compensation for damage. The issue of waterproofing in panel houses is especially relevant.
If the pipes are old and rusty, it is preferable to replace them. You can use plastic ones, they are cheaper, but it’s better not to save on valves and valves and take high-quality ones.
Protruding pipes ruin even an expensive interior. They can be hidden in a plastic box – cheap, aesthetically pleasing, there is easy access to communications. As an option, vertical pipes can be hidden in a pencil case, which will simultaneously serve as a place to store bit chemicals or rags and mop.
If you plan to replace the plumbing, it is recommended to install the bathtub first and then repair the walls. This will reduce the risk of water leaking between the wall and the tub. The latter can become a support for the first row of ceramic tiles.
If you need to relocate a luminaire or install additional light sources, be sure to call an electrician. These are just those works that are best left to a specialist.
Mixer can be purchased cheaply. The service life depends on the quality of the water, but on average it is 1-3 years.
Since the renovation is on a budget, the bathroom itself will look simple. Special decorative wall stickers, original curtains, shelves, new towels, soap dishes and other accessories will revive the interior.
Saving secrets
- Most of the cost of expensive imported sanitary ware and building materials is brand fees.
Cheap Turkey and China should also be abandoned: this is the case when you have to pay twice for stinginess. Manufacturers from Russia, Poland, Bulgaria and Slovenia offer certified products of good quality and at an average price.
- Half, and sometimes more, of all repair costs are paid to workers. There is some work that you can do yourself, for example, dismantling old tiles or painting walls. This way you can save a lot.
- And the third secret lies in the detailed planning of future expenses. It’s easy to go over budget without a budget. Take a “march” through hardware stores. You will be better guided in prices, assortment and ongoing promotions. Compare prices with online stores. Immediately specify the terms of delivery (terms, price).
- The more detailed and accurate the costs are, the easier it is to organize such repairs so that they easily fit into the desired budget. At the same time, be sure to include + 10% for unforeseen expenses.
If you wander around new buildings, you can find a great new sink for free! Some newcomers, when starting repairs, install other plumbing, and throw a completely new one from the developer into the trash.
![]()
And finally, to keep the bathroom always pleasing to the eye, it is important to maintain cleanliness and put everything on the shelves for storage. Clutter equally kills expensive and budget repairs.
Budget bathroom design
In this article we will look at how to create a budget bathroom design , how to save on repairs and what can be done on a minimal budget.
To begin with, let’s adequately evaluate the field of action and decide on the most necessary in our project: plumbing, bath or shower, lighting, dryer, etc.
Wall, floor and ceiling decoration
A budget option and the best in the budget bathroom design project, you can use tiles, pvc panels and stretch ceilings.
Finishing the bathroom with plastic panels
We select plumbing
Of course, you can’t save on plumbing, but it is possible to choose easier and cheaper.
Bathroom. In order to save money when choosing a bathroom, instead of cast iron, we recommend buying acrylic or steel, they have proven themselves in terms of wear resistance and maintenance.
Acrylic bath Acrylic bath Acrylic bath Acrylic bath
Toilet. We recommend purchasing not a hinged, but an ordinary floor-standing toilet. It is much cheaper. We advise you to study the manufacturers in detail, because in case of marriage, all your repairs are down the drain.
Floor standing toilet in bathroom design Floor standing toilet in bathroom design Floor standing toilet in bathroom design Wall hung toilet in bathroom design Wall hung toilet in bathroom design Wall hung toilet in bathroom design
Cost items that can be saved
- Delivery of materials
- Designer Services
- Builder Services
- Cheap Finishes
- Mid-Range Sanitary Ware
Budget Bathroom Design – Interior Options
Choose a design that costs less. An excellent option would be the style of minimalism, hi-tech and modern. These areas are characterized by a minimum of things and decor.
Bathroom design photo Bathroom design photo Bathroom design photo Bathroom design photo Bathroom design Bathroom design Bathroom design Bathroom design Bathroom design Bathroom design
Budget bathroom design in the photo
Budget DIY bathroom renovation
Expensive bathroom renovation, where exclusive tiles and elite models of sanitary ware are used, is not affordable for every apartment owner. However, the old environment requires change. A photo of a do-it-yourself budget bathroom renovation is an example of an update with a minimum of costs for both materials and labor.
The most significant part of a bathroom renovation is the replacement of tiles.
If the walls in the bathroom are even, the owners are lucky, otherwise they will need to be plastered and only then finished with ceramics.
However, even cheap tiles require skillful work. If there is no experience in laying, it is better to stay on plastic panels.
A significant advantage of polymer materials is not only the ease of installation, but also the opportunity to get an original interior for little money.
Complete moisture resistance in a humid bathroom environment can also be regarded as a plus.
With a limited budget, there is no need to talk about a wide variety of sanitary ware. However, even for little money, you can pick up a high-quality acrylic or steel bathtub, an acceptable quality sink and toilet bowl.
By hiding communications in a box lined with tiles or under a bath, you can significantly increase the aesthetics of the room without spending money on hidden wiring.
Using modern polymeric materials and finding the most cost-effective plumbing, you can make a completely tolerable repair and not fall into a financial hole.