How to mud a drywall: How to Mud Drywall Like a Pro
How to Mud Drywall Like a Pro
Photo: istockphoto.com
“Mudding,” the process of applying multiple thin coats of drywall compound to the joints and screw indentations in newly hung drywall, sounds messy—and it is. But when done correctly, the result is a wall so flat that few observers can spot the seams beneath.
While professional drywall tapers make the task look easy, do-it-yourselfers find that it takes practice, skill, and—of course—the right stuff for the job (in this case, the mud itself and the tape that prevents cracks from appearing in the seams). This guide will give you a primer on materials as well as step-by-step instruction for how to mud drywall, so you’ll feel confident and not like you’ve got to muddle through!
First, make sense of drywall mud types.
The two basic categories of drywall mud, “premixed” and “powdered,” are available in a handful of additional options that can make it tough to choose the right product when faced with a dozen different types in the DIY store.
Premixed
Premixed joint compound is just that: The mud has already been mixed with water to a smooth consistency and is ready to be applied. But within that category, you’ll find “all-purpose mud,” “topping mud,” and “lightweight, all-purpose mud.”
- All-purpose mud goes on smoothly and begins to harden in a couple of hours, depending on the temperature and humidity in the room. It’s suitable for all mudding applications, so if you’re a mudding newbie, use this one.
- Topping mud is used as a final top coating. It dries to a bright white and is easy to sand, making it a good choice for walls that will be painted a light color. Topping mud has less adhesion properties than all-purpose mud, so it’s not suitable for first and second coats.
- Lightweight all-purpose mud also dries to a lighter shade, making it suitable for walls that will take pale paint. Some pros use all-purpose mud for the first mudding application and then switch to lightweight all-purpose mud for the second and third applications.


Powdered
Powdered drywall mud, also called “setting mud” or “hot mud,” contains chemicals that react when water is added to hasten hardening time. This type of mud tends to shrink less than all-purpose premixed mud but it begins to harden very quickly. Quick-setting mud works well for pre-filling large gaps or smoothing over crushed drywall corners before starting the actual mudding process.
Advertisement
- Timed drywall mud: Setting mud is labeled by the maximum amount of time you have to work with it before it hardens. You can choose from 5-minute mud, 20-minute mud, or longer-hardening times, depending on your needs. If you use setting mud, mix only as much as you need, and wash your tools frequently as you work.
- Easy-to-sand setting mud: The chemicals in some types of hot mud harden into rock-like ridges on your walls, and you can spend hours trying to sand them smooth. Avoid this by choosing an easy-to-sand variety.
 Avoid this by choosing an easy-to-sand variety.
Photo: istockphoto.com
Then, understand the types of drywall tape.
During the mudding process, tape acts as a bond to keep the finished wall from developing cracks along the drywall seams. The different types of tape are “paper,” “mesh,” and “preformed”—and all three have their pros and cons.
- Paper tape is used almost exclusively by the pros because it’s very thin, which helps create imperceptibly smooth joints. Paper tape comes with a crease down the center that allows you to bend it along the crease to form sharp wall corners. It takes practice, however, to correctly bed paper tape in the first coating of wet mud without creating bubbles underneath.
- Mesh tape is made from fiberglass threads in an open-weave pattern and comes with adhesive on the backside. While it’s fairly simple to position mesh tape over a dry joint and then apply your first coat of mud on top, mesh tape is thicker than paper tape and can result in more noticeable joints when the wall is painted.
- Preformed tape, also known as preformed “corners,” may be made from paper, plastic, thin metal, or a combination of materials. It’s used on outside wall corners to achieve a smooth, uniform look. Some preformed corners require nailing while others attach with adhesive. If you’re not confident that you can successfully tape outside corners with plain paper tape, try preformed tape.

Photo: istockphoto.com
Now, you’re ready to learn how to mud drywall.
Primed with an understanding of mudding materials, it’s time to familiarize yourself with the process as outlined here. Because paper tape offers the most professional results, we’ll detail how to mud with paper tape. If you’re using mesh tape, you’ll find some tips below that will help you use it correctly.
Tools & Materials
- Canvas drop cloth
- Safety goggles
- Respirator mask
- Drywall mud
- Drill
- Paddle bit for drill
- See full list «
- Large plastic bucket
- Mud pan
- 6-inch drywall taping knife
- 10-inch drywall taping knife
- Inside-corner taping tool
- Drywall pole sander
- Power drywall sander
- Nylon bristle brush
- 5-gallon water bucket
STEP 1: Protect the floor and yourself from drywall mud splatter.
Cover the floor with a canvas drop cloth (plastic drop cloths can become dangerously slick) and don goggles and old clothing. Mudding is a messy process, and splatters can sting if they get in your eyes.
Advertisement
STEP 2: If you’re not using premixed mud, mix powdered setting mud.
Remove the lid from the bucket of premixed mud. If using powdered setting mud, mix as recommended by the manufacturer, beating until smooth with a heavy duty drill fitted with a paddle bit.
STEP 3: Apply the first coat of mud to the screw indentations and factory beveled joints.
Drywall panels come with slight bevels on both of their long sides. When the bevels are fitted together, they form a small indentation, about 2 inches wide, along the joints. Use the 6-inch taping knife to smooth and work the mud evenly into the joint, filling the entire indentation and wiping away excess mud.
Get a pro to do it for you
Receive free, no-commitment project estimates from licensed drywall installation and repair pros near you.
Find Pros Now
+
Photo: istockphoto.com
STEP 4: Cover the mudded joint with a piece of tape.
Cut and fit a piece of paper tape over the joint while the mud is still wet for a process called “bedding.” Use the 6-inch taping knife to gently smooth the paper onto the wet mud, working out bubbles as you go. Wipe away excess mud with the knife.
STEP 5: Tape the inside corners next.
With the 6-inch knife, apply a thin coat of mud to both sides of an inside corner, making sure to work it all the way into the center. Cut, fold, and fit a strip of pre-creased paper tape in the corner over the wet mud. Smooth the paper tape carefully in the wet mud, using either a 6-inch taping knife or an inside-corner taping tool that features a preformed 90-degree shape for easy bedding. Use light stroking movements to bed the tape without dislodging it from the corner. Wipe excess mud from the walls.
STEP 6: Apply mud to outside corners next.
If using preformed tape corners, attach them as recommended by the manufacturer, and then smooth mud over the corners, using long vertical strokes on both sides to form a sharp, uniform corner.
STEP 7: Mud butt joints last, if necessary.
You can avoid butt joints, which occur when un-tapered ends of a drywall panel are fitted together, by using sheets of drywall that span the entire room. But if dealing with ends that have no beveled indentations, it’s more challenging to get a smooth finish. Mud them as you did the beveled joints, taking care to use only as much mud as necessary to fill the joint and bed the tape.
Advertisement
STEP 8: Apply a second coat of mud.
Let all the mud dry before applying the next coat. Apply a second coat of mud to the screw indentations, beveled joints, and inside and outside corners in the same order as the first coat—only this time, use only mud. No need to add more tape! Just apply a thin layer of mud and wipe off all excess.
STEP 9: Apply a second coat of mud to the butt joints, too.
To do a second coat for butt joints, take the 10-inch taping knife, apply two swaths of mud, approximately 8 inches wide, along both sides of the first joint coat, but not on top of the original joint. This imperceptibly builds up the wall depth over a wider area to reduce the appearance of a bulky butt-joint seam. Feather out the edges of the swaths well with the knife for a smooth look.
STEP 10: Put up a third and last coat of mud.
Apply a third very thin coat of mud after the second coat dries. Use the 10-inch knife for all screw indentations, seams, and corners. The wider knife allows you to feather out the edges of the mud to a razor-thin application. Follow the same procedure for beveled joints and corners as before. On butt joints, apply a thin coat of mud over the previous swaths and the original mud joint. It’s not unusual for the mud swath on butt joints to be 2 feet wide or wider.
STEP 11: Do the same over any butt joints.
When the mud dries, apply one last thin coat only over the butt joints. Feather out the edges very well and let the mud dry.
STEP 12: Sand the dried mud at the joints and indentations.
Don your respirator mask and goggles prior to sanding. Use a drywall pole sander or, if it’s important to keep airborne dust at a minimum, rent a power drywall sander from your local construction rental store. Sand all joints and nail indentations until the wall is perfectly smooth. Now you’re ready to paint or wallpaper!
Advertisement
Photo:: istockphoto.com
If you want to use mesh tape to mud drywall…
Unlike paper tape that requires bedding in wet mud, self-adhesive mesh tape is applied over seams and then, when mud is applied, an adequate amount seeps through the mesh into the seam beneath. The order of taping is the same: Do screw indentations and beveled joints first, inside and outside corners next, and butt joints last. If you use mesh tape on flat joints, note that it’s not suitable for corners. Use pre-creased paper tape for inside corners and preformed tape for outside corners.
Get a pro to do it for you
Receive free, no-commitment project estimates from licensed drywall installation and repair pros near you.
Find Pros Now
+
How to Finish Drywall in 9 Steps
Project details
Skill
1 out of 5
Easy
The sheets are heavy and a bit unwieldy, especially when covering the ceiling
Cost
$8 to $10 per half-inch x 4×8-foot sheet
Estimated Time
6 to 8 hours
While hanging drywall takes a little muscle, getting the drywall ready for paint or wallpaper requires finesse. The goal here is simple: Make the joints between drywall panels disappear so that walls and ceilings are perfectly smooth.
Is It Hard to Finish Drywall?
The process isn’t complicated. It takes just a few tools—a small and a large drywall knife and a swivel-head pole sander—to finish drywall. Here, Paul Landry, of P.L. Drywall in Waltham, Massachusetts, shows us how to mud and tape drywall, using premixed joint compound (a.k.a. “drywall mud”) and drywall tape.
How to Finish Drywall Step-By-Step
1. Drywall Finishing Steps Overview
Gregory Nemec
The tricky part is learning how to properly bed the tape and feather out the compound to an imperceptible edge. “First time out, you’ll probably get more ‘mud’ on the floor and on your clothes than you do on the wall,” says Landry, who finished the walls at This Old House‘s recent TV project in Manchester, Massachusetts.
Sanding is the other key skill. Joint compound is soft, so the challenge is to avoid removing so much that you risk fraying or tearing the paper tape. “Be patient,” Landry advises. “Even beginners can do a fine job if they take their time.”
Related
How to Hang Drywall on a Ceiling
How to Mud and Tape Drywall Corners
2.
 Stir compound and prep surfaces
Allen Penn
- Cut band on top of the bucket with a utility knife or tin snips and pry off lid.
- If there’s water on top of the compound, chuck a mixing paddle into a ½-inch drill. Mix at slow speed until water is blended and compound is smooth. If there’s no water, the compound is ready to use.
- Look for any screwheads poking above the drywall surface and drive them until slightly recessed.
- Tear away any loose or torn paper from drywall (especially at corners and cut edges) to prevent bits from ending up in the compound.
3. Cover joints and screwheads
Allen Penn
- Using 5-inch knife, fill mud box halfway with compound.
- Load the edge of the knife blade with about 2 inches of compound.
- Starting in one corner of the room, force the compound into the joints between sheets. When they’re completely filled, hold the knife at a 25-degree angle to the surface and smooth out the compound in a single pass.
- Scrape excess compound off knife and into mud box.
- Fill screw holes with a swipe of a compound-loaded knife.
- When all the joints and screwheads on a wall or ceiling are filled, go to Step 4.

4. Apply paper tape
Allen Penn
- Unroll 3 feet of tape from dispenser, but don’t tear it off.
- Center tape over seam and, using fingers, gently press into the fresh compound.
- Unroll and bed tape into rest of joint.
- At the end of the joint, place the knife edge perpendicular to the tape face and tear.
5. Smooth tape
Allen Penn
- Starting halfway along the joint, hold the 5-inch knife against the tape at a 25-degree angle to the wall.
- Pull knife to one end of the joint in a single stroke, smoothing the tape and pressing it firmly into the compound.
- Scrape excess compound from the blade into mud box.
- Return to the starting point and repeat in the other direction. (This technique prevents tape from pulling off wall.)
- Repeat Steps 3, 4, and 5 on remaining walls or ceiling.
 (This technique prevents tape from pulling off wall.)
6. Tape Inside Corners
Allen Penn
- Using a 5-inch knife, fill the seam and cover 2 inches on either side of the corner with compound.
- Cut a piece of tape the full length of the corner; crease it in half lengthwise. With knife, gently push into corner.
- Starting in the middle, draw the knife along the drywall, smoothing the tape on one side of the crease. Skew blade 45 degrees to squeeze out excess mud.
- Run knife in the same way on the opposite side of the crease. Finish by smoothing back to the starting point.
7. Cover outside corners
Allen Penn
- Make sure the metal corner bead on outside corners is nailed or clinched every 10 inches. Straighten bends, if necessary, with corner clincher (see tools and materials above)
- Using the 5-inch knife, smear one side of bead with compound. Repeat on the other side.
- Holding the blade against drywall and bead at the same time, run the knife down the corner, smoothing the compound in a single stroke. Repeat on the other side.
- Let compound dry overnight.
 Repeat on the other side.
8. Sand the first coat
Allen Penn
Pro2Pro Tip: Don’t try to sand out indentations or craters; these will be filled by subsequent coats of compound.
- Check that compound is uniformly white, which indicates that it is dry. (Wet areas appear darker.)
- Sand inside corners with corner sanding block.
- Sand all other surfaces using a pole sander with medium-grit abrasive. Apply gentle, even pressure. Sand only enough to smooth rough areas; don’t sand down into paper tape.
- Feel for rough areas and sand as needed.
9. Apply second and third coats
Allen Penn
- With the 10-inch knife, scoop up 2 inches of compound. Then scrape off 2 inches worth at each end of the blade.
- Apply compound to all joints and screwheads, then smooth it in a separate pass. Allow to dry overnight.
- The next day, sand with fine-grit drywall sandpaper.
- For third coat, load entire edge of 10-inch knife with compound and apply to joints and screwheads as before. Smooth to an imperceptible, feathered edge.
- Let dry overnight, then sand as before. Wipe all surfaces with a damp cloth to ready them for priming.

Tools
Tools & Materials
-
Drill/driver
-
Drywall taping tool
-
Swivel-head pole sander
-
Sanding block
-
Mortar box
-
Mallet
-
Corner clincher
-
Shop vacuum
 ” data-url=””>
drywall knives – 5- and 10-in.
Expert Tips Using Drywall Mud Tools (DIY)
A color-coded guide to flat, smooth, perfect walls.
Time
Multiple Days
Complexity
Intermediate
Cost
$101–250
Introduction
Save yourself $100s by taping your own walls. We’ll show you how. This article shows you everything you need to get perfectly smooth walls, without having to worry about nail pops, cracks and bad joints later. We take a beginner DIY approach, so even if you’ve never used drywall tools before, you can get good results on your walls.
Tools Required
- Banjo
- Clincher
- Corded drill
- Drywall sander
- Dust mask
- Hammer
- Hawk
- Mixer
- Mud pan
- Putty knife
- Rasp
- Sanding block
- Sanding pole
- Taping knife
- Tin snips
- Trowel
- Utility knife
Materials Required
- 1-5/8 in. drywall nails
- All purpose compound
- Corner bead
- Paper tape
- Setting compound
A guide to smooth walls
Tape drywall like a pro
Family Handyman
Each coat of joint compound is a different color in this article so you can easily see the order of application.
Taping drywall can be a frustrating, gut-wrenching experience. Nagging flaws will show up right after painting and even months later. Nail pops, corner-bead cracks and bad joints will plague your walls forever.
To make your next taping job more successful, we’ve come up with a novice-friendly guide for getting good results and how to mud drywall. We’ve simplified professional techniques so you can learn them easily and recommended the basic tools and materials you’ll need to achieve smooth, flat walls ready for paint.
Since 90 percent of the cost of a professional job is labor, taping your walls yourself can save you several hundred dollars, even on small jobs. The key is a methodical, step-by-step approach with the proper tools and materials. Otherwise, taping will drive you nuts.
We’ll show you how to avoid the most common rookie mistake: heaping on drywall mud and then counting on a massive (and filthy) sanding effort at the end to rectify mistakes. We’ll also show you how to gradually build up layers, feather edges to avoid ridges and knock off high areas of freshly applied mud.
We’ve added a color to each coat of drywall mud to make it easier to see the proper order of application. The first coat is orange, the second green and the third yellow.
Buy or Rent These Taping Tools, also Called Drywall Mud Tools
You’ll find a mind-boggling assortment of gimmicky taping tools at home centers. The truth is, most aren’t worth having and you can do an excellent job with just the ones we recommend. Banjos (Photos 5 and 6) and clinchers (Photo 3) can speed up and improve the job. They’re a must for larger rooms with lots of corners. But for small jobs, skip the banjo, and if you only have a few corner beads to do, nail them on by hand and skip the clincher too.
1. Four-inch flexible putty knife (Photo 7) for small filling jobs and applying second- and third-coat mud to angles (inside corners).
2. Six-inch flexible putty knife (Photo 2) for larger filling jobs, embedding tape and filling fastener holes.
3. “Potato masher” mixer (Photo 5) for hand-mixing a bucket of mud quickly and thoroughly.
4. Mud pan (Photo 2) for convenient dispensing of patching, fastener hole and corner mud.
5. A clincher (Photo 3) makes quick work of crimping corner beads accurately in place to hold them for nailing.
6. A 12-in. trowel is less fatiguing and easier to use for applying mud to the joints and corner beads than the standard wide taping knives.
7. A banjo is essential for all but the smallest taping jobs for dispensing mud saturated tape right onto the drywall joints.
Buy the Old-Fashioned, Time-Tested Materials—They’re What Pros Use
Just as with drywall mud tools, there are many new drywall products on the market purporting to make taping easier. But talk to a pro and you’ll find that few of them work any better or are any more durable than the old-fashioned taping supplies like paper tape and 1-1/4 in. solid metal corner beads.
Pick up enough corner beads to cover every corner with a single bead—no splicing!—plus one or two extras to replace mistakes. You’ll also need a small box of 1-5/8 in. drywall nails for fastening the corner beads. One roll of paper tape is usually plenty for the average-sized room, but they’re only a couple of bucks, so get two in case you come up short.
Project step-by-step (19)
Sign Up For Our Newsletter
Complete DIY projects like a pro! Sign up for our newsletter!
Do It Right, Do It Yourself!
Step 15
Spread the second coat over one side of angles
Spread a thin layer of mud over one side of vertical and ceiling angles with a 4-in. knife. Apply more pressure to the outside of the knife blade to wipe off excess mud and leave a feathered edge. Refill fastener holes (as in Photos 8 and 9).
Some pros use special wide taping knives for applying second- and third-coat mud, while others use conventional cement trowels like we did. If you’ve used knives successfully, great! But if you’re a first timer, you’ll probably find a trowel easier to master and less fatiguing. Both take patience and time to get the right touch. When you’re first spreading the mud onto the wall to distribute it, hold the trowel at an angle away from the wall and slowly lower the leading edge as you empty the trowel (Photo 11). After the mud is on the wall, go back and hold the trowel flatter to smooth it out.
The second coat is the toughest coat to apply, especially on the butt joints. Don’t be shy about spreading this coat over a wide area. It really takes six passes with the trowel to handle a butt joint: three trowel-wide passes to apply the mud and three more to flatten the middle, smooth out the mud and feather the sides. When you’re through, the center should barely cover the tape, while the two sides feather out the center mound.
Different joints require different strategies. Butt joints, which join untapered ends, are by far the toughest because you have to build a wide, gradual “plateau” of mud and feather the edges to make the joint appear flat. In contrast, tapered joints along the long sides of drywall have recessed manufactured edges that are much easier to fill and level. They’re handled the same as butt joints, but the second coat doesn’t have to be nearly as wide or as built up because of the recess of the tapered edges.
Filling corner beads is about the simplest of taping tasks because you have the hard, defined surface of the corner bead to guide application (Photo 12). Just make sure to feather the edges flat to the drywall.
Angles only get one additional thin coat of mud—on one side during the second coat (Photo 14) and on the other during the third-coat layer (Photo 17)—with each side done alternately so one side is always dry when you coat the other side. That way you have a hard surface to drag your knife against. Again, feather all outside mud edges flat, then refill all the fastener holes.
Wall and Ceiling Repair Simplified: 11 Clever Tricks
Originally Published: January 17, 2019
Similar Projects
Drywall Taping Tips (DIY) | Family Handyman
Updated: Jun. 09, 2020
How to get better taping results with less hassle
Next Project›
Family Handyman
Follow these 12 pro drywall-taping tips to improve your skills, speed up the job and result in smoother walls. They include mixing, knife techniques and problems to avoid.
By the DIY experts of The Family Handyman Magazine
Tip 1: Mix the compound
Power mixing
Use a paddle-type drywall mud mixer in a 1/2-in. drill for this mixing method.
Mixing tools
The masher-type hand drywall mud mixer works well if you don’t have a 1/2-in. drill for the paddle mixer.
If you’ve just opened a bucket, remove about a quart of the joint compound to make room for water. Then add about two or three cups of water and start mixing the compound. Pros use a powerful 1/2-in. drill with a special mixing paddle. But a hand-powered giant “potato masher”–type mixer made for this purpose works great for the casual taper.
The best consistency for joint compound depends on its purpose. It should be pudding consistency for hand taping, and a little thicker for the final coats. For smaller jobs, transfer some of the joint compound to another pail before mixing so you can make custom batches for taping or finishing.
Tip 2: Don’t use compound right out of the pail
Hand mixing
The potato masher-type mixer smoothes the compound and gets the air bubbles out.
Joint compound straight from the pail is simply too thick to apply and spread evenly. So before you start taping, begin by thinning and mixing the joint compound.
Tip 3: Prefill gaps with “setting” compound
Filling gaps
Fill gaps top to bottom with setting compound.
Setting-type compound is perfect for prefilling because it hardens quickly and doesn’t shrink as much as regular joint compound.
Start by breaking or cutting out areas of the drywall that are broken or crushed, then peel away any paper shreds left around the edges. Then mix up a small batch of setting-type compound (if you mix too much, it’ll harden before you use it up). Mix it thick so it’ll stick in the holes without sagging. When the compound sets to the hardness of soap, scrape off high spots and lumps with the edge of your taping knife. Also fill gaps between sheets with setting compound and let it harden before you apply joint compound and tape.
Tip 4: Cut “V” grooves at butt joints
Cutting a “V” groove
Hold a utility knife at an angle and slice off the drywall edges to create the groove.
The paper facing on drywall ends may show through the taped seam. Avoid this problem by carving a shallow “V” groove between the sheets after you hang them. Then fill the “V” with setting-type joint compound before you cover the seam with joint compound and tape. This will really help out with the toughest taping challenge—butt joints.
Tip 5: Scrape ridges and bumps between coats
Scraping a ridge
Run a 6-in. taping knife over all the joints when dry to knock off ridges. The ridges are usually there, even if you don’t see them!
Even experienced tapers leave little globs of joint compound and an occasional ridge. If you don’t get rid of these after they dry, they’ll cause you all kinds of grief. Chunks of dried compound can break off and get stuck under your taping knife and cause streaks in your fresh joint compound that you’ll have to fill in later. Avoid the problem by scraping the joints between coats. All it takes is a quick once-over with a 6-in. taping knife to knock off ridges and bumps. Hold the knife at a low angle and push it across the taped joints.
Tip 6: Embed the tape completely
Embedding the paper tape
Press the tape into the compound, spreading the squeeze-out along the sides.
You can avoid a lot of extra work later by making sure paper tape is thoroughly embedded in the joint compound. Start by laying a thick bed of joint compound down the center of the seam. Then smooth it down to a consistent thickness of about 1/8 in. with your 5- or 6-in. taping knife. Wet the tape and press it into the joint compound. Then, starting at the center and working toward the ends, press the tape into the joint compound with your knife. The key to success is making sure joint compound oozes out from under both sides of the tape as you embed it.
Tip 7: Don’t leave dry tape
A sign of dry tape
If compound doesn’t ooze out, the tape probably won’t stick in that area.
Paper tape that’s not completely embedded in joint compound will bubble or fall off later when it dries. Keep a close eye on the tape as you embed it with the taping knife. If you see sections of the tape where one or both sides remain dry with no joint compound oozing out, pull off the tape and apply more joint compound under the dry areas. Then reapply the tape over the new joint compound.
Tip 8: Don’t mud both sides of the corner at once
Smoothing both sides
Working both sides of a corner at once seems faster, but actually results in more nicks, dents and ridges.
It’s pretty easy to get a nearly flawless coat of joint compound on the first side of an inside corner. But if you start on the second side before the first is dry, things get tough. That’s because it’s impossible to avoid messing up the wet compound on the first side, and you won’t be able to avoid making a groove in the corner.
Tip 9: Mud one side of the corner at a time
Mudding one side
Smooth one side; then allow it to dry before mudding the other side.
The trick is to coat one side of each corner and let it dry overnight before troweling joint compound on each adjacent side. Start by spreading about a 3-in. band of joint compound over the tape on one side of the corner. Then smooth it with a 5- or 6-in. taping knife. Press the outside edge of the knife against the drywall to create a feathered edge that won’t require much sanding. Try to avoid leaving too much joint compound over the tape—a buildup at the corner will make it harder to fit baseboard or crown moldings tight to the wall.
Tip 10: Tape over metal corner beads
Taping a metal corner
Taping the metal corner helps to prevent cracks.
Cracking along the edge of metal outside corner beads is a common problem. And usually it doesn’t happen until after the wall is painted, so repairing the crack means repainting the wall again! There are a couple of solutions. One method that’s become standard practice for professional tapers is to use special corner bead that is held on by joint compound rather than nails. No-Coat Ultratrim is one such product.
If you don’t want to go shopping for special corner bead, avoid future cracking by applying paper tape over the metal edge after you’ve nailed on the bead. Embed the tape just as you would on any joint. Then fill the corner as usual.
Tip 11: Wet the paper tape
Wetting tape
Dampen, but don’t soak, the tape in a bucket of water.
Wetting the tape before you embed it in the joint compound can help eliminate troublesome bubbles that show up after the joint dries. Keep a bucket of water nearby and quickly run each piece of tape through it before applying the tape to the wall.
Tip 12: Cut out bubbled or loose tape
Cut around bubbled area
Completely remove all bubbled tape and remud.
Even if you’re diligent about embedding the tape, you’ll occasionally run into a section of tape that bubbles or comes loose. Don’t try to bury the problem with more compound. It’ll just reappear later. Instead, cut around the damaged area with a utility knife and remove the tape. Avoid a divot in this spot by filling the recess with setting compound and letting it harden before applying another coat of joint compound.
Required Tools for this Project
Have the necessary tools for this DIY project lined up before you start—you’ll save time and frustration.
- Bucket
- Mud pan
- Sanding block
- Taping knife
- Utility knife
You’ll also need a potato-type mixer or paddle mixer and a 1/2-in. drill.
Required Materials for this Project
Avoid last-minute shopping trips by having all your materials ready ahead of time. Here’s a list.
- 100-grit sandpaper
- Drywall compound
- Metal corner bead
- Paper drywall tape
- Setting-type compound
Originally Published: October 17, 2019
Similar Projects
How to Successfully Mud and Tape Drywall Yourself
Touchups on Inside or Outside Corners and More
By
Lee Wallender
Lee Wallender
Lee has over two decades of hands-on experience remodeling, fixing, and improving homes, and has been providing home improvement advice for over 12 years.
Learn more about The Spruce’s
Editorial Process
Updated on 06/16/22
Reviewed by
Johnathan Brewer
Reviewed by
Johnathan Brewer
Johnathan Brewer is a home improvement expert with over two decades of professional experience as a licensed general contractor specializing in kitchen and bath. He has been featured on HGTV’s “Super Scapes,” “Curb Appeal the Block,” “Elbow Room,” DIY Network’s “House Crashers,” “This Old House,” and OWN Network’s Emmy award winning show, “Home Made Simple.” Jonathan is also a member of The Spruce Home Improvement Review Board.
Learn more about The Spruce’s
Review Board
Fact checked by
Sarah Scott
Fact checked by
Sarah Scott
Sarah Scott is a fact-checker and researcher who has worked in the custom home building industry in sales, marketing, and design.
Learn more about The Spruce’s
Editorial Process
The Spruce / Margot Cavin
Drywall finishing—including drywall taping—is by far the most challenging part of drywall installation, and it’s where some do-it-yourselfers run into the most problems. The process requires several different coats of mud that must be dried and smoothed properly, and at first, it can seem more complicated than it actually is.
While the skill of perfect finishing comes only through practice, several common drywall issues are easily corrected with a better technique or materials, or both. Thankfully, there are simple ways for beginners to mud and tape drywall like a pro.
Watch Now: How to Properly Finish Drywall
How to Tape and Mud Drywall
The easiest way to mud and tape drywall is to cover the screw holes, apply a layer of mud before taping, smooth the joints, then follow up with another layer of mud after letting it dry overnight. You’ll need two drywall knives approximately sized 6- and 10-or 12-inch, paper drywall tape, pre-mixed drywall mud, and a drywall sanding screen or sandpaper.
-
Apply Mud to Screw Holes
Use the drywall knife to apply joint compound, or mud, across screw holes in the face of the drywall.
-
Apply Mud to Joints
When using paper tape, mud the drywall joints before taping. Use the 6-inch drywall knife to apply mud to the seams between sheets of drywall. Apply only a thin coat, as this will be used to embed the drywall tape.
-
Apply Tape to Mudded Joints
By hand, press the drywall tape into the wet mud. Use the flat of your hand rather than your fingers.
-
Smooth Down Tape
Further smooth and embed the tape in the mud base with the 6-inch drywall knife. Wipe away any excess and deposit it back in the drywall bucket or tray. After applying the first layer of mud under the tape, you can add one more thin coat of mud to get a smooth finish.
-
Sand Dry Mud
After taping and smoothing drywall, wait one day to allow the mixture to dry overnight. Next, lightly sand off any bumps before applying another coat of mud. Go easy with the sanding at this point to avoid abrading the drywall tape paper.
-
Apply Second Coat of Mud
With the 10- or 12-inch drywall knife, apply a second coat of mud to the seam. Let dry overnight.
-
Apply Third Coat of Mud
With the 10- or 12-inch drywall knife, apply a thin layer of mud to the seam. Feather the mud outward to blend the seam with the rest of the board.
-
Sand
Sand the drywall one last time.

Drywall Taping and Mudding Troubleshooting
Inside drywall corners look ragged, not straight
Instead of creasing the all-paper tape that you might be used to, try mudding and taping inside drywall corners with metal-reinforced corner tape.
Metal-reinforced tape combines a metal angle with paper flanges for a perfectly shaped and smooth inside corner: The tape does the creasing for you. The metal gives your drywall knife a smooth, rigid surface to ride along when taping the corner. This process can also be used when mudding and taping drywall ceiling corners.
Outside drywall corners are fragile or rough
Instead of using standard paper options to mud and tape outside corners, use metal or plastic outside corner beads.
The best practice is to use corner bead because it is more durable and easier to install than paper-only corners. Save the paper tape for outside corners that never receive any traffic, such as bulkheads or skylight shafts. Any outside corner within reach should use a rigid bead.
Drywall mud dries before putting on the tape
It’s common to apply the drywall mud to the wall, then find that the paper tape isn’t sticking well because the mud has dried.
Before you apply the joint compound or mud, cut your paper drywall tape to length and pre-crease it. You’ll save yourself a crucial few seconds.
If you’re using metal-reinforced tape, cut it to length and have it at the ready before mudding the corner. In either case, it’s also easier to measure for your tape length before there’s mud on the wall.
Drywall tape shows through the mud
If you keep seeing the drywall tape under the mud, your coating is too thin.
Use three layers: tape coat, filler coat, and final coat. The tape actually should show through the filler coat. If it doesn’t, your filler coat is too thick. Covering the tape comes only with the final coat or coats. If your initial final coat doesn’t cover the tape, apply more coats, but keep them thin.
Mesh tape shows through the butt joints
This can be hard to fix, and it’s why a lot of drywall workers prefer paper tape on butt joints. If you’ve already mudded over mesh tape and it’s still showing, keep applying thin final coats with a 10- or 12-inch drywall knife. Gradually build up the joint in the middle—to cover the tape—and feather it at both sides to make it all look flat. Mesh tape is also commonly used for mudding and taping drywall patches, so it’s important to use the same smoothing process for these projects.
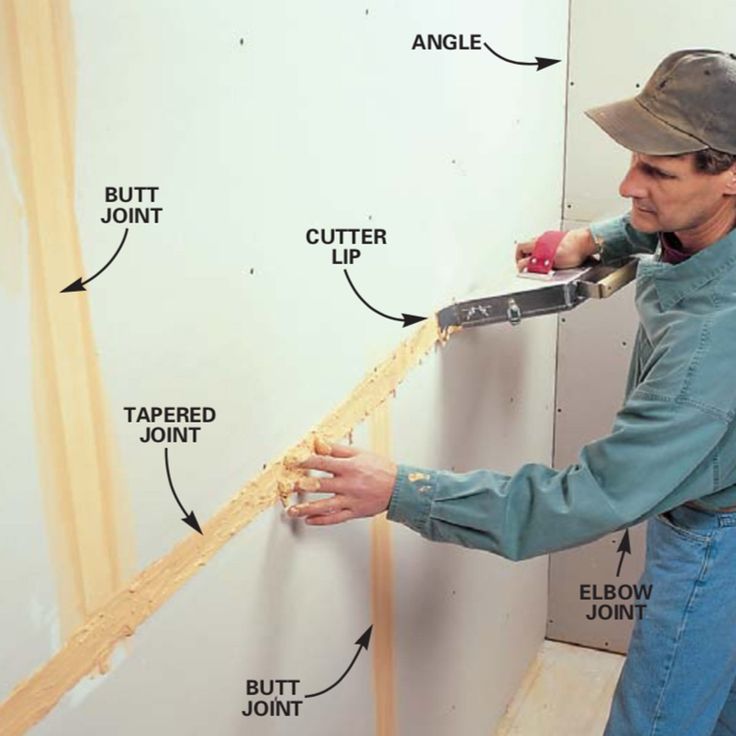
Butt Joint
Butt joints are seams where two panels meet at their square (not tapered) edges, so there’s no recess for the tape and mud.
Paper tape is visible on butt joints
Butt joints are difficult to cover, even with paper tape. Since you have no edge tapers creating a recess, the tape and mud are riding on top of the drywall.
Carefully apply the final coat or coats and feather it out well with the 10- or 12-inch knife. One error with butt joints is to use too much mud under the tape, creating a hump that is hard to hide with all of the thin final coats.
Applying some pressure to the knife when smoothing the tape over the initial layer of mud helps to squeeze out excess mud from behind the tape. Ideally, though, don’t put too much mud there to begin with.
Drywall seams are cracking
Drywall joints crack for many different reasons. Over the door and window openings, joints can crack due to movement in the wall framing. The movement is unavoidable, so the best solution is to make the taped joints as strong as possible. Mesh drywall tape is easier when it comes to drywall for beginners, but it is more likely to crack over time.:no_upscale()/cdn.vox-cdn.com/uploads/chorus_asset/file/19497674/howto_finishdryw_04.jpg)
The paper tape itself is less strong than mesh tape, and paper is also less elastic and doesn’t stretch as mesh tape does. This is why some drywallers prefer paper for these high-stress joints.
If you do decide to mud and tape with mesh in these areas, always use a setting-type mud for the first coat over the tape. Setting mud is stronger than pre-mixed all-purpose mud and helps compensate for the elasticity of mesh tape.
Any drywall joint can also crack if the mud is applied too thick or too quickly. To prevent cracking, don’t use more mud than you need for any of the coats, and let each coat dry completely before adding the next.
Tip
To cut down on dust, use a wet sponge between coats instead of dry-sanding with sandpaper or a drywall sanding screen.
Everything You Need to Know About How to Mud and Tape Drywall
Now that your drywall is installed, it’s time to mud and tape the drywall. This easy tutorial walks you through how to use drywall tape and mud.
Learn how to finish drywall so you can get your room finished quicker.
You might also like this post on how to install drywall or how to paint a room.
This post contains affiliate links. By purchasing an item through an affiliate link, I earn a small commission at no extra cost to you. As an Amazon Associate I earn from qualifying purchases.
Finishing Drywall FAQs
What is drywall mudding?
Drywall mud is the process of covering the seams and screw heads on the drywall. It provides a seamless look for walls.
Drywall mud is actually called joint compound. You can buy it premixed in a bucket or you can mix it yourself. For simplicity’s sake, I prefer the premixed variety.
Is mesh or paper tape better for drywall?
Paper tape is better for drywall seams. It’s easier to use and requires less join compound to cover the taped seams.
Paper can also be used for corners, so it’s more versatile.
Mesh is great for fixing mistakes or repairing holes in the wall. Mesh tape requires a lot more joint compound to completely cover the mesh texture.
Can you mud drywall without tape?
It is not recommended to mud drywall without tape. Even if your seams are tight, you need tape. The tape prevents cracking at the seams when the walls expand and contract with temperature changes.
Do I have to sand between coats of drywall mud?
Yes, you need to sand between coats of mud. However, perfection isn’t needed on those first few coats. Knock down ridges and obvious bumps so that your next coat can be smooth.
How to Mud and Tape Drywall
This technique is for finishing walls with a smooth texture. Smoothly finished drywall is easier to paint and easier to repair in the future.
Supplies Needed
- Joint compound
- Mud pan
- Putty knives in several sizes (4″ knife, 6″ knife and 10″)
- Drywall tape
- Scissors
- Metal corner bead
- Paper faced metal corner bead
- Tin snips
- Sand paper
- Sanding sponges (I like these better for corners and difficult areas)
Prep Work for Mudding and Taping Drywall
Mudding is messy, so be prepared for that. We used plastic drop cloths and I really regret not using the paper rolls to protect the ground.
Close all doors to adjoining rooms to prevent the dust from getting everywhere in the house.
Consider the dust control joint compound. The dust falls to the ground faster instead of floating in the air and traveling around.
Go around the room and make sure that all screw heads are below the surface of the drywall.
Use a putty knife to see if the screw heads protrude. Any screw heads that protrude need to be screwed in more.
How to Cover Screw Heads
- Use a putty knife to spread a thin layer of joint compound over each screw head. Be sure to get the screw head holes well.
- Let dry.
- Sand as needed.
- Apply another coat of joint compound filling any holes you may have missed.
- Let dry.
- Sand.
- If necessary, apply a 3rd coat and sand.
The screws along the seams will be covered with tape, so skip them for now.
How to Mud and Tape Seams
Be generous with the first layer of the joint compound under the tape. This helps it stick better and you won’t have to go back and fix spots later in the process.
- Fill the seams with a generous layer of joint compound.
- Cut a piece of paper tape that’s long enough for the wall.
- Press it onto the join compound, smoothing as you go.
- Use a 4″ putty knife to smooth the tape and remove any excess mud.
- If the tape isn’t sticking, pull it away and add more joint compound.
- Continue along the wall until finished.
- Let the tape and joint compound dry.
- Sand lightly to remove any ridges. Be really careful around the tape because it will tear and cause a funny texture.
- Once dry, use a 6″ putty knife to add another thin coat of joint compound on top of the tape.
- Continue until the room is finished.
- Let dry.
- Lightly sand away ridges.
- Add another coat of joint compound using a larger putty knife (we used a 10 inch knife. )
- Try to fill any low spots.
- Continue around the room and let dry again.
- Sand well. Use a block sander for difficult spots.
- If needed, add another coat in spots that need it.
- Let dry and sand.
 )
)If your tape starts to bubble during the process, you can remove the bubble by cutting it with a utility knife, then apply more mud to the spot. It will require a few light coats to cover the spot.
How to Mud and Tape Corners
Corners are harder than straight seams. For outside corners, we used these metal corner pieces.
We also bought these pieces with paper and metal corners to cover large gaps.
Since they are rigid, they are so much easier to use than the folded tape method. I recommend using these for all corners instead of wrestling with the paper tape.
Outside metal corner edging will need to be nailed into the drywall (into studs.)
- Apply a generous coat of joint compound to the corner. If you have large gaps, you may need to concentrate more on the drywall edges than the actual gap.
- Measure the corner pieces and mark them with a sharpie. They can be cut with tin snips.
- Place them against the joint compound, smoothing as you go. Use a putty knife to remove excess joint compound.
- Let dry and sand lightly if needed.
- Apply a coat of joint compound on one side of the corner, smoothing as you go.
- Continue around the wall.
- Let dry.
- Go back and cover the other side with joint compound. (It takes longer like this, but it prevents you from destroying one side as you work on the other.)
- Continue like this using larger putty knives as you go to cover the previous layer.
- Outside corners are worked in the same manner, applying joint compound to one side and then the other after the first dries.
 If you have large gaps, you may need to concentrate more on the drywall edges than the actual gap.
 You may need to use a smaller putty knife for tight corners.
If you have places where inside corners meet, it’s okay to overlap the tape to cover the gaps. Just make sure the tape is “glued” in place with the joint compound.
There are corner drywall knives, but I’ve never found them to be useful. Instead buy nicer corner pieces and more sizes of putty knives.
How Many Coats of Drywall Mud Do I Need?
Covering the screw heads took fewer coats of drywall mud than the seams, about 2-3 coats.
Including the initial coat under the tape, each seam and corner took about 4 coats.
There will also be places that need touch up.
You may need more or less depending on your skill level.
The tape and corner pieces should be covered where you can’t see them anymore. The edges should be smooth where you can’t feel them when you run your hand against them.
Uneven Drywall Joints
Whether you have uneven drywall due to framing mistakes or using different thicknesses of drywall*, uneven drywall can be fixed.
*We used a few pieces of old drywall that we already had and although they were both 3/8″ thickness, in reality, they were off a little. I don’t recommend this if you can help it, though.
You will need to work slowly, in layers to correct this problem.
- Apply the tape as directed above and let dry.
- Build up the layers on the lower part first and then add to the higher part.
- Continue adding layers of joint compound and sanding between coats.
- Using a sanding sponge is really helpful for these seams.
The Best Way to Sand Drywall
For general sanding, we used these handheld sanders with 220 grit sandpaper.
They sell up to 80 grit sandpaper, which I think is really overkill. Sandpaper with 220 grit works great.
For tricky spots, I prefer these soft sanding sponges. They can be squished into tricky spots and are great for uneven drywall sections.
If you’re having trouble with the sandpaper gouging your dried joint compound, try these soft blocks.
In the past, we’ve also used a wet sanding technique. You use a damp sponge to remove the excess joint compound.
It makes less mess, but it’s harder to get a seamless look. Plus, it’s possible to remove too much of your hard work.
Cleaning Up the Mess
- Remove the flooring protection.
- Sweep us as much mess as you can.
- Use a shop-vac to remove debris from corners and edges. (Be sure you have a clean filter on the shop-vac for best results.) By the way, don’t use your regular vacuum for this because drywall dust can damage the motor.
- Wipe the walls down with a microfiber rag. The walls will be super dusty.
- Use a damp rag on anything else in the room (or adjacent rooms.)
- Mop the floor as needed, changing the water frequently. If joint compound landed on your floor, it will come up with a bit of scrubbing.
IMPORTANT: Before You Paint
Raw drywall and joint compound needs to be primed before painting! Without primer, the drywall paper will absorb the paint differently than the joint compound and make your paint look splotchy.
Also, be aware that joint compound will absorb a lot of the primer.
I like this primer for walls because it’s pretty cheap but it does a great job. Plus, it cleans up with water.
Tips and Tricks for Drywall Mudding
- Start with a small putty knife and move on to larger putty knives as you go. This allows you to cover and smooth the areas that you previously covered.
- When working with joint compound, ridges are easier to sand than low spots.
- Clean as you go to prevent a huge mess at the end.
- Cover your bucket of joint compound as you work. It can dry out and form chunky spots that are hard to work with.
- If you have more than one person working on mudding the drywall, buy 2 or more mud pans so you don’t have to share or work out of the bucket.
- Perfection is overrated. Paint covers a myriad of sins!
Painting the walls comes next, then installing baseboards and trim!
You might also like:
- How to Paint an Unfinished Basement Ceiling
- How to Frame Basement Walls
- Choosing Lighting for a Basement
Pin for Later!
Emy Flint
Emy is a vintage obsessed mama of 2 DIYer who loves sharing affordable solutions for common home problems. You don’t need a giant budget to create a lovely home. Read more…
Sealing joints between drywall sheets: step-by-step instructions
Before starting puttying and painting the plasterboard (gypsum board) coating, it is necessary to correctly process the joints between the sheets. At first glance, this procedure seems simple, but in fact, the presence or absence of cracks in the future finish layer depends on its implementation. In this article, we will analyze in detail the procedure for sealing joints between GKL sheets.
Tools
- Spatulas – a must-have tool for laying putty. For convenience, you need to have 2 – 3 spatulas of different sizes with you: 8 cm, 10 cm and 20 cm. A large spatula should have a hard canvas.
- Containers for mixing mortar must not contain residues of old mixtures. For the preparation of putty, it is better to take a small container.

When using a dirty container for mixing putty, particles of dry mix will fall under the spatula and leave furrows. Read more about mistakes when working with putty in the article “11 beginner mistakes when puttying walls.”
- Brushes or rollers for applying primer, it is better to use a brush as it is easier to penetrate into the depth of the joint.
- Joint reinforcement tape reinforces joints and also hides cracks when they occur. To strengthen the joints, a sickle mesh tape or a continuous perforated paper tape is used.
- Sandpaper is required for final sanding, for convenience it can be fixed with a grater or a regular wooden block.
Types of seams
GKL joints can be factory or edged.
Joints with prefabricated and cut edges.
- The factory edge of the drywall is rounded, so when joining, a recess is formed, which is filled with putty.

- Shearing edges appear when sheets are cut to fit. On these edges, a chamfer is made at an angle of 25 – 45 degrees. The chamfer is made with a knife or a special planer for drywall. In the absence of a chamfer, the putty will be squeezed out to the sheets – a bump will appear on the joint surface, which will need to be compensated with a layer of finishing putty.
Mixtures for sealing joints between plasterboards
It is not recommended to use plaster to fill the joints between drywall sheets, since the plaster mix solution cannot be applied with a layer thinner than 5 mm. In addition, plaster does not give a perfectly flat surface; due to large inclusions, it will not be possible to make the joint surface smooth.
Grout is made from a special putty that has increased elasticity and strength. The technology for preparing the solution is also different: the mixture is kneaded in small portions so that the putty does not have time to lose the desired consistency. Mixing is carried out at low speeds with a mixer drill or spatula so that the solution is not saturated with oxygen.
Preparation of mortar
Pour water into a small container, then gradually pour in the dry mixture. It is added until “islands” of dry putty appear on the surface.
Then the mixture should be saturated with water, for this it is left for 5 – 10 minutes.
The mixture must be remixed to break up any lumps.
Joint preparation
The surface must be primed to improve the adhesion of the filler to the surface. Particular attention should be paid to cut seams. The primer will remove dust from the recesses. It is better to apply the composition with a brush; subsequent work is started after the primer dries.
Progress
The first step is to fill all the recesses with putty. For factory joints, it is better to use a wide spatula, and for edged joints, a 10 cm spatula. All recesses on the cut seams must be filled.
Also on the sheets it is necessary to cover up all the holes in which there are self-tapping screws.
Covering holes with self-tapping screws with putty.
It is better not to leave marks from the spatula on the seams, as this will make further work and sticking of the tape more difficult.
Another layer of putty is applied to the surface of the seam, this layer should be wider than the paper tape.
Tape is measured to fit the seam and torn off at the desired location. Before gluing, it must be soaked in warm water. To improve adhesion, you can apply a liquid layer of PVA glue to the tape.
At the junction of two sheets with cut edges, try to apply the putty thinly, at the factory joints you can put a thicker layer.
Press the putty knife to remove excess putty from under the tape.
Remove residual water from the tape and stick it on fresh putty, press on the tape with a spatula and remove excess mixture from under it. So the material will fit more tightly to the joint.
The belt must be free of waves and bubbles during operation.
Another layer of putty is applied to the tape with a wide spatula. Excess mixture must be removed.
After drying, sand the surface with a float and sandpaper.
If all work is carried out in accordance with the technology, then cracks will not appear at the joints between the sheets. At the same time, it is important that the frame is also mounted without violations. Read more about the installation of plasterboard partitions in article “Installation of plasterboard partitions” .
How and with what to seal the seams in drywall?
When creating shapes or simple drywall constructions, there are many connections and seams. Naturally, in this form, the surface is no good. All these joints need to be sealed with something.
Many sheets break, do not throw them away after that. No, they will go to work. You just need to cut the break point fairly evenly, and connect the damaged sheet with a new one. Sometimes two cut sheets are simply connected.
Needs alignment where they meet. But not everyone knows how to properly, and how, to close up such seams in drywall. To avoid mistakes in finishing and preparing surfaces for further work, consider the simplest and most popular ways to do this.
Putty with mesh
Before starting work, check the available tools. Not much is needed:
- Spatula of any width, although in corners and at level transitions, it will be easier to work with a narrow tool.
- Mesh for reinforcing joints, or serpyanka, to put it simply.
- Perforated paper tape
- Putty mix.
- Container in which the mixture will be mixed
After that, you can proceed to sealing the joints of the structural parts.
The method proposed by Knauf, and has the status of “official”, involves the use of a mixture for sealing joints in drywall constructions and joints, called “Fugenfühler”.
This mixture, though good, is far from perfect. When using it, with a high probability, when the humidity in the room changes, or with the smallest deformations of the coating, the putty at the place where the parts are joined can easily crack.
It can be used when there is a strong certainty that such things will not happen.
Much stronger, although much more expensive, mixture from the same manufacturer, but with the name “Uniflot”. This is a putty designed specifically for joints, and its characteristics are much better than those of the Fugenfüler. To work according to this method, you will need a self-adhesive mesh made of fiberglass or vinyl. It is sold in small rolls and is very convenient to use.
The first step is a spatula and some putty. It must be evenly applied to the junction of the sheets and completely filled with a mixture, and leveled with a spatula.
When the joint filled with putty dries, you can stick the sickle. It should lie exactly in the middle so that equal edges of the grid remain on both sides of it.
Next, on top of the grid, another layer of putty mixture is applied. After it dries, it is rubbed with a grater and the work is finished.
Putty with paper tape
Much stronger, you get a seam that is pasted over with perforated paper tape instead of mesh. With it, the connection of two parts is obtained more accurately, and its strength increases.
Putty must be applied first, as in the previous method. While it dries, we are engaged in reinforcing material.
Depending on the manufacturer, drywall tape may require pre-soaking in hot water prior to use. Be sure to take into account the time it takes to get it wet.
It is better, in general, to thoroughly wet any of its varieties with water. Next, you need to apply an even and not very thick layer of PVA glue on the surface of the paper. To do this, it is best to use a brush with not very stiff bristles.
The cut and applied tape is folded with the adhesive backing inward, as when wallpapering. The finished strip is postponed, and the next one follows it. This is done until the right amount is reached to seal those joints that are planned to be leveled at a time.
Dry joint surface needs to be grouted. This is easy to do, a grater is used for grinding. After that, the joint itself must also be smeared with glue, and immediately stick a tape on it. You need to level it with a spatula. Be careful not to press too hard on him, as he may tear the tape.
When the tape dries, it will take the shape of the seam and become much thinner. Now you can process the joint with putty again, and grind it again with a grater.
Despite the apparent fragility of the joint, paper tape for drywall seams, tightly fastens two sheets of drywall together. After gluing the tape, the seam is guaranteed not to crack.
Finishing uneven sheet edges
If a sheet has been cut or broken and then cut along the edge, it must be prepared before use. Why, how and why – we will answer further.
If you pay attention, on the edges of all gypsum sheets, you can notice a rounding, or decrease in the thickness of the sheet. This was done for a reason, but for a very specific purpose – sealing the joints of the sheets.
Putty is applied to the recess created by joining two sheets at the edges when leveling. It forms an even and strong layer, if it “enters” the sheet area a little, and not only is located at the junction itself. To make such a recess, you need to prepare the trimmed plasterboard parts.
It’s very simple – you need a drywall planer or a sharp knife. Either one or the other, it is necessary to chamfer along the edge of the part, at an angle of 45 degrees.
Now, if you attach such a part to another, even with a factory edge, a depression is formed, which will be filled with putty mixture when leveling, and as a result, the seam will be stronger.
Conclusion
The use of reinforcement when sealing joints or seams on the surface of plasterboard structures slightly increases the time of their finishing.
But, you should not neglect such gain. Without mesh or tape, the seams can easily crack within a short time after the repair.
To avoid such situations, reinforcement was invented. Well, if the crack is under the pasted wallpaper, but if not? And redoing all the work, because of a couple of saved hours, is simply irrational.
How to properly putty drywall joints without cracking
- Procedure
- Related materials
- Plasterboard grouting procedure
- Stage I
- Stage II
- Stage III
- Preparing putty mixture
- Stage IV
- Stage V
- Final stage
- Conclusions:
Gypsum plasterboard deservedly enjoys special popularity among finishing materials. It is not only quickly mounted, but also does not require a “wet” process, it allows you to create structures and shapes of any complexity.
The only drawback that occurs during installation is the sealing of drywall joints.
If the sealing of drywall joints is made with violations of technology, cracks appear at the joints over time. And the question arises, how to properly seal the seams in drywall, what tool and related materials to use.
Procedure
Plastering of gypsum board joints is carried out on structures, partitions, walls already assembled from gypsum boards.
But without a properly selected tool, related materials, high-quality work cannot be done.
Remember! It is recommended to putty plasterboard joints at a room temperature above +10ºC and air humidity of at least 60%.
For mixing the solution, it is better to use a container and in small volumes.
Remember! It is recommended to mix the putty mortar with a mixer at the lowest speed. At high speeds, a large amount of air enters the solution, which increases the porosity of the resulting solution, and therefore reduces its strength characteristics. When kneading by hand, the quality of the mixture is higher, but the use of power tools increases the efficiency and productivity of work.
Any containers can be used to mix the solution, but it is best to use a plastic bucket or a special trough. The main thing is that it is convenient to wash the container after using the mixture.
Puttying drywall joints with trowels of various widths. The minimum spatula width is 100 mm. For large areas, it is advisable to use spatulas with a width of 350 mm.
To clean putty joints, it is recommended to use fine-grained sandpaper, sanding mesh. Grinding mesh is more convenient to use, but its cost is much higher than sandpaper. You will also need a construction knife.
Related materials
Deep penetration primer, gypsum board joint filler reinforced with tape should be stocked.
We have repeatedly pointed out that it is not worth saving on quality materials. The best auxiliary materials for sealing drywall sheets are related products from the Knauf company, which developed the technology for using drywall sheets.
For grouting gypsum board joints, the Knauf-Uniflot dry putty mixture is recommended, which is based on a gypsum binder with polymer additives or Fügenfühle.
There are other equally high-quality materials for joints, for example, putty mixture for sealing joints: Knauf, Uniflot, Fugen, Volma. You just need to always remember that all auxiliary materials must be from the manufacturer whose drywall you bought.
Do not skimp on quality finishing materials. The proverb: “The miser pays twice” is fully true. Details on choosing the right putty mortar for grouting in GKL.
Plasterboard jointing procedure
Preparing the surface for puttying
Stage I
Work should begin with cleaning the surface of the joints.
Clean the mortar with a wide spatula, remove the dust with a vacuum cleaner. Holding the spatula at a 30º angle, go over the joints of the sheets, removing any irregularities.
Screw in the protruding heads of the self-tapping screws, sinking them 1 mm.
Use a damp cloth to remove dust from the surface.
Gypsum boards have factory and cut edges. The factory edge does not require preparation, but the cut edge at the ends must be chamfered.
Stage II
A special tool called an edge planer is used to chamfer a cut edge. It provides a chamfer on the ends of the cut edge at an angle of 22.5º.
Do not attempt to bevel with a utility knife.
The presence of a chamfer greatly facilitates the laying of a putty layer, which increases the strength of the structure.
Stage III
The joint must be primed. The primer is applied with a roller or a wide flute brush. The use of a roller improves the process of rubbing in the primer, rather than using a brush for this purpose.
Allow time for the primer coat to dry completely. It is better if you start puttying in a day.
Preparing putty mixture
A special putty mixture is prepared strictly according to the attached instructions, without various improvisations and deviations. To seal the seams of drywall sheets, special mixtures are produced. They are gray or beige. The color does not affect the quality of the solution.
So what kind of putty to seal drywall joints?
It is preferable to use Knauf mixtures specially designed for this technology. We recommend using Uniflot or Fügen Fuler dry mixes.
But there are other high-quality analogues produced by various manufacturers.
The consistency of the solution should resemble the density of non-liquid sour cream.
Remember! You need to prepare as much solution as you can work out during the life of the solution, which is 20 minutes.
Stage IV
Using a trowel, the mixture is evenly applied to the joints, leveled with a wide trowel. At the same time, the caps of the self-tapping screws are puttied.
The filler layer at the cut edge joints is thinner than the layer at the factory edge joints.
Order of layers at the joint
Step V
While the putty is wet, a special reinforcing tape is applied to the joints and smoothed with a wide trowel. Sticking a reinforcing tape increases the strength of the seam and prevents cracks from forming later.
It is recommended to use Kurt reinforcing paper tape or equivalent. The tape has high strength and protects against cracking.
Kurt Reinforcement Tape is highly breathable, does not stretch and easily absorbs moisture. After drying, the tape does not bubble, does not cause cracks. Of Kurt tape analogues, we recommend
It is not recommended to use paper tape when sealing drywall joints. The tape from paper does not pass air, does not absorb moisture. After drying, the paper tape bubbles up, lifting the putty layer.
Well, self-adhesive mesh tape, so beloved by Russian painters, is completely useless. It is easily stretched and does not have strength.
At the finish, the final grouting of drywall joints with putty is carried out.
Finishing step
After drying, the butt joint is cleaned with a spatula if necessary, cleaned with sandpaper. The entire surface is covered with a layer of soil.
You have noticed that sealing drywall joints with your own hands is not difficult and can be done independently at home even by a novice master.
But in order to answer the question of how to seal the joints between drywall, it is recommended to watch the training video.
Video:
Conclusions:
- to obtain a high-quality docking unit for drywall sheets, the joined edges must have chamfers, factory or using a planer;
- chamfers must be coated with a deep permeable primer;
- it is recommended to use reinforcing paper tape Kurt or its analogues as reinforcement;
- as a putty, it is recommended to use special mixtures for sealing joints of gypsum boards.
- Video on grouting drywall will help you understand the intricacies of work.
Video:
 youtube.com/embed/Fx6BVPndo1Q?rel=0″ frameborder=”0″ allowfullscreen=””>
Video:
Drywall jointing
How to seal drywall joints? You will learn in detail from this article, which will fully advise you on this issue. You will learn the basic principles of drywall grouting and learn how to properly grout them to create a neat and attractive appearance. Also, learn how to correctly calculate your working time, select the right material and decide which option will best suit you.
Sealing plasterboard joints does not require special knowledge, what should be observed when doing this? All technological principles developed by GKL manufacturers. Because drywall is a specific material, the slightest mistake and that’s it, an unpleasant surprise – cracks at the joints of the sheets.
How to properly prepare for work?
- Be sure to observe the room temperature. The temperature must be above +10°C.
- There should be no sudden changes in temperature for about two days after you have finished all the drywall work.
- Make sure there is no draft in the room when you are grouting drywall.
- Don’t forget, drywall installation is the final step. Before that, you must carry out wet work – plaster and install floor screeds.
- In order to prevent problems with seams and effectively carry out all puttying work, you need to monitor the humidity in the room.
- When you plaster the surface, it must dry thoroughly.
- Carefully check the fastening of the drywall sheets to the base. If the sheet does not lie tightly, then soon the putty layer will collapse at the junction.
- To prevent the heads of the screws from forming tubercles under the filler, they must be tightened well.

Principles for grouting gypsum boards
Depending on the type of longitudinal edge, gypsum boards are available with or without thinning. Why is a little thinning necessary? In order to create a smooth flat surface after puttying all the seams. What sheets of drywall to choose? All standards are met by Knauf sheets, which have a semicircular thinned edge or PLUK. They create a reliable joint and are in excellent contact with putty.
You will need perforated paper reinforcing tape to seal drywall with putty. Reinforcement is very important so that cracks and microcracks do not form at the joints. Of course, it is not very easy to find it, but do not be lazy, because the result depends on the correct execution technology. Reinforcing tape must be applied to each seam.
As for the price of the tape, it is inexpensive, so you definitely need to buy it for a quality repair. For PLUK sheets, you can not use it, but when the skin is multilayer, it must be fixed inside the layer.
How to grout drywall joints? Special gypsum plasters. There are cheap putties, and there are expensive ones. We recommend opting for a durable putty that costs more – Uniflot or Pufas will be an excellent option. USG offers ready-made putty in a Shitrok bucket. Its very convenient to use.
How to grout thinned drywall?
Gypsum board joints that have an untrimmed thinned edge must be grouted as follows.
In order for the putty to adhere securely to the surface, you need to take a damp cloth and wipe the joints between the sheets well. You can also prime them, but this is not absolutely necessary.
First you need to apply one layer of putty on the joint, then press the reinforcing tape there and remove unnecessary putty residues. How to mark the correct reinforcing tape? It must be placed in the center and for the entire length of the seam. If you don’t succeed, it’s best to take it off and redo it. When the layer applied by you dries, you need to apply a covering layer on top of the tape.
After this layer has dried, a final leveling layer must be applied. To do this, the entire volume must be filled, and you will see how the plane of the drywall sheets has become even. What is the best tool to use? To apply putty, you will need a spatula (width – 150 mm).
How to grout drywall with end edges?
The principles of working on such seams are significantly different from the previous ones, because drywall sheets do not have thinning.
1. You will need a planer or drywall cutter for this job. The edges need to be chamfered. On mounted sheets, this can also be done neatly with a knife. You should end up with a 45° corner. There is no need to deviate from standard norms, as unprofessional craftsmen often do, because in this way you risk reducing the strength of the seam.
2. The next step will be dedusting and priming the chamfer with high-quality putty.
3. Puttying plasterboard joints after chamfering. Using a spatula, it is necessary to press the putty as deep as possible end-to-end, immediately remove the excess. What should happen? The joint must be completely filled and flush with the surface.
4. Apply a second top coat, press in the reinforcing tape with a spatula. After drying, a third layer is applied, with the help of which alignment occurs. If you plan to glue wallpaper on top, you need to make a leveling layer at a width of 15 cm, otherwise tubercles will be noticeable.
5. The material must be applied very thinly. If in the future the walls will be painted, it is recommended to completely putty the sheets. After the growing layer is completely dry, you need to trim everything using a fine skin.
That’s it, you’ve made sure that if you know all the subtleties of the work, questions of how to seal the seams on drywall and how to cover up are easily and simply solved. Do not forget to just be tolerant and do everything on time, do not rush. Choose only high-quality material for work, the further result and service lines depend on it. You can also read the material on how to properly glue drywall to glue.
Drywall loves a thorough, neat and correct approach! Therefore, follow the correct sequence, so you can save your time and effort. It is better to do it slowly once well than poorly, in haste, then you have to redo everything again.
Share with friends:
Tweet
Share
Share
Send
Classify
How and what is the best way to seal the seams on drywall
Drywall is one of the universal materials for finishing rooms. It is great for leveling surfaces, for creating various decorative elements on walls and ceilings, for decorating arches, niches. But so that cracks do not appear during temperature changes that provoke expansion or contraction of the drywall construction, it is necessary to seal the joints with a special putty mixture. It is necessary to process the joints of drywall sheets carefully, following the processing technology. What is the best way to seal the seams on drywall, and what finishing work should be done? Let’s figure out how to putty the joints of drywall with your own hands.
Why sealing joints is needed
Sealing between plasterboard sheets is necessary to prevent the following negative consequences:
- Cracking at the joints of sheets
- Reduced life of fabricated structure
- Finish damage
- Staining of painted or pasted surfaces
- The edges of the sheets will be subject to wetting, drying out and other adverse environmental factors
The formation of uneven cavities can be accompanied by the installation of an insufficiently rigid frame, where a small number of metal profiles were used.:no_upscale()/cdn.vox-cdn.com/uploads/chorus_asset/file/19497424/howto_finishdryw_10.jpg) Under heavy load, the metal structure is deformed, and the edges of the gypsum plasterboard bend. Slots can appear when the linear dimensions of the plates are lost as a result of temperature fluctuations. Microscopic shifts of GCR here are the main factor in the formation of cracks. To prevent such troubles, it is necessary to provide a gap of 1-2 mm during the installation process.
Under heavy load, the metal structure is deformed, and the edges of the gypsum plasterboard bend. Slots can appear when the linear dimensions of the plates are lost as a result of temperature fluctuations. Microscopic shifts of GCR here are the main factor in the formation of cracks. To prevent such troubles, it is necessary to provide a gap of 1-2 mm during the installation process.
Finishing drywall joints consists of reinforcing and filling gaps with putty.
What you need for grouting
When grouting drywall, you will need the following tools:
- Trowels (Wide, Medium, Narrow)
- Falcon. This is a special tool in the form of a flat plate with a handle. You need to have a device for the convenience of working with putty mixture. If one is not available, then a wide spatula is quite suitable, from which you can also take putty
- Building level
- Electric drill equipped with mixer attachment
- Brush, roller for applying primer mix
- Sandpaper and stone
- Painting knife
- Container for mixing plaster
- Protective equipment (respirator, goggles, work clothes, gloves)
Materials for grouting drywall joints should be prepared:
- Starting putty for grouting drywall joints
- Finishing putty mixture, used to create a smooth surface
- Deep penetration primer. The recommended option is
- Reinforcing tape – serpyanka, it is used to glue the seams after sealing the joints with plaster. This type of reinforcement prevents the formation of cracks. You can use perforated paper tape for seaming
- Special perforated corners for processing corner irregularities. Serpyanka for gluing corners is also needed
 The recommended option is
 Acrylic Wall and Ceiling Compound.
Preparing the joints
One of the frequently asked questions is “How to treat drywall joints so that the finish coating does not have any damage – cracks in the future?” How to seal drywall joints with your own hands correctly, what step-by-step process should be followed?
First you need to clean the work surface from dust particles. If there are burrs in the docking points, it is recommended to carefully remove them with a construction knife so that there are no flaws on the base. You can clean the surface of dust either with a brush or an unnecessary rag.
Sealing joints between drywall sheets is not complete without checking the heads of the self-tapping screws to see if they protrude above the surface. This is necessary so that the spatula does not cling to them when puttying. Before closing the slots, all fasteners must be recessed slightly below the GKL level with a screwdriver, screwdriver. You can feel the protruding screw by running your hand over the surface. If the fastener is in the wrong position, the cap will protrude above the sheet.
GKL factory edges do not need additional processing, only the joints of straight end sides or cut fragments need to be embroidered.
When grouting gypsum board joints, chamfer at a 45 degree angle with a maximum width and depth of 5 mm. You can cut the chamfer with an ordinary construction knife. To increase the strength of the joints, a chamfer will help, which is sealed with a sickle mesh and sealed with plaster.
Before grouting the joints between drywall sheets, a primer mixture is applied to the substrate. Such processing of walls and ceilings from GKL strengthens the surface and helps to avoid further damage to the finish coating. If the composition of the primer is concentrated, then it is diluted according to the instructions. Ready solution can be used immediately. It is recommended to choose products from trusted manufacturers.
The joints should be primed 15 cm to one side and the other from the joint. It is good to take a brush or roller for this.
How to Seal Drywall Joints: Workflow
After all the preparations, it’s time to figure out how to properly seal drywall joints. Everything is quite simple here, the main thing is to do everything in stages and use high-quality putty mixtures to fill the gaps and a mesh for reinforcement. No less effective will be the use of PVA glue, Bustilat.
Applying the drywall joint mesh with a self-adhesive layer on the seam, unwind it while pressing it to the junction of the sheets. It should be glued additionally on one of the proposed adhesive compositions. Gluing the drywall seams with a sickle at this stage is complete.
It is best to cover the fastening points with reinforcing tape or perforated paper. You need to stick it on a pre-spackled surface.
Sealing gypsum board joints with serpentine prevents swelling of the coating and greatly facilitates filling. Now it’s clear how to reinforce the seams on drywall.
Before filling the joints, prepare the working mixture. Taking a suitable container (bucket), pouring the right amount of water and pouring the dry mixture, you need to mix everything well until a homogeneous mass is formed. If you use a drill, you can improve the quality of the mixture and spend less effort on preparing the solution. It is good to cover the cracks after jointing with a mixture having the consistency of thick sour cream.
How to seal plasterboard joints? Here it is better to use gypsum-based putty, which dries faster and has high working qualities.
Puttying the surface is necessary only after grouting and mesh reinforcement. Taking a small amount of putty mixture on a wide spatula (for this purpose it is better to use a narrow tool), cover the gap between the GCR boards. The movements should go across the joint, the mass should be well pressed into the recess. All cavities must be filled in this manner. Excess putty is also removed with a spatula.
Corner joints must be sealed with a 100 mm drywall joint mesh and sealed with starter putty. For convenience, you can use an angled spatula.
For puttying joints, it is advisable to prepare a working solution at the rate of 5 liters of mixture per run, since after 30 minutes the putty dries up and loses its properties.
After allowing the surface to dry (12-24 hours), it needs to be smoothed out with sandpaper attached to a special sanding block. Alternatively, an abrasive mesh can be used. The processed base after grouting should be perfectly even. If flaws are found, they must be covered again with the same putty mixture and rubbed.
It is quite possible to do the grouting of drywall with your own hands, but if you have a grinder, then this process is greatly simplified.
By performing all the steps in stages, you can not only reinforce the weak points of the decorative structure, but also greatly facilitate the subsequent surface finishing. After reviewing the above information, it becomes clear how to seal the seams in drywall between sheets.
Like it? Share on social networks!
How to putty drywall for wallpaper and painting
The fastest and most popular method of leveling walls and ceilings is plasterboarding. It allows you to quickly finish the decoration of the premises. The most important thing is to perform high-quality drywall putty. This operation can be done by hand, this procedure can be mastered by everyone.
Article in the topic: how to align the walls with drywall on the frame or glue.
Drywall is a finishing material in the form of ready-made large sheets of gypsum covered with a layer of cardboard. Sheets often have dimensions of 1.2 m by 2.5 m, when working, the sheets are combined with each other, cutting them if necessary.
After the room is sheathed with sheets, it is necessary to prepare the surfaces for decorative painting or pasting. The most important thing is to carefully putty all the joints between the sheets.
Content
- The stages of work
- Surfacing primer
- Starting putty
- Finish putty
Starting to putty drywall, it is important to remember the four stages of work: primer, starting putty, finish, finish, finichelovka.
The question arises which mixture to use.
- There are gypsum mixtures that work well in most cases. They are not suitable only in wet rooms, as they quickly exfoliate.
- Moisture-resistant putties are used in rooms with high humidity (eg bathroom, kitchen, basement).
- Polymer putties are usually used for topcoat applications. They create a smooth surface that sometimes does not even have to be sanded.

For puttying drywall joints, you can buy specialized types: Knauf Uniflot, Knauf Fugenfüller, Volma SHOV, Kestonit GP, Forward Gipsmontazh Hydro. There are also options for the time-tested Sheetrock or Vetonite.
Surface Primer
Start by applying the primer to the sheathed surfaces. The primer will increase the adhesion between the wall, putty and glue. In addition, the soil is able to close the slightest wall defects.
For drywall, you can use a special primer Knauf Tiefengrund or Putzgrund, or any other highly absorbent primer.
By applying liquid to the entire surface, especially carefully in the area of joints and corners. Then they wait for the surface to dry and start work.
Starting putty
At the first stage putty is carried out by covering the joints and heads of self-tapping screws.
Before starting work, check that all screws are slightly recessed. To do this, simply run your hand over the surface, they should not protrude.
 Tighten them if necessary.
 In general, the process of puttying drywall is a fairly simple procedure. The main thing is to pay attention to the joints between the sheets of drywall. We select the edge of the wall or ceiling, from which we will start and get to work.
Chamfering with a knife
On gypsum board seams that do not have a standard chamfer, but cut by hand, be sure to cut off the corner with a knife so that the mortar penetrates well inside. The new standard edge of Knauf sheets called PLUK allows you to apply the mixture inside more tightly and avoid the appearance of cracks.
New edge Knauf PLUK
-
- First, a special self-adhesive mesh is applied to the seams – sickle, which will help the putty mixture to hold in the seams and prevent cracks.
Bonding sickle
-
- A special perforated tape based on non-woven fabric is glued in places where drywall adheres to the plaster.
- Dilute the mixture itself according to package directions. It is easier to do this with a special nozzle on the drill.
- A special perforated tape based on non-woven fabric is glued in places where drywall adheres to the plaster.

-
- The main rule is that the putty should completely fill the joint, but the layer should be minimal to hide the mesh.
- The corners are puttied alternately: first one side, then the other.
- The visible heads of the self-tapping screws are smeared with a crosswise motion.
- Wait for the layer to dry and putty the seams again.
This process is well illustrated in the video:
Use a special perforated corner to cover raised joints or corners. It comes in metal (for smooth corners) or plastic with slots on one edge, which can be applied to any winding corners.
When calculating, it is important to take into account the consumption of putty per 1 sq.
 m. drywall – approximately according to the formula 1: 1, that is, one kilogram of the mixture per square meter.
 Let’s explain how to putty drywall corners using a corner.
- Measure the desired length, cut off the corner.
- Apply a layer of putty to one of the mating surfaces. It performs the task of glue for the corner.
- Apply the cut corner closely.
- Press down on the side of the corner using a long level, rule or block.
- Adjust the overlap so that the corner sits in a straight line.
Next, we proceed to puttying over the perforated joint.
How to putty a plasterboard ceiling at a corner joint sealed with a metal or plastic corner? We take the starting mixture and seal the joint with a spatula. When connecting the main part of the wall or ceiling to the edge, you need to avoid a sharp transition. You should get a plane of putty, sharp bumps are unacceptable. You will definitely need a two or three repetition of this action, the mixture is applied gradually in thin layers.
Do not attempt to apply a large layer at a time. It will definitely crack and have to be redone.
When the layer is dry, sand it with a trowel.
Finishing putty
Puttying the last layer. For this, polymer putty mixtures are used. They are high-tech, their uniqueness lies in the ability to create the thinnest coating, up to one millimeter thick. With the help of a finishing putty layer, the surface becomes smooth, ready for decorative finishing.
Plasterboard plastering for painting is carried out more carefully. It is necessary to bring to perfection the entire surface, every corner, any connection should become invisible even to the picky eye. It is best to use Sheetrock putty for this, it allows you to get the perfect surface without flaws.
Two spatulas, narrow and wide, are used to apply putty. Small ones need to put the mixture on a large spatula or collect excess from it. Putty is applied to the paper surface with a large spatula. They do it from wet to dry, that is, they apply and smear the mixture, starting movement on a dry surface. If you start from a damp place, the surface will be uneven, thin spots will appear.
If you decide to finish your home with roll coatings, we will tell you how to putty drywall under the wallpaper. Different experts have an ambiguous opinion on what mixture to putty drywall with, it all depends on the quality of the selected wallpaper. For example, if the choice fell on heavy textile wallpaper for the ceiling, then the surface should be rough for better adhesion.
In this case, a coarse-grained mixture is optimal, it is not necessary to use a finishing putty. The entire surface is well covered with an even layer of coarse putty and lightly overwritten places with a clear defect.
It is an erroneous opinion that only the joints of gypsum sheets are puttied under thick vinyl wallpaper. It often happens that artificial light gives out places of putty, so take the trouble to treat the entire surface with an even layer.

How to putty drywall under thin paper wallpaper? Here, too, all small irregularities will be visible, as in painting, so the requirements do not change. It is necessary to choose a quality mixture and carefully remove irregularities with a grout mesh.
If you use a high-quality mixture and be careful when working, then grinding may not even be necessary, it will be enough to remove small bumps by running a spatula. This technique of applying the finishing layer is described in the video:
As a result, three layers of putty should be obtained under the wallpaper: two for the seams and one for the entire surface. And for painting and thin types of wallpaper, there will be four layers, because it will be necessary to putty the surface twice.
Puttying plasterboard under wallpaper is a crucial moment, it is unlikely that the glued surface will hide all the nuances.