Diy brick walls: How to Create a “Fake” “Real” Exposed Brick Wall — The Decor Formula
How to Create a “Fake” “Real” Exposed Brick Wall — The Decor Formula
Some of my greatest do-it-yourself accomplishments have come from a combination of the desire to create a certain look in my home, while having a limited budget, and limited budgets usually mean you don’t have the money to pay for the labor of an outsider on certain projects.
This “exposed” brick wall fit that bill.
When I began the planning and saving process for our kitchen renovation, (which was three years in the making)- there were certain projects I knew would fit the “modern farmhouse/rustic look” that Shad and I were going for, and could be completed prior to the actual renovation.
Project 1 in year 1 of saving for our renovation was our sliding barn door (see my other blog post on How to Build a Barn Door on a budget).
Project 2 in year 2 of saving was this exposed brick wall.
Project 3 just a few months prior to the start of our renovation included the building of these floating shelves.
Doing small projects along the way before the actual renovation somehow made the wait seem a lot shorter, the “saving” not as painful, and as our vision started to take shape, I became more and more excited to finally get to the big renovation.
So when it came to this brick wall: I wanted it so badly and I didn’t want to pay for the labor. This combination somehow led to me feeling like I could do it- but I wasn’t positive that I would be successful. Everyone I mentioned this to would say: “YOU’RE going to brick that wall? Yourself??” And if I have to be honest, the self talk in my head shuffled back and forth between, “You can totally do this!” to “You’re nuts, what are you thinking?”
When I started to price this out the doubt truly started to set in. This was a huge risk to take mainly because of the cost of the “real” brick veneer was so much. In total I needed enough for 85 sq. feet (Our wall is 15 ft long by 8 ft wide minus the large 40 sq ft opening), and it cost me around $650 in brick. For anyone who knows me, I’m super frugal, but I dove into this project head first and prayed it would work out for the best. Thankfully it did.
Spackle + Brick Veneer+ Omnigrip Adhesive + Sanded Grout + Misc. Tools listed below
Now, if only I could go back in time these past three years, I would tell my old self to take lots of before & during pictures of all the projects I’ve done. Unfortunately, I’m the worst at this but I am getting better. I do have an amazing memory for detail, which is needed when teaching American History is your day job. It also helps that I spent 2 days alone staring at bricks while I completed this project, so I can very vividly remember each step. So I will do my best to describe in great detail how easy this project was…. and in a weird way this project reminded me of baking: you’ll find out why later on 🙂
The closest thing I have” to a “before” picture is this picture right here. Use your imagination to picture a regular wall… with the same burlap bulletin board… in the same exact spot.
Supplies:
Prepping the wall:
You can buy any 32 oz of Spackling puddy, but I prefer the type that is pink and dries white. I am always so eager to start the next step of the project, that sometimes I don’t wait long enough for things to dry. This spackle is fool-proof, (ADHD proof, Barbra-proof) because there’s no question as to when it’s ready. This amount was more than enough for my wall with some left over to spare.
Application:
I borrowed mine from my father.
I wanted the look of mixed brick colors. I researched different products available online at Home Depot and Lowes. All reviews led me to believe that even though online photos show products with multiple brick colors in a box, most of the real brick veneer products available on these sites arrived at reviewers homes all in one color: red. I feared my wall looking like a Pizza Hut circa 1994- so I went to my local Mason yard instead- by me this is Orange County Mason Supply in Middletown, NY. In the show room they have multiple options available. I decided to mix two different kinds: Irish Pub & Peppermill. I liked some of the darker bricks in Peppermill and the washed bricks in Irish Pub. I ended up purchasing more boxes of Irish Pub than Peppermill. (Savings note: If you have a friend who owns a landscaping business, they can often get you their discount at these type of places. I didn’t know this until after I spent the $650 on bricks…it would have most likely saved me at least $65, but I count that as a huge loss because as you’ve heard, I’m super frugal.
 )
)
Since I didn’t know I would be writing a blog post about this down the road, my example photo in the “steps” section below will show a different product But definitely spring for the Omnigrip product. It’s what I used on my wall and had no issues. I bought a gallon and it was more than enough for 85 sq ft.
I used this knife to “butter” the bricks and it was much easier than the trowel.
I used this trowel to scrape the bricks, as you would if you were applying tile to a wall.
Finishing:
( In a color of your choice. I went with Alabaster, to give my wall a more “antiqued” look. I felt white would make it look too new. )
(Sold not by the grout *go figure* but by the cement in the plywood aisle. Get 2 if you have a partner helping you grout like I did)
(Get 2 if you have a partner.)
Steps:
(Anytime you see the word sparkle it’s mean to be spackle, autocorrect keeps wanting to change it)
Step 1: Prepare the wall for the bricks to adhere to. This involves wiping down the wall with a slightly damp rag to remove any dust, and creating a rough surface for your brick & mortar to adhere to.
I created a rough surface for my brick to adhere too by getting a 32oz tub of spackle puddy at Home Depot. Using the 4 inch flexible joint knife, I lightly applied a thin layer of spackle to the entire wall to give it a “plaster-look”. You can buy any type of spackle, but I prefer the kind that starts out pink and turns white when it’s dry. I’m the type of person who is way too eager and excited to get going, and it turning “white” lets me know when the wall is definitely ready for the next step.
Sidenote: I did a lot of research on whether this brick would adhere and stay on the sheetrock as it was or whether I would have to invest in durarock or something of the sort. Everything I read led me to believe that since this was brick veneer and not an actual regular size brick, it would have no problem adhering to the wall if I used the right product and there was a rough surface to adhere it to. This was the second scariest leap-of-faith I took because if I was wrong, it would not only mean the lost of $650 in brick, but the potential need to re-sheetrock this entire wall. Luckily it worked out.
Step 2: Lay out your brick pattern while you’re waiting for your spackle to dry. Have an area somewhere where you can lay out the different color bricks in a pattern to ensure that you don’t have the same color bricks all around one another when you start putting them on the wall. I chose my garage floor and I made a pattern on the floor as if it were the wall inside. I alternated between both Peppermill and Irish Pub boxes. I then took row by row into the house to put up. (Time consuming, but totally worth it. Trying to pluck these bricks off this wall even 2 minutes after putting them up, proved to be difficult.)
Step 3: Draw Leveled Lines on the Wall. Once the spackle has dried, take a level and draw lines every foot or so horizontally on the wall. This is an important step because it will give you a point of reference to make sure your bricks are being adhered in a straight line, once you get to the application step. Since our wall is pretty long and our level is only 3 feet in length, we also used a chalk line, and snapped lines on the wall to make this step easier.
Step 4: Choose a starting point, pattern, and start buttering your bricks! Whether you should start at the top of your wall or the bottom of your wall is completely up for debate. In my case, I decided to start just above the radiator on my wall, because I didn’t want to be slicing bricks in half on the last leg of the project. It worked out that I only had to cut three bricks in half for where the bricks hit the baseboard molding, and by pure luck when I got to the ceiling, my spacing worked out perfectly as well. I used the wet saw to make cuts on the bricks and it worked perfectly.
Buttering your bricks: This is where this project starts to feel like “baking”. In order to “butter” your bricks, use your 1 inch flexible joint knife, grab a sizable amount of Omnigrip Adhesive, and butter your brick as if you were frosting a cupcake. Don’t over-do the Omnigrip to have a “sloppy” brick, but don’t under-do your brick either because then it won’t stick to your wall.
Then grab your margin trowel and scrape lines horizontally across the brick and put the excess back in the Omnigrip container (you’ll need it for later). Creating this trowel mark will help the brick adhere to the wall by creating space for a “suction”, much like when you tile a wall.
Step 5: Apply your brick to the wall. Apply a little pressure against it with your fingers and hold for up to 20 seconds. Then release. To space my bricks- I didn’t use any “tile spacers”. Instead, all of the bricks were spaced with my pointer finger. (I have pudgy fingers so this worked well for me. My 2nd grade teacher Mrs. Dees gave me a complex with my fingers. She was tracing my hand for a project and she said “My you have fat fingers for a little girl!”…. and I never forgot it. If you have skinny fingers you might want to space them a tad farther apart : P ) For between rows I turned my pointer finger like pictured below. Between bricks I turned my pointer finger sideways. Occasionally a brick would move a little on the wall and I’d have to adjust it accordingly. Take a step back from the wall periodically and check the bricks to make sure they’re not moving, Omnigrip dries pretty quickly.
When I got to the top of the door frame, I turned the bricks vertically to mirror the old-school style that masons use to do back in the day above windows and doors.
Step 6: Grout between the bricks. Make sure you wait overnight for the bricks to completely dry to the wall. Grouting between the bricks is best done by working in small sections. You’ll need your grout mixed, grout bag, gloves, and chip paint brush for this part.
I wanted my wall to have a messier feel when it came to the grout so that it would look more authentic- so I used sanded grout in alabaster color (an antique beige-ish color). It definitely helps to have a partner with this part of the project. Although Shad went golfing (conveniently) two days in a row when I put up the bricks for this project- he spent the entire third day grouting with me, and it would have taken me a ton longer if I hadn’t had his help.
Put a good amount of grout in the grout bag, cut off the end of the bag with scissors, and working in sections squeeze the grout out of the bag into the spaces between the bricks. You will have to use both hands for this step and it’ll also remind you of icing a cake.
Using your glove-covered fingers, push the grout in between the spaces to make sure you fill in all areas. Shad and I both worked in 2 x 3 foot little sections at a time. We would go across the rows horizontally, and then fill in the small spaces between vertically.
To get the look of “straighter” but messy grout lines- we would stop after working in 2×3 sections and we used the end of the $1 chip paint brush to dig out grout lines. Doing this step too soon makes a lot of the grout fall out. Doing it too late makes it super hard to dig out. (PSA: This step is super messy and a pain-in-the… it was like we had a beach in our kitchen and I was super grateful we did this prior to taking out the tile and putting down hard wood floors in here.)
Step 7: Vacuum the beach that is currently in your kitchen (or whatever room you do this in). We used drop cloths which helped greatly- and we shook them out outside when we were done. Once the grout had completely dried, I also took the shop vac and vacuumed the brick wall grout lines as well.
Tips:
Thanks for reading. If you enjoyed my post, or if you have any questions/comments, please feel free to leave a message below!
🙂 Barbra
DIY Faux Brick Wall – A Super Easy Wall Treatment!
This DIY faux brick wall is an easy and inexpensive brick accent wall for your rustic decor! Learn how to make a brick wall indoors with faux brick wall panels in under 4 hours!
We just completed a total office makeover, and I am IN LOVE with this new farmhouse style, perfectly neutral but still textured wall treatment! Yes, our DIY faux brick wall is SO gorgeous that I can’t stop looking at it. I think it’s actually making me less productive…
I type a few sentences and then glance up at my gorgeous whitewashed brick wall… type a few more sentences… “oooh” and “aaah” over my brick accent wall.
I just can’t help myself! The new, pretty wall is such an improvement from the plain old storm cloud gray wall that I used to stare at.
And it was SUPER easy to do! I’m telling you… if you’ve been afraid to try some of my other projects like this faux subway tile fireplace makeover or this DIY mudroom wall, then you should REALLY try this one!
Making your own faux brick wall out of 3D faux brick panels and some joint compound is SO easy to do. We actually finished our wall in less than 4 hours… that’s start to finish AND making cuts for an outlet and a funky diagonal ceiling. My husband even commented that he couldn’t believe how easy this accent wall treatment was to do.
So, are you ready to make your own 3D accent faux brick wall? Here’s how to do it:
*This post contains affiliate links, which means if you click a link and make a purchase, I earn a commission at no additional cost to you. Read my full disclosure here.
Supplies to DIY a Faux Brick Accent Wall
3D Faux Brick Wall Panels
The wall panels we used are from Home Depot. They are 4′ x 8′ 3D panels that look exactly like a red brick wall. They are priced at about $35 per panel, and we used 4 panels.
*Note – When you’re picking out your brick panels at the store, be sure that the ones you select have “bricks” and “grout lines” that line up evenly. It will make your DIY faux brick wall MUCH easier to install!
Liquid Nails
This is the type of Liquid Nails (affiliate) that we used to hang the brick panels. We used one bottle per full panel.
Nail Gun and Brad Nails
This is the nail gun (affiliate) that we used, with 18 gauge 2″ brad nails.
Skilsaw and/or Jigsaw
You’ll need a Skilsaw or a similar saw to cut the brick wall panels to fit your wall. If your wall has any outlets or switches, you’ll also need to cut around those. The jigsaw made the smaller cuts for our outlet much easier!
Chalk Line
The chalk line is not completely necessary, but it WAS helpful with getting long straight cuts. We snapped our chalk line on top of one of the faux brick wall panels to cut it down to size more easily with the Skilsaw.
Tape Measure
Level
You’ll need a level to be sure that the panels are nice and straight as you nail them to the wall. The last thing you want is lines of “bricks” that aren’t perfectly straight across.
Joint Compound
We used USG All Purpose Dry Wall Joint Compound. It was about $7.00 for 3.5 quarts, and we used almost the whole container. The joint compound on top of the bricks makes your wall look EXACTLY like real brick!
Plastic trowels
We used a 3 pack of plastic trowels. The smaller sized trowel made it easier to get the joint compound out of the bucket, and the larger ones were used to put the compound on the wall.
How to Make a 3D Faux Brick Wall
Step 1: Plan where your faux brick wall panels will go.
The first step is to do a little planning. You’ll want to measure your wall, and figure out how your panels should go up with the least amount of cuts and seams.
Our ceilings are 9 feet high, and the faux brick wall panels are only 8 feet long, so we had about 1 foot that we had to “patch” in. We knew that my desk would be pushed up against the faux brick wall, so we decided to have the extra 1 foot at the bottom, because any seams would be hidden by the desk.
We also chose to nail our faux brick wall panels into the studs, though I don’t think that’s necessary, especially if you use Liquid Nails AND a nail gun.
Step 2: Optional, if hanging shelves on your brick wall – Find and mark the studs.
Once you get your faux brick wall installed, it will be difficult to find the studs. So if you’re planning on hanging any type of heavy shelving or artwork on your new brick wall, then go ahead and mark the studs now.
We knew that we were going to be hanging some DIY Farmhouse Wood Shelves on the whitewashed brick wall, so before we hung up the panels, we marked the studs so that we could later install the shelving.
Since you’ll be covering your wall completely, you’ll need to mark the location of your studs by placing a small pencil mark on the ceiling. Once you find a stud, use a level as a guide. Hold the level on the wall vertically where your stud is, and butt the end of it up against the ceiling. Then mark it for future reference.
Step 3: Attach faux brick panels to your wall.
Once you have an idea of how the wall panel pieces will fit together, it’s time to get them on the wall.
We applied one 10 oz bottle of Liquid Nails to the back of each 4′ x 8′ wall panel in a scallop shape pattern like this:
Then, we placed the brick panel on the wall, and I held it in place while my husband nailed it in with the nail gun.
This is definitely a two person job… The panels are rather heavy, and they will have a tendency to slip down the wall initially (because the Liquid Nails isn’t dry yet), so one person will probably have to hold them up against the wall from the bottom, pushing them up to the ceiling, while the other person nails the panels in to the wall.
Here’s what the first 3D faux brick panel looks like on the wall:
How to line up the seams of the wall panels:
Once you’ve installed the full 4′ x 8′ panels, you’ll need to “patch” in smaller pieces. We found it easiest to use a fresh 4′ x 8′ panel, rather than trying to piece together the scraps that remained from our 3rd panel.
We could have done the entire wall with just 3 brick panels, but for the extra $35, it saved us some work to just use a 4th panel.
We began by cutting a 12″ tall by 4′ wide panel piece, making sure that the top of the piece would line up perfectly with the bottom of the panels that were already installed on the wall. We lucked out because the bottom of the full sheet panels ended perfectly on a “grout line”, so the seam wasn’t visible after adding joint compound on top.
Then, for the other pieces that would go next to it, we lined them up like this and made a small pencil mark where we needed to cut the panel:
You can see from the picture above that we did have a few inches of waste on the bottom of the panel to get the seams of our DIY faux brick wall just right.
Here’s what the wall looks like with all of the full panels and cut pieces installed:
If you look really closely, you can see the smaller pieces on the bottom 12″ of the wall, but overall, the seams aren’t visible unless you’re really looking for them.
The 3D faux brick wall panels were just about PERFECT right off the shelf, as is, and they lined up really nicely on the wall with minimal effort.
Step 3: Smear joint compound on top of the brick panels.
After you’ve got your brick wall panels installed, it’s time to “whitewash” them.
This is VERY easy, and doesn’t have to be precise at all. I actually like the variation on the wall where the joint compound is thicker in some areas and thinner in others, so don’t worry about getting a perfectly even layer.
Just load a large plastic trowel with compound, and smear it on the wall… Easy as that! If you hold the trowel flatter against the wall while smearing it on, the compound will be thicker. You’ll have to hold the trowel flatter to fill in the “grout lines” of the brick, or the areas where the panels are more recessed.
Scraping the trowel with it more perpendicular to the wall will leave a thinner layer of compound.
Don’t worry… it’s MUCH easier than it sounds! And this part went SUPER fast! In fact, I would rather do this DIY faux brick wall treatment than painting a wall any day.
Here’s what the DIY faux brick wall looks like at this point:
Step 4: Cover seams on your DIY faux brick wall with extra joint compound.
As you’re applying the joint compound, you may notice that the seams of the 3D brick wall panels are starting to become more visible. You can see the vertical lines right in the middle of the “bricks” under my hand in this photo:
To fix that, I simply took a dab of compound on the tip of my finger and smoothed it over the seams. Did I mention that this project is a tad bit messy? You’ll definitely have spots of joint compound on your hands, so if that bothers you, be sure to wear gloves.
And here’s the finished DIY brick accent wall, “whitewashed” with joint compound:
If you want a whiter look, with less brick color showing through, then just apply a thicker layer of joint compound.
We actually tried painting over the wall with watered-down white paint at this stage, but we IMMEDIATELY wiped it off because the white paint completely covered the rustic look of the bricks. And I personally prefer this look to the solid white brick wall look.
Step 5: Use extra joint compound to “caulk” the outer edges of the wall.
You will probably have some slight gaps where the faux brick wall panels meet the ceiling and the corners of the wall. You can barely see a gap at our ceiling in the photo above.
To fill in those gaps, we just took a bit of joint compound on a small trowel and used it as caulk. Just fill in the gaps with the compound, and then smooth your finger over top (just like you would with caulk) for a nice, finished look.
Of course, you can also use actual caulk if you prefer.
And that’s it!
I COULD NOT be happier with how this easy DIY wall treatment turned out! It was SO easy to do, and the result gives the perfect amount of subtle, rustic farmhouse texture to my office.
For about $150 and 4 hours of your time, you can’t beat this DIY faux brick wall!
Here’s another view:
And here’s a close up view:
What do you think? Leave me a comment down below!
And check out House Beautiful for even more accent wall ideas!
Or check out some of my other DIY farmhouse decor ideas:
- DIY Reverse Shiplap Wall for Under $75
- DIY Large Wall Calendar – See All 12 Months at One Time!
- DIY Basket Labels for Pretty Organization
- Easy Large DIY Wall Art Using Drop Cloths
And happy nesting!
How to Create an Aged Faux Brick Wall
This post is long overdue and I so appreciate your patience. After sharing our son’s room, I had so many questions about how we achieved the faux brick wall. Moreover, you wanted to know how we made the wall look aged. Today I am happy to share our tips and tricks and walk you through what we did to get this look. Other than knowing how to use a couple of power tools, this is a very straightforward DIY project that you can knock out in 2-3 days.
How to Install & Age a Brick Wall
This is one of my favorite rooms in our home. It makes me happy each time I walk by and the crazy thing is that it wasn’t even a room when we bought the home. You may remember that we converted our loft space into this room for our son. By adding a closet and two walls, our upstairs took on a whole new look and we have never looked back.
After traveling around the country for sports, my son saw enough cities, restaurants and quaint towns to know he loved the look of age brick. In fact, he would even say that a brick wall in his room would be so cool. When we created this room and had a blank canvas I started looking around at options. We decided we would go for it and the faux brick panels from Home Depot would help us achieve the look.
INSTALLATION SUPPLIES
- brick panels
- drill
- hole saw
- circular saw with guide
- nail gun
- compressor
- square
- tape measure
- stud finder
- jig saw
- eye protection
If you are doing a large blank wall, you will most likely have far less cuts than we did. Because of the windows, it was definitely a bit of a puzzle. Just remember that when you make your cuts, you are wanting to line up the brick pattern with the adjacent piece. We spent a good amount of time holding up panels and carefully marking them prior to cutting.
INSTALLING THE PANELS
My husband used the nail gun to install the panels. If you are installing the panels as they come ( and not cutting them down) you may want to consider using some glue prior to attaching them to the wall.
Here is a good example of matching the pattern. Often it won’t be perfect because you are not lining up the same bricks, but you need to get the scale right. The seams are the biggest challenge. For our aged wall, spackle and paint helped disguise those seams very well. We know where they are can can still pick them out, but if you just look at the wall in its entirety, they definitely fade away.
Planning, cutting, and installing the wall only took half of a day. It really was so quick. Just be patient as it is much like putting together a puzzle and you want to be sure you take your time.
The panels and bricks already have some discoloration and texture. But my son really wanted it to look like the wall had been around for years. More character and more grit so to speak. Applying spackle was the way to go to give it a more realistic look. In fact that is a great look on its own. Many people even whitewash it first. You really can achieve any look you want if you just take the time. I wanted to take it one step further and paint the bricks first.
PAINT AND SPACKLE SUPPLIES
- various paint colors (blue, black, white)
- one sponge (cut into pieces)
- foil wrapped pan
- paper towels
- container of spackle
- metal putty knife
No matter what you decide to do, practice first!!!! That is so important. I used a scrap piece of brick to add paint and spackle. It helped me learn the technique that worked best for the look I was going for. While I like the aged look of this, the spackle was too white for us. We wanted it to look less bright and a bit more dingy. That was easily fixed by adding a bit of black paint to my tub of spackle, which you will see below. There is no right or wrong way to do this and I encourage you to find play around until you get the look you’re after. We even drove around neighborhoods looking at brick walls to see which would look best in his room.
ADD PAINT TO THE BRICKS
I wan’t fancy with this at all In fact, I shopped our home for craft paint and paint leftover from previous projects. I went with white, navy and black but you really can use any colors you want. Covering a baking sheet with foil worked well. A sponge cut in thirds also worked well for applying the paint to all of the bricks.
There is absolutely no right or wrong way to do this. Crank up the music and have fun. I actually loved this part of the project. Don’t worry about keeping each sponge for a specific color. You can mix and blend all you want. Adding a bit of paint to a brick and then using the sponge to wipe it worked well. The whole idea is to make each brick look slightly different so there are no rules. The spackle will transform the bricks from looking like a paint project to an aged brick wall.
WORK IN THE SPACKLE
My spackle looks gray because I added black paint to it. It dries differently than it goes on so be sure you test that, too. Ours dried more on the khaki side which is what we were going for.
This two minute video should help you see just how we achieved this look.
When you add it to the wall, you want to be patient and use the putty knife to spread it over the bricks and in between them. You can scrape away the excess. It’s up to you how much you want to be on the wall. As you scrape away the spackle, it will build up on the backside of your putty knife. You can use that for your next section. A little bit of spackle actually goes a long way. I would start in a section that may be covered by furniture when it’s all said and done. Like with any DIY it takes a minute to get into a rhythm and see what works. That will give you a bit of grace as you practice.
THE FINISHED PRODUCT
After I completely a section, I held up the light to see how it would look. This gives you a good idea of how the panels looks close up after this treatment. Quite a big difference from where they started.
While you can definitely paint and spackle in one day, I chose to split it up. This feature wall took us three days to complete.
OUR SON’S ROOM
Please let me know if you have any questions. Happy to answer them in the comments below. We love the way the room turned out. You can see the full room reveal and source list here.
How to Build a Faux Brick Wall
DIY, Home Renovation
therestoringhouse
/
March 17, 2018
Hands down, the most talked about element in the Mulberry House is the faux brick wall. Not one person stepping into the dining room for the first time thought that it wasn’t real exposed brick. In fact, after we informed people that we built the feature wall out of 4X8 hardboard wall panels, most of them moved closer to feel it because they didn’t believe us. And, after touching the bricks, people still couldn’t accept that it was fake.
I was inspired to attempt this faux brick wall after pinning a post from Corey at Sawdust2stitches. She includes a video on how she accomplished the technique of smearing the spackling over the hardboard.
I am not tech savvy, and also not awesome on video, so therefore you will not see me give you any live demonstrations on how to achieve the beautiful end result. However, I am super great at taking lots of pictures, so hopefully I can walk you through step by step on how we built our feature wall.
This post contains affiliate links.
First off, we purchased our brick panels from The Home Depot. There are several stores that sell these brick panels, I just happened to like Home Depot’s brick colors the best. Any of them should work just fine. The one we chose was the Kingston.
Before bringing the panels into the house, I notched out the bricks so that each panel would piece in together, and give the illusion of a real brick wall. These panels are specifically designed to fit together and have their seams hidden, but we just didn’t want to take the chance of being able to spot a straight vertical line after hours of labor. So, we chose to make notches.
I tested a couple of different tools, but in the end, I thought the jigsaw worked the best. This is the one that I use and it works great. It’s extremely simple to notch out the bricks. Just follow along the grout lines with the jigsaw. It does not have to be exact or perfect in any way. Don’t stress.
The picture below shows why I was inspired to build the brick wall in the first place. Century old plaster walls that we didn’t feel like ripping out and redoing. We thought it would be a perfect opportunity to undertake something new, and create a focal point in the room.
Once we had our panels notched out, it was time to hang them up on the wall. On the first board, you notice that we kept the straight edge of the panel, without any notches, so that it could hug tight against the corner. I forgot to mention that you should save the little bricks that you notch out/off of the hardboard. You can use these later if you have small spots that need to be filled back in. We used little remnant pieces here and there to cover our wall.
Corey (my inspiration girl) didn’t apply Liquid Nails on her brick wall because she desired to have the option to take it down if she changed her mind. We, however, knew that if someone removed this paneling, they were going to be extracting the plaster walls too, because they were in such a dreadful state. Therefore, we used the crap out of our tubes of Liquid Nails.
We laid the boards flat on the floor and applied the liquid nails all over the back side of the panel with a caulking gun, and then pushed the brick sheeting up against the plaster walls. Once we pressed our hands firmly all over the front of the hardboard to help the liquid nails adhere to the walls, we used a brad nailer all around the edges and center of the 4×8 sheets to ensure that those panels were not going to fall down.
I honestly liked the look of the brick wall just like this. But, I had my heart set on the resemblance of an old exposed brick wall. I thought the “exposed look” fit with the feel of the house better than the plain old brick.
When we finished piecing all of the hardboard together (this took my husband some time around the opening into the living room. It was reminiscent of building a puzzle in many areas), it was time to caulk the seams. We used this, and it worked great for us. Again, it was messy, and rather sloppy, no need to be perfect.
As soon as all of the caulking was dry, we were prepared for the spackling. I actually used Joint Compound for our wall. I would just scoop a bit up on my trowel, and smear it’s nice and smooth consistency all down the wall in one big swipe. Working in about three foot by three foot sections at a time seemed to have the best outcome. Don’t get too carried away with too large of a section. It’s more advantageous to work in small patches.
After I noticed that the joint compound was drying out a bit (I could see the change in color and consistency), I would take my trowel, and “rough up” the compound a smidge and smear it all back around so that the final effect would appear rough and old and a bit crumbly. This took me awhile to get my technique down, but once I got it mastered, I really enjoyed the process. I wanted the color of the brick to peak through the spackling, so I was careful not to apply the compound on too thick.
Because spackling will leave a white residue on your hands and clothing if not sealed properly, several tutorials that I read recommended sealing the spackling with a “white wash”, or watered down paint. However, I did not want the appearance of my brick wall to change once I had worked for hours on “just the right look.” So, a friend of mine recommended using a polycrylic. It was the perfect solution. It does not yellow, and gives the wall a beautiful finish. My contractor sprayed it on with a paint sprayer.
Once we had the wall completed, it was screaming for some barn lights. I got these little cuties at The Home Depot. Love them.
I could not be happier with the end result. It gives the dining room the perfect ambience for a fun little dinner party.
Ok! Now go and build your faux brick wall! You can do it! It’s super fun and simple.
Did you enjoy this post? Please feel free to share it on Facebook and Pinterest. Buttons are below.
Do you want to hear more from me? Subscribe at the bottom of the page to receive my latest blog post in your email.
If you have any questions, please feel free to ask in the comment box below. Thanks for reading!
Like this:
Like Loading…
Tagged accent wall, faux brick wall, feature wall, home renovation
The Proper Way To DIY A Fake Brick Wall
Paul shuang/Shutterstock
By Daniel Feininger/June 22, 2022 7:53 am EDT
Applying a faux brick panel to a wall in your home is a great way to personalize the space. Brick walls offer a unique style aspect and can be a major conversation starter. Brick walls were once reserved for city apartments that were built into historic landmarks, repurposed as a loft space for residential use. However, today, many people are finding that adding brick walls or a representation of an interior brick façade is easier than ever to accomplish.
From sourcing the brick façade to mixing the perfect spackle and paint ratio, the process will only take a day or two to accomplish, meaning that even the greenest of DIYers can start and finish the project in a weekend (or two at the maximum extent), according to A Thoughtful Place. Installing a faux brick wall isn’t difficult, but it does take an eye for detail (via Frugal Family Times). No matter how you square the installation, lining up brick patterns along each new segment to be installed will leave you with a great visual product, while a lack of attention to detail will likely mean that you’ll need to start over again.
With these steps in mind, engaging in a DIY effort to install a fake brick wall is simple, straightforward, and immensely rewarding.
Ensure that you have all the required materials
nadia_if/Shutterstock
Installation of a faux brick wall isn’t particularly difficult, but it does require some crucial tools that may not be in every homeowner’s tool shed. Frugal Family Times includes the use of a brad nailer on their list of must-have items for this project. Brad nails are small nails that are fired through a nailing power tool that may be either gas-powered or completely cordless. The nailer will make quick work of the project and create minuscule indentations at the joins, whereas screws or traditional nails simply can’t provide the same speed or discreet fixing power.
Alongside your nailer, you’ll need a square, jig saw, circular saw or table saw, and adhesive compound to affix the panels to the wall more permanently. It’s also essential to wear eye protection and ear protection while working with these pieces of equipment. On top of the technical material requirements, you’ll need spackle or joint compound and paint, as well as the panels themselves.
Measure and purchase faux brick paneling
Olegs Petuhovs/Shutterstock
Taking accurate measurements is always crucial when planning out a home makeover project. If you’re installing a fake brick wall section along just one accent wall, you’ll need to measure the area of the space and take into account the need to carefully create overlaps that place brick sections against one another (rather than haphazardly), according to A Thoughtful Place.
This all adds up to a requirement of overestimating your material purchase, just like when buying lumber to build something for the home or yard. Fortunately, these panels can be found in abundance at local hardware stores, and they come in a variety of pattern scales, color gradients, and textures. After you’ve finished measuring the space you’re planning to add the panels to, shop your local area stores to find the perfect panels for your project and make sure you have some extra area to match up the seams for a stunning new feature in the home.
Start in the toughest corner or edge
Good dreams – Studio/Shutterstock
If you are adhering these panels to a single, bare wall, you should start on one edge and work across the wall until you finish the installation. However, most homes and walls contain odd corners, windows to work around, and other elements that need to be considered when installing any new feature. Frugal Family Times reports that it’s a good idea to begin with the trickiest segment of the space you are attaching paneling to and then work outward around the remaining wall area.
If you are including coverage of a corner or edge with odd dimensions, making measurements and cuts to facilitate the installation in this section first can speed along the overall installation in a significant way. These areas can be difficult to tie into the larger space later on because of their smaller surface area or odd shapes. Starting here will give you the ability to make decisions freely about the edge cuts and overall layout of the faux brick pieces and then work your way out from there rather than being boxed in when you arrive at the tight corners.
Test your spackle and color blend
Yashkin Ilya/Shutterstock
After completing the installation of the paneling and making sure to line up seams between the brick segments to ensure a cohesive look throughout the wall, you’ll want to move on to the texture. Jennifer Decorates reports using a mixture of spackle or drywall compound and paints to create the look that most homeowners are going for with their brick feature.
A Thoughtful Place reports that it’s also a good idea to practice adding this mixture to sections of brick walling that you have leftover before going in on the wall itself. This is another reason to overestimate the number of brick wall panels you’ll need for the project. Mixing your paint and spackle concoction isn’t an exact science, so continue adding until you’ve arrived at a consistency and color that makes sense for your design. Whites, blacks, blues, and reds make for good pops of color in the finished product, but testing out a few options is always a good idea before committing to a color scheme for your wall. A Thoughtful Place also notes that taking a field trip around your local area to see real brick walls and get a sense of color patterns that you like can help in this process.
Add your texture sparingly
Good dreams – Studio/Shutterstock
Adding this smear across the surface is perhaps the most fun part of the whole process. You’ll want to create a more or less even coat across the wall, but precision isn’t exactly key here. Brick walls are uneven, unpredictable, and never the same in two places. This comes from the nature of the bricks themselves, and in order to mimic this, you’ll want to apply a healthy coating but ensure that it’s not done to a level of relative perfection. The Savvy Sparrow recommends using an uneven coating to mimic the natural variation in real bricks and suggests that this process is actually far easier than traditional painting because of the imprecise slathering you’ll be doing.
A Thoughtful Place suggests using sponges to dab on the mixture across the newly installed surface, while The Savvy Sparrow reports that a joint compound trowel works well to fill in gaps created by the grout spaces between brick features. Take your time to apply this coating across the whole surface, then when it’s dry, Frugal Family Times suggests that you might want to go over the wall with sandpaper to rough up the surface a little (further mimicking the aesthetic of a true brick façade).
Recommended
DIY faux brick wall from paneling
My DIY faux brick wall is (finally) done.
Here’s what the wall looked like before, when it was part of my son’s bedroom:
After he left the nest, I decided to give his old room a makeover and turn it into a guest room/office with a farmhouse industrial vibe.
My husband was onboard with most of my plans for the space. Unfortunately the one idea he didn’t like was the one I needed his help with: the faux brick wall. He liked the pictures I showed him of similar walls on Pinterest. But I lost him when I explained that the wall would be made from paneling.
While he was stewing over the idea, I pulled the wallpaper border down and painted the walls in Dutch Boy Birched White.
Then I measured and did the math to figure out how many 4’x 8′ sheets of paneling we’d need to fill the wall. (Answer: 3)
At this point, I think my husband realized resistance was futile. I’m glad he finally caved because hanging paneling is definitely a two-person job. (Especially when one of those persons has zero construction skills and a deep-seated fear of power saws. 🤣 )
Hanging paneling for a DIY faux brick wall
Before we started hanging the paneling for the DIY faux brick wall, we set up saw horses in the room, so we wouldn’t have to haul the pieces out to the garage every time we had to make a cut. Then we located the studs in the wall with a stud finder and marked where they were.
Hanging the first piece of paneling was a breeze. We just had to trim a little off the bottom attach the panel to the studs.
The second and third pieces were a little trickier because we had to navigate around the window. We used a circular saw for the straight cuts and a jigsaw for the corners.
Here’s what the wall looked like once we had all the panels up:
My husband was underwhelmed with how the wall looked at this point. I was too. But I was confident the wall was going to start looking better once I moved on to the next step. The husband still had his doubts.
Giving the bricks a “German schmear”
To tone down the shiny, red fake bricks and make them look old, weathered, and, most importantly, real, I wanted to cover them with a “German schmear” of joint compound (aka drywall mud).
The joint compound was supposed to mimic the look of mortar squeezing out from between the bricks.
I spread the joint compound onto the wall with a taping knife, making sure to apply it unevenly so parts of the bricks would peek out from underneath.
Then I dragged my fingertip through the indents between the bricks so the “mortar line” wasn’t completely filled in.
The bricks really started to look authentic with the joint compound on them. Even up close.
To fill in the seams between panels, I made sure to apply plenty of joint compound in the gap, but then I tapered it down to a thinner coating as I got further away from the seam.
Once the joint compound dried, I sanded off any high spots and rough patches.
Whitewashing the DIY faux brick wall
Next, I mixed some of my leftover white paint with water, using about a 1:1 ratio.
Then I whitewashed the wall with the watered down paint. Watering down the paint allowed it to go on translucent, so darker patches of brick still showed through here and there.
The watered down paint also served as a finish coat over the flat, powdery joint compound. If the wall gets dirty now, I should be able to wipe it down with a wet rag without damaging the finish.
When I was done painting, I was thrilled with how my new DIY faux brick wall looked. So was my husband. 😃
For about two weeks.
Then the joint compound in the seam between the two panels to the left of the window cracked. 😠
Ugh.
To fill in the crack, I ran a bead of caulk down the seam. Then I painted over the caulk and sanded a bit to blend that area in with the rest of the wall. When I was done, the seam wasn’t noticeable.
For another two weeks.
Then the crack came back.
The second time I filled the crack in with a type of wood filler called “plastic wood.” After more touchups and more sanding, the wall once again looked great.
For a few more weeks. Then it cracked again.
Grrrr.
Flex Paste
At this point, I decided on a two-pronged attack to deal with the crack.
Prong 1 involved a product called Flex Paste, which is a rubbery substance that I hoped would have more “give” than the other products I tried.
Flex Paste is kind of a pain to use because it’s not sandable or water soluble. But I figured if it actually held the two pieces of paneling together without cracking, it would be worth the trouble.
I applied the Flex Paste with a paper towel, smooshing it deep into the crack and spreading it thin on either side of the seam.
Then I scraped off the excess with a razor blade and painted over the seam again so it would blend in.
While waiting to see if Prong 1 was going to be effective in the long term, I moved on to Prong 2: floor-to-ceiling curtains.
Floor-to-ceiling curtains
With the seam being so close to the window, I figured I could hang curtains over it. That way if the crack returned, at least it wouldn’t be noticeable.
The walls in this room are 95 inches tall — the same height as the Threshold Blackout Curtains from Target. (Yay! No hemming!) I bought two panels for $33.99 each. (They must have been hanging on the wrong hook at the store, because I double checked my receipt and they were definitely not $29.99 like the price tag in the photo shows).
I hung the curtains from an oil rubbed bronze curtain rod that I bought at Menards for $31.21. The rod adjusts from 66-120 inches. I made sure to extend it out far enough so the curtains would cover the potential trouble spot.
I love how the curtains look. I was originally planning to use a shorter pair that I found at a thrift store (and hang them from a shorter thrifted curtain rod). But the extra expense is definitely worth it.
Budget? What budget?
When I started this project, I thought it would be fun to challenge myself to do the room makeover with a ridiculously small budget of $300. I figured I could reuse a lot of the elements that we already had in the space and thrift everything else, except for construction materials. But the crack issue threw that plan out the window.
I ended up spending $100 on the window treatments alone. Add in another $100 for the paneling, $30 for paint, and $30 for caulk/plastic wood/Flex Paste, and — if I did the math right — I’ve already blown through $260. So, we’re just gonna forget about the budget. 🤣 (Good thing I’m not a contractor.)
Crack? What crack?
While I may have blown the budget, I think I may have successfully slain the crack. It’s been over three weeks now since I Flex Pasted it, and so far the seam is holding. (And we’ve been through some pretty dramatic temperature swings that must have caused the wall to expand and contract during that time.) Fingers crossed that it continues to hold.
So what do you think? Anybody else have experience with Flex Paste? Will it hold long term? Should I continue to obsessively check behind the curtain to see if the crack has returned? If not, what should I do with all my newfound spare time? 🤣 🤣 🤣
— Lisa
Like this:
Like Loading. ..
..
Do-it-yourself brick wall from plaster: how to make an imitation of a brick
05/20/2019
1 star 2 stars 3 stars 4 stars 5 stars
From plaster, foam or tiles, it is quite possible to make a decorative brick wall quickly and at no extra cost. Our guide will help.
Pexels
How to make a brick wall in an apartment:
From plaster
- Marking
- Mortar preparation and application
- Shape correction
- Painting
Foam
- Marking
- Installation
- Painting and decoration
Tile
- Elastic clinker
- Hard materials
Decorating Tips
Do-it-yourself brick wall made of plaster is the most popular way of decorating, but far from the only one. Let’s take a closer look at each one, shall we?
- Inexpensive way. Such coverage does not require financial investments.
- Eco friendly. The plaster does not contain harmful impurities.
- Uncomplicated. It does not require special skills and tools. Just a little care and patience.
Marking
Before starting the main work, it is necessary to prepare the surface – remove the old finish. If it is not even, level with plaster and cover with a primer. Another option is to use drywall, this is a dry leveling method. However, if the area of \u200b\u200bthe room is small, this method is unlikely to work, because the sheets will “eat up” the space.
Please note: if the apartment is in a new building, you can start decorating the room no earlier than 1 year after the house is handed over. Otherwise, the walls may shrink and cracks form.
Unsplash
After the surface is prepared for work, you can start marking. And there are two options here.
Pery: in some construction stores they sell a ready-made mesh form, this method is simpler, but also more expensive. Second: self markup. How to make an imitation of a brick wall with your own hands?
- The standard brick size is 250 mm x 65 mm, the size of the joints is about 15 mm, although this is not essential, and they can of course be changed.
- Cut out a cardboard brick with seams on the sides.
- Mark the center of the brick, also considering the seams. You should get a blank as in the photo below.
Marking starts from the left corner. Provide for indents from the ceiling and floor in advance – at least 5 cm. First, you can mark the area according to the grid principle, marking the grid, and then draw half the brick through the row. Circle the resulting stones, and you will have a standard brickwork.
It is convenient to use masking tape 15 mm thick. Glue the jumpers with an overlap, be sure to leave “tails” at the edges so that later the tape can be easily removed.
If you forgot about the primer at the processing stage, it can be applied directly over the tape now.
Mortar preparation and application
You will need the following tools:
- Mortar dilution container;
- Wide, narrow spatula;
- Gloves, oilcloth.
The most reliable mortar is gypsum plaster and tile adhesive. You can knead it with a special nozzle on a drill (mixer) or manually. What is important to consider? If there is no experience in repair work, do not knead a large amount of the mixture at once. If you don’t have time to apply it, it will dry out.
Pexels
Plaster can be applied either with a spatula or by hand. But it is better to level the solution with a wide spatula in an upward direction.
You need to tear off the adhesive tape immediately, without waiting for the plaster to completely harden! Otherwise, later it will be impossible.
Correction of the shape
To make the imitation of a brick wall look natural with your own hands, you need to slightly correct it. This is true if you did not level the surface before removing the adhesive tape.
When the bricks have hardened, you can go over them again with sandpaper or, for example, make neat small chips. The texture of the surface depends only on your wishes.
Instagram @stone__spirit
Painting
Before applying paint, the surface must be prepared: walk with a dry brush, remove dust not only from the stones, but also from the gaps.
Then comes the primer. Here it is also important not to forget about the gaps. After that, start painting.
Only stones can be painted, and the seams should be left as they are. Or paint over the seams. In this case, be careful, take a thin brush so as not to stain the brick if the paint is contrasting. It is advisable to choose one that can be washed. Especially if you are remodeling your kitchen. One of the suitable options is the usual water emulsion.
By the way, instead of plaster, you can take gypsum putty, the principle of operation will be the same.
-
Finishing materials
How to lay decorative bricks: detailed instructions for flexible and hard materials
- This imitation sticks well to the wall.
- Styrofoam is easy to cut and process.
- It does not generate dust, which is important for interior work.
- Cheaper than plaster.
- The main disadvantage: low impact resistance, it is easily crumpled and breaks on impact.
In this case, it is better to purchase dense foam with fine grain, it does not break or crumble when cutting.
It is most convenient to use liquid nails as an adhesive for single bricks, and mounting foam for a solid sheet.
Pexels
Marking
How to make the imitation of brickwork on the wall as natural as possible? There are two ways to create such a masonry.
Individual elements
The size of the bricks is exactly the same – 250 mm x 60 mm. If you have a sheet of expanded polystyrene (polystyrene) in front of you, then the optimal width of one product is about 12 mm.
The material is easy to cut with an ordinary construction knife with a sharp blade. In this case, each detail will have its own texture.
Sheet
Instead of individual bricks, you can make a decorative sheet that imitates masonry. Since the foam melts easily, a soldering iron is used for this. They are carried out at the seams, controlling the depth of pressing. Be especially careful with the corners – they should be even, without roundings and bevels.
I must say that this method is suitable for those who are already familiar with the material; It’s unlikely to be perfect the first time. Need to practice.
When burning, be sure to wear a mask, ventilate the room well! Styrofoam emits harmful fumes when melted.
Instagram @muravina_designer
Laying
Start laying the bricks always from the corner, then lay the door and window openings.
Can be attached directly to the wall using liquid nails, or to a sheet of drywall or plywood. Subsequently, such a sheet can be fixed on self-tapping screws. This method is more convenient, since the sheet lies on the floor, the work is carried out on a horizontal surface.
Painting and decoration
Some leave the texture of the foam, while others cover it with putty – to give a special structure to the stone.
In any case, the material must be primed before painting. Carefully choose the paint, it can ruin the polystyrene foam. Suitable paints without solvents, for example, water-based. The result can be fixed with matte acrylic varnish.
See the video below for more information on making bricks from Styrofoam.
-
Building materials
How to prepare a mortar for laying bricks: proportions and the right technology
Today, you can find several options for tiles in the hardware store. This is not only standard ceramic, but also modern soft – elastic clinker based on polyacrylic.
Working with elastic clinker
- Very flexible material, it adheres to any surface, bends even around sharp corners.
- Easy to cut with long scissors, can be cut into any shape.
- UV and frost resistant, non-fading, breathable.
- Suitable for both interior decoration and house facades.
Instagram @klinker05
Surface preparation in this case is the same: it is leveled and primed. The difference is in the materials used. Most often, clinker is planted on tile adhesive, but the seller may advise you to purchase a special one from the manufacturer. Such a composition will make the tile more stable and solid.
- First, the rows are marked with a simple pencil and a ruler.
- The adhesive is applied with a notched trowel, a layer of 2-3 mm is sufficient. No need to completely cover the entire area! Fill in small areas so that the adhesive does not have time to dry.
- Apply the tile carefully, without applying too much pressure. Making half a brick is easy, just cut it with scissors.
- After the main stage is completed, the adhesive on the seams is leveled with a thin brush slightly moistened with water.
- Flexible clinker does not require the use of grout. This is an undoubted advantage of the material.
Pexels
Features of hard materials
- Rigid gypsum tiles are cheaper than analogues.
 However, its main disadvantage is that it is not at all resistant to moisture, so it cannot be laid in rooms with an aggressive environment, for example, in a bathroom, in a kitchen. However, there are also products with a protective coating.
 - Another type – from cement. Inexpensive yet durable, it is often used to create both indoor and outdoor decor. Interestingly, you can even make it yourself. The solution is simply poured into a special form.
- Finally, the third type is clinker tiles. It has the highest performance characteristics, but the price is appropriate. It is rarely purchased for interior decoration.
 However, its main disadvantage is that it is not at all resistant to moisture, so it cannot be laid in rooms with an aggressive environment, for example, in a bathroom, in a kitchen. However, there are also products with a protective coating.
 Instagram @shedarchitecture
Mounting
Working with rigid material is similar to working with elastic material. The main difference is that solid bricks will have to be cut, and one cannot do without the appropriate tools. You will need a circular saw or grinder with a disc.
In addition, the joints must be grouted with a special compound after installation. This must be done very carefully so as not to get on the stones, because it is difficult to wipe it off.
In general, if you have experience in laying tiles, there will be no problems.
Pexels
The more light hits a brick wall, the more natural and natural it should look. An illuminated decorative brick wall attracts attention, and if done carelessly or poorly, it reduces the cost of the interior.
Choose a color based on the overall gamut of the room. Standard terracotta is suitable for warm interiors, cold gray – for more brutal ones. By the way, it is better to add a little ocher to neutral white, so it will not seem flat and lifeless.
Prepared by
Anastasia Khripunkova
Was the article interesting?
Share link
By clicking on the “Subscribe” button,
you consent to the processing of personal data
Recommended
The 12 Best Aluminum Radiators of 2022
15 best adhesives for tiles of different types and purposes
Tax deduction when buying an apartment on a mortgage: all about the rules for obtaining and step by step instructions
7 good reasons to buy an air conditioner right now
Which bath is better: acrylic or steel? Analysis and comparison table
Fashionable wallpaper for the bedroom: 6 trends in 2022 and 95 photo examples
Freestanding bathtub: tips for choosing and 98 stunning photos in the interior
6 proven ways to create modern lighting in the apartment
Combined wallpaper: combination rules and ideas for each room (120 photos)
Advertising on IVD. ru
ru
7 ways, photo and video
One of the fashion trends in interior decoration is a brick wall. Good for those who have a brick house. All they need is to beat off the plaster and slightly “shamanize” what is available. But what about the rest? There are wallpapers and brick-like tiles, but not all of them are believable, and good ones cost almost like a natural brick wall. The best option in this case is a self-made brick imitation for interior decoration. Moreover, “brick-tiles” can be made separately, or you can decorate the entire wall in one go.
Content of Article
- 1 How to Make an imitation of a brick wall: A brief list of methods
- 2 Cock brick
- 3 How to draw brickwork on the wall
- 3.1 drawing bricks on the wall
- 3.2 Final strokes
- 4 for interior decoration from plaster mortar
- 4.1 What and how to make mortar
- 4.2 Surface preparation
- 4.3 Technology No. 1. We use thin adhesive tape to draw seams
- 4. 4 Technology No. 2: cutting the “seams”
- 4.5 Technology No. 3: seams with a saw
- 5 Making a mold for pouring brick tiles from plaster
- 6 How and with what to paint
 4 Technology No. 2: cutting the “seams”
 How and with what to paint
list of methods
The easiest way is if you have brickwork hidden under the plaster. Upholster the plaster, clean the seams, primer and paint. It turns out a natural brick wall. And it will look quite “old” and vintage. Those who are less fortunate will have to imitate this brickwork. The good news is that there are many ways, inexpensive materials are available, you can make a “brick wall” on concrete, drywall, plywood … any more or less durable surface. Time, by the way, most techniques take a little. So, here’s how you can make an imitation of brick for interior decoration:
This is only a short list. Each item has several technological differences. So imitation brick for interior decoration can be done in at least a dozen ways. Let’s talk about some in more detail.
Sawing bricks
It seems like a reasonable idea to replace expensive “brick-like” finish tiles with bricks that have been cut into plates. But a brick is needed of good quality, without voids, inhomogeneities, underburning or burnt places. In general, a brick is needed expensive. Or old.
An example of sawn bricks… but these are two “beautiful” parts
Sawing it is better with a water-cooled circular saw. You will get a decorative brick-like tile in natural color. The thickness of the tile is at least 8-10 mm. The advantages are clear: low price, no need to paint – there is a natural color. This homemade brick-like tile is then glued to the walls using ordinary tile adhesive.
- We lay out any texture from the sawn brick
- For a more pronounced color, you can cover with a matte varnish
- And this is for the design of the outer corners
But there are also disadvantages: you need a good quality brick, but you still have to find it. When cutting, the plates may break. Only two of them are obtained with a beautiful surface – extreme. The rest will have to be finalized manually, creating a relief. It is dreary, dusty, long, difficult and it is not a fact that brick imitation will learn really “on the level”.
With all the shortcomings, this method is used. And this is the only, perhaps, home-made imitation brickwork option that can be used for exterior decoration . For these purposes (finishing the facade of the building), by the way, you can cut a brick into two halves. Everything is cheaper than buying tiles.
How to draw brickwork on a wall
If “wet” or “dusty” work is not your forte, but you know how to draw at least a little, you can draw a brick wall. You will need acrylic paints, brushes, a couple of natural sponges, masking tape, thick paper plates for mixing paints. When diluting paints, remember that acrylic paints darken when they dry. And one more thing: they dry quickly, but freshly applied ones can be removed with a clean cloth dipped in water.
The whole process in step-by-step photos
First, we prepare the workplace: we cover the baseboard and the adjacent floor with polyethylene or old wallpaper (it is better to fix it with adhesive tape). With masking tape we outline the borders – at the top, on the sides. At the bottom, the limiter is a plinth, although, in order not to get dirty, it can be removed.
Paint the bricks on the wall
Step by step:
- Paint the wall with semi-matt white acrylic paint. We leave to dry.
- Preparing the background paint. In one of the paper plates, mix 1/6 of the umber, 1/6 of the black paint and 4/6 of the titanium white. We immediately prepare some paint, apply it to the wall with a sponge, simply by applying the surface soaked in paint to the wall. Do not try to make a solid background – it should be torn, textured. In some places we put the paint more densely, passing twice, somewhere with a more transparent layer.
Preparing the background: it should not be uniform
- On a dry background, by hand, not on a ruler, draw several rows of bricks. We focus on the standard for masonry: 25 * 6.5 cm, the thickness of the seam is 0.8-1.2 cm. When marking, please note that using this technology it is easier to make the seam a little narrower by painting over it than to try to expand it later.
- To stain the “bricks” it is necessary to mix ocher and sienna in different proportions, getting different shades of “brick” colors – from yellowish-orange to brownish. We got some shade, painted a few “bricks” in random places. They mixed a new portion, painted over other bricks. We apply the paint with a brush, not trying to get a uniform surface or a dense layer of paint – the background layer is translucent. The edges of the “bricks” should also not be smooth.
- For the traditional red-brown color, to sienna and red ocher, add a little light ocher, a little white. This color can be painted over several bricks in a row.
Little by little paint over the bricks with different shades
- Another shade – add brown mars and a little water to the above composition. Apply with a brush or sponge – as desired.
- If white and burnt sienna are added to ocher and sienna, we get another color.
- These shades randomly paint over all the bricks.
- Dilute white and a little ocher, add water. We apply the composition with a sponge, acting like a tampon.
- Take an old toothbrush and burnt bone paint. We dip the bristles into the paint and spray it on the wall, imitating the heterogeneity and texture of clay bricks.
Final steps
- Add volume to the bricks: dip a thin brush into a mixture of umber and white. We bring all the bricks from below and to the right or left. All on one side, depending on where the window is located (on the side opposite the window). The thickness of the eyeliner is different, since the masonry and the bricks themselves cannot be perfect.
 We focus on the standard for masonry: 25 * 6.5 cm, the thickness of the seam is 0.8-1.2 cm. When marking, please note that using this technology it is easier to make the seam a little narrower by painting over it than to try to expand it later.
  Apply with a brush or sponge – as desired.
 Describing is much longer than doing it all. A beginner can draw about 30 squares of imitation brickwork in a day. For maximum likelihood, there are several secrets, which we will discuss below.
Finishing touches
To make the brickwork painted on the wall look as natural as possible, there are a few little secrets:
With some ability and diligence, it is possible to make the painted brickwork look like natural. The main rule: imperfection and heterogeneity.
Imitation brick for interior decoration made of plaster mortar
The general idea is simple: a layer of plaster or tile adhesive is applied to the wall, a seam is cut / pressed through it. After processing the edges of the “bricks” and seams, painting, a semblance of brickwork of varying degrees of plausibility is obtained. Everything is simple, but there are significant differences and nuances.
Imitation brick for interior decoration of premises from mortar, plaster (ordinary and decorative)
What and how to make mortar
The first question that arises is: what solution and from what is needed? Lots of recipes. Here are a few options:
Regardless of what you make the solution from, it should be semi-dry, should not leak in any case. It will not need to be leveled, so its plasticity is not important to you, and additives – tile adhesive and PVA – will provide the adhesive ability. To adjust the consistency, add water in small portions.
Surface preparation
The wall on which we will make imitation brickwork does not have to be even. It should not be dust and dirt, crumbling fragments and particles. This is where the requirements end.
The process of preparing the wall – a thorough approach: first make the markup
Before starting work, it is better to prime the wall. The type of primer depends on the substrate. If the wall is concrete or loose, go through the “concrete contact”. It will bind crumbling particles, create an adhesive surface on which any composition fits perfectly. If we decorate plywood, plasterboard or other similar material, you can do without a primer, or you can coat it with diluted PVA.
Technology No. 1. Using thin adhesive tape to draw seams
First, paint the wall in the color of the seams between the bricks. Someone plans gray-brown, someone white-gray. We cover the wall with paint of a suitable shade. On the prepared base, using a narrow masking tape (1 cm or a little less / more), we apply markings. The adhesive tape will mark the seams between the bricks, so we stick it horizontally, at a distance of about 6-6.5 cm from each other. When the horizontal lines are glued, glue the short vertical ones. From each other they are at a distance of 23-25 cm – this is the length of a standard building brick, but decorative ones can be shorter.
Now we take the mortar and apply it on the wall. The layers are not the same, the thickness is 0.3-0.5 cm. We apply it according to the “how it goes” type, without achieving a flat surface, smooth transitions … As it turned out, let it be so. We do not allow only obvious bald spots through which the wall glows. We filled the area, took a flat trowel (grater), slightly smoothed out what happened. Leave until it dries slightly: so that when pressed with a finger, the composition is slightly squeezed.
We apply mortar without worrying about beauty and uniform thickness
We pry off the ends of the horizontally pasted strips of adhesive tape in any place (when pasting, leave the “tails”), pull, remove together with the solution adhering to the tape. We remove the entire network. The edges of the “bricks” in this case are torn uneven. This is fine. Even good.
Take a toothbrush or paintbrush with fairly hard bristles. We go through the seams with a toothbrush, removing the remnants of the solution. At the same time, the edges of the bricks are rounded. Then we take a wider brush and go through the surface with it, adding naturalness, removing too sharp edges. Leave to dry at room temperature for about 48-72 hours. Forced drying is impossible – it will crack. Although, if you want to have cracks … If the composition has not been dyed in bulk, it’s up to painting.
 youtube.com/embed/fEtA9ByZIaU?feature=oembed&wmode=opaque” frameborder=”0″ allow=”accelerometer; autoplay; clipboard-write; encrypted-media; gyroscope; picture-in-picture” allowfullscreen=””>
Technology No. 2: cutting “seams”
This method of imitation brick for interior decoration takes less time: no need to glue adhesive tape. We apply a solution to the surface of the wall. Everything is exactly the same as described above, only the layer can be thicker – up to 0.8-1 cm. After waiting for the solution to “grab” a little, we designate the seams. Here again, there are options:
The second option is more accurate. But you have to be careful not to be too flat. Although, due to the fact that the hand trembles, the seam “walks” slightly, which gives a more believable look.
Having done the horizontal seams, we proceed to cutting the vertical ones – also by hand. The width of the bricks is about 6 cm, the length is around 23-25 cm. When finished, we wait 12-14 hours. Until the composition is set enough to be picked off. When, with strong pressure, the concrete begins to crumble, we take a wide screwdriver (usual, which is a “spatula”) and pick out the mortar between the cut strips with it.
In progress…
When the seams are cleaned, take a hard brush or brush, remove the remains of the mortar, crumbs. The bristles on the brush should be fairly stiff. If the solution is dry, you can try more drastic measures – a metal brush.
Technology No. 3: seams with a saw
This method of making imitation brickwork for interior decoration differs only in that we take an old hacksaw blade instead of a knife.
After waiting until the mortar sets and does not slip, mark the borders of the seams with a saw. Here you choose one of the methods described above. But you don’t have to wait any longer: with a hacksaw, you paint the seams a little. It is quick to make long horizontal seams, but with vertical ones it is not very convenient, since the canvas is not very suitable for small distances.
From a distance and you won’t understand that this is just an imitation of a brick.
This method is good because there is no danger of “overdrying” the solution. You can do the “joint” as soon as the solution hardens a little. In this state, it is easier to round the edges of the bricks, giving them a natural “old age”. Minus – you have to adapt, otherwise you can do things.
We make a mold for casting brick tiles from gypsum
Another imitation brick for interior decoration in an apartment or house can be cast: you can make your own gypsum tiles in the form of bricks. To do this, an impression is taken from interesting specimens of bricks (a mold is made to form an artificial finishing stone), then a gypsum mortar is poured into it. The resulting tiles are used for wall decoration. This technology is good because it allows you to prepare several forms in which you can make bricks of different colors for different rooms.
We find bricks of interesting shape and a few almost ordinary ones, but with various small defects. We will use them for mold casting. It is desirable that there be at least a dozen of them, and preferably more. More diverse will be “artificial brickwork.”
The result can be very similar to real masonry.
On the side that we will “multiply”, we apply grease or heated wax mixed with kerosene. This is necessary so that the silicone does not stick to the surface. When everything is dry, apply a layer of silicone sealant to the treated side. The layer thickness is 1-1.5 cm. Leave until the silicone is completely polymerized (the time depends on the type, it is written on the package).
You can also make the following forms: brick imitation with marine motifs
When the silicone has hardened, we take mounting foam and coat the mold without removing it from the brick. After the foam hardens, remove the brick, level the bottom of the mold so that it stands level. Can be used by filling with gypsum mortar. It sets quickly, if you have a dozen shapes in 2-3 days, you can make a tile for a couple of squares of imitation of a brick wall. Gypsum mortar, by the way, can be painted in bulk. Then new cracks and chips do not matter – like a brick.
How and with what to paint
Recently, a white brick wall has become fashionable. If you are going to do just that, there are no problems: seams with a brush, the surface with a roller. If you want to have a not too monochromatic color, add a little tint to the base coloring composition – gray, brown, yellow … or at least pink or blue. Paint with this paint. Add more white to the rest and add highlights with this lighter composition using a semi-dry roller, sponge, brush. If desired, you can apply the upper “shadows” with silver, bronze, adding a little gold. Here is what you like best.
Imitation of brick in the bedroom – looks very stylish
If the seams in the imitation of brick luggage should be darker, first go through them with a brush. Then, with a roller with a short or medium pile, we paint over the very surface of the bricks. If you take a roller with an even shorter pile, dip it in paint of a different shade (lighter or darker – that’s how it goes), in bronze, silver, gilding, etc. and with this roller, quickly, slightly touching, paint over the most protruding parts, you get an even more interesting effect. In general, you can experiment. With this approach, imitation of brick becomes a design object and the main decoration of the interior.
How to make an imitation of a brick wall in the interior with your own hands
High-quality imitation of brickwork in the interior quickly conquered designers around the world. This decor is distinguished by its stylish appearance, versatility, and ease of execution. Brick has a unique charm, immediately becomes the central design detail. Internal lining with real brick is not always possible. This is due to the large weight of the material. Such a load on load-bearing walls can lead to serious negative consequences. For this reason, an imitation of a brick wall is created from lighter, cheaper materials. Features, step-by-step instructions for creating a simulation are indicated in this article.
Brick wall looks good in a bright living room interior
Contents
- 1 Where is a brick wall appropriate?
- 2 styles combined with a brick decoration
- 3 Preparation of the wall for decoration
- 4 Imits from foam
- 5 We use gypsum
- 6 decoration for brick plaster
- 7 We use wood
- 8 Untreated wall in the interior
- 9 Photo: Imitation of a brick wall in the interior
- 9.1 See also
Where is a brick wall appropriate?
The idea of a brick wall would be appropriate in any room of a house, apartment, cottage. This is a great solution for a modern kitchen. There, brick will not only decorate the interior. It will perform a practical function. Imitation is often laid out in the area of \u200b\u200bthe apron, covered with transparent glass on top. Such an apron will reliably protect the wall from dirt, it looks very unusual.
Cozy kitchen with white brick accent wall
Brick wall can be painted any color
White brick wall in contemporary bedroom
In the living room, imitation brickwork will be the main decorative accent. It will be combined with a fireplace, white upholstered furniture. Also, this idea will find its application in the bedroom interior. It is usually embodied in a brutal male interior.
See also Panels for the kitchen with your own hands: 9original ideas
Styles to match with brick finishes
This element of decor is not suitable for every style of living space. The most suitable directions are discussed in the table:
| Style | Features |
| Loft | This is the most successful style for placing an imitation brick wall. The loft is characterized by an almost complete lack of decoration. The interior of such a plan is very reminiscent of a warehouse, industrial premises. |
| Country | This direction is usually used in the process of arranging country cottages, dachas. In them, brickwork looks appropriate near the stove, fireplace. Country style is characterized by bright colors. For this reason, expensive red brick can be used. |
| Minimalism | Rooms in the style of minimalism are more character than city apartments. It is better to use white brick imitation in them. This solution will help to make a simple interior more interesting. |
| Gothic | Bedrooms are decorated in this style using brickwork. The brick will go well with the original metal bed. Chic satin bedding will be a great addition. |
Loft kitchen with open shelves on brick wall
Bright living room in Scandinavian style
See alsoMaking an educational rug with your own hands for children from 0 to 3 years old with photo
Wall preparation for decoration
It is necessary to start finishing the wall with your own hands by preparing the surface. The first step is to remove the old coating. The old cladding must be completely removed from the wall. Dismantling usually takes a minimum of time, especially if the old material does not need to be stored for later use. After dismantling, it is necessary to start repairing large chips and cracks. They can be sealed with plaster. It is applied with an ordinary spatula. Sometimes it is convenient to distribute the solution with your hands inside the chip.
Removing the old coating will be the dirtiest job
The next step is putty. The wall must be perfectly level so that the brick imitation is easy to install. Requires finishing putty. This composition will get rid of small cracks, shortcomings. It will level the wall, give it a pleasant uniform shade. The final step in wall preparation is the application of a primer. It is more convenient to prime the surface with a medium-sized roller. It is better to apply the primer mixture in two layers. First the first layer, then you need to wait. The wall should dry thoroughly. Then the final layer is applied.
See alsoShells as an interior element
Styrofoam imitation
Styrofoam imitation brickwork is light weight, low price. To build it with your own hands, you will need a foam ceiling tile, a sharp stationery knife, a gel pen, glue, and paint.
Styrofoam imitation brickwork technique is quite simple: cut, smeared and glued
The manufacturing process is quite simple:
- Marking tiles. Bricks should have a small size – 150×70 mm. Larger elements will look implausible. Marking can be done with a regular gel pen. Between the bricks, be sure to leave a little space for the seams.
- Brick cutting. You can use a sharp utility knife for this. Cut carefully. Styrofoam is a brittle material.
- Brickwork wall decoration. Finished bricks can be glued to the wall. It is better to mark the surface, prepare it in advance. Attaching the elements is easy with ordinary tile adhesive. It is worth starting facing from the bottom edge of the surface. It is necessary to lay the bricks with a small gap – 2 millimeters.
- Painting. Paint will help to give the decor a natural look. The color of the paint should be chosen based on the colors of the rest of the interior elements. You can paint the masonry with a roller, brush. More paint needs to be added between the bricks. This will bring the coating closer to a more natural look.
 It is worth starting facing from the bottom edge of the surface. It is necessary to lay the bricks with a small gap – 2 millimeters.
 Bricks can be textured with a soldering gun or a regular soldering iron
You can paint the foam wall only with paints without acetone, the best option is water-based compositions
See also Why do you need to make crafts for the interior with your own hands
We use plaster
Making a realistic brick wall is easy with plaster. Such a cladding will look no worse than factory-made building products.
If you want the bricks to come out strong enough, purchase G-16 grade gypsum
Detailed instructions will help you create such a simulation yourself:
- Purchasing a mold. It is not difficult to find molds for the construction of imitation brickwork. You can find them at hardware stores. If there is a desire, the form can be made independently from improvised materials. The main thing to remember is that the thickness of the brick should not be less than 10 millimeters. Otherwise, the element will simply break during installation.
Silicone molds come with different surfaces that imitate any texture
- Preparation of gypsum mixture. Dry gypsum must be diluted with water.
It is important to calculate the amount of plaster needed to fill one mold
- It is better to lubricate each mold with soapy water. Then the workpiece will be easy to get out of the mold.
Moisten conveniently with an aqueous solution of laundry soap poured into a spray bottle
- The finished gypsum mass is poured into a mold, left for half an hour.
Mold drying
- Painting. If desired, gypsum blanks can be painted in any color. Paint is best applied in several layers. After painting, the elements can be additionally varnished. This will significantly extend their service life.
Color can be used to create original surface decorations
- Surface decoration. Gypsum blanks must be laid evenly. Draw a starting line at the bottom of the wall. Follow it as you work. Installation of gypsum bricks is done using ordinary tile adhesive.
For even seams, use wooden slats
 It is not difficult to find molds for the construction of imitation brickwork. You can find them at hardware stores. If there is a desire, the form can be made independently from improvised materials. The main thing to remember is that the thickness of the brick should not be less than 10 millimeters. Otherwise, the element will simply break during installation.
 Paint is best applied in several layers. After painting, the elements can be additionally varnished. This will significantly extend their service life.
See alsoHow to decorate a battery: recommendations from designers and heat engineers
With the help of decorative plaster, for example, you can finish the accent wall in the living room, and this can be done in two ways
See also How to beautifully decorate a wall with photographs
You can make a beautiful brick wall for the interior using plaster, a special stencil. Finding a flat stencil is not easy. To do this, you will have to travel around any store, market. However, it is the stencil that will help to make decorative cladding quickly.
Such stencils are made of composite material, do not break and last for a long time
A similar stencil can be made by hand from thin boards
To begin with, the wall must be prepared – repair cracks, chips, putty, primed. Then you need to purchase a good decorative plaster. The plaster must be of high quality, be completely environmentally friendly. The surface is plastered in the usual way. Immediately after plastering, you can take a stencil slightly moistened with water and apply it to the coating. Then the stencil is removed, and clearly traced seams remain on the surface. In this way, you need to process the entire coating. After drying, the plaster layer should be primed, the bricks should be painted. Seams, bricks should have a different color.
See also How to turn an ordinary mirror into a highlight of the interior
Second method
For the next method, a stencil is not needed, we will use ordinary masking tape.
First, mark the primed wall with masking tape
Then apply the plaster in a layer 3–5 mm thick
After a few minutes, depending on the density of the solution, remove the tape. It is important not to overexpose the plaster, otherwise the edges will come out torn!
After the plaster has completely dried, cover the wall with paint
And we get such beauty!
See also How to decorate a room with your own hands from improvised means
We use wood
If you want to build almost eternal brickwork, you must give preference to wood. The tree will last a long time, is completely safe for human health. For work, you need to select the material. Ordinary dense plywood is ideal. It is easy to handle, has a relatively small weight, excellent performance.
Plywood sheet must be marked
Each brick must be carefully cut. The next step is grinding with an element. To do this, use fine sandpaper. Elements are polished only from the front side.
Grinding determines the quality and appearance of the surface
Next, the tiles must be attached to the wall. This can be done with a special wood glue. You need to glue only according to the markup, leaving a small indent between the bricks. Then you need to wait for the masonry to dry completely. Only after that you can proceed to decorative processing. The surface should be painted, coated with a colorless varnish. The varnish can significantly extend the life of the finish, make the surface more attractive.
See also How to decorate a wall in a room with your own hands: the best decor ideas
Untreated wall in the interior
If you don’t want to do the cladding with your own hands, you can simply find a brick wall in the room. In some apartments, private houses, finding such an overlap is not a problem. To give a brick wall an attractive appearance, you need to follow the following instructions:
- Removal of the old coating. Wallpaper, tiles, any other kind of old lining must be removed from the surface.
- Cleaning of layers of putty, plaster. For this, various tools are used: spatulas, hammers, chisels, etc. The work is dusty. All surfaces, furniture in the room must be protected with a dense plastic wrap. If after cleaning the surface is not entirely successful, it is better to mount an imitation on it.
It is convenient to clean the cement mortar from the bricks with the help of the barbosky brush
- Grinding. The surface must be carefully sanded. It is most convenient to use a grinder with a petal disc for grinding.
- Correction of seams with plaster. Inter-brick seams can have various defects, plaster will allow them to be easily eliminated.
Carefully prepared wall is coated with primer
- Decorative finish. To give the coating shine, you can use acrylic varnish, special wax.
For painting it is better to use acrylic compositions
 If after cleaning the surface is not entirely successful, it is better to mount an imitation on it.
See alsoHow to decorate a closet with your own hands?
Photo: Imitation of a brick wall in the interior
How to make plaster of brick walls with your own hands
Hello readers of my blog! Today we will talk about How to make plaster of brick walls with your own hands. It would seem that this is not a tricky thing, but when you encounter this problem, you have to think about how to do it right, what preparation to do, what materials to choose. Thus, I decided that this article would be useful to someone, and I devote my efforts to this topics. In it, I will answer a number of questions that will arise immediately before How to make plaster of brick walls with your own hands, and some even after that. This topic is quite wide, because thorough preparation is necessary before work, but how to do it? And this is a separate issue. You can learn about all this in great detail in the article below.
Imitation of brickwork
One of the fashion trends in interior decoration is a brick wall.
Good for those who have a brick house. All they need is to beat off the plaster and slightly “shamanize” what is available. But what about the rest?
There are brick-like wallpapers and tiles, but not all of them are realistic, and good ones cost almost like a natural brick wall. The best option in this case is a self-made brick imitation for interior decoration. Moreover, “brick-tiles” can be made separately, or you can decorate the entire wall in one go.
Content
- 1 How to make an imitation of a brick wall: a brief list of methods
- 2 Cock brick
- 3 How to draw brickwork on the wall
- 4 draw bricks on the wall
- 5 Final bar
- 6 IN interior decoration from plaster mortar
- 7 What and how to make mortar
- 8 Surface preparation
- 9 Technology No. 1. We use thin adhesive tape to draw seams
- 10 Technology No. 2: cutting through the “seams”
- 11 Technology No. 3: seams with a saw
- 12 Making a mold for pouring brick tiles from gypsum
- 13 How and with what to paint
- 14 Brick wall in the interior of the room and the choice of material for its creations
- 15 How to create a bare brick wall in the interior
- 16 Imitation of a brick wall: photos of interiors using wallpaper
- 17 Lightweight brickwork: photos of rooms with facing bricks
- 18 Using tiles and glass bricks in an interior
- 19 Choosing a color for an interior with brick walls
- 20 Benefits of a white brick wall in an interior
- 21 Features of interiors with a brick wall in gray
- 22 Using a red brick wall in an interior
- 23 How to use a brick wall in the interior of the kitchen, bathroom, living room, hallway and bedroom
- 24 How to use brick in the interior of the kitchen and bathroom
- 25 Making a brick wall in the interior of the living room, hallway and bedroom
- 26 How to make a brick wall: manufacturing and painting technology
- 27 How to create an imitation of a brick wall with your own hands
- 28 How to paint a brick wall in the interior
- 29 Why plaster do-it-yourself walls – the best option?
- 30 Preparing walls for plaster
- 31 How to finish walls with plaster
- 32 Video
How to make an imitation brick wall: a short list of methods
The easiest way is if you have brickwork hidden under the plaster. Upholster the plaster, clean the seams, primer and paint.
Creates a natural brick wall. And it will look quite “old” and vintage. Those who are less fortunate will have to imitate this brickwork.
The good news is that there are many ways, inexpensive materials are available, you can make a “brick wall” on concrete, drywall, plywood … any more or less durable surface. Time, by the way, most techniques take a little. So, here’s how you can make an imitation of brick for interior decoration:
Make a “brick-like tile” by sawing an ordinary brick into plates. Draw with acrylic paints. Print a picture and use it as a wallpaper.
It’s clear why “brick” walls are so popular lately
Make a silicone mold with an imprint of beautiful bricks and cast gypsum tiles imitating bricks in it.
Simulate brickwork with mortar, tile adhesive, decorative plaster.
Make seams: using adhesive tape; cutting and removing excess; squeezing seams with a template. Cut out of thin foam. Cut from drywall. Make a frame from thin strips.
Planks – seams, fill the space between them with mortar. These will be bricks.
Brick Wall Frame
This is just a short list.
Each item has a few technological differences. So imitation brick for interior decoration can be done in at least a dozen ways. Let’s talk about some in more detail.
Sawing bricks
It seems like a reasonable idea to replace expensive “brick-like” finish tiles with slabbed bricks.
But good quality brick is needed, without voids, inhomogeneities, underburning or burnt places. In general, a brick is needed expensive. Or old.
An example of sawn bricks… but these are two “beautiful” parts
It is better to cut it with a water-cooled circular saw. You will get a decorative brick-like tile in natural color.
Tile thickness – at least 8-10 mm. The advantages are clear: low price, no need to paint – there is a natural color. This homemade brick-like tile is then glued to the walls using ordinary tile adhesive.
But there are also disadvantages: you need a good quality brick, but you still need to find it. When cutting, the plates may break.
Only two of them are obtained with a beautiful surface – the extreme ones. The rest will have to be finalized manually, creating a relief. It is dreary, dusty, long, difficult and it is not a fact that brick imitation will learn really “on the level”.
With all the shortcomings, this method is used.
And this is perhaps the only homemade imitation of brickwork that can be used for outdoor decoration. For these purposes (finishing the facade of the building), by the way, you can cut a brick into two halves. Everything is cheaper than buying tiles.
How to draw brickwork on a wall
If “wet” or “dusty” work is not your forte, but you can draw at least a little, you can draw a brick wall.![]()
You will need acrylic paints, brushes, a couple of natural sponges, masking tape, thick paper plates for mixing paints. When diluting paints, remember that acrylic paints darken when they dry. And one more thing: they dry quickly, but freshly applied ones can be removed with a clean cloth dipped in water.
First, we prepare the workplace: we cover the baseboard and the adjacent floor with polyethylene or old wallpaper (it is better to fix it with adhesive tape). With masking tape we outline the borders – at the top, on the sides. At the bottom, the limiter is a plinth, although, in order not to get dirty, it can be removed.
Paint the bricks on the wall
Step by step:
Paint the wall with semi-matt white acrylic paint.
Leave to dry. Prepare the background paint. In one of the paper plates, mix 1/6 of the umber, 1/6 of the black paint and 4/6 of the titanium white. We immediately prepare some paint, apply it to the wall with a sponge, simply by applying the surface soaked in paint to the wall.
Do not try to make a solid background – it should be torn, textured. In some places we put the paint more densely, passing twice, somewhere with a more transparent layer. We prepare the background: it should not be uniform On the dried background, by hand, not along the ruler, we draw several rows of bricks. We focus on the standard for masonry: 25 * 6.5 cm, the thickness of the seam is 0.8-1.2 cm.
expand. To stain the “bricks” it is necessary to mix ocher and sienna in different proportions, getting different shades of “brick” colors – from yellowish-orange to brownish. We got some shade, painted a few “bricks” in random places. They mixed a new portion, painted over other bricks.
We apply the paint with a brush, not trying to get a uniform surface or a dense layer of paint – the background layer is translucent. The edges of the “bricks” should also not be even. For the traditional red-brown color, to the sienna and red ocher, add a little light ocher, a little white. You can paint over several bricks in a row with this color. Gradually paint over the bricks with different shades. One more shade – add brown mars and a little water to the above composition.
Apply with a brush or sponge – as desired. If white and burnt sienna are added to ocher and sienna, we get another color. Paint all the bricks with these shades in random order. Dilute the white and a little ocher, add water. We apply the composition with a sponge, acting like a tampon. We take an old toothbrush and “burnt bone” paint. We dip the bristles into the paint and spray it on the wall, imitating the heterogeneity and texture of the clay brick.
We bring all the bricks from below and to the right or left. All on one side, depending on where the window is located (on the side opposite the window). The thickness of the eyeliner is different, since the masonry and the bricks themselves cannot be perfect.
Describing is much longer than doing it all. A beginner can draw about 30 squares of imitation brickwork in a day. For maximum likelihood, there are several secrets, which we will discuss below.
Finishing touches
To make the brickwork painted on the wall look as natural as possible, there are a few small secrets:
If the shadows near the bricks are too sharp, they can be smudged with a toothbrush (other) dipped in a mixture of white and natural sienna, strongly diluted with water.
Tricks, without which there will be no credibility. After applying the paint to the brick, do not wait until it dries.
Take white, add a little umber, dip a sponge and use it to “break” the uniformity of the paint, imitating a rough surface. To do this, slightly touch the “brick” with a sponge.
On a plate next to the main mix, squeeze out a little bit of the other colors.
They change the color in the course of coloring. The brick will not be monophonic. It has a smooth and not very color gradient. Imitation of a brick for interior decoration: the result of artistic efforts The dimensions of the bricks, their edges, seams – all this does not have to be perfect.
With some skill and diligence, painted brickwork can be made to look like natural brickwork. The main rule: imperfection and heterogeneity.
Imitation brick for interior decoration made of plaster mortar
The general idea is simple: a layer of plaster or tile adhesive is applied to the wall, a seam is cut / pressed through it. After processing the edges of the “bricks” and seams, painting, a semblance of brickwork of varying degrees of plausibility is obtained. Everything is simple, but there are significant differences and nuances.
Imitation brick for interior decoration of premises from mortar, plaster (plain and decorative)
What and how to make a solution
The first question that arises is: what kind of solution and what is needed? Lots of recipes. Here are a few options:
Regardless of what you make the solution from, it should be semi-dry, should not leak in any case.
It will not need to be leveled, so its plasticity is not important to you, and the adhesive ability will be provided by additives – tile adhesive and PVA. To adjust the consistency, add water in small portions.
Surface preparation
The wall on which we will make imitation brickwork does not have to be even. It should not be dust and dirt, crumbling fragments and particles. This is where the requirements end.
The process of preparing the wall – a thorough approach: first make the markup
Before starting work, it is better to prime the wall. The type of primer depends on the substrate.
If the wall is concrete or loose, go through the “concrete contact”. It will bind crumbling particles, create an adhesive surface on which any composition fits perfectly. If we decorate plywood, plasterboard or other similar material, you can do without a primer, or you can coat it with diluted PVA.
Technology No. 1. Using thin adhesive tape to draw the seams
First, paint the wall in the color of the seams between the bricks.
Someone is planning gray-brown, someone is white-gray. We cover the wall with paint of a suitable shade. On the prepared base, using a narrow masking tape (1 cm or a little less / more), we apply markings.
The adhesive tape will mark the seams between the bricks, so stick it horizontally, at a distance of about 6-6.5 cm from each other. When the horizontal lines are glued, glue the short vertical ones. From each other they are at a distance of 23-25 cm – this is the length of a standard building brick, but decorative ones can be shorter.
Now we take the mortar and apply it on the wall. The layers are not the same, the thickness is 0.3-0.5 cm. We apply it according to the “how it goes” type, without achieving a flat surface, smooth transitions … As it turned out, let it be so.
We do not allow only obvious bald spots through which the wall glows. We filled the area, took a flat trowel (grater), slightly smoothed out what happened. Leave until it dries slightly: so that when pressed with a finger, the composition is slightly squeezed.
We apply mortar without caring about beauty and uniform thickness
We pry off the ends of the horizontally glued strips of adhesive tape anywhere (when sticking, leave the “tails”), pull, remove together with the solution stuck on the tape. We remove the entire network.
The edges of the “bricks” are ragged and uneven. This is fine. Even good.
Take a toothbrush or paintbrush with fairly hard bristles.
With a toothbrush, go through the seams, removing the remnants of the solution. At the same time, the edges of the bricks are rounded. Then we take a wider brush and go through the surface with it, adding naturalness, removing too sharp edges.
Leave to dry at room temperature for approx. 48-72 hours. Forced drying is impossible – it will crack. Although, if you want to have cracks … If the composition has not been dyed in bulk, it’s up to painting.
Technology No. 2: cutting the “seams”
This method of imitation brick for interior decoration takes less time: no need to glue adhesive tape. We apply a solution to the surface of the wall.
Everything is exactly the same as described above, only the layer can be thicker – up to 0.8-1 cm. After waiting until the solution “grabs” a little, we mark the seams. Here again, there are options:
We stretch the twine along which the horizontal “seam” of decorative brickwork will go.
Cut two lines with a knife. Do not use a ruler, cut by hand. We take a bar of the required width – 0.8-1.2 cm, press it in the right place so that it is slightly imprinted. Using a knife, we cut the applied solution along the marked lines. The essence of the process in five photos
The second option is more accurate. But you have to be careful not to be too flat. Although, due to the fact that the hand trembles, the seam “walks” slightly, which gives a more believable look.
Having done the horizontal seams, we proceed to cutting the vertical ones – also by hand. The width of the bricks is about 6 cm, the length is around 23-25 cm.
When finished, we wait for 12-14 hours. Until the composition is set enough to be picked off. When, with strong pressure, the concrete begins to crumble, we take a wide screwdriver (usual, which is a “spatula”) and pick out the mortar between the cut strips with it.
When the seams are cleaned, take a hard brush or brush, remove the remnants of the mortar, crumbs. The bristles on the brush should be fairly stiff. If the solution is dry, you can try more drastic measures – a metal brush.
Technology No. 3: seams with a saw
This method of making imitation brickwork for interior decoration differs only in that we take an old hacksaw blade instead of a knife.
After waiting until the mortar sets and does not slip, mark the borders of the seams with a saw.
Here you choose one of the methods described above. But you don’t have to wait any longer: with a hacksaw, you paint the seams a little. It is quick to make long horizontal seams, but with vertical ones it is not very convenient, since the canvas is not very suitable for small distances.
From a distance you won’t understand that this is only an imitation of a brick
This method is good because there is no danger of “overdrying” the mortar.
It is possible to do “jointing” as soon as the mortar has hardened a little. In this state, it is easier to round the edges of the bricks, giving them a natural “old age”. Minus – you have to adapt, otherwise you can do things.
We make a mold for casting brick tiles from gypsum
Another imitation brick for interior decoration in an apartment or house can be cast: you can make your own gypsum tiles in the form of bricks.
To do this, an impression is taken from interesting specimens of bricks (a mold is made to form an artificial finishing stone), then a gypsum mortar is poured into it. The resulting tiles are used for wall decoration. This technology is good because it allows you to prepare several forms in which you can make bricks of different colors for different rooms.
We find bricks of interesting shape and a few almost ordinary ones, but with various small defects.
We will use them for mold casting. It is desirable that there be at least a dozen of them, and preferably more. More diverse will be “artificial brickwork.”
The result can be very similar to real masonry
On the side that we will “propagate”, we apply grease or heated wax mixed with kerosene. This is necessary so that the silicone does not stick to the surface.
When everything is dry, apply a layer of silicone sealant to the treated side. The layer thickness is 1-1.5 cm. Leave until the silicone is completely polymerized (the time depends on the type, it is written on the package).
The following forms can also be made: brick imitation with marine motifs
When the silicone has hardened, take mounting foam and coat the mold without removing it from the brick. After the foam hardens, remove the brick, level the bottom of the mold so that it stands level. Can be used by filling with gypsum mortar.
It sets quickly, if you have dozens of shapes in 2-3 days you can make a tile for a couple of squares imitating a brick wall. Gypsum mortar, by the way, can be painted in bulk. Then new cracks and chips do not matter – like a brick.
How and with what to paint
Recently, a white brick wall has become fashionable.
If you are going to do exactly this, no problem: brush the seams, the surface – with a roller. If you want to have a not too monochromatic color, add a little tint to the base coloring composition – gray, brown, yellow … or at least pink or blue. Paint with this paint.
Add more white to the residue and add highlights with this lighter composition using a semi-dry roller, sponge, brush. If desired, you can apply the upper “shadows” with silver, bronze, adding a little gold. Here is what you like best.
Imitation of brick in the bedroom looks very stylish
If the seams in the imitation of brick luggage should be darker, first go through them with a brush.
Then with a roller with a short or medium pile we paint over the very surface of the bricks. If you take a roller with an even shorter pile, dip it into paint of a different shade (lighter or darker – that’s how it goes), into bronze, silver, gilding, etc.
the most protruding parts, you get an even more interesting effect. In general, you can experiment. With this approach, imitation of brick becomes a design object and the main decoration of the interior.
Brick wall in the interior
This article discusses such a design technique as a brick wall in the interior of a living space: features of surface decoration, common laying methods, tips on choosing colors and materials to create the appropriate effect.
The text contains recommendations that will help to give the room a stylish look, taking into account its purpose, as well as create a beautiful imitation of brickwork with your own hands.
Brick walls are great for interior design in the loft style
Brick wall in the interior of the room and the choice of material for its creation
The design of an apartment, in the interior of which there is a brick wall, despite the apparent rudeness, is successfully used by decorators. Finishing in the form of natural or facing bricks allows you to create a contrast in the room, give it an exclusive and natural look, and also attract attention. In addition, a decorative brick wall can be used as a base for many modern styles.
Brickwork is often used in classic interior design
How to create a bare brick wall in the interior
The most natural way to get a brick wall is to build it or expose the existing surface. This option is available to residents of private brick houses.
It is enough to leave one of the walls unfinished to get a unique design. If the house is new, then the alteration will be minimal. In this case, the walls can be left in their original form, while removing small impurities that remained after construction. If the building is old, careful processing will be required.
The combination of bare brickwork with a smooth surface of the walls allows you to get an interesting decorative effect.
Special solutions are used for this. After that, the surface of the wall is polished, all seams are overwritten. As a decor for this background, a picture in a frame from a wide baguette, or a photo, is suitable.
Useful advice!Cleaned brickwork in the interior will look attractive if you open it with a colorless varnish. To avoid the effect of “wet stone” it is desirable to use matte compositions.
Bare brickwork is recommended to be covered with a layer of protective varnish
Imitation of a brick wall: photo of interiors using wallpaper
Unlike private houses, apartments do not have suitable conditions for the construction of brick walls. There are restrictions on the weight acting on the floors, so an additional partition can cause overloading, cracking and even collapse. It will also not work to expose the wall, since slabs and other monolithic materials are most often used for the construction of multi-storey buildings.
Residents of urban apartments can create an imitation of a brick wall with wallpaper. This method does not require significant modifications.
The material conveys the features of the texture quite realistically. The wallpaper imitates all scuffs, cracks and other relief features of natural brick. At the same time, the buyer can choose the appropriate color and design in the store or paint the wallpaper on their own.
Create an imitation of a brick wall with wallpaper
Plastic panels can be used to create a brick wall.
This finish features a masonry print that looks real. Unlike wallpaper, plastic panels are more practical, but you will have to tinker with their installation. In addition, this material cannot be called completely environmentally friendly.
Lightweight brickwork: photo of rooms with facing bricks
In modern interiors, facing bricks are often used to create beautiful walls. This material is called thin-walled. Facing bricks are much thinner than those used for construction, so they are ideal for residential applications.
As a result, it is possible to save useful centimeters of space, since the finishing takes up a minimum volume. Another advantage of facing bricks is its light weight. This material allows you to decorate thin walls without the risk of their destruction.
Red brick wall perfectly harmonizes with white interiors
A wide range of facing bricks is available on the market, so that the consumer can choose the appropriate option. All colors, textures and shapes are available to customers, as well as material with a matte or glossy surface. In addition, in stores you can find bricks that look like new or aged.
To create a decorative brick wall, glue is used to fix the elements to the surface. For these purposes, it is desirable to use compositions intended for laying natural or artificial stone.
To create an imitation of brickwork from facing bricks, use specially designed adhesives
Helpful hint! After the wall is completed, all joints between bricks should be treated with tile grout.

Scope of facing brick:
This material is strong, durable and environmentally friendly, presented in a wide range of colors. Therefore, it can be successfully used both for creating a white brick wall in the kitchen, and for finishing surfaces in the living room, bedroom, hallway and corridor. The material has the correct shape, which greatly facilitates its installation.
The texture of a brick wall brings a cozy feeling to the interior
The use of tiles and glass bricks in the interior
Brick effect tiles will be an excellent finishing material.
Its second name is “brick veneer”. Unlike the previous version, this tile is lighter and thinner. Most often you can see in the photo white brick walls in the kitchen or in the bathroom, finished with this material, although there are other colors.
Tiles can be clinker and ceramic. Installation of finishing is carried out in the same way as laying ordinary tiles.
To do this, the surface is carefully prepared and leveled. The tile is fixed on the wall with a special adhesive. To avoid distortion, experts recommend using plastic crosses.
Brick imitation tile is an excellent solution for decorating the kitchen
Glass bricks are used in modern interiors. The material is presented in the form of opaque or transparent blocks of several colors:
Decorative brick can be used to decorate any premises
The presence of decorative brick in the interior will fill the room with light and visually expand its space.
The material is suitable for wall decoration in the hallway, living room or hallway. Glass brick can also be used for zoning a room. In apartments with a limited area, it can act not only as a decorative finish, but also serve as a screen.
Decorative brick for interior decoration and its propertiesVarieties and properties. Possibilities of using decorative bricks in the interior of an apartment and a house.
Color selection for interiors with brick walls
The standard shade for brick walls is red-brown. But this does not mean that the interior of the room can be limited only to this color. When choosing a design, you should consider the style and purpose of the room.
The color of artificial brick in the interior can be any:
To create a cozy and romantic atmosphere in the bedroom, the brick wall can be painted blue.
In addition, you can always paint the surface in any shade you like.
Helpful Hint! A brown, navy or burgundy wall in the bedroom will add a romantic touch to the setting, especially if you complement the interior with flickering candles.
The benefits of a white brick wall in the interior
White is most often used in styles such as Scandinavian and minimalism. In both cases, the use of a light-colored brick wall allows you to enrich the restrained decoration of the room with minimal funds. At the same time, it is desirable to deprive the atmosphere of color so as not to overload the visual perception of the room.
A white brick wall is a great backdrop for bright interior accents
Painting ordinary masonry is a great way to create a white brick wall in an interior. A light shade allows you to achieve the effect of a visual increase in space, which is a definite advantage if the area of \u200b\u200bthe room is limited in size. In addition, white color will be an excellent background for demonstrating the decorative details of the interior.
Light shades visually expand the space
A combination of white brick in the interior with ordinary masonry is allowed.
This design is suitable for any room (bathroom, kitchen, living room or bedroom) provided it is properly placed. White color allows you to emphasize the individuality of the room and create an exclusive interior. Even if all the walls in the room are made in white, the brick of the same shade will still stand out against the general background, thanks to its pronounced texture. The atmosphere is weightless and airy.
Features of interiors with a brick wall in gray
Like white, gray is considered a neutral color. It is used by designers to create a calm background, thanks to which the decorative elements of the interior and furniture will look as attractive as possible. Depending on the saturation, the gray wall will perform a certain function in the interior and create the desired effect.
Gray glossy brick with reflective effect looks very original in the interior
Using a light gray color scheme, you can expand the interior space of the room, as well as slightly dim the brightness.
This shade is ideal for rooms that are too brightly lit. Dark gray color creates an intimate and intimate atmosphere, it calms, although it slightly hides the volume of the room. Gray is an integral part of modern loft or minimalist interiors, but it can also be used for classic interior design.
The use of a red brick wall in the interior
“Red” is the name given to the masonry made of ordinary clay-based bricks.
However, nothing prevents the owner from repainting such a wall in any other shade over time. Red brick goes well with almost all existing styles. The classic and gothic direction is no exception.
Red brickwork immediately catches the eye and draws attention to itself. The wall itself can be used as the main decorative element in the interior of the room, so it does not need additional decorations.
The red brick wall will serve as the main accent in the interior of the room
Please note! Furniture should be carefully selected in a room with a red brick wall. Some furnishings may fade or simply get lost against its background, so it is advisable to avoid simple shapes and shades that are close in tone.
How to imitate a brick wall in the interior of the kitchen, bathroom, living room, hallway and bedroom living room, kitchen, bathroom or hallway. The main thing is that the material and its colors fit into the overall design of the room.
 When choosing a material, the purpose of the room must also be taken into account.
The operating conditions of the room affect the life of the finish and other nuances. For example, the bathroom and kitchen are characterized by temperature fluctuations and high humidity. An ordinary brick, properly treated, will cope with these conditions, while a foam plastic imitation or wallpaper is unlikely to withstand such an impact.
The brick wall in the living room is an excellent backdrop for the relaxation area.
In the kitchen, the wall decoration is exposed to dirt. For this reason, it is desirable to select a material that is not afraid of cleaning products and frequent cleaning. In the hallway or corridor, the finish is subjected to mechanical stress, so the material must be resistant to abrasion.
How to use brick in the interior of the kitchen and bathroom
Kitchen design is practically unlimited. The brick in the interior of this room will originally emphasize the appearance of the equipment present. With the help of decorative bricks, you can zoning the space and highlight the area where the dining table will stand.
Brick in the interior of the kitchen will emphasize the appearance and design of the room in an original way
Different color combinations are allowed. The brick wall in the kitchen can consist of black, gray and white elements.
They are versatile and complement each other well. Other combinations are also possible. The ideal option for the kitchen would be brick tiles.
With this material you can:
Moisture-resistant materials should be preferred when decorating a bathroom with decorative bricks. It fits perfectly into the interior and withstands the operating conditions of the room. Brickwork can be real or present in the form of imitation.
Glass blocks are allowed. They are durable, so they are suitable not only for finishing walls, but also for floors. This material allows you to supply heating and even install spectacular lighting.
Pay attention! Under the influence of adverse factors, bare brick will collapse. Therefore, it is desirable to treat the surface of the wall with a special protective agent before painting or varnishing.
Brick wall decoration in living room, hallway and bedroom
In the living room, a brick wall can be used as a backdrop for furniture, fine appliances and decorative accessories. Many designers use a fireplace to create a cozy, comfortable and warm atmosphere in a room. In this case, the interior can be supplemented with a self-made brick wall made of plaster or decorative gypsum bricks.
Loft-style bedroom interior decoration
If the living room is done in the Greek style, it is desirable to use columns and gypsum bricks to create an appropriate decor. Partitions made of glass elements are suitable for dividing the space between the living room and the kitchen, if these rooms are combined.
Brick decoration will be appropriate in the bedroom. White masonry will emphasize the modern style of the rest room, while giving the room charm and lightness.
A brick wall in the interior of a two-level apartment or studio will look especially impressive. This element can be arranged in the form of an arch, which will be installed instead of the front door to the rest room. Brick walls are suitable for bedrooms decorated in Provence, loft, country, classic and Scandinavian styles.
The best option for the hallway would be a brick-like tile with the effect of “destroyed edge”.
This finish can be used for zoning rooms if the entrance hall is adjacent to the living room or kitchen. As a decor for a brick wall, you can use lamps that imitate candles. Since there are no windows in the hallway and the level of lighting is low, it is better to give preference to finishing in white or other light shades.
How to make a brick wall: manufacturing and painting technology
Before you start work, you should decide on the design.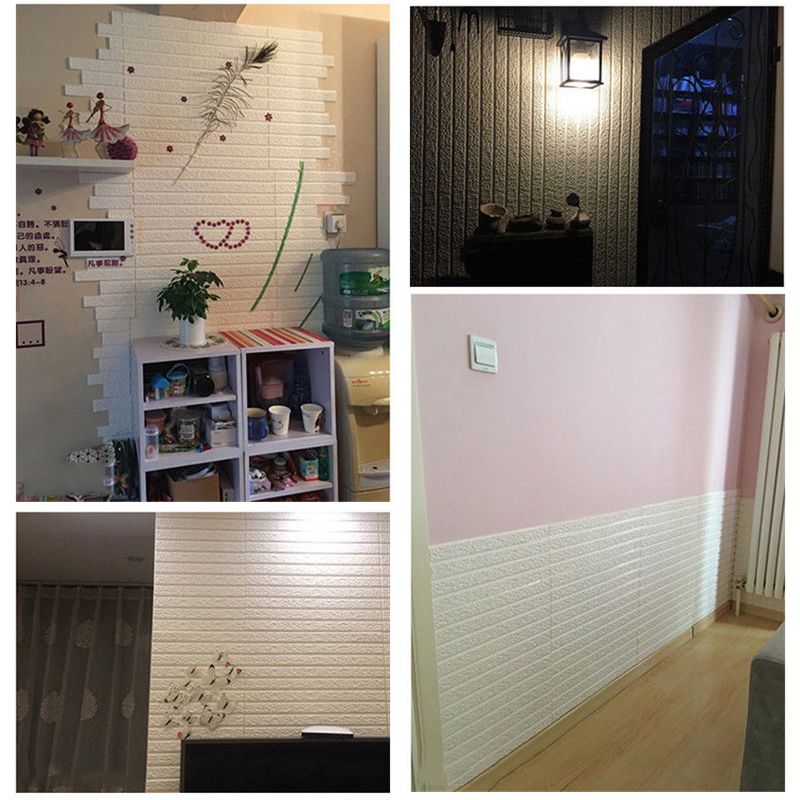 Finishing in the form of brickwork can be decorated in various ways:
Before starting work on the installation of decorative bricks, it is worth marking the wall according to the intended design.
If partial finishing is required, a small area of the surface is covered with bricks. This method allows you to emphasize the solidity of the walls of the living space.
Interiors with brickwork look especially interesting and unusual
Useful advice! It is advisable to use the design in the form of a fragment to create an interior in the Scandinavian style.
Imitation brick wall as an accent in the living room interior
With the help of an accent, you can highlight a certain part of the wall that needs special attention. This method is most often used to advantageously beat the central objects of the interior:
To highlight a separate part of the room, which has the main semantic load, an entire wall is drawn up. In the living room, this method is used to shade the sofa, in the kitchen – the dining area, in the bedroom – the bed.
Bricks can be used to create individual architectural details. As such an element, a section of a wall located separately, an arch or a bar counter can act.
How to create a fake brick wall with your own hands
Having determined the key design points, you can start creating a finishing material to simulate masonry. To make bricks, you will need a special form for pouring and a coloring composition. Experts advise using clear varnish and brick gypsum for this.
A polyurethane mold can be purchased from a store or made from plastic. The main thing is that it has the appropriate size and shape. And the size of the bricks can be different, as long as they remain rectangular.
First, prepare the gypsum mixture according to the instructions. Then it is placed in a mold for pouring and aged until completely dry. After making sure that the bricks are frozen, you can get them.
The prefabricated elements are fixed to the wall with an adhesive designed for laying tiles. To get a more realistic effect, you can partially break the edge of some bricks. The thickness and size of the elements is selected at your own discretion.
A special gypsum mixture and molds are used to create facing bricks
How to paint a brick wall in the interior
You should not start painting immediately after the masonry is done. The finish must dry to allow the moisture level to reach its natural level. This process can take several months, but all active alkalis are completely neutralized during this time.
Brick wall painting technology:
It is possible to single out a separate part of the room, which has the main semantic load, by decorating the entire surface with bricks
Anyone can make and paint a brick wall, the main thing is to choose the right materials for this and adhere to the technology requirements. If the apartment does not allow you to use real brick as a decor, you can always make an imitation of it. To do this, it is enough to paint the wall in the desired color and apply decorative seams over it, or use a special roller and putty to get a more voluminous result.
Wall plaster
In repair, the main thing is not the process, but the result, which may not be of very high quality if you deviate from the technologies tested by time and dozens of masters, especially when plastering the walls with your own hands. Surfaces should turn out perfectly smooth, without flaws and deviations from the vertical. Therefore, we learn to give the room the correct geometry.
Why do-it-yourself wall plastering is the best option?
The first thing the foremen of hired teams of craftsmen who specialize in repairs suggest doing is to prepare an estimate. At the same time, a significant part of the total amount will be the wages of workers, as well as the share of the contractor. In the best case, the cost of materials will need to be doubled, and presumably how much will it cost you to hire a team.
That is why fairly simple do-it-yourself plastering of brick walls is much more profitable. But there is also a flip side of the coin – if you do not have experience, mistakes can be made with the result in the form of cracked walls and the need to start all over again, or call the same masters. Not to mention wasted materials.
It follows that the finishing technique must be well studied, the tools and materials must be used, the stages of wall plastering must be performed only in the sequence that is suitable for the work you have planned. And here’s the first tip: stock up on building materials, especially plaster mortar (or its components, if you mix it yourself), since layers of different compositions may not adhere well. It is also better to take care of the tools right away so as not to interrupt the finishing process, which can adversely affect the quality.
Preparing the walls for plaster
Nothing prevents you from covering the walls with a leveling mortar, just smearing it on the surface, but the result will be unpleasant, believe me. There will no longer be a plane as such, instead your gaze will cling to a wavy surface. It is quite another matter if, according to all the rules, the walls are prepared for plastering.
To begin with, we chip off all unreliable fragments from the surface, whether they are sagging, which can be present both on brickwork and on concrete slabs, or peeling paint. The seams between the rows of bricks should also be especially carefully compared, as they will make it difficult to determine the most
We drill holes in the upper right and left corners of the wall and screw screws into them using plugs.
We press the plumb line to one of them and determine the most protruding section on this line, after which we screw another screw exactly vertically in the lower part of the wall.
Using the attached rule and level, make sure that the line between the heads of the screws is perfectly vertical, if there is a deviation, tighten it with a screwdriver.
We repeat the operation at the other end of the room, after which we stretch the cords between the upper and lower screws, along which we screw new self-tapping screws at regular intervals, vertically from below and above, also to the length of the rule.
When the marking of the future location of the beacons is done, the cords can be removed. Now you need to clean the wall again, sweeping dust and crumbs left after drilling from it.
Then we take a primer, preferably deep penetration, and work the entire surface well with a roller. If it is brickwork, the joints must be covered very carefully, due to the high degree of unevenness. We are waiting for the soil to dry.
Along the line between the screws vertically positioned in relation to each other, in several small portions, we apply the plaster on the wall. We gently press the profile beacon into them, pressing the edge of the rule along the entire length, and pressing it until we hit the screws.
We press the profile beacon into the wall
Prepared walls for plastering
Carefully coat the beacons with slightly spread thick plaster, trying not to hook the installed profiles.
It is very important that the distance between the beacons does not exceed the length of the rule, which must move as if on rails.

When everything is ready, we clean the wall from excess mixture that holds the profiles, especially from particles that do not hold securely, after which we begin to level the walls with plaster with our own hands. To do this, we take the same composition that was used earlier, only, of course, in a large container. It can be a cement-sand mixture mixed in proportions of 1:3 or 1:4 with sand.
There are two things to consider. Firstly, the thicker the layer is planned to be, the larger the sand fraction should be. Secondly, the proportions of the wall plaster mortar must be precisely adjusted, since the more cement is added, the faster the mixture will harden and the more fragile the coating will be.
How to finish the walls with plaster
So, the paths for the rule are laid, the soil covers every centimeter of the surface that we want to make even and smooth, it remains only to roll up our sleeves and get to work.
Many beginners are wondering how to properly level the walls with plaster and do not get a clear answer from experienced craftsmen. Although there is nothing complicated in listing all the stages. Let’s be consistent and consider the whole process in great detail.
We take a spatula or a trowel, whichever is more convenient for us, scoop up a small amount of the mixture and throw it against the wall with a whipping movement, as if trying to break through it with this lump.
The harder the captured portion hits the wall, the better it will adhere to the smallest irregularities on the surface. Soundly we fill all the space between the beacons, not trying to level the composition. This technique of plastering walls is called spatter.
In principle, the first layer can also be the last, if the irregularities are small and the beacons are not used too high.
But if the applied coating was not enough to match the profiles, repeat the procedure after the primer has set. I must say that when the base is covered with a leveling compound, the technology of plastering brick walls does not differ from working with a concrete base. As a result, you should reach the finish plane when the mixture almost completely hides the beacon strips under it.
When there is enough finishing compound on the wall, wait a while until it begins to dry out.
Then we take the rule, tightly apply it with an edge to the bottom of two adjacent beacons and move it up like a sled. At this stage, do-it-yourself wall decoration with plaster is carried out with the greatest effort. When the edges of the beacons appear from under the mixture, the coating should be completely leveled.
It is advisable to use a long rule to capture a couple of rows between profiles at once. More is unlikely to work, because there will be too much difference in the degree of drying of the composition at opposite ends of the site. When all the walls take on the proper form, we wait for the composition to seize thoroughly.
But now everything has hardened, if not completely, but some strength is already there. Let’s remember what to do after plastering the walls. It’s time to get rid of the profiles embedded in the coating, unless, of course, you intend to leave them there forever.
The fact is that plaster absorbs moisture from the air well, and metal tends to rust, and sooner or later corrosion appears on the surface, whether it is wallpaper or “Venetian”. Therefore, we boldly cut the coating along the lighthouses with a spatula and, slightly tapping them with something weighty, we extract the “rails” for the rule that have served us so well. We cover the resulting gaps with the composition used earlier with a spatula or trowel.
Now we take a grater, and, regularly moistening the surface of the walls, gently, in a circular motion, smooth out all the observed defects, which should not be so many. It is not necessary to press hard, your main goal is to make all the bumps left by the rule disappear. Actually, on this master class on plastering the walls came to an end, then you can proceed to wallpapering or painting.
Well, it’s time to finish the article.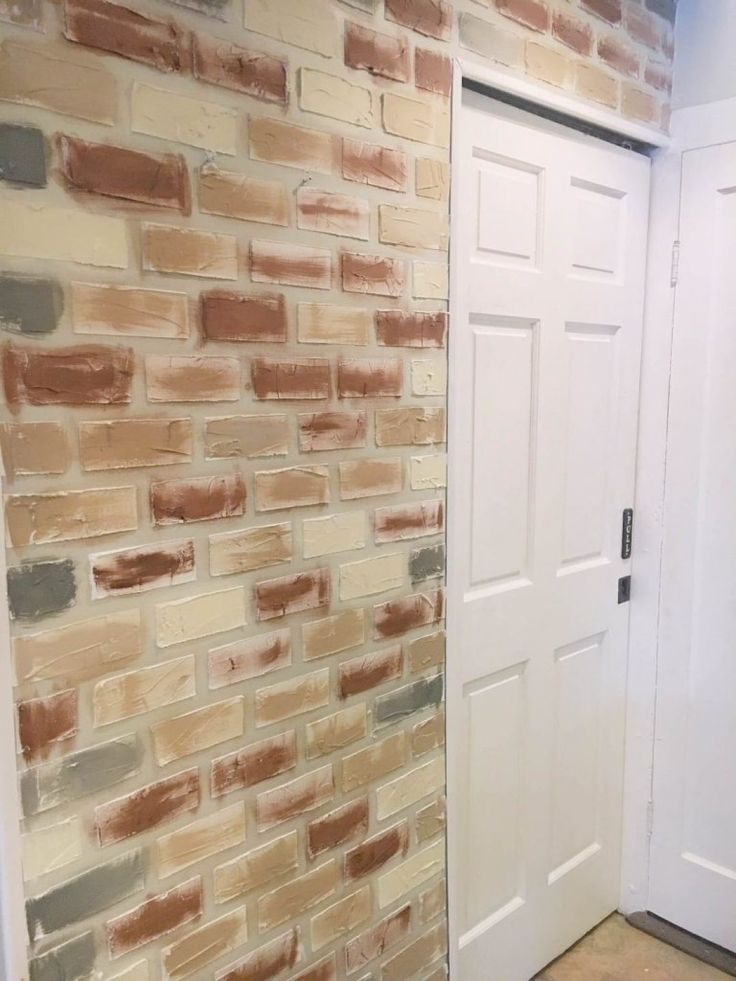 All the material that I wanted to share is considered. I hope it will be useful to you, and you will use it if you need to plaster brick walls. Improve your own practical skills and gain new knowledge, as they say: “It’s never too late to learn!” That’s all, thanks for your attention, successful and easy repair!
Contents
- 1 Brick wall in the interior of the room and the choice of material for its creation
- 2 How to create a bare brick wall in the interior: photos of the premises and recommendations
- 3 Imitation of a brick wall: photos of interiors using wallpaper
- 4 Lightweight brick masonry: photo of rooms with facing bricks
- 5 Using tiles and glass bricks in the interior
- 6 Choosing colors for an interior with brick walls
- 7 Advantages of a white brick wall in the interior
- 8 Interior features with a brick wall in gray
- 9 Using a red brick wall in the interior
- 10 How to beat a brick wall in the interior of the kitchen, bathroom, living room, hallway and bedroom
- 11 How to use brick in the interior of the kitchen and bathroom
- 12 Making a brick wall in the interior of the living room, hallway and bedroom
- 13 How to make a brick wall: manufacturing and painting technology
- 14 How to create an imitation brick wall with your own hands
- 15 How to paint a brick wall in the interior
- 16 Video
Brick wall in the interior of the room and the choice of material for its creation for seeming rudeness, successfully used by decorators.

Natural or facing brick finishes create contrast in a room, give it an exclusive and natural look and draw attention.
In addition, a decorative brick wall can be used as a base for many contemporary styles.
How to create a bare brick wall in the interior: photos of rooms and recommendations
The most natural way to get a brick wall is to build it or expose the existing surface. This option is available to residents of private brick houses.
It is enough to leave one of the walls unfinished to get a unique design. If the house is new, then the alteration will be minimal. In this case, the walls can be left in their original form, while removing small impurities that remained after construction. If the building is old, careful processing will be required.
The combination of bare brickwork with a smooth surface of the walls allows you to get an interesting decorative effect.
Special solutions are used for this. After that, the surface of the wall is polished, all seams are overwritten. As a decor for this background, a picture in a frame from a wide baguette, or a photo, is suitable.
Useful advice!Cleaned brickwork in the interior will look attractive if you open it with a colorless varnish. To avoid the effect of “wet stone” it is desirable to use matte compositions.
Bare brickwork is recommended to be covered with a layer of protective varnish
Imitation of a brick wall: photo of interiors using wallpaper
Unlike private houses, apartments do not have suitable conditions for the construction of brick walls. There are restrictions on the weight acting on the floors, so an additional partition can cause overloading, cracking and even collapse. It will also not work to expose the wall, since slabs and other monolithic materials are most often used for the construction of multi-storey buildings.
Residents of urban apartments can create an imitation of a brick wall with wallpaper. This method does not require significant modifications.
The material conveys the features of the texture quite realistically. The wallpaper imitates all scuffs, cracks and other relief features of natural brick. At the same time, the buyer can choose the appropriate color and design in the store or paint the wallpaper on their own.
Create an imitation of a brick wall with wallpaper
Plastic panels can be used to create a brick wall.
This finish features a masonry print that looks like the real thing. Unlike wallpaper, plastic panels are more practical, but you will have to tinker with their installation. In addition, this material cannot be called completely environmentally friendly.
Lightweight brickwork: photo of rooms with facing bricks
In modern interiors, facing bricks are often used to create beautiful walls. This material is called thin-walled. Facing bricks are much thinner than those used for construction, so they are ideal for residential applications.
As a result, it is possible to save useful centimeters of space, since the finishing takes up a minimum volume. Another advantage of facing bricks is its light weight. This material allows you to decorate thin walls without the risk of their destruction.
Red brick wall perfectly harmonizes with white interiors
A wide range of facing bricks is available on the market, so that the consumer can choose the appropriate option. All colors, textures and shapes are available to customers, as well as material with a matte or glossy surface. In addition, in stores you can find bricks that look like new or aged.
To create a decorative brick wall, glue is used to fix the elements on the surface. For these purposes, it is desirable to use compositions intended for laying natural or artificial stone.
To create an imitation of brickwork from facing bricks, use specially designed adhesives
Helpful hint! After the wall is completed, all joints between bricks should be treated with tile grout.
Scope of facing brick:
This material is strong, durable and environmentally friendly, presented in a wide range of colors. Therefore, it can be successfully used both for creating a white brick wall in the kitchen, and for finishing surfaces in the living room, bedroom, hallway and corridor. The material has the correct shape, which greatly facilitates its installation.
The texture of a brick wall brings a cozy feeling to the interior
The use of tiles and glass bricks in the interior
Brick effect tiles will be an excellent finishing material.
Its second name is “brick veneer”. Unlike the previous version, this tile is lighter and thinner. Most often you can see in the photo white brick walls in the kitchen or in the bathroom, finished with this material, although there are other colors.
Tiles can be clinker and ceramic. Installation of finishing is carried out in the same way as laying ordinary tiles.
To do this, the surface is carefully prepared and leveled. The tile is fixed on the wall with a special adhesive. To avoid distortion, experts recommend using plastic crosses.
Brick imitation tile is an excellent solution for decorating the kitchen
Glass bricks are used in modern interiors. The material is presented in the form of opaque or transparent blocks of several colors:
Decorative brick can be used to decorate any premises
The presence of decorative brick in the interior will fill the room with light and visually expand its space.
The material is suitable for wall decoration in the hallway, living room or hallway. Glass brick can also be used for zoning a room. In apartments with a limited area, it can act not only as a decorative finish, but also serve as a screen.
Decorative brick for interior decoration and its propertiesVarieties and properties. Possibilities of using decorative bricks in the interior of an apartment and a house.
Color selection for interiors with brick walls
The standard shade for brick walls is red-brown. But this does not mean that the interior of the room can be limited only to this color. When choosing a design, you should consider the style and purpose of the room.
The color of artificial brick in the interior can be any:
To create a cozy and romantic atmosphere in the bedroom, the brick wall can be painted blue.
In addition, you can always paint the surface in any shade you like.
Helpful Hint! A brown, navy or burgundy wall in the bedroom will add a romantic touch to the setting, especially if you complement the interior with flickering candles.
The benefits of a white brick wall in the interior
White is most often used in styles such as Scandinavian and minimalism. In both cases, the use of a light-colored brick wall allows you to enrich the restrained decoration of the room with minimal funds. At the same time, it is desirable to deprive the atmosphere of color so as not to overload the visual perception of the room.
A white brick wall is a great backdrop for bright interior accents
Painting ordinary masonry is a great way to create a white brick wall in an interior.
Light shade allows you to achieve the effect of a visual increase in space, which is a definite advantage if the area of the room is limited in size. In addition, white color will be an excellent background for demonstrating the decorative details of the interior.
Light shades visually expand the space
A combination of white brick in the interior with ordinary masonry is allowed.
This design is suitable for any room (bathroom, kitchen, living room or bedroom) as long as it is properly placed. White color allows you to emphasize the individuality of the room and create an exclusive interior.
Even if all the walls in the room are white, a brick of the same shade will still stand out against the general background due to its pronounced texture. The atmosphere is weightless and airy.
Features of interiors with a brick wall in gray
Like white, gray is considered a neutral color. It is used by designers to create a calm background, thanks to which the decorative elements of the interior and furniture will look as attractive as possible. Depending on the saturation, the gray wall will perform a certain function in the interior and create the desired effect.
Gray glossy brick with reflective effect looks very original in the interior
Using a light gray color scheme, you can expand the interior space of the room, as well as slightly dim the brightness.
This shade is ideal for rooms that are too brightly lit. Dark gray color creates an intimate and intimate atmosphere, it calms, although it slightly hides the volume of the room.
Gray is an integral part of modern loft or minimalist interiors, but it can also be used for classic interiors.
The use of a red brick wall in the interior
“Red” is the name given to the masonry, made of ordinary workman’s brick, made on the basis of clay.
However, nothing prevents the owner from repainting such a wall in any other shade over time. Red brick goes well with almost all existing styles. The classic and gothic direction is no exception.
Red brickwork immediately catches the eye and draws attention to itself. The wall itself can be used as the main decorative element in the interior of the room, so it does not need additional decorations.
The red brick wall will serve as the main accent in the interior of the room
Please note! Furniture should be carefully selected in a room with a red brick wall. Some furnishings may fade or simply get lost against its background, so it is advisable to avoid simple shapes and shades that are close in tone.
How to imitate a brick wall in the interior of the kitchen, bathroom, living room, hallway and bedroom living room, kitchen, bathroom or hallway. The main thing is that the material and its colors fit into the overall design of the room. When choosing a material, the purpose of the room must also be taken into account.
The operating conditions of the room affect the life of the finish and other nuances.
For example, the bathroom and kitchen are characterized by temperature fluctuations and high humidity. An ordinary brick, properly treated, will cope with these conditions, while a foam plastic imitation or wallpaper is unlikely to withstand such an impact.
The brick wall in the living room is an excellent backdrop for the relaxation area
In the kitchen, the wall finishes are exposed to dirt. For this reason, it is desirable to select a material that is not afraid of cleaning products and frequent cleaning. In the hallway or corridor, the finish is subjected to mechanical stress, so the material must be resistant to abrasion.
How to use brick in the interior of the kitchen and bathroom
Kitchen design is practically unlimited. The brick in the interior of this room will originally emphasize the appearance of the equipment present. With the help of decorative bricks, you can zoning the space and highlight the area where the dining table will stand.
Brick in the interior of the kitchen will emphasize the appearance and design of the room in an original way
Different color combinations are allowed. The brick wall in the kitchen can consist of black, gray and white elements.
They are versatile and complement each other well. Other combinations are also possible. The ideal option for the kitchen would be brick tiles.
With this material you can:
Moisture-resistant materials should be preferred when decorating a bathroom with decorative bricks
Moisture-resistant brick is successfully used for wall decoration in the bathroom. It fits perfectly into the interior and withstands the operating conditions of the room. Brickwork can be real or present in the form of imitation.
Glass blocks are allowed. They are durable, so they are suitable not only for finishing walls, but also for floors. This material allows you to supply heating and even install spectacular lighting.
Pay attention! Under the influence of adverse factors, bare brick will collapse.
 Therefore, it is desirable to treat the surface of the wall with a special protective agent before painting or varnishing.
 Brick wall decoration in living room, hallway and bedroom
In the living room, a brick wall can be used as a backdrop for furniture, fine appliances and decorative accessories. Many designers use a fireplace to create a cozy, comfortable and warm atmosphere in a room. In this case, the interior can be supplemented with a self-made brick wall made of plaster or decorative gypsum bricks.
Loft-style bedroom interior decoration
If the living room is done in the Greek style, it is desirable to use columns and gypsum bricks to create an appropriate decor. Partitions made of glass elements are suitable for dividing the space between the living room and the kitchen, if these rooms are combined.
Brick decoration will be appropriate in the bedroom. White masonry will emphasize the modern style of the rest room, while giving the room charm and lightness.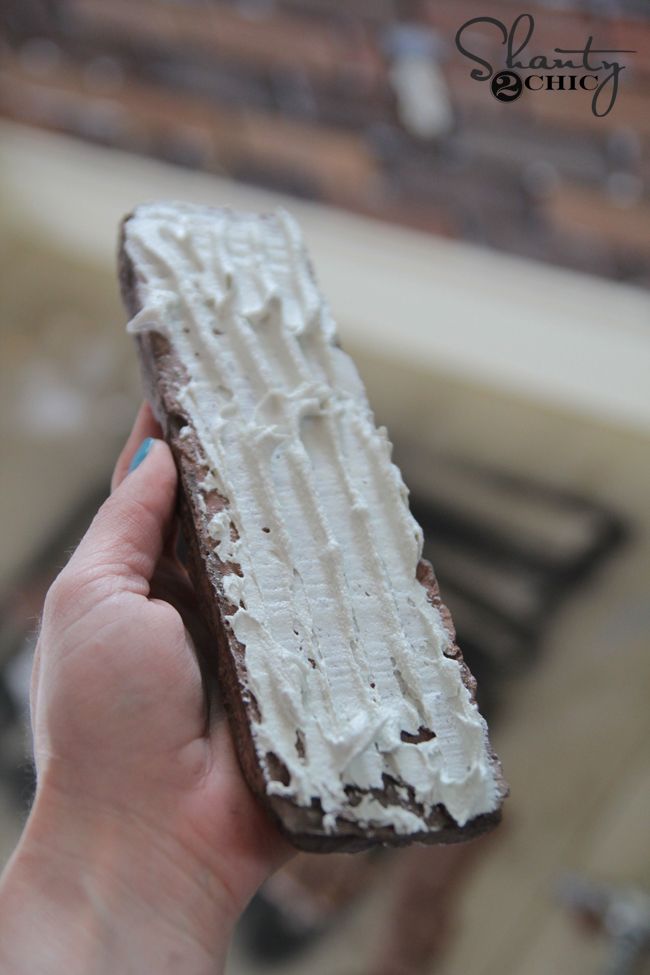
A brick wall in the interior of a two-level apartment or studio will look especially impressive. This element can be arranged in the form of an arch, which will be installed instead of the front door to the rest room. Brick walls are suitable for bedrooms decorated in Provence, loft, country, classic and Scandinavian styles.
The best option for the hallway would be a brick-like tile with the effect of “destroyed edge”.
This finish can be used for zoning rooms if the entrance hall is adjacent to the living room or kitchen. As a decor for a brick wall, you can use lamps that imitate candles. Since there are no windows in the hallway and the level of lighting is low, it is better to give preference to finishing in white or other light shades.
How to make a brick wall: manufacturing and painting technology
Before starting work, it is worth deciding on the design. Finishing in the form of brickwork can be done in various ways:
Before starting work on the installation of decorative bricks, it is worth marking the wall according to the intended design
If partial finishing is required, a small area of the surface is covered with bricks. This method allows you to emphasize the solidity of the walls of the living space.
Brickwork interiors look especially interesting and unusual
Useful advice! It is advisable to use the design in the form of a fragment to create an interior in the Scandinavian style.
Imitation brick wall as an accent in the living room interior
With the help of an accent, you can highlight a certain part of the wall that needs special attention. This method is most often used to advantageously beat the central objects of the interior:
To highlight a separate part of the room, which has the main semantic load, an entire wall is drawn up. In the living room, this method is used to shade the sofa, in the kitchen – the dining area, in the bedroom – the bed.
Bricks can be used to create individual architectural details. As such an element, a section of a wall located separately, an arch or a bar counter can act.
How to create a fake brick wall with your own hands
Having determined the key design points, you can start creating a finishing material to simulate masonry. To make bricks, you will need a special form for pouring and a coloring composition. Experts advise using clear varnish and brick gypsum for this.
A polyurethane mold can be purchased from a store or made from plastic. The main thing is that it has the appropriate size and shape. And the size of the bricks can be different, as long as they remain rectangular.
First, prepare the gypsum mix according to the instructions. Then it is placed in a mold for pouring and aged until completely dry. After making sure that the bricks are frozen, you can get them.
Finished elements are fixed to the wall with an adhesive designed for laying tiles.
To get a more realistic effect, you can partially break the edge of some bricks. The thickness and size of the elements is selected at your own discretion.
A special gypsum mixture and molds are used to create facing bricks
How to paint a brick wall in the interior
You should not start painting immediately after the masonry is done. The finish must dry to allow the moisture level to reach its natural level. This process can take several months, but all active alkalis are completely neutralized during this time.
Brick wall painting technology:
It is possible to single out a separate part of the room, which has the main semantic load, by decorating the entire surface with bricks
Anyone can make and paint a brick wall, the main thing is to choose suitable materials for this and adhere to the requirements of the technology.
If the apartment does not allow you to use real brick as a decor, you can always make an imitation of it.
To do this, just paint the wall in the desired color and apply decorative seams over it, or use a special roller and putty to get a more voluminous result.
Well, it’s time to finish the article. All the material that I wanted to share is considered. I hope it will be useful to you, and you will use it if necessary, how to make a brick wall. Improve your own practical skills and gain new knowledge, as they say: “It’s never too late to learn!” That’s all, thanks for your attention, successful and easy repair!
Video
Sources:
http://remoo. ru/steny/kirpichnaya-stena-v-indereere
How to make a simulation Miscellaneous
Miscellaneous
Reading 4 min Views 2.3k. Posted by
Updated
A brick wall looks very impressive in a modern interior. Of course, building it using natural material and the classic masonry method is a very time-consuming and financial undertaking. Therefore, it is much easier to make an imitation. This is within the power of a beginner who can do without the help of specialists. There are simple and effective ways to make an imitation of a brick wall with your own hands.
Sawing bricks
It is possible to make tiles that will consist of brick layers at least 1 cm thick. This method has both positive and negative points.
The first includes a natural and attractive appearance, no need for additional coloring and processing of the material. Such a wall will resemble ordinary brickwork as much as possible. Moreover, it can be created both indoors and outdoors.
Negatives include the need to use professional equipment, such as a circular saw, as well as the highest quality bricks (which are very expensive). In addition, sawing this material is a rather complicated undertaking.
The work is carried out in several stages:
- Marking is applied to the brick.
- Produce sawing of the material according to the existing marks.
- The wall is treated with a primer, after which a mortar is applied to a small area of the surface, on which a brick is laid.
Brick painting
If hard work is not possible, but a person has a talent for painting, you can paint a brick wall. Of course, this option will not look too natural, but very aesthetically pleasing and original.
For work it is necessary to prepare the following tools and materials:
- primer composition;
- white translucent acrylic paint;
- Brick Textured Paint;
- yellow paint;
- brushes;
- masking tape;
- toothbrush;
- sponge for washing dishes.

Carry out the following algorithm of actions:
- The surface is treated with a primer.
- Masking tape is applied to protect areas that should not be stained with paint.
- When the primer is completely dry, markup is applied to the wall with white paint and a brush, which should resemble brickwork, that is, draw rectangles with the size and shape of a brick.
- These elements are painted with a sponge, simply by applying it to the wall. It turns out a textured pattern that resembles the porous surface of a brick.
- When this layer is dry, take a toothbrush, dip it in yellow paint, run your finger along the bristles, spraying the composition onto the wall to give texture and a more natural look to the painted brick.
The advantage of this method is the availability of the materials used. The disadvantages include the fact that certain artistic skills are required to complete the work.
Styrofoam Brick
Styrofoam pieces can be used to simulate brickwork and made into individual bricks. They are then arranged in a special sequence so that an imitation is obtained.
For work it is necessary to prepare the following tools and materials:
- primer composition;
- paint that resembles mortar;
- piece of foam;
- pencil and ruler for marking;
- stationery sharp knife;
- glue gun;
- brick tone paint.
The work sequence includes the following steps:
- The old coating is removed from the wall, which is planned to be bricked.
- Treat the surface with a primer, wait for it to dry completely.
- The wall is painted with mortar-colored paint.
- On a piece of foam plastic, draw even rectangles with a pencil (it is convenient to use a ruler for this).
- In accordance with the applied pattern, individual elements are cut out of the foam – bricks.
- Glue is evenly distributed on them from the wrong side, after which they are pressed tightly against the wall so that the composition grabs.
- Each styrofoam rectangle is painted with a paint that resembles a natural shade.

Mortar Brick Making
This method creates a simulation that closely resembles real brickwork. For work, it is necessary to prepare the following tools and materials in advance:
- primer;
- mortar and water for its dilution;
- PVA glue;
- spatula;
- thin tape;
- white-gray paint;
- paint roller.
The work process includes the following steps:
- The wall is primed, and then, after waiting for this layer to dry, it is painted in a gray-white color.
- Adhesive tape is applied to the surface in such a way that brick-shaped rectangles are obtained. The areas covered with tape will be the seams between them.
- Dilute the mortar in the proportions indicated on the package, add a little PVA glue to it to ensure better adhesion to the surface.
- Apply the mixture to the wall and, until the mass is dry, carefully remove the adhesive tape, after which the surface is thoroughly dried.
