Wet room installation prices: How Much Does a Wet Room Cost to Install?
How much does it cost to install a wet room? All your questions answered
Homes & Gardens is supported by its audience. When you purchase through links on our site, we may earn an affiliate commission. Here’s why you can trust us.
(Image credit: Future / Davide Lovatti)
Wet room installation costs are somewhat more unknown to seasoned bathroom renovators, but this room is becoming an increasingly popular commodity in a busy family home, thanks to its practicality and durability.
Chris Scott, Joint MD, Mascot Bespoke , says: ‘Wet rooms are now a staple feature of most luxury developments and refurbishments. Well-travelled clients, often time-poor, are looking to recreate that five-star luxury hotel spa experience within their own homes.’
So how much does it cost to install a wet room? As with all other bathroom ideas, installation costs for wet rooms really depend on how much reworking of pipework is needed, whether new drainage needs installing, the awkwardness of the configuration of the room, and its size, fittings and finishes.
Chris says: ‘The key to success when designing and installing a wet room is ensuring that you have the basics right. While choice of tiles, vanity units and taps may be the exciting tactile elements of the scheme you notice once the work has been done, its actually the less inspiring items that sit behind the scenes that will inform the end look and feel of the wet room.
‘For a true wet room experience, it’s preferable to avoid using a shower tray and instead tile your whole wet room, floors and walls. Over time, grout and silicone will inevitably fail, it’s therefore key to ensure that you have the correct waterproofing system in place, which is laid on-top of the under-floor heating system and can be tiled directly onto.
‘Adding this layer does increase the cost in the short term, but pays dividends when you’re not having to pay for repairs to other rooms in the home as a result of water damage.’
We’ve tapped top bathroom experts to explain the costs of installing a wet room in your home below.
How much does it cost to install a wet room?
(Image credit: Future / Mark Bolton )
Nick Cryer, founder of Berkeley Place , has installed many wet rooms during renovation projects. He says: ‘On average we would expect circa $11,000 (£8,000) to $18,000 (£13,000) for a medium-sized wet room, compared to say $8,000 (£6,000) to $14,000 (£10,000) for a similar traditional bathroom.
‘Overall, we would say the wet room is worth an uplift in cost. We would expect a 20% to 30% uplift for a wet room over a traditional bathroom. Most of this uplift relates to the preparation work associated with waterproofing the area. Some additional ventilation may also be required and, any radiant heating installation needs to be better planned.’
Gemma Holsgrove, associate director at interior design agency Sims Hilditch , suggests even higher. ‘I would anticipate a wet room costing anything between $20,000-$40,000 (£15,000-30,000) depending on the size and level of specification. ‘
‘
Average costs to install wet room components
Wet rooms can be costly. Nick Cryer says: ‘Wet room installations are more specialist, more time consuming and more expensive. All the materials and kit is very readily available, however, we recommend only experts are employed to complete the installation.’
Discover how much each wet room stage might cost below. Remember that prices will vary depending on the size of the room, how complicated your wet room ideas are, and level of finishes that you choose.
- Fittings: Generally if you have a joisted floor, the tray can be set flush (depending on joist positions). However, if it is a concrete floor you will need to raise the tray. Jo Sangster, senior designer at Ripples Bathrooms , says: ‘Trays and waterproofing can range between $800-$1,400 (£600-£1,000) depending on size. The bigger you go the higher the price! A lot of suppliers will also offer options for trays that can be made in bespoke sizes and waste positions.
 ‘ Gemma Holsgrove, associate director at Sims Hilditch, says you can expect to pay anywhere from $11000 (£8,000) to $20,000 (£15,000) for higher end finishes.
 - Tiles: Ripples’ Jo Sangster says an average cost for tiles is anywhere between $70-$140 (£50-£100) per square meter. She adds: ‘When choosing tiles for use within a wet room tray these will need to be anti-slip. You also need to consider the size and I generally suggest not too large or too small. Smaller tiles generally have more anti-slip properties however there are more grout lines. I usually like to design wet floors using the same tile across the whole bathroom floor.’ Gemma Holsgrove suggests putting aside $2,000-$5,500 (£1,500-£4,000) depending on size and finish.
- Drainage and plumbing: The task of tanking (also known as waterproofing) is the process of adding an extra layer of protection between the walls and floor and the tiling or flooring you use in the wet room. According to Gemma, you’ll need from around $2,700-$4,000 (£2,000-£3,000) for plumbing. Jo says: ‘Don’t forget to consider the drainage position based on your shower glass and shower head. Ideally not directly below where you are standing and as far away from the entrance to the shower as possible.’
- Labor: ‘There is more labor involved when fitting a wet floor as it requires extra tanking and cutting the tiles to the fall of the tray, however the finished look is well worth it!’ says Jo. Put aside anything from $700-4,000 (£500-£3,000) for tiling, depending on the size of the room.
 ‘ Gemma Holsgrove, associate director at Sims Hilditch, says you can expect to pay anywhere from $11000 (£8,000) to $20,000 (£15,000) for higher end finishes.
 Jo says: ‘Don’t forget to consider the drainage position based on your shower glass and shower head. Ideally not directly below where you are standing and as far away from the entrance to the shower as possible.’
Are there any hidden wet room costs to consider?
When browsing walk-in shower ideas, you may have noticed that many of the surfaces are hard – and therefore cold and unwelcoming. Therefore, you may want to add underfloor heating to your wet room for added luxury.
Jo says: ‘I believe underfloor heating is a must when fitting a wet floor tray. This can go all the way underneath the tiles in the shower so it helps to dry up water and create a much more pleasant showering area with warmth underfoot and help to combat any damp in the bathroom. ‘
‘
Chris Scott, Joint MD, Mascot Bespoke , says many people are extending underfloor heating to walls, too, adding: ‘Another consideration is how you will heat and vent the space. It’s no longer uncommon for clients to extend their underfloor heating systems to cover the walls of a wet room as well as the floor. This luxurious option helps keep the room at a perfect temperature but also speeds up the rate at which the tiled walls dry. Ideal for maintaining clean grout lines and a less soggy space. ‘
Costs for this will vary: electric underfloor heating is easy to install under tiling in an upstairs room – you can buy underfloor heating mats that are simply wired in by an electrician to your mains. If you are completing a more dramatic renovation of your entire house, and particularly on the ground floor, it is possible to have wet underfloor heating which is connected to the boiler just as radiators are.
Are wet rooms worth the added cost?
Wet rooms are worth the added costs, particularly if you are looking for small bathroom ideas for a second bathroom or en suite.
‘The finished look of a wet room is always fantastic and really finishes off a space, in particular if you have an open walk-in shower,’ says Jo Sangster of Ripples. ‘Of course there are alternatives on the market with many new products and tray types that can also be set flush to floor, however this will still create a divide across the bathroom and will usually make the space feel smaller.’
Ruth Doherty is an experienced digital writer and editor specializing in interiors, travel and lifestyle. With 20 years of writing for national sites under her belt, she’s worked for the likes of Livingetc.com, Standard, Ideal Home, Stylist and Marie Claire as well as Homes & Gardens.
How much does a wet room cost
Have you been considering a wet room? You’re sure to have a few questions, most importantly, how much does a wet room cost? Worried it might cost too much?
Installing a wet room doesn’t have to cost a fortune. In the long run, wet rooms can add lots of value to your home. Based on the size of your bathroom, wet room installation can cost anywhere from £3500 to £10,000.
Labour costs will increase with additional features, such as underfloor heating or a shower screen. If you’re wanting to completely remodel your bathroom, the costs of the job will of course increase. Interested? Read on to find out if a wet room is right for you.
What is a wet room?
In contrast to a traditional shower, the entire floor and walls of your bathroom will be waterproof with a wet room. Non-porous surfaces stop water from leaving your shower area, minimising the possibility of damage to your flooring, tiling, and overall building.
Often, they are seen as a luxurious addition to any home that can also add value after they’ve been installed – making up for the average cost of installing a wet room in the first place.
If you have difficulty with mobility or a small bathroom, getting a wet room installed can be a great idea to improve your general wellbeing, whilst adding value to your home. They’re easy to clean, and guide rails can be installed in the shower area for the elderly or those who struggle with movement.
Your wet room can be designed around your wants and needs. Fittings, fixtures and other materials can be chosen and customised depending on what style you’re looking for.
When installing a wet room, you can choose and customise the entire floor and the walls of your wet room (including the tiles). A professional will ensure everything is installed to fit your taste.
The Benefits of Having a Wet Room
Affordable luxury
Typically, a wet room installer will offer design suggestions that will increase the space, look, and feel of your wet room.
A wet room takes an average house and turns it into a luxury home.
Following your wet room installation, walking into your bathroom, you’ll feel like royalty as you step into and out of the shower. You can add additional fixtures and features such as underfloor warming, and more expensive materials and furnishings than your average bathroom space.
Fully waterproof space
Installed by a professional, they will ensure that your new wet room is completely waterproof – preventing any damage to your building, floor, and walls.
The average cost of a wet room is reduced by the prevention of any potential future damages to your home through leakages.
Cleaning is a breeze
Compared to your average bathroom, a wet room is considerably easier to clean – especially if you decide to go with hanging fixtures.
Even if you do not choose a hanging toilet or sink, simply take some wipes or a mop and wipe down the surfaces. The waterproof tiles and materials ensure that a wet room floor is easy to clean and then drain everything down the shower tray once you’re done.
Increasing the value of your home
The average cost of installing a wet room, including labour costs per day, can be costly. However, in the long run, these costs could even out when considering how much value could potentially be added to your property.
A wet room is considered to be an advantage by many home buyers to be a modern, functional and desirable room to have. This will be extremely attractive to potential buyers if and when you come to sell your property. Read our post on wet room advantages and disadvantages to give you a better understanding of the and positives and drawbacks that a wetroom can bring.
Choose the layout and design that you want
The design of your wet room is completely up to you! Choose the flooring, tiles, shower tray and additional fixtures to fit any aesthetic you’re looking for.
Even a small shower space can be turned into a much bigger wet room space thanks to the common lack of a screen or tray.
Some of the most important things to consider when installing a wet room are the shower tray and the waterproofing of the wall and floor areas of your room.
For the price you’re going to be paying when installing a wet room, you want to ensure that the shower tray will prevent water from sitting and will allow it to go down the shower drain.
If your shower tray is not on a small slant then it will not be able to drain properly. A shower drain that does not work will leave you with standing water in the floor area of your new shower.
A convenient and safe space for all
For elderly people and those with mobility issues, a wet room can be a great choice to ensure you can have a comfortable, labour-easy shower every day.
The additional space offered is great for those who use a wheelchair. Moreover, guide rails, seats and additional lighting can be added to further help those who need it. Simply get in and get out, no need to lift your legs.
The non-slip, waterproof tiling and flooring makes for a safe bathroom, no matter your situation.
For those with disabilities, your wet room could cost significantly less thanks to a reduction to or exemption from VAT – check the government’s website to discover if you’re eligible.
Is your home suitable for a wet room?
It’s unlikely that you’ll need any sort of permissions before you start to install a wet room. But, if you reside in a listed building, it’s best to seek advice from the local planning committee.
If you’re designing a wet room for any sort of new build then you will have to apply for building regulations approval.
No matter if you have a small or large bathroom, a wet room can be installed in your home. The only thing that will vary depending on the house is the overall wet room cost.
In fact, for those with a smaller home and bathroom, you’ll see a huge increase in the room you have to manoeuver with no shower tray and shower screen to take up space.
So long as your bathroom is redone from the flooring upwards and the installation is done by a professional, your wetroom will be able to function no matter what sort of house you live in. However, it is important to note that you’ll need a slanted shower drain to allow water to go down, and you’ll need to waterproof (tanking) the entire room.
How much does installing a wet room cost?
Tiling
The tiles you choose can change the cost of your wet room. The labour and materials needed for larger tiles can reduce cost – less time on fitting and less grout and spacers needed makes for cheaper labour costs.
Depending on the tiles you go with, the price per square meter will increase or decrease. The price of tiling can cost around £10 per square meter, all the way up to £100 per square meter.
Choose the best materials for your budget – you really don’t want to cut corners, as this could lead to expensive repair costs later down the line.
The majority of tiles available are non-porous, however, marble and travertine will need to be resealed regularly.
Adhesive, grout, and spacers are additional costs but will be comparatively smaller and less significant than the tiles themselves. However, you always want to buy the best products around for the budget you’re operating with.
Waterproofing
Waterproofing (tanking) is one of the most important steps in building and installing a functional wet room.
No matter the cost or look of a wet room, it’s vital that it is adequately waterproof so it’s durable.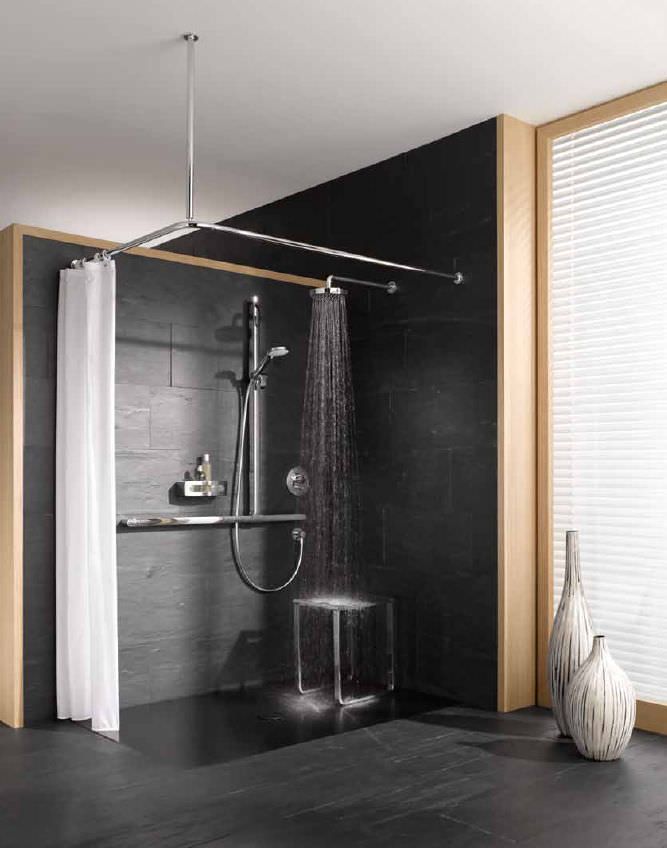
A wet room is not a wet room if it allows for water to leak through the floors and walls – destroying the structure of your home. Damp, mould and other dangerous things can come from a dysfunctional wet room.
You’ll find tanking kits that provide all the products you need to properly waterproof a room before tiling can begin. Cheaper kits will likely cover smaller areas, ensure you check that the kit you end up buying is the right size for the entirety of your floor and shower area.
These tanking kits are available from £50 up to £350.
Labour
Labour costs will differ from installer to installer. Some will offer cheaper quotes, however, it’s important you find someone who is reliable and experienced.
An experienced installer will be able to adapt to any bathroom situation, creating a wet room for any size or space.
The average price can vary from £100 to £200 per day, per man. London and other cities will likely come with higher costs. The average price will change depending on the scale of the work and the complexity of it.
Overall, labour costs will usually range from £1500 to £2000. Contractors may be required, further increasing the costs involved with your wet room install job.
If you were to do the job on your own, and unfortunately not do it correctly, the costs of additional labour and materials to fix damage will reduce the value of your wet room installation.
Not only will a professional have your wet room installed faster, but they will also ensure that things such as water drainage, waterproofing, and underfloor warming work as they should.
There are so many aspects that you need to consider, which make it very difficult to install a wet room on your own. Per day, the cost of a specialist wet room installer is worth it.
Underfloor heating
Underfloor heating helps to keep every part of your new room dry, whilst providing warmth for your feet that is especially great on those cold winter mornings. It can be installed under all different types of flooring – from wood to tiles and carpet.
Underfloor heating mats are the likely best choice. They’re easy to install and heat up faster than the alternative wet systems. Again, this is something that you don’t want to cheap out on, as you won’t have a thermostat or effective heating solution by doing so.
A kit starts at upwards of £100, potentially going as high as £350 depending on the quality of the kit and the size of the room it covers.
Wet underfloor heating systems are connected to your central heating system, so you’ll need a plumber to hook everything up correctly.
Preparatory work
Planning is the best way to ensure that your new shower and toilet will be effective whilst costing you the minimum it possibly can.
First, consider what will need to be done to your bathroom. Will it need to be completely remodelled and stripped down? How much will this cost and how long will it take?
Does your flooring need to be completed? Does tanking need to be installed? Does any pipework need to be done?
It’s a good idea to get a consultation from a reputable plumber or specialist so that you can fully understand all the work that needs to be done, and perhaps importantly, the cost of said work.
At the end of the day, plan, plan and plan some more. It is also handy to have a backup for everything, so you are fully prepared for anything that might go wrong with the installation and building process.
Fixtures and materials
Depending on your budget, you may look to cheaper or more expensive fixtures, fittings and materials.
However, no matter your budget, it’s important that you buy items effective at the job they’re supposed to be doing and have good reviews from other people who have used them before.
Our advice would be to choose the best products that you can afford. It will be an investment that in the long term you’ll appreciate.
Fixtures and fittings such as waterproof lighting, the shower unit and head you choose, or the type of tiling backboards you go with can make or break your new wet room.
For those with larger bathrooms, and a larger budget, a bath can be implemented alongside the shower.
Things to consider
Size of bathroom
The features that you can implement in your new wet room may differ depending on the size of your existing lavatory. If you have a smaller room, you likely will not be able to have a bath alongside the shower and toilet.
However, a smaller size room will end up costing much less to transform in comparison to a large one.
For example, the cost of tile work for the flooring and wall will be cheaper in a smaller room as fewer materials and labour is required.
Budget
You should buy products, items and services that fit your budget. However, it’s best not to sacrifice quality for a cheaper cost, as this is an investment.
If you end up buying cheaper, less effective and reliable items, you’re liable to experience future troubles that can lead to expenses totalling more than if you just bought a better item in the first place.
Of course, do not completely go over budget. Make sure you do some in-depth research on quality, cheaper products that will work effectively for a long time.
Quality of fittings
A wetroom can fall apart at the seams if you don’t save some of your overall budget for good quality, long-lasting fittings.
No matter whether it’s the light fittings or the underfloor warming, once more, it’s not a good idea to go cheap and ineffective.
Plan your budget, and figure out whether you can afford good fittings or whether you’ll have to reduce payments elsewhere in order to do so. Without the right fittings, your wet room will cost you more in the long run.
Time frame
Overall, from planning to finish, it can take upwards of a fortnight to complete the build of a wet room.
You should spend a week planning the design of your wet room. Then, you’ll need to find the correct fittings, furniture, shower unit etc.
Finding the right tradesmen for the job can also be tricky. You’ll need someone with a good reputation and plenty of experience.
Whilst work is being done turning your bathroom into a wet room, you will need a place to shower, go to the toilet and do everything else you normally do in the bathroom. It’s a good idea to understand and plan for all sorts of issues as you prepare for a week or two of work.
The installation of a wet room can take anywhere from 4 days to two weeks – this again depends on the size of the wetroom and the additional features you wish to implement.
FAQs
Is a wet room more expensive than a traditional bathroom?
Yes, usually a wet room will cost upwards of 20% more than a standard bathroom. Mainly, this is because of the waterproofing (tanking) process that is a necessity with wet rooms.
This price is variable in relation to the size of the bathroom, the features implemented and the labour used. It is also changeable with the quality of items you decide to go with.
Due to the build-up of costs from labour, furniture, fittings, and materials, wet rooms are often more expensive than traditional bathrooms. However, this price does come with some perks such as easy cleaning, a luxury feel, and practical nature.
Do wet rooms add value to a home?
Yes, a properly, and professionally installed wet room will increase the value of your home if it is added as an ensuite or secondary shower room.
The majority of modern home buyers see wet rooms as attractive, useful features that put them above alternative homes that don’t have one.
Can any bathroom be a wet room?
Yes, no matter the size or design of your current bathroom, a professional installer will be able to transform it into a wet room.
Some compromises may have to be made for smaller rooms, however, a fully functional, effective wet room is possible in any home or apartment.
Your budget will decide whether you can afford to install an effective, quality wet room.
What is the cost of wet room installation?
The average overall cost of a wet room is between £3500 and £10,000.
This price is dependent on the labour you use, the products you purchase as well as the scale and complexity of the project. Those with smaller bathrooms should expect to pay less than those with larger bathrooms.
Is having a wet room practical?
Yes, a wet room can help elderly people or those who struggle with mobility to enjoy more comfort when showering. Additional features such as handrails and chairs can be implemented at an extra cost if they are required.
Wet rooms are extremely easy to clean. Simply mop or wipe the flooring and walls, then it will drain or dry up soon enough. You’ll no longer have to lift your legs to get into a bathtub or scrub vigorously to clean those corners of the tub that are hard to reach and build up with dirt.
How long does it take to install a wet room?
The minimum time you should expect building work to last is four days. However, more often than not it will take around a week for all work to be completed, leaving you with a fully functioning wet room to enjoy.
Sometimes, it can take upwards of two weeks to install a wet room if there are complexities or complications along the way.
The size of your bathroom and the expertise required to make the design for your wet room a reality may extend the amount of time needed and the amount of money demanded.
It’s good to be prepared, so have somewhere lined up to shower, brush your teeth, go to the toilet and do all other things you might need to do in your bathroom.
You should plan for all of these things before you hire anyone and should have backups just in case there are problems along the way that you cannot control.
Wet Room Costs 2022 | PlumbNation
If you want a luxury experience in your home, then a wet room is an excellent option. Step into your wet room to shower in the morning and to relax in after work.
Wet rooms are growing in popularity because they are becoming easier and cheaper to install. In this article, we’ll clue you in on everything you need to know about the costs of installing wet rooms.
How Much Does Each Wet Room Component Cost?
Shower tray former
The shower tray former is a special type of shower tray that sits underneath the tiles or flooring in the shower room. Its job is to maintain the evenness of the floor and to direct the water from the shower towards the waste pipe.
The wet room shower tray is an important feature of the wet room installation, and it’s recommended that you choose the right one for your wet rooms project. This also influences the cost.
Estimated cost:
The cost of your shower tray former will depend on the scale and cost of your wet room installation. For instance, if you want a luxury wet room installation, then you will pay more for your shower tray former, more expensive formers can offer better quality and functionality.
However, in general, a shower tray former should only cost between £200 and £300, for one that’s guaranteed to last.
Tiles and flooring
When it comes to flooring for your wet room project, you have a range of options for the tiles. Most people choose between porcelain, mosaic, or natural stone. Tiles made from these materials offer a beautiful and functional flooring style that will last for many years.
Remember, it’s important to have tiles that grip in a wet room, so ceramic tiles are not recommended, although they are good for walls.
Estimated cost:
Again, the cost of the wet room will largely depend on the size and ambition of the project. Regardless of whether you choose natural stone or porcelain, the cost of the wet room will be higher if you have larger floor space.
Typically, you will pay more for natural stone tiles; these come in at around £5.00 per square metre and are the more expensive option. Porcelain is cheaper; these cost around £2.00 per square metre.
Shower unit
When it comes to designing your wet room, you have two options; you can have a wet room shower or a shower unit. A wet room shower is a shower that blends with the rest of the room; there is no shower unit; instead, there is a gradient on the floor directing water to the drain.
Other wet rooms have a shower unit that is separated from the rest of the shower area. A shower unit is sometimes raised.
Estimated cost:
If you intend to install a new shower unit in your wet room, the cost will depend on the size and scale of your project. Unlike a wet room shower, a shower unit requires some additional materials such as a glass enclosure and step.
If you want to install a shower unit in your wet room, you can expect to pay somewhere between £2000 and £5000 depending on the materials and style of the shower room.
Tanking slurry/membrane
Wet rooms aren’t straightforward; in order to succeed as a wet room, the area needs to be sealed and watertight. This can be achieved in two ways, one of them is a tanking slurry, and the other is a tanking membrane.
Membranes are needed to prevent the shower water from penetrating the wall or floor and causing problems with the foundations or infrastructure. Each has its advantages and wet room costs.
Estimated cost:
The cost of your waterproofing will depend on the size of your floor space. Whether you choose tanking slurry or tanking membrane, the cost will increase in tandem with the square meterage of your space.
In general, the tanking slurry is cheaper than a tanking membrane, which also requires professional installation. Expect to pay around £50 per metre for a slurry or membrane, but the membrane needs installation.
Toilet
When it comes to toilet installation in your wet room, there are good and bad choices. In general, you want a toilet that is raised and sits flush to the wall; this prevents flooding underneath when you use the wet room freely.
If you choose a floor-standing toilet, it can lead to collected water and flooding issues that require further maintenance. For this reason and more, a raised toilet is a better idea.
Estimated cost:
While conventional floor-mounted toilets tend to be cheaper than wall-mounted ones, they are not as sensible for a wet room project.
For this reason, it’s better to invest in a wall-mounted toilet at a higher cost. These toilets can cost anywhere between £100 and £5000 depending on the quality and brand you want for your project. Remember, there are sometimes some hidden costs, such as seats.
Basin
The basin in your wet room is one of the most versatile features of your project. There are many designs, styles, and materials of a basin that you can choose from; of course, the choices you make will be determined by the style of the wet room and your budget.
Consider whether you want a wall-mounted washbasin or a floor-mounted washbasin; again, a floor-mounted one has some issues.
Estimated cost:
Washbasins are available in a variety of shapes and styles, and they vary quite substantially in price. Since the washbasin is integral to the overall style of the project, you will have to integrate this with the style of the toilet and tiles.
For this reason, it’s a good idea to decide on the style of the washroom early in the project, even if you want a standard wet room. Expect to pay upwards of £100 for a quality basin.
Underfloor heating (optional)
Whether you are stepping into the wet room for the first time or stepping out of the shower onto the floor space, it makes a difference when the floor is pleasantly warm and not icy cold.
While it is not necessary to have heated flooring for your wet room, it’s a good idea, especially if you want that luxury experience. The good news is that underfloor heating is more accessible and affordable than you think.
Estimated cost:
Installing underfloor heating in a wet room is recommended not only for the reasons of luxury living but also because it provides exceptional functionality.
Unsurprisingly, wet room floors regularly become flooded, which can lead to structural issues in the long term. If you want to keep your wet room dry, then install underfloor heating. Expect to pay around £1000 for underfloor heating for a new wet room.
Shower screen (optional)
If you have a wet room shower, there is no need to install a shower door; in this style of wet room, the entire space is sealed, and you can turn the shower on freely without worrying about flooding the floor space – but this is not the case with other wet room designs.
If you have a shower unit installed, you will need a shower door to prevent too much flooding on the wet room floor, even when it’s sealed.
Estimated cost:
When it comes to wet room shower screens, you have different options; you can choose a shower unit or a separate shower screen. Shower units are enclosed spaces with doors that open; you will have to step in and out of the shower and close the door when the shower is in use.
The other style is a shower screen that blocks the water. A shower door will cost you upwards of £100 and depends on your budget.
Additional costs
There are typically two ways to install a wet room; if you have some building experience or trade experience, you can install the basic wet room yourself; otherwise, it’s a good idea to hire a professional installer.
Although you will pay a little more than doing the work yourself, you can rest assured that the installation will be professional and guaranteed for at least a decade. This is a reasonable option.
However, if you want to install the wet room yourself and save money, make sure you plan the project carefully and work to a tight and realistic budget. If you decide to go it alone, you will need some tools and materials to carry out the work successfully.
Additional tools you will need include a measuring ruler and pencil, a circular saw, and a drill with a range of bits; you may also need tape and primer.
How Much Will Labour Costs Be?
Of course, the labour costs of your project largely depend on how you decide to install the wet room. If you are willing to study some of the trade skills you need for the job, it’s realistic to achieve a high-quality result without spending too much on labour costs.
Even if you decide to carry out the work yourself, you might still have to hire a professional for some jobs, such as plumbing or electric work.
If you decide to hire professional installers for the entire job, you can expect to pay between £10,000 and £20,000 in total. Again, the cost of the installation depends on the size and scale of the project.
If you want to reduce the overall cost and still enjoy luxury wet room installations, it’s a good idea to install as much as you can and only pay for specialist work. Plumbing can still be expensive.
Factors Affecting The Price Of A Wet Room Installation
Current flooring
If you’re like most households, your bathroom will have flooring that is based on wood or concrete. Nowadays, a wet room can be installed regardless of the type of flooring you have; nevertheless, there are some considerations to make.
For one thing, if you want to install your wet room on an existing timber floor, you will need to prepare it correctly using a shower tray and special drainage facilities.
Room size
A large wet room with a free-standing bathtub is an attractive prospect, but it’s not always the most affordable one. In general, the larger the area, the more expensive your wet room project will turn out.
Most of the materials needed for installing a wet room are measured in square feet. This includes tikes for the floor and underfloor heating. It also affects the price of the shower unit and toilet you select.
Accessibility
When it comes to accessibility, there are various options for you to choose from, you can have an open plan wet room installed with no shower unit, or you can have a shower unit that separates the area from the rest of the room.
If you opt for open plan accessibility, it might cost more overall because you will need to have the flooring properly tanked with a membrane or a slurry. This can affect the cost.
Location
Another factor that can affect the overall cost of your wet room installation is the location of your property. Whether you opt for partial installation or a full installation, the costs of plumbing, electricity, and materials often depend on the cost of your local services.
It’s possible to find cheaper installation services online, but unless they are accessible to your property, you might pay more.
Quality of parts
As with most household projects, the cost of the overall project depends on many factors. One of these factors is the quality of the parts, labour, and additional components needed to carry out the project successfully.
As with most aspects of the project, costs vary depending on the quality of the components used; this is an opportunity to save as well as improve quality depending on your attitude.
Wet Room Building Regulations In The UK
When you are thinking of installing a new wet room in the UK, the question of planning permission often arises.
Although a wet room installation seems like an internal modification that doesn’t require any permissions, it might still require an inspection from the building department at the local council office if you make alterations to plumbing and electrics. These modifications are very common.
Wet Room Vs Walk In Shower: Which Is Cheaper?
While wet room areas are an attractive prospect, they are not always the cheapest option. When it comes to installing a new shower in your home, the cheapest option is to install a prefabricated shower unit.
Not only are these prefabricated showers cheaper to buy they are also cheaper to install. But if you opt for a wet room shower, the costs can spiral quickly. In short, walk-ins are much cheaper.
Make your Wet Room a reality with Plumbnation
A wet room is an excellent idea; it provides a luxurious place to relax and enjoy your home while increasing the value of your property. A wet room also makes a property easier to sell.
However, it’s important to plan the project carefully and consider all the wet room installation costs, the last thing you want is for your project to become more expensive than you planned for, but there are cheaper options.
At Plumbnation we stock all the parts you’ll need to build a wet room of your own. You’ll find a selection of showers that are perfect for any wet room or walk-in shower. We also stock specialised wet room shower trays and wet room screens to help you turn your project into a reality.
FAQs
Is it better to use tanking slurry or a membrane for waterproofing?
There are advantages and disadvantages to both tank slurry and tank membranes. In general, tank slurry is very effective; however, its effectiveness largely depends on the quality of the wall behind it; if the walls are low quality, the slurry’s integrity will be compromised, leading to leaks and drainage issues.
Membranes are more reliable overall, but they must be installed by professionals with a pump.
How much value will a wet room add to my home?
In general, installing a wet room will add value to your home, that’s because wet rooms and ensuites make maintenance simpler than a traditional bathroom; it also increases the functionality of the property.
However, to add value to the home, the wet room takes professional installation. According to recent surveys, installing a wet room can add 5% value to your home or property.
Is an upstairs wet room a good idea?
Installing a wet room is considered a luxury in the home; it allows you to walk into a room and have a shower or bath without worrying about flooding, rot, or drainage issues.
Naturally, most people imagine a wet room on the ground floor where it is easier to seal the room and protect it from flooding; but if the wet room is installed correctly, you can easily install one on the second floor or upstairs area.
How long will it take to install my wet room?
Installing a wet room in your home can improve your quality of life and increase the value of your property; you need to be prepared to wait one week for the work to be carried out adequately.
Typically, a wet room will only take a maximum of four days to install by a professional company, but there will be a day or two on either side of the work for preparation and clearing up the work after.
How Much Does a Wetroom Cost?, Wetroom Experts
Often the first question we are asked is “how much does a wetroom cost?” Many factors can affect the answer but we have put together some figures for you based on creating a wetroom with a floor area of 2m x 2m. We hope this will help you in budgeting for your wetroom project.
Shower Tray Former
A properly functioning wetroom needs to have a slope in the floor (slope to falls) which allows the water from the shower to drain away leaving the floor water free. The easiest and most reliable way of creating the correct slope to falls is to use a Shower Tray Former. Unlike a traditional shower tray, a shower tray former is built into the floor and is tiled over to create a seamless finish.
Be wary of cheap shower tray formers which, although they may be guaranteed, are not rigid. Any movement in the former can cause the tanking or the tiles to break. Such damage will not be covered by the guarantee and can lead to costly repairs.
There are many formers available on the market with prices ranging from £100 for a composite former (often supplied without waste or grating) to £630 for a made-to-measure former including a robust waste outlet and a solid stainless steel laser cut grating.
The quality of the grating (tile set) is a major factor in cost: cheaper products will either include a pressed steel tile set, or sometimes, won’t include any waste outlet at all.
Tanking (Waterproofing) Your Wetroom
Choose a tanking product which has been certified as suitable for use in wetrooms. Look for the CE mark on the product to confirm, it has been thoroughly tested and will form a reliable waterproof base on which to tile.
Often wetroom tanking is sold in the form of a kit containing all the products you need to fully waterproof the wetroom: check the size of kit you are purchasing and not just the price, as cheaper kits can cover a very small area.
Remember the entire floor should be tanked as well as the walls in the immediate showering area. We have produced a calculation guide which shows how to calculate exactly how much tanking is required.
Wetroom tanking kits (10sq.m) are available from about £65 to £314.51.
Underfloor Heating
Underfloor heating is a great choice for a wetroom: it is warm underfoot and helps to keep the wetroom dry.
Electric underfloor heating mats are ideal for fitting in a wetroom: they are easy to install and quicker to heat up than wet systems. The heating mats come in a variety of sizes and require a control unit. Be careful when choosing your system as some of the cheapest looking heating mats don’t include the thermostat.
We usually advise our customers that it is unnecessary to install underfloor heating in the immediate showering area as the heat from the water will heat the floor sufficiently and the slope to falls will prevent standing water.
Prices for a 3 sq.m. kit (including thermostat), start at about £100 rising to £300. Most of the difference in cost is in the sophistication of the thermostat you buy. Be sure to check the guarantee supplied with your product as most reputable electric heating mats will be supplied with a 10 year guarantee.
Wetroom Showers
There are a vast array of showers available and they range in price from £100 to, well the sky seems to be the limit but being realistic, say £900.
The choice of shower will depend on your needs and budget but to help you choose the best type of shower we have found this handy article Shower Types Explained
Shower Screens
Shower screens aren’t strictly necessary in a wetroom but can be useful if splashing is likely to be a problem. Choose a shower screen which has been designed for a wetroom, these tend to be taller than those designed for a shower cabinet.
Prices for shower screens start at about £100 but, as with the showers can climb depending on the fittings and style to £600 +.
Tiles
With tiles the style you choose can affect the labour cost involved with large tiles taking less time to lay and using less grout and spacers.
Most tiles are non-porous such as ceramic or porcelain. Porous tiles such as marble and travertine can be very attractive but will need to be sealed on a regular basis.
The cost of tiles range from approximately £12 per sq. m. up to £80+ per sq. m.
Tile Adhesive, Spacers and Grout
The cost of tile adhesive, spacers and grout should not be forgotten. A good wall and floor adhesive will cost around £14 per bag and cover approximately 4m2 and a 2.5 kg bag of flexible grout will cost around £8 and a bag of spacer comes in at approximately £10 per hundred.
Labour costs
Labour cost can vary throughout the country but a cost of between £150 and £200 per man day would not be unreasonable, with prices higher in the London area. The time taken will depend on the amount of ripping out required, the complexity of the design and the type of tiles used.
Average cost of Wetroom
Taking a 4 sq.m. room with walls of 2.3m high, we can now put together the average cost for a wetroom using a robust shower tray former and tiling the entire floor and walls.
| Material / Labour | Cost (£) Including VAT |
|---|---|
| Shower Tray Former | 480 |
| Tanking Shower Kit | 150 |
| Underfloor Heating 2m2 | 150 |
| Shower | 450 |
| Shower Screen (corner panel) | 300 |
| Tiles (£40 per m2) | 816 |
| Tile Adhesive | 70 |
| Grout | 40 |
| Spacers | 20 |
| Labour (2 person team for 5 days) | 1800 |
| TOTAL COST | 4276 |
*Please note these figures do not include adding any further features such as basin or toilet.
In Conclusion
The cost of a wetroom is very dependent on the size of your room, the fittings you require, the quality of those fittings and the amount of labour needed to strip out and re-fit the room. It would be reasonable to expect a 4 sq.m. wetroom to cost in the region of £5000 but please note, the figures we have supplied are to be treated only as a guide.
The most important thing to remember is to use the best quality products you can afford and have them fitted by a reputable installer. Some decisions such as tiles and grating type will affect the way your wetroom looks, while other decisions, such as the quality and quantity of the tanking and the strength of the shower tray former, may not have an immediate visual impact but are probably more important when it comes to long term performance and peace of mind.
Looking for a Reputable Wetroom Installer? We can help, just call us on 01387 270252.
How Much Does It Cost to Make Your Bathroom a Wet Room? – Livings Cented
There is no definitive answer to this question as the cost will vary depending on the size and layout of your bathroom, as well as the materials you choose. However, a wet room can typically be created for around £2,500 – £3,500. This price includes the cost of waterproofing the room, installing drainage and tiling.
If you are planning on doing any of the work yourself, then obviously your costs will be reduced.
If you’re considering turning your bathroom into a wet room, there are a few things you need to know about the potential cost. First, wet rooms can be much more expensive than traditional bathrooms because they require special construction and waterproofing. However, many people feel that the extra expense is worth it for the increased safety and convenience that wet rooms offer.
To give you an idea of how much it might cost to turn your bathroom into a wet room, we’ve put together some estimates for common materials and labor costs. Please keep in mind that these are only rough estimates and your actual costs may be higher or lower depending on the specific details of your project.
Materials:
-Waterproofing membrane: $200-$300
-Shower pan: $450-$550
-Tile: $800-$1200 (depending on type and quality)
-Grout and sealant: $100-$200
Contents
- How Much Does a Disabled Wet Room Cost
- Wet Room on a Budget
- Wet Room
- Wet Bathrooms
- Wet Room Installers near Me
- How Much Does It Cost to Put a Wet Room in a Bathroom?
- Can You Turn Any Bathroom into a Wet Room?
- Is It Easy to Make a Wet Room?
- How Do You Make a Bathroom a Wet Room?
- Bathroom Fitting Cost 2021 – Ultimate Guide to New Bathroom Prices.
- Conclusion

How Much Does a Disabled Wet Room Cost
A disabled wet room is a specially adapted bathroom that can be used by people with limited mobility. The main feature of a disabled wet room is that it has a level entry shower area, which makes it much easier for wheelchair users to access. Disabled wet rooms can also include other features such as grab rails and non-slip flooring, to make them even more user-friendly.
So, how much does a disabled wet room cost? Well, the answer to this question depends on a number of factors, including the size of the room and the specific features that you want to include. However, as a general guide, you can expect to pay around £3,000 – £5,000 for a small disabled wet room (excluding installation costs).
If you want to add extra features or make your wet room larger, then the cost will increase accordingly.
Installing a disabled wet room in your home can make life much easier for someone with limited mobility. If you are thinking about having one installed, then it is definitely worth getting some quotes from local bathroom specialists to see how much it would cost.
Wet Room on a Budget
A wet room is a shower area without a tray or screen and with a gradient floor that allows water to drain away. They’re often seen as a luxury item, but with careful planning, you can easily create a wet room on a budget.
Start by considering the layout of your bathroom and where the best place for your wet room would be.
If you have a large bathroom, you may be able to incorporate it into the existing space. However, if you’re working with a smaller bathroom, you may need to get creative and consider converting another room, such as an unused closet, into your wet room.
Once you have the space sorted out, it’s time to start thinking about drainage.
Wet rooms require good drainage in order to function properly so make sure to factor this into your budget. You may need to install an additional drain in your floor or make some modifications to your existing plumbing.
Next, choose waterproof materials for your walls and floors.
Tiles are a popular choice as they’re easy to clean and maintain but there are also waterproof paint options available if you want something different. Make sure any materials you select can withstand getting wet on a regular basis.
Finally, add some finishing touches like grab bars and shower curtains or doors to contain the water spray.
These items will help keep your wet room looking neat and tidy while also providing safety features for anyone using the space.
Wet Room
A wet room is a bathroom that doesn’t have any barriers, like a shower curtain or door, between the shower and the rest of the room. Wet rooms are becoming increasingly popular in homes because they can make small bathrooms feel larger and more luxurious.
One downside of wet rooms is that they can be difficult to keep clean since there’s no way to contain water inside the shower area.
But if you’re willing to put in a little extra effort, a wet room can be a beautiful and functional addition to your home.
Wet Bathrooms
Wet bathrooms are a type of bathroom that features a shower area and a wet room. The wet room is usually adjacent to the toilet area, and it contains a drain in the floor that allows water to drain away. Wet bathrooms are common in Europe, Asia, and South America, but they are becoming more popular in the United States as well.
There are several benefits to having a wet bathroom. First, they eliminate the need for a separate shower stall or tub. This can save space in small bathrooms.
Second, they allow you to take showers without creating any mess – all the water stays contained in the wet room. Finally, they can be easier to clean than traditional bathrooms because there are no corners for dirt and mold to collect in.
If you’re considering adding a wet bathroom to your home, there are a few things you should keep in mind.
First, make sure you have enough space. Wet rooms require at least 35 square feet of space, so if your bathroom is on the small side you may need to reconfigure some things (like moving the sink into another room). Second, consider your drainage system – remember that water will be draining directly onto your floor so you’ll need good ventilation and possibly even an additional drain in your floor (consult with a professional before making any changes).
Finally, think about what kind of finishes you want – tile is usually best since it’s easy to clean and won’t be damaged by water exposure.
Adding a wet bathroom can be a great way to update your home and make better use of your space – just make sure you do your research first!
Wet Room Installers near Me
If you are in the market for a wet room, there are several Wet Room Installers near Me that can help you with the installation. A wet room is a great addition to any home, and can add value and style. Wet rooms can be installed in any number of ways, so it is important to consult with a professional installer to ensure that your wet room is installed correctly.
Many installers will also offer warranty protection on their work, so be sure to ask about this before you make your final decision.
How Much Does It Cost to Put a Wet Room in a Bathroom?
When it comes to adding a wet room to your bathroom, the cost can vary depending on a number of factors. The size and layout of your bathroom will play a big role in how much it will cost to install a wet room. If you have a large bathroom, you may be able to convert an existing space into a wet room without too much trouble.
However, if you have a smaller bathroom, you may need to make some changes to the layout in order to accommodate a wet room.
The type of flooring you have in your bathroom will also affect the cost of installing a wet room. If you have tile or stone floors, they will likely need to be replaced with waterproof materials in order to create a safe and effective wet room.
This can add quite a bit to the overall cost of the project.
Finally, the fixtures and fittings that you choose for your wet room can also impact the total cost. If you want high-end finishes and fixtures, expect to pay more for them than if you opt for more basic options.
All told, installing a wet room in your bathroom can range from several thousand dollars up to $10,000 or more depending on the factors mentioned above.
Can You Turn Any Bathroom into a Wet Room?
A wet room is a bathroom in which the shower area is not enclosed by a shower screen or curtain, but instead is open to the rest of the room. Wet rooms are growing in popularity as they can give the illusion of more space in small bathrooms and create a luxurious spa-like feel.
So, can you turn any bathroom into a wet room?
In short, the answer is yes – but there are some things to bear in mind before starting such a project. Firstly, your bathroom will need to have good drainage as water will be flowing freely from the shower area. You will also need to waterproof your bathroom floor and walls to protect them from damage.
Finally, it’s important to choose non-slip flooring for your wet room as it will inevitably get wet! With all of these factors in mind, transforming your bathroom into a wet room can be a great way to add value to your home.
Is It Easy to Make a Wet Room?
A wet room is a type of bathroom that doesn’t have any barriers, such as shower doors or curtains, between the shower and the rest of the room. Wet rooms are becoming increasingly popular because they can make small bathrooms feel more spacious and open.
Making a wet room can be easy if you have some basic construction knowledge and follow these simple steps:
1. Choose the right location: The best place for a wet room is on an upper floor where gravity will help drain water away. Avoid putting a wet room on a concrete slab, as this will make it harder to control moisture.
2. waterproof the area: You’ll need to put a waterproof membrane over any areas where water could potentially leak through, such as cracks in the foundation or around pipes.
Make sure to use a breathable membrane so that vapor can escape.
3. Install a drainage system: A typical wet room will require installing a linear drain in the floor along with proper sloping and drainage to ensure that water flows towards the drain instead of standing in puddles around your feet.
How Do You Make a Bathroom a Wet Room?
When most people think of wet rooms, they envision a space that is constantly wet and slippery. However, wet room bathrooms can be designed in a variety of ways to fit the needs of the user. For example, some wet room bathrooms have a shower area with a drain in the floor, while others may have a bathtub or Jacuzzi.
The important thing to remember when designing a wet room bathroom is that all surfaces must be waterproof and there should be good drainage to prevent water from pooling on the floor.
One way to make your bathroom into a wet room is by installing a shower base with a drain in the floor. This type of installation is ideal for small bathrooms as it doesn’t require any extra plumbing.
Another option is to install a bathtub or Jacuzzi in your wet room bathroom. This will create an oasis-like feel in your bathroom and you won’t have to worry about water spilling onto the floor.
If you are planning on using your wet room bathroom for both showers and baths, then you will need to install two drains – one for each purpose.
You can also consider installing heated floors in your wet room bathroom so that you can enjoy warm feet even after stepping out of the shower or tub. No matter what type of design you choose, remember that all surfaces must be waterproofed and there should be adequate drainage to prevent water from pooled on the floor.
Bathroom Fitting Cost 2021 – Ultimate Guide to New Bathroom Prices.
Conclusion
Making your bathroom a wet room doesn’t have to be expensive. In fact, it can be quite affordable if you know where to look. There are a few things you’ll need to consider, such as the type of flooring and walls you have, but overall the cost shouldn’t be too high.
Wet Room Installation Costs: How Much in 2022?
A wet room has become a popular feature of many homes in the modern era, due to the practical advantages installing one gives your property and residents. Installing a wet room is not a job that can be easily DIY-ed as there as so many different elements to ensuring your wet room is installed correctly, from tiling to pipe installation to water leak prevention.
The differences between a wet room and a standard bathroom aren’t always clear. A wet room is a type of bathroom that usually contains a shower with no threshold.
A wet room’s floor is typically installed with a slope so that the water runs to the installed drain and doesn’t stagnate on the floor.
In comparison, a traditional bathroom could contain a toilet or bathtub as well as a shower, and there will be some kind of threshold to separate the bathing area from the rest of the room.
The main point of difference between the two is the accessibility of the space. Wet rooms are relatively open spaces and often include wall-hanging toilets and sinks, whereas traditional bathrooms may be much smaller with bathtubs and other appliances installed.
Our guide will take a closer look at wet room installations, including how much they cost, what affects the cost of building a wet room, how to save money and the best way to find a builder to help you build one!
Topics
How Much Does a Wet Room Cost?
Wet room installation costs can vary, and this is often due to the size of the room and the design of the wet room. You will probably want to keep the design of your wet room as close to the general aesthetic of the rest of your property as possible so that the new addition doesn’t look out of place.
The table below takes a look at estimated supply and labour costs for installing a wet room.
| Bathroom Type | Advantages | Disadvantages |
|---|---|---|
| Traditional bathroom | -Less expensive to instal -Traditional aesthetic is more desirable for some homeowners -Easier to keep dry than a wet room -Can still be installed in a smaller space |
-Potentially less open space -Not completely watertight as a wet room -Not as accessible -More difficult to clean and maintain as not as much open space |
| Wet room | -Completely waterproof after installation -Very easy to clean as easy access to the floor, particularly if installed with hung toilet and sink -Increases the value of your home -Very accessible |
-Expensive to instal -Is more likely to experience mould growth if not maintained properly -Can be difficult to keep dry -May not be possible to instal in particularly small rooms |
A wet room installation did use to be primarily limited to the ground floor of a property, but this is no longer the case as building techniques and material qualities have developed. Wet rooms can’t always be installed in very small spaces, however, as the flooring needs to be at a certain slope for drainage, so do bear this in mind when considering installation.
Size also plays a big factor in impacting the final cost. A small wet room with no additional costs is likely to take three-four days to complete with the total cost estimated between £2,000-£3,500.
A medium-sized wet room with no additional costs is likely to take between five-six days to complete and will cost an estimated £4,000-£5,000.
A large-sized wet room with no additional costs is likely to take between six to seven days to complete with the total cost estimated between £4,500-£6,500.
If you want a wet room with more accessories, such as specific lighting or underfloor heating, be aware that this could push the cost of the wet room installation up to between £7,000-£9,000.
Hoping to install a new wet room in your property? Use HouseholdQuotes to quickly and easily compare quotes from reputable builders experienced in wet room installations and a good fit for your budget.
Click To Get Quotes
What Affects the Cost of Building a Wet Room?
There are a few different factors that will have an impact on the final cost of installing a wet room. We take a closer look at these factors below, so you know exactly what to keep an eye on when it comes to your own wet room installation.
Size
The larger the wet room, the more expensive it will be to instal.
Larger wet rooms will come with both larger supply and labour costs than smaller wet rooms. If you’re hoping to keep the costs of a wet room installation down, it is worth considering the size of the wet room and maybe opting for a smaller wet room installation.
Design
Similarly, the more complicated the design and features of your new wet room are, the more expensive it will be to instal. This is because more complicated work that may need to be undertaken to get your wet room functioning is likely to take longer, therefore increasing the labour costs.
If you’re working to a smaller budget, don’t go overboard with additional features or functions of the wet room when thinking about the initial design. Keeping it simple is the best way to keep your labour costs down.
Location
As with all home renovation projects, the location of your property will have an impact on the final price. Properties located in London can expect to pay an estimated £50-£100 more per day for labour costs than properties located in the Northern regions of the UK.
When creating your budget for a new wet room installation, do bear in mind the location of your property and the impact it will have on labour costs.
Number of Contractors
The typical number of contractors to work on a wet room installation is two, but if you’re considering getting a larger wet room installed with lots of intricate finishings and demanding pipework, there may need to be more than two contractors on-site to get the job finished.
A larger number of contractors needed will mean that your labour costs will also increase. An estimated cost for an installer of a wet room is £150-£200 per day.
Additional Features
If you want more than just a basic wet room, you’re likely looking at some additional features to add to the design. These features can make your wet room more luxurious and heighten the enjoyment of using the room, but they will come with some extra costs.
Underfloor heating is a popular additional feature for wet room installation that improves a wet room experience. It typically costs £300-£500 to have underfloor heating installed.
If you’re hoping to add some additional bathroom features to your wet room, such as a toilet or a bath, you can expect to pay between £700-£1,500 for their installation.
Additional pipework and plumbing may also be needed. Plumbers will usually charge £40-£65 per hour for their work.
If it is a larger-sized project, they may offer you a daily rate instead which will normally cut the final price a little bit and can typically range from £200-£300.
It’s a good idea to speak with the builder you are considering hiring about any additional pipework or plumbing that may need to be undertaken as they will be able to advise you on what needs to be done.
Should I Choose a Wet Room Over a Traditional Bathroom?
Deciding between a wet room or a bathroom can be a tricky choice as there are pros and cons of both types of room. It varies from homeowner to homeowner which choice will work best, and it usually comes down to individual preference and the size of your budget.
A good way to help you decide is to consider what you want and need from this space: is it a luxurious bathing experience? Somewhere that can provide you and your family a large and easily maintained place to clean? Somewhere that’s easily accessible?
The table below takes a look at the advantages and disadvantages of installing a traditional bathroom and a wet room to help you decide which room type works best for you.
| Bathroom Type | Advantages | Disadvantages |
|---|---|---|
| Traditional bathroom | -Less expensive to instal -Traditional aesthetic is more desirable for some homeowners -Easier to keep dry than a wet room -Can still be installed in a smaller space |
-Potentially less open space -Not completely watertight as a wet room -Not as accessible -More difficult to clean and maintain as not as much open space |
| Wet room | -Completely waterproof after installation -Very easy to clean as easy access to the floor, particularly if installed with hung toilet and sink -Increases the value of your home -Very accessible |
-Expensive to instal -Is more likely to experience mould growth if not maintained properly -Can be difficult to keep dry -May not be possible to instal in particularly small rooms |
Wet rooms can be great options if a resident of the home is differently-abled and needs an easily accessible place to bathe.
How Can I Save Money on a Wet Room?
There are a few ways you can save money on a wet room, but you should still be prepared for the costs of installing one even in its most basic design as it is a relatively expensive installation.
Firstly, ensure that your design for a new wet room is simple and doesn’t include a lot of add-on features or accessories. Keeping the supply costs as minimal as you can is a really good way to keep the overall price of a wet room down.
Secondly, consider the size of the wet room. If you want a larger wet room installed, you are going to find that the final price will be higher than installing a smaller wet room, so take this into account beforehand.
Thirdly, steer clear of additional features. Adding a wet room to your property can increase your property value and that’s without the additional features such as underfloor heating or an additional bathtub installed.
Stick to a simple design that doesn’t have additional costs to keep your price.
Finally, you’ll need to compare quotes from as many different contractors as possible to find the best price for you. Use HouseholdQuotes for an easy and quick search to potentially save you 40% off your project quote!
Click To Get Quotes
How Do I Find and Hire a Builder?
We always recommend seeking recommendations from family, friends and neighbours for any builders they may have worked with who have installed a wet room for them or are known to have experience in this field.
Speaking with your close circle means you can source recommendations from tradespeople you know you can trust and that may have even worked with your family, friends or neighbours for years.
It’s also likely you can see first-hand the work the tradesperson did and decide for yourself if the quality of the job fits the standards you’d like.
Finally, make sure to use HouseholdQuotes to search for the perfect builder for you who suits your budget and expectations!
Click To Get Quotes
Ensuring the Professional Is the Right Fit
It’s a good idea to make sure you have a list of questions ready to verify that the professional you are hoping to hire is the right fit for you and meets the correct standards. Use the questions below to make sure your professional is up to the job:
- Ask them for a written quote. Any contractor worth their salt will be happy to provide you with a written quote and this way you will get to see exactly what is included in the price.
- Ask for their experience. It’s best to go with a tradesperson who has previously installed wet rooms and understands the experience required.
- For their references. If they can provide you with references you can be sure of their ability and may even be able to see some of their previous work.
- For any photos of their previous jobs. This will offer you the opportunity to see the quality of their work and could also provide you with some good references for your project designs.
- If they and their tools are insured. This can protect you from lawsuits if they or your property is damaged when they come to your home.
Final Checklist:
Take a look at the checklist below to make sure you’ve got everything you need before you begin your wet room installation:
- Consider the size of the wet room. Think about the budget you’ve laid out and what size room you have available for installation.
- Think about the design of the wet room. You should try to keep the style of the wet room matching the rest of the home.
- Decide whether or not you will be adding any additional costs to the final price with features such as extra tiling or underfloor heating.
- Use HouseholdQuotes to search contractor quotes and find a builder to get started on installing your wet room!
 Think about the budget you’ve laid out and what size room you have available for installation.
Click To Get Quotes
Frequently Asked Questions
Do I Need Planning Permission or Building Regulations Approval for a Wet Room?
Generally, no, permission is not required for installing a new bathroom. However, if you’re unsure it’s best to speak with your local Planning Office so they can guide you on the next steps forward.
If you’re renovating a previous bathroom into a wet room, it’s unlikely you’ll need to apply for Building Regulations approval, however, if you’re making structural changes such as building an extension to turn into a wet room or if you’re adding new drainage, you should consult a Building Regulations officer before installation.
What is Tanking?
Tanking is also known as waterproofing and it is the act of adding an additional layer between the flooring and walls located in your wet room. Changes in humidity and water levels in a wet room can lead to fine cracks, which could eventually lead to water leakage.
To prevent this, you should get your water room tanked so that you don’t have to worry about tile damage, water leakage or mould. If you want complete peace of mind, it’s best to have a professional tanking done which is likely to cost from £25-£45 per square metre.
You can also tank a wet room yourself with a tanking kit that can range from £50-£300, but we would recommend you hire a professional so that you don’t run the risk of additional costs for repairs later on.
What Is the Best Flooring for a Wet Room?
There are various options for flooring a wet room.
Tile is typically the most common flooring option, and you can choose from waterproof tiles such as stone and mosaic for your floor. The cost of these tiles will range on their quality and design, but you can expect to pay between £20-£100 per square metre.
You may wish to go for a vinyl flooring finish which is likely to cost around £200-£400 for supply and labour costs. Vinyl has good anti-slip qualities, is waterproof and easy to install but it is also susceptible to extreme fading of design and sharp objects can easily damage the material.
An expensive flooring solution, favoured for its aesthetic appeal, is micro-cement. This is made up of cement, water-based resins and colour pigments and is likely to cost £80-£120 per square metre.
It’s a beautiful flooring option that is resistant to chemicals and scratches but it is an expensive option that is also complicated to install and could increase labour costs.
Prices for finishing work in Moscow: price list 2019
-
home
- Prices
from 2000 ₽/m2
Order a quote for freePrice list “StroyRemDesign” – prices for more than three hundred finishing works for Moscow for the repair of offices, premises, apartments, country houses, which are grouped by type:
- Dismantling
- Ceilings
- Walls
- Floors
- Electrical
- Plumbing
Calculating the cost of finishing work is not an easy task. The price of finishing works per m2 varies by 15-20% or more, depending on the conditions of the premises, the type and size of the property, the level of materials, non-standard and the extent of renovation. For a starting point in budgeting, keep reading or give us a call to review your renovation and prepare a detailed estimate.
Prices for finishing works: StroyRemDesign price list in Moscow for 2022
Demolition
| Demolition of walls | Price |
|---|---|
| Breaking brick partitions into 1/2 bricks | 160 ₽/m2 |
| Dismantling brick partitions into 1 brick | 400 ₽/m2 |
| Disassembly of brick partitions and walls into 1.5 bricks | 750 ₽/m2 |
| Dismantling of frame-sheathing partitions | 135 ₽/m2 |
| Dismantling of wall cladding from plasterboard on a metal frame | 150 ₽/m2 |
| Dismantling partitions from GKL | 190 ₽/m2 |
| Dismantling of walls from foam blocks and plasterboard | 145 ₽/m2 |
| Removing paint from walls | 90 ₽/m2 |
| Removing old wallpaper from walls | 105 ₽/m2 |
| Removing ceramic and tile from walls | 180 ₽/m2 |
| Removing plaster from walls | from 90 ₽/m2 |
| Removing ceilings | Price |
|---|---|
| Removing the slatted ceiling | 120 ₽/m2 |
| Armstrong suspended ceiling removal | 90 ₽/m2 |
| Removing paint from the ceiling | 90 ₽/m2 |
| Stucco removal without saving | 80 ₽/mp |
| Removing plaster from the ceiling | 160 ₽/m2 |
| Removing wallpaper from the ceiling | 80 ₽/m2 |
| Ceiling whitewash cleaning with rinsing | 150 ₽/m2 |
| Dismantling plasterboard ceiling 1 level | 180 ₽/m2 |
| Dismantling plasterboard ceiling 2 levels | 250 ₽/m2 |
| Stretch ceiling removal | 250 ₽/m2 |
| Opening removal | Price |
|---|---|
| Removal of door blocks and door frame without saving | 600 ₽/pcs |
| Removal of door blocks and door frame with preservation of | 900 ₽/pcs |
| Removing the window unit | 550 ₽/piece |
| Floor removal | Price |
|---|---|
| Removing linoleum and carpet floor | 70 ₽/m2 |
| Laminate removal | 85 ₽/m2 |
| Dismantling a wooden floor on joists | 200 ₽/m2 |
| Parquet removal without saving | from 280 ₽/m2 |
| Removing floor tiles | 190 ₽/m2 |
| Removing the skirting without saving | 50 ₽/m2 |
| Dismantling of the old substrate, hardboard, plywood | 50 ₽/m2 |
| Removing concrete screed up to 2 cm thick | 150 ₽/m2 |
| Removing concrete screed over 2 cm thick | from 160 ₽/m2 |
| Removing the screed from expanded clay concrete | from 90 ₽/m2 |
| Electrical removal | Price |
|---|---|
| Dismantling the electric point | 50 ₽/pc |
| Removing luminaires | 60 ₽/pc |
| Wiring removal | 15 ₽/mp |
| Dismantling the heated towel rail | 90 ₽/pcs |
| Removing sockets and switches | 40 ₽/pcs |
| Electrical panel removal | 250 ₽/pc |
| Plumbing removal | Price |
|---|---|
| Removing the shower enclosure without saving | 600 ₽/pcs |
| Removing the toilet bowl, bidet | 500 ₽/piece |
| Removing the sink, sink | 500 ₽/piece |
| Dismantling the cast iron bath (without removal) | 600 ₽/pcs |
| Dismantling mixer tap | 200 ₽/piece |
| Removing the heating radiator | 480 ₽/piece |
| Removing water pipes | 150 ₽/mp |
| Sewer pipe removal | 200 ₽/mp |
Ceilings
| Repair and installation of ceilings | Price |
|---|---|
| Installation of a single-level plasterboard false ceiling with a metal frame device | from 650 ₽/m2 |
| Installation of a false ceiling made of multi-level plasterboard with a metal frame device (without roundings and niches) | from 900 ₽/m2 |
| Installation of a multi-level plasterboard false ceiling with a metal frame device (with niches or roundings) | from 1150 ₽/m2 |
Mounting suspended ceiling rack, mirror, Armstrong up to 8 sq. m (bathroom, kitchen) m (bathroom, kitchen) |
470 ₽/m2 |
| Installation of false ceiling rack, mirror, Armstrong over 8 sq.m. | 380 ₽/m2 |
| Installation of foam skirting board | 120 ₽/mp |
| Painting trims, skirting boards | 80 ₽/mp |
| Painting foam molding | 90 ₽/mp |
| Ceiling plaster on plastic mesh up to 20mm | 550 ₽/m2 |
| Ceiling plaster over 30mm | 700 ₽/m2 |
| Wire mesh assembly | 130 ₽/m2 |
| Jointing, crack filling, rustication | 70 ₽/mp |
| Ceiling primer 1 coat | 50 ₽/m2 |
| Ceiling putty for painting 1 time | 140 ₽/m2 |
| Ceiling putty for painting 2 times | 350 ₽/m2 |
| Ceiling putty for painting 3 times | 420 ₽/m2 |
| Ceiling putty on plasterboard with sickle | from 350 ₽/m2 |
| Finishing putty for painting | 280 ₽/m2 |
| Sanding ceilings 1 coat | 50 ₽/m2 |
| Ceiling painting with HD paint (Matte) in 2 coats | 180 ₽/m2 |
| Venetian plaster prefabricated ceiling finish | 1100 ₽/m2 |
| Decorative cornice (fillet) | 250 ₽/m2 |
| Filling and painting decorative cornice (fillet) | 200 ₽/mp |
| Pasting of ceilings with fiberglass | 150 ₽/m2 |
| Pasting of ceilings with interlining for painting | 165 ₽/m2 |
| Installation of polyurethane skirting board | 320 ₽/mp |
| Painting and filling polyurethane skirting board | 300 ₽/mp |
| Installation of plaster and polyurethane rosettes | 850 ₽/pcs |
| Painting and filling plaster and polyurethane rosettes | 700 ₽/pc |
| Ceiling primer with concrete contact | 50 ₽/m2 |
| Groove | 130 ₽/m2 |
| Ceiling waterproofing | 290 ₽/m2 |
Walls
| Construction of room dividers | Price |
|---|---|
| 1/4 brick partition walls | 580 ₽/m2 |
| Construction of partitions in 1/2 bricks | 640 ₽/m2 |
| Construction of partitions in 1 brick | 790 ₽/m2 |
| Installation of plasterboard partitions in one layer | 400 ₽/m2 |
| Installation of plasterboard partitions in two layers | 490 ₽/m2 |
| Masonry walls from foam blocks and tongue-and-groove slabs | 490 ₽/m2 |
| Painting and plastering | Price |
|---|---|
| Plastering of internal walls made of bricks, foam blocks | 420 ₽/m2 |
| Plastering of internal walls made of bricks, foam blocks with mesh | 450 ₽/m2 |
| Alignment of walls with plaster on lighthouses with their subsequent dismantling | 550 ₽/m2 |
| Plastering and leveling walls with gypsum mix | 330 ₽/m2 |
| Interior wall decorative plaster | from 700 ₽/m2 |
| Plasterboard filler | 250 ₽/m2 |
| Wall putty on plaster | 180 ₽/m2 |
| Wall putty according to grid | 220 ₽/m2 |
| Wall putty for painting | 250 ₽/m2 |
| Wall putty for wallpaper | 350 ₽/m2 |
| Wall sanding 1 layer | 35 ₽/m2 |
| Pasting walls/ceilings with masking mesh | 90 ₽/m2 |
| Wall primer, one coat | 50 ₽/m2 |
| Wall primer (second coat and all subsequent coats) | 35 ₽/m2 |
| Wall primer with concrete contact | 50 ₽/m2 |
| Wall sanding | 45 ₽/m2 |
| Wall sanding for painting | 45 ₽/m2 |
| Simple wall painting 2 coats matt | 145 ₽/m2 |
| Decorative wall painting | from 550 ₽/m2 |
| Painting wallpaper | 170 ₽/m2 |
| Plain and non-woven wallpaper gluing without pattern matching | 190 ₽/m2 |
| Vinyl and non-woven wallpaper gluing with matching pattern | 230 ₽/m2 |
| Textile wallpapering | 420 ₽/m2 |
| Wallpaper border | 60 ₽/mp |
| Application of multi-layer decorative coating without preparation | 700 ₽/m2 |
| Installation of polyurethane moldings | 310 ₽/mp |
| Polyurethane painting and moldings | 300 ₽/mp |
| Wall painting | 170 ₽/m2 |
| Wall grooving | 30 ₽/mp |
| Plasterboard | Price |
|---|---|
| Plasterboard wall cladding with metal frame in one layer | 390 ₽/m2 |
| Wall cladding with gypsum board with metal frame in two layers | 490 ₽/m2 |
| Wall putty on GKL with gluing the seams with sickle | from 250 ₽/m2 |
| Installation of gypsum board boxes in the bathroom | from 350 ₽/mp |
| Tiled | Price |
|---|---|
| Wall cladding with ceramic, stoneware tiles | from 650 ₽/m2 |
| Wall cladding with ceramic tiles on plasterboard | 600 ₽/m2 |
| Wall cladding with porcelain tiles without grouting | from 700 ₽/m2 |
| Ceramic border installation | 350 ₽/mp |
| Trimming tiles at 45 degree outside corners | 550 ₽/mp |
| Drilling holes in ceramic tiles | 300 ₽/pc |
| Drilling holes in porcelain stoneware | 520 ₽/pc |
| Wall cladding with artificial stone without grouting | 1400 ₽/m2 |
| Grouting and jointing artificial stone | 520 ₽/m2 |
| Trim artificial stone at 45 degree outside corners | 620 ₽/mp |
| Installation of artificial stone prefabricated corners | 420 ₽/mp |
| Grouting tiles with one-component mortar | 100 ₽/m2 |
| Epoxy grout | 800 ₽/m2 |
| Epoxy mosaic grout | 1200 ₽/m2 |
| Openings | Price |
|---|---|
| Standard opening in masonry and plaster walls | 750 ₽/m2 |
| Opening in reinforced concrete walls | from 3500 ₽/m2 |
| Installation of door frames with trim and trim | from 2600 ₽/piece |
| Installing architraves (without dissolution) | 100 ₽/mp |
| Drawer | 100 ₽/mp |
| Dissolution of platbands, extensions | 170 ₽/mp |
| Mounting paint corners | 45 ₽/mp |
| Installation of plaster corners | 50 ₽/mp |
| Simple metal door installation | 2450 ₽/pc |
| Arrangement of arched openings from 90 to 140 cm | 1780 ₽/m2 |
| Slope plaster | 350 ₽/mp |
| Miscellaneous | Price |
|---|---|
| Installation of MDF wall panels | from 350 ₽/m2 |
| Wall paneling with plywood | 180 ₽/m2 |
| Wall cladding with plastic panels with purlins and moldings | 430 ₽/m2 |
| Device for heat and sound insulation of walls made of plasterboard | from 70 ₽/m2 |
| Wall waterproofing | 300 ₽/m2 |
| Wall soundproofing | from 100 ₽/mp |
Floors
| Floor screed | Price |
|---|---|
| Installation of concrete floor screed up to 50 mm | from 350 ₽/m2 |
| Floor screed reinforcement with mesh | 110 ₽/m2 |
| Expanded clay up to 10 cm | 70 ₽/m2 |
| Expanded clay installation over 10 cm | 110 ₽/m2 |
| Installation of a finishing screed from self-leveling floors | from 190 ₽/m2 |
| Floor tiles | Price |
|---|---|
| Porcelain stoneware flooring | 850 ₽/m2 |
| Laying tiles and ceramic tiles on the floor | 800 ₽/m2 |
| Floor waterproofing | Price |
|---|---|
| Installation of floor waterproofing coating in 2 layers | 90 ₽/m2 |
| Floor waterproofing device | 280 ₽/m2 |
| Floor installation | Price |
|---|---|
| Underlay for laminate and parquet | 25 ₽/m2 |
| Laying laminate with adhesive | 350 ₽/m2 |
| Lay laminate with lock | 330 ₽/m2 |
| Easy installation of strip parquet | 1400 ₽/m2 |
| Complicated installation of strip parquet | 1800 ₽/m2 |
| Installation of friezes, diagonal laying (to be added) | 520 ₽/m2 |
| Lacquering parquet in 3 coats | 175 ₽/m2 |
| Lay linoleum | 220 ₽/m2 |
| Carpet installation | 250 ₽/m2 |
| Carpet tiling | 300 ₽/m2 |
| Installation of plastic skirting board with corners | 90 ₽/mp |
| Mounting decorative thresholds | 100 ₽/piece |
| Installation of ceramic tiles thresholds | 700 ₽/mp |
| Laying plywood on the floor under linoleum, parquet | 350 ₽/m2 |
| Floor primer | 40 ₽/m2 |
| Temporary floor covering with hardboard | 20 ₽/m2 |
Electrical
An exact calculation is possible after studying the drawings of electric lighting and electrical equipment. The main factor that affects the cost of electrical repairs is the number of sockets, switches, and types of electrical appliances.
| Installation and assembly of the electrical panel | Price |
|---|---|
| Installation of a niche for the switchboard | from 700 ₽/piece |
| Switchboard installation | from 1100 ₽/piece |
| Installation of a wall-mounted electrical panel up to 54 modules | 1500 ₽/piece |
| Installation of a suspended electrical panel for a low-voltage network | 750 ₽/pcs |
| Installation of a built-in electrical panel of a low-voltage network | 1100 ₽/piece |
| Installation of low current circuit elements | 180 ₽/piece |
| Installation of circuit breakers | 180 ₽/piece |
| Power cable connection in panel | 650 ₽/pc |
| Telephone and TV cable connection in switchboard | 270 ₽/pcs |
| Grooving and drilling holes | Price |
|---|---|
| Chasing channels in gypsum walls for wiring, width up to 30mm | 125 ₽/mp |
| Chasing channels in brick walls for wiring, width up to 30mm | 145 ₽/mp |
| Chasing channels in reinforced concrete walls for wiring, width up to 30mm | 380 ₽/mp |
| Chasing channels in reinforced concrete floors for wiring, width up to 30mm | 290 ₽/mp |
| Chasing channels in reinforced concrete ceilings for wiring, width up to 30mm | 445 ₽/mp |
| Groove termination, width up to 30mm | 130 ₽/mp |
| Chasing for the installation of a built-in electrical panel up to 12 modules (without switching) | 1500 ₽/piece |
| Chasing for the installation of a built-in electrical panel up to 24 modules (without switching) | 2150 ₽/piece |
| Chasing for the installation of a built-in electrical panel up to 54 modules (without switching) | 3230 ₽/pcs |
| Added when chasing under the electrical panel in reinforced concrete walls | 3900 ₽/pc |
| Chasing and installing the socket box and junction boxes in plaster walls | 180 ₽/piece |
| Chasing and installing the socket box and junction boxes in brick walls | 150 ₽/piece |
| Chasing and installing the socket box and junction boxes in reinforced concrete walls | 270 ₽/pcs |
| Added to install junction boxes larger than 80X80 | 175 ₽/piece |
| Wall punching | from 50 ₽/piece |
| Wall punching in load-bearing walls up to 20mm | 180 ₽/piece |
| Hole punching in plasterboard ceiling for lamp | 140 ₽/piece |
| Punching holes in drywall for sockets and switches | 130 ₽/pcs |
| Laying of vinyl pipes (trays) | from 100 ₽/mp |
| Cable routing | Price |
|---|---|
| Cable management (concealed, recessed) | 25 ₽/mp |
Cable routing (open) up to wire 4. 0 mm 0 mm |
45 ₽/mp |
| Cable routing in false ceiling (open) up to 10mm | 67 ₽/mp |
| Cable routing in screed (corrugated) | 150 ₽/mp |
| Cable routing in cable channel | 35 ₽/mp |
| Cable routing for large cross sections over 10mm up to 25mm | 180 ₽/mp |
| Laying television, telephone, computer, speaker cables | 30 ₽/mp |
| Laying other low-voltage cables (CCTV, alarm) | 30 ₽/mp |
| Cable pulling through PVC, HDPE corrugation | 22 ₽/mp |
| Pulling cable through PVC pipe | 35 ₽/mp |
| Cable routing in electrical box | from 90 ₽/mp |
| Lighting assembly | Price |
|---|---|
| Ceiling lamp installation | 450 ₽/piece |
| Installing recessed spotlight in false ceiling | 180 ₽/piece |
| Halogen spotlight installation | 200 ₽/piece |
| Fluorescent fixture installation | 250 ₽/pc |
| Armstrong ceiling luminaire installation | 450 ₽/piece |
| Installation of wall lamp | 450 ₽/piece |
| Chandelier hooks | 55 ₽/pcs |
| Easy installation of the chandelier on a hook without assembly | 600 ₽/pcs |
| Simple chandelier installation with assembly (cost up to 15000 ₽) | 1500 ₽/piece |
| Installation of a complex chandelier with assembly (cost up to 30,000 ₽) | 3750 ₽/pc |
| Installation of a complex chandelier with assembly (cost over 30,000 ₽) | from 4200 ₽/piece |
| Installation of transformers under lamps | 140 ₽/piece |
| Lamp protection unit installation (soft start) | 125 ₽/piece |
| Installation profile for LED lighting | 350 ₽/pc |
| Easy mounting of LED lighting | 400 ₽/piece |
| Mounting RGB LED lighting | 570 ₽/piece |
| Installation of step-down transformers | 120 ₽/piece |
| Installation of transformers, controllers, amplifiers for LED | 600 ₽/pcs |
| Installation and replacement of sockets and switches | Price |
|---|---|
| Installing an electric point of concealed supply | 500 ₽/piece |
| Installation of surface socket, switch | 200 ₽/piece |
| Installation of a socket, switch in a socket | 180 ₽/piece |
| Installing the switch through, cross | 280 ₽/pc |
| Installation of a computer, television, telephone socket | 250 ₽/pc |
| Electric stove socket installation | 550 ₽/piece |
| Installation and connection of the bell with button | 600 ₽/pcs |
| Installation of retro sockets, switches, wiring | 600 ₽/pcs |
| Installation of retro cable on insulators | 180 ₽/mp |
| Miscellaneous | Price |
|---|---|
| Installation of underfloor heating DEVI | 550 ₽/m2 |
| Installation and connection of thermostat for underfloor heating | 500 ₽/piece |
| Fan installation | 450 ₽/piece |
| Cooker hood installation | 2000 ₽/piece |
| Electric towel warmer installation | 1500 ₽/piece |
| Hand dryer installation and connection | 1800 ₽/pc |
| Installation and connection of the video camera inside (video eye) | 1900 ₽/piece |
| Installation and connection of a video intercom with a calling panel | 3500 ₽/piece |
| Electrical connection for the water leakage system | 1500 ₽/piece |
| Shower/bath electrical connection | 1000 ₽/piece |
Plumbing
The cost of plumbing services depends on the number and characteristics of water-consuming devices – water heaters, dishwashers, washing machines, bathtubs. Sometimes it’s not so much the size of the building that matters as the height: plumbing for several floors is more complicated and expensive.
| Replacement of heating, sewerage and water pipes | Price |
|---|---|
| Connection to an existing water supply | 1800 ₽/piece |
| Steel pipeline tie-in | 1900 ₽/piece |
| Cast iron sewer connection | 1450 ₽/piece |
| PVC tie-in sewer line | 600 ₽/pcs |
| Sewer pipe laying | 300 ₽/mp |
| Installation of PVC bends, tees for sewerage | 80 ₽/pc |
| Laying of steel pipes by welding | 180 ₽/mp |
| Laying of steel pipes on a threaded connection | 110 ₽/mp |
| Threaded connection for steel pipes | 120 ₽/piece |
| Pipe insulation | 40 ₽/mp |
| Laying metal-plastic pipes | from 100 ₽/mp |
| Installation of compression fittings for multilayer pipes | 90 ₽/pcs |
| Installation of press fittings for multilayer pipes | 130 ₽/pc |
| Copper piping | 160 ₽/mp |
| Installation of fittings for copper pipes | 180 ₽/piece |
| Mounting copper pipe fittings by soldering | 180 ₽/piece |
| PE-X piping | 145 ₽/mp |
| Fitting for PE-X pipes | 145 ₽/piece |
| Polypropylene (PP) or polybutene (PB) piping | 150 ₽/mp |
| Pipe installation (XLPE metal-plastic) | 590 ₽/pc |
| Replacing pipelines open 1/2” – 3/4” | 350 ₽/mp |
Replacement of open PVC pipes 40-100 mm. |
150 ₽/mp |
| Piping installation 1/2″ – 3/4″ (galvanized) | 470 ₽/mp |
| Chipping | Price |
|---|---|
| Chasing reinforced concrete walls for pipes up to ⌀32mm | 320 ₽/mp |
| Chiselling of brick walls under the pipe up to ⌀32mm | 200 ₽/mp |
| Chasing gypsum walls for pipe up to ⌀32mm | 180 ₽/mp |
| Chasing concrete floor under pipe up to ⌀32mm | 350 ₽/mp |
| Chasing reinforced concrete walls for pipes over ⌀32mm | 450 ₽/mp |
| Chasing brick walls for pipes over ⌀32mm | from 300 ₽/MP |
| Chasing gypsum walls for pipes over ⌀32mm | 260 ₽/mp |
| Concrete floor chasing for pipe over ⌀32mm | from 450 ₽/mp |
| Reverse grommets | 130 ₽/mp |
| WC installation | Price |
|---|---|
| Temporary toilet installation | 500 ₽/piece |
| Simple toilet installation | from 1600 ₽/piece |
| Complicated toilet installation | 2800 ₽/piece |
| Bidet installation | 1500 ₽/piece |
| Installation of a hygienic shower (watering can) | 200 ₽/piece |
| Installation installation | 2400 ₽/piece |
| Bath installation | Price |
|---|---|
| Installation of a metal bath (Acrylic) simple | 1500 ₽/piece |
| Installation of a cast-iron bath (corner) simple | 2800 ₽/piece |
| Sink and sink assembly | Price |
|---|---|
| Washbasin installation and connection | 1200 ₽/piece |
| Simple tulip washbasin installation | 1000 ₽/piece |
| Washing machine simple | 1350 ₽/pc |
| Complicated moid hole installation | 1700 ₽/piece |
| Kitchen sink installation (without worktop cutout) | 700 ₽/pc |
| Kitchen grinder installation | 1400 ₽/piece |
| Filter installation | Price |
|---|---|
| Installation and connection of fine filters | 1200 ₽/piece |
| Coarse filter installation | 180 ₽/piece |
| Installation of filters for multi-stage water purification system | 650 ₽/pc |
| Shower cabin installation | Price |
|---|---|
| Installation and installation of a shower cabin simple | 3000 ₽/piece |
| Mounting and installation of a shower cabin complicated | from 3500 ₽/piece |
| Installation of sanitary drain | from 600 ₽/piece |
| Installation of shower tray (acrylic) with sewer connection | 2500 ₽/piece |
| Mixer installation | Price |
|---|---|
| Bathroom shower faucet installation | 1500 ₽/piece |
| Mixer installation | from 400 ₽/piece |
| Installation of wall mixers | from 400 ₽/piece |
| Installation of built-in mixers | 1500 ₽/piece |
| Installation of a shower column for the shower mixer | 450 ₽/piece |
| Installation of sanitary accessories (hooks, soap dishes, shelves) | 100 ₽/piece |
| Other plumbing work | Price |
|---|---|
| Ball valve installation | 180 ₽/piece |
| Manifold mounting (with connection fittings) | 2400 ₽/piece |
| Installation of manifolds | 1100 ₽/piece |
| Installation of pressure reducers | 450 ₽/piece |
| Installation of shut-off valves | 200 ₽/piece |
| Installation of water meters | 180 ₽/piece |
| Squeegee installation | 110 ₽/piece |
| Tee installation | 125 ₽/piece |
| Installation of adapters, nipples, barrels | 110 ₽/piece |
| Pressurization of the cold water, hot water system (standard bathroom) | 1400 ₽/piece |
| Installation of anti-leakage system (sanitary part) | 1500 ₽/piece |
| Equipment installation | Price |
|---|---|
| Washing machine installation | 1000 ₽/piece |
| Dishwasher installation | 1300 ₽/piece |
| Storage water heater installation | from 3500 ₽/piece |
| Towel dryer installation | 2000 ₽/piece |
| Installation and connection of heating radiators | 4500 ₽/piece |
Prices for finishing and repair work in Moscow
Each object is something more than just a number of square meters. For example, repairing a multi-storey building is more expensive than a one-story building due to additional work at the junction of floors. The cost per square meter of repair is a rough estimate. To order an accurate calculation, taking into account the specifics of your property, call us – we will answer your questions and schedule a meeting on the spot.
| Type | Version (₽/m2) | Rough materials (₽/m2) |
|---|---|---|
| Rough | from 5,000 | from 3 600 |
| Cosmetic (budget) | 3000-6000 | from 1 500 |
| Capital | 7000-12000 | from 3 600 |
| Designer | 7000-14000 | from 3 600 |
| Renovation | 6500-12000 | from 3 600 |
| Elite | 7000-16000 | from 3 600 |
| New building | from 6 600 | from 3 600 |
| Type | Version (₽/m2) | Rough materials (₽/m2) |
|---|---|---|
| Cosmetic | from 2,000 | from 1 500 |
| Capital | from 3 500 | from 3 600 |
| Designer | from 6,000 | from 3 600 |
Hidden Finishing Works: As the Price of the Job Rises
A well-thought-out plan and budget keeps you from surprises that increase the cost of repairs so much that completion of the renovation is in jeopardy. Here are the most common money traps:
- Hidden structural damage. During redevelopment, electrical installation and installation of pipelines, especially in old buildings, defects in walls, floors, ceilings are found. If you do not correct the deficiencies found, then you risk security.
- Violations of building codes. In a similar situation, an electrician or plumber discovers that existing systems are not designed correctly, which threatens to fire, flood and other damage if traces of unprofessional installation are not corrected.
- Fungus and mold. A special risk group is old and damp rooms. Mold is dangerous to health and interior. Do not turn a blind eye to the problem, over time, the damage only gets worse.
- Project changes on the go. If you make changes after the project has started, then the prices for implementation increase many times over than if you thought through the little things in advance. This also applies to unscrupulous contractors – they lure with a low price, and then wind up the total amount with additional work. To avoid this scenario, make sure you have a detailed estimate on hand, showing all the activities that the contractor charges money for. If an unforeseen circumstance nevertheless arises, it is necessary to include it in an additional agreement to the contract.
 To avoid this scenario, make sure you have a detailed estimate on hand, showing all the activities that the contractor charges money for. If an unforeseen circumstance nevertheless arises, it is necessary to include it in an additional agreement to the contract.
 Call to discuss the prices in the price list and the cost of turnkey repair and finishing works in Moscow.
+7 (495) 231‑00‑89
[email protected]
Request a call back
Get an estimate and a free consultation
Installation of a false ceiling, installation of a false ceiling price
INSTALLATION OF SUSPENDED CEILINGS
Installation of a false ceiling of any kind! Employees of our company will help you with this! Highly qualified employees with 2 years of work experience!
The installation price of suspended ceilings for standard rooms is shown in the table below. The calculation is made according to your desire: either based on the price of installation work per square meter of the room or based on the price of installation work in a typical room.
If you need to install a false ceiling in a non-standard room, for an approximate accurate calculation, you can contact our specialists by phone:
+7 926 129 34 90
+7 903 111 93 34
Attention: check the price for false ceiling installation using the numbers indicated above!
| rack | cassette (closed) | glass | |
| Washroom | RUB 2,000 | RUB 2,000 | RUB 2,000 |
| Bathroom (up to 5 m2) | RUB 3,000 | RUB 3,500 | RUB 3,500 |
| Up to 5 m2 | RUB 3,000 | RUB 3,500 | RUB 3,500 |
| 5 to 10 m2 | 650 RUB/m2 | 750 RUB/m2 | 750 RUB/m2 |
| 10 to 50 m2 | 600 rub/m2 | 700 rub/m2 | 700 rub/m2 |
| From 50 m2 | negotiable | negotiable | negotiable |
| Diagonal mounting | 70% of installation cost | 100% of installation cost | 50% of installation cost |
|
Armstrong: |
|||
|
up to 12 m2 – 3000 rubles |
|||
|
Additional work: |
|||
Installation equipment (fire alarm sensor, speaker, etc. ) – 250 rubles/piece, from 8 pcs. – 200 rubles / piece ) – 250 rubles/piece, from 8 pcs. – 200 rubles / piece |
|||
| Installation vent. diffuser – 500 rub. | |||
| Installing fluorescent lamp – 250 rubles/pc., from 8 pcs. – 200 rubles / piece | |||
| Installation of four-roster lamp – 350 rubles / piece. | |||
| Installing LED strip – 150 rub. for 1. m.p. | |||
| Installation of transformer for LED strip – 250 rub. | |||
Installation of controller for RGB – 200 rub. |
|||
| Installation corrugated wires – 100 rub. m.p. | |||
| Corner bypass – 150 rubles / pc. (in case there are more than 4 corners in the room) | |||
| Lifting material to the floor – By agreement | |||
| Dismantling of the old ceiling – 50% of the cost of installation | |||
| Work at heights over 3.5 m – 30% of the installation cost | |||
|
Measurements*: |
|||
| MEASUREMENTS IN MOSCOW AND MOSCOW REGION! | |||
Installation of frescoes and photo wallpapers Affresco
Affresco Factory > Installation
Preparatory work
- The surface must be even, dry and primed, uniform white color. Choose a light-colored acrylic primer or paint (preferably white) to avoid showing through the color of the wall.
- Before starting work on the wall (using a plumb line, level), a vertical line is beaten off, which serves as a guide for gluing.
- When installing a large canvas, make sure you have enough space to lay it out on the floor.
- It is recommended to carry out the installation under the lighting that will be used in the room when using the wallpaper. Also use additional lighting to carefully examine the places of possible folds.
- For the installation of frescoes and photo wallpapers, dilute the adhesive for heavy non-woven wallpaper according to the instructions.
 Choose a light-colored acrylic primer or paint (preferably white) to avoid showing through the color of the wall.
 Installation of frescoes and photo wallpapers in one sheet
Installation of frescoes and photo wallpapers produced in one sheet and cut into rolls.
Installation is carried out according to the principle of gluing frescoes with one canvas, only beforehand it is necessary to lay out all the rolls on the floor in order in accordance with the picture.
Installation of Affresco frescoes on the ceiling
For convenient and accurate installation, we recommend using a plastic film of the same size as the fresco (you can use a repair film).
Caution
- This product must not be installed on wallpaper.
- Affresco fresco can be stored in the package for 6 months, with the preservation of all its characteristics.
- When exposed to low temperatures during transport, products must be kept at room temperature in closed packaging for 24 hours.
- In the case of product installation in wet areas (bathroom, swimming pool), pre-treat the wall with an antifungal compound to prevent the formation of mold on the wall.
- It is obligatory to apply glue both on the reverse side of the product and on the walls.
- After applying the glue on the back side of the fabric, allow the glue to soak and soak the base of the product for at least 5-7 minutes.
- During installation of the product and during the period of its drying, windows and doors in the room must be closed.

Installation of facade frescoes (Sabbia)
The Affresco factory has developed a special fresco material for facades – Sabbia (Sabbia) facade.
Facade frescoes are reinforced with a special reinforcing mesh that prevents cracks and ensures durability, and thanks to a special varnish, facade frescoes are not afraid of wind, humidity, frost and ultraviolet rays.
Attention
- Façade frescoes exclusively for the exterior!
- When installing facade frescoes, use Water-dispersion acrylic adhesive for tiles and linoleum!
- Installation must be carried out at a temperature of at least 15 °C without direct sunlight and rain.
Installation of scene and background wallpapers
Background wallpaper installation Affresco Colore, ETHNO, FabriKa
Installation of background wallpaper is carried out according to the principle of gluing non-woven wallpaper or Affresco frescoes. The only exception is that the joint of the background wallpaper is made strictly in the corners between the walls, with an overlap of 3-5 cm.
Preparatory work
- The surface to be wallpapered must be flat, dry and primed, uniformly white. Choose a light-colored acrylic primer or paint (preferably white) to avoid showing through the color of the wall.
- Before starting work on the wall (using a plumb line, level), a vertical line is beaten off, which serves as a guide for gluing.
- When installing a large canvas, make sure you have enough space to lay it out on the floor.
- It is recommended to carry out the installation under the lighting that will be used in the room when using the wallpaper. Also use additional lighting to carefully examine the places of possible folds.
- For wallpaper installation, dilute the adhesive for heavy non-woven wallpaper according to the instructions.
Installation of thematic wallpaper in one sheet and in rolls
Before starting work, place all the rolls on the floor in order, in accordance with the picture. Each roll is numbered on the reverse side. If the plot is repeated several times, then the first digit is the serial number of the roll, and in brackets is the panel number according to the catalog. Start the installation from the first canvas of the composition, according to the numbering of the rolls.
Wallpaper installation is carried out according to the principle of gluing Affresco frescoes.
Attention
- This product must not be installed on wallpaper.
- The wallpaper can be stored in the package for 6 months, with the preservation of all its characteristics.
- When exposed to low temperatures during transport, products must be kept at room temperature in closed packaging for 24 hours.
- In the case of product installation in wet areas (bathroom, swimming pool), pre-treat the wall with an antifungal compound to prevent the formation of mold on the wall.
- It is obligatory to apply glue both on the reverse side of the product and on the walls.
- After applying the glue on the back side of the fabric, allow the glue to soak and soak the base of the product for at least 5-7 minutes.
- During installation of the product and during the period of its drying, windows and doors in the room must be closed.

Installation of panels Factory 19
Preparatory work
- The surface under the panel must be filled, sanded and primed. Choose a light-colored primer or paint (preferably white) to prevent the color of the wall from showing through the panel.
Recommendations
- It is recommended to install with lighting that will be used indoors when the panel is in operation. Also use additional lighting to carefully examine the places of possible folds.
- Attention! Panels are glued like non-woven wallpaper, only glue must be applied both to the back of the canvas and to the wall. The panel cannot be mounted on the wallpaper available on the wall.
- Attention! During the installation of the panel and the subsequent 24 hours, the windows in the room must be closed.
- Attention! If glue gets on the front side of the canvas, it is necessary to wipe this place with a damp cloth.

- When installing the panel, you will need: glue for heavy non-woven wallpaper, a cuvette or other container for diluting the glue, a paint roller (for applying glue to the wallpaper and the wall), a wide wallpaper roller (for smoothing out bubbles and wrinkles), a narrow plastic roller (for smoothing the edges of the canvases), a sharp wallpaper knife (for cutting off excess panels).
INDEPENDENT PANEL DECORATION
When ordering a panel in white, you can use any paint to decorate it, without restrictions. You can decorate the panels yourself after mounting directly on the wall.
Installation of panels Fabrika 19-53
Preparatory work
- The surface under the panel must be filled, sanded and primed. Choose a light-colored primer or paint (preferably white) to prevent the color of the wall from showing through the panel.
 Choose a light-colored primer or paint (preferably white) to prevent the color of the wall from showing through the panel.
 Recommendations:
- It is recommended to install with lighting that will be used indoors when the panel is in operation. Also use additional lighting to carefully examine the places of possible folds.
- Attention! The panels are glued like non-woven wallpaper, only the glue must be applied both to the back of the canvas and to the wall. The panel cannot be mounted on the wallpaper available on the wall.
-
Attention! When ordering a batch of more than 3 rolls (1.06×10 m) or more than 6 rolls (0.53×10 m), it is necessary to strictly observe the sequence of joining the numbered rolls.
-
Attention! During the installation of the panel and the subsequent 24 hours, the windows in the room must be closed.
- Attention! If glue gets on the front side of the canvas, it is necessary to wipe this place with a damp cloth.
- When installing a panel, you will need: glue for heavy non-woven wallpaper, a cuvette or other container for diluting glue, a paint roller (for applying glue to wallpaper and a wall), a wide wallpaper roller (for smoothing bubbles and wrinkles), a narrow plastic roller (for smoothing the edges of the canvases), a sharp wallpaper knife (for cutting off excess panels).
- The panels can be stored in the package for 6 months, with the preservation of all their characteristics.
- When exposed to low temperatures during transport, products must be kept at room temperature in closed packaging for 24 hours.
- In the case of product installation in wet areas (bathroom, swimming pool), pre-treat the wall with an antifungal compound to prevent the formation of mold on the wall.
INDEPENDENT PANEL DECORATION
When ordering a panel in white, you can use any paint to decorate it, without restrictions. You can decorate the panels yourself after mounting directly on the wall.
Attention

Installation of imitation timber. Prices, warranty, price list
After special technological processing, a unique product is produced on the basis of wood – sheathing material, profiled to look like timber. The trapezoidal profile of the wooden panel when finishing gives the impression that the wall is actually made of solid timber.
Imitation timber, unlike natural, is not subject to deformation, cracking during drying, wood-destroying insects and fungi. The interior, trimmed with a timber simulator, maintains a beneficial microclimate for living at an optimal level of humidity and fairly good air exchange.
Prices for our works. The total cost of installation work of imitation timber is calculated based on the volume and degree of installation complexity, based on the prices indicated in the price list below.
| Name of work: | Unit of measure. | Price |
|---|---|---|
| Waterproofing, vapor barrier | sq. m. m. |
110 |
| Wooden wall battens | sq. m. | 200 |
| Concrete sheathing, brick wall | sq. m. | 260 |
| Single layer insulation | sq. m. | 100 |
| Installation of imitation timber (wall) | sq. m. | from 650 |
| Installation of imitation timber (ceiling) | sq. m. | from 750 |
| Installation of skirting boards, fillets | m. | 230 |
| Two coat paint | sq. m. | 350 |
| Antiseptic impregnation of the frame of the crate | m. | 100 |
| Removing the old coating | sq. m. | 150 |
| Finishing of window and door openings | m. | from 200 |
* Final prices may vary slightly. Depends on the configuration of the facing surface itself.
If you need master carpenters and have the financial means, then hiring us as professionals is a profitable option to give a cozy appeal to the interior of your home. The prices won’t disappoint you!
Still have questions? We can call you back…
The process of installing imitation timber
Each of us wants to create an environmentally friendly environment at home that does not contain any harmful substances. Not everyone is able to afford the construction of a wooden house, but the colorful rustic interior of a log hut can be organized both in a country house and in a city apartment. Finishing with a timber simulator is a great way to rework and update the space of an old room. In addition, the remarkable heat and sound insulation characteristics of interior decoration with a wooden beam imitator increase the degree of comfort of the household and reduce heating costs by an order of magnitude.
Mounting technology. For an experienced specialist who knows all the secrets of laying, the installation technology of imitation timber is not particularly difficult. The technological process mainly consists in the stage-by-stage installation of the lathing and directly cladding with imitation timber panels. Initially, the sheathed area is covered with a layer of waterproofing material. Insulation is laid on external walls (not insulated from the outside), interior partitions can not be insulated due to the poor thermal conductivity of the skin. For the construction of the crate frame, dry planed timber is used, pre-treated with an antiseptic and a refractory compound. In wet rooms, it is typical to use a galvanized profile for the crate. Before sheathing, the resulting frame structure is covered with a vapor barrier material.
Imitation of timber on a mansard ceiling
The quality of installation of a timber simulator largely depends on the correct laying of the first panel in a strictly horizontal position, because any error can violate the installation geometry and distort the appearance of the coating. The tongue-and-groove coupling system provides a snug fit of the panels to each other, qualitatively leveling the surface. The panels are mounted from the bottom up and with the groove down, after they have acclimatized in the sheathed room. To compensate for the expansion of the panels with significant fluctuations in the temperature level and air humidity, a gap of 2-3 mm is provided between them. It is advisable to pre-impregnate and paint each element of the finish before starting to lay the imitation of timber, in case the panels dry out a little and disperse, to avoid the unpleasant appearance of unpainted stripes.
It is equally convenient to finish both the ceiling and the walls with imitation timber panels, whether they are framed or made of any other material. Frame-frame structures can be sheathed immediately, but the finishing of a freshly built house with the help of imitation timber follows after shrinkage. Although, without waiting for shrinkage, you can use the sliding crate technology used to reduce deformation. Knowledgeable specialists of our company will help you with this, who will perform a comprehensive installation of a beam simulator using all technologies for laying natural wood coatings.
Completed WORKS
Woodwork can significantly decorate any interior. We invite you to take a look at the additional services that we are ready to perform for you. Departure for budgeting – free of charge
Imitation timber in a cottage
Finishing a house from logs
Renovation of an old wooden house.
Full price list with current prices for bathroom renovation
View/download price list
| Name of works | Unit. Unit | Price, rub |
|---|---|---|
| Dismantling of brick walls (partitions) (1/4,1/2) and cinder block | sq.m. | 315. 00 00 |
| Demolition of existing reinforced concrete structures | cbm | 2400.00 |
| Demolition of existing brick structures | cbm | 1200.00 |
| Dismantling of walls (partitions) from aceid, plaster, plasterboard | sq.m. | 225.00 |
| Removing the door blocks | units | 300.00 |
| Removing window units | units | 600.00 |
| Dismantling tiles (floor, walls) | sq.m. | 90.00 |
| Parquet floor removal | sq.m. | 75.00 |
| Dismantling the floor from linoleum, carpet | sq.m. | 51.00 |
| Removing plaster | sq.m. | from 90.00 |
| Stripping old wall paint | sq.m. | 90.00 |
| Cleaning the ceiling from old paint | sq. m. m. |
96.00 |
| Removing old wallpaper | sq.m. | 63.00 |
| Dismantling mixers | pcs. | 150.00 |
| Removing the toilet/bidet | pcs. | 500.00 |
| Washbasin removal | pcs. | 300.00 |
| Bath removal | pcs. | 1000.00 |
| Removing radiators | pcs. | 450.00 |
| Junction boxes connection | pcs. | 375.00 |
| Name of works | Unit. Unit | Price, RUB |
|---|---|---|
| Punching holes in reinforced concrete walls | sq.m. | from 6300.00 |
| Reinforcement of openings with metal profile | m. m. m. |
1400.00 |
| Floor waterproofing with mastic | sq.m. | 200.00 |
| Floor waterproofing with roll materials (two layers) on bituminous mastic | sq.m. | 300.00 |
| Self-levelling floor screed | sq.m. | from 250.00 |
| Floor screed up to 50 mm. | sq.m. | from 300.00 |
| Device “dry floor” Vanguard – Knauf (10mm) | sq.m. | 360.00 |
| Floor screed reinforcement | sq.m. | 135.00 |
| 1/2 brick partitions | sq.m. | 420.00 |
| 1-brick partitioning | sq.m. | 480.00 |
| Installation of partitions from cinder blocks, tongue-and-groove blocks | sq.m. | 330.00 |
| Plasterboard walls (1 layer) | sq. m. m. |
420.00 |
| Plasterboard wall installation (2 layers) | sq.m. | 480.00 |
| Wall cladding with plasterboard (1 layer) | sq.m. | 330.00 |
| Wall cladding with plasterboard on glue | sq.m. | 255.00 |
| Device for heat and sound insulation of walls made of plasterboard | sq.m. | 75.00 |
| Wall waterproofing (depending on room humidity) | sq.m. | from 135.00 to 390.00 |
| Wall reinforcement with plaster mesh | sq.m. | 150.00 |
| Wall plaster | sq.m. | from 350.00 |
| Ceiling plaster | sq.m. | from 500.00 |
| Wall plaster (for tiles) | sq.m. | from 500.00 |
| Plastering of openings (slopes) | m. |
from 300.00 |
| Wall cladding with drywall (2 layers) | sq.m. | 390.00 |
| Name of work | Unit. Unit | Price, rub |
|---|---|---|
| Installation of slatted suspended ceilings | sq.m. | 400.00 |
| Installation of false ceiling “Armstrong” | sq.m. | 300.00 |
| Plasterboard false ceiling installation (1 layer) | sq.m. | 420.00 |
| Installation of a multi-level ceiling made of plasterboard with straight elements | sq.m. | from 900.00 |
| Installation of a multi-level ceiling made of GKL of complex geometric shapes with curved elements | sq.m. | from 1200.00 |
| Structural coating assembly | sq. m. m. |
360.00 |
| Ceiling primer | sq.m. | 100.00 |
| Ceiling putty | sq.m. | 250.00 |
| Ceiling paint | sq.m. | 200.00 |
| Decorative cornice (fillet) | m. | 165.00 |
| Filling and painting decorative cornice (fillet) | m. | 150.00 |
| Ceiling pasting with mesh “Strobe”, “cobweb” | sq.m. | 170.00 |
| Plasterboard false ceiling installation (2 layers) | sq.m. | 480.00 |
| Name of works | Unit. unit | Price, rub |
|---|---|---|
| sq.m. | 78.00 | |
| Drywall putty | sq.m. | 135. 00 00 |
| Wall putty | sq.m. | 205.00 |
| Wall primer (including each stage) | sq.m. | 100.00 |
| Wall papering (without pattern selection) | sq.m. | 200.00 |
| Wall papering (with pattern selection) | sq.m. | 250.00 |
| Wall papering for painting | sq.m. | 200.00 |
| Wall painting | sq.m. | 150.00 |
| Wall painting with putty | m. | 150.00 |
| Slope primer | m. | 80.00 |
| Slope putty (up to 400 mm wide) | m. | 156.00 |
| Slope painting | m. | 105.00 |
| Mounting paint corners | m. | 78.00 |
| Panelite sloper | m. |
300.00 |
| Installation of wall panels (panelite type) | sq.m. | 420.00 |
| Name of works | Unit. Unit | Price, rub |
|---|---|---|
| Wall cladding with ceramic tiles | sq.m. | 800.00 |
| Wall cladding with ceramic tiles on plasterboard | sq.m. | 700.00 |
| Facing slopes, semi-columns with ceramic tiles | sq.m. | 600.00 |
| Floor covering with ceramic tiles | sq.m. | 780.00 |
| Drilling holes in ceramic tiles | units | 50.00 |
| Grout | sq.m. | 100.00 |
| Bath screen installation | units | 2500. 00 00 |
| Installation of curb, ceramic plinth | m. | 500.00 |
| Magnetic revision making | units | 750.00 |
| Processing the corners of rooms with corners, layouts | m. | 120.00 |
| Mosaic | sq.m. | from 1200.00 |
| Name of works | Unit. Unit | Price, rub |
|---|---|---|
| Floor screed up to 50mm | sq.m. | from 360.00 |
| Laying plywood on the floor under linoleum, parquet | sq.m. | 200.00 |
| Commercial linoleum flooring | sq.m. | 270.00 |
| Commercial linoleum floor installation with pattern | sq.m. | from 360. 00 00 |
| Floor installation from carpet, linoleum | sq.m. | 250.00 |
| Laminate underlay, parquet flooring | sq.m. | 100.00 |
| Adhesive laminate flooring | sq.m. | 350.00 |
| Laminate floor installation with lock | sq.m. | 300.00 |
| Parquet flooring | sq.m. | 400.00 |
| Flooring made of “piece” parquet (depending on the type and method of laying from 1.4 to 1.8) | sq.m. | from 500.00 |
| Artistic parquet installation | sq.m. | from 780.00 |
| Parquet sanding | sq.m. | from 255.00 |
| Parquet floor putty | sq.m. | from 135.00 |
| Lacquered floor | sq.m. | from 135.00 |
| Thermal and acoustic floor insulation device (single layer) | sq. m. m. |
105.00 |
| Skirting board painting | m. | 81.00 |
| Adhesive skirting board | m. | 105.00 |
| Plinth on concrete base | m. | 170.00 |
| Plinth installation on a wooden base | m. | 150.00 |
| Tile flooring | sq.m. | 600.00 |
| Name of works | Unit. Unit | Price, RUB |
|---|---|---|
| Installation of window units (standard) | units | 2100.00 |
| Installation of window sills | units | 900.00 |
| Door block installation | units | 1350.00 |
| Hanging door panels (with hinge insertion) | units | 750. 00 00 |
| Installation of locks | units | 450.00 |
| Hardware installation | units | 75.00 |
| Installation of prefabricated arches (standard) | units | 1350.00 |
| Casing device | m. | 105.00 |
| Drawer | m. | 126.00 |
| Installation of decorative thresholds | units | 180.00 |
| Installing door stops | units | 120.00 |
| Name of works | Unit. Unit | Price, rub |
|---|---|---|
| Installation and connection of washbasin | units | 1500.00 |
| Installation and connection of washbasin with furniture | units | 2000. 00 00 |
| WC/bidet installation and connection | units | 1500.00 |
| Installation and connection of the bathtub without hydromassage | units | 2850.00 |
| Installation and connection of whirlpool tub | units | 15% of the cost of |
| Installation and connection of the washing machine | units | 1800.00 |
| Installation and connection of mixer | units | 1000.00 |
| Installation and connection of the water heater | units | 1650.00 |
| Installation and connection of the heated towel rail (not including welding work) | units | 2500.00 |
| Installation and connection of coarse filters | units | 195.00 |
| Installation and connection of fine filters | units | 900. 00 00 |
| Installation and connection of gearboxes | units | 465.00 |
| Installation of shut-off valves | units | 195.00 |
| Replacing pipelines open 1/2” – 3/4” | m. | 315.00 |
| Replacement of open PVC pipes 40-100 mm. | m. | 435.00 |
| Piping installation 1/2″-3/4″ (metal-plastic, polypropylene) | m. | 195.00 |
| Installation of PVC pipe 40-100 mm. | m. | 255.00 |
| Strobe device (for pipe ? -3/4”) in concrete | m. | 150.00 |
| Strobe device (for pipe 40-100mm.) in concrete | m. | 210.00 |
| Strobe device (for pipe ? -3/4”) in brick | m. | 120.00 |
| Strobe device (for pipe 40-100mm.) in brick | m. |
150.00 |
| Installation and connection of heating radiators | units | 4500.00 |
| Accessory installation | units | 225.00 |
| Mirror attachment | units | 1200.00 |
| Connection to existing water supply | units | 1650.00 |
| Piping installation 1/2″ – 3/4″ (galvanized) | m. | 465.00 |
| Mounting of wall brackets | pcs. | 195.00 |
| Name of works | Unit. unit | Price, rub |
|---|---|---|
| Installation of channels in concrete | m. | 200.00 |
| Channeling in brick | m. | 150.00 |
| Laying wires in prepared ducts / under plaster | m. |
55.00 |
| Corrugated wire routing | m. | 60.00 |
| Laying of vinyl pipes (trays) | m. | 100.00 |
| Installation of socket boxes, junction boxes in concrete | units | 300.00 |
| Installation of socket boxes, junction boxes in brick | units | 200.00 |
| Installation of socket boxes, junction boxes in false walls | units | 180.00 |
| Installation of sockets, switches | dot | 200.00 |
| Installation of step-down transformers | units | 135.00 |
| Installation of luminaires (spotlights) | units | 150.00 |
| Mounting fixtures (fluorescent) | units | 200.00 |
| Installation of circuit breakers | units | 225. 00 00 |
| Installation of RCDs | units | 285.00 |
| Fan mounting | units | 300.00 |
| DEVI underfloor heating installation (shielded) | sq.m. | 700.00 |
| Installation of a niche for the switchboard | units | 750.00 |
| Switchboard installation | units | 1200.00 |
| Wiring in electrical box | m. | 135.00 |
View/download price list
Need advice right now?
Order a specialist call
90,000 installation of furniture in the bathroom, prices
| Furniture | Cargo elevator | without an elevator | , roller (Tumbelo, ribbon) units (up to 60 cm) | RUB 800 | 1100 rubles | 300 rubles/floor |
|---|---|---|---|
| Furniture set (cabinet, sink, mirror) — 3 units (from 61 cm) | 1100 rubles. |
RUB 1550 | 350 rubles/floor |
| Furniture set (cabinet, sink, mirror, closet-pencil case) — 4 units (up to 60 cm) | 1000 rubles. | RUB 1400 | 400 rubles/floor |
| Furniture set (cabinet, sink, mirror, cabinet-case) — 4 units (from 61 cm) | RUB 1400 | 2000 | 450 rubles/floor |
| Pencil case up to 40 cm | 500 rubles | 500 rubles | 100 rubles/floor |
| Pencil case from 41 cm | 700 rubles | 700 rubles | 125 rubles/floor |
| Cabinet without sink up to 60 cm | 650 rubles | 100 rubles/floor | |
| Cabinet without sink from 61 cm | 950 rubles | 125 rubles/floor | |
| Mirror cabinet up to 60 cm | 700 rubles | 950 rubles | 125 rubles/floor |
| Mirror cabinet from 61 cm | 900 rubles | RUB 1250 | 200 rubles/floor |
| Mirror up to 60 cm | 500 rubles | 500 rubles | 100 rubles/floor |
| Mirror from 61 cm | 700 rubles | 700 rubles | 125 rubles/floor |
| Baths | Freight lift | Passenger lift | Without lift |
|---|---|---|---|
| Cast iron bath size up to 160 cm | 2000 | 700 rubles/floor | |
| Cast iron bath size from 170 to 179 cm | 1800 rubles | 2200 rub. |
900 rubles/floor |
| Cast iron bath size from 180 cm | 2300 rubles | 3000 rub. | 1300 rubles/floor |
| Artificial stone bath size up to 169 cm | 1800 r. | 4500 rub. | 900 rubles/floor |
| Artificial stone bath size from 170 to 179 cm | 2000 rubles | 5500 rub. | 1300 rubles/floor |
| Artificial stone bath size from 180 cm | 2500 rubles | RUB 6500 | 1700 rubles/floor |
| Artificial stone bathtub round, oval, non-standard | check with the manager | ||
| Steel, acrylic bath up to 175*80 cm without crate and hydromassage | 800 r. | negotiable | 400 rubles/floor |
| Steel, acrylic bath up to 175*80 cm with crate and hydromassage | 1300 rubles | negotiable | 650 rubles/floor |
| Steel, acrylic bathtubs larger than 175*80 cm without crates and hydromassage | 1300 rubles. |
negotiable | 650 RUR/floor |
| Steel, acrylic bathtub larger than 175*80 cm with crate and hydromassage | 2000 RUR | negotiable | 1000 rubles/floor |
| Asymmetric bathtubs up to 80 cm wide without crates and hydromassage | 1300 rubles. | negotiable | 650 RUR/floor |
| Asymmetric bath from 81 cm wide without crate and hydromassage | 2200 RUR | negotiable | 1100 RUR/floor |
| Asymmetric bathtubs up to 80 cm wide with battens and hydromassage | 2500 RUR | negotiable | 1250 RUR/floor |
| Asymmetric bathtubs from 81 cm wide with crate and hydromassage | 3500 RUR | negotiable | 1750 rubles/floor |
| Bath screen up to 80 cm | 600 rubles | 600 rubles | 150 rubles/floor |
| Bath screen from 81 cm | 700 rubles | 700 rubles | 200 p. /Floor /Floor |
| showers and boxes | cargo elevator | Passenger elevator | 1300 rub. | 1800 rubles | 650 rubles/floor |
|---|---|---|---|
| Shower cabin, shower box (with tray) from 91 cm | 2600 rub. | 900 rubles/floor | |
| Shower enclosure without tray up to 90 cm | 900 rubles | RUB 1300 | 200 rubles/floor |
| Shower enclosure without tray from 91 cm | 1800 rubles | 250 rubles/floor | |
| Shower tray (acrylic) | 600 rubles | 600 rubles | 150 rubles/floor |
| Shower tray (faience, porcelain, artificial marble) | 900 rub. | RUB 1500 | 200 rubles/floor |
| Shower door in a niche up to 90 cm | 800 rubles | 200 rubles/floor | |
| Shower door in a niche from 91 cm | RUB 1500 | 200 rubles/floor | |
| Bath screen | 500 rubles | 500 rubles | 100 rubles/floor0036 |
| WC/sink/bidet | Freight lift | Passenger lift | Without lift |
| Wall hung toilet | 450 rubles | 100 rubles/floor | |
| Compact toilet | 550 rubles | 550 rubles | 150 rubles/floor |
| Monoblock toilet bowl (with cistern) TM Gustavsberg, Vitra, etc. | 650 rubles | 900 rubles | 125 rubles/floor |
| Bidet | 450 RUB | 450 rubles | 100 rubles/floor |
| Sink up to 60 cm | 400 rubles | 400 rubles | 100 rubles/floor |
| Sink from 61 cm | 600 rubles | 600 rubles | 125 rubles/floor |
| Floor sink | 1300 rubles | RUB 1300 | 125 rubles/floor |
| Urinal | 600 rubles | 600 rubles | 125 rubles/floor |
| Installation | 450 rubles | 100 rubles/floor | |
| Ready solution: Installation + toilet | 700 rubles | 700 rubles | 150 p. /Floor /Floor |

| Other | Cargo lift | Passenger elevator | 300 rubles | 100 rubles/floor | ||
|---|---|---|---|---|---|---|
| Sanitary hatches over 60*60 cm | 300 rubles | 300 rubles | 50 p./Floor | |||
| mixers | Free | free | 150 p./Floor | |||
| Plum-crossbreaks, Siphons | free | 90. 900. 900. 900. 900. 900. 900. 900. 900. 900. 900. 900 2 | Covers and microlifts for toilet bowls | Free of charge | Free of charge | 150 rubles/floor |
| Shower accessories, max. 3 pieces with a total weight of less than 10 kg. | Free of charge | Free of charge | 150 RUR/floor | |||
| Bathroom accessories, max. | Free of charge | Free of charge | 150 RUR/floor | |||
Toilet accessories, max. Scroll Up
|