Minimum depth of concrete foundation: Minimum Thickness of Concrete Footing
Minimum Thickness of Concrete Slab, Beam, Column, Foundation
🕑 Reading time: 1 minute
Minimum thickness of concrete slab, beam, column, foundation and other structural members is selected to meet the design requirements as per standard codes. Minimum thickness of concrete structural elements based on ACI 318-14, IRC 2009, IS 456 2000, and UBC 1997 is presented.
Design process includes proper assumption of structural element sizes and then check the suggested dimensions to make sure that it meets the requirements of the design.
If proper structural dimension is not assumed, then the design would be time consuming and required considerable effort since substantial trials will be involved till satisfactory dimensions are specified.
That is why majority of codes provide minimum dimensions and specifically thicknesses for almost all structural elements.
Contents:
- 1. Minimum Thickness of Slabs
- 1.1 Minimum thickness of One-way slab
- 1.
2 Minimum thickness of Ribbed slab
- Slab thickness with embedded conduits and pipes
- 1.3 Minimum thickness of Slab on the ground
- 1.4 Minimum thickness of Diaphragms
- 1.5 Minimum thickness of Two-way slab
- 1.6 Minimum thickness of Drop panel
- 2. Minimum Thickness of Beams
- 3. Minimum Thickness of Columns
- 4. Minimum Thickness of Walls
- 4.1 Bearing walls
- 4.2 Exterior basement wall and Foundation wall
- 5. Minimum Thickness of Footings
- Footing on soil
- Footing on pile
- Plain concrete structural footing
- Raft foundation
- 6. Minimum Thickness of Other Concrete Members
1. Minimum Thickness of Slabs
1.1 Minimum thickness of One-way slab
ACI 318-14 provides suggested minimum thickness for one-way solid slab, as provided in Table 1, unless deflections are calculated.
Table 1 minimum thickness of one-way solid slab unless deflections are calculated
| Minimum thickness, h | |||
| Simply supported | One end continuous | Both end continuous | Cantilever |
| Members not supporting or attached to partitions or other construction likely to be damaged by large deflections | |||
| l/20 | l/24 | l/28 | l/10 |
Notes: Values given shall be used directly for members with normal weight concrete and Grade 420 reinforcement. For other conditions, the values shall be modified as follows:
a) For lightweight concrete having equilibrium density (wc) in the range of 1440 to 1840 kg/m3, the values shall be multiplied by (1. 65 – 0.0003wc) but not less than 1.09.
b) For fy other than 420 MPa, the values shall be multiplied by (0.4 + fy/700).
Fig.1: one way slab thickness
1.2 Minimum thickness of Ribbed slab
ACI 318-14 recommend the same value of non-prestressed beams as provided in Table 2. Unified Building Code (UBC) specified minimum thickness of ribbed slab to be 1/12 distance between ribs or 51mm.
Fig.2: Ribbed one way slab
Slab thickness with embedded conduits and pipes
- UBC recommended minimum thickness of slabs with embedded conduits and pipes to be 25mm greater than total overall depth of conduits or pipes.
- ACI 318-14 specify that, conduits and pipes shall not be larger in outside dimension than 1/3 the overall thickness of slab, wall, or beam in which they are embedded
1. 3 Minimum thickness of Slab on the ground
UBC recommends minimum thickness of Concrete floor slabs supported directly on the ground to be 89mm, whereas BCGBC4010A – Apply structural principles to residential low-rise constructions determined minimum thickness to be 100mm.
Fig.3: slab on ground
1.4 Minimum thickness of Diaphragms
UBC recommend concrete slab and composite topping slab serving as structural diaphragm used to transmit earthquake forces to be 50mm.
1.5 Minimum thickness of Two-way slab
ACI 318-14 provided recommendations to determine minimum thickness of slabs (including slabs with beams, flat slabs, flat plates) that can be found here.
Fig.4: Two way slab
1.6 Minimum thickness of Drop panel
sometimes drop panels used at top of columns to improve shear strength of slabs. The minimum thickness of drop panels shall be quarter of slab thickness beyond the drop.
2. Minimum Thickness of Beams
- ACI 318-14 provides suggested minimum thickness for non-prestressed beams, as provided in Table 2, unless deflections are calculated.
- Canadian Standard Association CSA provides similar table except for one end continuous which is l/18.
Table 2 minimum thickness of non-prestressed beams unless deflections are calculated
| Minimum thickness, h | |||
| Simply supported | One end continuous | Both end continuous | Cantilever |
| Members not supporting or attached to partitions or other construction likely to be damaged by large deflections | |||
| l/16 | l/18.5 | l/21 | l/8 |
Notes: Values given shall be used directly for members with normal weight concrete and Grade 420 reinforcement. For other conditions, the values shall be modified as follows:
a) For lightweight concrete having equilibrium density (wc) in the range of 1440 to 1840 kg/m3, the values shall be multiplied by (1.65 – 0.0003wc) but not less than 1.09.
b) For fy other than 420 MPa, the values shall be multiplied by (0.4 + fy/700).
The depth of beam can also be estimated based on span/depth ratio. IS 456 2000 provides span to depth ratio to control deflection of beam as provided in Table 3.
Table 3: Span to depth ratio based on the span and type of beams, IS 456 2000
| Beam span | Beam type | Span/depth ratio |
| Up to 10m | Simply supported | 20 |
| Cantilever | 7 | |
| Continuous | 26 | |
| Greater than 10m | Simply supported | 20*10/span |
| Cantilever | – | |
| Continuous | 26*10/span |
Fig. 4: Reinforced concrete beam thickness, h
3. Minimum Thickness of Columns
Dimensions of columns is based on the requirements of the design and several shapes can be selected for the columns such as square, rectangular, trapezoidal, cylinders, and others.
Fig.5: Column dimensions
4. Minimum Thickness of Walls
4.1 Bearing walls
UBC recommends minimum thickness of bearing wall to 1/25 supported height or length whichever is shorter or not less than 102mm.
4.2 Exterior basement wall and Foundation wall
5. Minimum Thickness of Footings
Footing on soil
The minimum depth for footing on soil is advised to be 150mm.
Footing on pile
The minimum depth for footing on pile is recommended to be 300mm
Plain concrete structural footing
The minimum thickness for plain concrete structural footing is suggested by ACI 318-14 and set as 200mm, and the same value is suggested by UBC. It shall be known that plain structural footing is not suitable to be used for the top of piles.
Raft foundation
The minimum thickness of raft foundation is 300mm.
Fig.7: Footing thickness
6. Minimum Thickness of Other Concrete Members
Table 4: minimum thickness for other structural elements
| Structural Element | Thickness, mm |
| Pile cap | 600mm |
| Levelling concrete below liquid retaining structures | 100mm |
| Levelling concrete for other RCC foundations | 75mm |
| Underground pit / reservoir (below ground water table) walls and slab | 200mm |
| Underground pit (above water table) walls and slab | 200mm |
| Parapet wall | 100mm |
| Chajja | 100mm |
| Cable / pipe trench walls and base slab | 125mm |
| Precast trench cover | 125mm |
| Insert plate | 12mm |
| Corner angle | 6mm |
What is current minimum foundation depth for new build house
Current living in bungalow and and thinking of knocking bungalow down and building two storey house on same foot print as bungalow using existing foundations.
Current depth of foundation is 600 mm with 250 mm concrete.
I have been told modern standard is 900 mm
Trying to establish if I can build on these existing foundations
7
7 Answers from MyBuilder Groundworkers
Best Answer
B J D BUILDING/ROOFING
Cheltenham • Member since 29 Oct 2008 •
34
jobs,
100% positive
feedback
Footings need to be minimum 1m deep by 600mm wide.
We always trench fill with concrete.
Final decision will be with building control, hope you dont have any large trees near.
We just completed a job, 1m footings as spec, building control noticed a Holm Oak tree about 30m away, made us go down 3m and fit clay boards, lots of extra expense, ie trench sides collasping, more concrete.
A lot depends how lenient the inspector is, the young ones seem more keen.
2011-03-10T21:05:02+00:00
Answered 10th Mar 2011
Dream Makers
Caterham • Member since 6 Jan 2011 •
No feedback
Hi Kevin.
For a new build house the foundation depth is dependant on ground conditions, soil type and proximity of trees etc.
If the new building is going to be built on a demolition sites or has unstable ground conditions on the plot then piled foundations maybe required.
An architect (or similair) should summit plans to the local Building Control officers’, proposing what type of foundations and how deep they will be. Unless they are being built under a NHBC scheme or similar.
It is upto the Building Control Officer or independant surveyor (NHBC etc) to be satisfied that the foundations when dug, but not filled, are satisfactory.
Foundations sometimes have to be made deeper/wider than the planned amount.
There is no min and max depth. Trenches do not need completely filling with concrete.
All exisiting foundations need removing anyway for a new build.
Hope this helps and dispells some urban myths.
Conrad
2011-03-12T09:20:02+00:00
Answered 12th Mar 2011
m w building construction and property maintenance
High Wycombe • Member since 28 Sep 2008 •
16
jobs,
100% positive
feedback
Your existing footing is not substantial enough.Footings need to be 600mm wide x 1m deep minimum,in some cases depending on ground quality/type,proximity of large trees footings are required to be up to 2m deep. For good impartial advice speak to your local building control office,hope this helps.
2011-03-10T09:50:02+00:00
Answered 10th Mar 2011
y,not build
Milton Keynes • Member since 3 Oct 2009 •
6
jobs,
100% positive
feedback
speak with building control they have the say on that one.
2011-03-11T14:45:01+00:00
Answered 11th Mar 2011
ibuild building services
West Bromwich • Member since 28 Jun 2008 •
5
jobs,
100% positive
feedback
The depth of the footing is ground dependant. The only way to find out the depth is to consult building control who will advise you correctly at the time of digging the foundations. Most building companies will allow a price for 600mm wide x 1000mm deep but footings do NOT need to be 600mm wide or 1 mtr deep as somebody else has mentioned. This is a new building you are constructing so the old building has to be completely removed, including all foundation and old drainage so that is your starting depth.
2011-03-10T21:05:02+00:00
Answered 10th Mar 2011
NR Building Services
Leiston • Member since 19 Nov 2009 •
4
jobs,
100% positive
feedback
This is a question which will have every answer possible. Fact is your Architect/building control/structural engr will decide this one.
In my experience building control will be reluctant to remove the old footing as this will disturb a lot of earth.
Kind regards.
NR Building Services.
2011-03-12T09:20:02+00:00
Answered 12th Mar 2011
GM Builders
London • Member since 29 May 2017 •
2
jobs,
100% positive
feedback
Your existing footing is not substantial enough.Footings need to be 600mm wide x 1m deep minimum,in some cases depending on ground quality/type,proximity of large trees footings are required to be up to 2m deep.For good impartial advice speak to your local building control office,hope this helps.
2017-07-06T22:30:02+01:00
Answered 6th Jul 2017
Building Guidelines Drawings. Section B: Concrete Construction
Building Guidelines Drawings. Section B: Concrete Construction
|
Caribbean Disaster
|
|
Introduction | Section
A | Section B| Section C | Section D
| Section E | Section F | Section G
Download AutoCAD DWG files (zip archive): Section A | Section B | Section C |
Sections D-G
Figure B-1: Permissible Arrangement of Strip Footings
All exterior walls and interior load-bearing walls should be supported on reinforced
concrete strip footings. Interior walls may be supported by thickening the slab under the
wall and suitably reinforcing it. The foundations should generally be located on a layer
of soil or rock with good bearing characteristics. Such soils would include dense sands,
marl, other granular materials and stiff clays.
The foundation should be cast not less than 1 6″ to 2 0″
below ground, its thickness not less than 9″ and its width not less than 24″ or
a minimum of three times the width of the wall immediately supported by it. Where
clays must be used as the foundation bearing material, the width of the footing should be
increased to a minimum of 2 6″.
Figure B-2: Typical Spread Footing Detail
When separate reinforced concrete columns or concrete block columns are
used they should be supported by square footings not less than 2-0″ square and
12″ thick. For columns footings, the minimum reinforcement should be “
diameter bars at 6″ centres in both directions forming a 6” mesh.
Figure B-3: Reinforcement of Strip Footings
Reinforcement in the foundation is needed to ensure the continuity of
the structure. This is particularly important in cases of bad ground or where the
building may be subjected to earthquake forces. The reinforcement is assumed to be
deformed high yield steel bars which are commonly supplied in the OECS. For strip
footings, the minimum reinforcement should consist of 2 No. 4 (“) bars placed
longitudinally and ” diameter bars placed transversely at 12″ centres.
Figure B-4: Concrete Floor in Timber Construction
Figure B-5: Concrete Strip Footing and Concrete Base with
Timber Construction
An acceptable arrangement for a foundation of a small timber building
with a concrete or wood floor is shown in these figures. This construction is suitable in
reasonably stiff soils or marl. Where the building will be on rock, the thickness of the
footing may be reduced, but timber buildings are very light and can easily be blown off of
their foundations. Therefore the building must be securely bolted to the concrete footing,
and the footings must be heavy enough to prevent uplift.
Figure B-6: Typical Block Masonry Details
Concrete blocks used in walls should be sound and free from cracks and
their edges should be straight and true. The nominal width of blocks for exterior walls
and load bearing interior walls should be a minimum of 6 inches and the face shell a
minimum thickness of 1″. It is better to construct exterior walls of 8″ thick
concrete block. Non-load bearing partitions may be constructed using blocks with a
nominal thickness of 4″ or 6″. Blockwork walls should be reinforced both
vertically and horizontally; this is to resist hurricane and earthquake loads. It is
normal practice in most of the OECS to use concrete columns at all corners and
intersections. Door and window jambs must be reinforced.
The recommended minimum reinforcement for concrete block construction
is as follows:
- 4-” diameter bars at corners vertically.
- 2-” diameter bars at junctions vertically.
- 2-” diameter bars at jambs of doors and windows
- for horizontal wall reinforcement use “Dur-o-waL (or similar) or ” bars
every other course as follows: - For vertical wall reinforcement use ” bars spaced as follows:
4″ blocks 1 bar
6″ blocks 2 bars
8″ blocks 2 bars
4″ blocks 32
6″ blocks 24
8″ blocks 16
Figure B-7: Concrete Column Detail
Columns should have minimum dimensions of 8″ x 8″ and may be
formed by formwork on four sides or formwork on two sides with blockwork on the other two.
The minimum column reinforcement should be 4- diameter bars with ” stirrups at
6″ centres. A filled core column or poured concrete column should be placed full
height to the belt course (ring beam) at each door jamb.
Figure B-8: Alternate Footing Arrangements for Block Masonry
This reinforced concrete footing is constructed monolithically with the
floor slab. It consists of a series of slab thickenings under the walls with a
minimum 12″deep downstand on the perimeter. The footing is placed entirely on well
compacted granular material.
Figure B-9: Floor Slab Detail
The reinforced concrete floor slab is kept free of the perimeter
walls. The mesh reinforcement in the slab is placed in the top with 1″ covers.
The slab is constructed on well compacted granular fill, crushed stone or marl.
Figure B-10: Alternative Floor Slab Detail
The suspended reinforced concrete slab is tied into the external
capping beam at floor level. The top (steel) reinforcement is important. The main
reinforcement should be of the order of ” diameter at 9″ centres, and the
distribution steel 3/8″ diameter at 12″ centres.
Figure B-11: Fixing Detail for Vernadah Rail to Column
It is important that the rails be adequately fixed into the side
column. At a minimum the bolts should be galvanised to prevent corrosion.
Epoxy grout or chemical anchors are recommmended for fixing the baluster into the concrete
column.
Figure B-12: Reinforcement Arrangement for Suspended Slabs
The reinforcement should be bent and fixed by knowledgeable workmen.
Care must be taken to maintain the top steel in the top with adequate cover.
Figure B-13: Reinforcement Arrangement for
Suspended Beams
The reinforcement should be bent and fixed by knowledgeable workmen.
Care must be taken to maintain the top steel in the top with adequate cover.
Figure B-14: Reinforcement Arrangement for
Suspended Cantilever Beams
The reinforcement should be bent and fixed by knowledgeable workmen.
Care must be taken to maintain the top steel in the top with adequate cover.
Figure B-15: Reinforcement Arrangement for
Suspended Stairs
Introduction | Section A
| Section B| Section C | Section D | Section E | Section F | Section G
Village of Fox Point, WI Footings and Foundations
A.
General. Footings shall be of adequate bearing area to safely distribute
all live and dead loads to the supporting soil without exceeding the
bearing capacity of the soil. Footings placed in unstable soils shall
be formed.
B.
Type and size. Concrete footings, unless designed by structural analysis,
shall comply with the following requirements:
(1)
Continuous footings. The minimum width on each side of the foundation
wall shall measure at least four inches wider than the wall and the
minimum depth shall be eight inches.
(2)
Pier and column footings. The minimum horizontal dimensions of column
or pier footings shall be two feet by two feet and shall be at least
12 inches in depth.
(3)
Stepped footings.
(a)
Where variations in the elevations of the bottom wall footings
are necessary, it shall be spanned with an approved lintel.
(b)
Exception. A vertical connection between the footings at the
step may be constructed of concrete, eight inches thick and of the
same width as the footings, if there is less than two feet difference
in elevation.
(4)
Chimney and fireplace footings. Footings for chimneys or fireplaces
shall be at least four inches wider than the outside dimension of
the chimney or fireplace foundation and at least 12 inches thick.
(5)
Trench footings. Footings poured integrally with the wall, at least
eight inches wide, may be used for a one-story structure when soil
conditions assure that trench walls will not collapse.
C.
Frost protection. The bottom of all footings shall be a minimum of
four feet below grade. Footings shall not be placed upon frozen material.
D.
Curing. Concrete footings shall cure at least 24 hours before foundation
wall or wall forms are begun to be constructed.
E.
Drain tiles. All foundation walls of basements, cellars or other occupied spaces shall have drain tiles on each side of such walls. [See § 756-21B(3) for basementless spaces.] Bleeder tiles shall be placed in the foundation footing at not more than eight-foot centers. Drain tiles shall be connected to a sump pit, provided with a pump to discharge the water at grade or shall be connected to the storm sewer house drain. Drain tiles shall be covered with 12 inches of No. 2 washed stone or other approved porous material. Drain tile and stone shall be placed prior to starting the fourth foundation block course.
A.
General.
(1)
Foundation walls shall be of masonry and shall be continuous under
all areas of the principal building including attached garage and
shall be designed and constructed to support the loads placed thereon
without exceeding the allowable stresses of the materials therein.
(2)
Exceptions. Overhanging bays and projecting floors are permitted,
providing that such cantilevered floors do not exceed four feet. Cantilevered
porches and balconies may project six feet, providing they do not
support a roof. In each case, the joists must return twice the distance
they project. Clear minimum space of eight inches shall be provided
below the bottom of joists to grade.
B.
Strength. Structural analysis shall be submitted to the Building
Inspector when requested.
C.
Decay and termite protection.
(1)
The top of foundation walls under all buildings or structures of
wood frame construction shall be at least eight inches above lot grade
at all exterior walls and no exterior wood siding or construction
shall be less than six inches above grade.
(2)
Exception.
(a)
Wood pressure treated with a preservative, or naturally durable
decay-resistant species and grade of lumber or protected against decay
and termites, may be used for:
[1]
Sills which rest on concrete or masonry walls and are less than eight
inches from exposed earth.
[2]
Ends of wood girders entering masonry or concrete walls and having
clearances of less than 1/2 inch on top, sides and ends.
[3]
Wood siding less than six inches from the earth.
[4]
Wood embedded in earth.
(b)
All pressure-treated wood shall be identified.
D.
Foundation wall thickness.
(1)
Concrete foundation walls. Unless designed through structural analysis,
the minimum thickness of concrete foundation walls shall be determined
from Table 756-19A, but in no case shall the thickness be less than
the thickness of the wall it supports.
(2)
Masonry foundation walls. Unless designed through structural analysis,
the masonry foundation walls shall be constructed in accordance with
the following requirements:
(a)
Unreinforced masonry walls; thickness. The minimum thickness
of unreinforced masonry foundation walls shall be determined by Table
756-19B, but in no case shall the thickness be less than the thickness
of the wall it supports.
(b)
Reinforced masonry walls; thickness. Reinforced masonry walls
shall be reinforced in accordance with the requirements of Tables
756-19C and 756-19D. In partially reinforced masonry walls, vertical
reinforcement shall be provided on each side of any opening, at each
wall corner and at intervals indicated in the tables.
E.
Pilasters. When a girder whose span exceeds 12 feet frames into a
masonry wall, pilasters of a minimum size of four inches by 12 inches,
built integrally with the wall, shall be provided.
F.
Girder bearing. Four inches of end bearing shall be provided for
girders framing into foundation wall, and when wood girders are used,
an air space shall be provided between the foundation walls and the
ends and sides of the girder.
G.
Damp-proofing. Masonry foundation walls of basements and crawl spaces
shall be made damp-proof by the application to the exterior surfaces
thereof of a continuous coat of three-eighths-inch thick waterproof
cement mortar or portland cement mortar plus a coat of bituminous
damp-proofing material over the parging from top of stone to finish
grade. One coat of bituminous damp-proofing material shall be applied
to concrete foundation wall from the top of the stone to finish grade.
When a minimum of one-eighth-inch thickness of an approved surface
bonding cement is applied to exterior masonry foundation wall, it
shall qualify as damp-proof.
|
Table 756-19A Concrete Wall Thickness |
|||
|---|---|---|---|
|
Type of Concrete |
Nominal Thickness (inches) |
Maximum Height of Unbalanced Fill1 for Wood Frame Wall Being Supported (feet) |
|
|
3,000 psi |
6 |
6. |
|
|
Unreinforced concrete |
8 |
8 |
|
|
10 |
9 |
||
|
122 |
10 |
||
|
14 |
11.5 |
||
 5
5|
NOTES: |
||
|---|---|---|
|
1 |
Unbalanced fill is the difference in elevation between the outside |
|
|
2 |
The maximum height of unbalanced fill for a twelve-inch thick |
|

|
Table 756-19B Maximum Depth Below Grade* (Height of Fill) and Thickness for Various Concrete Masonry Foundation Walls Without Pilasters |
||||
|---|---|---|---|---|
|
Maximum Depth Below Grade (feet) When Wall Supports |
||||
|
Type of Unit Wall Construction Nominal Thickness (inches) |
Frame Construction |
Masonry or Masonry Veneer Construction |
||
|
Hollow — load bearing |
||||
|
8 |
5 (6) |
6 |
||
|
10 |
6 (7) |
7 |
||
|
12 |
7 |
7 |
||
|
Solid — load bearing |
||||
|
8 |
5 (7) |
7 |
||
|
10 |
6 (7) |
7 |
||
|
12 |
7 |
7 |
||
|
NOTES: |
||
|---|---|---|
|
* |
In well-drained sand and gravel soils, the height of the unbalanced |
|

|
Table 756-19C Maximum Depth Below Grade (Height of Fill) for Various Concrete Masonry Foundation Walls With Pilasters |
|||||
|---|---|---|---|---|---|
|
Type of Unit Wall Construction Nominal Thickness (inches) |
Total Height of Wall (feet) |
Maximum Pilaster Spacing O.C. (feet) |
Pilaster Size (Nominal) (inches) |
Maximum Depth Below Grade (feet) |
|
|
8 hollow load-bearing |
7. |
11 |
16 x 16 |
6.5 |
|
|
8 hollow load-bearing with solid pilasters or filled cells of |
7.5 |
20 |
16 x 16 |
6.5 |
|
 5
5|
Table 756-19D Maximum Depth Below Grade for Partially Reinforced Masonry |
||||
|---|---|---|---|---|
|
Type of Unit Wall Construction Nominal Thickness (inches) |
Total Height of Wall (feet) |
Reinforcement Size and Spacing (feet) Center to Center |
Maximum Depth Below Grade (feet) |
|
|
8 hollow load-bearing |
7. |
No. 5 Bars at 8 |
6.5 |
|
|
No. 6 Bars at 8 |
7.5 |
|||
|
No. 7 Bars at 8 |
7.5 |
|||
 0 to 8.5
FOUNDATION BASICS – FOOTINGS – Solid Concrete Walls
By Ethan Davis
The objectives of footing design are:
-
to provide a level surface for construction of the foundation wall;
-
to provide adequate transfer and distribution of building loads to the underlying soil;
-
to provide adequate strength, in addition to the foundation wall, to prevent differential settlement of the building in weak or uncertain soil conditions;
-
to place the building foundation at a sufficient depth to avoid frost heave or thaw weakening in frost-susceptible soils and to avoid organic surface soil layers; and
-
to provide adequate anchorage or mass (when needed in addition to the foundation wall) to resist potential uplift and overturning forces resulting from high winds or severe seismic events.


By far, the most common footing in residential construction is a continuous concrete spread footing. However, concrete and gravel footings are both recognized in prescriptive footing size tables in residential building codes for most typical conditions . In contrast, special conditions give rise to some engineering concerns that need to be addressed to ensure the adequacy of any foundation design.
Special conditions include:
-
high-wind conditions;
-
inland or coastal flooding conditions;
-
high-hazard seismic conditions; and
-
poor soil conditions.
Simple Gravel and Concrete Footing Design
-
Building codes for residential construction contain tables that prescribe minimum footing widths for plain concrete footings (ICC, 1998). Alternatively, footing widths may be determined in accordance with Section 4.3 based on a site’s particular loading condition and presumptive soil-bearing capacity.
The following are general rules of thumb for determining the thickness of plain concrete footings for residential structures, once the required bearing width is calculated: -
The minimum footing thickness should not be less than the distance the footing extends outward from the edge of the foundation wall, or 6 inches, whichever is greater.
-
The footing width should project a minimum of 2 inches from both faces of the wall (to allow for a minimum construction tolerance), but not greater than the footing thickness.
-
It should also be understood that footing widths generally follow the width increments of standard excavation equipment (a backhoe bucket size of 12, 16 or 24 inches). Even though some designers and builders may specify one or two longitudinal No. 4 bars for wall footings, steel reinforcement is not required for residential-scale structures in typical soil conditions. For situations where the rules of thumb or prescriptive code tables do not apply or where a more economical solution is possible, a more detailed footing analysis may be considered.
-
Much like a concrete footing, a gravel footing may be used to distribute foundation loads to a sufficient soil-bearing surface area. It also provides a continuous path for water or moisture and thus must be drained in accordance with the foundation drainage provisions of the national building codes. Gravel footings are constructed of crushed stone or gravel that is consolidated by tamping or vibrating. Pea gravel, which is naturally consolidated, does not require compaction and can be screeded to a smooth, level surface much like concrete. Although typically associated with pressure-treated wood foundations, a gravel footing can support cast-in-place or precast concrete foundation walls.
-
The size of a gravel footing is usually based on a 30- to 45-degree angle of repose for distributing loads; therefore, as with plain concrete footings, the required depth and width of the gravel footing depends on the width of the foundation wall, the foundation load, and soil-bearing values.
Following a rule of thumb similar to that for a concrete footing, the gravel footing thickness should be no less than 1.5 times its extension beyond the edge of the foundation wall, or, in the case of a pressure-treated wood foundation, the mud sill. Just as with a concrete footing, the thickness of a gravel footing may be considered in meeting the required frost depth. In soils that are not naturally well-drained, provision should be made to adequately drain a gravel footing.
 The following are general rules of thumb for determining the thickness of plain concrete footings for residential structures, once the required bearing width is calculated:
 Following a rule of thumb similar to that for a concrete footing, the gravel footing thickness should be no less than 1.5 times its extension beyond the edge of the foundation wall, or, in the case of a pressure-treated wood foundation, the mud sill. Just as with a concrete footing, the thickness of a gravel footing may be considered in meeting the required frost depth. In soils that are not naturally well-drained, provision should be made to adequately drain a gravel footing.
Concrete Footing Design
For the vast majority of residential footing designs, it quickly becomes evident that conventional residential footing requirements found in residential building codes are adequate, if not conservative. However, to improve performance and economy or to address peculiar conditions, a footing may need to be specially designed.
A footing is designed to resist the upward-acting pressure created by the soil beneath the footing; that pressure tends to make the footing bend upward at its edges. According to ACI-318, the three modes of failure considered in reinforced concrete footing design are one-way shear, two-way shear, and flexure. Bearing (crushing) is also a possible failure mode, but is rarely applicable to residential loading conditions. To simplify calculations for the three failure modes, the following discussion explains the relation of the failure modes to the design of plain and reinforced concrete footings. The designer should refer to ACI-318 for additional commentary and guidance. The design equations used later in this section are based on ACI-318 and principles of engineering mechanics as described below. Moreover, the approach is based on the assumption of uniform soil-bearing pressure on the bottom of the footing; therefore, walls and columns should be supported as close as possible to the center of the footings.
Reinforced Concrete Footing Design
For infrequent situations in residential construction where a plain concrete footing may not be practical, or where it is more economical to reduce the footing thickness, steel reinforcement may be considered. A reinforced concrete footing is designed similar to a plain concrete footing; however, the concrete depth to the reinforcing bar is used to check shear instead of the entire footing thickness. In addition, the moment capacity is determined differently due to the presence of the reinforcement, which resists the tension stresses induced by the bending moment. Finally, a higher resistance factor is used to reflect the more consistent bending strength of reinforced concrete relative to unreinforced concrete.
As specified by ACI-318, a minimum of 3 inches of concrete cover over steel reinforcement is required when concrete is in contact with soil. In addition, ACI-318 does not permit a depth less than 6 inches for reinforced footings supported by soil. These limits may be relaxed by the designer, provided that adequate capacity is demonstrated in the strength analysis; however, a reinforced footing thickness of significantly less than 6 inches may be considered impractical even though it may calculate acceptably. One exception may be found where a nominal 4-inch-thick slab is reinforced to serve as an integral footing for an interior load-bearing wall (that is not intended to transmit uplift forces from a shear wall overturning restraint anchorage in high-hazard wind or seismic regions). Further, the concrete cover should not be less than 2 inches for residential applications, although this recommendation may be somewhat conservative for interior footings that are generally less exposed to ground moisture and other corrosive agents.
Minimum Reinforcement
Owing to concerns with shrinkage and temperature cracking, ACI-318 requires a minimum amount of steel reinforcement. The following equations determine minimum reinforcement, although many plain concrete residential footings have performed successfully and are commonly used. Thus, the ACI minimums may be considered arbitrary, and the designer may use discretion in applying the ACI minimums in residential footing design. The minimums certainly should not be considered a strict “pass/fail” criterion. Designers often specify one or two longitudinal No. 4 bars for wall footings as nominal reinforcement in the case of questionable soils, or when required to maintain continuity of stepped footings on sloped sites, or under conditions resulting in a changed footing depth. However, for most residential foundations, the primary resistance against differential settlement is provided by the deep beam action of the foundation wall; footing reinforcement may provide limited benefit. In such cases, the footing simply acts as a platform for the wall construction and distributes loads to a larger soil-bearing area.
Lap Splices
Where reinforcement cannot be installed in one length to meet reinforcement requirements (as in continuous wall footings), reinforcement bars must be lapped to develop the bars’ full tensile capacity across the splice. In accordance with ACI-318, a minimum lap length of 40 times the diameter of the reinforcement bar is required for splices in the reinforcement. In addition, the separation between spliced or lapped bars is not to exceed eight times the diameter of the reinforcement bar, or 6 inches, whichever is less.
In our next blog, we will be discussing Foundation Walls.
(This information is taken from an article by Nick Gromicko and Ben Gromiko on the International Association of Certified Home Inspections website)
What is the Optimal Foundation Wall Thickness?
A well-built and strong foundation transfers the building’s load to the footing and into the earth, resisting wind or seismic forces and providing anchorage for the above-grade structure. A durable foundation also ensures a moisture-resistant barrier (following the applicable building codes) and adequate resistance to shear and bending stresses resulting from lateral soil and water pressures. A poorly constructed foundation can lead to significant structural damage, endangering the building’s occupants and the neighborhood.
Characteristics that impact a foundation wall’s strength and durability include the width and depth of the footers, the foundation’s comprehensive and tensile strength, and the foundation wall thickness.
Most foundations rest on slightly deeper concrete footers, which gives the foundation its stability. The footers sit bare on undisturbed soil below the frost line — the foundation’s lowest point.
The footer’s width depends on the soil and the building’s construction. A two-story house on moderately strong soil requires a wider footer, the wider the footer the thicker it may be. A small, one-story home on strong-densely packed soil may require a smaller footer in width and thickness. The proper size footer will ensure a house’s stability. The soil bearing capacity and footer design size are key elements in eliminating cracks and unstable foundations.
Building codes mandate a minimum foundation concrete compressive strength of 2,500 pounds per square inch (psi). Earthquake-prone or extreme weather regions often require a greater compressive strength. A high compressive strength protects the concrete from loads pushing on it. However, the low tensile strength of concrete often requires rebar reinforcements to prevent cracks from external forces that stretch it, like soil’s freeze-thaw activity or hillside homes and buildings that create significant lateral soil pressure.
A concrete foundation wall’s thickness plays an integral role in its long-term strength and durability. Local building codes mandate the foundation specifications, addressing conditions that affect the foundation thickness.
The foundation wall’s minimum thickness depends on the wall height, soil strength, siding material, hydrostatic pressures, and shear stresses. The minimum width should equal the house wall’s frame.
Traditional Foundation Design
The foundation’s thickness has to handle pressure from the overhead structures and the underground forces; however, specifications may vary due to differences in local building codes. Traditional foundations are constructed of poured concrete or concrete block.
-
A typical foundation wall minimum thickness of eight inches applies to walls eight feet or less with no more than seven feet of soil pressing against it.
-
Foundation walls taller than eight feet with more than seven feet of soil pressing against it requires a larger foundation wall 10 to 12 inches in width.

Siding Materials and Foundation Wall Thickness
Heavier siding materials require thicker foundation walls.
-
Wood, metal, and vinyl-sided buildings require a foundation wall thickness of eight inches.
-
Brick veneer requires a foundation wall thickness of 10 to 12 inches, leaving room for a ledge to support the brick.
Hydrostatic Pressures and Foundation Wall Thickness
Areas of high hydrostatic pressure from soil and water require thicker-stronger foundation walls (10 to 12 inches). In some cases, for further support, building codes require rebar. Without adequate protection, hydrostatic pressure can cause a foundation to crack and bow, significantly degrading or even collapsing the wall.
Shear Stress and Foundations Thickness
Shear stress on a foundation occurs due to lateral loads on a structure associated with wind and earthquake. The foundation thickness has to withstand the bending due to these types of pressures.
Foundation Finishes
Tradition foundation walls result in bare concrete or concrete block. The interior side, to meet code must have strapping, insulation and a vapor barrier to complete the wall and, meet code requirements.
Fox Blocks makes straight and corner block insulated concrete forms (ICFs) in various widths, from 6 inches to 12 inches, fitting all foundation thickness needs, accommodating all wall heights, soil strengths, and siding materials. Fox Blocks have been tested and engineered to protect hydrostatic pressures, wind, and earthquake stresses. Fox Blocks wall assemblies work with all exterior siding finishes, brick, stucco, EIFS, stone, drywall, or fiber cement.
Fox Blocks ICF and Foundation Formation
An ICF block has six polypropylene ties (recycled plastic) molded into two (16″x48″) expanded polystyrene insulation panels. To build the foundation wall, the crew stacks the blocks, interlocking them together end to end in a running bond to the desired wall length. After installing the first course of ICF blocks, they place horizontal reinforcing steel bars, interlocking securely together in the blocks’ ties. The next course of straight and corner blocks is then placed firmly on top as the wall is built.
The Fox Blocks Advantage
Adaptable Fox Blocks ICF foundations allow for various thicknesses ensuring optimal foundation wall thickness for the wall height, soil strength, siding material, hydrostatic pressures, and shear stresses. A Fox Blocks ICF foundation provides excellent energy-efficiency, indoor environmental quality, disaster-, moisture- and pest-resistance compared to a traditional poured foundation.
The engineering provided by Fox Blocks provides for most designs a 6″ reinforced concrete core for foundation walls up to 10 feet high, creating substantial savings over traditional design for concrete, or concrete block, without compromising structural stability. In some regions, the local codes dictate that 8″ is the minimum foundation width. As an insulated form, Fox Blocks also provides thermal insulation, vapor barrier benefits, and strapping for foundation walls.
Connect with a Fox Blocks professional today to help answer your questions on achieving optimal foundation thickness wall thickness with ICFs.
DOWNLOAD THIS RESOURCE
To download this file, please fill out this form. Don’t worry, once you’ve filled it out, we’ll never ask for your information again.
Sorry, there was a problem submitting your form.
Concrete foundation depth: installation?
Table of contents
- 1 What influences the depth of the strip concrete base under the house?
- 2 Depth of strip foundations in different conditions
- 3 How frozen can the soil be?
- 4 Buried foundation for a building with a significant depth
- 5 Installation of a buried strip foundation with the construction of a basement
- 6 Depth of a shallow strip foundation for a house
- 7 Installation of a shallow foundation
- 8 Summing up
It is simply impossible to build a house without a foundation. The foundation holds the entire structure. But not all foundations are the same. There are prefabricated and monolithic, pile, tape. Now we will consider a strip concrete foundation. What does he represent? What is its depth, and what does it depend on? What are the types of concrete strip foundation?
What affects the depth of the strip concrete base under the house?
Several factors can be distinguished here:
- types of soil;
- distance between the surface of the earth and groundwater;
- level of soil freezing in the cold season. Before calculating the required depth for a concrete base, it is worth calculating the average values of sub-zero temperatures, getting a root from them, which is multiplied by the freezing coefficient characteristic of all soil forms;
- building materials used in the construction of buildings;
- structure of the building (number of floors, presence of basements, ground floors, type of floors, additional buildings).

Back to the top
Depth of strip foundations under different conditions
Laying of strip foundations is carried out under the following conditions:
Scheme of strip foundation laying.
Note that lands with complex clay soils, saturated with a large amount of groundwater, are not suitable for strip foundations. After all, clay soil under the influence of flows is rather unstable, and the erected structure can most likely become thinner and collapse.
In addition, the house shrinks for quite a long time on clay, and due to heaving processes inside the soil, a well-deepened concrete base has to be laid. As a rule, in such situations, the foundation is installed in a tape method half a meter below the edge of the frozen soil.
Back to index
How frozen can the soil be?
The degree of freezing of the soil is affected by climatic features corresponding to a particular area. These features include:
- average temperature indicators in the autumn-winter period;
- duration of the cold season;
- moisture level and soil type.
Back to TOP
Buried foundation for building with considerable depth
Well-buried bases are used for the construction of multi-level buildings. The depth of the pit for such a foundation should be equal to the depth of the frozen soil, or even exceed it.
Statistics say that the average soil freezing ranges from 1.5 to 2 meters. Based on these figures, a ditch for a heavily deepened concrete base is dug 1.8 m deep. A small part of the trench (about 20 cm) is covered with backfill with backfill. It is this foundation that is used for a structure with a basement device and a heavy load on the base.
Back to the top
Installation of a buried strip foundation with the construction of a cellar
Deep strip foundation.
Implementation of such a task is not a cheap pleasure. However, you can’t build a basement otherwise. To build a house with a basement, you need to dig a trench suitable for its parameters in accordance with the above conditions, inside which you need to install formwork and lay a concrete strip under each wall of the designed building.
If the strip foundation is buried, prefabricated reinforced concrete blocks can also be used to lay it. However, this technology requires the use of a crane, because it is not possible for a person to manually install such reinforced concrete structures. The foundation tape acts as the interior walls of the basement. Such a foundation for a house needs to be strengthened through reinforcement. The bottom of the trench is covered with rubble, sand is poured from above. Each ball is well rammed.
This method of building a basement makes it possible to treat its facades with waterproofing material. Bitumen is often used for these purposes. Do not ignore the inner side of the basement walls, as well as the wooden flooring of the first floor, which also need to be protected from moisture. Here, bitumen or liquid rubber serves as waterproofing, which is applied to the surface of the basement walls by means of a roller or a paint brush. On request, the basement can be insulated.
The final and obligatory step in the installation of a recessed strip base is the pouring of the blind area, which is a not very wide concrete strip laid on the surface of the earth along the entire outer perimeter of the foundation. The blind area is poured as follows – gravel is poured over the entire territory of the proposed site, well compacted, poured with cement mortar.
The blind area must be sloped away from the building so that all precipitation flows down it away from the base of the house. To do this, you can also make a special pothole so that the water leaves faster. The blind area serves not only to protect the base of the building from water, but gives the structure a finished aesthetic appearance.
Back to the Table of Contents
Depth of shallow strip foundation under the house
This type of strip foundation is characterized by deepening into the soil up to a meter, and is considered standard. A ditch under it is dug with a depth of exactly 1 m. The concrete pour itself takes from 50 to 70 cm of the total depth. The rest of the volume belongs to well-compacted bedding.
Back to TOC
Shallow foundation installation
With such ease of installation, the shallow foundation can be installed very easily by yourself.
The design of such a foundation includes:
- directly foundation tape;
- matching fittings;
- sand cushion;
- blind areas;
- moisture protection;
- slope waterproofing.
Waterproofing for strip foundation slopes can be:
- glassine;
- cellophane, stacked in several layers;
- roofing felt;
- only
The editing process is as follows. The bottom of the dug trench is covered with fine gravel or sand, which acts as a cushion that protects the integrity of the foundation from soil swelling and corrosion processes.
The minimum height of this cushion is 20 cm. In addition, this layer must be insulated from water. Otherwise, if moisture gets on the sand cushion, it will become heaving in nature and stop fulfilling its direct duties. This is fraught with deformation of the foundation, and then directly to the house itself.
A shallow foundation must be reinforced with reinforcing materials, thus increasing its strength and resistance to various negative processes. Dimensional parameters of reinforcing bars are selected according to the type of structure and the nature of the soil. These rods are usually not welded. This type of foundation is used in the construction of light one-story buildings, in which the construction of a basement is not implied. It is also suitable for wooden huts.
Back to index
Summing up
As it turned out, the depth of the future foundation is influenced by many factors that must be taken into account during construction. If you do not neglect these conditions, correctly calculate the required depth, then the foundation for the house will not only turn out to be strong, reliable, able to withstand any load, but will also largely save the entire building from destruction.
Width and depth of fence foundation
The fence, especially from the side of the street, has not only the function of a fence. It is also a kind of “visiting card” that characterizes the status of the owners or organization. It is possible to combine practicality and a respectable appearance of a structure only in a capital fence, which, as a rule, is erected on a strip foundation.
Although the foundation performs a supporting function and is not an element of decor, its presence allows you to implement almost any design options. There is an opportunity to use brick pillars and a basement in the fence, in harmony with any type of fence. In addition, the capital base significantly increases the service life of the fence and prevents the penetration of small rodents and moles into the fenced area.
At first glance, the installation of a strip foundation is not difficult, but if you make a mistake, the fence will not last long and may begin to collapse in six months. In addition, even the correct calculation, which will become a guarantee of high quality and durability, will not always be optimal from the economic point of view.
Depth of strip foundation
This parameter depends mainly on the composition of the soil and the climatic zone. Many experts recommend laying below the freezing depth, but in the Moscow region it is deeper than 1. 5 m, and in the northern regions you will have to dig a foundation pit under the fence.
We offer a strip foundation for a fence laid to a depth of only 40 cm, and we guarantee that our option will become a reliable foundation for your fence, even on heaving soils. Naturally, the foundation can be made even deeper, but this will entail additional labor costs and concrete consumption, which will significantly affect the cost for the client. It is possible to optimize the depth without sacrificing quality and reliability thanks to three important points – a reinforced sand cushion, the correct reinforcement and the appropriate brand of concrete.
Sand cushion
As you know, a layer of sand under a concrete base contributes to a uniform distribution of the load on the soil and is usually poured with a thickness of 10 cm. In our case, a sand cushion is poured in a layer of 20 cm, and the load is not distributed at all. Sand is a permeable material and does not retain water, so there will be a relatively dry layer underneath the concrete. In winter, when the soil swells when freezing, the sand remains immobile and significantly reduces the forces of heaving of the lower layers.
Concrete tape reinforcement
Reinforcement of any reinforced concrete structure is carried out in order to strengthen it in the tension zone. Therefore, the reinforcement is laid precisely in those places where the load will be tensile. In cantilever structures, these are the upper layers, in double-console structures, the lower ones. But there are elements that are subjected to alternating loads, so their reinforcement is performed using a completely different technology.
In this case, the foundation tape is such a structure by analogy with a road slab. Therefore, the working reinforcement is laid both in the lower and in the upper part, subject to a protective layer of concrete of 30 mm, in accordance with SNiP 2.03.01-84. As a result, the resulting beam is able to withstand the load from above from the weight of the fence, as well as from below from the pressure of the soil during swelling.
Concrete
According to the rules, heavy concrete of class B 22.5 is used for pouring monolithic foundations. Such concrete is characterized by the strength grade M-300, frost resistance F 150 and water resistance W 5-W 6. The characteristics seem to be ideal, but there are also “pitfalls” here. All these indicators are achieved only with the correct laying technology, so that the density of the hardened concrete solution reaches about 1800-1900 kg / m³. With the content of air bubbles in the mixture, all quality characteristics will be significantly reduced. In order to lay the concrete in the formwork, we use submersible vibrators, which not only ensure the release of air, but also a tight adhesion of the solution to the reinforcement.
Important! A tape depth of 40 cm, subject to all the above parameters, becomes optimal for most soils. At the same time, in swampy areas or at a high level of groundwater, the depth and design of the base is calculated individually.
Foundation width for fence
The width of the sole of the base determines the area of support of the structure on the ground – the wider the foundation, the lower the specific load. Having calculated the specific load and having analyzed the composition and density of the soil at the depth of support, it is possible to calculate the required width of the structure. Since the bearing capacity of the soil for each type has already been calculated, you need to divide the weight of the fence section by this indicator, and then divide by the length of the section and get the required width. It is also necessary to add 30% of the reserve to the result obtained, since the water saturation of the soil at different times can change its bearing capacity. The width calculated in this way must be optimized by increasing it to standard dimensions for laying the plinth.
Our catalog offers 3 options for the width of the strip foundation, optimized for the load and laying the plinth from bricks of the standard format 1 NF 250x120x65. The choice is made taking into account the load, which depends on the type of fence and its height.
-
250 mm – for light railings made of corrugated board
or a picket fence with a basement masonry, half a brick thick. - 380 mm – for forged or fences from corrugated pipes of medium weight category with laying the plinth in brick.
- 510 mm – for heavy brick fences with a base of one and a half bricks.
When choosing a fence, our experts will accurately determine the required thickness of the monolith, but at the request of the client it can be expanded. It should also be taken into account that the thickness of the brick pillars corresponds to 510 mm, when choosing a base – 250 or 380 mm, in the places where the supports are installed, the foundation is made with a corresponding width of 510 mm.
In some cases, on unsteady and swampy soils, a combined type of foundation is possible, combining the qualities of a strip base and grillage, transferring a significant part of the load to supports concreted to an appropriate depth.
The company LLC “TSENTRZABOROV” offers to order the installation of a strip foundation for a fence with brick pillars. When ordering, it should be borne in mind that along with the implementation of monolithic structures, supports are installed, at least metal poles without brick lining. Since the pipes are installed along the foundation line, they can only be installed before the formwork is filled with concrete. The need for laying electrical cables inside the supports for connecting lighting equipment and / or mechanical gate drive units is also taken into account. To do this, it is necessary to provide for the laying of sleeves and sleeves in concrete.
When placing an order, a professional measurer leaves for the object. The calculation is made only on the basis of the received data. The client will be offered several of the most suitable options, while in the process of joint consideration, adjustments and additions may be made. After the customer approves the final project, the cost of the foundation is determined with a detailed justification of all work and materials.
Foundation installation
Installation is carried out by a mobile team of experienced installers at a convenient time for the client, agreed in advance in the contract. During installation, all construction rules are observed, and the work is carried out in full accordance with the project within the specified time frame.
Marking on the ground
The marking is carried out in accordance with the design data for the beacons, installed by the measurer in the presence of the customer. To indicate the axes of the fence, a cord is pulled.
Trenching
The trench is dug to the estimated depth, taking into account the sand cushion. The trench is dug 10 cm wider in width to allow the installation of the formwork structure.
Drilling holes for supports
Wells are drilled in the center of the trench at the designated points. Drilling is carried out with a gas drill with a diameter of 20 mm larger than the diameter of the support, which allows you to maximize the density of the soil.
Installing and sealing supports
The supports are pre-made from a 60×60 square pipe and treated with an anti-corrosion compound. In case of high corrosive activity of the soil, the project may provide for protective coatings, as well as replacing the soil from the well with a sealing compound (gravel with sand, carving, concrete). After installing the supports during compaction, their verticality is leveled. The wicket and gate supports are supplemented with reinforcing belts in the form of reinforcing cups.
Formwork assembly
The formwork is assembled from laminated plywood with wooden elements. The material allows you to speed up assembly, prevent leakage of concrete mortar and achieve smooth walls of the monolith.
Filling and compacting the sand bed
For a sandy base, coarse sand is used, which has high water permeability. Backfilling is carried out with a layer of at least 20 cm, followed by spilling water to seal. On sandy soils, the thickness of the cushion layer can be reduced.
Installation of reinforcement cage
The frame is made at the installation site from four longitudinal reinforcements: A 400 ø 10 mm in 2 rows with a transverse strapping step of 40 cm. The reinforcement is connected by welding or knitting. In the formwork, the frame is installed in the center with a 30 mm offset from the bottom and surface. Reinforcing belts of load-bearing supports are connected to the armoskeleton of the tape.
Concrete laying
Concrete is delivered from the nearest BSU in an automixer and poured into the formwork through a sleeve. During the laying process, compaction is carried out by vibration. The mechanized method is carried out promptly within the period of preservation of concrete mobility.
Formwork demolition
Dismantling of the formwork structure is carried out not earlier than the hardening of concrete to 70% strength, which occurs within 10-14 days. Immediately after the analysis, the slopes are backfilled and the soil is compacted.
Delivery of the finished structure to the customer
Visual control is subject to checking the integrity of the foundation, the absence of cracks, chips, shells and other deformations. Instrument control – the horizontal surface of all spans of the foundation strip.
See also:
- What height of the fence should be according to the legislation of the Russian Federation
- How to choose a fence for a suburban area?
- Fence Installation Code
Strip foundation depth: minimum and optimal
Strip foundation depth is the total distance from the soil surface to the bottom of the base and this indicator should not be confused with the depth of the trench, because the pit can be made larger by laying a pillow of sand / crushed stone in it. The depth of the tape type foundation is influenced by such main factors as the type / depth of soil freezing, the level of passage of soil water, the weight of the structure, etc.
The strip foundation itself is a reinforced concrete structure with a cross-section, usually rectangular in shape. This type of foundation is very durable, able to freely withstand a structure built from materials with a density index of 1000 kg / m3. The use of tape allows the base to withstand the serious weight of walls and ceilings, providing the building with durability and reliability.
Strip foundations are not buried, shallow and buried
. Each type assumes its own bookmark level. The depth of the strip foundation is the main parameter that will affect all other indicators (including the cost). Therefore, everything must be calculated correctly: in order, on the one hand, to build a solid building, and on the other, not to increase costs unreasonably.
Contents
- 1 Deepening of strip foundations
- 2 Factors affecting the depth of laying the foundation
- 3 Determining the depth of foundations
- 4 Ways to reduce the required foundation depth
- 5 Thermal insulation of a shallow strip foundation
Deepening strip foundation
First you need to decide what the strip foundation will be: the depth is determined after choosing the type of foundation. For light frame-type structures, made of wood and foam concrete, small brick buildings, a shallow foundation is suitable, which can be erected on slightly loose soils. Usually its depth is up to 70 centimeters.
A recessed type of foundation is designed for structures erected on heaving soils, with walls and ceilings that have considerable weight. This type of construction is also used in cases of designing houses with a basement. The depth of the strip foundation for the house in this case will be an indicator of the depth of soil freezing plus 20-30 centimeters. It is allowed to lay a foundation of lesser depth under the internal walls.
For heated structures, it is allowed to calculate how much to deepen the strip foundation, without taking into account the level of soil freezing. But then it is necessary to complete all construction work before the end of the warm season, or else think about measures to counteract the freezing of the soil, which will be relevant in the process of work.
The minimum depth of a strip foundation for an unheated building is:
the average level of soil freezing + 10% + 20-30 centimeters; for a heated building – a decrease in value by 20-30%. If it is planned to equip the basement, all measurements are performed from its floor.
When deciding how deep to dig on sandy and dry soils, it is worth considering that, according to the standards, it is allowed to dig above the soil freezing line. But only on condition that the sole of the base is located no closer than 50-60 centimeters to the ground level. Under the condition of close passage of groundwater and the need for greater depth, strip brick foundations are not used. On strongly heaving and deep-freezing soils, it is generally advisable to refuse any type of strip foundation for a house.
It is worth remembering that the foundations of the main building and all annexes adjoining it must be at the same depth. If there is a difference in the loads on the foundation, a difference in the depth of the bookmark is allowed. In this case, ledges 30-60 centimeters high with oblique angles of any size are made along the entire length of the base, which are designed to connect parts of the structure at different levels.
Factors affecting foundation depth
When a strip foundation is being designed, the depth of the foundation plays a fundamental role, so the parameter must be calculated with great care. The higher the sole of the base is, the lower the costs will be by reducing the volume of concrete mortar for pouring. But saving on quality is unacceptable, so everything must be taken into account.
Calculating the depth to which the strip foundation is to be made, the following main factors are taken into account: the boundary of soil freezing, the proximity of the passage of groundwater, a precisely defined type of soil on the site. It is also desirable to take into account the class of the building, the planned service life, the sensitivity of the building structure to the effects of uneven sediments, and the general relief of the site.
Topsoil can be highly compressible and change properties with the weather. In such cases, the tape foundation must be buried in stable bearing soils, regardless of the depth of their penetration.
Soil types by effect on foundation strength:
- Medium/large gravel sands, coarse clastic rocks with sand inclusions, rocky soils
- Silty, fine sands
- Various types of sandy loam
- Clays and loams, coarse clastic rocks with clay aggregate impurities
Even if the foundation is deepened well below the frost level, protection against the effects of frost heaving is not guaranteed. If the freezing layer does not press on the sole of the base, it can act on the walls, which takes into account the calculation of the depth of the foundation.
Ways to reduce the impact of freezing soil on the structure:
- Creation of a sliding layer on the side of the foundation from a material with a minimum coefficient of friction
- Trapezoidal base pour with taper at the top
- Soil protection near the foundation with screens and systems against waterlogging
- Backfilling the sinuses of the foundation structure with non-rocky soil
Thinking about how deep the strip foundation should be, the main task should be to determine the optimal depth where the bearing layer of soil with the underlying layers can give a uniform settlement of the building, which will not exceed the permissible values.
Determination of foundation depth
The choice of depth for laying the foundation begins with the calculation of the depth of freezing of the earth on the site, taking into account the heating mode. Calculations are carried out using the formula:
Df = k × Dfn, here:
- Dfn – standard freezing depth indicator
- Df – calculated freezing depth
- Kn – coefficient related to the heating mode of the building (according to SNiP 2.02.01-83)
Then the properties of the soil are determined directly at the site of laying the foundation. It is enough to dig a hole and take soil samples.
The soil can be selected even after independent (but thorough) study in the field. It is enough to take the earth in the palm of your hand, knead it, roll it up with a cord, try to make a ring out of it and look at the result: a whole ring speaks of clay soil, decaying – about loam, crumbling in the process of folding – the soil is most likely from sandy loam. But the best way is to contact the experts.
Then they determine at what depth the groundwater passes – for this they drill a hole up to 3 meters deep, lower a metal or plastic pipe into it, measure the water level at different times of the year – it is important to understand whether the water is able to rise above 2 meters to the level ground freezing.
The obtained data allows you to determine how deep the strip foundation should be. Usually, table 2 of SNiP 2.02.01-83 is used for calculations. Provided that the groundwater level is located 2 (or more) meters below the freezing boundary of the earth, the foundation is laid to a certain depth in accordance with the type of soil.
Optimum foundation depth:
- Gravelled, medium/coarse sands – 50 centimeters
- Fine sands, sandy loam – at least 50 centimeters
- Loams, clays, coarse soils – minimum 0.5 Df
In the case when groundwater is located closer than 2 meters to the freezing boundary Df, the foundation is designed at a depth of at least Df.
Ways to reduce the required foundation depth
There are cases when it makes sense to reduce the cost of laying the foundation to a greater depth. So, if the depth of the strip foundation for a one-story foam block house is not too large, then serious heavy structures sometimes require huge costs, which developers are trying to reduce.
The most radical method
is the complete replacement of heaving soil with non-heaving one: they simply dig a foundation pit, much larger than the design dimensions, reaching a place below the freezing line. The soil is selected, replaced with sand, carefully rammed. Earthworks are large-scale, but they provide a reliable result.
It is possible to design blind areas to lower the depth of freezing of the earth and prevent its waterlogging. Blind areas are concrete platforms that pass under the walls of the house and have a slope of up to 10 degrees. Their width is selected in accordance with the soil, the dimensions of the roof overhang. So, for subsiding soils, it is enough to design a blind area up to a meter wide.
It is possible to lower the water level under the object thanks to the arrangement of ditches with water drainage, made according to the slope of the relief. The structures work well and divert water during snowmelt, showers. If the groundwater level at the site is constantly elevated, serious drainage systems are made.
It is possible to reduce the depth of soil freezing by laying a special foundation made of polystyrene foam plates under the blind area. So, if you take plates up to 5 centimeters thick, it will be possible to reduce the freezing of the soil to a depth of 30 centimeters.
If a not very massive wooden house is being built, you can install the foundation directly into the freezing layer. Under the condition of high-quality reinforcement and laying above the water boundary, the foundation will redistribute uneven loads and act as a single monolithic structure.
Thus, at the moments of swelling of the soil in one of the zones under the base, the structure does not deform, but rises, but the weight of the building holds and ensures the preservation of the foundation plane. Be sure to backfill the base with gravel and sand in order to smooth out uneven heaving of the soil. While the reinforced concrete frame will ensure the distribution of loads around the perimeter and will not allow the structure to squint.
Shallow strip foundation thermal insulation
When choosing the depth for laying the foundation, you should think about thermal insulation, especially if it is a shallow type. To prevent the ground from freezing under the base and to avoid ground shifts.
Extruded polystyrene foam
is used for the thermal insulation layer, which does not deform or decompose in moisture. Thermal insulation properties increase in proportion to the thickness of the material. So, a sheet 2.56 centimeters thick provides a heat transfer resistance identical to 120 centimeters of soil. That is, the material will conditionally increase the depth of the foundation by 120 centimeters.
High-quality vertical and horizontal insulation ensures the strength and reliability of the structure, even if the foundation is laid even at a depth of up to 40 centimeters.
The depth of the strip foundation is a very important parameter that must be calculated according to the technology, taking into account the main factors and indicators. Only in this case it will be possible to build a durable and reliable building.
what is the minimum size according to the regulations
Contents
- 1 Important parameters for determining the dimensions of the base
- 2 Determination of the type of soil
- 3 How to calculate the depth and width of the base
- 4 Calculation of the area of the base of the foundation
- 5 Calculation of the load from the building required
- Diagram 6 Estimated height of the foundation
- The structure of the future building, as well as building materials that will be used in the construction of the structure.
- Mass of all building structures, taking into account the weight of load-bearing walls, ceilings and roofs.
- External climatic factors, such as the duration and snowiness of winter, the accumulation of wet snow, the duration of showers.
- Type and arrangement of soil.
- Uniform distribution of building mass.
- Prevents local heaving of the soil due to seismic shocks or the impact of deep soil layers.
- Strengthens weak soils with its mass and presses them to strong soils.
- Ensures the uniformity of the device of the building itself on a horizontal plane.
- k(n) – safety factor, taken as 1.2. This coefficient means that already initially the sole area will be 20% more than the calculated one;
- F – Calculated base load. It consists of: the mass of the building, the loads from the soil, the mass of the foundation;
- k(c) – coefficient of working conditions, taking a value from 1 for clay and rigid structures with stone walls, to 1.4 for coarse sand and non-rigid structures;
- R – design soil resistance (these are tabular data). You can find them in reference books for all types of soils.
- Masses of load-bearing walls and ceilings (here the amount of building materials required for the construction and their total weight is calculated).
- Coated roof masses.
- Masses of a snowball that can be fixed on the roof and press down with its mass, transferring the load to the load-bearing walls and foundation.
- The weight of all furniture, appliances and laid communications (this indicator is insignificant, it is often neglected or a coefficient of 1.1 is set).
- The weight of the foundation itself. Here already there is a difficulty in the calculations, because the area of the sole also affects the mass of the base. Therefore, a strip width of 40 cm is assumed, knowing the length of the building from the project, the density of concrete (2400), all this is multiplied and the weight of the foundation is obtained.
- First you need to make a sand and gravel cushion at the bottom of the trench, on which the foundation itself will lie. The thickness of the layer varies between 25 – 40 cm (depending on the type of soil), and this is an additional height of the structure.
- Depth of soil freezing (reference data).
- You also need to make a plinth up to 30 cm, sometimes more, depending on the type of soil and design solutions.
- 25 cm for light fences, eg corrugated board or picket fence with 0.5 brick plinth.
- 38 cm for heavier fences, wrought iron or shaped pipe with a masonry thickness of 1 brick.
- 51 cm for brick fences with plinth laid with a masonry thickness of 1.5 bricks.
- First, the marking of the territory is carried out in accordance with the project according to the lighthouses, which are installed by the measurer in agreement with the client. The axes of the fence are marked with a cord.
- The next step is to prepare the trench. The pit is dug in accordance with the calculations made, taking into account the size of the sand cushion and with a margin in width for installing the foundation formwork.
- Special holes are drilled to install the supports. Wells are made in pre-marked places with a drill with a margin of 20 mm.
- Anti-corrosion-treated supports from a profile pipe are installed in the holes, aligned vertically, and supports for gates and gates are additionally reinforced.
- Foundation formwork is best made from plywood. This material allows you to perform all the work as quickly as possible and make the formwork even.
- As a sand cushion, coarse sand is used, which will pass water well.
- Reinforcement is then installed into the formwork. Connect the elements by welding or viscous.
- Concrete mixture is poured into the formwork with the help of a special sleeve and compacted with vibrating machines.
- After the concrete has hardened by at least 70%, the formwork is dismantled, the slopes are backfilled and compacted with soil.
- 23 m2 of geomaterial;
- 1.6 m3 of sand;
- 3.2 m3 of crushed stone;
- 2.4 m3 of concrete;
- 216 linear meters of reinforcement with a section of 10 mm;
- At least 20 linear meters of drainage pipe and all fittings necessary for it.
- The name itself speaks for itself – tape, which means that the foundation for all the walls of the garage is made, as it were, with a tape around the perimeter. Please get acquainted with the information about the purpose of the foundations, the types of materials from which they can be made in the article – why do I need a foundation so that I do not repeat myself. And we move on.
-
The advantage of a strip foundation is that it transfers the load to the base (soil) evenly, which is especially important for heterogeneous and weak in compressibility, subsidence microporous soils. The width of the base of the foundation is determined based on the size of the load on it, as well as the calculated resistance of the soil itself.
- The width of the foundation for the garage on top is arranged, as a rule, by 100-120 mm more than the thickness of the wall, performing a cut on each side (the cut is the plane of the top of the foundation, on which the elevated part of the structure is based – we have garage walls).
- Rectangular;
- Trapezoidal;
- Stepped;
- Rectangular foundations with cushion.
-
Prefabricated foundations
they are assembled from blocks – concrete or reinforced concrete factory production, which implies a number of advantages – reduced labor costs, saving time, facilitating construction during the winter period of construction. They, as a rule, consist of blocks – pillows, on which rectangular wall blocks are installed. Blocks – pillows can be mounted on sandy preparation with a thickness of 100-150mm or leveled ground. -
Tape monolithic foundations
carried out directly on the construction site. They are arranged from materials such as concrete, reinforced concrete, rubble concrete, but. -
Any construction begins with preparatory work. I described them in great detail in the article – the work of the preparatory period of construction. Their list also depends on where the construction site will be located. In addition, geodetic work, demolition and clearing, site planning and other points are considered.
Trenching - We carry out earthworks for digging trenches under the foundation. This can be done manually or mechanized. We clean the base, tamp it down and level it with a layer of sand 100 mm thick. We calculate the depth of the trench based on the calculation – the depth of soil freezing in your area plus 100mm.
-
The width of the foundation depends on the structure of the soil. If it is uniform and dense, then the width of the foundation can be equal to the thickness of the wall. If the soil is of a heterogeneous structure, then here the width of the foundation will be equal to the thickness of the brickwork (one and a half bricks, for example = 38 cm) plus 10 cm, for a total of 48 cm (round up to 50 cm). From practice I can say that this is more than enough.
- The width of the trench should be, subject to the installation of the formwork, 30 to 40 centimeters more than the width of the foundation, so that the formwork can be mounted and fixed. With ideal soils that hold slopes well, you can do without formwork altogether, since the vertical walls of the slopes will replace it.
- We install formwork. All stages of formwork installation, recommended materials for it, fastening method and quality indicators are described in a special article – how to install formwork for a foundation. Click on the title and the article will open.
-
In order for concrete to work in tension and bending, it is reinforced. Reinforcement of the foundation for the garage is carried out with welded frames or meshes. The reinforcing mesh is welded or knitted and installed in the formwork so that the protective layer of concrete is maintained. In terms of diameter, it is sufficient to use a diameter of 14 -16 mm class A III. The installation of reinforcing products in the formwork is carried out only after checking its compliance with the design dimensions. In addition, an act is drawn up for hidden work on reinforcement.
Foundation concreting -
The concreting of the foundation structure includes the preparation, transportation, placement of concrete into the foundation structure, proper maintenance until the concrete acquires the required strength. The brand of concrete is determined by the project, but for the foundation of the garage from my practice, the M-150 brand is enough. If you prepare concrete on site, then you can see the ratio of inert and binder components for any brand of concrete in the article – concrete preparation for floors.
-
Together with the strip foundation, we fill in the plinth with a height of 200-400mm – in
Garage foundation ready
depending on your preference and site slope. The plinth can also be made not of concrete, but, for example, of brick. After the concrete has set, we remove the formwork and fill the sinuses with soil compaction. All. - Coating reinforcement.
- Construction of formwork for the structure.
- Moisture protection.
-
Filling the foundation with concrete mass.
- Foundation calibration.
- Calculate the weight of the structure from the reference data (P).
- Determine the soil resistance force (R) from tabular data.
- Calculate the area of the supporting surface: S=P/R.
- Weak soils. They have the ability to change position, move. These include loams, as well as fine dusty and sandy soils, powdery sandy loams. Such soil must necessarily be subjected to additional compaction. Vibrating plates or other devices are used depending on the construction conditions. Compaction is allowed in an already dug and prepared trench, and even in a foundation pit. Soils of this type do not retain moisture, therefore, after tamping, any type of foundation is erected.
-
Gravel and sandy soil. They do not need additional sealing, they are able to withstand massive buildings and foundations. Allows you to build foundations of any type.
- Rocky ground. They do not move, are not subject to deformation under the influence of low temperatures, and are not washed out. Due to their high bearing capacity, they are considered the most durable.
- Clastic soils. In many ways, they are similar in their characteristics to rocky soils, they are able to withstand the enormous weight of the entire structure.
-
Clay soil. Builders and specialists consider them problematic for any construction. The main problem is the inability to pass water freely. Moisture accumulates inside and freezes when cold weather sets in. The soil begins to change its shape and put pressure on the foundation. The pressure force can reach 5 tons per cubic meter. A deeper foundation, which is located below the freezing line, allows to solve the problem. Sometimes the soil near the foundation is insulated, preventing moisture from turning into ice. Of the expensive methods, there is a special drainage system that can drain a large amount of water from the soil that is in contact with the foundation.
90 for calculating the values of the foundation
Any foundation, regardless of type and device, is characterized by such parameters as the depth and width of the supporting structures. Many developers take the thickness of the load-bearing walls of the house as the width of the foundation, but this calculation is not always correct. The depth of the sole is also calculated by eye, taking into account personal experience and minimal knowledge in this area, but this is not worth doing.
In fact, the dimensions of the strip base depend on many factors, here the length of the strip is not taken into account, because these are the dimensions of the future house. But the width of the strip foundation and the depth of occurrence is calculated separately, and this must be done for each building individually.
Important parameters for determining the dimensions of the base
Table with the calculation of the specific gravity of structural elements for calculating the thickness and depth of the base

There are no clear regulations, where there are all the necessary formulas for calculating the maximum allowable size of a house. There are empirical calculations, according to which the strip foundation is then built, and the overall dimensions of the structure will be provided by the architectural service.
Determination of the type of soil
Calculation of the width and depth of the foundation depending on the freezing of the soil
Not only the depth of the foundation, but also the width of the bearing sole depends on the type of soil. Since there is a factor of heaving of the soil in winter, and this property of the soil can lead to irreparable destruction of the foundation and the house.
It is possible to determine the type of soil not only with the help of specialists, but also by handicraft methods. To do this, it is enough to take the earth and moisten it with water, and then bend it into a ring. Clay will retain its structure. Loam crumbles into several parts, and sandy soil immediately crumbles into powder. So you can determine the structure of the soil. Sandy soil with a fraction of 1.5 mm perfectly withstands heavy loads, it is optimal for the construction of strip foundations and does not contain much moisture.
Next, you need to determine the depth of groundwater. To do this, you can go to the nearest well and measure the depth of the water reservoir, this should be the maximum height of the ground horizon. With the help of small mathematical calculations, the depth of the aquifer will be calculated.
You don’t have to do a soil analysis yourself. It is enough to contact the geodetic service. It will give a complete map of the composition of the soil, even taking into account the depth of soil freezing, and this parameter for choosing the depth of the sole will be considered key.
 ” src=”https://www.youtube.com/embed/U2VTh-4_pjA?feature=oembed” frameborder=”0″ allow=”accelerometer; autoplay; encrypted-media; gyroscope; picture-in-picture” allowfullscreen=””>
How to calculate the depth and width of the base
Table with the recommended depth of the strip foundation depending on the soil
Once the soil composition and the depth of groundwater are clearly determined, you can begin to calculate the dimensions of the base. If the building is massive enough, high and has several floors, then the depth of immersion of the base should be large, up to the border of soil freezing.
Builders who have the financial resources are trying to deepen the foundation even lower, thus providing the foundation with greater strength and reliability. The height above the zero level should be up to 30 cm, sometimes more, for arranging the basement and the blind area.
So, the minimum depth of the strip foundation for massive buildings should be SHG + 60 cm. SHG is the depth of soil freezing. This is a table value, different for each region and soil composition. For light buildings, it is enough to equip the foundation at a depth of the freezing line or below 50 cm. In such cases, it is believed that due to the mass of the structure and the tape of the base itself, the soil will spread evenly under the sole, and swelling of the soil should be minimal.
The standard thickness of the strip is 40 cm, it can be increased as needed, but it should not be less than the thickness of the building’s load-bearing walls.
Calculation of the area of the base of the foundation
Table with the calculation of the minimum base and the width of the strip base
The area of the base is responsible for the uniform distribution of the mass of the entire structure together with the base on the ground. Therefore, it will not always correspond to the width of the tape, in most cases it is larger. Moreover, the sole is also responsible for the following functions:

The area of the sole is calculated by the formula:
S = k(n)*F/k(c)*R
where:
In fact, all the parameters are reference, so it remains only to calculate the load from the building itself.
Calculation of the load from the building
Table with the calculation of the width of the tape base depending on the material of construction (for a house made of foam blocks and bricks, a house made of timber) in the middle lane
This parameter is calculated by summing up all the loads that the building creates on the base:
 Therefore, a strip width of 40 cm is assumed, knowing the length of the building from the project, the density of concrete (2400), all this is multiplied and the weight of the foundation is obtained.
 Design Height of Foundation
Design Depth, Width, and Height of a Strip Foundation for a Foam Block, Brick, or Timber House in the Middle Lane
The height of such a foundation must be large enough to withstand horizontal ground movement and groundwater action. The height of the strip foundation, knowing the depth of freezing of the soil, is also not difficult to calculate. But at the beginning of the construction of the foundation, the height will be completely different, and here’s why. It consists of the following layers:

Now that all the necessary parameters of the future strip foundation are available, it is not difficult to calculate the required amount of reinforcement and concrete mortar for its arrangement. If the filling is carried out strictly according to the technology, then the base will last the maximum possible period.
How to determine the depth and width of the foundation for the fence
Select type of fence
forging
from chain-link
from a picket fence
from profiled sheet
grid gitter
Choose your fence color
Fence Visualizer
Full version
The fence is the first thing that visitors and ordinary passers-by see.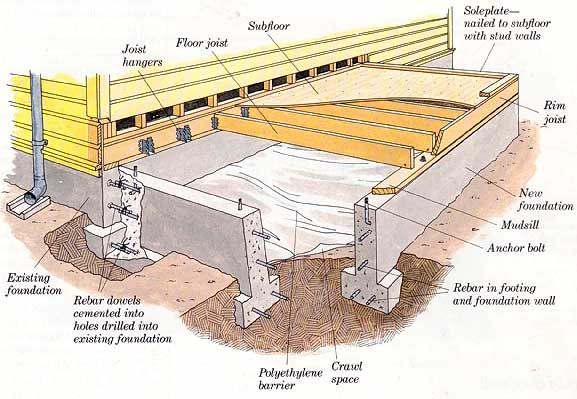 The impression of your home depends on its appearance and functionality. To make the fence effective and reliable, it should be installed on a strip foundation. How to determine the dimensions of this structure?
In fact, the foundation is only the basis, the supporting structure for the fence. But its presence allows you to implement almost any fencing project. You get the opportunity to decorate the fence with powerful brick or stone pillars, make a beautiful plinth for the whole structure, etc. At the same time, the foundation also has a purely practical function. It significantly extends the life of the structure and prevents small animals from entering the site.
By itself, the installation of a strip foundation for a fence is not so complicated. However, one should not make mistakes in the calculations here. Otherwise, the fence will begin to quickly collapse, and all the advantages of such a fence will come to naught.
How deep should the foundation be
Typically, the depth of laying is selected taking into account the type of soil and climate in a particular region. According to the rules, the depth of the foundation for the fence must exceed the depth of soil freezing. But in Russian conditions, it is not possible to dig such a pit, because our soil freezes by more than 1.5 meters, and even more in the north of the country.
Experienced fence installers believe that high quality construction can be achieved by deepening the strip foundation by only 40-50 cm. You can make it deeper, but keep in mind that this will increase the cost of work due to increased material consumption and increased labor costs. To make a reliable foundation of small thickness, you need to pay attention to 3 important things: strengthening the sand cushion, reinforcing the structure and choosing the right concrete.
Reinforced sand pad
Most often, filling the trench for the foundation with sand, the craftsmen are content with a layer of 10 cm. The sand allows you to evenly distribute the load from the fence. In our case, it also plays another role. For a shallow foundation, the sand cushion is made thicker – about 20 cm. Sand passes water well. Therefore, even on heaving soils, there will always be a layer of dry material under the fence, which will significantly reduce the risk of soil swelling and deformation of the fence.
Foundation reinforcement
The main task of reinforcing reinforced concrete structures is to strengthen them in places of tension. Based on this, reinforcement is produced in those areas where the risk of stretching is maximum. For some structures, this will be the top layer, for others, the bottom. But there are objects that are subjected to variable loads, so the reinforcement procedure for them has its own characteristics.
Strip foundation refers to this type of structure. Therefore, during its construction, reinforcement is laid both in the lower layer and in the upper one. Between them, it is necessary to pour a protective layer of concrete 3 cm thick. The reinforcement at the bottom of the foundation will protect the fence from swelling of the soil, and the reinforcement of the upper layer will allow it to take on the load from a heavy fence.
Selection of concrete grade
Cast-in-situ foundations must be cast using B 22.5 heavyweight concrete. The strength of such material is M-300, it is resistant to frost and has low water permeability. But with all the excellent characteristics, such concrete loses all its properties if the filling is not done according to the rules. It is enough for air bubbles to appear in the material, and its characteristics will deteriorate significantly. Therefore, submersible vibratory devices should be used to work with concrete. They force all the air to “come out” of the material, and also improve the adhesion of the material to the reinforcing elements.
Note: A foundation depth of 400 mm is optimal for most soils. But for areas with swampy soils and a high level of groundwater, the depth of the bookmark is calculated individually.
Fence foundation width calculation
The base width is the area on which the railing will rest. The wider the strip foundation, the lower the specific load indicator. To calculate how wide the foundation you need, you need to take into account not only the specific load, but also the composition, as well as the density of the soil. The specific load parameters for each type of soil are already known. So all you have to do is divide the weight of one span of the fence by this indicator, and divide the result by the length of the span. This will give you the exact width of the base for a particular fence. Add 30% to this figure for a reserve, as the bearing capacity of the soil varies with the season and its saturation with moisture.
Experts have already calculated several standard widths:
If it is planned to install brick supports for light fences, the foundation should be expanded to 51 cm in the places where they are installed.
The specialists of our company will make an accurate calculation of the depth and width of the foundation required for your fence, taking into account all the features of the terrain, soil and type of fence.
Foundation construction
Construction of the foundation by the specialists of our company is carried out within strictly stipulated terms. In the process of work, we strictly follow the established technology, follow all the rules of construction, which is a guarantee of an excellent result.

After completion of the work, a visual inspection of the integrity of the foundation is carried out. The structure is checked for cracks and other defects. And with the help of special devices, the accuracy of the geometry of the foundation is controlled.
July 19, 2018
Minimum garage foundation depth
We make a slab foundation for a garage from foam blocks with our own hands
The first thing with which the construction of a garage begins is the choice of the type of foundation for future construction and its manufacture. Foam blocks are often used as a material for the manufacture of garage walls, because it is a practical, warm and relatively light material.
So what is the best foundation for a foam block garage?
We will try to answer this question in this article.
Requirements for the base and the influence of the type of soil on it
The most basic requirement is durability. The foundation structure must withstand the load from the walls and at the same time not sag to avoid cracks.
The second is practicality – some types of foundation can serve not only as a base for walls, but also as a floor for a future garage. And the last thing is that the structure should be protected as much as possible from the negative influence of the soil on which it is installed. For example, it is heaving and high humidity.
Based on these requirements, we can conclude which foam block foundation for a garage is preferable.
Please note
If a
soil type heaving
, for example, clay or loam, then two types of foundation can be used – this
pile-screw and slab
. The strip foundation immediately disappears, because.
to. it will need to be buried below the freezing point of the soil, and this will require additional costs.
A pile-screw is not very suitable for a building such as a garage, because there will definitely be a problem with organizing the floor, moreover, when building a garage, it is often necessary to organize an inspection hole in it, which in this case will be impossible.
A slab foundation in this case will be the best option, since it will also be used as a garage floor at the same time, and there will be no problems with organizing a viewing hole.
At a high level
ground water
version with base
monolithic slab
will also be preferable to all the others, for the reason that it does not need to be deepened over a long distance, but it is enough to lower it to a depth of no more than 30 cm.
If a
sandy or rocky soil
, then you can use
shallow strip foundation
on a sand bed. In the future, you will have to separately fill the floor, which is not very convenient. The slab foundation, due to the fact that it is made by one monolithic reinforced slab, will be more reliable.
From the foregoing, we can conclude that, other things being equal,
slab foundation is the best fit
t for the construction of a garage on its basis. Consider how to properly make a slab foundation with your own hands.
Calculation of the slab foundation
Now consider how many materials will be required for the construction of a slab foundation.
An example of calculating a slab foundation
The optimal dimensions of the foundation for a garage of foam blocks are 4 by 4 meters, that is, an area of 16 square meters. The first thing that is needed is
geotextile
, which covers the bottom and side walls of the pit for the future foundation.
We know the area of the bottom of the pit, it remains to calculate the area of the side walls. To do this, we multiply their length by the width: 16 m * 0.3 m = 4.8 m2. This means that in order to cover the entire pit with side walls, 20.8 m2 + 10% for overlapping will be required.
Next, we calculate
amount of sand and gravel.
To do this, multiply the surface area by the height of the pillow of each of the materials. For the normal functioning of the sand cushion under the foundation slab, a layer of 10 cm is enough, respectively, 20 cm remains under the gravel. As a result, we get: 0.1 m * 16 m2 = 1.6 m3 is the required volume of sand. 0.2 m * 16 m2 = 3.2 m3 is the volume of crushed stone.
Important
Now let’s count
solution volume
. For a foam block garage, the minimum concrete thickness must be at least 15 cm. Accordingly: 16 m2 * 0.15 m = 2.4 m3 of concrete.
For reinforcement, it is better to use metal
rebar
section not less than 10 mm. Its step should be approximately 15 cm. The length of the whips should be exactly 4 meters, along the width of each side.
To determine the required amount of reinforcement, it is necessary to divide the length of the side by the pitch of the reinforcement. As a result, we get: 4 m / 0.15 m = 26.6 round up to 27 pieces and multiply this number by 2, since the reinforcement should be laid perpendicularly. As a result, you will need: 54 pcs * 4 m = 216 running meters of reinforcement.
Also for organizing
drainage system
a perforated drainage pipe is required, which is laid along the perimeter of the foundation in a layer with crushed stone to cut off moisture from the soil. Its total length is equal to the length of the perimeter of the foundation and is 16 linear meters plus the amount necessary to bring the drainage to the receiving well.
To summarize, for the construction of a 4 x 4 foundation from a monolithic reinforced slab, you will need:
It should also be noted that a minimum of 16 meters of running boards will be required for construction
formwork
.
Do-it-yourself slab foundation, step by step instructions
The construction of any building begins with
preparing a place for it.
The area should be cleared of old stumps and young shoots of trees, if any. After that, you can start marking.
Foundation layout
Marking is one of the important stages at the beginning of any construction, because it depends on how smooth the future building will turn out.
The second reason why marking should be taken with the utmost responsibility is that incorrect marking can lead to problems in the construction of walls and especially the roof of a future garage. Consider how to mark the foundation for the house with your own hands.
For marking, you must have a tape measure, twine or construction cord, as well as wooden stakes. Work must be carried out with a partner, because it is rather problematic to do this alone.
Tip
First of all, it is necessary to measure and mark with stakes the location of any of the sides, along which you can orient the position of the future garage relative to other buildings.
Further, it is necessary to designate three other sides. This is done alternately for each of the sides, trying to maintain an angle of 9 by eye.0 degrees, between the main side (from which the countdown comes) and the side adjacent to it. After the sides are approximately marked, it is necessary to align the diagonals.
So, the markings have been made, the diagonals are the same and all sides of the future garage are four meters, now you can start sampling the soil.
Soil sampling
As mentioned earlier, for a garage measuring 4 * 4 meters, a monolithic foundation slab 15 cm thick and a well-packed pillow 30 cm are sufficient.
For a foam block garage, a foundation depth of 30 cm will be enough.
It is more convenient to sample the soil using a construction cart, which will allow you not to throw out the earth along the edges of the future foundation, but immediately take out the fertile layer to the place where it can come in handy.
We make reservoir drainage and a sand cushion
After the soil is selected, it is necessary to level the bottom of the resulting pit as much as possible, and then lay it
geofabric
. It is necessary to filter the moisture that will penetrate from the ground into the pillow, and then removed from it with the help of drainage. The fabric is spread with an overlap of 10 cm, while the edges of the pit must also be covered.
At the next stage, it is poured into the pit and compacted
sand
. The thickness of the sand layer should be 10 cm, and you should try to make the sand bed as even as possible. As a rammer, it is most convenient to use a vibrating plate, this is a special installation with a gasoline engine, which compacts the sand due to the vibration of its platform.
Further, in a similar way, it is poured
rubble
and is also rammed, and in parallel, along the edges of the perimeter is laid
drainage pipe
.
The thickness of the gravel layer should be approximately 20 cm, while the drainage pipe for such a foundation system can be used not thick with a diameter of 110 mm, but medium, for example, 50 mm with an additional filter winding.
At the same stage, the
manholes
for the drainage system.
It is worth remembering that the drainage pipes must be laid with a slope that should not be less than two degrees. After the crushed stone layer is compacted, it is necessary to carry out
waterproofing
. Any available roll material can be used as insulation.
Further along the outer edge of the perimeter, a
formwork
. Its height must be at least 15 cm. If a 20 cm wide board is used as a formwork, then after installation, using the building level, it is necessary to mark the level to which the concrete will be poured.
Please note
The last stage of preparation for pouring the foundation is knitting reinforcement. Knit
rebar
using a special knitting wire.
The reinforcement must be lifted with the help of special linings, this is necessary to ensure the minimum necessary protective layer of concrete.
Pouring concrete
The last stage of foundation construction is the pouring and leveling of concrete. For the foundation for a garage of foam blocks, concrete grade M100 is suitable.
To pour the foundation slab with your own hands, you will need to have a concrete mixer, but it is much more convenient to order concrete from a specialized organization that will put it on the site in a mixer and pour it into the formwork using special dispensing sleeves.
Plus, when buying ready-made concrete, you can be sure that it corresponds to the declared brand. While with its independent production, often batches are made with approximate observance of proportions. In addition, preparing almost three cubes of concrete is a rather laborious process.
After the concrete is poured, it is left for a day to set the fortress, after which it must be poured with water and covered with plastic wrap. Thus, it is possible to prevent the appearance of cracks that occur due to its rapid drying.
Conclusion
Independent production of a monolithic shallow slab foundation for a garage from foam blocks is a simple process. If desired, anyone can cope with it, even without skills in construction.
The cost of such a foundation will be lower than that of a strip foundation, and in addition, you will get a ready-made floor. If necessary, in the process of its manufacture, you can immediately prepare and fill in the inspection hole.
Source:
Делаем плитный фундамент под гараж из пеноблоков своими руками
Foundation for garage laying depth
In contact with
Classmates
Google Plus
Many who want to build a house with their own hands are wondering ”
How deep to lay the foundation
? In order to understand this issue, you need to understand what the depth of the foundation depends on.
The main factors affecting the depth of laying are the level of groundwater, the depth of seasonal freezing, the type of soil and the bearing capacity of the soil. In previous articles, we talked in detail about all these factors. All these conditions must be considered together.
The main criterion for choosing the depth of the foundation for the house, from which we will build on in this article, will be the type of soil on the site. We will consider the depth of the strip foundation, when laying it on sandy and clay soils.
Important
In this article, only the strip foundation will be considered, because. columnar and screw is better to lay at the depth of soil freezing.
So, let’s start with sandy soils. This is the perfect foundation for any home. The depth of the foundation does not depend on the level of groundwater and does not depend on the depth of seasonal freezing.
Such soils are the least susceptible to the forces of frost heaving. they pass water well.
Even if the water is high, it is distributed evenly over the entire area and, when frozen, will push the foundation out evenly, which will not affect the integrity of the base and the entire structure.
The depth of laying the strip foundation for a house on sandy soils is at least 0.5 m. With greater depth, the earth becomes denser and the bearing capacity of the soil increases, which allows you to build heavier houses, but at the same time the cost of the foundation increases.
It should be noted that at a high level of groundwater, strip foundations should be made monolithic with reinforcement. Such reinforcement will give your base the strength that will allow you to rise and fall without breaking when water freezes and thaws.
Now let’s consider how the depth of the foundation changes, if there is clay soil on the site. The group of such soils includes clay, loamy, loamy silty, sandy loam.
The main feature of such soils is that they do not pass water well and swell strongly at low temperatures. Unlike sandy soils, clay soils swell unevenly; at one angle, buildings can rise by 5 cm, and at another, for example, by 20 cm. As a result, the structure is skewed, which leads to the destruction of the house and foundation.
Tip
Therefore, the depth of laying the strip foundation on such soils cannot be the same as on sandy ones.
See also:
The right choice of a contractor for building a house: how to find a team of craftsmen and not miscalculate
Any type of foundation is suitable for such soils, but it will have to be laid to the freezing depth i.e. to the depth where the water does not freeze during low temperatures, and therefore there are no frost heaving forces capable of pushing the foundation out. The depth of freezing can be viewed on the climate map, which we have on our website (link).
The depth of the foundation can be significantly reduced, but for this it is necessary to carry out a number of measures. These include replacing the soil with sandy soil, followed by compaction, insulation of the foundation, link).
The foundation on such lands should be made monolithic with reinforcement, regardless of the type chosen.
Source:
http://www.krepkoeradi.ru/obschee/78370-fundament-pod-garazh-glubina-zalozheniya.html
Foundation device for garage | School repair
The main purpose of the foundation is the perception of the load from the overlying walls, floors, roofs and its uniform transfer to the foundation soil.
The further stability and durability of future garage walls will depend on how competently you arrange the foundation. And in turn, the stability of the foundation for the garage directly depends on the type and properties of the base soil.
The ideal soil for construction is considered to be a homogeneous, low-compressibility soil that does not have quicksand and is not eroded by groundwater. This is a sign that the soil does not shrink, does not sag or swell.
However, unfortunately, in the conditions of a construction site, not every soil meets these requirements.
The most optimal soil for construction is rocky soil, it practically does not shrink and does not sag, and due to its properties it also practically does not freeze.
It could be considered ideal for building a foundation for a garage, if not for one thing, but, namely, the laboriousness of earthworks.
Therefore, in such soil, trenches under the foundation do not break through, but arrange a garage directly on the surface of the soil. Having previously leveled the site.
Please note
Gravel soil also does not shrink and is not washed away by groundwater. Also in these soils, the freezing depth is rather small, about 50-55 cm. Therefore, the depth of laying the foundation should be slightly greater than the freezing depth by about 10-15 cm.
The main disadvantage of clay soils can be considered their ability to swell when freezing. In addition, they have the ability to compress and put pressure on the sole of the foundation. As a rule, the humidity of such soils is quite high, which is why the depth of their freezing is much greater.
Therefore, the depth of laying the foundation should be greater than or at least equal to the calculated freezing depth of these soils. This condition is due to the fact that heaving soil settles unevenly, which in turn causes uneven settlement of the foundation.
And the uneven settlement of the foundation leads not only to the formation of cracks in the foundation, but also in the structure of the walls. Thus, uneven settlement of the foundation is excluded.
Sandy soil also has many advantages: a small freezing depth, practically does not shrink under load and has a high porosity, due to which it quickly passes and does not retain water. At the same time, the depth of laying the foundation on a site with such soil can vary from 45 to 75 cm.
Sandy loam is a soil consisting of a mixture of sand and clay or loam – the content of clay particles in which is up to 30%. Water in such areas passes rather poorly, which is why the soil freezes deep enough about 1.5-2.0 m. Therefore, it is necessary to build a foundation in such soil, lay it to a depth no less than the calculated freezing depth.
Even with individual construction, the normative and estimated depth of soil freezing in your region can be found in any design construction organization.
Unsuitable soils, such as peat, silt, fine or silty sand mixed with clay or silt, which form quicksand when wet, are replaced by a special cushion of coarse-grained sand, laid in a trench with a compacted layer of 20–25 cm.
Important
An important role in the construction of the foundation for the garage is played by the depth (level) of groundwater. With a high level of groundwater, the base of the foundation is buried below its level. For example, if the soil is dry enough, then at a low groundwater level exceeding the freezing depth of the soil by more than 1.8-2.0 m, the foundation should be laid to a depth of at least 55 cm.
If the level of groundwater in winter is less than the freezing depth of the soil plus 2 m, then the depth of laying the foundation should be approximately equal to the freezing depth with partial replacement of its part below 55 cm with clean coarse sand or fine gravel.
If the distance from the level of groundwater to the surface of the earth is less than the freezing depth, then the depth of such a foundation should be slightly greater than the freezing depth.
Uneven subsidence of the foundation and, as a result, the formation of cracks, both in the foundation itself and in the walls of the garage, is facilitated by the washing out of the soil from under the base of the foundation, which occurs due to its prolonged moistening by rain, melt or technical water, for example, while washing the car etc.
Therefore, in order to prevent this from happening with your garage, it is necessary to make a vertical layout of the site in advance and give the site a slight slope from the building. It is also necessary to provide a blind area device.
Most garage owners prefer strip foundation designs. For the construction of a strip foundation for a garage, you can use rubble stone, bricks, monolithic concrete, rubble concrete and, of course, precast concrete.
The prefabricated strip foundation is mounted from concrete foundation blocks 50–60 cm wide. With significant loads on the walls and roof, the base of the lower row of blocks should be completed with a reinforced concrete pillow, it can have different widths, but the minimum width of the pillow should be 60 cm.
Installation of reinforced concrete blocks due to their dimensions is carried out with the help of special equipment, or rather a truck crane.
Tip
If a
strip foundation for garage
is carried out with the help of rubble concrete, then a layer of concrete with a thickness of about 25-30 cm is poured into the formwork. After that, rubble stones are placed on the not yet hardened layer of concrete solution.
The layer is built up to the very top. The minimum thickness of the walls of the rubble concrete foundation is 35 cm, and from the rubble stone on the mortar – 50 cm (example in Fig. 168).
In terms of strength characteristics, such foundations are in no way inferior to monolithic foundations.
Rice. 168.
Concrete strip foundation
:
1 – horizontal waterproofing; 2 – blind area; 3 – rubble stone
The laying of a rubble strip foundation is carried out under the bay at odds with the walls of the trench. For erection, large “bedded” rubble stones with a thickness of about 25 cm are selected, which are laid dry on compacted and rammed soil.
Blocks should be laid as tightly as possible, but if there are voids, they must be filled with small stones or rubble. After that, the stand must be thoroughly compacted with a rammer and a sledgehammer. Next, everything needs to be poured with a liquid concrete solution.
If your site has dry sandy soils that serve as the basis for
garage foundation
, then for the construction of the foundation itself, you can use a red brick (an example in Fig. 169).
The method of laying the foundation wall is no different from that used in
masonry of the building’s load-bearing walls
.
However, no matter how dry the soil is, care must be taken to
high-quality waterproofing of the foundation
. Also, when constructing a brick foundation, it is necessary to make a monolithic concrete sole.
Rice. 169.
General view of the brick strip foundation
:
Please note
1 – horizontal waterproofing; 2 – blind area; 3 – brickwork; 4 – monolithic foundation slab
You can also opt for a monolithic strip foundation.
The device of such a foundation is as follows: first, a trench is dug with a depth slightly greater than the freezing depth and a width of 35 cm. Then crushed stone preparation is arranged under the future foundation.
To do this, a layer of coarse sand of about 15-20 cm is laid and compacted at the bottom of the trench, and a layer of crushed stone of about 30 cm is rammed on top.
In order to prevent the leakage of cement laitance, a layer of crushed stone should be poured with cement mortar.
Further
formwork is mounted
around the perimeter of the trench.
To do this, strictly vertical plank shields are installed on both sides of the trench, the height and distance between them is equal to the height and thickness of the future foundation. From the outside, the shields are reinforced with stakes driven into the ground.
And at the top, the formwork panels are connected with wooden planks, since during the process of pouring concrete, the panels can disperse by themselves, violating the geometry of the foundation.
Next, it is necessary to waterproof the foundation for this, the walls of the trench and formwork are covered with a rolled waterproofing material.
If necessary, you can perform
foundation reinforcement
. To do this, a frame is knitted from metal reinforcement with a cross section of 8 – 12 mm.
Important
After carrying out all the preparatory work, you can begin to prepare the concrete solution.
Concrete for a monolithic foundation is prepared on cement grade M300 or M400. Coarse sand and crushed granite serve as a filler.
The concrete solution is prepared in accordance with the parts: cement – 1 part, sand – 3 parts, crushed stone – 4-5 parts.
Water is added in portions in a small amount, so much that plastic homogeneous concrete is obtained, which is placed in the formwork with light tamping.
The harder the concrete is, the stronger it will be.
Concrete is laid in stages, in small layers about 10-15 cm thick, with careful tamping. A monolithic foundation must be poured in one go, but if for some reason the concreting is not completed and the concrete is dry, then its surface must be watered abundantly with water and continued.
The width of the strip foundation should be 10–15 cm greater than the width of the overlying walls. With insufficient bearing capacity of the soil under the base, it is necessary to increase the width of the base of the foundation; for this, a transition is made from the upper to the lower part with ledges.
Concreting is carried out in two stages. At the first stage, the formwork is mounted and the lower, wider part of the foundation is concreted. Then a new formwork is made on top of it and the upper part of the foundation is poured.
Fasteners or embedded elements and recesses in concrete necessary for further construction and repair, for example, for
plumbing
or
sewers
done immediately, while the concrete has not yet seized.
Tip
As we noted above, the design of the future foundation directly depends on the characteristics of the soil and the level of groundwater at the construction site.
For example, if the groundwater level is above the base of the planned foundation, then the use of red brick for the construction of foundation walls is highly undesirable.
In this case, the foundation is buried below the groundwater level, and its side surfaces are carefully protected by waterproofing.
Professionals in their field do not recommend arranging a foundation of silicate bricks. Since, being in the ground, it collapses very quickly.
For greater protection of the walls of the garage, the foundation must be erected 20-30 cm above the ground. The elevated part of the foundation above the ground is called the plinth.
The basement part of the walls, as the most exposed to moisture, should be made of selected weather-resistant and frost-resistant materials.
Also in the basement it is necessary
perform horizontal waterproofing of walls
using roll materials or bituminous mastic.
For example, if you plan to arrange a cellar in a garage not under the entire building, then there is no need to lay the foundation under the entire building at this depth. Since it is uneconomical and impractical.
Please note
Building codes provide for such an option and prescribe at different depths of laying the foundation to provide for a smooth transition from one depth to another.
This is done with the help of ledges. For example, if the base soil is dense, then the height of the ledge is made no more than 100 cm, and the ratio of the height of the ledge to its length should be 1: 1. In case of non-cohesive soils of a loose structure, the height of the ledge should not exceed 50 cm, respectively, the ratio of the height of the ledge to its length should be 12.
Naturally, it is desirable to build a foundation as soon as possible: dig a trench and immediately complete the foundation.
Backfilling of the sinuses between the walls of the foundation and the foundation pit is mandatory. For backfilling, earth dug from the pit is used.
Floating garage foundation
In some regions of Russia, the depth of soil freezing ranges from 1.6 to 1.8 m. Therefore, if the groundwater level at the construction site is at a fairly high level, then
foundation and cellar of the garage
about the methods, the construction of which we spoke earlier, will be very expensive.
See also:
How to lay fbs blocks when building a foundation
But in any case, the cellar should not be abandoned. Especially when the construction technology called
“floating foundation”
.
For a floating foundation, a trench is dug 70-75 cm deep and wide in accordance with the plan of your garage. Concrete mortar is used as a material for our foundation, but rubble concrete is also suitable (it will be somewhat cheaper).
Once the trench is dug, you can start laying rubble concrete. It is laid along the entire length of the trenches, after which the reinforcing cage is laid. A metal skeleton of a floating foundation is knitted from a metal wire or strip. In our case, 4-6 bars of reinforcement are enough connected to each other at a distance of 30-40 cm using a soft knitting wire.
A layer of rubble concrete is again laid on top of the reinforcement. This action should be repeated several times: a layer of rubble concrete – a layer of reinforcement – again a layer of rubble concrete. And so on until the foundation reaches the desired height.
After the final execution, the floating foundation is kept wet (the surface of the foundation is wetted with water) for about a week and a couple more days in a dry state.
Inspection pit device
Many experts do not recommend arranging an inspection pit in a garage room, and the main reason for this is the evaporation coming from it, which forms condensate as a result of temperature changes.
And condensate, as we know, causes metal corrosion and, since the car consists of more than 90% of metal, standing, as a rule, above the same looking hole will be the first to be subject to condensate and metal corrosion.
The inspection hole should be located on the side of the machine.
But if it is not possible to build a large garage and there is simply no way without a viewing hole, then you need to try to make it at least away from the parking lot of your car. At the same time, it must be kept constantly closed with a light hermetic lid.
Important
Also, do not forget about groundwater.
It is impossible to arrange a viewing hole in the garage if the groundwater level is less than 2.5-3.0 m.
Waterproofing the garage
Thanks to the waterproofing layer, moisture does not penetrate into the construction material.
In order to protect the foundation being built for the garage from moisture, waterproofing is carried out at the level of the basement and the base of the foundation; for this, you can lay a layer of horizontal rolled waterproofing or coat the foundation surface with bituminous mastic.
For example, the external horizontal waterproofing of the foundation consists of a layer of cement mortar about 1. 5-2.0 cm thick, which, after ironing and drying, is covered with roofing material (an example in Fig. 170).
Ironing the foundation surface is already a good protection of the structure from moisture penetration, and in combination with roofing material, an even better effect.
Ironing of the concrete surface is carried out as follows: a layer of fresh cement mortar is applied to the surface of the base, which is still sprinkled with dry cement M400-M500 on a wet surface. After that, the surface is smoothed with a wooden or plastic board.
The resulting crust is very durable and practically does not allow moisture to pass through. A waterproofing layer is laid on top of it. We will tell you more about this below.
Rice. 170.
Foundation waterproofing device
:
1 – wall; 2 – base; 3 – blind area; 4 – cement mortar; 5 – a layer of rolled waterproofing; 6 – log; 7 – floor
To perform waterproofing, a bitumen-based composition is widely used. To prepare it, you will need bitumen and chalk in a ratio of 1: 1 or bitumen and sifted slaked lime in a ratio of 2: 1.
Tip
The prepared mixture is applied to the surface with a layer about 1 cm thick in several approaches. The waterproofing of the foundation should rise above the ground by about 25-35 cm.
We advise you to watch the video, which will discuss the main mistakes that are made when laying the foundation:
Errors in laying the foundation
Source:
Strip foundation for garage
And again I welcome you, dear readers. I remember the time when I got a place for a garage and started designing it. The first structural element is a strip foundation for a garage. Let’s take a quick look at the main points that precede the foundation device.
Ideally, if there is a project of an engineering company. Usually it is ordered by a garage partnership, a private person and other customers. Today there is a trend that in new buildings, houses and garages are designed in a complex for the inhabitants of this house, sometimes underground or boxes, which is very convenient.
Naturally, all calculations are performed by specialists.
However, at the initial stage, you should decide what building material you plan to build the garage walls from in order to determine the type of foundation.
If you have a metal garage, from a profiled sheet, then this is a mobile option – you made a concrete base, put a finished garage, made a blind area and you’re done.
Another thing is if this is a capital structure made of brick, limestone, concrete blocks, and other natural stones, then a foundation for a garage is needed.

Whatever the foundation, there are common points for it at the design stage:
It is necessary to perform soil geology in order to identify the type of soil, the level of groundwater occurrence – this determines the depth of the foundation and its geometric dimensions.
I propose for consideration a strip foundation for a garage in a monolithic reinforced concrete version.
General provisions
 The width of the base of the foundation is determined based on the size of the load on it, as well as the calculated resistance of the soil itself.
Types of strip foundations in cross section are divided into:
The garage is a small structure, so the strip foundation for the garage must meet simple design requirements, and, consequently, the cross-sectional shape (first and fourth types).
Strip foundations are of two types:
Strip foundation technology
It’s better to work with an example. Let’s set the size of the tape garage in terms of – 4×6 meters. The wall material is applicable, for example, brick. Now let’s go build.
 If the soil is of a heterogeneous structure, then here the width of the foundation will be equal to the thickness of the brickwork (one and a half bricks, for example = 38 cm) plus 10 cm, for a total of 48 cm (round up to 50 cm). From practice I can say that this is more than enough.
 Reinforcement of the foundation for the garage is carried out with welded frames or meshes. The reinforcing mesh is welded or knitted and installed in the formwork so that the protective layer of concrete is maintained. In terms of diameter, it is sufficient to use a diameter of 14 -16 mm class A III. The installation of reinforcing products in the formwork is carried out only after checking its compliance with the design dimensions. In addition, an act is drawn up for hidden work on reinforcement.
But a few more words about the fact that if you want to mount prefabricated foundations from blocks, then it is much faster, but requires the presence of lifting equipment.
The work we have considered on the installation of strip foundations provides for the construction of boxes without a viewing hole and a basement. We will talk about this in the following articles, since they have their own characteristics (waterproofing, drainage, ventilation and other nuances).
Source:
https://remont-stroitelstvo77. ru/lentochnyj-fundament-pod-garazh/
Do-it-yourself strip foundation for a garage
The popularity of the tape type foundation is due to moderate cost, ease of construction and long service life. A tape-type foundation is much easier to do on your own than it seems, and even inexperienced builders will have to do it. You just need to familiarize yourself with some of the subtleties of the work, which we will discuss in the article.
Compared to other types of foundations, such as screw-pile foundations, the tape-type foundation is perfect for the construction of structures with basements, warehouses and basements. It is also not necessary to plan the construction of a strip foundation for a house of a large area or with a deep foundation. For small buildings, baths or garages, such a foundation will be the best option.
Please note
Note! It is more expedient to lay the strip foundation on a dry, flat surface.
Strip base on level ground
The foundations of buildings of this type, as already mentioned, are erected on a flat, solid surface. Foundations of this type are highly discouraged from being built under buildings with a deep underground – this will require significant financial investments that are incommensurable with the end result. After the garage construction plan is ready, all the drawings are completed, you can start building.
Foundation device
Shallow
Basically, the construction of a strip foundation consists of the following steps:

The first step is to mark the elements of the building. Most often, the strip foundation has no more than 450 mm in width. Having marked the approximate perimeter of the foundation under construction, we hammer metal or wooden bars in the corners. At the next stage, we stretch a thin fishing line or wire between the bars. Similarly, we make internal markings (we take into account an indent of 450 mm).
Before starting the construction of the strip foundation, it is necessary to measure all the differences and surface irregularities. Stop the choice at the lowest point – you need to take a reference from it for digging a foundation pit, while the future foundation will turn out to be equal in height along the entire perimeter.
Calculation
Soil Density Test
A reliable method of calculating and planning construction is to look through a number of reference books, search for articles, study standards and follow step by step all the requirements described in the relevant literature. This method does not seem to be the easiest. That is why it is possible to make all the necessary calculations independently according to a simplified scheme, using ready-made mathematical calculations.
See also:
How to properly reinforce reinforced concrete grillage
The first step is to study the compaction, plasticity, homogenization and “water content” of the soil: moisture, sorption capacity, solubility and physical stability.
Groundwater levels need to be taken into account
The most important criterion for specialists is the depth of freezing and the presence of groundwater and other types of underground flow. The presence of cavities in the depth of the soil is extremely important, because the degree of resistance of the oppositely acting forces of the soil depends on them when a large mass is laid on its surface. Also, do not forget that the calculation of the strip foundation adjusts to the peculiarities of the local climate, season and fluctuations in the composition of the soil.
The second criterion necessary for self-calculation is the mass of the garage and the load level. All components of the structure are taken into account: the foundation, walls, partitions, windows and doors, roofing, and at least 10% of the resulting mass is added as items that fill the garage. There is an approximate formula for calculating:
The required width of the foundation is obtained after calculating the entire area of the constituent elements of the strip foundation. It is worth remembering the terrain features and surface irregularities – this adds some error to the calculation.
In the case of laying the foundation on rocky terrain, the terrain error is not taken into account. It is only necessary to increase the slope until it is completely parallel to the slope of the surface.
As you know, the depth of the foundation is also an important criterion, it directly affects the cost of the future foundation and, at best, it should be left minimal.
Note! Only after all the calculations have been made and the study of reference materials, it will become clear how to lay the strip foundation for the future garage.
The traditional technology for building a strip foundation comes down to a few simple steps. There is nothing difficult or difficult for a novice builder. It is only necessary to fully comply with all the rules of construction and not deviate from the calculations performed earlier.
When building a strip foundation, do not forget about utilities, pipelines, electrical wiring, and ventilation ducts. It is important to create comfortable working conditions, easy and timely availability of all construction materials, water, electricity. Precautions must be taken when working in close proximity to bare wires.
In case of inaccessibility of the necessary communications, the location of the construction should be shifted in order to avoid unpleasant consequences during work.
Good luck building your garage!
Video
Video on how to properly dig a trench for the foundation:
Another video about ways to avoid problems when building a strip foundation with your own hands:
Source:
Pouring the foundation for a garage – expert advice
It is difficult to imagine a person who would build a reliable house without a foundation. The necessity and importance of this part of the structure is known even to schoolchildren. And such a house is a garage for a car. It is also the second home for many enthusiastic motorists.
Modern motorists do not have such hot battles as the heroes of the famous movie, and buying a garage is not such a big problem, but even today not every car owner is a happy owner of a garage.
And if this building is created by one’s own hands, pride and a reverent attitude towards it are ensured for many years. This idea is especially popular among owners of private houses with large plots of land, cottages.
Important
Often they are located outside the city, which can only be reached by car, so the issue of storing an iron horse is very acute.
If there are no obstacles in the way of building your dream, in the form of free space or legal issues, then the first question arises – how to make a foundation for a garage.
In order to choose the right type of foundation and calculate it, you must first imagine, or better, make drawings of the future structure. This makes it much easier to make calculations, and the risk of losing sight of important details that can affect the final quality of the building is minimal.
We calculate the foundation
When building a foundation, correct calculation is important
The task of the foundation is to evenly distribute the load on the soil from the building, equipment and the car that will be stored in the garage.
Therefore, the calculation of the foundation for the garage is performed with maximum accuracy. It is possible to make calculations correctly only by knowing the weight of the structure and everything that will be in the garage.
The mass of the material from which the structure will be erected is learned from reference tables, of which there are quite a lot on the network.
There is a simple formula that calculates the area of support that is sufficient for a particular building: S \u003d U / R. S is the area of support of the foundation, U is the force with which the building acts, R is the resistance of the soil.
From the formula it follows that for the calculation it is important to know not only the total mass of the garage and its intended contents, but also the type of soil, the amount of soil freezing and take into account the presence of groundwater. When calculating and at the stage of drawings, waterproofing is provided to protect the foundation, and it is also recommended to bring the “body” 25-30 cm above ground level in order to prevent the walls from getting wet.
Experts advise to design and drain water from the base. All car owners arrange a car wash right next to the garage, which causes excess moisture. Getting into cracks, water accumulates there, and when negative temperatures occur, it freezes, causing microscopic destruction. Gradually, small cracks turn into large ones, and the foundation collapses.
Choosing the foundation for the garage
The choice of the type and design of the base, which will reliably perform its function, directly depends on the massiveness and design of the main building.
If you are planning a light construction made of metal or wood, then a columnar foundation will do its job. It is much easier and cheaper to build than any other.
In addition, those who made the column foundation for the house are already familiar with the design and will have less difficulty.
Tip
When building a monolithic foundation for a garage with your own hands, it is important not to neglect the calculations of the mass of the structure. If you save on the foundation and use a columnar foundation in a massive structure, then this is fraught with serious losses that threaten the loss of not only the building, but also the car.
Strip foundation
When arranging a basement in a garage, and this option is used by the bulk of people, and when building from brick or concrete, they make a strip foundation. This type of base is monolithic and prefabricated.
Monolithic is poured into the finished trench, in which the reinforcement structure and formwork are already installed. The prefabricated one is made from separate foundation blocks or even from bricks.
The fixing of individual parts is carried out using cement mortar.
There is another type of foundation that can be used when building a garage. This is a slab foundation. The choice in his favor is justified on subsidence and unstable soils.
It is a monolithic slab with good reinforcement, which may not even be buried. Depending on the condition of the soil, this type of foundation can be slightly deepened, but not more than 500 mm.

This design can safely endure minor ground movements without deforming the walls and the entire garage as a whole.
reinforcement
Recently, non-removable concrete formwork for foundation construction is gaining popularity in foundation construction technologies. It differs from wood only in that it is made of flat concrete blocks resembling small slabs. The rest of the technology is exactly the same.
Please note
The advantage of such a formwork is that it is not removed after the main concrete has hardened, and the properties of the formwork itself replace additional materials. So the work becomes less laborious, and the foundation is stronger. The concrete used for the manufacture of such formwork has a special porous structure, which gives excellent thermal insulation properties.
This eliminates the need to additionally insulate the foundation and install hydroprotection.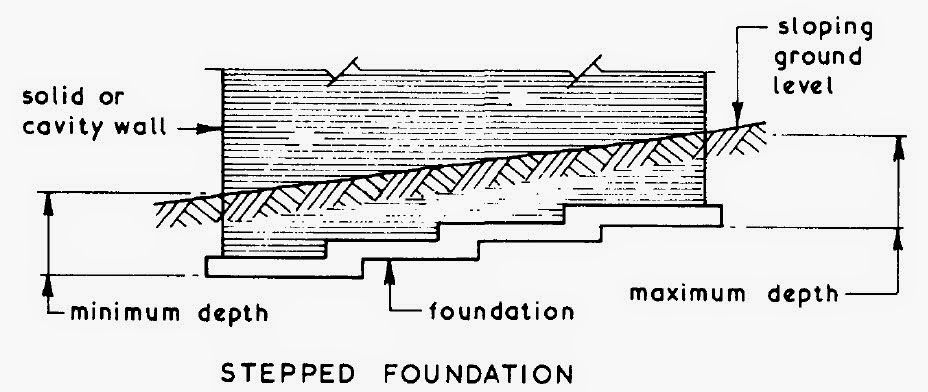
Determine the type of soil
The soil on which the garage will be installed needs to be carefully studied. The depth of the entire foundation for the garage depends on its condition, as well as the need for additional work, if any.
Soils are divided into several types:
 Allows you to build foundations of any type.
 Of the expensive methods, there is a special drainage system that can drain a large amount of water from the soil that is in contact with the foundation.
There are often cases when the soil is not at all suitable for building a foundation and building in general. In this case, they dig a foundation pit and fill it with soil suitable for building a foundation and a garage.
Soil type matters
It is not always possible to determine exactly which soil prevails at the construction site, especially for a non-specialist in this field.
For an accurate and correct choice of the type of foundation, they resort to the services of people who understand the types of soil.
The fate and service life of the building depends on the correct definition and choice of the foundation, do not neglect these studies: apparent savings can turn into big expenses in the future.
Depth of garage foundation
Only the soil and its type regulate the depth of the foundation. Under all conditions, the bottom of the base must be below the freezing level of the soil. When building a foundation for a garage with your own hands, this rule is memorized as a law. You also need to remember that the same depth is added to the depth of the foundation, which is planned to be poured with concrete, for a pillow of sand and gravel.
To determine the amount by which it is necessary to go deeper below the freezing line, a simple calculation is used: 20% is added to this level. For example, if the level of soil freezing is 1 meter, then the depth of the concrete base will be at least 1.20 m.
Base Width
This value cannot be narrower than the walls of the building. The main factors in calculating the width of the foundation are the total weight of the structure and the properties of the soil. Ultimately, the area of \u200b\u200bsupport of the entire structure on the ground directly depends on the width of the foundation, and this is the primary factor that needs to be calculated correctly.
In this case, the principle “the wider the better” is partially true. Moreover, the calculations take into account seasonal loads, which change, and sometimes quite within decent limits.
This is the amount of snow cover, which in some regions of the country is not just large, but huge.
Important
If the roof of the garage is shed or has a profile other than horizontal, the foundation will also experience wind loads.
In addition to the foundation, many points should be considered: the material from which the building will be made, the method of insulation or heating of the garage, if necessary. Also, the location of the garage will influence the choice of base, because if it has one common wall with a house or other building, the type of foundation may change.