How to build foundations for an extension: Building Foundations: A Step-By-Step Guide
Building Foundations: A Step-By-Step Guide
(Image credit: David Snell)
Building foundations function to distribute the weight of your home, stopping the plot’s subsoil from spreading and the structure facing an unequal settlement — both of which could lead to structural problems for your home down the line.
If you’re the project manager for your self build or taking on the work yourself, it’s critical to double check all measurements for the building foundations and make sure everyone on site is working from the same plans to avoid costly mistakes that are difficult to rectify.
The type of foundations system you choose may depend on the type of soil you’re laying your building foundations into, however a good team should have a level of flexibility in case they discover some surprising ground conditions during the excavation. Arm yourself with our guide to foundation systems and soil types, as well as keeping some budget back as a contingency for the foundations.
Whether you need a refresher on the process, or just want an overview about what foundations will entail for your build, take a look at this step-by-step guide for laying out building foundations.
What Materials Do I Need for Building Foundations?
To start laying the building foundations, you’ll need:
- mesh reinforcement in the foundation concrete
- compressible material for lining the trenches
- a polythene slip membrane
- cut metal pins to use as markers ready on site
- several rakes and pairs of wellies (you’ll be surprised how many people turn up for work in trainers)
(Image credit: David Snell)
Be aware of any lead-in times. If the engineers have designed a foundation that requires reinforcement cages, these may have to be manufactured off site.
Also think ahead to getting the services into the house, so get some lengths of pipe or ducting to take through the concrete.
How to Lay Building Foundations
1.
 Start Building Foundations by Marking Out a Level Datum Point
Mark out a level datum point. (Image credit: Homebuilding & Renovating)
Whats is a datum point?
A datum point is a point of reference from which further measurements can be made. The point can be based on the finished floor level, an existing building or a benchmark.
First you will need a level datum point. If you are building an extension, this is usually the finished floor level or damp-proof course (DPC) of the existing building. For new builds, this will be marked on the plan as a fixed point such as a manhole cover or a marker in the road or pavement.
The datum point is important: all your height measurements are relative to this point, so any errors could cause problems later on, particularly if there is a height restriction placed on the building.
2. Calculate Material to be Removed for Building Foundations
Calculate how much material needs to be removed and cleared as a starting point for your foundations and oversite.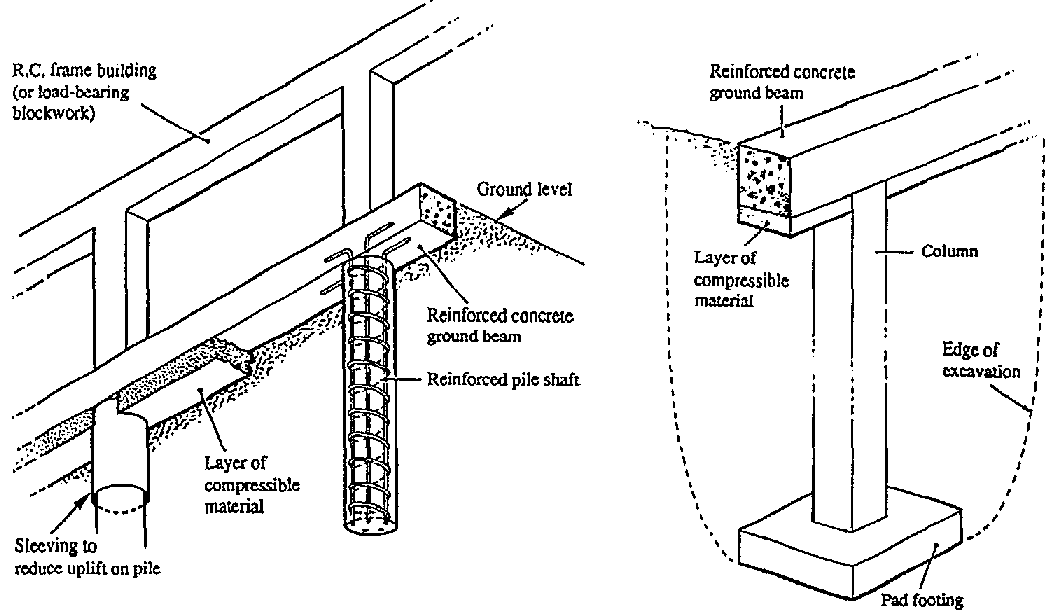 (Image credit: Homebuilding & Renovating)
Next, calculate how much material needs to be removed from the site to end up back at finished floor level once all the layers of flooring materials (insulation, concrete, screed, etc) have gone down. Time taken with a site level at this stage will make things easier later on when the digger may not be able to reach any areas that have not been dug deep enough.
3. Use String Lines to Mark Out Your Building Foundations
Start marking out the walls, starting with one corner point (Image credit: Homebuilding & Renovating)
Start marking out for the walls. Set up timber hurdles at the end of each wall, out of the way of where the digger will need to be. These carry the string lines that represent the wall faces of your building. Where space is limited, use corner pins instead and set up the hurdles after the concrete is in.
4. Mark Out the Trenches for Your Building Foundations
Use marker paint to mark out your footings (Image credit: Homebuilding & Renovating)
Begin lining up your footings by referring to your datum point. When it comes to extensions, never assume an existing building is square; pick the side you need to be square to and set up a line, then square off that line.
The easiest way to do this is using Pythagorus’s theorem (the square of the hypotenuse is equal to the sum of the square of the other two sides). If you measure the length of your first wall and then secure a tape measure at each end, by working out the length of the hypotenuse you can use both tapes to give you a third point exactly 90° to your first line.
Alternatively, most modern laser levels have a square function which does this for you.
5. Mark All Corners of the Building Foundations
Once you have two lines set up at 90°, other measurements can be taken (Image credit: Homebuilding & Renovating)
Once you have two lines set up at 90°, all other measurements can be taken from this point, with all corners and junctions marked. A lot of digger drivers are quite happy for you to mark ‘centre of dig’ lines, but you may prefer to mark both sides of the trenches.
Check the width your walls and allow 150mm both sides, then use a string line as a guide to mark the trenches with marker paint.
6. Start Digging The Foundation Trenches
Digging the trenches can begin (Image credit: Homebuilding & Renovating)
Now you’re ready to start digging. Have your site level set to the depth you need to dig and check it often. Ultimately it is down to the building control inspector to decide how far down you need to go; they will inspect at this stage and advise.
7. Introduce Depth Pegs and Pour
Introduce depth pegs in the trenches to show where you need to fill concrete to (Image credit: Homebuilding & Renovating)
Once Building Control has visited, you are ready to pour the footings. You should place depth pegs in the trenches to show you how deep to fill, but you may find that marking the sides of the trenches with marker paint also works well, with a final onceover with the site level and a concrete rake to get them spot on — the more accurate you can be with your levels the easier (and cheaper) the next stage will be.
Also make sure that ducts are installed for any pipes or cables that need to cross the trench below the concrete.
Begin pouring the footings using either a pump or labourers with barrows (Image credit: Homebuilding & Renovating)
If your site is difficult to access, it may be worth considering a concrete pump. This can work out more cost-effective than a few bodies with barrows.
Top Tips for Laying Building Foundations
Keeping the Site Tidy When Laying Building Foundations
Before you fire up the digger you’ll need to decide what’s going to happen to the spoil. If it’s staying on site you may need to hire in a dumper so that it can be stored in a suitable place where it won’t interfere with the build.
Otherwise, you’ll have to organise lorries to take it to a tip. The turnaround time, or distance to the tip, will dictate how many lorries are needed to maintain continuity on the dig.
You will also need to decide whether you’ll be able to load the concrete directly into the trenches or whether a pump will be needed. If you do decide on a pump — always a good idea if more than three loads are anticipated — then it will need to be booked and the concrete suppliers advised so that their mix and turnaround time can be adjusted to facilitate a continuous pour.
Getting Lorries to Site
If the concrete is being directed from a lorry into the trench then you need to make sure that there is hardstanding and stable ground for it to park.
Most mixes can be ‘pulled’ around the trenches using rakes, but if the sides of the trenches are unstable this may cause collapses and unwanted contamination of the concrete. (Shuttering the trenches prior to pouring can aid in this instance.)
Lorries have extension ramps but these can usually only reach for around 4m at most. Unless the lorries can off-load at various convenient points around the building, then it’s best to use a pump.
Adding a Basement When Building Foundations
If your ground conditions appear difficult, you might do well to consider building a basement. If you are expecting to spend, say, £30,000 on getting out of the ground, then you are maybe halfway towards the cost of a basement and you may find that you are able to add considerably more value to the house than the additional cost of a basement build.
Bruce is a third generation builder, based in the South West, with over 30 years’ experience in the building industry. He specialises in new build homes, extension and renovation projects, and his even built homes for self build industry guru David Snell. Bruce has recently completed his latest self build.
Foundation Solutions for Home Extensions
Share article:
Login/register to save Article for later
Build It
Get your extensions project off on the right footing with Tim Doherty’s in-depth guide
by Tim Doherty
30th June 2019
So you’ve got a great design in the bag and you’re keen to crack on with your extension.
First things first: you need to decide how to build it.
This process starts with the foundations. Specifically, you need to understand what supports the existing house. This will have a major impact on the design of the new footings.
Combine this with knowledge of soil conditions, trees, service/drain locations and more, and your team can plan the best solution for your project.
Typical existing foundations
The long hot summer of 1976 heralded a turning point in foundation design.
Following a significant flurry of claims for subsidence, insurance companies enforced deeper foundations in order to stabilise new properties.
Before that, houses built in the 1930s to 1970s may have had foundations little more than 600-800mm in depth. Properties from the Victorian /Edwardian periods frequently only went to depths of just 450-500mm.
In fact, the Victorians, famous for their solid brick walls, used to step the brickwork out by a quarter -to- half of the brick’s width over several courses. This meant that the bottom of the wall sat on a wider brickwork footing. This footing may in turn have sat on a shallow strip of concrete, but not to any significant additional depth.
Houses built post war may have used more concrete and less brick, but they still used shallow foundations. However, Building regulations have since changed, and they now require foundation depths of circa 1m. This change was a bid to eliminate superstructure movement.
If you have an old house with an existing cellar, this will probably have shallow foundations under the base of the external (retaining) walls.
If the cellar has shallow foundations, so too will the walls above-ground. So, the cellar might have depth of 2.5m, and sit immediately next to a non-cellar wall foundation of only 500mm depth.
Nowadays, it is common practice to transition these changes in depth over a short length of walling.
Topography, trees, services & drains
Next on the list should be a practical assessment of levels, planting and services on your property.
Drains, in particular, have a nasty habit of being right in the way of your extension. Traditionally they sit close to the existing building and often wrap around several sides. Sometimes drains on your land also cater for neighbouring properties. Here you’ll be under an obligation not to compromise overall performance.
An installation that serves two or more properties is technically a public drain. Under regulations introduced in 2011, the water authority is responsible for its maintenance. Plan ahead for drain diversion, and make sure that the water authority agrees with your proposal.
The same applies to services (gas, electric, water and broadband) leading to your property. Always make sure these won’t be compromised by the addition. Speak to the network distributor if necessary.
If large trees are in close proximity to your home or extension, this can also be a problem. The NHBC (www.nhbc.co.uk) has a very useful guide. This guide shows how deep your foundations will need to be according to the height of common species and how far away the house is from the tree.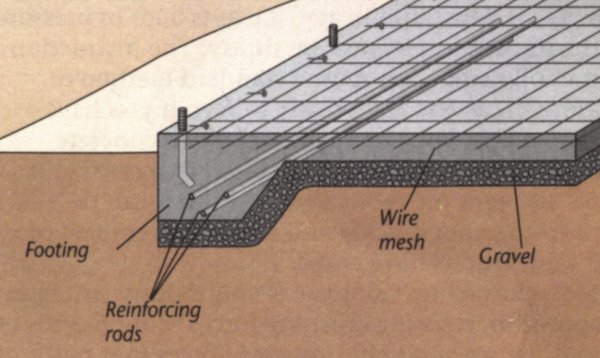
Topography is also important. Stepped foundations help if the ground is sloping. Here, again, there are clear minimum standards to conform to in terms of the depth and length of steps, and how far they need to overlap.
The Party Wall Act sometimes requires neighbours to come to an agreement if foundations come close to boundaries. Any agreements must be met prior to foundation excavation.
The Act provides a framework for preventing and resolving disputes .
Find out more: www.self-build.co.uk/party-wall
Soils
The type of subsoil will also influence the depth and width of foundations required; and sometimes affects more fundamental aspects of the foundation design.
The ideal conditions to find are well-compacted sandy gravels (with the right mixture of porosity and compressive strength), chalks or sand/siltstone. Generally, these will allow for straightforward foundations.
Clays, on the other hand, will shrink as they dry out in summer and expand when they soak up moisture in the wet seasons – so footings generally need to be deeper and wider. You may need to install specialist products, such as clayboard, in order to stabilise the foundations – or even an engineered solution.
You’ll probably need to appoint a structural engineer if the soil adjacent to your property is soft, organic or generally unstable (such as filled, made-up ground).
Can you use trench fill or strip footings?
The easiest type of foundation to build is an excavated trench. This is when the excavation is mass filled with concrete (hence the name trench fill).
The concrete is taken all the way up to 75mm below the top of the excavated trench walls. After-which, a course of blockwork will be installed up to damp proof course (DPC) level. This gives you a minimum of 150mm clearance above external ground level.
Strip footings work according to the same principles. However, the depth of concrete is restricted to the bottom of the trench only, up to depths of around 200-400mm. The rest of the foundation wall is constructed in dense concrete blockwork, directly under the above-ground external walls, with a DPC separation at floor level.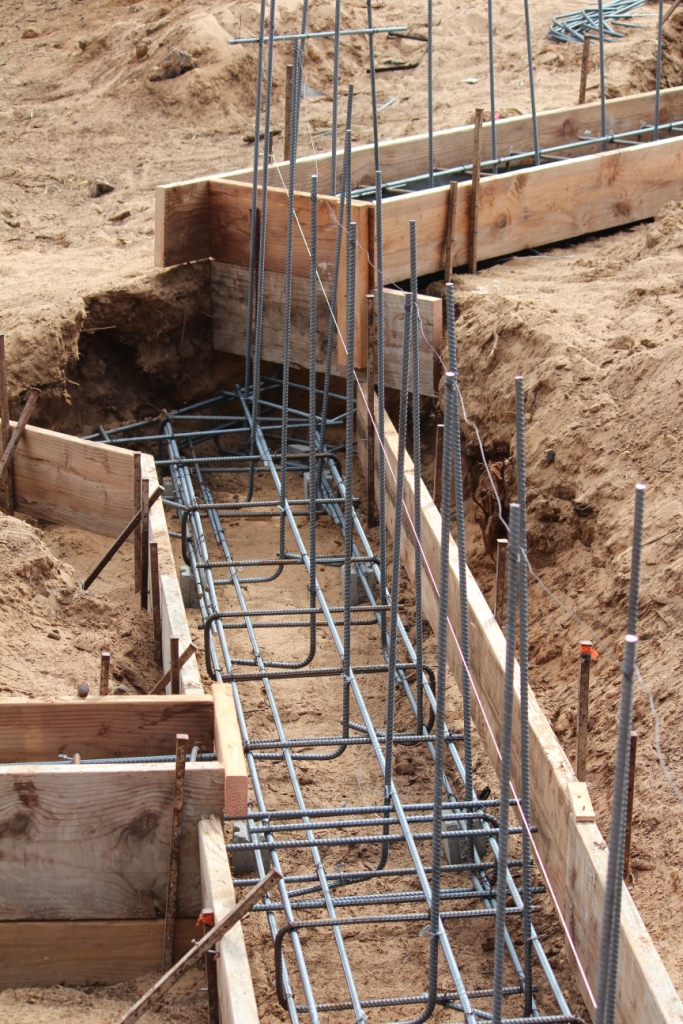
Concrete costs mean trench fill is a bit more expensive, but most people go for it as it’s so quick and easy to install. Widths are usually 450mm or 600mm to match excavator bucket sizes.
The external wall system, which is typically around 300mm thick, then sit directly in the middle of the foundation. The trench sides should always be vertical, so you can be sure the concrete is substantial all the way to the base.
Those doing the work will often dig the trenches by hand if access is tight. It’s fine to go for something between those two widths (unless your engineer says otherwise).
The wall must be central to the top of the foundation and the setting must be accurate. Those laying the foundations will use string lines and profile boards to accurately set out the site.
If the excavation depth is more than 1.2m (3m being the maximum with these standard foundation types), and depending on soil conditions, then the sides of the trenches may need to be supported temporarily.
Pumps might also be necessary to remove any water in the bottom of the excavations.
Engineered rafts
Where trench fill or strip footings aren’t suitable, your structural engineer might opt for a raft.
The reinforcing bars and mesh tie the integrated foundations and floor slab together, and these are strongest at the sides and mid span. It’s unusual for an extension to use a raft.
As the name suggests, this type of foundation ‘floats’. Purpose-designed movement joints connect the new edition to the existing dwelling to create the raft.
But engineers are solution-oriented people, and they will let you know if an engineered raft is the right move for your project and the site conditions.
Piles & pads
Troublesome sights may require concrete pad or piled foundations, with purpose designed engineered ground beams spanning from one pad/pile to another. Ground beams can then suspend any concrete of timber floor joists.
The choice between pads or piles is based upon soil conditions, with the latter being a more extreme, and thus expensive, option.
Typical domestic piles can reach depths of 6m to 8m – or even further – to reach good ground bearing strata. Mini piles work on the same principle but often only reach depths of 3m to 4m. There are several ways that you can install them. Many can twist into positions, much like a cork screw.
The engineer will have to approve the eventual design and some piling firms have their own engineering services to offer a full package.
A major cost is the pile caps, which sit on top of the piles to give a level base for the ground beam. Concrete pads, by comparison, are often only one metre square and are built to normal depths of 1m to 1.5m, with reinforcement typically added to tie the ground beams to the top of the pads.
Those installing a pad such as this will usually do so by hand, as it can be difficult shaping a pad of this size correctly
Photography
/
Published
30th June 2019
Groundworks & Foundations – Build It
Log In
Share article:
Login/register to save Article for later
Structural Choices
We explain everything you need to know about getting your groundworks done
by Build It magazine
13th January 2021
You can’t afford to be complacent about the setting out of foundations – getting it wrong is all too easy. If you end up having to have extra trenches filled with concrete, this means extra cost for you right from the outset.
How to get foundations right
It doesn’t just matter to you that your first steps are correct, it matters to the local planning authority that your home is built in the position shown on the approved plans. Even when dimensions haven’t been specified, planning enforcement officers can scale off the drawings to check that your home is where it should be.
The distances to boundaries and the levels are both important from a planning aspect, because of the issues of overlooking and overshading neighbouring buildings.
tHE pOLITICS OF PLANNING
You and your builder are the only people who will check the setting out at the start, so take the time to get it spot on. With pegs driven into the corners and chalk lines sprayed on the ground between them, you can start digging the foundation trenches.
Mark the centre line of the foundations to avoid confusion; the wall positions will be set out with pegs and string lines later when the foundations have been concreted.
Self Build Education House – Groundworks & Basement Floor SlabBuild It magazine’s Self Build Education House is a real-life, access-all-areas project that will give you a unique insight into the process of creating your own bespoke home. The guide has a comprehensive section which outlines the process of laying foundations. READ MORE |
Foundation types
Trench fill foundation
Preferred by many self builders and by most large-scale operators, trench fill avoids the need for bricklaying below ground.
The concrete is poured to within 150mm of the surface ground level, saving time and trouble. This means your project will get out of the ground quickly.
The sides of the trench play as much a part in supporting the load as the bottom, and so this foundation must only be used in stable ground, where the trench sides are firm and capable of bearing loads.
Clay and chalk soils are ideal for trench fill foundations.
Strip foundations
Usually wider, strip foundations use less concrete than trench fill because the base layer of concrete is thinner. Strip foundations are typically 300mm thick.
The exact thickness will be determined by the soil conditions, design of the building and the number of masonry courses in the walls up to damp-proof course.
If you have a sloping site, you may need to step the foundations to keep them level. Steps should overlap at least the width of the trench when concreted and that means shuttering across them. Use plywood and retaining pegs.
Strip foundations are often necessary in softer soils, such as sand, since they spread the load of the building out over a greater area.
Building control and home warranty inspections
You must notify your building control officer at certain stages and await their inspection. You can assign the task of giving notice to your contractor, but check for yourself that the works have been inspected and approved before covering that stage and continuing.
Most building control authorities are happy to book inspections from a phone call, email or fax, so long as they are given a day’s notice. The same goes for your insurance warranty inspector, who will also need to inspect at some stages.
Building control inspection schedule for groundworks
- Commencing the work Give two days’ notice in writing
- Foundation excavations Give one day’s notice by phone, email or fax
- Oversite preparation Give one day’s notice by phone, email or fax
- Drains laid in trenches Give one day’s notice by phone, email or fax
- Drains testing Give one day’s notice by phone, email or fax
Foundation depth
Foundations formed in rock and stony grounds can often be shallower than those dug in “shrinkable” soils such as clay. In the latter, at least 1m deep is normal.
Nearby trees or shrubs may extend this depth to a good deal more. Your building control officer will guide you in these cases.
Once the trenches have been dug and inspected, you will need to hammer pegs into the sides to mark the level for top of concrete. Timber pegs are safer than steel pins.
Pouring the concrete
Make sure the ready-mix lorry can access the site. Readymix can be placed by pump if the trenches are difficult to get to or the truck’s chute can’t be extended far enough.
Pumps must be booked in at an early stage. One reason for doing so is because there may not be that many of them in your area – they’re often tied up with bookings on civil engineering works.
Once poured, the concrete will need to be hand-raked into level against the pegs.
Ground-bearing floors
Beneath a ground-bearing concrete floor slab, the ground must be properly prepared with an oversite treatment.
The site should have been stripped clear of topsoil and vegetation before the foundations were dug. It’s from this reduced level the infill construction begins.
Hardcore should be used in a layer, at least 150mm thick, but no greater than 600mm, in selected aggregate. It’s then compacted down in layers with a plate compactor. If this task is done badly or with the wrong material, settlement is to be expected, causing the slab to crack.
Check out your options for oversite material locally. Hardcore rubble needs to be clean, broken brick, concrete or stone that has been crushed or is naturally available in less than 100mm particle sizes.
Approved aggregates are available from merchants and some offer recycled glass and concrete crushings.
On sloping sites, where part of the oversite may exceed 600mm deep, it may be acceptable to use lean-mix concrete in layers with the hardcore to make up the difference, instead of switching to a suspended floor type.
Who does the groundworks?If you’re hiring a main contractor to deliver your build, they may have an in-house team or at the very least will appoint trades they trust for the groundworks phase. If you’re working with a package or turnkey home supplier, bear in mind that most of these companies require you to sort the groundworks yourself – before they come on site to do their bit (the house shell and onwards). “Your frame supplier or brick and block contractor isn’t going to inspect the groundworks as they go along,” says Charlie. “They’ll turn up on site expecting the work to have been done properly, so it’s crucial you find the right person for the job. Otherwise, you’ll end up with a lot of standing time, while the trades wait on your groundworker to rectify their work.” If you’re knocking down an existing building to make way for your dream abode, then it can make sense to use the same contractor for both this and the groundworks. This way you can avoid any bickering between trades about whether the site has been left in an adequate condition (with any rubble or debris properly cleared away) post-demolition. |
 Nevertheless, you may find it reassuring to ask for references for site operatives you haven’t directly appointed.
Take care not to push out the external walls if a round stone fill is used. Stone just rattles around and doesn’t exactly compact. Like water, it finds its own level very quickly. Lap and tape down 1,200 gauge polythene for the damp-proof membrane and make sure it is dressed up over the walls so it can be lapped with the damp-proof course later.
The insulation boards can be laid out over the damp-proof membrane and covered by an additional layer of polythene before placing the concrete. These boards should also be cut to an upstand around the external walls to encase the concrete slab fully in a warm tray.
Angular hardcore needs binding with a thin layer of sand to protect the polythene damp-proof membrane from puncturing and also to create a level bed for the insulation to sit on.
Levelling
the concrete
The hard work is in raking it out and tamping it into level using a straight length of timber that will span the distance between the walls on either side.
Tamping the concrete helps to consolidate it in the same way that vibrating it does and, combined with a gentle sawing and tapping motion, will bring the surface to the level and finish needed.
Planning the drainage system
Levels are just as critical when laying the drainage system. The invert level is the bottom of the pipe and from this point the system falls are determined.
The trenches need to be carefully dug to the right depth and gradient to avoid huge amounts of bedding being necessary to support the pipes.
Gravel is used to a depth of 100mm to 200mm thick for both bedding and surround material supporting and protecting the pipes at the correct fall. A gradient of 1:40 is ideal, but plastic drains will tolerate much shallower falls if it’s necessary.
Look for at least half a bubble out on the spirit level and make sure they fall the right way. Eyes can be deceived when looking at drains in trenches, particularly when the ground slopes the other way.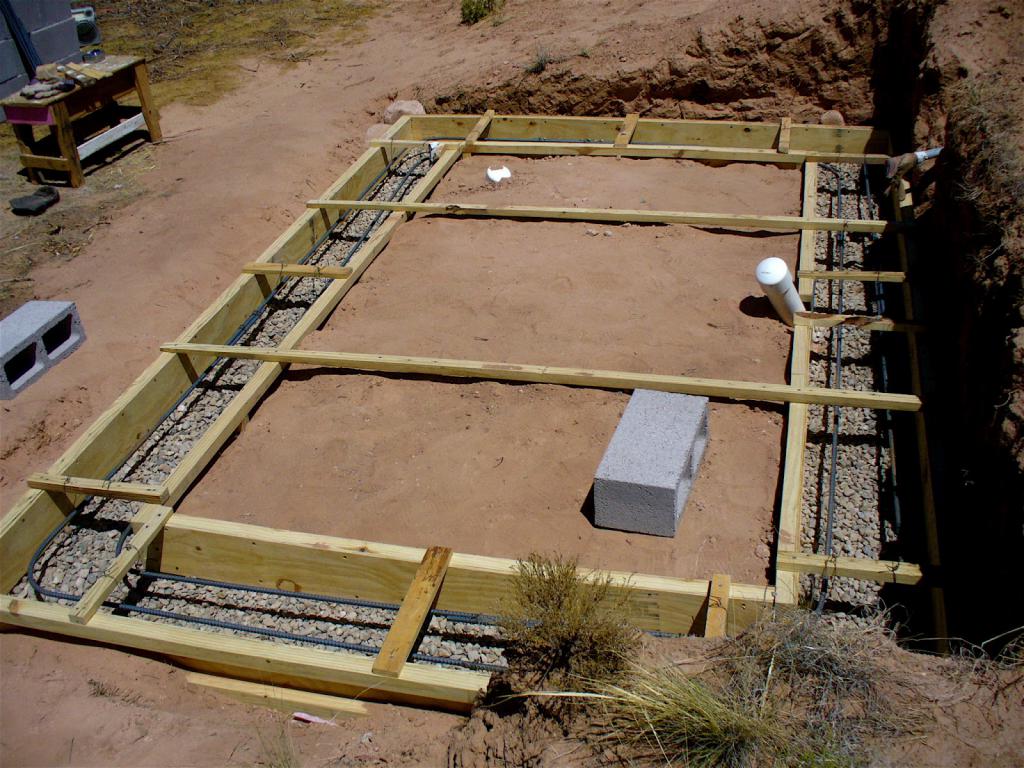
Drainage tips
- Lay pipes to an even gradient
- Lay pipes in straight lines and avoid bends
- Locate the soil vent pipe at the head of the run
- Provide rodding points or inspection chambers at bends and changes in gradient
- Connect water closets and soil vent pipes direct to inspection chambers
- Use at least 100mm of gravel to cover the pipes before backfilling the trench and don’t leave the trench open for longer than is necessary
Drainage trenches to run services
Using deep drainage trenches for running in other services makes good sense. Gas, electric and water cables all have to be provided at your expense, so laying them in position now will save time and money later. Getting the supply companies to connect them when the house is complete can be a slow procedure, so get the job registered, priced and booked in well ahead to avoid delays later.
Drains testing
For peace of mind, a water or air pressure test should be carried out before drains are backfilled to ensure all the joints are watertight and everything works. Your building control officer may want to witness the test at this stage or when your self-build is complete.
The reason for the latter is that drains can become displaced or damaged with careless backfilling and site traffic.
Drainage connections are usually best left until later, but if you do connect up at this stage to the mains system, make sure you fit manhole covers and fill gulley traps with water. The air will have turned foul on site before you’ve hardly started.
Photography
/
Published
13th January 2021
You may be interested in
Building Code Foundation Requirements
By
Lee Wallender
Lee Wallender
Lee has over two decades of hands-on experience remodeling, fixing, and improving homes, and has been providing home improvement advice for over 12 years.
Learn more about The Spruce’s
Editorial Process
Updated on 04/29/22
Reviewed by
Kelly Bacon
Reviewed by
Kelly Bacon
Kelly Bacon is a licensed general contractor with over 40 years of experience in construction, home building and remodeling, and commercial building. He is a member of The Spruce Home Improvement Review Board.
Learn more about The Spruce’s
Review Board
Fact checked by
Emily Estep
Fact checked by
Emily Estep
Emily Estep is a plant biologist and fact-checker focused on environmental sciences. She received a Bachelor of Arts in Journalism and a Master of Science in Plant Biology from Ohio University. Emily has been a proofreader and editor at a variety of online media outlets over the past decade.
Learn more about The Spruce’s
Editorial Process
Pat Canova / Getty Images
Nobody can deny the need for a good house foundation. Improperly built foundation footings—unlike poorly installed gutters or gapped hardwood flooring—can eventually bring down the house.
So, building codes naturally have a few things to say about foundation footings. Like any code recommendations, these are not how-to guides to building footings so much as they are parameters that you need to observe and should be adjusted according to your local code requirements.
Site Grading
The ground immediately adjacent to the foundation footings—on the exterior of the foundation—should slope down at a five percent minimum slope. This must continue for at least ten feet.
Load-Bearing Value of Soil
Foundations must rest on firm, undisturbed soil. Undisturbed soil is soil that has never been turned over, tilled, graded, hoed, dumped, dug, scraped, compacted, amended, or anything of that nature, by human by or machine. Undisturbed soil is significantly stronger than soil that has been disturbed.
Code refers to load-bearing values (LBVs) as “presumptive.” This means that a soil test is the only way to really know the load-bearing value (LBV) of the soil for the footings on a given site.
Disturbed soil can eventually be classified as undisturbed after enough time; a soil test can determine this.
| Soil Type | LBV Per Square Foot |
| Bedrock | 12,000 |
| Sedimentary Rock | 4,000 |
| Sandy Gravel or Gravel | 3,000 |
| Sand, Silty Sand, Clayey Sand, Silty Gravel, Clayey Gravel | 2,000 |
| Clay, Sandy Clay, Silty Clay, Clayey Silt | 1,500 |
Depth, Width, and Thickness of Footings
Depth of Footings
Footings should extend to a minimum depth of 12 inches below previously undisturbed soil. Footings also must extend at least 12 inches below the frost line (the depth to which the ground freezes in winter) or must be frost-protected.
These rules may not apply to accessory buildings (such as sheds) if they are below a certain square footage specified by your local building code. Also, deck footings may have a different depth requirement. Some decks, such as those not attached to the house, may not have the same depth requirements.
Tip
Areas with expansive clay soil will require caissons (or concrete columns) to be drilled down to bedrock at pre-determined locations, with some sort of expansion material between caissons to allow for soil expansion and contraction. The foundation walls will then be poured on top of them.
Width of Footings
Footing width can vary according to the structure, site, and conditions. Under code, generally, one-story buildings with footings on undisturbed soil with LBVs between 1,500 and 4,000 should have a minimum width of 12 inches.
Two-story buildings require a minimum of 15-inch wide footings for 1,500 LBV soil. For 2,000 LBV soil or greater, two-story buildings may have 12-inch minimum wide footings.
Levelness
Requirements for levelness are different for the top and bottom of the footing:
Top of the Footings
The top of the footings must be level, with no exceptions.
Bottom of the Footings
The preference for the bottom of the footing is that it is level. Exception: If building on a sloped grade, you can step the footing by as much as one unit vertical per 10 units horizontal (or a 10-percent slope).
Spread Footings
Spread footings help distribute the load carried by the footings over a wider area. The spread part is a base that looks like an upside-down “T” and transfers the weight across its area. The spread footing should be no less than six inches thick. It should project, on both sides, no less than two inches.
Strength of Footing Concrete
For foundations and slabs, except for garages, the minimum strength of the concrete should be 2,500 psi. Vertical walls exposed to the weather may be required to have 2,500 psi concrete minimum strength, on up to 3,000 psi, in some severe weathering conditions.
Building Code Basics
These code specifications are derived from the International Building Code (IBC) for 1- and 2-story residences. This summarized guide is intended to give you a general sense of code requirements for foundation footings. The IBC encompasses the International Residential Code (IRC) but includes provisions for commercial buildings as well as for residential buildings. The IRC is equally suitable for residential buildings. In the IRC, the chapter relating to foundations and footings is chapter 4.
Keep in mind that each construction project is unique. For example, the soil is different from place to place, and thus the load-bearing value of the soil will change. Also, code rules are set and enforced at the local level, typically through each city’s building department. Most local code authorities use the IBC and/or IRC as their model codes but may omit, modify, or expand any code specification to suit local conditions and legal requirements. While the IBC and IRC are merely suggested guidelines, the local code is the law of the land that you will need to observe.
Watch Now: How to Tell If a Wall Is Load-Bearing
House Foundation Types, Uses, and Pros and Cons
Every house is built on a foundation, but not every house is built on the same type of foundation. Home foundation type is based on factors such as house design, geographical location and climate, soil and moisture conditions, and the project budget.
Click Play to Learn About the Types of House Foundations
Foundation types vary, but likely your house or home’s addition does or will have one of these three foundations: full or daylight basement, crawlspace, or concrete slab-on-grade. These are serviceable—and sometimes even flexible—foundations that work for millions of homes across a variety of climates and needs.
-
01
of 03Full or Daylight Basement Foundation
BanksPhotos/Getty Images
A basement foundation is the deepest of the three major foundation types.
 A full basement matches most or all of the floor space of the level above and it is generally at least 7 feet high. Newer homes typically have taller basements to facilitate conversion into living space.
The primary advantage of a basement is all the extra space that it provides for storage or for living. In some homes, finishing a basement can nearly double the home’s living space. A basement can be conditioned (meaning that it is heated or cooled) like the rest of the house or it can be unconditioned.
Full Basements
A full basement is one that matches the perimeter of the house above. So, if the ground floor of the house is 800 square feet, the full basement’s square footage is also 800 square feet—more or less.
A full basement consists of structural foundation walls that bear on foundation footings running along the perimeter of the basement. Footings usually extend below the frost line, the depth to which the ground freezes in winter.
A full basement with a ceiling 7 feet high or higher is a valuable asset to a home.
It can be converted into habitable living space or turned into a home gym, children’s play area, home theater, or just left for storage.
Daylight Basements
One variation of the full basement is the daylight basement, sometimes called a partial basement. Built against a slope, the daylight basement has one or more sides that are completely embedded in the ground, from floor to ceiling. However, as the slope descends, one or more sides of the foundation are exposed and can have large windows and doors to bring in daylight.
Daylight basements are often more practical for conversion into living space than full basements. They offer the possibility of adding a separate entrance, a necessity if you plan to rent out the space. Daylight basements, too, avoid many aspects of basement living, due to the increased natural light and air. Mold and mildew are easier to manage in daylight basements than in full basements.
-
02
of 03Crawlspace Foundation
slobo / Getty Images
Foundations that create a crawlspace consist of short foundation walls that stand on footings.
The walls may be very short—creating a space that you literally have to crawl through—or they can be in the range of 4 feet tall, providing room for storage and sometimes a furnace or other equipment.
Typically, crawlspaces are unheated spaces and may be ventilated with small vents that penetrate the foundation walls to promote a small amount of airflow through the crawlspace. Moisture control and water leaks and seepage are other considerations with crawlspace foundations.
Tip
For foundations in areas with certain types of clay soils, caissons (or deep holes filled with concrete) are often drilled down to bedrock. The foundation is then placed on them in lieu of footings. This allows for the expansion and contraction associated with certain soils.
Crawlspace foundations are less expensive than full basements because they require less excavation and less foundation wall material and labor to build. Like full basement foundations, crawlspace walls typically are made with poured concrete or mortared concrete block.
-
03
of 03Concrete Slab-On-Grade Foundation
Wicki58/Getty Images
A slab-on-grade foundation is a solid concrete slab that rests on the ground. Grade refers to ground-level, and slab refers to the monolithic concrete pad.
Slab-on-grade foundations are most commonly used in climates that do not experience ground freezing and thawing, as this can lead to cracks in the concrete and shifting of the foundation.
Slab-on-grade foundations tend to be less expensive than the subgrade (full basement or crawlspace) foundations and can offer better protection against termite infestation (also common in warmer climates).
One notable downside of slab foundations is that water supply and drainage pipes are encased in the concrete. In the event of a problem, the concrete slab must be cut into to access the pipes. With a slab foundation, it also means you won’t have storage space for your home or additional living space.
It is also not feasible to retroactively add a basement or crawlspace.
 A full basement matches most or all of the floor space of the level above and it is generally at least 7 feet high. Newer homes typically have taller basements to facilitate conversion into living space.
 It can be converted into habitable living space or turned into a home gym, children’s play area, home theater, or just left for storage.
 The walls may be very short—creating a space that you literally have to crawl through—or they can be in the range of 4 feet tall, providing room for storage and sometimes a furnace or other equipment.

 It is also not feasible to retroactively add a basement or crawlspace.
Building regulations: extensions: Foundations | GOV.WALES
Guidance
In this guide
4. Foundations
Foundations are required to transmit the load of the building safely to the ground. Therefore, all buildings should have adequate foundations (normally concrete), which will vary from one project to another depending on the circumstances of each case.
These foundations can be cast as deep-fill (filling most of the trench) or shallow-fill (where the minimum thickness to transfer the load to the soil is provided).
There are other types of foundations that may be used if the ground conditions do not make trench fill practicable. It is advisable to contact a structural engineer or speak to building control for further advice.
Factors to be taken into account of when designing a foundation:
Type of soil
The type of soil that the foundation will sit on is important for two reasons:
- It should be able to bear the weight (load) of the foundation and the extension – different soils have different load bearing capabilities.
- The way it reacts to variations in moisture content (such as in prolonged rainy or dry seasons) can lead to the soil expanding or contracting. This is a particular issue with some clay soils. These changes mainly occur up to a certain depth (typically about 0.75m) therefore foundations should be made deeper so they are not affected by ground movement (although see “Trees” below).

Adjacent structures
It is important to ensure that the excavation for the new foundation does not undermine adjacent structures. In general it is good practice to excavate at least to the same depth as the bottom of the foundation to the adjacent building. If the excavation runs alongside an existing footing then care will be needed – for example, by excavating and concreting the foundation in shorter sections to avoid undermining a whole length of an adjacent structure (see also guidance on the The Party Wall etc. Act 1996).
Trees
Trees will draw moisture from the ground around them and beyond through their root system. As moisture is drawn from the ground it will have a tendency to shrink. How much the ground will shrink will depend on the following factors:
- Type of soil – Clay soils shrink more than other types of soil. Therefore excessive movement of the ground could cause damage to the foundation and the structure it supports.
- Size and type of tree – How large a tree or shrub will grow (its mature height), and the tree type will determine how much moisture it generally draws from the ground.
The presence of trees in clay soil areas can mean foundations need to be significantly deeper than might be first expected, although if the trees are far enough away, there may be no impact. Note: If existing trees are removed or significantly reduced in size, all or some of the moisture in the root system will be released over time into the soil and, if the soil is clay for example, could cause swelling of the soil and damage to nearby foundations and structure(s) supported.
Drains and sewers
As the weight (load) from the foundation of a building is transferred to the soil it spreads downwards outside the footprint of the foundation at a typical angle of 45 degrees. If a drain or sewer is within the area covered by that 45 degrees area there is a risk that it could be affected by the load from the foundation and possibly crack. Therefore,the foundation excavation should normally be at least to the same depth as the bottom (invert) of the deepest part of the drain, sewer or its trench.
Size and construction of new building
The foundation will need to support more weight (load) from a two storey building compared to a single storey. This has a significant factor in determining design, particularly in respect of its depth and width. This is directly related to the bearing capacity of the soil supporting it. The width of the foundation is also governed by the wall thickness.
Ground condition
Generally the topsoil is taken away and good undisturbed ground is found i.e. ground that has not been built on. In some cases there are areas which have previously been backfilled, such as above where drains have been laid or to level a site, which consist generally of soft, mixed soil with foreign objects. The foundation can not be poured until undisturbed ground has been found.
Landfill sites
Some properties have been constructed on landfill sites which may require a more extensive form of foundation like piling as the depth of undisturbed ground could be many metres deep. An alternative may be a “raft” foundation. A structural engineer will be able to advise you further.
For health and safety reasons, care should be taken when working in trenches due to the risk of collapse causing potentially serious injury.
Back to top
90,000 how to make quickly, reliably and durable
Content
- Preliminary work
- Rules for the foundation
- Hard accession
- Separate construction
- frame extension
- If a brick or wood house
is early or late in almost any other households need additional living and working space. When planning the construction of new buildings by joining the existing main house, it is important to take into account all the loads and the impact of the inevitable shrinkage on both parts of the structure. Before starting the construction of any such structure, it is necessary to equip the foundation for the extension. In case of errors during construction, deviation and distortion of the structure is possible. That is why the most important stage of the process will be the design and installation of the foundation for the future premises.
We must not forget that the implementation of any major projects requires coordination with regulatory organizations. To build an extension to an existing building is a rather responsible task, as well as the construction of a full-fledged house. An accurate calculation and a well-planned action plan are required. A number of professional tools are involved. Most likely, you will have to get helpers. And yet, subject to the technological process, it is possible to do it yourself, without involving third-party specialists.
to contents ↑
Preliminary work
Preparatory stage
In order to determine the type and dimensions of the building foundation, a pit 100 × 150 cm or 100 × 100 cm is pulled out near any wall. The strip foundation is measured in width and height. For a columnar, the parameters of the pillars and the depth of their laying are important. Enough attention should be paid to this issue, since marking the foundation is one of the most important stages.
The size of the base is measured using a steel rod, the end of which is bent 90°. The rod is placed under the sole, placing the bent part strictly horizontally. By turning it, they detect the moment when the curved edge rests against the wall from the inside, a mark is placed on the metal. The distance from the bend to the mark, measured after the rod is removed, will correspond to the width of the tape.
At the time of excavation of the pit, the type of soil on the site is also determined. From the data obtained will depend on which foundation to choose.
If there is a project of an old house, preliminary measurements are not required. But it is necessary to know the geological characteristics. Careful planning at the initial stage of work, taking into account all the features of the area, will help to avoid mistakes.
After the analysis, you should decide what design the future foundation should have. They are distinguished by several types:
- columnar;
- tape reinforced concrete;
- pile and screw pile.
With rare exceptions, the extension has the same type of foundation as the house. This ensures the reliability of the entire structure.
back to contents0005 In the process of attaching two bases, it is impossible to dig the entire perimeter at the same time if it is more than 3 meters. This will make the building less stable.
 This creates a place for future shrinkage.
 - Separate installation and subsequent formation of an expansion joint;
- Rigid bond with common reinforcement.
To correctly pour the foundation for an extension, you need an error-free calculation. The choice of communication method depends on the type of land in the area. This is also affected by the dimensions of the attached structure.
to contents ↑
Rigid connection
A similar method is used in the following cases:
In the case of the column version, the fittings are fixed on the plinth, if it has sufficient dimensions.
 When the length is not enough, it is more logical to choose another method. Violation of this rule is fraught with cracks and unsteadiness.
 How to start joining strip samples:
- A ditch is cut to size. A layer of sand is poured to the bottom to ensure stability.
- Holes are drilled in the foundation. Each next row is drilled with an offset relative to the previous one.
- Metal rods are driven into the holes with a longitudinal slot at the end, into which wedging wooden inserts are inserted.
- With the help of protruding pieces of reinforcement, the foundation for the extension is formed.
- After the frame is ready, the concrete is poured.
- Further work may only be carried out after the structure has shrunk. This standard is observed for any filling options.
The slab foundation is connected in this way only if its thickness is more than 400 mm. The possibility is preserved even when the slab protrudes beyond the basement of the house. The protrusion must be more than 300 mm. The fittings are exposed and welded to the metal frame of the base of the extension. Such protrusions are often found in buildings made of foam blocks.
back to contents ↑
Separate erection
When working with a tape base, the territory is marked out and a ditch about 600 mm deep is dug under the tape. The bottom of the trench is covered with sand or gravel to create a cushion. The next step is to install a solid formwork according to the given dimensions. Reinforcement is made with metal rods and cement mortar is poured. A free-standing foundation for an extension to the house guarantees durability and stability of the result.
Adjusting the base to a wooden house
Using this method, a void is left between the wall of the old house and the foundation of the extension. The width varies from 100 to 150 mm. Inside, a layer of waterproofing and thermal insulation is laid. It is imperative not to miss this moment and make such a deformation seam that prevents shrinkage and protects against damage. The new sole is slightly higher than the old one. Over time, it will settle to the same depth as the main structure. This will ensure the reliability and durability of the entire structure.
In addition to the strip foundation, a columnar foundation is also used, closely adjoining the main building. The piles are preliminarily waterproofed and installed on concrete pads. Next, the strapping of the required dimensions is mounted. This method reduces construction time, allowing construction to continue in just a few days.
back to contents ↑
Frame extension
The foundation for the frame extension does not carry significant loads. Basically, such designs involve the use of lightweight materials. In this case, the correct solution would be to use a columnar view.
The work takes place in several steps:
- holes are dug in the ground, located below the freezing level;
- the bottom is filled with sand and gravel;
- fittings are installed;
- formwork installation works;
- cement mortar is laid;
- poles can be completed with brickwork.

Glass extension
It is possible to make an extension to the house using a variety on screw piles. They are screwed into the soil and cut off to the desired height. In order to increase strength and durability, concrete is poured, then the heads are welded.
This type is characterized by speed of execution. After its installation, it is possible to proceed to the construction of a structure from timber, OSB or plywood. The finished structure cannot be further weighted with any elements. The whole process should strive for minimalism.
to contents ↑
If the house is made of brick or wood
In this case, tape variations of reinforced concrete are used. The base for an extension attached to a brick house is installed in the following order:
- The territory is marked according to the developed plan.
- Dig trenches below the freezing level of the soil.
- The bottom is covered with a sand-gravel mixture to a height of 100-150 mm.
- A rigid connection to the existing base is installed and an expansion joint, if necessary.
- The foundation for the extension is reinforced with a reinforcement frame. Most often this is a design of four segments with jumpers.
- Formwork is exposed.
- Concrete mortar is poured.

The foundation for an extension to a wooden house is made in the same way.
The best option for building an extension is the one in which it is built together with the main building. Unfortunately, it doesn’t always work out that way. The need for expansion may arise due to family circumstances, hobbies of the owners of the house, and also depends on financial issues. It is quite possible to attach a room to the house on your own, if you follow all the rules and recommendations.
How to make a foundation for an extension to a house – builder’s secrets + video
Is it true that the foundation for an extension differs from the main one, what are its features? Many people are looking for the answer to this question, because when adding additional rooms to an existing house, you want these rooms to also have a reliable foundation. We have collected the most important tips and instructions in this article.
Wouldn’t the extension be complete without a foundation?
Everyone knows what role the skeleton plays in the human body, similar functions are assigned to the foundation. In fact, this is the basis that is responsible for the reliability and durability of the building. Also, it is the foundation that provides heat and dryness in the room. If the base is of poor quality or does not fit the specific conditions, then dampness will appear inside, the floors may deform and even deteriorate. It also levels the ground level and prevents the penetration of carcinogenic gas from the soil into the dwelling.
Outbuilding base
The choice of foundation must be taken with particular care. After all, it is necessary that it freely withstand the load and correspond to the type of soil. At the same time, there is no need to overdo it, for example, if you can fill in a strip or column foundation, then there is no point in replacing these simpler options with a complex monolithic base. Firstly, it is too expensive and will not justify the investment. Secondly, the first ones are much easier to perform and you can do them yourself even without outside help, but you won’t be able to lay a concrete slab on your own.
It is mainly built of stone or concrete, but there are also wooden structures. If the building is lightweight, then you can give preference to a shallow base located above the freezing point. But most often its depth should be below this level. According to its purpose, it is divided into carrier and combined. The latter, in addition to standard load-bearing functions, must also provide seismic protection. There is also a special type, it includes “swinging” and “floating” foundations, their pressure corresponds to the pressure of the excavated soil.
Which type of base to choose from?
In this paragraph, we will consider what types the foundation for an extension is divided into. Tape can rightfully be called universal, because it is perfect for both heavy and lightweight structures. It is located only under the outer and outer load-bearing walls. It is mainly poured from concrete; to make the structure more reliable, it should be reinforced with iron rods. If you are going to make this type of foundation with your own hands, then it is better to give preference to the prefabricated version. The disadvantages include high cost.
Universal strip foundation
But the columnar foundation, on the contrary, refers to budget options. But it is advisable to use it only when it comes to lightweight structures, for example, you need to tie a frame extension to a wooden house. The supports are special pillars located at intervals of 1.5 to 3 meters. These pillars must be placed at the intersection of load-bearing walls. It is best to make such elements from brick or reinforced concrete, but larch bars can also be used. However, such supports are expensive, and wood is not durable.
If you are going to build a fairly massive building, and weak soil prevails, then you should give preference to the pile type of foundation. This design consists of supports connected by means of a strapping beam.
How can two foundations be connected?
The foundation for an extension can be rigidly attached to the base of the dwelling, resulting in a single structure. Such a decision is relevant if the site has a weakly or non-heaving type of soil. It is also worth giving preference to this option when you are going to make an extension of several floors and want to connect it to the main housing through one roof.
If the base is a slab, then a solid foundation must also be poured for additional housing. At the same time, it is necessary that its thickness be at least 400 mm or the base of the residential building should have protrusions. In this case, it is possible to weld the reinforcement of the slab to the frame of the new foundation. In addition, if you wish, you can do everything with your own hands.
Monolithic foundation slab
Tape-to-tape connection requires a sand cushion and reinforcement with a longitudinal slot. Metal rods are driven into specially prepared holes in the base of the house and form a frame for a new foundation. Next, the joint is made by means of a release about 40 cm long.
You can also build a separate base for an extension, which will be located in close proximity to the house. A sheet of roofing material should be placed between the two bases. This material acts as an excellent waterproofing, you can also place a layer of thermal insulation or get by with a simple tow. In this case, it is very important that this layer allows the new base to not collect water during rainfall and not damage the foundation of the house. From the outside, special decorative overlays are fixed to the wall, covering the seam.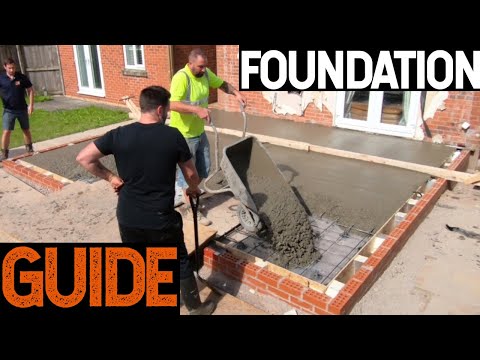
Laying the foundation – we do it according to science
Now let’s move on to the practical part and consider how to make a foundation for an extension with your own hands. This detailed instruction will help save on the services of a master, because it is designed for independent construction work.
Building a foundation for an extension with your own hands
How to make a foundation for an extension to a house – a step-by-step diagram
Step 1: Choosing a base
The new foundation must fully match the type of the old foundation. In addition, the load and type of soil are taken into account. For example, if we are talking about a massive extension to a brick house, then it is necessary to lay a tape or make a pile foundation. But if the additional room is adjacent to the wooden housing, then it is possible to get by with a cheaper columnar option.
Step 2: Calculations
Regardless of whether you prefer a fixed type of connection or a separate foundation, the depth and width, as well as the dimensions of the foundation pillars, if any, should be the same as the foundation of the house. Determining these parameters is quite simple. It is necessary to dig a hole next to the housing wall and measure the dimensions of the base. If there should be no questions about how to measure the depth of a structure, then in order to measure the width, you should take a rod, bend one of its edges by 90° and push it horizontally under the foundation. Then we turn the rod until its bent part rests on the back side. After that, you need to make a mark on the bar and pull it out. By measuring the distance from the hook to the mark, we find out the width.
Step 3: Preparatory work
Preparatory work must be carried out before the foundation for the extension can be poured. If you decide to give preference to a rigid connection, then we dig a trench of a given size and drill holes in the existing base. Moreover, their diameter must exceed the thickness of the reinforcement. Metal rods should also be prepared. It is necessary to make a longitudinal slot on their end and insert a special wedging insert into it.
Step 4: Forming the frame
We drive the reinforcement with wedges into the prepared holes. The number of rods is taken at the rate of 20 pieces per square. Thus, the frame of the future foundation is formed. To ensure a secure connection of the following parts, it is necessary to leave the edges of the reinforcement about 300 mm long, which will subsequently need to be welded .
Step 5: Installing the formwork
Now you need wide wooden boards. We form the formwork of the given dimensions. We securely fix its walls with props, earth, cinder block, etc. You can close the inside of the formwork with polyethylene. The latter is especially true if you are pouring only part of the foundation and you will have to reuse these boards.
Step 6: Pouring mortar
Prepare a mixture of cement, sand, gravel and water. It is very important to keep the proportions right. For example, for the M300, you can take 10 kg of cement, 30 kg of sand, 40 kg of gravel, mix everything well and pour 40 liters of water. If the concrete is too dense, then you should dilute it with a liquid, but only add it in small parts so as not to spoil the solution. We pour concrete into the formwork and wait a few days until it completely hardens. We moisten periodically, otherwise cracks may appear.
Step 7: Forming a column foundation
Making such a foundation is relevant when a lightweight extension adjoins a wooden house. We drill wells so that they are below the freezing level of the soil. We form a sand cushion and install fiberglass reinforcement. This material has excellent properties and does not require additional treatment with waterproofing compounds. Formwork of specified dimensions is also formed and poured with concrete. This foundation for an extension is the easiest to perform, and everyone can create it with their own hands.
Step 8: Construction of a separate foundation
But when the number of storeys of the main and adjoining housing is different, then a separate foundation should be made in close proximity to the former one. The distance between the two bases is from 2 to 5 cm, depending on the number of storeys of the new premises. The higher it is, the wider the seam is selected. We fill this gap with thermal insulation materials or tow. Then a special decorative overlay is attached to the wall of the housing. In this case, it is very important to correctly mark the base. To do this, we stretch the cord on the pegs around the perimeter of the future site and check if the diagonals are equal. If the heaving type of soil prevails on the site, then the floor of the extension must be made so that it is not lower than the flooring of the main housing by the amount of possible deformations.
- Author: Mikhail Malofeev
Rate this article:
(4 votes, average: 5 out of 5)
Share with your friends!
Foundation for an extension to the house with your own hands
19 May 2017 Stroyekspert
7320
Foundation for an extension to a house
An extension to a house is an additional area built after the main construction. The strength and reliability of this design largely depends on the quality of the equipped base. Therefore, it is important to take a very responsible approach to the construction of the foundation for an extension to the house.
- Types of foundations
- Base bond selection
- Marking under the foundation
- Arrangement of the foundation for an extension to a brick house
- How to make a foundation for an extension to a wooden house
- A few tips for arranging the foundation for an extension to the house
Types of foundations
To avoid problems during the operation of the extension, it is necessary to choose the right type of foundation. The most popular among private developers are several types of foundation:
Types of foundations for extension
- Tape type. Such a base is universal, as it can be equipped for a structure of any complexity and severity. The use of a closed base construction scheme prevents subsidence of the structure.
- Column type. This foundation is characterized by reliability and affordable price. It is considered an ideal base for light buildings. The foundation is based on pillars, which can be made of wood, brick or reinforced concrete. An important point can be called the location of the pillars. The distance between them is determined by the design features of the building and can be from 1.5 to 3 meters.
- Pile type. The structure consists of piles of steel, reinforced concrete or asbestos, interconnected by a grillage. Such supports are ideal for construction in areas with a predominance of weak soils or for the construction of massive structures.

back to contents ↑
Selecting a base bundle
Selecting the type of base for an extension is the first step. The second no less important step is the choice of a bundle of foundations for the main and additional structures. Particular attention should be paid to three factors:0003
Foundation bundle
- Type of soil at the construction site.
- Groundwater level.
- Quality and technical characteristics of the main structure.

Based on the research carried out, it is possible to determine the type of bond:
Types of foundation bond
- Rigid reinforced connection is made on stable soils, subject to complete shrinkage of the foundation of the main house. In this case, the extension and the house may have a common roof.
- Strain joint bonding is a simpler and easier option. Equipped for an extension adjacent to the main building. More suitable for the construction of a frame-type extension, which will have an independent roof.
to contents ↑
Marking for the foundation
The strength of the foundation largely depends on the correct marking.
- First determine the shape of the base.
- Wooden pegs are placed at the corners of the proposed foundation.
- A rope or cord is stretched between the pegs, defining the perimeter of the site.
- The correct layout is controlled by the length of the diagonals, they must be the same. If necessary, the trim is corrected.

to contents ↑
Arranging the foundation for an extension to a brick house
In most cases, an additional area near a brick house is built from the same material, that is, brick. This means that the foundation for such a building must withstand a significant weight of the structure being erected. Such properties are possessed by a tape reinforced concrete structure. This reliable and durable foundation is very popular in private housing construction. It is carried out in the form of a monolithic tape, and all the work can be done by hand.
The process of arranging a strip base for an extension to a brick house is as follows:
- After marking the site for an extension, they proceed to earthworks. At the same time, it is important to properly deepen the base, given that the base of the foundation should lie below the freezing line of the soil. In addition, it cannot be located higher or lower than the foundation of the main house. The thickness of the bases should also be approximately the same. Therefore, the width of the trench for an additional foundation must be made wider by 20-25 cm to install the formwork system. You can dig a trench with the help of construction equipment, but it is more economical and easier to do it manually using a shovel. The bottom of the trench is carefully leveled and rammed.
- Then the dug trench along the entire perimeter is covered with a small layer of sand, moistened and compacted. If necessary, moisturizing is performed again, after which the sand is rammed again. A dense sandy layer is covered with gravel or fine gravel, which is also well rammed. The result is a kind of cushion, which to some extent compensates for the seasonal movement of the soil.
- Formwork made of boards is installed in the trench. The material is hammered together, fastening with transverse bars. Put up knocked together shields on both sides of the trench. Spacers of the same length are installed between them, which support the shields and provide the same thickness of the foundation. The formwork should rise above the soil level. Be sure to check the verticality of the formwork. This is done using a plumb line or building level.
- The entire structure is reinforced with a reinforcing cage. To do this, 4 or 6 bars of reinforcement are connected with jumpers, maintaining a certain step. At the same stage, a rigid binding to the main foundation is performed. To do this, holes are drilled in an existing base and reinforcement bars are fixed in them. In the future, these rods are connected to the reinforcing frame of the additional base by welding.
- The entire structure is poured with concrete mortar, which can be ordered from the concrete factory. Ready concrete is delivered to the site by specialized transport immediately before pouring the foundation. Prefabricated concrete is of high quality, but this option is quite expensive. Preparing a concrete solution with your own hands will be cheaper, but this will take a lot of effort. Concrete is prepared at home as follows: take 1 part of M400 cement, 3 parts of coarse sand and 5 parts of fine gravel. All components are mixed, and water is added to the resulting mixture. Water is added gradually in small portions. The finished solution should have the consistency of thick sour cream.
- When pouring concrete into a trench, it must be carefully compacted. Simple compaction actions are performed by cutting rebar, which is pierced through the poured mixture. However, a greater effect is achieved when using a deep vibrator.
- The surface of the poured foundation is leveled with a trowel or spatula. The horizontalness of the base is checked by the building level. To avoid cracking the foundation, it is necessary to constantly moisten the surface.
 At the same time, it is important to properly deepen the base, given that the base of the foundation should lie below the freezing line of the soil. In addition, it cannot be located higher or lower than the foundation of the main house. The thickness of the bases should also be approximately the same. Therefore, the width of the trench for an additional foundation must be made wider by 20-25 cm to install the formwork system. You can dig a trench with the help of construction equipment, but it is more economical and easier to do it manually using a shovel. The bottom of the trench is carefully leveled and rammed.
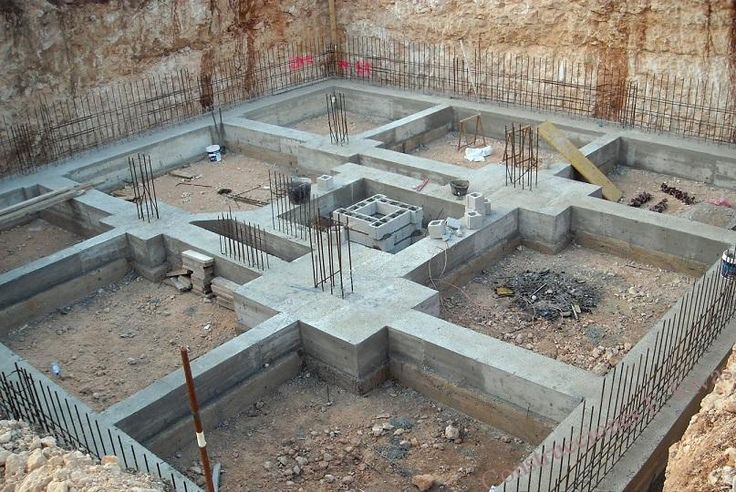
 Ready concrete is delivered to the site by specialized transport immediately before pouring the foundation. Prefabricated concrete is of high quality, but this option is quite expensive. Preparing a concrete solution with your own hands will be cheaper, but this will take a lot of effort. Concrete is prepared at home as follows: take 1 part of M400 cement, 3 parts of coarse sand and 5 parts of fine gravel. All components are mixed, and water is added to the resulting mixture. Water is added gradually in small portions. The finished solution should have the consistency of thick sour cream.
to contents ↑
How to make a foundation for an extension to a wooden house
An extension to a wooden house is recommended to be made of timber. Taking into account the fact that such a structure will not have a very large weight, you can make a base for it from pillars. The columnar foundation will reduce the cost of building the foundation. The work is carried out in the following order:
- The number of supports is calculated. In this case, it should be borne in mind that the pillars are installed in the corners of the structure and around the perimeter every 0.6 m.
- Dig a hole under each support. It should be deeper than the freezing level of the soil.
- At the bottom of each pit, a sand cushion is arranged. To do this, pour a layer of sand up to 20 cm, spill it with water and carefully compact.
- Reinforce the recess. It can be made from metal rods treated with a special waterproofing solution. You can use fiberglass reinforcement. This material is not subject to corrosion, so it will last a long time.
- Mount the formwork for the above-ground part of the pillars.
- The entire structure is poured with high quality concrete mortar.

to contents ↑
A few tips on arranging the foundation for an extension to the house
The construction of a structure adjacent to the main house requires special attention. Therefore, it is important to follow some rules for arranging the foundation for an extension.
Extension structures
First, the foundation of the main house and the base of the extension must be of the same type. This is due to the fact that each type of foundation interacts with the soil in its own way, so different foundations will have different shrinkage. As a result, not only the deformation of the extension can occur, but also its destruction.
Secondly, the type of base bond must be chosen correctly. This largely depends on the type of soil on the site. You can determine the stability of the soil by the foundation of the main structure. If the shrinkage of the house was insignificant, and the soil remained uniform, then you can safely perform a rigid bunch of foundations. If soil subsidence is constantly observed around the house, then it is better to perform an expansion joint between the bases.
The extension to the house is an important part, so you should carefully approach the arrangement of the foundation for this structure. Compliance with construction technologies and the implementation of all recommendations is the key to a solid and high-quality foundation.
Various foundations near the house and outbuildings. Building advice from Semenych
The base of the building is a loaded part of the building structure, which perceives the reaction of the soil and proportionally distributes the load from the mass of the building. Knowing how to pour the foundation under a room located next to an existing building, you can build a reliable foundation for the future building. Consider how to properly complete the task, ensuring the stability and durability of the extension to the existing house.
Contents
- 1 Pouring the foundation for an extension to a brick or wooden house
- 2 How to attach a veranda to a wooden house with your own hands.
- 3 How to combine the foundations of the house and verandas
- 4 for an extension to the wooden house
- 4.1 Strong connection
- 4.2 Separate construction
- 5 We connect two foundations
- 6 Pillable foundation for the extension
- ,0005 7 verandas attached to the house: attached to the house: construction phases
- 8 step -by -step instruction
- 8.1 1. Installation of the foundation
- 8.2 2. Installation of the strack beam
- 8.3 3. Installation of the frame
- 8. 4 4. Installation of the upper binding and installation of ceilings
- 8.5 5. Ceiling and insulation of the ceiling
- 8.6 6. Assembly of the truss system
- 8.7 7. Roof sheathing
- 9 Foundation
- 9.1 Tape
- 0006
- 11 Foundation for an extension to a brick house
- 12 Ideal option
- 13 Making an extension: where to start
Pouring the foundation for an extension to a brick or wooden house
After the construction of the main part of the house, a number of additional questions arise. How to make a foundation for an extension to the house? What load-bearing building structure is better to use for such relatively light structures as a terrace or veranda? Here it also makes sense to take into account in addition to which house the building will be built – wooden or brick.
If you take a closer look at houses, cottages and other residential and newly built structures, you will notice that in most cases they have various outbuildings that are part of them.
Some of these extensions are separated, rise relative to the main structure in winter (due to heaving of the soil), or crack. These defects are due to the fact that during their construction, sufficient attention was not paid to the foundation and the technology of its construction. Do-it-yourself foundation for an extension to a house Foundation for an extension to a house with your own hands How to properly pour the foundation for an extension to a house Do-it-yourself extension foundation – YouTube Marking the foundation for a house, garage, bath and extension – Builder’s Magazine How to make a foundation for an extension to a house with your own hands hands
Consider the algorithm for building a foundation for an extension with your own hands further in the text.
How to attach a veranda to a wooden house with your own hands.
The extension of a veranda to a house made of logs or timber can be started no earlier than one year after the construction of the house.
During this time, the walls of the house will settle and it is already possible to attach the frame of the future veranda directly to them. The frame house practically does not shrink, so the veranda can be built in parallel with the construction of walls. The first step is to determine the size of the veranda. Usually the veranda occupies one side of the house, which has access to the courtyard. The comfortable width of the veranda is at least 2.5 meters. On such a veranda you can put a spacious table and relax with a big cheerful company.
The foundation for the construction of the veranda can be used both strip and column. The weight of the wooden veranda attached to the house is not significant, so a massive foundation is not required and preference is given to the columnar type. To make it with your own hands, you will need: mark out a place for a future veranda by driving pegs into the ground and pulling a rope between them. Dig holes 60-70 cm deep and make a sand cushion 15-20 cm.
Assemble a wooden formwork 30 * 30 cm, put it on the prepared holes according to the level. Pour the concrete into the formwork and wait two weeks for it to set. How to connect the foundations of the house and the veranda
Attaching the veranda to the foundation, regardless of the size of the future structure, is only at first glance a simple matter. First of all, it should be remembered that when carrying out work, it is important to adhere to legislative and building codes, including obtaining permits for a new structure.
The construction of the foundation of a future building is one of the important tasks that must be dealt with at the very beginning. The best solution in this case is the unification of the foundations of buildings, and not the construction of a separate pedestal.
Before erecting the future veranda , it is necessary to study in detail what the foundation of the house consists of, how it was built and its overall dimensions.
In order to avoid subsidence of the floor and cracks in the walls in the future, it is recommended to build a foundation under the veranda of the same type as that of the house. First of all, this is due to the intensity of shrinkage, because different types of bases interact differently with the soil. The depth of the two structures must also match in order to avoid distortions in the future. Another important point in the construction of the foundation of the veranda is the season. In spring, soil moisture increases, and this will entail additional shrinkage of the structure. Also, a significant nuance can be the difference in the weight of the two buildings, which will also lead to uneven subsidence.
Considering these factors, it is recommended to wait one season before carrying out major construction work and provide for a technical break. To combine the foundations, it is recommended to use a concrete mortar or reinforced concrete, after reinforcing the foundations with a reinforcing cage or drilling reinforcing bars into the old foundation.
Depending on the severity of the new structure, the foundations can be connected in several ways:
- Separate construction of the foundation of a new building in close proximity to the old foundation . In this case, a full-fledged reinforced concrete grillage is constructed, and the distance between the two bases is filled with roofing material. When using this method, you need to take into account all the factors that affect shrinkage and create a layer that will allow the new foundation to play without damaging the old structure.
- Rigid connection between the foundation of a house and a building . This method is considered difficult to predict and is used if the soil on the site allows you to calculate shrinkage, and the future building will have several floors.
When using this method, a new foundation should be erected of the same type as the old one, and the weight of the future building should not differ significantly from the old one. Buildings of too different dimensions will have different shrinkage rates, and this will lead to distortions and cracks.
Important! If the soil on the site is prone to severe heaving, it is recommended that the floor level of the new building be lower than the level of the main house. Calculations are made based on the magnitude of heaving.
If at the stage of the initial construction of the house you are already planning to expand its territory, it is recommended to lay the foundation for future construction. This will allow you to create a single structure, which, during downtime, will finally take the necessary space and get stronger.
For an extension to a wooden house
In order to properly pour the foundation for such an extension, it is necessary to carry out an error-free calculation.
There are several types of connection – rigid connection or separate erection. The choice of a particular option is carried out taking into account the type of soil on the site and the dimensions of the extension.
Rigid connection
This method is useful under the following conditions:
- If the main building “stands” on a shallow strip base, and the base forms a single whole with it.
- Estimated shrinkage of the building.
- When building an extension of several floors under one roof with the main building.
- Dig a recess according to the required dimensions.
Place a layer of sand on the bottom to give stability.
- Drill holes in the base. Each subsequent row is drilled with a shift relative to the previous one.
- Install metal rods in the holes, which have a longitudinal slot at the ends. Install wedging wooden liners in it.
- Using protruding pieces of reinforcement to form the base for the extension.
- When the frame is ready, the grout can be poured.
- Subsequent work can only be carried out after the structure has shrunk.
- Rigid connection – used for houses of rather old construction. Such a connection should never be used in places with a non-rocky type of soil.
- Construction of expansion joints. So, let’s move on to a detailed consideration of each method of tying an extension to a wooden house. Before you combine the foundations using a rigid binding, you need to find out what type of foundation was used in the construction of the main dwelling: piles or slabs.
And also find out:
- Foundation for extension and its depth;
- Area occupied by the house;
- Find out about the building materials used to build a house. All information, if it is missing, can be easily filled. You need to make a ditch near your home, insert reinforcement there, and see how deep the base of the house is. The end of the reinforcement must be slipped under the base itself so that it lies under it. Then you need to turn and pull the reinforcement to the back wall of the base.
- With the help of drills, wells are prepared at a distance of no more than 2 m from each other.
- Sand is poured onto the bottom of the wells and then compacted. A layer of coarse gravel is laid on top, and then liquid bitumen (for waterproofing).
- Metal pipes of suitable diameter are used as support posts, treated on the outside with bituminous mastic. They are installed in wells.
- Fittings are inserted into the middle of the pipes and concrete is poured.
- Grill formwork is mounted on top of the support posts. It should be flush with the base of the previously erected building.
- The reinforcement of the grillage (it is laid after the formwork) is welded in several places to the embedded reinforcement of the foundation of the main building. In the event that it is made of bricks, studs of the required length should be made from steel rods, with threads on the edges. They are inserted into the drilled holes, after which wide washers are put on the edges and the nuts are screwed up to the stop. Thus, the two bases are tightly attracted to each other.
- The formwork is poured with concrete mix.
- After 24 hours, the formwork is dismantled, after the concrete has hardened, construction continues.
- Mark the contours with the help of pegs and twine.
- Remove the sod and topsoil. If this is not done, the vegetation under the deck will rot, spreading aromas.
- Lay out the foundation. At this stage, questions may arise: how high should it be. If you make the foundation incoherent and “floating”, the level of the veranda flooring should be 5-10 cm below the floor level. This is necessary so that even when raised, the extension does not block the front door. If you do not want the floor to be lower, you will have to make a high threshold in the front door: to guarantee the freedom of opening the door. The height of the support beam depends on the height at which the floor of the extension will be located. It is nailed to the wall of the house, floor beams are attached to it. The height of the foundation is beaten along its lower edge (these are the next two steps).
- Nail a support beam to the wall, along the lower edge of which the height of the foundation is beaten off.
How to mark the extension: nail the support beam at the required level, beat off the height of the foundation along its lower edge
- Build the foundation.
- While the concrete is at least half strength, complete the site preparation. If at the bottom of the pit (the fertile layer was removed) the soil passes water well (sandy, sandy loam), crushed stone is poured to the bottom. It can be compacted, but you can do without it. If there is loam or clay under the fertile layer, you will have to fill the pit with either the same soil (but not fertile) or pure clay. It must be well compacted so that voids are not created in which water will accumulate (it is better to lay layers soaked to a paste state).
- A layer of waterproofing is laid on the finished foundation.
- Support posts under the roof are exposed and fixed.
- They make the binding of the racks: they nail a beam 100 * 150 mm thick around the perimeter.
It can be nailed outside the racks or between them. Sometimes the racks are nailed after the floor has been laid. This is not the best option: the floor will quickly become unusable. With such a structure, in order to replace it, you will have to disassemble everything, up to the roof. If you first set the racks, and then the floor, it can be repaired without problems.
This is how the assembled frame of the veranda attached to the house looks like. Intermediate racks are needed only if the width of the veranda is more than 3 meters.
- Floor beams (beam 100*150 mm) are attached to the foundation and support beam. The step of their installation corresponds to the step of installing piles or posts.
- Assemble the truss system.
- Side guards (for open) or walls (for glazed) are installed. At this stage, the general technology ends. Further, for the covered ones, it is longer, the open veranda is easier to attach to the house:
- For open beams, floor boards are nailed.
- For glazed rooms, an insulated floor is made. A draft floor is nailed to the beams. Above – logs, between them – a heater, on top – a finishing floor.
- For open beams, floor boards are nailed.
- Roofing.
- Wall decoration inside and outside.
- close location of aquifers. The absence of a rigid connection of the additional slab with the base of the existing structure allows it to move when the soil is deformed;
- weak soils characterized by low load capacity. The increased contact area prevents uneven shrinkage of the attached structure.
- The first step is to level the area intended for the foundation. Next, markup is performed, in which special attention is paid to right angles. All markup is performed using the most standard mathematical and geometric calculations, using improvised means.
- Upon completion of the marking of the site, earthworks are carried out. It should be noted here that the foundation of the extension must be deepened below the level of soil freezing.
Then trenches are made for pouring a strip concrete base.
- On the bottom of the resulting trenches, using crushed stone or sand (often both materials are combined), a cushion is made, the thickness of which should be determined in accordance with the soil conditions on the ground. As a rule, the thickness of the crushed stone or sand cushion does not exceed 15-20 cm.
- Regardless of the size and weight of the extension to the house, it is highly recommended to reinforce the foundation structure. For this, reinforcing bars or a finished reinforcing network are used.
- After that, it is necessary to make a wooden formwork. It can be set only on those zones of the future foundation, which will be located above the level of the earth’s surface.
- It is recommended to use a high quality cement mixture for foundation pouring, which has been prepared in accordance with the manufacturer’s instructions. Experts advise choosing a brand of cement not lower than M400, which will allow you to obtain the necessary strength characteristics.
- In the process of pouring the cement slurry, it needs to be tamped down, making this the usual cutting of rebar. Of course, the most effective tamping of cement mortar can be carried out using a deep vibrator, but not everyone has such a tool (it can be rented from construction companies).
- If the work on the foundation structure is carried out in the summer, then it will be correct to pour water over the cement mortar 3-4 times while it hardens, in order to exclude the possibility of cracking the base in the process of curing.
- rigid connection, this method should be used in those houses that have been built for a long time and their foundation has already settled down. In addition, with the help of simple calculations, you should make sure that the load that has arisen will not bring deformation of the old foundation;
- arrangement of special expansion joints.
- depth at which the foundation is laid;
- determine the space it occupies under the house;
- identify the types and types of building materials that were used in the construction of the foundation.
- choose frost-resistant cement for the foundation;
- strictly observe the sequence of adding concrete components: water, crushed stone, fine sand, and only then cement;
- Ready-mixed concrete should be quickly delivered to the work site, it quickly hardens and becomes unsuitable for pouring;
- place the formwork only after the trench has been filled with concrete, remove it not earlier than one week after pouring;
- Before building an extension, waterproofing must be laid on the foundation.
- The general process of building a foundation is the same as building a platform for a residential building – marking the site, leveling, digging trenches or holes, cushioning, reinforcing, pouring or installing piles.
- A special feature will be the interfacing of platforms – they will have to be made in such a way that further shrinkage does not affect the strength of the residential building. There are two ways to do this – a rigid reinforced and a flexible connection – an expansion joint.
- So, how is an extension to a wooden house with a foundation made, like a rigid connection? For this, a perforator and a reinforced rod are used. Through holes are drilled in the wall of the monolithic platform under the common object.
- Further, the stages are similar – the ditch is filled with building rubble and poured. After filling, the thickness of the concrete is pierced to release air bubbles.
- In addition to the release, it is worth spilling the finished platform with cold water. The appearance of “milk” on the surface indicates a sedimentation of the solution to the bottom. Stratification is excluded.
- No differences in preparation – leveling, trenching, reinforcement, bottling, pouring.
- A feature will be the blank end of the formwork, which does not reach the common foundation by 2 – 3 cm. For the “cover” you can use a board wrapped with polyethylene.
- The final steps do not differ from the general technology.
 4 4. Installation of the upper binding and installation of ceilings
  Some of these extensions are separated, rise relative to the main structure in winter (due to heaving of the soil), or crack. These defects are due to the fact that during their construction, sufficient attention was not paid to the foundation and the technology of its construction.
  During this time, the walls of the house will settle and it is already possible to attach the frame of the future veranda directly to them. The frame house practically does not shrink, so the veranda can be built in parallel with the construction of walls.
  Assemble a wooden formwork 30 * 30 cm, put it on the prepared holes according to the level. Pour the concrete into the formwork and wait two weeks for it to set.
  In order to avoid subsidence of the floor and cracks in the walls in the future, it is recommended to build a foundation under the veranda of the same type as that of the house. First of all, this is due to the intensity of shrinkage, because different types of bases interact differently with the soil. The depth of the two structures must also match in order to avoid distortions in the future.
If you choose a column design, then the fittings are fixed on the plinth. But only this is possible, provided that it has sufficient dimensions. If the length is not enough, then you should choose another way. If this rule is violated, problems such as cracks and unsteadiness may occur. And here is what polycarbonate terraces attached to the house look like, and how to build them. This article will help you understand.
In the video – an extension to the house:
The construction of the tape base will be carried out according to the following plan:
When choosing a slab base, the connection process is carried out by analogy, only if its thickness is more than 400 mm. The possibility remains even if the slab protrudes beyond the basement of the building. But only this protrusion must not exceed 300 mm. Weld the reinforcement to the metal frame.
Separate erection
If you choose a strip base, you will have to mark out the territory under the strip and dig a groove, the depth of which is 600 mm. Lay a layer of sand or gravel on the bottom. Next, install a solid formwork, adhering to the specified dimensions.
Reinforce with metal bars. At the end, pour the cement mortar. Due to the fact that the foundation will be separate from the house, this allows you to give the extension durability.
Foundation for an extension to a wooden house
Using this option, you can find that a space has formed between the wall of the main house and the base of the extension. Its width can reach 100-150 mm. Lay waterproofing and heat-insulating material inside. It is important not to miss this moment and to perform an expansion joint, thanks to which shrinkage can be prevented and the base protected from damage. But what the summer kitchen attached to the house looks like, and how to make such an extension, the information from the article will help to understand.
The location of the new sole must be higher than the old one. Over time, shrinkage will occur to a depth equal to the main house. This will give the structure reliability and durability.
In addition to the tape base for an extension to a brick house, a columnar one can also be used. It will be closely adjacent to the main structure. Piles must be waterproofed in advance and installed on concrete pads. After that, the installation of the strapping of the desired dimensions takes place. This method significantly reduces the construction time, so that construction work can be continued in a few days.
You may also be interested to know what a shallow strip foundation looks like on heaving soils.
We connect two foundations
You need to know that you can’t blind an extension to the house just like that, it needs to be tied to the main building. First you need to carefully plan and calculate everything. Otherwise, you can harm your main home. The extension will certainly have an impact on the ground, which may well move. And this means that both foundations must be interconnected. Linking can be done in several ways.
Foundation for an extension to the house: how to fill in correctly, how to install screw piles for the base of the veranda with your own hands, lathed or columnar – which is better – which one is better ≡ Foundation for an extension《Repair Tips》Details… | Bergge How to make a foundation for an extension to a house yourself How to make a foundation for an extension to a house – builder’s secrets + video Foundation how to do it right – Foundation marking and digging with formwork and reinforcement – YouTube
Post foundation for extension
The easiest way to build a foundation for an extension with your own hands is of a columnar type. This method is suitable for light extensions and saves materials and reduces construction time. This is done as follows.
During drying, it is recommended to cover the concrete with plastic wrap or moisten it periodically: this will allow the mortar to dry evenly and prevent its cracking.
Which of the above methods is more suitable is up to you. We also recommend a video on how to pour the foundation for an extension and avoid mistakes that could adversely affect the reliability of the entire structure.
Veranda attached to the house: construction stages
First of all, you need to decide on the type – open / closed, from what material, choose the type of foundation. You also need to decide what size it will have, where and how to be located. All this is desirable to draw on the plan. Even better – order a project. Project construction is rather an exception for us, but at least a plan with dimensions and an indication of the location, linking to paths, etc. you should have.
Do-it-yourself construction of a veranda to the house follows the following plan (we build it from wood):
These are just the general steps. To have a more complete picture of how to make a veranda to the house, we will further consider the most problematic moments of construction in more detail.
Perhaps you are interested in building a gazebo? How to build a gazebo out of wood can be found here.
Step-by-step instructions
1. Installation of the foundation
Scheme of options for a columnar foundation for the frame
The first stage of construction is foundation work. Usually, a separate foundation is arranged for the extension, which must be connected to the base of the old house with the help of special embedded fittings.
Scheme of reinforcing the strip foundation
Of course, the most preferable option is the common foundation laid at the stage of construction of the first house, however, few of our compatriots look so far, which, however, is quite understandable and explainable in everyday life. When laying a new foundation, it is necessary to ensure maximum identity not only in form, but also in depth of both structures.
Scheme of the floor of a frame house
If it is impossible to achieve full solidity, then a so-called expansion joint must be left between the two foundations so that when the soil moves in the spring, cracks do not form on the walls of the extension and at the very foundation.
2. Installing the tie bar
The tie is the second step in building an extension. The thickness of the walls of the skeletons is usually 20 cm. Living rooms are rarely placed in extensions, which makes it possible to reduce the wall thickness to 10 cm. Therefore, the diameter of the strapping beam and the cross section of the vertical racks will also be 10 cm.
Installing the tie bar
The figure below shows a possible scheme for mounting the bottom trim of the extension:
3. Mounting the frame
Mounting the frame
When assembling the frame, the most attention should be paid to fixing the posts. The figure below explains its features.
It is recommended to make a step between vertical posts of 60 cm, then when laying mineral insulation boards there will be no difficulties. Accordingly, the distance between the floor lags and the rafters must also be taken as 60 cm.
4. Installation of the top rail and installation of the floor beams
Installation of the top rail and installation of the floor beams
The top rail is fixed according to the same principle as the bottom rail. The side view is shown in the figure below.
5. Sheathing and insulation of the ceiling
The ceiling, like the walls inside, is best sheathed with clapboard. This is the most favorable option from the price and aesthetic points of view. Pine lining will last at least 30 years, and even more with proper care. To insulate the ceiling in order to save money, you can use expanded clay, pouring it on top with a layer of 10–12 cm. roofing
Roof sheathing
The process of fastening the roofing material does not differ in any nuances, except for one thing: the upper part of the sheets must be under the roofing material of the main building. To do this, you may need to remove some of the fasteners. An approximate diagram of the roofing “pie” is shown in the figure below.
Foundation
The right foundation ensures the stability of the entire building . When laying it, materials, the planned load and the nature of the soil are taken into account. Sheds or light summer structures can do without a foundation.
There are several types of base: screw, monolithic, columnar, tape. Any base must be waterproofed.
Consider the last two options as the most common.
Tape
Marking the foundation for an extension to the house Foundation for an extension to the house: technology, where to order in Moscow
A massive building made of heavy materials requires a solid foundation. This is the strip foundation. It is a closed strip of various materials, passing under the load-bearing walls of housing.
Columnar
Perfect for veranda . Supports are mounted at the corners of the site. It can be a brick, a log, a metal profile. The pits dug under the racks are covered with sand, creating a pillow. The supports are fixed in the ground and poured with concrete. For complete solidification, 5-7 days are enough.
Joining the base for construction on slabs
The construction of a reinforced concrete structure in the form of a slab should be carried out under certain conditions:
If the extension is made to create a separate zone, and not to expand the room, then the foundation must be carried out separately and have an expansion joint. The optimal solution is to perform an expansion joint along the junction line.
Foundation of an extension to a brick house
In the case of a brick suburban building, in most cases, a strip reinforced concrete foundation is chosen for the extension. In the field of private suburban housing construction, a monolithic version of the foundation is sometimes used. This is partly due to the fact that almost everything can be done independently without hiring third-party specialists.
Foundation works for an extension to a brick out-of-town building are carried out in the following order:
It must be remembered that the optimal time for the cement mortar to harden and acquire all the necessary strength characteristics is 3-4 weeks.
Separately, this is stated in the instructions for the material. Before the expiration of this period, it is not necessary to carry out any construction work on the device of the annex.
Ideal
All possible problems with laying the foundation for the extension will be eliminated if you foresee the subsequent emergence of a desire to expand the property in advance. Even when building a house, you can lay an additional foundation without building anything on it. The main thing is to ensure good waterproofing of this part of the foundation.
Attach to the house with your own hands Marking the foundation. Preparatory work. Extension to the house. Part 1 – YouTube How to properly pour the foundation for an extension to the house Do-it-yourself foundation for an extension to a house : review, 9 tips0002 You can disguise it with flooring and use it as a platform. In addition to other positives of such a solution, it also reduces the risk of subsequent shrinkage, since quite a lot of time passes between the creation of the foundation and the construction.
We make an extension: where to start
Before starting the construction of a frame extension to the house, decide on its location. On the north or east side, it is advisable to place a pantry or utility room, on the south or west – a bedroom or living room (then there will be a lot of light in the room, during the day the sun will warm the frame extension, so you will save on heating).
If the annex will have a bedroom or a living room, make it on the south side – this way you can save a little on heating
This plan must be submitted to the technical inventory bureau of your locality. Of course, not all homeowners run to the BTI in order to organize a frame extension. But in vain! If checked, the illegal building will most likely be ordered to be demolished. Do you need such problems?
As practice shows, BTI specialists will not create obstacles and will quickly approve the project (maximum within 10 working days).
Permission from the BTI for an extension to the house will be issued within 10 days. Provided that the application meets all the established requirements, and the construction meets the technical standards
Foundation for an extension to a wooden house
Foundation for an extension to a wooden house
If you consistently follow all the recommendations that will be given in this article, then almost any owner will be able to forces to build a foundation for an extension. Moreover, if you do it yourself, then the cost of construction will be significantly lower than that of workers hired by ad. The ideal option can be considered if the key points of how the main construction was carried out and if there is a project with geodetic survey data remained in memory. All this will greatly facilitate and speed up the construction of the foundation.
Types of foundations
Linking the main and attached foundations
When thinking about an additional extension to your main house, you should understand that it cannot be just taken and stuck. Any construction activity must be carried out consciously and after strict calculations. Otherwise, you can damage the existing housing. After all, the new extension will have an impact on the ground, which can begin to move, which will cause damage to the structure. Therefore, when building an extension, it is necessary to connect its foundation with the foundation of an already standing house.
Start binding to the house
The foundation can be tied in several ways:
Slight setback, rigid connection should under no circumstances be practiced in areas where non-rocky soils exist.
Let’s consider in more detail each of the ways to arrange a new foundation for an extension to a wooden house .
Rigid foundation connection system
Before you start pouring the foundation for an extension, you should remember what type of foundation the house was built on. We most often use tape or columnar types of foundation, less often you can find a foundation based on slabs or piles.
In addition to the type of foundation, several other factors that may affect future construction should be determined, namely:
It will not be a great tragedy if some of the information is lost, it can be restored as a result of new research. For this, a special ditch is dug along the old foundation, which gives an idea of the size of the foundation. Its depth is determined using a simple tool, a piece of reinforcement, with an end like a poker. This end should be pushed under the base so that it literally lies under it.
Reinforcing wall for the foundation
After that, the reinforcement should be rotated to a horizontal position and stretched to the stop of the rear wall, after which a notch should be made at the place where the wall ends. We remove the probe and repeat the operation along the entire wall, this will allow us to get a fairly accurate picture of the dimensions of the foundation.
The new foundation must be built exactly the same type as the old one. Moreover, this should be done after calculating the heaving of the soil at the construction site. Calculations must be done in any case, there should be no excuses that I am building a small extension, or it will be made of lightweight materials. In addition, the new foundation should not lie deeper than the old one, they should be located on the same level.
At the next stage of construction, we will need to drill holes for reinforcing reinforcement. The holes for it should be slightly larger than the diameter of the rods themselves. Inexperienced builders often have a question: to what depth should reinforcement be deepened? To calculate it, there is a universal formula: the recess should be 35 rod diameters.
There are times when the width of the base of the house is not enough to drill holes of the required depth. In this case, proceed as follows: vertical slots are made at the end of the plate, into which special wedges are inserted. This system is called anchoring, with its help the new foundation will receive a strong bond with the old one.
It is very important to correctly calculate the required number of reinforcing bars. This will envy the strength of the entire structure, if an insufficient number of them are installed, then the foundation will be weak, if more than the technology requires, then this is a waste of money. As a rule, they are installed at the rate of 5 pieces per quarter meter. The required length of the rods can be cut with a grinder, or you can order ready-made ones. To enhance the effect of the installed rods, small pieces of metal or nuts can be welded onto their free end. These ends will be filled with concrete, as a result of which the structure will receive additional reinforcement.
Proper arrangement of thermal seams
The thermal seam avoids the negative effects of seasonal and daily temperature fluctuations. To obtain a so-called expansion joint, when pouring a new foundation, a small gap should be left (2 cm for small buildings and 5 cm for buildings more than one floor high) between the new and old foundations. A board of the required thickness wrapped in plastic wrap and placed between two bases will help to get the right and even seam.
Digging a trench and pouring the future foundation
Before starting to dig trenches for the future foundation, it is necessary to clearly determine where it will be located and mark its boundaries. This will greatly facilitate the implementation of all future work. For a more visual marking, you can use pegs and a skein of twine. The diagonals that are laid at the corners of the trench will make it possible to understand how correct the future foundation will be. With the help of a plumb line, you can get even and regular walls, because this is also an important factor that affects the strength and quality of the future structure.
Expansion joint
If the extension is small, then you can dig a trench yourself, otherwise it is better to use the services of special equipment. After a hole of the required size has been dug, it is necessary to carry out primary insulation in it, pour a pillow of sand and gravel. Then you should think over all the necessary connections and communications, and you can start pouring the foundation.
Pouring the foundation into the formwork
When making concrete, a few mandatory rules must be observed:
Ready-made foundation for the extension
If all these conditions are met, it will be possible to successfully, by one’s own efforts, obtain a quality foundation for the future extension of one’s own wooden house. At the same time, the cost of the construction itself will cost you at the price of building materials and rented tools.
Video – foundation for an extension to a wooden house
Ol000 families, personal needs, repairs according to the selected project, and so on. The decision to make an extension to the main building is the simplest, especially since the work is not particularly difficult for home craftsmen if you follow all the points of the detailed instructions. The process is described below – how to attach a foundation to a house.
A reliable foundation is a guarantee of the fortress of two objects in the complex.
Foundation steps
An experienced owner does not need to be reminded of obtaining a building permit and documenting changes to the architectural plan. If this is not done ahead of time, then it is likely that security guards in all areas of the service will not approve of the actions and will force the annex to be demolished.
Strong “friendship” of the neighbors will also contribute to this. Joke! However, not without a grain of truth. So, when all the documents are in hand, you can begin to decide how to make an extension to the house on the foundation yourself.
Selection of foundation
Do not deviate from the type of foundation under a residential building and for an outbuilding. This will help balance both areas – different types shrink differently.
More perspicacious homeowners will make a continuation of the foundation for the extension at the time of construction of the main housing. This will greatly facilitate the work. But if this was not intended, then nothing will interfere with making a quality foundation.
Stage
The first is used to connect the foundations of the old house and outbuilding. The second one is for young objects.
Rigid version
Rebar is driven into them so that the ends protrude to a sufficient size to bond with the new foundation. The metal is bound by hand, welding makes it thinner.
ADVERTISEMENT
If this is not done, the foundation for the extension to the house will receive voids. Talk about a fortress then is redundant.
Expansion joint
Such a connection will avoid the defects of both buildings – it is no secret that they will act on each other. The essence of its conjugation is a void of several centimeters when pouring or installing various types of foundations. It is not filled with anything, only the walls of the objects are connected by foaming the gap with mounting foam. When performing an expansion joint, you should be completely sure that the foundation of the extension to the wooden house will not depend on ground movements. How it’s done:
That’s all the tricks, following which the foundation of an extension to a wooden house will become a reliable and safe structure for a private complex.
Saving to the detriment
The owner seeks to reduce construction costs at any cost, sometimes forgetting that the miser pays twice. Below are examples of what savings turn into at the most important stage of work – the manufacture of the foundation.