How to board a loft over thick insulation: Can I lay loft boarding straight on top of insulation that is above the joists?
Can I lay loft boarding straight on top of insulation that is above the joists?
I am having the insulation in my loft topped up for free by British Gas. They are putting an extra 8″ in on top of the insulation that already sits in the loft and lies just below the joists. I assume that the joists will be covered with the fresh insulation but having totally cleared out my loft I want to board it out properly after British Gas have finished. Can the boarding go on top of the insulation or will the joists need raising?
8
8 Answers from MyBuilder Loft Conversion Specialists
Best Answer
Roc builders
Harlow • Member since 25 Aug 2011 •
16
jobs,
100% positive
feedback
You do not have to mess around with insulation or extra timber. toolstation sell something called “loft flooring legs”.they come in packs of 12 and cost around £17.They fix to the top of the joist and raise the floor by 175mm and anyone can do it.They are only suitable for lofts though and are not structural so cannot be used if you intend on using the room as “HABITABLE”.
2011-10-12T21:45:02+01:00
Answered 12th Oct 2011
TJW BUILDING MAINTENANCE
Liverpool • Member since 11 Jun 2008 •
6
jobs,
83% positive
feedback
sounds like every one can do DIY `s and when it all go`es wrong they blame the product they are useing or I was told it would be ok , the damage done in time using legs or 3×2 timber over your old ciling joist its all weight on top of your ceilings that the old joist are not designed for ,they are only to hold your ceiling up if any one carries out work like this in 12 or so months if you are lucky you will be replacing your ceilings and all the insulation it may seem like a load of money to do it right but it will cost a lot more in the end place a add on here and ask for a loft conversion expert not a DIY`er
2012-03-15T20:15:01+00:00
Answered 15th Mar 2012
Ambux Ltd
Birmingham • Member since 24 Oct 2011 •
3
jobs,
100% positive
feedback
The joists will need to be increased in size to allow the new birds to rest on and to be screwed into.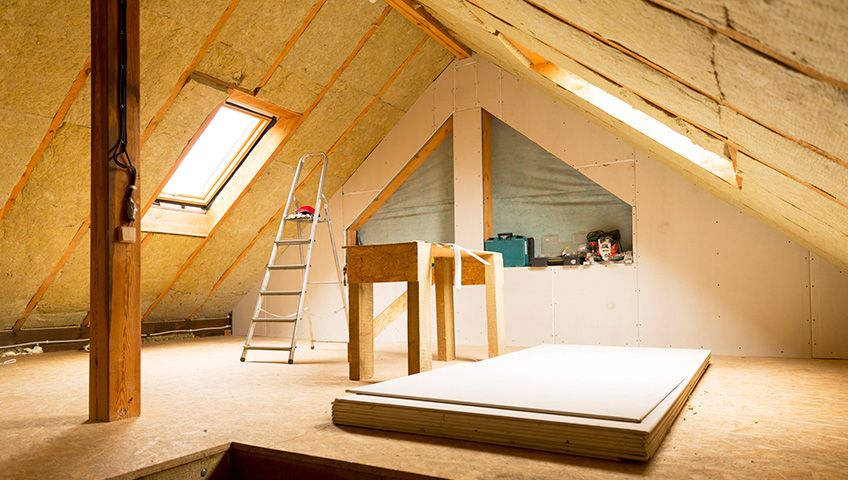 Compacting the insulation will cause the plasterboard to either bow or crack.
Kingspan or celotex is an option but British gas will not supply this. For a 100mm board it costs around £38
2011-10-31T14:00:01+00:00
Answered 31st Oct 2011
MTR Lofts Ltd
Maidstone • Member since 2 Jul 2008 •
64
jobs,
100% positive
feedback
Cheapest way would be to buy some loft insulation legs(no good putting down 4×2 timbers if you have already had your insulation layed). Once they are screwed down to the old ceiling joists you can lay the floor boards on top of the legs, cheap and easy to do even for a basic diy’er
Thanks Russell
MTR LOFTS
2012-02-19T17:30:03+00:00
Answered 19th Feb 2012
Charlie Carpentry
Bristol • Member since 23 Jun 2011 •
336
jobs,
100% positive
feedback
easiest way is to lay 3 or 4×2 across ceiling joists then board on that. you will find it much better in long run as there are all sorts protrusions on joists.
2011-10-12T10:45:02+01:00
Answered 12th Oct 2011
B J D BUILDING/ROOFING
Cheltenham • Member since 29 Oct 2008 •
34
jobs,
100% positive
feedback
You will need to increase the height of ceiling timbers, if you put extra insulation then fit the boards, when you push it down it will probably push the ceiling down.
If you didnt have the free insulation, I would have said lay solid insulation boards over the existing joists.
2011-10-12T10:45:02+01:00
Answered 12th Oct 2011
MJC JOINERY
Northwhich • Member since 16 Mar 2009 •
22
jobs,
100% positive
feedback
Hi in short no as this will compact the insulation and may cause the plasterboard or ceiling underneath to belly, you would be best to either put kingspan insulation in it’s place and board over that but kingspan can be dear or lay 100mm timbers the opposite way to existing joists to raise floor to allow for insulate and re cut insulation between the two
Layers of timbers then board, this would not be a strctural food but good enough for storage
Thanks
Good luck
2011-10-12T10:45:02+01:00
Answered 12th Oct 2011
Design Potential
Weston Super Mare • Member since 20 Apr 2018 •
7
jobs,
100% positive
feedback
Putting boards directly on top of insulation can almost halve its performance, there are engionous ways of raising the height of your flooring by using stilts you can research these online and buy them, and if your good at diy it’s a relatively simple project to do yourself
2018-11-23T20:35:02+00:00
Answered 23rd Nov 2018
How to Board a Loft
Why Do I Need to Board My Loft?
Boarding your loft will allow you to increase the storage potential for your loft and will also make it much safer and more stable for you to move around in.
This is incredibly useful if you are struggling with storage space in your home.
Table of Contents
- Why Do I Need to Board My Loft?
- How to Board a Loft Yourself
- Tools to Board a Loft
- Safety Equipment to Board a Loft
- Materials to Board a Loft
- How to Prepare for Boarding a Loft
- Loft Insulation Regulations
- Types of Loft Boarding
- FAQs
- Sources
How to Board a Loft Yourself
Step 1:
Begin by measuring the distance between the centres of the joists. This will help when calculating the number of loft legs required.
Then, you’ll need to work out what size boards you’re going to use. The most common thickness of boarding for a loft floor is 18mm.
Step 2:
Once you know the size of the sheets that you’ll be using, you can measure the loft area and work out how many sheets you’ll need to cover that area.
Step 3:
If there are downlights in the ceiling, these should be covered by a downlight cover or protector. Ensure the insulation is not in contact with the light fitting.
Step 4:
Start at a convenient place, such as next to the loft hatch and work your way around from there. Screw your first loft leg into position using your cordless drill. Drive the screws through the holes at the base of the leg and into the joist.
Step 5:
Use a straight edge to mark the positioning of the loft legs on other joists, and then work your way along to screw legs into those positions with the same method.
Step 6:
Repeat this process all the way across the joists until the entire area that you want to board has legs installed.
Step 7:
Then, roll your insulation into position. Where the insulation meets a loft leg, carefully make an incision using a trimming knife and push the leg through the insulation. Repeat this step across the entire length of the loft space.
Step 8:
Once the insulation is in place, the loft boards can then be installed. Place the first sheet on top of the loft legs and drive a screw through the board and into the top platform of the loft leg to lock it securely in place.
Step 9:
Your loft boards may have a tongue and groove fitting. Make sure this is nice and tight as you continue installing the boards next to each other.
Repeat this process to secure the boards to all of the loft legs. In some lofts, you may need to cut some of the boards around obstacles or simply to fit into the space.
Step 10:
Once all of the boards are fixed to the legs, you should then be able to stand and walk on the finished floor.
Tools to Board a Loft
- Tape measure
- Cordless drill and drill bits
- Pencil
- Hand saw Trimming knife
Safety Equipment to Board a Loft
- Builder’s gloves
- Dust mask
- Eye protection
- Knee pads
Materials to Board a Loft
- Downlight cover or protector
- Loft legs
- Loft boards
- Screws
- Insulation rolls (if it’s not currently at the correct depth)
How to Prepare for Boarding a Loft
To prepare for boarding your loft, you want to begin by removing any items that you may have stored up there. You should also check to ensure that your loft is correctly insulated before boarding.
Your insulation will need to be at least 270mm thick throughout to adhere to the government recommended guidelines.
You need to be able to see the joists in the flooring so that you know where you can step. So you will need to remove any excess insulation to reveal the joists.
Before starting the project, ensure that access to the loft is safe and that the ladder is secured.
Also, ensure that the loft is well-lit so that it’s safe to move around and the necessary work can be carried out.
Also, you will need to ensure that the loft is correctly ventilated before any work is carried out.
Loft Insulation Regulations
Before boarding your loft, it is important to consider planning permission and building regulations to ensure your loft boarding is compliant.
It is possible to board your loft without building regulations approval, as long as the loft will only be used to store items less than 25kg.
The loft insulation must also maintain the required depth of 270mm. Previously a depth of 100mm was necessary. However, this changed in 2013, although property owners do not need to increase the length in accordance with the new guidelines.
However, you will need to apply for planning permission and building regulations if you plan to convert your loft into a functional living space.
Types of Loft Boarding
There are several types of loft boarding, however, the best way to board a loft is using loft legs. This ensures that the insulation in your loft meets government guidelines. Below is a list of loft boarding types:
Laying Chipboard Directly on the Joists
This is a cheap method of boarding that can be laid out easily. However, this type of boarding doesn’t leave any room for the recommended insulation depth, and the insulation may be compressed, which can cause condensation and mould.
Insulation Boarding
You can purchase insulation boarding, which is laid directly over the joists. This makes up for the insulation depth, and then you can lay chipboard over these boards.
However, these boards are quite expensive, and they can also cause condensation and mould due to reduced airflow.
Using Loft Legs
You can raise the floor level using loft legs. This is considered the best loft boarding. It allows enough room underneath the floor area for the insulation and leaves room for good air circulation, preventing condensation and damp.
FAQs
Q: How to board a loft over insulation?
A: If you are boarding over insulation, you should create a raised boarded area above the insulation. You can do this using products such as loft legs to create a raised boarding that is safe.
Q: How much of my loft should I board?
A: Most homeowners prefer to board their entire loft. However, you don’t have to. The amount you board is completely up to your personal preference and needs.
Q: Will loft flooring impact my insulation?
A: Loft flooring won’t impact your insulation if you place the boarding on raised loft legs, as explained within our step-by-step guide.
Q: How much weight can loft boarding hold?
A: The average loft floor joists in the UK can hold around 40kg of weight per square metre. It’s important not to overload your loft as this can damage the joists and cause cracks in the ceilings below.
Try to spread the weight in your loft as much as you can, especially if you are storing a lot of items up there.
Q: Do I need planning permission to have loft boarding installed?
A: You do not need planning permission to install loft boarding at your home for the purposes of storage. However, if you are turning your loft into a living space, then this will require planning permission.
Sources
- https://www.youtube.com/watch?v=aqRAh9eY7tc
- https://www.theloftboys.co.uk/lofts/loft-boarding/#type-of-loft-flooring
- https://loftboardingscotland.co.uk/loft-flooring-for-storage/faqs
Author: Kim J
I have a bachelor’s degree in Journalism, which I studied in both the UK and USA. I’ve been a freelance writer for over eight years and have experience working with many large brands. My experience in writing is over a wide range of different niches, and I’ve specifically worked in the DIY and trades section for nearly two years. My favourite thing about freelance writing is working wherever I want as I love travelling and discovering new places and cultures.
How to Board a Loft: A Step-by-Step Guide
Homebuilding is supported by its audience. When you purchase through links on our site, we may earn an affiliate commission. Here’s why you can trust us.
(Image credit: getty images)
By learning how to board a loft, you can not only drastically increase the storage potential of your loft, but also make it safer and more stable to move around in. This is especially useful if you are short of storage space in your home – the loft is often completely underused, so if you’re not planning on turning it into habitable space with a loft conversion, then adding loft boards and using it for effective storage can be a great solution.
Loft boards are fixed together relatively easily, but working withing the confines of the loft’s available space can make boarding a loft a tricky endeavour. Do heed the safety advice detailed below and only attempt the task if you are capable. If not, hire a professional.
If you want to board your loft, follow this step-by-step guide.
How to Board a Loft: Step-by-Step
You will need:
- Tape measure
- Pencil
- Drill
- Jigsaw and workbench (if you need to cut the boards to size)
- Hammer
- Hooded Disposable Overalls
- Gloves
- Dust mask
- Screwdriver (ideally electric)
Materials needed:
- Loft boards
- 38mm, number 8 screws/ 4x40mm screws
- Insulation material (optional)
Before you start:
- Don overalls, gloves and a dust mask for protection, and finish off with a pair of trainers to aid agility in the loft
- Set up a temporary work platform on a piece of board set across the ceiling joists — it is safer, and more comfortable, than trusting your balance
Measure the area you plan to board out (multiply the width of the loft by its length). Take measurements in metres, this makes it easier when you are buying boards.
Standard boards are commonly available in two sizes: 2,400 x 600mm and 1,220 x 320mm; and either 18 or 22mm thick. The larger boards are available from your local timber merchant and are the cheapest and easiest way to board a loft. The smaller boards are sold in DIY stores.
The 1,220 x 320mm boards come in packs of three and cover 1.17m² per pack. The 2,400 x 600mm boards are sold separately and cover 1.44m² each. Always add a 20% contingency on top of your final square metre figure to allow for awkward cuts.
Before you buy the boards, check the edges for damage. The tongues-and-grooves are vulnerable to clumsy handling, so be very picky when choosing.
Before you start laying boards, check the depth of your insulation. Building Regulations guidelines recommend a minimum 270mm thickness of insulation blanket. But joists are usually no more than 100mm deep, so this would be impossible to achieve and still put a floor on top. Furthermore, squashing insulation down to fit joist height is a bad idea as this halves it’s effectiveness — doubling your heat loss.
The best solution is to build a raised loft floor above the insulation (details of which are shown below). You can still board directly on to the joists if you want, but it is worth noting that this would not pass a building control inspection, because you wouldn’t have the full 270mm depth of insulation required by regulations. Whatever you do, make sure you put as much insulation beneath the boards as possible.
(Do note that if you board directly on to the joists, you run the risk of causing interstitial condensation. This is where moisture condenses on the underside of the boards and drips down, causing damp. To avoid this you need to raise the boards up and permit a flow of air between the insulation and the boards. Only board directly on to the joists if you know there is no risk of condensation forming in your loft).
If you intend to board directly on to the joists instead of having a raise floor, then start by placing the first board across the joists.
If the board overhangs mark it at the centre of the last joist it crosses and make a straight cut at this point with a jigsaw. This allows the board that will butt up to its end to be supported by the joist.
For maximum strength the boards must be laid in a staggered pattern, in such a way that neighbouring joins do not line up. Lay a full board next to the first one and then mark or measure if it needs to be cut (see step three).
Cut the second board (if necessary) and slide it into position with the first board, making sure the tongue-and-groove is fully connected to form an almost invisible join. Fix with two or three screws along the join.
Measure, cut and fit infill pieces as you go to complete the run of boards. Slide them into position with gloved hands (the cut edges can be sharp).
Lay a block of wood along the outer edge of the board and tap it with a hammer if the tongue-and-groove connection creates too much resistance. This method prevents damage to the vulnerable board edges.
Things to note
Rather than having a run of uniform ceiling joists to attach to, older houses may have a mixture of old roof joists and joists put up to support a more modern ceiling. This can create a riot of different levels and cause problems with fixing boards. If this is the case, it may save time and make sense to go down the raised floor route instead.
Wiring in the loft often takes the most direct route from source to outlet. This means there could be wires strewn directly where you plan to lay a board. If there is enough slack in the wire, the joist can be notched and the wire run beneath the board.
If you decide to do this, mark the position of the wire clearly on top of the board and make absolutely sure that you are not trapping the wire before you fix it down. A better alternative is to fix the wire with clips where it can be seen.
If there is no slack at all in the cable then you may find that you have to disconnect the wire at its source before lengthening it using a junction box and some extra wire.
You are likely to come across the tops of light fittings while you are installing your loft boards. You can cut the panel to make access to the light easy and make a removable infill panel if the light falls mid-board.
Be aware that recessed spotlights generate a lot of heat, so make sure that any additional insulation material you have fitted is pulled well away from these fittings to prevent a fire hazard. However, doing this will reduce the insulating properties and counteract any efforts to limit heat loss.
It is now common practice to fit heat diffusers, or completely seal the area around the light fitting.
Homebuilding & Renovating Newsletter
Get the latest news, reviews and product advice straight to your inbox.
Thank you for signing up to Homebuilding. You will receive a verification email shortly.
There was a problem. Please refresh the page and try again.
By submitting your information you agree to the Terms & Conditions and Privacy Policy and are aged 16 or over.
Loft boarding and flooring guide – loft & attic board benefits
Would you like to find out more about loft boarding and flooring? Like, how much it costs, the different types available and whether you can install it yourself? How to convert your loft into usable storage space? If the answer’s yes then you’ve definitely come to the right place!
Who is this guide for?
- Anyone who is curious about loft boarding and would like to nerd out… welcome to our world!
- If you’re shopping around between different loft storage companies and want to see what we do
- Maybe you’re into DIY and think you can take a loft boarding job on? (Warning: it’s not for the faint-hearted!)
The estimated reading time is: 21 minutes
Guide contents
Use these quick links to jump to useful sections in this guide:
- What are the benefits of boarding your loft?
- Before you get started
- Knowing your roof design
- How much flooring do you need?
- How much does it cost?
- Types of loft flooring
- Other types of loft boarding
- Electrical cables and pipes
- Web shelving
- What about loft insulation?
- Can I convert my loft into a storage space myself?
- Working safely
- Our Conclusion
Have you checked out our
Typical Loft Packages yet?
We’ve got a range of packages to suit your property type and your budget.
VIEW OUR PACKAGES
An introduction to loft boarding and flooring
The Loft Boys get a lot of calls from folks who decided to have a bash at boarding their own loft. To then only realise that the job in hand is far more taxing than they first thought!
Lugging big hefty loft boards from the front garden up the stairs, and then into the loft is a large job in itself. Never mind then having to contend with manoeuvring the gear about up there whilst walking on floor joists. All whilst trying not to put your foot through the ceiling in the process (it happens a lot)! This makes the task a little more daunting than first imagined. Throw in the deep insulation found in many a house these days – that sits a lot higher than the top of the joists – and it certainly gets many head-scratching sessions going. Therefore many people admit defeat at this stage.
That being said, it is possible for DIYers to take on aspects of this type of work. But it’s definitely not for the faint-hearted as you’ll see.
Loft boarding is what we’re good at!
The Loft Boys have specialised in flooring lofts for storage since 2009. And there really isn’t anything that we haven’t seen or dealt with before. In fact, each member of The Loft Boys’ team spends approximately 2,000 hours a year carrying out this task!
We have got it down to a fine art. We’ve done this through years of trial and error, trying to establish the safest and easiest way to get lofts boarded. We now firmly believe that we’ve achieved this. And we want to help everyone who is looking to complete this job themselves by sharing our trade secrets.
Below you will find guides for each stage of the job. This will aid you in creating that storage space in the loft with ease.
What are the benefits of loft boarding and flooring?
Finished and fully-boarded loft with windows and lighting
There are lots of benefits to loft boarding and it’s growing more and more popular. Especially for people with growing families who either don’t want to move or find the cost of moving intimidating. Loft boarding can provide numerous benefits for both you and your home. Here is a list of six main benefits:
You already know this one, as it’s the most obvious reason for boarding your loft. What you maybe didn’t know is that it can create upwards of 50% extra usable space. Think about that. How many other areas of your home would you be able to de-clutter with that extra space?
2.
Storage made easier
Many lofts are already used for storage, so you might not see the point of loft boarding your loft. However, lofts tend to be unsuitably designed to get the most out of them. Storing items in your loft can be a difficult and hazardous task. Usually whilst you’re standing on the ladder and trying to move items around! Boarding your loft will not only provide you with extra space. If you also get a purpose-built loft ladder installed, getting the items up there will also be much easier (and safer) too. Awesome, right? After all, you’ll be able to go into the loft itself, and not have to perch precariously on a ladder!
We even take this concept further by installing shelving solutions for some customers. This involves building simple but highly useful shelves so that you can store items above the loft floor level. We use the structure of the roofing timbers to do this safely and you can imagine how much extra storage space this adds!
3.
It helps to prevent heat loss and saves you money!
When you have loft boarding installed, extra loft insulation is usually put in place at the same time. That brings it up to the government recommended standard of 270mm. That will help to keep your home warmer in winter and cooler in summer and save you money at the same time. So boarding your loft properly can help your home become more energy-efficient as you’ll be using less energy to heat it up. Who doesn’t like saving money?
4.
It helps to increase the value of your home
With storage space in the UK at a premium, the more space you have in your home, the more it’s worth. And the associated energy-efficiency gains add to that. And this is exactly what loft boarding provides for you. Having that extra space, whether it’s for storage or for everyday use, can really make a difference in the value of your home. We’ve got a blog post about home value here.
5.
It’s better value than self-storage
The typical cost of using a self-storage facility, for no more than 7 m2, would be around £140 a month – and that adds up to £1680 a year.
See how we calculated these figures here: More on how loft storage compares to self-storage
6.
You could even make money by renting out your loft space!
Yep, you didn’t misread that. There are companies already offering to help you rent out the free space you have in your home. Including in your loft! You can earn up to £150 per month with Stashbee which is one such company we found. Not bad aye?
Installing loft boarding yourself is tough, back-breaking, work!
Doing it the wrong way could cost you dearly – you could create a safety hazard in your loft space and even reduce the value of your home.
Before getting started… a little flooring forethought helps!
There are a few things to consider before you dive straight into boarding the loft. Those things will have an impact on the work needed to complete the loft to a professional standard.
Listed below are the main points to consider before picking up that saw and drill:
- The design of the roof
- Deciding on the size of the boarded area
- Electrical cables & pipes
- Insulation – existing or which types you need to consider
- How to work in a loft safely
- Personal protective equipment (PPE)
- Which tools you’ll need
Deciding on the area of the loft to be floored can in large part be dictated by the design of your property’s roof construction. It can also dictate what will need to be done to complete the job.
Joist and rafter roofs
Diagram of a joist and rafter or ‘cut’ roof
Older properties with a joist and rafter roof construction will usually allow more flexibility..jpg) These are favoured by The Loft Boys because they are usually large open spaces. And with few obstructions other than tanks and diagonal roof braces. You will usually find that these properties will allow for larger floorboards to be used (8’ x 2′). And this reduces the amount of cutting needed greatly. The only issue you may find using the larger loft boards is getting them into the loft itself. It may be best to call that favour in from your neighbour now!
These are favoured by The Loft Boys because they are usually large open spaces. And with few obstructions other than tanks and diagonal roof braces. You will usually find that these properties will allow for larger floorboards to be used (8’ x 2′). And this reduces the amount of cutting needed greatly. The only issue you may find using the larger loft boards is getting them into the loft itself. It may be best to call that favour in from your neighbour now!
Trussed roofs
Diagram of a truss roof
Houses built in more recent years usually have trussed roof constructions. These tend to restrict the usable floor area and involve a lot more work notching the boards to sit neatly around the central points of the roof construction. The Loft Boys favour the smaller loft packs for these jobs as we are able to manoeuvre the boards around easier and get the cuts nice and tight.
A little word of advice here… to get a professional finish, try to cut the boards in between the roof trusses rather than butting them on each side and then bridging the gap. Take a look at our gallery of work under the loft flooring section and you’ll see how the pros do it. Okay… it takes a little longer and adds a few more cuts but the end result is more than worth it.
Now for some shameless self-promotion!
We really hope you love this guide so far and are finding it useful (have you checked out our other guides yet). If you’d like some great reasons to choose us to sort your loft out, we’ve put together a video just for that here:
How much loft flooring do I need?
It’s a good question, and we get asked this a lot! Deciding on how much of the loft area to board depends on a couple of factors. The first is how much you intend on storing up there, and please do take into consideration how much more stuff might end up there compared to what you have currently.
It really does spoil the experience of a usable loft space if it is jam-packed with gear, so much so that you end up not using it as you are unable to move about and retrieve what you are looking for. Therefore we always try to advise people to utilise parts of the eaves (the edges where the roof meets the wall) in the loft to actually store their items leaving the central area clear to enable you to move throughout the loft easily.
Don’t get more than you need!
Some people opt for a small area just around the perimeter of the loft hatch. This allows them to climb the ladder and retrieve their items without actually entering the loft. This is fine if you only have a few items to store up there but again, should the amount of items increase, the overhead of extending the boarded area is greater than doing the job initially.
The next factor to deciding how much of the loft area to board is what your loft will accommodate. It is absolutely pointless wasting your time and money boarding an area of your loft that will never get used. Even if you’re looking to maximise on the loft floor space we always try to convince people not to bother boarding right into the eaves. Where the pitch of the roof meets the floor reduces the usability of this area hugely.
You could save many square metres of boarding needed by reducing the loft floor area by 500mm on each pitched roof elevation. What is the point of paying out for an area that will never serve any purpose?
Leave a little space
We also try to advise that a 2” (50 mm) upstand is attached around these exposed edges. This will stop any small boxes or items from being pushed off the new loft floor boarding and onto the ceiling below.
Boarding your loft doesn’t have to be an all or nothing affair. You may not have enough stuff to fill the entire loft, and in any case, there are likely to be areas unsuitable for storage – right into the eaves, for instance. All you need to do is measure up how much you need to have boarded and leave the rest bare.
How much does loft boarding cost?
If you’re going to buy boarding to do it yourself, 18mm chipboard costs from as little as £10 for a sheet of 2400m x 600mm. Insulation boards tend to average around £20 per sheet (and then you need the chipboard as well).
After the successful completion of thousands of loft jobs, we’ve established that 15-20m2 of floor space tends to prove sufficient for normal loft storage requirements. For a better idea of how much this quantity would cost to have installed – along with a ladder – have a look at our typical loft packages.
Need a quote?
We just need to have a chat to run through your requirements before booking your free survey.
The different types of loft boarding and flooring
New loft boarding and insulation
There are various ways of going about boarding your loft. Some are simpler and cheaper than others, but, as is often the case, these can have drawbacks. The main approaches are:
Laying chipboard directly on the joists
This is cheap and can be done by an expert DIYer. This doesn’t leave any room for the recommended insulation depth of 240-270mm, though. And what insulation is possible will be squashed down, not allowing enough airflow to prevent condensation.
Insulation boarding
An alternative is to buy insulation boarding which is laid over the joists. This is done to make up the insulation depth, then laying the chipboard over it. However, insulation boards are expensive and don’t solve the airflow problem.
Using counter battens
The floor level can be raised by attaching counter battens to the top of the joists. And then laying the boards on top. This will allow enough space for insulation and airflow.
The LoftZone StoreFloor system
Graphic showing the LoftZone system
A variant of this is to use a raised floor system, such as the awesome LoftZone. This is an expert job to fit but will give you a professional finish and it takes care of airflow.
LoftZone StoreFloor is a unique, patented, modular system. It’s been designed to protect the insulation underneath it whilst providing a safe deck for access and storage. Its strong components and design allow StoreFloor to be the only loft floor system that complies with building regulations.
Why try LoftZone?
LoftZone does what traditional loft boarding procedures can’t! Not enough for you? Ok, let us tell you why:
- It allows you to maintain the full height of your insulation (to Government guidelines of 270mm without impairment)… with no squashing (which is a massive no-no)!
- It maintains airflow between the underside of the flooring and the insulation (stopping the build-up of condensation and all associated problems).
- It’s independently tested for safety giving you absolute peace of mind.
- It’s stored load per square metre is 25kg.
- Winner of the ‘Best New Product’ category at the Ideal Home Show & backed by The Carbon Trust.
Read on: More about LoftZone StoreFloor
Other types of loft boarding
This image shows how the unusable eaves can be boarded up with access doors included
As well as wooden loft boarding installed to cover the floor of your loft, you might also consider boarding off areas that would be too difficult to access anyway. As we already mentioned above, due to the pitch of the roof it’s often not worth installing loft flooring right up to the eaves so we give our customers the option to have this area boarded off – with small doors installed for access if needed. Doing this creates a nice clean finish and can also help to insulate your loft from the extremes of heat or cold.
Upstands
That’s an upstand!
Upstands are wooden battens that are added to the outside edge of the loft floorboards. They are a great way of stopping boxes and stored items from sliding off the boards and onto exposed areas of insulation.
Finishing
At The Loft Boys, we love details. And finishing off any loft job is one of our favourite times because we get to work on all the finishing touches. That finishing can include skirting which are sections of boarding that are added to the sides of the hatch opening. We then also add trimming which is put around the corners where the skirting and the floor meet.
Both these things tidy and neaten up the loft and make it less likely you’ll get splinters on your hands when getting in or out of the loft.
Electrical cables and pipes
In any loft, old or new, you will find the electrical cables feeding the lighting for the rooms below travelling across the top of the joists. Many times in the past, we’ve witnessed people cutting into the ceiling joists to lower the cables and allow for boarding to be fixed on top.
The Loft Boys never do this and do not recommend this at all. Ceiling joists are there mainly to carry the ceiling below and are not like the construction of purpose-built floors. When boarding a loft to store items, you are adding weight to these timbers and cutting into them to accommodate electrical cables will interfere with the integrity of these joists. A big no-no for The Loft Boys!
As standard, The Loft Boys raise the finished loft floor above all wires and cables; and we highly recommend you do this if you’re having a boarding session yourself. Another little tip here… if using loft panels (you’ll find the smaller ones in your local DIY store) you should fix them at 610mm centres, larger boards (8’x2’) fixed at 600mm centres. This will reduce the workload massively and you will find the install takes a lot less time.
Web shelving
Web shelving is a fantastic way to achieve additional storage capacity within the loft of a trussed roof property. If that sounds too technical, let me explain. Trussed roofs are made up of diagonally placed rafters that fill more of the central space of the loft (and they are also more common in newer properties). This tends to restrict the usable floor area. But with web shelving, you can avoid the cost associated with extending the flooring space by adding shelves that sit within the rafters. Older properties with a joist and rafter roof construction, on the other hand, usually allow more flexibility for storing items on the floor.
What about loft insulation?
Different types of loft insulation
When taking on a new loft boarding job, how to deal with existing loft insulation is a really important consideration. We come across badly installed insulation all the time so it’s essential to figure out whether your current insulation is correctly laid and at the recommended thickness. That recommended minimum thickness is 270mm, but this has increased dramatically in the past few decades. Therefore, if you have old insulation, it probably won’t be thick enough.
For more info specifically on loft insulation check out our ultimate guide.
A cold or warm loft?
If you’re simply using your loft for general storage, a “cold loft” is fine, whereas if you’re storing items sensitive to temperature changes or planning to spend time up there, you’ll need a “warm loft”. These terms are actually misleading – a cold loft can be hot in summer and cold in winter, while a warm loft’s temperature is easier to control.
Basic loft insulation, which is required for either a warm or cold loft, is inserted between the joists or rafters. This may then be boarded over, but 270mm will probably come up over the joists. Therefore it’s important to raise the boards, to prevent restricting ventilation and overheating electricity cables. Leaving a gap between the top of the insulation and the underside of the loft boarding is essential for keeping air flowing and stopping the build-up of condensation.
For a warm loft, you also need insulating material on the underside of the roof. This is another type of job that we do regularly and when it’s covered with boarding can create a nice clean finish.
Does boarding the loft help insulation?
No, only when the boarding is combined with a good quality insulation material such as mineral wool will you achieve a properly insulated loft. In addition, there must be a gap between the boarding and the insulation to allow for proper airflow, otherwise, condensation and its related problems could arise.
Can I convert my loft into a storage space myself or should I leave it to the professionals?
The simple is yes, if you know some DIY and are handy on the tools then this could be a job you could take on. It’s not for the faint-hearted though and working within any loft, particularly in hot weather, is no joke. It’s something you should heavily consider before taking it on yourself.
We found this helpful video created by the good people over at DIY Doctor which shows how to install the LoftZone Storefloor system.
Working in your loft safely
At The Loft Boys, we take the health and safety of our loft installation teams extremely seriously. So if you’re planning on doing any work in your loft there are several safety issues to consider before getting started.
A fitter working in the loft installing a window.
- If working within an un-floored loft space then crawl/kneel boards are to be laid to enable safe movement. These can be temporarily fixed in place to eradicate the risk of creating traps or movement.
- Try to ensure that the loft is well ventilated and free from condensation.
- Ensure that the loft is well-lit so you can see exactly what you’re doing.
 Ideally, try to use several LED lights in various locations – LEDs won’t heat up and give off a powerful bright white light.
 - Wear a protective face mask to prevent breathing in dust particles. 3M is generally considered the market leader but a quick search for ‘Dust Masks & Respirators’ will give you plenty of options.
- Crawling around on your knees for any amount of time can get pretty gruelling so you might also benefit from using knee pads.
- If you’re not used to handling sheets of boarding you will need some gloves… watch out for those splinters!
- And finally, asbestos-containing materials could be present in your loft if your home was built before the year 2000. If you suspect there is then don’t take the risk, talk to us about how to safely remove those materials.
 Ideally, try to use several LED lights in various locations – LEDs won’t heat up and give off a powerful bright white light.
What tools do I need?
Here are some tips on what kind of tools you will need if boarding your loft:
- Rubble Bag
- Circular/mitre Saw
- Hand Saw
- Jigsaw
- Drill
- PZ2 drill bit
- Tape measure
- Mobile Work Bench
Conclusion: Installing loft boarding and flooring is clearly hard work but the benefits are huge!
If you’ve read through this guide you’ll probably recognise that boarding a loft is a pretty serious undertaking. While not impossible for DIYers to take on this kind of job, we would recommend that you think through all the considerations very carefully before making a decision. The fact that boarding should be installed above insulation of 270mm thick means that this job requires a good experience of working with wood.
The benefits of all that extra storage space should also be pretty clear by now. With storage space at a premium, utilising any available space in your home is a no-brainer. And doing it the right way, with properly installed insulation could save you a lot of money in the long run.
If you’re unsure of whether to take this job on then it’s worth checking out our pre-made packages which will give you an idea of how much installation costs and what you’ll get for your money. Or, head over to our package builder page for a more detailed look at the types of items we install. If you’ve got other questions about us or our services you could check out our FAQs page or just get in touch. Or read about some of the ways we go the extra mile for our customers.
Ready to take the next step?
Have a chat with us about getting your loft sorted out.
Have you checked out our Typical Loft Packages yet?
We’ve got a range of packages to suit your property type and your budget.
VIEW OUR PACKAGES
How to Board a Loft & Lay Attic Flooring
The best way to lay a floor in your loft for storage is to lay floor board panels. We show you how to board a loft by laying out tongue and groove loft boards in your loft and supporting them on joists for a secure and sturdy storage space.
Boarding a loft out is a fantastic way to gain more storage space for items that are rarely used such as suitcases and Christams decorations that would otherwise take up other more useful storage locations.
Laying loft boards is a relatively cheap and cost effective method of creating storage space that you can easily do yourself so in this DIY guide we look at how to board a loft.
Loft Flooring is for Loft Storage Only
Loft boards, loft panels and loft flooring in the loft or attic must only be done to store items such as empty suitcases. Unless your loft or attic has been converted, it is not designed to carry loads heavier than this.
The horizontal rafter, or ceiling joist timbers in your loft are there purely to hold up the ceiling below, not carry weights beyond normal domestic storage items.
Weight or Load Allowed on a Normal Loft Floor
When your house was built, the upstairs ceiling, which obviously forms the loft floor, was designed to be able to carry 25kg per square metre. A 10 stone human being weighs 64kg. Conclusion, lofts are not designed for parties!
There are parts of normal lofts which (before the popularity of combination boilers grew) are strengthened to hold water tanks for the normal domestic cold water and sometimes a header, or feed and expansion tank for the central heating.
Additional loft boards supporting water tank – Image courtesy of phap. co.uk
co.uk
You will see that in any part of the loft where there is, for example, a water tank, the floor is reinforced and, in a lot of cases, the rafters are given additional support by hanging timbers attached to the pitched section of the trusses.
If you mean to convert your loft into living accommodation of some kind (please note, even using it as an office or study counts as living accommodation) then you need to find out if you need planning permission from your local Council.
You will certainly need Building Regulation approval to convert your loft into anything other than a storage space. Please also read our projects on loft conversions and building regulations.
Weight Allowed on Loft Conversion Floor
As above, where for loft flooring or loft storage, the ceiling or loft floor is designed to carry only 25kg per square metre.
A floor in a loft conversion must be designed to carry a minimum of 150kg per square m. This is 5 times more than a loft used for storage on loft boards or loft panels.
Creating Greater Load Bearing Capacity in the Loft
Clearly to achieve this greater load bearing capacity, stronger (usually larger) timbers have to be placed in the roof.
It is essential that weight of any consequence in a loft is transferred to a support which in turn takes that weight right down to the foundations.
This is usually done by either adding additional support beams to reduce the span of the existing timbers, or simply enlarging the timbers which sit on the load bearing walls on either side, or either end of the property.
You can find out more about load bearing walls and safe floor joist spans in this project page.
Checking Loft Insulation when Laying a Loft Floor
Loft boards and tongue and grooved loft boarding panels can be bought from most DIY sheds and builders merchants. Read our project on loft insulation to make sure you have enough insulation in your loft or attic before fixing down floorboards.
Laying loft insulation to building regulation recommendations
Building Regulations and Loft Insulation
Building Regulations have recommended an increase in depth of loft insulation to make sure you do not lose too much energy from your house.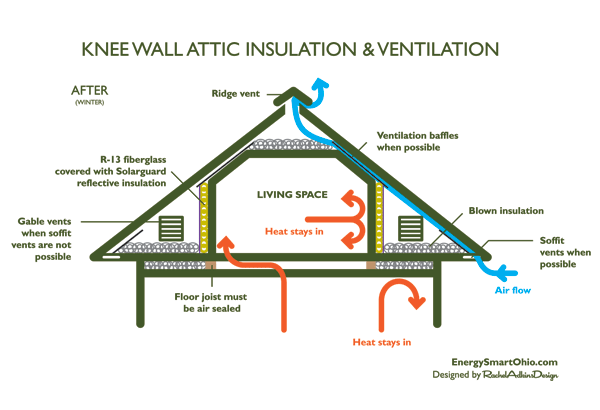
As loft insulation should not be squashed down, this means raising the height of your loft floor and this can be done in a number of ways.
Our preferred method is to use a kit which lifts the floorboards up from the joists enough to get a good amount of insulation down but still allow a good ventilation flow to avoid condensation. You can find out more about this kit by checking out our project on fitting loft storage boards over 270mm of insulation.
Successfully boarded loft using LoftZone kit
How to Lay Loft Boards for Loft Flooring
To put a floor in your loft is not a difficult job. It is made much easier by the production of special loft panel flooring. These panels are 18mm thick, 1.2m long and only 320mm wide. This means they are easy to get through the loft hatch. They come in packs of 3 or 5 usually and a pack of 3 is enough to cover a little over 1 square metre.
Using tongue and grooved loft flooring panels for loft flooring
You must make sure you do not lay the floor right up to the edge (eaves) of the floor space as air must be allowed to circulate in the loft to avoid condensation.
The loft boards or loft panels have tongue and grooved sides and ends. This allows one board to be slotted into the one next to it giving it greater strength over any length of floor not supported directly by floor or ceiling joists.
Staying Safe While Working in the Loft
Firstly, if you are intending to use the loft a lot for storage it is as well to fit a loft ladder. You may well have to enlarge your loft hatch to do so, so take a look at our project page on enlarging a loft hatch.
To buy a loft ladder just click on the image on the left and you will be taken to a selection of loft ladders which should be ideal to get you in and out of your loft safely.
Stay safe getting into and out of the loft with a loft ladder
In the majority of cases lofts are dirty and very dusty. All the dust in the air seeps through the tiles and roofing felt joints to settle on your ceiling. Add to that the dust created by old insulation and you have a pretty unhealthy environment.
Make sure you can breathe properly in the loft by using a filter mask and, where there are fibres from insulation flying around where you have disturbed the loft insulation you might want to wear some eye protection.
Additionally, the dust created from cutting, drilling etc. High Density Fibreboard such as standard loft boards (especially if you are using MDF boards, where MDF dust has been proven to be carcinogenic) can also be very hazardous to your health.
When cutting MDF and HDF loft boards you should always use a minimum of an FFP3 mask or mask with a P3 particle filter.
Disposable masks should be worn in the loft
Fixing the Loft Boards to the Ceiling Joists
The long sides of the loft boards should be laid at 90 degrees to the joists and the ends of every board should always meet on a ceiling or floor joist.
All fixings to the joists or rafters should be done by screwing the panels down. This avoids the vibration caused by hammering nails through the loft flooring into the joists or rafters below. This vibration can weaken the fixings used on the plasterboard forming the ceiling below and the joints can crack.
Screws should be counter-sunk into the loft boards to avoid them sticking up above the surface of the boards. If this happens they can catch on expensive suitcases, or other stored items, and cause a great deal of damage which is not noticed until you drag the bag out of the loft again to take on holiday.
Avoid damaging stored items by counter-sinking your loft board screws
Making Your Loft Floor Boarding as Strong as Possible
It is very rare for the loft boards to meet naturally on a joist. In the best-case scenario the joists will be perfectly parallel to one another and laid at exactly the same centres every time.
This however does not mean that the end of a loft board will “land” on a joist. In the worst-case scenario the joists will not be parallel and will have been laid at differing centres.
Laying loft boards or loft panels on ceiling joists
There is always a lot of cutting involved in laying a loft floor and its a great idea to buy a circular saw to save you a huge amount of time and effort.
Circular saws – Available in our online store here
Cutting Loft Boards and Flooring Panels to Board out the Loft
Normally a board has to be cut so it finishes in the middle of the joist as shown in the above diagram. This means of course that the tongue and groove need to be cut off both boards where they meet.
This does not matter as the joint will be very strong when it sits on the joist. Do not be tempted to join boards between joists as they will soon sag and cause a weak spot in the floor.
As mentioned, each screw should be countersunk and a pilot hole drilled. This makes fixing the boards easier and takes the heads of the screws below the level of the floor so when you slide suitcases along the floor they do not catch and tear on the screws. Another good reason for using pilot holes is so the boards do not split when you screw them close to the edge.
Loft Storage and Insulation Materials
Why not take a look in our DIY Superstore where you can buy the insulation and loft boarding systems you need to carry out a really successful and neat loft storage project.
Once your loft is boarded out properly you will be able to, with the correct access and lighting, store and remove all your suitcases and other storage boxes easily, quickly and, most importantly, Safely. Good luck with your loft boarding and storage project.
All project content written and produced by Mike Edwards, founder of DIY Doctor and industry expert in building technology.
Insulating Your Loft Joists: a Step-by-Step Guide
As we mentioned in our Introduction, there are two main ways to insulate your loft: one is via the rafters and the other is by insulating your joists. Insulating the joists is often the easier of the options and especially makes sense if you have no real plans to use the loft space.
Key points before you start
If your loft is easy to access, the insulating process should be pretty straightforward and can be undertaken as a DIY job. However, if you have any doubt in your own ability to carry out the work, we recommend getting a professional to do it.
Normally, people use mineral wool (either glass fibre or Rockwool) to do the job and if you intend to do the same it is imperative you wear protective clothing, goggles and a face mask, since the wool is an irritant.
You can use sheep wool insulation, which is much nicer to handle, 100% sustainable and actually is more breathable than the other types of wool insulation. If you are happy to pay a little extra we really recommend using this.
As a final warning, never stand between joists otherwise you will more than likely come through the ceiling which is never ideal. Using a board supported by several joists is the best way of working in the loft area regardless of whether you are insulating the joists or the rafters.
Preparing the loft space ready to insulate
Before you get to the business end of installing loft insulation up in your roof, you need to make sure you have prepared the loft space and also bought the right quantity of materials to do the job. Below is a quick step-by-step guide on what you should do before you begin any work – but before this a quick word of warning!
Please remember not to step in between the joists – otherwise you will end up falling through the loft! Make sure you only stand of the joists themselves, ideally using a plank as a kneeling board.
A kneeling board should straddle several joists, thereby spreading the weight more evenly and reducing the load on the joist structure. The board should go across at least 3 joists to ensure it spreads the weight sufficiently. We also recommend covering your skin with suitable clothing and using a face mask, as stray fibreglass can act as an irritant if it comes into contact with skin.
Before installing the loft insulation:
- Clean the space between the joists by vacuuming between them, removing any dust that may have settled there over time.
- Make sure you pay attention to any cracks, dry rot or damage to the joists. If the are looks unsafe to work in, stop what you are doing and immediately seek professional help to repair these areas.
- Ensure good lighting in the loft to provide decent visibility to help you do the work.
- If you have boards fixed to your joists you need to remove these before you begin insulating the loft space.

Once you have the loft space ready to insulation we recommend doing a quick equipment check – below is a list of all the equipment you will need:
- Tough pair of scissors to cut the loft insulation
- Measuring tape
- Protective overalls and gloves when handling mineral wool (otherwise it is itchy!)
- Safety goggles
- A disposable mask
The protective overalls, gloves, goggles and mask are really worth using – the mineral wool insulation most people tend to use to insulate the loft is incredibly itchy, so making sure your skin is covered is a good way of avoiding this.
Using sheep wool insulation is another way to get around the itch issue.
Measuring the size of your loft
After you have cleared bulky objects you can see the area more clearly on what you can insulate. When measuring your loft space you need to start with the following:
- Take a measuring device and measure the whole area of your loft (this is simply the width multiplied by the length).
- Take into consideration the thickness you want to insulate to and if there is any pre-existing insulation in place, we recommend using 300mm if using wool insulation and 150mm if using the rigid insulating boards like Celotex or Kingspan.
- Measure the width of your joists – for example our wool insulation comes in two widths 380mm and 570mm – the idea is you go for the one that is closest to width of your joists so it minimises cutting.
- Measure the height of your joists – normally this is about 100mm. This means that if you are looking to insulate to a depth of 300mm in total, you will first lay down a layer of 100mm thick wool between the joists, then use 200mm thick wool laid across the joists at a 90 degree angle.

Write down these measurements on a piece of paper and then take them with you to a DIY shop to buy the insulation or visit an online retailer. Just a word of warning: insulating wool is really bulky and so unless you have a huge car, you might be better off having it delivered directly to your home.
Installing loft insulation between the joists
Insulating the loft at joist level is actually pretty easy to do as a DIY job, but if you feel uncomfortable doing the work then please call in a professional. Since different insulation products have slightly different insulating properties, building regulations use a U-value that needs to be attained to conform. This allows you to calculate the thickness of your chosen insulation product required to conform with building regulations, for example if you opt to use mineral wool, you will need to use 270mm-thick insulation to reach the 0.16 U-value specified in building regs.
To insulate your loft at joist level, please follow the steps below:
STEP 1: The first thing to do is to check whether there are light fittings that protrude between the joists (e. g. a GU10 spotlight will always have the fitting protruding into the loft), if there are, these will require capping prior to laying any insulation. These caps, sometimes referred to as downlight fire hoods or insulation guards, allow sufficient space around the light fitting for the heat to dissipate to stop the light getting too warm. Each light fitting will require a cap to prevent this overheating – they are simply placed over the light fitting and then you are good to go with the insulation.
STEP 2: The first layer of wool insulation needs to be laid between the joists, so you need to measure the distance between the joists to ensure you can get the right width of product. Typically the gap between the joists is either 380mm or 570mm so you will need a width of insulation similar to this, so it can fit snugly between the joists. Most insulation you buy will be partially perforated, allowing you to cut the roll of insulation easily to produce either 2 rolls that are 570mm wide or 3 rolls that our 380mm wide. If the insulation isn’t partially perforated, you will need to use scissors to cut it to the necessary thickness.
STEP 3: Once the insulation is the correct width, you need to roll it out between the joists; lightly press the insulation material to fit between the joists, but be careful not to overdo it and compress the material. Joists tend to be only about 100mm high (although this can vary), so match the insulation thickness you buy with the joist height – once installed, the insulation should come up to the top of the joists. You will need to work the insulation around and over any downlight caps that may now be present.
STEP 4: You now need to spread an additional 170mm – 200mm thick insulation at 90 degrees to the joists. Starting at the furthest point from the loft hatch slowly unroll the insulation over the top of the joists – make sure you use kneeling boards to spread the weight load and reduce the risk of ceiling collapsing as you move around in the loft space. This second thicker layer of insulation should have no gaps between the strips that you lay out – it should produce a continuous layer of insulation – you will no longer be able to see the joists. This will take the total thickness of the insulation in the loft to 270mm – 300mm as specified by building regulations. You may like to install even thicker than this, but the energy savings of doing so will be negligible.
STEP 5: As a final step you will need to insulate the loft hatch, by strapping on some material to the top of the hatch. This can be stapled to the top of the loft hatch, helping to preserve a consistent thermal barrier. You can also fit draught proof strips on the outside of the hatch to stop gusts of cold air in the winter. A really easy way to do this is to fill a black bag with insulation and then tape this down to the top of the hatch using thick tape.
Although 270mm – 300mm is the optimum depth recommended for mineral wool, but if you are planning on using one of the other insulating materials such as loose fill, it is worth reading the guidelines provided by the manufacturer to ensure you use a sufficient volume to give the required depth. Putting more than 270mm on insulation within your loft (e.g. 350mm) will help you heat your house for less, but the savings equal the cost of laying the additional insulation so you may deem this unnecessary.
Storing items in the loft but still insulating to building regulations
As we have said, the more insulation the better and to adhere to building regs you need 270mm of wool insulation as a minimum. One of the issues with putting this much insulation in the loft space is that you lose sight of the joists. Many people like to use the loft space as storage, however, so will insulate only to the top of the joists and then attach chipboard directly to the joists making a solid, walkable surface. Obviously if you install 300mm this is not possible, so prior to STEP 4 above, you will need to install loft stilts (or loft lifters).
These are relatively simple to install, and are essentially strong plastic stilts that raise the height of the joists, allowing you to install the extra insulation and then attach chipboard on top of the them. This allows you to still produce a useable surface while also maximising the thickness of insulation you install.
Using rigid insulation board as loft insulation
Some people may prefer to use rigid insulation board to insulate the loft space – for example Celotex or Kingspan – the process is pretty similar to above, although you will need less depth to achieve the same insulation levels (than mineral wool). You will also need a hacksaw to cut the insulation to size. If you do decide to use rigid insulation board, then you will still need to use chipboard if you want to walk on it.
Insulating water tanks in the loft
One issue that arises from insulating the loft space just above the ceiling (i.e. in the joists) is that the loft space itself will become incredibly cold. During very cold weather the temperature could even become sub-zero, which if you have water tanks in the loft, could be a big issue!
If you do have cold water tanks in the loft, first of all, never insulate underneath them; always allow heat to travel up through the roof into the bottom of the cold water tank. Also, it is worth insulating the cold water tanks themselves and lagging any pipework you can see in the loft that sits above the insulation you have installed in the joists. The kit required to insulate the cold water tanks is known as the Byelaw 30 and can be purchased from any good DIY store.
What kind of vapor barrier to cover stone wool insulation in the attic?
Attic insulation with mineral wool: a technology for amateurs
There are dozens of ways to insulate the attic floor, in which hundreds of models of insulation are used, but mineral wool is still the most popular material.
Insulation of the ceiling with mineral wool from the side of the attic is considered the best option
The only problem is that not all amateurs know how to properly insulate the attic with mineral wool in a private house. Therefore, further we will analyze the technology and important nuances of the process.
Preparatory part
Before insulating the floors in the attic of the house, you need to prepare well.
- selection of wadding and related materials;
- calculation of the required amount of material;
The choice of mineral wool
Stone or mineral wool is the name of a whole trend in which there are dozens of different models. Based on the name, this includes all soft insulation made from rocks, the most famous option is basalt wool.
A number of sources also include glass wool and slag wool here. In the first case, glass is taken as the basis, and slag wool is made from blast furnace slag (a by-product of blast furnace production).
All materials are good, but which one is better is debatable. I must say right away that if you take material from a promoted brand, then there is not much difference in quality.
Mineral wool on any basis is suitable for a cold attic
It is much more important to choose the type of material.
There are 2 types of such insulation:
- Soft mats sold in rolls.
- Dense boards .
Theoretically, the insulation of the ceiling from the side of the cold attic can be carried out with both options, but from experience, it is better to give preference to dense slabs.
The price of boards is slightly higher, but this material does not shrink over time, plus, when wet, some models of boards can be dried without loss of volume and quality.
As for soft mats, here you buy a “pig in a poke”, well-known manufacturers make a good product, but it’s not a fact that you won’t buy a fake.
These mats are inexpensive, but in an attic space they lose volume in a couple of years.
Insulation of a cold attic floor is best done with slabs
Related materials
This is the case with related materials. Any cotton wool is afraid of moisture, in order to protect it, a vapor barrier membrane is needed.
It is a sheet that allows steam to pass through in one direction only, neither steam nor moisture can pass through on the reverse side.
Important! Steam moves from the room to the street or to the attic, so the membrane is laid with a vapor-permeable side to the room, i.e. way down.
Material calculation
To calculate the amount of wool, you need the area of the attic and the thickness of the insulation:
- Everything is simple with the area of the attic floor – the length is multiplied by the width. Plus 5% for shrinkage and trimming.
- The thickness of depends on the climate zone. In central Russia, to insulate the attic floor with mineral wool, the thickness of the plates is 100 mm, the mats are taken 150 mm. Accordingly, the further north, the thicker the layer.
Tip! If you expect to lay plates, for example, to a thickness of 100 mm, then it is better to take 2 plates with a thickness of 50 mm and lay them with a shift. So the joints overlap and there will be no cold bridges.
![]()
Insulation of the attic of the house with mineral wool
In a private house, the floor can be concrete and wooden (on beams). The technology of warming these options is similar, but there are still differences.
Attic insulation by beams
Instructions for the insulation of a beamed ceiling are similar to the arrangement of roofs with an inclined truss system, so if you wish, you can completely insulate the attic using this technology.
- The vapor barrier membrane is applied as the first layer (rough side down). The rolls are rolled across the beams and overlapped by 100 mm; with such an overlap, it is not necessary to glue the joint of the sheets with adhesive tape. The material is fixed with a stapler.
When arranging the attic with mineral wool, a vapor barrier is laid first. This tolerance will allow you to lay the material without gaps. As already mentioned, it is advisable to put the insulation in a run-up to cover the joints.
Photo of the arrangement of the ventilation duct under the vapor barrier
- A counter-rail is stuffed over the beams and the floor is mounted on it. Often, the subfloor in the attic is stuffed directly onto the beams.
The video shows the process of insulation along the beams:
Attic insulation on floor slabs
Attic floor insulation on top of a concrete floor is somewhat similar to the previous version.
Only the choice of materials is slightly different:
- Liquid waterproofing. Concrete floor is cold and condensation may form here. So that the cotton wool does not draw moisture from the concrete, instead of a vapor barrier, the slab is covered with waterproofing.
I recommend using Penetron liquid penetrating waterproofing.
- Legs. Further, wooden logs are attached to the floor slab. You select the thickness of the timber according to the thickness of the insulation, plus the ventilation gap.
- Insulation. After that, a heater is laid between the lag, just like along the beams.
- Vapor barrier. On top of the cotton wool is covered with a vapor barrier – it is needed so that excess moisture can go up.
- Subfloor. The joists can now be covered with a subfloor.
Mineral wool floor slab insulation cake
Properly installed attic thermal insulation will not only help to save heat, but also protect roof and ceiling elements from premature aging.
Attic insulation of a private house with mineral wool
Insulated attic floors of the house – a guarantee that the rooms will be warm in winter and fresh and cool in summer.
The procedure for laying thermal insulation material is quite simple, it is not necessary to involve builders for work – it is quite accessible to a non-professional.
Saving money on calling a roofer and doing it yourself is easy. It is enough to choose the “right” insulation, prepare the tools, study the instructions and advice from the builders.
Is it necessary to make insulation
Most of the houses in Russia were built with gable roofs. In winter, after heavy snowfalls, a thick layer of snow acted as a natural attic insulation. Roofing materials used in today’s construction do not have such properties.
As a result, condensation accumulates on the attic floor, leading to the destruction of ceilings and the growth of mold. The reason for this is the temperature difference under the roof of the house and in the living room itself.
Laying an insulating coating allows you to create such a microclimate in the room when the warm air from the house will not rush upwards, which will save up to 25-30% of the heated spirit and money spent on heating.
Selection of insulation
Thermal insulation of attic floors is made from the following materials:
- Stone (mineral) wool;
- Glass wool;
- Expanded clay;
- Extruded polystyrene;
- Granular foam;
- Vegetable insulation – buckwheat tyrsa, straw, reeds;
- Natural seaweed and linen in mats and rolls.
When choosing a heat insulator, you need to focus on the characteristics of the material. A good insulation should have the following qualities:
- Light weight – do not overload the floors so as not to deform the structure of the house;
- Low thermal conductivity;
- High level of moisture resistance;
- Fire safety;
- Durability.
The best “keeper” of heat is polystyrene – its coefficient is 20, the material is not at all afraid of moisture. However, in rural areas, such a coating may be subject to a raid by rodents, and if electrical wiring is laid in the attic, then there is a real threat of fire.
Each type of insulation has its pros and cons. Expanded clay is easy to install, has a low price, is absolutely indifferent to the effects of moisture and mold. But the considerable weight of such material is a serious drawback that can harm the structural details of the building.
Natural heat insulators (flax, straw, sawdust) are highly flammable, after 2-3 years of operation, putrefactive processes and fungus development can begin.
Expanded polystyrene is characterized by excellent thermal conductivity, is not afraid of moisture, and is resistant to fire. However, the difficulty lies in the fastening method – slabs of this material can only be laid on the attic floor using mechanical fasteners or using aqueous adhesive solutions.
The most commonly used in cold attic insulation is mineral wool – glass, stone or slag. The use of rolled basalt mineral wool is in greatest demand among owners of private houses. The material is distinguished by first-class sound and heat insulation properties, does not smolder or burn, and is inert to deformation over time.
Preparation of tools and materials
The thermal insulation process includes the following operations:
- Accurate measurements of spans, widths of gaps between ceilings and heights of beams;
- Determining the area of the attic ceiling;
- Depending on the climatic conditions, the thickness of the insulating material is set.
For self-insulation of floors, you will need not only mineral wool (in rolls or mats), but also materials that prevent the penetration of moisture and condensate – hydro and vapor barrier film.
After calculating the materials, you need to prepare auxiliary tools:
- Special cutter for heat insulator;
- Construction stapler for fastening vapor and waterproofing materials, staples;
- Adhesive tape for fastening film joints;
- Roulette;
- Spatula;
- Protective equipment – goggles, gloves, respirator.
Waterproofing
Waterproofing must be installed before laying the insulation.
A properly prepared (cleaned of debris, fungus-affected areas and treated with an antiseptic) attic floor is overlapped with a vapor barrier film. You can use cheap glassine, a fairly expensive vapor-tight membrane, or a thick polyethylene roll film. The joints are carefully glued with ordinary tape.
The insulation itself is located on top, which is additionally covered with a waterproofing membrane. In order for the air to circulate freely, ventilation ducts of 3-5 cm must be provided between the insulation layer and the inside of the finished floor.
Insulation of attic floors
Thermal insulation is carried out from the vapor barrier flooring. Rolls of mineral wool with a construction knife are cut into pieces of the desired size. Laying must be carried out in such a way as to avoid large gaps and excessive compaction of the material due to too large sheets. In both cases, the quality of insulation will suffer.
When insulating the attic floor with mineral wool, pay attention to the thickness of the sheet and the height of the cross beam. If the insulation layer protrudes beyond the edge of the ceiling, then it is necessary to strengthen an additional beam for the crate.
After laying the mineral wool, waterproofing is laid, and the entire roofing cake is covered with plywood sheets or even boards.
Ceiling insulation
If an attic is provided in the attic of a private house, it is recommended to insulate the ceiling.
The thermal insulation process consists of several steps:
- Fastening the waterproofing material to the roof batten. To prevent leakage, the film or membrane is overlapped and fixed with narrow wooden slats. Under the roof, it is better to use a waterproofing material with a foil surface – this will protect the attic from the penetration of cold air;
- Installation of individual pieces of mineral wool of appropriate sizes between the rafters. It is more convenient to add additional logs so that the step between the bars is not too large. Heat in the attic is better preserved if the insulation is placed in 2-3 layers;
- Installation of a vapor barrier film and fixing it with bars, which will serve as the basis for subsequent finishing.
Compliance with all the rules and sequence of insulation will significantly increase the temperature under the roof and make it possible to use the attic as a living space.
![]()
Finishing the attic
After completion of all thermal insulation work, the interior decoration of the attic is carried out. Materials needed:
- Damp-proof drywall;
- Clapboard;
- fiberboard;
- Thick plywood.
Cement bonded particleboard or magnesite board is well suited to create an additional warm layer.
Joints between individual finishing sheets are sealed with mounting foam and putty. Facing with eurolining, block house, plywood will create a feeling of comfort in the attic and act as an additional insulation.
After completion of all works, the attic will be suitable for housekeeping or living.
Insulation of cold attic floors: materials and methods
In order to understand why it is necessary to insulate the cold attic floor, let’s clarify a little why an attic is needed in a private house and what its purpose is. Our ancestors built houses that could stand for more than 100 years, while it was warm inside, and the wooden structure of the roof always remained dry.
Previously, gable roofs were mainly built with a slight slope. This was done so that in winter the snow could remain on the roof. Thus, snow was used as a natural insulator. One or two windows were made in the attic and kept closed in winter so that the compressed air acted as a heat insulator. In the summer, however, the situation was somewhat different. Attic windows were opened at night so that the air cooled down, and during the day, in hot weather, they were closed so that the air would not get too hot, thus regulating its temperature.
When snow fell in winter, it covered the roof like a solid cover, becoming a natural insulator at the same time. Even in severe frosts, the temperature in the attic did not fall below zero. Thus, the air in the attic and the insulation of the ceiling made it possible to maintain the temperature in the house at the level of +20-25 °C. The roof slopes were not insulated so that the snow lying on the roof would not melt. The truss system remained open, making it possible to inspect and repair it if necessary. Therefore, in a cold attic, only the ceiling is insulated.
If the roof slopes are insulated, then the attic becomes a heated room, i.e. attic, which has a completely different functional purpose.
Now it remains to find out how to insulate the attic floor in a private house, and what materials are used for thermal insulation.
Attic floor insulation materials
There is a wide range of insulation materials on the market. To determine the choice, it is necessary to take into account the conditions in which the heat-insulating material will be used :
- The material must retain its properties at temperatures from -30 to +30 °C. Should not freeze in severe frosts and should not emit harmful substances in hot weather.
- It is necessary to choose a fire-resistant insulation in case of electrical wiring in the attic.
- It is better to choose a material that is moisture resistant so that when wet it does not lose its thermal insulation properties.
- Insulation should not quickly caking in order to fulfill its purpose as long as possible.
Before deciding on the type of material for warming the floor of a cold attic in a private house, it is necessary to take into account what material the ceiling is made of. If the attic floor is made of wooden beams, then slab, roll and bulk insulation can be used. In the case when the attic floor is made of concrete slabs, then they resort to the use of heavy bulk or dense slab heat insulators. Their use makes it possible to make a cement screed on the floor.
Materials produced in the format of boards and mats :
- mineral wool (mineral wool) in mats;
- foam;
- extruded polystyrene foam;
- algae;
- straw.
- mineral wool;
- glass wool;
- stone wool;
- algae ladders;
- linen.
Bulk materials for attic floor insulation :
- expanded clay;
- ecowool;
- reeds;
- sawdust;
- straw;
- slag;
- buckwheat sir;
- foam pellets.
Insulation of the attic floor in a wooden house must be carried out with ecological, natural and breathable material.
How to properly insulate the attic floor with mineral wool
Mineral wool is a common and modern heat insulator. Available in rolls or slabs (mats). It does not rot and does not burn, rodents and various kinds of microorganisms are also not afraid of it.
Insulation of the cold attic ceiling with mineral wool starts with laying the lining material on the floor. For a budget option, glassine is laid on the floor, but a more expensive and high-quality option is a vapor barrier film flooring. The film is laid with an overlap, and the joints are glued with adhesive tape or fixed with wooden slats, which are fixed with a construction stapler.
The width of the insulation is selected based on the requirements of thermal engineering standards for each region. Mineral wool is laid between the lags tightly and without gaps. The joints are glued with adhesive tape. After the insulation is laid, even boards are simply laid on the logs, thus forming the floor in the attic. Such a simple solution for creating a floor allows the mineral wool to “breathe” and ventilate normally if moisture gets on it. To prevent moisture from entering the mineral wool, waterproofing material is laid under the roof.
Mineral wool is laid in personal protective equipment: tight clothing, goggles, gloves, respirator.
Insulation of attic floor slabs with extruded polystyrene foam
Expanded polystyrene or foam plastic are not very dense materials, so they are used when the attic floor is a structure of logs and beams. If it is necessary to insulate the plates, use the insulation of the cold attic ceiling with extruded polystyrene foam. This material is stronger and therefore denser than conventional foam. Before laying it, the surface of the plates should be leveled. On the warm side of the floor, vapor barrier is not required, since concrete slabs have almost no vapor permeability.
A vapor barrier film is laid on the leveled concrete slabs. Next, slabs of extruded polystyrene foam are laid in a checkerboard pattern. Joints are blown with mounting foam. After the foam dries and hardens, the heat-insulating plates are poured with a concrete solution 4-6 cm thick. When the screed dries, it is already suitable for use as a floor. Although you can go further and put any floor covering on the screed.
Ecowool cold loft insulation
Ecowool is a cellulose, light and loose insulation, consisting mainly of waste paper and newspapers. Other components – borax and boric acid are used as flame retardants.
Before insulating, it is necessary to lay a film on the floor. The procedure for laying ecowool is carried out using a special blowing machine. A layer of insulation is applied as a continuous cover, without creating gaps. Since ecowool contains a large amount of air, a layer of 250-300 mm is usually enough.
Do not forget that over time, shrinkage of the material will occur. Therefore, apply a layer of ecowool 40-50 mm more.
After the insulation of the cold attic ceiling with ecowool is completed, it must be moistened. You can do this with ordinary water or prepare a solution of 200 gr. PVA glue on a bucket of water. Soak a regular broom in this solution and moisten the cotton well. After drying, a crust is formed on the surface of the cotton – lingin, which will not allow the cotton to move.
When insulating their home, many people start finishing the attic. Is it necessary? Yes, because it is through the ceiling that a lot of heat escapes. And if you take care of its insulation, then the ceiling will not let heat out. Everyone knows from physics lessons that warm air goes up to the ceiling. And if it passes heat, then such air will simply go outside. Thanks to this article, you will learn which attic insulation to choose in order to reduce heat loss.
What is attic insulation at home
What is the work on the insulation of the attic. The technology is quite simple: the insulation material can be laid on the floor, in the space between the floor beams and additionally between the roof rafters. If we talk about the insulation of the room, which is located at the bottom of the attic, then it is enough to insulate the floor. In the event that you want to store something in the attic or use it as an attic from time to time, the roof is also insulated.
What materials can be installed in the attic for insulation? In this article, we’ll take a look at the different options and their pros and cons. Immediately, we note that there are several types of heaters:
- Slab.
- Rolled.
- Sprayable.
- Bulk.
Each of the insulation options is good in its own way. We will select the best heaters that are suitable for this purpose. You must understand that the choice is yours. Our site will offer you only a list of proven attic insulation materials that have won a lot of positive feedback. So, we will consider the following options:
- classic – mineral wool;
- essential foam;
- expensive, but very high quality PPU;
- simple and cheap bulk materials such as expanded clay, sawdust or slag.
What are they? What is the laying technology of each insulation and its advantages? Let’s find out further.
Insulation with mineral wool
Perhaps only a grandmother in the village has not heard of mineral wool, and that is not a fact. This is the most common insulation for home insulation, which is used both for self-insulation and by professional teams. I would especially like to note basalt wool, which does not burn at all and has excellent characteristics. Why did you love mineral wool so much? Let’s look at its positive aspects.
- Environmentally friendly.
- Good shape keeping property.
- Light weight, which does not burden the structure.
- Low thermal conductivity.
- Rodents do not spoil it.
- It doesn’t burn.
- Sound insulation.
- Has a “breathing effect”, creating a good microclimate.
- Relatively low cost.
- Easy to work with insulation material.
Why is this attic insulation so good? Mineral wool is sold both in slabs and in rolls. It keeps its shape well, and you can easily insulate the floor of the attic, as well as the roof. It is enough to lay mineral wool in the space between the beams and sheathe everything with hydro and vapor barrier. This is very important, since the main disadvantage of the material is that it is afraid of moisture. It will destroy the insulation, which will eventually lose its original properties.
You can see the technology of laying mineral wool from the video.
Styrofoam insulation
Well, if a grandmother from the village might not have heard of mineral wool, then foam plastic is definitely familiar to her. One of the simple and affordable insulation materials, which is widely used by builders. The main advantage of polystyrene is its low cost along with good performance. It is much denser than cotton wool, so it is easier to work with foam. It works great and fits in the right place. What else can be noted?
- Low thermal conductivity (lower than mineral wool).
- Low cost.
- Reasonable price.
- Sound insulation.
- Moisture resistant.
- Easy to install.
- Holds its shape well.
However, the low cost affects other aspects. There are more disadvantages to polystyrene. For example, it burns very well. One spark is enough and the material will immediately begin to melt. In addition, it is not vapor-permeable, you will not get a breathing effect for walls. And if it is not properly protected, then the rodents will pretty sharpen the material.
Nevertheless, foam is and will be one of the most popular insulation. Fires are an infrequent phenomenon, in the attic the breathing effect is not so important, and if you protect the material, then rodents are not terrible. For the price this is a great option.
PPU insulation
One of the most expensive insulation options due to the complexity of the process. PPU is a representative of sprayed materials such as penoizol. The insulation technology, at first glance, is simple: it is enough to spray the composition from the unit onto the surface, it will increase several times and fill all the cracks. On the one hand, this is true, but the catch is that such equipment is not easy to find. And it’s not even the availability of units, but the ability to use them. Such work is entrusted only to experienced specialists who have access to the equipment.
The components that make up polyurethane foam are mixed in the unit in an ideal ratio, and the finished composition is sprayed onto the surface, which increases in size. Why is this expensive method so good?
- Environmentally friendly material.
- Light weight.
- Lowest thermal conductivity.
- Creates a monolithic structure without seams that can act as cold bridges.
- Moisture resistant.
- Adhesion to virtually any surface.
- Biostability.
- Sound insulation.
- It is not eaten by rodents.
- The quality of insulation at the highest level.
As you can see, there are really many advantages of insulation. But they are offset by some factors. Firstly, an insulated attic will not breathe. Secondly, you will not be able to do the insulation yourself without specialists. Thirdly, such a pleasure for the attic will be expensive. Whether it’s worth it is up to you.
Insulation with bulk materials
This option can be called the simplest and “in haste” without problems. All that is required is to pour the selected insulation of a certain layer. What can be used?
- Expanded clay.
- sawdust.
- Slag.
Expanded clay
Insulation material consists of balls that are poured onto the floor. You realized that they will not be able to insulate the walls. It is divided into fractions: expanded clay sand, crushed stone or gravel. What is the feature of the material?
- Off.
- Environmentally friendly.
- Durable.
- Frost resistant.
- Has high strength.
- Light weight.
- Sound and heat insulation.
Insulating material is poured over a layer of roofing material, at least 15 cm thick. It all depends on the attic floor and the properties of thermal insulation. In order for you to be able to walk on the floor surface, you can make a concrete screed from above, the thickness of which is about 5 cm. It remains to arrange the flooring from wood, chipboard or other material.
As for sawdust and slag, the technology is almost identical. The laid material will save heat, but not as good as the options above. However, labor costs are minimal. If you do not want to bother, then this is a good alternative to conventional insulation.
To summarize
As you can see, the variety of materials for attic insulation is really great. Each of them is good in their own way. If you are limited in funds, then you can use foam. And when there are funds, then choose between mineral wool and polyurethane foam. Some combine insulation materials, leveling the shortcomings of the foam. How? The bottom layer is made of thick foam, and a thin layer of mineral wool is laid on top. Simple and fireproof. However, remember, no matter what insulation you choose to cover the attic, stick to the technology of its installation. This is the only way to achieve high-quality attic insulation.
-
Types of roofs of private houses
-
How to cover the roof with slate
-
How to cover the roof with corrugated board with your own hands
-
The device of a roofing pie under a professional flooring
What is the best insulation for the attic of a private house
How to properly insulate the attic in a private house with a cold roof
A large amount of heat escapes through an uninsulated attic, for which money is paid. As a result, the room temperature does not rise, and utility costs rise. The only way out is to insulate a cold attic with inexpensive building materials. If you have time and extra money, you can insulate the roof, but this is not necessary, because it is enough to insulate the ceiling from the side of the attic and all the heat will remain in the room.
Why attic insulation is needed
The floor area in a private house is equal to the ceiling area, through which most of the heat escapes. In a cold living room, more moisture forms, so the likelihood of fungus formation increases, which leads to respiratory diseases in the future. The most unpleasant sensations occur in the bathroom, the floor and walls in which do not have time to dry out, discomfort is created, in addition, the cold in the bathroom contributes to colds when there is a sharp change in temperature. Children in such conditions are more likely to get sick.
Most insulating materials are good at draining water, so when insulating, condensation will not accumulate on the walls. Warm air dries out excess moisture, while the walls and floor warm up.
If the roof slopes and the gable are insulated, moisture will not form in the attic and the smell of mold will not be heard. This is a more difficult job, but doable, since the materials are light in weight.
It is best to carry out work on the insulation of the attic with your own hands, so as not to spend extra money on wages. It is necessary to choose a heater according to technical characteristics, calculate its quantity and lay it according to available technologies. All work may take 1 day.
Thermal insulation materials
Both natural and artificial materials can be found on the insulation market. Their difference lies in cost, efficiency, service life, thermal conductivity.
Mineral wool
Mineral wool or its varieties – glass wool, basalt insulation, slag wool – are distinguished by an increased coefficient of thermal conductivity due to the structure of randomly arranged fibers. Cold air in winter does not penetrate into the room from the outside, and in summer it is cool in it, since the cotton wool does not allow the air streams cooled by the air conditioner to pass through.
Of all varieties of mineral wool, it is recommended to choose basalt insulation for the following reasons:
- The material does not crumble and does not cause an allergic reaction.
You can work with stone wool without protective equipment.
- Service life about 50 years.
- Mineral wool from volcanic rock comes in different densities – you can choose the appropriate option for any region, including the coldest.
- Basalt wool is a lightweight material, so it can be installed by one person.
- Mineral wool from basalt does not burn. It can be melted at very high temperatures, so the attic will be safe.
Basalt insulation can be used to insulate the chimney, then even more heat will remain in the room where there is a stove or fireplace.
When using glass wool and slag wool, you will need to wear a protective suit, goggles and gloves, as the thin fibers break and can get into the respiratory system, eyes and skin. These materials are also non-combustible, but melt at much lower temperatures. In this case, the material loses its structure and useful properties.
Styrofoam
Attic insulation in a house with a cold roof can be done with foam. This material also has advantages:
- Low weight and cost.
- Does not emit harmful substances when heated, therefore it is chemically neutral and safe.
- Contains flame retardant which does not support combustion.
- Microorganisms, mold do not start in the foam.
- Does not weigh down the structure of the ceiling.
- Low coefficient of strength, therefore additional material protection is required in the form of boards laid on top supported by logs. This will require additional costs and time.
- The material does not allow air to pass through, so dampness and condensation may form in the room.
- Rodents that are found in private homes damage the foam, build holes from it, so additional coverage is needed.
Styrofoam is used most often for outdoor work under plaster. As a heater for an attic in a private house, it is not profitable – it requires large investments to protect the material itself.
Styrofoam ceiling insulation in a house with a cold roof is best done from the inside, but it can lower ceilings.
Penoplex (expanded polystyrene)
Penoplex insulation is made from granules of synthetic material polystyrene or expanded polystyrene. This is a heater, which is a porous structure with separately located cells. Cells do not touch each other, which on the one hand is a positive quality, on the other – a negative point. The fact is that polystyrene foam does not pass moisture well, it will accumulate inside the room, causing dampness.
The advantage of polystyrene is its cost and small thickness. The air inside makes up 98% of the total volume of the material, which is why it is so cheap. Compared to stone wool, the thermal conductivity is lower. To achieve good thermal insulation, it is necessary to buy polystyrene foam of greater thickness, which will cost more.
Penoplex is combustible, therefore, in terms of fire safety, it is absolutely useless.
The melting point is 75 degrees, so it can not be laid next to heating appliances. In the attic it can be a chimney from the stove.
Polyurethane foam
In terms of service life, as well as heat-retaining characteristics, it is worth paying attention to polyurethane foam, which is applied by spraying. In this case, there is no need to build logs for laying mineral wool or expanded clay, save money by purchasing cheap fragile materials.
In a short time, you can create a monolithic floor in the attic, in which rodents will not settle, mold will not start, cracks will not appear. When using polyurethane foam, you do not have to buy additional vapor and waterproofing.
Bulk expanded clay
It is possible to insulate the attic with expanded clay. This is a durable material that is used in bulk with prepared cells. If you need to move around the attic, you will have to build a floor on wooden logs from above. Advantages of expanded clay:
- strength;
- durability;
- does not absorb moisture;
- retains heat well;
- is breathable;
- may be used in combination with other materials as preferred.
Most often, expanded clay is combined with mineral wool or sprayed with polyurethane foam so as not to waste time building a frame.
Thermal insulation layer thickness
To insulate the attic in a house with a cold roof, thermal insulation materials of any density can be used, since the room is not residential. If you plan to lay mineral wool on the roof slopes, you can prepare a material of lower density and thickness, since as a result the ceiling insulation will be double, but laid in two places.
Builders recommend placing a thicker layer of insulation along the perimeter of the attic, since the greatest heat loss occurs in the corners.
For ease of movement on soft insulation, it is necessary to build paths made of wood or other material so as not to violate the compression properties of the heat-insulating layer.
Preparing the attic for insulation
Before starting work, it is necessary to calculate the area of the room and the amount of building materials. The main thing is the thickness of the insulation, which is needed in the middle lane, where the temperature can drop to minus 30 degrees. The thickness of the mineral wool must be at least 20 cm.
- Remove all debris and dust so that the seal does not absorb it.
- Seal gaps in the roof with construction foam.
- Remove sharp objects. They can damage the protective layer of cotton wool.
After cleaning, you can bring building materials, tools, as well as an additional lamp for lighting.
Vapor barrier
According to the laws of physics, warm air saturated with steam will always rise up, passing through walls and ceilings. This process is called diffusion.
Different materials have different levels of vapor permeability. High resistance to the diffusion process can be provided by the formation of condensate or the accumulation of moisture between floors. In such places, floors are usually made of wood, and wood, saturated with moisture, loses its strength.
When the lower room is warm and the upper room is cold, a vapor barrier is a must. In the case of stone wool, you can buy a material with a hydrophobic coating that will not allow steam to pass into the cold room above, where water droplets form from it.
In the technical documentation, there are two concepts: steam resistance and vapor permeability coefficient. These are different concepts.
Two materials are used to organize the vapor barrier – a film to cover the entire area and adhesive tapes to connect layers of hydrophobic insulation so that steam does not penetrate into the cracks.
The characteristics according to which the vapor barrier is chosen should take into account strength (polyethylene film is not suitable), UV resistance, since the sun’s rays sometimes enter the windows, which can damage the materials.
Waterproofing
To protect the attic from flooding and ceilings and repairs from water drips, it is recommended to lay a layer of waterproofing material on the roof slopes.
- Fusion welded – overlapped and connected with a torch. The cheapest option is synthetic materials.
- Sprayable. A solid film-membrane is created.
- Powder. Water is added to it immediately before installation.
- Liquid – suitable for concrete floors, soaking into their surface.
- Coating based on bitumen.
Before you buy waterproofing, you need to re-read the properties: the material must pass air, but retain water. Some cheap films create a greenhouse effect in a cold, unheated attic, causing mold to form on the walls.
How to carry out the work correctly
Do-it-yourself attic insulation in a private house is carried out as follows:
- If the attic is not to be inhabited, it must be ventilated. To do this, ventilation troughs are installed in the roof.
- It is recommended to insulate an old roof with a waterproofing layer of any of the types described above.
This is necessary to protect the mineral wool. A wooden structure is suitable, on which a film is pulled, or a spray gun.
- If you simultaneously insulate the slopes, it is recommended to start with them. Plates on one side are smeared with glue and attached to the inside of the roof. You can use self-tapping screws, substituting square wide plates under them. Rolled insulation can be cut after it is laid between the rafters.
- A vapor barrier film is mounted on top of the boards.
- When installing insulation on the floor, lags are first constructed – a wooden frame, between which a roll or tile layer is laid.
- A vapor barrier is laid in front of the slabs, then slabs and waterproofing.
In order to be able to move freely throughout the entire area of the attic, the logs are covered with durable material – wood or drywall sheets. This makes the appearance of the room more neat – if desired, you can equip a workshop or storage room there. If you want to save money, you can only equip paths to important objects, for example, to a chimney, a dormer window, ventilation.
Which insulation for the attic to choose
Insulation of the attic of a private house can be partial, that is, one overlap, and complete. Also, such work can be done independently or hire craftsmen, but in any case, the owner will have to decide the issue with the choice of insulation.
Each roof model has its own best insulation, the main thing is to choose the right one.
Wool insulation
Wool for roof insulation began to be used about 50 years ago. It can be used as a floor insulation and as a roof insulation at the same time.
Glass wool
The material is a special type of glass fiber. Most models are available as soft mats of various thicknesses, but recently dense glass wool boards have appeared on the market.
You should not take the cheapest models, they are a source of harmful glass dust, and the mats themselves quickly become unusable.
![]()
Now there is an environmentally friendly thermal insulation with excellent performance, for example, Isover has released a good fiberglass line.
The price of these models is somewhat higher, but they are absolutely harmless and nothing spills from them.
Slag wool
The material is made from blast furnace waste, specifically from slag.
Slag wool has pros and cons:
- The low cost of the material will please you, in addition, the density of plates and mats is quite high, which is also good.
- Low environmental friendliness — the entire periodic table is in blast-furnace slag, although manufacturers claim that the material is harmless.
Perhaps, slag wool from a well-known brand really does not pose a danger, but personally I do not recommend installing this insulation in a living space. But for baths, boiler rooms and other technical premises, this is an excellent option.
![]()
Basalt or rock wool
Stone wool is made from basalt and similar minerals and is considered to be the queen of all cotton wool.
Insulation of the mansard roof with stone wool is considered one of the best options
In terms of characteristics, it significantly exceeds the above options:
- Environmental friendliness – 100% natural material.
- Fire resistance – the melting point of this thermal insulation material fluctuates around 1000 ºС, which allows it to be used for arranging chimneys and other fire hazardous places.
- Holds volume – dense stone wool slabs do not lose volume when wet and fully recover after drying.
Basalt wool is suitable for warming the entire attic room, regardless of the sector. The only drawback here is the price, this material is somewhat more expensive than competitors.
Ecowool
Insulation based on cellulose – made from waste from the woodworking industry or waste paper. Ecowool is a cross between loose and wadded heaters.
In the video, the author of the video tells how he insulated the attic with an area of 100 sq.m. blow molding machine:
- Ecowool is well sprayed on the walls and between the rafters, but this requires special equipment.
- But if we are talking about the insulation of the ceiling along the beams, you can put ecowool between the beams with your own hands.
The material is harmless and vapor-permeable, but ecowool burns on contact with an open fire.
Loose insulation
Loose insulation is attractive due to affordable price and relatively easy installation instructions. Plus, all bulk materials are harmless.
But bulk options have 2 common disadvantages:
- Suitable only for horizontal floors . More precisely, there are technologies for backfilling the same expanded clay into inclined truss systems, but it is very problematic to do this with your own hands.
- Thickness of any backfill is at least 2 times greater than compared to cotton slabs or polystyrene.
Bulk insulation has the richest history – how many thousands of years they have been used, people do not know. However, it is difficult to say which insulation is better, it all depends on the specific conditions.
Consider the 3 most popular options:
- Expanded clay is fired clay, looks like rounded granules of different sizes. The material is strong, durable and non-flammable. Quickly absorbs moisture, but also dries quickly.
Among bulk heaters, expanded clay is considered the golden mean
- Perlite is a porous volcanic rock, the price of perlite is slightly higher than that of expanded clay, but this material absorbs moisture less.
- Sawdust is the cheapest, almost free option, but sawdust must be prepared for a long time before use (drying and impregnating with various compounds), according to technology, it takes at least six months, and most importantly, sawdust burns perfectly.
When choosing a heater for filling, you should not focus solely on the price. The difference between the cost of sawdust and expanded clay is small, but the latter will last longer than the house itself.
Polystyrene boards
This niche is represented by foam and extruded EPS foam.
They have excellent thermal insulation, but the problem is different – foam plastic and especially XPS do not let steam through at all.
They are suitable for insulating reinforced concrete floor slabs, but if you lay polystyrene between rafters or wooden beams, they will rot in a few years, and here even forced ventilation does not save.
Further in the video in this article, the specialist shows what happens when polystyrenes are preferred when choosing insulation for wooden structures.
General principles of installation
Insulation of the truss system and ceilings along the beams are similar. We proceed from the fact that the rafter system is assembled and covered with roofing material, and the beams of the attic floor are hemmed from below with a subfloor.
- Vapor barrier. First, a vapor barrier is attached to the base. Keep in mind that the canvas is laid so that the steam leaves the room towards the street, and moisture is blocked on the reverse side.
- Insulation. Further, between the rafters or beams, insulation is laid or filled up.
- 2nd layer of vapor barrier. Another layer of vapor barrier is mounted on top of the insulation, it is located in the same way as the previous one.
- Beam slab. Further, if the ceiling is arranged along the beams, then the floor is laid, and when the mansard roof is insulated, the interior trim is attached.
Conclusion
Now you know how to choose one or another insulation, which one is best suited for a particular design, you decide.
The photos and videos in this article show different options for arranging an attic space, where you will find practical tips for installation.
Do-it-yourself attic insulation, what do you need to know about it?
Over time, every owner of a private house thinks about attic insulation. After all, every year the materials lose their original qualities, which leads to the loss of heat that escapes through the attic.
Thermal insulation of the house is a priority that must be addressed before the onset of cold weather. So, as everyone knows, a warm house is not one that is well heated, but one that does not let all this heat through.
It is also necessary to note the fact that the insulation of the attic of a private house with foam plastic or any other insulation will make it possible to significantly reduce heating costs.
That is why the question of how and with what to insulate the attic becomes extremely relevant.
What types of insulation are suitable for use in the attic?
As a standard, this kind of insulation is necessary in underutilized rooms. It is also important to note that they must necessarily be equipped with properly equipped roof ventilation.
The attic, together with its floors, performs a very important function, namely, it acts as a boundary between heat and cold. A large amount of condensate also accumulates here and this happens as a result of the intensive effect of moisture on the attic. And this must be taken into account when warming your private house.
Many firms and companies offer similar services, but it often happens that the prices for their services are too high and many people think about insulating the house themselves. You can insulate your house with your own hands. However, for this it is important to take into account all the features of the installation of a particular insulation.
All materials that can be used as attic insulation are described in more detail below. Here, all the advantages will be considered, as well as their disadvantages, and everything so that in the end you can choose the best option for yourself.
But first you need to determine the main types of insulation:
It should be noted that each of the options has its own characteristics and can be used as insulation for the attic. It is important to understand that only the main materials that have received the most positive feedback are listed here.
Insulation with mineral wool, ecowool
Mineral wool, perhaps, is the most popular material for warming the mountain today. This is a classic in the construction industry. After all, it is used by both professional teams and people who decide to deal with the issue of insulation on their own.
Such wide popularity of mineral wool was achieved due to its excellent performance characteristics. Especially if you take into account basalt mineral wool. It is non-flammable and easy to install.
It is also worth considering some of its advantages, which include:
- Simplicity in operation, there are absolutely no problems when working with mineral wool, even for those who insulate the attic on their own.
- It has a “breathing effect” and it is due to this that a good microclimate is created.
- Non-flammable.
- Allows you to create good sound insulation.
- Environmentally friendly material.
- Many note its property not to lose shape even over a long period of use.
- Has a relatively low weight, which in no way affects the main structure.
- It will not be spoiled by rodents and other pests.
- Minimum thermal conductivity.
- One of the cheapest materials suitable for insulating the attic of a private house.
It should also be said that mineral wool is sold both in rolls and in slabs. And this makes it possible to choose the most suitable option, which will be easier for you to lay.
Important! If you decide to insulate the attic with mineral wool, then you should take care of both waterproofing and vapor barrier. This is due to the fact that this material is afraid of moisture. And if you ignore this moment, then after a while the mineral wool will lose its original appearance and its performance characteristics.
Attic insulation with expanded polystyrene, polystyrene foam
Everyone who wonders how to insulate the attic comes up with the idea of using expanded polystyrene. And this is not at all accidental, since this material is even more common than mineral wool. It is also used by professional builders in their work, and it is perfect for independent work.
The main feature that foam plastic has is an acceptable price. This is actually the cheapest building material that can be used as attic insulation.
It is also important to note that Styrofoam is much denser than wool, and therefore it is a pleasure to install it, since it is an “obedient” material. It can be easily processed and laid in the right place.
In addition, a number of its advantages can be noted:
- Perfectly keeps its original shape.
- Not affected by moisture.
- Low thermal conductivity, an order of magnitude lower than that of mineral wool.
- Ability to create excellent sound insulation.
But along with a large number of advantages, this material also has significant disadvantages, which include the following indicators:
Despite all its shortcomings, Styrofoam still remains one of the leaders in attic insulation. After all, fires do not happen so often, you can use additional material protection against rodents, but the “breathing effect” is not so important on the mountain. Therefore, we can conclude that for such a low price, this is just a great option. This method of warming the attic in a private house is the most fashionable today. It is used by almost all companies that offer such construction services. The main advantage of this attic insulation is that it independently fills all the space, voids and at the same time creates a uniform and continuous layer. You no longer need to cut blocks in order to close up all the holes.
Blow-out insulation for the attic
In Russia today, two blown heaters are used: blown wool and ecowool.
The latter consists of 80% cellulose fibers. They are also made from the most common waste paper, but the remaining 20% are a wide variety of additives, which can be boric acid, which acts as an antiseptic, and snowstorm as a fire retardant.
Blown wool consists entirely of standard mineral substances, which are intended for thermal insulation. It is important to note that it is highly crushed.
How to properly and how to insulate the attic floor
The issue of building insulation is now more acute than ever. Most start with wall insulation, but this is where it ends, however, as you know, warm air tends to rise and leave through the roof, so attic floor insulation plays an important role. As with all construction work, insulation should be carried out with high quality. But how to insulate the attic floor in order to get the maximum benefit?
Selection of insulation
When choosing insulation for the attic floor, it is important to take into account its heat-shielding properties, strength, and resistance to external factors. The type of flooring will also play a role: concrete and wooden floors have their own characteristics. So, how to insulate the attic floor?
Popular attic insulation
- Basalt mineral wool.
- Expanded clay.
- Styrofoam.
- sawdust.
Mineral wool
Most often, attic floor insulation is carried out with the help of mineral wool. What are its features and why is this heater so popular?
Mineral wool is laid between the wooden beams of the attic floor
Advantages of mineral wool:
- High thermal insulation. For example, to insulate the attic floor with mineral wool, the layer thickness is 3.5 times less than when using expanded clay.
- Easy to install material. This heater is not difficult to work even for those who are engaged in insulation for the first time.
- Fire safety. Mineral wool is not easily flammable, therefore, in the event of a fire, it does not serve as a fast carrier of fire, which, for example, cannot be said about polystyrene foam.
- Long service life. If you properly lay the mineral wool, it will not roll down and will not create cold bridges.
- Reasonable price.
It is thanks to all these advantages that mineral wool insulation of attic floors is a widely used method of saving heat in a room.
However, this insulation also has disadvantages. In particular, due to its ability to absorb moisture, the mineral wool insulation layer may no longer provide the same thermal insulation as before. Also, when insulating the attic floor with mineral wool, it is important to observe safety precautions. Mineral wool fibers in contact with the skin can cause irritation, so you should work with it in tight clothing, glasses, a respirator and, of course, gloves.
Expanded clay
Another material for attic insulation is expanded clay. Although this insulation is rarely used, it still has a number of advantages.
Expanded clay – very popular in earlier heat insulators
- The cost of insulation.
- Good thermal insulation performance. However, to achieve a really good result, the thickness of the expanded clay layer should be about 35-40 centimeters.
- Fire safety.
However, expanded clay as a heater also has significant disadvantages:
- Greater weight compared to other heaters.
The thermal insulation of a wooden attic floor creates a load on the beams, so when choosing expanded clay, this point should be taken into account.
- Installation is difficult. Raising a huge amount of expanded clay to the attic can cost a lot of effort.
Styrofoam
Styrofoam is one of the best materials for wall insulation, so some people decide to use it for attic floor insulation as well. And although the foam has advantages, it is still not recommended to use it.
Attic floor insulated with foam plastic
- Waterproof. This is a plus compared to the widely used mineral wool.
- Reasonable price.
- Easy to install. Lifting sheets of foam and laying on the attic floor is not difficult.
Despite these advantages, foam as a heater has a number of significant drawbacks.
- Highly flammable. If the fire reaches the heater, it is unlikely that the fire will be extinguished.
- Intolerance to high temperatures.
At a temperature of +60°C, the material deforms, at +80°C it begins to melt, which releases toxic substances, and at +210°C the foam ignites.
- Brittleness. The foam is able to crumble, which reduces its thermal insulation properties.
In view of these shortcomings, especially the danger in case of fire, it is better not to use foam plastic as insulation for a wooden attic floor. After all, the combination of foam plastic with wooden beams is very dangerous. However, this insulation can be used for thermal insulation of concrete floors.
Sawdust
This method of insulation was very popular earlier, before the advent of modern thermal insulation materials. It is not without its advantages, although they are very insignificant compared to other heaters.
Insulation of the attic floor with sawdust
- Absence of toxic substances, as well as the natural origin of the insulation.
- Relatively affordable price.
If we talk about the shortcomings of sawdust, we can note:
- The need to prepare a solution consisting of sawdust, cement, lime and water.
All other heaters are bought ready-made.
- Large weight, which creates an additional load on the ceiling.
- Thick insulation layer.
Installation process
Having decided on the material for thermal insulation, the question arises: how to properly insulate the attic floor? If we talk about mineral wool, then what density should it have and what layer of insulation will be the best?
Choice of mineral wool layer and density
Mineral wool insulation is best done in two layers
In short, the larger the mineral wool layer, the better. However, it must be remembered that mineral wool has its own coefficient of thermal conductivity. The lower this coefficient, the higher the thermal insulation properties, and, therefore, it is possible to lay a smaller layer of wool or have a greater insulation efficiency. Often, mineral wool with a thickness of 15–20 centimeters is used, however, a 30-cm layer of insulation can also be used to provide increased thermal insulation. It is also worth noting that with an equal thickness of insulation, two layers of mineral wool are always better than one.
You also need to pay attention to the density of mineral wool, because it can be different: from 30 kg / m 3 to 220 kg / m 3. Thermal insulation properties practically do not depend on density. A denser insulation is used for facades and floors under the screed. Mineral wool with a density of 35 kg / m 3 is also suitable for the attic floor, because the insulation will be on a horizontal unloaded surface.
Vapor barrier
Since mineral wool tends to absorb moisture, you need to start the insulation with the installation of vapor barrier material.
Vapor barrier – first layer of insulation
The best option is to lay a continuous layer of vapor barrier, but due to the size of the attic this is not always possible, so all joints must be glued with special tape to ensure tightness. The edges of the vapor barrier must be raised above the level of the future insulation and glued with the same tape.
Heat insulation
Working with heat-insulating materials is necessary in overalls
Next is the installation of insulation. It must be laid so as to completely fill the entire space between the wooden beams. If we are talking about mineral wool, then it does not need to be pressed or squeezed. It should completely cover the space between the beams, leaving no gaps or gaps. The floor beams themselves will also not be superfluous to cover with heat-insulating material, because they can serve as a kind of cold bridges.
When laying mineral wool, it is very important to protect yourself, and especially your respiratory tract, from getting into the fibers of the insulation. Therefore, you need to use a respirator, as well as gloves, goggles and long-sleeved clothing.
Waterproofing
Insulation of the attic floor is completed with waterproofing and subflooring
Due to the property of mineral wool to absorb moisture, it is necessary to lay waterproofing over the layer of mineral wool. It is also necessary if a concrete screed is poured over the insulation.
If the attic is constantly used, a subfloor can be made on top of such a heat-insulating “pie”. In its role can be a concrete screed or OSB slabs. If the attic is practically not used, then you can simply lay the boards on top of the existing beams. Then, if necessary, go up to the attic, movement through it will not create difficulties.
As you can see, attic floor insulation is an affordable task, even for those who have never done it before. It is necessary to decide on the material for thermal insulation, although most often it is mineral wool. When installing a heat-insulating “pie”, it is important to remember the need for vapor barrier and waterproofing. This will achieve high results in the insulation of the attic floor.
Video: discussing in detail the structure of the floor
Overview of the structural details of the attic floor insulation device. What is a sufficient layer of insulation for a cold attic? What are the specifics of the work on laying the thermal insulation of the attic floor?
Attic insulation
Insulation of a residential building will always be the main task in solving the problem of heating. After all, you must agree that not the house that is heated will be a warm house, but the one that retains this heat. No matter how good heating is, without thermal insulation, efforts will be in vain. And in order to reduce heating costs and make the house really warm, you need to think about saving heat.
When insulating their home, many people start finishing the attic. Is it necessary? Yes, because it is through the ceiling that a lot of heat escapes. And if you take care of its insulation, then the ceiling will not let heat out. Everyone knows from physics lessons that warm air goes up to the ceiling. And if it passes heat, then such air will simply go outside. Thanks to this article, you will learn which attic insulation to choose in order to reduce heat loss.
What is attic insulation at home
What is the work on the insulation of the attic. The technology is quite simple: the insulation material can be laid on the floor, in the space between the floor beams and additionally between the roof rafters. If we talk about the insulation of the room, which is located at the bottom of the attic, then it is enough to insulate the floor. In the event that you want to store something in the attic or use it as an attic from time to time, the roof is also insulated.
What materials can be installed in the attic for insulation? In this article, we’ll take a look at the different options and their pros and cons. Immediately, we note that there are several types of heaters:
Each of the insulation options is good in its own way. We will select the best heaters that are suitable for this purpose. You must understand that the choice is yours. Our site will offer you only a list of proven attic insulation materials that have won a lot of positive feedback. So, we will consider the following options:
- classic – mineral wool;
- essential foam;
- expensive, but very high quality PPU;
- simple and cheap bulk materials such as expanded clay, sawdust or slag.
What are they? What is the laying technology of each insulation and its advantages? Let’s find out further.
Insulation with mineral wool
Perhaps only a grandmother in the village has not heard of mineral wool, and that is not a fact. This is the most common insulation for home insulation, which is used both for self-insulation and by professional teams. I would especially like to note basalt wool, which does not burn at all and has excellent characteristics. Why did you love mineral wool so much? Let’s look at its positive aspects.
Why is this attic insulation so good? Mineral wool is sold both in slabs and in rolls. It keeps its shape well, and you can easily insulate the floor of the attic, as well as the roof. It is enough to lay mineral wool in the space between the beams and sheathe everything with hydro and vapor barrier. This is very important, since the main disadvantage of the material is that it is afraid of moisture. It will destroy the insulation, which will eventually lose its original properties.
You can see the technology of laying mineral wool from the video.
Styrofoam insulation
Well, if the grandmother from the village could not hear about mineral wool, then the foam plastic is definitely familiar to her. One of the simple and affordable insulation materials, which is widely used by builders. The main advantage of polystyrene is its low cost along with good performance. It is much denser than cotton wool, so it is easier to work with foam. It works great and fits in the right place. What else can be noted?
However, the low cost affects other aspects. There are more disadvantages to polystyrene. For example, it burns very well. One spark is enough and the material will immediately begin to melt. In addition, it is not vapor-permeable, you will not get a breathing effect for walls. And if it is not properly protected, then the rodents will pretty sharpen the material.
Nevertheless, polystyrene is and will be one of the popular heaters. Fires are an infrequent phenomenon, in the attic the breathing effect is not so important, and if you protect the material, then rodents are not terrible. For the price this is a great option.
PPU insulation
One of the most expensive options for insulation, due to the complexity of the process. PPU is a representative of sprayed materials such as penoizol. The insulation technology, at first glance, is simple: it is enough to spray the composition from the unit onto the surface, it will increase several times and fill all the cracks. On the one hand, this is true, but the catch is that such equipment is not easy to find. And it’s not even the availability of units, but the ability to use them. Such work is entrusted only to experienced specialists who have access to the equipment.
The components that make up polyurethane foam are mixed in the unit in an ideal ratio, and the finished composition is sprayed onto the surface, which increases in size. Why is this expensive method so good?
As you can see, there are really many advantages of insulation. But they are offset by some factors. Firstly, an insulated attic will not breathe. Secondly, you will not be able to do the insulation yourself without specialists. Thirdly, such a pleasure for the attic will be expensive. Whether it’s worth it is up to you.
Insulation with bulk materials
This option can be called the simplest and “in haste” without problems. All that is required is to pour the selected insulation of a certain layer. What can be used?
Expanded clay
Insulation material is balls that fall on the floor. You realized that they will not be able to insulate the walls. It is divided into fractions: expanded clay sand, crushed stone or gravel. What is the feature of the material?
Insulating material is poured over a layer of roofing material, at least 15 cm thick. It all depends on the attic floor and the properties of thermal insulation. In order for you to be able to walk on the floor surface, you can make a concrete screed from above, the thickness of which is about 5 cm. It remains to arrange the flooring from wood, chipboard or other material.
As for sawdust and slag, the technology is almost identical. The laid material will save heat, but not as good as the options above. However, labor costs are minimal. If you do not want to bother, then this is a good alternative to conventional insulation.
Summing up
As you can see, the variety of materials for attic insulation is really great. Each of them is good in their own way. If you are limited in funds, then you can use foam. And when there are funds, then choose between mineral wool and polyurethane foam. Some combine insulation materials, leveling the shortcomings of the foam. How? The bottom layer is made of thick foam, and a thin layer of mineral wool is laid on top. Simple and fireproof. However, remember, no matter what insulation you choose to cover the attic, stick to the technology of its installation. This is the only way to achieve high-quality attic insulation.
How and with what to insulate a cold ceiling or attic in a private house?
Which wall primer is best?
Any repair work involving interior finishing requires the use of a primer. What is the primer for?
Increasingly, drywall is being used to level surfaces in a room. Inexpensive price and easy installation..
Read more… 01.10.2021
How to properly insulate a house?
Thermal insulation of a house is a complex undertaking that includes several stages. To decide how to insulate wood..
Read more… 08/14/2021
Do-it-yourself attic in a private house
Residential attic in a private house solves many useful tasks. During operation, the need to repair the attic arises..
Read more… 07/27/2021
Which adhesive for tiles is better to choose?
Tiles are used for cladding surfaces both indoors and outdoors, which means that they will be exposed to a..
Read more… – a guarantee of comfort throughout the house. Why is it so important to choose the best insulation for the ceiling per hour? Without..
Read more… 04/18/2021
How to insulate a house with foam plastic from the outside
The need to insulate houses in the face of rising heating costs is obvious. foundation insulation – correct
Mistakes made during foundation insulation become apparent only after a few years. Moisture penetration reduced.
Read more…03.12.2020
Fastening foam to the wall: types of glue
Styrofoam or foam materials are among the most popular insulation materials. Styrofoam is light, very light..
Read more…10/28/2020
Errors when working with plaster
The key to an impeccably completed repair of walls and ceilings is a high-quality rough finish. In many situations ..
Read more…10/23/2020
Mineral wool is the best attic insulation
The attic is a difficult place to perform thermal insulation work. At least 20% of the warm air in the house escapes, rising in..
Read more…07/08/2020
Styrofoam or foam plastic – which is better
Comfortable housing that requires minimal operating costs cannot be built without the use of effective insulation..
Read more… 05/31/2020
Why do we need a vapor barrier when insulating a house
In the construction of buildings, the presence of a vapor barrier is a decisive factor. Comfortable and effective insulation is impossible..
Read more… 05/29/2020
Plaster – application for walls and ceilings
Plaster is the basis from which the repair (major, cosmetic, European-style repair) of any room begins. Va..
Read more… 06/23/2017
Drywall with delivery – profitable and convenient
Drywall is an environmentally friendly material for leveling walls, ceilings and floors, erecting partitions, arches, and . .
Read more.. .19.06.2017
Primer concentrate
When choosing a primer for surface treatment before applying paint, putty, glue or other finishing material..
Read more…
In order for a fine finish to please with neatness and novelty, it is not enough to purchase high-quality materials. It is important to ..
Read more… 06/13/2017
Wall primer consumption – per 1 m2
The primer is used to prepare the wall surface for finishing, it improves the adhesive properties of the surface ..
Read more… 06/13/2017
Primer paint – why is it needed?
Primer paint, paint primer or ground paint – builders and professional repairers use any ..
Read more… 06/13/2017
Epoxy primer
products against corrosion. That is why it is applied …
Read more…0005
An affordable and uncomplicated material for floor screed is cement. The thickness basically does not exceed ..
Read more. .. 06/13/2017
Drywall selection – tips
Any modern hardware store offers a wide selection of drywall types in composition in different sizes and from ..
Read more… 06/13/2017
Thermal insulation materials Rockwool
0005
Read more…06/07/2017
How to seal drywall joints?
Sealing the joints between drywall boards is an obligatory step before finishing the plasterboard structure. House owners want m..
Read more…0005
With the beginning of roofing work, many questions always arise about the quality of the components of the “roofing cake” and about the expediency..
Read more…06/07/2017 . Despite the abundance of types of paper and non-woven fabrics..
Read more…06/07/2017
Which drywall is better – choose the right one the price for it depends on the method of application, thickness, conditions of use..
Read more…06/07/2017
Laying tiles
Apartment renovation is a matter of business
troublesome and responsible. But along with the end of the repair, a new one comes into the house.
comfortable atm..
Read more…
whose purpose is to level surfaces or create
partitions, in itself n..
Read more…06/07/2017
View all
material selection and work steps
Attic insulation is an important part of the overall thermal insulation of the house.
Insulation of any structure must be approached comprehensively. So say all the experts.
After all, it is impossible to maintain the temperature in the house, regardless of its structural material, at the proper level, by insulating only the walls in it.
Therefore, both the floor and the ceiling are subject to thermal insulation, especially in the attic. Question: “How to insulate the attic?” is very acute when it comes to a wooden, private structure.
Everyone knows the law of physics, according to which warm air has a lower specific gravity, therefore it always rises, while cold air remains at the bottom. The same thing happens in the rooms of the room. Warm air rises to their ceiling, cold air is closer to the floor. If the thermal insulation of the ceiling or attic is not carried out, then warm air freely penetrates through the structural material of the ceiling and gives it part of its energy. In a word, if you do not insulate the ceiling and attic of the house, then about 30% of all heat losses of the building pass through it.
Features of warming the attic of a wooden house
It is necessary to insulate the attic in a Jewish house in order to avoid heat leakage.
In order to correctly insulate the attic in a wooden structure, you need to remember a few rules:
- warm air always contains water impurities, that is, the warm air in the room is always saturated with domestic steam. A tree, being constantly in an atmosphere of high humidity, may lose its technical characteristics or simply rot. Therefore, when carrying out thermal insulation of this design, it is necessary to remember about the waterproofing layer;
- the tree is able to pass air through itself, that is, it “breathes”.
Air and steam in it can be on the surface and in the thickness of the insulation material, even if it is located outside the structure, therefore an additional layer of waterproofing material is also needed here;
- wood, in comparison with other structural materials of buildings (brick, metal-concrete structures), has a lower bearing capacity, therefore, the insulation material for a wooden house should not exert additional load on the ceiling;
- thermal insulation material must have fire protection characteristics to prevent the spread of fire in a wooden building.
Mineral wool, glass wool
Mineral wool, glass wool – materials are environmentally friendly, fire resistant, lightweight, easy to install. However, it is characterized by high rates of vapor permeability and water absorption, therefore they require the presence of waterproofing or a vapor barrier.
Polyurethane foam
Attic insulation technology with polyurethane foam.
Polyurethane foam – made from gas-filled plastics, sold in pressurized cans, applied by conventional spraying to the desired surface. Advantage – it forms a seamless coating that prevents the formation of cold bridges, it has a high degree of adhesion to a wooden surface, therefore it does not require additional fasteners. It is lightweight, therefore it does not exert additional pressure on the ceiling, it has high rates of heat and sound insulation, and does not absorb moisture.
Polyurethane foam does not rot, withstands the action of an aggressive environment, microorganisms do not develop on its surface. It is characterized by strength and rigidity, it does not absorb water and does not pass steam through itself. The disadvantage is the high price compared to similar products.
Styrofoam
Styrofoam – this is erroneously called Styrofoam. Expanded polystyrene, unlike polystyrene, undergoes several additional processing steps, therefore it is characterized by increased strength. Properly organized on the basis of its insulation layer in the attic of a wooden house is vapor-tight. Expanded polystyrene is moisture resistant, but does not tolerate the action of organic solvents. It promotes the spread of fire.
How to properly insulate the attic – execution technique
If the attic of a wooden house is not planned to be converted into a living room, it is enough just to insulate the floor. Stages of the insulation process:
You can insulate the attic of a private house correctly with your own hands.
- clean the surface of debris and rot, treat the floor with an antiseptic, if there are gaps, they must be additionally caulked;
- the attic is covered with a waterproofing film, but it must pass steam, otherwise the ceiling will rot;
- , logs are erected, to which the final floor covering will subsequently be attached, and the thermal insulation will be laid in even layers without gaps;
- waterproofing layer, but it should no longer let steam through;
- if the attic will continue to serve as a living space, the insulation is additionally covered with expanded clay with its subsequent viscous;
- finish.
How to properly insulate the pitched roof of a wooden house
- First, the entire surface is covered with a waterproofing film. It is overlapped so that joints do not form with construction tape;
- further insulation is laid. Mineral wool performs well in its quality, but only in the form of mats. It keeps its shape perfectly and does not sag when in an upright position. Mineral wool is laid between the rafters and fixed by means of a slatted crate or mesh made of nylon cord;
- , the vapor barrier layer will not allow steam in the air to penetrate into the thickness of the insulation, thereby reducing its technical characteristics, but at the same time allowing the thermal insulation to “breathe”. The vapor barrier is attached to the rafters over the insulation and fixed with construction tape;
- finishing – fiberboard or chipboard, drywall can be used.
Insulation of the attic in a private house is a very important measure that allows you to save internal heat. Today, it is possible to insulate the attic with a variety of insulating materials.
And if earlier, the attic was insulated with sawdust and expanded clay, then today, preference is given to such modern heat-insulating materials as mineral wool, foam plastic, polyurethane foam, etc.
It is worth noting that the properties and characteristics of all thermal insulation materials are different. Some of them are flammable, others are not. Some heaters, for example, are “afraid” of moisture, while others are not afraid of it. Therefore, before insulating the attic in a private house, it is very important to choose a high-quality and reliable insulation for these purposes.
Today, the market offers the consumer a variety of products, so there is, of course, something to choose from.
To insulate the attic, you can use such heaters as:
- Mineral wool;
- Styrofoam or expanded polystyrene;
- Polyurethane foam;
- Inflatable heaters.
Cheaper materials for attic insulation in a house are still:
- Sawdust;
- Expanded clay, and others.
As you can see, today there is no problem with how to insulate the attic in a private house. The main thing is to choose the right high-quality and reliable insulation for these purposes. Well, when choosing one, of course, one should start from its characteristics and properties, which will be discussed in more detail below.
It is quite easy to insulate an attic with mineral wool, because this material easily bends and takes any shape. In addition, it has a high density, and most importantly, it does not burn, which is very important to consider when choosing an attic insulation material.
In addition, mineral wool has a long service life, which is also important. It does not cake over time, so it is great for warming horizontally located surfaces.
The only disadvantage of mineral wool is that it is able to absorb moisture, and this adversely affects its thermal insulation properties.
In addition to mineral wool, to insulate the attic in a private house, you can also use modern thermal insulation materials such as. The advantages of using expanded polystyrene and foam plastic for attic insulation can be safely attributed:
- Light weight;
- Easy to install and process;
- High thermal insulation performance;
- Affordable cost;
- Absolute resistance to moisture, fungus and mould.
Of course, these two popular insulation materials have their own drawbacks.
First of all, high flammability should be attributed to them.
Polyurethane foam is a completely new building material with a number of significant advantages. Along with a high degree of adhesion, with absolutely any type of surface, polyurethane allows you to better seal all joints, cracks and various kinds of defects.
Also, this heat-insulating material has a fairly light weight, so you don’t have to worry about additional loads on the ceiling at all. In addition, polyurethane is environmentally friendly, it is not affected by moisture, but is afraid of harmful ultraviolet rays.
The issue of building insulation is now more acute than ever. Most start with wall insulation, but this is where it ends, however, as you know, warm air tends to rise and leave through the roof, so attic floor insulation plays an important role. As with all construction work, insulation should be carried out with high quality. But how to insulate the attic floor in order to get the maximum benefit?
When choosing insulation for the attic floor, it is important to take into account its heat-shielding properties, strength, and resistance to external factors. The type of flooring will also play a role: concrete and wooden floors have their own characteristics. So, how to insulate the attic floor?
Popular attic insulation
Types of insulation:
- Basalt mineral wool.
- Expanded clay.
- Styrofoam.
- Sawdust.
Mineral wool
Most often, attic floor insulation is carried out with the help of mineral wool. What are its features and why is this heater so popular?
Mineral wool is laid between the wooden beams of the attic floor
Advantages of mineral wool:
- High thermal insulation. For example, to insulate the attic floor with mineral wool, the layer thickness is 3.5 times less than when using expanded clay.
- Easy to install material. This heater is not difficult to work even for those who are engaged in insulation for the first time.
- Fire safety. Mineral wool is not easily flammable, therefore, in the event of a fire, it does not serve as a fast carrier of fire, which, for example, cannot be said about polystyrene foam.
- Long service life. If you properly lay the mineral wool, it will not roll down and will not create cold bridges.
- Reasonable price.
It is thanks to all these advantages that mineral wool insulation of attic floors is a widely used method of saving heat in a room.
However, this insulation also has disadvantages. In particular, due to its ability to absorb moisture, the mineral wool insulation layer may no longer provide the same thermal insulation as before. Also, when insulating the attic floor with mineral wool, it is important to observe safety precautions. Mineral wool fibers in contact with the skin can cause irritation, so you should work with it in tight clothing, glasses, a respirator and, of course, gloves.
Expanded clay
Expanded clay is another material for attic floor insulation. Although this insulation is rarely used, it still has a number of advantages.
Expanded clay – very popular in earlier heat insulators
Advantages of expanded clay:
- Cost of insulation.
- Good thermal insulation properties. However, to achieve a really good result, the thickness of the expanded clay layer should be about 35-40 centimeters.
- Fire safety.
However, expanded clay as a heater also has significant disadvantages:
- Greater weight compared to other heaters.
The thermal insulation of a wooden attic floor creates a load on the beams, so when choosing expanded clay, this point should be taken into account.
- Installation is difficult. Raising a huge amount of expanded clay to the attic can cost a lot of effort.
Styrofoam
Styrofoam is one of the best materials for wall insulation, so some people decide to use it for attic insulation as well. And although the foam has advantages, it is still not recommended to use it.
Attic floor insulated with foam plastic
Advantages of foam plastic:
- Waterproof. This is a plus compared to the widely used mineral wool.
- Reasonable price.
- Easy to install. Lifting sheets of foam and laying on the attic floor is not difficult.
Despite these advantages, foam as a heater has a number of significant drawbacks.
Foam disadvantages:
- High flammability. If the fire reaches the heater, it is unlikely that the fire will be extinguished.
- Intolerance to high temperatures. At a temperature of +60°C, the material deforms, at +80°C it begins to melt, which releases toxic substances, and at +210°C the foam ignites.
- Brittleness. The foam is able to crumble, which reduces its thermal insulation properties.
In view of these shortcomings, especially the danger in case of fire, it is better not to use foam plastic as insulation for a wooden attic floor. After all, the combination of foam plastic with wooden beams is very dangerous. However, this insulation can be used for thermal insulation of concrete floors.
Sawdust
This method of insulation was very popular earlier, before the advent of modern thermal insulation materials. It is not without its advantages, although they are very insignificant compared to other heaters.
Advantages of sawdust:
- Absence of toxic substances, as well as the natural origin of the insulation.
- Relatively affordable price.
If we talk about the shortcomings of sawdust, we can note:
- The need to prepare a mortar consisting of sawdust, cement, lime and water. All other heaters are bought ready-made.
- Heavy weight, which creates an additional load on the ceiling.
- Thick insulation layer.
Important! After analyzing all the advantages and disadvantages of various heaters, many come to the conclusion that mineral wool is an ideal option, because it has high thermal insulation properties, is fireproof, easy to install, and also has an affordable price. As for its shortcomings, hygroscopicity can be compensated for by installing vapor barrier and waterproofing, and inconvenience when laying mineral wool – by observing safety rules
.
Mounting process
Having decided on the material for thermal insulation, the question arises: how to properly insulate the attic floor? If we talk about mineral wool, then what density should it have and what layer of insulation will be the best?
Selecting the layer and density of mineral wool
Mineral wool insulation is best done in two layers
In short, the larger the layer of mineral wool, the better. However, it must be remembered that mineral wool has its own coefficient of thermal conductivity. The lower this coefficient, the higher the thermal insulation properties, and, therefore, it is possible to lay a smaller layer of wool or have a greater insulation efficiency. Often, mineral wool with a thickness of 15–20 centimeters is used, however, a 30-cm layer of insulation can also be used to provide increased thermal insulation. It is also worth noting that with an equal thickness of insulation, two layers of mineral wool are always better than one.
You also need to pay attention to the density of mineral wool, because it can be different: from 30 kg / m 3 to 220 kg / m 3. Thermal insulation properties practically do not depend on density. A denser insulation is used for facades and floors under the screed. Mineral wool with a density of 35 kg / m 3 is also suitable for the attic floor, because the insulation will be on a horizontal unloaded surface.
Vapor barrier
Since mineral wool tends to absorb moisture, you need to start the insulation with laying vapor barrier material.
Vapor barrier – the first layer of insulation
Important! It is best to lay a layer of vapor barrier under the wooden beams, otherwise they will be very susceptible to decay. Nevertheless, if it is impossible to put a vapor barrier film under the beams, they must be impregnated with solutions that protect against rotting and mold.
The best option is to lay a continuous layer of vapor barrier, but due to the size of the attic, this is not always possible, so all joints must be glued with special tape to ensure tightness. The edges of the vapor barrier must be raised above the level of the future insulation and glued with the same tape.
Thermal insulation
It is necessary to work with heat-insulating materials in overalls
Next is the installation of insulation. It must be laid so as to completely fill the entire space between the wooden beams. If we are talking about mineral wool, then it does not need to be pressed or squeezed. It should completely cover the space between the beams, leaving no gaps or gaps. The floor beams themselves will also not be superfluous to cover with heat-insulating material, because they can serve as a kind of cold bridges.
When laying mineral wool, it is very important to protect yourself, and especially your respiratory tract, from getting into the fibers of the insulation. Therefore, you need to use a respirator, as well as gloves, goggles and long-sleeved clothing.
Waterproofing
Insulation of the attic floor is completed with waterproofing and subflooring
Due to the property of mineral wool to absorb moisture, it is necessary to lay waterproofing over the layer of mineral wool. It is also necessary if a concrete screed is poured over the insulation.
If the attic is constantly used, a subfloor can be made on top of such a heat-insulating “pie”. In its role can be a concrete screed or OSB slabs. If the attic is practically not used, then you can simply lay the boards on top of the existing beams. Then, if necessary, go up to the attic, movement through it will not create difficulties.
As you can see, attic floor insulation is an affordable task, even for those who have never done it before. It is necessary to decide on the material for thermal insulation, although most often it is mineral wool. When installing a heat-insulating “pie”, it is important to remember the need for vapor barrier and waterproofing. This will achieve high results in the insulation of the attic floor.
Video: Discussing the floor structure in detail
Overview of structural details of the attic floor insulation. What is a sufficient layer of insulation for a cold attic? What are the specifics of the work on laying the thermal insulation of the attic floor?
The thermal insulation of a residential building will always be the main task in solving the problem of heating. After all, you must agree that not the house that is heated will be a warm house, but the one that retains this heat. No matter how good heating is, without thermal insulation, efforts will be in vain. And in order to reduce heating costs and make the house really warm, you need to think about saving heat.
When insulating their home, many people start finishing the attic. Is it necessary? Yes, because it is through the ceiling that a lot of heat escapes. And if you take care of its insulation, then the ceiling will not let heat out. Everyone knows from physics lessons that warm air goes up to the ceiling. And if it passes heat, then such air will simply go outside. Thanks to this article, you will learn which attic insulation to choose in order to reduce heat loss.
What is attic insulation
What is the work on the insulation of the attic. The technology is quite simple: the insulation material can be laid on the floor, in the space between the floor beams and additionally between the roof rafters. If we talk about the insulation of the room, which is located at the bottom of the attic, then it is enough to insulate the floor. In the event that you want to store something in the attic or use it as an attic from time to time, the roof is also insulated.
What materials can be installed in the attic for insulation? In this article, we’ll take a look at the different options and their pros and cons. Immediately, we note that there are several types of heaters:
- Slab.
- Roll.
- Sprayable.
- Bulk.
Each of the insulation options is good in its own way. We will select the best heaters that are suitable for this purpose. You must understand that the choice is yours. Our site will offer you only a list of proven attic insulation materials that have won a lot of positive feedback. So, we will consider the following options:
- classic – mineral wool;
- essential foam;
- expensive, but very high quality PPU;
- simple and cheap bulk materials such as expanded clay, sawdust or slag.
What are they? What is the laying technology of each insulation and its advantages? Let’s find out further.
Mineral wool insulation
Perhaps only a grandmother in the village has not heard of mineral wool, and that is not a fact. This is the most common insulation for home insulation, which is used both for self-insulation and by professional teams. I would especially like to note basalt wool, which does not burn at all and has excellent characteristics. Why did you love mineral wool so much? Let’s look at its positive aspects.
- Environmentally friendly.
- Good shape keeping property.
- Light weight, which does not burden the structure.
- Low thermal conductivity.
- Rodent resistant.
- It does not burn.
- Sound insulation.
- Has a “breathing effect”, creating a good microclimate.
- Relatively low cost.
- Easy to work with insulation material.
Why is this attic insulation so good? Mineral wool is sold both in slabs and in rolls. It keeps its shape well, and you can easily insulate the floor of the attic, as well as the roof. It is enough to lay mineral wool in the space between the beams and sheathe everything with hydro and vapor barrier. This is very important, since the main disadvantage of the material is that it is afraid of moisture. It will destroy the insulation, which will eventually lose its original properties.
You can see the technology of laying mineral wool from the video.
Foam insulation
Well, if a grandmother from the village could not hear about mineral wool, then the foam plastic is definitely familiar to her. One of the simple and affordable insulation materials, which is widely used by builders. The main advantage of polystyrene is its low cost along with good performance. It is much denser than cotton wool, so it is easier to work with foam. It works great and fits in the right place. What else can be noted?
- Low thermal conductivity (lower than mineral wool).
- Low cost.
- Reasonable price.
- Sound insulation.
- Moisture resistant.
- Easy to install.
- Holds its shape well.
However, the low cost affects other aspects. There are more disadvantages to polystyrene. For example, it burns very well. One spark is enough and the material will immediately begin to melt. In addition, it is not vapor-permeable, you will not get a breathing effect for walls. And if it is not properly protected, then the rodents will pretty sharpen the material.
Nevertheless, foam is and will be one of the most popular insulation. Fires are an infrequent phenomenon, in the attic the breathing effect is not so important, and if you protect the material, then rodents are not terrible. For the price this is a great option.
PPU insulation
One of the most expensive options for insulation, due to the complexity of the process. PPU is a representative of sprayed materials such as penoizol. The insulation technology, at first glance, is simple: it is enough to spray the composition from the unit onto the surface, it will increase several times and fill all the cracks. On the one hand, this is true, but the catch is that such equipment is not easy to find. And it’s not even the availability of units, but the ability to use them. Such work is entrusted only to experienced specialists who have access to the equipment.
The components that make up polyurethane foam are mixed in the unit in an ideal ratio, and the finished composition is sprayed onto the surface, which increases in size. Why is this expensive method so good?
- Environmentally friendly material.
- Light weight.
- Lowest thermal conductivity.
- Creates a monolithic structure without seams that can act as thermal bridges.
- Moisture resistant.
- Adhesion to virtually any surface.
- Biopersistence.
- Sound insulation.
- It is not eaten by rodents.
- Top quality insulation.
As you can see, there are really many advantages of insulation. But they are offset by some factors. Firstly, an insulated attic will not breathe. Secondly, you will not be able to do the insulation yourself without specialists. Thirdly, such a pleasure for the attic will be expensive. Is it worth it – you decide.
Insulation with bulk materials
This option can be called the simplest and “in haste” without problems. All that is required is to pour the selected insulation of a certain layer. What can be used?
- Expanded clay.
- Sawdust.
- Slag.
Expanded clay
Insulation material is balls that fall on the floor. You realized that they will not be able to insulate the walls. It is divided into fractions: expanded clay sand, crushed stone or gravel. What is the feature of the material?
- Off.
- Environmentally friendly
- Durable.
- Frost resistant.
- High strength.
- Light weight.
- Sound and heat insulation.
Insulating material is poured over a layer of roofing material, at least 15 cm thick. It all depends on the attic floor and the properties of thermal insulation. In order for you to be able to walk on the floor surface, you can make a concrete screed from above, the thickness of which is about 5 cm. It remains to arrange the flooring from wood, chipboard or other material.
As for sawdust and slag, the technology is almost identical. The laid material will save heat, but not as good as the options above. However, labor costs are minimal. If you do not want to bother, then this is a good alternative to conventional insulation.
Let’s summarize
As you can see, the variety of materials for attic insulation is really great. Each of them is good in their own way. If you are limited in funds, then you can use foam. And when there are funds, then choose between mineral wool and polyurethane foam. Some combine insulation materials, leveling the shortcomings of the foam. How? The bottom layer is made of thick foam, and a thin layer of mineral wool is laid on top. Simple and fireproof. However, remember, no matter what insulation you choose to cover the attic, stick to the technology of its installation. This is the only way to achieve high-quality attic insulation.
To reduce heat losses in a private house, one effective heating system is not enough – to minimize them, it is necessary to insulate all elements of the building. The same applies to the roof. If it is not planned to equip the attic, insulation of the cold attic floor will be required.
A bit of the history of roofing
Since ancient times, people built private households so high quality that they could stand for 100 years. At the same time, it was not cold to live in them, and the natural wood roof frame was always dry. As for the shape of the roofs on such buildings, they were most often built with two slopes, and had a slight slope.
This choice was explained by the fact that the snow that fell in winter had to linger on the roof and act as a natural insulation. In the attic of the building, one, less often two windows were made. They were closed for the winter and then the air in the under-roof space played the role of a heat insulator.
During the summer, the windows were opened slightly at night to cool the temperature in the attic. In the heat they were closed, and the air did not heat up. So in the attic they regulated the temperature.
In winter, when snow fell, it covered the roof with a solid carpet and thus was a roofing natural heat insulator. Even in severe frosts, the temperature in the under-roof space did not drop below zero. As a result, the house was warm in cold weather.
The roof slopes were not insulated, so that the snow on them would not melt. The rafter system was left open, thereby allowing its inspection and maintenance. Therefore, in such attics, only floors were thermally insulated.
If the roof slopes are insulated, then the attic becomes a heated attic, which has a different functional purpose.
Building materials for floor insulation – the better to insulate
A large selection of building materials is presented on the domestic market. To decide how to insulate the ceiling of a cold attic, it is necessary to take into account the conditions in which the heat insulator will be operated.
There are a number of requirements for insulation:
- preservation of its original qualities at temperatures from -30 to +30 degrees;
- in hot weather, the material should not emit substances harmful to people and freeze in severe frost;
- you need to choose a fire-resistant heat insulator if lighting is planned in the attic;
- products must be moisture resistant so that when wet, their original properties do not decrease.
Before purchasing materials for insulating the floor of an unheated attic in a private household, you need to consider what the floor is made of. If these are wooden beams, then bulk, roll or slab heaters are used.
When the ceiling was created from concrete slabs, bulk or slab insulators that are heavy in weight can be used. Often a cement screed is poured on the floor.
Sold in the form of plates and mats:
- mineral wool;
- extruded polystyrene foam;
- foam;
- straw;
- algae.
Manufactured in the form of rolls:
- mineral wool;
- stone and glass wool;
- algae ladders.
One of the most popular options for arranging thermal insulation is the insulation of the attic floor with mineral wool.
Bulk materials include:
- expanded clay;
- sawdust;
- straw;
- reeds;
- ecowool;
- granular foam;
- slag.
When laying insulation in the attic of a wooden house, it is necessary to use natural, environmentally friendly and breathable materials.
Attic insulation with mineral wool
This modern and popular insulation is produced in rolls or mats. Mineral wool does not burn, does not rot, various microorganisms and rodents are not dangerous to it.
Insulation of the attic floor with mineral wool is carried out in stages:
- First, lining material is laid on the floor. In the case of an economy option, inexpensive glassine is laid on the floor. A more expensive and high-quality device will be a flooring device made of a vapor barrier film, which is mounted with an overlap.
- At the same time, the joints of the segments are glued with adhesive tape or fastened with wooden slats, fixing them with a stapler.
- The width of the thermal insulation material is selected taking into account the technical standards for a particular region. The mineral wool between the lags is laid out tightly, leaving no gaps. Tape is used to seal the joints.
- After the installation of the insulation is completed, even boards are placed on the logs and thus form the floor in the attic.
The solution described above, how to insulate the attic of a private house with mineral wool, gives the material the ability to “breathe” and ventilate when moisture gets on it. To prevent the penetration of moist air into the insulation, waterproofing is mounted under the roof.
When working with mineral wool, wear protective equipment such as a respirator, goggles, gloves and overalls.
Use of extruded polystyrene foam
Styrofoam (expanded polystyrene) refers to loose materials, so it is used when it is necessary to insulate the floor made of logs and beams. For thermal insulation of plates, extruded polystyrene foam is used, which is denser than conventional foam.
The surface of the substrate must be leveled before laying it. On the warm side of the floor, vapor barrier is not needed, since concrete slabs have practically no vapor permeability. A vapor barrier film is laid out on the prepared base. Then, slabs of extruded insulation are laid out in a checkerboard pattern. Mounting foam is blown into the joints.
After it dries and becomes hard, the thermal insulation boards are poured with a concrete mixture about 4-6 centimeters thick. After hardening, the screed becomes suitable for use as an attic floor. If desired, you can lay the final coating on the screed.
Ecowool cold attic insulation
Ecowool is a light and at the same time friable heat insulator, consisting of cellulose, it also contains flame retardants, such as boric acid and borax. Before starting work, a film is laid on the floor. For laying ecowool, a special blowing machine is used.
The heat-insulating layer is applied continuously, without leaving even the slightest gaps. Ecowool contains a large volume of air, so a layer of 250-300 millimeters is enough. When performing insulation, it should be remembered that shrinkage of this material occurs over time. Therefore, a layer of ecowool is applied with a margin of 40-50 millimeters.
The insulation must then be moistened with water or a solution. It is prepared from 200 grams of PVA glue and a bucket of water. The broom is moistened in the solution and the cotton wool is well moistened. After drying, lignin is formed on the heat-insulating layer – a crust that prevents the insulation from moving.
Which of the above options to insulate the attic space depends on the specific situation.
Do-it-yourself door to the attic
After all, any construction flaws in the first year of operation will result in drafts, an unpleasant odor and other similar problems. And often, unfortunately, in the rush of the last finishing work, many people forget about such an element as an attic hatch with its design and insulation.
And instead of a well-thought-out option, they often leave a thin cover that closes the ceiling opening. As a result, cold oozes from the attic into the living quarters, and moist steam rises from the rooms and penetrates into the insulation in the attic, gradually destroying them. That is why we advise you to make a hatch to the attic in accordance with all the rules from the very beginning!
Absolutely all attic hatches perform the following main functions:
- Thermal insulation.
- Vapor barrier for residential areas of the house.
- Blocking access to the house for small rodents that like to live on the roof.
- Access to the attic, namely the entrance to it.
- Blocking fire and smoke from the lower rooms in case of fire.
Let’s dwell on fire safety separately. So, the attic hatch prevents the spread of fire, while protecting it from the passage of poisonous gases and smoke. Note that such a hatch is made of several layers of insulation, and from different materials, and the materials themselves differ in the degree of expansion at high temperatures. All this will allow the thermal insulation of the hatch not to burn out immediately and not to burst into pieces.
After all, if people live at home, and the attic is cold, then the vapor barrier of the hatch is vital and you can’t do without it. Otherwise, all the vapors and heat will rise from the house right through the hole in the attic, from the inside, and saturate all the roofing insulation with moisture.
Attic access hatch can be built according to two basic designs: with one cover or with two. The first option is, of course, the easiest, and in the second, the inner lid is a “sandwich”.
Standard attic hatch consists of a wooden frame and fibreboard. Between them is a sheet of expanded polystyrene, from 3 to 6 centimeters. And the thickness of the inner covers is usually from 3.5 to 6.5 centimeters. And in order for the inner cover of such a hatch to adjoin the opening tightly, use an O-ring and drown it in advance in the milled groove of the box.
You can make a manhole cover from metal or wood, using additional insulation, or without it. The main position in the manufacture of a hatch cover is occupied by a mechanism that will open it.
The height of the manhole box depends mainly on the parameters of the ladder that comes with it or is designed. Often this height does not coincide with the thickness of the attic floor, but this is not scary and usually does not cause any difficulties in practice.
Manholes for stairs with a fireproof cover are produced separately today, and the protective layer can be on one side, or on both at the same time. At the same time, the sides of the box are necessarily protected by metal, and as a result, the entire structure is able to withstand the spread of fire for as long as 30 minutes.
Special enclosing structures are produced today for both living and cold attics. In any case, it is better to put them, especially if you go up to the attic more than once a month. Many manufacturers supply such railings complete with ladders, or they can be purchased separately.
Basically, modern manufacturers indicate parameters in their pure form for their products. This means that the box with the stairs will indeed have exactly such external dimensions, and you will need to make the ceiling opening for it quite a bit larger. But other manufacturers, on the contrary, indicate the exact external dimensions of the future opening and the hatch to them goes 1-3 centimeters less. Pay attention to this!
It is not uncommon for a finished ladder hatch (or single hatch) to be marketed unpainted. This is done so that you can paint the entire structure in a color that will blend in with the interior of the lower living space.
Mainly in industrial production loft ladders are produced in accordance with German DIN standards. Such stairs and a hatch are designed for a standard attic opening, and this is equal to the standard step between the floor beams of houses abroad. But in Russia, the rules are somewhat different. Therefore, it is imperative to think over an attic staircase with a hatch at the design stage of the entire attic. It’s even easier to just go to the store, choose the model you are interested in, and already cut the attic according to it. Or, if you do everything yourself (which will be the easiest for you), you simply adjust a homemade hatch with a ladder already under the existing attic floor.
The manhole cover itself consists of a blockboard up to 20 mm thick, but not thinner than 16 mm. Modern manufacturers of stairs with a hatch offer already insulated covers, with a thickness of about 32 millimeters. Such a frame is usually sewn up on both sides with sheets of chipboard or fiberboard, and between them there is a foam insulation: foam or polyurethane foam. Sometimes they offer reinforced insulation, where the insulation layer is more than 30 millimeters thick.
An interesting new product on the market are manhole covers with dust protection. Such a cover actually has many more advantages, because its dustproof layer also serves as another layer of thermal insulation. The essence of the novelty is that a folding ladder under which hatch cover does not collect dust on itself, and then you will not have an unpleasant feeling when you decide to open the attic in a month or two and lower the ladder down.
Here is the easiest option that can only be made:
And here you will need special fasteners:
Here is a video example of making the simplest attic hatch:
Here’s what mount you need for the attic hatch:
So, step by step:
- Step 1. The first step is to mark the future location of the hatch. To do this, use the usual construction pencil and meter.
- Step 2. Using a puncher, you need to make a strictly vertical through hole, so take drills whose thickness exceeds the thickness of the concrete floor.
- Step 3. Place the puncher in the corners along the marked holes, and drill a through hole in the vertices of this rectangle. They will also serve as a certain guideline for the bottom markup.
- Step 4. Now with a grinder with a special disc for concrete, draw a line around the perimeter of the hole so that the disc does not hit the reinforcement in the floor during the cutting process. Now you will see all the weak points and voids in the floor and you can easily drill through them.
- Step 5. Once you find the vulnerabilities, break the concrete with a sledgehammer, hitting the weakest. In the same places where the remains of concrete are held on the reinforcement itself, use a crowbar.
- Step 6 Now that all the concrete has been knocked down, all you have to do is remove the rebar. Do not leave its protruding parts – such will interfere with the installation of the attic hatch.
- Step 7. Now, with a diamond-coated disc, we finally level out all the irregularities on the edges of the opening. This is very important, and no matter how tired you are at this moment, be sure to pay attention to this.
More details on the photo:
If making a square hatch opening is easy, you should know a few things about a round one. Sample instructions:
- Step 1. On the underside of the attic floor, mark out the planned opening and add the thickness of the finish. In general, do this right on the floor of the residential floor, and only then transfer it with a plumb line to the ceiling.
- Step 2 Now install the jack stands.
- Step 3. Next, drill a through hole in the opening, from bottom to top.
- Step 4. Climb up to the attic and insert a pin into the hole and use twine and a pencil to trace a circle.
- Step 5. Make a hole in this circle and cut along the contour of the entire opening. You will meet beams on the way, do not touch them – you will cut them out later.
- Step 6 Now to make the circle opening, you need to make a lumber fold.
In addition to the round version, you might be interested in other examples:
And now let’s consider such a problem as installing an attic hatch in a stretch ceiling. In general, if you have such an opportunity, do not initially mount such a ceiling where the entrance to the attic will be. But since you already have to install all this now, with the finished repair, you will have to tinker. The fact is that such material is constantly worn out, and it is quite easy to damage it when installing the hatch. But we will do everything carefully.
Our main task is to hide the sunroof against the background of the entire stretch ceiling, so as not to spoil the whole overall look. And so – step by step:
- Step 1. First we build a frame around the skylight – these are wooden blocks along the perimeter of the hatch.
- Step 2. Attach the ceiling aluminum profile to them.
- Step 3. Next, we fix the stretch ceiling profile along the perimeter.
- Step 4. If the sunroof is on an inclined plane, install an additional dividing profile.
- Step 5. Now we measure the hatch itself and take the same canvas from which the stretch ceiling was made.
- Step 6. We mount the stretch ceiling, tightening and fixing the entire structure to the opening.
All attic hatches are divided into two main types: with and without a ladder attached to them. If you bought a ready-made design of an attic hatch with a folding ladder, you do not need to insulate it: usually such structures are already insulated. If you do everything with your own hands, and thermal insulation will definitely need to be thought about.
Often, ready-made hatch sets with a ladder are sold already with specially heat-saving plates, which are located on the front surface of the cover. They create the desired effect and do not allow heat loss. If you make such a hatch yourself, just insulate its cover with the same material that was used to insulate the attic.
If you start the thermal insulation yourself, you will need a plywood sheet and the insulation itself – the one that you used when insulating the attic is better. After all, you probably still have some trimmings or extra material. And just a couple of simple steps:
- Step 1. We measure the opening of the attic hatch.
- Step 2. Based on the data obtained, we assemble a frame from boards with a thickness of about 2.5-3 centimeters.
- Step 3. Now we assemble the hatch cover – it will be exactly 45 centimeters smaller than the frame.
Thus, we will put a layer of insulation and will not let it “walk”.
- Step 4. Lay vapor barrier film on the manhole cover.
- Step 5. We fix all the details of the hatch with glue and wooden planks.
- Step 6. Sewing up the hatch with plywood and decorating it as dictated by the interior design of the lower room.
- Step 7. Be sure to treat all the wooden parts of the hatch with an antiseptic.
- Step 8. Now we fix the finished cover in the opening, using self-tapping screws and hinges that will hold the opening hatch.
Here is a detailed master class:
The attic hatch, insulated with foam plastic, is also wonderful:
And the whole hatch, which was originally made from only expanded polystyrene:
Or this combined version:
For your convenience to climb to the attic, build around the hatch like this:
And the last moment: if there is a special loop on the hatch cover, it will be especially convenient to open it – just with the help of an elongated handle. And you won’t need to grab a stool or use some kind of stand to reach it. Just make one end of such a pen in the form of a square or hexagon.
Do-it-yourself attic ladder – May come in handy – For home – Catalog of articles
Do-it-yourself attic ladder thought that the attic space can and should be used for its intended purpose. For example, to store rarely used tools or non-combustible materials there. Of course, when storing any, even non-combustible materials in the attic, it is desirable to equip it with a fire alarm. How to equip your house with a fire alarm with your own hands, we will consider in one of the following articles, but for now we need to come up with a simple (to manufacture and operate) way to enter the attic and of course we will do it with our own hands.
– One of the easiest options is to make an exit from your attic to the street, and use a ladder (attached or permanent) to climb there. This option is good because the hatch (door) from the attic will go directly to the street, so it does not require special insulation (if the attic is not heated), but for this reason it has many disadvantages: such an entrance must be well protected from vandalism, use such an entrance is either not very convenient (each time attaching a long staircase), or significant material investments will be required (in the case of the construction of a capital staircase).
-Another option is that the entrance to the attic is from the house.
Here again there may be options, for example, you can build a permanent staircase and make an insulated door (hatch) to the attic, if it is not heated. This method will be the most convenient, but it will require a certain free space, which will be occupied by the stairs in the room. This option is suitable if you plan to use the attic very often, but if we do not use the attic very often, I think this use of living space will not be rational.
You can make a standard attic ladder, there are a lot of designs on the Internet. This method has many advantages. Firstly, we do not constantly occupy the living space of our premises. Most designs are quite easy to use and reliable enough for infrequent use, which is what we need. There are some minor downsides. The design of such a hatch is not the simplest and the thermal insulation of such a device is slightly difficult, because. The manhole cover is part of the ladder. And the design of such a hatch is not always applicable due to local conditions. (as it turned out in my case.)2371
Here’s another option for extreme sports.
I decided to make a simpler, cheaper version of the attic hatch and stairs with my own hands, which is probably less convenient in operation than a standard attic ladder.
The proposed design consists of a conventional insulated hatch to the attic and a light wooden ladder that retracts to the attic. The question was how to close the hatch, if we had already removed the stairs to the attic. To do this, I built a simple mechanism consisting of two rollers, a counterweight and a rope or cable. The counterweight is hidden in the bulkhead.
I’ll try to display it schematically:
This is the hatch itself. It is insulated with mineral wool, but due to the fact that the dimensions are approximately 80×110 cm, and sheathed from below with a thick ceiling clapboard, it turned out to be quite heavy. On the sides, the hatch was also insulated with artificial fur so that there were no gaps.
As I already said, I throw the ladder up to the ceiling by hand, from a stool, so I made it as light as possible. An aluminum ladder would work well for this purpose.
But the actual elements of the mechanism, I don’t know how clear it turned out, there is not enough space in the attic to take a picture from a good angle.
Let me explain a little. At the bottom of the photo is an open hatch, then the first block and in the distance the second block, after which the rope went through the ceiling down to the counterweight. The passage through the ceiling is made in a plastic tube so that the expanded clay does not wake up. I took the rollers on bearings. These are used in the door opening mechanism of many elevators, and when repairing an elevator car, they are usually thrown away.
That’s basically it.
I would be glad if this version of making a simple attic ladder and a do-it-yourself hatch is useful to someone.
PHOTO REPORT TO THE ARTICLE.
Related Topics:
DIY Laptop Keyboard Lamp0017
Do-it-yourself LED flashlight powered by Krona
en
Do-it-yourself staircase to the attic
In principle, there is nothing difficult in building a staircase for a summer cottage, but this is only right for someone who understands this.
Any person who has received a civil engineering education will be able to independently carry out preparatory calculations, select building materials and put everything together. But for someone who is new to construction, a staircase to the attic with their own hands will not be an ordinary task. If there is a very huge distance between the steps, then it will not be easy to climb, and if it is very small, then climbing the stairs will not only be awkward, but also unsafe.
A conventional staircase consists of a base and steps. Side and vertical beams act as a base, it depends on them how large the load on the stairs can be. In order to walk up the stairs comfortably and safely, the height of the riser should be 15-18 cm, and the width of the tread should be about 30 cm. It is customary to install attic stairs at an angle of 60-75 °.
First you need to calculate the number of steps, their height and the width of the stairs itself. For example, let’s calculate the height of a small staircase equal to 1.5 meters. Let’s calculate the number of steps: 150cm / 18cm = 8, 3. It turns out that for our stairs 1.5 meters high, it will be necessary to make 8 steps in 18 cm increments. slots. After that, with the help of a circular saw, we cut off all the excess, with the help of the level we make sure that everything was done correctly. After the base is ready, it must be fixed, and after that the steps are screwed. To strengthen the entire structure at the end, you can install risers – the vertical base of the step.
On the site vienna-rus.taxi you can order a transfer from Vienna Airport. The cheapest taxi in Vienna.
Attic hatch installation features and do-it-yourself installation
The attic is an excellent room for storing old things, clothes. But in order to equip such a room, you need to make a convenient attic hatch. Until now, in the villages, for access there, it is customary to install a door to the attic from the end of the building. An ordinary portable ladder is attached to it. But now, days require a more responsible attitude towards their property. Therefore, more and more often the access to the attic is done inside the house.
Sunroof selection and location
Sunroof installation is the easiest. The first thing to consider when arranging a hatch is the lid, its type and size. It should open easily without hitting other objects. In addition, the appearance should merge with the ceiling. If an ordinary stationary staircase is planned, then it should not interfere, stand in the middle of a small room, preventing it from passing.
It is important to keep the ceiling frame intact. Therefore, the place for installing the stroke should not be cut out of the floor beams. There are some requirements for building a manhole.
- Easy installation.
- Design that blends in with the interior of the ceiling.
- Complete safety.
- It is better to build a passage with an insulated type of ladder.
- It is better to install additional fittings, such as handles.
Each product differs in the location of the attic hatch. Therefore, such devices are distinguished by:
- Vertical. They are called laz;
- Horizontal. Carved into the ceiling;
- Angle. For sloping roofs.
Attic hatches of the second type are the most convenient both in use and in manufacturing. The materials for the moves are very different. It can be plastic, metal, wood. Moreover, the tree is used much more often. Making a hatch to the attic with your own hands is quite easy.
When purchased, read the installation instructions carefully. But still, the opening must be strengthened. If the structure is wooden, then it is reinforced with beams of the same material. Well, for concrete houses use metal corners.
Creating an attic hatch in stages
How to make a hatch to the attic yourself? Before work, be sure to make drawings. Mark all measurements on them. If the room is initially insulated, then you can install a regular cover. But if not, then you will have to do additional thermal insulation. And it does not matter how the scheme is drawn up. The main thing is to take into account all the dimensions down to the smallest detail. After drawing up the drawings, you can prepare the tools and begin work.
So, here are the stages you have to go through.
- Opening cutting.
- Opening frame assembly.
- Creating a lid.
- Insulation and finishing.
Creating the opening
You can skip this step if you already have an opening in the ceiling. If not, then we markup in the selected place. We expect the hatch frame should be 5-6 centimeters smaller than the hole itself. You can compensate for the gap by choosing thicker boards.
Assembling the frame
Prepare sanded boards 2-3 cm thick. Such materials will make the base strong enough. The shape of the frame itself can be round, rectangular and square. If the second option is chosen, then all corners must be straight.
Frame dimensions
There are standard dimensions that you can refer to, this is 60×120 cm. For most houses, these dimensions are ideal. Of course, depending on personal preferences, the entrance to the attic can be increased by changing the dimensions. But less than it is not recommended. When the frame is assembled, it is mounted in the ceiling opening.
Making the lid
Making the lid is easy. Ordinary remnants of the overlap from the cut opening are perfect for collecting the cover. On the reverse side, the door must be reinforced with a transverse bar. The hinges can be placed on both the long and short sides of the lid.
Pay attention to the opening board on the opposite side of the hinge. It needs to be tilted a little so that the lid does not cling to the opening. Before installing the hinges, take a look at which way it is more convenient to open and close the door.
Insulation
Insulation is required only if the top floor is not insulated. If it is not installed, then the house will be cold. The insulated attic hatch is made in cold houses. At the same time, if necessary, cover the entire ceiling with insulation. According to the standard scheme, you will have to lay one layer of the insulating membrane.
The exit to the attic needs to be insulated like the rest of the room. At the bottom you need to lay a layer of vapor barrier, then a heater on top. At this stage, it is imperative to use respirators, as dust will fly everywhere.
Installation of purchased structures
You can install a made hatch in the attic with your own hands, or you can install it ready from the store. Moreover, they usually buy together with a ladder. The process of installing a purchased product is a little simpler. But even here certain nuances must be taken into account. And they must be remembered and observed. A warm move to the attic, how to make it of high quality?
To begin with, the price of the issue. The cost of such products depends on the quality and materials from which they are made. Metal models are valued higher, as they are considered more durable and stronger.
But it’s worth choosing, after all, based on the aesthetic appearance. If the ceiling is wooden, then the cover material and color must match. In addition to the hatch itself, you should immediately purchase a ladder for the attic.
Do not forget to measure the height of the walls and the space for the ladder and walkway. These sliding stairs have many advantages.
- Versatile.
- Compact. It folds easily, so it can be installed even in a small room.
- Easy to install.
- Attractive appearance.
- All additional elements are not visible because they are inside.
- Step profile is set by default to prevent slipping.
- The height of the structure can be adjusted to the height of the room.
The attic ladder is very easy to unfold, which even women’s hands can handle. This advantage makes purchased models more common. After all, homemade stairs often stand in the middle of the room, obstructing the passage. Two people must be involved in the assembly procedure.
Before installing the frame, install two temporary boards on the bottom. They are mounted to support the entire structure. Since the frame to the ceiling opening has not yet been fixed. It is worth noting that some manufacturers install special studs instead of boards along the four edges of the frame. After the structure must be laid and leveled with wedges. To check the evenness of corner structures, use the level.
By following these simple steps, you will not damage any parts during installation. The insulated hatch to the attic must be firmly fixed. Secure the cover with screws. It is possible to eliminate the formed gaps thanks to construction foam. Now do not forget to remove those boards that insured the lid from warping. If you still used mounting foam, do not use the hatch until it has completely hardened. Otherwise, distortions and irregularities may form.
Output
To unfold the ladder to the desired size, just loosen the side bolts. If distortions nevertheless appear, they can be adjusted by simply twisting the bolts. To protect the floor from scratches, it is better to install tips for the stair leg.
The hatch will be an optimal and convenient entrance to the attic. It is not difficult to make it with your own hands or install an already purchased one, and it does not take much time. But thanks to a convenient manhole, you can effectively use the free space under the roof.
Attic insulation – the complete ✔️ guide!
Attic insulation – step 1. Materials
The amount of basic materials needed is easy to determine, as they create successive layers on the insulated surface that can be easily measured. Mineral wool is preferably purchased for attic insulation in two thicknesses – one for insulation between the rafters (usually 10-15 cm thick), the other for an additional layer laid over the entire surface (also approx. 10 cm, sometimes thicker, depending on how much space we have on the rack). Highly vapor-permeable foil and vapor barrier foil are purchased in rolls, with an area that includes the necessary overlaps, and with vapor-permeable foil also an increase in area – if the rafters are wrapped around it (although not necessarily).
For the erection of a frame for thermal insulation, we need construction profiles of the CD 60/27 type in sections of 3 or 4 m with a total length obtained from the length of the roof multiplied by the number of profile levels corresponding (in numbers) to approximately twice the total length of the entire pair of rafters plus two levels. On the other hand, the number of required EP or flat grips will be obtained by multiplying the number of pairs of rafters by the number of profile levels. For mounting the frame, longitudinal connectors for profiles, wood screws, “fleas” for EU handles are also useful.
In addition to the boards themselves, the set of materials for roof installation includes self-tapping screws, tape for reinforcing the seams, as well as putty and acrylic for filling elastic seams. As additional materials, you will need double-sided tape, twine, upholstery staples, impregnations for wood and drywall.
Attic insulation – step 2. Tools
Several tools are required for insulation. For measurements, we will use a spirit level with a laser pointer (instead of a rope), a hammer will replace a manual or electric furniture stapler. For cutting steel elements, we will use an angle grinder, and the installation of screws for wood and metal will be possible thanks to a cordless or cordless drill-driver. To control the plane created by the rack profiles, you will need a long rail, which you will also use when cutting boards and wool. The necessary cutting tools are a long knife for wool, a knife with a broken blade for plates and foil, scissors for cutting holes.
Insulation of the attic – step 3. Checking the condition of the roof
Before insulating the roof, it is necessary to carefully check:
Any damage must be repaired before insulating, and the areas where it has occurred must be checked for the effectiveness of the restoration of tightness.
Attic insulation – step 4. Proper ventilation
Insulation of the roof surface requires ventilation above the thermal insulation, which is associated with the need for inflows in the eaves and circulating air outlets in the roof or ridge. If this is not possible because the continuity of the ventilation gaps is interrupted by chimneys, skylights or skylights, it is necessary to make additional air inlets and outlets in the roof itself using ventilation plates and chimneys.
Advisory
Do you value our advice? You can get the latest news every Thursday!
When the deck is completely covered with roofing material, bituminous tiles or a top coating of metal, ceramic or cement tiles, the ridge deck must be modified by laying ventilation ridge tiles adapted to the type of roof and making gaps in the deck under them – otherwise there will be no space under the sheathing ventilate.
Air exchange can be provided in another way – if the height of the attic in the ridge line is large enough to create a ventilation attic. Then the air flow will be provided by holes in the gable walls, and the middle of the attic will be covered by a horizontal insulated ceiling made of plasterboard profiles or based on crossbars. It may also be necessary to modify the roof eaves, which – regardless of the method of finishing – must allow air to enter the under-roof space through holes or slots, for example, in a soffit or in a covering finish.
As an indication, the area of the ventilation openings at the entrance to the eaves and the exit at the ridge must be at least 250 cm2 per meter of roof length (i.e. a continuous gap must be at least 2.5 cm).
Attic insulation – step 5. What needs to be done
The scope of thermal insulation work in specific conditions may differ slightly from the measures presented here, but in most cases it will be necessary:
- occur in the insulation layer;
- laying mineral wool thermal insulation in two layers with a total thickness of at least 20 cm;
- plasterboard frame assembly;
- installation of a vapor barrier film on the frame, which protects against the penetration of water vapor formed in the rooms used;
- installation of plasterboard coatings, grouting board joints and surface finishing (painting, ceramic tiles).
Attic insulation – step 6. Laying vapor-permeable foil
The vapor-permeable foil must have a high vapor permeability above 3000 g/(m2 x 24 h) or an Sd value of less than 0.02 m. Mechanical strength is not so important here – the foil will not be subject to mechanical damage. Since we will be laying the foil from the inside, we will have to roll it out differently than from the outside of the roof – so that the inscriptions face the formwork.
Fastening can be done in two ways – directly to the rafter sides or to additional struts nailed to the roof formwork. Planks measuring 3 x 4 cm allow you to move the film away from the formwork and create the necessary ventilation space. We start work from the ridge, attaching the foil to the slats with an upholstery stapler or to the side of the rafters at a distance of about 3 cm under the skin. The foil should be evenly stretched so that the folds do not restrict air circulation. You can also use an additional tension bar.
A strip of foil, initially placed in 3-4 places, is finally fixed through a thin strip, over which the foil is pulled simultaneously. The following bands are attached in the same way, with an overlap of 10 cm, i.e. adjusting them to the line marked on the foil. Glue the ends of the foil strips to the gable walls a little closer to the formwork (the sloping edge will prevent water seepage), and lay the last strip on the sheathing and knee wall. Elements passing through the roof (chimneys, ventilation pipes, masts) are wrapped tightly with foil, forming a small mound around them.
Insulation of the attic – step 7. Fastening the holders to the profiles ceiling (Fig. 5 a) and ES (Fig. 5 b). Holders of the second type are easier to insert, but they can be used when the frame deviates from the rafters by no more than 10 cm. For large distances, we must use flat grips (Fig. 5 a).
fig.5 a
fig.5 b
Let’s start by marking the places where the handles are attached. We will use a rope stretched between the extreme rafters – first near the knee wall, and then every 50 cm towards the ridge. It is enough to fasten the holders of the ES type to the bottom of the rafters sequentially along the line marked with a rope. It will be more difficult to attach flat holders (we attach them to the sides of the rafters). The rope will only indicate the attachment point, but not the extension of the handle, which we must determine separately for each rafter.
After selecting the attachment point (rope imprint) on two rafters at a distance of 3-4 m from each other, install the brackets perpendicular to the bottom of the beam, expanded by the planned thickness of the additional insulation. Using a laser pointer or cord, check if the attachment line “runs away” from the estimated distance on further rafters. Slide the frame profile over the attached holders and, inserting additional holders into it, screw them to the rafters. If you leave the profiles until all the handles are sealed, it will be easier to control whether the surface of the later installed coating remains flat. After checking the created surface, the profiles are easily dismantled, so that we will have convenient access to the insulation.
Attic insulation – step 8. The first layer of wool
The first layer of wool insulation is laid on the thickness of the rafters minus the ventilation gap (3-4 cm). Wool is supplied in pressed rolls and after unpacking must be unwrapped or in the form of plates (less popular). Leading a long knife along the superimposed crate, we cut the cotton wool crosswise to get a strip 2-3 cm wider than the pitch of the rafters.
Insulation inserted between the rafters must remain there due to the elasticity of the wool, but sometimes – with careless trimming and variable spacing between the rafters – it will need to be supported with a zigzag tie. film, which will prevent the circulation of ventilation air.
Attic insulation – step 9. Second layer of wool
Ref. In places of longitudinal connection, the wool must be compressed a little more in order to obtain continuity of the insulation after fastening the profiles. In the case of attaching flat holders to attics, the supporting profiles for drywall are simply snapped onto these holders, and subsequent sections are connected in the longitudinal direction using the appropriate connector.
With ES type handles – we need to determine the position of the profiles with a cord or laser pointer. Pre-attach the first lower profile at the ends and check that it is correctly positioned horizontally. Then, in the same way, position the profile near the ridge. From the bottom and top profiles, we can determine the position of the intermediate profiles and attach them to all holders. The so-called fleas – short self-tapping screws for sheet metal – are fastened with a drill / screwdriver.
Attic insulation – step 10. Installations
The open insulation stage is the last moment to conveniently complete the planned installations, especially the electrical cabling. They are always placed under the frame – but not inside the profile – and fastened with clamps. This will protect the insulation from damage when the plasterboard is screwed on. The installation can be laid directly with a multi-core cable for a voltage of 750/500 V or laid in channel-type pipes. In the places provided for sockets and connectors, we output sufficiently long cable segments, which will facilitate their subsequent assembly.
Attic insulation – step 11.
vapor barrier film
The roof insulation must be protected from the ingress of water vapor by placing a vapor barrier film on the frame. It is fixed with double-sided adhesive tape smeared on the profiles, after wiping them with a cloth moistened with a solvent that removes grease. Spread the foil horizontally in strips with an overlap of at least 10 cm, which should fall on the frame profile. Any damage is sealed with tape and a piece of foil, and the passages of chimneys and mounting risers are also sealed.
Insulation of the attic – step 12.
Installation of drywall
For thermal insulation, use moisture-resistant drywall sheets (green) and even with a thickness increased by 20 mm (so-called bold) or choose a two-layer lining. This will increase the resistance of the wall to damage and reduce the chance of deformation in case of high humidity. Alternatively, more rigid gypsum boards can be used.
Planks are arranged vertically so that the longitudinal joints – when the height of the covering exceeds the length of the board – fall on the post profiles. Board sections must be at least 1 m long, and in the case of longitudinal joints, horizontal joints in subsequent strips must be shifted by at least 50 cm. The boards are fastened with sheet metal screws, preferably with a screwdriver with a screw depth limiter.
You can also use a cordless drill/driver with a torque regulator, but if you are not experienced enough, the final tightening is done by hand so that the head of the screw enters the board to a depth of 1 mm without damaging the cardboard. We place self-tapping screws every 15 cm. At the longitudinal joints, they should be shifted by half the scale in both rows.
Insulation of the attic – step 13. Filling
Joints between drywall sheets must be filled with putty and reinforced with fiberglass or paper tape. at an angle of approximately 45 degrees to a depth of half their thickness. Initially, the seams are filled with putty and a reinforcing tape is glued in, pressing it into the fresh mortar. Then, a leveling putty is applied in 2 or 3 layers and, after hardening, it is polished with fine sandpaper or a sponge.
Editor: Cezary Jankowski
photo hole: Rockwool
.
Attic insulation. Do it yourself!
It is no coincidence that solar collectors are installed on the roof. Due to the particularly intense exposure to sunlight and the relatively thin coating, this is one of the fastest heating partitions in the house. Especially in summer, when tiles, metal sheets or roofing material heated during the day give off heat inside the building, much to the chagrin of the residents. Contrary to what it seems, the comfort-enhancing solution is… insulation.
In summer, the insulation prevents hot air from penetrating inside, maintaining the optimal temperature in the attic. Such a solution is not only convenient, but also profitable. When it is cold outside, adequate insulation of sufficient thickness will effectively prevent heat loss and reduce heating bills.
Choose the right material for your attic insulation!
You can decide to improve the thermal insulation of the roof during construction or when thermo-modernizing the house. In the case of roof structures, it is worth paying attention to the fact that the insulation is flexible and non-combustible. Due to this, the applied insulation tightly fills the gaps between the rafters, eliminating cold bridges, and protects the wooden structural elements from possible fire hazards. These are the features of stone mineral wool. In addition to general fire resistance, durability and resilience, stone wool also improves indoor acoustic comfort. When we choose the material and the optimal thickness, the question of assembly remains, which you can do yourself.
Attic insulation – do it yourself!
Attic energy-saving insulation consists of two layers of insulation, the first is laid between the rafters, the second under, on a specially prepared grid. Roof insulation can be arranged at any time of the year. Assembly accuracy – tightness at the joints of the plates – is achieved by pressing them against each other, due to the elasticity of stone mineral wool. Thus, cold bridges at the joints of the plates are eliminated. If we are insulating a kitchen, bathroom or other room in the attic with increased steam pressure, then it is also necessary to use a vapor barrier.
The accuracy of the assembly depends primarily on the tight fit of the insulation boards to the roof structure and to each other. Particular attention must be paid to the corners and bends of the roof – the attic insulation should preferably be combined with the insulation of the walls and ceiling above the attic, says Tomasz Kwiatkowski, technical Rockwool consultant.
Optimum insulation or adaptation of the attic entails certain costs. However, when considering such an investment, it is worth considering not only ease of use, but also savings on bills in the winter. As a result, it usually turns out that one-time costs are more than paid off after several heating seasons. If you choose ROCKWOOL stone wool today, you can get a discount on the purchase of KOMANDOR cabinets worth PLN 500.
More information about the conditions of the promotion can be found on the website: http://www.rockwool.pl/ocieplenie-domu/s/promocja-welna-na-poddasze.
Source and photo: Rockwool
.
Do-it-yourself attic insulation
A well-insulated attic provides a significant reduction in heat loss in winter and protection of the interior from excessive temperature rise in summer heat. Thanks to this, we also get very clear economic benefits.
Attic insulation can be done by yourself . How and what is the best way to insulate this space is presented by ROCKWOOL .
The choice of thermal insulation and its parameters
There are many solutions with different parameters. It is based on the thermal insulation properties of the product. Thermal conductivity is denoted by the symbol lambda – λ. The lower the value of this parameter, the thinner the layer of material will perform its function.
Pay attention to the moisture resistance of the insulation. The attic is especially exposed to water. It can be assumed that the roof in a new house is airtight. In an already standing building, there may be signs of possible execution errors or operational damage. The insulation is adjacent directly to the roof structure, so it must have low water absorption. Otherwise, we risk the formation of mold and fungi.
Fire resistance is a very important parameter. Nonflammable products should be used. The reaction to fire class is expressed as Euroclass from A1 to F. Class A1 means non-combustible material, class F corresponds to unclassified materials.
Another parameter is the elasticity of the insulation, a high value of which ensures that the insulation can get stuck between the rafters. This prevents the formation of thermal bridges and increases the tightness of the insulation.
Due to its very good parameters, mineral wool is most often used for attic insulation . You can do the work yourself.
Do-it-yourself insulation of the attic – the next steps
- We carry out an accurate measurement of the distance between the rafters.
- As insulation between the rafters, we use rolled wool, for example TOPROCK . When unfolding the rolled-up insulation board, measure the sections that are approximately 2 cm longer than the clear distance between the rafters. Their cutting with the appropriate allowance means that there is no need for additional fastening of the material with ties.
It holds well between the rafters. It also reduces the amount of material waste.
- Sections of the first layer of insulation should be carefully laid between the rafters, paying special attention to the tight fit of the insulation boards to each other and to the attic structural elements (rafters, crossbars, pincers). it is necessary to provide a ventilated gap 3 to 6 cm thick and inlets under the eaves and outlets in the ridge or gable walls. .
- The next stage is the installation of steel grating under the roof and ceiling sheathing under the attic. The grille consists of spacers (eg U-type) and cladding support profiles (eg C-type). The standard suspension spacing along the rafters is 40 cm. According to the recommendations of the cladding manufacturers, for example, drywall, a different suspension spacing is also used depending on the type, thickness and amount of cladding. By moving the suspensions above the frontal plane of the rafters, it is possible to install a second layer of insulation of a previously selected thickness (with tongs or tongs) under the rafters.
The support profiles are screwed to the hangers or pressed in. They are mounted perpendicular to the rafters. Before installation, the supporting profiles should be filled from the inside with cotton strips, which improves the thermal insulation of the attic.
- The next step is to lay the second layer of insulation under the rafters, collar pliers or pliers and between the load-bearing sheathing profiles. A suitable product in this case is ROCKWOOL SUPERROCK . Protected wiring can be distributed in the second layer.
- In humid rooms with a water vapor pressure above 13 hPa (bathroom, kitchen, toilet) it is necessary to lay a vapor barrier in addition to the supporting profiles of the cladding. It is laid with an overlap and glued with double-sided tape. Installation is carried out from the inside of the attic – under thermal insulation or a steel cladding structure. Fastening is carried out using double-sided adhesive tape to the bottom of the steel supporting profiles.
- The final stage of do-it-yourself attic insulation is screwing the roof sheathing and ceiling over the attic. The attic cladding is screwed to the supporting profiles with self-tapping screws. The distance between the screws is determined by the lining manufacturers. Most often, it should not be more than 25-35 cm. The linings are installed so that their longer edges are perpendicular to the grate. The cladding joints on the shorter sides must be offset in adjacent cladding lines by at least one distance between the vertical profiles. Cross connections are always made on C-profiles. Such an arrangement of panels eliminates the formation of transverse joints (the point of contact of 4 skins) and increases the rigidity of the attic building.
We invite you to familiarize yourself with the bookmark of the company ROCKWOOL , which is located here.
Source and photo: ROCKWOOL
.
Ceiling insulation – practical advice on how to insulate the ceiling yourself
Modern housing construction for single-family houses he refuses to build unused attics. In their place, residential attics appear, which increase the useful area of \u200b\u200bhouses. However, there are still many buildings that are not used for various reasons. roof space. In their case, you do not need to invest in full insulation of the attic slopes. Thorough insulation of the ceiling is enough. Below we will show you how to insulate the ceiling of concrete and wood.
If you plan to insulate a building, use the service Search for a contractor , available on the Construction Calculators website. Thanks to this, you will get access to the best offers of proven professionals.
How to insulate the ceiling?
This is the first question we have to answer before starting work. Unused lofts must be insulated with durable heat-insulating material, which will not allow excessive cooling of living spaces. The minimum thickness of the thermal insulation coating is 20 cm. However, an unused attic can also be sheathed with thicker insulation. Thanks That’s why we minimize the degree of heat transfer through the ceiling. Warming can be made from several popular materials with satisfactory thermal insulation parameters. Each of them has slightly different properties, so we will discuss them separately. Ideally, the type of insulation should be provided at the initial stage, which is the construction of a house.
Attic insulation with mineral wool
Mineral wool for the ceiling in the house is usually in the form of a mat. It is very hardy, thanks to this it covers hard-to-reach places well. The great advantage of this material is also very good thermal and acoustic insulation. Wool effectively suppresses sounds coming from the upper floor. Therefore, it will be a good decision if we plan to allocate our unused attic for storage.
worth it also note that mineral wool is a non-combustible product. Thanks to this great one, it is perfect for insulating a wooden ceiling in an attic house. It will do two things there function – like thermal insulation and fire protection. Also check mineral wool type .
Polystyrene ceiling insulation
This is another very popular solution. Expanded polystyrene has different thicknesses and thermal insulation properties. Thanks to this, we can choose the material according to individual needs. investor needs. Unfortunately, the thermal insulation of the attic with foam plastic does not make it an effective acoustic barrier. In addition, the material works worse in the case of lofts of complex shape. Polystyrene is not suitable for uneven floors and walls. However, it works fine as concrete ceiling insulation.
Ceiling insulation – practical advice on how to insulate the ceiling yourself
Ecofibra
These are granules of cellulose fibers. Provides very good thermal insulation. There is a material recommended for use in hard-to-reach places. Ecofiber can be poured onto the ceiling surface. The very small granules fill any space well and prevent the formation of thermal bridges. Fire resistance proves to be an additional advantage of cellulose fibers. Thanks to this, thermal insulation also protects against the spread of fire.
Stand-alone use of this material will work only completely unused attics. We can scatter ecofiber on a very low attic roof and hard-to-reach places. If the attic is not in use, it will not be haunted and there is no need to create a floor.
Mineral wool granules
Those who are wondering how to insulate the ceiling should pay attention to mineral wool granules. Scraps of wool have the same properties as the rug. But they are even better complement hard-to-reach places. Shabby wool mineral for the ceiling is perfect for unused rooms. We can distribute it on the surface of the ceiling in the same way as the above mentioned eco-fiber. Also check cost of attic insulation with wool .
How to insulate a concrete ceiling – the attic does not work completely
We have already discussed how to insulate the ceiling. Second, let’s move on to action practical. Below we will give you step by step instructions on how to do it yourself. concrete ceiling insulation.
Underfloor heating A concrete ceiling is usually made of styrofoam boards or wool mats. mineral. We will achieve the best thermal insulation by applying a double layer of material layers. There is no need to insulate the attic when not in use creating a floor. In this case, it is enough to make two overlapping layers of thermal insulation material. When laying the material, remember that the joints between the upper and lower layers of thermal insulation do not overlap. Thanks to this, we will eliminate possible thermal bridges.
Heated concrete ceiling in a building under construction should be enriched with vapor barrier foil. We place it between the ceiling and the first layer of mineral wool. A fresh ceiling may have technological moisture. This could penetrate deep into the wool and limit its properties. Additional vapor barrier foil will prevent this. Ceiling insulation in an old house does not need to be fixed with a film between the ceiling and the thermal insulation material. However, it is better to use foil. windbreak. We lay it between the first and second layers of thermal insulation. Due to this, gusts of wind penetrating through the cracks of the attic cover do not reduce the effectiveness of thermal insulation. Or maybe you are interested in roof insulation ?
Ceiling insulation depending on the type
Concrete ceiling insulation for a rarely used attic
Attic No. must have a residential purpose. We can turn it into a pantry or a small, rarely used utility room. In these cases, it is not enough to simply insulate the ceiling with mineral wool, foam or granules. If we want to walk through the floors, we will need to make at least an impromptu floor.
The floor should be put on joists. To ensure complete stability, we install the joists on the floor using spacers. Another popular solution is to install a lag on roofing strips. Between the beams – mineral wool for the ceiling. Its task will be to warm and create additional sound insulation. We install the boards on the OSB logs or nail the boards. This is how a flooring is created that we can create to use safely and place objects that are not too heavy on it.
In the case of lofts with low intensity of use, we can also insulate the ceiling with foam. However, this is a slightly less popular solution. Insulation of the ceiling with polystyrene foam will require the implementation of a concrete floor. This, in turn, will lead to an increase in the cost of the entire enterprise.
Ceiling insulation – practical advice on how to insulate the ceiling yourself
How to insulate a wooden ceiling is out of use?
Underfloor heating A wooden ceiling is made very similar to ceiling insulation. specific. Mineral wool is usually used for work. Thermal insulation is laid between the building slats. Usually this is done by a height of 20 cm, which corresponds to the standard thickness of thermal insulation. But accurate attic insulation should also take into account the insulation of the space above the beams. Thanks to this, we will eliminate the cold bridge and make the ceiling keep the temperature better.
Mineral wool can be placed on a wooden ceiling with one additional layer on top of the beams. If the top tier is decommissioned, then it is not necessary to create a floor. However, it turns out to be a good idea to organize a windproof film. Thanks to this, the mineral wool will be better protected and its microparticles will not start to separate a few years after installation.
Thermal insulation of a small wooden ceiling intensity of use
If the attic is to be used from time to time, it will be good to lay a floor for insulation. To do this, we install a wooden lattice on the beams. Between the slots of the grating we lay the second layer of insulating material. Next we install OSB boards or wooden boards.
Assembling the floor is not exempt from the arrangement of the wind protection foil. We can put it directly under the wooden grate. We connect the individual sheets of foil to each other, observing approx. An overlap of 10 cm. Thanks to this, we will create a dense protective barrier, which will increase the effectiveness of thermal insulation.
Is it possible to insulate the ceiling? wooden bottom?
Of course you can. However, you have to take into account the reduction in the height of the walls on a given floor. We mount the ceiling insulation from below to the ceiling joists. Layers Place the insulation between the grate that will be used to make the panel ceiling. drywall. If you have to insulate the attic from below in the bathroom or kitchen, then it is worth laying a vapor barrier foil.