House extension plan: 10 Questions to Ask Yourself Before You Plan an Extension
10 Questions to Ask Yourself Before You Plan an Extension
Extending your home is an exciting prospect, but for many it is quite daunting too – we’ve all heard horror stories shared by those who have gone down that path. It doesn’t need to be that way though. With a little bit of planning, the right advice and some discipline, you can take control of the process and ensure your extension improves your lifestyle for many years to come. Here are 10 questions to get you started and heading in the right direction.
Brickworks Building Products
1. What is the first step?
No matter how big or small, every extension project requires a custom design solution. It is an opportunity to improve the liveability of a house, and a chance to add value to the property. Therefore, it is critical that you get professional help at the design stage of the project, to ensure you get the best possible outcome for your given budget. This should be your first step.
The options in most cases are to engage a draftsperson, a building designer or an architect, and generally speaking the fees associated will increase in that order. However, rather than focus on the exact profession of who you might engage, I would suggest you get familiar with the type of work they do. Ask friends and colleagues for recommendations and when interviewing your shortlist of preferred designers, ensure they are able to demonstrate experience in working with a brief and a budget that is similar to yours.
Tarlet Architectes
2. Who am I building it for?
This is an important and often overlooked question. Too many people get into an extension project without enough clarity about what they are actually trying to achieve.
You need to think carefully about who you are building it for and what the purpose of the project is. For example, are your children still young and likely to be at home for a long time, or are they grown up and more likely to be leaving home soon? Do you want them to leave home, or do you want them to stay on for a while? Maybe the kids have already left and you are approaching retirement; in which case you should ask yourself if you really need any extra space at all.
Your design brief should clearly address these very personal and unique aspects of your life, rather than being a list of random thoughts and ideas you have seen over the years. Clarifying these questions and their answers will help you create a detailed brief, which is also more likely to help you avoid overspending on unnecessary spaces and items.
Preston Lane
3. Do we have enough space to extend?
To answer this question you’ll need to think about what it is you actually need. One extra bedroom may not take up a lot of room, but a new family room and kitchen is a bigger extension that may have an impact on the amount of space you have left over for a backyard, for example.
You can start to visualise how much space you might need by using rope or other markers to map out how big the new spaces will take up on your property. Use the size of your existing rooms as a guide to how big each room should be. Then stand back and assess what you have left and if you are happy with the open space that remains.
ArchiBlox
4. Maybe we need to go up?
If you don’t have enough space to extend at ground level, you may need to consider going up and adding a second storey. Adding another level is great for retaining backyards and open space. However, extending up is rarely the most cost-effective option as there is a lot of work in removing the roof structure, replacing it with a new floor structure and supporting the new upper-floor walls.
Another important consideration is what it will look like. Investing in a second storey addition has the potential to enhance the look of your home and give it more appeal in the streetscape, but to avoid the look of it being ‘tacked on’, you should consider the benefits of engaging a good architect or building designer to help you balance the practical solutions you require with the aesthetic considerations.
See more photos of this house
Christopher Polly Architect
5. How do we make it cost-effective?
One of the dearest elements of an extension is demolition work, and the knock-on costs that tend to follow. Keep in mind that for each wall that is demolished, there will also need to be a lot of rectification work done involving several tradespeople.
A major potential cost of demolishing walls is the likelihood that structural modifications will be required if the wall being removed is load-bearing. But regardless of whether the wall is load-bearing or not, repairs will still be required at the base of the wall where it connected with the floor, and at the top of the wall where it connected with the ceiling. In each case there are several tradespeople involved, including carpenters, plasterboard experts, and painters.
Plus, depending on the rooms affected, electricians, plumbers, ceramic tilers or timber floor installers may also be required. Think very carefully during the planning stage about how to design your extension with as few existing walls removed as possible.
What to expect when renovating
Philip Stejskal Architecture
6. Do we need to match the existing house?
One of the exciting things about extending a home is the opportunity to have some fun with the design. Who says you need to match the existing style of your house (other than the council if you happen to live in a heritage area)?
By choosing to adopt a contrasting building style to that of the existing house, you are opening up numerous possibilities for material choice, roof style, use of texture, glazing proportions, ceiling height and much more. Modern materials are better suited to the open-plan living style that we generally desire, enabling more natural light and ventilation, as well as the ability to personalise your colours and finishes.
One of the key considerations when choosing to extend in a contrasting style is to make the change from old to new as deliberate and concise as possible.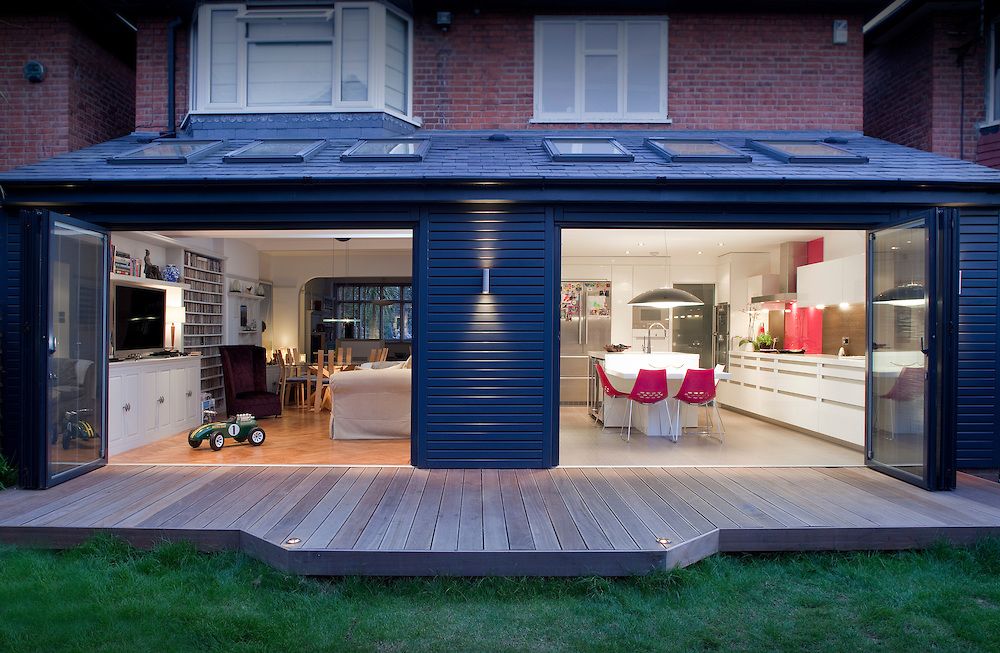 This may include contrasting the roof style, exterior finish and colour, as well as associated details. Ideally it should be very obvious where the old home finishes and where the new part of the home begins.
Chan Architecture Pty Ltd
7. Can we get more sunlight and natural warmth?
Older homes aren’t generally known for their solar passive design qualities, so one of the key considerations when extending is to investigate ways to get more sunlight and warmth into the house.
Understanding where north is will give you a good idea of where the sun will be at different times of the day; and if you have already lived in the home for a while, you will know where the sun will enter the property from season to season. Capturing northern sun should be one of your key priorities when extending, especially if you are adding a living room or family room that you spend a lot of time in. More natural sunlight will make it a much more comfortable space to live in, and will also reduce the amount of artificial heating required.
However, when adding larger windows you must also be very aware of how exposed the windows are to summer sunlight, especially the west-facing afternoon sun. While having sunlight beaming into the space in winter is a lovely outcome, the opposite can be said for scorching hot summer sun as it can make the space unliveable. This is where a thorough understanding of the orientation, appropriate glazing specification and good use of shading elements is critical. Once again, a good architect or building designer will help achieve the best results in your circumstances.
Kate Mountstephens Architecture+Heritage
8. Would we need to move out?
The financial benefits of living in the house throughout an extension are obvious, not to mention the convenience of not having to uproot your life and routine. Unfortunately, it may not be that easy. Any extension project that also involves a significant amount of renovation work to the existing part of the house will be very difficult to live in throughout the build. In these circumstances, the project may be able to be staged so that you can move from one part of the house to the next.
But you must also be aware that staging a building project will generally mean it takes longer to build, which also means it will cost a little bit more.
Do you stay or go during renovation?
9. How do I find a builder?
Recommendations are important when looking for a builder. As mentioned earlier, you should choose a builder who is experienced in doing similar work and within similar budgets to yours. Your building designer or architect should be a good source of advice, and be able to recommend builders suited to your project. Some will even offer a service that sees them administering the building contract for you, and acting as your agent on site.
You should also ask friends and colleagues for their recommendations, with a view to creating a shortlist of builders to get quotes from. The final selection of builder tends to be the builder who is cheapest. This is an acceptable outcome only if you are completely satisfied that all of the quoting builders have quoted the same thing.
See how an Inclusions Schedule can prevent unforeseen costs.
Find a local professional
10. How long will it take?
How long is a piece of string? A quick and simple extension might only take four to six weeks. Say, for example, you happen to be adding only a small amount of space under an existing roofline, and the full range of tradespeople aren’t required for the job. A similar timeline would apply if you were adding a kitchen or bathroom.
However, as most extensions generally do include a wet area – and assuming that the extension is of a decent size – the time frame is probably more like three to six months. Large extensions that also involve a lot of renovations to the existing house may take even longer; especially if they involve second storey additions. Six to nine months might be a more realistic time frame in that case.
TELL US
Have you planned an extension at your home? Were there any significant surprises in the process? Share your experiences in the Comments below.
MORE
7 Renovating Lessons You Don’t Want to Learn the Hard Way
Plan a Clever Extension That Blissfully Blends Old and New
8 Rear Extensions That Bring the Outside in
House Extensions Tips – Planning An Extension From Scratch
Planning
What are the different types of house extensions?
The term ‘house extension’ simply refers to any structure that’s added to the original building. This can be a loft extension, basement extension, a kitchen, a living space, or even a new bedroom. Extensions can be made from a variety of materials: from simple brick & block to more expensive, luxury designs, such as those including structural glass (internal link).
House extensions are usually one or two storeys high, and include everything from conservatories and garage roof extensions to multi-storey annexes, featuring their own kitchenettes, bedrooms, and bathrooms.
Will I need planning permission for my house extension?
The honest answer is that it depends, but usually no, you won’t need planning permission for your house extension. Most properties benefit from what’s called ‘permitted development’, which basically means that you can extend the original building (which is as it stood in 1948) without applying for permission – provided you obey certain restrictions.
These include things like not extending above the height of the roof of the property, and limitations on how far your extension can project outwards, but they will depend on the type of property you own. The full list of permitted development criteria can be found here, along with a handy quick start guide.
If in doubt, the best bet is simply to speak to your local planning authority, which is usually the Council. They’ll be able to explain the process, whether or not your house qualifies for permitted development, and what fee payments and applications – if any – you’ll need to make.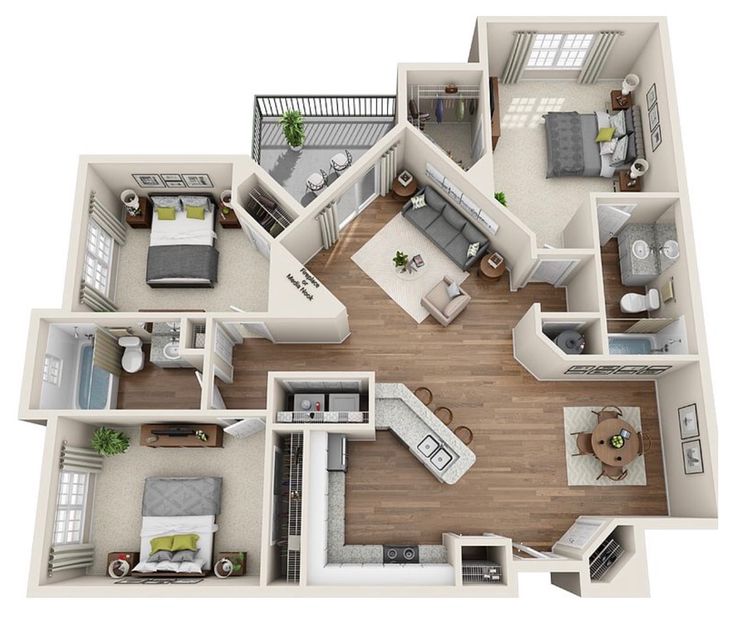
Do I need planning permission for an extension on a listed building?
If your home is a listed building, then it won’t qualify for permitted development – and you’ll need to obtain both planning permission and listed building consent before undertaking any work. It’s a criminal offence not to do this. Speak to your local authority’s Conservation Officer, as they’ll be able to help you understand what restrictions might apply to your specific property.
Do I need planning permission for an extension in a conservation area?
If your home is in a conservation area, such as a World Heritage Site, National Park, or area of outstanding natural beauty, then permitted development rules do apply – but they’re slightly more restrictive.
The entire design process is scrutinised to a much greater degree by the local authority, but this doesn’t necessarily mean you can’t plan for a contemporary extension – just that it’s best to get in contact as early as possible with your planning authority Conservation Officer, to discuss your intentions. For more information, Home Building offer a fantastic guide to check out.
Do I need an architect for my house extension?
There’s a lot to be said about this, but we’ll try to keep it straightforward: the simpler you want to keep things with your extension, the less likely you’ll need to employ an architect. There’s no law requiring you to do so, and it’s all about personal preference.
If you simply want a basic, brick and mortar construction – or are planning something like a humble conservatory – then an architect probably won’t be necessary. If you have a grander vision for your space, or are looking for an expert to design something a little more special, then employing an architect is a sensible idea.
Are there restrictions on where to place toilets in a house extension?
Short answer: there used to be, but there aren’t any more. The Building Regulations (more on those further down) used to insist on a lobby space between a toilet and other rooms, but this is no longer the case.
You can place a toilet anywhere you like, providing there is ample room, that you include a wash basin and that you allow for sufficient ventilation. The same goes for showers, providing they meet minimum size requirements outlined in the Regulations. As a result, the main consideration when planning for a shower or toilet is the proximity to suitable plumbing, as this is one of the largest influences on price.
Do I need to tell my neighbours when I’m planning my house extension?
There is only a legal requirement to tell your neighbour about your extension plans if the work you intend to organise will impact the boundary between your two properties. In general though, it’s just common courtesy to inform your neighbours of any intended construction work.
The disruption caused by the noise of the building work is likely to have an impact on their lifestyle, at least for a short while, and it’s only right to give them the chance to prepare for this – particularly if they have young children.
It’s also worth noting that keeping the neighbours on side is a very sensible thing to do anyway, as it can make it less likely that they’ll take umbrage to your actions, and try to cause problems for the development, such as attempting to invoke their ‘right to light’ (if applicable – see below).
House extensions: The legal right to light
In theory, even if your house extension qualifies for permitted development or you have planning permission, owners of neighbouring properties can block development of your extension by claiming their legal ‘right to light’.
Natural light is hugely important to our daily lives, and the right to light states that a development can be legally prevented if it will block light to a window or door in a neighbouring property – but only if the amount of light it blocks prevents the room being used properly. It doesn’t guarantee people the right to sunlight or bright airy spaces; it basically just prevents extensions from plunging a neighbour’s home into darkness.
It’s unusual for this to present a problem – right to light disputes tend to stem from deliberate, vindictive builds. It’s just good to be aware of your neighbour’s legal rights, particularly if you live in a city or environment in which the houses are very close together.
How high does the ceiling need to be in a house extension?
As is the case with toilet and shower rooms, there is no longer a minimum requirement specified in the Building Regulations as to the height of a ceiling in a house extensions. Your extension can’t be higher than the roof of your home, but other than that there isn’t any legally binding clause as to ceiling height. Your ceiling can be as high or low as you like.
With that in mind, it’s still important to be realistic about things. If your ceiling is impractically low, your extension won’t be a very nice room to inhabit; you don’t want your expensive new space to cause chronic back pain for anyone that walks into it. The normal ceiling height in the industry is 2. 4m, around eight feet, and this is a good baseline when making your plans.
What are the building regulations for house extensions?
The Building Regulations are a set of guidelines and minimum standards, determined by government and enforced by local planning authorities, to ensure building work accommodates safety and health and factors. These can include everything from how a structure uses energy and water to its fire protection. The Regulations apply to any new builds, as well as to all extensions and alterations.
If you want an example: one regulation (the ominous ‘Part L’, that sounds rather like something out of the X-Files) relates to energy efficiency. The government has put in new requirements to raise the efficiency of all new buildings and structures by 40%, and so the amount of glass in a structure is now limited to 25% (Don’t worry, this doesn’t mean you can’t opt for one of the glass extensions we construct; you just have to factor in insulation elsewhere, or opt for something like low-e glass or triple glazing).
The full list of regulations is long, technical, and not really the remit of an amateur developer. You can browse all of the restrictions that apply, but in general, when it comes to planning, your architect or building contractor is the go-to contact. Unless you’re willing to study hundreds of pages of documents, it’s best to refer your ideas to the person responsible for drawing up your plans.
How do I choose a builder for a home extension?
Unless you’re really confident in your own ability, you’ll need to hire a builder to… well, build your house extension. This means finding a contractor who you can trust. There are lots of ways you can find a suitable builder, but it’s a good idea to search online for contractors with experience building extensions near you, and look at some reviews. Word of mouth is also a good source, as are local forums.
Once you’ve found someone you think might be suitable, ask to see some examples of their previous work, and if they can put you in contact with someone for a reference. Don’t feel obliged to hire the first person you speak to about a quote, and take as much time as you feel is necessary to find the right contractor.
How do I choose an architect for a home extension?
The same process as above applies: if you decide for a more bespoke or complicated design, and choose to hire an architect, then finding the right firm for you requires a bit of research. Look online (sites such as Houzz can be a good place to start) and draw up a shortlist, then research the architects you like the look of by browsing their website, and speaking to them in person.
Ask to see their portfolio of relevant projects, ask for references, and if possible, request to go and view some of their work in person. Don’t be intimidated by flashy and impressive work – trust your gut. You’re hiring them to design the extension you want, so you need to make sure you’re confident in their ability to deliver what you’re looking for, not what they’d prefer to design.
Budgeting
How much will a house extension cost?
It might sound like a bit of a cop out, but the cost of your extension really does depend on a lot of things. It’s unrealistic to provide an average or benchmark cost of a house extension, as there are too many variables that impact price, but a very rough estimate would be to budget for £1200 – £2000 per m2.
This doesn’t account for professional fees for your builder and/or architect (along with things like planning application), which you can usually expect to run somewhere in the region of 10-15% – and you’ll need to add VAT on top. Extensions in London and the South East will also inevitably cost more.
Once you’ve decided on the kind of design you’d like to opt for, the best thing to do is consult with your architect or builder, and have some preliminary plans drawn up.
From these, you can then approach a number of builders – the more the better – to provide you with cost estimates. You can use this to get a ballpark cost for the house extension you’re planning, and work out if you can actually afford what you’re intending to build.
Do I need insurance for my extension?
The short answer is yes, but the typeof insurance policy you’ll need to take out depends on a number of factors.
You’ll likely need a site insurance policy (or unoccupied buildings insurance if you’re vacating the property when the work is taking place) – and your contractor will need their own insurance too. It’s also a very good idea to take out a structural warranty, which involves having the extension build inspected and passed for any errors – so if the roof caves in a year later, the builder (technically you) isn’t responsible.
Also, your standard home insurance policy won’t continue to cover your home when it’s under renovation, and you’ll need to check on the insurance status of your builder – if they only have public liability insurance, they won’t be covered if an accident takes place that they weren’t responsible for (such as a fire, or tsunami).
You’ll need to notify your home insurance provider well in advance of any works taking place, and it’s a good idea to use this opportunity to speak to them about the relevant policies you’ll need both during the construction of your extension, and after it has been built.
Can I claim VAT relief on my home extension?
You most likely can’t claim VAT relief for work carried out on your house extension project. If you’re using a contractor, then the standard rate of 20% almost always applies. There is sometimes an exception if you’re using independent tradespeople who aren’t VAT registered, in which case you’ll only need to pay VAT on materials used.
If your property is a listed building, and you’ve obtained permission to undertake work on your extension, then you’re in luck – listed buildings are zero-rated for VAT when it comes to improvements.
Will my house extension add value to my property?
One of the main reasons many people choose to extend a property is the prospect of increasing its value when they eventually decide to sell. It’s usually the case that adding more space to a property results in the value of said property increasing – particularly in London and the South East, but this isn’t always true.
One of the best ways to assess whether extending your home will increase its value is to speak to a local estate agent. They’ll be able to tell you the kinds of renovations that are popular in the local area, as well as offer a guideline to what the ceiling value of property in your street tends to be. If your home already approaches this, then it’s possible to ‘overextend’, and cap out the value of your property despite adding multiple new areas.
It’s also worth bearing in mind that as the housing market changes, so does the potential financial benefit of extending a property. It might not be financially viable to extend your home now, but the extension you build could add significant value in years to come.
Extension Plans | House Plans Queensland
House Plans Queensland can prepare plans for your house extension, deck or patio. Having a detailed set of drawings will reduce the chances of ‘surprises’ during the building process and gets you enjoying your extra space sooner and with less stress. Check below for advice on planning an extension, keeping your extension costs to a minimum and planning a two storey extension.
To discuss your plan requirements and to arrange a site visit please contact us.
Planning your extension
When planning your extension consider the following:
- To minimise costs avoid altering existing walls and roof lines if possible.
- Invest in a set of extension plans – this will help avoid costly surprises during construction. A set of plans for your extension from House Plans Queensland should not cost any more than $1100 – and this includes a site visit.
- If you have your existing house plans this will be a great help to the draftsperson.
- Engage a builder who specialises in extensions.
- Research council building regulations before planning your extension.
The plan drawing process of a house extension is similar to that for a new home. The main difference is that there is an existing structure that needs to be taken into account. When designing your new spaces remember that the existing walls and roof should be altered only where necessary. If possible, a new extension should remain similar in structure and follow the rooflines to ensure that a costly redesign is not required. When large areas need changing that is when you are most at risk of budget blow outs.
How much will my extension plans cost?
A basic home extension plan containing a couple of rooms shouldn’t cost approximately $1100 to be drawn up – and that includes a site visit. And remember you can save money in design fees by having your existing house plans available. This allows the draftsperson to draw the house without spending a large amount of time measuring up the existing house.
How much will building an extension cost?
The cost can vary greatly depending on the size, type and extent of the construction and how much this impacts on the current dwelling. While you may have grand ideas of turning an unused part of your house into a new games room, study or perhaps even a granny flat, there will be implications or issues when it comes time to build or renovate. Something as simple as removing a wall – although it looks fairly minor – may require a series of beams to be introduced to support a roof or floor. This can add significant costs to the construction of the home extension or renovation. This is why someone with the experience and knowledge should have a look at the project before undertaking any renovations to the existing home. You don’t want to spend half your budget on rearranging your current residence just to get that little bit of extra space.
A builder should be able to provide you with a rough estimate of the cost of your renovation project by attending the site and looking at preliminary sketches or plans. When the final house extension drawings or house renovation plans are completed then an exact price can be obtained from any interested builders.
Engage a builder that specialises in house extensions or renovations. When they do this type of work day in and day out they will often quote less than someone who prefers to avoid smaller renovation jobs.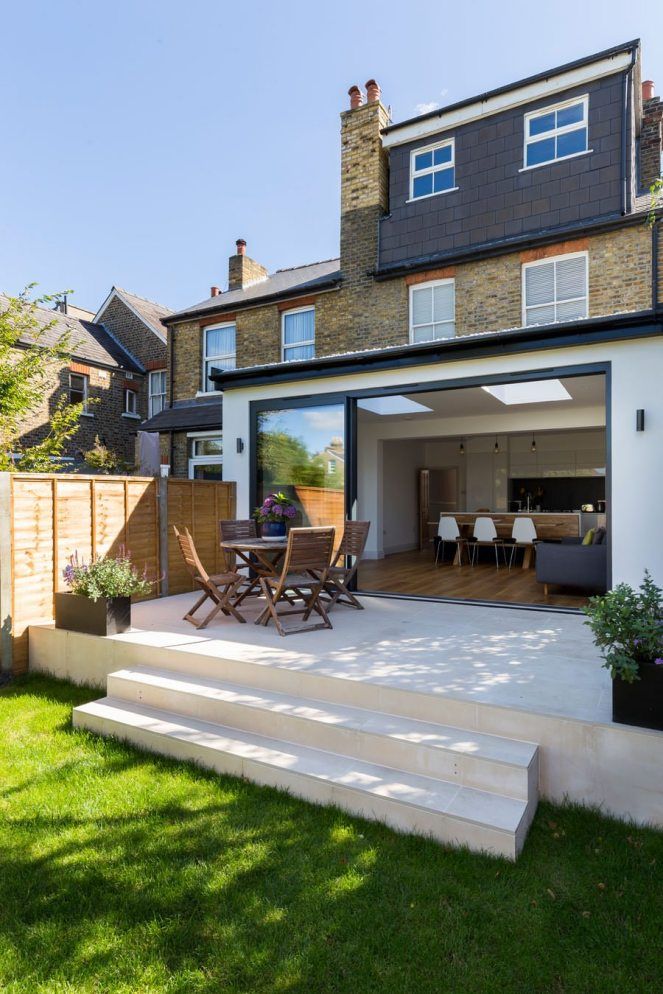
U
To help reduce the costs of building an extension do some research beforehand with your local council to get an idea of exactly what you are allowed to do with your house in regard to planning requirements. By doing some digging first you can then take your ideas to a designer or draftsperson and save them from performing the research for you.
Two storey extensions
Increasing your living area by extending upwards is often a viable option particularly when you are restricted by limited land area. Although not always a preferred option due to the cost, a two storey addition can add valuable area and privacy to a single level home.
Adding a new floor level can create construction issues, but can also provide a refreshing modern look to your home if designed properly. The loss of floor area downstairs for access to the upper levels needs to be addressed, as stairwells will often need to be placed in areas that are used for valuable living space. Often the placement of the stairs on the lower floor will determine the layout of the upper floor extension because of the alignment of stairwells. All of this leads to design issues that need to carefully be addressed when planning to construct a second level on your house.
Contact us to discuss which design and construction method will best suit your home and family.
the dos and don’ts of renovating
Kitchen extension planning? I get it – building an extension is daunting. But it’s also one of the most popular types of home improvement and one that I think can be the most transformative – not only on a property but on your life at home as well. We’re all aware now that space comes at a premium, so don’t underestimate the positive effect building an extension can have.
Kitchen extension planning is complex. If you’re thinking of adding to your home’s footprint, you may need planning permission in addition to professional help in the form of an architect, designer or builder. Alternatively, you might be able to build under permitted development (PD) which doesn’t need full planning consent.
In brief: permitted development when planning a kitchen extension
When assessing if your kitchen extension planning falls within PD, check with your local authority to be sure. Several things may affect what’s allowed. For example: if you live in a conservation area, Area of Outstanding Natural Beauty or in a listed building. Also, if owners have remodelled the property outside of the original boundary in the past.
If your kitchen extension planning works fall under PD, that means you usually can add a 6m extension to a semi-detached property. If your property’s detached, you can add 8m. However, as always, clarify with your council – and remember, you’ll still need to meet building regulations. Employing a planning consultant is advisable, as they are on top of the ever-changing policies and can help with more complex applications. For example, if you live in a conservation area – not to mention that rules are different in Wales and Scotland.
The Tsubo House by Fraher and Findley.
But before you set out on your own renovation project or kitchen extension planning, here is my go-to list of the dos and don’ts…
DO: See what other buildings around you have had done to get an idea of what you could achieve, and check with your local authority about any special conditions you may have to meet. Kitchen extension planning is tricky enough without getting carried away with interiors fantasies that won’t be allowed.
DO: Book a free 30-minute appointment with your planning office. Take as much information as you can to get valuable advice. Consider how the kitchen extension layout you’re planning is going to work. Bigger isn’t always better. You can have too much space, plus the location of windows or doors can impact the interior. Also look at the natural light. It’s very popular to have lots of glass, but making your house longer means its centre is further away from light sources – roof lanterns or side windows can help with this.
More things to do
DO: Get to know your neighbours. They will be invited to comment on any planning applications. Talk them through what you want to do, show them your kitchen extension planning and get them on your side. Any objections from them could cause delays or even dictate what you can achieve.
DO: Check your systems when kitchen extension planning. Adding rooms will increase demand for water, so you may need to upgrade it. Think about where plumbing and extraction are going to run to ensure you don’t end up with an eyesore on your lovely new extension.
DO: Hire a project manager when kitchen extension planning. They could save you money, as they ensure the project gets completed on time and in budget. Consider what else could be worth getting done in advance. A structural engineer, ground reports, and asbestos and drainage surveys can all prevent unforeseen costs.
A kitchen extension by Paul Archer Designs.
And here’s my list of things you shouldn’t do
DON’T: Rush your kitchen extension planning. Take time to ensure you are happy with the plans before you submit them. Planning permission often takes around eight weeks, but it can take up to 12. You can make minor alterations once it’s been granted, but larger ones will need resubmission.
DON’T: Start any work except kitchen extension planning until you have the relevant permissions. Your local authority can have your work altered or demolished if you fail to get consent. Altering a listed building without prior permission is a criminal offence and can lead to prosecution.
DON’T: Live in the house, if possible. This can actually slow down progress, as the builders try to work around your life and spend more time cleaning than building, which can raise the cost.
DON’T: Draw up plans without knowing the space. Live in the property first to see it at every stage of the day and really get a feel for it. Think you need to stick to the same materials and window styles. I find the most inspirational projects offer contrasts.
The Quarter-Glass House by Proctor & Shaw.
Also, bear in mind…
DON’T: Forget about site insurance. You need it to cover the existing structure and the building works until you complete the project. Always let your existing insurance provider know about your plans.
DON’T: Wait too long to start the work. Planning permission automatically expires after a certain period. This is usually three years from when full consent was granted. Also, don’t keep making changes, as this can drastically drive up cost and time.
DON’T: Be afraid. Extending is usually more cost-effective than moving. It’s also a great way to create a space unique to your family.
Yes, kitchen extension planning may seem daunting at first, but trust me. Follow my tips, embrace the project and enjoy the process of creating an amazing kitchen extension – it will be more than worth it in the end, promise.
Work with professionals to get your project going and to keep it on track. Remember to always seek at least three quotes for each trade you plan to hire and ask to see their previous work for peace of mind.
A kitchen extension design by Cousins & Cousins.
Featured image: a kitchen extension design from MW Architects.
Hayley Robson is the creative director at Day True and originally wrote this feature in November 2019. It was updated by Ariane Sherine in July 2022.
Want to carry on reading? Check out our feature The Kitchen Sessions: Short on space? Plan your perfect kitchen extension.
About Post Author
kitchenkitchen extensionrenovation
Home Extension Renovation Guide | Billdr
Home extensions can add liveable square footage to your dwelling — but are they worth it? With the extensive work involved with this type of renovation, home extensions (and additions!) land on the higher end of construction costs. Depending on your goals, if you’ve outgrown your home, you might want to consider building a home extension and expanding your current place.
Are you looking to stay within the same neighborhood? Is there additional outdoor space on your property? Do you want to increase your home’s value? Adding to your home’s footprint with an extension is worth the investment, if so.
To help you plan your renovation project, this home extension guide will take you through:
- What is a home extension?
- Pros and cons of extending your home
- How to build a home extension step by step
- Plans and permits needed to build an extension
- Costs of different types of home extensions
- Does an extension add value to your home?
- House extension before and after
What is a home extension?
There are several ways to increase your home’s footprint and add value to your property. You can build up, down, or out through a home extension or addition.
- An extension involves adding to an existing level either sideways, towards the back, or to the front to increase floor space while remaining at ground level.
- An addition involves adding an entirely new level to your house or digging down into a more welcoming and/or functional basement.


Costs, timeline, and building requirements are dependent on the type of renovation you choose and how you decide to use the extra space.
Pros and cons of extending your home
For many homeowners, their house is a lot more than four walls and a roof — it represents cherished memories, comfort, and community. But as families grow and life-changing events happen, it’s not unusual for homes to no longer meet your needs. To adapt to your new lifestyle, you can either purchase a new house or remodel your current home. Both options have their pros and cons, so how do you choose between adding an extension or moving out?
Pros
Adding more space to your home could be the best option if you already live in a sought-after area and wish to remain there. The hassle and upfront costs of moving (such as stamp duty, deposit, or legal fees) alone can be enough reason to stay put. Putting your current home on the market is an option, but with rising housing prices, will you be able to find and afford a new one that ticks off all your boxes?
Cons
On the other hand, if the idea of embarking on a large-scale renovation like a home extension or addition fills you with anxiety — you’re worried about costs, managing the renovation process, finding reliable partners, or living in a construction zone — moving could be a more attractive alternative.
Factoring finances into your decision
Think about when you purchased your home and how much equity you have in it. Prices for housing are soaring across markets. If you bought your home several years ago when prices were lower and you own a lot of it outright, you might be able to finance your home extension or addition without significantly increasing your monthly mortgage. Purchasing a larger home may bring even more expenses — you could also want (or need!) to make changes to your new place, so you’ll have to set aside extra budget to do so.
How to build a home extension step by step
1 – Define your project’s scope of work
To set a clear direction for your home extension, begin by describing the problem you plan to solve. Take the time to understand your current situation and research what you want out of your renovations.
Here are some questions to ask yourself:
- What type of home extension do I want?
- What is the total surface area of the home extension? How many floors are there?
- How many and what type of rooms do I want to add (kitchen, bedroom, bathroom)?
- Do I need a centralized HVAC (heating, ventilation, and air conditioning) system?
- What is my budget?
- What is my timeline? When should the work start? When should it be completed?
- What is my current living situation pre-construction?
- What is my desired outcome? What do I want the extension to look like?
The guiding questions will help you build your project scope and communicate your goals, vision, and needs to to a building expert (architect, engineer, or interior designer).
Think long-term
Expanding or modifying your home is a significant property investment. A renovation can affect the value and use of your home over the long-term. As a rule of thumb, your upgrades should last up to 20 years. Whether you plan to stay in your space permanently or not, consider your future in the scope of work to get the most out of your investment.
2 – Understand your municipality’s requirements
Present your home extension project to your municipality to see if it’s eligible for construction. In some cases, a building permit may be required to move forward with the project. Rules for extending your house differ depending on your area and whether renovations involve house modifications, second-story additions, or home extensions. To find out how to get a permit, here are some questions to ask your municipality:
- Am I allowed to modify my home as defined in my project scope?
- How long does it take to get a building permit for this project?
- What documents will I need to obtain a building permit?
Here are some documents that may be required when applying for a building permit:
- 3D concept plans
- Architectural plans
- Structural plans
- Survey plan
- Drawings/photos of external elements (e. g., exterior siding, doors, windows)
- Certificate of location
- Building sheet
- Proof of insurance from the general contractor performing the work
 g., exterior siding, doors, windows)
You may need to review and modify your project scope before getting approval for a permit. For example, there could be building height restrictions in your area. To circumvent this rule, you could extend your house to the side or towards the backyard instead of building upwards.
Credit: Go building
3 – Identify the experts you need
Depending on the type of home extension, different design and build professionals can be involved at various stages of your project. As a general rule, the larger the project, the more stakeholders there are. When it comes to a standard home extension, you’ll work with the following experts:
- Architect (or architectural technologist)
- Interior designer
- Structural engineer
- Municipality
- Insurer
- General contractor and their subcontractors
- Material suppliers
Get a Billdr project manager by your side
After defining your needs, Billdr helps you identify all the required resources to make your renovation ideas come to life and evaluate the different options available.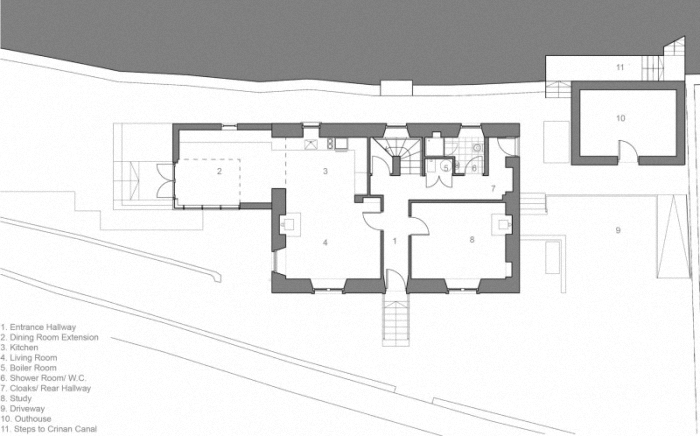
While this guide offers several tools to prepare for your renovation, each project is unique and requires a personalized approach.
A Billdr project manager ensures that your project is a success through custom support from pre-construction planning to on-site project management.
Tell us about your project
4 – Hire an architect (or an architectural technologist)
The architect (or architectural technologist) is responsible for providing guidance and bringing your vision to life. They’ll work with you to understand your reasons for extending your home, your style, and your design preferences while maintaining a sense of harmony between your current home and the new layout.
What is the difference between an architect and an architectural technologist?
- An architect can carry out and sign plans for all residential, commercial, or industrial projects with complex structural requirements.
- An architectural technologist may not be qualified to undertake large-scale construction projects.

5 – Design architectural plans
After discussing with you, an architect/architectural technologist will take measurements of your home. They’ll then be able to draw a series of plans for various stages of your project.
- Sketches: Drawings outlining the layout of the space to be renovated
- Preliminary plans: Plans used to obtain a building permit
- Construction plans*: Plans explaining the work that needs to be done
- Demolition plans (if necessary): Plans showcasing elements that need to be taken out
* Though not mandatory in theory, construction plans are important for the following reasons:
- As the primary means of communication, they describe the work that needs to be done during your renovations with details such as room dimensions, materials, finishing specifications, siding, flooring, foundation, and sound and thermal insulation.
- These plans allow contractors, subcontractors, and suppliers to estimate costs and build quotes. The entire scope of work is compiled into a single document to reduce ambiguity, misunderstanding, and interpretation risk.
- They may also be presented as a legal document for designs that need to be based on plans signed by a designated professional.
 The entire scope of work is compiled into a single document to reduce ambiguity, misunderstanding, and interpretation risk.
Get design plans for your home extension project
Through our partnerships with trusted architects and interior designers, Billdr can provide you with design plans for your renovation projects. These plans are tailor-made to suit your needs and bring your dream home to life.
Tell us about your project
6 – Hire a structural engineer
Building an extension to your house typically requires both an architect (or architectural technologist) and a structural engineer. While the architect is responsible for designing the new layout and choosing construction materials and finishes, the structural engineer is responsible for designing and sizing structural elements (i. e., load-bearing components that hold a construction up, whether they’re wood, steel, or concrete.)
What is the difference between architectural plans and engineering plans?
During the design phase, the architect can suggest having a reinforced concrete foundation. However, there won’t be any specifications about the selected concrete, no plans of reinforcement within the poured concrete, nor walls and footings dimensions in their architectural plans. Since the architect doesn’t have the necessary expertise to give these directives, it’s not within their professional responsibility to define these details. The design and sizing of structural elements are strictly reserved for structural engineers, who have the knowledge and credentials to include this type of information within their plans.
Credit: Affleck Property Services
7 – Develop structural plans
Structural plans determine the structural elements of your home extension: foundation, concrete slab, load-bearing walls, columns and beams, and lintels above doors and windows.
These plans give precise information to the general contractor on how to build the parts of your extension that holds it up. According to the Law on Engineers, an engineer’s input is mandatory for any construction work related to a building’s structure.
General contractors can recommend a structural engineer that they’ve worked with. However, we suggest hiring an independent one to avoid potential conflicts of interest. Also, keep in mind that a contractor needs an engineer’s recommendations on structural work before being able to provide you with final quotes.
8 – Apply for building permits
A building permit is an authorization from your municipality to undertake specific renovation work, including home extensions. You should try to get a building permit from your municipality as soon as you receive your architectural plans. Some areas may also require structural plans for your project to be approved. In general, it takes between two and three months to get a building permit, depending on the municipality and the type of construction work.
Save time with an easier permit application process
Forget the hassle of back-and-forth communication with your municipality. Billdr does the heavy lifting for you. We’ll support you with your permit application by providing the required plans and following up with your municipality on your behalf.
Tell us about your project
9 – Request quotes from general contractors
Once architectural and structural plans are finalized, you can start receiving quotes from general contractors. Providing complete project plans will allow you to get the most accurate quotes. If there’s missing information, general contractors might have to take additional time to revise their quotes.
Once documents are received, contractors will visit your property to get a full understanding of the scope of your home extension project and the environment that they are working with. This step will help them assess and visualize the different components of the construction site that impact the cost of your project (e. g., entries, exits, overall condition of the house).
Should I discuss my budget with a contractor?
The short answer is yes! Discussing with your contractor about your objective is a good exercise. Sometimes contractors will have ideas that build upon architectural and/or structural plans to help reduce your costs or improve work quality.
General contractors ask clients about the budget to ensure that their time is well spent. Preparing a quote for a home extension project can take up to one week. This process requires the general contractor to read plans and specifications, meet with the client, communicate with other build professionals, and request prices from suppliers and subcontractors — while not being sure if they will be paid for the job. So, before starting to work on a quote, a contractor needs to be assured that their client has the budget to complete the project.
Between design plans and actual construction, changes can occur along the way. Keep a contingency plan of at least 15% of your budget to cover for these unforeseen expenses and/or additions to the scope of work.
Get connected to vetted and experienced general contractors
Billdr partners exclusively with general contractors who have their licenses and civil liability insurance, ensuring that your home is in good hands. To learn more about our vetting process, consult our guide to finding a good contractor.
By working with Billdr, you’ll get access to portfolios from each general contractor who’s interested in your project. In these portfolios, you’ll find their license number, areas of expertise, and photos of recent projects to help you decide who you want to hire.
Tell us about your project
10 – Hire a general contractor
After meeting with several general contractors and receiving quotes, you’ll have a better sense of who you want to work with. At this stage, you’ll be able to choose and hire a general contractor to carry out construction on your project.
Once signed, the quote becomes a binding contract. So, before moving forward with the quote, make sure that it includes the following information:
- The general contractor’s name
- The general contractor’s license number
- Your name
- Your project’s address
- Scope of the project (the contractor must state that the work will be done “according to the architectural and engineer plans”)
- Deadlines
- Cost
- Payment terms
- Any specific conditions (elements not included in the contract or additional details)
Tips for hiring your general contractor
- Make sure that the general contractor has a valid license and liability insurance (minimum $2,000,000) to protect your property and your neighbor’s during construction.
- Check out their portfolio to get a good sense of their experience.
- Review their availabilities to see when work can begin.
- Verify your payment terms.
11 – Begin construction work
The first few days of a project are dedicated to site mobilization. During this time, the general contractor installs protective measures to secure the site and existing installations (e.g., covering floors), sets up temporary services (e.g., on-site lighting), and secures a waste container, among other things. Afterward, when necessary, their team will carry out demolition work before proceeding with the new construction.
Building a house extension involves several stakeholders. Though a general contractor may have to execute part of the construction, they usually work with specialized subcontractors (e.g., electrician, plumber, or excavation company). Their role is to manage build professionals on-site to get the project done. As the primary contractor, they’ll also ensure that construction follows laws, regulations, and building codes.
Establish a communication channel
There’s no such thing as overcommunication during a construction project! As soon as the contract is signed, decide on the most effective communication channel for both you and your general contractor. This allows for regular construction updates, next steps planning, site visit coordination, invoice and payment follow-ups, and change management. We also recommend keeping a written record of your communications to have something concrete to look back on.
Manage mid-project changes
Your scope of work can change during a construction project. These mid-project changes could include additional work (which may incur extra costs) or canceled tasks (which becomes a credit to your contract’s value).
Changes can become a source of conflict if a process for managing them hadn’t been agreed on beforehand. Make sure that any change in the scope of work requires your approval first. This means that the general contractor will need to share the price of the changes before related work can begin so that there are no additional surprise costs at the end.
Review your project scope
Your project’s scope of work serves as a baseline and may change over time. As the project develops, there may be new opportunities or alterations to initial designs. To remain aligned, the scope of work must be reviewed regularly and changes must be communicated to each stakeholder involved in the project.
Monitor the construction schedule
Monitoring a pre-established schedule helps you measure the progress of your project over time. It allows you to identify and document delays if they occur, and plan site visits more efficiently.
Track costs
Tracking your costs allows you to control your budget and account for expenses. Your budget should have a specific amount dedicated to paying your general contractor and another amount as a contingency. You should also keep track of the amount spent on changes.
Control quality
Quality control is performed through weekly on-site evaluations to see if work has been completed according to your project’s scope. These visits occur at key moments — usually during structural changes, electrical installation, thermal insulation, waterproofing against moisture and water, or concrete pouring.
Unlock peace of mind with a Billdr project manager by your side
Billdr supports you throughout construction. Information is shared directly between you, the general contractor, and your Billdr project manager in a group discussion.
Through weekly site visits, your project manager provides you with status updates on construction progress, ensuring that the project remains on time and within budget. You’ll also receive a report that tracks work completion, site photos of your project’s progress as well as updates on your project scope, budget, and payments.
Tell us about your project
12 – Approve the construction work
The end of your home extension is marked by the final approval of the work that has been completed. This process is carried out in two stages:
Deficiency visit
You’ll need to visit the construction site with the general contractor to see if there are any irregularities or uncompleted work (also known as deficiencies). The contractor’s role is to note all the deficiencies that have been found on the work that they were responsible for.
Transfer of responsibility
Once deficiencies have been corrected, your new home extension is yours! This is when the responsibility for the premises transfers from who was in charge of the project (general contractor) to the homeowner (you). Call your insurer to update your home insurance and add your new home extension since it was covered by the general contractor’s insurer until now.
13 – Complete your renovation project
Once work is completed and all deficiencies are corrected, the contractor will have fulfilled most of their contractual obligations. To finalize the project, they must give you a letter of guarantee. Once you receive the latter, you can pay your last invoice, marking the end of your project!
Renovate with confidence
Billdr makes sure that all construction work has been completed to standards, so you can rest easy knowing your expectations have been met. Our team also prepares a list of deficiencies for you and ensures that they’re all corrected by the general contractor.
Tell us about your project
Plans and permits: What you need to know
Any type of home extension or addition will require a building permit and architectural plans. Depending on the complexity of the work, a plan from a structural engineer could be sufficient.
Before deciding on a type of extension, you need to know what’s allowed in your area. For instance, there might be a height restriction in your neighborhood, which will prevent you from building a second story. Or, if you live in a historical area, you might be allowed to build up but only if you maintain the facade of the existing building. There could also be restrictions on the kind of exterior siding you can use, the number of windows you need to install, and egress requirements.
If you’re working with an architect, it’s their job to collect these requirements from your municipality. But if you’re just in the exploration phase and wondering what you can and cannot do, it’s a good idea to visit your local building permit office where you can get information about what type of construction is allowed in your municipality.
If you have your heart set on a particular type of extension or addition that isn’t allowed, you can ask for an exemption or derogation. However, this requires quite a bit of leg work and will impact your project’s timeline. At that point, it might be worth considering another way to expand your home that both meets your goals and complies with local building codes.
Get end-to-end support on your home extension project
At Billdr, we provide you with an end-to-end project report once your renovations are complete, which serves as proof of the quality of the work provided.
This document lists all the information related to your project: the scope of the work, architectural and structural plans, stakeholders’ contact information, site visit reports, progress photos of the project, cost tracking, and shop drawings for materials and equipment installed during construction.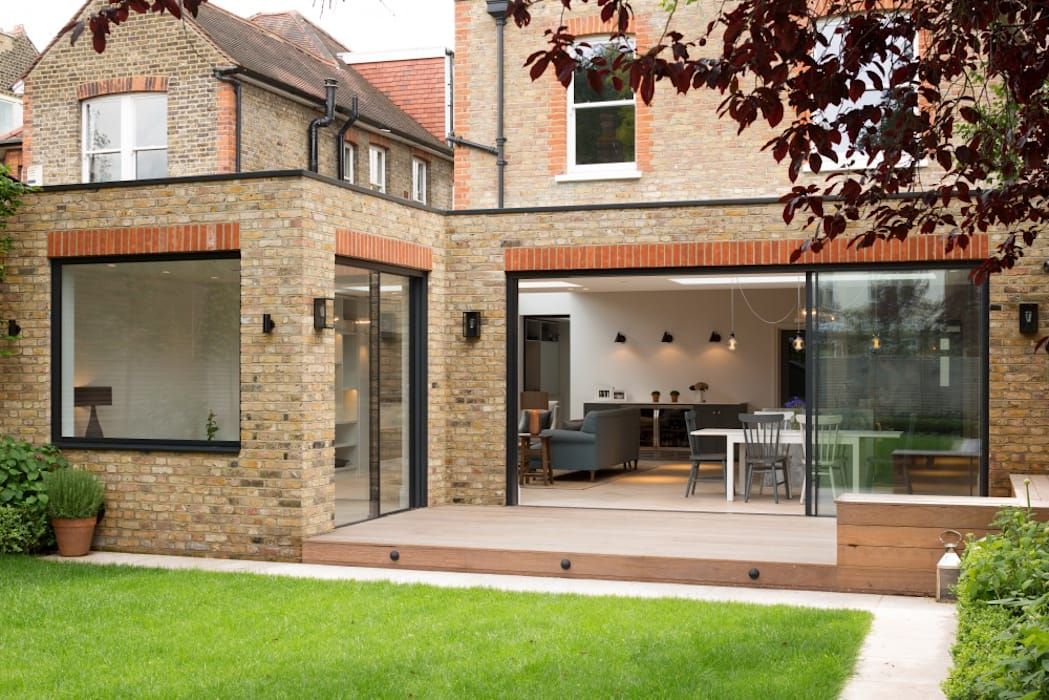
Tell us about your project
Costs of different types of home extensions
Like with any home renovation, home extension costs depend on several factors: complexity, size, finishes, and the purpose of the new space. An extension with no plumbing and minimal ventilation or electrical work will be cheaper than creating an extension for a new kitchen or bathroom.
The type of extension is the biggest determining factor when it comes to price. When you’re in the planning and budgeting phases, it’s important to think long-term. A smaller expansion will be more expensive in terms of cost per square foot when accounting for labor and construction materials. So, if you anticipate needing more space in the future, you should consider getting all the work done in one shot.
There are three types of home extensions:
- Building down: Adding a basement
- Building up: Adding a story
- Building out: Adding an extension
Building down: Adding a basement
Average price: $225/sq. ft or $180,000 for 800 sq.ft
Adding a basement is a popular way to expand your home. It’s a good option for building a lounging or entertainment area, additional bedrooms, an office space, or a bathroom. You can also excavate your basement to create an accessory dwelling unit (ADU) and convert your home into a multi-generational living unit for a family member or rental income.
Basement construction involves excavation to create larger windows, a higher ceiling, and legal exits. Many older homes don’t have full-height basements, which makes them less functional than basements that have high ceilings of over seven feet.
A lot of structural work is involved when you dig under a foundation. The home must be stabilized and the foundation strengthened by installing supports during a process called underpinning. By building up concrete walls, underpinning allows you to get more than three feet of space in your basement. Once excavation work is complete, your contractor will build a new foundation, walls, and footings. Since this is a specialized trade, your general contractor will work with subcontractors who exclusively do this kind of work.
If you’re planning to add plumbing to your basement addition, you’ll also need a plumber who can verify where the main water supply and drain are situated. If the drain is above the floor of the newly dug-out basement, you won’t be able to install a standard toilet and shower unless you bring the drain down to below grade. There are options like toilets and showers that pump the wastewater up into the drain, but it’s best to discuss the implications of that option with your contractor.
Building up: Adding a story
Average price: $200/sq.ft or $160,000 for 800 sq.ft
IIf you own a single-family home, building up is often an easier and more affordable home addition — especially if you’ll be replicating an existing floor plan on this new level. For example, placing a new bathroom directly above the existing one allows you to share the same plumbing stack, and lining up radiators and heating vents with their counterparts facilitates construction.
However, some factors can impact the cost and complexity of adding a story. Do you have a flat or peaked roof? Do you share a wall with a neighbor? Is it a concrete wall? Do you want to use the second story for an ADU? A structural engineer and architect will be able to evaluate your current situation and what the possibilities are.
Since building up means altering the exterior of your home, you’ll also have to make sure that there’s a certain visual harmony between the existing building and the addition. Your architect or architectural technologist will keep this in mind when designing your new space.
Building out: Adding an extension
Average price
- Garage: $135/sq.ft or $108,000 for 800 sq.ft
- On foundation: $195/sq.ft or $156,000 for 800 sq.ft
- On piles: $160/sq.ft or $128,000 for 800 sq.ft
If you have a backyard, side yard, or a good amount of space in the front of your home, an extension could be the right move for you. You can build a garage-type unit with access from the main part of your home, but use it to house a family room or a powder room. There’s also the option of building a garage for a vehicle and adding another unit on top of it.
When extending your house towards the back, front, or side, your engineer and/or architect will determine if you need a concrete or pile foundation.
- A concrete foundation is recommended if your extension includes a basement or a basement and first floor.
- In a pile foundation, supports (or piles) are driven into the ground to support the expanded footprint of your home. While this is the most cost-effective option, it’s only possible if you want to expand on one floor. If you think long-term and may want to build up as well, you’ll need to pour a foundation.
Does an extension or addition add value to your home?
With such a huge project, you might be wondering, “Are home extensions worth it?” When renovating your home, consider the potential return on investment from your home extension project if you decided to sell it later. A well-renovated home extension or addition will add value to your home since you’re making your home more spacious, modern, and functional. For instance, if adding another story allows you to market your home as a four-bedroom house, it’s instantly more appealing to families, especially in urban settings or areas with older homes where two or three bedrooms are the norm.
According to Opendoor, an online residential real estate platform in the United States, adding a full bathroom can increase resale value by almost 6%. Depending on the market, increasing your above-ground living space can net you an average of an extra $20,000. However, it’s difficult to put an exact number on the value of your home extension or addition due to all the variables that influence it. If you’re expanding your home to live there, consider the value that renovation brings to your lifestyle, in addition to the value it brings to your wallet.
House extension before and after
With the help of some of the best home extension general contractors, Billdr worked with over 100+ homeowners to bring their ideas to life. Licensed general contractors from the Billdr network are fully vetted to ensure high-quality workmanship on your home extension project.
Welcoming their second child, Philippe and his wife found themselves in need of more room. With two rambunctious tykes in tow, the couple was looking for housing to accommodate their growing family and daily playtime rowdiness. At the same time, the grandfather expressed an interest in being closer to the couple and their children, hinting at the idea of aging in place.
Read more about their home renovation story
Adding to your home is a huge endeavour, but it can be broken down into a series of smaller projects. With thorough planning, a clear vision, trusted partners like Billdr, and patience, having your dream home with all the space you need is more than possible.
Ready to start your home extension or addition?
Share details of your home extension project with our team, and we’ll kickstart your renovations together.
Tell us about your project
More guides
8 steps to follow when planning an extension project
Extending your existing home to accommodate a growing family or to get a purchased property to the size you’d originally hoped for is an increasingly popular choice in the UK. In this guide, we walk you through what you’ll need to know and think about before you begin your project.
1. How much will an extension cost?
Extension costs vary depending on the quality of finish you’re after, how many storeys you’re adding and most importantly your location, but as a guide, a small single storey kitchen extension of 2 X 4 m will come in between £10,000-£15,000 whereas a more involved project adding two storeys each containing two 4 X 4m rooms could set you back £80,000-£120,000.
2. Where do I start?
Every good project needs a plan and in the case of an extension, this means getting an architect or design and build company to work with you to sketch out a drawing of your extension. Depending on how your extension is built e.g. above a garage, you may also need a structural engineer to produce drawings and calculations to prove the build will comply with building regulations.
3. Rules, regulations and permissions
You’ll also need to establish whether you need planning permission for your extension, which may or may not fall under permitted development which doesn’t require additional planning permission. Permitted development rules that apply are:
– If you have a detached property, you can extend it by 8 m to the rear for a single storey or 3 m if it’s two-storey.
– A single storey extension should be less than 4 m high on the ridge and eaves, also the ridge can’t be higher than the existing property.
– Your rear boundary must be at least 7 m from the edge of any two-storey extension.
– Extending to the side is only permitted as a single storey, no more than half the existing building length and again less that 4 m high.
– You need to match the extension building materials to the existing property.
– You can’t go forward of the original building to the front.
– Extensions shouldn’t cover more than half the garden.
If you live in a listed property, in a conservation area, natural park, area of outstanding natural beauty or anything of this nature, additional planning permission may still be required, even within these constraints.
Whether you need planning permission or not you’ll have to comply with building regulations, and this means doing a full plan submission to adhere to best practice and reduce the risk of discovering areas of non-compliance during the build when they may be costly to fix.
4. Find a good builder
If you went with a design and build company for your plans this bit is already sorted, but if you engaged an architect, you’ll need to find a good builder to make their plans into reality.
The best way to find a good builder is through recommendations from people you trust who’ve used the firm before, from your architect or building inspector. Once you have a name to go to, there are certain checks that you can make to ensure the recommendation is a good one. A decent contractor should:
– Have evidence of their current insurance policies showing cover for all risks
– Ask for enough information to give you a fixed price and timeline for the job
– Be comfortable with you talking to their past clients
– Never ask for money up front but instead agree a payment schedule with you
– Not be suspiciously cheaper than everyone else you get to quote
– Have a VAT number and be able to provide VAT receipts
– Ideally, they’ll offer a warranty on the work
5. Financing your extension
Ideally, you’d finance the work from your savings, but we all know that’s not always a realistic option. If you need to borrow money, here’s the best way to do it:
– Small extensions that run into the thousands rather than tens of thousands are best put on a 0% interest credit card which have interest free period of 12-27 months.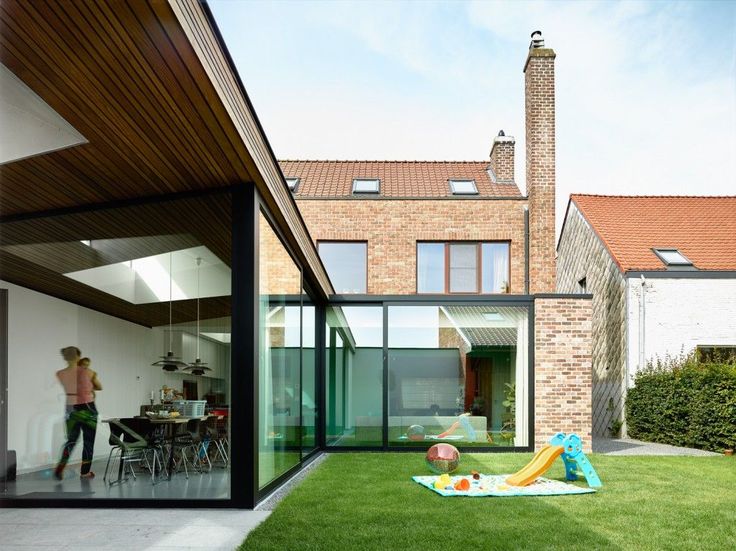
– Mid-sized extensions can be covered by personal loans of up to £25,000 and you can often get kitchens and bathrooms on 0% finance deals too. You just need to be aware of the total repayments you’ll need to make each month and make sure you can afford them.
– For larger projects, you’ll need a secured loan or re-mortgage. If your mortgage company won’t play ball, it’s worth talking to building societies, many of whom offer significant home improvement loans.
6. What do I need to order and when?
Your contractor should take care of ordering most of the materials you’ll need for the actual building work e.g. bricks, plasterboard etc. but you’ll probably want to take care of some things yourself:
– Kitchens and bathrooms often have to be ordered weeks if not months before their installation date, so if you’re set on a certain thing in this respect check the lead times and plan accordingly, making sure that anything you order is in your name and not the builder’s.
– Rooflights and windows similarly can have lead times from 8 – 10 weeks.
– It can be tempting to get straight into ordering new furnishings and finishing touches for your dream space, but try to hold off until you actually need them as not only will this put an unnecessary strain on your cash flow, you’ll have to find space for them in an already disrupted and cramped household until the dust has settled and the finish is complete on your extension.
– The exception on this is bespoke or made to order items which sometimes have long lead times and will need to be planned for, so you don’t end up sitting on the floor whilst you wait for your beautiful new sofa to arrive.
7. Tradesmen and installers
In addition to your main building contractor, you may choose to hire independent tradesmen to complete different aspects of the work, for example if you know a particularly brilliant plumber already or you want your windows and rooflights installed by a specialist.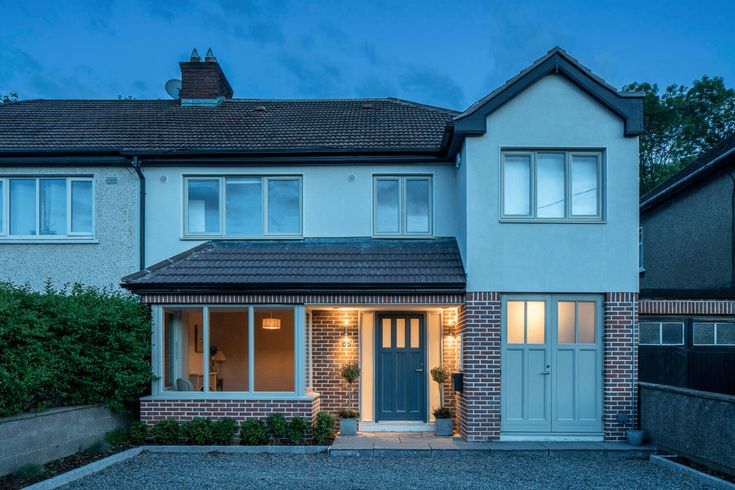
It is important to communicate your desires up front to your main contractor up front and do the leg work in coordinating their visits to the site if your main contractor is unwilling to take on this extra responsibility for people they may not know or trust.
8. Interior design
Once the dust has settled and the site has been signed off, you can get into what a lot of people think of as the fun stuff. Whether you choose to go it alone or to hire an interior designer to help you plan the look of your new space, you’ll want to complete the planning well in advance of your planned completion date. This will allow you time to carefully select your colours and furnishings and allow for any lead time on made to order items. You probably want to hold off buying smaller items and finishing touches until the interior is mostly finished, to allow you to see what the main elements of the new room/s look like in the flesh. Bear in mind that you’ll have a long time to perfect the look of your new space, whereas wasted money on hasty purchases is less easy to recoup.
Want to talk to a daylight expert about putting rooflights into your new extension? Give us a call +44 (0) 1592 778 246 or write us at [email protected]. We’re happy to help.
Permission and documents for the reconstruction of a private house in 2022
Reconstruction of a private house is a thorough and capital restructuring of physically and morally obsolete buildings in order to improve their appearance, condition, parameters, characteristics, as well as give them new properties.
Option for reconstruction of a private country house
Back to the table of contents
Material content0010
Which houses need reconstruction
Time has a devastating effect on any building, regardless of what material they were built from and how well they were made. Taking into account the fact that construction technologies and architectural art do not stand still, buildings are subject not only to physical destruction, but also to moral obsolescence.
Today, the country’s housing stock contains a very significant number of old and dilapidated houses that were built more than 40 years ago. In most cases, these buildings are already far from being in perfect condition and are unsuitable for people to live in because they pose a threat to their life and health.
The simplest option that could be foreseen is the demolition of the old building and the construction of new housing on the vacant site. The liquidation of the old house is completely optional, because a competently and skillfully drawn up reconstruction project and the documentary permission received for it will make it possible to make a completely modern and comfortable cottage even from a completely dilapidated suburban building, while it will meet all the requirements and standards.
If we turn to this option, then it will be necessary to resolve the question – how is the reconstruction of a private house legally carried out and what documents will be required in order to obtain the appropriate permit.
Back to the Table of Contents
Required Documentation for House Reconstruction
There are options for old housing that can be made comfortable and convenient only if a private house reconstruction project is drawn up and significant changes are made to its design.
Sample permission for the reconstruction of a house
Only redevelopment in this case cannot help, the reconstruction of a country house, like the reconstruction of a summer house, implies the construction of a veranda or terrace, as well as an increase in the number of floors and other processes associated with construction work and obtaining appropriate permission for such reconstruction.
These processes will cause a change in both technical and economic indicators, because the renovation project of the old building will significantly affect the change in the total area of the premises.

Reconstruction of country houses is carried out, regulated and controlled on the basis of a normative act called “Regulations on the procedure for the reconstruction of residential private houses and non-residential buildings”.
Based on this provision, the reconstruction of country houses from the funds of old housing comes into force after an application is submitted to the relevant local authority.
An example of the reconstruction of a country house
The law provides for a period of up to one month for consideration of an application in 2020.
At this time, the authority responsible for making the decision either gives its consent to the reconstruction project of a private house or responds with a refusal, which will need to be motivated. In any case, the applicant must be informed in writing of the outcome of the decision.
However, this does not end the documentation process for the improvement of the old building, in addition to the application for reconstruction, the applicant will have to complete the following documents:
- Building plan on the land plot, confirming the relevant permit. Such a document is usually performed either by a legal entity or by a private entrepreneur.
- A project for the reconstruction of an old building, which should contain a detailed plan and type of proposed work, including a description of how the purpose or parameters of the premises of a residential building will be changed.
- Documents with signatures of all residents, confirming their consent to the reconstruction. Signatures of residents temporarily absent for any reason are also required in this case.
 Such a document is usually performed either by a legal entity or by a private entrepreneur.
 It will be possible to start the reconstruction of the old house only after the applicant has submitted all the specified documents and received consent to carry out the work. Only in this case the reconstruction will be considered legal.
Return to the top
Reconstruction of the foundation of a private house
The construction of any house begins with pouring the foundation. Restoration work also starts from the ground. The first step is to examine the foundation of the building and check it for defects.
In the event that significant defects are found, appropriate measures must be taken to eliminate them. If the reconstruction is carried out in log houses, then in addition to the foundation, it is necessary to check the lower crowns of the log house.
Such a place is most often subject to the process of decay, which has an extremely negative effect on the stability of the entire structure.
The process of reconstructing the foundation of the house
If the fears were not in vain and rotten elements were found, then their immediate replacement should be a priority.
Back to the top
Reconstruction of the main premises of the house
In the process of reconstruction, it is often necessary to raise the issue of redevelopment of living rooms. There may be some difficulty in resolving this issue..jpg?1449713719) In order to unite spaces, it is often necessary to remove one or another wall, and it may turn out to be a load-bearing one.
In order to unite spaces, it is often necessary to remove one or another wall, and it may turn out to be a load-bearing one.
If such a problem has arisen, then it will not be possible to demolish the wall immediately and finally, it will be necessary to install a special structure instead of the wall to support the building.
The structure usually consists of interconnected supports and a beam laid on them.
Back to the Table of Contents
Reconstruction of brick walls
If the reconstructed house was built of brick, and defects were found in its walls, then it is first necessary to understand the causes of deformations in the bricks.
An example of the strengthening and reconstruction of the brick walls of the house
For this, the quality of the luggage, its horizontalness, as well as the thickness of the seams and dressings are checked. If the masonry was laid with mixed mortar or poor quality limestone, then it will need to be disassembled.
The most convenient way to carry out this procedure is with a pneumatic jackhammer. It will also require an increase in the bearing capacity of the wall. The most rational option here would be a peripheral replacement of the mortar in polymer-based joints.
The main advantage of this method is the significant savings in time and money. It is also important that the reconstruction of the wall will be carried out without changing its mass upwards and without reducing the interior space of the room.
Back to the top
Reconstruction of wooden walls
Reconstruction of wooden walls only at first glance looks simpler than restoration work on brick walls, in fact, there are also a number of nuances here.
The main reason wood walls need repair is when the wood starts to rot. Decayed logs are not subject to restoration, they will need to be replaced with new ones. To reduce the degree of decay in the future, waterproofing must be applied to the foundation.
Three layers of roofing material can serve as an example. The lower part of the log crown will need to be covered with a special antiseptic and bitumen.
To improve the strength and durability of the house, the rotten lower crown can be replaced with brickwork. This will require several levels of waterproofing – first between the laid masonry and the foundation, and then between the masonry and the preserved crowns. As a rule, reconstruction is usually carried out in old houses, the settlement of walls in which has long ceased. In this case, it is not necessary to leave a gap above the openings, it must be filled with insulation.
The side posts can be left, but the top and bottom cushion can be removed. The resulting opening must be hammered with timber or logs, clearly repeating the design of the wall itself.
Return to the Table of Contents
Alteration of floors during the reconstruction of a house
Repair of floors is usually carried out either by replacing the roll, or by reinforcing wooden beams and the design of floors throughout the entire area of \u200b\u200bthe dwelling.
To begin with, it is necessary to remove the floor, the insulation layer, as well as all the layers of rolling and insulation, after which it will be possible to proceed to the study and diagnostics of the beams. Before starting the repair, it is necessary to strengthen the beams, this can be done with the help of side plates, which will need to be attached to the beams with nails or bolts.
The process of reconstructing the floors of the house
For greater reliability, a temporary support must be placed under the repaired beam. After that, you can start repairing the beam, removing the part that has become unusable and replacing it with a new one.
The reconstruction of reinforced concrete floors must be approached with particular responsibility. Such structures can be divided into several types:
- Flooring, which rests on the outer walls of the house and completely covers the span between the bearing walls.
- Individual reinforced concrete beams of various profiles, which are slabs. Or lightweight concrete liners located on the shelves of the beams.
- Beams with reinforcement exposed at the top, similar to monolithic structures. Reinforced concrete slabs are usually laid on them, and concrete is poured into the remaining voids.
- Small blocks laid on slotted decking are also monolithic slabs in which concrete and rebar frames are laid.
Example of pouring a new floor in an old house using a galvanized profile
 Or lightweight concrete liners located on the shelves of the beams.
 Back to the top
Reconstruction of partitions in the house
Reconstruction of partitions will include the following types of repair work:
- Complete replacement of partitions that have become unusable, or installation of additional new partitions if the reconstruction provides for redevelopment of the house;
- Relocation and strengthening of existing partitions;
- Replacement of individual parts of the frame;
- Cohesion of various parts of shrunken partitions by adding boards;
- Boarding up openings in partitions;
- Correction of partitions that have sagged or otherwise deformed over time.

At the same time, at the time of reconstruction of private houses, it is recommended to completely remove the old partitions and install new ones instead, made using more modern technologies.
For example, it can be gypsum concrete slabs, ceramic stones or regular bricks. The laying of partitions can be carried out by combining all of the above options.
To make the structure more reliable and durable, partitions can be reinforced. For this, a thin reinforcing wire of 5-7 mm will be enough. This technique makes the partitions more stable.
Where the structure intersects with the main wall, metal pins will need to be driven in or screwed in. In order for a brick partition to remain in good condition for a long time, it must be carried out strictly vertically, while monitoring the formation of seams and filling them with a special solution.
Back to the top
Work in the attic during the reconstruction of the house
The first thing to be done in the attic is to address the issue of strengthening the floor surface. To do this, you will need to replace the logs with more durable ones. As a material, it is best to use timber for them.
An example of reconstruction and insulation of an attic in an old house
After strengthening the floor, it is necessary to reconstruct the roof. Special attention will need to be paid to the thermal insulation of the walls of the house. To do this, you can use mineral wool slabs – this will be the most economical option. You can also resort to a more expensive one, using modern heat-insulating roll materials.
With proper reconstruction of the house, which can give the building a “second life”, the living space can serve for more than a dozen years to the delight of the people who will live in it.
The Ministry of Construction will prepare projects for 12-story wooden houses
Vitaly Belousov / RIA Novosti
The Ministry of Construction and the Ministry of Emergency Situations approved an action plan (road map) for the development of wooden housing construction for the period up to 2024. The document provides for the organization of joint work of departments with AFK “Sistema” and the Association of wooden housing construction to improve technical regulation and expand the scope of wood structures.
“Our country has a rich historical experience in the use of wooden structures in construction, and also has great potential for the development of the timber industry. In order to apply and implement them, our ministry, together with the Ministry of Emergency Situations, conducted an analysis of the current regulatory framework used for wooden housing construction, and determined its compliance with modern market needs and the world level of technical development, – commented the Minister of Construction and Housing Irek Faizullin. – The result of our consolidated work with the active involvement of the professional community was a plan, the implementation of which will ensure the widespread introduction of the construction of multi-storey wooden buildings using the best foreign and domestic experience “.
The roadmap provides for a whole range of research and development work (R&D) aimed at ensuring fire, mechanical and seismic safety of wooden objects. For example, already this year, the minimum distances between buildings required in terms of fire safety will be determined using the field modeling method. The results of R&D will allow solving a number of problems that limit the widespread introduction of wooden housing construction, which are associated with seismic resistance, laying of engineering systems, low thermal and sound insulation characteristics of materials, their maintainability, and the need for constructive fire protection.
In parallel, it is planned to prepare designs for pilot projects – public and residential buildings from 3 to 12 floors, built from cross-laminated timber (CLT), laminated laminated timber and the same veneer material (LVL).
“Project documentation approved based on the results of the work carried out can be used for construction in seismic areas and under any climatic conditions. At the same time, the safety of such houses and the quality of life in them will be comparable to more common buildings made of concrete and iron,” explained Deputy Head of the Ministry of Construction Sergey Muzychenko.
Another important block of roadmap activities is the adjustment of the regulatory framework based on the research work carried out. Both the updating of existing and the development of new regulatory and technical documents are envisaged.
It is worth noting that the Ministry of Construction has already developed and approved a number of codes of practice for the design of wooden buildings – public, residential multi-apartment, buildings made of glued wooden beams, of wooden log structures, changes have been made to the set of rules for wooden structures.
Pilot four-story apartment buildings are currently being built in the Vologda Oblast using CLT structures, according to the Ministry of Construction.
The foundation was completed in April, the buildings themselves have already been fully built in three months, Maxim Babaev, technical director of the Sokolsky plant of the Sokol Sielti company Segezha group, told RG. The interior work is underway and the façade paneling will begin next week. According to current regulations, for fire reasons, wooden structures must be closed both outside and inside (the walls of the rooms are sheathed with plasterboard), the apartments will only have wooden ceilings. But the houses are “breathable”, energy efficient, with durable facades, and at the same time no less durable than those made of concrete, Babaev assures. The cost of building pilot houses is about one and a half times higher than that of concrete counterparts, he notes. But if the construction standards are improved, and the construction itself becomes massive, there will be some experience, then it will definitely become more economical, says a company representative. At the same time, according to him, the construction of such houses is already cheaper in seismically hazardous areas (concrete needs to be strengthened more than more plastic wood), as well as in hard-to-reach areas of the Far North, delivering panels there costs several times cheaper than concrete or metal .
 In addition, the installation of buildings – without welding or wet work, is simpler and faster, which facilitates construction in the short warm season.
The construction of multi-storey wooden houses is Russia’s strategic future, says Yury Vissarionov, First Vice President of the International Academy of Architecture. Such houses are environmentally friendly, easier to repair, easier to dismantle and recycle after the expiration of their service life. The main concerns are related to fires, but the metal in the fire loses its strength faster than the shield from the timber burns out. “We have a country of wood. This is originally native Russian wooden housing construction,” the architect emphasizes. If there is an installation for industrialization, typification of such construction, then it will be cheaper than the construction of reinforced concrete buildings. In addition, such buildings are healthier, the architect emphasizes.
By the way
There are no problems with stocks and quality of forests in Russia: there is sufficient volume for the construction of wooden high-rise buildings, says Olga Kalyuzhnaya, President of the National Association of Timber Industry “Russian Forest”.
“Another issue is building technologies, obtaining permits and approvals, changing existing building codes and regulations, legislation, as well as creating a culture of demand for such houses among end users, customers, designers and architects,” Kalyuzhnaya noted.
According to her, the construction of wooden high-rise buildings using CLT-panel technology is an emerging trend in Western countries.
“In this regard, we see progress in the Russian market and quite highly assess the prospects for this segment in the long term,” – said the expert.
Kalyuzhnaya does not expect that the demand for wood from the high-rise wooden housing segment will greatly increase the consumption of timber in the short term, as this is a question of the industry’s development for decades. “High-rise wooden houses are not a mass building, but a segment of unique individual expensive projects, so we should expect an appropriate pricing policy here. If there is demand, prices will certainly rise, but the correlation will not be linear,” she added.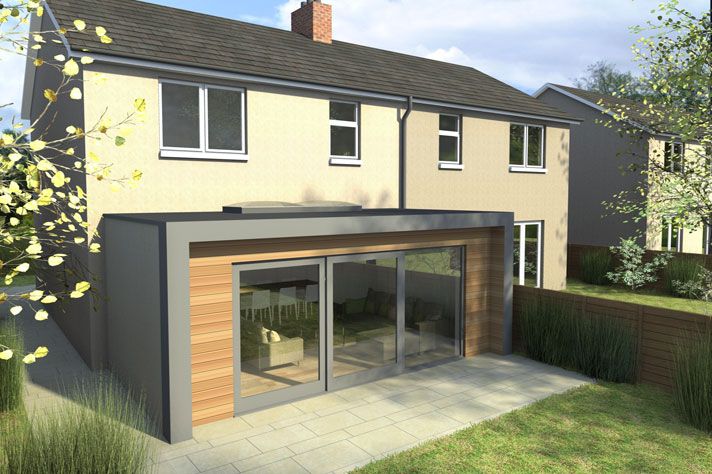
About the project – building plan of the Baltic Pearl district
About the Baltic Pearl
Creating the Baltic Pearl, we were inspired by sunsets and sunrises on the Gulf of Finland, the noise of the green foliage of the parks in the environment, freedom and space that the whole future territory breathed …
All the beauty that we met here was embodied in the harmonious architecture of buildings, public spaces and infrastructure.
We have built not just square meters, but a territory of safe and comfortable life, a carefree childhood, recreation, sports, a healthy lifestyle… The territory of your inspiration…
The territory of your inspiration…
Video about the project
Further
about the project
CJSC “Baltic Pearl” was founded in 2005. It is a subsidiary of the Shanghai Overseas United Investment Company (SCOIC), established by the seven largest Shanghai corporations, including Shanghai Industrial Investment Company, Brilliance Group Corporation, Jin Jiang International Holding, Shanghai Greenland Group and Shanghai Euro-Asian Development Center Europe & Asia. Shanghai United Investment Company is a strategic investor in St. Petersburg.
Our mission
The mission of the company “Baltic Pearl” is to create a modern area on the border of the city and the sea for a comfortable and cozy life in a dynamic city. As a developer and builder, the quality and reliability of Baltiyskaya Zhemchuzhina is guaranteed by state support from China and Russia. Stable financing and clear fulfillment of the obligations of partners and investors in the Baltic Pearl project is a guarantee of the commissioning of all objects on schedule.
Our awards
Back
Further
Experience at 17 years old
9 residential properties
- Residential Complex “Pearl Premiere”
- Residential Complex “Pearl Symphony”
- LCD Duderhof club
- Residential Complex “Pearl Frigate”, 3 turns
- Residential Complex “Pearl Coast”
- Residential Complex “Pearl Cascade”
- Residential Complex “Pearl Harbor”
2 commercial real estate objects per 103 thousand sq. m. m
m. m
- Baltic Pearl Business Center
- SEC “Pearl Plaza”
40,000 square meters built
commercial premises in residential buildings
Back
Further
Present and near future
“Pearl Cascade”
Comfort class residential complex (commissioned in December 2020)
“Pearl Harbor”
Business class residential complex (commissioned in March 2022)
LCD Lotos club
Business class residential complex (under construction)
Riviera club
Business class residential complex (under construction)
Back
Further
Social infrastructure
2 schools and 5 kindergartens with swimming pools have been built on the territory of the Baltic Pearl microdistrict. In total, there are 4 schools and 7 kindergartens in the microdistrict.
In March 2021, a polyclinic for adults and children with an emergency department was commissioned. The multi-profile complex will be able to receive 420 visitors per shift.
The construction of the police station is being completed.
Back
Further
The quarter is also building its own infrastructure
Already, there are four kindergartens, two secondary schools, the shopping and entertainment center “Pearl Plaza”, numerous cafes and restaurants. In the future, it is planned to build three more preschool educational institutions and two schools.
The construction of studios is not provided for
Only spacious apartments from 1 to 4 rooms are provided for in the quarters.
More than 60% of apartments with panoramic views
Due to the variable number of storeys of residential quarters, a large number of apartments with panoramic views of the surroundings of the area have been created: the Gulf of Finland, the Dudergofsky and Matisov channels, the South Primorsky Park
Closed house adjoining territories
For additional safety of residents, round-the-clock video surveillance is carried out.
Underground heated guarded parking is provided in each quarter
You can go down to the parking lot by elevator without going outside
Projects of comfort, comfort+, business and elite classes are being implemented on the territory
This creates social homogeneity of the microdistrict.
Variable number of storeys with high-rise dominants from 18 to 22 floors
Medium and low-rise buildings of most buildings and low building density make it possible to comfortably equip house adjoining territories, children’s and sports grounds in every yard, recreation areas, common areas, guest parking lots.
Unified planning of territories
All quarters of the district are implemented within the framework of a unified planning of the territory in accordance with the approved architectural concept.
Strengthening of banks and canals
Bank protection and improvement of three historical canals flowing through the territory, construction of the wall of the Sea Embankment of the Gulf of Finland is also starting
Comprehensive engineering preparation of the site at the initial stage of the project
Today, this provides a hassle-free connection of houses to city engineering networks and communications.
Advantages of the area and development
All quarters of the area are implemented within the framework of a single territory planning in accordance with the approved architectural concept.
Back
Further
Ecology
- Genuine Ecology
- Surrounded by water
- Smelt
- Surrounded by fauna
- Surrounded by parks
- Reserve “East of the Gulf of Finland”
Transport accessibility
- Transport accessibility
- Metro
- Airport
- Roads
Attractions
- Palaces and fountains
- Historic buildings
Sports and leisure
- Bicycle lanes
- Roller tracks
- Pearl Beach
- Gyms
- Golf Club
- Yacht Club
Back
Further
Infrastructure
All
Sales office
Shops and shopping centers
Schools and kindergartens
Pools
Fitness clubs
The medicine
Parks
Schools and kindergartens
Two new general education schools and five kindergartens operate on the territory of the Baltiyskaya Zhemchuzhina residential microdistrict.
Entertainment
Two new general education schools and five kindergartens operate on the territory of the Baltiyskaya Zhemchuzhina residential microdistrict.
Parking
Two new general education schools and five kindergartens operate on the territory of the Baltiyskaya Zhemchuzhina residential microdistrict.
Back
Further
Zyuzin Nikolai
real estate consultant
About the project
CJSC “Baltic Pearl” was founded in 2005. It is a subsidiary of the Shanghai Overseas United Investment Company (SCOIC), established by the seven largest Shanghai corporations, including Shanghai Industrial Investment Company, Brilliance Group Corporation, Jin Jiang International Holding, Shanghai Greenland Group and Shanghai Euro-Asian Development Center Europe & Asia. Shanghai United Investment Company is a strategic investor in St. Petersburg.
CJSC Baltic Pearl is implementing the first large-scale project in St. Petersburg for the integrated development of the territory in the south-west of the city – the Baltiyskaya Zhemchuzhina microdistrict. The spacious territory of the microdistrict with an area of 205 hectares is being created for a comfortable life for almost 40,000 people. The project provides for the construction of 1.07 million square meters. m of housing and 320 thousand square meters. m of commercial space, the development of transport infrastructure, the construction of social facilities: 4 schools, 7 kindergartens, adult and children’s clinics, police stations.
Our experience
Over 17 years of operation, the company has built 9 residential real estate objects, about 540 thousand square meters. m: LCD “Pearl Premiere”, LCD “Pearl Symphony”, 2 stages of LCD Duderhof Club, 3 stages of LCD “Pearl Frigate”, LCD “Pearl Coast”, LCD “Pearl Cascade”, LCD “Pearl Harbor”, 2 objects of commercial real estate for 103 thousand sq. m: business center “Baltic Pearl”, SEC “Pearl Plaza”, 40 thousand square meters. m of built-in commercial premises on the first floors of residential buildings.
Two residential blocks are under construction:
- Riviera club business class residential complex
- LCD business class Lotos club
Our Mission
The mission of the company “Baltic Pearl” is to create a modern area on the border of the city and the sea for a comfortable and cozy life in a dynamic city.
As a developer and builder, the quality and reliability of Baltiyskaya Zhemchuzhina is guaranteed by state support from China and Russia. Stable financing and clear fulfillment of the obligations of partners and investors in the Baltic Pearl project is a guarantee of the commissioning of all objects on schedule.
Benefits of the Baltic Pearl
- At the initial stage of the microdistrict project, a comprehensive engineering preparation of the site was carried out, which today ensures a trouble-free connection of houses to city engineering networks and communications.
- Bank protection and improvement of three historical canals flowing through the territory have been carried out, construction of the wall of the Sea Embankment of the Gulf of Finland has also begun
- All quarters of the district are implemented within the framework of a unified planning of the territory in accordance with the approved architectural concept.
- Variable number of storeys with high-rise dominants from 18 to 22 floors, medium and low-rise buildings of most buildings and low building density make it possible to comfortably equip house adjoining areas, children’s and sports grounds in every yard, recreation areas, common areas, guest parking lots.
- Comfort, comfort+, business and elite class projects are being implemented on the territory, which creates social homogeneity of the microdistrict.
- Each block has an underground heated guarded parking lot, which can be accessed by elevator without going outside.
- The adjoining territories of residential areas are closed, for additional safety of residents there is a round-the-clock video surveillance.
- The variable number of storeys of the residential quarters of the entire microdistrict makes it possible to create more than 60% of apartments with views to the surroundings of the district: the Gulf of Finland, the Dudergofsky and Matisov canals, the South Primorsky Park.
- In the quarters, only spacious apartments from 1 to 4 rooms are provided, construction of studio apartments is not provided.


Social infrastructure
2 schools and 5 kindergartens with swimming pools have been built on the territory of the Baltic Pearl microdistrict. In total, there are 4 schools and 7 kindergartens in the microdistrict.
Two children’s preschool educational institutions: kindergarten No. 78 “Zhemchuzhinka” with a branch, kindergarten No. 89 “Brigantina” and two of their branches, located in premises built into residential buildings. In September 2021, kindergarten No. 88 “Istok” opened its doors.
Kindergartens are located in the courtyards of the residential quarters “Pearl Premiere”, “Pearl Frigate”, “Pearl Symphony” and “Pearl Harbor”. In total, they are ready to accept over 500 pupils. All kindergartens have their own separate territories with playgrounds and development areas and modern swimming pools.
Two comprehensive schools No. 509 and 547, which meet all modern standards. They provide swimming pools, spacious assembly and sports halls, equipped with everything necessary for study. In 2021, the company commissioned a polyclinic complex for adults and children. And in 2022, the completion of the construction of the police station is planned.
Location and true ecology
The location of the Baltic Pearl project is also unique: on the southern coast of the Gulf of Finland, surrounded by 5 parks. The microdistrict is built up on the territory, which has a huge historical and natural value. In the neighborhood are palace and park ensembles, parks and historical centers of Petrodvorets and Strelna, the estates of Mikhailovka, Znamenka and Sergievka, the Orthodox Monastery of the Trinity-Sergius Hermitage, which are included in the UNESCO World Cultural Heritage List.
The Peterhof Highway, along which a new Petersburg in miniature is growing, has always been an important direction for St. Petersburg and its environs. Since the time of the great reformer Emperor Peter I, country estates of representatives of prominent noble families have been located here. The royal highway on the way from St. Petersburg to the stately summer residences of Peterhof was to overshadow the glory of the famous Paris-Versailles road.
The Peterhof highway has not lost its significance even today. Guests from all over the world come to look at the Versailles luxury of the fountains of Peterhof. And the Konstantinovsky Palace in Strelna is the current state residence. Heads of state gather here to discuss important political issues.
The project “Baltic Pearl” has become a natural continuation of the architectural traditions of the south of St. Petersburg. Block after block, organically blending into the natural landscape, immersed in the greenery of the surrounding parks, a modern multifunctional microdistrict is growing.
Surrounded by parks
- South Seaside Park with amusement and recreation area
- Novoznamenka Park, where the estate of M. I. Vorontsov has been preserved – a rare monument of the Elizabethan Baroque
- Polezhaevsky park, decorated in the English style
- Alexandrino Park
- Park Sosnovaya Polyana
- Alexandria Park
Surrounded by water
- Over 1 km coastline of the Gulf of Finland
- Matisov Canal
- Duderhof Canal
- Untitled channel
Surrounded by fauna
- nightingale
- common frogs
- in 2017, the East Gulf of Finland Reserve was created with an area of 14,000 hectares to protect the habitats of ringed seals and gray seals. By the way, the cubs of the latter are quite often found on the shores of the bay, news about this happens annually. Both species are in the Red Book.
- Baltic cod and Baltic herring, these subspecies are found only in the Baltic Sea and are found in the Gulf of Finland
- smelt, which Emperor Peter the Great considered the king-fish.
Smelt has long been a symbol of the Gulf of Finland and St. Petersburg.
According to legend, smelt was another argument in favor of the founding of St. Petersburg in this very place. Allegedly, Tsar Peter, seeing schools of silver fish in the water, realized that the builders of the city would definitely not remain hungry in these barren lands. And although historians are skeptical about this statement, the fact remains that in 1705 Peter the Great issued a decree on supporting fishermen who caught smelt.
Golf and sailing are among the TOP most expensive sports in the world
- Baltiets Yacht Club – 10 minutes from the Baltic Pearl
- golf club “Peterhof” – 10 minutes from the “Baltic Pearl”
Transport accessibility
The company pays attention to the development of the transport network of the microdistrict: roads and five bridges have been built, two pedestrian ones across the Matisov Canal and three automobile roads across the Dudergofsky and Matisov Canals.
There are 2 comfortable exits to the city: to Leninsky Prospekt and Peterhof Highway. Convenient exits to the ring road and WHSD are located near the area. The road to Pulkovo airport will take no more than 20 minutes. A network of land urban and commercial transport has been developed, three metro stations (Avtovo, Prospekt Veteranov, Leninsky Prospekt) are located 15 minutes from the microdistrict. The plans for the development of the subway until 2025 include the construction of a new station “Yugo-Zapadaya” next to the microdistrict. In the future, a light rail tram line from the Kirovsky Zavod to Peterhof will be launched through the microdistrict.
“Baltic Pearl” in numbers
- Krasnoselsky district of St. Petersburg
- Building area 205 ha
- Integrated development project for 40,000 inhabitants
- Residential area 1.073 mln. meters
- Variable number of floors: from 4 to 22 floors
- 7 kindergartens (five built) and four secondary schools (two built) with swimming pools
- Three canals in the territory and five bridges
- 6 parks surrounded by microdistrict
- Three metro stations in 15 minutes by transport
- Three convenient entrances to the Ring Road and exit to the WHSD
- Coast of the Gulf of Finland – walk 10 minutes
- City center and Nevsky prospect – 30 minutes by transport
- Pulkovo Airport – 20 minutes by car
- 6 kilometers to Konstantinovsky Palace
- 10 minutes drive to the fountains of Petrodvorets
Draft master plan for the city district Lobnya
Decree No. 179-PA dated September 14, 2022 On approval of the composition of the acceptance committee for the acceptance of work performed during the reconstruction and (or) redevelopment of premises in an apartment building on the territory of the urban district of Lobnya, Moscow Region (Download / Appendix)
General plan of the urban district of Lobnya, Moscow region (Download)
Notification of the start of public discussions on the draft amendments to the General Plan of the urban district of Lobnya, Moscow region (Download)
Decree No. 852-PG dated 07/29/2022 On holding public discussions on the draft amendments to the General Plan of the Lobnya City District, Moscow Region (Download) Lobnya No. 1305 dated September 12, 2016 “On approval of architectural solutions for the appearance of non-stationary retail facilities in the city of Lobnya” (Download)
- Appendix (Download)
Decision No. 129/61 dated August 25, 2020 On amendments to the Master Plan of the Lobnya City District, Moscow Region (Download)
Amendments to the Master Plan of the Lobnya Urban District, Moscow Region. Regulations on territorial planning. 2020 (Download)
- Appendix 2 Information on the boundaries of settlements that are part of the urban district of Lobnya (Download)
- Border location description (Download)
Map of the boundaries of settlements that are part of the municipality (Download)
Map of the planned location of objects of local importance of the municipality (Download)
Map of the functional zones of the municipality (Download)
Map of uncoordinated issues regarding the intersection of land plots with lands of the forest fund (Download)
17.01.2020
MASTER PLAN OF THE CITY
Notification of the start of public hearings (Download)
PROJECT OF AMENDING THE MASTER PLAN OF THE CITY DISTRICT OF LOBNYA, MOSCOW REGION (Download)
Resolution of 03. 12.2019 No. 1719 on the public hearing on the project of amendments to the general plan of the city district of Lobnya of the Moscow Region (download)
Information message
on the project on the project of the General Plan of the city district of Lobnya
The Lobnya city administration informs residents and interested parties about holding public hearings on the draft master plan for the Lobnya city district, developed on the basis of the Town Planning Code of the Russian Federation.
The draft master plan can be found at the exposition of demonstration materials in the lobby of the building of the Administration of the city of Lobnya at the address: Moscow Region, city of Lobnya, st. Lenina d.21. The exposition is open from April 28, 2017 to May 19, 2017 from Monday to Friday from 9.00 to 18.00.
The draft master plan can also be found on the official website of the urban district of Lobnya on the Internet at: www. lobnya.rf – (Spheres of life – urban planning – General plan).
Applications for speeches, suggestions and comments on the draft master plan are accepted in writing from April 28, 2017 to May 29, 2017. at the address: Moscow region, Lobnya, st. Lenina d.21, office No. 304. Reception time: Monday – Thursday from 9.00 to 18.00, Friday from 9.00 to 16.45, break from 13.00 to 14.00.
Public hearings are held in accordance with the schedule:
May 19, 2017 at 11.00 in the meeting room of the building of the Administration of the city of Lobnya at the address: Moscow Region, Lobnya, st. Lenina d.21, 1st floor for residents and interested parties of the microdistrict “Central”, microdistrict No. 4, microdistrict “Southern”.
May 19, 2017 at 15.00 in the meeting room of the building of the Administration of the city of Lobnya at the address: Moscow region, Lobnya, st. Lenina d.21, 1st floor for residents and interested parties of the Moskvich microdistrict, Katyushki microdistrict, Bukino microdistrict.
May 22, 2017 at 11.00 in the Palace of Culture “Krasnaya Polyana” Lobnya at the address: Moscow region, Lobnya, st. Sportivnaya, 6 for residents and stakeholders of the Krasnaya Polyana microdistrict. May 22, 20170648 at the address: Moscow region, Lobnya, st. Lenina d.21, 1st floor for residents and interested parties of the Vostochny microdistrict, Depo microdistrict, No. 3 microdistrict.
May 23, 2017 at 11.00 Residential complex “Lugovaya” of the city of Lobnya at the address: Moscow region, city of Lobnya, Scientific town, building 1B for residents and interested persons of the Scientific town and microdistrict “Lugovaya”.
List of documents
Conclusion on the results of public hearings on the consideration of the draft master plan for the urban district of Lobnya (Download)
9(Download) hearings on the consideration of the draft master plan for the urban district of Lobnya, Moscow region” (Download)
DRAFT MASTER PLAN FOR THE CITY DISTRICT OF LOBNYA, MOSCOW REGION:
Regulation on territorial planning (Download)
Map of the planned placement of local facilities of the urban district (Download)
Map of the boundaries of settlements included in the urban district (Download)
Map of the functional zones of the urban district (Download)
Materials on substantiation of the master plan
Volume I (Download)
Map of the location of the urban district in the settlement system of the Moscow region (Download)
Map of the current use of the territory (Download)
Map of existing and planned zones with special conditions for the use of territories (Download)
General (project) plan (Download)
Map of the planned development of engineering communications and structures of local importance within the boundaries of the district. Water supply, sewerage, rain sewerage (Download)
Map of the planned development of engineering communications and structures of local importance within the boundaries of the district. Heat, gas, electricity and communications (Download)
Map of the planned development of transport infrastructure of local importance within the boundaries of the district (Download)
Volume II (Download)
Map of the boundaries of existing and planned specially protected natural areas (Download)
Volume III (Download)
Map of planned zones with special terms of use of the territory of the urban district associated with objects of cultural heritage (Download)
General plan of Novosibirsk | City Hall Department of Construction and Architecture
Decision of the Novosibirsk Regional Court of the city of Novosibirsk dated 10/22/2021 ( decision )
Decision of the Council of Deputies of the city of Novosibirsk dated 03/24/2021 No. 105 “On Amendments to the Decision of the Council of Deputies of the city of Novosibirsk dated 26.207 No. 207 No. 207 On the General Plan of the City of Novosibirsk” ( decision )
Decision of the Council of Deputies of the City of Novosibirsk No. 597 dated April 25, 2018 “On Amendments to the General Plan of the City of Novosibirsk, approved by the decision of the Council of Deputies of the City of Novosibirsk dated December 26, 2007 No. 824” (decision, Appendix)
Decision of the Council of Deputies of the city of Novosibirsk dated December 26, 2007 No. 824 “On the master plan of Novosibirsk “, General plan of the city of Novosibirsk (explanatory note) (download, doc, 1.16Mb).
Annex 1. Map-scheme of the use of the territory of the city of Novosibirsk (download 4,538Mb)
Annex 2. Map-scheme of water protection zones. Current situation (download 4,207Mb)
Appendix 3. Map-scheme of the sanitary and ecological state and boundaries of zones of negative impact of capital construction facilities of local importance (download 4,758Mb)
Appendix 4. Map-scheme of the boundaries of territories at risk of natural and man-made emergencies (download 5.005Mb) scheme of the existing water fund and urban forests (download 4,559Mb)
Annex 7. Map-scheme of land plots of capital construction facilities, objects of federal, regional and local significance (download 4,780Mb)
Annex 8. Scheme of the results of the analysis of the integrated development of the territory of the city of Novosibirsk and the placement of capital construction facilities of local importance (download 4,587Mb)
Annex 9. Scheme of the existing planning structure (with the location of local community centers) (download 4,478Mb)
Annex 10. Map-scheme of the borders of the survey of the territories of cultural heritage sites of the city of Novosibirsk (is being corrected, changes are being prepared for consideration at public hearings)
Annex 11. Map-scheme of the boundaries of the territories of cultural heritage sites. The central part of the city of Novosibirsk (download 1,558Mb)
Appendix 12. The list of objects of cultural heritage of the city of Novosibirsk (download 0,638Mb)
Appendix 13. A map-scheme of the structural parts of the city of Novosibirsk (download 5,013Mb) zones of the city of Novosibirsk for the period up to 2030 (download 4,293Mb)
Appendix 15. Map-scheme of the planned placement of urban forests for the period up to 2030 (download 5,033Mb)
Appendix 16. Map-scheme of the boundaries of the territory of predominant development until 2015 (with designation of planning axes and nodes) (download 4,879Mb)
Appendix 18. Scheme of the planning structure of high-speed highways with the designation of ring, radial and chordal transport corridors for the period up to 2030 (download 5,001Mb) highways) (download 4,706Mb)
Appendix 20. Map-scheme of the integrated development of public transport for the period up to 2030 (download 4,882Mb)
Appendix 21. Map-scheme of existing and planned boundaries of industrial, energy, transport, communications lands until 2030 (download 4,033Mb)
Appendix 22. Map-scheme of the planned placement of capital construction facilities of local importance for the period up to 2030 (download 5.212Mb)
Appendix 23. Planned development of electrical networks in the city of Novosibirsk (download, 722Mb)
Appendix 24. Scheme of measures for the development of heat networks for the period up to 2015 (right-bank part of the city) (download 1,417Mb)
Appendix 26. Map-scheme of the existing and planned location of fire stations in the city of Novosibirsk (download 5,693Mb)0179 Annex 28. Map-scheme of free territories for the placement of capital construction facilities of local importance for the period up to 2030 (download 5,876Mb)
Annex 30. Map-scheme of the phased development of the boundaries of the territories of the settlement of the city of Novosibirsk for the period up to 2030 (download 5,615Mb)
Public hearings on changes to the master plan
Amendments to the plan for the implementation of the General Plan of the City of Novosibirsk
General plan for the development of Leningrad.
1930s | Architecture and Design
The Moscow experience had a strong influence on the planning and development of the cities of the Soviet Union, and above all on the reconstruction of the second largest city in the country – Leningrad (the authors of the master plan were L. Ilyin and V. Vitman).
Leningrad in terms of urban planning is fundamentally different from Moscow. The very emergence of St. Petersburg was an act of human will. Drawing has always been at the heart of its construction and development. In St. Petersburg in the 18th and early 19th centuries, the formation of architectural ensembles was a matter of state. Even the end of the 19th century with its rapid, but spontaneous capitalist development, could not distort the strict features of the capital of the Russian Empire, although the class contradictions of the luxurious center and the poverty and unsanitary conditions of the working outskirts were particularly acute in St. Petersburg.
The idea of preserving the existing urban structure turned out to be especially fruitful for Leningrad, since from the very beginning it ruled out the possibility of any extreme proposals. The continuation and development of the radial planning system of the central district made it quite logical to spread the new territories of the city to the south, southwest and southeast. These territories in relation to the coastal part were located at higher elevations, which protected them from floods. The main compositional axis of the southern, most intensively built-up direction was Moskovsky Prospekt, a continuation of Mezhdunarodnoy Prospekt, coming from Sennaya Square.
For the transport connection of the new areas outlined by the master plan on both sides of the Neva, an arc main was designed, which, through the new Volodarsky bridge, went to the right bank in the area of Malaya Okhta, thereby ensuring the development of the city in an easterly direction. The entire territory between the new radial directions was divided by a system of transverse streets into large blocks (9-15 hectares) – later microdistricts.
|
Leningrad. |
|
Leningrad. Scheme of the development of the city according to the project of 1935 L. Ilyin |
|
Leningrad. Scheme for the development of the city center according to the project of 1940 N. Baranov |
Unlike Moscow, in Leningrad there was no need for priority reconstruction of central districts and highways. This circumstance predetermined the placement of new housing construction in Leningrad on practically free territories. The design of new residential complexes and individual buildings was carried out on the basis of comprehensively developed development projects for large blocks and entire districts, although here, too, real construction was often located primarily along the main highways. First of all, Avtovo, located in the southwest (behind the Kirov Plant), the Moscow Highway area, located behind the Electrosila plant, the Shchemilovka area, limited by the arc main and the Neva, and the Malaya Okhta area on the opposite bank of the Neva, adjacent to the future bridge, were built up. them. Volodarsky.
However, there were significant shortcomings in the new general plan of Leningrad. The density norm adopted for new residential areas was excessively low – no more than 3,000 m2 of living space per 1 ha. The size of the new city squares was sharply exaggerated, contrary to the existing spatial scale of the city. This was especially evident in an attempt to move the city center from the historically established area and create a focus of attraction for the public life of the entire city in the new part. For this purpose, a huge area was created at the intersection of Moskovsky Prospekt with an arc main. On this square at 19In 1940, the construction of a large architecturally super-monumental building of the House of Soviets was basically completed (N. Trotsky, Ya. Svirsky, and others).
In 1938, when adjusting the general plan of Leningrad, N. Baranov and A. Naumov (with the participation of E. Katonin) decisively revised its economic basis and, maintaining the same planning principles, raised the density to 5000-5500 m2 of living space per 1 ha , which made it possible to reduce the territory of the city from 55 thousand to 48 thousand hectares, increase the efficiency of the current building, make it more compact and expressive.