False plasterboard ceiling: plasterboard ceiling, false ceiling designs for bedroom ceiling hidden lighting
Everything You Need To Know
False ceilings are a great way to add more space and value to your home. But there’s a lot of confusion about what they are, how much they cost, and if you should get one or not.
Researching false ceilings can be a bit of a nightmare. There’s conflicting information across the Web and it’s difficult to separate fact from fiction.
We’re here to help clear up the confusion. In this article, we’re going to break everything down for you and help you decide if a false ceiling is a good choice for your home.
What are false ceilings?
A false ceiling is a type of construction that involves the installation of a secondary ceiling below the original ceiling. This extra ceiling can be made from a variety of materials, including plaster, metal, or wood.
A false ceiling is also known as a dropped ceiling or suspended ceiling since they are literally lowered or hung from the main ceiling.
Suspended ceilings and metal ceiling tiles are most commonly used in commercial settings, such as offices and restaurants. However, they’re becoming more and more popular in residential settings as well.
The main benefit of a suspended ceiling in a residential setting is that it can add more interest and character to a room. It can also make the room seem larger and more spacious.
A false ceiling can be installed in any room in your home, but they are most commonly used in kitchens, bathrooms, and bedrooms.
The benefits of installing a false ceiling
There are many benefits to installing a false ceiling in your home. Here are some of the most important ones:
1. Wow factor
A false ceiling can add a lot of interest and style to a room. A false ceiling can really add some extra glamour and sophistication to a room. It can also make the room feel more luxurious and expensive. A false ceiling can really add some pizzazz to a room. It can make the room seem more luxurious and chic.
2. Better acoustics
A false ceiling can help to improve the acoustics in a room if a good acoustical treatment is used. This has advantages in rooms where you want to reduce noise but don’t want to lose wall space. A false ceiling can help to improve the acoustics in a room by absorbing sound. One of the biggest benefits of having a false ceiling is that it can help keep sound out and noise levels down. This is especially helpful in rooms where you have a high level of ambient noise. Or in spaces where you like to listen to music or watch movies and want a great listening experience.
3. Hides wires and services
A false ceiling is a great way to hide unsightly electrical wires, cables and air conditioning ducts. This can be really helpful in rooms where you want to keep things neat and tidy. They’re great for concealing AV equipment, especially if you’re hiding speakers or lights in your ceiling. If you’re looking for a way to hide your cables and wires, then a dropped ceiling is the perfect solution
4. Recessed lighting
A false ceiling is a great way to install lights. This type of lighting is very popular because it’s efficient and creates a nice, soft light. Recessed lighting is a great way to add some extra style and ambiance to your home.
5. Added insulation
A false ceiling is a great way to add Insulation to your home. This is also helpful if you want to improve energy efficiency in your home. Good Insulation can help to keep your house warm in the winter and cool in the summer. Adding insulation to your false ceiling is a great solution for older homes where insulation is lacking.
6. Customizable
A false ceiling is very customizable and can be made to fit any size or shape. This makes them a great choice for people who want a unique and tailored look for their home. You can choose from a variety of materials, colors, and styles to create a false ceiling that is perfect for your home.
Disadvantages of false ceilings
While there are a number of benefits to installing a suspended ceiling in your home, there are also some drawbacks to consider. Here are some of the main disadvantages:
1.
 Increased cost
A false ceiling can be expensive to install. This is because they require additional materials and labor. If you’re on a tight budget, then a false ceiling may not be the best option for you. Although you can save money if you are willing to do some of the work yourself, and you shop around for the best deals.
2. Reduces headroom
A false ceiling can reduce the headroom in a room. This is because they are installed below the existing ceiling. If your room doesn’t have high ceilings or enough vertical space to begin with, then a false ceiling may not be the best option for you.
3. Installation can be tricky
A false ceiling can be tricky to install, especially if you’re doing it yourself. If you’re not familiar with how to install them, then it’s best to hire a professional to do the job for you.
Types of false ceiling
There are many different false ceiling materials available. The most popular ones include:
Plaster of Paris False Ceiling
Plaster of Paris false ceilings are the most popular type of false ceiling. They’re made from plaster of paris or plasterboard sheets. This means they are lightweight, easy to install, and can also be painted to suit any style or décor.
Gypsum Suspended Ceilings
A gypsum suspended ceiling is another type of false ceiling. They’re made from ceiling panels made of gypsum plaster that’s attached to a metal ceiling grid. Gypsum false ceiling panels are commonly found in commercial applications. Suspended supports and metal frames are installed to create the support structure. Ventilation ducts, electrical cables and wiring, fire protection systems and other non pleasing elements are concealed above the finished ceiling. They can also be used in residential buildings.
Wooden False Ceiling
A wooden false ceiling is made from real wood and are a great way to add some extra warmth and character to your home. They are available in a variety of different types of wood, including pine and oak.
Glass False Ceiling
A glass false ceiling can be made from a number of different materials, including glass tiles or mirrors. They are very contemporary and modern looking and suit any aesthetic.
Metal False Ceiling
A metal ceiling is a great way to add some extra interest and character to your home. They come in a variety of different finishes, including chrome, brass, and nickel.
Synthetic Leather or Cloth Ceiling
A synthetic leather or cloth ceiling is a great way to add some extra warmth and character to your home. They come in a number of different styles and colors and suit any décor.
How much do false ceilings cost?
The cost of false ceilings can vary depending on many different factors. These include:
Design
A false ceiling can be very expensive to install if it has a complex design with lots of angles. For example, if the ceiling is designed in a diamond pattern with various peaks and troughs, then this will require a lot more materials and labor, and will be more expensive.
Size
The price for a false ceiling is lower per m2 for larger areas as the materials can be purchased at wholesale prices in bulk.
Material Choice
If you go for a high-quality material such as metal or wood, then this will be more expensive than a standard material such as gypsum. It is best to shop around for the best deals and discounts.
Labour costs
The cost of labour can also add to the overall cost of a false ceiling. If you’re having the installation done by a professional, then this will be more expensive than if you are doing it yourself.
How to save money on a suspended ceiling
Here are a few ways that you can save money on a false ceiling:
Go for a simple design
A false ceiling is best suited to simple designs with few angles. This will be cheaper than a false ceiling that has lots of angles or peaks and troughs, as it requires less material and labor.
Use a standard material such as gypsum plasterboard
Using a standard material such as gypsum plasterboard for your false ceiling is cheaper than using expensive materials such as real wood or metal.
Do it yourself
If you’re good at home improvement projects, then you can save money by doing it yourself rather than hiring a professional. However, this will only be the case if you have prior construction experience and are confident in your abilities.
Shop around for the best deals
A dropped ceiling can have a wide price range depending on the material used to make them. It’s best to shop around for the best deals so you don’t pay more than necessary.
Don’t forget your lighting fixtures, fittings and hardware.
The cost of false ceiling lighting fixtures, accessories, and hardware can add up, so it’s best to shop around for the best deals. LED strip lights are cheap and look great, so try to use these if you can.
Conclusion: Is a false ceiling right for you?
False ceilings are a great way to add some extra aesthetic appeal and character to your home. They come in lots of different colors, designs, and finishes, so you should be able to find one that suits your needs.
They can be installed in any room of the house including the bathroom or kitchen. They look good when they’re installed in a contrasting color to the walls and can really make a room stand out.
The cost of false ceilings can vary depending on the size, design, and finishes used, but it’s best to shop around for the best deals. They are a great way to add some extra value to your home.
So, should you get a false ceiling?
Yes! We think you should. They’re a great way to add some extra character to your home, and they can add value as well. Plus, they come in lots of different colors, designs, and finishes so you’re sure to find one that suits your needs. As long as you have a decent ceiling height and can afford a false ceiling, then there’s no reason not to get one.
False Ceilings Explained: What are They and How to Build One
(Image credit: John Cullen Lighting)
There are several reasons why building false ceilings – also known as suspended ceilings – can be necessary.
They are actually a really useful solution to a number of issues thrown up by renovation projects and can usually be quickly and cost-effectively constructed — often on a DIY basis. This type of ceiling can also be used to conceal lighting, extractor fans and so on, or even as an architectural feature in their own right.
There are a couple of main ways that false ceilings are constructed and our guide offers step-by-step instructions on how to build a false ceiling using timber studs, as well as explaining where and how these ceiling can be used.
What is a False Ceiling?
False ceilings are constructed beneath the original ceiling. A void, the depth of which will vary depending on your requirements, is created between the existing, original, ceiling and the new one.
The most common reasons why false ceilings are built are:
- To cover a damaged ceiling that can’t be boarded over
- To conceal pipes or wires
- To run ducting for a kitchen extractor hood, MVHR (mechanical ventilation with heat recovery) ducting or an air conditioning unit within
- To hide structural beams or lintels
- To create architectural interest
- To make fitting recessed downlights simpler
- For soundproofing a ceiling — particularly if working with a concrete ceiling where fixing soundproofing materials directly to the solid surface can be tricky
False ceilings are most commonly created using plasterboard that is attached to either timber battens or metal framing (MF).
Sometimes, false ceilings are constructed by fixing new plasterboard directly to an existing ceiling by drilling up into the old plasterboard, directly into the existing joists overhead. This is known as ‘overboarding’ and is often done to conceal an unattractive ceiling — it saves the mess of pulling down the old one and won’t lower your ceiling height too much.
However, if the old ceiling is very badly damaged, this will not be an option. In this case, you have two choices. You can either take down the old ceiling – something that is often necessary with damaged old lath and plaster ceilings – leaving the joists exposed, ready to fix into, or, alternatively, build a suspended false ceiling beneath, as detailed here.
In the case of overboarding, the ceiling needs to be in sound condition — if it is too badly damaged, it can be taken down or a new false ceiling installed below. (Image credit: Getty)
Is a Metal or Timber Frame Best For a False Ceiling?
There are two main ways to build a false ceiling. The traditional method is to build a frame, attached to the existing ceiling, using timber battens. Sheets of plasterboard can then be attached to this.
The second method is similar, but uses a metal frame instead. The metal frame is created using a combination of channels, hangers, brackets and clips and can still be fitted on a DIY basis.
Both work well and in most cases, which is used comes down to personal preference. Those favouring metal framing site the fact that it is lightweight, moisture resistant and completely straight as their reasons. It is also a useful alternative to timber when very large spans are being covered.
When it comes to timber false ceilings, if you know how to build a stud wall, you are halfway there when it comes to understanding how to construct one — it is basically the same process carried out on a horizontal surface as opposed to a vertical one.
How to Build a False Ceiling: Step-by-Step
If you fancy trying your handing at building a false – suspended – ceiling, our step-by-step guide is here to take you through the process.
- Work out the height at which you want your new ceiling to sit. This should be the lowest point needed — below where any ducting will sit, for example.
- Using a laser or spirit level, mark the new ceiling’s height all around the perimeter of the room.
- Measure four lengths of wood, 3″x2″ timbers are most commonly used, to the fit each wall.
- If there are electrical channels fixed to the wall, you may need to take notches out of the timbers to run around these.
- Work around the room, fixing lengths of timber all around the perimeter. You will need to place plugs in the wall, then use 4″ long screws to fix the timber to the wall. Work until you have one, level frame all the way around.
- With the frame in place you can begin to fit studs, made from 3″x2″ timber, within it — they should be at between 400mm – 600mm centres. When measuring these, go just a little longer than required so that you can knock them tightly into place when fitting into the frame.

- You should now skew screw (screw in at an angle) the studs between the frame — aim for three screws at each end.
- Once all the studs are fixed in place, it is time to strengthen the frame. It is wise, at this stage, to slide a piece of 3″ x 2″ timber the length of the ceiling, above the studwork, running at an opposite direction. You can then screw up from the bottom of the studs below into this. Finally, place noggins at regular intervals between the studs.
- Before you begin to put your plasterboard up, mark on the wall where the studs are so you know where your screws should go.
- Measure and cut your plasterboard.
- It’s time to find out how to plasterboard a ceiling. Screw or nail your plasterboard into place, sinking screw or nail heads just below the surface but no so far as to tear the paper. Staggering the plasterboard sheets will add strength.
- The next step is to tape the joints and skim the plasterboard ceiling. This might be a job for a professional plasterer if you’ve not tried your hand at plastering before.
- Once the plaster is dry, painting the ceiling is typically the final step.


Sometimes, suspended ceilings are used as a way of creating architectural interest — here, concealed lighting from John Cullen Lighting , has been placed strategically within the new ceiling. (Image credit: John Cullen Lighting)
What Does a False Ceiling Cost?
The price you pay for your new false ceiling will depend on the type of frame you use, the size of your room and the materials you decide to purchase, as well as whether you decide to take the DIY route.
However, on average, professionals charge between £20-£30/m2 and you could usually expect this to include materials.
This does not take into consideration the additional cost if you wish to install elements such as an extractor hood or LED lighting within your false ceiling.
Natasha is Homebuilding & Renovating’s Associate Editor and has been a member of the team for over two decades. An experienced journalist and renovation expert, she has written for a number of homes titles. She has renovated a terrace and is at the end of the DIY renovation and extension of her Edwardian cottage. She is now looking for her next project.
The Ultimate Guide to Plasterboard and Tile Suspended Ceilings
Suspended ceilings are a common form of dry lining and extremely popular within commercial buildings such as offices and shops. You can board over a ceiling with plasterboard, but another option is to hang a ceiling grid and then fit it with ceiling tiles and lights. This allows for a nice looking ceiling that hides all of the wires, nooks and crannies that you find on a commercial ceiling.
The basic idea for a suspended ceiling has been around for centuries. The architecture of Japan during the middle ages suspended ceilings using planks of wood.
However, these days a suspended ceiling usually consists of ceiling tiles that hang below the ceiling structure of the building. Modern suspended ceilings have their roots in the 1920s, where a booming construction industry spurred innovation and led to many techniques still in use today.
‘Suspended ceiling’ is the common term but there are many other names for this type of construction, including the following:
- Drop ceiling
- Dropped ceiling
- Drop-in ceiling
- Drop out ceiling
- False ceiling
- Grid ceiling
- T-bar ceiling
Suspended ceilings have so many different names as they are such a common part of construction for both commercial and domestic settings. Overall, they are most prevalent in commercial buildings and larger residential blocks in cities.
Why Use a Suspended Ceiling?
You can get a lot of great benefits by using a suspended ceiling. You might think that there are losses, however slight, to ceiling height that could be used for practical things such as storage – but most suspended ceilings are high enough that you will not notice much difference.
There are also lots of benefits to a suspended ceiling, such as the following:
- Hiding wires: You can more easily hide unsightly cabling from electrical equipment such as computers, air conditioning and internet facilities, or speakers with a suspended ceiling. For an area such as a commercial office, this makes for a much cleaner, safer space that is also easier to maintain.
- Ability to install lighting: Most suspended ceilings are built with the main intention of adding lighting, to illuminate the space below and eliminate the need for wall or floor lighting – thus adding valuable square footage to the area of a commercial or public setting.
- Fire protection: You can unobtrusively run pipe for sprinkler systems very easily with a suspended ceiling. This is a great safety feature suitable for slightly more industrial or even residential settings. Many buildings have stringent fire safety requirements, so this kind of ceiling design is ideal.
- Moisture resistance: One benefit of certain kinds of plasterboard is moisture resistance, which you can also get when using suspended ceilings. You can prevent mould and humidity with plasterboard ceilings or ceiling tiles so a suspended ceiling design is good for health and hygiene.
- Sound absorption: Acoustic ceiling tiles can make for great acoustical ceilings on their own, and by using resilient bars (a design that decouples the suspended ceiling from the joists, creating a gap that increases soundproofing) results are even better – and can rival music studio spaces.
- Quick installation: It is simple and very fast to install a suspended ceiling, either with plasterboard, ceiling tiles using concealed grid systems – this can help to keep a ceiling’s costs down. The ceiling’s ongoing maintenance costs are also helped by DIY ceiling kits for repairs and routine access.

Whether you choose ceiling tiles or plasterboard you will also get an opportunity for extensive customisation. There are many materials and finishes available, which can provide certain textures and features such as insulation.
Should You Choose Plasterboard or Ceiling Tiles?
Plasterboard and ceiling tiles each use a metal frame to support the weight of the ceiling. Many people call ‘metal frame’ ceilings ‘MF ceiling systems’. The main difference is simply in the materials used in the ceiling material – tiles use mineral fibre whereas plasterboards use gypsum, in addition to other fibrous layers.
The different materials create a slightly different appearance to each type of suspended ceiling, which you can see below:
A typical plasterboard ceiling, note the lack of seams – creating its uniform appearance.
A suspended ceiling grid using ceiling tiles, note the light systems in place of certain tiles – to provide even light coverage.
When it comes to the question of whether you want to use plasterboard or ceiling tiles for your suspended ceiling, the key detail to look out for is how often you anticipate requiring access. In commercial offices, there may be a legitimate need for frequent access and ceiling tiles are much more versatile in this area. Ceiling tiles are also quicker to install.
Of course, it is possible to combine both – by installing ceiling tiles in the frame where services run and then plasterboard where access is unnecessary.
Cost-Effectiveness
Average prices are relatively low for a suspended ceiling, thanks to its simplicity and minimal use of materials. However, the cost will depend on the size of the installation, and extra things such as lighting or cable management and other services such as the internet, as well as painting, decorating and other finishes.
You will also have to incur the cost of the tiles or boards. The average cost of a suspended ceiling in 2021 is £28.50 per m2, but this can vary widely depending on the type of tiles or boards you choose.
Your supplier can also affect the costs you face for a suspended ceiling. Slow deliveries in a business setting, a key setting for suspended ceilings, can increase installation costs and a company’s ability to do business.
Make sure you always select a reputable supplier, you can look for fast delivery and extensive product lines as a sign of good quality services.
In Summary
Suspended ceilings are usually made from plasterboard or tiles, and use a metal frame to provide a gap above the structural ceiling. This gap can contain wiring, services, lighting and other materials such as acoustic insulation. Suspended ceilings are cost-effective and most suitable for commercial areas.
Dry lining is an excellent skill to learn and when you know how to dry line, you can apply it to a thousand useful renovation projects. There is a lot to it however, so the best place to start is knowing exactly what materials are involved.
Luckily for you, we’ve broken this all down in Drylining Materials.
Exposed Ceilings VS Suspended Ceilings: How Do They Compare?
- Home
- Blog
- Exposed Ceilings VS Suspended Ceilings: How Do They Compare?
A ceiling can be defined as an overhead interior surface that covers the upper limits of a room. Ceilings are not structural elements, but rather the finished surfaces below a roof or concrete slab. Many types of ceilings are used in buildings, but the most common are exposed and suspended ceilings.
Ceilings provide a space for mechanical, electrical and plumbing (MEP) installations. They are useful spaces for installing components like speakers, lighting fixtures, fire and smoke detectors, automatic sprinklers, etc. This article provides a comparison between exposed ceilings and suspended ceilings, describing the advantages and disadvantages of each option.
Design an optimal MEP layout according to your type of ceiling.
Exposed Ceilings
Exposed ceilings are also known as open ceilings or open plenums. In this type of ceiling, all the structural and MEP systems are left exposed, either with their normal colors or painted. Open ceilings are gaining popularity in almost every field: this architectural trend gives an industrial look, while making rooms more spacious thanks to the increase in height. Exposed ceilings provide several advantages:
-
Increased natural lighting with skylights: This effect is especially prominent if your building faces south, since that’s the side receiving the most sunlight in the northern hemisphere.
-
Modern interior designs: An exposed ceiling allows design creativity with custom lighting and piping fixtures. Mechanical and electrical installations can become decorative elements, and not only distribution systems.
-
Extra space: A traditional closed ceiling often makes a room seem much smaller than it actually is, and an exposed ceiling gives the effect of extra space even in a crowded room. Having exposed ceilings also provides extra space for hot air to rise, making rooms cooler – this can be beneficial in warm climates.
However, open ceilings require planning. Poorly designed and constructed ceilings will develop problems related to acoustics and MEP features. The following are some disadvantages of exposed ceilings:
-
The “unfinished” look of an exposed ceiling is actually the result of skilled labor: Exposed ceilings lack many components used in suspended ceilings, but don’t assume they require less work. In existing buildings with suspended ceilings, the old ductwork and plumbing are usually dirty and not aesthetically pleasing, requiring plenty of work and money to achieve a nice “exposed” look. Also, ducts and pipes must be painted for exposed ceilings, which requires specialized labor.
-
Higher labor costs: The growth of the construction industry demands an increasing supply of skilled labor, and contractors are experiencing a shortage of qualified workers in active markets like NYC. Open ceilings may require less materials than suspended ceilings, but these savings are usually offset by the labor-intensive tasks needed for an open plenum.
-
Sound considerations: Exposed ceilings need acoustical treatment, since they lack the sound-absorbing effect of suspended ceiling tiles.
Surfaces in exposed ceilings usually create an echo chamber, requiring solutions like spray-on acoustic materials.
 Surfaces in exposed ceilings usually create an echo chamber, requiring solutions like spray-on acoustic materials.
-
Exposed ceilings can increase energy expenses: Although exposed ceilings have a lower material cost, they are less effective as a barrier against heat transfer. This leads to increased summer heat gain and winter heat loss, driving up HVAC costs.
-
Demanding maintenance: Exposed ceilings require frequent cleaning and repainting, which is not necessary with suspended ceilings. Overall, suspended ceilings are more cost effective.
Exposed ceilings can create an aesthetic vibe in buildings, leading to a productive and appealing space for employees and tenants. However, meticulous planning is necessary to achieve good performance and to keep working conditions pleasant. It is easy to assume than an “informal” exposed ceiling is less expensive to own than a suspended ceiling, but the reality is often quite different.
Suspended Ceilings
Suspended ceilings are sometimes referred to as dropped ceilings or false ceilings. As their name implies, they are suspended from the structure above, usually a roof or slab. This creates a space between the underside of the structure and the upper surface of the ceiling.
Suspended ceilings are hung from brackets fixed to the underside of the roof or slab. These brackets support a series of interlocking metal sections, forming a grid or beam system into which panels can be fitted. These tiles can be removed to access the ducts and pipes above.
The following are some of the main advantages of suspended ceilings.
-
Concealing ductwork, pipes and wires: Instead of performing costly repairs and painting, suspended ceilings can conceal visual imperfections that don’t affect the performance of MEP installations. This type of ceiling allows easy access to the systems above for maintenance – simply remove a panel to perform reparations, and place it back when finished.

-
Easy and quick installations: Suspended ceilings can be easily installed in offices and homes. In businesses, where minimal interruption of work is required, a suspended ceiling can be completed quickly by professional installers.
-
Sound proofing: Suspended ceilings with fiberglass will block exterior sounds. As opposed to drywall or plasterboard ceilings, suspended ceilings provide improved acoustic qualities, so noise pollution from above floors is reduced considerably.
-
Easy installation of electrical components: Lighting fixtures, air vents and other appliances can be easily installed between the ceiling panels. Many lighting fixtures are even sized to fit the slot of a panel – typically 2’ x 2’ or 2 ’x 4’.
-
Fireproofing: Fire resistant suspended ceilings can offer up to one hour of protection during a fire to allow evacuation.
Additional fire barriers can be installed above the suspended ceiling to increase the protection level.
 Additional fire barriers can be installed above the suspended ceiling to increase the protection level.
-
Insulation: A suspended ceiling provides insulation while reducing conditioned spaces. Energy bills are lowered, since the space being heated or cooled becomes smaller.
However, like in any construction decision, suspended ceilings also have their limitations. The following are some of their main disadvantages:
-
Space loss: An evident disadvantage of suspended ceilings is reducing the height of indoor spaces by several inches or feet. As a consequence, spaces can feel more cluttered for occupants.
-
A suspended ceiling can hide building issues: When buying or renting a property with suspended ceilings, make sure to inspect the installations covered by them. Remove panels and inspect the space, to ensure there are no structural deficiencies or damaged MEP components.

-
Deterioration: Suspended ceilings tend to sag and show signs of discoloration over time. Thus, frequent maintenance is required to maximize their lifespan.
Suspended ceilings tend to have a higher material cost than exposed ceilings. However, those additional costs are offset in the long term by lower energy costs and easier maintenance. Renovations and reconfigurations are also simpler and less expensive.
Conclusion
Engineering decisions are often characterized by having several options with benefits and downsides, and this applies for ceiling selection.
An exposed ceiling uses less materials while increasing indoor space, and its industrial appearance may be favored by architects in some applications. However, exposed ceilings are more demanding in labor and maintenance, and they tend to increase HVAC expenses.
Suspended ceilings hide MEP installations, and their appearance is less important as long as they operate correctly. While the material cost of a suspended ceiling is higher, it brings labor and maintenance savings. HVAC systems also operate more efficiently, since the unwanted heat transfer across the ceiling is reduced.
Nearby EngineersNew York Engineers has a MEP design track record of 1,000+ projects. Contact us via email ([email protected]) or phone (646-877-0767212-575-5300), and make sure your building systems meet codes.
Tags
MEP Design
exposed ceiling
suspended ceiling
MEP installations
Join 15,000+ Fellow Architects and Contractors
Get expert engineering tips straight to your inbox. Subscribe to the NY Engineers Blog below.
© 2022 Nearby Engineers New York Engineers . All Right Reserved. Legal Notice | Trademarks
Suspended ceilings by Saint-Gobain – Gyproc
 /@data-label"}”>
Filter
66 Products
Sort by:
Saint-Gobain – Gyproc
GYPROC RIGITONE™ ACTIV’AIR® CLIMAFIT – Plasterboard ceiling panels
Request info
Saint-Gobain – Gyproc
GYPROC DURAGYP ECO ACTIV’AIR® – Gypsum plasterboard
Request info
Saint-Gobain – Gyproc
GYPROC THERMOTOP 27 – Plaster ceiling panels
Request info
Saint-Gobain – Gyproc
GYPROC RIGITONE™ ACTIV’AIR® 6/18 – Acoustic plasterboard ceiling panels
Request info
Saint-Gobain – Gyproc
GYPTONE® QUATTRO 70 ACTIV’AIR® – Acoustic ceiling panels
Request info
Saint-Gobain – Gyproc
GYPTONE® QUATTRO 75 ACTIV’AIR® – Acoustic ceiling panels
Request info
Saint-Gobain – Gyproc
GYSEISMIC TOP – Frame and accessory for suspended ceiling
Request info
Saint-Gobain – Gyproc
GYPROC GYPTONE® POINT 80 – Sound absorbing plaster ceiling panels
Request info
Saint-Gobain – Gyproc
GYPROC GYPROFILE – Frame and accessory for suspended ceiling
Request info
Saint-Gobain – Gyproc
GYPROC DUO’TECH ACTIV’AIR® – Acoustic plaster ceiling panels
Request info
Saint-Gobain – Gyproc
GYPROC GYQUADRO® ACTIV’AIR® – Plaster ceiling panels
Request info
Saint-Gobain – Gyproc
GYPROC GYQUADRO® A1 – Plaster ceiling panels
Request info
Saint-Gobain – Gyproc
GYPROC GYPTONE® ACTIV’AIR® SIXTO 60 – Ceiling panels
Request info
Saint-Gobain – Gyproc
GYPROC GYPTONE® ACTIV’AIR® QUATTRO 20 – Ceiling panels
Request info
Saint-Gobain – Gyproc
GYPROC GYPTONE® ACTIV’AIR® QUATTRO 22 – Plasterboard ceiling panels
Request info
Saint-Gobain – Gyproc
GYPROC GYPTONE® ACTIV’AIR® POINT 12 – Plasterboard ceiling panels
Request info
Saint-Gobain – Gyproc
GYPROC GYPTONE® ACTIV’AIR® POINT 11 – Plasterboard ceiling panels
Request info
Saint-Gobain – Gyproc
GYPROC GYPTONE® ACTIV’AIR® LINE 4 – Plasterboard ceiling panels
Request info
Saint-Gobain – Gyproc
GYPROC GYPTONE® ACTIV’AIR® BASE 31 – Plasterboard ceiling panels
Request info
Saint-Gobain – Gyproc
GYPROC GYPTONE® ACTIV’AIR® – Plasterboard ceiling panels
Request info
Saint-Gobain – Gyproc
GYPROC RIGITONE™ ACTIV’AIR® – Acoustic plasterboard ceiling panels
Request info
Saint-Gobain – Gyproc
GYPROC RIGITONE™ ACTIV’AIR® 15/30 – Ceiling panels
Request info
Saint-Gobain – Gyproc
GYPROC RIGITONE™ ACTIV’AIR® 12-20/66 – Acoustic plasterboard ceiling panels
Request info
Saint-Gobain – Gyproc
GYPROC RIGITONE™ ACTIV’AIR® 8/18 Q – Acoustic plasterboard ceiling panels
Request info
Saint-Gobain – Gyproc
GYPROC RIGITONE™ ACTIV’AIR® 8-15-20 – Acoustic plasterboard ceiling panels
Request info
Saint-Gobain – Gyproc
GYPROC RIGITONE™ ACTIV’AIR®8-15-20 SUPER – Acoustic plasterboard ceiling panels
Request info
Saint-Gobain – Gyproc
GYPROC RIGITONE™ ACTIV’AIR® 12/25 Q – Acoustic plasterboard ceiling panels
Request info
Saint-Gobain – Gyproc
GYPROC RIGITONE™ ACTIV’AIR® 8/18 – Acoustic plasterboard ceiling panels
Request info
Saint-Gobain – Gyproc
GYPROC RIGITONE™ ACTIV’AIR® 10/23 – Acoustic plasterboard ceiling panels
Request info
Saint-Gobain – Gyproc
GYPROC GYPTONE® BIG CURVE BASE 31 – Ceiling panels
Request info
Saint-Gobain – Gyproc
GYPROC GYPTONE® BIG CURVE LINE 6 – Ceiling panels
Request info
Saint-Gobain – Gyproc
GYPROC GYPTONE® BIG CURVE – Ceiling panels
Request info
Saint-Gobain – Gyproc
GYPROC GYPTONE® BIG CURVE QUATTRO 41 – Ceiling panels
Request info
Saint-Gobain – Gyproc
GYPROC GYOTONE® BIG CURVE SIXTO 63 – Ceiling panels
Request info
Saint-Gobain – Gyproc
GYPROC FIRELINE – Fire-rated suspended ceiling
Request info
Saint-Gobain – Gyproc
GYPROC HABITO ACTIV’AIR® – Acoustic gypsum plasterboard for partition walls for suspended ceiling
Request info
Saint-Gobain – Gyproc
GYPROC HABITO HYDRO ACTIV’AIR® – Moisture resistant gypsum plasterboard for partition walls
Request info
Saint-Gobain – Gyproc
GYPROC VAPOR – Moisture resistant gypsum plasterboard
Request info
Saint-Gobain – Gyproc
GYPROC FLEX – Gypsum plasterboard
Request info
Saint-Gobain – Gyproc
GYPROC FLEXO – Frame and accessory for suspended ceiling
Request info
Saint-Gobain – Gyproc
GYPROC STIL PRIM 50 – Frame and accessory for suspended ceiling
Request info
Saint-Gobain – Gyproc
GYPROC – Aluminium inspection chamber for suspended ceiling
Request info
Saint-Gobain – Gyproc
GYPROC – Steel inspection chamber
Request info
Saint-Gobain – Gyproc
GYPROC DURAGYP ACTIV’AIR® – Moisture resistant gypsum fiber ceiling tiles
Request info
Saint-Gobain – Gyproc
EUROCOUSTIC TONGA® A – Acoustic rock wool ceiling panels
Request info
Saint-Gobain – Gyproc
CLINI’SAFE – Fireproof ceiling panels for healthcare facilities
Request info
Saint-Gobain – Gyproc
EUROCOUSTIC ACOUSTICHOC® – Acoustic rock wool ceiling panels
Request info
Saint-Gobain – Gyproc
EUROCOUSTIC ACOUSTICHOC® IMPACT 15 – Acoustic rock wool ceiling panels
Request info
Saint-Gobain – Gyproc
EUROCOUSTIC ACOUSTICHOC® IMPACT 30 – Acoustic rock wool ceiling panels
Request info
Saint-Gobain – Gyproc
EUROCOUSTIC ALIZÉ® – Acoustic rock wool ceiling panels
Request info
Saint-Gobain – Gyproc
EUROCOUSTIC ACOUSTIPAN® – Acoustic rock wool ceiling panels
Request info
Saint-Gobain – Gyproc
GYPROC HABITO SILENCE ACTIV’AIR® – Gypsum plasterboard
Request info
Saint-Gobain – Gyproc
GYPROC GYPTONE® BIG ACTIV’AIR®QUATTRO 40 – Plaster ceiling panels
Request info
Saint-Gobain – Gyproc
GYPROC GYPTONE BIG ACTIV’AIR® QUATTRO 41 – Plaster ceiling panels
Request info
Saint-Gobain – Gyproc
GYPROC GYPTONE BIG ACTIV’AIR® QUATTRO 42 – Plaster ceiling panels
Request info
Saint-Gobain – Gyproc
GYPROC GYPTONE BIG ACTIV’AIR® QUATTRO 44 – Plaster ceiling panels
Request info
Saint-Gobain – Gyproc
GYPROC GYPTONE BIG ACTIV’AIR® QUATTRO 46 – Plaster ceiling panels
Request info
Saint-Gobain – Gyproc
GYPROC GYPTONE BIG ACTIV’AIR® QUATTRO 47 – Plaster ceiling panels
Request info
Saint-Gobain – Gyproc
GYPROC GYPTONE BIG ACTIV’AIR® LINE 6 – Plaster ceiling panels
Request info
Saint-Gobain – Gyproc
GYPROC GYPTONE BIG ACTIV’AIR® SIXTO 63 – Plaster ceiling panels
Request info
Solutions
- Accessories
- Aquaroc
- Gyproc sheets
- Habito Activ’Air®
- Saint-Gobain EUROCOUSTIC
- Suspended ceilings
Collections
- Coated-gypsum panels
- GyQuadro® Activ’Air ®
- Gyptone® Activ’Air®
- Gyptone® Big Activ’Air®
- Gyptone® Big Curve
- Habito Activ’Air®
- Metal structures and accessories
- Rigitone™ Activ’Air®
- ThermoTop 27
- Tonga®
Categories
Materials
-
Concrete and cement-Based materials
-
Plaster
- Plasterboard
- Gypsum fiber
-
Plaster
-
other materials
-
Mineral wool
- Rock wool
-
Mineral wool
-
Metal
- Aluminium
- Steel
-
Rubber
-
Synthetic rubber
- EPDM Rubber
-
Synthetic rubber
Designers
No designer found
Dropped Ceilings For Bedrooms: features and uses
If you are looking for ideas for dropped ceilings for the bedrooms, you have come to the right place.
Inserting a dropped ceiling into a house is never a simple procedure. Consider, however, that installing a dropped plasterboard ceiling will allow you to make the most of the rooms of your house. Keep on reading.
DROPPED CEILINGS FOR BEDROOMS: THE TECHNICAL FEATURES
Technically speaking, a dropped ceiling (which can also be referred to as suspended or false ceiling) is a flat and light structure, anchored to the main ceiling with specific hooks. More precisely, a dropped ceiling consists of a supporting structure, in the strict sense of the word, and of covering panels.
The supporting structure consists of a roof frame (usually made of light metal) sustained by steel tie rods, which are anchored to the main ceiling.
Suspended ceiling panels can be made of different materials (from plasterboard to metal sheet), but plasterboard is generally used in private homes.
False ceilings have become very common over the last few years. By giving up part of the room’s net height, you will have a great solution for installing lighting systems, and also a practical hollow space, perfect for concealing the wiring and not only.
THE DIFFERENT TYPES OF DROPPED CEILING
There are two types of dropped ceiling, removable and non-removable.
A removable dropped ceiling is generally used if the gap needs to hold wiring (it’s rarely used in private homes). It’s made up of panels that can be opened for electrical system inspections.
A non-removable dropped ceiling, on the contrary, has more of an aesthetic purpose. It’s used to get a lower ceiling, which is more pleasing to the eye, and to install recessed lighting elements. In the latter case, the finishing and closing of the plasterboard panels are essential in order to have a quality final product.
THE USES OF DROPPED CEILINGS
In the past, suspended ceilings have always been widely used in both residential and commercial buildings, mainly because of the need to quickly heat houses in the winter.
Nowadays, false plasterboard ceilings are primarily used in residential buildings for aesthetic purposes linked to the lighting projects of the rooms, and for technical purposes linked to their function as wiring storage place.
Dropped ceilings are perfectly suitable for any room of the house, wherever they are needed for technical or aesthetic purposes. They are most frequently installed in the bedrooms and in the living area/kitchen.
DROPPED CEILINGS, THERMAL INSULATION AND SOUNDPROOFING
Not only appearance and light. A suspended ceiling is also an efficient way to thermally insulate and soundproof rooms.
Thanks to the sound-absorbing and insulating covering materials, it’s also possible to install a false ceiling to improve interior acoustics and maintain ideal thermal comfort.
DROPPED CEILINGS FOR THE BEDROOM
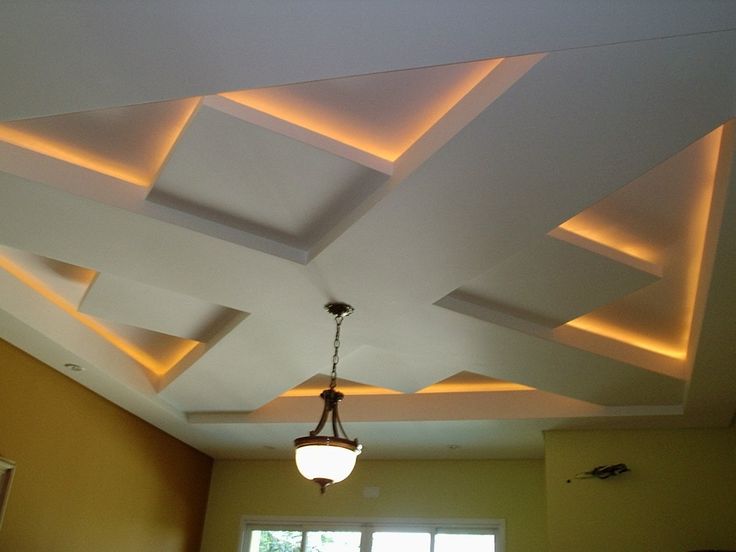
By planning to install a suspended ceiling in the bedroom, you will be able to optimise the lighting project of the room and not only. Let’s see how.
Thanks to a false ceiling, it will be possible to plan a series of recessed lighting fixtures to install where a greater amount of light is needed. Apart from illuminating the room evenly, recessed lights in the false ceiling of the wardrobe area for example will allow you to use the room to its fullest.
MODERN BEDROOMS AND DROPPED CEILINGS: THE PERFECT MATCH
Especially in modern design bedrooms, a suspended ceiling will create plays of light and shadow that highlight the purity of the interiors’ geometric shapes.
A dropped ceiling in the bedroom with recessed spotlights
Dropped ceilings for the bedrooms
A detail of great aesthetic and practical relevance is the so-called cove lighting.
What is cove lighting?
Cove lighting consists of an interstice that is usually created along the perimeter of the suspended ceiling (but it can also follow different patterns) for the installation of a continuous lighting system.
A dropped ceiling in the bedroom
The resulting effect is very fascinating, without losing sight of the elegance and precision of modern design, nor the lighting of the room.
MODERN BEDROOMS AND PLASTERBOARD: NOT ONLY DROPPED CEILINGS
In modern bedrooms, plasterboard is not only used for false ceilings, but also for other creations. Backlit recesses near the bed are definitely a glaring example.
These little recesses, apart from lending even more elegance to the room, are also highly practical, and act as bearing plane and as lighting element, by creating the perfect setup for the bedroom.
Dividing walls are another use of plasterboard in modern bedrooms that combines practicality with aesthetics. Dividing large bedrooms by using plasterboard walls (not necessarily to full height) helps optimising space and creating the wardrobe area, for instance.
It’s also possible to install a plasterboard wall lining behind the bed in order to create on the wall the same light effect of the cove lighting on the ceiling. An elegant detail, perfectly consistent with a modern and essential interior design.
NOT ONLY BEDROOMS. THE DROPPED CEILING IN THE KITCHEN
The living area too is suitable for installing a suspended plasterboard ceiling, especially the kitchen.
Reducing the net height of the room will allow you to properly illuminate the kitchen, and will also give you the opportunity to install the suction system inside the gap between the ceilings in order to absorb the vapours produced while cooking.
A perfect example are the modern fume hoods that, installed above island stoves, fully furnish the kitchen area.
A false ceiling allows you to install these elements that are both practical and pleasing to the eye.
Much the same applies to lighting. Just like in the bedroom, a proper light is fundamental in the kitchen too. A suspended ceiling will allow you to install directable recessed spotlights, a great solution for illuminating the kitchen area smoothly while having the possibility to direct the light beam where you need it the most.
An example of dropped ceiling in the kitchen with recessed spotlights – Cantalupi Light Engineering
A dropped ceiling is an important detail and a must-have for your modern home. Useful for holding the wiring and for the installation of recessed lights, or also for creating a fascinating cove lighting, a suspended plasterboard ceiling allows architects and interior designers to create elegant light and shadow effects.
Gypsum board suspended ceiling
Recently, “dry” finishing methods have become more and more popular. The ceiling was no exception in this regard. Suspended ceiling is one of the common types of decoration. Consider how to make such a plasterboard ceiling.
Plasterboard suspended ceiling
Plasterboard ceiling is the most widely used. The main idea is that the ceiling frame is suspended on a “rough” base, then sheet material is attached to the frame, which creates a flat plane for any kind of fine finish.
Do not think that a false ceiling can only be made of plasterboard. For these purposes, any sheet material is suitable: gypsum fiber sheet (GVL), aquapanels, wood composite materials (plywood, chipboard, OSB). But we will talk specifically about drywall, because this coating option is the most common.
Advantages and disadvantages of using drywall
Consider the main advantages and disadvantages of using drywall ceiling.
Advantages:
- The prevalence of the material – the popularity of drywall can be attributed to the advantages. GKL is not difficult to find in the right quantity, and a large number of craftsmen have experience working with this material.
- Do-it-yourself work – it is quite easy to work with drywall on your own. Sheets are cut with a regular knife. For example, it will be difficult to make a stretch ceiling without many years of experience.
- Sustainability – drywall consists of a gypsum core and thick cardboard. These components do not have a negative effect on the human body.
- Ability to produce complex shapes – the material is well suited for the manufacture of complex multi-level false ceilings. GKL will allow you to create bends that cannot be done using other sheet materials (OSB, plywood, etc.)
- Relative strength – it is impossible to call a plasterboard coating durable, but compared to stretch ceilings, the material is more resistant to mechanical stress.
- High maintainability – patching holes in drywall is possible even without the involvement of a master.
- Fire resistance – material and all frame elements are classified as non-combustible materials.
- Concealed installation of communications – the material hides communications. True, the wiring is mounted in a hidden way, so in the future it will be more difficult to access it.

Disadvantages:
- Poor mechanical shock resistance – Plasterboard on the ceiling can be easily pierced when rearranging furniture or cleaning.
Do not be surprised that the strength characteristic is in the pros and cons. This is a relative parameter and it depends on what material to compare with.
- Moisture Damage – Drywall will not protect against leaks from upper floors. Upon contact with moisture, gypsum swells and cracks – the suspended ceiling will need to be repaired.
- Long installation – 2-4 days construction work. At the same time, the installation of a false ceiling must be carried out at the stage of rough work. During the work, a large amount of dust and debris is generated.
- Installation does not tolerate mistakes – this can be said about many materials, but this applies especially to drywall. Violation of technology leads to the appearance of cracks and the destruction of the finish. As a result, it will be necessary to eliminate errors and then restore the finishing layer.

Read the articles on the link “https://www.sdvor.com/articles/new/575/” about errors during frame installation and when fixing sheets.
Where to install plasterboard ceilings
Before making a false plasterboard ceiling with your own hands, you should decide whether the room is suitable for installing such a structure. Here you need to immediately pay attention to three factors: humidity, room height and temperature.
- Gypsum is not afraid of negative temperatures, so it can be used in unheated rooms. Some types of suspended ceiling structures are deprived of this possibility.
- Humidity is drywall’s weak point, it cannot be said that the material is not suitable for wet rooms. This is allowed, but subject to certain conditions. In most cases, other materials prove to be more resistant to ceilings in wet areas.
Drywall is often used under tiles to line walls in wet areas. In this case, the material is protected by a layer of tile adhesive, and the mills are not threatened by leaks from the upper floors. Read the article about laying tiles on drywall here.
- The height of the room must also be taken into account, since the suspended ceiling “takes away from the room” from 5 cm. A two-level ceiling can reduce the height of the room by 20 cm. m, and multi-level structures are best done in rooms no less than 3 m.
- Drywall varies in thickness, on the ceiling in most cases 12.5 mm is used. The rigidity of the entire structure depends on the thickness of the sheet.
The strength of the structure is given not by the frame, but by the plasterboard sheets that fasten this frame.
Drywall is divided into ordinary (GKL), moisture resistant (GKLV) and fire resistant (GKLO). Moisture resistant is suitable for wet areas, usually modified material with additional properties is more expensive.
- galvanized profiles are required to form the frame. For suspended ceilings, two types of profiles are used: a ceiling guide (PPN, UD) and a ceiling profile for a crate (PP, CD). The profile differs depending on the thickness of the steel. The frame made of 0.3 mm steel bends easily in the hands, so it is better to use material with a thickness of 0.5 – 0.6 mm.
PPN
PP
The crate for the ceiling can also be made of wood, but it is more practical to install it on a galvanized profile, as it does not rot and allows you to get an empty space for communication between the plasterboard and the draft ceiling.
- Hangers are required to secure the frame to the base. These elements are of two types: straight and anchor. A direct suspension (“crocodile”) is made if the distance to the main ceiling does not exceed 12 – 12.5 cm. Such a suspension is one-piece, therefore, the thickness is adjusted when fixing the ceiling profiles.
Straight hanger
- Anchor hangers consist of a stud that is attached to the ceiling and a movable part with fastening under the profile. The anchor hangers can be lowered and raised after the profile has been fixed on it, the distance between the drywall and the ceiling can be 12 cm.
0031 Sealing (damper) tape is used for soundproofing the room. It is glued to the back of the guide profiles. It reduces the spread of impact noise through the frame.


In addition to the tape, you can create additional sound insulation on the fasteners. For this, there are special suspensions on a soundproof gasket.
Impact sound emission with and without tape
- Fastener set includes dowel-nails for installing rails, anchor wedges for fixing suspensions to the ceiling base, black self-tapping screws for fastening profiles and for fixing drywall to the frame.
Tool kit for sealing GKL joints
- To seal joints , putty (in the form of a dry mix or ready-made) is required. Also, for joints, a sickle mesh or perforated sealing tape is required.
One-level crab connector
- Connectors are mandatory for ceiling installations, there are two types of connectors: one-level and two-level. When using a two-level ceiling thickness, it turns out more, therefore, with simple ceiling structures, in most cases a single-level connector (“crab”) is used. It allows you to create cruciform profile connections.
 It allows you to create cruciform profile connections.
 GKL profile extension
- Extension and needed to increase the length of the short profile. They are usually needed in large rooms that are not covered by standard profile sizes.
- Soundproofing and insulation – sometimes the creation of a false ceiling is combined with a soundproofing device and additional insulation, in which case heat-insulating and sound-proofing materials will be required. Usually this role is played by mineral wool.
Now consider the tools that will be required for the work.
- The Construction Knife is the most essential tool for drywall work. It is used for cutting material and for chamfering, if there is no edge planer.
- Edge planer required for chamfering cut edges. It allows you to cut the corner of the sheet at an angle of 22. 5 degrees, so you can get 45 degrees at the junction.
 5 degrees, so you can get 45 degrees at the junction.
 Edge planer work.
A standard drywall sheet has a front and back side, on the front side of the sheet edges are chamfered (factory edges). Due to this, at the junction of two sheets, a recess is formed, which in the future is filled with putty. If during the installation of the GKL they cut, then the chamfers must be done independently. It is desirable to do this before fixing the sheets on the frame, but sometimes the craftsmen chamfer after mounting all the sheets. It is difficult for a beginner to make a neat cut. Read more about cutting drywall in the article “https://www.sdvor.com/articles/new/578” on our website.
Cutter is a tool for fastening profiles, it partially replaces self-tapping screws. When using a cutter, it must be remembered that there are many hard-to-reach areas on the ceiling where the tool cannot crawl through. The cutter makes holes in the metal and bends the edges. This keeps the elements together. At the same time, the head of the self-tapping screw does not rise above the surface.
Self-tapping screws with a press washer in some places can prevent drywall from adhering to the frame, in places where rigid fixation is required, they cannot be dispensed with.
- Metal shears may be required for cutting ceiling and rail profiles.
- Drill or hammer drill – required for drilling holes. For example, under dowels.
- Screwdriver is necessary for tightening a large number of self-tapping screws, you can not rely on a screwdriver, as your hand will get tired very quickly.
- Measuring devices – a bubble level is mandatory, it will be useful to have a laser level in the absence of a laser level, you can make a hydraulic level yourself. Also, if there is no laser level, it is useful to have lacing with paint for beating horizontal lines.

The hydraulic level operates on the basis of the law of connected vessels. Two containers with scales are connected by a flexible tube. Two people are required to use the hydraulic level.
Plasterboard ceiling installation instructions instructions
Stage 1. Marking the frame level and fastening the guide profiles
Before installing the profile, the ceiling must be thoroughly cleaned of dust and debris. It is also recommended to treat the surface with an antiseptic, especially this recommendation is important for wet rooms.
It is better to start with the markings when making a plasterboard ceiling. Using a bubble level, you need to find the most protruding part of the ceiling. From it down the wall we make a mark. This will be the thickness of the false ceiling. At this stage, you need to resolve the issue with built-in lighting. If it is, then immediately lay the size of the lamps in the thickness of the ceiling (from 9 cm). If there are no built-in lamps, then we make a mark at a distance of 5 cm.
At this level, we beat off the horizontal along the perimeter of the entire room. The easiest way to do this is with a laser level. If there is no laser level, then you need to make a hydraulic level. With it, we mark the corners, then with the help of a chop thread we draw a horizontal line.
We will fix the guide ceiling profile along this line. The bottom of the profile should go along the line. Fasteners should be in 50 cm increments or in 25 cm increments on loose substrates. There are already holes in the profile, but they do not always coincide with the points we need, so we make new holes if necessary.
If the wall to which the guide profile is to be attached is uneven, cuts must be made on the side planes of the profile. If this is not done, then the guide pressed by the fasteners will bend.
Glue the sealing tape on the reverse side of the guide profile. The minimum number of fasteners on one profile is three. For installation, you can use dowel-nails or nylon dowels with self-tapping screws with a press washer.
Step 2 Marking the ceiling profiles
The ceiling profiles should form the battens to which the drywall will be attached. It is first recommended to lay out the layout of the sheets on paper. The joints of the sheets should fall on the ceiling profile, the edges of the sheets should not be allowed to sag. Also make sure that no cross-shaped joints appear, for this the sheets should go apart.
Layout example
Sometimes the factory edge at the end sheet is cut off to make it easier to putty. In this case, the distance from the wall to the first profile must take into account the dimension after cutting.
The pitch between the ceiling profiles is 1200 mm, which corresponds to the width of the plasterboard sheet. This profile performs the main bearing function. Another ceiling profile is attached perpendicular to it (it is usually called “bearing”). With one side, the carrier profile is inserted into the guide, the other side is connected with a single-level connector to a perpendicular ceiling profile. They are recommended to be placed every 50 cm.
Before starting work, mark the location of all profiles on the ceiling using a tie-string.
Stage 3 Fixing the hangers
We already have the location of the ceiling profiles, now we need to install the hangers. They should be fixed on 2 anchor wedges. The quantity depends on the weight of the ceiling. The recommended distance between hangers is 1 meter if the weight of the ceiling is 15 kg per square meter. We make an indent from the wall 25 – 100 cm.
Stage 4 Fixing the main frame profiles
We proceed to fixing the main profile, which comes in 120 cm increments. The length of the profile should be 10 mm less than the length of the room. The frame should not be rigidly fixed on the walls so that thermal deformations can occur freely.
It is convenient to use a magnetic level to level the frame, in this case you can magnetize the measuring device to the profile and not hold it with your hand. At this time, you can adjust the position of the frame we need.
If the room is longer than the profile, then the length must be increased by connecting several profiles. To do this, we use an extension cord. Direct suspension should cover the profile on both sides. Self-tapping screws are screwed into it from both sides. The height should be set according to the laser level or string should be pulled in the room. The evenness of the fastening should be checked using the rule and the level.
Direct hangers are more difficult to adjust than anchor hangers, since after screwing in the screws, the height of the direct fastening cannot be changed.
When all profiles are level, you can fold back the ends of the hangers so that they do not interfere with the drywall sheets.
Stage 5 Installation of “crabs” and bearing profiles. Mineral wool
Bearing profiles are placed perpendicular to the main ones. First, every 50 cm, one-level connectors (“crabs”) must be installed on the installed profile. Then we cut the ceiling profile to size so that it can fill the gaps between the “crabs” on the ceiling. It is better to make a distance from the wall 10 cm.
The easiest way to cut a profile is with metal shears. To do this, two side walls are cut off from the profile, then it is bent and the back surface is cut off. At the same time, it must be remembered that the length of the carrier profile must be less than the distance from one main profile to another, so there will be no expansion.
The supporting profile must be screwed to the crabs with self-tapping screws. Each profile is fixed with two hardware, in total, 8 self-tapping screws may be required for one fastening.
When the frame is formed, you can start laying the insulation. Mineral wool must be placed in the gaps between the racks of the frame.
Stage 6. Sheathing the frame with plasterboard
The drywall sheets are fixed to the frame according to the layout that was previously marked on paper. Before installation, you need to make chamfers on the edges; for this, you can use an edge planer or a construction knife. You can also chamfer after fixing the sheets, but on the ceiling it will not be so easy to do. If there are protruding corners in the room, then sheets cannot be joined on them, it would be more correct to make a tie-in.
Please note that the sheet should not rest close to the wall anywhere, there should be a temperature gap of 3 – 5 mm everywhere. Since the factory joint is not always justified when adjoining the wall, it sometimes makes sense to cut it off and chamfer it. This way you can reduce the consumption of putty
There are usually no factory chamfers on the ends of the sheets, so they will also need to be made. For cutting sheets, it is better to use an ordinary construction knife: first we cut through the top layer of cardboard, then the sheet is shifted to the edge of the plane and the gypsum core is broken. A break is made in the opposite direction from the cut, after which the cardboard is cut from the reverse side. Roughness on the edge can be removed with a planer.
Two people are required to lift the sheets to the ceiling. If the work is performed by one person, then a lift will be required that will hold the sheet at the desired height.
Drywall is fixed to the frame with self-tapping screws, the distance between them should be no more than 15 cm. The hat should be slightly recessed by 1 mm, while it should not tear the cardboard itself. If you overdid it and screwed the screw too deep, then you need to unscrew it, seal the hole with putty, and make a new mount in another place.
Also make sure that the screw is not too close to the edge of the sheet. The distance to the edge should be at least 5 – 10 mm, but not more, because then you run the risk of simply missing the profile.
Stage 7. Sealing of joints GKL
When all the main work on the installation of plasterboard false ceiling in the apartment is completed, you can proceed to sealing the joints. This will require a sickle tape or perforated tape, putty, several spatulas, containers, a primer and brushes.
First, it is important to properly prime the joints. For these works, it is necessary to take a deep penetration soil with a large proportion of dry residue. It is better to apply the primer with a brush, and not with a roller, since the brush allows you to well coat the joints and chamfers. After processing, the time must pass, which is indicated on the instructions for the primer composition.
If we use dry filler, it must first be kneaded. To do this, it is better to use a small container, it is necessary to prepare the solution in small portions so that the mixture does not have time to harden.
To mix putty, you need to use a clean container and clean tools, the remnants of old solutions will get into the fresh mix and disrupt the uniformity of the structure.
Pour water into the container, then start pouring dry putty in small portions. We do this until dry elevations remain on the surface, after that we mix the composition with a spatula, leave it for 10 – 15 minutes. Then mix again until smooth and you can work.
First you need to fill the joint with mortar with a small spatula, then apply another layer of putty. A perforated tape or mesh is glued onto it. The tape can be pre-soaked in water. With a spatula, the tape must be well glued to the surface of the seam, then the tapes are covered with another layer of mortar.
Instead of joints, it is necessary to cover with putty and self-tapping screws, which fastened the drywall to the frame. Detailed instructions for sealing drywall joints can be found at “https://www. sdvor.com/articles/new/573/”.
When the putty has dried, its surface must be treated with sandpaper. The skin can be wound on a bar or fixed on a special grater, if any.
Additional work
In some cases, additional measures may be required when installing a plasterboard false ceiling.
Cutting holes for luminaires
Consideration should be given to the need for recessed luminaires at the planning stage of the ceiling. Firstly, the space inside the ceiling should be enough to accommodate appliances. If the room has low ceilings, then taking an additional 5 cm under the equipment will not be a good idea.
Luminaires must also be taken into account immediately on the plan and before the installation of the frame. It is necessary to make a communication line for all lamps. The electrics in the plasterboard suspended ceiling are mounted in a hidden way, so the requirements of the PUE for this type of installation must be observed.
When the basic steps of the ceiling installation are completed, you can proceed to drilling the holes for the lights. This will require a core drill that can make round holes. The scheme drawn up earlier will avoid falling into the frame profiles.
Painting the ceiling with water-based paint
At the final stage, you can paint the plasterboard ceiling with water-based paint. The surface must first be primed. The easiest way to apply paint is with a long-handled roller. Excess coloring composition can be removed with a cuvette. Hard-to-reach places and the ceiling next to the walls are easier to brush.
How to make the backlight
The location of the backlight is also decided at the design stage. This question is more related to the design project. It is desirable that the backlight not only performs a decorative function, but also plays the role of additional lighting.
- Perimeter lighting creates a bright outline of the ceiling. If the ceiling has several levels, then both are illuminated. This type of illumination is created using LED strips, which are glued in special recesses.
- Spotlights – can also act as the main light source, but they do not cope with this function as well as a chandelier. Under them, in drywall, you need to make round holes, to which you must first bring an electrician. Such lighting fixtures illuminate the space below them more and, due to the large number, they often have to be changed.
- Light panels were designed for Armstrong ceilings, but are also suitable for plasterboard ceilings if the appropriate hole is made for them. Light panels have their own frame for fixing.
- Chandeliers – the most common way of lighting, it is also the most effective. Under the chandelier, one hole in the central part of the room is enough.
 If the ceiling has several levels, then both are illuminated. This type of illumination is created using LED strips, which are glued in special recesses.
 How to make multiple levels
Multi-level ceilings can have a variety of configurations. First, a frame is made for the first level, then a second box is fixed on it. In general, the sequence of actions is preserved, as in the formation of a conventional ceiling. In this case, an additional lateral plane is added, it is sewn up last.
Do-it-yourself plasterboard ceiling with photo. How to make the installation of a suspended, suspended plasterboard ceiling with video
- Do-it-yourself one-level suspended ceiling
- Plasterboard ceiling fabrication workflow
- Materials and tools for installation of suspended plasterboard ceilings
- An example of mounting a single-level false ceiling with your own hands
- We fix drywall sheets to the ceiling frame ourselves
- Video how to install a suspended ceiling yourself
- An easy way to self-mount the hl sheet on the ceiling without helpers
Do you really want to make a plasterboard false ceiling yourself? People who do repairs do it quickly and automatically. If you are new to such matters and you want to do the installation of plasterboard suspended ceilings yourself, then the installation instructions will help. Our tips for repairing an apartment with your own hands will help you learn this from photo and video instructions. If something is not clear, then ask in the comments, we will definitely answer.
Do-it-yourself one-level suspended ceiling
Plasterboard ceilings have a number of irrefutable achievements. It hides all the imperfections of your ceiling (cracks, bumps, etc.) It is very convenient to hide wires under such a ceiling. And also, the most important advantage is a flat surface.
Plasterboard ceilings are very versatile and numerous in terms of design. You can make such a ceiling from GKL, for every taste. There is no limit to the choice and imagination, they have different colors, there are single-level, multi-level ones. Plasterboard ceilings allow you to improve the lighting in your house or apartment and give it originality and elegance. On suspended ceilings, it is very convenient to place the light in a way that suits you and that you like to look at it. It is possible to carry out soundproofing of the ceiling to save yourself from unnecessary noise.
This ceiling is suitable for any room, so to speak “universal”. You can make such a ceiling even in the bathroom, you first need to treat the sheets with a special compound that repels water. Now let’s look at how to install a plasterboard ceiling with your own hands. To do this, below is a kind of photo-instruction, we tried to make it as clear and simple as possible. You will have access to a video on assembling and installing the ceiling yourself.
The order of work for the manufacture of a ceiling of plasterboard
Brief designations and concepts for the installation of a suspended ceiling of hl.
- Starter (perimeter start profile).
Name of elements
- Main (bearing frame profile).
- Longitudinal profile (for rigidity and reliability).

There are only two technologies for mounting walls with sheets. This is a technology called Knauf and Giprok. You can see them for yourself and evaluate them. Experienced craftsmen prefer Gyprock technology, since our suspensions and profiles, so to speak, are the basis of which the entire supporting structure of the suspended ceiling consists and on which they are actually attached later, drywall sheets, to put it mildly, are not made according to European standards, as well as many things … In a word, learn how to make suspended ceilings well and with high quality.
The construction of your plasterboard ceiling, above all, must be durable. And all other parts (fastenings and suspensions) must be very well fixed to the very base at such a distance as to prevent the drywall sheets from sagging. Because it is sagging that leads to the appearance of cracks between the joints of the sheets and the appearance of bumps. Under the fastening of drywall, you need to select high-quality and technological materials.
Materials and tools for installation of suspended plasterboard ceilings
Knauf direct suspension Self-tapping screws that will be needed
First of all, these are special suspensions (photo on the left), which must be attached to the base. So that they are firmly and securely fastened, they use the so-called dowel-nails (photo on the left) or metal anchor wedges. More preferably – a dowel-nail. Profiles with a width of 70 mm are attached to the suspensions with the help of the so-called “kids”, shown in the figure below under the number 1, (screws with a gimlet for metal, they better “enter” the profile). Then go the drywall sheets themselves, 12.5 mm wide, they are screwed with screws indicated in the photo on the right under the number 2. Measure each piece yourself in length, depending on the size of the ceiling. You will also need a laser level. And do not forget about a tape measure, a pencil, a puncher and a screwdriver, you can’t do without it. The video tutorial below shows everything clearly. Our free online calculator will help you calculate the required number of sheets and profiles, components.
Fixing the hanger to the ceiling
An example of mounting a single-level suspended ceiling with your own hands
First you need to draw a line for the initial profile, for this, use a laser or water level to help. The distance from the ceiling should be 10–20 cm, make sure that you can hide electrical wiring, communications, etc. Set the level up. Mark the outline of this line with a pencil on the wall. Then attach the guides along the perimeter of the room along this horizontal line with dowels 350-500 mm apart.
Checking the evenness of the ceiling
The next step is to mark the ceiling for the main bearing rails. First you need to draw parallel lines more than 125 cm, and this is about half a sheet of drywall. Drywall sheets will be attached with a small gap between them, and when we putty, that could be filled with gypsum mixture to seal the seams between the sheets. The main profiles will run along the edges of the sheet and in the middle, keep in mind. And along these lines we will fix the suspensions on metal anchor wedges or dowels 400 mm in size.
Now you can take the profile guides and insert them into the starting frame, which we fixed around the perimeter of the walls of the room. The only thing that is not advisable to do is to insert them close to the wall, you need to leave a small gap so that there is no deformation of the ceiling from various unforeseen circumstances, like thermal expansion. Therefore, we insert guides into our suspensions. We fasten the guides to the hangers with metal screws, 2 on each side of the profile. Be sure to check the horizontal level with a long level or a laser.
Connection option without crab
Next, do-it-yourself installation of a plasterboard ceiling involves marking and inserting longitudinal profiles (photo on the right). It is recommended to look at the specification for transverse installation of drywall sheets of guides of about 600 mm, and for longitudinal installation – 400 mm. You can choose the design option yourself and watch the video. Here we will consider the transverse mount. You can easily cut the longitudinal profiles from the guides with metal scissors to the length you need. Then insert the longitudinal profiles between the guides also in increments of about 500mm. They should be located so that their ends do not fall into the places of fastening of the guide profiles with suspensions.
Connection to the starting profileConnection to the main profile using a crab
Longitudinal profiles are attached to the rails using special crab, photo on the left. To make the structure more durable, use a different design for fastening the longitudinal profiles. Two segments are attached to the carrier profile and a longitudinal one is inserted into them. It is this method that strengthens the structure very well. You can fix the longitudinal profile with the help of suspensions, approximately in the middle of each.
You can use pieces of the same profile for rigid fastening of the profile to the ceiling, only it must first be cut along the edges and bent with the letter G. For convenience, first measure the distance from the ceiling to the bottom edge of the profile, this will be the cut point and leave about 3 centimeters for fastening dowel to the ceiling. Please note that you need to fasten with a dowel closer to the edge of the profile bend in order to prevent sagging under the weight of drywall sheets. Using this method, you can make suspensions of any length with your own hands and the ceiling can be raised or lowered to the distance you need. Important tips on how to avoid common mistakes when working, be sure to look at the secrets of working with a profile.
Fixing plasterboard sheets to the ceiling frame independently
Finished and insulated frame
So the main frame for the GKL ceiling is ready. Now you need to sheathe it with sheets of drywall. Before that, treat each sheet from the side of the ceiling with a special primer, this will improve the waterproofing, after fixing, you will process it from the back side. Set back a few millimeters from the wall so that the drywall can breathe. Attach the sheets across the longitudinal profiles. Attach the first sheet from the wall, and the next one starting from the first longitudinal profile. Close the distance (between the wall and the longitudinal profile) with half the sheet. Thus, we pass the entire ceiling. Fasten drywall sheets to all laid profiles with metal screws in increments of about 15-20 cm.
The heads of the self-tapping screws do not need to be sunk much, they should be almost flush, but not sticking out above the drywall plane. A screwdriver with a stiffness limiter will help you with this, set it in such a way as to achieve the triggering of the limiter on a light recess of the self-tapping screw. Make a gap between the sheets of 2-3 mm, which is useful for further sealing the joints with a gypsum mixture.
That’s it. It remains only to cover up the joints that formed between the sheets. It is necessary to putty the ceiling completely, first go through it with a primer, when puttying, you may need to tighten the protruding screws. To seal the joints well, use special mixtures or a gypsum mixture. A sticky reinforcing mesh made of fiberglass is superimposed on it. And smooth everything with a spatula so that it does not stick out. When everything is dry, smooth out all puttied areas from stains with fine sandpaper. In the same way, the gaps that have formed between the wall and the drywall sheets are processed. The ceiling is completely puttied with a gypsum mixture, try to do it without streaks if you do it for painting, and if you do it under wallpaper, then this may not be visible.
Here is the finished plasterboard suspended ceiling, made by hand. Then you can do whatever you want with it. Glue wallpaper, paint and so on. If you did everything right, then the ceiling will serve you for a very long time. Ceilings are also multi-level, this is written in this article. Now check out the video installation instructions to consolidate knowledge before practice.
Video how to install a suspended ceiling yourself
 youtube.com/embed/3OvewXvMogo?rel=0″ frameborder=”0″ allowfullscreen=””>
Video:
A simple way to self-mount a drywall sheet on the ceiling without helpers
Video:
How to make a plasterboard ceiling with your own hands: photo and video installation
In this material, we will take a closer look at how to make a plasterboard ceiling with your own hands. You will receive step-by-step instructions for assembling ceilings, everything will be explained with the help of a photo.
Back to TOC
Complete material content
- 1 Plasterboard ceiling assembly steps
- 2 Marking the water level
- 2.1 Where to put marks?
- 3 Exhibition of guides
- 4 How to make a frame of drywall ceiling
- 5 Hypsum plasterboard fastening to the ceiling
Stages of assembly of gypsum plasters
Plasterboard ceilings are collected in several stages:
- 9003 the height of the ceiling is determined.
- Guides are set according to the broken level.
- Profiles are inserted into the guides, the brackets are rotated and the frame is leveled.
- Wool is placed behind the ceiling (if necessary), lintels are placed and drywall is fixed.

Next, consider all the stages in turn.
Back to the top
Leveling the water level
In order to beat the level in the room, you must have a water level and an assistant.
For example, we have a rectangular room 3 by 4 meters.
First you need to draw a horizontal line on any wall with a pencil at eye level, and then a vertical line, that is, you should get a cross.
Draw a horizontal lineHorizontal line on the wallDraw a vertical lineCross on the wall
This will be the workplace of the one who will catch the level, while the other person will walk around the corners and draw.
It is necessary that the water in the flasks be halfway and between each other so that it is at the same level.
You also need to release all the air in the water level, otherwise you will not beat it off evenly.
The water in the flasks is half full
So, one puts the flask to the cross, the other puts the flask in the corner against the wall.
Another worker at this time puts the flask in the corner
The one who put it to the cross begins to catch the water boundary with a horizontal line, the second one stands and does not move the flask.
Now we are fishing the level
Now we have fished the water level
When the exhibitor catches the year border with a horizontal line, waits 5 seconds to make sure that the water is no longer moving, then he tells the other to make a mark. The second person should try to look horizontally at the water line and at this time mark a line from the water line with a pencil.
Marking the level line
Then the marker goes to the next corner and the operation is repeated.
Where to put marks?
Marks are placed in the following places:
- two on the longest wall;
- one on the other walls.
Below are the locations of the rooms and dashes indicate the places where you need to put marks.

Rectangular room Rectangular non-standard room
Why we put labels this way will be told when we set the guides.
Next, we go through all the corners and measure the distance from the marks to the ceiling itself.
For example, in a room 3 by 4, the marks at the four corners will be at the following height: 170 cm, 169 cm, 172 cm, 170 cm.
.and we get a label, according to which we will set the guide. (164 cm.)
If you have recessed lights in the ceiling, you will need to lower by more than 5 cm. For example, by 10 cm.
Return to the index
Alignment of the guides
So, we transfer the marks from the bottom up by 164 cm using a tape measure, then measure the wall with two marks at the corners and cut the guide along the length.
We nail on the dowels in places with marks, bring a two-meter level from below and align it so that there is no gap along the entire length between the level and the guide.
We put the rest of the dowels.
My advice to anyone who buys ceiling rails, if your room has at least one wall larger than 3 m, then it is better to buy rails and profiles 4 m long.
It happens that the wall is longer than the length of the guide, then we take a chop cord and on the wall along the entire length from the mark to the mark (under the ceiling) we beat off the line, we already nail the guide along the line. The distance between the dowels should be within 50 – 60 cm. serves as a second label.
We nail the next guide and so on in a circle.
Aligning rails under the ceiling
We don’t have marks on the last wall, but here I think it’s already clear what serves as marks for us.
Set the guides very carefully, because if the guides are not set correctly, then the ceiling will also turn out to be crooked, and this is a marriage.
Back to TOC
How to make a plasterboard ceiling frame
At the third stage we will make a plasterboard ceiling frame, all this can be done by hand. To begin with, I took a small room 258 by 270 cm to make it clearer.
In this photo, the guides for the plasterboard ceiling frame are already installed.
A more or less even angle
We mark the distance every 60 cm, that is, after 60 – 120 – 180 – 240 cm. Then we do the same on the other side. We measure the profile, cut it to length and insert it into the guides according to the marks.
Inserting the profile into the guides This profile photo already has 9 inserted0002 Sometimes we twist profiles with guides with seeds so that when we expose them, they do not leave the marks. After installing the profiles, we twist the brackets.
Screwing the brackets to the rails
Attention: the brackets should rotate at a distance of 80 -110 cm from each other.
So: the brackets were installed, the profile was twisted. We begin to expose the frame. 2 people should participate here, one should keep the level, the other should fasten the profile with slabs to each other with “seeds”.
Since our profiles turned out to be 250 cm long, we can set the frame using a 2-meter level, without pulling on the laces.
First, we set along the profile, which is at a distance of 180 cm, because the next profile is at the mark of 240 cm, and we have a 2-meter level, naturally it will not reach when we put it across between the exposed profile and the guide.
Aligning the profile to the plane
One person sets the level from one edge of the profile, the second twists the seed from the same edge into the bracket and the profile. Then we unfold the level across the profiles and press one edge of the level to the guide, the other edge of the level to the profile near the bracket, which was only recently set up and fasten the profile with the brackets that are above the level.
This is how, by placing a level across between the profiles and guides, the rest of the profiles are set.
In this way, we fasten the profile with staples with seeds
If the frame is not set correctly, this can be easily checked if you set the level diagonally along the profiles.
Someday later I’ll tell you how the frame is exposed in a room of 5 by 5 meters, it is exposed with the help of laces, in order to explain how this is done, I need to make a drawing.
Jumper
Back to index
Fixing drywall to the ceiling
We have already decided where we will throw the first sheet from when we set up the profile.
Since the drywall sheet is 250 cm long, we mark distances of 125 cm and 250 cm on the guide and profiles. The measuring tape must be stretched along the guide and profiles.
Then we cut the honeycombs and fasten them to the profile shelves in the places where we put the marks (in the center of the marks). As a result, 6 cells should go to the first two profiles.
Next, we measure the distances for the jumper profiles. For example, if we have a distance between the wall and the closest shelf of the profile 57 cm, then it is necessary to cut off the profile 56 cm so that it fits freely between the guide and the honeycomb.
All honeycombs and profiles are exposed, after that we start preparing mineral wool.
In this case, we put cotton wool, because we have a balcony on top, which freezes in winter. If you live, for example, on the 2nd floor of a five-story building, then you do not need to install cotton wool.
We cut the wool into 60 cm pieces (it turned out to be 120 cm long and 60 cm wide) and inserted tightly between the profiles.
Insulation of the plasterboard ceiling with mineral wool
Now you can install the first drywall sheet, which we did.
Fastening the first sheet of drywall to the ceiling
We put the screws 25 – 30 cm apart, the distance between them can be made smaller. A greater distance cannot be made.
We continue to insulate the ceiling
We go further along the profiles, insulate with wool and put the next sheet, it must first be cut.
Fastening the second sheet of drywall to the ceiling
When one layer of drywall has been laid, start the same work on the opposite side.
Do the same on the other side
Rule: there must be no intersection of seams on the ceiling.
If a strip of less than 70 cm is not sewn at the end, then we cut the drywall sheet across. If the strip is more than 70 cm, then the sheet can be cut along.
Completely DIY plasterboard ceiling
GKL ceilings – advantages and types of structures
The most popular option for repairing ceiling planes has long been considered drywall. GKL ceilings can be found everywhere – in offices, shops and apartments. This is a very simple and easy to process material. With it, you can create a wide variety of designs and shapes.
Positive aspects of such solutions
First of all, it is worth mentioning the relative ease of installation. Anyone, even a novice master, can assemble a ceiling from GKL in his apartment. The only difficulty he will face will be the rather solid weight of the sheets.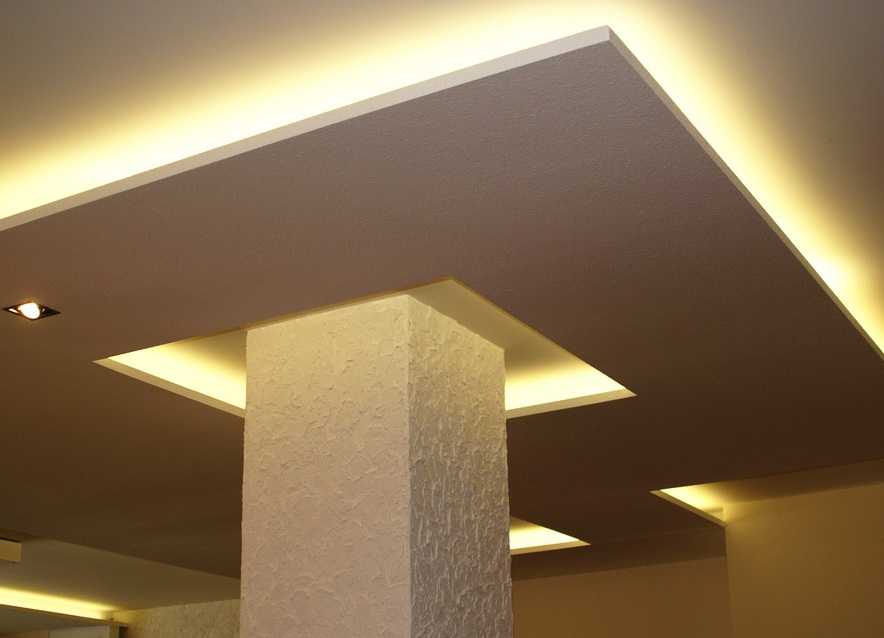
Being a very easy material to use and work with, drywall makes it possible to bend, cut and form various curved shapes on the ceiling. This will give the room a personality.
It is also not necessary to level the concrete floor slab. The assembled structure will hide all the shortcomings of the overlap and allow you not to think about it. In addition, the electrical wiring and even the ventilation ducts of the air ducts will perfectly fit in the assembled structure.
What is GKL like? Various additives in the gypsum mixture during their production give different types of such sheets different properties. Most often, only two types of such sheets are used – moisture resistant and ordinary.
However, there are several other types of this versatile material. Some types of drywall can withstand high temperatures and are called “fire resistant”, although this does not mean that they can withstand open fire for a long time.
The most important parameter, apart from moisture resistance, when choosing a GKL will be its thickness. Sheets can be from 6 to 16 millimeters, of which the most popular are details with a thickness of 6.9 and 12 millimeters. For different manufacturers, these figures may differ by half a millimeter, and then the values \u200b\u200bwill be larger. The length of one part is usually 250 centimeters, with a width of 120.
What to choose for ceilings
Depending on which room will be renovated, moisture resistant or simple material can be chosen. As you might guess, the moisture-resistant type can tolerate exposure to moisture. Therefore, this type of sheets is used for repairs where there is a high level of moisture in the air. In the remaining rooms of the apartment, you can get by with simple drywall, since you should not be afraid of high humidity there. It is much more important to choose the right thickness of the parts.
One standard sheet, 12.5 millimeters thick, weighs about 25 kilograms and all this weight must be securely fastened. Therefore, for the ceiling, a thinner plasterboard is more often used, the thickness of which is from 8 to 9. 5 millimeters. Parts with a thickness of 6 mm are used to create curved shapes and are too fragile to form the main area of \u200b\u200bcovering with this material.
What you need besides drywall
In order to attach the gypsum boards to the ceiling, you first need to build a solid base. For this, the Knauf company produced special-shaped metal profiles, which have become an indispensable attribute of all drywall constructions.
They come in several varieties, each designed for a different purpose. There are guide profiles that are used to assemble supporting structures and ceiling ones, which will serve as the basis for fixing fragments of the coating.
In addition, you need to make sure that all the necessary tools are at hand. For work, you will need a screwdriver, a building level, a puncher, self-tapping screws and materials for exterior decoration.
Designs
Gypsum board provides a wide range of possibilities for modeling and assembling ceiling compositions. It is impossible to say exactly how many types and types of such solutions can be assembled with its help. You can only divide them all into several basic types:
- Single-level ceilings, in which there is only one plane.
- Multi-level solutions in which there are several planes located at different heights.
- Combined. They differ in that several coating finishing materials can be used during assembly. Most often, there is a combination of drywall with a stretch fabric.
The simplest to assemble and therefore popular designs are similar. The photo below shows the most successful or common plasterboard ceilings mounted in ordinary apartments.
Most of these compositions are equipped with built-in lighting or recessed lights. The advantages of the suspended structure make it possible to use recessed luminaires and place them anywhere on the ceiling.
It looks like a ceiling made of plasterboard and equipped with a special niche with lighting as in the photo below. It greatly changes the overall perception of the ceiling and is an excellent option for light decor.
DIY plasterboard ceiling: step by step installation instructions
02/01/2022
1 star2 stars3 stars4 stars5 stars
We give advice on the choice of material, calculation of its quantity and installation of the structure.
ShutterStock
Suspended plasterboard structures are a good solution for finishing the ceiling. They are strong, durable and inexpensive. There are a lot of design options: one-, two-, three-level systems with or without built-in lighting, combinations with other materials of varying degrees of complexity. It is easy to assemble the suspension system yourself. To make everything work out the first time, we offer step-by-step instructions for installing a plasterboard ceiling with your own hands.
Everything about self-assembly of a suspension system from drywall
Pros and cons
What you need for work
Preparation for installation
— Designing
— Calculation of material
— Base preparation
Assembly instructions
— Markup
— Frame assembly
— Sheathing GKL
– Finishing
Features of the manufacture of multi-level structures
Plasterboard ceiling is a rigid structure fixed to a rough base. Its basis is a metal profile frame. Plasterboard sheets are fixed on it. Such a system has many advantages.
Pros
- Covers all defects and imperfections of the base.
- Masks engineering communications, electrical wiring.
- You can save on the preparation of a rough base. No leveling, puttying, etc. required.
- Service life — 25-30 years.
- Many design options.
- Easy and inexpensive installation.
 required.
 Cons
- Fairly difficult surface finish.
- “Eats” the height of the room by 5-10 cm.
-
Ceiling
Which ceiling is better – stretch or plasterboard: we study all the pros and cons
Assemble the framework on the base. It needs guide rails, UD and CD type metal profiles. Fasteners are also needed. Longitudinal planks are fixed on suspensions, transverse ones are fixed with the help of crab joints.
The frame is sheathed with plasterboard sheets. These are building boards made of pressed gypsum, covered with cardboard on both sides. They are produced in standard, small and extended format.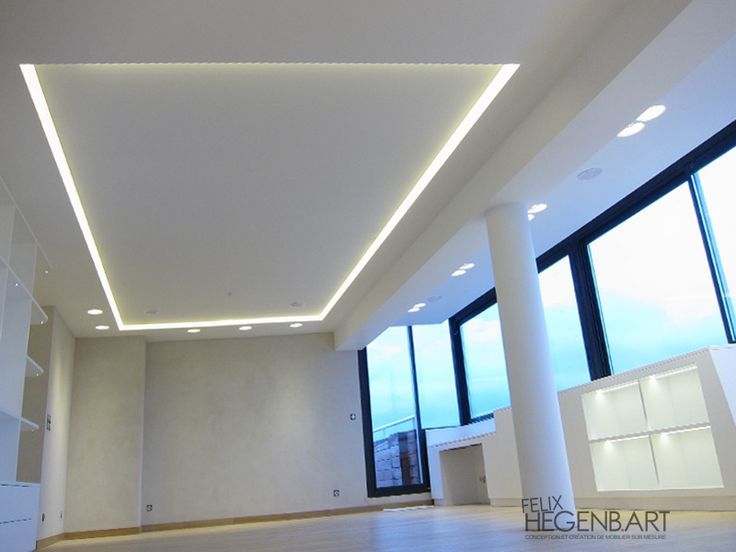 There are several types of material, but three types are used for ceiling structures. Let’s briefly characterize them.
- GKL. Standard light gray board without additional processing. Hygroscopic, deteriorates from moisture. It can only be installed in dry rooms.
- GKLV. Moisture resistant material of light green color. During the production process, it is treated with hydrophobic impregnation. Sufficiently resistant to moisture, it is installed in rooms with high humidity.
- GKLO. Light pink flame retardant board. During manufacture, it is treated with a flame retardant. Withstands high temperatures and fire. It is mounted where high temperatures are possible.
In addition, you will need fasteners: self-tapping screws, bedbug screws, self-tapping dowels or anchors, crab fasteners. For the final finishing of the ceiling plane, you need a primer for plasterboard, sickle tape, putty, water-based emulsion. From the tools you need to prepare a screwdriver, puncher. For marking, you need a laser level, a plumb line, a hydraulic level, a tape measure, a chopping cord. In addition, they prepare tools for applying a primer and putty: a roller, brush and spatulas.
-
Ceiling
Plasterboard ceiling: design tips and 106 photos
Do-it-yourself plasterboard false ceiling assembly is easy if you follow all the instructions exactly. Start with preparation. We will analyze in detail all its subtleties.
Design
This is a mandatory step that will help you correctly calculate the required amount of materials. First you need to measure the length and width of the room, taking into account all the protrusions. Then, on paper on a scale, build an exact plan of the room. A frame diagram is built on it and the areas for fixing the suspensions are marked. They do it like this.
- Select the fixing spacing of the longitudinal profiles. For thin slabs (up to 9.5 mm) – this is 0.6 m, for thick ones – 0.4 m. Draw these lines on the diagram.
- Mark the mounting points for the cross pieces. Their installation step is 0.5 m. If the longitudinal profile is set in increments of 0.6 m, the transverse one must also be attached to the base. Mark it on the diagram.
- Mark on the diagram the wiring lines, the places for mounting lighting fixtures.
Material calculation
- Determine the number of guide rails. They are attached around the perimeter of the room to create the basis of the frame. First find the perimeter of the room, then divide it by 3 m. This is the standard length of one rail. Round the resulting number up to the nearest integer.
- Calculate the number of longitudinal rows. To do this, divide the length of the room by the installation step. Subtract one from the resulting number. Round the result up to the nearest integer. Similarly, count the number of transverse rows.
- Determine how many profile strips are needed for one row. Multiply the number of rows by the resulting value.
- Calculate the number of hangers on which profile strips are fixed. Use the formula: (M + 1) x C + (C + 1) x M. Here M are rows of longitudinal parts and C are rows of transverse parts.
- Count the number of crab connections. It is equal to the number of intersections between the longitudinal and transverse parts. Define it according to the diagram.
- Determine the number of plaster boards. Find the area of the room and divide it by the area of the sheet. Round your result up to the nearest whole number.
 Round the result up to the nearest integer. Similarly, count the number of transverse rows.
 In addition, self-tapping dowels are prepared, anchors can be used. They are placed in profile strips every 0.3 m and two pieces per suspension. Self-tapping screws and hardware bugs will be required.
-
Kitchen
Choosing a plasterboard ceiling for the kitchen: design options with photos and useful tips
Base preparation
Begin by preparing the room. All things and furniture must be taken out of it. If this does not work out, you can move them to the center, hermetically covering them with plastic. It is necessary to remove all the decor from the ceiling, remove the chandeliers. Examine the ceiling surface. If there is peeling plaster or paint, carefully remove it. The entire coating does not need to be removed, only exfoliated fragments. Mold stains, if any, must be cleaned, treated with an antiseptic and dried.
1. Marking
First, mark the frame installation lines on the draft ceiling. They do it like this.
- Find the lowest point on the ceiling plane. To do this, measure the distance from the floor to the ceiling surface in different places.
- Descend 50 mm from this point if you do not plan to backlight. For a backlit system, set aside 100 mm.
- Through the marked point, draw a line along the entire perimeter of the room. Use a level. This will be the line for attaching the ceiling structure.
- Mark the position of the longitudinal profiles. Start from the wall with a window. Measure from the corner a distance equal to the installation step of the profile bar. Repeat the operation until you mark the entire length. Do the same on the opposite wall. Connect the marks with chalk cord, beat off the lines.
- Mark the position of the transverse profiles. The algorithm of actions is similar to the previous step, just change the installation step. Break off the attachment lines.
- Mark the fixing points for the hangers. They fall on the center of each side of the rectangles outlined on the base.

2. Frame assembly
Installation of plasterboard on the ceiling begins with the assembly of the frame. They do it like this.
- Install guides around the perimeter with damper tape glued to the outside. This will improve sound insulation. Screw the first fastener at a distance of 0.1 m from the corner, then every 0. 3 m. If you install them less often, the strength of the structure will suffer. Strengthen the joints of the slats: insert a metal plate inside the slat, fasten it to the screws.
- Install hangers. They are mounted in the areas indicated on the markup. Fasten to the base with anchors or self-tapping dowels. Place the element so that its center falls on the intended point. Bend the mesh mustache-mounts of the suspensions down.
- Form a model of the ceiling plane from a fishing line or cord. Fasten them according to the markup above each longitudinal element. This will help to control the horizontal of the suspended structure.
- Install the longitudinal profiles. First, put them in the guides, fix them with self-tapping bugs. Insert the parts one by one into the suspensions and fix them in them. Horizontal control the level and position of the stretched threads.
- Mount the crab connections. Place them on the already fixed longitudinal strips at the intersections of the frame elements.
- Fit the cross profiles. Fix their ends in the established crabs. Next, attach them to the hangers. Check horizontal.
 3 m. If you install them less often, the strength of the structure will suffer. Strengthen the joints of the slats: insert a metal plate inside the slat, fasten it to the screws.
Frame ready. If you need a device for heat or sound insulation, a heater is placed in it. Most often these are mineral wool slabs. They are cut so that the joints are tight, without gaps.
-
Internal structures
Frame made of metal profiles for plasterboard: installation details
3. Plasterboard sheathing
Plasterboard sheets must be brought into the room in advance. They will need at least a day to adapt to new conditions. Lay them horizontally so as not to disturb the geometry. After that, the plates need to be cut. Holes or recesses are cut out in them, adjusted to size. Masters always cut the first sheet in even rows by 0. 5 m. Then the joints in adjacent rows will not match. It is important. On the cut edges, chamfer with a sharp knife. Cut it at 45˚.
Let’s figure out how to fix drywall to the ceiling. The first plate is lifted and pressed against the frame structure so that a 2 mm gap remains between the plasterboard and the wall. Hardware is screwed along the edges and in rows along the profiles. The first one is placed at a distance of 0.1 m from the wall, the rest every 0.2 m. Self-tapping screws are screwed with a screwdriver and tightened by hand. The hat must be sunk into the GKL. But you can not twist, otherwise the fasteners will not hold the plate. Therefore, it is better to twist it manually.
4. Finishing
This is best done by professional finishers, but you can try to do it yourself. We offer detailed instructions.
- Fill in all irregularities. Putty the joints, lay with a sickle, remove excess putty. Putty dents from the heads of hardware, all chips and damage to the plasterboard.
- Leave the putty to dry completely for about a day.
- Apply a final coat of filler paste, smoothing out carefully. Let dry and sand with a fine-grained sandpaper.
- Fill the surface with a finishing putty. Modern putty materials can be applied without prior priming. If using a different putty, prime the base first.
- If you plan to assemble a backlit plasterboard ceiling with your own hands, cut out holes for the lights. First, outline their location, focusing on the project drawn up in advance. Cut holes with a puncher with a removable crown of the desired diameter.

The ceiling is ready, it remains to paint or wallpaper it. After that, install the lamps.
If the ceilings are high, you can install three- or two-level systems. Theoretically, there are more levels, but it is better for professionals to assemble such structures. The assembly process is almost the same as described above, but there are some features. Let’s figure out how to make a two-level plasterboard ceiling.
- Prepare a project, mark both levels in detail on it.
- Mark out: transfer the drawing to the ceiling surface.
- Assemble the upper level framing.
- Assemble the side frame frame connecting the two levels.
- Assemble the frame on the lower level.
- Wiring for lights if needed.
- Cut drywall boards to assemble both levels.
- Assemble the boxes of the first and second levels.
- Cut and prepare the drywall strips for the side piece. Put them in their place.
- Carry out finishing.
- Install lights.
If additional lighting with LED strip was supposed, it is fixed along the intended contour.
-
Ceiling
Standard ceiling height in an apartment: what it is and how to change it
Contributed by
Inna Yasinovskaya
Photo
ShutterStock
Was the article interesting?
Share link
By clicking on the “Subscribe” button,
you consent to the processing of personal data
Recommended
Wallpaper for the nursery: the best colors, suitable materials and 96 photo examples
The 12 Best Aluminum Radiators of 2022
How to cut garlic for the winter: technology, choice of tools and storage methods
In Norway, built a floating museum covered with “scales”
Singer Adele puts her Beverly Hills home up for sale
A floating bathhouse was built in the capital of Norway
What is planted before winter: 14 best crops for your garden
In Italy, built a wellness center with upside down houses
7 trends in window decoration with curtains
Advertising on IVD. ru
ru
Do-it-yourself single-level plasterboard ceiling
Introduction
The plasterboard ceiling is known as a decorative and technically convenient element of a living space. The technical convenience of a plasterboard ceiling in closing engineering communications, hiding the insulation system and the possibility of quickly leveling the main ceiling. A variety of plasterboard ceiling designs allow you to significantly change the design of the room by making illuminated ceilings, two-level ceilings, and curly ceiling structures.
Of course, it is worth noting that the plasterboard ceiling needs finishing. Unlike other ceiling structures, it needs to be plastered and painted, which can be inconvenient due to timing or other reasons. It is much easier to choose a ceiling from PVC ceiling panels. PVC panels do not require finishing. They are completely ready for installation, have a variety of colors and designs. In addition, PVC panels are not afraid of moisture and can be installed on the balcony, in the bathroom and other wet rooms of the house and apartment. On this site you can learn everything about PVC panels.
However, despite all this, plasterboard ceilings and PVC panel ceilings have different tasks and no one forbade them to combine. One to hide communications, the second to make a quick finish.
Choosing the type of plasterboard ceiling
Choosing the type of plasterboard ceiling depends on its purpose. Technological diversity of plasterboard structures allows you to create the following types of ceilings.
- Flat single-level plasterboard ceiling, with ceiling level lowered by 100-1500 mm.
- Two-level ceiling with optional lighting.
- Two-level ceiling with curly elements;
- Figured ceiling in several levels;
- Other types of ceiling.
Plasterboard ceiling appearance options are very diverse and are limited only by the imagination of designers and plasterboard construction technologies.
Plasterboard Ceiling – Two Designs
There are two fundamentally different designs for plasterboard ceilings.
- The first design is mounted on a frame made of a special profile, which is called the plasterboard profile, also known as the ceiling profile PP 67/27 and the ceiling guide profile PNP 28/27. Ceilings are made on a metal frame more often in city apartments and stone houses.
- The second construction, plasterboard ceilings, is made on a wooden beam. For this design, any dry construction beam 60 mm wide, 30 or 40 mm high is used. Ceilings on a wooden frame, more often, are mounted in wooden houses, houses with wooden floors and attics with a truss system.
Procurement of plasterboard ceiling materials
Plasterboard ceiling material can be divided into three groups:
- Ceiling frame material and its attachment (suspension) to the sub-ceiling;
- Plasterboard sheets;
- Fixing and additional material for construction.
Material for the ceiling frame and its fastenings
Let’s consider the option of a ceiling in an apartment using a metal profile for drywall.
A special ceiling profile is called a ceiling profile. Correctly such a profile is called and marked as follows:
- PP ceiling profile PP 60/27,
- PNP guiding ceiling profile PNP 28/27.
The dimensions of the profiles are such that they can be inserted one into the other when assembling the structure. The profiles are fixed in the structure with the help of special screws called “bugs” (“bug” is a screw type: LB) or a special tool called a cutter.
Floating and hard plasterboard ceilings
Pay attention to this section. There are two technologies for installing a plasterboard ceiling on a metal frame.
The first technology is tough. It assumes that the plasterboard ceiling is attached to the sub-ceiling and to the walls at the same time. The suspended ceiling frame is attached to the draft ceiling with the help of special PP suspensions (straight suspension) or clamps with rods. Direct suspension will allow you to lower the ceiling to a height of no more than 200 mm. Suspension with traction allows you to lower the ceiling by 300-1500 mm.
Note: It is worth noting that when choosing the type of ceiling, you must understand how much the ceiling will fall and from this make a choice of suspension types.
The second technology is floating. It assumes that the ceiling frame will be attached to the sub-ceiling, but will not be attached to the walls. Such a ceiling is carried out only with PP profiles, without the use of PNP profiles. This ceiling design is used in new buildings of the first years of commissioning, houses near highways and railways.
An example of a ceiling on direct suspensions, I described in detail in the article: Suspended ceiling on direct suspensions. Here, for a variety of examples, we consider the device of a single-level floating ceiling on rods with clamps.
Material for a single-level ceiling
To determine how much and what material to purchase, you must first draw a diagram of the future ceiling design. We draw the room where the ceiling is planned, with dimensions.
Ceiling hangers must be installed in 600 mm increments and 250 mm from walls (see photo). Put the planned suspensions on the drawing of the room based on the required gaps between them, and get their number. An example of the location of profiles can be seen in the figure from the article Layout of a single-level suspended ceiling.
When making a hard ceiling with your own hands, you would need a guide profile around the perimeter of the room (PNP 20/27). Its length can be calculated by the length of the perimeter of the room plus 10% of the margin. In this floating ceiling design, this profile is not needed.
The main structure of the floating ceiling frame is a kind of grid of ceiling profiles (PP 60/27). Some of these profiles will be attached to suspensions (they are called the main ones). The second part of the profiles will be attached to these profiles (they are called carriers). The name is bearing, due to the fact that drywall sheets will be attached to these profiles.
In plasterboard technology, intersecting ceiling profiles can be connected in one level (butt) or in two levels, overlapping one another.
- The first connection is called a single-level connection of ceiling profiles and is made with special crab fasteners.
- The second connection is called a two-level connection and is made by a special profile connector a two-level connection.
In floating ceiling construction, only two-level profile connection is used!
I repeat and this is important . In the construction of the plasterboard ceiling frame, two types of profiles are clearly separated. Some profiles are called main, the second are called carrier (load). The main profiles are attached to the draft ceiling, and the load profiles bear the load from the weight of the drywall attached to them.
Important! In a two-level frame, the main profiles are located at the top of the structure, and load-bearing profiles are attached to them.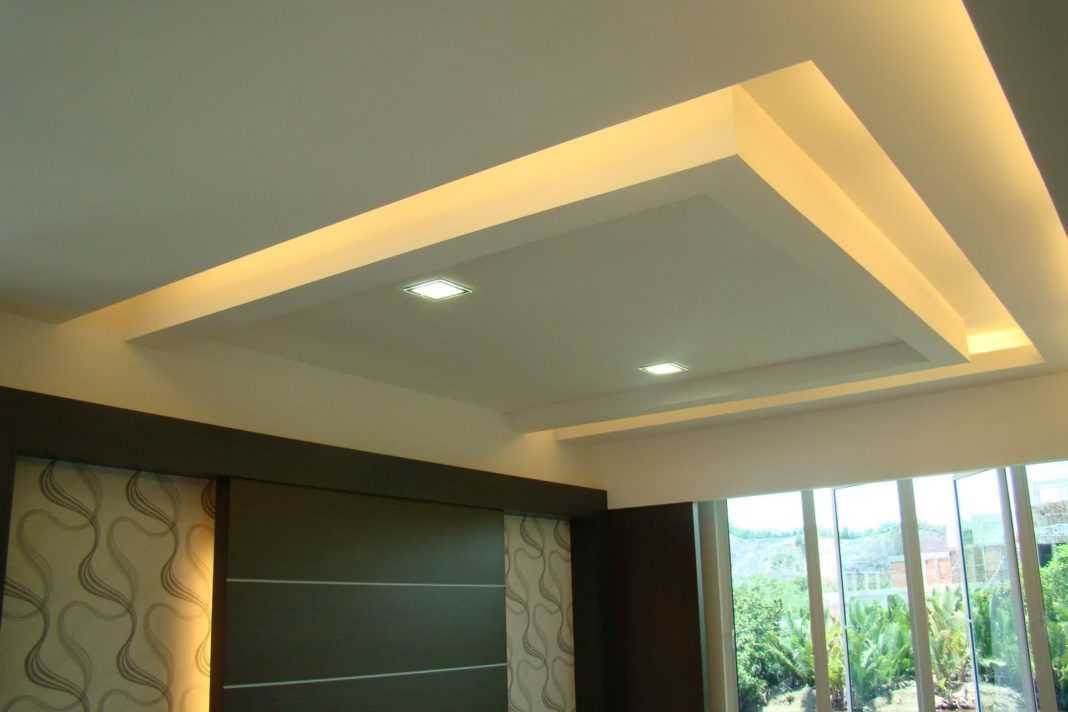
Plasterboard fixing material
For any type of plasterboard ceiling, fixing material required:
- Screws type: TB
- Screws type: LB (bugs)
Dichtungsband soundproofing tape must be purchased. It is glued to the outer sides of the shelves of the rigid false ceiling profiles, for sound insulation and deformation compensation.
Plasterboard purchase
The following type of plasterboard is purchased for the ceiling:
- For dry rooms: GKL.
- For damp rooms: GKVL.
Preparing the instrument
Prepare the following instrument for work:
- Laser level;
- Hammer drill;
- Hammer;
- Knife for cutting hyposcraton;
- Screwdriver set;
- Metal shears or cutting machine;
- Painting tool.
Do-it-yourself plasterboard ceiling – marking
- When making a plasterboard ceiling with your own hands, it is important to make the markup correctly. You need to start work by cleaning the old ceiling and the top of the walls from the old building material. If necessary, the walls are strengthened with building mixtures.
- Let’s start with marking the ceiling. Marking is best done using a laser level.
- On the perimeter of the room we apply the lower level of the ceiling.
 You need to start work by cleaning the old ceiling and the top of the walls from the old building material. If necessary, the walls are strengthened with building mixtures.
 On the ceiling we put the places of fastening of suspensions, taking into account the distances from the outer profiles to the walls (at least 100 mm) and the distances between the main profiles (at least 600 mm).
For precise marking, we put on the marking lines the location (attachment) of the hangers. For marking, we use a building marking cord and, with the help of an assistant, we fill the markings on the ceiling.
Mounting hangers
- According to the markings made, install the hanger rods using dowels with screws or other fasteners.
- On the installed rods, at the same level, we fasten the clamps with hangers for the profiles.

Mounting the ceiling frame
Mounting the ceiling frame with your own hands, we begin with the installation of the main profiles. They are fixed with a suspension in the following way.
- Attach load profiles to the main profiles. We connect them to the main profiles with a two-level suspension.
- We observe technological distances between profiles.
Important! When making a plasterboard ceiling with our own hands, we constantly measure the horizontal profile levels. If necessary, adjust the level with clamps on the rods. In the photo, such an adjustment is shown by arrows.
Upon completion of the installation of the frame, once again check the horizontality of the entire structure in different directions.
Plasterboard sheathing of the frame
Plasterboard sheets are attached to the load profiles with TN self-tapping screws with a pitch of 150 mm. To support the sheets, you will need an assistant or fixture. A device for supporting sheets can be made by hand, for example, a T-shaped support from wooden slats.
The joints of the sheets on the ceiling must be made in the middle of the profile so that they do not hang in the air. Self-tapping screws need to be recessed by 2-3 mm.
We have a single-level floating ceiling, so we retreat from the edge of the walls by 5-7 mm.
The joints of adjacent rows of drywall sheets must be offset, as in brickwork.
How many layers of gypsum plasterboard should be in the ceiling? When using thinner sheets, sheathing is done in two layers.
Plasterboard ceiling finishing
Plasterboard ceiling finishing includes three steps:
- Sealing between sheets. An article on seaming is here.
- Putty ceiling in several layers. An article about puttying a plasterboard ceiling is here.
- Ceiling painting or other finishes.

Two-level framework will require
A two-level drywall ceiling will require more material and the amount depends on the ceiling design. All curving edges of the structure are made of guide profiles (PNP 28/27), and how to make a two-level ceiling in detail in the next article is here.
©Gipsokart.ru
Related Articles
- Choosing and installing a chandelier on a false ceiling
- Suspended stream frame with single-level connectors
- Attic plasterboard finishing
- Suspended ceiling on direct suspensions
- Suspended ceiling with a two-level frame
- Plasterboard ceiling for narrow rooms
- Plasterboard ceiling on wood frame
- Do-it-yourself plasterboard ceiling: single-level floating ceiling on rods
- Ceiling profile for drywall
- The truth about satin stretch ceilings
Similar articles
Round drywall niche
Do-it-yourself plasterboard ceiling painting
Marking a one-level suspended plasterboard ceiling .