Blocking up an external doorway: 5 Easy Ways to Block Up an External Doorway
Bricking up an external door
-
-
A
-
ARWadsworth
-
- posted
11 years ago
When you are bricking up an external door are you supposed to “open up” and
expose the existing wall cavity or do you just brick up the gap (with it’s
own cavity)?
Loading thread data …
You probably will find the cavity exists anyway on a modernish house
right up to the frame.
I would definitely open it up and remove alternate half bricks etc to
get a good continuos cavity and brick key. But then it would be my house.
Quick’n’dirty if I was a builder on a budget..
-
-
T
-
Tim Watts
-
- posted
11 years ago
Yes – it’s not hard.
Angle grinder (really! ;-> ) to cut the mortar between the half bricks,
and remove. You can key both sides in an hour or less. Hammer and
bolster would work too but not quite as quick.
Pack mortar in tight with a bit of wood on these when building up the
wall and it will be a very strong joint.
I did the same to extend a wall by a foot (also a door opening that was
moved along a bit).
They will be… Metal strip if you’re lucky (though that is a fairly
strong solution) or a couple of nails banged in if they are really cheap
bastards.
-
-
T
-
Tim Watts
-
- posted
11 years ago
I forgot to add – when I did my wall extension, I also inverted the new
bricks where they keyed in so I had a frog facing a frog – fully packed
with mortar.
That’s probably over engineered for a full doorway bricking up but as I
was adding a little wibbly bit on the end of a wall, it was necessary to
make the joint really solid…
-
-
A
-
ARWadsworth
-
- posted
11 years ago
I guess that there is already some sort of vertical DPM in place around the
door.
Opening up the cavity is no big deal.
I will need to hold back the existing cavity wall insulation whilst cutting
back. I believe that it will be a wool filled insulation.
It might be the metal strips for the external part of the wall. It is not
brick but concrete bricks. The idea is to brick up the old door and then
render the new brickwork to look like it was concrete bricks.
-
-
A
-
Andrew Gabriel
-
- posted
11 years ago
That will probably just stay put.
Be thankful it’s not tiny polystyrene balls…
-
-
T
-
Tim Watts
-
- posted
11 years ago
Yes – I can personally confirm that wool (or blown fibre) does not tend
to fall out – much at least. It’s worth having a bit of glass wool to
hand (old tank jacket is a good source if there’s one down the tip) and
just stuff a bit back as you go. But mostly it is pretty stable.
-
-
M
-
Martin Bonner
-
- posted
11 years ago
Cavity? What is this cavity of which you speak?
formatting link
suggests cavity wall
construction moved east across the country between mid-19th and
mid-20th century. I’m from Cambridge, and would have guessed they
became common in the 50’s.
Cavity wall insulation didn’t become required until the 70’s, which is
hardly “very old”. In fact, it wouldn’t surprise me if the majority
of our housing stock predates cavity wall insulation.
-
-
A
-
ARWadsworth
-
- posted
11 years ago
I am assuming that the house in question has a vertical dpm of some sort
(built around 1955 but NOT with normal bricks). It certainly has got cavity
wall insulation (installed 11 months ago just in time for cold snap we had).
I would feel happier by opening up the cavity before bricking the hole up.
Cheers
-
-
R
-
Roger Mills
-
- posted
11 years ago
I’m sure you’re right. That doesn’t necessarily mean that the majority
of the housing stock is *still* uninsulated because a hell of a lot of
cavities have been filled retrospectively (and not just by dentists).
-
-
D
-
dennis
-
- posted
11 years ago
It wasn’t required in the early eighties.
Until about three years ago I had the only house with cavity wall insulation
in the street and I had to pay for that in 1981 just after the house was
built. Quite a few have been done now its subsidised. I can’t moan though, I
have saved many times the cost in thirty years.
-
-
N
-
Nutkey
-
- posted
11 years ago
Now it’s subsidised. .. My dad popped round to see a neighbour last
night. Rang me up afterwards to tell me that she’s having cavity wall
insulation put in for free (she’s an OAP).
Trouble is, she has solid walls. I think I might go round with my dad
to watch….
wave a fairy wand over the house, collect the subsidy and feck off..?
Oh, sorry, that’s ‘renewable energy’..;-)
-
-
D
-
dennis
-
- posted
11 years ago
Watch from outside.. they will drill holes through the wall and fill the
room with insulation.
-
-
A
-
ARWadsworth
-
- posted
11 years ago
Now that would be fun if they were still using the expanding foam type of
cavity wall insulation.
Blocking Up Doorways in Brick Walls
When blocking up a doorway or entryway in a brick wall, it is important to make sure that the new section is tied into the existing wall. This can be done in a variety of ways, as we will show here. If the wall is not structural (i.e. it is decorative), the method used to tie it together is not quite as important.
The other important element of blocking up doorways in brick walls is making sure that the new section is lined up with the wall on either side, particularly if it will be plastered over at a later date.
Step 1 – Choosing Materials
If at all possible, match the bricks to be used to block the doorway to the bricks used in the rest of the wall. Bricks suitable for building walls are generally of a standard size, but if the new bricks don’t match the existing bricks, you are only giving yourself more problems and more work.
Mismatched bricks may result in cracks forming in the mortar or in any plaster applied over the bricks. The same applies if filling an opening in a block wall.
The next thing to decide is how you are going to tie the walls together. If you plan to cut half bricks out of the surrounding wall and bond the new section in, you only need the bricks and your mortar. If you prefer to go for the easier option of tying the sections of wall together using nails, frame cramps or a wall connector system, you need to decide which is best.
If the surrounding wall is solid and in good condition, both nail ties and frame cramps are perfectly good. If the wall is not in such great condition, it might be better to use a call connector system (available from many DIY chains).
Step 2 – Preparing the Opening
If the doorway or opening in the wall is bare brick, you can simply clean up the inside faces by brushing them down and removing any loose mortar and dirt. If the doorway has had a door in it (which we will assume has been removed), you will need to carefully take down the architrave and door lining before you can start filling the gap.
Prise off the architrave using a pry bar and then saw through the door jamb and lining near the top of the doorway. Prise this away with a pry bar and discard it. If the doorway is an original feature of the house, the bottom of the linings might extend below the flooring. If this is the case, saw through the linings flush with the floor. Saw through the threshold (if there is one) and pry it up out of the way.
Cut back the plaster around the opening by about 150mm. Don’t worry too much if this is not neat or straight as an irregular edge can help to disguise the outline of the doorway when re-plastering. Finally, clean off the inside faces of the bricks using an old brush, and remove any loose mortar.
Step 3 – Brick Bond Method
The best way to fill the opening is to use the brick bond method. This mean removing half bricks from either side of the opening, every fourth course, all the way up the doorway. The best way to remove half bricks is by drilling out the mortar around each one and then knocking them out with a lump hammer and cold chisel. This method should give you the strongest finished result.
Start to lay your new bricks in the opening, matching the level of the existing brick courses. If the floor level in the opening is lower than the first course of bricks, nail a timber sill in place to act as the foundation for the first course. If you are very lucky, the opening will be exactly 3-4 bricks wide (plus room for the mortar) and you won’t need to cut any bricks.
When you reach the fourth course, where the half brick was removed from the wall on either side, butter a brick with mortar and slide it into the gap. On these courses, you may need to cut bricks to make them fit. Just don’t cut the brick which is inserted into the wall.
Continue to lay brick courses in this way until the whole opening has been filled.
Step 4 – Wall Tie Method
If you don’t want to start cutting out half bricks from the wall on either side of the opening, you can use nail ties, frame cramps or wall connectors to tie the wall together (as discussed above). Nail ties are simply 100mm cut clasp nails which are driven into the mortar of every fourth course of the existing wall. Use two nails each time, driving them in at an angle so that they stick out of the mortar in a V shape.
Frame cramps are L-shaped brackets that are screwed to the inside face of the doorway and project out into the opening. Make sure that when they are fixed into place, on every fourth course, the projecting part is level with a line of mortar.
A wall connector system works in a similar way. The difference being that a long metal strip is fixed to the inside face of the doorway and projecting tabs are fixed to this at various heights. As with frame cramps, you need to make sure that the projecting tabs match up with a line of mortar.
Lay bricks in courses, as shown in the previous method, and simply bed the nail ties or frame cramps into the mortar of the course they are on.
Step 5 – Finishing the Opening
Leave the mortar to dry and then brush down the new wall. Apply a coat of basecoat plaster, with a coat if finishing plaster over the top. This should hopefully match in to the plaster on the surrounding wall. Take care over this part of the job, as it is often the plaster which will show up the outline of the old doorway.
When this is dry, fit two complete lengths of skirting board along the bottom of the wall (if required). You can now paint or paper over the wall to further disguise the old opening. When blocking up a doorway in an exterior wall (a garden wall for example), you can help to disguise the new section by rubbing dirt into the mortar once it is dry, and then brushing it down with a stiff broom.
Bricking up Side Door – Building Regs?
Hi,
We are about to commence a house refurb project and we want to brick up the existing back/side door to the house and an adjacent window to expand the kitchen space. There is a bi-fold door to the rear of the house and we are also going to introduce a door between the house and the integral garage, which in turn has a rear door to provide access to the back of the house.
My question is are we ok with Building regs by bricking up the existing door and are we likely to need planning permission or building regs approval for doing such works?
Thanks in advance.
4
4 Answers from MyBuilder Restoration & Refurb Specialists
Best Answer
Rcb Group
London • Member since 8 Apr 2019 •
7
jobs,
86% positive
feedback
Ideally it’s to contact the Local Authority to verify before you do it. Normally this will be the right way. Good luck to you!
2019-10-07T11:40:02+01:00
Answered 7th Oct 2019
Gus Designs Ltd
London & Portsmouth • Member since 4 May 2017 •
2
jobs,
100% positive
feedback
Good day to you,
We have here a few issues, but basically three main ones as follows:
A. Internal Blocking / Closing / Bricking up Doors:
If the doors are internal, this is not an issue, as long as there is another door to this area, due to the fire regulations (to run out in case of fire).
Also if the door is not a fire escape door, or should I say leading to the fire exit etc.
B. External Blocking / Closing / Bricking up Doors:
If the door/s are external to the house, and are not fire escape doors, and all the details specified as above, you need to notify building control, as this will alter the house elevation of the property. Remember, anything that is external, it is always advisable to notify the local authorities about it.
C. Creating a new door between House & Garage:
This is a very important issue, as you trying to connect a living space area with a potential hazardous area, e.g. garage= fuel = fire = smoke = CO2 exhaust fumes etc). The only way you can do this is:
1. The door has to be a 30 min – 60 min. Fire resistance door, including the door frame gasket.
2. The floor level between the two areas must vary: e.g the garage floor MUST BE lower (100 mm min.) that the living area (house).
Ideally, you must call out an experience Architect / Surveyor / Inspector for advice. Your best solution, is to take your drawing and go visit your local Council building control team for a quick advice.
I hope this answers your questions.
Kind regards
Gus Barbero
2019-10-07T11:55:01+01:00
Answered 7th Oct 2019
JCK Construction Solutions
Ashford • Member since 4 Oct 2019 •
No feedback
Hi. You do not need planing permission for that. You need to serve the council with building notice and they will let you commence the work within 48 hours after the application is been processed then a enginner will come out to see the work and then sign if off. And the door you was talking about between the garage and the house- my advice is that you contact a construction enginner prior to serving the council with a building notice as you will need proper plans for this in case the wall you breaking into ia a load bearing wall. Hope this helps
2019-10-07T19:05:01+01:00
Answered 7th Oct 2019
HAY CONSTRUCT LTD
Pembroke Dock • Member since 5 Sep 2016 •
22
jobs,
100% positive
feedback
The best thing to do is contact your local building control of planning department like the previous message has said.
Every county tends to have different views on things like this depending to wether your in a conservation area or if it is going to effect the look of the street.
I have found the most alterations to the rear or a property or internally do not need planning permission but building control will need to be notified under a building notice and they will call at milestones to check the builders quality and method.
Hope this helps.
Aaron Hay
2019-10-23T10:10:02+01:00
Answered 23rd Oct 2019
How Much Does It Cost To Renovate A House?
How Much Does it Cost to Renovate a House?
Who is this guide for?
If you are planning any internal renovations, then you should take a look at the following guide which sets out supply and installation costs, along with time frames and what each job involves.
How much are the average costs of renovations?
The average cost of internal renovation projects ranges from £100 to £150 per sqm, however, this does depend on the type and size of internal renovation job.
You should expect to pay around £1200 to £1800 for wall removal and the cost of RSJ installation, £350 to £500 to block up a doorway and £300 to £1000 to create a new door or window opening.
House Renovation Prices
| INTERNAL RENOVATIONS | TOTAL COST |
|---|---|
| Stud wall | £700-£1000 |
| Wall removal/RSJ | £1200-£1800 |
| Blocking up a doorway | £350-£500 |
| New door/window opening | £300-£1000 |
Table of Contents
- How Much Does it Cost to Renovate a House?
- House Renovation Prices
- What are the Supply Costs of Internal Renovation?
- What are the Additional Costs of Internal Renovations?
- Tradesmen Costs for Internal Renovations
- How Long Does It Take for Internal Renovation?
- Types of Internal Renovation
- How Much Does It Cost to Remove Internal Renovations?
- FAQs
- Sources
What are the Supply Costs of Internal Renovation?
If you plan to conduct internal renovations on a DIY basis, then you need to calculate the following supply costs in your budget:
Stud Wall Supply Costs
The supply cost to build a stud wall includes the price of timber which is around £2 to £3 per square metre or plasterboard for £3 to £5 per m².
You will also need to consider the cost of insulation which ranges from £13 to £18 per square metre for mineral fibre insulation and up to £25 to £30 per square metre for wool fibre insulation.
RSJ Supply Costs
When removing a wall, you will need to consider the cost of fitting a rolled-steel joist to support a load-bearing wall.
The average RSJ cost is around £200 to £500.
Blocking Up a Doorway Supply Costs
Bricking up a doorway will involve the cost of bricks which are typically priced at £0.70 to £5 per brick, while mortar ranges from £0.40 to £2 per kg.
New Opening for Window or Door Supply Costs
To create a new opening for a window or door, you will need to consider the cost of a lintel which is usually placed at the top of the opening to support the wall structure.
Steel lintels typically cost around £18 to £230 each, or for concrete lintels, you should expect to pay around £10 to £50 each.
What are the Additional Costs of Internal Renovations?
There are various other costs you need to consider when making any changes to your property interior, including:
Painting & Decorating Cost
After installing a stud wall or blocking up a doorway, you will need to consider painting and decorating costs.
This could include having your walls painted, which generally costs around £180 to £500 to paint a room.
If you opt for wallpaper instead, then you should expect to pay around £180 to wallpaper a small room and up to £600 for a larger space.
However, you need to remember these prices will vary depending on the type of wallpaper you choose.
Plastering Cost
Before painting and decorating, it is vital that your walls are fully prepared and plastered before they can be decorated.
The average cost of hiring a professional to plaster an entire room is around £600 to £1000. Plastering costs will depend on the size of room or walls.
Waste Removal Cost
If removing a wall to expand your space or to create an opening for a door or window, you will need to consider waste removal costs.
To get rid of unwanted materials, you can hire a skip which can range from £170 for a 6-yard skip up to £340 for an 8-yard skip.
Tradesmen Costs for Internal Renovations
Most internal renovations will be conducted by a team of professional builders who will charge various rates depending on the type of job.
To help you understand the labour costs for different internal renovation costs, take a look at the below table.
| INTERNAL RENOVATIONS | LABOUR COST |
|---|---|
| Stud wall installation | £260 – £1000 |
| Wall removal/RSJ | £400 – £800 |
| Blocking up a doorway | £130 – £780 |
| New door/window opening | £260 – £780 |
How Long Does It Take for Internal Renovation?
The overall cost of internal renovations will also depend on the duration of the job. The following table sets out the time frames for different internal renovations.
| INTERNAL RENOVATIONS | TIME FRAME |
|---|---|
| Stud wall installation | 2 – 4 days |
| Wall removal/RSJ | 1 – 3 days |
| Blocking up a doorway | 1 – 3 days |
| New door/window opening | 2 – 3 days |
Types of Internal Renovation
Before many any internal changes to your property, you should take a look at the following guide. This explains the different jobs and what they involve, as well as the costs and time frames for each task.
Stud Wall Costs
Stud walls are a type of partition wall which are made up of timber frames and plasterboard.
They are generally used for non-load bearing walls, although they can be used to support load-bearing walls.
The average stud wall cost is around £700 to £1000.
Wall Removal/RSJ Costs
If you want to expand your living space, then you may opt to remove a wall.
This will involve installing a rolled-steel joist (RSJ) which is a type of structural beam which is put in place to support a load-bearing fixture during removal.
The average RSJ installation is around £1200 to £1800.
Blocking up a Doorway Costs
When renovating, you may decide to remove an unused doorway and block it up with brickwork.
This normally costs around £350 to £500, although this will depend on how wide the doorway is.
New Door or Window Opening Costs
Another popular internal renovation is the construction of a new window or door opening.
This involves measuring and cutting out part of the wall where you want your new doors or windows.
The average cost to create a new door or window opening is around £300 to £1000.
How Much Does It Cost to Remove Internal Renovations?
If you wish to open up your space and remove stud walls or an RSJ, then you should expect to pay around £130 to £260 per day for a professional builder.
Once removed, you will have to consider waste disposal costs which usually ranges from £170 to £340 to hire a skip.
FAQs
Q: What is a renovation?
A: Renovation involves upgrading or fixing structures in your home, which are damaged. Many homeowners conduct renovations to enhance the space in the home and create open-plan spaces or new rooms.
Q: How thick is a stud wall?
A: Average stud walls tend to be around 5 inches which will ensure your walls are structurally sound and also offer an adequate level of noise reduction.
Q: What size RSJ do I need?
A: The size of the RSJ you choose will depend on your wall dimensions, as you need to make sure that the RSJ is the right length. The weight its supporting will also determine what size you need as the heavier the wall is the larger RSJ you need. RSJ beam installation cost will vary depending on the size you need.
Q: What does RSJ stand for?
A: RSJ stands for rolled-steel joist, which is a type of steel structural beam which supports load-bearing walls during wall removal.
Q: Can a metal stud wall be load-bearing?
A: Stud walls are typically installed as non-load bearing walls; however, there are some occasions where metal stud walls can be load-bearing. Although, this usually is only in older properties where they support small joists.
Sources
- https://propertyworkshop.com/carpentry/stud-partition-wall-cost-per-m2/
- https://www.beamcalculation.co.uk/what-size-steel-beam-do-i-need/
- https://www.designingbuildings.co.uk/wiki/Rolled_steel_joist_(RSJ)
Author: Heather B
I am a seasoned copywriter from Liverpool – who after graduating with a BA (Hons) degree in English Media and Cultural Studies – went on to specialise in the creation of business and lifestyle copy for a wide range of industries across the UK and USA.
3.1 Windows and exterior doorways in existing dwellings and outbuildings
Skip to main content
Skip to search
Skip to primary navigation
Skip to secondary navigation
Building Performance
Site search
Search
Search
- Share
- Save
A building consent is usually not required for building work related to a window or exterior doorway in an existing dwelling.
- Share
- Save
This exemption allows you to carry out any building work in connection with a window (including a roof window, whether it is fixed or opening) or an exterior doorway without needing a building consent where it is an existing dwelling or outbuilding. That is as long as the original doorway or window has not failed prematurely and replacing it will not modify or affect any specified system, such as sprinklers or fire alarms.
If you are replacing a window, roof window or door, it is important to consider whether it originally met the durability requirements of the Building Code. In most cases, doors and windows in an external wall are required to last at least 15 years. Most windows and doors should achieve this requirement with regular maintenance.
If the door or window is older than 15 years and you are replacing it because it has rotted out, then this work will not require a building consent.
However, if you are replacing a window, roof window or door that has been installed within the last 15 years and it has failed (eg it has rotted out), this work will require a building consent. This recognises that replacing a window or door that has failed its durability requirements with a similar window or door could result in the replacement also failing.
All new building work must comply with the Building Code, including the structural performance requirements. Also note that, on completion of the building work, the altered building must comply with the Building Code to at least the same extent as it did before the building work was undertaken, unless it already exceeded the code.
If you are considering building work that is close to or involves potentially load-bearing walls, it is important to get professional advice from a chartered professional engineer, registered architect, building consultant or registered building surveyor.
Any changes or additions to doors or windows where the building forms part of the compliant pool barrier, must comply with the Building Act 2004.
What is exempt
- A builder installs a roof window to an upper level apartment of a 2 storey multi-unit dwelling which will go between the existing roof trusses without altering any specified systems.
- Following earthquake damage, a builder decides to install a bi-fold door to replace a pair of French doors leading from the ground floor dining room of a 2 storey dwelling. As the wall opening for the new joinery is wider than the existing opening, they need to install a new lintel to span the opening.
- To gain more sunlight, a home owner decides to install a window in an external fire-rated bedroom wall which contains no other openings. As the window will be less than 1 metre from the boundary, the owner instructs the builder to install a fire-rated window to meet the Building Code requirements.
- Removing a dwelling’s lounge window and covering the opening with external cladding and internal linings to form a wall with no opening. Note that minimum Building Code requirements will still need to be met for ventilation, natural light and visual awareness of the outside environment.


What needs consent
- A window installed in an existing outbuilding six years ago needs to be replaced because of a rotten timber window frame. Replacing this window requires a building consent because it has failed its 15 year durability requirement.
- The owner of a commercial building wants to install a roof window into an existing roof and ceiling to a top floor office. As this building is not a dwelling or outbuilding, and as the roof window installation will affect the existing sprinkler system, a building consent is required.
What the law says
8. Windows and exterior doorways in existing dwellings and outbuildings
Building work in connection with a window (including a roof window) or an exterior doorway in an existing dwelling that is not more than 2 storeys or in an existing outbuilding that is not more than 2 storeys, except:
(a). in the case of replacement, if the window or doorway being replaced has failed to satisfy the provisions of the Building Code for durability, for example, through a failure to comply with the external moisture requirements of the Building Code; or
(b). if the building work modifies or affects any specified system.
- 1 Star
- 2 Star
- 3 Star
- 4 Star
- 5 Star
Please note your feedback is anonymous. If you need a response, contact us.
You must enable JavaScript to submit this form
This information is published by the Ministry of Business, Innovation and Employment’s Chief Executive. It is a general guide only and, if used, does not relieve any person of the obligation to consider any matter to which the information relates according to the circumstances of the particular case. Expert advice may be required in specific circumstances. Where this information relates to assisting people:
- with compliance with the Building Act, it is published under section 175 of the Building Act
- with a Weathertight Services claim, it is published under section 12 of the Weathertight Homes Resolution Services Act 2006.

Parts of a Door: Anatomy of a Door
How-To
Are you shopping for a new door, or is there a door in your home that needs repairing? You could benefit from this door parts glossary.
July 13, 2022
If you’re embarking on a door replacement or new build project and you’re overwhelmed with all the technical terms, we’ve got you covered. This post breaks down all the parts of a door so you can understand the terminology and how all the parts and pieces come together. Understanding the basic parts of a door makes it easier to talk with contractors and dealers to choose the right door for your project.
Door frame
Side jambs, head jambs, and mulls are the parts that make up the frame. Residential door frames are most often made of wood but can also be made of aluminum, fiberglass, or a composite material. Door frames can be purchased primed (ready to paint) or ordered with a factory finish in a variety of colors.
Head jamb
The top horizontal section of a door or window frame is called the head jamb.
Door jamb versus door frame
A door jamb is an individual section of a door frame. Two side jambs make up the vertical components of the door frame and the head jamb is the top horizontal component. Together, the jambs (along with mullion) comprise the door frame.
Mullion (mull)
When two individual windows or a door and window are joined, the seam between the frames of the two units is called the mull, which is short for mullion. In this case, a door jamb has been joined to a window/sidelight jamb. The seam is typically hidden with a piece of trim called a mull casing (See additional definition below).
Figure 1. Shows Door Parts including: Head Jamb, Side Jamb, Casing, Mullion (Mull), Threshold, Sidelight and Glazing.
Sill
Sills are the bottom component of a door frame. They are the part of the door that gets sealed and fastened to the floor. Only exterior doors (those that lead to the outdoors or garages) have sills. Learn how to prep a floor for a door sill.
Threshold
A threshold is the protective cap that covers the sill. It is typically sloped toward the outside to help shed water. Thresholds are made of durable materials like metal or fiberglass because they need to be strong enough to withstand foot traffic.
Glazing
Glazing is just another word for the glass in a door or window. The glazing in newer exterior doors like this one are made up of at least two layers of glass and sometimes three. Inert gas, usually argon, is injected between the glass layers to provide additional insulation. Nearly invisible coatings are added to glass to help manage the amount of light and heat conducted through a windowpane or reflected away from it. Glazing can be enhanced with tints and laminations in order to add privacy, provide decorative options, and increase strength. Find out more about glazing.
Sidelights
Sidelights are tall narrow windows found on one or both sides of a door. Sidelights allow more light into entryways, improve views, and can create a more welcoming entry point experience. Find out more about sidelights and when you might want to install one.
Casing
Window and door casing trim is designed to hide the gaps between a window or door frame and the surface of the interior wall.
Figure 2. Shows Brick Mould and Weather Stripping
Brick mould
Brick mould is an exterior casing trim designed to conceal the gap between a window or door frame and the exterior wall surface. Brick mould is thicker than most interior casing trim profiles and provides a buffer between the window/door and the brick or other cladding surrounding it. Brick mould can be made of wood, aluminum, PVC, fiberglass, or composite materials and is the part of the door that a screen door or storm door is attached to.
Weather-stripping
On exterior doors, weather-stripping helps seal the gaps between a door frame and a closed-door panel, weather-stripping is typically made of a resilient, flexible material like silicone, rubber, or foam.
NOT SHOWN
Door sweep
The weather-stripping installed on the bottom of a door panel, a door sweep creates a weather resistant barrier between a door panel and sill.
Astragal
On an exterior double door arrangement like the one above, an astragal covers the seam between the two door panels and is fitted with weather-stripping to prevent wind and water from entering the house.
Transom
A transom is a narrow window located above a door or window. Most transom windows do not operate, but if they do, they are typically hinged at the top like an awning window.
Simulated divided lite bars (SDL)
Because large panes of glass are now stronger, less expensive to manufacture, and more energy efficient, muntin bars have largely been replaced with SDL Bars which rest on the surface of the glass.
NOT SHOWN
Grilles
Grilles are bars that create the effect of divided lites but are removable for easy glass cleaning. Grilles-Between-the-Glass (GBG) are also available. As the name suggests, GBGs are bars that are permanently installed between the glass panes for easy cleaning and low maintenance.
Muntin bars
Up to the middle of the 19th century, large panes of glass were fragile and expensive to create, muntin bars were joined together in order to create large expanses of glass from smaller individual panes (Not shown).
Figure 3. Shows Transom, SDL Bars and Astragal
Figure 4. Shows Top Rail, Panel, Lock Stile, Bore Hole, Mullion, Bottom Rail, Stop Moulding, Hinge Style, Mid Rail, Hinge
Panel
A door panel, sometimes called a slab, refers to the whole part of the door that swings back and forth. Full door panels are often divided up into smaller panels, which are set between the stiles, rails, and mullions.
Rail
The narrow horizontal segments on a door panel are called rails. This door has a top, bottom, and a mid-rail.
Stile
A stile is the narrow vertical segment located on either side of a door panel. One is called the lock stile and the other a hinge stile.
Mullion
A mullion resembles a stile. It is the vertical component that separates two panels located in the middle of the door between the rails.
Stop moulding
Door stop moulding is attached to a door frame. It aligns the door panel within the frame and prevents the panel from swinging right through the opening.
Hinge
This is the piece of hardware that allows the door to swing open and closed. Standard sized doors have three hinges, but larger doors will have four or more. The color or finish of the hinges typically matches the finish of the lockset.
Bore hole
A bore hole is drilled into a door to accommodate a lockset.
Lockset
The lockset refers to the handles, locks, latches, strike plates, and all the other hardware components that allow a door to latch and lock in place. Locksets are also referred to as handlesets or hardware.
Handle
A handle, knob, or lever is the component of door hardware that is used to unlatch the door panel and pull it open or push it closed. There are many styles and finishes to choose from. There are three types of door handles:
Entry handles
are operated with a key cylinder on the exterior side of the door and a push or turn lock button on the interior.
Bed/bath handles
have a push or turn lock button on the inside but not on the other.
Passage handles
have no locking mechanism.
Latch
A door latch is a shaft that protrudes from the edge of a door panel and into the door frame securing the panel in place. When the handle is turned, the latch retracts allowing the door to be opened.
Deadbolt
Similar to a latch, a deadbolt is a shaft that protrudes from the edge of the door panel and into the door frame securing the panel in place. Residential interior doors are not equipped with deadbolts, and not all exterior doors have them either. Deadbolts are considered an additional form of security and are most often set apart from the handle assembly, which means that a door with a deadbolt needs an additional bore hole. Multi-point locking hardware systems provide even more protection than a latch and deadbolt combination, and new home automation systems are available.
Thumb turn
A deadbolt is operated by turning a thumb turn on the inside of a house and by a key cylinder on the exterior side.
Mortise plates
These plates add strength to latches, deadbolts, and the door panel, which helps prevent a forced entry.
Strike plates
Strike plates add strength to door frames which helps prevent a forced entry.
Escutcheon
Escutcheons are ornamental plates that can be found surrounding handles, thumb turns and key cylinders. They’re designed to protect the surface of the door panels from nicks and scratches.
The experts at Marvin are experienced at working with architects, builders and homeowners. Connect with a dealer in your area to visit a showroom and to discover which Marvin products will work best for your next project.
Browse Marvin Doors By Type
Related Content
Learn More
Get Started with Window and Door Replacement
Replacing windows and doors doesn’t have to be stressful. Marvin can help you understand each step and make your replacement project a success.
Learn More
Learn More
Explore Marvin Doors
From French doors to exterior patio doors that slide or swing, Marvin doors are designed to offer uncompromising performance to any project.
Learn More
Learn More
Window and Door Design Options
Marvin provides an array of design options to customize your windows and doors, reflecting your unique home’s architecture, character, and personality.
Learn More
Download
Marvin Doors Solutions Catalog
Features and benefits of all Marvin Doors including available types, styles and design options.
Download
How to independently measure the doorway for the installation of the front door?
Before buying an entrance door, all you need to do is measure the width, height, thickness of the doorway, and determine the wall material and the direction the door opens.
Usually, 2 door standards are produced 860 x 2050 mm and 960 x 2050 mm are single-leaf, and double-leaf 1200 x 2050 mm.
How to measure a door?
So, we arm ourselves with a tape measure, a piece of paper, pencils or a pen and measure several parameters of your doorway. At the same time, preferably make three measurements : top, bottom and middle of the opening (see picture).
Why is it necessary to measure in three places?! Because the wall may not be even and a difference of 1-2 cm is possible, this is not visually noticeable, but when you install the front door, it may not crawl through the opening due to the fact that you did not immediately measure correctly.
So be careful!
Short video how to quickly measure the doorway with your own hands. Before watching, make sure you have the sound turned on.
Main opening measurement parameters: Even if there is a finish in the opening (plaster, lime, etc. ), you should try to determine where the wall begins directly.
– width of the doorway from the side of the room – the distance from the inner right to the left edge of the wall doorway (from wall to wall) is measured. This measurement is done if it is planned to install a second (for the purpose of additional heat and sound insulation) entrance door.
Typical residential buildings have standard openings:
Brick-panel houses – doorway width 900 mm.;
Series 112 houses – opening width 900 mm and 1000 mm.
Read more about the dimensions of the doorway in typical series of houses here
– opening height – the distance from the level of the “clean” floor (parquet, laminate, tile, linoleum) to the outer upper edge of the opening is measured. Usually this parameter is 2070-2100 mm.
The size of the door frame we need can be easily determined from the table:
the height and width of the existing door frame. But, to be sure, it is better to measure from edge to edge of the opening itself. Why dismantle the platbands of the old door from 2 sides.
– wall thickness of the opening – we measure the width of our wall, this is necessary to understand whether it will be necessary to install an extension or not.
– wall material (concrete, brick, etc.)
– opening side – on fire safety rules established by the Ministry of Emergency Situations of the Russian Federation (Order of the Ministry of Emergency Situations of the Russian Federation No. 313 “ON APPROVAL OF FIRE SAFETY RULES IN THE RUSSIAN FEDERATION” dated 18 June 2003), residents of the house do not have the right to change the direction of opening the doors, as this can block the doors of neighbors, passages in the entrance, thereby preventing the evacuation of people.
Even if the door has previously opened inwards, the door must be installed on the opening side so that the above situations do not occur.
To determine the side of the door opening, you need to stand facing the outer side of the door (“ from street side ”), and on which side (left or right) of the hinge, this is the opening of the door (see figure).
Attention! The size of the opening must be greater than the size of the door box, not less than by 2 centimeters for adjusting and installing the box in the opening in terms of level, as well as so that the mounting foam can take on its heat-insulating properties.
A large gap between the door frame and the opening will adversely affect the strength of the door fastening.
The difference between the dimensions of the box and the opening is not more than 70 mm. in width and no more than 35 mm in height (without building or expanding the opening).
Write down these parameters (width, height and thickness of the opening, wall material, door opening side) and report them to the store consultant manager.
According to these parameters, the consultant will be able to choose the right size of the front door for you, determine the installation method, additional work, and in some cases the possibility of installing some door models. We offer to get acquainted in detail with door models (technical characteristics, equipment and their sizes) on the page of our catalog of entrance doors.
If you have a non-standard situation with the opening: the wall, at the place where the door is attached, is sprinkled, the opening is narrowed by fragile plaster, and more, then it is better to call our master measurer, who will professionally assess the situation, give recommendations and, if possible, eliminate this problem.
Call us at: 8 (495) 222-01-82, 8 (985) 222-01-82. .
Without weekends and holidays from 9:00 to 21:00 . Entrust the work to professionals!
interior and entrance, installation according to regulations
By Michael Read 7 min Views 7.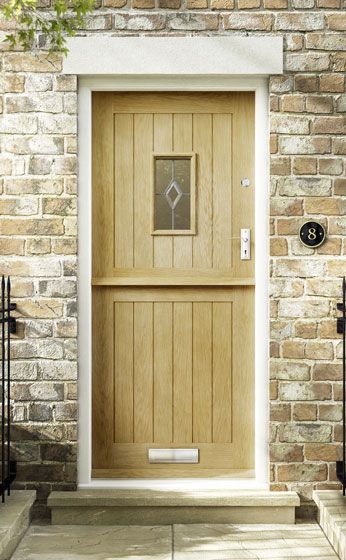 3k. Posted on
Before starting the installation of interior or entrance doors, it is important to evaluate the appearance of the canvas and the qualities of the entire structure. But you should also be sure to familiarize yourself with the existing SNiP standards and check the selected doors for compliance with the requirements. This will allow you to perform installation with high quality and create conditions for further safe operation of products.
The code of building codes and regulations (SNiP) clearly regulates the main dimensions of interior doorways. In addition, the document also spells out the permissible dimensions of the canvas itself in the form of height and width. This information is contained in the document under codes 21-7 – 21-13 and varies depending on the material of the walls. In most cases, manufacturers of door structures adhere to the same dimensions.
Also in the SNiP documentation, in sections 24-15 and 24-19, the requirements for door panels and construction methods are prescribed. However, due to significant changes in the materials used and the principles of operation, these standards are irrelevant.
Still in use is the list of matching the door leaf to the opening box. So, according to SNiP, all interior doors installed in apartments must have the following ratios of the leaf width to the door frame:
| Door leaf width, m | Opening width, m |
| 1.5 | 1.58-1.6 |
| 1.4 | 1.48-1.5 |
| 1.2 | 1.28-1.3 |
| 0.9 | 0.98-1.1 |
| 0.8 | 0.88-0.97 |
| 0.7 | 0.77-0.87 |
| 0.6 | 0.66-0.76 |
| 0.55 | 0.63-0.65 |
In addition, the dimensions prescribed during the construction of houses of various types are invariable requirements. So, in brick houses with a wall height from floor to ceiling of 2. 25 m, a concrete lintel located above the doorway should be located at a height of 1.88 m.
In the case of installation of interroom-type door structures in monolithic buildings with a ceiling height of 2.25 m, the jumper is located at a distance of 1.87 m from the floor.
In wooden houses, the height of the ceiling is 1.97 m. In this case, the lintel is located at a distance of 1.85 m from the floor.
Fitting a non-standard opening
If the set parameters indicated in the SNiP do not correspond to the existing dimensions of the doorway, it must be adjusted to the appropriate dimensions. These activities must be carried out until the completion of finishing work on the walls. It is worth remembering that the maximum overlap of the gap with the help of platbands is 3 cm.
Reducing the width of the opening must be done evenly on both sides. However, narrowing can be made no more than 3 cm from each side. To build walls of acceptable size, it is necessary to use a wider door block.
Purpose and functional features of interior doors
Based on the requirements of sanitary standards and SNiP, doorways must necessarily meet several basic criteria:
- The opening of an interior door with an open canvas should not create any obstacles for passage and evacuation measures;
- The width of the doorway must allow a person to pass unhindered;
- The size of the opening of the interior door must provide sufficient space for the use of special means of transportation in the form of a stretcher;
- According to the requirements of fire safety and sanitary standards, the minimum doorway cannot be less than 0.8 m wide and 1.9m height.
Today, non-compliance with a set of such rules is quite rare. However, you should be aware that any discrepancies in parameters, including after redevelopment, entail problems in the registration process with the BTI and the architectural service. Violations may result in a fine, as well as an obligation to redesign the doorway.
Requirements for installation work
According to SNiP, there are a number of mandatory requirements, following which the installation of interior doors will be of high quality and safe. Based on the standards, the frame racks must be fixed in at least 2 places on both sides. The distance between the fasteners varies within 1 m.
The choice of the side of movement of the leaf is carried out according to the principle of opening the door towards the room or room with large dimensions. New interior doors should be mounted in such a way that they do not block other doorways during the opening process. So, according to the requirements of SNiP, interior doors for private and apartment buildings should be installed in this way:
- Bathroom and toilet – opening is outward;
- Kitchen – outdoor opening preferred;
- Bedroom and living room – based on the wishes of the owner.
It is worth remembering that the problem of blocking door panels with each other can have several solutions. So, as a way out of the situation, it is possible to change the direction of opening the canvas, not only based on the principle of movement inward-outward, but also in terms of placement on the left or right.
During the installation of structures, it is possible to place a threshold. However, its installation is carried out in the presence of various floor coverings. The presence of the same type of floors does not imply the placement of a threshold.
Installation of interior doors according to SNiP
According to established standards, the installation of interior doors is conditionally divided into several stages: preparation, installation and testing. Each of the stages must be controlled accordingly. So, the preparatory stage necessarily includes checking the product documentation with the indicated warranty obligations. In addition, the canvas and box are subject to a thorough inspection for defects and chips.
Before starting the installation phase, additional checks are subject to:
- Opening parameters;
- Marking accuracy;
- Proper placement of fasteners.

A complete technical inspection is performed during the installation phase. During the inspection, the tightness of the insulating parts located in the gaps of the slopes and the frame is examined. The quality of the frame, its fasteners and sealing elements is evaluated. It is mandatory to check the compliance of the finished structure with the design indicators and the correct insertion of fittings.
The verification stage is carried out directly by the customer or his authorized person.
SNiP norms for installation of entrance doors
The process of installing an entrance door that does not meet the requirements described in SNiP is a serious violation. Such actions are punishable by the imposition of a fine and the requirement to reinstall the door. These measures are due to the purpose of the input canvas. The design is of great strategic importance in the evacuation process and in no way should create barriers to the way. Based on this, SNiP determines the external type of opening as the most suitable. However, this condition is applicable only when the entrance doors do not interfere with the opening of neighboring doors.
One of the main requirements for entrance door structures is a high degree of tightness of the door leaf in relation to the frame. The opening itself cannot have dimensions less than 0.8 m wide and 1.9 m high. The blowing capacity of a properly installed structure cannot exceed 1.5 kg / m2 per hour. High-quality sound insulation is indicated in the standards at the level of 30 dB.
When fully opening the door leaf, a free space of 1 m is required. Opening doors should in no case create difficulties in moving.
Installation of entrance doors according to SNiP
Document SNiP 3.01.01-85 regulates the rules according to which entrance doors are installed. The process of installation of the structure itself consists of three stages: dismantling, installation and the final stage.
In the process of dismantling, not only the removal of the old leaf and frame takes place, but also the reconciliation of the existing opening with the acquired door structure. If necessary, at this stage, the size of the opening is adjusted to the existing door. The expansion procedure is carried out by knocking out the walls. The narrowing is carried out using cement mortar. A mandatory requirement for the implementation of installation procedures is the alignment of the side parts of the opening and the lintel to the level.
Installation procedures
Installation work can be carried out in several ways: by fastening directly to the wall plane through special holes, or using special mounting iron plates.
Plate mounting method is more popular and easier to use. For its implementation, a frame is inserted into a pre-prepared opening. Fixation is carried out with the help of wedge lining. The alignment procedure is mandatory and is carried out from the side of the future location of the hinge mechanisms. After that, the pre-prepared metal plates are fixed. Their fixing is carried out on the surface of the adjacent wall.
 youtube.com/embed/Ln6P4nvVojM” scrolling=”yes” frameborder=”0″/>
Before fixing, the metal rack is leveled under the lock. In this case, it is necessary to maintain a gap of 2 mm from the surface of the frame. The retaining wedges are not removed until the final stage.
According to SNiP, the final assembly procedures of the structure are performed with the door leaf closed. Such measures are necessary to avoid distortions of the frame and web of the product. In the course of work, the supports can be removed, however, if desired, it is enough to simply cut them off during alignment, after blowing the voids with mounting foam.
Glossary of terms
Anchor is a mounting element used to fasten door frames to concrete and brick. By design, it consists of an internal bolt, nut and body. When the bolt is tightened, the nut is drawn into the housing, causing it to expand in diameter and securely fasten to the wall.
Armor pocket – protection of the lock body from outside access.
Armor plate is a metal plate (washer) made of a hardened alloy, mounted on the lock bore, in order to protect against vandalism.
Burglary resistance – the ability of the door to prevent burglary. There are 4 classes of burglary resistance of entrance doors.
Peephole is an optical device for inspecting the space from the outside of the door. The peephole can be plastic and glass. By structure, it is a lens system that is fixed in the door leaf.
Finished opening is a hole in the wall prepared for the installation of a door.
Door frame (frame) is a frame structure designed for hanging a door leaf. Consists, basically, of two vertical and one horizontal part. The door frame is permanently attached to the doorway.
Door leaf is the opening part of the door block, which is attached to the door frame. The design of the leaf of the entrance doors is a hollow frame inside. The internal cavities are filled with insulation.
Deviator is a locking mechanism that connects metal rods to bolts and distributes locking points around the entire perimeter of the door. Thanks to this system, vertical rods fix the door from above and below, or from all four sides.
Decorative panel for entrance doors is made from MDF with PVC film. The decorative panel is used to give metal doors a sophisticated appearance, as well as to increase heat and sound insulation.
Extension is a flat, rectangular section designed to increase the width of the door frame when it is narrower than the wall.
Closer is a device that automatically closes open doors. Closers are mechanical and hydraulic.
Finishing the opening is a set of measures aimed at preparing a door hole in the wall for door installation in case this hole does not fit in size. It can be either an expansion or a narrowing of the opening. And it can also be a strengthening of the doorway.
Latch (night watchman) is a locking device for the door leaf, installed from the inside of the room. It has a crossbar (constipation), which moves with a rotary handle.
Two-system lock – combines two types of mechanism: lever and cylinder. This increases the level of reliability of the lock, and is also convenient in terms of installation.
Soundproofing – a set of measures aimed at reducing noise due to various materials.
Mounting key – a temporary key to the lock, necessary for the period of repair work (for employees), or for recoding the lock. Then the lock is recoded, and the installation key either does not fit at all, or it can turn two times instead of four.
The seal contour is where the door leaf meets the frame. A seal is used to ensure tightness. The double sealing contour is provided by an additional rebate on the side of the door where the hinges are located.
Manganese plate – fixing the manganese plate directly to the lock under the steel plate provides protection of the lock from drilling.
MDF platband – due to its texture, strength, resistance to damage and soundproofing properties, MDF platband is the best option when choosing a material for decorating door slopes.
Metal door consists of stiffeners, lining, door filler and door locking system.
Entrance door assembly is a set of measures aimed at installing the entrance door. It includes several stages: preparation of the opening, installation of the door block in the opening, hanging the door, filling technological gaps with foam, decorative design of the entrance metal door.
Mounting clearance is the space between the surface of the door opening in the wall and the door frame.
Lock plate – steel plate with cutout for the key, has a protective function. There are overlays that perform a decorative function to hide traces of the installation of the lock. In this case, the pad protects against dust and dirt. In the case of using an armor plate, it also protects against force. It is possible to place a magnetic or code pad that will close the lock hole.
Architraves is a profiled strip framing the doorway, which covers the gaps between the frame and the wall. In steel doors, platbands can be made integral with the frame, which will increase its protective properties.
Slopes is the part of the wall adjacent to the door frame, which, after the door is installed, is covered with some material (plaster, drywall, MDF, laminate or plastic panels).
Recoding the lock – changing the combination of the location of the locking elements inside the lock. Produced without dismantling the lock or changing the larva using a mounting key.
Hinges is a device by which the door leaf is attached to the frame. Loops are true and hinged. Mounted are divided into universal and detachable. Hinges for entrance doors are equipped with a special anti-removable mechanism.
Threshold – the lower transverse part of the door frame. With the help of the threshold, the door leaf is held in the door block. Increases heat and sound insulation. And also serves to eliminate the height difference in the premises adjacent to the door.
Rebate – a uniform protrusion along the outer perimeter of the door leaf, which is the place of its junction (connection) with the door frame. Increases the insulating properties of the door, and also makes the door more secure in the event of a break-in attempt.
Anti-removal pins – iron rods with a diameter of 12 mm, installed on the side of the hinge end of the door leaf in order to strengthen the steel door.
Bolt – a metal rod that extends from the lock body and enters the door frame, i.e. in fact it is a bolt. There can be several crossbars in one lock (from 3 to 5).
Door handle is an element of door fittings with which the door leaf is opened or closed. Door handles are overhead and mortise.
Steel doors are entrance doors made of two sheets of steel with stiffeners between them. The cavities inside the door are filled with a filler that provides heat and sound insulation.
Opening side is the direction in which the door opens. When opening to the right (towards you) – the door hinges are on the right, and the door handle is on the left. With the left tearing off, the opposite is true.
Lever lock – the bolt of the lock is fixed thanks to levers, metal plates of various configurations. Opening occurs by lifting the key of each of the levers.
levers are door lock parts, metal plates with various configurations. They are folded into a “package” and blocked by a bolt detail – a lever stand.
Thermal insulation – protection against heat loss. In the design of the front door, thermal insulation is provided by the filler of the door leaf.
Seal is a protective roller that is installed around the entire perimeter of the door leaf. Serves to increase the insulating properties of the door, as well as damping noise when closing metal doors.
Reinforcement of the opening – when the walls in which the doorway is located are not sufficiently reliable and cannot withstand the load that is implied from steel doors, the opening is reinforced through a number of measures. This can be a U-shaped strapping using a steel corner, or a profile pipe is inserted into the wall, or a channel is put on the wall around the entire perimeter, which is attached to the floor and ceiling with reinforcing pins.
Installation of metal doors – a set of measures, the purpose of which is the installation of an entrance door. It includes several stages: preparation of the opening, installation of the door block in the opening, hanging the door, filling technological gaps with foam, decorative design of the entrance metal door.
Insulation is a material placed inside the frame of the door leaf. There are several options for insulation for entrance doors: mineral wool, mineral slab, polystyrene foam, polyurethane foam.
Fittings are various elements that are attached to the door to ensure its functioning. Door fittings include: lock, hinges, handle, closer, peephole, stopper, chain, numbers, plates, mailboxes.
Cylinder is a “larva” of a door lock, inside of which pins of different lengths are placed, fixed in the desired position with the help of springs, or disks with code slots.
Cylinder lock – the base of the lock is a cylinder fixed either with pins or discs. When the key is inserted, either the pins are pressed out by the springs, or the discs are combined and form a well, thanks to which the key can be turned and the bolt moved back.
How can I determine the width and height of swing and sliding doors myself?
Instructions for measuring door openings
Before you buy interior doors, you need to know the answers to three questions
1. What size door leaf do I need (width and height)?
2. Do you need extensions and what width?
3. What should be the opening side of the doors?
Finding out the answers to these questions for each doorway is quite simple. Below are described and shown all the features of the method of measuring and determining the required dimensions of doors and accessories for them.
 youtube.com/embed/rt8wMzbvO5E” frameborder=”0″ allowfullscreen=””>
Which door leaf size should I choose for my doorway?
There are no standard doorways. To determine the width and height of the door leaf you need, you need to measure the doorways in which you plan to install the doors.
How to determine the door leaf width?
To determine the desired width of the canvas, we determine the width of the doorway. To do this, we measure the opening in three places – at the top, bottom and in the middle. The smallest value will be the width of your doorway.
If you still have old doors in the doorway, then everything is much simpler. We measure the width and height of the old door leaf.
As a result, the leaf width should be narrower than the doorway by 80 – 100 mm for doors with a simple (non-telescopic) door frame, and by 100 -120 mm for doors with a telescopic frame.
But since the standard dimensions of the width of the canvases are multiples of 100 mm (600, 700, 800, 900), then with a certain width of the doorway, a narrowing or expansion of the opening will be required. See the table below for details.
PRE-SET
Doors with a leaf width of 600 mm.
Doors with a leaf width of 700 mm.
Doors with a leaf width of 800 mm.
Doors with a leaf width of 900 mm.
Door leaf width selection table
|
Opening width (mm) |
Blade width (mm) |
May require work |
|
450-480 |
400 |
opening extension |
|
480-500 |
||
|
500-600 |
opening narrowing |
|
|
600-620 |
550 |
opening extension |
|
620-650 |
||
|
650-680 |
opening extension |
|
|
680-700 |
600 |
|
|
700-750 |
opening narrowing |
|
|
750-780 |
700 |
opening extension |
|
780-800 |
||
|
800-850 |
opening narrowing |
|
|
850-880 |
800 |
opening extension |
|
880-900 |
||
|
900-950 |
opening narrowing |
|
|
950-980 |
900 |
opening extension |
|
980-1000 |
||
|
1000-1050 |
opening narrowing |
It is possible not to narrow or widen the opening, but to order doors of non-standard width exactly to fit your opening. But such an order can be made not at all factories. For example, a door factory like Sinerlji makes doors of non-standard width, multiple of 10 mm, in 3-5 days.
How to determine the height of the door leaf?
The height of the opening is measured in the same way as the width of the opening. The measurement is made in three places and the smallest value is selected.
The standard height of the canvas is 2 meters. For a standard leaf, the height of the opening should be 2060-2100 mm.
If the height of the doorway is below 2060 mm, then you will need to either file the door leaf or order a lower height.
If the height of the doorway is higher than 2100 mm, then either the narrowing of the opening will be required, or doors of a non-standard height must be ordered.
Not all manufacturers produce doors of non-standard height, but those that do increase the cost of doors by 30-50%. For example, doors from the Princip, Vladimir Doors, Verda factories are not made in non-standard sizes.
SELECTED DOORS IN CUSTOM WIDTH:
Doors 1900 mm high.
Doors 2050 mm high.
Doors 2100 mm high.
Doors 2300 mm high.
How do I determine which side of the door to open?
If you have chosen asymmetrical doors (that is, if the doors are visually divided in the middle by a vertical line, then the right half will differ from the left) or doors into which fittings are embedded at the factory (for example, the doors of the Mario Rioli factory), then you must definitely decide on door opening side – left opening or right opening.
10 problems most interior door buyers face >>>
The opening side of the door leaf is determined as follows.
1. Stand on the side of the doorway into which the doors will open.
2. We open the doors towards ourselves and look at which side the door hinges will be.
3. If the door hinges are on the right, then this is a right-hand door, if on the left, then it is a left-hand door.
If you are still not sure about the size of the door leaf you need, then it will be more reliable to call a measurer – a door specialist.
In addition to the dimensions of the canvas, you also need to find out if extensions are needed for your doorway.
Which accessories and how many are required for the doors?
To install a door in a doorway, you need a door frame. To hide the gap between the door frame and the wall, platbands are needed. If the wall thickness is more than 70 mm (greater than the thickness of the box), additional boxes will be required – box expanders.
Telescopic and simple accessories
Telescopic components are called such components, in the set of which the platbands are “L”-shaped and are attached to the door frame and extensions by inserting the platband ridge into the groove of the box or extension.
How many door frame posts are required?
To install a single-leaf swing interior door without a threshold, 2. 5 racks of the door frame are required. If the door is planned to be installed with a threshold, then 3 racks are required – this is the floor of the rack from above and the floor of the rack from below. the threshold of the interior door is part of the door frame. In our catalog of doors, by default, there is the required number of frame racks for doors without a threshold.
How many architraves are required?
As a standard, by default, a set of single-leaf swing doors includes 5 architraves – these are 2.5 posts on one side and 2.5 posts on the other side. There are cases when platbands are placed only on one side, and on the other side they ennoble slopes with plaster, tiles, etc. Platbands on the one hand are installed most often in a bathroom or when the opening is in a thick wall.
Here is an example of a door kit ready for installation.
Do you need extras?
The extension is an expansion element of the door frame, which is required if the wall thickness is more than 70 mm. To determine the thickness of the wall, you need to measure the thickness of the wall in three places on each side of the doorway.
-
If the wall thickness is from 70 to 80 mm, then extensions are definitely needed for a simple non-telescopic box. With telescopic architraves you can do without extensions
-
If the wall thickness is more than 90 mm, then extensions are definitely needed, even if they are telescopic.
An example of a ready-to-install door kit with extensions.
What width do the extensions need?
The extensions of almost all manufacturers have a standard width – 100 mm, 150 mm, 200 mm. The width of the door frame is usually 70 mm. But everywhere the thickness of the wall is different and therefore it is almost always necessary to cut the extensions along. Thus, if the wall thickness is from 70 to 170 mm, then additional 100, etc. will be required. See the table below for details.
Width selection table for extensions
|
wall thickness |
Extension width |
|
|
Simple |
Telescopic |
|
|
up to 70 mm |
donations are not needed |
donations are not needed |
|
70 – 80 mm (90 mm) |
100 mm |
donations are not needed |
|
90 – 160 mm |
100 mm |
100 mm |
|
160 – 210 mm |
150 mm |
150 mm |
|
210 – 270 mm |
200 mm |
200 mm |
If the wall thickness is more than 110 mm, then the number of racks of extensions is equal to the number of racks of boxes
If the wall thickness is less than 110 mm, then the number of extensions depends on the number of doors. extensions during installation by the master will be sawn along and from one extension you will get two. Therefore, for example, for two openings, the wall thickness of which is 100 mm, one set of extensions is required – this is 2.5 sticks.
all about repair and home improvement
If you are planning to buy a new metal front door, you must first measure the doorway in the apartment – this will avoid unnecessary work during installation. If the dimensions of the opening turn out to be non-standard, it will be possible to increase or decrease it yourself – this will save a significant amount, since custom-made doors will cost 25-30% more than buying ready-made ones.
It is also important to make accurate measurements before installation for another reason – in old houses there may be a discrepancy between the width at the top and bottom of the aisle, and its height may differ significantly from similar indicators in standard buildings.
Preparing for measurements
To measure the front door correctly, no special skills are needed, just follow a few simple rules and follow the sequence of work.
Step one. Dismantling the old front door and cleaning the passage from plaster, seals, insulation.
Measuring the dimensions of the doorway
Step two. The height is successively measured at three points (middle, left and right) and the width is measured in the same way. For this purpose, a construction tape measure is used, the calculation is carried out in millimeters. Next, you will need to measure the thickness of the wall, also at three points. The threshold is leveled.
If you need to measure the entrance door to install a new one, keep in mind that all values in the specifications of metal entrance door manufacturers are indicated in millimeters.
To avoid confusion, you must first understand the definitions:
- Depth. The thickness of the wall, the distance from its outer edge to the inner. Typical door structures are designed for a wall thickness of 300-400 mm. In a situation where the box is wider than the doorway, special additional elements can be used to cover the frame;
- Height. The value from the threshold to the top bar of the doorway. The height of a standard steel door is 2000 mm, and with a frame it will be 2050 mm, so the height of the passage should be 20 mm more;
- Width. Distance between the side walls of the passage. The typical width of an iron door is 800 and 900 mm, and together with the frame they will be 60 mm larger.
 The value from the threshold to the top bar of the doorway. The height of a standard steel door is 2000 mm, and with a frame it will be 2050 mm, so the height of the passage should be 20 mm more;
 Important! The gap between the unit and the wall must be at least 20 mm.
If different values are obtained during measurements for three positions, then the smallest of the indicators is taken into account. In the event that the dimensions of the passage are non-standard, and for some reason it cannot be increased or decreased, then there is only one option left – to make a replacement door to order. When placing an order, please note that the height and width of the structure must be a multiple of 10 mm.
Diagonal Measuring Technique
Professional builders also use another way to measure front doors – diagonally. The passage is a rectangle, and the diagonals of the rectangle must be equal. To check this, the distance is considered from the lower left to the upper right corner, and from the lower right corner to the upper left. This method allows you to identify the curvature of the planes in relation to each other. In this case, deviations of no more than 10 mm are permissible.
Dimensions of a standard door structure
In Russia, single-leaf metal entrance doors are produced in two standard sizes – 2050 by 960 mm and 2050 by 860 mm (unit dimensions). Double iron doors are produced according to the standard 2050 by 1600 mm.
What defects can a doorway have?
The most common situation is when there is a discrepancy between the width or height of the door at different points. Other defects may also occur – the slope of one or more planes, potholes or bulges. Elimination of local irregularities can be done immediately on the spot – plaster potholes or chip off the protruding part of the wall. If the difference is significant, then to increase the passage, it will be necessary to dismantle part of the wall, followed by plastering the slopes. Concrete mix or brick can be used to reduce the opening.
To order an entrance door, call: +7 499 653-59-50.
When building a new house, a doorway is created for the entrance structure. You can make the width and height parameters in any order, or you can make a doorway according to the standard dimensions taken into account in the regulatory documentation.
In the article we will consider the dimensions of door openings according to GOST, what is the importance of standardization, how to calculate the dimensions of a door for an opening before buying, recommendations for non-standard openings.
Why Doorway Standards Matter
Doorway standards are important because you can purchase pre-engineered structures to replace front doors in the future. All manufacturers produce doors from different materials according to GOST standards. If the doorway is a non-standard size, the owner will have to buy custom-made doors or do extra work to fit the doorway to the standard size.
Current regulations
Today in the Russian Federation there are standards for doorways that have been in force since the times of the USSR.
Standard dimensions according to GOST:
- Single door width – 70, 90, 120 cm.
- Opening for double leaf structures – 130, 150, 190 cm.
- Standard height – 210-230 cm.
Dimensions of entrance door openings according to GOST
The above standards apply to interior and entrance doors. If we consider the question specifically about the input structures, then in this case the minimum width of the opening is determined from 90 cm (for wooden doors it is possible from 80 cm). Standard height – from 210 cm. Let’s determine from the table which doors to choose for openings of different sizes.
| Door opening height 2060-2290 mm | Optimal dimensions of the front door. Standard height – 2000-2100-2200 mm Standard height – 2000-2100-2200 mm |
| Width – 68-70 cm | 600 mm |
| Width – 78-80 cm | 700 mm |
| Width – 88-90 cm | 800 mm |
| Width – 98-100 cm | 900 mm |
| Width 128-130 cm | 1200 mm |
| Width 148-150 cm | 1400 mm |
| Width 158-160 cm | 1500 mm |
What to do with non-standard openings: practical tips
Non-standard openings will require additional work, which will allow them to be adjusted to the standard. If the opening is too wide, the excess gap can be bricked up or a mortgage beam can be installed, and then plastered. The main thing is to focus on standard parameters when performing work.
If a few millimeters are missing in the opening, it will be necessary to machine the wall using a tool – an ax, a chisel, a grinder, etc. After grinding off the excess, the protrusions are aligned and adjusted to the standard dimensions of the opening.
All these jobs require certain skills, attention and effort. A simplified way to solve the problem with a non-standard opening when buying an entrance door is to make a custom design. Specialists will perform accurate measurements of the doorway and make the front door of the appropriate dimensions.
On our website you can see the designs of finished structures and place an individual order for the creation of a heavy-duty metal entrance door in optimal sizes.
The door panels are covered by a 10-year warranty. Under the contract, service maintenance is carried out during the entire period of operation. You can place an order for the manufacture of the front door by phone. Delivery and installation in Moscow and the region is free.
All buildings today are equipped with entrance structures. The vast majority of these products are made of steel. This is due to the need to create a high level of security for any objects. In order for the structure to be installed without problems, you need to know the dimensions of the doorway for the entrance metal door.
The vast majority of standard apartments and houses in Russia were built back in Soviet times. Today, the number of such buildings is decreasing every year only in large metropolitan areas. In each typical building, the dimensions of the doorway for a metal door correspond to the established standard. It regulates the height and width of the passage intended for the installation of the input structure. Most modern manufacturers of metal doors adhere to accepted standards. Therefore, it is not difficult to choose the necessary product for the object today.
Dimensions of the opening for a standard metal door
The existing dimensions of typical steel entrance structures are reflected in GOST. At the same time, standard products are laid on and insulated. These types of products are manufactured with different widths and heights. Therefore, they can only be installed in certain openings for metal doors. Thus, overhead steel products of a specific size are mounted in passages having the following width and height:
- a door 850×2050 mm is installed in an opening 880×2080 mm;
- construction 890×2070 mm is fixed in the passage 920×2100 mm;
- product 970×2070 mm is mounted in the opening 1000×2100 mm.
When it is necessary to install a two-leaf overlay structure with a standard dimension of 1200×2070 mm, a space must be prepared for it in the wall, the width and height of which will be respectively 1230 mm and 2100 mm. When installing insulated products, the passages are already required to have other dimensions. The size of the opening for an entrance metal door of this type with a certain width and height should be equal to the following values:
- 900x2080mm for 865x2050mm construction;
- 940×2100 mm for products 905×2070 mm;
- 1020×2100 mm for door 985×2070 mm.

In fact, the size of the opening for metal doors is not always suitable for installing the desired entrance products. Therefore, each installer provides a service that allows you to expand or reduce the existing passage. In this case, the required space for insulating the joints between the box and the wall is always taken into account.
Actual dimensions of openings in houses
Doorways in new residential high-rise buildings of the P44 M, P3 M or P44 series are created with a width of 740 to 760 mm. At the same time, their height is 1950-1980 mm. At the same time, typical houses built of brick are distinguished by openings, the size of which is from 880 to 920 mm horizontally, and from 2050 to 2100 mm vertically. In buildings of the old type, a person can always find a passage designed for a single-leaf door, with dimensions ranging in width from 830 to 960 mm, and in height – from 2040 to 2600 mm. If we consider the nine-story buildings erected in the 70s, then places with dimensions of 1280 × 2550 mm were created in them for the entrance structures.
As you can see, today there are a large number of doorways, the dimensions of which have different values. Property owners need to take this nuance into account when they want to install a new entrance structure. In this case, they will not have to perform on their own or order additional work related to changing the parameters of the passage.
Opening size for a fireproof metal door
Entrance structures not only prevent the entry of unwanted persons, but also protect people and other premises from fire and harmful combustion products. Such products always undergo a certification procedure. Therefore, each model has its exact dimensions in width and height. These values may deviate slightly from the set values.
The dimensions of the opening for a metal fire door must be both vertically and horizontally 20 mm larger on each side of the structural box dimensions. So, for the largest single-floor product, you need to prepare a passage with a maximum width of 1120 mm and a height of 2417 mm. At the same time, a double-leaf structure is installed in an opening whose horizontal dimension is no more than 1920 mm, and vertical – 2550 mm. If a one and a half product is mounted, then the maximum dimensions of the passage are 1220 × 2070 mm.
Often, buyers wonder what size entrance doors are suitable for their opening. This information simplifies the choice of models. Having come to the construction market, it is difficult to choose a suitable door block without having an idea about the main parameters, so information on how to measure the size of entrance doors will certainly come in handy in the future.
Standard dimensions of entrance doors to apartment
According to GOST, there are standard and non-standard sizes, which can also differ in one direction or another. As a rule, in new buildings with an improved layout, the size of the doorway is:
- 900 * 2100 mm;
- 920*2090mm;
- 2050*900mm;
- 1000*2080mm;
- 1100*2100mm;
- 2100*950mm.

It is not difficult to verify this by taking a construction tape measure.
In houses built 20-30 years ago, there are also standard openings, but they differ significantly from modern ones, and can be significantly smaller: 2000 * 800mm, 1970*790mm. It is not worth buying a door made according to new standards, the design will certainly not work. There are also such concepts as “Stalin”, “Khrushchev” and “Mitinsky openings”. As you guessed, these are multi-apartment residential buildings of different years, made using GOST and standards of those times.
It is not worth focusing on the year of construction, because there is an error and our measurers revealed a pattern: in one entrance, the dimensions of the doorways of the entrance doors to the apartment differ by 2-5 cm.
The only way out of the situation is to order and subsequently buy the front door to the apartment to the size of the existing opening.
Recommendation: If you want a new entrance metal door to be installed according to specifications, be sure to call the measurers first.
Dimensions of openings for entrance doors
You will be surprised, but the dimensions of the opening for entrance doors differ from the box. Sometimes this difference can be up to 10 cm. If you need to calculate the exact dimensions, do not measure the canvas, but armed with a tape measure, measure vertically and horizontally along the walls where the door to the apartment is installed. Estimate the layer of plaster how thick it is and add to the resulting value the width and height. The complexity of the measurement is to accurately measure the parameters, taking into account the technological gap, which is mandatory for installation work. If you doubt the correctness of the resulting parameters, the best option would be to invite a specialist to fix the exact dimensions.
The DM+ company manufactures doors according to individually taken dimensions of openings for entrance doors. The craftsmen carry out the work: measuring, selecting the structure and finishing materials, drawing up an estimate and a contract for the manufacture of the structure. Check out is free!
Beautiful display of Cloud
requires
Adobe Flash Player 9
or higher
Download Adobe Flash Player
In a private house, the security of the door is of decisive importance, especially when it comes to entering the house. It should be wide enough, thermally insulated, fit snugly to the box and be equipped with a good lock. Its design must have a high class of reliability, which implies high-quality material of manufacture. Consider the features of the dimensions of iron entrance doors for a private house, the stages of preparation and installation.
Metal doors
Depending on the needs of the owner of the house, metal doors are single-leaf, one-and-a-half or two-leaf. For the sizes of each of these types there are standards. At the same time, for each type, changes in height are possible when such doors are installed with a transom.
The next gradation of species has to do with quality. The line includes the following models:
- “Standard” – a simple canvas, often imitating wood;
- “Elite” – increased thickness of the metal sheet and hidden hinges;
- “VIP” – the thickness of the iron entrance door is even greater, there is a reinforced lock system.
Models are distinguished by the reliability and quality of the materials used.
Standard dimensions of canvas and box
Manufacturers are guided by generally accepted basic parameters, which are also contained in GOST. The standard dimensions of the entrance metal door, together with the frame, must fit into the opening, the dimensions of which may vary in different buildings. The following dimensions of height and width are common:
- width – 740-760 mm in a panel house and 880-930 mm in a brick house;
- height – 1950-1980 mm in panel and 2050-2100 mm in brick.
The thickness does not matter much, since most doorways have a sufficient margin for this parameter.
Non-standard door for a private house
The dimensions of the opening in houses of old construction or built according to an individual project may differ from those generally accepted. For example, many houses built in the year before last and at the beginning of the last century have higher ceilings and wide entrances. Accordingly, the dimensions of the entrance metal doors are not standard for them. Most often they are larger in both height and width. Heights greater than 2200 mm are no longer considered a standard.
Rules for Measuring the Entrance
Please check the dimensions of the entrance before purchasing. The width is measured from wall to wall, so before measuring, you will need to remove the trim, if the old box is not dismantled. This information is enough not to invite a specialist, but immediately in the store to determine the required dimensions of the entrance metal door with a box.
If the opening has non-standard dimensions, the easiest way out of the situation may be to expand or reduce it. The reduction is made by laying the opening with bricks to the required width and thickness of the opening. If such work is difficult to perform, work on an individual project will be required.
Installation procedure
Before installation, it is required to dismantle the remains of the old fasteners and completely clean the entrance arch from plaster. When installing heavy steel entrance structures, the box is fixed in the entrance opening on steel bolts or fittings in pre-prepared holes. So it will be more difficult to crack, and it will be more stable during operation.
The next step is sealing, which will require mounting foam. The box is burst with wedges, the bolts are tightened, and then foam is poured between the frame and the entrance arch. After it dries, you can hang the canvas itself. If necessary, insulation can be laid on the outside of the entrance opening.
Which locks to install
Locks should be selected in advance for metal entrance doors. According to the type of mechanisms, it is best to opt for mortise ones, since when using a metal sheet, it makes sense to hide the lock inside the case.
Another important criterion is the reliability class. The thicker the canvas, the more reliable the lock itself should be. For a good door, grades 3 and 4 are suitable. Classes 1 and 2 have a metal sheet thickness insufficient for burglary resistance.
Fittings
At the end of the installation process, the door will require additional arrangement by hand. First of all, you need a quality handle that will last a long time without replacement. Handles can be stationary or push action. In the latter case, the handle mechanism has a tongue that locks the canvas in the closed state.
A seal is used to prevent drafts. It eliminates the smallest gaps between the canvas and the box. For metal doors, the seal is made of silicone or foam rubber.
One of the most important criteria that largely determines the choice of a product for purchase is such a parameter as the standard dimensions of entrance metal doors. It directly affects both the cost of the steel structure and the price of performing installation work. In addition, the operational characteristics of a metal door also largely depend on its dimensions.
The main factors influencing the dimensions of metal entrance doors
Almost all serious manufacturing enterprises try to produce products that have standard dimensions of entrance doors with a frame. This allows you to significantly reduce the cost of a separate structure, which is achieved by using standard technological processes, parts and components. In addition, the installation procedure is greatly simplified, as it also involves the use of standard working methods.
It is important to note that the dimensions of iron entrance doors are influenced by several of the most important factors, in particular:
- Opening dimensions. Naturally, this parameter largely determines the size of the input structure. This fact is explained quite simply. The performance of work, both on the expansion and narrowing of doorways, requires additional expenditure of financial resources;
- Level of finish, insulating qualities and degree of protection. These characteristics determine, first of all, the thickness of the steel door, which is also one of the main dimensions of the product;
- Type of building where a metal door is planned to be used. Obviously, different buildings require entrance structures of different sizes. This is a logical consequence of the difference in project documentation, construction material, purpose of the structure and its location. It is not surprising that the standard size of the doorway of the water door in a private house and in an apartment is noticeably different.
 Naturally, this parameter largely determines the size of the input structure. This fact is explained quite simply. The performance of work, both on the expansion and narrowing of doorways, requires additional expenditure of financial resources;
 Each of these factors has a serious impact on the size of the entrance doors used in a particular case. It should be understood that in some cases, the current legislation establishes certain requirements related to the minimum dimensions of such structures. Usually this concerns the implementation of fire safety rules. Therefore, when choosing a product that is suitable in size, the question of the presence of these requirements should be studied first of all.
Standard sizes of metal doors according to GOST and SNiPs
With a certain degree of conditionality, the existing GOSTs and SNiPs today provide for several options for standard sizes of metal doors. The application of each of them depends, first of all, on the time of construction of a multi-storey residential building and the material that was used in this case. According to the specified criteria, all buildings can be divided into three categories:
- Old panel buildings. The standard width of the front door in this case is 74-76 cm, and its height is 195-198 cm;
- Old brick houses. For this type of building, the width of the structure is used, which is in the range of 88-93 cm, and the standard height of the front door varies between 205-210 cm;
- Apartment buildings built according to modern standard designs developed at the end of the last – beginning of this century. Entrance structures of such buildings are made, as a rule, in two standard versions, the dimensions of which are 96*205 and 86*205 cm.
 Entrance structures of such buildings are made, as a rule, in two standard versions, the dimensions of which are 96*205 and 86*205 cm.
 Of course, in practice, not only the above standard dimensions of the input metal structures are used. Moreover, for public and commercial buildings, as well as private residential cottages or houses, such dimensions can hardly be called typical. However, when installed at the entrance to the apartment, they are used much more often than other options.
Non-standard sizes of entrance structures made of steel
Most of the major manufacturers do not limit their model range to only two standard products that have the above dimensions. On the contrary, the most popular input designs often have 5-6 standard variations, which are in active demand in the domestic market. In addition, many manufacturers offer services for the production of products manufactured according to an individual sketch or project developed by the company’s specialists together with the client. Naturally, in most of these cases, the dimensions of the metal door are also not standard.
Most often this approach is used by owners of private houses or owners of commercial real estate. In both of these situations, the manufacture and installation of a metal entrance structure, produced according to an individual project, emphasizes their status, giving the building a stylish and solid appearance. Of course, such a door ensures the effective performance of other standard functions of the product, related to the achievement of the necessary degree of security and comfort in the interior.
The security of our home is affected by many different factors. Metal doors protect us from the attempt of intruders. In order to choose a product and not miscalculate with the purchase, you must first familiarize yourself with the existing dimensions of such a design. Choosing the right door size with a suitable frame will make it more functional and reliable.
Varieties
Metal doors are distinguished from the rest by their large width. Standard values are used in a wide variety of steel doors. Today, doors are made from several basic materials:
- wood;
- MDF;
- steel.
The dimensions of Chinese products have some differences with domestic designs. This is due to differences in the standards of China and Russia.
However, the material of the sheets remains the same. Doors must be selected taking into account all the nuances. It is especially necessary to pay attention to the design of the product.
Single leaf partition
Standard design with one leaf fixed in a frame. The width of such a door should not exceed 110 cm. To make the product look more beautiful, they make an original design and change the dimensional parameters of the opening, of course, without going beyond the standard.
Double
This door is usually installed in a private cottage. The height of the product is standard. The size of the opening, especially its width, is approximately doubled. It looks very nice, but this requires the presence of free space. One and a half systems can become an alternative. The width of the canvas can be different. One side remains completely motionless, it plays the role of a beautiful insert.
Slab with overpanel
Changes the height of the door frame. Moreover, in such metal doors, the dimensions of the paintings remain standard. The fastening of the upper part of the product is carried out in the form of a separate decorative part.
Selection of the entrance door
The size of the opening for the entrance metal sheet has several standards. Therefore, the choice of such a partition is made individually for each opening.
For old houses built in the 20th century, it is quite easy to find doors that fit exactly into the existing openings. Modern high-rise buildings and private cottages are built using various technological approaches.
It is very difficult to correctly determine the size of such an entrance partition together with the box. In the first place in this case is the location of the installed system.
It becomes simply impossible to adhere to standard dimensions in such conditions. Installation of the entrance model to a private cottage is much easier. It becomes possible to change the size of the door opening, which will not affect other floors.
The pressure on the walls in high-rise buildings is much greater. It is very dangerous to break the monolithic structure. This can lead to the destruction of the entire house.
Standardized dimensions
Standardized dimensions have been developed for every type of construction.
- Height. The opening should be 2070–2370 mm in height. The exact value of this parameter depends on the existing ceiling level, as well as the size of the canvas.
- Width. For a normal entrance door, the opening width is more than 910 mm. In single-leaf structures, a width of 1010 mm is considered the standard parameter. One and a half products can have an opening 1310–1550 mm wide.
In double-floor designs, the width can vary between 1910–1950 mm.
- Thickness. There is no strict regulation for this parameter, but usually it exceeds 20 mm. The size depends on the type of product itself. However, the door must be such as to reliably protect the owners of the house. In metal structures, it is very important to choose the most durable sheet of metal.
Standards Chart
Custom Models
Homes today are built with innovative design solutions. Standardized dimensions for door structures are no longer suitable. The dimensional parameters of a metal sheet can have completely different values.
To avoid violating design standards, opening dimensions are compared with standard values. However, builders do not adhere to specific figures.
The design of the house is carried out using original designs. The dimensions of the input systems are determined on the spot.
The width of the entry web can be between 900-2000 mm and the height between 2000-2400 mm. Changes in magnitude are often inherent only in houses where the opening is much larger than the standard values.
Selecting the door leaf with the box
The iron box should fit easily into the doorway. It is very important that there are small gaps. They will allow you to set the structure strictly vertically and horizontally in level.
In order to avoid errors, measurements must be taken in a well-cleaned opening.
The ideal option is to buy together with the box. If you buy a box separately, you can choose the appropriate door leaf for it.
There must be a small gap between the door leaf and the box for free movement. Its size usually does not exceed 2 mm. When choosing, be sure to take into account the level of the threshold. It is installed at the entrance to the room.
Before buying a door, carefully measure the opening
Choosing the right model
The parameters of the walls must be taken into account, as sometimes they do not correspond to the dimensions of the door frame.
To install the curtain, the size of the opening is corrected with the help of slopes, the position of the architraves is adjusted. This allows you to provide a high level of insulation of heat and noise, to avoid the formation of drafts. If the opening parameters do not correspond to the size of the front door, the sash may not open fully. The opening of the canvas will interfere with the protruding end.
Some highlights
When choosing an entrance door together with a frame, it is necessary that its dimensions be smaller than the opening. You can choose the right model if you take the width of the canvas, and then increase this size by 70 mm.
Domestic manufacturers produce canvas with a width of 60 cm or more. It can reach 90 cm. In most cases, a canvas is installed, the width of which is 80 cm. The opening width is 87 cm, and the height is 210 cm.
Non-standard dimensions
Some houses are built according to foreign projects. The size of the doorways in such houses differs from the standard ones.
In case of non-compliance with building regulations, it is also possible that the dimensions of the box do not match the inlet web. To correct errors, the size of the opening is corrected or a new product is manufactured.
By ordering a new partition, you can make the model stronger and more fire resistant. The size of the canvas and the box is selected taking into account all the nuances of the opening. If you make the right measurements, you can ensure the full functionality of the product and its durability.
For tips on how to properly measure the opening for a future door, see this video.
Before purchasing an entrance door, all you need to do is measure the width, height, thickness of the doorway, as well as determine the wall material and the direction in which the door opens.
Usually, 2 door standards are produced 860 x 2050 mm and 960 x 2050 mm – these are single-leaf, and double-leaf 1200 x 2050 mm.
How to measure a door?
So, arm yourself with a tape measure, a sheet of paper, pencils or a pen and measure several parameters of your doorway. At the same time, preferably make three measurements : top, bottom and middle of the opening (see picture).
Why is it necessary to measure in three places?! Because the wall may not be even and there may be a difference of 1-2 cm, this is not visually noticeable, but when you install the front door, it may not fit through the opening due to the fact that you did not immediately measure correctly.
So be careful!
Short video how to quickly measure the doorway with your own hands. Before watching, make sure you have the sound turned on.
Main opening measurement parameters:
— width of the doorway from the side of the landing – the distance from the outer right to the left edge of the wall doorway (from wall to wall) is measured. Even if there is a finish in the opening (plaster, lime, etc.), you should try to determine where the wall itself begins.
– width of the doorway from the side of the room – the distance from the inner right to the left edge of the doorway of the wall is measured (from wall to wall). This measurement is done if it is planned to install a second (for additional heat and sound insulation) front door.
Typical residential buildings have standard openings:
Brick-panel houses – doorway width 900 mm.;
Series 112 houses – opening width 900 mm and 1000 mm.
Read more about the dimensions of the doorway in typical series of houses here
– opening height – the distance from the level of the “clean” floor (parquet, laminate, tile, linoleum) to the outer upper edge of the opening is measured. Usually this parameter is 2070-2100 mm.
The size of the door frame we need can be easily determined from the table:
the height and width of the existing door frame. But, to be sure, it is better to measure from edge to edge of the opening itself. Why dismantle the platbands of the old door from 2 sides.
– wall thickness of the opening – we measure the width of our wall, this is necessary to understand whether it will be necessary to install an extension or not.
– wall material (concrete, brick, etc.)
– opening side – on fire safety rules established by the Ministry of Emergency Situations of the Russian Federation (Order of the Ministry of Emergency Situations of the Russian Federation No. 313 “ON APPROVAL OF FIRE SAFETY RULES IN THE RUSSIAN FEDERATION” dated 18 June 2003), residents of the house do not have the right to change the direction of opening the doors, as this can block the doors of neighbors, passages in the entrance, thereby preventing the evacuation of people.
Even if the door has previously opened inward, it is necessary to install the door on the opening side so that the above situations do not occur.
To determine the side of the door opening, you need to stand facing the outside of the door (“ from street side ”), and on which side (left or right) of the hinge, this is the opening of the door (see figure).
Attention! The size of the opening must be greater than the size of the door box, not less than by 2 cm for adjusting and installing the box in the opening according to the level, as well as so that the mounting foam can take on its heat-insulating properties.
A large gap between the door frame and the opening will adversely affect the strength of the door fastening.
The difference between the dimensions of the box and the opening is not more than 70 mm. in width and no more than 35 mm in height (without building or expanding the opening).
Write down these parameters (width, height and thickness of the opening, wall material, door opening side) and report them to the shop manager.
According to these parameters, the consultant will be able to choose the right size of the front door for you, determine the installation method, additional work, and in some cases even the possibility of installing some door models. We offer you to get acquainted in detail with door models (technical characteristics, equipment and their dimensions) on the page of our catalog of entrance doors.
If you have a non-standard situation with the opening: the wall, where the door is attached, is crumbling, the opening is narrowed by fragile plaster, etc., then it is better to call our master measurer, who will professionally assess the situation, give recommendations and, if possible, eliminate this problem.
Call us: 8 (495) 222-01-82, 8 (985) 222-01-82. .
Excluding weekends and holidays from 9:00 to 21:00 . Entrust the work to professionals!
One of the key parameters influencing the choice of product for installation is the dimensions of the entrance doors. This is quite logical, given the fact that the dimensions of the structure directly affect the cost of its manufacture and subsequent installation. At the same time, in most cases, it is much more profitable for the client to order a steel door of standard sizes, since the production of a non-standard one will cost much more.
Factors influencing the size of entrance doors
First of all, it should be noted that the dimensions of entrance doors with a frame are determined taking into account several factors. The most important of them are the following:
- Design features. Obviously, double-leaf products, most often, are much wider than single-leaf and one-and-a-half;
- Opening dimensions. Quite often, with individual construction, any size is atypical. As a result, openings to a private house or bathhouse often differ markedly from the standard ones;
- Building type. The current GOSTs and SNiPs provide for various sizes of openings for Khrushchev, panel houses, as well as old buildings and new brick buildings.
Of course, steel doors, which are best suited in each case, also have unequal dimensions;
- Installation location and function. It is quite obvious that the standards for products that are mounted at the entrance to the apartment and at the entrance can be quite different. At the same time, it must be remembered that GOSTs and SNiPs do not single out street or external doors as a separate category, which can hardly be called the right decision. Moreover, double-sided products are much more often used for them. It should also be borne in mind that different standards are often applied for insulated, fireproof or armored doors.
A sufficiently large number of factors that affect the standard dimensions of entrance metal doors with a frame leads to the fact that a significant part of reputable manufacturing companies produce several models at once. Their dimensions are considered typical. This approach should be recognized as fully justified and proven effective in practice. Moreover, in addition to this, some Russian enterprises also offer potential customers the opportunity to manufacture products of any non-standard sizes.
Standard dimensions for steel doors
Today’s standards for entrance doors, as already noted, largely depend on the type of building where they will be installed. This is quite logical, especially considering the fact that a significant part of the housing stock was put into operation quite a long time ago, when Soviet building standards were still in effect. As a result, the standard size of the doorway of the front door is:
- for houses made of reinforced concrete panels: width – from 78 to 82 cm, height – from 198 to 205 cm;
- for brick building: width 93 to 98 cm, height 210 to 215 cm.
Of course, the dimensions of the frame and the door leaf are somewhat smaller than the dimensions of the opening. This is quite logical and allows you to ensure a trouble-free installation of the product. As a result, the standard size of an entrance door to an apartment is 74 to 93 cm wide and 195 to 210 cm high. Most often, manufacturers as standard are used as the first indicator of 80 and 90 cm, and for the second – 195, 200 and 205 cm.
Custom sized entry doors
There are two most common reasons why custom sized metal doors are made. In the first case, this is the desire of the owner to install a large, often double-floor structure at the entrance to a private house. In this case, it goes to a noticeable rise in price, resulting in an original and stylish product that has an individual design in most of these situations.
The second reason for ordering an entrance structure with non-standard dimensions is the presence of a large opening. In this case, either additional work is required to narrow the installation site of the door, or the use of additional elements. The third solution to the problem is the production of a non-standard steel door, which costs the owner of a house or apartment, as a rule, more than the previous two.
A to Z door guide
Contents
What will you learn
What is the door made of?
- Door frame types
- Door leaf structure
- Door opening direction
- Door hinge side
- Door hinges
- Locks
- Static Ledgers
- Lock plate and armor plate
- Door handles
- Peephole
- Decorative trim
- Seal or sealing loop
Burglary protection
- Reinforced door leaf and frame
- Lock pocket
- GOST burglar resistance and mechanical strength
- Guardian door classification by strength and burglary resistance
- Door metal thickness
Locks and locking mechanisms
- Burglary resistance of locks according to GOST
- Cylinder lock
- Lever lock
- Combination lock
- Electronics in locks
- Replacing the cylinder mechanism
- Recoding of lever locks Guardian
- Deviators
- Vertical ledgers
- Night valve
- Recommendations for choosing a complete set of locks
Protection against noise, cold, drafts and odors
- Noise reduction index
- Door leaf thickness and door frame depth
- Insulating material
- Tightness and number of sealing loops
Appearance
- Painting metal surfaces
- Metal finishes
- Decorative panels
- Decorative material options
- Painted in RAL
- Style selection
- Selection of fittings and colors
- Trim and trim
Installation and installation
- Door size and SNiP
- Ways to install a door in a doorway
- Door frame mounting methods
Conclusion
What you will learn
In a store or on an entrance door website, a common person will not understand such words as “stiffening ribs”, “anti-removable latches”, “lever lock” and the like. He just wants to buy entrance doors to the apartment, which would protect his home from possible troubles. We will try to tell in simple language about the features of the entrance doors to the apartment and give advice on their choice.
What the door is made of
A modern front door is a metal structure that is immediately ready for installation, consisting of a door frame and a “leaf”. It comes with accessories and fasteners.
The constituent structural elements of a steel door may vary from model to model, but there are also basic ones among them. These include:
-
door frame,
-
door leaf,
-
loops,
-
static bars,
-
lock,
-
lock pad and armor plate,
-
a pen,
-
peephole,
-
decorative trim,
-
seal contour or seal.
In a simple sense, a steel door is called a door frame and its closing sash. But in the terminology of sellers and manufacturers, a “leaf” is a door leaf, and a jamb or a door frame is a door frame. Together, the door leaf and frame form a door unit.
Door frame types
The door frame can be open or closed design. A closed frame implies that the door frame is made up of hollow weldments. It gives the door block the rigidity and strength required for high burglary resistance, and allows you to make a minimum installation gap. The latter will increase the heat and sound insulation of the door, the performance of which mainly depends on the insulating material. If they fill the door leaf, the doors will be warm and quiet.
The design of the open box does not have a cavity. In some cases, it is less voluminous, which allows you to increase the light opening of the door.
The main models of Guardian doors are produced with a closed box.
Door leaf design
The door leaf is made of a solid sheet of metal on the outside of the door and a second sheet on the inside. One-piece bent sheet – when the edges of the metal sheet are bent inward and form a profile without welding additional parts of the metal. This method allows you to increase strength, improve quality and simplify manufacturing technology.
Door opening direction
Models of doors Guardian are external and internal opening.
Outward opening doors are more common than inward opening doors. Doors of the first type are easier to protect against forced entry, so they are easier to manufacture. This design makes it difficult to access the locks, which makes the doors more burglary-resistant.
Interior opening doors can be used as a second door or to preserve the appearance of the main entrance. This method of opening requires additional measures of protection against burglary and is demanding on the configuration of the lock.
In terms of fire safety, there is not much difference in which direction the door opens. SNiP 21-01-97 only regulates that the light opening of the door must be at least 1.9 m high and not less than 0.8 m wide. You can find out more about the requirements of SNiP in the item “Door size and SNiP”.
However, an external opening door should not interfere with neighbors opening the door.
Hinge side
Door hinge side – the side on which the hinges are welded to the door.
When determining the side of the hinges for Guardian doors, the following rule applies: always look at the front door from the outside from the landing and determine the side.
This method is used not only for the door of external opening, but also for internal.
Door hinges
Door hinges in form are steel cylinders, inside of which there are axles. The design of the door basically involves two hinges. The third hinge is usually installed on heavy doors, due to the structure of the door itself, its size and decorative finish.
For different conditions, different types of loops are used:
Spherical hinges
In them, in addition to the axles, there are parts in the form of a hemisphere – bearings. They evenly distribute the weight of the door leaf and keep the door working even when the door frame is displaced.
Hinges with support bearing
The bearing is located between the bearing parts of the hinge, which reduces friction, improves the opening and closing of the door.
Hinges Bark
They contain a ball instead of a classic pin, which divides one loop into two parts. These hinges are suitable to deepen the leaf into the door frame and increase burglary protection.
Concealed hinges
They allow you to improve the appearance of the door, but some models open only to a limited angle.
Extension hinges
They are welded on remote mounts at a distance from the door leaf and frame, thanks to which you can install a massive finish and preserve its aesthetics.
Locks
The main way to protect the house from “uninvited guests” is the lock. The level of burglary resistance depends on the type of lock mechanism.
It will be more reliable if different types of locking mechanisms are combined in the design.
Even better, there are two locks that differ in the type of locking mechanism and the level of secrecy.
You can learn more about locks and locking systems in the chapter Locks and locking mechanisms.
Static Ledgers
When hacking, an attacker may try to knock down or cut off the hinges. Anti-removable latches or static bolts protect the door from this. They are located on the door leaf from the end on the side of the hinges. Unlike locking bolts, static bolts do not extend, they dig into the door frame and fix the door leaf in the door frame.
Anti-removal labyrinth
Anti-removal labyrinth option is provided for burglary-resistant doors. It is a solid vertical spike, which is located at the end of the door leaf. In the closed position of the door, the spike enters a special groove in the door frame.
Such a precautionary measure makes it difficult to press the door leaf with a lever, stop, jack and other similar tools along the entire height of the door block.
Lock plate and armor plate
To improve the appearance of the keyhole and the protruding mechanisms of the lock, a decorative overlay is installed on the door leaf, and for protection – an armored overlay. A decorative overlay is a small metal plate or a three-dimensional convex detail. It decorates the keyhole or lock cylinder on both sides of the door. The armor plate is a massive metal part that is attached to the keyhole on the front side of the door. In a cylinder lock, it protects the larva or the core of the lock, in a lever lock it protects the keyhole itself. In the first option, it will be more difficult for an attacker to damage and knock out the cylinder. In the case of a lever lock, it is more difficult for him to open the keyhole and gain access to the lock.
Armored plates are overhead and mortise. The invoice is less resistant to burglary than the mortise, but this option is better than none.
But the mortise armor plate does its job best of all.
You can learn about other methods of protection against burglary of locks and doors in the section “Protection against burglary”.
Door handles
The door handle is also important in the door: it opens the latch of the lock and helps to get into or out of the room. It should be understood that the handles for entrance doors and interior doors are somewhat different. Entrance doors are heavier than interior doors, so the handles for them are more massive and look more powerful.
You can find recommendations on the choice of door handles in the “Selection of fittings and colors” section.
Peephole
There is no way in the front door without a peephole: you need to see who is standing outside the threshold. To improve the field of view, eyes with a wide viewing angle are used: 180 degrees instead of the standard 120. A good viewing angle allows you to see an intruder when he sits down, presses against the left or right wall from the door.
The peephole is primarily an element of protection for the owner himself. He hides the fact of his master’s presence from whoever is behind the door. To do this, there is a curtain – a plastic or metal part on the peephole on the inside of the door, which prevents outsiders from seeing what is happening in the room. Therefore, you should not save when choosing a curtain design.
It is best to choose a peephole that has a sliding curtain instead of a flapper, which is called silent.
Door eyes are also made with plastic or glass optics. Both options can be good. Modern technologies make it possible to create high-quality lenses from plastic, but they often belong to the low-budget segment. Otherwise, it is better to take a peephole with glass optics.
Today, another alternative has appeared – a video peephole. From the outside of the door, it looks like a standard peephole, but inside the room there is a panel with a screen. On it you can see standing outside the door, which is more convenient than the classic peephole.
Decorative trim
Do not forget about the decorative finish of the door, because it shows the taste and personality of its owner. Here you can choose:
-
type of coating and material for the outer and inner sides of the door leaf, door frame, platband,
-
cover color,
-
accessories.
Doors Guardian are completed with laid on decorative panels or external metal furnish. Decorative panels are distinguished by a special variety: their coating can be laminated or painted, the design is prefabricated with or without a milled pattern.
Also, the thickness of the panel increases protection against cold and loud noise. For advice on choosing a panel for interior or exterior, see the “Choose a Finishing Style” section.
Seal or sealing loop
In order for the front door to be airtight and warm, a sealing contour must be added. It consists of rubber “tubes” of a special shape in the profile, which are glued at the junction of the door leaf and the frame. They allow you to provide a soft vestibule between the elements of the door block during the opening and closing of the door, increase protection against drafts and odors, ensuring tightness.
You can find out in more detail how the tightness of the Guardian doors is arranged in the section “Tightness and the number of sealant circuits”.
Burglary protection
First of all, in the front door, it is important how resistant it is to burglary. This is facilitated by strengthening the design of the door and the castle zone.
Reinforced door leaf and frame
To increase burglary resistance, stiffeners are welded to the door leaf from the inside and reinforce the door frame.
Stiffeners – vertical “beams” of the U-shaped profile, located inside the door leaf. They increase the rigidity of the door leaf.
The main elements of the door are reinforced to make it more difficult to use the “squeeze” method – a breaking method when a mount is inserted into the gap between the door leaf and the frame. Under its pressure, the door leaf can be deformed, and the door will open without breaking the lock.
In order to avoid hacking, the Guardian door design uses an integrated approach: one-piece welded parts, stiffeners, pockets, and other amplifiers that increase the strength of the door unit. The entire door structure is also reinforced with numerous bends.
Bending is the process of processing a sheet of metal, in which it is given the desired shape.
The easiest way to add protection to the castle is to install:
Lock pocket
It is not for nothing that the lock pocket is called like this: the lock is inserted and fastened into a special cavity, as if in a pocket. In this case, it is protected from the front by an additional sheet of metal.
When these precautions are not enough, an armor package is added – a set of protection methods.
This includes:
-
armor plate,
-
reinforced protection of the lock zone,
-
necessarily an armor plate for a cylinder lock,
-
protection of crossbars of locks and latches.
How exactly they improve the burglary resistance of doors and locks, you will learn more from the article “Protection of locks of entrance doors from opening and burglary”.
Armor plate
The armor plate is a hardened steel sheet, which is additionally installed in the lock pocket.
Reinforced lock zone protection
Reinforced protection of the lock zone, at first glance, sounds complicated. In fact, parallel steel rods are welded into the lock pocket to significantly strengthen the door leaf wall in the event of a mechanical break.
Lock and bolt protection
It is a metal plate, one of which is welded into the porch, in the place where the door leaf covers the door frame and the bolts of the lock. The other is installed in the door frame in the crossbar area. This makes it difficult to open the door or cut the lock bolts.
The design of the door from 2 sheets of metal with additional metal profiles provides good mechanical strength of the door leaf and protection against burglary.
You can get information about the main security measures for Guardian doors in the article “17 Benefits of Guardian Entrance Doors that Prevent Burglars”.
GOSTs of burglar resistance and mechanical strength
The door design can be evaluated according to two important characteristics: burglary resistance – GOST R 51113-97 and mechanical strength – GOST 31173-2016.
During the tests, the doors are subjected to the most severe impacts with special tools, in some cases even explosive devices.
In terms of burglary resistance, GOST R 51113-97 “Banking protective equipment” distinguishes H0 and 0 (the lowest classes) and XIII (the highest). H0 and 0 are completely opened after 15 and 30 minutes, and XIII – after 4500 minutes. In the door market, class I and II doors are more often in demand: class I will be partially opened after 30 minutes, and completely – after 50. The second class – after 50 and 80 minutes, respectively. This is enough time for the neighbors to notice the break-in attempt and for the police to arrive.
The level of protection against burglary is certainly affected by the mechanical strength of the door: according to GOST 31173-2016 “Steel door blocks” M5 or according to GOST 31173-2003 “Steel door blocks” M1 are the standard. The mechanical strength of the door contributes to burglary resistance and keeps an intruder away from his target longer.
Often unscrupulous sellers are cunning when they talk about burglary resistance, referring to a certificate of mechanical strength. It must be clearly understood that these concepts are not equivalent. The strength of the door block is not a true guarantor of burglary resistance: it only indirectly indicates that the door will last a long time and that it will not be quickly broken into.
Sellers simply do not specify this, giving out one property for another. Only a strong door construction does not explicitly guarantee protection against burglary and opening.
If the door does not have a burglary resistance certificate, then it is incorrect to call it burglar-resistant.
Guardian door classification by strength and burglary resistance
Manufacturers may claim different levels of mechanical strength and burglary resistance. Depending on this level, different protective structures are needed.
Guardian doors are divided into three groups according to strength and burglary resistance:
-
entry level security doors,
-
security doors,
-
burglary doors.
Entry security doors
They are certified, comply with GOST for strength. These doors perform their function well, having the necessary reliability and durability. They will also protect from an intruder who will not be able to afford such a door. If it is enough for the buyer that the door performs its utilitarian function well, then his choice is the door of the initial level of protection.
Security doors
These doors exceed the highest GOST requirements for strength. They are made with locks and locking mechanisms recommended by the Ministry of Internal Affairs, with high burglary resistance. The package of such doors may include armor plates for locks, an armored package of the lock zone. Doors with a high level of protection can protect against a well-trained and experienced intruder.
Security doors
Such doors belong to the bank GOST of burglary resistance. They are purchased to maximize the protection of housing when the owners are away from home for a long time. Doors of this category are resistant to power, intellectual breaking and opening.
We advise you to choose entrance doors manufactured in accordance with GOST, taking into account the following factors:
-
the level of crime in the area where you live,
-
the presence of video surveillance,
-
the presence of an intercom,
-
the presence of a security alarm or concierge.
Door metal thickness
When choosing doors, the buyer is often faced with such a criterion as the thickness of the metal. Many people believe in the old fashioned way: the thicker the sheet of metal from which the door is made, the better. Sellers indulge in every possible way, but the rule “the thicker the better” does not always work. A thick layer of metal only makes the door heavier, which is why it is necessary to install additional hinges and further weight and strengthen the structure.
The weight of the door is also affected by the size and decorative finishes. If the door is over 90 kg, it may not be suitable for use by the elderly and children. All this leads to an increase in the cost of the product, which is not always justified for the buyer.
So, when choosing a good front door, taking into account the thickness of the outer metal sheet, we recommend that you follow the following rules:
-
A door with a metal thickness of 1.3 – 1.6 mm must have a closed door frame structure or open, but with a metal thickness of more than 1.6 mm. The door leaf, however, must be made of 2 sheets of metal or have vertical and horizontal stiffeners.
-
For doors with a thickness of metal sheets of 2 mm, the design of the door leaf from 1 sheet of metal is allowed, but it must have vertical stiffeners.
Guardian doors are produced with outer metal sheet thickness of 1.2, 1.4, 1.8, 2 and 3 mm, due to structural necessity. At the moment, door models, in addition to low-budget options and doors with polyurethane foam, have two sheets of metal in their design.
In modern doors, the strength and burglary resistance of the structure is achieved not only due to the thickness of the metal, but also due to the presence of a sufficient number of curved elements – bends. It is the presence of a good system of profiles that strengthens the door block.
Locks and locking mechanisms
The door lock has a “simple” task – to block the way into the room from illegal entry. But in order to fulfill it, mankind has created different versions of castles. Basically, they are distinguished by the secret part of the lock – the correct “password” for opening or closing the door with a key.
According to the type of mechanism that creates secrecy, locks are:
-
cylinder,
-
level.
By the number of secrecy mechanisms in one building, there are:
-
simple – with one secrecy mechanism,
-
combined – more than one secrecy mechanism and, possibly, of a different design.
According to the principle of work, there are:
Burglary resistance of locks according to GOST
GOST classifies the burglary resistance of locks, cylinder mechanisms and latches. The class of the lock or its component is assigned according to the test results, focusing on the lowest values of the indicator.
Among locks, locks of class 4 according to GOST 5089-2011 are considered the highest, when class 1 is the easiest to break.
Opening resistance of locks:
-
1 class is missing;
-
2 classes – at least 5 minutes;
-
3 classes – at least 10 minutes;
-
4 classes – at least 30 minutes.
Locks of 2-4 classes must resist opening with destruction within the specified time.
GOST 5089-2011 also regulates the scope of use of locks of each type of burglar resistance:
-
Class 1 is designed for interior doors in an apartment, offices;
-
Class 2 is suitable for rooms that lack the usual level of protection, including for interior doors and offices;
-
Class 3 – for premises with additional requirements, which include reinforced entrance doors to apartments, offices;
-
Class 4 locks are designed for special requirements for the protection of premises that will be insured and taken under guard.
If the requirements of GOST are met, then locks of 2-4 classes can withstand drilling and opening with master keys. Class 3 and 4 locks should have protective elements against sawing of bolts, and lever locks on the shank stand should have similar precautions, but against drilling.
Elements of a cylinder lock, such as a cylinder mechanism and latches, have their own separate classification of burglar resistance according to GOST 5089-2011. It also consists of 4 classes, where class 1 is the lowest and class 4 is the highest. Therefore, the indicators of burglary resistance for a cylinder lock, a cylinder mechanism and a latch vary. These features should be considered when choosing a lock and its components.
GOST burglary resistance allows you to determine the resistance of a particular model of locks to various methods and methods of burglary. The higher the class, the longer the lock will be able to keep an intruder from opening the door.
Cylinder lock
This is the most common type of lock. Inside the lock case there is a “larva” or “core” in the form of a cylinder, because technically it is called a cylinder mechanism. When the key is inserted into the lock hole, it enters the core of the cylinder mechanism. Through it, the moving elements of the secret move from their place: pins, disks, frames. This is how the secret of the cylinder lock works.
Cylinder mechanisms by type are:
Key-key cylinder
Thanks to this type of key, the door opens and closes from the outside and inside with a key. This option is the most reliable: an intruder who entered the apartment through the window will not be able to just leave through the door.
Key-stem and key-turn cylinders
The key-rod and the key-revolver can be attributed to the functional door latch – it opens from the outside with a key, and from the inside – with a revolver. This principle of operation is also called a permanent key. The functional latch is convenient to use for young children and the elderly: it is easier to open or close the door from the inside.
The difference between a cylinder with a rod and a cylinder with a turntable is that in the first case, the cylinder mechanism is not visible from the inside of the door. And the turntable either replaces the entire pad of the lock, or is installed above it and is supplied separately. In the second case, the turntable comes with the cylinder and is an integral part of it.
The key of the cylinder lock is small and almost everywhere, except for the holder and the skirt, has grooves, protrusions, convex and concave patterns – a secret part.
The popularity of cylinder-type locks is explained by the following advantages:
-
if the key is lost, the lock will not need to be replaced: it is enough to install a new cylinder mechanism;
-
the key fits even in a small pocket;
-
a cylinder lock with a turntable is installed as an alternative to an additional valve.
If the buyer of the front door decided to install a cylinder lock, then he needs to choose a cylinder mechanism for the lock. But it must be taken into account: the lock and the cylinder work as one mechanism, only according to GOST they are certified separately. For this reason, we recommend:
-
choose products with a certificate of burglary resistance of locks according to GOST and with a large number of protective properties from the most common methods of burglary and opening;
-
the burglary resistance class of the cylinder must correspond to the class of the lock, moreover, be at least class 3.
We also recommend installing a protective armor plate on the cylinder mechanism to increase protection against mechanical influences.
You can learn more about the cylinder lock in the article “Guardian cylinder locks, protection against the main methods of opening, independent replacement of the secret. ”
Lever lock
The suvald castle got its name in honor of the suvalds. The levers are flat plates of various shapes, gathered together in one pile – the secret of the lever lock. The key to it has a long rod with a spatula, on which there is a secret part that unlocks the lock. He raises and lowers the levers in such a way as to scroll and push the shank of the lock bolt. This opens or closes the lever lock.
The advantages of this type of lock include the fact that:
-
the secret of the lock is located in the case itself, so no elements of the lock protrude from the door leaf, which improves its security;
-
lever lock has a simple and reliable mechanism, which is technologically easier to manufacture.
When choosing a lever lock for the front door, you should give preference to models of burglary resistance class 3 and 4 according to GOST: they will best cope with the onslaught of an intruder. Additionally, you can protect the castle:
You can learn about other ways to protect a lever lock in the article “Guardian lever locks, protection against hacking and opening, ways to recode individual models.”
Combination lock
This type of lock is called so because it contains 2 locks of the same or different type. It can have 2 levers or 2 cylinders, but the most reliable is a two-system combination of a lever and a cylinder.
The combined type does not mean that two locks work at the same time: they can be used separately.
We recommend choosing a model for a combination lock, where:
The replaceable secret of the Guardian lever lock is a rotor – a part of the locking mechanism for replacement and recoding. More information about the replaceable rotor can be found in the paragraph “Recoding Guardian Lever Locks”. This mechanism has a simple design and is also very reliable. However, we consider the most practical locks with recoding without changing the secret, such as the Guardian 75. 14 lock.
Electronics in locks
In addition to the usual cylinder and lever locks, modern technologies began to use electromechanical components in locks. Because of what they received the name “electromechanical locks”. Such models have an electronic control unit: when control commands are given to it, the electromechanical part of the lock is activated.
The range of “Guardian” presents several options for electromechanical locks according to the principle of operation:
-
hidden installation and electronically controlled locking,
-
electronically controlled deadbolt and latch lock,
-
smart lock with electronic control.
Electromechanical lock Guardian Smart 1.6 concealed installation
The Guardian Smart 1.6 lock belongs to the “invisible” locks that will come as a surprise to an intruder: it is impossible to determine their presence outwardly. After all, the lock body is mounted in the door block, moreover, there are no protruding parts on the front side of the door.
The Guardian Smart 1.6 set includes an electromechanical lock and a control unit with GSM technology. The electronic lock is controlled using the tone dialing of a mobile phone or smartphone, dialing without lifting the handset, SMS commands, radio key fobs. Programming takes place in the control unit and batteries of type A are placed there, providing power to the lock.
Electromechanical lock Guardian 72.16 Cyber with latch and deadbolt lock
The Guardian 72.16T Cyber + lock has an access controller, a power supply, a button for locking or unlocking the lock inside the room, and a key reader. Due to this, the lock has multi-level protection: it will not open when you try to break into the mechanical part. This will happen because the primary role in the Guardian 72.16T Cyber + lock is played by electronics, not mechanics.
The complete set of this lock allows you to block the bolts and the latch of the lock by pressing a button on the door panel or using an electric key. If desired, the heating of the lock and the power control of the unlock are configured. The lock can also be configured to remain locked even when there is no power.
Smart lock Samsung 728 with digital control
The Samsung Lock 728 is a standalone multifunction device.
This lock uses different types of keys: RF card, code entry and fingerprint. The latter makes the lock biometric – the unique biological features of its owner become the key to the lock.
The Samsung 728 has a number of useful features that will make your life easier:
-
Setting of additional functions such as heating, automatic locking, double locking mode, fire detection sensor.
-
The lock is connected to the “Smart Home” system, which will provide home automation and increase your comfort.
-
Built-in Bluetooth module that controls the lock through a special application on your smartphone. So you will receive notifications about visitors and view the history of events.
-
Battery powered so you don’t have to rely on electricity. Moreover, their charge level is enough for a year of operation, if there are no more than ten door openings per day.
Benefits of electromechanical locks
The use of electronics in locks has its advantages:
-
No need to carry heavy keys, because the key can be a smartphone, a special card, a remote control, a magnet or a key fob. But if you install a touch reader on the lock, then there is no need to carry the keys with you.
-
The presence of auxiliary functions: lock heating, auto-closing, blocking at a distance, visitor access control, fire alarm.
An electromechanical lock is one of the additional options that you can use when choosing doors according to individual requirements.
Cylinder replacement
To replace the cylinder mechanism, you need to know the cylinder size – this is the size of the cylinder itself. But it is divided into two often unequal halves, the size of which is called size A and size B. Therefore, the option of simply measuring the entire larva will not allow you to determine its size.
Having bought a cylinder of the right size, you can proceed with the replacement: unscrew and remove the mounting screw from the end of the door. If the type of mechanism is a key-rod, then it is necessary to remove the turntable. To do this, unscrew the fixing screw and remove the turntable from the stem. After inserting the key into the keyhole and gently scrolling it, you need to find a position where you can pull out the cylinder. The fact is that the cylinder mechanism has a rotary cam. In the normal position, it protrudes beyond the mechanism body. To replace the cylinder, you need to turn the key so that the cam plunges into the body of the cylinder mechanism and does not interfere with its movement during dismantling. After that, you can replace the larva with a new one. Then installation and installation is carried out in the reverse order.
However, we recommend that you contact a specialist to replace the cylinder mechanism:
-
he himself will select the required size;
-
will solve any difficulties that arose during the replacement of the cylinder;
-
will correctly replace the cylinder, which guarantees the operability of the lock.
Lever lock recoding Guardian
What to do if the keys to the lever lock are lost? Previously, the whole lock would have had to be changed. Now modern designs allow you to adjust the lock to a new key. This process is called recoding. But not all lever locks are designed for it. For this reason, when choosing a new door with a lever lock, you should give preference to a model with recoding. If your Guardian castle initially has such a function, then there are 2 options for recoding:
-
for lock models Guardian 71.
14 T and Guardian 75.14 T,
-
for models of locks with a rotor Guardian 21.14 T, Guardian 21.14 DT, Guardian 25.14 T, Guardian 25.14 DT.
Recoding locks Guardian 71.14 T and Guardian 75.14 T
Before proceeding with the conversion, it is important to know which series your lever key belongs to: A, B, C, D. If you have keys of series A, then the key of series B will not work for you. To determine the series, you need to look at the key: the letter A, B, C or D is written on it. Having acquired new keys that match the series of your lock, you can start recoding:
-
When the door is open, the old key is inserted into the keyhole and turned so that the bolts are halfway out. Now it can be pulled out.
-
Below the crossbars there is a special hole for a hex or recoded key – an L-shaped metal rod. It must be turned clockwise until a characteristic click is heard.
-
Then a new key is inserted into the keyhole and turned 90 ° towards the crossbars.
-
Turn the transcoding key back until it stops.
-
We turn the new key 90 ° away from the crossbars. The crossbars themselves must completely slide inside the castle.
This completes the conversion.
Recoding locks with rotor
The rotor is a round part, which is found only in the design of lever-type locks. For example, it is on models of locks of the Roror Lock and Maximum series. The kit for the lever lock includes 2 rotors. One mounting, which is installed in the castle initially, and the second will be the main one. The mounting rotor is needed to check the operation of the mechanism itself when installing the door. A plastic key is attached to it so that the consumer does not confuse it with the key from the main rotor. After checking the operability of the lever lock, the mounting rotor changes to the main one.
To replace one rotor with another, you need:
-
Insert the key into the keyhole and pull out the bolts two half turns.
-
Insert the mounting rod into the hole in the middle of the rotor and turn to the right.
-
Unscrew the three screws to pull out the old rotor. Then it can be removed. If necessary, the key rotates 30-45 ° in any direction.
-
Insert the mounting rod into the new rotor and turn it to the left, after which the new rotor is mounted in the lock. Also, if necessary, the key is turned 30-45 ° in any direction.
-
Screw three screws into the rotor and remove the old key from the lock.
This completes the conversion.
Deviators
In addition to the locks, you can choose deviators – this is a valve mechanism for two crossbars driven by the main lock. They are installed in pairs at the top and bottom of the door leaf from its end, similarly to the main lock.
Deviators are needed to block the door leaf in the corners: if the lock is in the middle, then an attacker may try to wring out the door leaf. With deviators, it will be more difficult for him to do this, because the deviator crossbars will hold the door leaf in the door frame. Another protection option would be to install locks at the maximum possible distance from each other or a system of vertical crossbars.
Ledgers
An auxiliary element for door protection is vertical crossbars, which are installed below and above the door leaf driven by the main lock.
Vertical bolts are an integral part of a vertical drive lock. Such locks are called crab – this is a locking system where vertical crossbars can be installed. The castle received a similar nickname because of the resemblance to the claws of a crab when a vertical drive is used with it. But it has another name – a three-way locking system.
Crab lock allows you to get a reliable locking mechanism. Thanks to him, breaking the door leaf will be as difficult as possible.
Night valve
Night valve is added at the request of the client. She locks the door tightly so that no one from outside can open it even with a key. But the night valve is usually used at night, hence its name.
In some locks, a night valve is provided by the design, so the buyer does not need to pay extra for it.
Selection guide for locks
When choosing a complete set of locks, we recommend:
-
choose locks of at least 3-4 burglary resistance classes. Classes 3 and 4 of burglary resistance guarantee that the lock will hold out under the pressure of a burglar from 10 to 30 minutes or more;
-
choose locks with two different locking systems or one combined. This complicates the opening of the door: you will have to separately crack different types of locks;
-
choose at least one lock that can be locked with a key on both sides of the door. If the attacker did not get inside through the door, then he will not be able to just leave the room: he will have to additionally open the lock from the inside;
-
it is desirable to install an armor plate on the cylinder mechanism.
Thanks to her, it will be difficult for a burglar to damage and knock out the cylinder in order to get inside the room;
-
if you choose a heavy lever lock, then it is better to stop at one that has the possibility of recoding: if you lose the keys, the usual lever lock will have to be changed entirely. The lock with recoding only needs to be recoded for new keys;
-
take into account when choosing thick doors that lever locks will be with long keys. The length of the key increases due to the thick web, which makes it more difficult to carry in your pocket or bag.
Noise, cold, draft and odor protection
The door protects not only from intruders, but also protects from noise, cold, drafts and odors. To ensure the necessary protection indicators, we use heat and sound insulating materials with seals in the construction of doors.
Noise reduction index
Noises are structural and sound. The first appear from mechanical impact on the surface: for example, the sound of steps on the floor or the sound of closing elevator doors. Sound noise is transmitted through the air.
GOST entrance doors regulates protection from sound noise like conversations outside the door, loud laughter, music and the like.
In terms of sound insulation, GOST 31173-2016 divides doors into 3 classes, among which class 1 is considered the highest. Such a door reduces the sound volume by 32 dB or more. It is doors with sound insulation of 32 dB or more that you should choose to protect your home from sound noise: they are able to drown out loud sounds to comfortable values.
Doors Guardian have performance up to 47 dB. This is affected by:
-
thickness of the door leaf and door frame,
-
door insulating material,
-
thickness of thermal insulation material,
-
tightness of the door porch,
-
door trim thickness
-
tightness of the installation of the door block in the doorway,
-
decorative door trim.
When choosing soundproof doors, keep in mind that their soundproofing performance may be higher than that of the walls and partitions of your home. This is especially true for the apartments of the old housing stock. In this case, it may not give the expected effect.
Door leaf thickness and door frame depth
According to the thickness of the leaf and the depth of the door frame, the Guardian doors can be divided into simple and thickened ones. The first ones have a door leaf thickness from 60 mm to 80 mm, and the second ones – from 80 mm and more than 120 mm, taking into account the decorative finish.
Increasing heat and sound insulation requires an increase in the amount of insulating material, which makes the door structure thicker. Decorative panels also make the doors thicker, which adds to the protection against cold, loud noises and burglary. Such doors are especially good for landings where it is noisy. They are often used for apartments on the first and last floors, which are often cold.
The advantages and disadvantages of thick doors are also covered in the article “How thick should a door be. Thick entrance doors, pros and cons.
Ordinary doors are suitable for those who do not have excessive requirements for thermal insulation and sound insulation. According to these indicators, ordinary doors comply with the requirements of GOST and SNiP and, thus, provide comfort in your home.
Insulating materials
Guardian doors cannot do without insulating material: they are always filled in the door leaf and optionally in the door frame. Heat and sound insulation mainly depends on the quality of the material. In addition, it must retain its original properties well.
The Guardian doors use mineral wool boards, polyurethane foam and honeycomb core.
In most running models of doors to an apartment, mineral wool is used, while polyurethane foam and honeycomb filler are used in low-budget doors.
Mineral wool boards have a number of advantages, thanks to which they are often used for doors to an apartment:
-
Environmental friendliness.
Mineral wool is harmless to health, and its disposal does not harm the environment.
-
Low thermal conductivity. Heat is retained in the pores, making mineral wool an excellent insulator.
-
Fire resistance. This material is able to ensure the fire safety of the door structure.
For simple apartment doors, we also use polyurethane foam or polyurethane foam. It protects well from cold and noise. Polyurethane foam is poured into the door tightly and glues its parts together. PPU hardens in the door leaf, which gives it rigidity without the use of additional amplifiers. This simplifies the design: instead of two sheets of metal, low-cost doors use one sheet of metal and a decorative panel.
Honeycomb filler consists of glued and pressed cardboard, in the form of honeycombs. Its low technical properties stem from the characteristics of the cardboard itself.
Honeycomb filler performs more of a utilitarian function, so it is used for low-budget doors.
If you want to get a deeper understanding of heat-insulating materials and methods of door insulation, you can read the article “Insulation methods and types of fillers for Guardian metal entrance doors”.
Tightness and number of sealing loops
With the help of a sealant, the door leaf and the frame fit snugly together, forming a sealed vestibule. Due to this, the door does not let air in, and the room is warmer in winter and cooler in summer.
We consider it the best solution to choose doors to an apartment with two seals: one of them is the main one, and the second is an additional one. The main seal is more voluminous, and it is he who provides most of the tightness of the door, when the additional one performs only an auxiliary function.
The use of three or more seals is unjustified: they unnecessarily increase the elasticity of the door closing. Such conditions require softer seals, which negate the quantitative advantage.
Appearance
The use of decorative trim on the front door is not only a manifestation of the taste and status of its owner, but also a practical necessity.
Polymer-powder coating protects the metal surface from corrosion. Decorative finishing increases burglary resistance, thermal insulation and sound insulation of doors. The fittings not only complement the overall design of the door trim, but also fulfill their practical purpose.
Painting of metal surfaces
The metal surfaces of the Guardian doors are painted with a polymer-powder coating. It is represented in our assortment by several types: Shagreen, Antique, Moire, Anthracite and Silk.
A surface with one or another coating can resemble orange peel like Shagreen, antique pieces like Antique, or velvet like Moiré. In this connection, they differ in characteristics. So Shagreen and Antique are considered anti-vandal paints: they are resistant to mechanical damage, reliable, but do not differ in external attractiveness. Moire, Anthracite and Silk, on the contrary, look beautiful, while being capricious of scratches and damage. For example, Silk coating requires special care when dirty.
Our range contains only the most popular colors for a particular type of coating, but you can also choose a color from the RAL Classic catalog.
You will learn more tips on choosing a coating for metal doors in the article “Painting Guardian Metal Doors: Practical Tips for Choosing Coatings and Colors.”
Metal trim
One of the decorative elements of the door is a metal finish: it decorates the outer side of the door leaf and allows you to create various design solutions. Some of its models increase protection against hacking. Then why not combine beauty and usefulness by choosing a decorative finish that suits you?
For doors to the apartment, several types of metal finishes are used:
Aerodecor, airbrushing, photo printing is an artistic print on a metal surface or on a decorative panel, after which the artist himself finalizes the drawing. This creates a whole work of art. With this technology, you can print any pattern on your door.
One option to simply decorate the door is to finish with pressure on the canvas. It creates simple geometric patterns and allows you to design doors for minimalist, modern, classic styles.
Overhead decorative elements can serve not only as decoration, but also as additional protection for the castle. For example, when the metal trim elements overlap the lock pocket of the main lock, which increases the overall burglary resistance of the door.
Decorative panels
Decorative panels are the most popular of the options for decorating front doors. They also make the door leaf thicker, which increases the performance of the door. A variety of designs and materials allow you to choose a panel for any style of interior or exterior.
Decorative material options
For Guardian doors, decorative panels are made of MDF with laminated, veneered, painted and plastic coating. Also in our assortment there are panels from the massif of an oak.
MDF is a board made from compressed wood fibers. MDF is durable and unpretentious. It is easy to process and mill – this is a mechanical cutting of a pattern on the surface of the material. This technique allows you to create a variety of interesting designs.
Laminated MDF
Panels made of processed MDF are covered with PVC film. This type of coating allows you to imitate the appearance and texture of wood, concrete, marble, metal, leather and other decorative materials.
Veneered MDF
MDF board is covered with veneer on top.
Veneer is a sheet of wood several millimeters thick. The veneer happens:
Both types of veneer are made from wood, but differ in the way the wood pattern is created. With natural veneer, the natural pattern is obtained naturally and has a random character, when with fine line veneer it is created artificially.
In terms of price and practicality, veneer is more advantageous than solid natural finishes.
Painted MDF
The paint makes the panel monotonous, which allows the doors to be used in any interiors and exteriors. The extensive color palette also includes the RAL Classic catalogue.
MDF, plastic clad
On top of the MDF is covered with a layer of plastic. The range of “Guardian” has 2 finishes with plastic:
-
glossy finish,
-
“anti-claw”, which is less susceptible to scratches.
Solid oak
The array is made from solid wood.
The array attracts attention with its naturalness, high cost and woody pattern. The array, like natural veneer, has a pattern of natural origin.
Usually, for solid wood and veneer, tinting is used, which imitates the color of various types of wood. But you can achieve an additional visual effect using:
For more information on the use of wood in Guardian doors, see “Guardian Entrance Metal Doors with Solid Wood Finish”.
At the request of the buyer, we install decorative panels on both sides of the door.
Painted in RAL color
RAL is a color system used throughout the world in industry, architecture, design and trade.
We use paint from the RAL Classic catalog for metal surfaces and decorative panels. The RAL color palette for metal is presented in Shagreen and Moire coatings, and for panels – gloss.
RAL Classic is a color standard where each color has a four-digit digital index. This allows the same color to be interpreted equally by both the customer and the manufacturer.
For 2022, the RAL Classic palette includes 215 colors, which will allow you to choose RAL-painted doors for various interior styles.
Style selection
In a good way, the door should fit into the environment in which it is located. Modern design uses different styles: high-tech, baroque, classic, neoclassic, chalet, Norman, Alpine and others. Each style has its own philosophy, so everyone chooses what is closer to him. Among them are the most common: for example, loft and minimalism.
The loft was created in the last century by creative individuals who equipped their workshops in ruined factories, warehouses and factories. From those times, the loft was left with an attraction to brick walls, shabby ceilings and walls, an abundance of free space and natural light. This style does not tolerate artificial materials: everything should be natural. It combines simplicity and luxury, accuracy and negligence.
Help emphasize this color palette. White, gray and ocher are suitable for the main color. Contrasting is better to choose black, terracotta, green, dark orange, coffee.
For this style, door finishes made of natural materials, strict and concise design, where geometric shapes and patterns can be used, are suitable.
If the loft plays on the contrast of destruction and wealth, then this is alien to minimalism. Minimalism – fatigue from excess consumption and the desire to have fewer things, but multifunctional. Therefore, in the interior of minimalism there is a lot of free space and no unnecessary decor. A monochrome palette is chosen from white, gray, beige, brown, black and natural materials are used. For minimalism, a decorative panel with a simple design is suitable, for example, using a large mirror: it saves and expands space. Other advantages of doors with a mirror are covered in the article “The use of a mirror on the front door in the interior.”
For a more refined and sophisticated taste, there is a classic style and neoclassic. The classical style is a gravitation towards the baroque, rococo and classicism styles, while neoclassicism is a modern reading of them. So neoclassical is loyal to materials, when the classical style needs only natural ones. The classic style uses dark colors such as brown and burgundy because they are associated with luxury. Neoclassic prefers calm and light ones like beige, cream, white. Even in the classical style, heavy and massive objects are used, when neoclassical prefers lightness.
For a classic style, a panel made of natural wood and exquisite design is suitable, for neoclassicism – a sophisticated version with a calm color palette.
If you are looking for high-tech panels, then we have an article “How to choose a Guardian front door for a high-tech interior” that talks about it and gives tips for finding the right decorative finish.
When choosing a finish, it is worth considering what effect you are achieving. Doors for interior and exterior can be chosen to match the style of the overall environment or make them a bright accent. With their help, you can declare your social status or show restraint. All this is a matter of taste and preference.
Selection of fittings and colors
The external appearance of the door is complemented by fittings. It includes:
All these elements are important from a practical point of view, which is why you should not save on their quality.
The door handle for the front door should be more massive and more reliable than the handle for the interior door.
A compromise between convenience and visual appeal will be the rectangular models, which are popular with our customers. Their discreet design is suitable for minimalism, loft and neoclassicism.
Or you can choose a more intricate option than simple geometry – a wavy line. This model resembles traditional models of handles and can be chosen for the interior of a modern apartment.
The door handle sets the general tone for the rest of the fittings, so consider the compatibility of the shape of the lining and armor plates with it. For example, a square-shaped overlay is better suited for a square handle, and an oval one for a wavy one.
The choice of fittings is influenced not only by the shape of the door handle, pads on the lock, but also by color. Usually they try to select all of the same color. The Guardian catalog presents fittings in several colors:
-
chromium,
-
matt chrome,
-
black,
-
bronze,
-
brass.
Due to the prevalence of minimalism, black and matte chrome have become in demand. Bronze, chrome are also often used, and brass is rarely used. The golden color of brass stands out too much against the background of common minimalism and loft, but it is well suited for classic and neoclassical style.
We advise you to take into account the color and shape of the fittings so that they fit the style and model of the door you have chosen.
Trim and trim
Let the platbands and additional beams be decorative, they also have a more important role than purely aesthetic. This is an improvement in thermal insulation and sound insulation of entrance doors. All due to the fact that the platbands and extensions cover the mounting gap, including the wall in the doorway, thereby improving the insulation of the door block as a whole.
Platbands can be installed on both sides of the door, so they are selected separately for the color of the exterior and interior of the door. But not only the choice of color is at your disposal: they can be made from painted, veneered, laminated MDF, as well as from solid oak and pine. In addition, their lineup includes flat models, embossed ones, with plinth blocks and a cornice.
A variety of architraves and additional timber allows you to complement the design of entrance doors and enrich your interior and exterior.
You can learn about the ways of designing a doorway and get an idea about the range of Guardian door trims in the article “How to design a doorway”
Installation and assembly
Installation and installation is the final touch before using the door. And it is better to make it qualitatively in order to feel all the technical advantages of operation.
How a new door will be installed in your doorway depends not only on the size of the opening and the door block, but even on the evenness of the walls themselves. The subtleties that are needed for perfect installation and installation will be discussed in this section.
Door size and SNiP
There are certain requirements for the size of entrance doors. In the code of building codes and regulations (SNiP) 21-01-97, doors are classified as fire barriers. According to SNiP, a person is required to pass through the front door and a stretcher is required to climb through, so the clearance of the door for evacuation must be at least 1.9 meters high. For normal use, entrance doors manufactured in accordance with SNiP have a height of at least 1.9 m and a width of at least 0.8 m.
Guardian doors have a certain grid of sizes, which are called standard sizes. A grid of typical sizes is formed, more often with a step of 10 mm, mainly from the most popular door sizes installed in apartments. If you buy a standard size door, you do not need to pay extra for the size.
The size of the Guardian door is understood as the width and height of the door frame without taking into account the size of the flanging in width and top, where the flanging is the part of the metal trim protruding above the base of the door frame.
But this rule has exceptions and does not apply to all door models.
Guardian doors of individual production are made to the size of the doorway, so that the mounting gap is no more than 10 mm: this increases the burglary resistance and tightness of the door.
Ways of installing a door in a doorway
There are 3 ways to install doors in a doorway:
-
installation in the doorway from the outside,
-
in a recessed doorway,
-
mixed way.
Installation in the doorway from the outside is used when the thickness of the walls without plaster is more than 160 mm. In this case, the door block is installed on the same level with the doorway, and the platband covers the mounting gap and part of the wall.
Installation in a doorway with a recess is used for walls with a thickness of 210 mm without plaster. The door block deepens into the opening, which makes the use of the casing becomes impractical.
If the door cannot be installed in a simple way, then they turn to the mixed method. For example, when one of the sides of the door block is adjacent to the wall.
During installation, the existing plaster of the opening is removed completely up to the load-bearing wall. In order to avoid subsidence of the door frame during operation, the lower part of the door frame must be lined with mortar. If necessary, reinforced with additional mounting rods.
You can read more about how to properly install the door in the article “Installing an entrance metal door: basic steps and recommendations”
Door frame mounting methods
You can mount the door frame using mounting plates or through the door frame itself.
The first method implies that the door frame is attached to the doorway through the mounting plates. Why are they pre-fixed on the door frame.
In the second case, the installation takes place through the door frame.