Bath tub refinishing kits: The Best Tub Refinishing Kit Options of 2022
The Best Tub Refinishing Kit Options of 2022
BobVila.com and its partners may earn a commission if you purchase a product through one of our links.
Photo: istockphoto.com
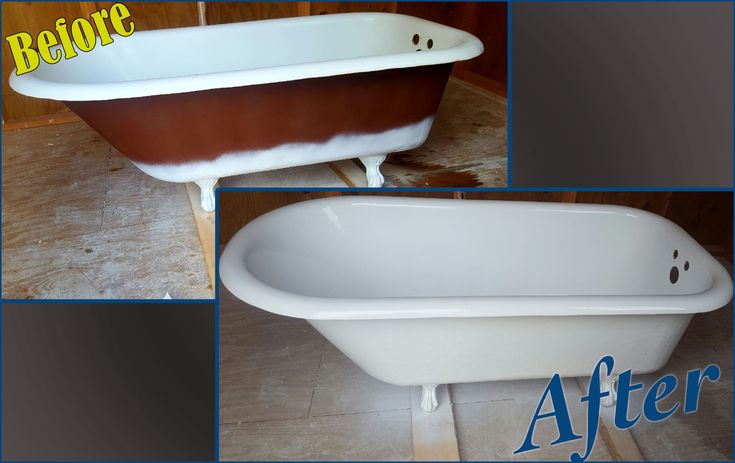
Though bathtubs are made from durable glazes, after years of being subjected to hard water, abrasive soaps, dirt and oils, and the occasional dropped shampoo bottle or shaving cream can, they can begin to accumulate stains and chips that turn the tub into a bathroom eyesore.
While the cost of replacing a tub may not be in the budget, there are DIY tub refinishing kits that can return the tub to a like-new appearance in just a few hours. These kits include strong epoxies and enamels that one can apply with a paintbrush, a roller, or an aerosol spray can to porcelain, metal, and fiberglass tubs.
This guide will explore what factors are important to consider when selecting the best tub refinishing kit while reviewing some of the top products on the market.
- BEST OVERALL: Ekopel 2K Bathtub Refinishing Kit
- RUNNER UP: Armoglaze Bath Refinishing Kit
- BEST VALUE: Homax Aerosol Tough as Tile Tub Refinishing Kit
- MOST USER-FRIENDLY: Magic Tub and Tile Refinishing Kit Spray on Aerosol
- BEST FOR REPAIRS: HT HOMETINKER Tub, Tile and Shower Repair Kit
- BEST NONSLIP: Bathworks DIY Bathtub & Tile RefinishingKit
Photo: depositphotos. com
What to Consider When Choosing the Best Tub Refinishing Kit
Most bathtub refinishing kits are compatible with the most common bathtub materials, but it’s also essential to consider how each product is applied, how much coverage they provide, and what supplies are included with the kit. Ahead, learn more about these and other important characteristics of tub refinishing kits.
Bathtub Material
Bathtub refinishing kits are versatile. Most are capable of working with the most common bathtub materials, including cast iron, porcelain over metal, fiberglass, and acrylic.
- Cast iron: Cast-iron tubs consist of a metal form coated with a thick layer of enamel. The enamel resists scratches and chips, making it one of the more durable tub types.
- Porcelain over metal: Porcelain over metal tubs consist of a thick coating of porcelain on steel, which gives it strength. Porcelain can chip easily, revealing the dark metal underneath it.
 Over time, the porcelain coating can also become stained and dull.
 - Fiberglass: Fiberglass is a cheaper plastic material that is more durable than porcelain and porcelain over metal tubs. While fiberglass will not chip like porcelain on metal tubs, it can crack and fade over time.
- Acrylic: Acrylic tubs are similar in look and feel to fiberglass and are relatively easy to repair. They consist of acrylic over supporting fiberglass sheets. Like fiberglass, they are susceptible to fading and cracking over time.
 Over time, the porcelain coating can also become stained and dull.
Color
White is the most common and popular option for bathtubs, although other colors are available to suit different styles. Many refinishers are tintable, allowing the user to change the color by adding acrylic paint. Some kits even include tinting dyes that allow the user to match the refinisher to the existing tub if it’s for a repair, or create a color of their choice if it’s a total refinish job. Most refinishers dry to a high-gloss smooth texture that mimics porcelain; however, some have a sand additive that gives the finish a slightly rough, nonslip texture.
Coverage and Thickness
Paying attention to the coverage the product offers is key to achieving good results. Since these products typically have strict drying times, there won’t be any leeway to run to the store for another kit should one run out mid-refinishing.
Most refinishing kits provide enough coverage to apply two coats to a standard-size bathtub.
If the tub has a significant amount of wear, it may need three coats to return it to its former glory, in which case it may be necessary to purchase additional resurfacer. Some larger kits include enough resurfaces to cover a bathtub and a tub surround.
Thickness also impacts coverage. Two-part pour-on enamels and epoxies are thicker than refinishers that come in an aerosol spray can. As such, a pour-on refinisher may only require a single coat to refinish the tub whereas a spray refinisher may require as many as three coats.
Kit Contents
Many refinishing kits include all the supplies needed to complete the refinishing project. Typical supplies included in these kits are tack rags, stir sticks, etching cleaners, foam rollers, sandpaper, and rubber gloves. That said, not all bathtub refinishers come fully equipped with supplies. Check to see what supplies the kit includes and what will need to be purchased separately to complete the job.
Ease of Application
Spray-on bathtub refinishers come in aerosol spray cans, while pour-on refinishers are packaged similarly to paint or epoxy. Refinishers that come in aerosol cans are easiest to apply as they require very few additional supplies. Once the tub has been prepped and taped off, simply spray the tub from a distance of about 12 inches using even back-and-forth strokes to get a uniform coating. Since spray refinishers go on in a thin coat, they typically require two or three applications for best results.
Pour-on refinishers are more labor intensive and require a bit more skill as the user must pour the material around the rim of the tub, then distribute it with a brush or a foam roller. While single-step refinishers are ready to use out of the can, two-step epoxy coatings require the user to mix the hardener and the resin just prior to application. The user must also work quickly when using a pour-on resurfacer to prevent the product from setting up before the application is done. Although pour-on resurfacers are more work, they typically produce better results and often require only a single coat.
Drying Time
While tub refinishing kits will dry to the touch rather quickly—some spray-on products dry in as little as 20 minutes—the user must typically wait longer before using the bathtub. The wait time before reopening the bath depends on the product and can be as little as 24 hours or as long as 3 days. Most manufacturers list the resurfacer’s total cure time on the packaging. Remember, it’s always best to err on the side of caution when deciding when to use the bath, as exposing a refinisher that hasn’t fully dried to water can ruin the new coating.
Eco-Friendliness
In order to create a durable coating that can withstand the rigors that a tub faces, most tub refinishing kits include strong solvents in their ingredients, many of which put off harsh fumes and high VOCs. With that in mind, it’s wise to ventilate the space while applying the resurfacer by setting up fans, turning on the bathroom fan, and opening windows. There are some products that are odorless during application and put off low VOCs, making them ideal for resurfacing projects in bathrooms that lack windows for ventilation.
Tips for Using a Tub Refinishing Kit
Refinishing a bathtub is a job most DIYers can handle, though there are a few tips and tricks to getting the best results and ensuring the new coating lasts many years. Properly preparing the tub, evenly applying each coat, and giving the new coating plenty of time to cure are all key to achieving good results.
- Don’t cut corners when prepping the tub. How long a tub refinishing kit lasts is directly related to how well the product adheres to the tub’s existing finish. So while cleaning and sanding the tub may seem tedious, it’s critical to creating a surface that will adhere well to the refinisher.
- Apply evenly. Even though most refinishers are self-leveling, it’s still important to get as even a coat as possible, whether using a brush, roller, or spray can, to prevent inconsistencies in the paint.
- Remove the tub drain and overflow faceplate. If possible, remove the tub drain and the faceplate covering the overflow. This will allow you to coat under these areas, eliminating a seam between the new coating and old coating around the drain and faceplate that could promote chipping or peeling.
- Let it cure. The sight of a refinished tub may make you anxious to use it, but subjecting the new finish to water too soon will shorten the life of the new glaze. Err on the side of caution and wait a few days for the glaze to harden.
 Err on the side of caution and wait a few days for the glaze to harden.
Our Top Picks
The tub refinishers on the list below are some of the best options for returning a tub to its former glory. They work with most types of tub materials, are easy to work with, and produce quality results.
Photo: amazon.com
Check Latest Price
The Ekopel 2K Bathtub Refinishing Kit comes with everything needed to complete a standard bathtub refinishing project. Compatible with the most common tub materials, including cast iron, steel, ceramic, and fiberglass, this kit is a great choice for most bathtub refinishing projects.
Unlike thinner spray options, this kit is applied by pouring the paint onto the tub from around the tub rim, then spreading and smoothing it with the included foam roller. The result is a thick first coating that won’t require additional coats.
The kit comes with all materials required for installation including a foam roller, scooper boxes, and covers. Ekopel is odorless and includes no harmful chemicals, making it one of the more environmentally friendly options on the market. Refinishing takes about 2 to 4 hours, and the refinisher cures in just 24 hours.
Product Specs
- Cure Time: 24 hours
- Material Compatibility: Cast iron, steel, ceramic, fiberglass
- Colors: White, biscuit, black, light grey, dark grey
Pros
- Multiple colors available
- Fast curing time
- Suitable for various types of tub
Cons
- Pricey
Photo: amazon.com
Check Latest Price
A one-coat application and compatibility with multiple materials make this enamel finishing kit a great choice for most bathtub refinishing products. Because it’s a pour-on product, it creates a much thicker coat than spray-on options, limiting the number of coats one needs to apply to just one. It also conveniently comes with the necessary tools for prepping the tub and applying the refinisher, eliminating the need to make a trip to the local home improvement store for supplies.
This is also one of the more versatile kits on the market as it is compatible with cast iron, metal, acrylic, and fiberglass. The epoxy is odorless, making it ideal for use in bathrooms that lack a window for ventilation. ArmoGlaze also takes some of the anxiety out of the refinishing process by offering step-by-step online tutorials.
Product Specs
- Cure Time: 36 hours
- Material Compatibility: Porcelain, enamel, acrylic, fiberglass, cast iron
- Color: White
Pros
- Simple pour-on application
- Clear instructions
- Takes fewer coats to complete
- Multiple tools provided
Cons
- Can scratch from heavy scrubbing
Photo: amazon. com
com
Check Latest Price
For those refinishing a tub in a rented apartment or who are on a tight budget, it may not make sense to spend $100 or more on a tub refinishing project. This refinisher from Homax is a great affordable option. For just a fraction of the price of other tub refinishers, users can restore a fiberglass, porcelain, ceramic tile, or acrylic tub.
Application is easy; simply prep the surface with the included steel wool and surface prep cleaner, then coat using the aerosol spray cans. Apply an additional coat after about an hour and reopen the bathtub for use in 48 hours. The kit includes all prep materials, protective gloves, and two 16-ounce cans of refinisher. Homax Tough as Tile comes in white and bisque.
Product Specs
- Cure time: 48 hours
- Material Compatibility: Porcelain, fiberglass, metal, ceramic
- Colors: Bisque, white
Pros
- Ideal for renters
- Easy spray application
- Affordable
Cons
- Can yellow over time when exposed to sunlight
Photo: amazon. com
com
Check Latest Price
With an aerosol spray can application, this is one of the easier to use options for refinishing a tub. Most of the heavy lifting happens when prepping the tub, which involves cleaning and sanding the surface, then taping off the faucet and drain. To apply, simply spray evenly on the tub surface and wait 30 minutes before applying additional coats. It dries to a hard, porcelain-like finish in about 24 hours.
This kit includes two cans, which is enough to cover 35 to 45 square feet—about the size of an average bathtub—with two coats. Keep in mind that the kit does not come with the required sandpaper for prepping the tub or protective gloves, so be sure to order those separately or pick them up from the local home improvement store.
Product Specs
- Cure Time: 24 hours
- Material Compatibility: Porcelain, acrylic, fiberglass, ceramic
- Color: White
Pros
- Fast curing time
- Affordable
- Easy-to-use spray can
- Enough for an average bathtub
Cons
- Sandpaper and gloves not included
Photo: amazon. com
com
Check Latest Price
Sometimes a full refinishing isn’t what the tub needs. For minor touch-ups such as fixing chips, gouges, or small worn areas in fiberglass or porcelain tubs, this kit from HOMETINKER might be the perfect fit.
This repair kit consists of a resin and a hardener that the user mixes just before applying. Once mixed, it becomes a thick paste that covers gouges and holes that can be sanded to a smooth finish that matches the tub’s existing finish once it dries. Included color gels allow the user to match a wide range of tub colors from white to almond to black.
In addition to the repair materials, this kit conveniently includes all accessories needed to complete the repair, including sandpaper, scraper, color gels for tinting, toothpicks, craft sticks, and disposable gloves.
Product Specs
- Cure Time: 24 hours
- Material Compatibility: Porcelain, fiberglass, alloy steel, ceramic
- Colors: White, almond, black, bone, bisque, biscuit, grey, cream, off white, beige
Pros
- Can match almost any color
- Includes full kit with tools and accessories
- Ideal for touch-up repairs
Cons
- Manual color matching can be difficult
- Can flake over time if applied incorrectly
Photo: amazon. com
com
Check Latest Price
High-gloss finishes are beautiful, but they can also be slippery, making them hazardous for certain users. While it still dries to a high gloss, Bathworks’ refinishing formula includes a sand additive that gives it a nonslip finish, making it a good option for those concerned about slipping in the shower.
The refinisher, which works with porcelain over metal, fiberglass, and even cultured marble, is a two-part resin that, once mixed, can be applied with a roller. One kit will cover about 60 square feet, which is enough for an average-size bathtub, and it includes a paint tray and roller, a tack rag, a stir stick, etching cleaner, sandpaper, and rubber gloves.
Product Specs
- Cure Time: 24 hours
- Material Compatibility: Porcelain, fiberglass, cultured marble, plastic
- Colors: Biscuit, almond, bone, white, black
Pros
- Nonslip finish for added safety
- Available in multiple colors
- Includes accessories
Cons
- Can be difficult for novice DIYers
Our Verdict
For a professional-looking bathtub you can do yourself, consider our top pick, the Ekopel bathtub refinishing kit, available in multiple colors to match your existing bathroom fittings. As a more budget-friendly solution for rental properties or quick fixes, the Homax tile and tub refinishing kit is also worth a look, suitable for most bathtub surfaces with a quick curing time.
How We Chose the Best Tub Refinishing Kits
When looking for the best tub refinishing kits on the market, we considered ease of application, drying time, and color matching as major aspects to find our top picks. We made sure to provide options for shoppers across a range of colors to match their existing bathroom fixtures and fittings. We even included a product that features color-matching gel for users to perfectly match a wide spectrum of colors. All of our recommendations also feature relatively quick curing times, from a single day up to 3 days.
Depending on user preference, we also made sure to feature a variety of application methods, from sprays to pour-on liquids to paints applied using a roller.
FAQs
If you’re wondering about how long a newly refinished tub will last or how to maintain a refinished bathtub, then read on for answers to these and other commonly asked questions about these products.
Q: How long will the coating on a refinished tub last?
Most refinishing jobs will last about 4 years, although that lifespan can be extended by properly maintaining the tub and being aware of what type of cleaners one uses on it.
Q: How long does it take to reglaze a bathtub?
Most reglazing can be completed in a couple of hours with the tub ready for service within a few days.
Q: Can a bathtub be refinished more than once?
Yes. Just make sure to properly prep the tub for refinishing by thoroughly cleaning and sanding the old finish. This will ensure a strong bond between the old surface and the new.
Q: How do I clean a refinished bathtub?
Avoid using abrasive cleaners and instead opt for a soft soap type of cleaner. This will help preserve the new finish and extend its life.
DIY Bathtub Refinishing Kits | Bathworks®
This DIY bathtub refinishing paint was created by the professionals and is used by professionals and do-it-yourselfers all over the country, in residential homes as well as Marriott, Sheraton, Homewood Suites, and more.
Unlike other bathtub refinishing paint kits, which are based on epoxy paints that easily peel and discolor, Bathworks® tub refinishing paint is a 2-part resin, and the resulting finish is a porcelain-like, hard, glossy surface that won’t easily, chip, peel, crack, or yellow.
Bathworks® DIY bathtub refinishing kits can also be purchased with the Non-Slip additive for extra safety. Easily applied to the finish. A permanent replacement to old bath mats that produce mold and bacteria.
If you have questions about refinishing your particular tub, shower, sink, or wall surround please take a look at our Frequently Asked Questions section.
We sell three types of kits:
- Standard Bathtub and Tile Refinishing Paint Only Kits (This kit is for the “do-it-yourselfer” that already has the necessary accessories – paint trays, rollers, gloves, sandpaper, etc… If you need those items, then you’ll want to look at our Premium Kits).
- Premium Bathtub and Tile Refinishing Kits (Complete with all necessary accessories).
- Premium Bathtub Refinishing Kits with Anti-Slip Coating (the non-skid includes everything that the Premium Kit includes, but also has an extra 3″ roller and a non-skid slip guard bottom application for increasing the safety of slippery tubs).

Shop Now
The Bathworks® Chip Repair Kit uses a two part “rigid speed filler,” and is safe for all cast iron, steel, plastic and fiberglass bath fixtures. Great for all bathtubs, tub/shower units, shower basins and tiles.
- The DIY Kit has enough material to complete 7 to 10 quarter size chips or gouges
- The filler dries in minutes and sands easily with water
- Wet/Dry Sandpaper included
Shop Now
The Bathworks® Touch-Up Paint repair kit is perfect for refinishing any small blemishes in bathtubs, tile, showers, and sinks.
- Used for all touch-ups of tubs that have been previously refinished with our DIY Bathtub Refinishing Kits
- Used for color over chip repairs that use our DIY Chip Repair Kit
Includes:
- 8 oz of Touch-up paint & 3 oz of Hardener
- Applicator
- Step-by-Step Instructions
Shop Now
The Bathworks® DIY Slip-Guard Kit is perfect for Anti-Slip Protection in ALL bathtubs, tub/shower units and basins. Kit includes everything needed to eliminate slippery bath fixtures.
- Dries in 24 hours
- Becomes permanent
- Cleans easy
- Very easy to apply
- Great for damaged, rusted or warn fixture bottoms
- Step-by-Step Instructions.
Shop Now
Bathworks® Bathtub & Tile Polishing and Cleaning Kit is formulated for all refinished and non-refinished bath fixtures.
- Protects and prolongs the beauty of newly refinished bath fixtures
- Helps restore the luster of old worn bath fixtures
- A great compliment to the Bathworks® DIY Bathtub & Tile Refinishing Kit
Kit Includes:
- Cleaner – Scratch remover
- Revitalizing cream
- Finishing gloss
- Brass & chrome polish
Shop Now
Preparation of the surface is the most important step in any refinishing project! With that in mind, we formulated the Bathworks® EZ Etch Kits
What is EZ Etch? EZ Etch is a mild etching cream that when applied gently etches porcelain, ceramic, and glass to remove the shine and promote ultimate bonding! EZ Etch in combination with any one of our DIY Refinishing Kits will maximize the life of your new coating.
The Bathworks® EZ Etch Kits are very simple and very easy to use but are extremely effective and work every single time!
NOTE: If you’re planning to refinish fiberglass, plastic, or acrylic then EZ Etch is NOT for you. Sandpaper which is included in all of our Premium Refinishing Kits is all you’ll need!
Kit Includes:
One Tub Kit
- 16 oz. EZ Etch
- Four (4) Latex Gloves
- Scrubby Pad
- Step by Step Instructions
Two Tub Kit
- EZ Etch (1) Quart
- Four (4) Latex Gloves
- Scrubby Pad
- Step by Step Instructions
Shop Now
Here at the Bathworks® Do-It-Yourself store we’re all about making it easier for YOU! We realize that caulking your bathtub or really caulking anything is a messy, challenging project to say the least. So here you go, we did it, we made a caulk & gun in one that ANYONE can use! And when we say ANYONE, we mean ANYONE! Check this out…
Caulk Made Simple! Bathworks Pro® Caulk & Gun In One™ completely eliminates the need for a caulking gun along with removing the hassle, and the mess of old tradtional style caulking. Caulk comfortably, confidently and quickly while using Bathworks Pro® top of the line, 100% white multipurpose silicone.
Be sure to watch our video!
Shop Now
Bathtub Refinishing Kits | Top Rated Countertop & Tile Reglazing Supplies and Equipment from TopKote
Trusted Product Solutions You Can Count On
View All
Bathtub and Tile Reglazing Coatings & Supplies
Countertop Reglazing Coatings
Cabinet Refinishing Paint and Supplies
Reglazing Fume Exhaust Systems
Reglazing Preparation Materials and Tools
Refinishing Kits and Bundles
Recent Reviews
5 of 5 stars
Fuji Q5 T70 System
Loved it
by Steven Smith
First time use and finish was outstanding! I have never used a spray gun before. No runs, drips finish was great
5 of 5 stars
280 Low VOC Glaze
Outstanding Results!
by James Curtis
After using one product for 5 years I was a little skeptical about trying something new. Top kote was generous and believed in their product so much that they sent me a sample to try. So I sprayed a ceramic toilet tank lid, I let it sit for 24 hours and sanded a small spot ( about the size of a quarter) all the way through the paint and let it sit in my yard for 6 months. Checked it and couldn’t believe it. There was absolutely no peeling whatsoever! So it’s still sitting in the yard over a year later been rained on in the hot and cold and it still hasn’t peeled! This is a great product!
Latest Posts
Multispec Application In 8 Steps
Multispec is a great way to give your countertop, vanity, tile, or even floor a stone look without the stone cost and it’s a simple process.
Bathtub Refinishing Dust Control
Here are just a few things you can do to help prevent dust or debris from settling onto your freshly refinished bathtub.
Bathtub, Tile and Countertop Refinishing, Reglazing Supplies & Training
Topkote™ Products, the leading manufacturer of bathtub, tile, and countertop refinishing paints and coatings, was developed from the ground up. Our bathtub and tile refinishing system is uniquely designed, easy to learn and gets the job done quicker. Topkote Products feature premium acrylic urethane bathtub refinishing supplies and paints, used for residential, commercial and industrial applications.
Ready to start your bathtub refinishing company?
Become your own boss with our start-up kit for tub and tile reglazing businesses. The kit includes everything you need for your first 10-12 projects.
Get Your Kit Today
Be The Next TOPKOTE Pro
Want to become a certified bathtub, countertop and tile refinishing expert? With our training program, you can get the hands-on training needed to be successful in the field. Learn from industry professionals with more than 37 years of combined experience and jump-start a new career.
Join Today
Find Your TOPKOTE Pro
Looking for someone to refinish your bathtub? Choose from our network of certified Topkote professionals.
Search Now
Best Tub and Tile Refinishing Kits for Easy Home Maintenance
(Many of the links in this article redirect to a specific reviewed product. Your purchase of these products through affiliate links helps to generate commission for Storables.com, at no extra cost. Learn more)
There’s nothing like a refreshing soak in the bathtub after a long day. Indeed, it’s a great way to soothe your tired muscles and ease any stress on your body. But if your tub is filled with scratches, cracks, stains, or even chipped glaze, it certainly can be hard to focus on the relaxing bit.
Fortunately, you can buy a tub and tile refinishing kit to revamp the piece of heaven in your bathroom. Check below to know how this cost-effective solution can rejuvenate the look of your bathtub, sinks, and showers all in one go.
Bathtubs are not necessities, but in interior design, they are the star of the bathroom. Aside from adding value to your home, bathtubs provide several health benefits that make it worth the investment. In fact, bathing in tubs is proven to help you sleep better, exfoliate the skin, and uplift your mood in ways showering can’t.
Depending on the material, bathtubs can last for 10 to 30 years, all thanks to their durable glazes. But just like other home furniture you have at home, bathtubs deteriorate over time. Harsh cleaners like strong chemicals and abrasive brushes are mostly the culprit. On the other hand, lack of support and uneven weight distribution can also lead to chips and cracks.
Since replacing a bathtub costs thousands of dollars, you can use a tub and tile refinishing kit instead. Think of it as cosmetic surgery to improve fine lines and wrinkles on one’s face. Using the best tub and tile refinishing kit can cover even the slightest imperfections on your tub. Scratches, discoloration, cracks, you name it!
The kit contains a coating that will be sprayed or painted onto your tub. It usually dries after 24 hours, but it is extensively advised to use it after 10 days. With the best tub and tile refinishing kit, you can make your bathtub look good as new at a low cost! Remember that you can only use this kit to reglaze your porcelain, ceramic, and fiberglass tubs. So, if you have a portable bathtub, consider buying a new one.
Tub and tile refinishing kits are usually versatile, but that doesn’t mean these kits apply to any bathtub material. Hence, knowing the material first could save you from expenses, costly repairs, and wasted time.
By far, cast iron tubs are the most durable bathtub material on the market. They’re constructed with molten steel coated with a thick enamel layer. One disadvantage of cast iron bathtubs is that they’re harder to refinish.
Next to cast iron is porcelain. While they don’t seem durable enough as bathtub material, they’re usually placed on top of steel to give weight to the body. They’re also commonly known as porcelain on metal, and you’d need a specific tile and tub refinishing kit to fix these up.
On the other hand, fiberglass is a cheap alternative to cast iron and porcelain on metal tubs. It’s a plastic material that’s more durable than the first two and is easier to repair. Though it will not chip quickly, it can still fade and crack over time.
If you have a colored bathtub at home, then it must be made of acrylic. This bathtub material looks similar to fiberglass because fiberglass sheets support it. Mainly, it consists of a soft plastic that can be colored to your needs.
Knowing the contents of the tub and tile refinishing kit is essential simply because you will have to do it all by yourself. Not all kits have the same contents; some may have additional brushes, foam rollers, gloves, sandpaper, or different coatings in general. If you’re not a handyman, or it’s your first time refinishing a bathtub, buying a kit with all the necessary equipment will help you get started.
Refinishing kits are something you can’t just simply lather on your tub. Paying attention to the coverage and thickness of the formula is the secret to getting good results. For instance, you wouldn’t want to be running to the store for another kit just because you run out mid-refinishing. Reglazing follows strict drying times, and your DIY project can turn into a disaster if that happens.
Luckily, most refinishing kits are enough to coat a standard-size bathtub two times. Not to mention that you can buy either an aerosol or pour-on refinisher. The former may require you to do two to three coats to achieve the proper thickness when covering imperfections. For pour-on refinishers, you can do a single coat since they’re more thick and dense. If your bathtub has seen better days, we advise using the pour-on refinishing kit.
Refinishing your tub sounds like a solid job, but reglazing is pretty much a straightforward process with the right tools, technique, and equipment. If a quick fix is what you need, then aerosol refinishers are your best bet. While a pour-on refinisher does the job better, it may require your patience and skill. But, they do produce better results.
While you’re at it, take a look at your drain covers and spot chipped corners in your bathroom. Since these areas are hard to reach, considering the ease of application can ease the job.
We know how unbearable it is to wait, especially when your “new” bathtub begging for you to use it. When it comes to drying time, you might want to use the shower first for two to three days. Most manufacturers put the total cure time on the packaging, which lasts about 24 hours. While it seems dry to the touch, it’s much better to take precautions. So, giving it much time, like a week, if you can, will prevent the glaze from getting ruined by water and bath products.
Take the expense out of bathtub improvement with the Ekopel Bathtub Refinishing Kit. You’d get extreme gloss and an odorless finish in just 24 hours with just one layer! It also comes with step-by-step demos so you can adequately reglaze your bathtub all by yourself.
Key Features
- Non-toxic
- 24-hour cure time
Specifications
- For cast iron, steel, ceramic, and fiberglass tubs
Pros
- Odorless
- Eco-friendly
- With foam roller and scooper
Cons
- Takes too long to dry
Say goodbye to chips and cracks on your bathtub thanks to this tub and tile refinishing kit from Bathworks. This package includes two premium kits (one with non-slip protection). Plus, it has everything you’ll need to refinish your tub and tiles, such as paint trays, sandpapers, etching cleaners, and gloves.
Key Features
- Flexible coating
- 24-hour dry time
- Highly durable resin
Specifications
- 42 fluid ounces
- Includes two premium kits with non-slip protection
Pros
- 4-piece set
- Available in 5 different colors
- With directions on safety care tips
Cons
- Poor quality control
Make bathroom fixtures look new again with this AquaFinish Tile and Tub Refinishing Kit from Amazon. Since it’s a pour-on, the coating will be much thicker than aerosol refinishers, giving back your bathtub’s pristine condition. Ensure proper ventilation within the area and reapply another coat or two if needed.
Key Features
- Durable
- 24-hour dry time
Specifications
- 32 fluid ounces
Pros
- Enough for 2 to 3 coats
- With foam roller, tray, brush, sandpaper, and tack rag
Cons
- Poor roller quality
Hiring a bathtub refinisher can cost you almost $500. If you want to DIY your bathtub renovation, you might as well try this refinishing kit. Another product manufactured by Bathworks, this kit is the perfect option to make your bathroom fixtures durable and long-lasting. Use it on your bathtub, shower, sink, or walls, and expect great results after 24 hours.
Key Features
- Durable
- Flexible coating
- 24-hour dry time
Specifications
- Coats an average tub of 60 sq. ft.
- For porcelain, fiberglass, cultured marble, and other bathroom surfaces
Pros
- Super high gloss resin finish
- With etching cleaner, sandpaper, tack rag, tray, and foam brush
Cons
- Poor quality control
Transform your worn-out, stained bathtub or dated ceramic tile into an easy-to-clean glossy white with the Ekopel Refinishing Kit. Like the previous one, you can use it on your shower, sink, or any spot that needs refurbishing. Moreover, this oil-free glaze never peels and dries quickly, so you can immediately use the tub for your daily bathing routine.
Key Features
- Non-toxic
- 24-hour cure time
Specifications
- 45.86 ounces
- For cast iron, steel, ceramic, and fiberglass tubs
Pros
- Non-toxic
- Eco-friendly
- With foam roller and scooper
Cons
- Not easy to use and apply
Looking for an all-in-one tub and tile refinishing kit? You can end your hunt because the NADAMOO Tub and Tile Refinishing Kit has everything for you. The kit provides you with all the essential items like pre-taped film, tape, sandpaper, brush, roller, and gloves, so there’s no unnecessary stress when refinishing your bathroom fixtures. And since it’s water-based, it doesn’t smell strong and is less likely to turn yellow over time than its oil-based counterparts.
Key Features
- 24-hour cure time
- High film flexibility
- Water-based formula
Specifications
- 35 fluid ounces
- For ceramic, porcelain, acrylic, fiberglass, and enamel
Pros
- Easy to apply
- Semi-matte finish
- With masking tape, masking film, brush, roller, and sandpaper
Cons
- Slightly expensive
- Should wait 7 days before running hot baths
After years of using abrasive soaps, your bathtub may need a makeover to regain its charm. Luckily, you can spray it with the Magic Tub and Tile Refinishing Kit. This spray-on refinisher is specially formulated to withstand moisture and hide stubborn grout stains and cracks like a breeze. Aside from that, it sprays 360° so you can effortlessly reach hard-to-reach areas for a spotless finish.
Key Features
- Easy spray-on application
- High-gloss porcelain-like finish
Specifications
- 12 ounces per pack
- For ceramic, porcelain, fiberglass, enamel-coated cast iron and acrylic tile, tubs or sinks
Pros
- No mixing required
- With step-by-step guide
- Provides 2 coats for a 22-square-foot tub
Cons
- Has a strong odor
Recaulking your tub and wall is no longer a pain, thanks to this repair kit from Ankita Store. This has everything you need for minor chip repairs in sinks, tubs, and toilets. Best of all, it comes with color gels and a matching color card to accurately match your ideal or preferred color. Indeed, this is your ultimate chip fix, so you won’t need to replace an already pricey bathtub.
Key Features
- Durable
- Non-toxic
- Waterproof
Specifications
- For porcelain, fiberglass, alloy steel, ceramic
Pros
- Odorless
- Easy to use
- Strong adhesion
Cons
- No color mixing instructions
- Hard to achieve deeper colors
The Homax Tough as Tile Tub Kit might be the next best thing for your home repair needs. It restores outdated, stained, or discolored bathtubs, tiles, or sinks in bathrooms. And since it’s a spray-on, it eliminates the time, hassle, and expense of a complete bathroom remodel.
Key Features
- Durable
- Easy spray-on application
Specifications
- 32 ounces
- For tubs, sinks, and tiles
Pros
- High-gloss porcelain finish
- Covers 1 standard tub or 2 bathroom sinks
- With gloves, steel wool, and surface prep cleaner
Cons
- Only available in white
- Not suitable for places exposed to high temperatures
Manufactured by the Portivo Store, this tile and tub refinishing kit produces professional results without exceeding your budget. It can conceal every chip, scratch, and dent on your tub and sinks while maintaining a hard-wearing coat that withstands water and temperature. Above all, it includes the accessories you need to complete the job and a video tutorial to help you along the way.
Key Features
- Durable
- Non-toxic
Specifications
- 5.6 ounces
- For fiberglass and porcelain
Pros
- Easy to apply
- Accessories included
- With step-by-step video
Cons
- Poor quality control
Refinishing a bathtub or any other bathroom fixture may seem a lot of work. But think of it as doing you and your tub a favor. A tub and tile refinishing kit can restore your bathroom’s former glory in a few hours and at a fair price. Don’t forget to check this list when you’re ready to do some DIY bathtub repair.
On a side note, have you ever realized the difference between porcelain and ceramic tiles? Know which of the two is the best for your needs by clicking the link to the article.
How to Refinish a Bathtub With a DIY Kit
By
Lee Wallender
Lee Wallender
Lee has over two decades of hands-on experience remodeling, fixing, and improving homes, and has been providing home improvement advice for over 12 years.
Learn more about The Spruce’s
Editorial Process
Updated on 05/26/22
The Spruce / Liz Moskowitz
Project Overview
When a bathtub has seen better days, there are several approaches you can take. The best option is to replace the tub, but this is both complicated and pricey. While a very basic 5-foot enameled steel tub might cost less than $150 when you add the cost of a contractor, demolition, removal, landfill fees, tilers, and a plumber, the total cost of the job skyrockets. And bathtub replacement is one of the more complicated DIY projects—so complicated that most people are well-advised not to tackle it.
Another option is to reline the tub with an acrylic liner, but this, too, can be a pricey option. Lining a tub costs nearly as much as bathtub replacement, and it is not a project homeowners can tackle themselves.
The third option—refinishing the tub’s surface—is the least expensive approach and the only one that DIYers can readily tackle. Refinishing essentially involves painting on a very hard epoxy coating over the existing enamel, acrylic, or fiberglass tub surface. There are professional services that specialize in this kind of refinishing, but there are also DIY kits that produce fairly good results. You can buy DIY kits that include epoxy resin with hardener, etching powder, latex gloves, steel wool, brush, cleaning solution, cleaner/thinner, and safety goggles. The epoxy coating comes in white but it can be tinted (tint not included).
Before You Begin
Whether you have your tub refinished by professionals or recoat it yourself, all the work is done on-site. Surrounding materials, including tile, flooring, and all of the other elements, are masked off and left in place as the resin coating is applied. This is one of the main benefits of refinishing, and while it does not provide the same like-new results as installing a new tub or liner, refinishing can be a good choice as a stop-gap measure, or for a bathroom that doesn’t see everyday use.
Be aware, however, that DIY refinishing kits do not produce the same results as refinishing jobs performed by professionals, nor is a DIY job likely to be as long-lasting. The key to a good DIY result is very thorough cleaning and preparation of the surfaces, and following the manufacturer’s instructions exactly. To protect the finish, do not clean a recoated tub with any abrasive cleaners.
Safety Considerations
Modern bathtub refinishing kits are often sold as “odorless” products that need no ventilation, but this is an overly optimistic view. The best refinishing products are two-part mixtures that involve mixing an epoxy resin with a chemical hardener, a process that inevitably produces fumes. Make sure to ventilate the space thoroughly and run the bathroom exhaust fan while working. Follow the manufacturer’s recommendations regarding the use of breathing protection or a respirator—especially during the preparation stage when you are sanding the existing tub.
The process described below summarizes the steps required for most two-part bathtub refinishing products, but make sure to read the manufacturer’s directions carefully for specific details on how the product should be used.
Need more help? Talk to a bathtub expert
Our partners can help you compare quotes from top-rated professionals near you
Get a Quote
Advertiser Disclosure
The offers that appear in this table are from partnerships from which The Spruce receives compensation.
Equipment / Tools
- Screwdriver
- Putty knife
- Abrasive pad
- Rubber gloves
- Breathing protection
- Bucket
- Sponge
- Bathtub refinishing kit
- Paint roller with roller cover
- Sponge paintbrush
- Roller tray
- Caulk gun
Materials
- Chemical caulk remover
- Bleach
- Abrasive cleanser
- Drop cloth
- Painter’s tape
- #400 to #600 wet/dry sandpaper
- Paper towels
- Tack cloth
- Tub-and-tile caulk
Click Play to Learn How to Refinish a Bathtub
-
Remove Hardware
Where possible, remove escutcheons and cover plates from plumbing fixtures.
Bathtub spouts can be temporarily unscrewed and removed during refinishing. Make sure to clean away any dirt or caulk residue from around openings in the bathtub, using a putty knife.
The Spruce / Liz Moskowitz
-
Clean the Bathtub
Clean the tub thoroughly and remove all caulking from the joints around the tub. If necessary, use a chemical caulk remover to remove all traces of caulk from the surfaces.
Use bleach to clean away any mildew stains, then scrub the entire thoroughly with an abrasive cleanser, or with LimeAway applied with an abrasive pad. Rinse thoroughly with clear water.
The Spruce / Liz Moskowitz
-
Mask Off Areas Around the Tub
Use drop cloths and painter’s tape to mask off floors and walls around the tub. The epoxy coating will be hard to remove, so make sure to guard against drops and spills.
The Spruce / Liz Moskowitz
-
Ventilate the Space
The etching, sanding, and coating operation will create dust and fumes.
In addition to the fumes of the epoxy product, simple sanding can create fiberglass dust that shouldn’t be inhaled. Before beginning work, open windows, turn on the exhaust fan, or set up portable fans to improve ventilation in the space. It’s also a good idea to wear breathing protection or whatever respiratory equipment is recommended by the product manufacturer.
The Spruce / LetÃcia Almeida
-
Etch the Tub Surfaces
If the kit includes an etching powder, apply it to the surface of the tub with water and scrub the surfaces with an abrasive pad. The etching powder helps dull the finish so the new coating will adhere. Rinse the tub thoroughly with clear water.
The Spruce / Liz Moskowitz
-
Sand the Tub
Sand the tub with #400 or #600 with wet/dry sandpaper while it is still wet to further roughen the surfaces. Make sure to roughen all corners and edges of the tub; this is a critical step to ensure the epoxy coating will adhere without later peeling.
Thorough sanding is especially important if the kit did not include an etching powder. Rinse the tub and let it dry.
The Spruce / Liz Moskowitz
-
Wipe Down the Bathtub
Wipe the tub with paper towels to make sure it is completely dry, then wipe with a tack cloth to remove any dust or paper residue.
The Spruce / Liz Moskowitz
-
Prime the Surfaces
If the kit includes a primer, apply it to the bathtub surfaces. Apply the primer with a roller and foam brush, and let it dry as directed.
Some refinishers are self-priming and do not require a separate prime coat. Do not prime bathtub surfaces with ordinary commercial paint primer; use only the primer that is included with the kit you buy.
Tip
To avoid leaving lint on the bathtub surfaces, clean the roller cover before applying primer or epoxy coating. A good way to do this is by using sticky tape to pull away any loose lint from the roller cover.
The Spruce / Liz Moskowitz
-
Mix the Epoxy Coating
Blend the hardener/catalyst into the epoxy resin, as directed by the label instructions. You will now need to work fairly steadily, as epoxy coatings gradually begin to harden once they are mixed. The product label will usually tell you how much working time (“open time”) you have, but you should be prepared to coat the entire tub in one working session.
The Spruce / Liz Moskowitz
-
Apply the Coating
Begin applying the coating to the sides of the tub with a roller. Alternate between vertical and horizontal strokes to prevent drips and roller ridges. Move on to the tub deck (horizontal surfaces), then roll the tub bottom. Finish the edges as needed with a sponge brush.
Apply a second coat of coating as directed by the label instructions. Some products require immediately recoating, while others may suggest one or two hours of drying time before applying the second coating.
Let the final coat dry and cure, as directed by the label. Some products require a full two days of cure time; with others, it may be as long as three days. Keep the area well ventilated for at least the first day of curing.
The Spruce / Liz Moskowitz
-
Caulk and Reinstall Hardware
Seal the tub’s joints with fresh silicone caulk and let it cure overnight. Reinstall the faucet hardware. Your refinished bathtub is now ready to use.
The Spruce / Liz Moskowitz
 Bathtub spouts can be temporarily unscrewed and removed during refinishing. Make sure to clean away any dirt or caulk residue from around openings in the bathtub, using a putty knife.
 In addition to the fumes of the epoxy product, simple sanding can create fiberglass dust that shouldn’t be inhaled. Before beginning work, open windows, turn on the exhaust fan, or set up portable fans to improve ventilation in the space. It’s also a good idea to wear breathing protection or whatever respiratory equipment is recommended by the product manufacturer.


When to Call a Professional
DIY refinishing can be a very good temporary solution to a worn, unattractive tub, but it’s rare for such refinish coating to last more than a few years before a new application is needed. Most people view DIY refinishing as a stop-gap measure until a full bathtub replacement is practical. If your refinished tub must have an extremely smooth and durable finish, it’s best to hire a professional service to perform the refinishing.
Professional tub refinishers often market their process as reglazing. The specific steps they use may differ somewhat, but the basic process is more or less standard. The methods used by professionals are similar to that of DIY kits, but the pros typically spend quite a bit of time repairing chips and cracks—often for an additional fee. Further, the etching process may be done with an acidic solution rather than an abrasive powder, and there is almost always a primer coat applied before the refinisher applies several coats of epoxy coating—usually with a sprayer rather than a roller and brush. The technician may then return a few days later to buff the surface to a shiny finish.
The result is a finish that is usually better than that achieved by DIYers. However, don’t expect any refinishing job—even by pros—to be as good as a new bathtub.
How to Refinish a Cast Iron Tub
When scouting out my current apartment, I was immediately drawn to the oversize bathtub — a real soaker from an era when bathing was savored and showers described rain. But my elation quickly ebbed once I eyed the rusty gully along its bottom, the work of a persistent leak that had eroded the white porcelain tub and exposed the tub’s cast-iron shell.
The building’s super promised to fix it — and fix it he did, by slapping on some latex paint that flaked off every time I settled in for a warm bath. The super’s methods were suspect, but he was essentially on the right track in trying to save the tub by recoating its surface.
“People very often rip out old tubs because they’re slightly blemished,” says Richard Trethewey, This Old House plumbing and heating expert. “But it’s not easy to find an affordable bathtub with the look and size of a period tub.”
Is a Bathtub Refinishing Worth It?
Each year refinishing shops across the country rescue thousands of tired old tubs and sinks by spraying on an acrylic urethane resin coating. Done correctly, either off-site in a shop or in place, sink or tub resurfacing is an effective and inexpensive solution for porcelain that is chipped, worn rough, or whose color has simply gone out of style.
How much does it cost to refinish a cast iron tub?
For an average cost of $350 to $500—a fraction of the $1,200 to $5,000 expense of a new cast-iron or steel tub installed—refinishers can make an antique fixture look brand new. “Professional refinishing can be a cost-efficient solution for that retro look,” Trethewey says.
That’s what Jackie Metropoulos chose to do, and hired Scott Ayers, a technician for the Miracle Method franchise in Ludlow, Massachusetts, to resurface the old cast-iron bathtub in the 1919 house she and her husband, Matt, own in Longmeadow, Mass. Their second-floor bathroom has a mix of old charm and new shine, but the mounted tub looks and feels weathered, with a green watermark under the faucet, several nasty dings on the lip, and a dull, gritty texture from years of improper cleaning.
Ayers, a former auto-body repairman, refinishes tubs using many of the same techniques he once used on fenders; he fills dings and scratches with putty before he shines the finished product with a power buffer. David Carmack
The Process
Clean and Remove
To prepare for refinishing, Ayers first carves away the caulk between the tub and the walls and floor with a putty knife, then removes the drain cover and masks off the faucets. The edge of the coating will be hidden behind the refitted fixtures and a new bead of caulk.
Next he cleans the tub to remove the impurities that can hinder adhesion of the new finish: He scrapes off soap scum with a razor blade, then wipes on an alkaline emulsifier commonly used to strip wax off floors. He follows with an acid-based citric cleanser that neutralizes the emulsifier, and after rinsing and drying the tub, rubs it clean with denatured alcohol.
Fill Dings and Scratches
Ayers, a former auto-body repairman, trowels fiberglass putty into deep chips and scratches, just as he would on a damaged car door. (Had the tub been severely etched by cleanings with bleach, he would have had to putty the entire inner surface. ) After the fiberglass hardens, he sands it with a coarse 36-grit paper to knock down high spots and an 80-grit paper to feather it out. He fills any pockmarks in the dried fiberglass with a polyester glazing putty, waits for it to set, then sands it in the same manner.
After wiping with a tack cloth, he rags on a bonding agent that enables the acrylic urethane enamel to adhere to the porcelain’s glasslike surface. Many refinishers first roughen up the tub’s surface by brushing on a solution of hydrofluoric acid before using a bonding agent. Critics of acid etching point out that the acid must be properly neutralized before being washed down the drain or it can damage pipes, as well as the environment. Miracle Method’s proprietary bonding agent eliminates the acid-etching step.
Before spraying, Ayers applies a blue bonding agent over the tub’s entire surface, a necessary step to ensure that the new finish won’t peel off the old porcelain.
Photo by David Carmack
Apply Three Coats of Acrylic Urethane Enamel
As the bonding agent on the Metropouloses’ tub sets, Ayers slips on a Tyvek suit and straps on an air mask connected to a ventilator so that he does not inhale paint vapor. Using a spray gun, he applies three coats of acrylic urethane enamel, letting each dry for 10 to 15 minutes. With the help of a heat lamp, the finish cures in about one hour; a wet sanding with 1,000-grit paper smooths bumps and rough patches.
Dry and Buff
After he dries off the surface with paper towels, he goes over it with a power buffer equipped with a foam pad and some auto compound to remove any scratches. Finally, he hand buffs the tub to a shiny luster with a soft cloth and polymer glaze car wax. Eight hours after arriving at the Metropouloses’ house, his work is done. They’ll be able to slip into a bath later that night.
Miracle Method, like many refinishing companies, offers a five-year warranty. But says Diane Robbins, co-owner of the franchise that resurfaced Jackie’s tub, with proper care and maintenance (nonabrasive and bleach-free cleaners only), a refinished cast-iron tub surface should last 15 to 20 years. And while that’s a few years short of the five decades you can expect from new porcelain, it sure beats buying a tub that will never be historically authentic.
Enveloped in a mist of paint, Scott Ayers sprays an acrylic urethane enamel over the bathtub’s damaged porcelain. He protects the bathroom with plastic and his lungs with an air-supplied respirator.David Carmack
Good As New
Refinishing may be the most practical way of restoring a built-in bathtub, but for those lucky enough to have a removable claw-foot tub or cast-iron sink, the dream has long been to give it a new finish that matches the hardness and durability of the old one.
Custom Ceramic Coatings, of Lenzburg, Illinois, is pioneering a method to re-porcelain tubs in a furnace, the same way these fixtures got their original glossy skin.
The process involves sandblasting off the old finish, then baking on a new enamel coating at 1,475 degrees Farenheit for about four hours. “It’s genuine porcelain enamel, the same glass coating used on bathtubs you buy in stores,” says owner Kara Kopplin.
Her company has already successfully restored steel sinks for about $250 to $650. (Clay fixtures, like toilets and pedestal sinks, can’t be refired.) The cost to treat a bathtub should range from $800 to $1,400; shipping will be extra.
Sets for self-restoration of bathtubs
Set for restoration of bathtubs “Basic”
Designed for complete coverage of the bathtub using the “pouring bath” method. Suitable for working with steel and cast iron bathtubs that do not have deep chips and cracks. The materials included in the kit require manual cleaning of the tub (without the use of power tools). The kit includes:
- Filtering half mask, type FFP1 — 1 pc
- Sandpaper, cloth-based, P46 grit (in sheets) – 2 pcs
- Sandpaper, cloth-based, grit P60 (in sheets) – 1pc
- Nitrile gloves — 1pc
- Rubber spatula, width 100mm – 1pc
- Degreaser, 50 ml – 1pc
- Construction knife with replaceable blades — 1pc
- Detailed instructions (4 pages) — 1pc
- Straight mini screwdriver – 1pc
- Masking tape, width 50mm, length 50 meters — 1pc
- White cotton rags (rags) — 4 pcs
- Garbage bag — 2 pcs
- Bulk acrylic for bathtubs – 1pc
- Hardener for poured acrylic – 1pc
- Plastic stick for mixing acrylic with hardener — 1pc
The table shows prices for sets (poured acrylic + all consumables + tools). Select the brand of acrylic and the length of your tub:
| Material | 150 cm | 170 cm |
|---|---|---|
| Plastol Titan | 3700 .- | 3900 .- |
| Plastol Premium | 3800 .- | 4000 .- |
| Fintex Eco 24 | 3400 .- | 3600 .- |
| Fintex Eco 16 | 3500 .- | 3700 .- |
To order a kit or get a consultation, click on the “buy” button and leave your phone number. We will call you back within 5 minutes
Buy
Buyers of enamel and liquid acrylic for bathtubs often ask us to tell you exactly what tools and consumables you need to purchase in order to do a quality job. There are also reverse situations, when people first restore, and only then ask why the coating turned out to be different from the one in the picture. We figure it out and it turns out that the matter is in an elementary thing – in an incorrectly selected rag for wiping the bath or too hard abrasive. Therefore, in order to insure you against annoying mistakes and simplify the restoration process, we have come up with and assembled sets for you.
- So, a complete set will make life easier – you will save yourself from going to the store for consumables (and sometimes more than one).
- The set will cost less than buying all the items separately – we buy them in bulk and do not overcharge. Many items in the hardware store are only sold in sets of several pieces. And in the set there are exactly as many as you need – you do not have to overpay and buy too much.
- You will save on the work of the master.
- Materials selected based on our experience. The set contains only high-quality, convenient and hassle-free consumables that we use ourselves. Everything from the wiping cloth to the type of abrasives and degreaser matters. The right materials will save you from many mistakes and pitfalls that you are not even aware of. As an example, here’s an article on why you shouldn’t use a cellulose rag when applying acrylic.
- Detailed instructions from practicing masters. Videos on YouTube and even instructions on the packaging of bulk acrylic are far from reality and show a simplified restoration method, many nuances are skipped or intentionally hidden. We have made a four-page instruction that takes into account all the nuances and describes in the most detailed way the process of preparing the surface of the bath and applying the acrylic (or enamel) coating.
- Online consultation. If questions arise before, during or after the restoration or you encounter a problem, our senior master will tell you the way out – just send a photo or video describing the essence of the problem to the VK group messages, mail or messenger (whatsapp, viber, telegram).

Types of sets and individual equipment
Every situation is different and we understand that one set will not fit all baths:
- Depending on whether you will clean the bath by hand or grinder, you will need different abrasives.
- Putty is useful for chips.
- If you have a cast iron bath you need one set of tools, if you have an acrylic bath you need another.
- If the tub has been covered with acrylic before, more sanding discs will be needed.
- If you want to close the gaps between the ledge and the wall, we will help you with this too by offering the best adhesive-sealant that does not turn yellow over time.

Therefore, before we sell a set, we want to make sure that it suits you. Submit a photo of your bathtub (general view to make it clear how the bathtub is located in the room) and any damage. And we will tell you which materials are best suited, give advice on how to work and complete an individual set specifically for your case.
Contents:
- Moisture resistant abrasives
- Lint-free rags
- Tools (knife, screwdriver, spatula)
- Protective equipment (respirator, gloves)
- Degreaser
- Cleaning (garbage bags, masking tape)
- Detailed instructions (4 pages)
- Detergent
- Acrylic+hardener
We remind you that the sets are made individually for your bath, so the list is approximate.
To complete the set, you can choose any bulk acrylic. If you are at a loss with the choice, we will suggest convenient and reliable options for application without experience.
How can I order a DIY bathtub restoration kit?
Leave your phone number by clicking on the buy button or call us. If you want to get an individual consultation on your bath, send a photo of the bath to [email protected] or whatsapp to 8 (952) 288-32-85 and we will contact you within five minutes.
Acrylic bath repair kit in Astrakhan: 786 products: free shipping, 52% discount [link]
Set surface polishing / for removal of shallow scratches, roughness, yellow spots on the surface of acrylic bathtubs / for repairs bathtubs .
IN STOREMore prices and similar items acrylic bath / for repair chips and cracks acrylic bath .
MORE DETAILSMore prices and similar products
Repair kit for acrylic bath “Samodelkin. ” Set for surface polishing / for removing light scratches, roughness, yellow spots on the surface of acrylic bathtubs / for bathroom and kitchens No. 1 Type: plumbing gasket, size:
In the store prices and similar goods
2 Page of 18
Remolets for vanni.
We can help you to choose the repair kit for your bathroom and close the problem without a deposit.
in order for the increase in the rank for the decrease in the rank for novelty
shp_1
Rubber spatula set
20 UAH
Wholesale and retail
 eyJwcm9kdWN0SWQiOjQ3MjUzMjYxMywiY2F0ZWdvcnlJZCI6MTMyNDAyMTksImNvbXBhbnlJZCI6NjAwNTk2LCJzb3VyY2UiOiJwcm9tOmNvbXBhbnlfc2l0ZSIsImlhdCI6MTY2Mzc0NDc5MC41MTg4Nzk3LCJwYWdlSWQiOiIxZDUzNTViMS00MjM5LTQwZWUtOWViMC0yMDlkNzc4ZWMxYTciLCJwb3ciOiJ2MiJ9.zve696gK0anJlO9HDftssB57LAHEf-uvEdLZZa1GtPc” data-advtracking-product-id=”472532613″ data-tg-chain=”{"view_type": "preview"}”>
Car putty NOVOL
100 UAH/set
Not available
Wholesale and retail
mojush_acr
Miyuchiy zasib for acrylic bathtubs “Simple and Easy”
220 UAH
Wholesale and retail
 eyJwcm9kdWN0SWQiOjgwMzA5OTYxMCwiY2F0ZWdvcnlJZCI6ODIxMDUsImNvbXBhbnlJZCI6NjAwNTk2LCJzb3VyY2UiOiJwcm9tOmNvbXBhbnlfc2l0ZSIsImlhdCI6MTY2Mzc0NDc5MC41MjAxNzA1LCJwYWdlSWQiOiIwNDRhZWRjMC1mYzY2LTQzOTUtOWFlMC03ZDA2NzdiMDM1MGIiLCJwb3ciOiJ2MiJ9.lBdhV1mK0sgXrzBowkQ90jeGhyyEk0ZsPBpKgbt7kjI” data-advtracking-product-id=”803099610″ data-tg-chain=”{"view_type": "preview"}”>
Miyuchiy zasіb for watching chrome-plated surfaces TM “Simple and Easy”
230 UAH
Not in reality
Wholesale and retail
Miyuchiy zasib for watching the bathrooms TM “Simply and Easy”
250 UAH
Not in the presence
Wholesale and retail
16243248
Are you new? We show you how to renovate your bath without pardons, basing on your 6th grade of restoration of baths.
Are you ready to become a master? Our expert will give guidance on how to deal with chips, cracks and cracks.
Self-recommended and recommended
You have a team of professional bath restoration professionals. For more than 6 years, we have been restoring baths, showers, swimming pools and we know that spot repairs easily and on a budget solve the problem of cracks and cracks.
We invite you to review repair kits for the installation of cracks on the surface of the bathtub and shower tray.
Did you get it? Find a trendy woman who can start repairing an old bathroom without much effort!
by our repair equipment for the repair of vanni can easily accelerate:
Demapy
Vidkoli
TriShchini
Darzhavi dance
For the pre -post of the nachy reptile of the vi, it is easy to vigor the accurate repairs with their own hands, not the marshmallow of Maistra.
Self cream bath enamel/acrylic We can supply all necessary tools and materials needed for bath work.
You can get complete bathroom renovation kits, as well as custom materials and tools you need. Choose the most suitable option for you, buy and restore.
When purchasing a repair kit for bathtubs, you take into account the detailed instructions for working with the material, as well as the final consultation of the manufacturer.
On our website you can see a detailed video about how the repair kit works.
RIDKY AKRISIL – Paul -Haughty divided MaterIAL, ROSTICALLY ON THE SUNSIA VINNIA OF ACRILEVTYA, ROBLIA BUNNED INTOCE, PISLYA RESENTARICA RESEMILA
Bath restoration set in Ukraine.
 Prices for a bathtub restoration kit at Prom.ua
Working
Plastall Classic liquid bulk acrylic 1.5 m with a bathtub restoration kit Original
In stock in Kyiv
Delivery across Ukraine
1 665 — 1 765 UAH
from 5 sellers
1 865 UAH
1 665 UAH
Buy
Official partner Plastall Ukraine
WorkingOl000 Cast acrylic Plastall Premium 1.5 m with a set for the restoration of bathtubs Original
In stock in Kyiv
Delivery across Ukraine
0003
1 815 UAH
Buy
Official partner Plastall Ukraine
works
Liquid acrylic Plastall Premium 1.7 m with a set for van restoration original
at Kyiv
Delivery in Ukraine
per 1 915 GRNN
from 6 sellers
2 115 UAH
1 915 UAH
Buy
Official partner of Plastall Ukraine
Working
Ol000 Liquid bulk acrylic Plastall Classic 1. 5 m with a set for the restoration of bathtubs Original 7trav
In stock
Delivery in Ukraine
1 865 UAH
1 665 UAH
manufacturers Asian 9Ol000 Trav” products from manufacturers in Ukraine, Europe and Asia
Works
Plastall Premium poured acrylic 1.5 m with a set for the restoration of bathtubs Original 7trav
In stock
Delivery in Ukraine
2 015 UAH
1 815 UAH
Buy
Marketplais “7 Herbs” products from manufacturers of Ukraine, Europe and Asia
Class Acrylic Plastall Premium 1.7 m with a set for the restoration of baths are original 7trav
at the ward
Delivery across Ukraine
2 115 UAH
1 915 UAH
Buy
Marketplace “7 Herbs” goods from manufacturers in Ukraine, Europe and Asia
Works
Original 7trav 9Ol000 set for restoration of bathtubs Original mebelime
In stock in Kyiv
Delivery across Ukraine
1 865 UAH
1 665 UAH
Buy
Online store “MebeLime” – furniture and household goods0003
operates
Acryl Acrylic Plastall Classic 1. 7 m with a set for restoration of vann Original Mebelime
In warehouse
Delivery in Ukraine
1,965 UAH
9000 1 765 UAH
Buy
online store “Mabeli” furniture and household goods by Dropshipping
Working
Plastall Premium poured acrylic 1.5 m with a set for the restoration of bathtubs Original mebelime
In stock in Kyiv
Delivery in Ukraine
2 015 UAH
1 815 UAH
Buy
online store “Meophelim” – furniture and household goods
works
Liquid acrylic Plastall Premium 1.7 m with a set for restoration of vanes Mebelime
warehouse in Kyiv
Delivery across Ukraine
2 115 UAH
1 915 UAH
Buy
Online store “MebeLime” – furniture and household goods by Dropshipping
Works
Liquid acrylics of bulk Plastall Titan 1.5 m with a set for restoration of baths Original Mebelime
in warehouse
Delivery in Ukraine
1 715 UAH
1 515 UAH
online store Meopheline – furniture and goods – furniture and goods – furniture and goods – furniture and goods – furniture and goods – furniture and goods for home by Dropshipping
See also
Working
Plastall Classic liquid poured acrylic 1. 5 m with a set for restoring bathtubs Original smile
In stock
Delivery in Ukraine
1 865 UAH
1 665 UAH
Buy
online store “Smile”
works
Plastall Classic 1.7 m on a set for the restoration of Baths Original Smile
at a warehouse in Kyiv
Delivery across Ukraine
UAH 1,965
UAH 1,765
Buy
Online store “Smile”
Working
Plastall Premium poured acrylic 1.5 m with a set for restoration of bathtubs Original smile 9Ol000 In stock
Delivery across Ukraine
2 115 UAH
1 915 UAH
Buy
Online store “Smile”
Works
Ol000
In stock
Delivery across Ukraine
UAH 1,864
UAH 1,664
Buy
Marketplace “Daymart” goods from manufacturers in Ukraine, Europe and Asia
Working 9Ol000 and Asia
In operation
Cast acrylic Plastall Premium 1. 5 m with a set for the restoration of bathtubs Original daymart
In stock
Delivery in Ukraine
2 014 UAH
1 814 UAH
Buy
Marketplais “Daymart” goods from manufacturers of Ukraine, Europe and Asia
work
liquid acrylic Plastall Premium 1.7 m with a set for the restoration of the vann Original Daymart
in warehouse
Delivery for Ukraine
Delivery for Ukraine 9009
2 114 UAH
1 914 UAH
Buy
Marketplace “Daymart” goods from manufacturers in Ukraine, Europe and Asia
Works
Plastall Titan Liquid Acrylic 1.5 m with a set of daymart bathtubs 9 original for restorationOl000 for bathroom renovations. Original.
In stock in Chernivtsi
Delivery across Ukraine
UAH 1,865
UAH 1,665
Buy
Shop “Na Dachu”
Working
Plastall Classic Liquid Acrylic 1. 7 m with bathtub restoration kit. Original.
in a warehouse in Chernivtsi
Delivery in Ukraine
1 965 UAH
1 765 UAH
Buy
Shop “
works
Acryl Plastall Premium 1.5 m with a set for restoration of Vanns. Original.
In stock in Chernivtsi
Delivery across Ukraine
UAH 2,015
UAH 1,815
Buy Now
Shop “Na Dachu”
In operation
Plastall Premium liquid acrylic 1.7 m with a set for the restoration of bathtubs. Original. Happened in the bath Repair is available – you need Cramer / Articles / San-Premium.ru
How can you easily and quickly restore the enamel on the bathtub after the appearance of a chip or scratch?
They don’t go to the enameller with their own bathroom
When people have problems with tooth enamel, people most often turn to dentists or to folk and other available means of restoration. In the case of enamel in a bathtub or other sanitary containers, the issue of finding a specialist can be more difficult to solve. Plumbers, it seems, have a slightly different specialization, and enamel artists have prices for services that may turn out to be more than “dental”. By the way, do not think that plumbers completely refuse to provide such services. Some, on the contrary, may even actively offer. However, in this article we will talk about freedom and independence from the need for someone else’s services with such a problem as chipped enamel in the bath.
Enamel chip repair and repair of scratches
It is, of course, possible to restore the broken integrity of the enamel coating on your own, quickly and easily. To do this, you may not have the appropriate tools and tools at hand, but you can choose them right now and purchase . The main thing is that there is a desire to restore the enamel and clear instructions on how to do it.
Both instructions and execution must be accurate
Manufacturers of such a level as the German company Cramer usually implicitly rely on compliance with a bilateral and again implicit agreement with the user of the product. In this case, its essence lies in the fact that the user of the bathtub enamel chip repair kit strictly follows the proposed instructions and recommendations. The manufacturer, on the other hand, takes on all the problems that are associated with maximizing the efficiency, practicality, environmental friendliness and reliability of the proposed means of solving the problem.
So, the basic rule for using Cramer’s bathtub chip repair can be: please do everything according to the attached instructions. The rest has already been done and provided by the manufacturer, and any unrest in this regard can be considered unnecessary.
For those who prefer conversational language
Some people are more accustomed to and easier to follow instructions in less precise but more familiar words and terms. Therefore, we offer here information on the use of the Cramer kit, presented with a minimum of technical and specialized terms. Of course, with illustrations and a video…
Before purchasing and repairing something, please note:
- Thin (hairy) long cracks, as well as cracks caused by stress (dent, for example), will most likely not be adequately repaired in the manner described below.
- Shiny, glossy surfaces may not (or may) fail to achieve a “discreet” patch. In other words, the manufacturer does not guarantee a “jewelry” level of restoration quality.
- The treated surface will need to be protected from any contact with water for 4 days.
- The materials offered in the repair kit only withstand temperatures up to 60°C. Do not pour boiling water on them, and indeed on plumbing in the bathroom.
- Once repaired, the repaired area must not be treated with concentrated or abrasive cleaners, alcohol-based polishes, disinfectants, or organic solvents. It is better not to wash the bath with such means at all. There are over 92,155 simple, eco-friendly, and cost-effective cleaning options .
 It is better not to wash the bath with such means at all. There are over 92,155 simple, eco-friendly, and cost-effective cleaning options .
 Required for repair (all of the following are included in the Cramer repair kit in question):
- two-piece filler,
- fixer,
- aerosol (paint),
- spatula,
- ceramic/enamel sandpaper.
Application:
- Clean the damaged area (including degreasing and rust removal) and dry as far as possible.
- Thoroughly mix the filler (in a jar) and the hardener (in a tube) from the repair kit and evenly spread the right amount of the mixture over the damaged area with a spatula. The ratio of filler and hardener by volume should be approximately in the same proportions in which the volumes of the jar and tube are related. If you add too much hardener from the tube, the mixture will become solid before it “merges” with the complex (at the micro level) surface of the damaged area.

- Let the mixture dry for 30 minutes.
- Using the supplied sandpaper, carefully polish and sand the surface. It is better to check the quality with your eyes closed, trying to feel with your finger the transition from the enamel to the former place of the chip (scratch). Grind until the transition is almost impossible to feel.
- Spray paint in several thin coats.
After 4 days, you can use the bath (sink, shower tray) or other enameled surface. The kit is designed for approximately seven medium-sized damage (approximately as in the photo). Unused residues, like a new set, must be stored at a temperature between +5°C and +30°C.
If you want to minimize the likelihood of problems with enamel chips and choose a decent bath, then it makes sense to consider very high-quality and hardy models from the German brand Kaldewei .
We wish you a clear understanding that it is no longer worth worrying, worrying and looking for expensive specialist services because of such trifles as enamel chips, and, moreover, scratches in the bath.
Technical information, videos and photos: Cramer
Author of the article: Valery Shtobbe
best ideas, selection of sets (+ photos) own labor. But for some reason, we do not have the feeling of comfort that we have been striving for. Oh yes, of course, we lack all sorts of little things that should always be at hand. Bathroom accessories needed.
It is precisely thanks to small devices and design elements that the very atmosphere of comfort is created, when everything is in its place, and there seems to be nothing superfluous. It is these small details that can breathe life into such a functional room and make it a real center of strength in your home: with their help, you can recharge your morning energy every day and relieve evening fatigue from your shoulders.
Contents of the article:
- Such useful little things
- Everything that we fix on the walls
- Sets for hygiene procedures
- Equip a bath with everything you need
- something specially for children
- Inventory for cleaning the premises
- TEXTIONS for bathroom
- something just beautiful
- Ideas for ideas for ideas for ideas incarnations of different styles
- Minimalism
- Marine
- Ethnic style
- Indian style
- Some useful tips
Such useful little things
If you think about it, besides plumbing fixtures and furniture, any bathroom is simply flooded with all sorts of interior details. How not to buy too much and, at the same time, not be left without something necessary?
To decide what we really need to buy, let’s divide all the accessories for your bathroom by type.
Bathroom accessories play an important role in the realization of design ideas: they are the finishing touch that creates comfort
Everything that we fix on the walls
This category of accessories includes all fixtures and structures that can be fixed on the walls of the room. These, of course, are all kinds of shelves, towel holders, mirrors and all sorts of hooks.
We don’t need extra shelves, so let’s take a critical look at the existing pieces of furniture. If there are enough of them to accommodate bath and cosmetic accessories, then you can get by with just one shelf, which will be located under the mirror.
It will contain the most up-to-date everyday cosmetics and hygiene items that we use every morning. If you need more shelves, then they can be arranged in tiers. So they will look better and do not take up much space.
The towel should ideally be positioned so that anyone who needs it can easily reach it.
Towel hangers or towel holders can be made in the form of rods, rings, hooks and half rings. Modern models are made using hinges, crossbars and other elements. Drying towels on them can be done with water flowing through pipes, or with hot air generated by electricity.
It is important that these hangers are convenient and easily accessible, so they are fixed not only on the walls, but also on the back of the door. Sometimes towels are hung on metal or plastic hooks. Please note that self-adhesive items may not support the weight of wet bath towels.
In addition to the role of a towel holder, a hanger can play another role: it can dry a damp item, which is also very important.
The choice of bathroom mirrors is a topic for a separate article. These interior items deserve special attention. Here we only note the fact that, in addition to the main mirror, which is usually placed above the washbasin, it would be wise to use a magnified model, which is indispensable for shaving and applying makeup.
Increased room humidity requires attention to the protection of the mirror from fogging.
Hygiene kits
Toothbrush and shaver cups, soap dishes, napkin holders, original dispensers filled with liquid soap, and other similar items are often sold in sets. It is preferable to buy them in a set, because in this case they have the same design and complement each other perfectly.
Hygiene kits can be extremely simple, or they can look like exquisite cutlery, which is very pleasant even just to touch
In addition, sets are usually cheaper than the same items purchased individually. It is especially convenient to purchase a set if the bathroom is made in a certain style. Otherwise, you will spend too much time looking for perfectly matching cups, soap dishes and dispensers.
Equipping the bath with everything you need
It only seems that, apart from a high-quality faucet, there is no need to equip the bath with anything. In fact, there are many useful little things for the bath, the convenience of which you will certainly appreciate as soon as you start using them:
- Handrails. It’s good to be young and easy to manage your own body. But with age, trying to get up from a “lying” position in a slippery bathroom can seem like a difficult exercise, and people are reluctant to resort to outside help in such a situation. It is in these cases that handrails become indispensable.
- Head restraints. Sometimes you have to take a bath for a certain amount of time. To make it more comfortable to sit during this procedure, use a polyurethane headrest. There are models with suction cups.
- Rugs. Here we are talking about special anti-slip mats with or without suction cups, which are used directly in bathrooms or showers.
 It’s good to be young and easy to manage your own body. But with age, trying to get up from a “lying” position in a slippery bathroom can seem like a difficult exercise, and people are reluctant to resort to outside help in such a situation. It is in these cases that handrails become indispensable.
 The handrails that you see above the bath, next to the washbasin, near the bidet and toilet bowl, make life very easy for the disabled and elderly residents
anti-slip mat
Something special for children
Water activities will be pleasant and desirable for children if some accessories look like toys. The kid will be pleased to use a washcloth in the form of a popular cartoon character.
The yellow rubber duck floating in the bathtub touches not only children, but also adults. Combs and brushes, soaps and shampoos “without tears” should evoke pleasant associations in children, then bathing will be a pleasure.
No need to think that all accessories for children are created for the sole purpose of entertainment. Here is an example of a great back holder that will prevent your child from accidentally being underwater
Cleaning supplies
These items are as relevant as bathroom accessories. Their list is quite extensive: buckets and basins, mops, containers for dirty laundry, brushes, gloves, wastebaskets, napkins and brushes.
If you manage to find such equipment in a set, it will be a good purchase. But even apart, these items are easy to pick up, for example, by color.
Regular cleaning items in the bathroom are a must, but they can look neat and even elegant
Much attention is paid to the choice of laundry basket. These containers are made from metal, plastic and wood, they are sewn from fabrics and made from newspaper tubes by weaving.
It’s not that difficult to get even an exclusive item for storing laundry before washing it. It is important to pay attention to the ventilation openings in the container in order to ensure that the linen has the necessary air access during the entire storage period.
Bathroom textiles
It would seem that what textiles are needed for a bathroom, in which, as a rule, there are no windows. But modern bathrooms, unlike their Khrushchev predecessors, are equipped with windows.
That’s why they often use curtains in the style in which the whole room is designed.
Well-chosen textiles can turn an ordinary bathroom into a real corner of good rest, in which you will be pleased to be at any time of the day.
Rugs, towels, bath curtains should also be made in the same style. All these accessories have important functions. For example, a rug next to the bathroom is needed so that you can dry off well before putting on your shoes and putting on your clothes.
As a rule, such a rug is made in two layers. The acrylic top layer is pleasantly soft on the feet, while the rubberized bottom layer allows the mat to not slip on the floor surface, protecting us from injury.
Towels must absorb moisture well and dry quickly. At the same time, it is towels that primarily attract the attention of both owners and visitors. They must be impeccable.
In order to choose a good towel, you should pay attention to the material from which it is made. Naturally, the best choice is natural materials, such as cotton. Towels made of natural materials are very soft, pleasant and have a long service life.
Something simply beautiful
The function of some things is to be admired. However, it cannot be said that they are absolutely useless. Not!
They create our mood, imperceptibly positively affecting all body systems. We are just pleased to see this or that thing. It is she who evokes good associations in us.
Just a beautiful thing gives us a wonderful mood for the whole day and, as a result, strong nerves and excellent health
It can be figurines, scented candles or lamps, flowers, colorful stones, shells or fish decorations. The desire to decorate the bathroom is great, therefore, when starting this work, special attention should be paid to maintaining a sense of proportion.
For original and fun accessories, watch this video:
Choosing the color of accessories
There is no need to remind you what an important role colors play in the life of any person. One inspires him, others can plunge him into a long depression. Therefore, when choosing accessories, pay attention to this characteristic:
- Green. If the room is designed in green, then an atmosphere of calm and tranquility has already been created in it. Better not to irritate her with a metallic sheen. Pleasant white and brown ceramics are a great color choice for most accessories in a green room.
- Red. In a room with such a bright and exciting energy, universal white and silver details can be added. They will serve as a kind of compensator for violent colors.
- Blue, light blue. These cool colors are often used in the embodiment of the marine theme. Accessories in sandy yellow, gray, white and silver will create the right naval order. A few bright spots in the interior will only decorate the room.
- Black. As a rule, black bathrooms require very spacious rooms. In this case, they look luxurious, not gloomy. Of course, black goes well with red, sand, white, gold and silver. The details of these colors will be a wonderful addition and a real design delight.

Of course, not only monochromatic, but also colored sets are used. They delight the eyes and heart. But do not forget that they are simply obliged to harmoniously fit into the style of the room you have chosen.
White accessories look great in a green bathroom: they refresh the interior, making it brighter, more positive and more attractive.
Without a doubt, this interior belongs to the luxury class. This black bathroom with gold, silver and white accessories is just gorgeous
Ideas for different styles
It’s the details that make the designer’s choice of style authentic. Let’s take a few well-known styles as an example and figure out which accessories could emphasize their features.
Minimalism
Even the name of the style makes it clear that there should be no frills. Everything is simple and concise. You can choose natural shades or monochrome colors.
Stone and plastic, ceramics and glass will look good in the interior. A large frameless mirror and the rejection of decor are the basic principles of minimalism.
Minimalism is a style that does not tolerate excesses, but at the same time, this bathroom has everything you need for coziness and comfort
Marine theme
By embodying this style, we can completely unleash our imagination and give free rein to feelings. There is only one nuance worth paying attention to: the marine style can be dedicated to modernity and antiquity. Mixing these two directions is not recommended.
Contemporary style with glass and plastic and chrome details. Modern realistic painting on ceramics creates the right mood.
Retro nautical style can be depicted using brass and bronze, more textiles and wood. In the frame of various items in the bathroom, you can use shells and pebbles, thick and thin rope, rare sculptures, etc.
Using just a few elements of wood and accessories related to the sea, you can feel on a cozy sea coast. Just imagine how interesting accessories are in the Japanese, Chinese, Mediterranean or African spirit.
It is not enough to have material resources for the embodiment of an ethnicity, it is necessary to include artistic imagination and then even a simple clay vessel will become a real work of art
Indian style
Creating such an interior, you can not be afraid of bright colors and a combination of their various shades.
All accessories, from soap dishes to mirror frames, can be made of metal by forging. Original color inserts will complement the impression and make your interior unforgettable.
Accessories play an important role in any style. Just like well-chosen spices, they should enhance the taste of the main dish without distracting all the attention.
Some useful tips
It remains only to supplement the article with a few tips from professional designers so that you do not make the most common mistakes when choosing accessories:
- If you bought inexpensive plumbing fixtures, do not try to compensate for their cheapness by buying expensive accessories. Best of all, things that belong to a single price segment are combined with each other.
- There are many ways to visually expand the bathroom space. Transparent interior items made of plastic or glass are also included in this arsenal.
- No matter how pretentious some interior elements attract you, it is better to avoid extreme coloring and texture. Things that are not too noticeable will last longer, because they will not annoy you.
- When choosing the color of accessories, do not try to match the tone of the tile.
