Homemade desk: DIY Desk – 15 Easy Ways to Build Your Own
DIY Desk – 15 Easy Ways to Build Your Own
Crafty Counter
1/16
It’s no sweat to build your own desk out of sawhorses—especially if you already have a couple of sawhorses laying around in the garage or workshop. But even if you don’t, no problem. Just the hinges at your local hardware store and attach 2×4 lumber to them. Then last but not least, top the DIY desk with a regular sheet of plywood, cut to size. Get the tutorial from It All Started with Paint.
Related: Modern Furniture You Can Make with Most Unexpected Materials
itallstartedwithpaint.com
Modern Double Duty
2/16
This modern DIY desk will be your new all-purpose piece, able to function as a work surface as easily as serving platform. Watch the video tutorial for details on how to build your own desk just like it. Besides some basic tools, you only need plywood and a quartet of hairpin legs to pull it off. Total project time? A few hours.
Related: Be It Ever So Humble—12 Amazing Things Made with Plywood
homemade-
modern.com
Put It on a Pedestal
3/16
A couple of reclaimed pedestal legs finished with a board top makes an excellent multi-purpose piece. It’s a desk, it’s a buffet, it’s a snack bar, and more! Chapel Cottage Chicks has the full how-to guide.
Related: 13 Seriously Doable Ways to DIY a Kitchen Table
chapelcottagechicks.blogspot.com
Advertisement
A Tiny Table
4/16
Copper pipe and stock lumber are the two main materials in this chic yet functional DIY desk for kids, featured on A Beautiful Mess. Once the pipes are cut to length, it’s just a matter of gluing them together, mounting the seat, and setting the desk top in place. The desk is so adorable, it may earn a permanent spot in your living room instead of the playroom!
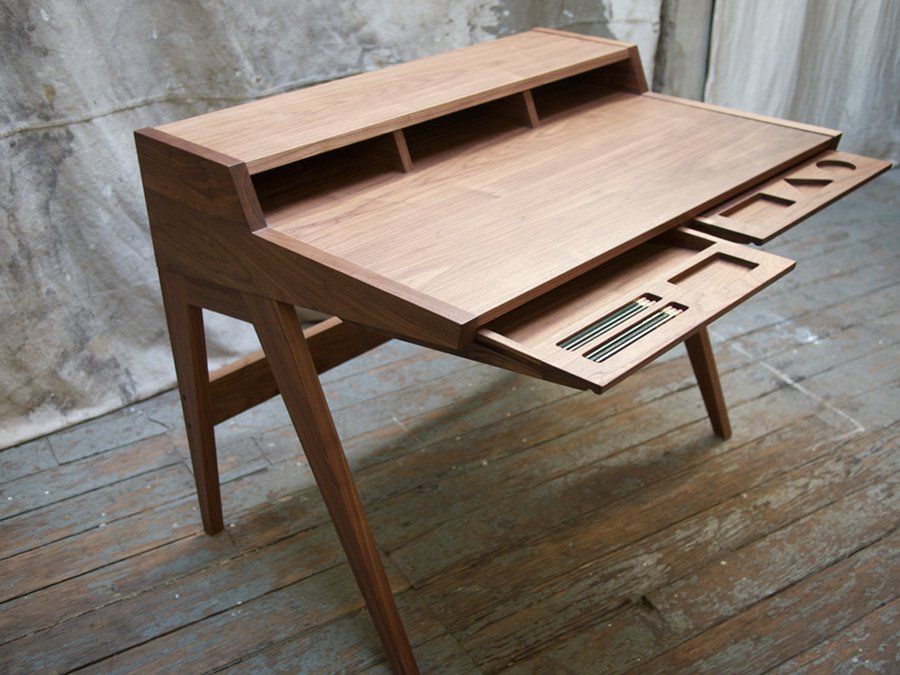
Related: DIY Copper Pipe Desk
abeautifulmess. com
com
Sneaky Storage
5/16
The design of this DIY desk allows for a great deal of customization. Once you have picked a base design, move on to tailoring the top with an arrangement of storage cubbies for the items you need day to day. Even better: Since the top uses off-the-shelf pre-cut plywood panels, the desk comes together more quickly than you might expect. Plans available from Ana White.
Related: 15 Sneaky Tricks to Double Your Storage Space
ana-white.com
Right on Track
6/16
Maximize a basic track shelving system by adding an especially deep shelf to function as a makeshift, informal desk. One of the best features of this design is its versatility—you can adjust the height of the shelf up or down on a whim. Check out Old Brand New for more details.
Related: 10 Insanely Creative Shelves You Can DIY
oldbrandnew.com
Advertisement
At Long Last
7/16
At 12′ long and 3′ deep, this farm table-style desk has plenty of room on top and down below. But the fact that it’s big in size doesn’t mean that it’s expensive. In fact, the entire table was built from found materials—cedar planks, pallet posts, and thick chunks of reclaimed wood. The total cost to Funky Junk Interiors? $3.00 for new screws.
Related: 16 Ways to Use Salvaged Wood in Your Home
funkyjunkinteriors.net
Upcycled Charm
8/16
Built from nothing more than an old wooden pallet and a few extra planks, this rustic DIY desk from Peculiarmee is as charming as it is creative. In addition to being a quick and low-cost (if not free) project, the end result gives you four bonus nooks for stray books.
Related: Build Up Your Home Library—10 Inspiring Reads with a DIY Point of View
peculiarmee.com
Taking a Stand
9/16
Want to build your own standing desk? Check out this wrap-around version from A Beautiful Mess. The design gives you plenty of workspace without taking up floor space or projecting too far into the room. Materials needed? Pine boards and shelf brackets.
Related: 6 DIY Standing Desk Projects to Keep You Healthy While You Work
abeautifulmess.com
Advertisement
In the Home Stretch
10/16
Spread out a little with a DIY desk whose generously proportioned top joins with sturdy legs that boast architectural interest and farmhouse charm. Instructables has a quick how-to video, plus a handy PDF version of the plans.
Related: 10 Ingenious Alternatives to a Traditional Home Office
instructables.com
Go Old School
11/16
Here’s another classic DIY desk design from Instructables that can be scaled up or down, depending on the size of your student. Once you’ve put it together, you may decide to keep it natural with a couple of coats of clear acrylic, or give it more character with an antique wax finish.
Related: Too Cool for School—9 Ways to Bring Home Classroom Style
instructables. com
com
Pull Up A Stool
12/16
In a small space, opt for a desk with a narrow profile. This clever idea from Liz Marie Blog fits the bill. Repurpose unused bar stools for the support legs, cut a wooden board to size, and use screws to affix each end into the top of a stool. Finish off with a couple of coats of paint or stain, and you’re done.
Related: 10 New Uses for Old Doors
lizmarieblog.com
Advertisement
Flip the Table
13/16
At first glance, this looks like a basic drop-down desk—but there’s a surprise underneath. When you’re not using the top as a space-efficient work surface, flip it up to reveal a chalkboard. Learn how to build your desk for dual purposes right here.
Related: Tight Quarters? 10 Smart Space-Saving Door Solutions
instructables.com
Convenient Cubbies
14/16
The epitome of budget friendly (and easy to build), this DIY desk depends on shelving units from Target and a desk top surface from IKEA. With a price tag around $60—and an assembly process that doesn’t demand any special skills—even a budget-conscious beginner can handle it. Check out Pretty Providence for full the tutorial.
Related: 20 Insanely Easy Ways to Build Your Own Furniture
prettyprovidence.com
Keep it On File
15/16
This workspace-meets-storage solution is easy to customize according to how much filing space you need, and it’s equally easy to break down into parts for relocation. If you’re feeling ambitious, you can build your own desk storage with cabinetry made from scratch, but prefab cabinets work just fine. Visit Instructables for the step-by-step.
Related: 10 Zero Dollar Storage Hacks
instructables.com
Advertisement
Easy DIY Desk Ideas
16/16
No matter the size of your space or the materials you have on hand, you can build a functional desk for your needs.
bobvila.com
Don’t Miss!
If you have the money to hire a handyman for every household woe, go ahead. But if you want to hang on to your cash and exercise some self-sufficiency, check out these clever products that solve a million and one little problems around the house. Go now!
25+ Best DIY Desk Ideas and Designs for 2022
If you need a fresh workspace in your home, it’s likely that you have considered making a DIY desk. The project doesn’t have to be intimidating. There are many good methods of constructing a DIY desk that are simple enough for the beginner and won’t break the bank when it comes to materials.
25+ Simple DIY Desk Ideas for a More Effective Workspace
Many of these desks would fit in the rustic or farmhouse home. There are several others with 1950s style modern design and others still with an industrial vibe. Some of the desks are constructed with metal plumbing pipe and others with shiny copper pipe.
Most of these desks combine practicality with a solid sense of style. Drawers are harder to make, but pull-out baskets or crates can take their place for the less experienced woodworker.
These desks use space creatively. One example shows how to convert an unused closet into a desk area. Another design tucks a desk into an alcove, utilizing wasted space. A desk is set at bar height in another room, giving a trendy but practical look.
Use our 29 inventive DIY desk ideas to transform your work space and bring a sense of updated style to your home.
1. Easy Desk with Shelves Underneath
DIY Project Details: prettyprovidence.com
No matter what work you’re doing, having everything you need within arm’s reach is a bonus anyone would love. So, consider adding in some shelves to either side of your desk. Keeping them low means you still have room everywhere else to do your work while having all your items organized in their own spots.
2. Rustic L Shaped Double X Desk
DIY Project Details: handmade-haven. com
com
You can create a lovely l shaped desk with a wooden top that gives off an incredible rustic feel. The wood looks smooth, giving you a comfortable working space. Meanwhile, the white lower half of the desk contrasts with the darker top portion, creating this beautiful cottage-like appearance so that the desk is both functional and serves as décor in the room.
3. Make Your Own Desk with Sawhorses
DIY Project Details: itallstartedwithpaint.com
You can transform other items into an awesome DIY desk, upcycling things you may have used for something else. The sawhorses work out exceptionally well here as they not only help build a rather handy desk, but they also lean into this industrial-like theme. It’s perfect to allow you to create a particular sort of mood with your office décor.
4. Glossy White and Golden Desk with Simplicity
DIY Project Details: justbellablog.com
IKEA hacks are always fun to try out, and this desk is no different. It’s the perfect desk for those of you who want something that is simplistic yet still has a contemporary touch to it. The golden legs effortlessly stand out in the end while the glossy surface gives the desk a hint of sophistication that makes it more appealing.
5. Simple Desk with File Cabinets and Top
DIY Project Details: mypassionfordecor.com
There’s no need to buy a desk when you can just as easily upcycle some items around your house to create a beautiful one. This project helps you breathe new life into some file cabinets, and with a simple wooden board, you are left with a reliable desk piece to put up in your office.
6. DIY Plywood Desk with Metal Legs
DIY Project Details: abeautifulmess.com
There’s always some good use you can find with a simple sheet of plywood. Take this desk, for example, that has the wood in its natural state while still leaving a lasting impact. It frees you up to decorate as you see fit to add your personality to the desk. Meanwhile, the metal legs aren’t just useful, but they stand out well against the lighter wooden top.
8. Potting Bench Style Desk with Distressed Wood
DIY Project Details: meedeedesign.com
Destressed wood is such an attractive go-to when you want something rustic or vintage in the room. The bench style appearance of this is equal parts stunning and functional as you are given plenty of space for extra storage. It is a rather nice size too so you can use this as a standing desk if you wish.
9. Sawhorse Desk with Clear Glass Top
DIY Project Details: simplestylings.com
Just because you are creating a sawhorse desk, that doesn’t mean you have to stick with just one type of style like vintage or industrial. Instead, you can use it to build up on a more modern theme. The pallet wood is transformed well here too thanks to the gorgeous glass top applied that gives this a glossy appearance.
10. Long Desk with Built In Basket Storage
DIY Project Details: ana-white. com
com
This lengthy desk design doesn’t just give you ample room to work with no matter the project, but it also grants you room to have these cool storage baskets underneath. You can organize everything you need with ease and get to them just as quickly. Plus, the natural wooden look has a charming feel to it.
11. Pink Desk with Drawers and Storage
DIY Project Details: bestfriendsforfrosting.com
With this DIY project, you end up getting such a lovely, colorful desk with a contemporary flair. The desk sits at a comfortable height fitting for a sleek desk chair. In terms of décor, the coloring creates a gentle look about the desk, allowing this to seamlessly fit into a room with similar décor throughout.
12. DIY Desk Ideas to Transform Closets
DIY Project Details: housefulofhandmade.com
When space is a concern, then it’s time to get creative. In this case, head to the closet to create a stunning floating desk. The wood looks attractive enough, and there’s a minimalistic quality to this desk that makes it instantly stand out despite the simple approach. With this layout, you create a cute little nook for all your work needs.
13. Double Layer Particle Board Desk
DIY Project Details: hellonancy.co.uk
Looking to maintain that natural look with your desk? Then consider using particle wood without much treatment given to it. The look stays, and with that comes a more downhome-like style that’s comfortable and relaxed. Plus, you can use the bottom portion as some extra storage space.
14. Sturdy Wood Desk in an L Shape
DIY Project Details: hometalk.com
For that classic office look, using thick, darker wood is a great way to go about it. The wood has an appealing earthy look to it while still maintaining a sense of class for those that want a more stylish and modern touch. This is l shaped styled too for that extra bit of room, and it is perfectly befitting a nice, large comfy chair.
15. Understated Wooden Desk with Drawers
DIY Project Details: muyingenioso.com
With the right material, you can create a simple desk perfect for a small space layout. The natural wood seems to shine in the light, giving your room a bit more brightness. It helps that the dark-toned legs contrast with the wood too. Also, you’re left with some much-needed storage space thanks to the built-in drawers.
16. Rustic Slat Desk with Glass Top
DIY Project Details: twiddlingmythumbs.com
Using pallet wood is such an affordable way to approach creating your own desk. Although this material can naturally give off a rustic style, you can still transform it into a modern look by giving the desk a glass top. This makes it appear sleek, full of flair, and overall professional.
17. Industrial Style Desk with Plumbing Pipe
DIY Project Details: craftthyme.com
Using pipe is an awesome way to create an industrial-styled desk. The wooden top works perfectly alongside the darker pipes used to support the desk. Not only that, but you can build a floating desk with pipe support as a shelf, giving you room to store items or add some more décor to the area.
18. Copper Pipe Desk with Handy Drawer
DIY Project Details: amandamayphotosblog.com
Pipes don’t always have to have a dark look to give off that industrial vibe. Rather, these copper-colored pipes do all that and more, combining both the industrial look with an updated, contemporary appearance. Using the pipes to build shelves in addition to supporting the desk makes them as useful as they are nice to look at.
19. DIY Desk Ideas with X Shaped Ends
DIY Project Details: handmade-haven.com
When you’re finished with this desk, it won’t even look as though you made it at home. Giving the wood an all-white paint job truly helps this desk to stand out immediately. It pairs well with the darker wooden top that’s smooth and simple, giving you ample desk space to complete all your work at.
20. Early Modern Style Desk with White and Blue Paint
DIY Project Details: alittlecraftinyourday.com
With an old desk, you can upcycle it to create something fresh and charming. This desk has a compelling brightness to it by balancing out the white and blue color theme. It’s almost retro in a way while maintaining some modern qualities that allow it to stand as a unique piece of furniture in the room.
21. Bar Height Desk with Tall Stools
DIY Project Details: abeautifulmess.com
Looking to create a standing desk or a desk you can use with some high chairs? This bar height desk is a great way to go about it. The desk itself is straightforward in design, and the l shaped layout paves way for either multiple people to use the desk, or for you to have more room for your work.
22. Weathered Gray Desk Tucked in an Alcove
DIY Project Details: tatertotsandjello.com
Do you need a desk for that small space living style? Well, as long as you have an alcove, you can build yourself a handy desk. The weathered gray look has such a nice style to it that it works well with shabby chic design. Plus, you can consider using the same material to build some shelves if you have the space, giving your desk area more storage.
23. Easy DIY Desk with Three Shelves Underneath
DIY Project Details: caitlinwallacerowland.com
You can make the perfect desk using only a handful of materials. The wooden top effortlessly grants you more than enough room for all your working needs. Alongside that, transforming the bookcases into not only support for the desk, but to storage areas is such a wonderful way to upcycle items.
24. Simple Desk with Ample Wall Storage
DIY Project Details: honeybearlane.com
If you have the space for it, you can create a simple desk that has just enough personality in it thanks to the slight blemishes in the wood. That isn’t the only eye-catching thing you do with this project. Rather, when you have it against the wall, you have plenty of room to use some more wood to create shelves for additional storage.
25. Stylish Desk with Metal Rectangles
DIY Project Details: instructables.com
Looking for a way to give that basic wood top an updated look with more style? Then consider taking this unique approach with the metal rectangles. It is a cool way to add some pattern and texture to the wooden top, allowing you to build up something that is modern, rustic, and with a hint of vintage to go along with it.
26. Cute Desk with Storage Crates
DIY Project Details: thecreativemom.com
A cute little desk is all you need when you want to make the most out of the space you have. The two built-in shelves do an incredible job at giving you enough room to slide in some storage baskets. It makes for a great work desk, art desk, or space for you to handle anything else.
27. Understated White Desk with Drawers
DIY Project Details: manhattan-nest.com
When you want something a bit more contemporary, this sleek desk is a great way to build it yourself. The white top is smooth and clean, while the wood adds some contrasting texture and color to the overall look of the desk. It pairs effortlessly with the white drawers that allows this desk to have that stylish appearance.
28.
 Sawhorse Style Desk in Gray and White
DIY Project Details: blog.homedepot.com
The sawhorse style is a nice way to give your desk area a rural look. However, opting for the gray and white coloring is a distinct way to provide your own modern style along with the rustic vibe. There is a minimalistic look about this too, while the color pattern offers a nice brightness to the area.
29. IKEA Style DIY Desk with Baskets
DIY Project Details: youtube.com
With this IKEA hack, you get a beautiful desk with a lovely wooden top design that looks chic. The storage areas contrast nicely with it while offering you up some organization space. It balances functionality with style with relative ease so that you have something you enjoy looking at as much as you enjoy working at.
30 DIY Desks That Really Work For Your Home Office
By Simona Ganea | Published on
Buy Now
If you’ve ever had the opportunity to work from home, you know how influential your home office furniture can be with regard to your productivity. The desk, in particular, plays a critical role in any office space, particularly one at home.
It should be functional and comfortable. Although having a customized desk built to fit your specific space can be expensive, the good news is that there are many DIY options out there for a DIY computer desk. These can be made into a corner desk, a closet desk, or really any size or shape your home office space requires. And, best of all, since you’ve made it yourself, the desk will be completely original. Here are some inspiring DIY office desks for you to check out.
1. Pottery Barn-Inspired DIY Desk
View in gallery
View in gallery
View in gallery
View in gallery
For this project, you’ll simply need a corner desk (like Ikea’s Effective Desk) and a pair of wooden file cabinets. The first step is to paint the desktop and the cabinets in white. Remove the legs and hardware from the desk, then add some braces to the back corner that, in this case, have been fashioned out of metal plates and banister inserts. Now you have a brand new desk that looks better than ever. {found on ikeahackers}.
2. DIY IKEA Standing Desk
View in gallery
View in gallery
Space-saving standing desks can be pretty expensive, which is why a DIY project like this one can be a wallet-loving alternative. This particular desk was made using some IKEA tech, as well as items from the hardware store. The owners didn’t give us many details on the process, but you can figure it out from the pictures. It’s an attractive, functional piece, and the best part is that it didn’t cost more than a few dollars. {found on Tom Borowski}.
3. Designing and Building a New Desk
View in gallery
This is a more elaborate project, although it’s totally doable with some planning and careful construction. Building a solid and stable (and stylish!) desk from scratch is not difficult, but it’s not the easiest DIY, either. But it’s a great way to get exactly what you want. In this case, it all started with an old solid wood door.
View in gallery
View in gallery
The sawhorse legs were made using three pieces of pine glued together for each leg. Two of the legs have hollow centers for power cords and internet cable, which is a very clever solution for electrical requirements. For the tabletop, the door was cut down to its final size of 28″ x 62″ and then sanded. After a quick prime and paint job, the table is done. {found on thecheapgeek}.
4. How to Build a Mini Laptop Desk
View in gallery
I’m personally a big fan of portable laptops. They’re smaller than regular laptops, but they’re more practical because of how easy they are to carry around. Here’s how you can build a desk for your own mini laptop. First, you’ll want to cut the piece to the size you’re after. Use laminated pine for the top, and pine for the risers and legs. You’ll also be using a circular saw.
View in gallery
Once your pieces are cut, you’ll want to cut an alcove for the cable. Use a coin as a template and a jigsaw fitted with a scroll blade. Next, you’ll have to cut the angled edges. Use a compound miter saw to cut the leg tops and bases and the front of the risers, and use a circular saw to cut the front edge of the shelf. Now it’s time to assemble the desktop with adhesive and screws. Drill pilot holes to attach the legs at the top with four #8 x 1-1/4-in. wood screws each side, plug the screw holes and paint the desk. {found on freshhomeideas}.
5. Home Studio Desk
View in gallery
View in gallery
For this DIY home studio desk, you’ll need a tabletop and four legs to make the main desk base. Then you can build another shelf for a keyboard and monitor. You can hide all the wire underneath the desk, and you’ll still have plenty of room for the monitor, the keyboard, and the speakers…plus some spare space. This desk was made for only £45.99 ($72.86). {found on ikeahackers}.
6. Birch and Aluminum Desk
View in gallery
This particular desk was designed to meet some specific needs. For example, it had to be large enough to spread out an open textbook, notebook computer, and writing notebook. It also had to be durable and had to be without nooks and crannies that would fill up with knick-knacks. And, stylishly, it had to have modern, clean lines.
View in gallery
Here are all the materials that were used for this project: 1 4×8′ 3/4″ birch plywood, 1 3×6′ 0.118″ acrylic sheet, 1 12′ 4×4″ Douglas fir, 2 8′ 1″ aluminum angle, 12 8×12″ galvanized steel flashing in pre-cut sections, 10 3/4″ #8 stainless screws, 4 4″, 3/8″ hanger bolts, 4 3/8″ tee nuts, 1 can polyurethane finish, double stick tape, glue, Wide tape, aluminum polish, and car wax. Despite that rather lengthy list, you’d be surprised how non-difficult this desk is to make yourself. The key is to pay attention to details. {found on instructables}.
7. Build-Your-Own Desk for Less than $30
View in gallery
View in gallery
View in gallery
When you think practically, there’s no need to pay hundreds of dollars for a desk when you can make your own one for under $30. Here’s how: Use (9 cm) wide CLS for the main frame (legs and one support) and some 60mm (6cm) CLS timber for the supports that will be visible. Use 18mm thick plywood to make the desktop. Cut it down into 4’’ planks, then place as the desktop, leaving a small gap between each plank. Use screws and glue to keep everything together. You can also choose to paint it. {found on instructables}.
8. Custom Desk Project
View in gallery
View in gallery
View in gallery
View in gallery
Here’s how you can make your own desk without paying tons of money and without sacrificing style or function. First, decide on the dimensions you’re after, then buy the wood for the desktop. In this case, three planks of pine were used. Sand the wood and stain it. (This desk has a water-based walnut finish.) Use a foam brush to apply two to three coats. You’ll have to use some cabinets as a base (shown: three IKEA Besta Cabinets). Place the planks on top of them, line them up, and secure them together. Now you have a nice desk and plenty of storage space in the cabinets. {found on aubreyandlindsay}.
9. DIY Upcycled Tabletop Standing Desk
View in gallery
View in gallery
For this standing desk, you’ll need a table (upcycle one you already have, buy a new one altogether, or make one yourself) as well as a second tabletop and brackets. Place them one on top of the other, secure them together, and you’ll have a brand new and very functional standing desk for less than $30. {found on ikeahackers}.
10. Eclectic DIY desk
View in gallery
This is a fantastic DIY desk-building project that resulted in a modern desk incorporating multiple finishes. It’s glamorous and chic. If you’re up for creating your own version, start by sanding the top and the sides of the desk (provided that you already have one).
View in gallery
View in gallery
View in gallery
Then use a blow torch and have fun with it. Lay the torch at such an angle that the flame licks across the surface as you move horizontally. After that, wipe it down with a wet cloth and start the staining process. Assemble the legs and the shelves, place a glass top over it, and you’re done. {found on ikeahackers}.
11. Murphy-Style Wall-Mounted Desk
View in gallery
Grab a chunky wood remnant and attach some cables or hinges to the edges. Make sure you research your weight constraints to the support system you choose, but once you’ve got the thing mounted to the wall, you’ve got yourself a fantastically minimalist-modern hanging desk. Bonus: It can fold up onto the wall when not in use.{found on murraymitchell}.
12. Shelf-Supported DIY Desk
View in gallery
If you have some old shelves lying around and you’re not quite sure what to do with them, look no further than this DIY computer desk design. Grab a top for your table (use wood cut to size then sand it), and lay the top on top of the two supporting shelves. Prime and paint everything to fit your taste. The benefit of something like this is that you can use what you already have, and it will be a completely unique home office desk – with plenty of storage or display area.
13. Mid-Century Modern Desk
View in gallery
If you’re wanting to change up the look of your space, or if you only have one dresser available to mount a desktop onto, or if you love a mid-century modern vibe but your workspace doesn’t say that, consider this option. Pick up a pair of simple table legs that are similar in height to a modern-style dresser. (You can raise the height of the dresser with four short legs, if necessary.) Attach the dresser and the two legs to the underside of the desktop, and you have an absolutely original and fabulously stylish desk. {found on manhattan-nest}.
14. Upgraded Straight-Legged Table
View in gallery
For those old beat-up tables with straight legs and zero personality, this is a fantastic makeover into a showstopper of a desk. Use slim pine boards to create the design of your choice between the legs (this DIYer added in a board at the bottom between each pair of side legs and the entire interior design on each side), then paint everything. What an amazingly unique and chic desk project! {found on thelennoxx}.
15. DIY Desk with Vintage Sewing Machine Table Legs
View in gallery
Flea markets and yard or estate sales might be your new best friends if you’re after some kind of gem like this. Find a vintage piece with cool legs, like an old sewing machine table. Even (especially?) if the piece itself isn’t your style, you can repurpose the legs by detaching them from their original top and attaching them to a simple desktop board, cut to size. This is an excellent way to upcycle vintage bits and showcase your personality.
16. Industrial Pipe-Leg Desk
View in gallery
View in gallery
Great news for those of you with die-hard industrial style: your DIY desk doesn’t necessarily have to give you slivers or scrapes (from all that reclaimed rough-hewn wood you were bound to use) to have the edgy industrial vibe you love. Pipes! That’s the answer found in this complete (and awesome) tutorial. Galvanized pipes used as legs attach to a clean desktop for a totally inspiring, efficient, and stylish home office desk. {found on cafecartolina}.
17. Minimalist Floating Desk/Console Combo
View in gallery
When you think of minimalism, you think of the least possible components to achieve maximum effect or function. This DIY floating desk is just that – with a few boards from a hardware store and some elbow grease (not even that much elbow grease, either!), you could create a similar desk in your own space. (Full tutorial available.) Modern, cool, and very very chic. Not to mention completely functional. And, bonus, when you remove the chair or set it aside, you’ve got a working console in your hallway. If that’s not a win-win, I don’t know what is. {found on designsponge}.
18. DIY Double Desk
View in gallery
If your space is small but your desk space needs are large, you might be inspired by this creative DIY double desk idea. Although a tutorial isn’t available, you could let this photo be your guide to customize a similar double desk that works in your space. With a sturdy bookshelf as the separator, a desktop is mounted at the proper height (if the bookcase is sturdy enough, the desktop could even rest on the middle shelf and extend all the way through, making two workspaces out of one desktop). This is a great way to get the most bang for your DIY-home-office-desk buck.
19. Sawed-Apart Table Desk
View in gallery
View in gallery
For a potentially awkward and/or dreary corner office space, you’ll be able to brighten things up in no time by upcycling an old table. That’s right. An old, beat-up table that’s destined for the landfill. Cut off the end (or ends, if you need two), fill in any cracks or gaps on the top itself, and then prime and paint. Mount the table end (a.k.a., your new desk) to the wall, and voila! A beautiful customized desk. Do two of them if you have two people working at the same time, or even if you’re simply looking for symmetry. {found on migonishome}.
20. Wood Slab DIY Desk
View in gallery
The Merrythought shows us how to make this simple wood slab DIY desk that adds a rustic touch to any home office. If you don’t have a home office but desperately need somewhere to work at home during these challenging times, it’s the ideal budget-friendly solution. To make things cheaper and easier, this project uses two wood slabs, which are glued together to create the main part of the desk. Everything is attached directly to the wall, so you don’t have to worry about it taking up too much space in any room. This would look great in a teenager’s bedroom and offers a good area to work and study.
21. A Simple Standing Desk
View in gallery
A standing desk is a healthier option for working from home and can provide you with a way to stretch your legs instead of sitting down all day long. Many individuals are opting for standing desks nowadays, and this simple standing desk from A Beautiful Mess is the ideal solution for your needs. This wrap-around standing desk allows you to stand up or use a high stool and offers plenty of desktop space. It enables you to have a free center of your room and make the most of what is most likely an unused corner of your room.
22. DIY Compartment Desk
View in gallery
Shades of Blue Interiors shares this DIY compartment desk plan which offers you additional storage without adding bulky cupboards or drawers to your new desk. When you open up the compartment on the top of this desk, you’ll find three sections underneath. You’ll be able to tidy away your pens and papers instead of letting them clutter up the surface of your desk. You’ll also find this is a great option for a vanity, as you could hide makeup inside the compartment.
23. DIY Butcher Block Desk
View in gallery
You’ll love the modern and minimalistic look of this DIY butcher block desk from Modish & Main. It’s one of the easiest desk plans on our list today and offers a simple and sleek desk for any home office or bedroom. You’ll simply get a butcher block slab and then add hairpin legs to create your desk. It looks like something you would buy in an expensive furniture store, yet costs very little to put together yourself.
24. DIY Desk with Concrete Desktop and Wood Legs
View in gallery
This DIY desk from The Home Depot Blog creates an industrial look that will fit perfectly into a modern apartment or home. The concrete desktop offers a sturdy top for your desk, and the wood legs make the desk look a little warmer and more natural. It’s a simple desk which you can also add additional shelving to for extra storage if needed.
25. Leaning Wall Ladder Desk
View in gallery
If you are looking for a new desk that makes efficient use of your space, consider this DIY leaning wall ladder desk from Ana White. This plan incorporates your desk into a leaning bookshelf, so you can also store folders, books, or decorative items within your shelving. It’s a great option for anyone who has a lot of paperwork and files for their work and needs a practical and effective storage solution. This would be ideal for anyone who lives in an apartment and is short of space but has suddenly been forced to work from home this year.
26. DIY Farmhouse Desk
View in gallery
With this plan, you’ll create an X-shaped farmhouse-style desk that will fit in any small space in your home. There are two shelves to store your essential items or a printer for your computer. Handmade Haven offers us this stunning design, which will look great in a bedroom, home office, or the middle of your studio apartment. It’s a sturdy and open desk that looks stylish and modern while also offering a good space for you to work from each day. While the picture here shows a white desk, you can, of course, paint it any color to fit your needs.
27. DIY Piping Desk
View in gallery
House by Hoff shows us how to make this simple DIY desk project which is ideal for a small apartment or home. This would look great in a teenager’s bedroom or an apartment when you don’t have room for a massive desk unit. We love how this DIY project utilizes piping to create the legs, showing you just how many options there are for creating your own desk from scratch. Varnish the surface of the desk to suit your home décor, and you’ll be good to go for working from home.
28. DIY Corner Desk
View in gallery
A corner desk is a fantastic way to maximize your bedroom or apartment space and offers you plenty of storage without taking up space in the middle of your room. This DIY corner desk from Shanty 2 Chic will look great in any bedroom and provides you with plenty of storage for files, stationery, and papers.
29. DIY Mounted Wall Desk
View in gallery
The Crafted Life shares this DIY mounted wall desk, which offers side-by-side working spaces for two people. It’s ideal for couples living in a small space or business partners who need to work by each other for increased efficiency. This desk doesn’t look too clunky, which is often a big fear for anyone adding a desk into a smaller space. It will give you all the working space you need to add your computer or laptop.
30. IKEA Hack Desk
View in gallery
This simple IKEA hack from Pretty Providence creates a classic desk with plenty of storage space for your books and paperwork. A large desk doesn’t have to cost a fortune, and you’ll simply place an IKEA desktop on top of bookshelves for the perfect storage solution this year. This is an ideal setup for young students, who need to have books and files within their reach at all times. You can easily add baskets to the bottom of your shelves, so it’s great for storing stationery or crafting equipment.
We hope you’ve been inspired by the infinite desk-making possibilities available to you. It can be something elaborate or something minimal – whatever speaks to you and your time and ability. But the point is, a DIY home office desk is not only possible, but it’s often preferable to achieve the size, style, and price-point you want. Good luck, and enjoy the process!
14 Free DIY Desk Plans You Can Build Today
By
Stacy Fisher
Stacy Fisher
Stacy Fisher is an expert on crafting, sewing, and frugal finds, sharing her knowledge of hands-on DIY creations, finding freebies, and budgeting. Stacy was a guest on “The Dr. Oz Show” and featured in Woman’s World Magazine. She has nearly two decades of writing and editing experience.
Learn more about The Spruce Crafts’
Editorial Process
Updated on 04/22/22
The Spruce / Hilary Allison
These free DIY desk plans will give you everything you need to successfully build a desk for your office or any other space in your home where you need an area to work or create.
Building a DIY desk can be a beginner to intermediate woodworking project depending on what plan you choose to tackle. Whichever one you choose, you’ll find detailed building instructions, diagrams, and photos to help you along the way.
-
01
of 14Shanty 2 Chic
This free DIY desk plan will help you build a beautiful and large desk that would look great in anywhere from an office to a guest room.
The free plan includes a supply list, diagrams, photos, and instructions to help you build it.
DIY Truss Desk Plan from Shanty 2 Chic
-
02
of 14Ana White
Here’s another free desk plan from Ana White. This design will give a huge worktop and lots of space for storage.

This free desk plan includes dimensions, a materials and tools list, a cut list, building directions, and photos of others who have used the plan to build their own desk.
Parson Tower Desk Plan from Ana White
-
03
of 14Ana White
The design of this free desk plan by Ana White is inspired by Restoration Hardware’s Sawhorse Trestle Desk. By building it yourself, you’ll get the same look for a fraction of what you could buy it for.
Plenty of color photos, a materials and tools list, a cut list, step-by-step directions, diagrams, and user photos are all included in this free desk plan.
Sawhorse Trestle Desk Plan from Ana White
-
04
of 14The Borrowed Adobe
The Borrowed Adobe has created a free desk plan inspired by Pottery Barn’s Printer’s Writing Desk. She was able to build this desk for a quarter of the cost the Pottery Barn desk.
Download this free desk plans and you’ll get a materials and cut list, written instructions, and color photos.
Printer’s Writing Desk Plan from The Borrowed Adobe
-
05
of 14House by Hoff
House of Hoff has designed this beautiful DIY desk that uses a butcher block for the top and industrial piping for the legs. This can be used just about anywhere as a table also.
There’s a supply list, building instructions, color photos, and more to help you build this easy DIY desk in no time.
DIY Desk With Piping and Butcher Block by House by Hoff
-
06
of 14Shades of Blue Interiors
If you’re looking for a unique desk plan, this three compartment desk may be just what you’re looking for. It will give you tons of storage and you can even use it as a vanity if you’d like.
These DIY plans include a tool list, shopping list, cut list, step-by-step directions, diagrams, and color photos.
Three Compartment DIY Desk Plan from Shades of Blue Interiors
-
07
of 14A Beautiful Mess
You won’t believe how easy to build this DIY desk is! It only takes some plywood and brackets and you can get it built in an afternoon.
This desk is a standing desk so it’s at counter height and fits perfectly against any wall in your home without taking up very much space.
How to Build a Standing Desk fro A Beautiful Mess
-
08
of 14Handmade Haven
Handmade Haven has a free DIY desk plan that builds this farmhouse desk with two shelves and a roomy area for a chair. It’s a great size that would fit in just about any size of a room.
The free plan includes a materials list, cut list, building directions, and detailed diagrams and photos.
Farmhouse X Office Desk from Handmade Haven
-
09
of 14Shades of Blue Interiors
This small x-frame desk can be built for less than $50 and is perfect for a small space or a child’s room. It has a 3 foot long top, a full-sized top drawer, a small bookshelf on the bottom.
There’s a materials and supplies list, cut list, building instructions, diagrams, and photos so even the beginning woodworker can tackle this project.
X Frame Desk with Free Plans from Shades of Blue Interiors
-
10
of 14A Beautiful Mess
These built-in desks can be built right up against the wall in any room in your home. They also can be completely customized in size so you can make it work for however much space you do or don’t have.
You’ll start with pre-made cabinets and then add some plywood and a little bit of lumber make up the majority of supplies, making this a project that’s pretty light on the budget.
Custom Built-In Desk from A Beautiful Mess
-
11
of 14More Like Home
Here’s a free desk plan that will build a simple desk using just 2x4s. It will cost you under $25 so there’s no reason not to give it a go.
Simple building instructions and diagrams will step you through using this free desk plan.
The Casual Desk from More Like Home
-
12
of 14Ana White
We couldn’t resist adding one more of Ana White’s plans to the list, this one being a plan to build an office corner desk.
Diagrams, step-by-step building instructions, color photos, and shopping lists are all part of this free desk plan.
Office Corner Desk Plan from Ana White
-
13
of 14Bob’s Plans
If you’re looking to build a computer desk with plenty of storage space, you’ll want to highly consider this free desk plan from Bob’s Plans. It features a lot of workspace, a lap drawer, and several other drawers for office supplies and files.
Download the free desk plan and you’ll get color photos, a materials list, very detailed instructions, and tons of diagrams.
Free Computer Desk Plan from Bob’s Plans
-
14
of 14Rona
Rona has a free DIY desk plan that builds this great looking desk that includes a cabinet and several drawers.
You’ll find the tools and materials list, diagrams, and building steps included in this free desk plan.
How to Build a Desk from Rona


30 DIY Desk Ideas for Beginners You Can Build Today!
These easy DIY desk ideas are beginner-friendly, stylish and can be made at a fraction of the cost of higher-end versions. Create your perfect home office!
PIN THIS TO PINTEREST
Working from home, computer work, writing letters, working on assignments, playing games, making arts and crafts…no matter what you need it for, you need a desk in your home.
Building your own desk can not just help you achieve a stylish high-end look for a fraction of the price, but it can make sure you get the configuration or setup that works perfectly for YOU!
What’s inside
- How to build a simple desk
- What is the best wood for building a desk
- What tools do you need to build a desk
- Desks I have built
- Simple DIY desks
- DIY desks for small spaces
- Simple and stylish DIY desks
- DIY desks with drawers
- Pin this post to Pinterest
***This post contains referral or affiliate links. It is a way for this site to earn advertising fees by advertising or linking to certain products and/or services. Please read my full disclosure here ***
How to build a simple desk
The standard desk height is about 30″ and you want it to be at least 16″ deep to be able to work comfortably.
While the styles of desks can vary and the design can range from very basic to extremely complicated, they all have 2 things in common – 4 legs and a top.
You could also use pre-made hairpin legs and simply attach to a board to make a desk! If you are looking for a little more character, read on below!
The basic steps to build any desk are simple –
- Build the leg frame by joining 4 legs with aprons. Add any shelves if needed. You can also add some character by adding angles and more to the legs.
- Build the top – this could be a simple sheet of plywood or a top built of multiple boards. You can also add in drawers.
- Attach the top to the leg frame. Depending on the design, this could happen either at the end or during the process of building.
- Finish – paint or stain in the color of your choice and be sure to let it dry and outgas before bringing it inside for use.
What is the best wood for building a desk
For the legs, 2×2, 2×4 or larger boards work very well
- They are strong and sturdy and provide much-needed stability to the desks.
- They look great on any desk with their chunkiness.

For the top, you can build it using wider thinner boards or use plywood.
If using plywood, you want to decide if you will be painting or staining. If you are staining, pick plywood with a good quality veneer like oak or birch.
If you will be painting it, you can pick the sanded plywood which is a lot more budget-friendly. It will need a little love to get the top smooth but the price difference is well worth it.
What tools do you need to build a desk
Building a desk like any other woodworking projects needs the basic cutting and joinery tools. Here is the list of basic tools you could use and build almost all of the desks below –
- Miter Saw – to cut boards to length
- Circular Saw – to cut wider boards or to rip plywood.
- Power Drill – to drill holes and add screws.
- Kreg Jig – to make pocket holes. This is my favorite beginner-friendly way to make strong joints. Learn how to use a Kreg Jig here.
- Kreg Rip cut – If using a circular saw to rip plywood, this makes it really easy to get straight repeated accurate cuts
 Learn how to use a Kreg Jig here.
 While a table saw or a router isn’t necessarily needed, they are good to have.
RELATED: 19 Stylish And Affordable Office Chairs
DIY desk Ideas
I started out woodworking by building kids’ desks and it helped me figure out the important design and structural details that make desks strong. You can see DIY kid’s desk ideas here.
I have collected DIY desks ideas for you to match every style and experience.
Almost all of them come with build plans so you can start building right away!
Below are a couple of larger desks I have built. You can click over to get the building plans.
1. DIY A-Frame Desk from Anika’s DIY Life
This A-frame desk is my most recent desk build. The slight added angle to the leg completely elevates this design. It needs only 4 basic power tools to build.
I used sanded plywood for the top and the full tutorial shows you how to achieve the smooth finish.
2. DIY Farmhouse Desk from Anika’s DIY Life
I am writing this sitting at this desk. With 3 drawers and 2 shelves, this DIY Farmhouse desk has the perfect amount of storage for everything I need! It is very similar to the A-frame desk but this desk is simpler and uses straight cuts!
PIN THIS TO PINTEREST
Simple DIY desks
Building a desk doesn’t need to be intimidating at all! Like I mentioned above, they can be just 4 legs and a top.
Below are some of the simplest yet cute DIY desks ideas around –
3. Epoxy Resin Desk from Our Crafty Mom
This is a fairly simple desk to build – a top made of 2 boards and pre-made legs screwed into it. The top goes up a notch with the epoxy resin work.
4. DIY Writing Desk from Sawdust Sisters
Hairpin legs are very fashionable and super simple to use to build a desk – just attach it to the top.
I love the addition of a pre-made pencil drawer!
5. Transformable Hairpin Leg Desk from A Beautiful Mess
Simple, yet stylish – but also versatile! Love how you can set this desk up in multiple configurations to suit your needs.
6. DIY Wood and Metal Desk from Handyman’s Daughter
This one is a super simple desk build. The addition of the metallic accents add a great industrial touch.
PIN THIS TO PINTEREST
DIY desks for small spaces
Don’t have space in your home to dedicate to a desk?
There are many ways to achieve a working space – like turning a closet into a desk space, building a murphy desk, or putting those awkward nooks to work!
7. Desk in a Closet from Houseful of Handmade
This is perfect for when you don’t have space for a desk in a room. Turn a simple closet into a functional workspace by adding a floating desk and shelves on top. I think a pegboard will also look good in there!
8. DIY Fold Down Desk from Not Just a Housewife
No space for a desk? Put it on the wall! This simple fold down desk makes a great spot to get some work done. The built-in organizer and bulletin board holds all the important things you need.
9. DIY Murphy Desk from A Turtles Life
Another great option for small spaces! This fold-down Murphy desk is larger and works well in any space.
10. World Map Desk from Pillar Box Blue
Let’s talk about those awkward nooks. Just add a little table to fit in there!
Adding character to a simple table is easy with this world map desk!
11. Floating Desk with Hidden Storage from DIY Huntress
This floating desk can be built into any nook! And I love that hidden storage!
PIN THIS TO PINTEREST
Simple Stylish DIY desks
Here are some examples of desks of every style – modern, industrial, farmhouse, etc. These look great and are easy to build!
12. DIY Waterfall Desk from Dans Le Lakehouse
This waterfall desk is simple and a great addition to a modern home office.
13. DIY Chippendale Desk from Rain on a Hot Tin Roof
This is one of my favorites – so chic and pretty! And surprisingly easy to build!
14.
 DIY Industrial Computer Desk from Handyman’s Daughter
This desk features a deep desktop and shelves for storage with easy access. This desk is easy to build with the metal accents as a great way to hold the desk together.
15. Minimal Modern Desk from Papers N Stitch
A little more than simple but a true minimalist desk – this plywood desk has a good amount of storage as well!
16. DIY Farmhouse Desk from The Creative Mom
This farmhouse desk will fit in with the decor in any room with its simple lines, perfect amount of storage and neutral paint scheme.
17. DIY Workbench Inspired Desk from Jaime Costiglio
This industrial-inspired desk has plenty of workspace and it’s solid as a rock!
18. DIY Desk From 2X4s from A Turtles Life
This is a great desk idea made using 2x4s. The addition of the inverted V on the sides and back add a farmhouse touch!
PIN THIS TO PINTEREST
DIY desks with drawers
Organizing a desk is so much easier if you have drawers on the desk.
Are you intimidated by building drawers? I used to be too. But just a little patience and focus can help you make drawers in no time! I have a full guide to building drawers for beginners!
Now here are desks with drawers that are simple and easy to build!
19. Small Computer Desk from Sawdust Sisters
This desk is perfect for small spaces and has a hidden drawer for storing away desktop clutter.
20. DIY Modern Desk from Average But Inspired
This easy to make modern desk has hidden compartments, can you guess where?
21. 3 Compartment Desk from Shades of Blue Interiors
This desk is not just stylish, it has the perfect hidden vanity inside!
22. DIY Desk Under $100 from Handmade Haven
Can you say farmhouse glam? The finish and hardware on this desk look great in this space.
23. Industrial Wall Mounted Desk from Houseful of Handmade
This one might be small in size, but it’s big on rustic industrial style.
24.
 DIY Vanity Desk from Handmade Haven
This is a simple desk with drawers and straight legs made from 2x2s. The stenciled top and gold paint make is chic!
25. “Floating” Broken Leg Epoxy Resin Desk from Woodshop Diaries
This desk is a simple design but with a twist! The epoxy legs make it look like its floating! There is also a hidden drawer!
26. Modern Desk with Monitor Stand from ToolBox Divas
Having your monitor at eye level is key in helping keep your neck and back from hurting, this desk has the solution built right in. Plus I love the angled pre-made legs!
27. Vanity Desk with Deep Drawers from Jaime Costiglio
Deep drawers for better function and cute colorful drawer pulls make this vanity desk and tween or teen dream.
PIN THIS TO PINTEREST
28. Built-in U Shaped Desk from Charleston Crafted
When you need to fill an awkward nook, this u-shaped design is the perfect solution. It gives you tons of workspace and storage!
29.
 DIY Storage Desk from Woodshop Diaries
A more classic design. This can look a little intimidating to build but it really isn’t! The tutorial and plans are very detailed!
30. House Frame Kids Desk from Handmade Haven
I had to include this! I think its the cutest desk and every kid’s dream come true! What could you create at this desk made to look like a house?
SO, what do you think of all these desk ideas?
Which one will you pick to build?
PIN THIS TO PINTEREST
Don’t want to build? Check out these 20 stylish and affordable desks to buy!
More projects to make your desk space better –
- DIY footrest under desk
- DIY laptop stand
- DIY corkboard
- DIY acrylic and wood pencil holder
- DIY phone and photo holder
35 Best Desk Ideas for Handymen (Build a Desk in 9 Steps)
Buy Now
Building desks is a trend for modern homes and small offices, especially if you work from home. The idea is to create something functional yet classy enough to match any interior design. Check out these awesome desk ideas.
The best part about it is that you can come up with your own design by turning to specialized image editing software like SketchUp, which is online and free to use. However, if you need inspiration, you can find many DIY desk projects on the web.
Picking a specific design depends on multiple factors: available space in your home, budget, and woodworking skills. Of course, the last part is optional since you can always hire a professional woodworker to create the custom office desk of your dreams.
Best DIY Desk Ideas to Try
If you need inspiration, check out the following DIY desk ideas.
1. Fold-Down Wall Desk – Small Desk with Storage
A fold-down wall desk is an excellent solution for people who live in small homes or studio apartments. In addition to its compact size, the desk folds up when not in use so that it doesn’t get in your way.
The bad news is that the desk isn’t sturdy enough to support a lot of weight, so you shouldn’t try to place anything heavier than a laptop on it. For example, don’t think about using your printer here since the desk will probably break down.
On the bright side, you can use this desk for other purposes when you’re not working on your laptop. For example, you can work on crafting projects, write, draw, and even iron your clothes. Furthermore, you can take advantage of the small storage space that comes with this design.
Head over to DIY Huntress to get the full details on how to make this small desk with storage.
2. Simple Two-Person Desk
A person who works from home knows the importance of having a good desk. This is where you can place your computer, set out lovely decorations, and even put together small crafts with your kids.
If you work with someone else on a regular basis, like a spouse, family member, or friend, you might want to consider creating a simple two-person desk.
This way, you can both sit comfortably while working on projects, which is especially important if the work requires intense concentration.
And, when the second person is on vacation and not working on the nice desk, you can use it as extra space for printers, scanners, boxes, and so on.
You would think that building a DIY desk with drawers for two would be complicated, but this project proves otherwise. All you need are a couple of drawers, a butcher’s block, and wood stain.
DIY Domestic Blonde has all the details for this project, so check it out.
3. Wood Crate Desk – Cheap Office Desk
Some people are definitely committed to recycling. They think outside the box for their creative projects and want to find new uses for old objects.
If you’re one of them, you should consider making a wood crate desk, especially if you’re on a budget. It’s a terrific idea since using repurposed crates is inexpensive and doesn’t require too much storage space in your home office.
The good news is that, if you don’t already have them, you can find large wooden crates for free or at a meager cost. These are available in many stores, usually near the produce section of your local supermarket. Just talk to some employees and ask if they have anything old lying around.
You would think that building a cheap office desk out of several crates is complicated. But visit Making Manzanita to check out the intuitive instructions and photos.
4. DIY Farmhouse Corner Desk
The farmhouse style is quite popular among DIY enthusiasts, so it’s no wonder that many of them have created a unique corner desk with a farmhouse flair.
This design is a fantastic solution for a home office since it allows you to customize the structure and take advantage of two adjacent walls, especially if you want access to plenty of natural light while working on the computer during the day.
For example, if you’re tight on space, you can place the desk against a wall, which will give you extra room for putting together crafts or folding clothes. You don’t need elaborate DIY corner desk plans for this.
Furthermore, if you work with someone else on a regular basis, they can use the desk as an extension of their own computer station by turning it into a home office desk for two.
Our Repurposed Home has prepared a nifty tutorial that demonstrates how to transform two old doors into a DIY L-shaped desk with storage by following straightforward instructions. And, if you need extra storage, you can place a couple of wood creates under the desk.
5. Simple DIY L-Shaped Corner Desk with Top Shelves
An L-shaped desk is a smart choice for anyone looking to save space and add plenty of storage. It typically takes up less than three feet of floor area, yet it offers work surfaces on both sides and underneath them for printers, scanners, box files, or even baskets.
This particular model features a simple hardwood desk with three L-shaped shelves of the same material and color. The shelves are attached to the wall above the desk, which you can use for extra storage or decoration. We love the built-in look and natural color.
You don’t need a degree in woodworking to make this DIY L-shaped desk. It’s a comfortable project even for beginners since the tutorial from Honey Built Home provides all the necessary measurements and step-by-step instructions.
6. DIY Cheap and Simple Desk
If you’re on a tight budget or simply don’t have enough time for creating an elaborate custom desk, try making this simple model. It looks fantastic and takes up minimal storage space, making it perfect for small-sized apartments.
It’s also easy to customize since you can use different stain colors or paint the finish to match your decor. The desk design is so elementary that it doesn’t feature any drawers, baskets, or other storage space. But we’re sure you can work something out, like installing a cabinet nearby.
There’s no need to create complicated and time-consuming DIY plans for this beautiful desk. Angela Marie Made has shared the required measurements and step-by-step instructions. All you have to do is follow them to craft a simple wooden desk under $45.
7. DIY Floating Desk
Many people prefer floating desks because they have more room underneath and don’t bang their feet against wooden or steel legs. And it’s hard to ignore the minimalistic design it brings, especially when paired with a floating shelf made of the same material.
This DIY floating desk is a great solution for home offices because it adds an airy look to the room. Even though there are no legs, the desk sits firmly on the wall since it’s nailed tight. And there’s enough room for a home office desk for two.
The design also makes it easier for you to maintain cleanliness since all you have to do is wipe down the surface after working on your notebook. It’s best to use a clear varnish for preserving the beautiful color of the desk, so it’s worth adding to your list of projects.
Check out the complete instructions for this exquisite model at Within the Grove.
8. Desk Recycled from an Old Door – DIY Door Desk Ideas
Recycling an old door into a reliable desk is the perfect project for anyone looking to add a rustic touch to their home office. This design features an old door attached to a long wooden desk base.
If the door has chippy paint, you can leave it as it is to preserve the natural vintage feel. However, you might be interested in painting the apron and legs to a color that matches your overall decor, like black or white.
Furthermore, it’s necessary to install glass or plexiglass on top of the door (depending on your budget) to even the surface. The desk offers a vast amount of storage space underneath, which is great for keeping printers and other accessories.
If you’re interested in building this DIY door desk to design a French cottage farmhouse home office, head over to Live Oak Nest and look over the intuitive instructions.
9. Butcher Block Study Desk
If you don’t have a lot of time to create a custom design for your home office, consider making a study desk using a butter block countertop and a couple of drawer units to sustain it.
The DIY butcher block desk from this picture is made from birchwood. However, it was coated with a dark walnut stain and sealed with satin polyurethane.
As for the drawer units, you can retain their original color, especially if they’re light since it adds a lovely contrast to the butcher block. On the other hand, you can spray-paint the hardware to make it pop.
The storage area is the real star of this project because you can use it to stash office or computer supplies. And if you need more storage, consider building floating shelves. We absolutely adore the mail holder showcased in this image, which was repurposed into a file folder to match the sturdy desk.
With the right tools, materials, and detailed instructions from Beneath My Heart, anyone can build this DIY file cabinet desk for an office or study room. Add unique details to the drawers, like leather handles, to make it even more stylish.
10. Repurposed Piano – Unique and Fancy Desk Plans
Do you come across a lot of old pianos for sale? Or maybe there’s one in your garage that hasn’t been played in years. Well, instead of letting it rot away, consider transforming it into a stylish large wooden desk that’s custom-made for any space. It’s a unique and fancy desk plan that creative minds will surely appreciate.
This particular model has glass installed to protect the keyboard and make the surface even. It’s sturdy enough to sustain notebooks and laptops but delicate enough to accommodate any decor.
However, you will need plenty of room to accommodate this desk design since a piano is quite big. On the bright side, you can use the extra storage space on top to stash away books and notebooks or display decoration pieces.
For more inspiration on transforming an old piano into a homemade desk, check out this Pinterest post.
11. Floating Work Desk with Hidden Storage
People who want a clean office design will love this floating work desk with hidden storage. It’s a unique desk design that can be adapted to any room. But it works best in a nook since you can fit the desk wall to wall.
The most appealing part about this home desk idea is that it features hidden storage to stash away books, files, office supplies, or small computer hardware.
You just have to close the door when you don’t need to access the storage area. Plus, you can place your keyboard on the door when it’s open.
No legs are necessary for this simple wooden desk since it’s supported by two walls. So you don’t have to worry about hurting your legs when working in a tight space.
If you need additional space, consider shelves on the wall above the small modern desk. You can also install several cabinets to keep office supplies or decoration pieces away.
Watch the YouTube video tutorial uploaded by DIY Huntress to find out how to build this beautiful DIY wood desk.
12. DIY Floating Long Desk
A DIY floating long desk is an excellent solution for those who want to save money on their home office but also to have enough working space. Even beginners can build it without too much trouble.
The most important part of this project is obtaining a large piece of wood to build a long office desk. A butcher block countertop would be the best option since it’s durable.
However, you should be able to also get away with plywood, which is cheaper. If you can’t find a single piece of wood that’s large enough for your home office, consider using two smaller pieces that will be joined in the middle.
You don’t need to build any legs for this long desk table since you can use heavy-duty L brackets made from stainless steel. This also helps create a clean design with plenty of free room underneath the desk for storage purposes.
For more details, head over to Ms Handy Housewife and check out the full guide.
13. Small Desk with Storage
If you have limited space in your apartment but still crave a home office, then this small DIY writing desk is perfect for you. It’s a little desktop design that provides storage to some degree but without taking up too much space.
Since the top of the small wooden desk is plain, it can also double as a craft space. And you can fill up the drawer with office supplies when necessary. You only need a few nails and an electric drill.
Then, hang your favorite decoration pieces on the wall above your new desk design or enjoy the natural light of a large window, depending on how your room is displayed. In any case, this small desk table helps save space without compromising style in any way.
Check out the step-by-step guide by Addicted 2 Decorating to find out everything there is to know about building this cheap small desk.
14. IKEA Alex Desk and Drawer Hack – Double-Desk Home Office
Even if you have a small apartment, you can enjoy having a home office using an IKEA Alex desk and drawer hack. It’s significantly cheaper than ordering a custom-made desk. And you can make your own design in a free software editing program to create something modern, compact, and fit for your home office.
Head over to Hydrangea Treehouse to see what we’re talking about. For the home office desk idea shown in the photo, the DIYer used a couple of ALEX drawer units with drop file storage and EKBY ALEX shelves with drawers from IKEA, paired with a plywood tabletop.
As you can see, no woodworking skills are necessary. Instead, it’s just a matter of finding and assembling the right pieces from IKEA to create an extra-long desk to accommodate two or three people.
However, if you use only two drawers with one shelf, you can just as well craft a beautiful small desk with drawers for tiny rooms.
15. Modern Farmhouse Narrow Desk from Ana White
Ana White provides the best step-by-step guides for building farmhouse furniture, DIY home accessories, and so much more. She has even assembled an amazing collection of modern farmhouse desks.
This modern farmhouse narrow desk is part of her collection and can suit a home office or any other room. It has a great design, thanks to the thick wood, which makes the desk feel sturdy.
However, there is no storage space for this DIY office desk. If you need some, you can build shelves or install a drawer unit near the desk. On the plus side, this water-resistant desk is easy to clean and can look great in any home office without spending too much money.
You can download the DIY desk plan from Ana White at no cost. It involves building the desktop, sides, front and back, leg frames, angle supports, and bottom side, front and back trim. Optionally, you can add corner brackets and protective felt or rubber feet.
16. DIY Standing Desk
If you want to be more ergonomic while working at home, then consider building a DIY standing desk. It’s a great way to stay healthy and get rid of back pain that’s often associated with long sitting hours in front of the computer.
Start by measuring your height and buying plywood boards accordingly. 2x4s can work too, but plywood is lightweight and durable. Then, cut the boards to size and screw them together to create a standing desk with storage space for office supplies.
To make sure your cool desk doesn’t feel unstable or wobbly, you can use brackets and braces. Finally, paint it the way you want and assemble your new standing desk.
We also love this DIY sit/stand desk made by Field Treasure Designs. Whenever you feel like sitting, you can use a barstool.
It’s quite beautiful since it’s made from untreated fir. And there’s ample storage beneath the desk in the back for holding a printer, scanner, and other bulky computer hardware or office supplies.
17. IKEA Hack DIY Adjustable Standing Desk
If you don’t have much woodworking experience, then consider making a DIY adjustable standing desk using various IKEA components. Granted, it’s more expensive than a woodworking project, but it’s easy to assemble. And you won’t have to worry about back pain anymore.
Josh Medeski proposes a nifty plan to build a DIY standing desk converter: a KARLBY countertop, two ALEX drawer units, and an adjustable-height workspace like BEKANT.
It makes it easy to adjust the height of the desk since you place the countertop on the desk frame and not directly on the drawer units like in other examples we’ve seen so far. It means that you can pull up a chair and relax sitting in front of your desktop desk whenever necessary.
Visit Josh Medeski to discover more information about this awesome IKEA hack for building a DIY computer desk with an adjustable height.
18. Narrow Wall-Mounted Desk
In case you’re short on space but don’t want to sacrifice aesthetics, consider building a narrow wall-mounted desk. It’s a simple and inexpensive option, ideal for rookie woodworkers.
This design is perfect for creating a home office in a small room without taking up too much space. Furthermore, the skinny desk works great in a guest room, kid’s room, or even the family room.
More Like Home offers several options for building this thin desk, making it a versatile project. For example, if you prefer the original wall-mounted design, you just need a couple of brackets.
However, if you fear that the cheap DIY desk will collapse under its weight, you can add wooden or hairpin legs for additional support. More storage can be obtained by double-stacking a pair of drawers.
19. Kids Homework Hideaway Wall Desk
Kids will love their new homework hideaway wall desk. And they’ll never leave home without doing their tasks again.
This DIY desk idea is a creative solution to the problem of a lack of space, and it’s simple enough for most DIYer beginners. You can build this desk as big or small as you need, depending on your needs and available materials.
The secret is that the surface and legs are foldable. It’s only necessary to pull it down whenever it’s time for homework. Then, your kids can close the lid and enjoy playing with toys on the floor without bumping their heads on the desk.
You can also install a removable chalkboard on the back of the surface so that kids can draw after finishing their homework. What’s more, the cute desk idea has plenty of storage space for toys or school supplies. And parents will no longer have to face clutter since it also acts as a DIY desk organizer.
Visit Organized Mom to get the complete instructions for this inexpensive desk. We promise that you will absolutely love the results.
20. Easy DIY Kid’s Desk
Here’s a simple idea for a DIY kid’s desk that’s mounted to the wall and takes up little space. It’s inexpensive, too, since you can build it for under $50.
This small desk is the perfect solution for any room. It’s great if you lack space or want to make an office out of your kid’s bedroom. Or you could also use it in the living room or den.
If you’re wondering how to build a desk for your kids if you’re not a skilled woodworker, Family Handy Man provides step-by-step instructions with pictures that any rookie DIYer can follow.
You have to locate the studs, mark the desk height, attach the brackets, sand the wood board, apply wood conditioner and stain, and attach the desktop to the brackets.
Granted, you might feel that there’s not enough storage space, but you should be able to fix this problem by installing a couple of shelves above the desk. Be sure to use the same wood, conditioner, stain, and brackets to preserve the style.
21. Live Edge Wood Desk – Bedroom Desk Ideas
Here’s a unique bedroom desk idea for home decor lovers. Who would have thought that you could create an eye-catching live edge wooden desk without any professional help?
The design is both practical and rustic, with midcentury modern appeal. It’s a wonderful way to add some warmth and comfort to your living space. Plus, it also doubles as a DIY craft desk.
The Merry Thought has a detailed tutorial on how to build this modern home desk using two wood slabs like spalted maple. You also need wood glue and a clear polyurethane finish.
However, you will have to do some carpentry work to cut the wood and attach the cross braces. Thankfully, all these instructions are easy to follow.
The DIY home office desk is mounted to the wall. However, if you feel that the wood slabs are too heavy, don’t hesitate to add sturdy legs for extra support.
22. DIY L-Shaped Standing Desk
Check out this budget-friendly solution to build your own desk. It’s L-shaped, which makes it possible for two people to work simultaneously.
Or you can use the extra room for storing your bulky items. Furthermore, the DIY L-shaped desk has a standing design so that you can put the barstool away whenever you need a break from back pain.
What sets this custom computer desk apart from others with a standing design is that it’s mounted to the wall, so it takes up minimal space in your office. Furthermore, it doesn’t have an adjustable desk frame, which means that it’s cheaper to build. You do need a couple of barstools, though.
A Beautiful Mess explains the entire woodworking process in detail. It includes cutting the board, sanding the cut edges, wiping down the surface, and attaching shelf brackets to the wall.
No DIY desk legs are necessary. And, if storage becomes an issue, feel free to add a couple of corner shelves on the wall.
23. DIY Vanity Desk with Three Compartments
A vanity desk is typically used as a makeup table. It has a spacious tabletop and several drawers and cabinets for storage. They are often equipped with a mirror and other accessories, such as a stool or chair, to make it easier for the user to get ready in the morning.
However, if you build a DIY vanity desk with a foldable design, you can use it to work on your laptop, craft, draw, write, or any other activity that requires a smooth surface. And it perfectly fits bedrooms.
We love this vanity desk from Shades of Blue Interiors, which includes three compartments that you can control independently. And each comes with its own mirror.
You can quickly download the woodworking desk plan for this project to start working on a vanity table that’s 4-feet long, 18-inches deep, and 29-inches tall.
It explains everything you need to know, from building the lower frame and desk bottom to painting the desk, attaching brackets, and adding mirrors to the lids.
24. Polished Concrete Desk – Office Table
Here’s something you don’t see every day: an office table with a polished concrete tabletop. It’s certainly sturdy and easy to maintain, making it an idea for low-maintenance home offices.
Besides, you have plenty of storage space, thanks to the custom-made drawers. And the desk is big enough to hold all your devices, including printers, scanners or fax machines. It also doubles as a home office table whenever you need the extra space.
The polished concrete tabletop has a big wooden frame. But if you feel that it’s not strong enough, you can replace it with a stainless-steel frame for heavy-duty projects. This DIY desktop table can last for years to come, so take all the time you need for this project since it’s not quick.
Instructables guides you every step of the way for making this wide desk, like building the wood desk frame, constructing the concrete form, and adding supports and embedded objects. You will also need to pour the concrete, grind and fill the holes, polish, and assemble everything.
25. Leaning Wall Ladder Desk – Ana White Desk
The leaning ladder design is unique for a small desk with shelves on top. And you can build it with simple tools and a handful of boards. It’s a straightforward project that will have you up and running in a weekend.
The ladder-style design means that you can lean it against any wall without worrying about the limited space on your desktop. And you don’t have to worry about the entire thing falling apart since you can nail everything to the wall.
Evidently, the best part about this built-in office desk is the number of shelves. You can store just about anything there, from office supplies and gadgets to plants and family photos. However, the desk area is large enough to only fit your laptop or a monitor with a keyboard if you prefer working on a desktop computer.
Ana White offers complete instructions and building plans for this cool office desk, so be sure to check it out.
26. DIY Farmhouse Desk
This DIY farmhouse desk looks so comfy. You can pull up a chair, get cozy, and get down to work. As for the design, it has a solid wood tabletop with a warm-looking finish finished with white painted legs.
A bit of storage is available under the DIY plywood desk, although it doesn’t feature any shelves. Instead, you can directly place a printer or something similar there. Or you can opt for storage baskets to keep your small items.
If you go to Handmade Haven, you’ll find out everything you need to know about this project. Start by assembling the outer desk legs, creating decorative X pieces, adding the middle desk leg, and putting together the whole desk.
Then you can add decorative V pieces, assemble the DIY desk side, add desk shelving, as well as construct and attach the tabletop. We love the rustic feel brought by this DIY studio desk.
27. Secretary’s Desk Upcycled from an Old Dresser
The secretary’s desk exudes vintage style with its raised panel design. It’s certainly a classic. And you can make sure that it will fit in your bedroom.
This project is fairly simple, so you have no excuse to skip building this beautiful piece of furniture. The Domestic Heart used a nifty and inexpensive trick: upcycling an old dresser found on Craigslist for only $10.
If you want to follow in their steps, you have to remove the drawers to keep open storage only. After removing the paint and sanding the dresser, you can install shelves by drilling pocket holes and adding drawer slides.
Feel free to stain the drawer with wood before painting it with any color you want. It’s also worth applying a finishing wax.
Basically, you need to pull out a DIY desk shelf to create a working area for your laptop and then put it back in when you’re done working; there’s plenty of legroom. You don’t even need to put your laptop away when closing the shelf since there’s enough room to store it inside your new secretary’s desk.
28. Butcher Block and Piping Desk
This butcher block and piping desk is a stylish addition to any home office. You can also use it for crafting, although the main purpose of this DIY furniture is to create a laptop workstation.
Butcher block countertops are notorious due to their high appeal and natural feel. Besides, they’re also practical since the material of the low desk is easy to clean and can last forever if you treat it right.
In this case, though, we deeply appreciate the industrial design brought by the pipes used as desk legs. They’re not only beautiful but also create a minimalistic look that suits any modern home. Furthermore, this particular model has wheels attached, making it simple to change the position of the DIY pipe desk whenever necessary.
On the downside, there are no built-in desk shelves or any other type of storage. So you will have to make do with a couple of baskets, wood crates, or custom shelves if you’re feeling up to the task. Just make sure to match the existing decor.
You can find out more about this exquisite design at House by Hoff.
29. DIY Corner Desk – Bedroom Desk Ideas
This DIY corner desk is an excellent solution for people who are looking to create a modern workstation in their home office. The best thing about it is that you can configure it however you want, which means you can use this table in multiple ways.
Be creative and don’t limit yourself to the standard table shape. You can customize the desk by adding drawers, shelves, or cabinets.
This way, you will keep all your work supplies organized and set up the best conditions for using your laptop or doing paperwork. You can even use this piece of furniture as a reading station in your bedroom.
Visit Shanty 2 Chic to discover all the necessary instructions for making this lovely DIY L-shaped desk.
30. Mounted Wall Desk for Two – Dual-Desk Home Office
A mounted wall desk for two people is a truly creative workbench idea, especially for those who are short on space. It offers an excellent solution for working on two computers on the same surface.
And, when one person isn’t working, the other can take advantage of their space. Besides, it’s impossible to not notice the splash of color in this picture.
The Crafted Life provides step-by-step instructions for making a smart dual-desk home office in this manner, without adding any desk legs to support the long narrow desk. Arguably, the most challenging part is finding and installing the wall-mounted storage system that keeps the shelves in place.
However, if you prefer something easier, we suggest using IKEA’s BOAXEL system. It allows you to fully personalize your storage needs with shelves and mesh baskets. Besides, the system is modular, so you can change the layout as your needs change in time.
31. DIY Murphy Desk
When you have kids and not enough room for all their needs, it’s vital to come up with practical storage solutions. If you’re looking for a simple desk that folds up when not in use, we suggest building your own DIY Murphy desk.
It’s one of our favorite DIY home office ideas because it offers an abundance of storage possibilities. However, you can configure your workstation however you prefer. For example, you can use it as a desk, crafting area, or drawing table.
And, when it folds up, the desk displays a chalkboard for kids to play with. At the same time, it frees up floor space for other activities.
As far as functionality goes, the Murphy desk is similar to the hideaway wall desk for kids that we talked about earlier. However, the design is different, so it all depends on your tastes.
Shanty 2 Chick offers free DIY computer desk plans for download, so be sure to get them right away.
32. DIY Gaming Desk
If you need a larger, more complex workstation for your home office or game station, try building your own DIY gaming desk. It’s an excellent idea if your room doesn’t offer much space for furniture.
The main idea behind this creative piece of furniture is to build it in such a way that it leaves plenty of floor space when you aren’t using it. So, gamers can store their gaming consoles, controllers, and games in the drawers or shelves.
And when friends come over to enjoy some friendly competition, you won’t have to worry about whether they can find a place to put their stuff while waiting for you.
The only downside is that this custom PC desk requires serious woodworking skills. However, if you’re up for the challenge, check out the full instructions provided by Popular Science.
33. Deep Desk from an Old Door
If you’re too nostalgic to part with an old door that you can’t possibly use anymore, you’re in luck. Instead, you can transform it into a deep desk with minimal woodworking skills. It’s a terrific home office storage option if you’re looking for a functional and stylish, modern and traditional desk at the same time.
What we like about this DIY project is that you can apply any finish to this workstation your heart desires. For example, you can use chalkboard paint to create a touch of magic on its surface.
And, even if you haven’t used woodworking tools in the past, you can follow the simple instructions provided by Nourish and Nestle to see everything you need to do for this computer desk idea.
You might enjoy the fact that it’s not necessary to build a tabletop underframe from the ground up. Instead, you can purchase IKEA’s BEKANT in white or black and use it to support the door.
It’s also necessary to install glass on top of the door to create an even surface. This way, the glass is easy to clean, protects the door, and lets you see it at all times.
34. Easy DIY Treadmill Desk
Many hardworking people have trouble finding time to work out at home, especially when they have to deal with kids and house chores. Some of them resort to standing desks, but standing still for a long time can be damaging for your spine.
Moving around is better, so you can make the best out of both worlds and design a DIY treadmill desk. It’s exactly how it sounds: building a small working area on top of your treadmill. You can hardly call it a desk.
Oh The Things We’ll Make has come up with a simple yet ingenious plan for this project: building a tiny desk on a treadmill using a wooden board, a wooden strip, screws, eye hooks, and bungee cords since they’re durable.
Don’t worry since you won’t damage your expensive treadmill in any way. Plus, the desk is removable. We think this is the most exciting idea on this list for health-conscious individuals.
35. Floating Desk with Shelves on Top
A floating desk with shelves on top is a great way to add storage and free up floor space in your home office. This model is perfect for a nook, thanks to its wall-to-wall design. And, since there are no legs, you don’t have to worry about bumping your feet under the desk.
For additional storage, it’s best to build floating shelves that match the desk’s appearance. This way, you will have enough room to store your devices and files, or to display plants or toys.
This DIY wall-mounted desk is easy to build, as you can see by reading the step-by-step guide provided by The Navage Patch. What you need is a butcher block countertop (birch is fine).
How to Build a Desk
Having a dedicated workspace is important for productivity, but an affordable desk that matches your home office is hard to come by. Here is how you can build a desk easily:
Step 1: Gather tools and materials
- A sheet of plywood or MDF board (3/4 x 24 x 48 inches)
- 4x L brackets
- Wood screws
- Hack saw
- Tape measure
- Screwdriver
- Sander
- Ruler
Step 2: Take the measurements
Measure and cut down the plywood sheet so that it does not rest on the floor. The top of the desk should be about 36 inches high and 30 inches deep to accommodate a standard chair. Depending on your height, you may need to make adjustments.
In the following step, measure and mark two 33 3/4-inch strips of plywood along the width of the sheet.
Step 3: Cut the plywood
Cut down the plywood strips using a hack saw. These thin boards will serve as shelf brackets for supporting thin shelves that hold books or other objects found in a typical home office setting.
Step 4: Drill holes
Drill holes into each shelf bracket using a drill bit suitable for making holes into thin wood; it should be shallow) Space each hole 2 inches from each edge and center it vertically between one another so that they line up when attached to the top of the desk.
Step 5: Create the back support
Measure and mark a 5-inch strip of plywood that will serve as the desk’s back support for the desk. Cut it down using a saw.
Step 6: Sand the wood
Sand the surfaces to smooth out the wood. If you’re using thin plywood, you can skip this step.
Step 7: Assemble the shelf brackets
Assemble the shelf brackets onto the side of your desktop by screwing each one down tightly. Use two screws at each bracket to make everything extra secure.
Step 8: Add the back support
Screw in the back support piece you cut out earlier at the center bottom – behind where your chair would go. Make sure that these screws are below the area where you plan on placing any books or objects – they will hold them without having to drill extra holes.
Step 9: Finishing touches
Place the top shelf at a height comfortable for you and fill it up with books or objects of your desire. You can also add an accent piece such as a lamp, plant pot, or something to spruce up the desk’s look.
You’ve just built yourself a stylish and affordable home office desk that would rival those stands sold at IKEA. If you feel ambitious, you can always add other features such as enclosed cabinets and drawers. Have fun personalizing your own workspace.
How to Paint a Desk
Here’s how you can easily paint your desk:
Step 1: Disassemble the desk
Disassemble the desk completely, removing all of its hardware. Place each piece in a Ziploc baggie with a corresponding label that describes where it belongs on the desk.
Step 2: Sand down any rough surfaces
Use an electric sander to smooth out any rough edges or splinters on your wood pieces.
Step 3: Clean the surfaces
Wipe down all of your pieces with rubbing alcohol to remove dirt and let them dry. Allow at least 24 hours for drying since you don’t want moisture getting into the joints of your wood while they are still vulnerable. While waiting, make sure everything is labeled correctly.
Step 4: Paint the desk
Apply several thin coats of paint evenly across all surfaces; be sure that each coat has dried completely before applying the next one. This step will require at least two full cans of spray paint.
Step 5: Apply polyurethane
Use an applicator or foam brush to apply at least two coats of polyurethane. Be sure that you are applying it evenly across all surfaces for maximum protection. Wait about 15 minutes between each coat, and allow the desk to dry completely before moving on. Pro tip: you can use a blow-dryer set on low heat to speed up the drying process if necessary.
Step 6: Reassemble your desk
Reattach any hardware you removed, screwing parts together tightly; you may want to tighten them further after allowing time for reassembly. Place your new desk where it belongs, and enjoy your handy work.
How to Organize Your Desk
Organizing your desk is an important task because it will determine how much you can accomplish during the day. Your work tools should be easily accessible and your desktop clutter-free.
Besides, it’s also about creating a place where you can focus efficiently on what needs to get done right now. Only then will you be able to maintain a good workflow throughout the day.
Here are some general tips for how to organize your desk:
- Clean the desk. It seems pretty straightforward, but make sure you go all the way around your desk with a dust rag. It doesn’t take long and will make everything look lovely when you’re done.
- Hide cords. If you have a desktop computer, you probably have a ton of cords laying around. The good news is that there’s an easy way to hide these cords and keep things looking sharp. Try using wire or cable ties, which can be purchased at most hardware stores for less than $10. This way, you can thread the cables before tying them together in a knot. And it makes it easy to remove cords during cleaning or rearranging.
- Put everything in place. Discard all unused items and place the ones you need in their place. You can use drawers, bins, and even trays for office supplies, computer devices, toys, and so on. If there’s not enough room on the desk, you can place them on the floor in different configurations.
- Organize by importance. Arrange items in the most appropriate way, starting with essentials closest to you and ending up with less important things further away. Or, if this doesn’t work for you, just do it chronologically so that you start with what needs to be done first.
- Go vertical. If there’s insufficient space on your desk, beneath it, or next to it, then vertical space makes the most sense when organizing your desk. Try stacking items vertically in a simple organizer. Or, you can install shelves if you’re facing the wall, which you can also use to keep plants.
- Reassess the color scheme. You might be surprised by the level of impact that colors have on your productivity.
If they’re too loud, they will distract you. So if you want to be productive in a long run, consider changing the color scheme in your workplace for something neutral.
- Add plants. The right plants not only make your room smell fresh, but they can also make it look great. And this is especially true for small and simple spaces like a home office or a studio apartment. If you don’t have green fingers, consider low-maintenance plants that require little water and won’t need your constant attention.
- Get rid of distractions. If your computer is acting as a distraction magnet, try getting rid of all unnecessary tabs or minimizing browser windows altogether. Remember that having too many windows open might make you feel overwhelmed.
- Don’t be afraid to tell people no. Even if you are a fan of multitasking, it might not work for everything, so consider saying no when asked to do something that will take up too much time or energy.
It particularly applies to work-from-home individuals who receive calls from friends or family in the middle of the day because they haven’t yet grasped the concept of working from home doesn’t mean procrastinating.
DIY Desks FAQ
Learn more information about DIY desks.
How do I organize my desk?
There are several ways you can go about organizing your desk, but one of the most effective options is installing under-desk storage for your computer devices or office supplies. It will keep everything you need within reach, which makes it easier to work quickly and efficiently.
What kind of organizer should I use to make my desk look good?
You can use 3M hooks to hang up many items including calendars, photos, and cork boards. Don’t forget about other useful items like cord organizers or pencil cups. They come in different shapes and sizes, so you’ll be sure to find something that fits the style of your home office perfectly.
How do I choose the right color scheme for my workspace?
You should pick an accent color that gives you energy when looking at it. It’s also important to keep in mind that specific colors can help boost creativity or productivity. For example, green has been scientifically proven to stimulate ideas. At the same time, blue calms the brain and enables you to think clearly.
How tall is a desk?
If you’re wondering what the standard desk height is, you should know there’s no correct answer. The most important thing to consider is the height of your computer monitor, your work habits, and your preferences.
If you’re thinking about building a standing desk, be sure to choose what’s most comfortable for your height. At the same time, there should be enough space beneath the desk to hold a barstool if you feel like sitting.
Are standing desks good for you?
Yes, standing desks are good for your health. Studies have shown that sitting for extended periods of time can increase your risk of serious conditions like obesity, diabetes, and cardiovascular issues.
However, a better idea is to remain active while working at the desk. One solution is to resort to a DIY treadmill desk, which we have already covered earlier in this article.
Final Thoughts on DIY Desks
DIY desk projects may vary in appearance, style, and design. However, the underlying idea is always the same: making a sturdy surface where you can focus on your work without worrying about damaging the desk itself.
DIY desks are a great way to save some money and add some personality to your workspace. Since you can decorate any of these desks, they will fit in with any modern or rustic decor. In the end, building a desk is stress-free and fun.
What are your favorite DIY desk ideas? Feel free to share your thoughts with us in the comment section below.
How to make a desk with your own hands: step by step instructions
Today the market offers the widest selection of furniture of various designs, models and purposes. Manufacturers also take into account the financial capabilities of buyers, so in furniture stores you can find products made from various materials. And in the exhibition pavilions you can see products with a variety of designs and construction features: from the cheapest and simplest to exclusive models made of expensive wood and decorated with original fittings.
Households can consider pieces of furniture made by the hands of a home master as a special chic.
But household members can consider as special chic pieces of furniture made by the hands of a home master. Experts say that learning how to do it yourself is not so difficult: the main criterion here is desire.
Of course, in addition to the desire to do something yourself, some skills in handling the tool are also necessary.
To make the table more aesthetically pleasing, the screw positions can be covered with decorative caps. 9Ol000 DIY desk
Benefits of DIY
Of course, in addition to the desire to do something yourself, some skills in handling the tool are also necessary. And if you master them, you can experience the significant advantages of making any piece of furniture with your own hands. For their formation, it is recommended to start with the manufacture of simple products, which include a table, for example, a desk. At the same time, its design can be elementary, without cabinets or drawers. If an experienced home master takes up the matter, he will be able to make exclusive furniture. The advantages of independent work on its manufacture can be noted:
- significant savings in the family budget;
- the ability to choose the material of the future table to your liking;
- develop a user-friendly design;
- take into account the layout of the apartment and its interior.
For their formation, it is recommended to start with the manufacture of simple products, which include a table, for example, a desk.
In addition, a home master can realize his creative energy, but do it slowly, taking into account the existing skills and the availability of free time.
If an experienced home craftsman gets down to business, he will be able to make exclusive furniture.
If you work slowly, then the furniture “first pancake” will not be lumpy.
We decide on the design and construction
Before you start making a desk with your own hands, you need to decide on the design of the future product and its design.
The table top is attached in the same way.
The design must be chosen taking into account skills, abilities and capabilities. If the skill is still small, you should not take on a complex scheme – working on it will not only take a lot of time, but can also be a source of disappointment, as problems will inevitably arise that a novice home master is unlikely to be able to solve right away, and work may stop.
In addition, a home master can realize his creative energy, but do it slowly, taking into account the available skills and the availability of free time.
The top of a table made for a baby can be decorated with colorful strips of fabric or ribbons, fixed firmly on the top, and then varnished.
In order for it to bring joy and the result to become an object of admiration for the whole family, first you need to choose the simplest design of the table – without many additional elements. It can be an elementary classic table, consisting of a tabletop, two sidewalls and a back wall, made without frills and frills. The first experience will take a long time; failures and unforeseen problems are possible. Therefore, having undertaken to make a desk with your own hands, it is worth refusing to equip it with drawers and add-ons for the time being. But if the skill of the owner of the house is not in doubt, you can let your imagination run wild, and there may be:
- student’s desk with drawers on one or both sides;
- table with drawers and bedside table;
- double pedestal design;
- with “add-ons” from shelves, boxes, racks;
- compact corner;
- with a niche in the space under the worktop and others.
Before you start making a desk with your own hands, you need to decide on the design of the future product and its design.
Don’t give up on the original 19th century design, with elegant curved legs or a bureau or “desk” design. The more boldly the home master will experiment, the more original the interior of the office or work area will look.
The design must be chosen taking into account skills, abilities and capabilities.
The desk is a rather austere product, so decoration options may be quite limited for some.
Materials needed
Along with the construction and design, you need to choose the material to make the table to your liking, from traditional wood to glass top. Of course, the right of choice remains with the master, but in order for the product to be durable and functional, one should not abandon traditional materials that have proven their strength and reliability.
| Material | Features |
| Natural wood | Environmentally friendly, prestigious and expensive material. Differs in a huge palette of shades and an originality of drawing of wood. |
| Chipboard (chipboard) | Despite the cheap base, which includes small chips and chips, it is durable. Facing with decorative veneer makes it aesthetically attractive. |
| MDF, considered a new generation of chipboard | They successfully combine the best technical properties of chipboard and the environmental friendliness of wood. |
This can be an elementary classic table, consisting of a top, two sides and a back wall, made without frills and frills.
Required tools
When the design features are determined and the material is selected, it is necessary to prepare tools that cannot be dispensed with in the work. The “mandatory minimum required” used by experienced craftsmen includes a fairly large number of various tools. But for those who are just trying their hand at making furniture, you can limit yourself to the minimum set, which will include:
- screwdriver or screwdriver;
- hammer;
- drill and drill bits in various sizes;
- furniture bolts and screws;
- PVA wood glue;
- building level or strong ruler;
- tape measure, pencil, square.
The first experience will take a long time; failures and unforeseen problems are possible.
If you plan to make more complex models, you will also need a milling and grinding machine and clamps, and the whole set will be replenished with other tools and accessories.
Therefore, having undertaken to make a desk with your own hands, you should refuse to equip it with drawers and add-ons for the time being.
Manufacturing process: step-by-step instructions
If a home craftsman is just trying his hand at making furniture, it is best to take laminated chipboard as a material for its manufacture. At the same time, it will not be superfluous to know that in some construction stores they can not only sell the material, but also cut it to the specified dimensions, which will greatly facilitate the work.
Wood is an environmentally friendly, prestigious and expensive material.
An original DIY organizer can be placed on the tabletop.
The assembly should be based on an elementary drawing that can be easily executed even by those who have never been friends with drawing. On it you need to depict a countertop indicating the selected dimensions, a sidewall (there will be two of them) and a crossbar.
In parallel with the construction and design, you need to choose the material to make the table to your liking.
It is better to assemble the table with furniture screws, which are easy to use and provide strength to the product. The order of assembly of the desk is as follows:
- first drill small holes on the ends of the walls and legs of the table;
- then drill with a larger diameter drill so that a small groove is obtained where the screw is inserted;
- the side of the table is connected to the inner wall; at the same time, you need to connect carefully and carefully so that the upper ends are at the same level, otherwise the table will be skewed;
- the second side wall is fixed in the same way.
Of course, the choice is left to the master.
The table top is attached in the same way. A novice master should remember that its size should be such that the edges protrude beyond the “boundaries” of the sidewalls: this is not only beautiful, but also convenient, because the resulting protrusions make it possible to conveniently place the table in any part of the room. To make the table look more aesthetically pleasing, the screw locations can be closed with decorative caps. The simplest desk is ready, and although its design does not include drawers, cabinets, add-ons, it is made with love. If you work slowly, then the furniture “first pancake” will not be lumpy.
The more boldly the home master will experiment, the more original the interior of the office or work area will look.
The final stage is decoration
This part of making a desk may look different for different masters, depending on aesthetic tastes, the interior of the room where it will be installed, as well as the “addressee”: a table for a preschooler and a student will differ in design. Decoration may include:
- varnishing a wooden item in various shades;
- installation of a worktop made of a material of a different texture or contrasting color scheme;
- painting, plain or multi-coloured;
- decoration with self-adhesive film of various colors and ornaments;
or wallpaper;
use of decoupage napkins and other decoration methods.
When the design features are determined and the material is selected, it is necessary to prepare tools that cannot be dispensed with in the work.
If the master or household can draw beautifully, the table can be decorated with bright drawings.
The top of a table made for a baby can be decorated with colorful strips of fabric or ribbons, fixed firmly on the top, and then varnished. Or paste over pictures with your favorite cartoon characters.
But for those who are just trying their hand at making furniture, you can limit yourself to the minimum set.
The desk is a rather austere product, so decoration options may be quite limited for some. But this does not mean that it is impossible to make the table elegant and attractive. In addition, nothing prevents you from creating a work area and decorating the space near the table, as well as decorating the lid with interesting gizmos. And here the female half of the family can join.
If a home craftsman is only trying his hand at making furniture, it is best to take laminated chipboard as the material for its manufacture.
On the tabletop you can install an original organizer made by yourself, decorate it with a homemade cup for pens and pencils. On the open shelves fixed above the table, you can place boxes with stationery and toys, homemade products, and decorate the wall with drawings, a bright calendar, and photographs.
The assembly should be based on an elementary drawing that can be easily executed even by those who have never been friends with drawing.
If the design of the table does not provide for cabinets or drawers, plastic boxes can be placed in the space under the cover, which can be removed at any time.
It is better to assemble the table with furniture screws, which are easy to use and provide strength to the product.
VIDEO: DIY desk
50 photo ideas how to make a DIY desk
Previous
Tables0003
Next
TablesMake a folding table with your own hands
drawings, diagrams, step by step photos and instructions
how to make a desk
This collection of step-by-step instructions will provide you with all the information you need to successfully make your own DIY desk for your home office or any other space in your home that needs space to work. Whichever option you choose, for each example you will find detailed assembly instructions, diagrams and step-by-step photos to help you with this.
Before you start making a do-it-yourself desk , you need to understand what the design feature is. In fact, there is no standard definition of what a desk is! Although in practice there are several characteristics that make a regular desk a “desk” rather than a home office desktop:
- Size – Classic Desks have a smaller side (800mm wide instead of 1200mm)
- Storage – usually done desks with shelves and drawers for writing and stationery.
- Design – Modern desks are designed to be placed against a wall, not free-standing in the center of a room.
How to Make Your Own Desk
This step-by-step guide will help you make a beautiful and large Desk that will look great anywhere from the office to the bedroom.
So… let’s get started! Before you get started, take a look at this list. Six 2×4 boards and three 1×6 boards is all the wood you need to make this DIY Desk .
The author of the project used a K5 Kreg Jig for the entire assembly. For those who are interested in what kind of Crag Jig this is, you can watch a short video on the site, the link is below.
The table base has several 10 degree cuts and is all secured with pocket holes.
In the step by step photos you can see where the author placed the pocket holes for the back of the table. Then assemble the sides. If you plan to put a table, as in this case between cabinets, make pocket holes where they will be most closed. Then assemble the table top and attach it to the table frame.
For finishing, the author used a combination of impregnations, and for finishing, decorative glaze.
Photo source: www. shanty-2-chic.com/2014/10/diy-truss-desk-free-plans.html natural wood using pre-cut legs and top?
If you buy parts separately, it will be much cheaper, and it is not difficult to assemble the desk .
- Sand the boards with sandpaper. Wipe the surface and apply two coats of primer – sanding lightly between coats – and three coats of semi-gloss paint.
- Temporarily screw the metal bracket to the top of the leg. Set so that the leg is 20 cm from the end of the table and 7 cm from the edge. Mark the screw hole locations and repeat for the remaining three legs using the same leg.
- Drill pilot holes 15 mm deep for each bracket. Attach the brackets with flat head screws. Then screw the legs to the brackets.
- Attach drawer side.
- Measure the length of the table between the legs and cut a 1 x 3 pine board to that length. Repeat these steps for the other board. (Length may vary slightly so mark boards.
)
- To adjust the thickness of the metal brackets, mark the edge of the board 6mm from the ends along the edge that will go to the top.
- Make 45 degree cuts on both ends. Repeat for the other board.
- Drill two pocket holes each on two end boards. Then drill a hole in the center of the pocket along the long edge that will go up to the top. Pinch the end in the center across the width of the legs and remove the screws. Repeat for the other end.
- Drill two pocket holes at the ends of two long drawer boards. Then drill holes along the long edge 45 cm from each end. Fix the long board in the center along the width of the legs and tighten the screws. Repeat for another long board.
- Cut out a 45-degree notch in the corner, as on the side boards. Glue and attach the bracket to the surface of the table leg closest to the end (but not to the tabletop). Repeat these steps for the remaining three brackets.
- When the last coat is dry, assemble the table.
Photo source: www.lowes.com/n/how-to/easy-to-build-wooden-desk
How to make a modern desk
This is a very simple and modern desk , which you can make with just a few boards and some simple carpentry tools. This project only needs two 2.5m long 2×10 boards, this is the bulk of the build. First of all, cut all the boards to the desired size. Here the measurements are: (top) 2 x 100 cm (sides) 4 x 67 cm. [2 for each side]. Then glue to make panels. Use a tongue and groove, we will connect the boards with dowels. First lay out the boards, and then mark where the dowel should go.
Align the clamp with the mark and drill the board where the dowel should go. Apply glue to all parts and secure with ratchet straps.
After the panels are glued and dried, prepare them for assembly and finishing. Remove the dried adhesive with a chisel. Then sand with an orbital sander. Apply several layers of stain. When dry, add several coats of shellac spray, with a time gap between each coat.
Assemble table . First, make four pocket holes at the top of each of the side panels. It’s very simple. Measure where you want to make a hole, clamp, and then feed the drill through the clamp. Then attach the side panels to the top of the table.
If you want to know everything in more detail, be sure to watch the video for this project on the website, link below. It was very easy and pretty fast.
Photo Source: www. instructables.com/id/Simple-Modern-Writing-Desk/
How to Make a DIY Desk
great option. The author started designing at 4 pm, continued until 10 pm, and then worked another 4-5 hours on Monday. At this point, the project was completely ready. So in total it took about 8-10 hours. In a sense, this is a one-day project. However, the finishing process could potentially take another 2-3 days, depending on the finish you are using and the time you have available. It is best to apply the top coat in the morning before going to work. Then in the evening you can sand, remove dust, and then apply another layer. So in three days everything will be ready.
Considering this is a quick project, only simple technologies were used here: plywood top, hardwood finishes, and quick and easy pocket construction.
You can read the instructions or watch the assembly video on the website, the link is below the gallery.
Actually this project was designed with SketchUp. Here are a few features of this desk. First, this design has a plywood top. But the author did not want it to look like this. So the idea came up to add some “fake” mock-up ends to the top of the table to give the look of a solid wood table top. Then came the idea for another refinement, which is to narrow the legs so that they do not look like just square bars. Note that the cone starts below the side rails. Also, a kind of arched cutout at the front adds a nice decorative touch. On the right side of the photo you can see diagrams with dimensions in inches, multiply these figures by 2.54 to get the values in centimeters.
Photo Source: www. instructables.com/id/Quick-Writing-Desk-in-the-Shaker-Style/ do-it-yourself drawer . The finished table is 76 cm high, 74 cm wide and 41 cm deep. The base and drawer are made of 2×2 pine logs and 1×4 board, while the top is walnut. You will need (4) 74cm 2×2 lumber legs, (2) 62cm 1×4 back stretchers, and (4) 32cm side stretchers. Drill pocket holes at the ends of the rungs to connect the legs. Then assemble one side of the desk. First attach the upper stretcher to the inside of the leg.
Attach the lower side subframe 7 cm up from the floor with a centimeter offset on the sides. Fasten with screws. Repeat this process for the other side and you’ll have two sides of the desk ready.
Then connect the sides using the back rails. The bottom rails mount flush with the back of the legs so they can be attached to the wall if needed.
Then you need to make a box. Pull-out slides were used here, so the drawer should be 60 cm wide and 30 cm deep. Your drawer size may vary depending on the type of slide.
Cut out (2) 56cm fronts and (2) 30cm sides from a 1×4 board. Cut 7cm wide or you can use a 1×3 board to make a smaller box.
Cut out the slot on the sides and front for the bottom drawer. The groove is 6mm deep and the width is matched to the plywood (usually 5mm). This can be done in 2 passes on the countertop.
For the back, instead of the 6 mm recess, lift the blade and cut through. You will get a ~6cm wide piece that will allow you to slide into the bottom panel at the back.
Drill pocket holes on the outside of the front and back. Assemble the drawer with screws aligning the slots where the side and front meet. Attach the back of the box upside down so that the top edges of the box are even.
Cut a piece of plywood 57×31 cm to fit on the bottom of the box. Slide the bottom part in and secure at the back with two screws.
Fill and paint the base and front of the drawer before proceeding to install the rails. When installing, use spacers for anchor points. Install the drawer according to the manufacturer’s instructions.
The last step in assembling the desk is the 74×40 cm top. Attach the top with S-fasteners, but pocket holes can also be used. Coat the top with a walnut effect urethane finish.
Photo Source fixthisbuildthat. com/diy-writing-desk-plans/
Bedroom Desk
If you’re looking for the unique homemade bedroom desk, this three-compartment option might be just what you’re looking for. This design will give you plenty of space to store all sorts of small things, even can be used as a dressing table . The design is a bit rustic, incorporates vintage elements and is super functional. The table is 120 cm long, 45 cm deep and 74 cm high. The table top is a large drawer with three compartments.
First make the bottom by attaching a piece of plywood to the 1×2 plank frame. Use very thin pieces of plywood so that there is room for fastening and the screws do not split the wood. Then make another piece of the 1×4 frame that will fit inside the 1×2 frame on the base. Attach this 1×4 inner frame, which is actually the sides of the table, to the bottom plywood. Then turn it over, pre-drilling a few holes and screwing in a few screws from the bottom. Then a 3-piece lid. Attach the slat frame pieces to the covers (only on both sides for the left and right covers and in the front for the middle cover). Then fold to make sure everything opens properly.
Make sure that the edges of the covers do not rub against each other.
Notice the legs. They are very light – just a perpendicular connection on one side and a 10 degree angle on the other.
Attach the legs to the two supports at the bottom of the table, then the supports to the table with screws! Since the legs are attached last, you will need to measure and attach the covers using flat loops.
You might be wondering why 3 separate covers are needed? This is convenient, you do not have to lift the entire countertop to get some little things. One compartment can have a lamp or a vase of flowers, a laptop on the middle lid, and the compartment that you use most often can be left empty. If you use it as a dressing table, glue a mirror to the inside of the lid.
This is, of course, a short version of the manual, more details can be found on the website.
Photo source: www.shadesofblueinteriors.com/three-compartment-desk-free-build-plans/
DIY White Desk
A simple step by step guide to making a classic DIY desk . This light design is for those who are looking for a simple version of an elegant table with a classic style. The top is made from birch plywood. The front edge is cut at a 45° angle to keep the drawer flush (the drawers were also cut at a 45 degree angle). The side pieces are attached with hidden pocket screws created with the Kreg Jig. On drawers, the edge should be on top so that the edge can align with the slide in the middle.
Pine blocks 4×4 were used for the legs. If you are interested in making the same desk, we hope that the photos and diagrams will help you a little, and you can read the written instructions on the site!
Photo Source: www. dorseydesigns.com/diy-parsons-desk-tutoria/
Italian Style Desk
This excellent Desk from the catalog is prototyped for $800 and you can make one for 75 dollars. If you decide to take on this project, visit the author’s website and download a PDF file with drawings and instructions.
Here is what you will need for this project:
- 1 board 2 x 10, 365 cm long
- 1 board 1 x 10, 244 cm long
- 1 board 1 x 10 180 cm long
- 1 board 1 x 8 180 cm long
- 1 board 1 x 4, 244 cm long
- Craig jig
- Drill
- Mitral saw
- Roulette
- Pencil
Below you can see step-by-step photos, under the gallery there is a link to the site of the author of this project.
Photo Source: rogueengineer. com/diy-sicily-writing-desk/
Desk with Pencil Drawer
See also how to make a super lightweight writing desk with pencil drawer. Great minimalist design with stiletto heels. To make a table, you will need an edged panel made of solid wood. They come in different sizes, for this model you need a 60×120 cm panel. Also buy 70 cm high hairpins for legs and a drawer. By the way, you can assemble a drawer with your own hands, for this you just need a sheet of plywood and a couple of boards. And the sliding mechanism can be bought separately, it will be even cheaper. First prepare the countertop. If the wood is in good condition, you just need to sand the top and apply polyurethane. Attaching the pencil box is very easy. It comes with all necessary hardware. The brackets are attached to the side rails, which are then screwed to the table top. You can attach it on the side or in the center, whichever is more convenient for you. You can even install a keyboard inside! To attach the stud legs, place them diagonally at the corners and screw them in. If you liked this project, you can read more detailed instructions on the website.
Author: Janice
Photo Source: sawdustsisters.com/easy-diy-hairpin-desk-pencil-drawer/
Stylish writing desk for the home
This writing table definitely features gorgeous foot studs. These universal legs can be used for any type of table, and most importantly, it is very easy, just screw it on and that’s it.
You will need:
- 4 pin legs
- 2 boards x 60 cm x 120 cm and 4 narrow boards x 60 cm x 8 cm
- screw terminals
- cordless drill, wood screws
- wood glue
Here’s how to make a stylish DIY writing table .
- Lay the board (60 cm x 120 cm) on the floor and screw the table legs to the backrest. When all four legs are screwed on, place the table and mark the places where the partitions for the compartments from narrow boards (60 cm x 8 cm) will be installed. Mark the areas with a pencil and apply wood glue.
- Place a second large wooden plank on top. Tighten the clamps until the glue dries. Important: insert small pieces between the clamps and the tabletop so that there are no unsightly marks!
- You can make a door for a small box. Cut out a piece of plywood 5mm thick, then just glue the individual pieces and finally nail it down with small nails. That’s basically it. You can varnish it if you like.
Photo source: sinnenrausch. at/2015/09/schreibtisch-zum-selberbauen/
L shaped desk
Make an L shaped desk , it looks really cool.
First make the outer frame of the table legs. You need to attach the vertical legs from the 2×4 bars to the horizontal legs using a Kreg jig. It is necessary to make two such frames.
Next, add the decorative part of the X-bar. To get the exact measurements, attach the 1×2 rails to the assembled side of the table and mark where the cut needs to be made.
Attach the bracket to the frame using glue and nails. The first rails should be flush with the front of the frame. Then repeat this step for the other side of the table.
Now that the sides are assembled, the table can be formed. Using a 2×4 middle brace, connect the legs and the gathered side.
Be sure to pre-drill the Kreg holes on the inside of the middle brace.
Then attach the 2×4 brace to the other X square base with the Kreg Jig. After that, add a middle support brace to the other side of the base using the Kreg Jig.
Now assemble L shaped table top by attaching the 2×6 boards using the Kreg Jig. Once the table is assembled, fill any visible pocket holes with wood filler. Your finished desk should look like the one shown in the photo.
Photo source: handmade-haven.com/pages/l-shaped-double-x-desk
Or here’s another option, L-shaped desk + office makeup. It looks more solid, if you liked it, the instructions are on the site.
Photo source: www.hometalk.com/29871275/diy-l-shaped-farmhouse-wood-desk-office-makeover
Log Desk
If you also like the austere and rustic farmhouse style, you might be wondering how to fit such a desk into your interior. Of course, if your interior looks like a hunting lodge, then a table made of timber will look perfect. There are few items in home decor with the same universal appeal as a farmhouse style table. Made from thick timber and natural planks, these massive pieces of furniture are visually impressive in any room. So it’s no surprise that the farmhouse style trend, and especially the table, is often used for interior decor today, bringing a little bit of classic, rustic style to pretty much everything from restaurants to offices. In general, if this option suits you, here is a link to a site where you will find instructions on how to make a do-it-yourself farm-style log desk. For this you will need:
- circular saw
- plywood, large enough to cover the counter top
- sandpaper
- stain
- wood glue
- clamps or heavy objects to hold parts together
- old rag or stain brush
- vinyl gloves
Photo Source: www. amotherthing.com/amazing-inexpensive-diy-shiplap-desk/
DIY Large Writing Desk
This Large Writing Desk is a relatively expensive project, but at every step of the build you will get , valuable skills and insights that will make your next project much easier. Of course, it is unlikely that anyone will create exactly the same table, so this guide is written by the author of the project in order to share the tips, skills, ideas and tricks that were obtained during the construction process. If you want clear or specific information about the process of research, design, planning or writing desk assembly , then at the bottom under the gallery you will find a link to the site where you can read the full text of the instructions and watch a detailed video documenting the manufacture of the table.
I wanted to create a custom, unique design, so I designed this table from scratch using Fusion 360 construction and design software. Even if you are a beginner, designing a table in CAD (furniture computer-aided design) software will be invaluable to the design process. Whether you’ve used it before or are already a seasoned pro, design modeling in CAD can be incredibly rewarding. You will be able to make plans and get a better idea of the size of the table.
So give it a try, there are a number of free programs out there and most of them are pretty easy to use. CAD can be a really powerful tool when designing and planning a project.
The author decided to design each part of the desk, all rails, uprights, skids and panels as separate files and then match them in one file. This meant that if you wanted to resize, you wouldn’t need to expand the model for editing, instead you could just open the file for the details you needed and edit them there. It may not be the best way, but it makes editing and redesigning some essential parts of the table much easier.
Photo Source: www. instructables.com/id/Large-Writing-Desk/
DIY Adjustable Drafting Table
Even if you don’t do much drafting, Adjustable Angle Drafting Table is very handy for a lot of different things: drawing, reading, writing, working with the keyboard, mouse, etc. You can first test by simply resting the shelf on your lap to get the desired angle. This is a functional prototype, but perhaps not as user-friendly. Professional drafting tables are expensive and usually very large, so they do not fit well into the interior of an ordinary room. The author of this project also faced this problem, so he decided to make a drawing table with his own hands. Here are the benefits you will get:
- You can quickly and easily adjust the angle. The worktop is held in the middle by a simple metal bar, so you only need to move the support to change the angle.
- Adjustable work surface is strong enough.
- Drafting table looks nice and there are no external screws.
Since only used materials were used for the project, it didn’t cost the author a dime. There’s nothing out of the ordinary, just a few planks and sticks, wood glue, screws, and a couple of hinges.
Only simple tools were used for assembly: you basically only need to measure, saw, hammer, screw and gouge a little (you will need a chisel).
This drafting table is no frills; the only feature is the adjustable tabletop angle. But you can modify the design fairly easily by adding additional features such as top drawers, a chute on an incline, or an adjustable desk height.
Making a table frame is quite simple, you can read about it in the instructions on the site, if necessary. A little about regulation. First you need to make a simple mechanism, if you can call it that, from a small piece of wood, shown in the photo. You can adjust the angle of the table by inserting a metal rod into one of the holes in this device.
Alternatively, if you want to be able to specify any angle within a certain range, and not just a few angles corresponding to each hole, you can drill so many holes that you are effectively cutting a curved slot.
Then you only need a long nut and two bolts to hold the mechanism. The author decided not to do this, because the bolts holding the surface may lose their grip at some point. Using the metal rod method simply blocks the sloped surface, which is more reliable.
How to make an angle adjustment mechanism. The basic idea is that it is part of a circle, and the center of the circle is the point at which the inclined surface turns. The larger the slice, the higher you can raise the countertop. To mark where to drill holes in the angle adjustment mechanism, use a tape measure to evenly space the marks. Then a little work with a jigsaw and a drill and your lifting mechanism is ready.
After that, screw the mechanism to the sloping surface with a few small wooden blocks, as shown in the photo. Care must be taken here, if you drill too fast, the blocks can easily split.
The last step is to screw the sloped surface to the hinges of the top surface. Find some metal rod and you can turn the adjustment mechanism. And that’s all there is to it; your shiny new drafting table is ready to go!
Photo Source: www.instructables.com/id/Adjustable-drafting-table-with-basic-tools-and-mat/
Height Adjustable Desk
This is a wall mounted design that allows you to change height and angle table top tilt. Can be used as a drafting table or regular desk. The Adjustable Wall Mounted Desk was first developed in Blender 3D modeling software to allow for experimentation with design options and material listing. Using measurements, I fit as many details as possible into the dimensions of the 120×240 cm (3/4 inch thick) plywood sheet. All small cuts were made with a jigsaw and a circular saw.
First you need to draw a diagram, where to designate the distances between the racks. These are slots of 25 mm at a distance of 8 cm from each other at an angle of 45 °. Then pin the two pieces together to make sure the slots line up so you don’t have to drill as many holes.
Drill a hole in a piece of plywood and then use as a leveling tool. A total of 26 holes need to be made. Then a rather ore stage is grinding.
Now about the table. Set up rough cutting boards to get an idea of how much to cut. After cutting and drilling, attach a few pieces around the edge to hide the layers of plywood. Use Craig Jig and glue.
Close the trim corner. Attach additional support pieces on the underside.
The author used a 25 mm dowel for the rear mounting, as well as bolts and washers for the brackets.
Yes, be sure to drill holes for the safety pegs to keep the rear pin from popping out of the rack slots.
Clamp this board from below to prevent the thin layer of plywood from splitting when the drill pierces the back side.
Then glue, clamp and screw the parts.
Now you can paint. The author used natural impregnation and sealant.
The next step is to screw the mount to the wall. In order not to hold, you can screw the spikes to the table. Just push in some peg bolts and wrap pieces of copper wire around the dowel and bolt. Easy and safe, but a bit of a hassle when it comes to adjusting the table angle.
Then attach the lamp and charger extension.
As you can see, the finished table provides plenty of space for large sheets of paper and a few books. Much better than keeping it on the coffee table. The most convenient thing about this design is that the table can be completely folded against the wall, so it takes up almost no space.
Photo source: imgur. com/gallery/Dn57ADc
Industrial style table
The main thing here is not the design, but the design. The idea is simple, two filing cabinets, a tabletop on top, and here is the finished industrial style table .
In general, if you have the right cabinets or cabinets, it remains to find or make a countertop, and how to give it all an industrial style is up to your imagination. The author of this project seems to be all right with fantasy.
Photo source: www. mypassionfordecor.com/2013/03/my-pottery-barn-desk-hack.html
DIY Concrete Top
Shown here is how to make a modern desk with a concrete top and wooden legs that will fit almost anywhere in your home. This, of course, is a little unusual, but such a table looks quite stylish.
Cut the melamine board to assemble the sides and bottom of the mould. The side elements should correspond to the thickness of the board plus the size of the future countertop. Trim the sides to length so they form a square. The two sides will be the same length as the bottom side they are attached to, and the other two sides will be 4cm longer to overlap the other two sides. Drill holes at the top from the bottom edge of the side pieces to attach to the bottom and at the ends of the sides. Align the side piece along the edge of the bottom piece and drill holes. Attach screws to all four pieces. Wipe the inside of the mold to remove sawdust. Secure the masking tape around the inside edge and cover the corner joints. Smooth the putty with your finger to remove excess and round off the corner. Let the sealant dry. After that, remove the tape (pull back towards you, not sideways). Place the mold on a flat surface and grease with sunflower oil
Pour the solution into a container. Add some water and stir. Pour the concrete into the mold – it should be half full – and smooth it out. When the cement is smooth, use an orbital sander along the outer edge of the mold to vibrate it – this will create air bubbles. Cut the wire mesh as shown in the photo and place in the center of the mold on top of the wet cement. Mix more solution and pour onto the grid. The concrete must be flush with the top of the form. Smooth out and repeat the step with an orbital sander. Press the board firmly against the top of the mold to smooth and level the concrete. Let the cement dry for a couple of hours, then smooth with a spatula. Cover with foil and let dry for three days. When dry, unscrew the screws and remove the side walls. Carefully lift the concrete top and pull out the bottom. Sand the edges. Then leave to dry for another day.
How to assemble legs .
Make a drawing to determine dimensions and angles. Here, the height is 72 cm and the legs are 4 cm wide. Cut them 15 mm more so that when you level the saw, you get 4 cm. Saw the eight legs to length, cutting the top and bottom at an angle of 5 degrees so that they sit flat on the floor and close to bottom of the table. Cut out four coasters for the shelves and four coasters for the top of the table. Trim a 5 degree corner along the long edge of the support pieces. Then mark the notches on the legs for the shelf and table stand and then cut out with a jigsaw. Glue and nail the supports to the leg racks. Cut off the piece that will run between the two top supports at a 5 degree angle on the long sides. Apply glue and nail the part between the top supports. Cut the shelf by cutting a 5 degree corner so that the edges are flush with the legs. Align the edges and glue the shelf. Once the glue is dry, sand the shelf and legs. Cut and attach the two cross pieces to hold the two sets of legs together. Apply silicone sealant to the base plates. Set the concrete table over the silicone and apply sealant.
Photo Source: blog. homedepot.com/diy-concrete-desktop-with-wood-legs/
DIY Shelf Desk with Drawer
This handy Wall Shelf Desk is a great space saver in a kid’s room or even the living room. Here is a small step by step guide.
- First cut the boards with a miter saw. Then drill pocket holes into the short sides of the table. Attach the short side pieces to the long front pieces. Use glue and pocket holes for screws.
- Then cut out a piece of plywood, drill holes and attach to the inside of the frame. This is the bottom of the table. After that, attach the brackets to the bottom.
- Make sure the edge of the girdle is flush with the end of the plywood bottom.
- Then measure and cut two pieces for the top. 2 cm must be worn on the sides and front of the table.
- 1×4 board attached to the top flush with the back of the table.
- To make a tenon, measure and cut a 2 x 4 board. Drill pocket holes in the short pieces and attach to the long piece.
- The outer parts must be flush with the edges of the 2 × 4 board.
- Do not attach the second upper part until you have impregnated it.
Coloring time!
Dark walnut oil stain used here. When dry, brush on Varathane Triple Thick Polyurethane water-based polyurethane varnish. When wet, it will look white, but dry and smooth. Nice polish because it’s silky smooth to the touch!
Then screw 3 loops into the top of the cover .
Finally, fix a 2×4 plank on the wall with studs (do not forget to check with a level), and attach a table to the plank.
- Large enough to fit textbooks, a laptop and a notepad.
- Sturdy, with stable legs that don’t wobble.
- No extra drawers where all sorts of trinkets will accumulate.
- Modern design, stylish and as a positive addition to the workspace.
- What materials can be made
- Drawings and diagrams of computer tables with dimensions
- DIY table making instructions
- How to decorate a table
- Models of finished computer tables
- Video: do-it-yourself computer desk
- Computer tables in the interior in the photo
- It can be corner, hinged or regular
- Its dimensions will be ideal for the room
- It can be made from any material
- This is eco-friendly furniture
- It’s always nice to make it with your own hands
- Classic
- Corner
- Mounted
- With top shelves
- Round off the corners of all parts. On the sidewalls, cut out the corners for the plinth.
- Use furniture corners to fasten the main parts: top, sides and back.
- Check how comfortable the person feels at the table and how the furniture is installed in the designated place.
- If everything is in order, then it is necessary to tighten the screws in the furniture corners more firmly and continue assembling.
- Turn the product upside down.
First, additional vertical parts are attached, after which shelves, guides for drawers and a sliding panel are installed. Special legs are screwed from below, which will protect the floor from scratches.
- Drawer fronts can be decorated using decoupage technique
- Place original fittings on drawers
- The top and side surfaces can be painted with oil paints, varnished on top.
- We select the material for the table in the store and order its cut according to the drawing
- If you use existing material, you can also cut it yourself with a jigsaw or hacksaw
- The ends of the cut out elements must be pasted over with a special trimming tape to protect against destruction of the edges
- The previously cut out two posts will act as the legs of our table. In them you need to make holes with a drill for attaching the cross member
- We fix the rack between two crossbars with special furniture screws, which are called confirmations
- A tabletop is laid on top of the resulting structure, and it is also screwed with confirmations
- To give an aesthetic appearance, the screw heads are sealed with decorative plastic plugs
- Laminated chipboard sheet 16 mm thick
- Several blocks of wood to support
- Confirmation screws
- Four butterfly loops
- Decorative plastic caps
- Several sheets of chipboard 20-30 mm thick. It is necessary to purchase them in such a way that 4 canvases (1400×600, 450×1300, 750×500 mm – 2 pieces) can be made with minimal costs.
- Furniture edge. Sold in rolls, very cheap.
- Saw or jigsaw.
- Furniture conductors.
- Hardware – bolts and nuts or dowels.
- Wood glue or PVA glue (if dowels are used).
- No explanation required when using bolts.
- When using dowels, it is necessary to install the part in one of the holes, after smearing it with glue. Then the parts are knocked together with a mallet. You can use a hammer, but in this case you should hit through a thick rubber or a wide board.
- Sandpaper with different grain sizes.
You can also use USM.
- Paint and varnish brushes. You can also use an airbrush, but it is quite expensive, and decoupage will have to be done in a specially designated room. Therefore, such equipment is only advisable if the decor is a professional occupation or a very strong hobby.
- PVA glue.
- Acrylic lacquer. Volumes depend on the total surface area, the decor of which is performed. Each manufacturer indicates the consumption of a particular substance on the can – carefully read the labels when choosing.
- Paints of various colors.
- Pasting material. Decoupage involves the use of wallpaper, napkins, newspapers, color magazines – any printed drawings.
- Sanding and degreasing all surfaces.
- Covering a table or other piece of furniture with primer. The easiest way is to first apply the substance with a brush, and then immediately roll it out with a roller. This saves time and effort spent on decoration.
- Opening all surfaces with paint in the background color. It is necessary to cover in 2 layers, between layers there should be enough time for drying. The drying time depends on the specific paint and is indicated on the bank.
- Attaching pictures with glue. The more accurately the images are cut out, the better the decor will turn out. If desired, you can achieve the effect of invisibility of the transition – it will seem that the pictures are drawn, and not glued.
- Shutting down. Decoupage is almost done – it remains only to open the surface with acrylic varnish. It will keep the original look of the product for a long time. It is not worth using alkyd enamel instead of acrylic – the latter dries much longer, has a specific smell.
- oak or walnut furniture sheet;
- plywood or fibreboard;
- dowels;
- keys;
- screws or confirmants;
- wood glue;
- varnish for product processing;
- jigsaw;
- circular saw;
- hacksaw;
- milling machine;
- hammer;
- clamps;
- grinder.
- – Oak furniture board – 120 * 50 cm.
- – Pine timber 7 * 3 cm.
- – Pine timber 5 * 2 cm.
- – Pine timber 2 * 2 cm.
- – Pine planks 3 * 0.5 cm.
- – Glue for wood.
- – primer/paint.
- – self-tapping screws.
Ashley & Whitney0317
Desk with shelf and drawers
If you are looking for a classic style desk with a shelf, drawers and stylish design, then this step-by-step guide is what you are looking for.
See very detailed step-by-step photos below, all other information can be found on the website.
Author: Igor Kalinin
Photo source master-forum. ru/izgotovlenie-pismennogo-stola-svoimi-rukami/
Decorative writing desk
This writing desk was designed to meet the specific needs of the . The requirements are as follows – the table must be:
Finished with sturdy legs, birch top with steel panels and acrylic trim. The edges are trimmed with aluminum corner. Below you can see step-by-step photos, and a link to the site where you can read the full instructions can be found under the gallery.
Photo Source: www. instructables.com/id/Birch-and-Aluminum-Desk/
Pallet Desk
Tired of sitting on your couch in the middle of chaos and in desperate need of a desk? No money to buy? Then you need instructions, how to make a desk out of pallets with your own hands . It’s here. In the sense of the instruction, but finding a couple of old pallets is not a problem.
The hardest part is taking the pallets apart. Before you start cutting or even breaking, consider how long you will need. First, decide how big your desk is. It is approximately 100 x 60 cm, so I had to cut off a small part of the pallet.
You will then need to trim the sides of the other board pallet to make legs, etc. Trimming the sides will still leave the boards nailed in the middle. Be careful, the boards can split.
Having decided on the height of the table, cut the boards for the legs. If you want a shelf too, make the hind legs a little longer.
Next you will need cross bars for stabilization.
Add diagonal boards to make the table sturdy. Attach a shelf. That’s all. True, there is still a long job of grinding and then painting. But this is, the main thing is that the desk is ready, there is already a place to work, and beauty can be restored later.
Photo Source: twiddlingmythumbs.com/diy-pallet-desk/
Homemade Desk
Do you want this slightly unusual, but functional desk ? This can be done by hand.
The top is 2 cm deeper than the overhang cabinet and about 30 cm shorter than the distance between the radiator and the corner, so there will be free space on the table on both sides. This is an individual development, so everything can be reconfigured to suit your environment. An interesting story, how and from what this desk was assembled, read on the website.
Photo source: manhattan-nest. com/2010/07/11/a-desk-with-a-view/
DIY desk 30 photos
More in this category:
« DIY picnic table: instructions + step by step photos
DIY round table: 20 instructions with step by step photos »
dimensional drawings, homemade corner
DIY computer table is quite easy to make. This product has a number of advantages. It can be chosen for any interior and dimensions of the apartment.
Computer table – irreplaceable furniture.
Such a product is easy to make for a summer residence, and then simply disassemble. It will also fit as permanent furniture in an ordinary city apartment.
What materials can be made from
Homemade computer table has a number of advantages over purchased furniture:
Computer desk should combine many functions
The cost of the product and its appearance depend on the material. In this case, the materials may be different:
MDF sheets. This is the classic version.
You can choose any wood color for the table.
MDF material looks aesthetically pleasing, reminiscent of wood. It is easy to handle and reliable to use. MDF can replace other chipboards: chipboard or chipboard.
Chipboard is one of the most popular furniture materials.
Plywood. Such material is the cheapest. However, it is the least reliable. Plywood is well suited for a country table.
Plywood is cheaper than wood, but less durable and strong.
Natural wood boards. Solid wood furniture looks noble and luxurious. This is the most environmentally friendly material. However, it is very expensive. Another disadvantage is its heaviness.
Natural wood has been used for many centuries to create pieces of furniture.
Drawings and diagrams of computer tables with dimensions
If you have a question about how to make a computer table with your own hands at home, you should first of all think about the types of these products. This will help you choose a common project and create high-quality drawings, which will greatly simplify your work. Details will be cut out on them later.
There are different types of computer desks:
It is necessary to make a table exactly following the drawing.
The classic version is a regular rectangular worktop with solid side legs, a pull-out keyboard shelf, drawers and a system unit compartment. The length should be from 80 to 150 cm. Depth – 65 – 70 cm. Normal height – 75 cm. If a person’s height is more than usual, then the height is calculated by the formula: human height X 75/175.
Drawing a table is not difficult.
Drawings for this model are the easiest to make – just measure the desired length and width of the product. After the dimensions of the countertop are determined, you can draw the dimensions of the remaining compartments.
Make sure you have all the tools you need.
Important! The product should be 3-5 cm less than the occupied space. Otherwise, the furniture will be inconvenient to install in the allotted place.
Be sure to check that you have worked through all the details and did not forget anything.
The model with top shelves is similar to the classic one. But it has shelves built on top of the work surface. This option is very convenient for small spaces, or for installation in the play area of a common room or next to the kitchen table.
Use quality materials to make the table.
The top shelf can hold a printer, books or other items. Here they will always be at hand. Making a drawing for this model also begins with determining the dimensions of the countertop. After that, the dimensions of the sidewalls are determined.
Prepare all parts for table assembly.
Their width should be equal to the width of the table, height 160-180 cm. At this height, you can place 1 or 2 shelves for small items. Below is a place for the system unit. For convenience, you can arrange a couple of drawers or shelves.
Corner table will be more difficult to make.
Corner products are of two types. The easiest option is when a person is perpendicular to one wall and parallel to another. This is the most convenient model, but it takes up more space in the room. The working space of such a product consists of two rectangles connected perpendicularly. On one side will be the monitor and keyboard. On the other hand – the printer, paper, and small items.
After preparing the drawings, it is necessary to calculate the required material.
When making a drawing, the dimensions of the main tabletop where the monitor will be located are first determined. Then the dimensions of the additional working surface are determined. After that, the sidewalls and the lower support in the corner are created.
The most convenient option is when two countertops are located one above the other.
The main one is slightly higher, the additional one is 15-20 cm lower. At the same time, an additional shelf appears in the corner between the parts.
Important! For comfortable working conditions, the length of the free edge of the work surface should be 80-100 cm.
The tabletop can be made in any material.
Another model of the corner table assumes that the user is positioned diagonally in the corner. This is the most difficult option to manufacture. To create this drawing, you first need to determine the size of the side parts and then, relative to the size of the sidewalls, the size of the countertop is calculated. The working diagonal should be 60-70 cm long. The depth of the corner furniture should be 80-85 cm.
Legs can be made of metal.
Suspended version without legs. In this case, the tabletop is attached directly to the wall. Typically, this option is used for suburban structures. Such a model is placed in the corner, attached with furniture corners to both walls.
The table can be without legs.
Tip. For convenience, a separate stand should be provided under the screen, which will be located 7-10 cm higher than the tabletop.0033
After creating the drawings and cutting out the details, you can proceed directly to the assembly of furniture. Beforehand, it is important to prepare all small components, such as furniture corners and guides for a sliding surface for the keyboard and necessary tools.
Follow the table assembly instructions.
Step-by-step instructions:
How to decorate the table
To create coziness and make the furniture original, it can be decorated with additional decor. Table decoration options:
Show your imagination when creating a table.
Models of finished computer tables
Classic model. It’s the easiest to do. It suits a student. Dimensions: length 150 cm, depth 65 cm, height 75 cm. The product has an additional lower shelf for the block system on the right and several drawers on the left.
The gaming computer desk is a work of art.
Compact model with top shelves. The product is suitable for small rooms where space is very limited.
Dimensions: length 85 cm, depth 65 cm, working surface height 75 cm, product height 170 cm. The model has a compartment for the system unit, above which a small shelf is installed, 30 cm wide.
If the table is designed to work with a laptop, instead of niches, you can make additional shelves where things will be stored.
Corner table with top shelves. This option is more suitable for an adult who works at home. Dimensions of one side: length 150 cm, depth 65 cm, height 75 cm. Dimensions of the second side – length 75 cm, depth 65 cm, height 75 cm.
Standard computer table has only drawers at the bottom.
The upper shelves are attached with additional side pieces, which are screwed separately. Between them, at a height of 10 cm from the working surface, a monitor stand is installed. On both sides of the table there are 3 drawers. The option is very roomy.
A do-it-yourself desk is no longer just furniture, but a part of you, albeit an inanimate one.
Video: do-it-yourself computer desk
How to make a desk for writing with your own hands
Modern desks, which are presented in furniture stores, look very stylish.
However, costing a lot of money are often not strong enough. That is why people who value good quality and want to save money on buying new furniture often look for information on how to make a table for their home on their own. In addition to saving money, this solution allows you to show your creativity in creating designs, as well as improve your skills in working with materials and tools. In today’s article, we will share simple ways on how to make a table with your own hands for your home from various materials. Photos of interesting specimens of home-made tables, see below in the article.
How to make a table for writing beautiful and high quality
A table is such a convenient piece of furniture that today it is difficult to find a field of human activity where it is not used. Even within the framework of one modern house, you can see that for a comfortable stay of all family members, it is necessary to have several different tables.
For example, for frequent work with documents and at the computer, you will definitely need a spacious monolithic desk, and for rare viewing of magazines or writing letters, a folding small table is perfect.
Materials for making the table
MDF or chipboard is most often used for the manufacture of modern furniture. These materials are relatively inexpensive and easy to process, and also have a large number of colors. If you are a lover of natural materials and are not constrained by means, then you can use an array of natural wood. Products from it look very solid and noble (for example, there is a lot of information on the Internet on how to make a table from tree cuts). In addition to the above materials, glass or polycarbonate can be used to build a desk.
Ideas on how to make a glass table are originally shown below in a selection of photos. There are a large number of materials suitable for building a table on the market, and they all differ not only in appearance and quality, but also in price.
Therefore, which material to choose depends only on your taste preferences and budget.
See also: Folding tables – 70 photos in the interior
How to make a desk with your own hands – where to start?
A writing desk is a piece of furniture equipped with drawers for writing and working with documents. Often desks are also used for working at a computer. However, in order for a table made by hand to be comfortable and fit into the interior of the room, it is necessary to decide in advance who will use it, since not only the dimensions and the presence of drawers depend on this, but also the appearance as a whole. For example, a desk in a home office should be very spacious and have convenient drawers for folding work documents. At the same time, a compact table with a couple of drawers for notebooks is enough for a child to complete the lessons. As for the decorative design, it is better to do it in the same style as the room in which the table is located.
![]()
Desk construction and assembly process
If you have not made anything before, then the design drawings downloaded from the Internet will help you figure out how to make a desk with your own hands. The simplest desk consists of only four elements: a tabletop (number 1), two racks (number 3) and a crossbar (number 2), and almost anyone can assemble it.
The process of assembling the simplest table structure consists of the following steps:
To create more interesting variants of rectangular desks, you will need not only certain skills in working with the tool, but also the presence of imagination.
For example, the photos below show great ideas on how to make loft-style tables.
See also: Loft-style table: features, fashion variations and tricks
Compact desks
For owners of small one-room apartments, it can be difficult to place a full-fledged rectangular desk, so furniture designers came up with the following solutions to this problem:
9037 Folding tables
The advantage of a folding table is its compactness, which is determined by its design: a tabletop fixed on a wall or cabinet at one end, and with folding legs on the opposite side. To understand how to make a folding table, see the photo below.
Transforming tables
As for transforming tables, also called sliding tables, this is another way to save space in a small apartment, which helps not only free up space, but also change one piece of furniture into another. Such tables are relevant in cases where you work from time to time and do not want to take up space with a monolithic rectangular table.
Thinking about how to make a transformer table with your own hands? A few ideas for building such a table are shown below.
Book table
Book tables were invented a long time ago, but still do not lose their relevance, since a compact-looking design can turn into a large comfortable table.
How to make a book table with your own hands? Pretty simple! For this we need:
Chipboard at home without a special tool will not be able to cut exactly, so it is better to order a cut in the place where you will purchase the material. To create a book-table, we need three shields 800×300 mm, two of which will play the role of legs, as well as three shelves 760×220 mm in size. Assembling the table begins with marking the places where the shelves are attached between the racks (for this it is better to use the building level).
![]()
To get the base of the table, with the help of confirmations, we will install three shelves between the uprights, and fix the central tabletop on top. Here the table-book is almost ready, it remains only to hang the folding two tabletops using butterfly loops and make supports from a wooden beam.
We hope that in our article you have found answers to the question of how to make a table with your own hands? For your inspiration, in the photo below, we suggest looking at examples of several more models of desks.
How to Make a DIY Desk from Chipboard for a School Student – Making the base
Above are drawings of the simplest product. This is a desk that is usually made from chipboard. It requires a minimum amount of time, effort and materials .
Before making a desk with your own hands, you need to prepare the following materials and tools:
Using the drawings, this table is very easy to create:
If necessary, you can make a table for two. To do this, it is worth making a wider countertop. It does not make sense to make it longer – the product will be too bulky. A table for two will save space and create comfortable working conditions.
DIY desk: build a new one or decorate an old one? | Furniture magazine – all about furniture
Your child has already grown up and spends more and more time at the laptop.
To save space, parents of high school students often choose small but functional children’s desks.
Expert’s opinion
Strebizh Viktor Fedorovich, leading construction worker
Ask an expert
Therefore, such equipment is advisable only if decor is a professional occupation or a very strong hobby. If you want to clarify something, please contact me!
DIY children’s desk | Construction Portal
We make old furniture look aesthetically pleasing
Today, decoupage is very popular – the decor of various objects, based on the addition of a drawing, picture or ornament and covering the composition with varnish for durability and creating a special visual effect. In this technique, fantasy is of great importance – the final result largely depends on it.
Decoupage usually requires a small set of tools and materials:
Decoupage is an interesting activity that allows you to give new life to old things. In addition, such decor is available to absolutely everyone, both in terms of finances and in terms of skills.
![]()
Edge finishing
The edges must be carefully sanded before edging. If the sheets are cut on a panel saw, then sanding may not be necessary. With your own hands, cutting a sheet so neatly will not work. Therefore, you will have to arm yourself with sandpaper.
To glue with a more reliable PVC edge, you will need an industrial hair dryer and a respirator. Make sure that the entire process of processing the edge of the product takes place in a ventilated room, as harmful substances are released during the heating of polyvinyl chloride. Since we have a double tabletop, we process it with a wide edge tape. The temperature of the hair dryer must be at least 500 °C.
Which is better: underfloor heating or batteries?
Underfloor heatingBatteries
Expert opinion
Viktor Fedorovich Strebizh, leading construction worker
Ask an expert
I sanded the sawn parts and covered them with light beige paint in two layers.
I added a little brown tint to a liter can of high-quality acrylic white wall paint. If you want to clarify something, please contact me!
How to make a computer desk out of solid wood
Compact writing desk for older students
Your child has already grown up and spends more and more time at a laptop. To save space, parents of high school students often choose small but functional children’s desks.
By the way, this partial set lies just on the painted top of the finished table
I sanded the sawn parts and covered them with light beige paint in two layers (I added a little brown tint to a liter can of high-quality acrylic white wall paint.
After drying, the paint was tinged, but very light, close to white). Then I sanded it again to remove the wood pile that had risen after staining and the unevenness of the paint.
On the right in the photo is just a chest of drawers of the color and texture that I needed to get into.
Also a revealing photo. Colors and palette stand on a ready-made, painted tabletop. The tabletop was originally painted to match the color of the palette. And on top of the sponge, I applied this very brown-tinted paint that was poured into the palette. An interesting effect.
I covered every detail with VGT parquet in several layers. Then you can grind it all with fine sandpaper and assemble it.
4. Assembly.I’m happy with my tables and the new workshop I’ll go and look there, by the way
DIY tables from scratch: master class | Magazine of the Fair of Masters
The order of work does not differ from the order of creating a simple school desk – first all the details are prepared and processed, then the assembly is carried out and, if necessary, decor.
![]()
Expert opinion
Viktor Fedorovich Strebizh, leading construction worker
Ask an expert
Today, decoupage decor of various objects is very popular, based on attaching a picture, picture or ornament and covering the composition with varnish for durability and creating a special visual effect. If you want to clarify something, please contact me!
How to make desks with your own hands.
Needed
The first step was to prepare the worktop. To save money, I bought a class 3 furniture board. It had a couple of small flaws and small cracks. I sanded the countertop with 80/120/180 grit sandpaper.
After that I mixed sawdust and PVA glue.
It turned out to be an excellent grout for seams. This composition closed up all the problem areas.
Now I start making 3 table supports. The main frame of the table will be made of a 7 * 3 cm beam. To trim the beam, I used a homemade guide for a circular saw.
I will connect all the details with an oblique screw and PVA glue. For connections, I used a homemade conductor.
So, the legs are ready, now they need to be connected to each other. To do this, I cut 3 bars 7*3 cm, 70 cm long. And 6 bars 7*3 cm, length 35 cm.
I sanded the sawn parts and covered them with light beige paint in two layers. I added a little brown tint to a liter can of high-quality acrylic white wall paint. If you want to clarify something, please contact me!
Do-it-yourself writing desk with drawings and dimensions
We give an aesthetically attractive look to old furniture
The work procedure does not differ from the order of creating a simple school desk – first all the details are prepared and processed, then assembly and, if necessary, decor.