Radiant floor heat hydronic: Radiant Heating | Department of Energy
Radiant Heating | Department of Energy
Image
Radiant heating systems supply heat directly to the floor or to panels in the wall or ceiling of a house. The systems depend largely on radiant heat transfer — the delivery of heat directly from the hot surface to the people and objects in the room via infrared radiation. Radiant heating is the effect you feel from the warmth of a hot stovetop element from across the room. When radiant heating is located in the floor, it is often called radiant floor heating or simply floor heating.
Radiant heating has a number of advantages. It is more efficient than baseboard heating and usually more efficient than forced-air heating because it eliminates duct losses. People with allergies often prefer radiant heat because it doesn’t distribute allergens like forced air systems can. Hydronic (liquid-based) systems use little electricity, a benefit for homes off the power grid or in areas with high electricity prices. Hydronic systems can use a wide variety of energy sources to heat the liquid, including standard gas- or oil-fired boilers, wood-fired boilers, solar water heaters, or a combination of these sources. For more on the different types of energy sources and heat distribution systems for home heating, explore our Energy Saver 101 infographic on home heating.
Despite its name, radiant floor heating depends heavily on convection, the natural circulation of heat within a room as air warmed by the floor rises. Radiant floor heating systems are significantly different from the radiant panels used in walls and ceilings. For this reason, the following sections discuss radiant floor heat and radiant panels separately.
Radiant Floor Heat
Image
There are three types of radiant floor heat — radiant air floors (air is the heat-carrying medium), electric radiant floors, and hot water (hydronic)
radiant floors. You can further categorize these types by installation. Those that make use of the large thermal mass of a concrete slab floor or lightweight concrete over a wooden subfloor are called “wet installations,” and those in which the installer “sandwiches” the radiant floor tubing between two layers of plywood or attaches the tubing under the finished floor or subfloor are called “dry installations. “
“
Types of Radiant Floor Heat
Air-Heated Radiant Floors
Air cannot hold large amounts of heat, so radiant air floors are not cost-effective in residential applications, and are seldom installed. Although they can be combined with solar air heating systems, those systems suffer from the obvious drawback of only producing heat in the daytime, when heating loads are generally lower. The inefficiency of trying to heat a home with a conventional furnace by pumping air through the floors at night outweighs the benefits of using solar heat during the day. Although some early solar air heating systems used rocks as a heat-storage medium, this approach is not recommended (see solar air heating systems).
Electric Radiant Floors
Electric radiant floors typically consist of electric heating cables built into the floor. Systems that feature electrical matting mounted on the subfloor below a floor covering such as tile are also available.
Because of the relatively high cost of electricity, electric radiant floors are usually only cost-effective if they include a significant thermal mass such as a thick concrete floor and your electric utility company offers time-of-use rates. Time-of-use rates allow you to “charge” the concrete floor with heat during off-peak hours (approximately 9 p.m. to 6 a.m.). If the floor’s thermal mass is large enough, the heat stored in it will keep the house comfortable for eight to ten hours without any further electrical input, particularly when daytime temperatures are significantly warmer than nighttime temperatures. This saves a considerable amount of money compared to heating at peak electric rates during the day.
Electric radiant floors may also make sense for home additions if it would be impractical to extend the heating system into the new space. However, homeowners should examine other options, such as mini-split heat pumps, which operate more efficiently and have the added advantage of providing cooling.
Hydronic Radiant Floors
Hydronic (liquid) systems are the most popular and cost-effective radiant heating systems for heating-dominated climates. Hydronic radiant floor systems pump heated water from a boiler through tubing laid in a pattern under the floor. In some systems, controlling the flow of hot water through each tubing loop by using zoning valves or pumps and thermostats regulates room temperatures. The cost of installing a hydronic radiant floor varies by location and depends on the size of the home, the type of installation, the floor covering, remoteness of the site, and the cost of labor.
Types of Floor Installations
Whether you use heating cables or tubing, the methods of installing electric and hydronic radiant systems in floors are similar.
So-called “wet” installations embed the cables or tubing in a solid floor and are the oldest form of modern radiant floor systems. The tubing or cable can be embedded in a thick concrete foundation slab (commonly used in “slab” ranch houses that don’t have basements) or in a thin layer of concrete, gypsum, or other material installed on top of a subfloor. If concrete is used and the new floor is not on solid earth, additional floor support may be necessary because of the added weight. You should consult a professional engineer to determine the floor’s carrying capacity.
Thick concrete slabs are ideal for storing heat from solar energy systems, which have a fluctuating heat output. The downside of thick slabs is their slow thermal response time, which makes strategies such as night or daytime setbacks difficult if not impossible. Most experts recommend maintaining a constant temperature in homes with these types of heating systems.
Due to recent innovations in floor technology, so-called “dry” floors, in which the cables or tubing run in an air space beneath the floor, have been gaining in popularity, mainly because a dry floor is faster and less expensive to build. Because dry floors involve heating an air space, the radiant heating system needs to operate at a higher temperature.
Some dry installations involve suspending the tubing or cables under the subfloor between the joists. This method usually requires drilling through the floor joists to install the tubing. Reflective insulation must also be installed under the tubes to direct the heat upward. Tubing or cables may also be installed from above the floor, between two layers of subfloor. In these instances, liquid tubing is often fitted into aluminum diffusers that spread the water’s heat across the floor in order to heat the floor more evenly. The tubing and heat diffusers are secured between furring strips, which carry the weight of the new subfloor and finished floor surface.
At least one company has improved on this idea by making a plywood subfloor material manufactured with tubing grooves and aluminum heat diffuser plates built into them. Such products also allow for the use of half as much tubing or cabling, because the heat transfer of the floor is greatly improved compared with more traditional dry or wet floors.
Floor Coverings
Ceramic tile is the most common and effective floor covering for radiant floor heating, because it conducts heat well and adds thermal storage. Common floor coverings like vinyl and linoleum sheet goods, carpeting, or wood can also be used, but any covering that insulates the floor from the room will decrease the efficiency of the system.
If you want carpeting, use a thin carpet with dense padding and install as little carpeting as possible. If some rooms, but not all, have a floor covering, then those rooms should have a separate tubing loop to make the system heat these spaces more efficiently. This is because the water flowing under the covered floor will need to be hotter to compensate for the floor covering. Wood flooring should be laminated wood flooring instead of solid wood to reduce the possibility of the wood shrinking and cracking from the drying effects of the heat.
Radiant Panels
Wall- and ceiling-mounted radiant panels are usually made of aluminum and can be heated with either electricity or with tubing that carries hot water, although the latter creates concerns about leakage in wall- or ceiling-mounted systems.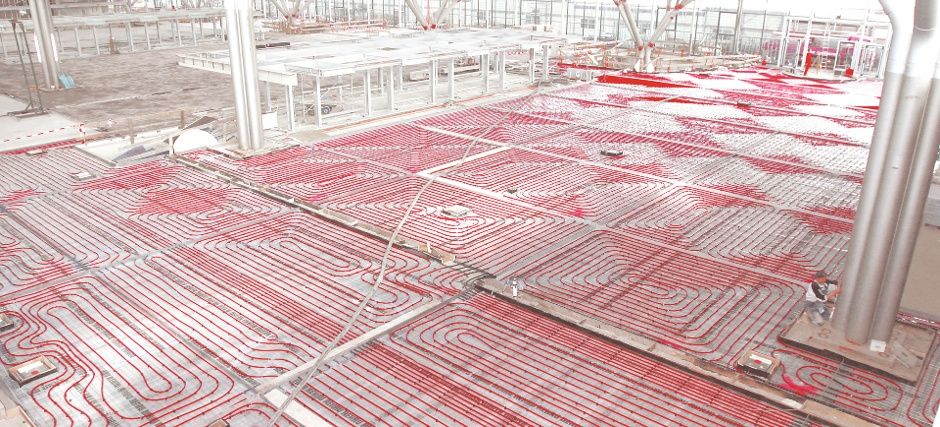 Most commercially available radiant panels for homes are electrically heated.
Image
Like any type of electric heat, radiant panels can be expensive to operate, but they can provide supplemental heating in some rooms or can provide heat to a home addition when extending the conventional heating system is impractical.
Radiant panels have the quickest response time of any heating technology and — because the panels can be individually controlled for each room—the quick response feature can result in cost and energy savings compared with other systems when rooms are infrequently occupied. When entering a room, the occupant can increase the temperature setting and be comfortable within minutes. As with any heating system, set the thermostat to a minimum temperature that will prevent pipes from freezing.
Radiant heating panels operate on a line-of-sight basis — you’ll be most comfortable if you’re close to the panel. Some people find ceiling-mounted systems uncomfortable because the panels heat the top of their heads and shoulders more effectively than the rest of their bodies.
Radiant Floor Heating: All About Electric and Hydronic Systems
The best heating system a house can have is the one you don’t realize is there. No radiators clanking in the night. No vents whooshing like a jet preparing for takeoff. No dust-spewing ductwork to run up your allergists’ bills. Just an even blanket of heat, right where you want it.
This Old House plumbing and heating expert Richard Trethewey helps guide you through two types of heated floors in terms of cost, installation, and energy efficiency to select the right one for your house.
How well does radiant floor heat work?
That’s the appeal of radiant floor heating, says This Old House plumbing and heating expert Richard Trethewey, who has long been a fan. “It’s truly invisible,” he says. But a radiant heat system has more than just aesthetics going for it. It’s also a highly efficient way to heat a house, increasing comfort as it reduces energy costs.
In a radiant setup, the warmth is supplied by hot-water tubes or electric wires buried underneath the floor. As the invisible waves of thermal radiation rise from below, they warm up any objects they strike, which radiate that captured heat in turn. Though the air temperature remains relatively constant, you stay comfortable because the surrounding surfaces aren’t stealing warmth from your body.
How does it differ from conventional heating?
Contrast that with what happens in a conventional forced-air heating system, the kind found in most American homes. Air blows out of the registers at a well-baked 120 degrees, rises to the top of the room where it quickly sheds heat, then drops back down as it cools.
The air in the room becomes uncomfortably stratified: Your head can be bathed in warmth while your toes lie in the frozen zone. Then there’s the problem of cycling. “You turn on the furnace, it quickly takes you to 68 or 70, and then shuts off,” says Richard. The result is a phenomenon he calls “the cold 70,” which is what you feel right after the hot air stops pumping from the registers.
Those jarring ups and downs are absent with radiant floors, which may reach 85 degrees, tops, on a frigid day. The warm air still rises, but it does so evenly over the entire floor, so the coolest air stays up at the ceiling.
Two Types of Heated Floors: Hydronic and Electric
There are two basic types of radiant floor heating that supply this gentle, even warmth: hot water or electricity. Electric radiant, which uses zigzagging loops of resistance wire, is generally retrofitted to a single room, such as a bathroom or kitchen. Hot-water “hydronic” systems—the most popular and cost effective way to heat an entire house—circulate water from a boiler or water heater through loops of 1/2-inch polyethylene tubing.
The flexible tubes can be installed in a variety of ways: on top of the subfloor in grooved panels or snap-in grids; clipped into aluminum strips on the underside of the floor; or embedded in poured concrete. Once the system is in place, you can cover it with most types of finish flooring, including hardwood and tile.
Carpet, however, can be tricky, especially if it has thick padding underneath. “If the floor is too well insulated, radiant heating really doesn’t make sense,” Richard says. “It’s like putting a sweater over a radiator.”
Hot-water radiant costs more to install than other types of heating systems—from $6 to $15 per square foot depending on the method, whether you’re starting from scratch or retrofitting, and where you live. (New builds where the tubes are buried in concrete slab tend to be the least expensive). And you’ll still need a separate air-conditioning system for cooling.
But if the price tag puts you off, consider this: Once it’s up and running, a radiant heat system can be up to 30 percent more energy efficient than forced-air heating, depending on how well insulated a house is. And there’s no comparison when it comes to comfort. In that category, radiant always wins, feet down.
Hydronic Radiant Floor Heating
Harry Campbell
What It Is
An energy efficient home heating system that turns entire floors into radiators, warming living spaces without uncomfortable hot or cold air pockets.
How It Works
Heated water is pumped from a boiler through a loop of flexible tubing embedded in the floor.
Why You’d Want One
Eliminates forever the discomfort of cold floors as it slashes energy bills.
What To Look For
Multiple heating zones: Makes it easy to fine-tune the amount of heat being delivered to different rooms.
Outdoor Reset Control
Slowly raises and lowers the amount of hot water flowing through the tubing in response to changing outside temperatures.
Pex Tubing
Specially treated polyethylene carries the hot water for hydronic systems. Unlike copper, this inert plastic won’t corrode and can be installed in long runs with just a couple of fittings, reducing the chance of leaks.
What It Costs
$6 to $15 a square foot for installation. In general, expect to pay 50 percent more for a hydronic radiant flooring system than for conventional forced-air heat.
Where To Get It
No one manufacturer supplies all the components for hydronic radiant heating. You’ll need a good heating contractor to put a system together. With electric radiant, it’s easy to find turnkey systems.
Electric Radiant Floor Heating
Alamy
For an alternative to the cost and complication of a hydronic system, there’s electric radiant heat. Its warmth comes from a loop of thin electric wire laid directly under the finish floor. No boiler, no water, no 1/2-inch-thick tubing to alter the floor’s height.
You’ll need an electrician to connect the wiring to the panel, but the rest of the installation is no more difficult than laying tile. The catch lurks in your utility bill: the 6 to 10 watts per square foot the system uses per hour makes it prohibitively expensive to heat a whole house. It’s best for spot heating, such as taking the chill off a tiled bathroom or stone countertop.
Radiant Floors: A Quick Historical Recap
Radiant heat dates to ancient times, when the Romans warmed rooms by running the flues for slave-tended, wood-burning fires under elevated marble floors, keeping toes and togas nice and toasty.
Many centuries later, in this country, Frank Lloyd Wright buried copper pipes in the concrete floors of his Usonian homes and warmed them with hot water. A few postwar subdivisions, including Levittown, followed suit. But when the pipes eventually corroded, most homeowners abandoned radiant rather than jackhammer their floors.
Today, plastic PEX tubing has replaced metal as the favored means of feeding hydronic heat into floors, making radiant heat systems more affordable than ever. And with a no-fail track record in Europe going back more than 35 years, it’s also made them more reliable.
Resources
Hydronic radiant-heat controls and parts:
Uponor Corporation
Apple Valley, MN
800-321-4739
uponor.us
Electric radiant mats:
Thermosoft International Corp.
Vernon Hills, IL
800-308-8057
thermosoft.com
Warmly Yours
Lake Zurich, IL
800-875-5258
warmlyyours.com
Speedheat US
Woodstock, Georgia
888-WARM FLOOR
https://www. speedheating.com/
SunTouch
Springfield, MO
888-432-8932
suntouch.com
800-660-7187
Special thanks to:
Larry Drake
Radiant Panel Association
Loveland, CO
800-660-7187
radiantpanelassociation.org
Radiant Floor Heating Systems Buyers Guide for 2022
Have you been considering radiant floor heating for your home or building? If so, you’ve come to the right place.
In this ultimate guide, we’ll discuss everything you need to know about heated floors and radiant heat, including how radiant floor heating works, the benefits and downsides, and more.
How Does Radiant Floor Heating Work?
Using thermal radiation and electromagnetic waves, a radiant floor heating system warms up a room by heating the floor directly rather than warming the air in the room. Radiant systems heat the floor, and that heat radiates up and is absorbed by other objects in the room, helping to warm the entire space efficiently.
In short, heated floors use radiant heat technology to make the floors warm, and the heat from the floors rises and disperses throughout the room.
Types of Radiant Floor Heating
There are two primary radiant floor heating systems: electronic and hydronic systems.
Hydronic Radiant Floor Heating Systems
Hydronic systems use heating pipes under the floor that are heated by a boiler system to heat the floors. The long-term cost of running the system is less expensive than an electric system, however, the installation is much more costly. Hydronic systems take longer to install than electric systems and generally work best with new builds versus installing them into an existing home or building. Unlike the electric system, a hydronic system will require regular maintenance.
Electric Radiant Floor Heating Systems
An electric radiant floor heating system uses electric heating wires to heat the floors. Installation is quick and incredibly energy efficient. Electric systems are also cost-effective and less expensive to install (compared to other heating systems), especially when considering the long-term electricity costs. Electric systems also require no ongoing maintenance. They’re installed and ready to go.
8 Benefits of Underfloor Systems
There are many benefits to using an underfloor heating system. Here are the top eight.
1. Invisible Hardware in Livable Areas
Unlike HVAC systems, space heaters, radiators, and other heating options, underfloor systems are built to be discreet. As a result, they’re virtually invisible in your living spaces, making them an aesthetically appealing heating option.
2. Energy-Efficient and Cost-Effective
Unlike gas or boiler-based systems, radiant heating systems are energy-efficient and cost-effective. Traditional radiators have to be heated as high as 167 degrees Fahrenheit before they’re able to heat a room. A radiant heating system only has to get around 84 degrees Fahrenheit to warm the entire space. With duct-based heating systems, you’ll always have a bit of duct loss as well.
However, with radiant heating, the floors are heated directly, resulting in less lost energy. Radiant floors are so energy efficient that they save an average of 15% on heating bills.
3. Smart Thermostat Compatibility
At Warmup, our smart thermostats are compatible with Creston and Control 4 home automation systems. They also work with Alexa and Google, making them easy to integrate into your existing systems. Using a smart thermostat, you can program your radiant floors on a preset schedule to provide reliable and consistent temperatures to your home or building.
4. Fewer Limitations on Interior Design
With radiant floor heating, you can enjoy your entire space without bulky radiators hanging on the wall. Your design freedom opens up when you don’t have to worry about designing around radiators.
5. Maintenance Free
Electric-based radiant floor heating systems generally do not need any ongoing servicing or maintenance. After they’re installed, they shouldn’t require any servicing. This makes them a worry-free, low-maintenance heating option.
6. Compatible with All Types of Flooring
Radiant heated floors are compatible with all types of flooring. It doesn’t matter if you want wood, laminated, stone, tile, carpet, or something else – radiant underfloor heating can work for your preference.
- Tile & Stone: DCM-PRO – highest heat output cable, anti-fracture membrane for tile crack prevention
- Vinyl / LVT: StickyMat or DCM-PRO
- Laminate, engineered wood, carpet: foil – no thinset or leveler required
- Concrete: in-slab cable
7. Ease of Installation
Electric-based radiant floor heating systems are a breeze to install anytime flooring is being installed. There are options for professionals and DIYers alike.
8. Air Quality
Radiant heat is a much better alternative when it comes to air quality. Radiators cause high temperatures, which can reduce oxygen levels. Plus, the circulation from air rising and falling gets dust going around in circles, which is not good for air quality. On the other hand, radiant floors keep the air fresh and don’t contribute to the circulation of dirt or debris.
3 Disadvantages of Radiant Floor Heating
There are many upsides to radiant floor heating, but there are also some downsides to consider.
1. Having to Replace Old Flooring
To install a radiant heating system, you’ll have to remove and replace your existing floors. This is why it’s best to install floor heating systems when you’re already in the process of renovating or installing new floors.
2. Installation Time
You usually have to apply a self-leveling compound on top of your floor heating system, and this compound has to be totally dry before you can put the floor covering on. The dry time takes around a day or two. (If you’re looking at a water-based system, the installation time is a bit longer).
The DCM-PRO system is “ready to tile”; the project can be completed in 1 day. The FOIL system does not require any thinset or leveler making it possible to install and use same-day.
3. Floor Height Issues
Warmup radiant flooring systems range from adding no height (foil under carpet) to 7/8″ in height (ultralight + DCM-PRO with leveler). Additionally, most people also add some insulation boards to maximize the system’s efficiency, adding another inch to the floor. As a result, radiant floors cause a slight height loss, so, if you’re thinking about installing radiant heating in a room that’s already short, this could potentially be an issue.
The Best Areas of a Home to Install Radiant Heating
Warmup systems are designed to be controlled per room making them a very energy-efficient option for supplemental or primary heating. By only heating the spaces you are using, while you are using them, you can drastically cut your energy savings.
Bathrooms
Bathrooms are a terrific room to install a floor heating system in, because no one likes stepping out of a shower onto a freezing floor. No matter where you are located, tile is always cold to the touch. Bathrooms generally have tile floors, damp towels, and lots of humidity, making them cold – especially in the fall and winter. Heated floors in the bathroom help keep the bathroom comfortable year-round.
Kitchens
Kitchens generally have cold tile flooring. They also tend to have a bit of humidity too. As a result, kitchens can get cold in the fall and winter, making heated floors a great option to consider. The kitchen is a great place to consider radiant floor heating as it is by and large one of the most used rooms in a home.
Bedrooms
Everyone loves a cozy bedroom, and nothing makes a room cozier than toasty temperatures. Radiant flooring is a terrific way to keep the bedroom warm without cranking up the HVAC or resorting to unsafe options like space heaters.
Garages
Most people don’t think about their garage when considering a radiant floor heating system. However, having heated floors in your garage can help control snow in the winter and keep your garage comfortable when you’re working on your car or hanging out.
Home Offices
You will not want to leave your home office once you install heated flooring. With so much time spent at our desks, home offices are a great place to invest in home upgrades that bring lasting comfort.
Basements
Basements are often damp and cold in the cooler months. However, with a radiant floor heating system, it can stay comfortable throughout the entire year. In addition, since heat rises, having a radiant system in your basement can help keep your whole house warmer.
Sun Rooms
Sunrooms are excellent rooms during the spring and summer. It’s a place to enjoy the outdoors without direct exposure to the elements. Sunrooms often have lots of windows to keep the room cool during the warmer months. However, those same windows can make the sunroom a frigid area during the winter. Heated floors in the sunroom can help make the room accessible and comfortable year-round.
Driveways
If you live in an area with lots of snow and ice, a radiant heating system under your driveway is an excellent option for you. When you install a radiant heating system under your driveway, you don’t have to worry about ice and snow anymore. Instead, you simply turn on your system and let it melt away the ice and snow from your driveway.
Tiny Homes and Mobile Homes
Many love to explore the world in an RV or mobile home, while others like to make their journeys a bit more permanent with a tiny home on wheels, or just one a nice property somewhere in the woods. Radiant floor heating offers either a powerful heating solution no matter the location or environment.
A Tree House!
If you can dream it, we can heat it! Who wouldn’t love a year-round treehouse? Colder months don’t necessarily have to signal an end to outdoor fun. With radiant heating, your kids can continue to enjoy their treehouse, even when the cooler weather rolls in. (The same applies to adult treehouses, too!)
Electric Radiant Heating Compared to Other Heating Alternatives
What are some of the alternatives to other heating systems? How does radiant floor heating compare?
Furnace and Forced Air
Almost everyone is familiar with furnaces and forced air systems. Forced air systems are typically HVAC systems that use gas or electricity to produce heat and push it through ductwork to heat the home. While they heat a home quickly, they can be noisy, unsightly, and cause a slew of allergy issues. The heat is also concentrated towards the top of the room, meaning you’ll have to crank up the heat higher (and use more energy) to keep your room warm.
On the other hand, radiant heat systems operate at lower temperatures than forced-air systems and eliminate parasitic heat loss, saving you tons of money on energy bills. They also don’t have the same issues with allergies since there’s no air blowing around. Radiant heating systems might take a bit longer to heat your home, but the heat is sustained, which leads to more stable temperatures and energy bills.
Boilers and Water-Based Systems
Boilers heat water to turn it into steam. Then, it pushes that steam through the home to heat it. Compared to electric-based systems, water-based systems take longer to install, require regular maintenance, take longer to heat up and cool down, and are usually only an option for brand new builds.
Electric Baseboards
Electric baseboards and radiant heat might seem similar, but there are many differences to consider. Electric baseboards are generally two to eight feet long and are either 120 volts or 240 volts, using convection to heat the room. Installing electric baseboards is cheaper than installing a radiant heating system, however, the long-term costs are usually much higher because they aren’t as efficient. In fact, it costs two to three times as much to heat a room using an electric baseboard than a radiant floor heating system.
Hybrid Heating
In hybrid HVAC heating systems, also called dual-fuel systems, a heat pump is backed up by a combustion furnace. It uses the heat-pump option unless the temperatures drop, at which point the combustion furnace kicks in. These systems do a great job of ensuring your home stays warm no matter what. However, these systems are expensive to install and often require a bit of maintenance. They also have the same downsides as forced air systems.
Space Heaters
Space heaters are cheap and portable. You simply plug them into an outlet, and they start to work. They’re ideal for quick heating in a pinch. However, they present a serious fire and burning hazard. They’re also easy to trip over and can cause your breaker to shut down. They also only heat one area of a space. Radiant floor heating doesn’t have any of these disadvantages. Instead, heated floors heat your entire home safely and efficiently.
How Does Radiant Floor Heating Perform?
We’ve already talked a bit about how radiant heating compares to other options, but it’s worth repeating. Radiant floor heating systems are energy efficient and do a terrific job of providing sustained and reliable heating for your whole home. However, there are a few ways to ensure you get the best performance out of your radiant heating system.
Insulation Recommendations for Structures With Radiant Floor Heating
To get the most out of a radiant floor heating system, you want to consider using subfloor insulation with your radiant floor. Insulation helps lower operational costs, ensure reliable and consistent heating, prevent moisture build-up, improve your environmental impact, and more.
Ultralight 3-in-1 insulation is the first insulation board designed for use with floor heating systems. Ultralight is always recommended for installations on a concrete slab or above a crawl space
You can further optimize performance by using a smart thermostat to program your system to turn on and off at designated times. You can also utilize Warmup’s SmartGeo feature that will use the location of cell phone data to control heating based on proximity to home.
How to Install Radiant Floor Heating
Installation varies depending on your exact system. Depending on your subfloor and finished flooring type, Warmup will recommend different products from our range. No matter which system is recommended for your project there are some general installation guidelines we always recommend.
Electric Heated Floor Systems
You can choose either mat or wire-based electric radiant floor heating systems. In both cases, the system is installed right onto a layer of insulation. Some radiant systems have a self-adhesive backing or rails. Others come with a kit that includes specialized tape. Either way, the system is installed on a layer of insulation. Then, after testing the system and connecting it to electricity, you can put your floor on top of it.
7 Electric System Installation Tips:
1. Radiant heating can not be cut and is not installed wall to wall or under any permanent fixtures. Calculate your heated area by deducting all fixtures that lay flush with the floor then multiply by .85 to give yourself a buffer around the room and fixtures you’ve deducted. From here, figuring out what you need is simple! Our instant pricing tool will give you a list of everything that we recommend for your project.
2. Insulation is recommended on a concrete slab or above a crawl space. Warmup offers 2 different types of insulation – Ultralight 3-in-1 boards (for embedded cables) as well as a roll of soft WIB (for FOIL installations). Floor insulation will create a thermal break between the subfloor and the finished floor significantly reducing downward heat loss.
3. 2 floor probes are recommended
4. Make sure you have a dedicated breaker with 2 conduits
5. Let thin-set or leveler cure
6. Not all products are created equal – be mindful of heat output and warranties – not just length but also straight-forwardness
7. Systems can be DIY-friendly with a careful review of product manuals, but a licensed electrician will always be required to get the job done.
Tile Same Day With Any Size Tile
Tile is an excellent flooring choice for electric radiant floor heating. You can even install it on the same day you install the heating system, with any size tile.
Hydronic Heated Floor Systems
In a hydronic system, pipes and a boiler are installed beneath the floor. There are lots of moving parts in hydronic systems, so they often require a mechanical engineer to help create and design the system.
How Much Does Radiant Floor Heating Cost?
The cost of heated floors varies greatly and depends on the size of the system and the type of system you choose. On average, expect to pay between $10-$15 per square foot. (Get an instant quote for an electric system here).
There are also installation costs and running costs to consider as well. For example, installation costs around $260-400 per day. The costs of running your radiant floor heating system will vary depending on its size and usage. However, the cost of running a radiant floor heating system is significantly less than most traditional alternatives.
To give you an idea, an average bathroom system utilizes about 300 watts, so for some people, that’s just about the same as the lights over the mirror. In dollars and cents, it costs about $5/mo to operate that system in a bathroom for a few hours in the morning and evening.
A whole-house system in a 3,000 sq ft space would run about $250/mo in the winter. The benefit of an electric system is that while electricity is viewed as expensive, the systems can be zoned and programmed and actually make them very cost-effective.
Is Radiant Heating Practical for Commercial Buildings?
Radiant heating isn’t just an option for homeowners. In fact, radiant floor systems are an excellent option for commercial buildings. They result in lower operating costs, greater installation flexibility, and offer more efficient, cleaner, and quieter heat.
In addition, radiant heating systems don’t require ongoing maintenance, saving even more in costs down the road. All in all, radiant floors are an excellent option for commercial buildings. (You can read more about radiant heating for commercial buildings here).
5 Myths About Radiant Heating
Summary: Are Heated Floors Worth It?
Radiant floor heating is an easy and energy-efficient way to warm your home and keep your toes cozy. Although the cost of installing radiant heating is higher than the installation cost of traditional radiators, there are various options available to suit your budget and it’s worth keeping in mind that underfloor heating provides substantial cost savings on your energy bills in the longer term.
When remodeling your bathroom, radiant floor heating is especially worth thinking about. You will save a lot on the labor cost if the flooring is being lifted up and changed anyway. The comfort and the cost savings of running the system on your heating bills will work out to your advantage in the longer run.
> ESTIMATE your underfloor heating RUNNING COST HERE
> VIEW the Warmup electric underfloor heating PRODUCT RANGE HERE
Hydronic Radiant Floor Heating Systems (Pros/Cons, Types, Cost)
Radiant heating was used in the form of radiators in many older homes during the last century, and steam heating was proven to be highly efficient, although the technology of the time was not without risks.
Need to Hire a Plumber?
Get a free estimate online from top local home service pros in your area.
Note: This post may contain affiliate links. This means that at no cost to you, we may receive a small commission for made purchases.
Today, we find a return to using radiant floor heating as a way to keep those toes nice and warm on a cold winter day.
Table of Contents
What is Hydronic Radiant Floor Heating?
There are three major types of radiant floor heating systems. The original (and largely abandoned in the West) method was used most notably in Turkish baths and consisted of a raised floor to allow hot air underneath, keeping the floor nice and warm.
While the true origin of radiant floor heating is unknown, Primitive Technology proves it was possible with even stone age methods. While this form of heating may still be found in some historic buildings, it is rarely (if ever) used in modern construction.
The second is a more modern solution and uses a series of electric cables installed between the floor and subfloor. Electric radiant floor heating works well in a small space, but (as you can imagine) becomes prohibitively expensive when used throughout an entire house unless you’re generating most of your power off-the-grid.
The final method, hydronic floor heating, uses the same basic principles of traditional radiator heating. This provides a cost-effective heating solution that gives a more consistent result than modern forced-air HVAC systems, although it isn’t perfect.
Related: Indirect Water Heaters: How They Work and Why You’d Want One
How Does Hydronic Radiant Floor Heating Work?
Hydronic floor heating takes advantage of the flexibility found in PEX tubing. Uncut lengths snake through the room, with the beginning and end attached to a manifold.
Because the floor will be sealed, there can be no joints in the tubing. Each loop of the tube is set approximately nine inches apart, then held in place with specially shaped staples.
The sub-floor and tubing is covered by concrete, gypcrete, or dry-tamped mortar, providing a solid seal.
These materials hold heat, allowing it to radiate evenly whether the system is running or not. In most cases, the floor is finished using ceramic floor tiles, as these also hold heat well.
Heading from the room to the system itself, the manifold helps keep the water evenly distributing between lengths of PEX tubing (see also ‘Should PEX Piping Be Insulated?‘) and helps vent the system. At the other end of the system is a dedicated boiler or water heater, with a circulating pump pulling water into the system and returning it to the bottom of the boiler to reheat.
As the water generally only loses about ten degrees, a running system maintains heat quite efficiently.
Advantages of a Hydronic System
There are quite a few things to love about radiant floor heating systems. Because the heat radiates from the floor itself, there are no vents to place furniture around and the furniture itself can pick up a bit of the warmth.
Unlike forced air systems, they won’t spread allergens around the room and heat evenly, eliminating cold spots.
Best of all, these silent systems tend to be between 10 and 30 percent more energy efficient than standard HVAC systems and will continue to keep the house warm for hours after a power outage.
Disadvantages of a Hydronic System
These systems are not without their flaws. The biggest problem is that you’re more restricted on floor coverings. Carpets can actually block the heat, for example. You will also have a longer wait time when the system is first turned on and can increase the humidity of your rooms near the floor.
The biggest headaches, however, happen during installation. You will need a contractor who’s trained to install the system due to its special requirements.
They can also get very complicated if you’re installing into an existing floor. Any repairs will likewise be rather complicated and potentially expensive, although any necessary repairs to the submerged portions are very rare.
Hydronic vs Electric
Hydronic systems tend to be cheaper to install and run than electric. They used a closed system, making the cost of running the boiler and pump your only real fees.
Compare this to an electric system, which needs to pump electricity throughout the system.
Hydronic vs Forced Air
Forced air systems require a furnace and duct work to be run throughout your home. Even with modern systems, this can lead to cold spots and the ducts need regular cleaning to reduce the spread of allergens.
The modular nature of duct work can also lead to heat loss and less overall efficiency. Because a hydronic system has its parts embedded and uses a smaller heating unit, most of these problems are eliminated.
See Also: 10 Important Innovations in Water Heater History
How Much does Hydronic Radiant Floor Heating Cost?
Installing and running a hydronic radiant floor heating system (see also ‘Which Is The Better Option For Your Home: Radiant Heat Or Forced Air?‘) is a very different experience than adding forced air systems. As such, planning out your expenses isn’t quite as predictable.
We’ve broken down many of the details so you can get a better idea of the cost. Please note that some materials, local rates, and other factors may result in higher or lower fees, especially for installation.
Cost to Install
Adding one of these systems is best done during a major renovation or new construction to avoid having to rip up an existing floor. Removal of an existing floor will vary greatly in cost depending upon the material and room size.
In some cases, you will also need to add extra support for the sub-floor to withstand the heavier weight of your filler material.
Hydronic systems tend to be cheaper to install than their electric counterparts, beginning at $6 per square foot (as opposed to $8 for electric). Larger areas will generally be cheaper to install than smaller, as space restrictions can compound the task.
As such, a smaller room may cost $9 or more per square foot, while extremely large areas could cost as little as $5 per square foot. The exact cost per square foot will thus be a combination of system type and project size.
One other factor that will affect the cost of installation comes in the form of temperature zones. Some rooms are more lived-in than others, and these will often need a higher average temperature than less frequented areas of the house. Such zones can require more complex systems, adding to the general cost.
In all, you can expect to pay anywhere from $6,000 to $14,000 to install a hydronic radiant floor heating system. This includes the system itself and the cost for a dedicated water heater or boiler (generally $360 to $1,000 for a 50 gallon water heater or approximately $6,000 for a boiler).
Cost to Operate
Thanks to the invention of the programmable thermostat, running a hydronic system can be much cheaper to operate than a traditional HVAC system. You can set the system to run during off-peak hours to reduce your electric bill and the floor will continue to radiate heat long after the system shuts off.
Radiant systems can also usually be run at six to eight degrees cooler than forced air (see also ‘How To Tell If Forced Air Heating Is Gas Or Electric‘), as hot air rises and the latter usually pushes the hot air in at the top of the room, reducing its effectiveness.
As water is more efficient at retaining heat, the system needs far less energy to reheat the recirculated water than a furnace does to reheat returning air. This results in energy savings of up to 30 percent.
These savings will only get better as solar heating systems continue to improve, promising to eventually replace the need for using grid power entirely in these systems.
Important Considerations
Radiant floor heating, especially hydronic systems, can offer a lot of options, but also have some restrictions. Planning ahead will save a lot of time and effort when adding one of these systems to your home.
Best Places to Install
You will ideally want to install the system during construction or renovation, but it can also be important to consider whether you wish to do your entire house or just one or two rooms. Larger rooms where your family spends most of its time are the most ideal.
The most common areas to warrant coverage are bathrooms, uncarpeted bedrooms and living rooms, hallways, or kitchens (in a busy household). Some say that bathrooms should only be done when installing a full-house system, but there’s nothing better than stepping on a warm tile floor after waking up on a chilly winter morning.
You will also need to think carefully if you plan to add a cooling system. Radiant cooling should be installed in the ceiling, so you may want to further restrict partial installations to account for this fact.
Remember, a radiant floor heating system can be used to augment or replace an existing HVAC system, but it’s far more complicated than swapping out a furnace, so plan any partial coverage carefully.
Best Flooring for Radiant Heat
The type of flooring you use will have a major effect on the efficiency of your new radiant floor heating system. Thankfully, you have a few options.
Porcelain or Ceramic Tile
Tile is perhaps the most popular solution, boasting a high heat conduction rate and the ability to continue radiating stored heat in addition to what’s held in the underlying surface.
Natural Stone
Right alongside tile are natural stone. Stone tiles work very similar to ceramic and work well in conjunction with the material beneath.
Laminate
Laminate floors are also an excellent match, although you will want to pay attention to any heating restrictions by the manufacturer, since water damage from below can ruin laminate easily. As most manufacturers have a limit as high as 85 degrees Fahrenheit, it’s pretty hard to hit those restrictions.
Wood
Wood flooring suffers from reduced efficiency, but can still be used. It’s best to go with engineered wood flooring, as the underlying plywood is less likely to warp. Solid hardwood should be quarter-sawn for improved flexibility and to accommodate any thermal expansion.
In both cases, the floor will take longer to warm up and won’t hold the heat nearly as well as with other materials.
Worst Flooring for Radiant Heating
Conversely, we have several types of flooring that can negate the effectiveness of your new heating system.
Carpet
The biggest culprit is carpeting, which is designed to absorb heat but has terrible conductivity.
Concrete
Similarly, concrete actually defeats itself when used as the main floor covering. Radiant systems rely upon layered flooring to help distribute and store heat. Without a higher layer of different material, the concrete loses most of its efficiency.
Rubber
While not commonly used, rubber flooring is another terrible choice, as it will give off an unpleasant odor due to the heat.
Need to Hire a Plumber?
Get a free estimate online from top local home service pros in your area.
Radiant Floor Heating 101 – Bob Vila
Illustration: Findanyfloor.com
Radiant floor heating is arguably the ideal home heating system. It’s comfortable, efficient, unobtrusive, quiet, and does not blow dust and allergens around the way forced hot air systems do. Instead of overheating the room’s perimeter in the hopes that the warm air will travel throughout the space before rising, subfloor heating serves up heat from below. The result is a more even overall heat that warms everything in the room, including surfaces, furnishings, and, most importantly, you. Radiant heat is similar to the heat you feel when you stand by a window on a sunny cold day. Your face feels warm, but the sun didn’t need to heat the air outside to make you feel that way.
For the record, subfloor heating has been around for centuries, from the hypocausts—a floor raised on pillars where heat could circulate below and radiate through layers of tiles and stone—of the ancient Turkish and Roman baths, to Frank Lloyd Wright’s turn-of-the-century adoption of more modern Japanese examples. And while the decision to install radiant heating used to be a pre-construction call, today’s innovations make it feasible—and, even DIY-suitable—for existing home retrofits.
Types of Radiant Floor Heating Systems
Radiant floors are heated either with electric resistance cables or hot water flowing inside tubing.
Electric systems
Electric radiant heating systems are typically supplemental, not meant to be the sole heat source for a room. The cables, which are often pre-attached to mats for ease of installation, are installed over the subfloor in a bed of thin-set mortar. Ceramic or stone tile are popular finished floor choices. There are also radiant electric floor heating pads that can be installed under laminate and other floating floors, such as engineered hardwood. One manufacturer, Thermosoft, makes pads that produce 31 BTUs per square foot. Installation is simple. Just roll it out, tape it in place, cover with floating-type flooring, and make the electrical connections. No mortar is required.
Advertisement
Don’t want to pull up your existing flooring? Companies such as SunTouch make electric radiant pads that fit in joist bays under the subfloor. You will, of course, need access to the bays from a basement or crawl space. Batts of fiberglass insulation are installed under the mats so most of the heat goes up, not down.
Photo: manasquanplumber.com
Hydronic systems
Hydronic radiant heating systems are usually designed to heat an entire house. Water is heated to between 100 and 120 degrees Fahrenheit by a boiler and circulated through tubing under floors. The tubing can be installed in several ways: embedded in a concrete slab, installed over an existing slab in cement, stapled under subflooring, or fitted inside the channels of specially designed subfloor panels. Any kind of finished flooring, including hardwood strip flooring, vinyl, or carpeting, can be installed above it. (Note: Some installers may recommend engineered wood rather than solid wood flooring products in homes with high moisture levels. Otherwise, changes in moisture content can cause wood planks to cup, bow, or warp.)
Find trusted local pros for any home project
Find Pros Now
+
More Comfort, Lower Energy Costs
Radiant heating is more comfortable than other systems for a variety of reasons. First and foremost, it feels warmer because the heat is delivered where you live—near the floor. Since all surfaces in the room are also being heated, there are no cold objects to draw heat from you and make you feel cold. In addition, radiant heat does not constantly cycle on and off, causing you to be too hot one minute and too cool the next. Nor does it dry out the air that in turn dries out nasal membranes. Plus, radiant heat is relatively draft-free. There are no supply and return registers or convection-reliant radiators, and there is less air leakage around doors and windows. Finally, the air inside the home tends to be cleaner because dust and allergens are less likely to be stirred up by air currents.
Photo: fotosearch.com
Because electric heat is expensive, electric radiant floors are typically limited to small areas, such as a bath or kitchen. Programmable thermostats with both air and floor temperature limits are recommended with such systems, to save on energy costs. Hydronic radiant floor systems save energy and lower fuel bills because radiant heat feels comfortable at lower air temperatures, enabling you to lower the thermostat. Further savings can be realized because running a high-efficiency boiler at lower temperatures will increase its lifespan. In addition, hydronic radiant heat is more efficient than other systems because it uses relatively low water temperatures to heat your home. In effect, the entire floor is a radiator, so it doesn’t have to be as hot as conventional radiators. Boilers can heat water to lower temperatures more efficiently than they can heat water to higher temperatures.
Photo: warmboard.com
Recent Innovations
The growing popularity of PEX (cross-linked polyethylene) tubing during the past 15 to 20 years has made radiant floors easier to install and leak-free. This was not so with ‘50s- and ‘60s-vintage radiant systems that relied on copper tubing embedded in concrete. With time, the tubing leaked and the systems were abandoned. Early on, PEX was not without hiccups as well. Tiny amounts of oxygen are able to penetrate the PEX lining, causing corrosion to metal components, such as cast iron boilers. Newer versions of PEX include an oxygen barrier.
The growing popularity of solar heating has also caused builders and homeowners to give radiant floor heat a second look. Solar energy is a good heat source for radiant floors because solar thermal collectors are very efficient at supplying the lower water temperatures that such systems require.
Advertisement
Simplified installation
Installations have been simplified in recent years with the advent of subflooring that’s pre-fitted with tubing channels. Warmboard, for example, manufactures 4 x 8 radiant floor panels for new construction and 2 x 4 panels for remodeling that are lined with aluminum sheeting for even heat distribution. The panels are more expensive than materials used in some other systems, but they are more efficient and reduce the labor costs, too.
Radiant cooling
The only negative for radiant floor heating is that it’s not so easy to use for cooling. With a conventional forced-air heating system, the same ducts that deliver hot air through ducts from the furnace can be used to introduce cool air from a central air conditioner. While radiant cooling is possible, it’s typically not cost effective to install. A chiller or geothermal heat pump must be used to supply the cold water. In addition, the tubing for radiant cooling is best run in the ceiling (not the floor, the better location for heating). And while radiant cooling systems will reduce air temperature, dehumidification may also be needed to make occupants feel cool.
Costs of Radiant Floor Systems
For new construction, a hydronic radiant floor system is likely to cost more than forced hot air (ducts and registers) or hydronic systems (baseboard radiators). In the long run, however, it will save money due to lower thermostat settings and higher efficiency. The cost of retrofitting hydronic radiant flooring varies depending upon whether there is access to the subfloor and the extent to which flooring and ceilings must be torn out and reinstalled. As a starting point, materials and mechanical equipment for installing hydronic radiant heat in a 2000 sq. ft. home cost about $3,500 or $1.75 per sq. ft., according to the Radiant Floor Company. This excludes the heat source and assumes two zones (a 1000 sq. ft. basement and 1000 sq. ft. first floor). Labor costs vary by the job and location.
Advertisement
Electric radiant floor heating costs about $6 per sq. ft. for materials but is often less expensive to install because of lower labor costs. Unfortunately, it’s far more costly to operate and therefore generally makes sense as a supplemental, not primary, heat source.
Is Radiant Heating Right for You?
Radiant heat—a no-brainer if you’re building a new house—can be retrofitted to fit the floors of existing homes, too, although installation costs will be higher. In retrofits, tubing is attached to the underside of the first-floor subfloor, assuming there is access to it from a basement or crawl space. If the renovation is extensive and the finished floor is going to be replaced in any case, it’s usually better to install tubing over the subfloor where it will be more efficient, easier to install, and require less tubing. Adding radiant heat to second and third levels, when existing floors are to remain in place, may require removing the ceiling of the rooms below to gain access to the underside of the subfloor.
Your heat source will also factor into your decision. If you have an efficient boiler that’s not too old, it probably can be used to supply heat to your radiant floors. If your boiler has seen better days, choose a high-efficiency, condensing, gas-modulating boiler that is capable of heating your domestic hot water, too.
Find trusted local pros for any home project
Find Pros Now
+
The Best Systems · Our Radiant Heating Systems Recommendations
No one radiant heating system is ideal for all situations, but after 40+ years of serving customers, a few systems and techniques stand out. We like simple honest value, with no gimmicks or do-dads. The best systems should be reliable, long lasting, and easy to work on. They should be energy efficient and environmentally responsible and they must be affordable. The best radiant systems should offer the features at right.
Check out our video below to learn more about the best radiant heating system.
The Best Systems Should Offer:
- Low initial cost
- Low operating cost
- Environmental sensitivity
- Energy efficiency
- Simple and easy to work on
- Compatibility with solar energy
- Should be “DIY friendly”
Simplified Schematic of The Open Direct System
The best radiant systems will use a high quality, high efficiency water heater instead of a boiler. These systems cost about half as much as one using a typical boiler. Yet, they are much more efficient. They are a simple, ingenious way to make warm water for radiant space heat, and domestic hot water, and you actually get a little cooling when you want it. If you use a boiler, you will incur extra costs and miss out on some great opportunities.
Domestic hot water based radiant heating systems are affordable. They make the exceptional comfort, high efficiency, and health benefits of a radiant heating system available to everyone. Not just the one percent!
Photograph of the Open Direct System
You can use the same water heater for your radiant heating system that you use for domestic hot water!
There are two systems to choose from that provide domestic hot water and space heating from the same unit. One is the indirect system that uses a heat exchanger and the other is the direct system that does not.
The “Open Direct System” is a significant breakthrough in radiant heating design. The Open Direct Radiant System offers unprecedented efficiency with a highly affordable first cost and is our preferred system of all radiant heating systems.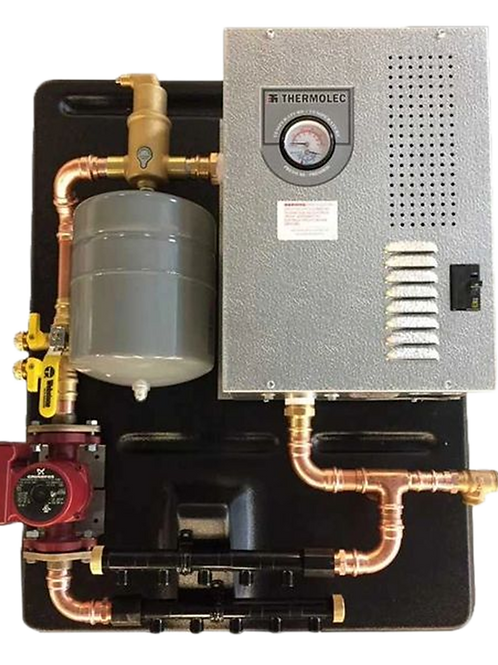 It is one single system that operates in two different and distinct ways. When floor heat is called for, the pump comes on and water flows out of the tank, through the radiant floor heating zone and back to the tank. When domestic hot water is wanted, water flows out of the tank and goes to the fixture. All water in the system remains potable.
It is arguably the most energy efficient and environmentally friendly heating system in the world.
It is one of the very few exceptions to the rule that better things cost more. You are literally getting a much better system for a lot less money.
Open Direct System Energy Efficiency Benefits:
- The “Open Direct System” uses radiant heating which is fundamentally more energy efficient.
- Dual use designs have less than ½ the standby losses of two independent methods. One set eliminated and the other reduced because of efficient utilization.
- Lower first cost presents the opportunity to buy a better, more efficient unit.

- The “Open Direct System” is compatible with solar.
- Domestic water heaters are potentially more efficient than a boiler. They can operate at low temperatures and they enable condensation of the flue gasses. Be aware that these benefits are only available with quality water heaters and may not be realized with cheap models.
- Cold water pre-heat provides limited free cooling by the detail where cold replacement water passes through the tubes in the floor before it goes to the tank.
- The tank enables a huge heat exchanger for the flue which enhances efficiency.

Open Direct System Environmental Benefits:
- Lower fuel consumption
- IF YOU CONDENSE THE STEAM IN THE EXHAUST DOWN TO WATER, YOU CAN PICK UP ANOTHER 10% IN EFFICIENCY. Significant amounts of the pollutants will dissolve in the water and they go harmlessly down the drain instead of polluting the air.
Click here for more information about radiant systems that use the domestic hot water heater as the heat source.
These radiant heating systems are arguably the
best and most efficient heating systems available.
Heating systems utilizing a water heater cost about half as much as those using a typical boiler. Yet, they are much more efficient. They are generally made of better materials. They are a simple, ingenious way to make radiant space heat and domestic hot water within the same unit. Properly designed domestic hot water based systems meet all major codes and are exceptionally safe. Because these systems operate at low temps they are more energy efficient and safer than systems using a boiler. Since the expense of a boiler is entirely eliminated, these systems are more affordable as well. Domestic hot water heater based heating systems are even compatible with a solar energy assist.
These systems are sometimes labeled “controversial” by people in the heating industry that want to sell you an old-school boiler system that costs 2 to 3 times as much. We have the science and happy customer feedback to back up our hydronic systems. It is up to you to consider the source of any negative comments.
The Polaris Water Heater.
Note the giant stainless steel
exhaust flue for extra efficiency.
The Polaris heating unit is a water heater (not a boiler) engineered for space heating and domestic hot water production. Because it is designed to make water warm instead of very hot, it is incredibly efficient – and safer as well. The Polaris is all stainless steel. A huge submerged stainless steel flue extracts just about every possible BTU of heat from the flue gas. Standby losses are nearly eliminated.
Even with these benefits, the Polaris costs far less than a similar capacity boiler. It’s a good value to buy, and a good value to continue to operate over time.
Click here for more information about the Polaris.
The least desirable place to cut cost is with radiant tubing and fittings. Radiant tubing often goes into inaccessible places where it would be difficult to replace. Is the material approved? Can you work with it? Is it energy efficient? Do not use waterline that has been retasked as radiant heating pipe. It is not worth it.
Here are some of the benefits to proper tubing selection:
- Higher heat output
- Less pumping cost
- Longer circuits possible
- Lower, safer operating temperatures
- More energy efficient
- Longer service life
- Lower electric bills
- Quieter operation
- Compatibility with solar heating and alternative energy.
Click here to learn more about high efficiency radiant heating tubes.
Photograph of a Joisted Floor System “Staple-Up”
Many joist installed systems on the market do not work very well, or cost too much. The following details are very important for performance and cost.
We suggest that you heat the floor with tubing installed in the underfloor joist spaces beneath the sub floor. Use 5/8″ PEX with .070 wall thickness. Use high efficiency tubing. Space the tubing 8″ apart within a 16″ joist space. Use thinner gauge aluminum heat emission plates and use them everywhere if possible.
The 5/8″ tubing is larger than typical 1/2″ material. It puts out more heat and allows the system to operate with lower fluid temperatures for longer life and better efficiency. The larger size reduces pump work and allows longer circuits. Tubing that is larger than 5/8″ may be too difficult to work with.
The aluminum plate takes heat away from the tubing and distributes it throughout the sub floor. Research shows that this detail is very important. The plates support the tubing well and the improved heat transfer is significant. Thinner aluminum plates have equivalent performance as thicker plates with half the cost.
Comparison of radiant tubing effect with and without aluminum heat plates.
The aluminum material has a very important and often overlooked property. Aluminum radiates much less heat into the air than other materials. This property sharply reduces heat loss in the downward direction (back loss) and has the effect of insulation. It is very important to control heat loss in the wrong direction. These losses can nullify most of the benefits of radiant heat.
Click here to read our research report about aluminum heat emissions and heating performance.
The thermograph on the right shows a significant difference in floor temp when aluminum plates are used. The far (orange/yellow) side of the floor has tubing and continuous plate coverage, while rest of the floor has tubing without plates. You can see from the legend in the right of the photo that this represents a large difference in temperature.
Thermograph of operating aluminum plates
The thermograph (right) shows that the plates (blue) emit much less heat than the surrounding areas (red, orange) even though they are at a much higher temperature. This means that the plates are taking the heat away from the tubing, distributing it through the floor, and then, making the heat go in the right direction.
Feel free to contact customer service technicians if you would like more information about these details. Customers may also request a research report.
Insulation Details
Schematic showing Slab on Grade
Our research shows that under slab insulation is most important at the perimeter and less important in the center of the building. Insulation should be extruded polystyrene. We know of no other acceptable material. In cold climates, it should be 2 inches thick at the perimeter. It may taper off to 1 inch as it goes inward towards the center of the building. Insulation should extend 12 feet from the perimeter towards the center of the building in cold climates. It can be reduced to 6 feet in warmer climates. Our experience indicates that failure to insulate properly is one of the most serious mistake that you can make.
Concrete reinforcement
“Rod” type reinforcement (rebar) is preferred over the “mesh” type because of overall strength and workability. Put down half of the rebar first and set it on “chairs.” Then lay out the tubing. Lay out the other half of the rebar on top of the tubing and tie everything together. It will be easier to lay out the tubing and the tubing will be well protected. The rebar will carry heat away from the tubing. It is generally well placed with half above the centerline of the slab and the other half placed a little beneath. Fiberglass reinforcing fibers are not a substitute for steel reinforcing.
Tubing Size and Spacing
If the slab is to be of any significant size, (1000 square ft or larger), a larger diameter tubing is preferred. Up to 7/8″ diameter. A larger tube (within reason) will put out more heat, reduce pump work and enable longer circuit lengths. Tube spacing may be spaced 24″ on center in very efficient and stable environments (such as basements). A 16″ spacing is more typical for reasonably efficient residential construction. A 12″ spacing will provide a little more heat and a more rapid response time.
Tubing layout should be a spiral or have gentle turns by another design.
Detailed research (DOE) has shown that 7/8″ PEX tubing with 0.70″ wall thickness and a circuit length of 200 feet is about ideal. The electrical consumption of the pumps will be as low as possible and the flow will be just slightly turbulent. The temperature drop will be about 10 degrees F from inlet to outlet. This is ideal, but different designs can still produce satisfactory results.
Tubing layout should be a spiral or have gentle turns by another design. Very tight turns strain the material and raise pumping costs. There is no benefit to a very tight and very evenly spaced design.
Click here to learn more about the benefits of an engineered tubing.
If you start out with a water heater based heating system then it is easy to add a solar supplement. Now or in the future. Solar domestic water heaters are well proven and accepted.
The “Solar Option Two” heating system is an extension of successful solar domestic hot water applications. In the right place, the solar domestic water heaters have been successful. The work must be done right and the domestic hot water production is valued. Schools and churches are often not appropriate, while residential construction is often ideal.
The radiant heating system is designed to use the domestic water heater as the energy source. Additional solar panels are provided so that some contribution to space heating or other energy needs can be made. The overall system may be limited by the ability of the house and system to store heat.
This system, either as a solar “assist” or in a building that already has its own “thermal mass” is cost effective in all areas of the United States when it is planned thoughtfully.
Click here to visit our solar heating website
Every month of the heating season, you must pay for the energy that your pumps use. It is most efficient to use a single individual pump for each heating zone.
The alternative would be to use one large pump and individual zone control valves. This is a common practice, but it is not good design. The pump must be sized so it can provide adequate flow when all of the zones are calling for heat. Most of the time, however, only one or two heating zones are calling. The pump is too large for the task resulting in a waste of electricity and unnecessary wear on the system.
A zone valve costs nearly as much as a small pump so there is really no money to be saved by using them.
We provide adjustable three speed pumps. These pumps will be set to meet your needs with the lowest amount of electrical use possible.
Home How to select and calculate pipes
Underfloor heating is a popular heating system today, with simple laying technology, reasonable cost and affordable operating costs. In addition, unlike electrical systems that emit electromagnetic waves, it is completely safe for human health.
It is important that the laying technology is not complicated, so it will not be difficult for almost every home master to install a water-heated floor with his own hands. And an important advantage of self-installation will be a reduction in overall costs, which will undoubtedly affect the total cost of operation and installation of this heating system.
How to lay underfloor heating: for underfloor heating with water, hot water pipes are laid with a snake or a snail. For an electric floor, various heating elements are installed according to certain technologies.
We also offer you to learn how to make a heated floor in the bathroom from a heated towel rail or in an apartment from central heating.
The main advantage of hydraulic floors is the provision of horizontal uniform heating of the room. At the same time, heat is distributed vertically, which creates a healthy microclimate, unlike radiator devices. Installation of such a system is especially recommended for rooms with high ceilings.
If we consider water structures from an aesthetic point of view, they also benefit, as they are not visible and do not take up useful space. In addition, as mentioned above, they are more economical to use.
The efficiency of water floors depends on good thermal insulation, because an increased level of heat loss reduces heat transfer. But the installation of such a system in a bathroom or toilet has its drawbacks – the possibility of surface overheating, since more often the heating element is connected to a heated towel rail.
In addition, such floors have a negative effect on the height of the room, because the “pie” implies the presence of a thick layer of concrete screed. Also, concrete pouring significantly weights the structure, so it is necessary to carry out work to strengthen the floors.
Water floor heating device
Water floor heating has a multi-layer complex structure, each layer has its own function. Consists of: a base, a hydro and heat layer, a reinforcing product, a heating element and a concrete screed.
A substrate is placed on the screed, on which the flooring is mounted, it must have a special icon indicating the possibility of laying it on warm systems.
Wall and screed joints, as well as the boundaries of the water circuit, should be laid with damping tape, this will help compensate for the expansion of concrete with temperature changes.
More often, self-laying of this heating structure is carried out in a “wet” way, that is, by pouring a cement-concrete screed. But “dry” installation is possible, it is used in houses with wooden floors.
Features of preparation of the premises
Due to the fact that the structure is heavy, with a large length of pipes and connecting nodes, the installation has its own technological features.
As a result, it is necessary to lay each layer strictly according to the instructions. But first, we will analyze the features of the preparation of the premises.
HEATED FLOOR in 1 day! Do-it-yourself water-heated floor part 1
Watch this video on YouTube
Room requirements
Water heated floor is recommended for construction in private buildings – find out how to install it yourself on a concrete floor. In multi-storey buildings, in addition to the heavy load on the floors, there is a risk of flooding the apartment from below.
In addition, the heating circuit is connected to a common heating system, but this is usually not intended for this purpose. This can lead to cold risers in your apartment or in a neighboring apartment. With this, the reluctance of the relevant authorities to issue permits for the installation of this system in multi-storey buildings is connected.
Today, two systems are often installed in new buildings: one for standard heating and the other for underfloor heating.
The ideal solution is to make a water heated floor yourself, even at the time of building a house. When assembling a structure in a finished house, the following should be taken into account:
- ceiling height, since such a construction leads to a significant decrease in them;
- size of doorways – their required height is not less than 210 cm;
- base strength.
In addition, the heat loss must not exceed 100 W/m2.
Substrate requirements
How to properly install a water floor, a prerequisite is the presence of an even and clean subfloor. If the housing is old, you need to dismantle the old floor screed and level the base.
The process is complex and time consuming, but necessary. After that, the base is thoroughly cleaned of debris and dust.
For the water floor to work well, you need a horizontal base without drops, deviations of no more than 10 mm are allowed. If cracks or flaws are found, they must be repaired.
If you are the owner of a new home with paneled ceilings, then you can install heating elements directly on them.
How to choose and calculate pipes
Before starting independent work on the construction of a hydrofloor, you should correctly select the type of pipes and calculate the optimal diameter size.
Pipes for floor heating. Recommendations of experts // FORUMHOUSE
Watch this video on YouTube
Types of pipes
Today, a large number of types of pipes are produced for laying in water heated floors, they are made of various materials.
Professionals advise for self-assembly, to give preference to polyethylene pipes of the cross-linked type PEX or PERT. The ideal option is PE-Xa, which has the highest crosslink density (85%).
This makes it possible to use axial fittings with a push-on end, which can be safely installed in a concrete structure. In addition, in cases where such pipes break, it is not difficult to return them to their original shape with the help of a building hair dryer by heating the fracture area.
Read the article: there are situations when it is necessary to connect pipes to each other in a screed, a pipeline has been pierced or it needs to be lengthened – find out how to do it.
PERT circuits do not have a memory property, so it can only be used with push-in fittings, which are not recommended to be hidden in a screed. But if the system is mounted from solid pipes, then the connecting nodes will only be on the collector, and this type of pipe is quite suitable.
Experts recommend using the PE-Xa or PERT model with a layer of polyethylene, which can be external or internal, when installing water systems. It is better to install pipes with an EVOH inner layer.
Please note! By choosing a PE-Xa circuit, you can test it yourself. A section of the pipe must be broken, and then warm this section with a building hair dryer. If the product is of high quality, it will take its original form.
In addition, metal-plastic pipes are often installed – the price is not expensive and they are not difficult to install. There are copper pipe products that are more expensive and require protection from alkaline exposure when pouring concrete.
Another type of pipe recommended for underfloor heating is composite. They consist of two layers of cross-linked polyethylene with a foil between them. The presence of an inhomogeneous material that has a different coefficient of expansion when heated can cause delamination of the circuit.
When choosing a model, you must consider:
- brand (Rehau, Tece, KAN, Uponor) is a guarantee of quality;
- marking;
- product conformity certificate;
- consider the coefficient of thermal expansion of the pipes;
- cost of accessories required for installation.
Calculation of pipe sizes
There are three basic pipe sizes for water floors: 16*2, 17*2 and 20*2 mm. The most popular mounting dimensions are 16*2 and 20*2.
Before purchasing a heating circuit, a size calculation must be carried out. If you are not sure that you can do it yourself correctly, it is better to entrust it to professionals. To do this, you need to decide:
- with the layout of the water floor heating;
- with floor areas where furniture will be placed and plumbing will be installed (pipes under the furniture are not installed).
A product with a diameter of 16 mm should have a contour no longer than 100 meters, with 20 mm – 120 m. That is, each should occupy a maximum of 15 square meters. m, otherwise the pressure in the system will be insufficient.
If the room is large, it is divided into several circuits. They must have the same size, the difference is allowed within 15 meters. If there is good thermal insulation, the standard laying step is 15 cm, it is permissible to reduce it to 10 cm.
When laying step:
- 15 cm – 6.7 meters of heating element per 1 sq. m. will be required;
- 10 cm – 10 m.
In addition, when calculating the size of the water floor, heat losses, system power, material of pipes, ceilings and flooring are taken into account.
The standard formula for determining the size of the circuit is the heated area in square meters. must be divided by the laying step in meters. To this indicator add the size of the curls and the distance to the collector.
Selection of the circuit laying scheme and its installation
When choosing the installation scheme and calculating the step, it should be taken into account that the liquid cools down while passing along the contour, therefore the installation must be done from the outer walls. This will help to protect the heated room from the penetration of cold air.
The level of heating of the room depends on the heating element laying pattern:
When installing a warm water structure, the calculation data and the laying scheme are taken into account. The standard laying step is 15 cm, and the contours are longer than 100 meters, they must be divided into several. In addition, each room should have a separate circuit.
Couplings or fittings are installed only when repairing breaks or repairing underfloor heating.
In addition, when preparing the calculation and the scheme, hydraulic resistance is taken into account, it depends on the number of turns, the more of them, the higher the resistance. Each circuit connected to the manifold must have the same given value.
Selecting a manifold and mixing unit
Selecting a manifold (see types, principle of operation and installation of the manifold, connection diagram and settings) is directly related to the number of circuits that are planned to be installed. The device must have as many exits as the structure of the water floor will have.
The device allows you to adjust and supply the heated coolant to the system, and take it back to the device after working out.
The simplest corrector model has only a shut-off type valve, and it cannot be used to adjust the operation of the structure. More expensive devices are equipped with valves for adjustment, they make it possible to independently set the level of intensity of water flows, separately for each circuit.
In addition, an obligatory attribute of any collector is an air vent valve and a drain cock, for emergency cases. In order for the device to work normally, it is only necessary to adjust all the valves once, according to the required parameters.
It is worth noting that more often not expensive collector models are installed. But if you do not need to save money, then it is better to buy a model with servo drives and mixing units. This device allows you to automatically adjust the degree of heating of the water supplied to the water floor.
The collector is installed directly in the heated room or in a nearby room. A special cabinet is made for mounting the device, its standard size is 50 by 50, and the depth is 12 – 15 cm. It is placed above the surface of a warm water floor. It is not uncommon that the collector cabinet does not spoil the interior of the room, it is recessed into the wall.
Collector for underfloor heating. Three ways to set up flowmeters.
Watch this video on YouTube
Installation of a warm water floor on a concrete screed
Installing a warm water structure with a concrete screed yourself is a laborious and lengthy process, since it takes about a month for the concrete to harden.
The construction of a structure consists of several step-by-step actions, we will describe them below.
HEATED FLOOR IN A READY SCREED WITH YOUR HANDS. SIMPLE OR EASY?
Watch this video on YouTube
Underfloor heating layers
Before installing the floor with your own hands, you should familiarize yourself with both the laying technology and the layers of the “pie” of the floor that are to be laid. Each layer is laid strictly in a certain sequence. The thickness of the structure is from 8 to 14 cm, and the load on the floors is about 300 kg / sq.m.
Let’s analyze what a warm floor consists of, its design:
- base – reliable and durable;
- vapor barrier layer – a polyethylene film with a thickness of at least 0.1 mm is used;
- insulation – extruded polystyrene foam is used;
- reinforcement – it gives strength to the structure;
- heating elements – pipes laid according to the scheme;
- concrete screed with a plasticizer – its thickness is from 3 to 5 cm.
If the heated floor is laid on the ground, then the “pie” is as follows:
After the concrete has hardened, the flooring is installed on the surface and the finish coat is laid.
Waterproofing
Lay the waterproofing layer, as mentioned above, on the prepared subfloor, it must be even and clean.
As a waterproofing material, ordinary polyethylene film is used, it should be overlapped, one strip on the other and on the walls (20 mm). For tightness, the joints must be glued with adhesive tape.
Damper Tape
Damper Tape is designed to compensate for the expansion of the concrete screed when the system is heated. It protects the surface from cracking. The standard thickness of the mounting tape is 5 – 8 mm, and the height is from 10 to 15 cm.
When concrete is heated to 40°C, it expands by 0.5 mm per 1 meter.
It is glued along the perimeter of the heated room, at the junction of walls and floor. The tape should be higher than the screed, and its excess, upon completion of laying, is cut off with a knife. In addition, if there are several contours, their boundaries are covered with it.
Insulation laying
When installing underfloor heating with your own hands, it is important to choose the right type of insulation. The efficiency of the device depends on it, because it does not allow heat to be wasted.
There are many types of thermal insulation material, but experts recommend two:
- Extruded polystyrene foam – low thermal conductivity and high mechanical strength. XPS is not exposed to moisture, as it does not absorb it. In addition, it has an acceptable cost. This type of gasket is produced in slabs 50 by 1000 mm or 600 by 1250 mm in size, and 20, 30, 50, 80 and 100 mm thick. The product is equipped with snap-on grooves, which allows you to make a strong docking.
Expanded polystyrene sheets are equipped with a foil layer, which increases the cost of production. But there is no significant benefit from it, since the reflective property does not work in an opaque environment. In addition, the cement mixture is alkaline, it will corrode the foil.
- Profile polystyrene mats are highly plastic, equipped with special bosses, pipes are laid between them. Also, the bosses serve as a retainer for the heating elements. In them, the contour is attached in increments of 50 mm. The use of a mat greatly simplifies the installation process, but at a cost they are higher than polystyrene foam insulation. The thickness of the plates is from 1 to 3 mm, and they are 500 by 1000 or 600 by 1200 mm in size.
When installing a water-heated floor on your own, you need to choose the right thickness of the insulation. To do this, you must adhere to the following rules:
- when laying heating floors on the ground, the minimum thickness of the insulation should be 100 mm, it is recommended to install two layers of 50 mm, located perpendicular to each other;
- when installing on the ground floor, 50 mm is sufficient;
- for thermal insulation in rooms above warm rooms – 30 mm.
Insulation sheets are placed along the entire perimeter of the area and fixed to the base. If XPS boards are used, they are fastened with dish-shaped dowels at the joints and in the center.
Reinforcement
The need for reinforcement during self-assembly of warm water floors is that the mesh gives strength to the structure, ensures uniform distribution of heat and heating elements are fixed to it.
The standard diameter of the reinforcing mesh rods ranges from 4 to 5 mm, and the cells are of different sizes, they must be selected depending on the laying step.
Experts advise laying two reinforcing layers. The first is on the insulation, and the second is on top of the heating elements (pipes). The meshes are connected to each other with a wire.
Tip! If you do not want to lay two layers of reinforcement, then before installing the mesh on the insulation, you should make supports under it so that when pouring the solution, it can leak under the reinforcement.
Laying and fixing pipes
The laying of heating elements is the most important stage when installing underfloor heating. In addition, it is good to have a device to unwind pipes in coils, since it is forbidden to remove them with rings, a lot of stress is created, which interferes with installation.
It is not allowed to remove the circuit from the fixed coil, it must be twisted. You can do it yourself, but with the help of a device it is easier to do it.
If the insulation boards have markings, the installation process will be greatly simplified. In the absence of such, they should be applied independently. It is necessary to make marks on the plates with a marker in accordance with the step of laying the heating element. Then, using a paint thread, draw a line and draw a route for the contours.
When installing water pipes yourself, you need to remember that you need to deviate from the walls by 15 – 20 cm. Ideally, if each circuit is single, without seams, and with a maximum size of 100 mm. Installation should be done according to the scheme, in accordance with the calculation. Permissible spacing at the walls is 10 cm, closer to the center is 15 cm.
The circuit must be installed from the most remote areas from the collector. In addition, the transit sections of the product should be insulated with foamed polyethylene, this will save energy and prevent heat from being consumed along the road. In this case, both ends must go to the place where the manifold cabinet will be installed.
To fix the contour, fixing profiles are used, which must be screwed to the floor with dowels. After that, the pipes are pressed against the reinforcing mesh and fixed with plastic fasteners. You can not pinch the pipe too much, the loop should fit freely to it.
Care must be taken when bending the contour, especially when made of polyethylene, because this material is subject to deformation. It is difficult to bend polypropylene pipes, they are springy. Therefore, when installing a warm floor, they are fixed directly to the grid with a large corner radius. If a white spot or streaks appear, the material is considered damaged and should not be used.
If you are installing metal-plastic pipes with a diameter of 16 or 20 mm, then you can bend them yourself without using a special tool.
Tip! At a bending angle of a small radius, so that it turns out to be even and the product does not burst, the bending process is carried out in several approaches (by intercepting hands). To get an angle of 90 ° C, it will take 5 – 6 times.
Connecting and filling the circuit – pressure test
After self-installation of the heating pipes, the device should be connected and checked for operability and integrity:
- Connection. The most common way to connect a water-heated floor is a distribution unit. Its main goal is to increase pressure, implement temperature adjustment and uniform supply of coolant to several circuits. There are different devices – with manual or automatic adjustment.
Connecting the system consists of connecting both ends of the pipe to the manifold wiring with clamp fittings. In addition, with the help of a collector, the underfloor heating device is connected to the main heating system or to a specially equipped boiler.
When choosing a heating boiler, it is important to take into account its power, it should equal the power of all sections of the floor with a small margin.
The boilers have a water inlet and outlet, which are equipped with shut-off valves.
Also, for the circulation of the coolant, it is required to equip the pump. More often, it is included with the boiler, but if the heated area is large, you will need another one.
- System filling. Before pouring the concrete screed, the system should be filled and hydraulically tested. Since in case of a malfunction, it will be difficult to repair a system filled with concrete. To do this, you need to connect a hose to the drain outlet of the collector and bring it to the sewer.
Tip! It is better to use a transparent hose to make it easier to see the air leaving the system.
The collector responsible for supplying the coolant is equipped with a ball valve, tap water is connected to it. And a pressure test pump is connected to one of the outputs connected to the underfloor heating circuit.
The process of filling the system is as follows:
- all underfloor heating channels are closed, except for one, while all air vents are opened;
- water is supplied, and the degree of its purity and the release of air from the system are monitored through the drain hose;
The inside of the pipes may be coated with process grease, which must be washed off with water.
- when all the air has escaped and the water is completely clean, the drain cock closes, after which the filled system is shut off;
- if there are several circuits, these actions must be done with each;
- After all circuits have been flushed and filled, close the tap that supplies water.
Upon completion of the procedure, no air should remain in the pipes, and the water should flow perfectly clean.
If a leak is detected during the testing of hydrofloors, it is eliminated immediately, but first the pressure in the system must be relieved.
- Crimping. To carry out pressure testing, a special pump is required, which has already been mentioned above, it must be connected to the outlet of the underfloor heating system.
Press sequence:
- all circuits connected to the manifold must be opened;
- fill the pump container with water and open the supply tap;
- using a pump, it is necessary to build up pressure in the system, it must exceed the working pressure by 2 times (6 atm), it is controlled by pressure gauges located on the pump and manifold;
- after pressurizing, it is necessary to visually inspect the entire pipeline and its connections;
- after half an hour, increase the pressure again to 6 bar and carry out an inspection, after another 30 minutes, repeat the action, if leaks are detected, the pressure is released and they are eliminated;
- if there are no leaks, the pressure should be raised again to 6 bar and left for a day;
- if, after this time, the pressure has dropped by no more than 1.
5 bar, then you have assembled the system correctly.
According to the law of physics, when pressure builds up in pipes, they try to straighten up. If their fixation is not made firmly, then unpleasant surprises will arise during the test. In the future, when the contour is filled with concrete, this can not be feared.
Installation of beacons
To make the most even screed, it must be poured over the beacons. As beacons, when installing a warm water floor, experts advise using a plasterboard profile.
Beacons are installed in accordance with the level of the finished floor, minus the thickness of the flooring. To fix the guide profile, mortar pillows are used, a plasterboard product is placed on them and leveled with a level.
Although this method has a disadvantage – if the profile falls below the required level, it will need to be removed and a solution added under it. Therefore, a rigid support is recommended under the beacons; dowels can be used. The top of the cap should rise above the surface of the screed.
Standard installation of beacons – 30 cm from the walls, with a small distance between them, as the solution settles and dimples may appear on the surface. The recommended spacing between the beacons is 1.5 m, then a 2-meter rule for alignment will do.
The installation process of the beacons looks like this:
- From the walls located on the right and left sides of the entrance, an indent of 30 cm is made and lines are drawn that will serve as a mark for placing the extreme beacons.
- The space between the lines is divided into equal parts, their maximum size is 150 cm. One strip should be placed opposite the entrance.
- According to the dividing marks made, parallel lines are drawn, the places for placing the non-gels are marked on them, the installation step is 40 – 50 cm.
It is best to use a laser level to level non-gels. If you mount beacons with your own hands, and you do not have such a level, you can rent it. Although it is possible to do this work with the help of the usual level, it will only take more time.
- A profile is placed over the screw heads. But in order for the beacons to be well fixed, until they are installed on the non-gel caps, mortar slides should be made in increments of 1 meter, slightly higher than the future screed. Then the profile is installed in place and pressed down, and the excess solution that has come out is removed.
The evenness of the installed beacons is also checked by the level.
Preparation of the mortar, pouring the screed
Concrete screed, which is poured into a water-heated floor, is subject not only to mechanical stress, but also to deformation under the influence of temperature, therefore, the requirements for it are increased. And the usual solution of concrete will not work here, you need to use a plasticizer or fiber as additives.
The use of a plasticizer reduces the ratio of water to cement in the mortar, increases the mobility and increases the strength of the screed. The degree of mobility is one of the most important indicators of a quality mortar for pouring heating floors, since it must penetrate well under the pipes and easily release air. By consistency, additives are available in dry and liquid form.
Fiber significantly increases the strength of the structure, and almost completely eliminates the risk of cracking. It is metal, polypropylene and basalt. For warm water floors, fiber made of polypropylene and basalt is intended. The standard rate of fiber per 1 m3 is 500 grams.
A large number of mixtures are presented in stores, they already contain a plasticizer and fiber. Of course, ready-made solutions are of high quality, and their use greatly simplifies the process of pouring the floor, but they will cost more than do-it-yourself ones.
A prerequisite that must be observed when making the mixture yourself is the mechanization of the process (using a concrete mixer or a construction mixer), as it requires a high-quality mortar.
When self-producing a cement-concrete composition, for pouring a water-heated floor, it is recommended to use a grade of Portland cement not lower than M-400. In addition, the date of its production should not exceed more than six months.
Sand, for use in mortar, must be screened, washed and dried. River sand is not suitable for these purposes, it has the correct shape, which is not very good.
Sand and cement in the mortar should be in proportions of 3 to 1. Water is needed approximately 1/3 of the amount of cement, per bag (15 kg) 15 liters. But the use of additives reduces the ratio of water and cement, so you need to add water gradually.
According to the technology, the production of mortar for the installation of underfloor heating differs when using different devices. If a mixer is used, then first, at low speeds, dry components are mixed – cement, sand and fluffy fiber. And only then, water with a plasticizer is added. The mixture is prepared in 7 minutes.
In a concrete mixer, the process looks exactly the opposite. Water with a plasticizer is poured into it, then cement is gradually poured first, then sand, after which cement is added again and at the end the rest of the water is poured. Fiber is added little by little during the kneading process, always in a fluffy form. The solution is prepared within 3 – 5 minutes.
Ready-mixed concrete is uniform in color and plastic in consistency. If you squeeze it in a fist, no liquid should come out. You can put the solution in a pile, if it does not spread, but only slightly settled, then the quality is good.
Vacuum the surface to remove dust before starting to pour underfloor heating. Also, it is necessary to close the windows in the room, as drafts and direct sunlight are contraindicated.
All screed work must be carried out at one time. Therefore, when carrying out self-filling, assistants are required. In addition, the device must be set to a working pressure of 2 atmospheres.
![]()
Laying mortar should be started from the far corner of the room, and poured in strips according to the beacons. It is necessary to finish the process with a strip at the exit. When leveling, you should not try to immediately make a perfect surface. It is important that there are no large holes. The minimum layer of mortar over the heating elements must be 3 cm.
The screed is left in this form for 1 to 2 days until it sets a little so that it can be walked on. After that, cleanup work begins. First, the damper tape, which rises above the surface, is removed with a construction knife.
Then, with a sharp edge, as a rule, pressing it against the beacons, the concrete is cleaned with short, sharp movements away from you. This is done until the beacons are completely bare. The resulting debris from the grout is removed, the surface is sprayed with water and covered with polyethylene.
After a day, the beacons are removed, and the furrows remaining from them are rubbed with a solution. The surface is again wetted and covered. It is necessary to wet the screed daily, for 10 days. Until the concrete surface is completely hardened, it must be kept for at least 28 days, until this time the system cannot be turned on.
Find out how to properly turn on your underfloor heating for the first time.
Expansion joints
If the expansion joints are incorrectly positioned or missing, the screed may break. Therefore, there is a need to arrange shrinkage joints if:
- the area of the room exceeds 30 square meters;
- wall dimensions over 8 m;
- the room has a significant difference in length and width, more than 2 times;
- curved room.
To do this, lay damper tape around the perimeter of the joints. It is necessary that the reinforcement at the seam is separated. And the gap intended for deformation at the base had a thickness of 10 mm.
Treat the upper part of the joint with sealant. If there is a non-standard room, it should be divided into parts, rectangular or square.
When the heating elements pass through the seams, they are mounted in these areas in the corrugation, it must cover them 30 cm on each side. Seams should not be placed inside the outline.
If you want to lay the tiles as flooring, then it is likely that they will come off in the areas of expansion joints. Therefore, one part of the tile should be mounted on glue, and the second on sealant.
If additional separation is required, the partial expansion joint method can be used. They are made with a trowel, 1/3 thick. When the concrete hardens, they are also sealed with sealants.
Cracks in the screed
Not infrequently, after hardening of the screed, cracks appear on it. Their formation is caused by the following reasons, if:
- low density insulation;
- poor mortar compaction;
- no plasticizer;
- screed too thick;
- no shrink joint;
- concrete dried quickly;
- Incorrect mix ratio.
It is easy to avoid the formation of cracks in the screed:
- apply insulation with a density of at least 35-40 kg/m3, and preferably higher;
- make the grout plastic in consistency, with the addition of fiber and plasticizer;
- separate large rooms with shrink joints;
- Prevent rapid hardening of the concrete by covering with polyethylene film the next day after pouring.
Laying the top coat
Only choose the top coat that is specifically designed for installation on underfloor heating. On the packaging of such products you can find a special icon that says this.
Ceramic tile or porcelain tile is the ideal flooring for self-assembly on the hydrofloor. The use of laminate, linoleum or carpet as a finish for heated floors is permissible, but only if there is a marking that allows installation on warm structures. Lay the flooring only on a well-dried concrete screed.
It is possible for everyone to install a warm water floor in a private house or apartment. Despite the fact that it will take a lot of time and work, but in the end, your home will become cozy and comfortable.
Instruction video
DIY HEATED WATER FLOOR
Watch this video on YouTube
Underfloor heating. 10 mistakes NOT TO MAKE
Watch this video on YouTube
5 key rules for installing a water heated floor
Watch this video on YouTube
combined heating system, connection to a radiator and ready-made kits.
Underfloor heating is perhaps one of the most comfortable types of home heating. The air in the room warms up evenly over the entire area, hot and cold zones are not created in the room, and the warmest is the feet.
But there are so many options for connecting a warm floor to a heating system that you can easily get confused in them. In this material, we will talk about the most common options for connecting a warm floor in different initial situations.
Direct connection to a separate boiler for floor heating
This is the best and simplest option, since the warm floor will not depend on another heating scheme and in any way affect it. But there is an important limitation:
Underfloor heating is a low-temperature heating system. Most types of boilers operate at high temperatures, and when operating in low temperature mode, they will give low efficiency. In addition, there is a risk of a quick failure of the heat exchanger.
The condensing boiler is the best for underfloor heating. In low-temperature mode, it gives the maximum efficiency for itself.
A simple scheme for connecting a warm floor directly to the boiler. Thermometers control the temperature of the incoming coolant and the return: the optimal difference is 5-10°C.
Since the condensing boiler can efficiently produce the optimum temperature for underfloor heating, it is easy to connect such a system – the fewest additional elements are required.
Combined heating system: radiators + underfloor heating
In this case, the owner of the house faces a fundamentally different task. For radiator heating, the boiler operates in high-temperature mode. The question is how to lower the temperature of the coolant.
Usually, for heating a house with radiators, the boiler heats the coolant to a temperature of 70-80°C, for warm floors it should not exceed 60°C, optimally – 35-45°C.
Various solutions are used to lower the heating medium temperature. One of the most popular is the admixture of the cooled coolant to the boiler already in the underfloor heating circuit. But this can also be done in different ways.
Three-way thermal mixing valve
The device works to mix two heat carrier flows of different temperatures. On the one hand, the heated coolant from the boiler passes through it, on the other hand, the cooled coolant from the return of the heating system. Mixing in the required proportion – to reach the set temperature – the water is sent to the underfloor heating circuit. After a full circle, the water is mixed with the return of the entire heating system.
After the mixing device, a circulation pump is usually installed.
One of the common models of a three-way thermostatic valve for underfloor heating. The sticker schematically shows the direction and mixing of flows.
Thermostatic three-way valves allow you to set the temperature of the underfloor heating. Some models have temperature range presets according to climatic zones.
In 3-way valve without thermostat the temperature of the coolant is controlled mechanically. The owner will have to manually adjust it for a long time to achieve a comfortable heating temperature. If you decide to change the temperature in the boiler or turn off the underfloor heating, you will have to set it up again. A servo drive can be installed on the crane – for automatic adjustment according to the specified temperature values.
Prefabricated Mixing Unit
Some manufacturers produce prefabricated all-in-one solutions for underfloor heating – pump-mixing units. Their equipment, workmanship and price are varied. This is the easiest option to connect. The principle of operation is the same: mixing the hot coolant with the cooled return to maintain the desired temperature of the warm floor.
Typically, such devices have a three-way valve in their design, supply and return thermometers, and connection elements – to the pump and pipes or manifold. The rest is a balancing valve, automatic air vents, a bypass, a thermal head with a remote sensor is optional. The pump is not included in the kit.
In the center is the finished pumping and mixing unit. On the left is a radiator heating collector, on the right is a warm floor. This solution has everything you need. Side connections are the most convenient and aesthetic solution for connecting to a collector.
You can buy all elements of the mixing unit and assemble a similar system yourself.
Underfloor heating on the second floor of the house
The main problem of installing underfloor heating on the second floor is the level of air vents. The air vent must be above the warm floor, otherwise the air will enter the pipes and stay there. Therefore, it is forbidden to install a floor on the second floor by connecting it to a collector located on the first floor.
Solution two:
- 1. Additional units with air vents on both pipes above the level of the heated floor.
- 2. Connecting a warm floor from a heating radiator.
To ensure that the pipes of the underfloor heating on the second floor do not become airy, additional air vents have been added – above the level of the underfloor heating.
Underfloor heating from a heating radiator
This solution is suitable for heating a small area or part of a room – 10-15 sq.m. It is a ready-made thermostatic mounting kit in a decorative box for connecting one underfloor heating loop to a high-temperature heating circuit without a pump-mixing unit. Inside there is a manually operated thermostatic valve, a servo drive or a head with an external temperature sensitive element, and an air vent.
Scheme of connecting the finished kit to the radiator.
One underfloor heating loop is connected to the high temperature circuit. A mounting kit is mounted at the outlet of the loop. The hot coolant enters the loop and cools down to the temperature set by the automatic regulator. The cooled coolant goes into the return line, and a new portion of the hot coolant is supplied to the warm floor.
For living quarters, this is not the most comfortable solution – it is more suitable for a loggia, balcony, bathroom, corridor.
Once again, the most important thing:
- If underfloor heating is connected as the only heating system, then for reliability and comfort it is better to use a condensing boiler in low temperature mode.
- To connect a combined heating system with underfloor heating, pumping and mixing units are used, the composition of which depends on your requirements and budget.
- You can buy a ready-made mixing unit, which is easy to install and allows you to mount a warm floor in any configuration – you just need to buy a pump.
- When installing underfloor heating on the second floor of the house, you need to remember the location of the air vents, if necessary, install additional ones.
- It is possible to install underfloor heating directly from the main heating radiator, but this solution is suitable for small non-residential premises.
Water floor heating system: principle of operation, device, description
From the author
Hello! This article will discuss how the water-heated floor system works, the features of its use and its types.
Water heated floor system – general description
Floor heating is carried out with a heat carrier. By the name of the system, it is clear that the water circulating through the pipes serves as the coolant for a water-heated floor. Temperature regulation and circulation control takes place in a specially mounted manifold cabinet. The pipes are laid in loops on the base floor and connected to a manifold cabinet.
As you can see in the photo, a manifold cabinet is a floor heating unit in which floor heating pipes are assembled and the heat carrier flows are regulated by collectors with valve control valves. By the way, not a single construction site, any industrial and residential buildings can do without engineering communications in the form of pipelines. A simple ubiquitous water supply and a frequently encountered gas pipeline are familiar to any resident of the city and the countryside. Pipelines of steam and oil products are familiar to employees of specialized enterprises.
If there is a pipeline, then you can not do without special equipment that shuts off, regulates the flows and distributes the moving flows. Such equipment is called pipeline fittings. The operation of all pipeline systems depends on its quality. read more about pipeline fittings for various purposes on the Mosklapan website.
Water heated floor loops are laid according to two schemes:
1-Bifilar laying system. In other words, “double helix” or “snail”;
2,3 meander system. In other words, “zigzag” or “snake”.
The most efficient laying system is where warm water loops alternate with cooled water (1.3 in the figure)
Depending on the type of coating covering the pipeline, the water heated floor is divided into a concrete floor heating, as well as a polystyrene system and a wooden system warm floor . In a concrete warm floor, the pipeline of the system is closed with a “wet” screed.
Water floor heating is not a universal floor heating system and has some limitations in use.
Water floor heating restrictions
- Underfloor heating in city apartments with central heating is prohibited.
- This is due to an increase in the hydraulic resistance of the system and a high probability of damage to the heating pipes after water hammer in the central heating system. However, in some series of modern new buildings, a separate main pipeline has been designed for the installation of water-heated floors.
- First of all, space heating using water floor heating is used for private houses with an individual water supply system. But here, too, a water-heated floor can be used either for comfortable or for general heating.
“Comfort” and “heating” water floor heating
“Comfort” water floor heating heats the floor and is used as an additional space heating system. The main heating is produced by heating radiators. For a comfortable warm floor, the temperature of the water in the system must be maintained constant. This type of water temperature control is called “thermostatic”.
“Heating” water floor heating has the function of complete and sole heating of the room. With such a system, the temperature of the heat carrier (water) must vary depending on the ambient temperature. This adjustment is called “weather-dependent”.
General principle of water floor heating
Water floor heating refers to low temperature floor heating systems. The temperature of the heat carrier (water) should be 35-45°C.
The water in the water floor heating system moves in a closed circuit, gradually cooling in the floor loops. From the main water comes with a temperature of 80-85°C. In the underfloor heating collector cabinet, the hot coolant is mixed with the cooled water returned from the system loops.
A pump-mixing unit (1) is used to mix hot and cold heat transfer fluid. To block the circulation of water, a collector block (3) is used, with rows of cold and “hot” shut-off valves (bypasses).
The balancing valve (2) is used to control the heat output. To maintain the set temperature, a thermal head (4) is used, which receives temperature data from a temperature sensor.
Servo drives and room thermostats can be installed for automatic control of the system. Servo drives and thermostats work in pairs.
When the water supply from the main is interrupted, the circulation of the coolant continues due to the opening bypass valve. The coolant circulates in the “cold mode”, through a free bypass (shut-off valve) of the collector block.
More details about the operation of the collector cabinet, installation technology and the device of the “pie” of a concrete water-heated floor in the following articles in the “Water-heated floor” series.
©opolax.ru
Other articles of the section
- Underfloor heating pipes: what type of pipe to choose
- Three elements of an electric underfloor heating: the electrical part of underfloor heating
- Electric heating mat
- Which underfloor heating is better, electric or water
- Electric underfloor heating under tiles
Similar articles
Water heated floor temperature control
Thermal insulation of a water heated floor: types and types …
Polystyrene floor heating system
Wooden floor heating system
Water floor heating pipes: what type of pipe . ..
Restrictions on the use of hot water…
Polymer pipes for underfloor heating
Layers of concrete water floor heating: heating …
Underfloor heating without screed
How to choose a substrate for underfloor heating
Keywords:
warm floor
underfloor heating system
water floor
manifold cabinet
Water heated floor – installation cost, description, materials
Our company offers its customers high-quality and cost-effective water floor heating systems for private houses, commercial enterprises and industrial premises. We will draw up for you an individual project of a warm floor, perform installation. Our specialists will perform the whole range of works: from design and assembly to installation and warranty service of water floor heating systems. Properly designed and installed water floor heating is comfort and pleasure available to almost every consumer.
You can get advice on underfloor heating systems or make a request for work. You can also order a visit of our engineer to the facility for technical inspection and consultations (the service is provided free of charge).
Underfloor heating is a functional and aesthetic heating system. It works as a main heating system but can be combined with 9 radiators0003
The best thing in our work is to receive gratitude from customers
What is a water heated floor
Underfloor heating are plastic pipes “hidden” in the floor through which warm water circulates. Usually, each room is served by one or more pipe loops. The loops are connected to the distribution manifold. Depending on the type of beam ceilings and the requirements for the floor, various installation methods are used. The most common is when underfloor heating pipes are poured with concrete.
Gentle, even heat, no drafts or dust transfer, cosiness and exceptional comfort, optimal temperature distribution, efficiency, absence of electromagnetic radiation – all this makes it possible to consider underfloor heating a close to ideal heating system.
Underfloor heating without radiators
For many future owners of underfloor heating systems, the question arises whether only a warm floor in the house is enough, or whether heating radiators are additionally needed.
If tiles or similar materials are to be used as flooring, underfloor heating to heat the room at low outside temperatures is sufficient in most cases. If floor coverings with a low coefficient of thermal conductivity are used (laminate, parquet, lenolium, etc.), then we advise our customers to use only a combined system (warm floor + radiators), otherwise you will have to raise the floor temperature to uncomfortable and even harmful to health.
The comfort of underfloor heating
The first thing you will notice when installing underfloor heating is increased comfort. The floor becomes warm and pleasant to walk on. The large heat transfer surface increases the amount of radiated heat, which, unlike convection in radiator heating, immediately spreads the heat to the surrounding surfaces, thus ensuring more uniform horizontal and vertical heat distribution.
Because people feel comfortable with cool air at head level and warmth at their feet, underfloor heating is a perfect heat distribution system.
If you want to know more about heating with a water-heated floor, as well as conda, you need to use a combined scheme – call +7 (351) 777-52-35 or 8 (951) 807-05-66
Saving energy
Uniform distribution of heat, in addition to comfort, allows the use of lower heating medium temperatures. The temperature in the room can be reduced by 2 degrees C compared to traditional radiators, with no change in the human feeling of warmth. Reducing the temperature by 2°C provides about 12% savings in energy consumption for the user.
The temperature of the heat carrier in water heated floors is 30 – 50°C, depending on the floor coverings used, the type of pipe laying, the heat loss of the room and the required heat load.
Thus, being a low temperature heating system (radiators require a coolant temperature of 60 – 85 ° C), a water heated floor allows you to further save resources for the production of thermal energy.
Difference between underfloor and radiator heating
- Often an underfloor heating system prevents cold drafts from windows by rapidly heating the air near the floor surface;
- With underfloor heating, the proportion of air movement is low compared to radiators, so less dust circulates in the air. At the same time, the hygienic conditions of the premises are improved;
- Underfloor heating – invisible and suitable for modern interior design. It is protected from damage, makes it easier to clean the house and eliminates the possibility of burns;
- Underfloor heating is much easier and cheaper to install than radiator systems. Underfloor heating does not require welding or threaded connections.
- The low temperature of the coolant is the most important and fundamental difference from traditional radiator systems. It must be borne in mind that the declared heat transfer of radiators is designed for a supply water temperature of 90 degrees.
Lowering the radiator temperature by 10 degrees reduces the heating efficiency by 15-20%. So, if the temperature of the supplied water is not 95, and 65 degrees, then the effective power given off by the radiator will drop by 50% of the design value, which is already unacceptable for maintaining comfortable conditions. For a warm floor, a coolant with a temperature of 30-50 degrees is required. This allows the use of autonomous boilers of reduced power.
For a preliminary calculation of the installation of a warm floor in a house, at a factory or in another building, you can send the layout of your house (dachas, baths or other buildings) by e-mail to our address [email protected], in the letter you can also indicate your wishes and contact phone number for clarification of emerging questions.
Basic requirements for the temperature of underfloor heating
The recommended temperature of the floor surface (according to SNiP 41-01-2003, p. 6.5.12) should not be higher than:
According to SP 41-102-98, the temperature difference in certain areas of the floor should not exceed 10°C (optimally 5°C). The temperature of the heat carrier in the underfloor heating system should not exceed 55 ° C (SP 41-102-98 p. 3.5 a).
So: The initial cost of a hydronic underfloor heating system is higher than a traditional radiator system, but further operation results in greater comfort and lower operating costs. In most cases, it is necessary to use a combined heating scheme.
Underfloor heating installation cost
The approximate cost of underfloor heating installation can be found in the table below. Our experts will select for you the most optimal option in terms of price and quality.
| Scope of work and equipment | ||
| Standard |
– multifoil and polyethylene film – masonry mesh – cross-linked polyethylene pipe (Russia) – collector assembly for underfloor heating Palanzh, Valtec |
1000 to 1200 rub/sq. |
| Comfort |
– multifoil and polyethylene film – masonry mesh – cross-linked polyethylene pipe Stout PEXa (Spain) – manifold with flowmeters Stout (Italy) |
from 1300 rub/sq.m |
| Maxi |
– foam and polyethylene film – masonry mesh – pipe cross-linked polyethylene Uponor, Rehau PEXa (Europe) – manifold with flowmeters Uponor, Rehau (Europe) |
from 1500 rub/sq.m |
In the table, the price is indicated taking into account the cost of materials, installation of equipment and pressure testing of the system, excluding the cost of materials and concrete screed work. For each particular house, the final cost of the underfloor heating system may differ downwards, and depends on the area of the house, the complexity or the availability of additional equipment. works (chasing, preparatory work).
Read also:
Installation of water floor heating in the house
Installation of boiler equipment
Installation of turnkey private house heating. Chelyabinsk and Chelyabinsk region. Price with prices.
|
Choice of parquet board. Which is better? When a person faces the task of choosing parquet for his apartment, house or office, the question naturally arises, which board is better? The answer to it for some buyers is very simple, for others, on the contrary, it is very complicated. This article will tell you how to choose the right floor covering and not get lost in its diversity. |
Kitchen parquet? Why parquet board Kahrs is the best solution for this issue The kitchen is one of the most visited places in the house, so its interiors need to be given special attention. What kind of flooring to choose for the kitchen tile, laminate, parquet? This article will help you make the right choice. |
Electric or water heated floor: comparison
Agree, it’s nice to walk barefoot on a warm floor, even when it’s winter outside. And it is not necessary to cover everything around with dust collector carpets. To maintain the desired surface temperature, there are special technologies.
These are underfloor heating systems that can be combined with classical heating or become the main source of heat in the house and forget about radiators forever.
Such systems are divided into electric and water systems. Which of them to choose to make your home warmer and more comfortable? You can find the right solution if you analyze all the pros and cons of electric and water floors.
Electric or water heated floor: comparison
The main difference between an electric and water heated floor is clear from the name and lies in the method of heating.
- In the first case, elements are placed under the surface that are heated by electricity and transfer heat to the floor.
- Water floor – these are pipes made of metal-plastic or polyethylene, through which hot water passes. Such a system provides for the presence of a boiler and a control unit.
There are many differences between these two types of systems. We will go through the main ones.
Important characteristics
To understand which underfloor heating to choose – electric or water, you first need to understand the main properties of these systems. It is important to understand that several systems fall under the general name “electric floor heating”. They differ in installation, price and principles of operation.
There are two main types of electric floor heating:
- infrared;
- cable.
In the first case, this is a carbon-coated film or carbon rods in mats. The floor is heated by infrared waves and heat is transferred upward. These are the easiest systems to install.
Cable underfloor heating can look like separate wires or ready-made mats. Ready-made mats are much more convenient.
Cable systems are divided into:
- standard resistive
- modern self-adjusting.
The latter are much more economical and have improved properties.
As a rule, conventional cable systems should not be laid under furniture, otherwise the cable may overheat and deteriorate. Self-regulating cables can be installed under the entire floor surface.
Safety
Obviously water floors are safer. The worst thing that can happen to them is a leak.
Although the installation of electric underfloor heating is relatively simple, an electrician must be involved in the process. Improper installation and connection of the cable can threaten minor and major electrical troubles. It is recommended to make reliable insulation and provide grounding.
Another problem with cable underfloor heating is electrical radiation. Although its amount does not exceed the maximum allowable indicators, it is believed that it does not have the best effect on health. Infrared heating is called safer.
Reliability
Provided that the wiring meets all modern requirements, electric floors can last 30 years. But the water system will sometimes have to be repaired. Although the pipes themselves are durable, various fittings and other connectors wear out over time and require replacement.
Therefore, when laying a water floor, they are now trying to install without a screed, using special profile mats, into which it is convenient to fix pipes.
Other pros and cons
The main advantage of electric underfloor heating is that it can be used “on a point”, for example, only in the children’s play area and toilet. And it is possible to turn on the system as needed.
The downside is that electricity is more expensive than water. Even with the most advanced electrical system, prepare to invest in your comfort.
Remember that electrical systems are dependent on the source of current. If there are frequent power outages in your area, you will have to provide an uninterruptible power supply for your home network.
The main advantage of underfloor heating is its efficiency. Although you will need to spend much more money on installation, in the future your efforts will pay off.
If you live in an apartment in a multi-storey building, most likely, a water heated floor is not for you. For such work, you must obtain a special permit. Indeed, for floors, such a system is a huge load. In addition, by connecting to central heating, you will reduce the quality of heating of neighboring apartments. And if the system leaks, the consequences will hit your pocket hard.
Brief summary
So, let’s sum up the preliminary results. We found out that water floors have the following advantages:
economy in use;
- safety;
- no radiation.
Cons:
- more expensive installation;
- need to replace fittings;
- possible leaks;
- problematic installation in a high-rise apartment.
Electric underfloor heating also has its advantages:
- easy to install;
- Possibility of installation in a high-rise building apartment and pointwise in certain areas;
- long service life.
And cons:
- electricity costs;
- presence of radiation;
- danger of electric shock and fire if installed incorrectly;
- the need for an uninterrupted power supply and good wiring.
In any case, a warm floor (electric or water) has one important advantage – it creates a feeling of comfort and gives our feet warmth, which is extremely important for health.
Topcoats for different types of underfloor heating
It is important that underfloor heating is suitable. The following recommendations exist:
Preferably for water floors:
- laminate;
- parquet;
- thin-backed linoleum;
- ceramic tiles;
- self-leveling floor.
For electric underfloor heating we recommend:
- laminate;
- thin parquet;
- ceramic tiles;
- uninsulated linoleum;
- self-leveling floor.
For underfloor heating film, it is recommended to use laminate and non-insulated linoleum.
Underfloor heating electric or water – which is more profitable?
So which floor is more profitable, water or electric? After analyzing all the advantages and disadvantages of the systems, it is easy to answer this question. Let’s break down the benefits point by point.
- Only electrical options are definitely suitable for residents of high-rise buildings. An exception can only be apartments on the ground floor with a modern heating system so that your water floors do not damage your neighbors.
- But the owners of private houses have a wide choice. All types can be used.
- For temporary heating and heating in separate areas, it is more profitable to choose electrical systems.
- For permanent heating over the entire area of the house, it is better to choose water floors.
- Which underfloor heating is more economical, water or electric? Here, as we found out, the first ones win. But installation is usually more expensive.