Covering shower window: Have a Window in the Shower? Here’s How to Get Some Privacy
Have a Window in the Shower? Here’s How to Get Some Privacy
Photo: istockphoto.com
Q: The shower in the main bathroom of our new home has a window. I’ve never seen such a thing before! How can I maintain my privacy while enjoying the sunlight the window offers?
A: While finding a window in the shower may still surprise folks, they’ve become an increasingly common construction feature for a few reasons. They offer a natural source of light and warmth, and create the illusion of larger shower dimensions, Most important, a shower window provides an escape route for odors and moisture in the air, thus staving off mold and mildew formation in the bathroom.
We understand your concern, though. Having a window in your shower may also give passersby and neighbors a glimpse into your most personal space. Fortunately, you can add privacy and still maintain brightness with these creative cover-ups, bathroom window treatments, and window replacement ideas.
Install shades or shutters to cover a window in view of the shower.
Photo: istockphoto.com
Window treatments are the simplest and quickest ways to add privacy. Two top choices are waterproof Roman shades, mounted over the window, or bathroom window shutters, which are vertical stiles and horizontal rails made of vinyl, polyvinyl chloride (PVC), or faux wood and fitted into the window frame.
- Shades can be pulled up or lowered with a lift cord that hangs from the top rod to add light and visibility or block it to boost privacy. Shades also lack slats through which heat can escape, making them a more insulating, energy-efficient option than shutters.
- Shutters, however, offer a greater degree of light and privacy control. Twisting the tilt bar (a long, stick-like apparatus) moves the slats up and down, altering the angle at which light enters. There are a wider range of style options available in waterproof shutters for shower windows than in shades.
 Also, you can treat regular shutters with a waterproof finish.
 Also, you can treat regular shutters with a waterproof finish.
Whichever option you choose, it’s best to avoid bamboo shades or wood shutters in showers. They can warp or form mildew or mold with enough exposure to moisture.
Advertisement
Frost the window glass.
Photo: istockphoto.com
Frosted bathroom windows have an appealing pitted effect on one side that increases privacy by blurring any images viewed through the window. Choose from some popular DIY window frosting methods below.
- Static window cling film: For a temporary option, use static window cling film—a removable alternative to traditional adhesive window film—in a frosted design. Wipe down the window with a soft cloth moistened with glass cleaner, mist the pane with a solution of 12 ounces of water and a few drops of liquid dish soap, and then apply the film, enlisting a squeegee to remove any air bubbles.
- Spray paint: For a semi-permanent effect, pick up a can of frosted glass spray paint, like Rust-Oleum Frosted Glass Spray Paint, that dries into a decorative coating. Clean the glass as above, use painter’s tape to protect the window frame, and then apply a thin coat of the spray paint to the pane, letting it dry per the product instructions. The paint can be removed later with a glass scraper.
- Etching: A glass-etching cream—Armour Etching Cream is a good one to try—will permanently frost windows in the shower by removing a thin layer of glass, leaving a frosted finish. Tape off the window frame, apply the cream to the pane with a bristle brush, and let it rest as directed per product instructions before rinsing the cream off with warm water.
 Clean the glass as above, use painter’s tape to protect the window frame, and then apply a thin coat of the spray paint to the pane, letting it dry per the product instructions. The paint can be removed later with a glass scraper.
Or, tint your bathroom window with window film.
Photo: istockphoto.com
Tinting windows a darker color with an aftermarket film on the interior side will also enhance privacy. These lightweight, self-adhesive coverings are made of polyethylene terephthalate and come in a range of types and colors, from weather-resistant security film to heat-absorbing solar film, and from silver to copper. Because certain types of film may possibly damage glass, check that applying window film will not void your window manufacturer’s warranty.
To apply film, cut the film to the size of your shower window with a utility knife, remove the adhesive backing, and then stick the film to the pane from the top down. Allow the film to cure completely, which can take anywhere from 4 to 8 days. You can shower during this period, but be sure to use the exhaust fan to keep humidity levels low to speed up curing. Do not attempt to clean the film until after it’s fully cured.
Replace the window in the shower with glass blocks.
Photo: istockphoto.com
If you have a single-pane window (i.e., one layer of glass) in the shower , consider replacing it with a network of glass blocks, which are thick, solid or hollow pieces that blur whatever’s behind them. Bonus: Glass blocks also double the insulation of the window. They can add an element of luxury to the shower, and can be customized to convey attractive effects ranging from pebbles to cracks. The downside is that they’re costly, and will run anywhere from $400 to $1,000 per window. Putting them in isn’t a DIY-friendly job, either.
Glass block installation requires a pro to cut the blocks to size, remove the existing window from the frame, and lay the blocks into the wall. Then mortar is placed in between the blocks and steel rods are driven through the mortar to maintain structural integrity (without the rods, the weight of upper rows of blocks can cause lower ones to crack). Finally, the contractor will seal the upgraded shower window with a waterproof caulk to stave off rot around the edges.
Advertisement
Bear in mind that you can’t open glass blocks as you can a traditional window, and poor bathroom ventilation can easily lead to mildew or mold problems. To avoid this issue, install an exhaust fan and use it during and after every shower.
Install bathroom window curtains.
Photo: istockphoto.com
If you can find the correct type, curtains can work well in a bathroom window. Many retailers sell waterproof bathroom window curtains made of polyester, vinyl, or other modern blends that can withstand the humidity of a bathroom setting.
Another option is a shower curtain cut down to size. For example, get a duplicate of your main shower curtain for a cohesive look. Whatever shower curtain material you select, there are a wide variety of colors and designs from which to choose. Be sure to avoid natural fibers such as cotton, which can absorb moisture and promote the growth of mold and mildew.
Depending on the size of the window and the size of the shower, hanging the curtains from an inset tension rod rather than an outside-mount rod might be less intrusive, especially in smaller bathrooms.
Enclose and landscape the view from the window.
Consider building a “screen” in your yard that blocks passersby from looking in the window, something similar to a basement window well, albeit above ground. Build a three-sided frame, and then use 4-inch slats spaced ½-inch apart so light can still travel through the window and into the bathroom. Build it a few feet taller than the top of the window to ensure privacy. Paint it to match the siding or trim on your home. You could then add interest to the screen by adding a few plants around it, or plant a vine or two to scramble up the screen.
Alternatively, tall, bushy shrubs planted outside of the bathroom window can block potential peepers. Be sure to select plants that are known to do well year-round in your region, and check to make sure the shrubs you choose are evergreen.
Advertisement
Place humidity-loving plants along the window sill.
Photo: istockphoto.com
You could also bring nature indoors as a visual barrier: Arrange a selection of plants in a row on the window sill. Choose tall, narrow pots if you can find them, and select tall plants that like humid conditions, such as majesty’s palm, calathea, some varieties of snake plant, and bird’s nest fern. Be sure to place planter saucers or coasters under your pot to collect water that pases through the soil.
To complete your indoor foliage screen, consider hanging a couple of trailing plants—golden pothos or English ivy, for example—from the ceiling and in front of the window. For hangers, retro macramé might be fun, or maybe a hanger made of metal is more your style.
Connect with a window tinting expert
Find licensed professionals in your area and get free, no-commitment estimates for your project.
Find Pros Now
+
5 Easy Ways to Protect Window in Shower
By WCMA NET
Placing a window at the shower space has several uses. Apart from making your shower look elegant, it helps bring in fresh air and extra light. Besides, you can even enjoy a beautiful outside view right from your shower.
But as moisture is common with this space, you might have to deal with potential damage on your window. So can homeowners keep these fittings safe from damp o?
Luckily, it’s possible to keep water from gathering around the sill. With the following tips, you will know how to protect window in shower rooms. Moreover, they don’t take up your time or cost a fortune.
Best Ways to Protect Window in Shower
1. Vinyl-Clad Windows Housed In A Wooden Jamb
Do you need a simple way to fix the tile with the window jamb, especially after providing a pitched sill? If yes, consider covering a window in vinyl and placing it in a wooden frame.
By adding both materials, your window gets the protection that it needs. First, the vinyl keeps damp from the window itself while the wooden jamb offers dependable support for it. But to get the best results, keep the window away from the shower spray.
- Like traditional tiled showers, cover the shower area with cement board. You should also allow this material to stay level with the window jamb. Then, use a good silicone caulk and seal the space between the frame and centerboard. Even if the caulk offers a seal, you will need extra materials to keep the wetness out.
- Wrap a piece of waterproof material -Schluter’s Kerdi works well – over the window jamb and joint. This material will entirely cover both fitting and keep them safe from damp. To secure the membrane to the wood, add thin-set that contains latex.
- Waterproof window sill helps drain water from a shower or bathroom window, so install one. Instead of going with wood, use latex-modified thin-set to fix a piece of Corian materials. For easy pitching, slowly build the thin-set from the back of the sheet and try to it mix it stiffly. With the sill in position, cover the area with tiles as you would with the shower.
- Add Silicone Caulk: After tiling the surface and sealing the grout, look for a point between any two planes and add some silicone caulk. You can start from the spot where the window touches the freshly tiled jamb.
 This material will entirely cover both fitting and keep them safe from damp. To secure the membrane to the wood, add thin-set that contains latex.
Since the window stays on an exterior wall, heat or cold can weaken any of the materials. With this in mind, perform annual checks for defective joints, grout, or caulk.
2. Hang Shower Curtains with Rods from the Shower Ceiling
A set of ceiling hung shower curtains comes as an ideal way on how to protect window in shower. Apart from keeping the shower spray out, this solution ensures your privacy by preventing any outside view. If you can’t find one, a ceiling rod track for bay window curtains should help.
If you can’t carry out a remodeling project on your window, these solutions serve as ideal ways to protect window in shower enclosure. Besides, you will use for a long time until you renovate the tub or shower itself. Furthermore, they do a great job of allowing air or light into the building.
3. Choose Waterproof Window Treatment
When it comes to using regular window treatments to protect your shower window, you need to consider items that boast of waterproof materials. Try using vinyl window blinds as they require minimum maintenance and cleaning. But you should choose one that can cover the whole window completely. With this size, the shower spray will not touch the curtain.
To install the blinds, fix the curtain on the tiled wall by using the grout lines. You can also mount it on the wall directly, but you will need a diamond drill bit.
4. Place a Waterproof Curtain on Your Window
Do you need another way on how to protect window shower from water spray? Well, placing a shower window waterproof curtain directly over your window should go a long way.
For this task, plastic or nylon products will do a great job as they can withstand damp and require minimal care. Most people love well-lit bathtimes, so purchase a see-through shower curtain made from the materials mentioned earlier.
Using a transparent one will also allow you to see amazing outdoor scenery from your shower window. However, this idea does not offer much privacy due to its transparency.
5. Use Glass Blocks Instead
Instead of using a waterproof window sill fitting, replacing the window for glass block is a good approach for shower spaces. Asides preventing any damage, glass blocks can help bring natural light to the bathroom. To install this material, you will need to fill the spaces with glass mortar.
Most home improvement or online stores have glass blocks for sale. But before purchase, determine the number of blocks required by measuring the window.
How to Get the Right Protection for Your Shower Window
Before learning how to protect the window in shower spaces, your choice must define the overall look of the room. With the ideal method, you should get a proper mix of cover and light to space. Since you have access to many options, the following tips will help you pick the perfect choice.
1. Consider the Room Space and Window Size
Check out the dimensions of your room, particularly before applying waterproof shutters for shower window or any other methods. As expected, the size depends on your particular needs or requirements.
Let’s say you don’t want your shower times to become public, choose a two and a half-inch real dark colored blinds – with vinyl- for a perfect mix of light control and privacy. If you want something unique, these blinds should measure between two and a half-inch while using no holes for routing.
Also, the measurement of your window will guide you in choosing a suitable treatment plan. For instance, you might prefer a remodeling project that features tiny openings or massive shower windows. To protect windows with shallow features like sills or frames, think about an inch thick real vinyl blinds or the slim metal ones.
Overall, the way you use your space plays a significant role in finding a good idea of how to protect window in shower rooms. For this purpose, use enough time to study the room.
2. Determine Your Lighting Needs
Next, find out the amount of light that you would love to have in your space. Then, try out roman or cellular shades that control brightness via up and down movements.
Wrap Up
Windows come as ideal fixtures to have in a shower or bathroom. When it comes down to it, they provide ventilation and light to these spaces. Sadly, water from your bathtimes can lead to the window in shower rotting if you neglect to protect it.
However, you can avoid this issue by using various methods. For instance, using a vinyl casing for your window and the jamb should do the trick. You can also hang some shower curtains from your ceiling while glass blocks and vinyl blinds also help.
But before using any of the ideas, try to know the measurement of your shower window. Also, know the right amount of light and privacy that you need for the shower space.
How to Maintain Privacy With a Window in the Shower
A window in a bathroom brings welcome natural light and fresh air—and it can also bring unwelcome attention from the outside, particularly when that window is in the shower.
With most windows, you simply add a window treatment for privacy. But showers are wet places and don’t easily lend themselves to conventional curtains and blinds. Plus, tile shower surrounds are a little more difficult to attach to than regular walls. The good news is that you have plenty of window privacy options that cost little, hang quickly, and work well in wet environments.
Static Cling Glass Covers
Static cling glass covers are thin, flexible, translucent vinyl coverings that stick to the window glass without adhesive. Available in rolls that cost from $5 to $15 (enough for a window or two), static cling covers come in a multitude of patterns, textures, and colors to suit everyone’s taste.
The glass must be clean and spotless before you apply the glass covers, and the covers do need to be precisely cut to fit the glass. A light mist with water is enough to help the covers cling to the glass. A few swipes with a squeegee push out bubbles.
Static cling covers will occasionally fall down, but many can easily be reapplied. After a while, mold and mildew may develop between the covers and the glass.
Cling covers are not a permanent solution to the problem of shower window privacy. But they are so inexpensive and simple to implement that they’re a great way to add temporary privacy.
Tip
Obscure glass or obscure plastic are common terms for translucent materials that permit light to pass through but are opaque and diffuse enough to provide privacy. Popular styles include frosted, pebbled, ribbed, bubbled, or patterned textures.
Frosted Acrylic Obscure Panel
Not all shower window privacy covers need to be on the inside of the window. You can install a frosted acrylic panel on the outside of the window, too, for just as much privacy.
A small frosted acrylic panel costs $20 to $40. Acrylic cuts cleanly with a special $7 to $10 plastic cutting tool. Acrylic’s corners and edges can be drilled to allow the panel to be attached to the window’s exterior trim. Stand the panel off from the trim with 1/4-inch plastic gaskets to avoid trapping water behind the panel and to allow airflow.
Placing an obscure acrylic panel on the outside eliminates any issues with indoor shower spray. It works best with smaller windows.
Frosted Glass Spray Paint
Frosted glass spray paint creates the appearance of etched glass with an oil-based obscuring coating. The semi-transparent coating allows light to pass through while maintaining privacy for the person in the shower.
One can of frosted glass spray paint is enough to cover one window, and application takes about 10 minutes. The cost is approximately $15 depending on brand.
One caveat is that frosted glass spray paint is not meant for constant contact with water. Occasional water drops are fine, but a great amount of water will eventually wear away the coating.
Glass Etching Cream
Frosted spray paint and glass clings are easy but temporary. When you know that you permanently want frosted glass, you can etch it yourself with glass etching cream.
A 2.8-ounce bottle of glass etching cream is sufficient to frost 6 square feet of window glass for $17 to $25. The product spreads on easily and does not require scrubbing. The cream washes off with soapy water, along with a final cleaning with mineral spirits.
The result is true etched glass that’s frosted for privacy in the shower. It won’t ever wear away. Clean with ordinary glass cleaners.
Waterproof Window Treatment
Any kind of 100 percent waterproof window treatment material can be used in the shower. You’ll find many to choose from: PVC shutters, vinyl roller blinds, cellular honeycomb shades (which also insulate the window), and plastic mini-blinds are just a few.
Every shower window treatment must be attached to the wall—which entails drilling into tile. All screw holes must be thoroughly caulked to prevent water from entering the wall through the screw.
Tip
If you choose to install blinds, make sure they have few to no metal parts, which can rust.
Glass Blocks
Replacing a window in the shower with a window made of glass blocks brings in natural light and increases privacy. Plus, it cures any waterproofing problems once and for all.
Due to the weight of glass blocks combined with mortar and supporting steel, the entire wall will likely need additional structural support or may even need to be rebuilt.
Replacing the window with glass blocks can cost anywhere from $600 to $1,200 but the cost can vary widely beyond this depending on size, materials and installation.
It’s a permanent solution that cures the lack of privacy, plus it gives you the chance to address any problems with moldy insulation or wet, decaying walls.
Rain-X Shower Door Water Repellent Makes Cleaning Easy
How To Cover A Window In A Shower
A window in a bathroom lets in natural light and fresh air, and many bathroom designs make full use of this feature. With many home renovation jobs in an old house, bathrooms are one of the main areas improved.
Now, windows end up inside shower stalls, which sadly leaves the shower exposed to the outside. To provide privacy on such windows, a window treatment such as a curtain or window blind could be added.
However, showers are wet environments and don’t suit traditional curtains or shades. In our guide, you can learn how to block your window, in-shower privacy options will keep eyes off your shower, yet you still gain all the benefits of natural light with our window-in-shower ideas.
In the end, no matter if you have a walk-in shower, or an over the bathtub shower, there is a suitable shower window cover for your bathroom and toilet. (Find the Best Waterproof Paint For Shower Tiles)
What Do You Do With A Window In A Shower?
It’s natural to want to cover a large window in shower for privacy.
Fortunately, there are several ways to conceal a window while letting light in as part of your home renovation in your master bathroom.
If you have a giant window, consider covering it with vinyl film, putting up a showerproof curtain, or replacing it with pebbled privacy glass.
These options will allow you to enjoy your showers in privacy.
Frosted Glass Spray Paint
As a quick remedy, spray the window with frosted spray paint. Cover any areas of the window that you don’t want to be sprayed with painter’s tape and anything around the window, such as walls or window sills.
To give the glass an opaque, frosted look. Follow the directions on the can of frosted glass spray paint to apply the frosted spray paint in an even layer to the glass.
Window Vinyl
To obscure the view of a window in the shower, use the idea of the vinyl film to cover the window.
You will find films available in various designs and obscurity levels, allowing you to choose how much light you want to pass through.
The adhesive backing makes it easy to apply and remove if required.
To let in more light, choose a window film that looks like stained glass or a simple etched leaf design. You can also get window film that protects you from UV rays.
Cut the film to size using a utility knife, peel off the backing, push it against your entire window in the shower and make sure you get rid of any air bubbles. (Read Double Hung Window Sizes Chart)
DIY Bathroom Window Curtain
To keep the window unspoiled, create affordable window curtains. The idea here is to find a short, adjustable curtain rod you can adjust to fit the shower window.
A permanent fix may need you to drill into the tile for the fittings.
Then, find an inexpensive shower curtain you can use to make into a window curtain to add privacy.
If you’re using a shower curtain, first measure the window, then cut and sew the curtain to fill inside the window.
Shower window curtains that a lot of water won’t harm are ideal.
Use Shutters
To block the window, you can use shutters. This is a more expensive choice that increases privacy but allows you to adjust when the windows in your house open and close.
When you walk into the bathroom door and can see the window in the shower-grade shutters are appropriate.
More tools, such as a drill, screws, and measuring tape, are required to install the shutters.
Make sure you don’t pick wood shutters as the wood trim will get wet as it covers the window in the shower and will then decay from excessive moisture.
Water-Resistant Blinds
Purchase blinds for your shower window; ensure you measure your window space before purchasing.
Follow the included instructions to install them correctly over your tub.
Glass Blocks
Use glass blocks to create an obscured window.
Glass blocks are a unique option that is often used in showers.
You can purchase the glass blocks individually, and they let plenty of light in while obscuring the view. (Learn How To Hang Lights Around Windows)
Installing several glass blocks will require you to use a glass mortar to fill the spaces between them and replace your window unless you have a deep enough sill to install the blocks without replacing your original window.
Note, you won’t be able to open your window in shower if you use these blocks, be it replacing the window, or stacking glass block in front and securing them with glass mortar.
Glass Etching Cream
Glass clings and frosted glass spray paint are simple but only temporary. However, if you know you want frosted glass for a long time, you can etch it yourself with glass etching cream.
Glass etching cream in a 2-ounce bottle will cover 6 square feet of window glass.
The product is easy to apply and does not need to be scrubbed. The cream can be removed with soapy water and cleaned with mineral spirits.
The result is real etched glass that is frosted for shower privacy. There will be no need to replace it because it will never wear out.
Can You Put A Shower Enclosure Over A Window?
If none of the above suffices, here are other ways you can
increase privacy without replacing anything.
Frosted Acrylic Obscure Panel
Shower window privacy covers do not have to be installed on the window’s interior as much privacy; a frosted acrylic panel can be installed outside the window.
A modest frosted acrylic panel might cost a few dollars, and all you need will be a plastic cutting tool.
Drilling the acrylic panel’s corners and edges allows it to be fastened to the window frame outside.
To avoid moisture trapped behind the panel and help ventilation, you can use 1/4-inch plastic gaskets to separate the panel from the trim.
Waterproof Window Treatments
In the shower, any 100 percent waterproof window treatment material can be employed.
To name a few, there are PVC shutters, vinyl roller blinds, cellular honeycomb shades, and plastic mini-blinds.
In addition, every shower window treatment needs to be secured to the wall, which needs drilling through the tile.
To prevent water from entering the wall through the screw, all screw holes must be carefully caulked.
Besides this, there are other things to know about in shower window protection.
How To Protect Window In Shower
Do you require a simple method of securing the tile to the window jam, particularly after installing a pitched sill?
Consider putting a window in a wooden frame and covering it in vinyl.
By combining the two materials, your window will receive protection.
- First, the vinyl keeps moisture out of the window, while the wooden frame provides sturdy support. However, keep the window away from the shower spray for the most outstanding results.
- Cover the shower area with a cement board, much like a regular tiled shower. It’s also good to keep this material level with the window jamb.
- After that, close the gap between the frame and the centerboard with strong silicone caulk. Even if the caulk seals the gap, you’ll need other materials to keep the moisture out.
- Wrap a strip of waterproof material over the window jamb and joint. This material will envelop both fittings and keep them dry. Next, apply a latex-based thin-set to secure the membrane to the wood.
- Install a waterproof window sill to help drain shower water from your bathroom window.
- To fix, use a latex-modified thin-set instead of wood. Slowly build the thin-set from the rear of the sheet and try to mix it stiffly for simple throwing.
- Cover the area with tiles as you would the shower once the sill is in position.
- Look for a location between two planes and apply silicone caulk after tiling the area and sealing the grout. Begin at the point where the window meets the freshly tiled jamb.
- Heat and cold might degrade any of the components because the window is fixed to an exterior wall. Check for poor joints, grout, or caulk on an annual basis with this in mind.

 Begin at the point where the window meets the freshly tiled jamb.
Hang Shower Curtains From Shower Ceiling
Shower Curtains with Rods can be hung from the shower ceiling to fill the space without being in the way.
A set of ceiling-mounted shower curtains is an excellent solution to protect the shower window.
This solution preserves your privacy by eliminating any outside view and keeping the shower spray out. A bay window curtain rod track should suffice if you can’t find one.
If you cannot complete a window remodeling project, these options are great for protecting the window in your shower enclosure. Furthermore, you will use for a long time until the tub or shower is renovated.
They also perform an excellent job of allowing air and light into your bathroom.
Waterproof Window Treatment
When using ordinary window treatments to protect your shower window, look for items that are made of waterproof materials.
Vinyl window blinds are a good choice because they are easy to clean. However, select one that can cover the window as the shower spray can splash behind ones that are not large enough. (Learn How to Replace Rubber Seal Around Shower Glass)
Using the grout lines to secure the curtain to the tiled wall to hang the blinds. You can also position it on the wall, but you’ll need a diamond drill bit.
Consider Room Space and Window Size
Check out the dimensions of your room, particularly before applying waterproof shutters for the shower window or any other methods. The size will vary based on your particular needs or requirements.
If you don’t want your shower times to become public, choose two and half-inch real dark-colored blinds. Such vinyl offers a perfect mix of light control and privacy.
If you’re looking for something special, these blinds should be no more than 2. 5 inches wide and have no holes in them.
In addition, knowing the dimensions of your window can help you decide on the best treatment method.
For instance, you might want a renovation project that incorporates little holes or big shower windows.
Think about an inch thick real vinyl blinds. You can also pick narrow metal ones to conceal windows with shallow characteristics like sills or frames.
8 Waterproof Blinds For Your Shower Window – Kitchen Bed & Bath
Waterproof blinds are a great addition to small bathrooms that gather steam while taking a shower or bath. Houses that often fight cold weather will shut their windows, allowing moisture to build up during bathing.
Having this in mind, we want to find the most elegant shower blinds that not only complement our stunning bathroom decor but prevent any moisture build-up on our blinds.
We will introduce you to waterproof blinds and how they can benefit your overall bathroom look.
What Are Waterproof Blinds?
Waterproof blinds are window curtains that prevent moisture from causing mold and bacteria. Waterproof blinds are also used for privacy and darkening a room.
Moisture resistance blinds are great for areas with high moisture, such as showers, indoor hot tubs, and even indoor patios.
If you’re hanging blinds in an area where there will be any moisture present, look into waterproof blinds to improve the look and improve the window’s longevity.
The Complete List Of Waterproof Blinds For Your Bathroom
8 Best Waterproof Blinds For Your Shower Window
This is our selection for waterproofing blinds that would not only look great in your home but will resist any moisture or water that is accidentally put on them.
NANAN Tier Bathroom Shades
Buy The NANAN Shades Here
The tier bathroom shades are at the top of our list for simplicity and style. These waterproof shades come in 10+ colors to work with any color pattern you desire.
Made of waterproof waffle weave textured plaid fabric, these shades provide the perfect balance of privacy and allow light to blossom the room.
Use these curtains to cover the lower half of the window, perfect for waist-high level windows. Also sturdy enough to handle a slight breeze that pours through on a summer day.
Jinchan Waffle Woven Textured Short Curtains
Buy The Jinchan Shades Here
These curtains have a fantastic texture at a great price.
The waffle weave texture plaid fabric is water repellent and perfectly fits any bathroom setup.
Over ten different styles available, these curtains fit any color bathroom and complement the existing scheme.
Two different style sets are available for purchase:
- Width 36 x Length 24
- Width 36 x Length 36
These curtains do a fantastic job covering the lower half of the window for privacy and letting the light from the top half illuminate the bathroom.
Great for bathrooms located on the same side of the sunrise, as the natural light sparks our bodies in the morning.
LUCKUP Waterproof Roller Shades
Buy The Luckup Shades Here
Made from 100% Polyester, these shades provide a thermal insulated coating.
The reason why I love these types of shades is that they provide complete blackout and waterproof solutions.
If you’re a person who likes complete darkness in the morning, and to use the nightlight or bathroom light to wake you up, then these roller shades will do the trick.
The chain connected to the roller is child-safe, so if a certain amount of force is applied, it will naturally fall off. The length of the chain is adjustable by the homeowner.
Available in many sizes, these curtains will fit any bathroom and deflect the water and moisture it encounters.
The only downside we could find from these shades is they only come in standard gray; there’s not much customization allowed from a purchasing standpoint.
Bloss Privacy Window Film
Buy The Bloss Shades Here
The Bloss privacy window film is a lovely traditional touch if you’re looking for a more conventional waterproof window shade.
The window film softly filters light through the room while also providing visual privacy for the homeowner. This multi-use shade can be used in the bathroom and other spaces to keep a unified look.
Easy to install with nonadhesive, find a smooth wall or surface to hang these waterproof shades.
Available in 5 different color patterns, these shades are great for pricing and can be trialed without breaking the bank.
Carnation Home Fashions Vinyl Curtain
Buy The Carnation Shades Here
These elegant yet straightforward waterproof blinds are not only stylish, but they will fit with any bathroom pattern.
Made from 100% PVC, these water-repellent imported blinds wipe clean with any damp sponge. They fit wonderfully on any bathroom window and are pleasant to the sight.
These vinyl bathroom curtains come with two panels and two tiebacks, open or private.
Keego Blackout Bathroom Roller Window Shades
Buy The Keego Shades Here
Looking to blackout a room and still have roller-style windows? The Keego blackout window shades are perfect for privacy and matching your decor.
It eliminates glare, blocks out light pollution, and prevents premature aging of your home’s fabrics. Like other blinds on this page, use a damp sponge to clean and maintain.
Our favorite thing about the Keego blackout shades is the wide variety of sizes and the six different color options. You’re not stuck having to choose one option. There are over 15+ sizes to match, however big your window frame is.
SEEYE Blackout Waterproof Window Roller
Buy The SEEYE Shades Here
The SEEYE waterproof curtain is attractive because of the rope tension they offer with every purchase. It’s to ensure that there isn’t an accidental injury to your pet or kid.
100% Shading fabric, the SEEYE blackout rollers offer four layers of blackout roller blinds, a nice slick white PVC coating with 100% polyester lining the back.
This material is not only waterproof – it’s oil, mildew, and moist-proof. Along with fighting off the water elements, it’s also UV resistant and flame retardant..jpg)
Jakooz Rollup Shower Curtain
Buy The Jakooz Shades Here
This shower curtain caught our interest, not only because it’s waterproof but because of the unique way that it’s used. Instead of using a traditional, bunch-up shower curtain, this Jakooz roll-up curtain is a great way to go outside the norm.
The long bath liner rolls up nicely in the thick aluminum base to tuck away. This is a great way to expose your beautiful shower or bathtub to guests when they use your bathroom.
This bathtub liner is a great waterproof option for bathrooms that want style and still desire the waterproof nature of traditional curtains.
Next Steps
Waterproof blinds are a great addition to bathrooms that are well ventilated. These blinds noted above are stylish and will fit perfectly with different bathroom styles.
We’ve compiled a complete list of frequently asked bathroom questions for new and experienced homeowners.
Our team of experts answers these questions to help assist you through DIY projects and home repairs.
Let us know your favorite waterproof blinds for your bathroom in the comment section below!
21 Bathroom Window Treatment Ideas for Style and Privacy
Design: Ashley Montgomery Design
Photography: Lauren Miller
A bathroom with a lot of natural light is a great thing, but if you’re lucky enough to have a load of natural light in your bathroom, you probably also have a window you need to consider.
When it comes to bathroom window treatments, you want something that will allow the light to filter through but will also give you privacy away from your neighbors, especially if your windows are lower. Plus, window treatments give some polish to the bathroom, giving your space that finishing touch that helps it feel complete.
We Swear By These Affordable Curtains to Make a Room Look More Expensive
If you’re struggling to dress your bathroom windows, we’ve rounded up some of the best ideas. From curtains to blinds to shades, here are 21 ideas to inspire you.
01
of 20
Design: Mary Patton Design
Photography: Molly Culver
We love a crisp white bathroom, but sometimes too much white can feel sterile and a little uninspired. But here a beautiful pink and black floral curtain acts almost as wall art and works wonderfully to open up the clean white space and add a pop of color. This light pink is unassuming, but still bold enough to add personality to the space while also covering the large windows.
02
of 20
Design: Andrew Brown Interior Design
Photography: Hector Manuel Sanchez
There’s just something incredibly chic and elevated about a marble bathroom. And if you decide to splurge on floor-to-ceiling marble, consider going the extra mile and pulling the theme through your window treatments. These custom shades are perfect for covering up the shower window while blending in with the rest of the bathroom.
03
of 20
Happily Ever After in Rosharon
Think curtains don’t belong in a bathroom? Think again. A floor-grazing curtain is a great way to create an elegant and elevated bathroom that feels instantly luxurious. Long curtains also help to open up your bathroom and make it appear even larger than it is.
04
of 20
Design: Mary Patton Design
Photography: Molly Culver
Once you pick a color palette for your bathroom, opt for window treatments that complement, but don’t distract from the rest of the space. Here white curtains with delicate details are the perfect sidekick to the graphic wallpaper.
05
of 20
Grace Cottage
Colorful tile is a wonderful way to add a load of interest to your bathroom, but it also is worthy of centerstage in your bathroom. In this light-filled bathroom, these neutral shades are perfect for covering the windows without clashing with the bold aqua subway tiles.
06
of 20
Design: Alison Giese Interiors
Photography: Robert Radifera
Don’t be afraid to be a little unexpected when it comes to the bathroom window treatments. Pick a bold color that plays well with the rest fo the hues in the bathroom, but if your window is small you can play around with the design and sprinkle in a little visual interest.
07
of 20
Design: Annie Elliott Design
Photography: Angie Seckinger
Covering the window for privacy is probably top of your mind, especially if you live close to your neighbors. But if you have a tall window, consider only a partial curtain that covers up the bottom pane so light can still peer in, but your nosy neighbor can’t.
08
of 20
Thnk Chic Interiors
If you already have pretty busy bathroom, consider a window treatment that sits in the background simply doing its job. This simple white blind is a great choice for coverage that won’t clash with the rest of the bathroom.
09
of 20
Design: Ashley Montgomery Design
Photography: Lauren Miller
Keep your space minimal and sleek by considering blinds or even built-in shutters instead of a curtain or a shade. This is a great way to cover up the windows when you need to in a way that basically disappears into the background.
10
of 20
Design: Georgia Zikas
Photography: Jane Beiles
Curtains are a great way to add a touch of warmth in your bathroom. A richer color with warm undertones such as beige or brown will make your space feel homier and cozy, but not dark or closed off.
11
of 20
Design: Becca Interiors
Photography: Rikki Snyder
When renovating your spa-like bathroom, a standing tub is key to creating a peaceful escape in your own home. If you have the space, consider installing bay windows to frame a soaking tub and opt for simple curtains to let the most natural light come through.
12
of 20
LeClair Decor
If your bathroom gets a ton of light, you may want the option to filter it out when simply need to soak in a tranquil, candle-lit bath in the middle of the day. Consider thick, velvet Roman shades that can filter out the light whenever you need it.
13
of 20
Design: Pure Salt Interiors
Photography: Vanessa Lentine
Opting for white shades in your bathroom doesn’t have to mean you can’t add a touch of texture to your bathroom. These simple white curtains have a delicate vertical line pattern that adds a hint of visual texture to the space but still feels incredibly minimalist and unassuming.
14
of 20
Interior Impressions
Having a hard time deciding what color window treatment to go with in your space? Consider picking one color from your room and matching your curtains. For example, the natural brown shade here highlights the brown hues throughout the bathroom wallpaper.
15
of 20
Design: Gail Davis Designs
Photography: Lisa Russman
We love a black, moody bathroom, especially in a powder room. Here, the rich color theme is pulled throughout the space with a rich black roller blind to complete the look.
16
of 20
Emily Henderson
Living in a rental means you probably can’t make a lot of changes to your space. But a curtain the bathroom is a simple way to make your rental bathroom feel sophisticated and elevated without a renovation.
17
of 20
Emily Henderson
Sometimes the best solutions are the simplest ones. A neutral-colored blind can be a quick fix to add privacy to your bathroom. Plus they’re easy to take care of and clean. Done and done!
18
of 20
Design: Kate Marker Interiors
Photography: Stoffer Photography Interiors
Whether your window is a triangle like this one or you have a round or arched window in your bathroom, a curtain is a great way to cover it without shelling out for a custom window treatment.
19
of 20
Design: Britt Design Studio
Photography: Stylish Productions
We love pairing white walls with wood accents in the bathroom to create serene, modern look that is anything but boring. But when you already have wood textures in the space, consider keeping the window treatments simple and white.
20
of 20
Betsy Anderson Interiors
The soft folds of this white window treatment are perfect for lending a traditional feel to this high-end space. Even if you don’t have an oversized bathroom, you can make your bathroom feel classy and elegant with a striking shade.
Read This Before You Choose Lighting For Your Bathroom
Windows of the Future: Modern Trends – Priorglass
New technologies radically change people’s ideas about architecture. Trends in construction are changing along with the pace of society, the characteristics of life and the aesthetic ideas of the individual. Windows are no exception and are modified over time.
There are eight major trends in insulating glass production.
Energy Efficiency
Modern trends inspire manufacturers to increase energy efficiency and heat capacity. The minimum glass thickness is 70 millimeters, while the technological standard used in Europe reaches 82 millimeters. Thus, double-glazed windows become wider, due to which they are warmer.
Increased dimensions
Thanks to modern technologies, a single-piece double-glazed window reaches a length of up to 7 meters, allowing technologically to equip panoramic glazing. Windows provide a wide view, improved energy efficiency and heat capacity. Light transmittance increases, solar heat partially penetrates. At the same time, the heat transfer resistance is comparable to that of load-bearing walls.
Transparency adjustment
In the production of modern glasses, a transparent conductor and an electrolyte gel are used. When a negative charge is applied from the remote control, the double-glazed window is darkened, when it is changed to a positive one, it will become lighter. Today, the technology is in the process of modification and improvement, so changing the level of transparency takes a few minutes. But soon the opportunity will move into the category of ordinary and familiar. Already, technological innovators have Smart Glass on the market for controlling insulating glass units.
Automatic decision to open or close
Smart windows are equipped with air analysis sensors. Among the analyzed indicators may be: the temperature regime in the room and on the street, the percentage of oxygen and carbon dioxide in the air, and other parameters. When the indicator reaches a certain level, the window automatically opens or closes for normalization.
Reliability and safety
Modern high-quality windows are no longer accessible from the outside. With the development of technology, the quality of anti-burglary fittings, the strength of frames and glazing are increasing, which reduces the risk of strangers entering the house.
Power generation and environmental care
The modern consumer is ready and willing to care for the environment, so manufacturers include an environmental agenda in their production processes. The question of converting a window into a solar panel to convert energy into electricity was repeatedly raised, but the need to keep the glass transparent remained a stumbling block. Modern developments have come closer to the solution: insulating glass units are equipped with thin strips of photovoltaic solar cells that do not affect the level of transparency, while collecting solar energy. However, so far the production is not enough and research continues, but in the future, with a high probability, smart double-glazed windows will provide apartments and cottages with electricity.
Change of style and design
Despite the prevailing white color in production, frames of various shades and materials are available to consumers. To give the desired color, plastic windows are laminated or rolled onto the surface with a thin film, which negatively affects performance: the surface remains sensitive to external factors, humidity, and temperature changes. New technologies involve adding a special color directly to the profile, which, in the end, withstands laboratory tests, is resistant to scratches or chips, and does not leave fingerprints on it.
Internet access
Sooner or later double-glazed windows will fully enter the digital world. A special chip with a unique identification number is installed in the window, which monitors its condition throughout the entire period of operation. The application contains up-to-date information: anti-burglary class, equipment, planned dates for service adjustment. In a smart home, windows are controlled from a phone or automatically using sensors: setting the opening or closing time, dimming and other adjustments at the threshold of implementation. The Internet of Things is confidently holding the direction of development.
Smart windows are designed as a structural element for life and work. The scope is actually limited only by the budget and imagination of the customer: apartments or offices, public and commercial institutions, industrial buildings and design offices. Production processes are built taking into account maximum compatibility with any designs. Not only researchers and developers are involved in the work, but also designers and architects who are actively involved in creating a new reality for consumers.
Windows are undergoing changes in all directions at once: design, functionality or interaction with the consumer. Innovation is no longer about measurable features. They become a fundamentally new construct, and are already changing here and now.
How to silicone a shower enclosure
Silicone is used in the installation of prefabricated shower enclosures and custom-made shower enclosures. A silicone seam is applied at the junction of the fixed glass to the walls, floor or pallet.
Even with a wide range of sealing profiles, it is not always possible to achieve maximum tightness in a shower room with profiles. To solve this problem, the seam is sealed with silicone-sealant, silicone-adhesive or adhesive-sealant.
In shower enclosures, so-called sanitary silicone should be used. Sanitary silicone contains special fungicidal additives that prevent the formation of mold. Sanitary silicones are available in a variety of colors, but when sealing a glass-to-wall joint, we recommend using transparent sanitary silicone.
If, after applying a layer of silicone, there is a possibility that the sealant will be visible, it is better to use colored silicone, the color of which matches the color of the walls or the color of the glass of the shower cabin as closely as possible.
The sealing material must be selected according to the task at hand. If you need to seal the glass-wall junction, you should choose a silicone sealant. If there is a need not only to seal the seam, but also to glue the glass to the surface, it is necessary to choose adhesive-sealant or adhesive-silicone. Such adhesives have not only sealing properties, but also provide a reliable inseparable connection.
If your bathroom has a window, choose sealants that are resistant to UV radiation.
Silicones or adhesive sealants have a different service life – it can be 3-5, 10 or 20-25 years. As a rule, this information is located on the official websites of manufacturers. Of course, we recommend the use of long-life sealants.
When buying, pay attention to the expiration date of the sealant. When buying silicones on the market, especially in winter, there is no certainty that the seller has withstood all the storage conditions for silicones or adhesives. If the sealant was stored at temperatures below those recommended by the manufacturer, it loses its properties and characteristics. Application temperature, storage temperature, and service temperature of sealants and adhesives are different concepts. And only compliance with the manufacturer’s recommendations guarantees long-term and safe operation of the product.
How to apply a silicone joint when installing a new shower enclosure
Apply a silicone joint when installing glass panels. The shower cabin must be assembled, the position of the glass must be set and adjusted in the fasteners and hinges. Where possible, the gap between the glass edge and the floor or wall should be as small as possible. With properly made glass and using Pauli fittings, the thickness of the silicone seam cannot exceed 3 mm, as a rule, it is 1.5-2 mm.
Due to the low fluidity of the adhesive, gaps smaller than 1.5-2 mm are very difficult to fill with sealant completely and accurately.
Such technological gaps between glass and tiles or other materials are needed in order to compensate for possible deformations of the walls that occur during the shrinkage of the building.
Walls must be clean and dry. Remove construction dust from the wall and floor before installing the glass and after drilling the fixing holes in the tile.
To protect against possible leakage of silicone on glass and walls – stick masking tape on the glass and wall. This will help make the silicone seam as accurate as possible.
Using a gun, apply a layer of silicone to the joint. Try to do this in a continuous strip of the same thickness.
If it is necessary to push the silicone deeper into the gap, use a rubber spatula. Moisten the spatula with soapy water – silicone will not “stick” to the spatula.
The masking tape must be removed no later than 10 minutes after the silicone application process has been completed. Otherwise, when removing the masking tape, silicone “hooks” are possible, which will need to be cut off with a sharp knife, which will worsen the accuracy of the silicone seam.
Silicone drying time is indicated on the tube. The drying time of silicone is affected by the temperature in the room where the work is carried out. We recommend using the shower cabin not earlier than one day after sealing the shower cabin with silicone or adhesive-sealant.
How to replace the silicone layer
When replacing the silicone joint, it is best to dismantle the structure. It’s troublesome, but effective. The remains of the “old” silicone must be completely removed, and the walls, floor, glass must be degreased. It is very difficult to remove residues and degrease the structure without dismantling.
When buying sanitary silicone, don’t forget to purchase a special gun for the tube – this will facilitate the process of applying the sealant.
As a rule, silicone from walls and glass is first cut with a knife. Residues of silicone can be removed either with a special solvent or ordinary vinegar.
Before applying a new layer of silicone, the place where the silicone will be applied must be dry and clean. The technology for applying a silicone seam is the same as for new designs.
Please remember to work with the door open, as silicones have a rather sharp acidic smell. After completion of work, you need to ventilate the room.
Close up the window in the bathroom. What was the window used for?
Contents
- Closing up the window in the bathroom. What was the window used for?
- How to seal a window in a wall. Ways to fill the opening
- How to close the window in the bathroom. Bathroom with a window: some cool examples and ideas
- Window under the ceiling
- Window in the shower room or next to the bath
- Curtains, film or frosted glass
- What to put by the window in the bathroom
- How to lay the window with foam blocks. Brick filling technology
- Window decoration between the bathroom and the kitchen. Why it is impossible to demolish the window between the kitchen and the bathroom and how to beat it beautifully
- The presence of a window between the bathroom and the kitchen, structural features and purpose
- Positive aspects of having a window
- Decoration of the bathroom space
- Effective solution
- Video how to plaster the window in the bathroom
 Why it is impossible to demolish the window between the kitchen and the bathroom and how to beat it beautifully
Close up the window in the bathroom. What was the window used for?
Old houses had their own peculiarities that some people liked, while others struggled with them in every possible way, changing everything inside on their own. In Soviet apartments, especially five-story buildings, a shared bathroom was originally built, which occupied a minimum of space, but at the same time allowed you to enjoy the comfort of your own communications. Each house was designed taking into account certain rules that were considered necessary at that time.
One of these was a window between the bathroom and the kitchen in Khrushchev and other houses of the 1950s and 60s.
The size of this window was approximately the same – 50×70 or 60×40 cm, depending on the dimensions of the wall. The presence of an additional product was due to several factors.
- Protection of the premises in case of a blast wave from a geyser. The designers claimed that having a window would help minimize the impact on the wall, which would keep damage to a minimum. In fact, this is not the case, and during the explosion of a gas column, a wall with and without a window will collapse in the same way.
- Ventilation in the toilet and bathroom. This function is not the main one, since most of the structures were deaf and could not help in ventilating the bathroom and in creating an additional draft in the apartment.
- Possibility to save electricity. In the sunlight in the daytime in the bathroom it was possible not to use a light bulb, since the room was quite well lit by the sun’s rays. By the time the Khrushchev houses were built, the light often went out in the houses, and having at least a small light source in each of the rooms was a big advantage, but this reason was also not the main reason for installing a window between the bathroom and the kitchen.
 By the time the Khrushchev houses were built, the light often went out in the houses, and having at least a small light source in each of the rooms was a big advantage, but this reason was also not the main reason for installing a window between the bathroom and the kitchen.
 - The main task of erecting an additional window structure in Soviet times was to combat the epidemic of tuberculosis, which was spreading at a fast pace, and it was necessary to solve the problem by any possible means. Thanks to sunlight, it was possible to disinfect the bathroom, which was the most favorable environment for the reproduction of microorganisms, due to the warm and humid environment. Even with a minimum of two hours of light for the whole day, it was possible to significantly improve the situation with the incidence due to the prevention of housing in each apartment.
In today’s realities, there is no need to place a window between the bathroom and the kitchen, since the tuberculosis epidemic is already in the past, and medications are successfully fighting it. Modern houses are already being built without additional structures in the wall, a good hood, which draws out all excess moisture, helps to achieve cleanliness and comfort in the bathroom. Old apartments, which still have windows between the bathroom and the kitchen, can be remodeled depending on personal wishes and needs. Those who consider the presence of such a product appropriate simply change the old window to a plastic one.
An opening product can be installed in place of the blind one.
How to seal a window in a wall. Ways to fill the opening
Sealing a window in a wooden house is a rather complicated process, primarily due to the fact that even after filling the former window opening lets cold air through and becomes a source of drafts and dampness in the premises. Because of this, you have to carefully select the material to fill the empty space of the wall. In addition, the decorative component must be taken into account: the sealed hole should not be visible either from the street or from the inside of the building.

There are several common solutions for how to remove a window in a wooden house:
- The most radical, but also the most reliable and aesthetic way is to dismantle a part of the log house and replace logs or timber. If we are talking about an attic or dormer window, this is not such an expensive solution, and it will allow you to forget about all the problems with blowing through the walls. But it should be borne in mind that old and new lumber will settle in different ways, so it is better to purchase dried wood and do not forget about laying insulation. When the shrinkage is completed, re-caulking of the cracks that have arisen will be required.
- Inserting pieces of a log or beam of the same size and diameter into the hole. This is a rather time-consuming method: the opening logs are cut at an angle of 45 degrees, the same angle is made at the ends of the plug-in pieces. There is also a minus: the new elements filling the hole will be very different in color. In this case, you will have to paint the entire wall to mask the embedded part, or use a different cladding option.
- If the house is to be clad in brick, the hole can simply be covered with thick boards. They should fit tightly into the opening, a heater is laid between them so that even small gaps do not remain. On the inside of the wall, you can close it with drywall or sheathe it with clapboard; on the outside, the former window will be invisible because of the brick.
- Frame infill using various wood materials. This is the simplest and most common answer to the question of how to seal a window in a wooden house. Let’s consider this repair method in more detail.
 In this case, you will have to paint the entire wall to mask the embedded part, or use a different cladding option.
 It is possible to build a false window: close the closed wall space with decorative shutters. New parts must also be treated with antiseptic and flame retardants. It is recommended to lubricate the joints with a special sealant.
How to close the window in the bathroom. A bathroom with a window: some cool examples and ideas
Ceiling window
In apartments, such windows are rare, but in private houses such a window will be a reasonable option. Therefore, if you are just designing your dream home, think about how convenient such a solution will be.
Even if such a window is located in the shower area, it won’t bother you. And if the opening itself is deep enough due to the thickness of the wall, then it can be used as an additional niche
Window in the shower room or next to the bathtub
If the window opening still does not quite fit into your plans, and is located exactly where the shower room should be or
like the owners of this bathroom: make a circular rack for the curtain and close on both sides at once when necessary.
There is also an extraordinary solution: an additional frosted glass door.
Curtains, film or frosted glass
In order not to invent too much, you can solve the issue of privacy once and for all by inserting frosted glass into the window frame.
A more budget option is to paste over them with a special film. At the same time, it can have various
Well, the classic of the genre is to close the window with curtains. True
What to put by the window in the bathroom
Usually, windows are found in quite spacious bathrooms, so you can plan the arrangement here as you like, the main thing is that the plumbing is located according to communications. therefore, if possible, it is better to put the bath and toilet on the side of the window, and not directly in front of it, so that you do not have to think about how to hide in your own bathroom. But here you can safely put a dressing table – a joy for the female soul.
You can also place a low pedestal under the window, and put a couple of pillows on top to make a comfortable place to sit: here you can calmly apply cream on your feet or wait until the water gets into the bath.
How to lay a window with foam blocks. Technology of laying the opening with bricks
Dismantling completed
The laying of the doorway with bricks, like all processes, begins with the preparation of the opening itself. First of all, it is necessary to perform dismantling work – this is the removal of the door leaf, the removal of the door frame, tow, foam, if any, the felling of the solution from the slopes.
A new brick structure must rest on a solid and even base. The base can be concrete or reinforced concrete – floor slabs, for example.
It is allowed to support the insert on a good quality cement screed laid directly on the reinforced concrete floor slabs. If the screed crumbles, then it is better to remove it altogether before overlapping.
We dismantle the flooring, the threshold, if it is present in the area of work, we clear the place for the installation of a brick insert. We remove debris, dust and forward.
If you decide to choose the first method and make streaks, then after pulling out the bricks along the edges of the opening, be sure to moisten its side surfaces and the base with water. Brickwork is carried out according to the usual requirements for it. Read more about the technology in the article – the device of brick partitions.
To save money, if you have a used brick, then after cleaning it from the mortar, you can safely use it to fill the opening. This is often practiced, since the embedded opening does not carry any load – a jumper remains above it. Insert – a self-supporting part of the wall, partition.
Starting laying
In the second method of embedding, if you decide to ensure the solidity of the old and new structures using anchors, then after laying out three or four rows, drill nests in the seams of the existing wall of the opening and hammer reinforcing pins or nails into it.
When doing this, make sure that the seams of the new construction coincide with the existing seams of the wall or partition horizontally. The seams are carefully filled with mortar.
Almost always there is a gap between the top row and the bottom of the opening, which can be filled with mortar, pieces of brick with mortar. The vertical evenness of the masonry of the opening is controlled by a rule or an even rail.
If you want to know by what criteria the quality of work is controlled, then read the article – quality control of brickwork.
The opening is blocked
The opening, as an option, can be closed with foam blocks, foam blocks, if the wall has the appropriate width. Drywall is one option, the installation process is dry and clean, but the surface strength is incomparable to brick. You have to look at the situation.
If you plan to nail something to the closed opening, then you will not be able to hang a heavy object on this area, hanging cabinets with dishes, seaming, and so on. Of course, it is possible to provide reinforcement with profiles, but this is not practical.
After closing the doorway, it remains to plaster a new area, and then proceed to the finishing work. Bricking a doorway is not a super complicated process. This work can be done by hand if you have basic builder skills.
Source: https://proremont-dom.ru/stati/kak-ubrat-okno-v-vannoy-v-hrushchevke-nachinaem-rabotu
Window decoration between the bathroom and the kitchen. Why it is impossible to demolish the window between the kitchen and the bathroom and how to beat it beautifully
The window between the bathroom and the kitchen is not found in new apartments. In the premises of the “Khrushchev” type there are similar structures.
Owners and builders question the need for this window and ask if this design feature is needed in everyday life. The window should look attractive.
The presence of a window between the bathroom and the kitchen, structural features and purpose
The presence of this element in old apartments is due to various reasons. The window was built so that in the event of a gas leak or explosion, it could be used as a technical opening.
Escape route for bathroom access. There may be a child in the room who cannot open the door on his own, someone may become ill in the process of taking a shower.
In order not to kick the door, you can get in through the window. The design feature is that the opening is located very high on the wall, so it does not interfere with using the bathroom, taking a shower.
Benefits of having a window
Light source of natural origin, saving energy. If the networks turn off, you can simply take advantage of the natural light coming from the window.
Also, excess condensate, steam, dampness and other physical phenomena can adversely affect the air and the condition of the room. Mold does not form in the bathroom if there is a window opening. Fresh air enters the room and quickly ventilates the room.
The tiny bathroom will be enlarged a bit with the light output due to the fact that the window opens onto the kitchen, where there is plenty of light. Space is needed, you need to create free space.
The presence of a window from the bathroom to the kitchen will effectively deal with high humidity. It is not necessary to close the opening, damaging the structure of the wall, which has a thin thickness, can significantly deteriorate during repair work.
Decorating the bathroom space
You can decorate the wall space where the window is located by installing a cabinet. The structural element is made independently from chipboard or ordered according to the size of the opening.
There will be a blank wall on the kitchen side. The bathroom will have a convenient closet for small items and accessories.
You can improve the appearance of an old window by replacing it with a new plastic one. The space will become more attractive.
Opening for ventilation will be easy and simple. If the style of the kitchen is a different color than white, you can order a laminated product in color.
The beautiful coloring of the film will give a modern look, and the package will be perfect.
An effective solution
The light will droop well into the bathroom, but it will not be possible to open it from the kitchen, which will protect it from prying eyes.
Illumination redevelopment looks fashionable and stylish, however, it will take money. The owner of the apartment independently decide on the desired option.
The need to cover the window with furniture may be caused by an external inconvenience that is not liked by the residents.
A person, having weighed all the nuances, must decide what is best. The design feature will not disappear, but it is impossible to close the window with drywall, excess moisture and dampness will fill the bathroom. The solution is to properly decorate the space. In old houses, a window is provided for air extraction.
Currently, builders do not install such windows in the apartment, there are inconveniences, but they can be eliminated.
Modern models of hoods and new equipment allow you to leave the window, but not use it.
Accumulated air will escape through the glass even if the window is not ventilated.
Video how to plaster the window in the bathroom
How to decorate the window between the bathroom and the kitchen
Everyone wants the apartment to be cozy and comfortable to live in. It’s good to be able to arrange everything the way you want. With living rooms, problems usually do not arise, with a bathroom and a kitchen it is more difficult. The situation is aggravated if there are design features that are unsuccessful from the user’s point of view. So, many do not understand why a window is needed between the kitchen and the bathroom, whether it is possible to get rid of it. We’ll figure out.
Sealing tightly
It is recommended to get rid of the window between the kitchen and the bathroom when the walls will be finished with plasterboard or plastic. It will not be necessary in these situations even to spend extra forces and means for embedding. The window will hide itself behind the structure.
- You can also seal the window with foam blocks or bricks. This method is advisable to apply in situations where cabinets will be placed in place of the window opening. But first, it will be necessary to remove the frame with glass. Before making brickwork, it is necessary to level the surface with cement mortar and wait for it to dry. The foam block must be placed on a specially designed adhesive, and the brick must be placed on cement. If gaps remain, then they should be repaired with a fight, and then wipe the surface so that it becomes perfectly smooth. After all the manipulations carried out on both sides. It is necessary to plaster the surface, level it, and then cover it with a finish.
- But in order to simply improve the appearance of the surface, you can use drywall, which will successfully withstand moisture. For these purposes, a metal frame is attached on both sides around the entire perimeter of the window opening, after which sheets are simply screwed to it. It is recommended to fill the void with mineral wool so that the noise from one room to another penetrates less.
- Grouting with cement is also possible. At the same time, it is not necessary to dismantle the frame, but it is simply necessary to remove the glass and trim. A chipboard frame must be attached to the frame, on which a plaster mesh is mounted. For a quick setting, the masters recommend making the solution thicker and pouring a small amount of gypsum into it. The solution is applied in small portions by throwing. This procedure should be done 5-6 times. After hardening, each layer must be leveled with a special grater, and then covered with a solution diluted with water. As a result of such manipulations, an ideally smooth surface is formed, which is subsequently sealed with a finishing material.
 The foam block must be placed on a specially designed adhesive, and the brick must be placed on cement. If gaps remain, then they should be repaired with a fight, and then wipe the surface so that it becomes perfectly smooth. After all the manipulations carried out on both sides. It is necessary to plaster the surface, level it, and then cover it with a finish.
  For a quick setting, the masters recommend making the solution thicker and pouring a small amount of gypsum into it. The solution is applied in small portions by throwing. This procedure should be done 5-6 times. After hardening, each layer must be leveled with a special grater, and then covered with a solution diluted with water. As a result of such manipulations, an ideally smooth surface is formed, which is subsequently sealed with a finishing material.
 Three ways to seal a window opening
Not all owners want to get rid of this window, there are people who like this architectural solution. Accordingly, it would be unfair to talk only about the blind sealing of the opening, so first I will tell you how to decorate the window from the bathroom to the kitchen.
Method No. 1: decorating the opening
You cannot build an opening window from metal-plastic with your own hands, it is better to order a complete replacement from the company here. The only thing you can somehow save on is the independent dismantling of the old structure (I will talk about this a little later).
The plastic construction is considered a good solution for those who do not want to part with the window in the bathroom.
But replacing an old window with a plastic one is not so much expensive as problematic. After all, for this you will have to shift the tiles or equip some other finish, which is already a full-fledged repair.
Much easier and cheaper to decorate old glass. The most affordable way out is to buy a self-adhesive film. It is sold in any construction market and the price there is cheap.
Self-adhesive decorative film can be installed quickly and is not expensive.
The instruction is similar to the arrangement of a tint film on car windows:
- First, wash and degrease the glass well with an alcohol-containing solution;
- Then take a soapy solution and, using a foam rubber sponge, generously lubricate the glass with it;
- Remove the protective coating and gently apply the decorative film to the glass;
- Next, take a plastic spatula for wallpapering and expel all the liquid and air bubbles from under the film;
- Now you just have to cut off the excess film around the perimeter with a blade or a sharp knife and wipe everything dry.

It is desirable to glue the film from the side of the bathroom, since from the side of the kitchen, greasy deposits will constantly settle on the window, and it will be easier to wash it off the glass.
It is convenient to expel air from under the film using a wallpaper spatula.
Bathroom niche
A functional niche can be created from the bathroom window. Thanks to this, you can make the most of the usable space. To this end, from the side of the kitchen area, the window is sealed with drywall. At the same time, in the bathroom, you just need to level the recess using a cement mortar, and then finish it with exactly the same material as the entire room. If you do not like a small niche, then you can easily increase it.
To do this, remove part of the wall. An oval shape would look perfect. It can be created using drywall sheets. To make the niche look more attractive and more comfortable, designers advise using the illumination of this zone.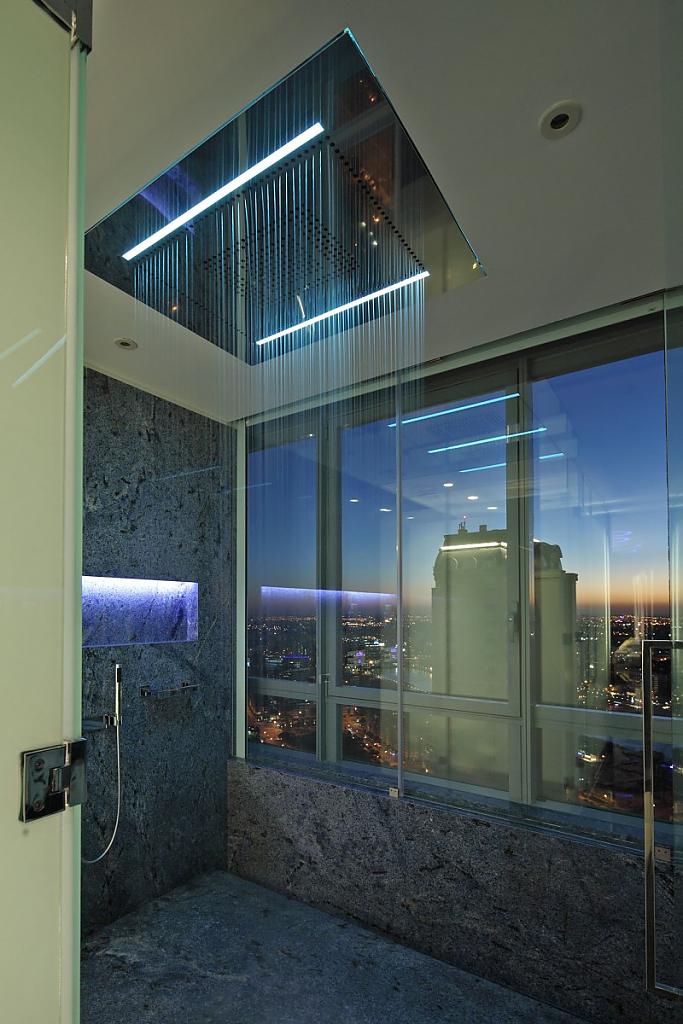
Efficient solution
The light will droop well into the bathroom, but it will not be possible to open it from the kitchen, which will protect it from prying eyes.
Redevelopment into illumination looks fashionable and stylish, however, it will take money. The owner of the apartment independently decide on the desired option.
The need to cover the window with furniture may be caused by an external inconvenience that the residents do not like.
A person, having weighed all the nuances, must decide what is best. The design feature will not disappear, but it is impossible to close the window with drywall, excess moisture and dampness will fill the bathroom. The solution is to properly decorate the space. In old houses, a window is provided for air extraction.
Currently, builders do not install such windows in the apartment, there are inconveniences, but they can be eliminated.
Modern models of hoods and new equipment allow you to leave the window, but not use it.
Accumulated air will escape through the glass even if the window is not ventilated.
How to beat the window in the bathroom: design and photo
The window can be very successfully fit into the interior of the bathroom. In order for the design of a bathroom with a window to look organic, you need to beat it correctly – decorate an existing window opening or make an imitation of this design.
Bathrooms with a small area usually do not have windows, but the design of a modern bathroom from 4 sq.m may well imply the presence of a window opening both between rooms and with access to the street. Some designers specifically complement the interior with a false window, thus creating the illusion of daylight entering the room.
The window that connects the bathroom and the toilet is often removed by the owners of the apartment, while the window that faces the street is played with as interestingly as possible, turning it into a stylish element of the interior. To do this, you need to make quite a bit of effort and turn on your imagination.
You can use ideas that have already been successfully implemented by designers, just look at the photos of these projects posted on the Internet. A convenient 3d bathroom design visualization program will also help to design the future interior.
Possible designs for windows in sanitary rooms
I think the above information is enough, and I convinced you that a window in a sanitary room is an excellent solution. It remains only to figure out how to make it.
And this is where I need your help. Below I will give several different options, and then you tell me in the comments which one is better and why. I promise that I will implement the best solution, and I will definitely report about it.
Flowers in the bathroom – a good idea, but someone will have to water them.
The only point: don’t just offer to buy flowers for a bathroom with a window. The fact is that the premises will be made in the country, where no one will live permanently. Therefore, there will be no one to water the plants. I immediately reject this option.
Configuration
I’ll start with the window shape. Most often, I have seen projects where the configuration of the window completely matched the shape of the bath. That is, the window opening was rectangular. In principle, the solution is obvious, but too boring and bureaucratic.
Rectangular window is the standard option for the sanitary room.
Moreover, not only rectangular bathtubs are available for sale, but also oval, round, triangular. And yes, their prices are quite affordable. No one bothers me to make the same window opening, because I will lay the walls myself.
No less questions about the window sill. I’m thinking of making it wide so I can use it as a stand immediately. I won’t put tropical palm trees on it (I described the reason above), but I think some fashion accessories will become quite appropriate. What do you think?
By the way, about the location of the bath. I want to place it right next to the window. It will turn out very effectively, I saw it in several projects that have already been implemented.
The shape of the window can be any, the main thing is to be combined with other design elements.
Considering the high level of humidity, I am going to buy plastic frames for the window. They tolerate external influences much better and do not change their size during operation (unlike, for example, wood). Moreover, it is easy to install a ventilation mechanism in them, which is then connected to a temperature and humidity sensor.
In short, a lot of plans. The main thing is to have the strength to implement.
To prevent the window from being covered with moisture, which prevents you from admiring the scenery, I will mask the heating element under the window sill. Thanks to him, water will evaporate from the surface.
Color solutions
Now let’s think about the color of the window. Actually, here I have already decided everything completely, so I’ll tell you about those points that you can be guided by when choosing a color scheme for a window in your own bathroom: shades.
Red shades in the interior give the bathroom a luxurious touch.
- Red window frames look organic only in large rooms. They will make the room very elegant, but in cramped bathrooms they will dominate too much.
- It is possible to make frames of the same tone with wall and ceiling finishes. As a result, the design of the room will be as holistic and harmonious as possible.
- The classic white color of the frames is also a good solution, but to avoid an official look, I advise you to decorate the window opening with curtains with a control mechanism. For example, Roman.
White color is universal.
- One of the boldest decisions is the game of contrast. When bright colors are used in the decoration and frames on the window, which stand out from the rest of the decoration.
A lot can be said about the colors of walls, windows and other bathroom accessories. And there will still be an option that I did not mention. So everyone will have their own opinion. You can send photos of your own interior solutions in the comments, and then we will arrange a competition for the most interesting and unusual design.
Contrasting shade – very bold and unusual.
Textile decoration
Before proceeding to the description of specific stylistic solutions, I would like to dwell on such a moment as draping a window opening with textiles. This must be done not only for the sake of creating a spectacular interior, but also to ensure the privacy of people who take a bath or wash in the shower.
Here are some popular solutions. I have selected them as the most interesting, but have not yet leaned towards any of them. Waiting for your suggestions.
So:
- Roller blinds. They take up little space, they are easy to manage with the help of special mechanisms, they are adjustable in height and mounted as simply as possible. It still doesn’t take up much space.
Roller blinds are perfect for decorating bathroom windows.
I think this solution is purely utilitarian and I leave it as a last resort, since it is hardly possible to achieve a spectacular appearance of the bathroom with the help of roller blinds.
- Textile curtains. They allow you to decorate the window, but do not tolerate the air in the bathroom, which is characterized by high levels of humidity and significant temperature fluctuations. Perhaps I will buy such curtains for a bathroom with a window in the country, but then I will have to take care of very effective ventilation. Most likely, with the use of several powerful fans with humidity sensors.
Bathroom curtains are a luxurious but impractical option.
- Stained glass. An original solution that will give the bathroom a unique touch and will not allow any individual to watch someone take a bath. Here the difficulty lies in the fact that you need to choose a stained-glass window design that organically fits into the style of the bathroom design. Yes, and I can’t do it myself, but I want to build the whole house myself. Here’s an idea.
 Yes, and I can’t do it myself, but I want to build the whole house myself. Here’s an idea.
 Stained-glass windows in the bathroom help provide the right level of privacy.
- Blinds. Practical and economical solution. Plastic blinds feel great in humid hot air and perfectly protect from indiscreet looks from the street.
Blinds are a practical and inexpensive solution for window decoration.
This option is still a priority, especially since it can be easily combined with other ways of decorating a window opening.
Interior styling
Now about the most important thing. About the design of the bathtub with a window. There are also many options, but I will focus on the description of those that attracted my attention.
Method 1 – Nautical motifs
Naturally, the nautical theme in the interior decoration in the bathroom is emphasized by the blue shades of the finishing material and round windows. I also think of using mosaic masonry on the walls, imitating sea pebbles. You can completely finish one of the walls or lay it with a decorative wave.
A nautical-style bathroom is an interesting interior design option.
You can buy plumbing fixtures that match the color of the ceramics on the walls, as well as dilute the interior with a few accessories in a similar style. You can buy some kind of compass or model of a sailboat.
The chrome elements go well with blue. Therefore, you can not do without silver faucets, a heated towel rail and handles on the window frame (I saw these in the store). You can also find spotlights with chrome rims.
Method 2 – Ladies’ room
You can do something nice for your son’s wife (well, in the sense of a daughter-in-law) and decorate the room in the so-called feminine style, turning the bathroom into a kind of boudoir. Naturally, in this case, the walls need to be made in pink tones, diluted with turquoise, gray, and so on (so that men do not feel uncomfortable there).
The ladies’ bathroom is reminiscent of a medieval boudoir.
For example, I plan to put gray tiles on those parts of the walls that will get wet, and plaster the walls and paint them with special paint. Instead of traditional tiles, the floor can be finished with waterproof laminate panels.
A mirror can be used as a centerpiece to match the window frame. So it will be very organic and beautiful.
Method 3 – Strict geometry
My son leans towards strict geometric designs. We are talking about buying square and rectangular plumbing fixtures, and using large ceramic tiles for wall decoration. Naturally, in this case, the window must also be made strict (square or rectangular).
A geometric bathtub will not tolerate round shapes.
This way you can beautifully and effectively zone the bathroom, visually dividing it into several parts:
- shower area;
- toilet area;
- washbasin location.
My offspring wants to separate the first and second zones from each other with vertical stripes of tiles of a different shade, and decorate the place near the hanging toilet bowl with a contrasting material.
The end result is a distinctive and unusual design that resents the beautiful part of our family (mine and his wife). I want to ask you to be an arbitrator and express your opinion on this matter in the comments.
Method 4 – Modern Styles
As a compromise, my son proposes to decorate the bathroom with a window in a modern style. In principle, modernity is characterized by experiments in design. The main features of this style are:
- asymmetric placement of windows, plumbing fixtures and accessories;
- use of a rich color palette for wall decoration;
- unusual shapes of the washbasin, toilet bowl and bathtub.
A modern bathroom gets an interesting look if it has a window.
At the same time, too much use of additional design elements is not welcome, which, for example, I also do not like.
Here you can buy and install a stained-glass window, which can be completed with a mirror mosaic with mineral grout. The floor can be made from both tiles and laminate by buying lamellas of some unusual color.
By the way, I read that a person has a good rest if he gets different impressions. In this case, you will lie in a jacuzzi bath installed in a room with a minimalist interior, and admire the rich natural world outside the window. Who knows, maybe great ideas will come to mind.
Minimalism is another way to design a bathtub with a window.
When choosing minimalist design options, do not forget that the room must fulfill the tasks assigned to it. So don’t forget the sink and toilet.
Method 5 — Classic
We decided to resort to this option with relatives, if we do not agree on other options.
A classic in a bathroom with a window is a room finished with solid wood. Well, or, in extreme cases, veneered panels. Naturally, the natural material must be impregnated with hydrophobic and antiseptic materials to help keep the room clean.
Classics will never lose their relevance.
To fit the window organically, it is better to make the frame from solid wood or cover it with a special film that imitates natural materials. Even better is to equip the shutters, which, among other things, will provide the necessary privacy.
As for plumbing, then I decided to buy expensive porcelain products, not exchanging for plastic and faience. I can already see a beautiful curved-legged bathtub standing near a wooden window.
I have an idea to make a marble podium for the bathtub, but here my imagination runs into a limited amount of money. Therefore, I will limit myself to artificial stone or high-quality tile.
If you’re going for the classics, you don’t have to skimp on expensive accessories. It is better to use furniture with expensive finishes, which helps to relax and unwind in the bathroom. As a result, you will also get a kind of combination of a boudoir and a sanitary room.
Such an interior solution requires a lot of money.
The window can be decorated with textile curtains. Naturally, one should not forget about ventilation so that the fabric does not get wet.
Window to the kitchen or toilet
Often a small opening is located at the very top of the wall above the bathroom. Initially, its purpose was to illuminate the bathroom during the daytime, but over time, the functional component was lost and the need for it disappeared. A window opening of this type can be closed or decorated. In the first case, it is usually sewn up with drywall, on top of which tiles are laid directly to the ceiling.
If it is decided to turn the window into a decorative element, several options are possible:
- Ennoble the opening by inserting a stained-glass window or an original picture instead of glass, for example, with the image of the sea.
- Remodeled for a niche. In a deep window opening there is enough free space to equip a decorative niche, shelves or a small built-in cabinet in it. Moreover, the window opening at the junction between the bathroom and the kitchen can be expanded – you get a large window, the window sill of which can be used as a functional shelf for various bathroom accessories.
- Equip a wide countertop window sill into which a washbasin is cut. Under the countertop, you can install, for example, a washing machine, thus further increasing the functionality of the room.
 Moreover, the window opening at the junction between the bathroom and the kitchen can be expanded – you get a large window, the window sill of which can be used as a functional shelf for various bathroom accessories.
 Tip! In a niche, instead of a former window, you can install a mirror with bright illumination – such an extraordinary solution will provide the room with additional light.
Window with access to the street
Unlike the interior option, this window opening is located more successfully, it makes it possible to get excellent natural light and ventilation in a private house or in a modern multi-storey building.
Related article: How to install PVC windows
Different layout options are possible:
- bath opposite the window – any shape of the bath from rectangular to asymmetric will do;
- window opposite the entrance – all plumbing fixtures can be placed along free walls by installing a corner bath or shower stall, which will free up space for a washing machine, furniture, etc. ;
- washbasin near the window – in this case, the mirror can be installed on the opposite wall;
- bath near the window – it is recommended to insulate the window opening and the adjacent wall so that there are no drafts and the temperature always remains comfortable when taking water procedures.
 ;
; False window
In the event that there is no way to break through a window opening in the bathroom, but there is a great desire to decorate the room in an original way and expand its space, a so-called false window is equipped. Of course, it will not let in natural light and will serve as just a decorative element.
A false structure on a blank wall can greatly change the entire space, creating the illusion of additional space. This technique will help out if it is necessary to hide the flaws of an unsuccessful design in the room, and also if we are talking about a very small area of \u200b\u200bthe bathroom, which needs to be visually enlarged.
A niche is provided in the free wall, and the window itself is framed in wood or polyurethane molding. It can be curtained with a cornice with a real curtain, and any image can be placed under transparent glass: a seashore or a 3D picture, a panorama or a patterned pattern. Images with a perspective, photo print, holography, etc. will look especially good. Complemented by fluorescent lamps and built-in fans, such a false window will definitely become the highlight of the bathroom, filling it with light and fresh air.
A false window on the ceiling will look bold enough in the spacious interior of the bathroom, creating the effect of filling the room with light from a transparent roof. To create it, a standard suspended ceiling is mounted, in which a false window is equipped. A frame or molding is used as a frame, wallpaper with a pattern is pasted inside, mirror tiles or a fresco are laid.
Choice of window sill and window pane materials
In general, the window opening is made in the general style of the entire bathroom, consistent with the interior in terms of color and finishing materials. For the design of the window sill are usually used: wood, natural stone, as well as tiles and other moisture-resistant materials.
The most commonly used frosted or decorative glass is sandblasted. Transparent glass can be completely or partially tinted with a decorative film if desired. The stained glass finish looks very stylish and original, as well as the installation of a mirror instead of window panes.
Additional decor
High floors usually do not have tinting or special finishing – it is enough to cover the windows with curtains or a screen. Roller blinds, pretty textile curtains, wooden shutters and simple budget blinds will help to isolate the bathroom from the outside world and complement its interior. Both simple curtains and Roman blinds, heavy and light airy fabrics can be used – the choice depends on the overall style of the interior.
Often the window sill is decorated with all sorts of plants that love moisture, and turns into a real green oasis. It is not at all necessary to hang the windows themselves – the suspension of the curtains around the bathroom will look original, which will protect this area from the rest of the space and give the interior some vintage.
Which fabrics are suitable?
For sewing Roman blinds, as well as curtains of classical length in the bathroom , polyester-based fabrics are suitable, as well as mixed fabrics with a predominance of synthetic materials (approximately 85-90%) in the composition (acrylic, polyester, polyamide) and the addition of natural ones – cotton, linen, cambric, muslin. Such compositions will not allow the fabric to shrink, withstand moisture and repeated washings, and will not shed in the sun. Roll versions of are usually purchased ready-made, and here it is important to check with the seller whether the canvas is impregnated with special water-repellent compounds. This option will extend the life of the system.
Design: Factor Design Build
Design: Factor Design Build
Design: Accent Window Fashions
Design: Accent Window Fashions
Removing the window between the bathroom and the kitchen: effective and original methods
features. Moreover, they are associated not only with the small size of the premises, but also with the “architectural delights” of that time. One of them is the window between the bathroom and the kitchen – an element inherent in all “Khrushchev”. Theoretically, it was supposed to help save energy by allowing you to use the bathroom without turning on the light in it. In practice, the light coming through a small window was not enough, but the already small “usable area” of the walls both in the bathroom and in the kitchen was significantly reduced. Therefore, in front of almost everyone who had to make repairs in the “Khrushchev”, the question arose: “How to close the window between the bathroom and the kitchen?” Considering that Khrushchevs have been repairing for more than half a century, the “people’s ingenuity” has found many solutions to this problem, the most popular of which we will introduce you to.
Beautiful examples
Having a window in the bathroom that leads to the kitchen is not always a problem. In some cases, this makes it possible to take a shower in the daytime without turning on the light, and for lovers of a steam bath there is a chance to quickly ventilate the room and refresh it. In order for the window opening to fit into modern design, you need to be able to properly decorate it and use it based on your own needs.
The use of glass blocks instead of ordinary glass is a good way to keep the room bright, but at the same time decorate it and give it a completely different look. The drawing should fit into the design of the room and be its complement. The color scheme of glass blocks can be different, everyone has the right to choose what he likes.
Stained-glass window is an equally beautiful option for finishing a window opening in a bathroom. The use of original and non-standard patterns can fascinate and promote relaxation while taking a bath. The stained glass pattern should be such that it looks equally good in the bathroom and kitchen, otherwise one of these rooms will look ridiculous with a stained glass window.
The shape of the window plays an equally important role in interior design. If the apartment is made in a modern style, then a round window opening will be a real find and complement the concept of the room. The size of a round window can be anything, from a small one, about 30 cm in diameter, to a large one, 60 cm or more. The use of a stained-glass window or other decorative elements in this case will be superfluous, as it will distract from the originality of the frame itself and the illusion of being on an underwater or ordinary ship.
If there is no possibility or desire to change the size and shape of the opening for the window, but you want to make it special, then the simplest solution is to choose platbands of non-standard colors. The most common color is white, so many people crave to put their window in any other color scheme to stand out and make their apartment unique. The wood-colored frame looks very beautiful, expensive and stylish, which goes well with almost any interior, which is very convenient.
For those who do not see the need for a window between the bathroom and the kitchen, it is possible to transform a niche into a useful space and make a shelf for useful little things or decorative items instead.
The finishing of such a shelf can be made of various materials, the main thing is that the resulting product be beautiful and functional.
Advocates of creativity can design a window in an original style, showing all their resourcefulness and talent. Each option deserves attention, so it is worth considering all the possibilities before making any decision regarding the window in the bathroom.
We remove the window “automatically”
Let’s start with the least time-consuming option, in which no additional work will have to be done to “seal the window”. We are talking about the situation when the walls in both the bathroom and the kitchen are finished with materials such as drywall or, say, plastic panels. In this case, the window is removed “automatically”, since both materials will reliably hide it. The maximum that will have to be done is to dismantle the window frame on both sides. However, given the tiny size of the “Khrushchev” bathroom and kitchen, this option is quite rare, since both panels and drywall “steal” a little space, which is already sorely lacking.
Related article: Carved architraves for windows and doors
Please note that nothing heavy (for example, a wall cabinet) can be attached to drywall or plastic panels in the window area. The maximum that can be hung on them is a small mirror or a light wall lamp.
If the above materials are used only in one of the rooms (for example, the kitchen is sheathed with drywall), the window can also be left unpaved, but turned into an additional niche shelf. To do this, from the side of the bathtub, it is only necessary to dismantle the window frame, and plaster the entire internal area of the niche with cement mortar or starting putty. After that, it remains to finish it with the same material as the rest of the walls, for example, tiles..jpg) For “more beauty” you can visually enlarge the space of a niche by installing a mirror on its back wall, provide a niche with decorative lighting, or even turn it into a mini-locker by attaching one or two light doors to it.
For “more beauty” you can visually enlarge the space of a niche by installing a mirror on its back wall, provide a niche with decorative lighting, or even turn it into a mini-locker by attaching one or two light doors to it.
If you choose this option, we recommend treating the gypsum board on the side of the bathroom with a moisture barrier before plastering, or even better, install a full waterproofing.
Having considered the “lazy” options for sealing the window between the kitchen and the bathroom, we move on to more complex, full-fledged options for solving this problem.
To issue or delete?
Openings between the bathroom and the kitchen have been preserved in many apartments. Many owners are wondering what to do with them.
There are two options:
Give the window a decorative look, expand the functionality.
Remove the window, seal the wall tightly.
Both options have their pros and cons. Sometimes it is not easy to choose the preferred one.
For example, sealing an opening is not easy if the rooms have expensive and high-quality finishes. There is a serious risk of spoiling it, wasting time and materials. However, the decoration of the opening can also spoil the finish of the adjacent sections of the wall on both sides.
Therefore, any work on the window is recommended to be carried out during a major renovation involving both the bathroom and the kitchen.
Deciding whether to seal or decorate a window is not easy. Today, there are a lot of materials and designs that allow you to decorate the opening and expand the functionality of the window. Keeping a source of light or fresh air is becoming an important and practical option for many apartment owners.
However, privacy advocates try to completely close up the opening, make a convenient niche in it, and install shelves.

Often the reason for closing an opening is the desire to make a solid wall finished with beautiful tiles or panels. Often the reason for sealing is the installation of a kitchen set – wall cabinets close the opening and make the presence of a window useless.
Closing the opening
If you decide to get rid of the window, you must first choose the appropriate way to close the opening. The choice depends on the reasons for such a decision, the availability of skills, the type of interior decoration and other factors. It is necessary to decide what material will be used to solve the problem.
If the weight of the cabinets or other load will fall on the former opening, it is necessary to ensure the strength of the seal, the ability to take mechanical stress.
This is not easy, most experts recommend not to plan any loads on the patched opening area. We must also not forget about the decorative side of the issue – if tiles have already been laid around the opening, you will have to maintain the plane of the wall.
The opening can be closed in different ways:
- completely fill it with bricks, followed by plastering;
- pour sand-cement mortar;
- install drywall or OSB board;
- cover the opening with plastic panels.
Installing panels is the quickest and easiest way to seal an opening. However, this is more of a decoration – a hole in the wall remains and requires response from the adjacent room.
You can do the same procedure on the other side of the wall, but this usually conflicts with the design and style of the room.
Full bricking is a convenient and quick method of bricking, giving a solid and massive patch. At the same time, it is necessary to use reinforcement elements – at least, mount the gratings and fix them in the opening so that the brickwork is securely fixed in it.
Pouring concrete is a more complicated procedure. You will need to assemble the formwork, and the casting itself will have to be done in several stages.
In addition, you must first install reinforcement – grating or at least a few vertical or horizontal bars.
Otherwise, cracks may appear in the patched area and the patch may sometimes fall out. In addition, it must be taken into account that pouring concrete is a very dirty procedure, and it will take several days to solidify, until the formwork can be removed.
Installing a board made of OSB or drywall is one of the fairly quick and convenient options. You can make a plane from the side of the kitchen, on which the tiles will be laid. A shallow niche is formed in the bathroom, in which shelves are made and shampoos, gels and other bath products are placed.
It is located at a high altitude and is not suitable for bathing. However, for a person under the shower, this shelf height is optimal – the flow of water from the shower head does not fall on the shelves.
Expert opinion
Sergey Svistunov
Specialist in the design of buildings and sewer systems. Knows everything about construction and repair.
A complete window seal can be done by removing the old frame, or by using it as a support structure for a drywall or other material. This is the most convenient option – you can adjust the height of the support so that the plane of the shield fully corresponds to the plane of the wall.
This will allow you to lay the tiles without visible height differences and create an even surface finish. On the other side of the wall, you can do the same, or create a niche. The most successful option is selected in each case individually, depending on the opportunities, time and other resources available to the owner of the apartment.
The procedure for pouring concrete into the opening
Let’s consider one of the most difficult options – complete sealing of the opening with sand-cement mortar.
Procedure:
- Removing the old frame . Carefully remove the glazing beads and remove the glass. Then, using a hacksaw, saw through the lower part of the frame (until the teeth of the hacksaw begin to touch the concrete). The mounter tear off the middle part and break it, after which the frame is torn off in parts and removed.
- Opening cleaning, preparation for formwork installation . Holes are made in the side or upper and lower parts of the opening using a perforator. Pieces of reinforcement are installed in them, which are connected with annealed steel wire so that a rigid frame is formed. If possible, the bars are welded – this will ensure maximum reinforcement rigidity.
- Starting the formwork from one side . An even and smooth (preferably) shield is attached to the wall using dowels and screws. Sockets for fasteners are made using a perforator. The size of the shield must exceed the size of the opening by at least 10 cm on each side.
- mate formwork is installed on the reverse side. Its height should reach a maximum of half the opening, so that there is where to fill the solution.
- Pouring concrete . Half of the formwork can be removed no earlier than after 3 days. This is the minimum time for curing concrete. On the reverse side (where the full shield is), the formwork is left in place. Then the half shield is moved up and set so that there is a gap of about 4-5 cm for pouring concrete. The formwork is again filled with mortar, if possible filling the upper gap between the edge of the formwork and the upper part of the opening. If the concrete is too liquid and flows out, you should wait for it to set and fill the gap with a thicker material.
- When the concrete has hardened sufficiently, the formwork can be removed from both sides of the wall . After that, it is necessary to withstand the casting for a few more days for the complete crystallization of concrete. After that, you can start finishing.
 Then, using a hacksaw, saw through the lower part of the frame (until the teeth of the hacksaw begin to touch the concrete). The mounter tear off the middle part and break it, after which the frame is torn off in parts and removed.
The procedure is rather lengthy and laborious. Because of this, most owners prefer simpler and faster termination methods that are not as strong but do not require as much effort.
Seal the window with cement mortar
One of the most common options for sealing the window between the kitchen and the bathroom is using cement mortar. For its preparation, you will need cement grade M-500 or M-400, sand and water. Considering that relatively little cement is needed to prepare the mortar (no more than 6-7 kilograms), it will be enough to purchase a small package, or use the remains of cement from other repair work.
In addition to the mortar, you will need a shield to hold the plaster on (for this purpose, a chipboard sheet cut to fit the window is perfect) and a metal paint mesh.
Mortaring a window consists of three steps.
Dismantling the old window
First of all, of course, it is necessary to dismantle the old window. First, take out the glass. Be careful not to damage your fingers . After that, using a nail puller or a large screwdriver, carefully remove the trim on both sides. As for the window frame, whether to take it out or not will have to be decided in each specific case. The fact is that the interior walls in the “Khrushchev” were made “do not understand what”, so when you take out the frame, you risk taking out a piece of the wall with it (this is especially true in cases where the wall between the kitchen and the bathroom is quite thin) . Therefore, we recommend that you leave the frame in place, especially since attaching a protective screen and plaster mesh to it will be much easier.
It is advisable to clean the remaining frame from paint residue and treat it with a water-repellent mastic or primer.
Lathing installation
Before installing the chipboard board into the window opening, it is necessary to fix a plaster mesh on it on both sides, which will help the mortar to better “grab” with the board surface. This can be done with small nails or self-tapping screws. When the grid is fixed, we proceed to install the shield in the window opening. The easiest way to fix it is with narrow glazing beads nailed to the remaining window frame.
“Throwing” the opening with mortar
Mix cement mortar with sand in a standard ratio of 1 to 3.
To make the mortar set faster, you can add a little gypsum or alabaster to it.
When the mortar is ready, we begin to apply it to the plaster mesh using a trowel. Please note that the mortar must be applied in thin layers, since a thick layer of wet mortar will fall off the crate with almost 100% probability, so all work will have to be started anew. And only after the next layer has dried, you can apply the next one. Thus, on each side you will have to apply a minimum of 4-5 layers of mortar.
After the final layer is almost dry, you can start leveling it. For this, it is best to use a paint grid. It can be fixed both on a special holder handle, and simply wrapped around a suitable wood block.
In order to obtain a perfectly smooth surface, after a “rough” mesh leveling is done, it is recommended to spray a very thin solution over the surface and level the surface again with the finest mesh or just a rough cloth.

After the mortar has completely dried, you should have a completely smooth surface, almost indistinguishable from a normal plaster wall. Now you can lay tiles on it or glue wallpaper.
Blocking the opening with bricks
The most “permanent” way to seal the window between the bathroom and the kitchen is brickwork.
As in the previous case, work begins with the dismantling of the old window. Moreover, it is necessary to remove not only the platbands, but also to remove the window frame and all embedded elements. As mentioned above, the walls in “Khrushchev” are extremely unreliable and can collapse, so you need to dismantle the window frame very carefully. If, nevertheless, the edges of the opening “wake up” in some places, they must be restored. To do this, you can use a thick cement mortar.
Article on the topic: The handle on the plastic window is loose
When the opening is ready, you can proceed directly to the laying of bricks. The same cement-based mortar is used as a binding element.
If the thickness of the walls between the bathroom and the kitchen is narrower than the width of the bricks, the bricks should be placed on edge.
When laying a window opening, there may be slight problems with the top row of bricks. If the remaining distance does not allow the use of a whole brick, it’s okay – the gap can be filled with a small “brick battle”, which is subsequently fastened with plaster.
The final stage of work is plastering. The solution for it can be prepared in the same way as described in the previous section, or you can buy ready-made gypsum plaster, with which you can get a smoother wall surface.
Decorating the window
All of the above methods allow you to close the window between the bathroom and the kitchen, as they say, “tightly”. But what if you want to keep this extra light source? To do this, the window must be “ennobled” or, in other words, decorated.
The easiest (but also the most expensive option) is to order a plastic window of the required size. If you equip it with a tilt-and-turn mechanism, you can turn the window not only into an additional source of light, but also provide good ventilation for the bathroom, given its small size, the issue is quite relevant.
You can also use stained glass to decorate the window or, as a more “budget” option, stained glass film. Both methods allow you to make the window opaque, thus ensuring the privacy of the bathroom. In addition, the colored light entering the room through the stained glass can be a “highlight” of your bathroom design.
As you can see, there are many ways to get rid of an unnecessary window between the bathroom and the kitchen. Moreover, almost all of them are not as complicated as it might seem at first glance. So if you decide to remove this “Soviet-era element” from your apartment, we are sure that you can do a great job with it without resorting to outside help. Good luck with your repair!
How to apply?
If you don’t want to remove the window in the wall between the bathroom and the kitchen, you can make it beautiful and original. The easiest way to change the appearance of this element is to replace the rectangular frame with a non-standard one, such as a round or semicircle shape. In addition, the design of the room may require original color schemes. The most popular is imitation wood or lavender. If the frame of the old product is still strong and will last for a long time, it does not always make sense to change it, but you can ennoble the glass itself by replacing it with a stained-glass window. Original drawings, which are combined with the concept of the bathroom or are a continuation of the decor of the kitchen, will be a real highlight. Stained glass can be ordered by a specialist or you can try to make it yourself if you have the proper experience in this matter.
If the window does not have a ventilation function and does not open, then glass blocks can be installed instead of ordinary glass, which resemble three-dimensional glass ceramic tiles. This material allows sunlight to penetrate into the bath, but reliably hides those who are in this room from prying eyes. You can decorate such a window with the help of colored glass blocks, which line up either in a clear sequence or randomly, creating a color ensemble. The picture looks very beautiful, which is laid out from many elements. They turn into a seascape, a forest clearing or something original that fits the design of the room.
If the window is not used for its intended purpose, but there is no desire to remove it, you can use a niche for shelves for small items. The bathroom always has enough things that need to be placed somewhere, so having such a place of storage will be very valuable. During the repair, you can remove the glass and close the window from the kitchen side with fiberboard or plywood, and organize one large or several shelves in the bathroom. If the transformation is planned to be thorough, then the niche is completely lined with tiles or other finishing material that does not let water through, which means it will last a long time. For creative people, an unnecessary window between the bathroom and the kitchen can serve as a pan for creating creative works, which, like paintings, can be changed from time to time.
Important! There can be many options for finishing the window and the opening itself, the main thing is to decide what exactly should be in the room and find the most successful options for implementing the plan.
Install a stained-glass window
The easiest and cheapest way to decorate an interior. Window casings are removed, carefully inspected. If they are in good condition, clean and paint. Perhaps they change their shape. Damaged parts are thrown away, new ones are put in their place. It is better to choose plastic, it is resistant to changes in humidity and temperature. Then they move on to the design of the glass. It is taken out and replaced with a stained-glass window, purchased or ordered according to the required dimensions. You can do it yourself. To do this, you need the ability to draw and special stained glass paints. If the ability to draw is completely absent, and the desire to create is available, a good solution is a self-adhesive film with any decor. It is glued to the glass over its entire surface or in fragments. The photo shows a few examples.
Our works – “Windows for Ages” company
A collection of glazing works made by permanent employees of “Windows for Ages” company. Our loyal customers trust us, for which we are extremely grateful to them !!! And we do not let them down in the most important way. In providing warmth, beauty and light.
Doors to the balcony
Completed work:
We have implemented two things at this object:
1) From a standard balcony block, we got a whole entrance group.
2) the window in the kitchen was cut in height to get the countertop to the place where the window sill was installed, while the floor surface was not yet ready.
Such a task is within the power of our master measurers.
Insulated Veranda glazing
Completed work:
Beautiful view, both outside and inside, all connections are made on static amplifiers. This significantly increases the rigidity of the structure. The rest of the photos of the work are examples of complex but at the same time quick solutions for glazing the contour.
Innovations
Completed works:
Illumination inside windows, luminous drawings, sandblasting and even heated double-glazed windows. Color of aluminum products in wood color. Individual drawings with stained glass paints inside the double-glazed window and much more.
Corporate order
Completed work:
Initially, we calculated a balcony 12 m x 2 m high. Then it turned out that this was a linear glazing of the facade of the building. We did the 2nd floor, on the 3rd floor there were already windows. A tangible difference between the quality of service delivery, in comparison.
Country house
Completed work:
An example of a neatly done work with the replacement of the pigtail. Outside, metal and at the same time durable platbands are installed.
Log house
Completed works:
Installed PVC windows, from the VEKA SOFTLINE profile system, double-sided lamination of different colors. On the outside, the client chose Amaretto Cherry and on the inside, the standard Golden Oak. The interior decoration of the slopes was also made from window sills.
Balcony interior decoration
Completed work:
Loggia interior decoration is made of premium class PVC panels (color of your choice). The floor insulation has been completed, the floor is a grooved board for impregnation.
Finishing slopes
Work performed:
The photo shows an example of how to finish slopes on uneven surfaces and hard-to-reach places
Glazing of the loggia
Work performed:
The loggia is also glazed with the Deulight40 profile system in a double-glazed window, energy-saving glass ( i ) with an emissive coating is installed. 40mm around the perimeter. Also installed roller blinds, a pleasant mint shade.
Enlargement of the doorway to the balcony, in order to save space. The height of the structure towards the floor was also increased by one row of bricks. An extraordinary decision was made to install a lightweight Provedal system, which significantly reduced the cost of the structure. At the same time, the doors were sliding.
Balcony finishing
Completed works:
Balcony glazing with PVC profiles, with pivoting sashes. As a rule, the choice of the client in plastic is justified by a significant difference in temperature, for example, in comparison with the Aluminum system. The interior is also finished with plastic panels with the right to choose the color and shade. The floor was made of plywood with insulation, and linoleum was laid in the finishing.
Shower cabin
Completed work:
Measurements, design, installation of Aluminum partitions, light doors, porches, gazebos. This shower cabin is one of the examples of ease of assembly and installation of such structures.
Glazing of a cottage in Suzdal
Completed work:
Rehau Delight Design, special order for a closed reinforcement of 2.0 mm inside the profiles to give maximum structural rigidity. The color of the lamination is black-brown Renolit, the grids are laminated in the color of the windows. Without screw fastening of ebbs. The entrance group of the first and second floors with the door placed in the center, so the side structures in connection with the door are reinforced with static connectors, which gives incomparable rigidity to the joints.
Building facade glazing works
Completed works:
Capital repairs of the building facade. November 2019
About 20 tons of metal were dismantled with the help of an autogen, only the perimeter and vertical racks were left. Between them, PVC structures made of ilmari classic profiles with a filling of 40 mm are mounted. Due to this, the design is not inferior in rigidity in any way, in comparison with the Aluminum post-transom system. Also, our specialists have done a great job of installing metal flashings on the entire facade of the building. All kinds of boxes, visors, ebbs, junctions are made of powder-coated white polyester.
Entrance group
Completed work:
SIAL KP45 each canvas hangs on three hinges. Filling triplex coating with tinted film with a bronze tint. Aluminum is always the most suitable system when it comes to reliability.
House
Completed works:
Insulation of vertical metal posts between which the entrance group is installed. Also, the threshold of the structure is made from the profile of the frame box, for additional insulation of the junction of the lower seam of the door panels. Private house
Dacha glazing
Completed work:
Architraves from the most ordinary wooden corner. All rounded shapes are made by hand on the spot according to the drawing of the Customer.
Corporate glazing
Completed works:
SIAL KP 45 profile system with double-glazed windows. The dismantling was carried out, the opening was increased in height by 50 cm, and on the same day the contour was closed.
Cottage glazing
Completed works:
Veka Softline, with 40 mm infill, coated with an energy-saving protective layer as part of the glass. Accessories MACO.
The veranda of the second floor was glazed with Aluminum Provedal C640 series with sliding doors in the basic brown color. The structure at its peak reaches a height of 4.5m. Reflective Bronze glass, which clearly gives the effect of a mirror.
Arched window
Completed work:
Installation of the window in accordance with GOSTs and construction SNiP. We remove the inner base of the panel, which makes it possible to make the material flexible, under the tide, a waterproofing tape, along the perimeter of the window, a vapor barrier tape, on a foil basis. Vapor barrier prevents moisture and condensate from showing through during sudden temperature changes. Mounting wedges plastic.
French doors
Completed work:
The balcony was glazed with 58mm Rehau Blitz series, filled with a single-chamber double-glazed window, which includes multifunctional glass that provides protection from sunlight, while only 6% is lost in light transmission.
The exit to the balcony is made of a Delight Design profile with a figured glazing bead, a Roto Swing handle, which gives a certain style. The layout inside the double-glazed window, in the European style, the doors on the shtulp connection, one of which is active, with a tilt-and-turn mechanism.
The heater has rebelled. The windows were crying. Luggage has grown legs
Questions from readers\”RP \” answers the head of the department for consumer protection of the consumer market and entrepreneurship development administration of Smolensk Valentina Medvedeva.
The shower cubicle was covered with… a cover
– We bought a shower cubicle – a showcase sample. During unloading, workers damaged the pallet and the top cover. I had to order new parts in the capital service. During installation, the specialists found out that we were given a pallet and a cover from a more advanced booth, and they do not fit. I’ve been calling the store for the second month, and they can’t find accessories for our booth there. I think that our claim is not to the store, but to the service center …
M. Alexandrov.
– In this situation, the decision of the issue depends on whose workers damaged the goods. If the shower cabin is damaged due to the fault of the store employees, and the tray with the top cover was ordered by the trade company, then the claim for termination of the contract and a refund must be submitted to the store. If the order is made by the consumer, it is necessary to check whether the model of the shower cabin is indicated in it correctly. This is the only way to determine who is to blame. If the service center gave the wrong parts, he must replace them.
Turbo oil problem
– Purchased a turbocharger and installed it on the car. The car did not drive even 100 kilometers, when a whistle arose during acceleration – the turbine wheel touched the body and damaged the blades. To find out the reasons for the breakdown, I sent the warranty device to the seller. The turbocharger was dismantled with me and they said that the breakdown was my fault:\”You started the turbine without oil\”. However, the external signs of damage spoke of improper balancing! A couple of days later they called again: \”The cause of the breakdown is an abrasive in the oil!\” I do not agree with this statement.
R. Kuskov.
– In case of disagreement with the quality control of the goods carried out by the seller, in accordance with Art. 18 of the Law of the Russian Federation\”On consumer protection \” you have the right to demand an independent examination of the turbocharger. The seller is obliged to conduct an examination at his own expense. However, it must be borne in mind that if it is established that the defects arose due to circumstances for which the seller is not responsible, the costs of the examination must be paid by the consumer.
When windows \”cry”
– I installed a double-glazed window, and after three days condensation formed on the outside of the window. The company says it’s normal. And it seems to me that the employees of the company either screwed up or delivered defective products!
A. Filippova.
– The reasons for the formation of condensate can be different, and this is not always related to the quality of the double-glazed windows. To determine the quality of the delivered double-glazed windows, it is necessary to conduct an examination. If the expert opinion confirms that the condensate is formed due to any defects in the double-glazed windows or requirements for their installation, you have the right to present the service provider with a requirement to eliminate the defects, and if they cannot be eliminated or are not eliminated within the prescribed period, refuse to execute the contract and demand damages and compensation for moral damages.
Surprise door
– Ordered the installation of steel doors. I had to wait… a month and a half, and the level of training of the craftsmen turned out to be doubtful: the door was installed with a creak only on the third day! And a week later, she completely skewed. Demand dismantling, demand money back and apply to another company?
E. Savlev.
– Based on art. 29 of the Law of the Russian Federation \”On the protection of consumer rights \” the consumer, upon detection of shortcomings in the work performed, has the right to demand at his choice:
– gratuitous elimination of deficiencies;
– gratuitous manufacture of another thing from a similar material of the same quality or re-performing the work;
– reimbursement of expenses incurred by him to eliminate the shortcomings of the work performed on his own or by third parties.
The consumer has the right to refuse to execute the contract for the performance of work and demand full compensation for losses, if the performer has not eliminated the flaws he has committed within the period specified in the contract.
In this situation, you should submit your claim to the contractor and, by an additional agreement to the contract, draw up a deadline for eliminating defects. If they are not eliminated in time or prove to be unremovable, you have the right to refuse to perform the contract and demand the dismantling of the door and compensation for damages.
Autostrasti clutch
– I bought a clutch for a car and put it in the service. It broke down after a week. There are no documents for the work performed, only a receipt for the clutch has been preserved. The information on the receipt says that the guarantee is valid for 14 days and claims are accepted only if there is an order for the installation work and an act of detecting a marriage. Do I have a chance to prove myself right?
G. Kashintsev.
– If you have been issued a warranty card, which states that the installation of the spare part should be carried out only by specialists, then the requirement of documents for the work is legitimate. If such information was not provided, the consumer should contact the place of purchase with a statement. The store is obliged to accept the claim, conduct a quality check of the part and determine the reasons for its failure. If you do not agree with the conclusion of the trade enterprise, then you have the right to demand an independent examination. The issue can be resolved only after establishing the cause of the breakdown. The clutch can fail both due to unskilled work on its installation, and for other reasons. The trade organization is not to blame? This means that the costs of the examination are paid by the consumer.
Lost luggage!
– Departed from Turkey with three bags, and left the airport … with one purse. Lost luggage! It is not possible to find ends: airline employees shrug their shoulders and declare their innocence in the incident. Is there a government on a completely unmanageable\”aviators \”?
L. Vorokhov.
– According to the \”Rules of Air Transportation of Passengers\”, if the carrier did not issue the checked baggage to the passenger at the airport (where the baggage should be delivered according to the ticket), then upon the written application of the passenger, issued on the basis of the transportation document, the carrier is obliged to provide the necessary measures to search for the passenger’s property.
If the baggage is not found within 21 days from the date of submission of the application for non-receipt of baggage, the passenger has the right to demand compensation for damage caused by its loss. If checked baggage is found, the carrier ensures that the owner is notified and transported to the airport or point specified by the passenger, without charging an additional fee.
merchandise, violating current legislation on retail markets.
Fragrance with… odor
– I wanted to buy “DuPont” cologne, but I had to refuse the purchase – its smell is different from the cologne with the same name, which I bought earlier. Why is that?
I. Privalov.
– Firstly, it may be a different kind of cologne containing a different perfume composition. Secondly, you may have come across a non-original version of aromatic products when the manufacturer uses only the trademark. There is a third option – a fake!
We demand recalculation for heat!
– The heating was turned on in mid-November, but the recalculation was not done . ..
..
N. Nesterova.
– In accordance with clause 19 \”Rules for the provision of public services to citizens\”, approved by Government Decree No. 307 of May 23, 2006, in the absence of metering devices, the amount of payment for heating is adjusted once a year. As a rule, recalculation is done at the end of the heating season.
Who closes shops?
– Why was the grocery store at 70 Gagarin Avenue liquidated?
V.Alexandrova.
– This was a private shop. The opening and closing of private outlets depends on various factors. There is a \”Products\” store in this area at 68 Gagarin Avenue, and the opening of new food minimarkets is not yet planned here.
Heater with Nordic character
– Bought a heater. Before the sale, the seller did not check it, saying that if defects were found within two weeks, I could return the unit back. The instructions say that the device is designed for heating a room of 20 square meters.