Stairs paint: How to Paint Stairs – The Right Way to Paint Stairs
How to paint a staircase – an easy guide to transforming hallways
Ideal Home Newsletter
The Home Of Great Ideas For More Than 100 Years
Thank you for signing up to . You will receive a verification email shortly.
There was a problem. Please refresh the page and try again.
By submitting your information you agree to the Terms & Conditions and Privacy Policy and are aged 16 or over.
Painting a staircase is a relatively quick DIY job that can totally transform your space. Good news if you’re on a tight budget, as paint ideas are always a great, cost-effective way to make tired hallways feel more loved.
And as the stairs are often the first thing you see when you walk in (particularly in Victorian homes), they definitely deserve some TLC. Learn how to paint a staircase that’ll look good for years to come with our guide.
How to paint a staircase
Our handy step-by-step DIY and decorating guide will show you how to paint stairs using specialist floor paint to give your own lobby a new lease of life with a splash of colour.
Freshly painted wooden stairs can look stylish just as they are. Or alternatively can provide the perfect fresh canvas on which to lay a striking carpet runner. Either way, a fresh coat of paint on the stairs is a simple yet effective staircase idea that will elevate the decor.
(Image credit: TBC)
Top tips before you get started:
- Start early or when the rest of the household are in the garden or busy downstairs and don’t need access for a while. Or make a start once the kids have gone to bed for the night. This means you may have to paint over the course of a few days.
- Factor in time to ensure the paint is fully dry before anyone walks on it. Because the longer you leave it to dry, the more hard-wearing it will be. If your only loo is upstairs, you’ll need to plan around it.
- Paint in order, so start at the top and work your way down. Or vice versa depending on where you want to finish – you don’t want to get stuck on the wrong floor. This may sound obvious, but it can be easy to get caught out.

- Ronseal recommends painting every other step, then marking the remaining steps and coming back once dry to complete them. ‘Or, if you want to use natural wood, be sure to apply a coat of Ronseal Diamond Hard Floor Varnish . This product is touch dry in just 30 minutes and can come in a satin or clear finish.’

What you’ll need
- Rust-Oleum Chalky Finish Floor Paint
- Sander / Dust mask
- Paint scraper
- Wood filler
- Paint brush
- Cleaning solution / Cleaning cloth
- Masking tape
- Paint roller / Paint tray
1. Prepare the steps
(Image credit: TBC )
Remove any old carpet from your wooden stairs. You need to make sure the surface is in good condition before you start. Repair any loose or broken areas, fill any dents with wood filler and sand any rough patches to prepare the floor for painting.
The bonus of a specialist paint nowadays is that it can be painted straight over old paint or varnish, so no need to fear hours of more sanding ahead of you.
Once complete, vacuum up any dust and clean with a cleaning solution and cloth.
2. Choose the correct paint
(Image credit: TBC )
Whether you’re sticking to the same hallway colour scheme all over or painting a striking stair runner, choose the right paint. Rust-Oleum Chalky Finish Floor Paint is ideal.
The hard-wearing, water-based paint resists knocks and scratches. Plus it can be applied directly to wooden floorboards or concrete flooring, and directly over old paint or varnish with no topcoat needed.
Top tip: Tape off areas if needed. If you’re painting stairs in different colours or painting a runner, mark out your design using decorator’s tape.
3. Start painting
(Image credit: TBC)
Apply the Chalky Finish Floor Paint ensuring there are no drips. Use a brush for any details and angles where stair riser and tread meet. You can use a small foam roller for any larger, flat surfaces.
Don’t be tempted to apply thick coats of paint. The coverage will last much longer if you paint a few thin coats rather than one thick coat. Wait until each coat is fully dry before applying the next one. Aim for a minimum of two coats but more may be required.
4. Take off the tape and clean
(Image credit: TBC )
Remove any decorator’s tape. Once completely dry, give a final brush or vacuum. Then stand back to admire your handiwork!
For a thoughtfully painted staircase, mix colours to give the look more depth. Paint the rises in the same colour as the edging and bannisters (in this case white), while adding a subtle splash of colour to the step itself (in this case light grey).
(Image credit: TBC)
A freshly painted staircase makes all the difference, especially in hallways where first impressions count. Of course due to the heavy footfall on the stairs they will require a fresh coat of paint every few years, depending on how well they are looked after to prevent excessive wear and tear.
And that’s how to paint a staircase. Happy decorating to one and all.
When painting stairs, what do you paint first?
Helen Shaw, UK Director of Benjamin Moore , recommends painting the handrails and spindles first. Then you can cut in on the stairs with a small paintbrush, before switching to a roller. Start from the top and work your way down.
Crown ‘s senior designer, Justyna Korczynska says, ‘Decide at the start whether you want to try to make your hallway look lighter and brighter, or if you want to go for a dark and dramatic scheme. The lighter the colour, the more it reflects available light – the darker the colour, the more it will absorb the light. So if you want to make a hallway seem larger you will need to go for lighter shades.’
(Image credit: Crown Paints)
Should you paint the stairs with a brush or roller?
To paint your stairs, you will need both a brush and a small roller, available at Amazon .
Do you need to sand stairs before painting?
‘Yes, use a fine-grit sandpaper (220-grit) and a sanding sponge,’ says Helen. ‘Sand the spindles, handrails, and any other wood surfaces to smooth them before painting. Vacuum up any sanding dust and wipe down your sanded surfaces with a damp cloth.’
22 Gorgeous Painted Stair Ideas
By
Ashley Knierim
Ashley Knierim
Ashley Knierim is a home decor expert and product reviewer of home products for The Spruce. Her design education began at a young age. She has over 10 years of writing and editing experience, formerly holding editorial positions at Time and AOL.
Learn more about The Spruce’s
Editorial Process
Updated on 08/17/21
The Spruce / Christopher Lee Foto
You’ve probably paid close attention to the color of your living room walls and spent hours picking out the backsplash for your kitchen, but have you put any thought into your stairs? If you think your staircase is simply a tool to get from one story to the other, you’re missing out on a great decorating opportunity. In many homes, the staircase is one of the first things people see when they walk through the front door, so why not make it eye-catching?
-
01
of 22Color Blocking
Pufik
We can’t think of a better way to return after a long, hard day at work than being greeted by these bright blue and yellow stairs from Pufik. We love the faux carpet runner look created by the deep blue block coloring. Plus, the deep color is a great way to hide marks and dirt without a lot of elbow grease.
-
02
of 22Try Ombre Stairs
Mommy Shorts
What’s happier than ombre? If you’ve already tried the ombre wall trend, these blue stairs from Mommy Shorts will take the look to the next level.
We love the idea of transforming our boring staircase into a sea-inspired oasis that will make us excited to start the day. Though it takes a little bit of an artistic eye to get it right, a few test swatches can help you master this look.
-
03
of 22Keep it Traditional
In My Own Style
Painted stairs don’t have to be bold. A fresh coat of paint can transform your staircase without a lot of money. These two-toned white and brown stairs from In My Own Style are proof that painted stairs work in any home. Blogger Diane ripped out old carpet and refreshed her hardwood stairs with a little paint and wood stain for less than $25.
-
04
of 22Rainbow Stair Risers
bfarhardesign
This rainbow stair look from bfarhardesign may not be for the faint of heart, but it sure is stunning. If you’re the type of decorator who gravitates toward colorful design, you’ll love the idea of splashing bright, bold colors on your stair risers.
-
05
of 22Perfect Pantone Stairs
Bloesem Living
Calling all Pantone lovers out there: Bloesem Living featured these stunning rose stairs emblazoned with each color’s code. Think you’re the biggest color fan? You may even want to update your stairs every time Pantone releases their color of the year.
-
06
of 22Keep it Monochrome
The Vintage Round Top
We’re all about black-and-white color schemes so it’s no surprise we’re obsessed with these stairs from The Vintage Round Top. The stark black, white and natural wood style blends seamlessly with the modern living space while helping to break up the white accents.
-
07
of 22Gray and Distressed Stairs
skonahem / Instagram
If you’re all about vintage, pre-war style, these distressed stairs from skonahem are right up your alley. The deep gray color adds dimension and depth, while the distressed surfaces lend a vintage, shabby chic feel.
The best part? Making new wood look old is an easy DIY.
-
08
of 22Pretty in Pink
Michael Graydon
Pink is the one color that sometimes has a difficult time “proving itself” as a solid player in the design world. But these candy pink stairs from Michael Graydon take our breath away, and remind us that pink truly can be the star of home’s decor. Since only the tops of the stairs have been painted, the use of pink doesn’t overwhelm.
-
09
of 22Try Chevron Stairs
Amber B Design
Searching for a painted stair idea that will truly stand out? These black-and-white chevron striped stairs from Amber B Design are one-of-a-kind and simply beautiful. We love how easily the chevron look blends with the neutral wood stair tread. Recreate the same vibe with thick painter’s tape.
-
10
of 22Go Geometric
Lovika / Pinterest
There’s just something about these black-and-white stairs found on Pinterest via Lovika that we can’t get enough of.
Chic and modern, these painted stairs also give off a whimsical and free-spirited feel. This is a great way to sprinkle in some shapes and patterns and add a touch of intrigue to your home decor.
-
11
of 22Bold and Bright Pink
Raw Edges Design
Though these stairs from Raw Edges Design are actually part of a storefront, they’re giving us major home decor inspo. Here, wood blocks have been painted various shades of pink and arranged to create an eye-catching chevron design.
-
12
of 22Paint Just the Top of Your Stairs
Maison de Pax
If a wild bold ombre or chevron stripe just isn’t your thing, these subtle, modern stairs from Maison de Pax are a beautiful alternative. They may not be a crazy bright color, but the crisp white and black contrast adds dimension and gives off a luxury feel with little effort.
-
13
of 22It’s Easy Being Green
Sour Jones
We wouldn’t have pictured neon green stairs in such a formal space, but this beautiful staircase from Sour Jones proves it can be done—and look stunning.
The pop of color on the riser adds a brightness to the foyer without a lot of natural light. If you’re ready to dive right into the painted stair look, why not start with something as bold as green?
-
14
of 22Peachy Stairs
arseniclace / Instagram
No matter the season, corals and peach colors work wonders and add a spunky, unique flair to any style of home decor. These bright peach stairs from arseniclace give off such an easy, happy-go-lucky vibe, especially when paired with this fun greenery wallpaper.
-
15
of 22Keep it Simple
Kammys Korner
These gray stairs from Kammys Korner are subtle, classic and beautiful. If your stairs are looking a little worse for wear, a fresh coat of paint and a little elbow grease can make them true centerpieces once again.
-
16
of 22Create a Faux Runner
theothersideofneutral / Instagram
A carpet runner can be nice, but these nautical-inspired stairs from theothersideofneutral prove you can create the same effect with paint.
Stick to the same guidelines you’d use when selecting a carpet runner, and you can swap out your “runner” for a lot less money than real carpet.
-
17
of 22Split Your Stairs
_three_little_birds / Instagram
If you have a small space, a wide staircase can look bulky and oversized. These half-white stairs from _three_little_birds are the perfect solution. By splitting the stairs in half with paint, it creates an illusion of a narrower staircase that works well with the rest of the space.
-
18
of 22Gorgeous Rainbow Stairs
modern_house_nashville / Instagram
Here’s another rainbow stair idea, this time from modern_house_nashville, that makes our heart stop. We love the matte paint used here—though the rainbow colors are bright and bold, the matte look creates a slightly more subtle and vintage feel that works in any home.
-
19
of 22Match Your Runner
Bright Green Door
There are many reasons why a carpet runner is a good idea—it adds texture and reduces slips and falls, especially in homes with active children.
If you want the best of both worlds, these stairs from Bright Green Door prove paint works just as well on a carpeted stair as it does on a naked one.
-
20
of 22Olive Green Stair Risers
Remodelista
Pale pink and olive green have been a trendy decor pairing for a few years now, and these stairs from Remodelista make us want to jump on the bandwagon. The blush wall and the deep green stairs work well in the otherwise all-white space while adding a bit of character.
-
21
of 22Wallpapered Stairs
kos.home / Instagram
Unless you’re a trained artist, creating elaborate murals on your stairs may be out of reach. These gray stairs from kos.home use both paint and self-adhesive wallpaper to create a designer look. It’s easy to find budget-friendly wallpaper that will create a luxury feel without a lot of money.
-
22
of 22Paint the Banister
kimbahills / Instagram
Already love the way your stairs look? You can still mix things up by adding a coat of paint to your banister, as seen in these stunning stairs from kimbahills.
We love how the bold teal banister matches an accent door in the entryway, creating a cohesive look.
 We love the idea of transforming our boring staircase into a sea-inspired oasis that will make us excited to start the day. Though it takes a little bit of an artistic eye to get it right, a few test swatches can help you master this look.

 The best part? Making new wood look old is an easy DIY.
 Chic and modern, these painted stairs also give off a whimsical and free-spirited feel. This is a great way to sprinkle in some shapes and patterns and add a touch of intrigue to your home decor.
 The pop of color on the riser adds a brightness to the foyer without a lot of natural light. If you’re ready to dive right into the painted stair look, why not start with something as bold as green?
 Stick to the same guidelines you’d use when selecting a carpet runner, and you can swap out your “runner” for a lot less money than real carpet.
 If you want the best of both worlds, these stairs from Bright Green Door prove paint works just as well on a carpeted stair as it does on a naked one.
 We love how the bold teal banister matches an accent door in the entryway, creating a cohesive look.
Do Painted Stairs Actually Hold Up? — Olive & June
/
Erika Conner
The Pros and Cons of Painted Stairs
Painting your stairs can be an inexpensive way to give them a completely new look, but do they actually hold up?
No one wants to take the time to do a home improvement project that doesn’t last. Lucky for you, in this post, I’m sharing the pros and cons of how my painted stairs are standing the test of time after 1 year so you can decide if this type of project is right for you!
We moved into our house a little over a year ago (at the end of October 2019). I immediately knew there was no way I wanted to be met with this image when I walked in my front door:
So the first project I tackled was ripping up the gross, dingy carpet and painting the stairs. In fact, that was one of the first projects I posted about here on the blog, too!
In the original post, I wrote all about how to rip up carpet on your stairs, prep, and paint them. But today I’m giving you the skinny on the question you might be wondering about…
Do Painted Stairs Actually Hold Up?
And my answer is a resounding YES! Better than I imagined, in fact!
Now, our stairs (and the surrounding walls) aren’t looking quite as pristine as they were when I first painted them. That’s to be expected. But ours have been particularly beaten up because a few months after I painted them, we decided to start our master suite renovation (that was a pretty significant lack of planning on our part).
However, considering they’ve had to endure the abuse of Lucius as he has not-so-gently carried loads of construction materials up and down them, they’ve held up amazingly well! I really do think our stairs have held up so well because of the time I took to prep them, and because I used a good quality porch, floor, and patio paint.
So, would I do it again? Absofreakinglutely! But painted stairs aren’t without their faults. Here’s a breakdown of the pros and cons of painted stairs to help you decide if painted stairs are for you.
Pros of Painted Stairs
DIY
Although it can be time-consuming, painting your stairs is totally a doable DIY project. Compared to the amount of time it would have taken me to sand, stain, and protect the stairs to return them to hardwood, painting my stairs was a much quicker (and cleaner) option.
Surprisingly not slippery
I mentioned in my original post that I was concerned the glossy paint used on the stairs would be slippery. Boy, was I wrong. I’ve lived in houses with carpeted stairs and I can honestly say I’ve slipped on the carpet way more often than I’ve slipped on my painted stairs – and that’s coming from a self-proclaimed klutz!
Cleanliness
Sweeping the stairs with a broom is so.much.easier than hauling a vacuum up and down.
Cons of Painted Stairs
Cleanliness
I know, I know, I listed this as a “pro” too, but while you don’t have to vacuum painted stairs, you do have to sweep and mop them every once in a while. Not the worst job in the world, but certainly not something I look forward to.
Upkeep
While prepping your stairs and using a high-quality floor and porch paint will help keep your stairs looking nice, nicks and general wear and tear are more noticeable than on hardwood and you’ll have to touch them up occasionally.
Mystery
If your stairs are carpeted and you don’t know what kind of shape they’re in underneath, you might run into some unpleasant surprises, like we did with our landing. In fact, just a few days ago I ripped up the rest of the hideous carpet that was at the top of the stairs and unearthed more things we’ll need to fix (cue the big ol’ gap between the tread and riser). Bwomp Bwomp.
The Elephant in the Room
Since I mentioned the landing… what the heck is going on with it? (Or, in other words, “why does it still look like crap?”)
As you can see, our landing hasn’t been replaced yet. I mentioned in the original post that we installed a temporary landing made out of some thick MDF-type material until we could figure out how to replace it.
We’ve discovered during this process that finding stair landings is oddly difficult. I don’t know if we’re just not looking in the right places, but we’ve only found one company near us that sells solid stair landings and they’re about 3 hours away. Our current plan is to wait until the master suite reno is complete and we’re not running the risk of ruining the new landing, then take a little road trip to pick it up.
Is the current landing ugly? Heck yes! But it works and it’s not the final version so I think we can live with it a little while longer. Plus, in case you didn’t notice, we’ll have to do some other repairs once the reno is done anyway.
What About the Railing?
So while the stairs are holding up nicely, and we’ve addressed the landing situation, the handrails, balusters, and newel posts (all of which will now be referred to as “the railing” because that’s way too much stuff to list out over and over) have seen better days, and I think I know the issue. This is one of those mistakes that I’m kicking myself for because I should have known better and now I’m going to have to fix it.
When we moved in, the railings were newly repainted and already peeling a little bit. I should have bit the bullet then and stripped the paint off then, but this was at the end of prepping and painting the stairs and I was tired. Now I’m paying for it.
When I painted the railings AGAIN, the paint never seemed to fully adhere and remained a bit tacky. Because of this, anytime the railing gets nicked or looked at the wrong way, it peels some more. You can easily take a fingernail and start to peel the paint off. Ugh.
BUT, I suppose that goes to show that even those of us that do this stuff all the time still make mistakes. And on the bright side, we had to remove the railing at the top of the stairs and replace the whole thing anyway because of the new layout, so I have a little less to fix than I originally painted.
Final Thoughts
So… painted stairs – yay or nay?
Honestly, I hate vacuuming stairs so much that the surprises we uncovered under the carpet are worth it. I think it’s also worth noting that I love natural wood. If our stairs were in better condition and our house was a different style, sanding a repainting them would have been a viable option. But for our house, painting the stairs just made sense and I’m happy with the result – even if it’s not 100% finished (still).
Staircase Remodel Project: How to Paint Stairs
We did a DIY staircase remodel by painting our stairs. Learn how to paint stairs with this tutorial and find out how our staircase renovation has held up over the last 5 8 years…
Today, we’re talking about how to paint stairs. A stare-worthy painted staircase remodel, to be exact.
Truth is, I guess these stairs have always been fairly “stare-worthy”. But in the beginning, I don’t think it was really for good reasons. But I’ll let you be the judge.
Pin
*This post was most recently updated 1/2022*
If painting your stairs is something you’re seriously considering, then grab the free printable stair painting guide!
Click here or below. I’ll send your free printable stair painting project guide immediately⤵
Pin
Pin
Pin
Pin
Before we get into the how-to, here’s what you’ll need for this stairs project →
Supplies for a Painted Staircase Remodel:
- porch paint for base color (Behr porch & patio – ultra-pure white)
- porch paint for runner color (Behr porch & patio – baltic gray)
- Frog tape (1. 5″ for delicate surfaces)
- angled 2.5″ paintbrush (this is my favorite brand/size)
- paint roller, pan, and nap
- measuring tape
- palm sander(this is the one we own)
- wood putty (paintable) or Bondo (to fill large gashes or dents)
 5″ for delicate surfaces)
Choosing Between Staircase Renovation Ideas
If these stairs look familiar, that’s because I’ve shown you these basement stairs of ours before. Truth is, we’ve had to renovate stairs MANY times in our day, and the problem is, staircase remodels are almost always $$$.
Well, we didn’t have $$$ for this project. We had more like ¢¢¢. Problematic.
Pin
Our first plan was to stain the stairs.
Pin
However, after a ton of sanding work, we realized this plan was going nowhere. These treads are made of pine. Pine is soft, and the treads have tons of wear on them. Gashes, divots, etc.
The sad reality is that stain doesn’t take evenly to pine in this condition. If we were willing to put a ton more time into the staining plan, it MIGHT have worked, but we weren’t willing to spend that time and energy on a ‘maybe’. So, we abandoned ship on Plan A.
We priced out a Plan B of purchasing new oak treads to stain. Holy moly. We realized quickly that wasn’t in our ambitious (cheap) budget.
So, we moved on to Plan C. It took a while for the hubs to embrace Plan C, since, admittedly, it was a little “different.” Sure, we’re not the only ones in the world to have painted stairs, but they are not universally loved and accepted on a regular basis…yet.
I love the look. Since it was certainly the right price point, he agreed to give it a try.
Don’t forget! You can make this project easier by downloading the free guide!
Click here or on the image below. I’ll send your free stair painting printable guide immediately ⤵️
Pin
Pin
Pin
Pin
How to Paint Stairs: An Affordable Staircase Remodel Option
With Plan C as the chosen route, we got right to work on our staircase renovation.
Step #1: Preparation
The preparation for painting wooden stairs is much less than it would have been for staining the stairs (bonus!).
First, take off any old paint or coating to ensure the new paint sticks well to the stairs. We used a palm sander to remove the glossy coating that was on our stairs.
If you have any HUGE gashes/divots/etc, you might want to try to sand those out or fill them with wood putty or Bondo to smooth them out a bit.
Once the sanding portion of this staircase remodel project is complete, simply make sure the staircase is wiped down and clean to remove any leftover dust.
Step #2: Prep Your Landing (if Necessary)
In our case, the landing was a subfloor that had been covered in linoleum. We decided to cover the landing with utility oak hardwood flooring.
This stuff is outstanding, and the best part is that we purchased it from Lumber Liquidators for .99/sq ft!!
We were able to use the old nosing piece to finish the edge of the landing, but we had to raise it up 3/4″ with plywood to match the height of the new oak flooring. Once the oak flooring was installed, we used the palm sander to sand the floor until it was nice and smooooooth.
Here’s what it looks like installed…
Pin
And if you’re wondering, YES, we do put our children to work on all our crazy DIY projects. And YES, pajamas are the standard business attire around here.
Step #3: Paint Your Base Coat(s)
We painted two base coats of the Behr ultra white porch & patio paint on the stairs (risers and treads) using a combination of a roller and brush.
This part of painting basement stairs isn’t really any different in terms of supplies or technique than other paint jobs you’d take on.
Pin
Step #4: Tape Off Your Runner Starting With the Outside Edge
This is the ONLY somewhat challenging part of this staircase remodel project. Take your time as you tape so that the results are great.
Pin
Otherwise…you’ll either have to live with the paint job being flawed OR redo the entire project. Neither one of those options appeals to me; trust me, it’s totally worth it to take your time on the taping.
Decide on the thickness of the gray “stripe”. We settled on 1.5″ because it was the width of the painter’s tape. 😉 That decision, alone, made taping the steps much easier.
Then decide on how wide you want your gray runner to be. In the image above, the blue painter’s tape was placed where our gray stripe would eventually be painted.
TAPE THIS PART FIRST.
Once I figured out where the stripes were going to go, I measured from the edge of the stair to the blue tape. Then I cut a spacer out of wood and used that to help align the blue tape as I went down the stairs.
**Note: we are using the regular blue painter’s tape for this portion because it’s cheaper and only being used as a placeholder. We personally prefer the Frog Tape to actually “do the job” here. The blue painter’s tape will be removed before you start to paint.**
Make sure to grab your printable DIY guide for this project! It’s free. Click here or below on the image to get started!
Pin
Pin
Pin
Pin
Tape off the Rest of Your Runner
Once the blue tape was installed and we were happy that it was nice and straight, we took the yellow tape (the Frog Tape) and ran it next to each side of the blue tape.
Repeat this for the other side of each stair.
Once you have your two lines of Frog Tape in place, remove the blue tape so that you’ll be able to paint on your gray stripe in that location. Remember: under that “inside” yellow tape is where your white “stripe” will be once the tape is removed.
Now repeat this process on the opposite side of the steps. Below is how the stairs should look prior to painting the gray runner.
Pin
Step #5: Important Step BEFORE You Paint Your Runner
Go back and do a light coat of base color (in our case white) over top of the tape, everywhere. This seals the tape edges so that you won’t end up with any paint seeping under your tape job!
This step is the most important tip for ensuring you will have clean lines created on your painted stairs!!! Just make sure it is a very light coat of paint that you put on.
Step #6: Paint Your Runner in Batches
You’ll be tempted to start at the top of your stairs, or at the bottom and just paint EVERYTHING now that you have everything taped off.
DON’T DO IT.
If you do that, you likely won’t be able to get to the other end of your staircase once you’ve painted! Yikes!
Instead, paint your runner in sections so that you’ll be able to get to the top or bottom of your stairs by skipping a step here and there. Once the first application of your runner paint has dried, go back to those steps you skipped, and give them the first coat.
Pin
You can see in the image below that we didn’t hold back with the gray paint. You really want to go all the way to the tape, and then paint OVER the tape as well so that you won’t have any unpainted little spots.
As a reminder, (you can see how we did it), leave painting the landing for last so that you can still negotiate the stairs even in the middle of your project.
Step #7: Tape and Paint Landing (if Applicable)
Taping the landing was a little more challenging. I first taped the stairs above and below the landing. The reason I did it that way is so that when I went to tape the landing, I could match up the runner from the stairs above the landing and the stairs below the landing.
I used a straight edge to get the tape as straight as I could, but in the end, I had to eyeball it a little bit to get the runner on the landing to match up with the runner on the stairs.
Pin
NOTE: Where the tape turns 90 degrees, you will have 2 layers of tape. In order to fix this, put a sharp blade or a box cutter and cut a 45-degree line through the tape. Remove the excess tape so that now you have a single layer of the tape forming your 90-degree turn.
The important parts in this step are to:
- use a new, sharp blade
- only cut through the tape (so you don’t cut into your landing)
Don’t forget to grab the printable guide! It’s free! Click here or below to grab your copy now⤵️
Pin
Pin
Pin
Pin
Step #8: Remove Tape
Pin
All that’s left to do is remove that tape!!
Pin
Step #9: Enjoy Your New Stare-Worthy Staircase Remodel
Pin
And that, in a nutshell, is how to paint stairs!
We love how these painted stairs turned out. For the cost of 2 gallons of paint, we have renovated an old staircase into something new-looking.
Pin
A couple more uber budget-savvy DIY projects finished off this space:
Pin
First, our DIY mirror frame we made using a builder-grade vanity mirror and some leftover barnboard from our guest room and bathroom ceiling projects.
Pin
And we took that builder-grade flush-mount “boob” light and created a beauty out of it in about 5 minutes. No joke!!
Pin
As I update this post, the painted stairs are going on being done for 8+ years! If you want to see some updates about how they’ve held up, here are a couple of links:
Staircase Remodel Updates:
See the stair after 2+ years
See the stairs after 5+ years
Pin
This super inexpensive project has even been in print! Check ‘er out in This Old House magazine. Not bad for a couple of cans of paint and a little DIY time and energy!
Pin this post for later! And if you try this project, leave a picture of your finished staircase remodel on the pin! That will help others decide whether they want to tackle this painted stairs project, too!
Pin
Pssst…before you go, I sure would love to hang out with you again really soon! Sign up now and get a FREE copy of “Builder-Grade To Beautiful: 10 Totally Transformative Home Decorating Solutions, All Under $100!”Click here to enter your email or on the image below. Your copy will be sent right away!
Pin
How to paint a staircase – 5 steps to spruce up treads and risers
Real Homes is supported by its audience. When you purchase through links on our site, we may earn an affiliate commission. Here’s why you can trust us.
(Image credit: Farrow & Ball)
Join our newsletter
Get the best home decor ideas, DIY advice and project inspiration straight to your inbox!
Thank you for signing up to Realhomes. You will receive a verification email shortly.
There was a problem. Please refresh the page and try again.
By submitting your information you agree to the Terms & Conditions and Privacy Policy and are aged 16 or over.
Knowing how to paint a staircase properly is essential, especially given that, if you know how, it’s an easy DIY job that can totally change the look of your hallway or landing. And, if you have been blessed with wooden stairs and are in need of a budget-friendly way to decorate them, we would highly recommend learning how to paint a staircase yourself for the perfect refresh.
We have seen so many great painted staircase ideas that we just had to pay homage to the trend by sharing some of our favorites and telling you how it is done. Whether you want to paint the whole staircase, just the treads or just the risers, a lick of paint will bring maximum impact to your space. Just be sure to move furniture out of the way before getting started – such as your console tables or shoe racks.
(Image credit: Kasia Fiszer)
How to paint a staircase in 5 easy steps
Joa Studholme, Farrow & Ball’s Color Curator explains, ‘If you choose to paint your whole staircase, including the spindles, string and newel posts in one color it will create huge visual interest.’
‘By using a strong tone like Down Pipe, it will become the focus of the space, while some opt to use the color of the walls to make the structure ‘disappear’. In either case it is best to paint any panelling or cupboards under the stairs in the same color.’
Whether you want to paint your staircase risers or just the treads, here’s all you need to know.
You will need:
- Paint
- Sander
- Wood filler
- Sugar soap cleaning solution
- Cleaning cloth
- Masking tape
- Paint scraper
- Paint stirrer
- Paint brush
- Paint roller
- Paint tray
- Dust mask (optional)
1. Prep and repair your staircase
First, remove any carpet or covering from your wooden stairs. While paint is perfect for making over an old staircase, you need to make sure it is in good nick before you start. Repair any loose or broken parts, smooth over uneven surfaces and fill any dents.
‘When painting unpainted wood floors for the first time ensure any joins or cracks are filled with a non-flexible wood filler before thoroughly cleaning and sanding the floor until smooth,’ explains Studholme.
You can paint both bare wood and painted wood, but if the stairs are very old and have many layers of paint on, you might want to strip them back first. This can be done using paint stripper, a heat gun or sanding – but take care as old paint may be lead based. Read our guide to maintaining your staircase for more advice on renovation.
Once you’ve done this, hoover up the mess and clean the stairs with a sugar soap solution to remove any remaining dirt.
Top tip: On bare wood you may want to use a resin and knot blocking primer.
(Image credit: Pete Helme/Rust-Oleum)
2. Choose suitable paint for your staircase
While you can use any wood paint, those designed for floors are best as they are designed to be more durable – and your staircase needs to be walked all over of course. If you do choose to use wood paint, a satin finish may be more forgiving.
However, remember that floor paints are designed to be less slippy. If you’re trying to match your hallway paint idea to your stairs, gloss and satin might be fine for risers, but could prove dangerous if used on the tread itself.
The simplest way to add impact to your hallway is with a bold contrasting color, great if you have gone for a neutral scheme for your walls.
(Image credit: Bruce Hemming)
3. Time it right and paint from the top
Start early and preferably when everyone is out for the day. You need to factor in drying time which will be at least a few hours to be touch-dry, and longer before you should be walking on it. If your only loo is upstairs, you might need to plan an alternative.
It may sound obvious, but start at the top and work down – especially when painting the treads – so you don’t get stuck upstairs (unless you are painting upwards from a basement of course). For a smooth finish use a small roller but cut in with one of the best paintbrushes.
(Image credit: Roger Oates)
4. Painting the risers
If you want to make visual impact with a more interesting staircase paint idea, you should consider painting the risers of your staircase (the vertical sections linking each step). It’s also best to paint these before tackling the treads, unless you do both at the same time. In which case you should paint the entire first stair, then skip a stair or two in-between as you work your way down, so that you can move around without scuffing up your paint job.
Studholme explains, ‘More excitement can be added by painting only the risers in a darker or more dramatic tone like Bancha, which is not only practical in defining the stairs, making them easier to use, but also helps to disguise scuff marks.’
Paint the risers using a roller, and avoid drips by applying several thin coats of paint rather than one or two thick ones. Use a paint brush to cut in at the edges and allow them to dry before using the staircase as usual.
(Image credit: Radiator Centre)
5. How to paint stair treads
To paint the treads, you’ll want to use a roller and apply the paint as before. Cut in when painting as you would do on walls, using a suitable paint brush.
Allow to dry, and your painted staircase makeover is complete. You’ve learnt how to paint a staircase like the pros.
Decor tip: If you want to paint the treads (the flat sections) of your staircase a different color to the risers to create a subtle two-tone effect, apply masking tape to the bottom of the risers to section off the surface you’ve just painted.
What kind of paint do you use on stairs?
When painting stairs, you need to use a suitable floor paint to ensure a long-lasting, hard-wearing finish. Choose a water-based floor paint that can be applied directly to wooden floorboards and concrete flooring, and directly over old paint or varnish.
Opt for a single color for a uniform look, or choose two different shades for the treads and risers for added interest. Farrow & Ball’s Joa Studholme says, ‘Alternatively, a stronger color such as Mole’s Breath (a popular Farrow & Ball shade) can be used on spindles, handrail and treads, leaving the rest of the structure in a lighter tone like Ammonite. It is best to use Modern Eggshell on all these surfaces for extra durability.’
Do you need to sand stairs before painting?
It’s really important to make sure the surface of your staircase is in as good a condition as possible before you start adding new paint to it.
Try to repair any holes or damage with wood filler, then sand down any lumps or bumps to make the surface as smooth as possible – it’s best to use a hand sander, like the Bosch multi sander, available at Amazon, for this job rather than attempting it with sheets of sandpaper.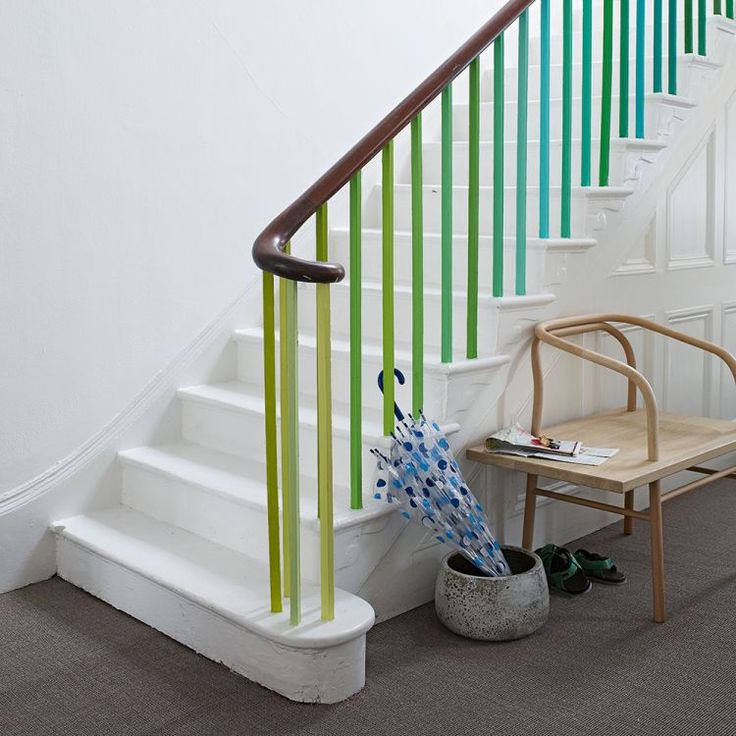
How many coats of paint do I need for stairs?
For the best results and longevity when learning how to paint a staircase, apply two coats of paint after a good quality floor primer and undercoat. To keep painted stairs from chipping, make sure you apply a clear water-based urethane varnish, like Rust-Oleum Varathane, available at Amazon.
Lindsey is Editor of Realhomes.com and Editor in Chief for Home Ecommerce at Future. She is here to give you aspirational, yet attainable ideas for your home and works with her team to help you get the best buys, too. She has written about homes and interiors for the best part of a decade for brands including Homes & Gardens, Ideal Home and Gardeningetc and isn’t afraid to take the inspiration she finds at work into her own space – a Victorian terrace which she has been (slowly) remodelling for the last eight years. She is happiest sipping a cup of tea with a cat on her lap (if only she had a cat).
Basement Makeover | Painting Stairs Black
Last year I updated our unfinished basement but ran out of steam before painting the stairs black. After a few months of walking down the old staircase, I knew it was time to finish the last basement project on my list! I decided to do a zero-dollar makeover using paint we already owned and artwork sitting in my storage closet.
Here is what our basement looked like before the makeover:
And here is that same view after the basement makeover. You can see the unfinished stairs (and unpainted wood) in this image.
Basement Stairs Before
When we brought the furniture back into the basement, the couch became stuck in the stairwell and we had to remove a few stairs to get the couch into the space. The stairwell has always had drywall, but it needed a fresh coat of paint.
The basement stairs are wood and were painted gray sometime before we purchased the property. Along with the steps needing to be cleaned and painted, the repaired stairs needed to match!
How to Paint Basement Stairs Black
Using materials that we already owned, I was determined to give our basement staircase a fresh and modern look without spending money. Our updated basement has a clean and crisp look with black ceilings, white walls, and light gray floors.
The plan for the staircase was a fresh coat of white paint on the walls and clean, black stairs. This simple color palette works perfectly with the style of the basement makeover. To add some personality to the space, I created a gallery wall with frames and photos in storage.
Step 1 | Paint the Staircase Walls & Ceiling
If you are planning on painting the ceiling and walls, tackle this before painting the stairs. If you don’t need to paint the walls and ceiling, skip to step 2.
To prepare the walls for paint, I used spackle to fill any holes in the walls. When the holes were filled, I sanded the area for a smooth finish. Using a rag and spray cleaner, I wiped down the walls to remove any dust and dirt to ensure the paint will adhere properly.
We have a good amount of flat ceiling paint leftover in storage so I decided to use it for the walls. Normally I prefer eggshell or satin finish on the walls for easier cleaning. Flat paint sheens are harder to clean compared to the glossier paint sheen options, but it’s just the basement stairwell and its free, so I am ok with it!
I painted the gas line at the bottom of the stairs to provide a little camouflage. If you paint a gas line, make sure to avoid the levers so that it can turn properly. Here is the gas line before.
And here it is after being painted. It definitely helps to blend it into the wall a bit more.
Step 2 | Clean the Stairs
Once the walls are dry, sweep the basement stairs and scrub the floor with cleaner.
I used a putty knife to scrape off any hard-to-remove dirt and gunk.
Step 3 | Trim the Edge of the Stairs with Paint
In our storage room, I found leftover black paint that is specifically for floors. A few years ago I painted our old linoleum in our laundry room in a black and white pattern and had plenty of paint leftover!
Using an angled paintbrush, I painted the edges of the steps. Once the first coat was dry to the touch, which was basically the time it took me to trim the entire staircase, I went back and gave it a second coat of paint.
The handrail for the stairs needed a little love too. I used the paintbrush to give the handrail a fresh coat of black paint. I applied a second coat once the first coat dried.
Step 4 | Roll the Steps with Black Paint
For this part of the project, I recommend painting in your socks. You will have to walk on paint that has not completely cured when painting a second coat. Figuring out the easiest way to paint the stair treads without getting stuck in the basement was a bit of a challenge. I decided to begin at the top of the staircase and used the roller to paint every stair riser and every other tread.
After 30 minutes, I went back to the top of the staircase and began applying the second coat. I painted a second coat on all of the risers and half of the stair treads.
As I worked my way down the stairs, I also applied the first coat of paint on unpainted treads. I waited another 30 minutes and gently walked on the painted stairs to give the second coat of paint to the remaining treads.
Step 5 | Apply the Clear Matte Top Coat
The product I used for the staircase requires a final clear topcoat to make the floor paint extremely durable.
I let the black paint cure for 24 hours and then applied the clear matte topcoat. The matte topcoat only requires a single coat. Unfortunately, the clear coat did not age as well as the black paint while sitting in storage. I shook the can vigorously and stirred it as best as I could, but it was still pretty chunky.
Because I couldn’t get rid of the chunks floating in the can, I only used a paintbrush to apply the clear topcoat (no roller). I couldn’t find a stir stick so I used chopsticks to stir the can before I dipped the paintbrush! Like I said earlier, my goal was to spend zero dollars and use only what we had in our home. I had to get scrappy, ha!
First, I applied the topcoat to the handrail, then I tackled the stairs.
I started at the top of the stairwell again and applied the coating evenly.
When I got to the bottom of the stairwell, I let the topcoat dry for 30 minutes. I gently stepped on the recently painted stairs and applied the topcoat to the remaining stairs. The Rust-Oleum HOME product recommends three days for the clear coat to dry. I walked on it a few hours after painting the topcoat and it held up just as well! However, I would not recommend wearing shoes or letting dogs scratch up the stairs for those three days.
Step 6 | Hang the Gallery Wall
With the entire stairwell painted, it was time to add the gallery wall. To create a cohesive look, I tried to only use black and light wood picture frames. I played around with the layout on the floor before hanging the frames on the wall.
I included sweet photos of our kids we already had printed and peppered in a few posters of places that we love. Our friend owns a print shop (D&W Elements) and sent us awesome city prints for Toledo (where we live) and Denver (where we used to live). It all came together perfectly!
I am so pleased with how this zero-dollar makeover turned out! One project that I have added to my list, however, is installing a rug runner. I realize now that all-black stairs can be intimidating for some people to walk down. My little black dog also gets quite scared walking down the black steps!
I hope you enjoyed hearing about this project as I reused items found in storage! You can easily recreate this using your own paint or purchasing various items at your hardware store.
More Budget-Friendly DIYs You Will Love
- How to Camouflage Your Electrical Meter | DIY
- How to Wallpaper Your Staircase Risers | Easy DIY
- Our Unfinished Basement Makeover on a Budget
- How to Paint an Exposed Basement Ceiling Black
- How to Paint Concrete Basement Floors Using Epoxyshield
- The Best Supplies for Painting Interior Spaces
How and with what to paint the stairs in the house: advice from professionals
Constant walking on stairs and using handrails leads to damage and rubbing of both wood and metal. The material can be protected by staining. However, in order to maximize the life of the structure, it is important to know how and what is the best way to paint the stairs.
Contents
- Necessity of painting stairs
- Requirements for dyes
- Variety of paints
- alkyd
- acrylic
- oil
- Additional components for painting
- Laki
- Refree
- Features of staining technology
- How to paint a wooden staircase
- As a result of frequent use of the structure, its unprotected surface is rubbed. Varnishes and paints create a shell on the wood, which takes on the main mechanical load;
- Even in a room with its own microclimate, wood is exposed to atmospheric phenomena such as changes in temperature and humidity. Without protective impregnation, it can crack. Also, the tree is actively influenced by the sun’s rays penetrating the house and contributing to the drying of the material.
- When placing stairs on the south side of the house, colorants should provide increased protection from ultraviolet radiation.
- Product must be suitable for wood treatment.
- When wood construction is expected to be used extensively, paint products should provide a high wear resistant finish.
- If there are any defects on the surface of the wood, it is better to cover the material with covering paint. It will provide a complete change in the color of the wood to the selected shade. The varnish will give brightness to the natural color of the wood, or, when choosing a tinting composition, it will slightly change it.
- Alkyd;
- Acrylic;
- Oily.
- Varnishes;
- Impregnations or stains.
- Fast drying;
- Creating a strong protective layer;
- Easy to apply;
- Adding shine to treated wood.
- Work with paint and varnish products of any type is carried out in conditions of good ventilation of the room.
- Staining of large areas is carried out in only one approach.
- In the process of work, the steps are painted through one. This allows you to use the ladder during the drying of the coloring compositions.
- Strokes of paint are applied along the wood fibers.
- Carry out preparatory work.
- Impregnate the material.
- Apply paint to the surface of the structure.
- Roller;
- Brush;
- Sprinkler.
- Pine and larch structure looks good when painted in red walnut or light oak;
- Birch looks more aesthetically pleasing when stained mahogany or walnut;
- The oak staircase will acquire a noble dark shade over time. However, in order not to wait several years until this moment, it is best to paint such wood in red walnut or chocolate wenge.
- suitable for outdoor, indoor use;
- withstand from -50 to +60 degrees;
- are resistant to abrasion;
- do not fade under the sun;
- wash well.
- dry about 2 hours indoors, full curing 24 hours;
- form a plastic “breathing” layer;
- resistant to mechanical stress, temperature extremes;
- do not smell;
- service life – from 7 years.
- We remove the old coating from the steps along the wood fibers with fine emery. If you need to repaint a dark tinted or varnished staircase, use a sander to remove them. Remove dirt and paint residue.
- Fill cracks and irregularities with putty. The mastic must be matched to the color of the wood so that the stains from it do not show through the paint.
- We sand the surface, remove the microparticles with a vacuum cleaner.
- Priming the base, waiting for it to dry. The primer creates better adhesion with paintwork materials, levels the surface. Some types of wood contain substances that interfere with a uniform coating. The primer protects against direct contact of materials with each other, prevents the formation of stains, discoloration of the paint. Especially carefully you need to prime the old and dense wooden base, otherwise the paint will drain from it.
- Start painting from the top step, moving down through the step. We collect a small amount of the composition on the brush, hold it at an angle of 45 degrees. The second and subsequent layers are applied after the previous layer has completely dried. If we paint with tinted varnish, we first apply a dark composition, on top – the lightest or transparent one to give depth to the natural color.
- Good adhesion to the substrate;
- Water resistant;
- Temperature resistance;
- Wear resistance;
- UV resistance of paints or varnishes;
- If the structure is located outdoors, then frost resistance is also important;
- Anti-corrosion properties (for metal stairs).
- Alkyd enamels;
- Waterborne acrylic;
- Polyurethane;
- Oily;
- Clear varnishes.
- Elasticity;
- Durability;
- Fast drying;
- Do not crack;
- Do not shrink.
- Excellent hiding power.
- Fast drying – the curing process lasts as long as the water evaporates.
- After the composition hardens, a plastic coating forms on the surface.
- Initially white, which allows you to achieve any shade by adding colors.
- The composition does not fade or fade in the sun.
- It has good moisture resistance, resistance to temperature extremes and frost resistance, so it can be used for outdoor stairs.
- Acrylic paint can be used to paint metal, concrete or wooden stairs with your own hands.
- Resistant to mineral and organic oils, acids, gasoline and oxidizers.
- Excellent adhesion to the substrate.
- After drying, a wear-resistant, elastic and at the same time hard film forms on the surface.
- The composition is not toxic.
- Does not fade in the sun.
- Has good frost resistance.
- impregnations help highlight the features of the texture, make it richer, change the shade, giving the look of expensive woods. Additional processing with transparent varnishes fixes and preserves the effect for a long time;
- opaque paints give you the opportunity to create something new. There is room for designers here, they can completely change the look of the entire structure. The most unusual ideas are embodied.
9000 Need to paint stairs
The use of paint products to paint steps and stair railings is a must. There are several main reasons for this:
Staircase painting is also necessary to give it an aesthetic appearance and create a harmonious interior.
Requirements for colorants
Before you start painting a wooden staircase in your house, it is important to choose the right colorants. The main condition put forward to the paint is its safety. However, depending on the type and color of wood, as well as the installation location of the structure, the following requirements may be imposed on coloring agents:

Coniferous trees require especially careful application of varnish compositions, since a large amount of resins does not allow the products to be evenly absorbed into the wood. You should also pay attention to the type of coverage. It is impractical to use glossy compositions to cover stairs, as they are quickly wiped off, and also highlight all the irregularities of the material.
Paint types
Several types of paints are suitable for woodworking:
All of them have both advantages and disadvantages. However, most often, when working with wood in rooms, alkyd and acrylic compounds are used.
Alkyd
After application and drying, the paint forms a water-repellent layer, effectively protecting the material from moisture. This coating is resistant to temperature extremes. Many products contain antiseptics that protect wood from pests. At the same time, one layer of the coating dries for about 8-12 hours.
Alkyd paint for stairs
The disadvantages of the compositions include their fragility. The paint does not penetrate deep into the material. Also, the compositions have a persistent unpleasant odor. Therefore, work with them should be short-term and carried out under conditions of good ventilation of the room.
Acrylic
Acrylic formulations are environmentally friendly, easy to apply and virtually odorless. The paint dries quickly and retains its appearance for a long time, even with the active use of the stairs. The advantages of mixtures include the fact that they do not create a dense film on wood. Due to this, air exchange occurs in the material. You can apply paint with a spray gun or with a regular paint brush.
Acrylic paints are environmentally friendly and almost odorless
The disadvantage of the product is its higher price compared to alkyd paint.
Oil paints
When working with wood in the house, oil paint is rarely used. Despite the economical consumption and low price, the coating does not last long. In addition, the composition is toxic, and during operation it has a strong unpleasant odor.
A layer of paint forms a dense shell that does not allow the wood to breathe. The applied composition dries in 1-2 days.
Additional components for painting
In addition to paints, other substances are used to protect and tint wood:
Impregnations often contain substances that not only tint wood, but also protect it from fire.
Lacquers
In most cases, when processing stairs, lacquers are used to create a strong protective layer. Such compositions are mostly transparent, and after drying, they completely convey the natural color and structure of the wood. Translucent varnishes provide a change in the color of wood by one or more tones.
Liquid benefits include:

Lacquer benefits include high gloss and ease of application
When finishing wood, alcohol-based lacquer is recommended. However, it is unacceptable to work with compounds intended for processing ship decks. Such varnishes are toxic. They have a persistent unpleasant odor that remains on the wood for a considerable time after the coating has dried.
Impregnations
To paint the stairs in the house, and at the same time, protect the material from parasites and the influence of atmospheric phenomena, it is worth using deep penetration impregnations, or stains. Such compositions can not only change the color of the tree by several tones. Penetrating deep into the wood, they create a breathable protective layer.
Both wax and oil impregnations can be used to paint stairs. However, to ensure the wear resistance of the coating, it is recommended to apply resinous varnish and polish over the dried stain.
Features of painting technology
For high-quality and aesthetic painting of such a structure as a staircase, it is important to adhere to the following technological rules:

Stairs should be painted along the grain of the wood
Stairs should be painted from top to bottom. Work in the opposite direction is possible only if an emergency exit is provided on the second floor.
How to paint a wooden staircase
In order to get the best finish on a staircase, it is necessary to paint the structure correctly. To do this, in the course of work, it is important to adhere to the following sequence of actions:
When working with any materials, it is worth adding another 4-5 hours to the drying time indicated on the package. And in the process of work, it is important that the microclimate in the house is comfortable and there is no high humidity or dryness of the air.
Preparatory work
The final result largely depends on how carefully and how correctly the preparatory work was carried out. So before painting it is important to consider the type of wood. For pine species characterized by increased resin production, it is important to deresin the tree. To do this, the surface of the material is carefully wiped with a 25% solution of technical acetone. When it is completely dry, it will be possible to proceed with impregnation and painting.
For any type of tree, it is important that the material is dry at the time of application of the coloring solutions. Wet wood will not allow the compound to penetrate the wood. As a result, the paint layer will turn out to be uneven and may swell from an excess of moisture.
Remove all debris from the ladder before painting and make sure the wood is dry.
In addition to resins, it is important to remove all debris from the wood. Irregularities on the surface are masked and corrected with putty.
Impregnation
Protective impregnation is applied to the stairs in a thin layer. After that, the structure should stand for 18-24 hours. After this time, a second layer of stain is applied.
The better and better impregnation is applied to the stair elements, the stronger and more reliable the wood will be. During work, all parasites and colonies of fungi are destroyed inside the material.
Painting
When using two contrasting colors in the design of the structure, the painting of each stair tread begins with applying a lighter composition to the wood. Painting can be done using the following painting tools:
Roller
can be used to paint stairs. Even if the paint is applied to steps and other structural elements perpendicular to the growth of the fibers, every last stroke should be done along the growth of the wood. This will ensure uniform distribution of the coloring composition.
Variations of colors
When choosing how to paint the stairs in the house, it is necessary to take into account the color scheme of the room. When choosing shades and colors, it is important that when painting the staircase does not merge with the floor and walls.
Closed wooden staircase can be painted with two contrasting colors at the same time. At the same time, the riser is painted in lighter shades and even white, and the tread is usually made dark. However, in this case, it is more expedient to paint the structural parts before its assembly.
When using one shade for the entire wooden staircase, it is possible to either lighten the natural color of the material, or darken it, or completely change it. You can lighten the wood with the help of translucent glazing agents with coloring light pigments. Coloring impregnations mixed with a small amount of topcoat can make the tree much darker.
But when choosing shades of coloring agents, you must also take into account the type of wood from which the stairs are made. Some shades most favorably emphasize the texture and basic color of the wood:
Of course, wood can be painted in any shade. However, to create a feeling of coziness, the structure should be painted in accordance with the colors used in the room.
How to paint a wooden staircase, what paint to paint the stairs in the house yourself, step by step, repaint, to the second floor material properties.

Decorative coatings
What kind of paint to paint depends on the material, where the stairs are installed. Manufacturers produce compositions for various materials, for outdoor, indoor or universal.
Powder coating cannot be done at home. According to the technology, spraying is done in special chambers, dried at high temperatures. The advantages of the coating are environmental friendliness, a limitless choice of colors, textures, and fast curing. The surface is almost not scratched, not subject to corrosion, retains its appearance and properties for up to 30 years.
Wooden stairs, steps, metal marches can be painted with your own hands, if you have skills in such work.
Paints, enamels, after drying, form an opaque colored layer with varying degrees of gloss. Coatings are used when you need to repaint the stairs, change the previous color, hide defects.
Alkyd enamels :

Includes antiseptic additives. It is better to take enamels based on glyptal varnish, which dry for 6-24 hours, retain their color and properties for up to 15 years. After drying, the coating may become darker (by a quarter of a tone), so test it on a small area.
Acrylic Paints :
For places with high humidity use compositions with antiseptic additives, corrosion protection components.
Polyurethane One-Part Compounds are suitable for wooden ladders installed in wet conditions (cure after 48 hours). Two-component polyurethane paint is stronger than one-component, so it is correct to paint marches with high traffic with it. The covering is steady against acids, alkalis, oil, is not afraid of frosts and humidity. When mixing the components, you need to accurately calculate the volume so that there is no excess material left. Residues lose their properties after 6 hours, they can no longer be painted.
Oil paints are rarely used, mainly for pine stairs, where oil coatings adhere better than others, or as an inexpensive finish for country marches.
Compounds can be tinted. For proper tinting, you need a computer program, special equipment. If you choose the color yourself, adhering to the manufacturer’s tinting system, the masters advise you to immediately make the right amount of the composition. Even repeating step by step all your actions, you can not guess what color will turn out.
Clear lacquer emphasizes the natural beauty and texture of wood, tinted – slightly changes the shade and depth of color. Oil and resin varnishes penetrate deep into the wood structure. Polyurethane – when dried, they form a durable film that is resistant to moisture, aggressive substances.
Oak, ash and beech do not need color coatings – it is better to paint the stairs with oil or wax, which penetrate deep into the structure of the tree, emphasizing the natural color and texture. Oil protects wood from moisture, mold, fungus, bugs, improves the appearance of the surface, increases its wear resistance.
Stain is used for toning. An additional layer of varnish is applied over the water-based coating. Alcohol stains are difficult to achieve a uniform color.
How to paint a wooden staircase step by step – tips
To preserve the pattern of a wooden staircase, it is better to use a matte or glossy varnish.
Inside the house, paint with odorless or quick-drying compounds.
The manufacturer indicates on the can how to use the paint correctly, what material consumption per 1 m2. In this case, you yourself need to take into account the breed, the condition of the wood. The paint lays unevenly on the surface of the pine, so you need to apply several layers. If you paint a wooden staircase immediately after its construction, the consumption of paintwork materials will increase – the open pores of the wood intensively absorb the compositions.
Stains, paints can be applied with a spray gun or brushes of various widths and shapes. The viscous composition for the first layer needs to be slightly diluted in order to be better absorbed.
Step-by-step instructions for painting wooden stairs:
 Some types of wood contain substances that interfere with a uniform coating. The primer protects against direct contact of materials with each other, prevents the formation of stains, discoloration of the paint. Especially carefully you need to prime the old and dense wooden base, otherwise the paint will drain from it.
 selection guide, video and photo
Stairs are very sensitive to negative environmental influences. means that also have a negative impact on them. Therefore, in order to extend the life of the structure, it is necessary to protect its surface with a reliable coating.
The most reliable and proven method of protection is painting. Moreover, every staircase needs it, regardless of the material from which it is made, whether it be metal, wood or concrete, since they all have their own weaknesses.
Painting stairs with a brush
However, in order for painting to really cope with the tasks assigned to it, it is necessary to choose the right type in each individual case, since there is a large range of coatings on the market and they all differ in their properties. This article is devoted to this topic.
Basic paint requirements
When choosing a paint, first of all, you should pay attention to the material from which the ladder is made, in what conditions it is operated, what requirements are imposed on the coating, and what kind of design you want to end up with .
As a general rule, a stair coating should have the following properties:

Painting a metal staircase on the outside
In addition, other requirements are sometimes imposed on paints, for example, flame retardant properties are sometimes important. In this case, specialized compositions are used, such as fire-retardant paints for metal Polistil.
Types of paints
So, today, as a rule, the following types of paintwork are used for painting stairs:
Of course, there are other types of coloring compounds, however, the above types are the most popular lately. Now let’s take a closer look at the features of these coatings.
Alkyd enamel for wood and metal
Alkyd enamel
This type of dye is one of the most versatile. Do-it-yourself painting of stairs with alkyd enamels can be done, regardless of the type of material from which the structure is made.
In addition, the coating has some other advantages, in particular, these enamels are distinguished by their decorative properties – the painted surface acquires a bright glossy finish.
These compositions are based on alkyd varnish, to which various solvents, fillers and coloring pigments are added. The filler is usually granite or marble chips, as well as quartz sand. It should be noted that the filler is much finer than ordinary sand.
Alkyd enamels of different colors
Sometimes manufacturers add additional substances to the paint that give it one or another property. For example, antiseptics may be included in the composition to protect wood from the formation of fungus and decay.
In addition to meeting all of the above requirements, these coatings also have the following properties:
Thus, alkyd enamels are an excellent protection for metal, wood or concrete surfaces. Moreover, the painting of the stairs can be performed both indoors and outdoors.
The only disadvantage of the coating is a strong toxic smell, which gradually decreases as the paint dries.
Tip!
White spirit may be used to thin thickened alkyd enamels.
Acrylic wood paint
Acrylic paints
Water-dispersion acrylic paints have been the most popular lately. Their main advantage is environmental friendliness. The composition is completely odorless, since ordinary water is used as a solvent, and acrylic resins act as a connecting link.
Thanks to this, before painting the stairs in the house, your loved ones do not even have to leave the house.
In addition, acrylic compounds have other advantages:

Acrylic paint for metal
Please note!
Before buying acrylic paint, you should clarify the scope of its application, since usually these compositions are highly targeted.
This information is contained in the instructions on the packaging.
Polyurethane Coatings
Polyurethane coatings are also very popular and can be used on both wood and metal surfaces. Due to their good resistance to mechanical stress, the painting of flights of stairs is usually carried out with these compositions.
When the paint, which is based on polyols and hardeners, dries, the painted surface forms a durable coating that is highly resistant to weathering. Due to this, polyurethane compounds can be used for outdoor work.
Polyurethane paint for metal
Other advantages of the coating include the following points:

Therefore, if the staircase will have high traffic, you can opt for polyurethane paints.
Tip!
Zinga electrically conductive paint is also an excellent option for coating outdoor metal stairs.
It provides a high level of corrosion protection and a long service life.
Oil paint
Oil paint
This type of paint is used less and less, as it was gradually forced out of the market by more “advanced” compositions, which we discussed above. But, despite this, and now you can find the use of oil paint. For example, pine stairs can be painted with such a composition, especially if you are not sure that the wood has dried well.
This is due to the fact that the oil paint and the resin emitted by softwood have almost the same composition, so the coating will adhere well, unlike many other paints. In addition, oil paint can cover the outer, metal structure.
True, before painting a metal staircase, it must be treated with a primer so as not to encounter corrosion in the near future. Another advantage of these paints is their low price. They are much more affordable than the above types of finishing coatings.
In the photo – the stairs are covered with transparent varnish
Transparent varnishes
Finally, it must be said that when processing wooden stairs, transparent varnishes are very popular. Like paints, they can have different characteristics that you should pay attention to when buying. In addition, some of them contain pigments, which allows you to give the surface a certain shade and emphasize the grain of the wood.
Wood varnish
Conclusion
Today there is a large selection of paints, which allows you to choose the composition in accordance with all the requirements that apply to the coating. Therefore, before making a choice, it is necessary to think carefully about the operating conditions of the stairs.
The right choice of paint will significantly extend the life of not only the finish, but also the structure itself. Additional information on this topic can be obtained from the video in this article.
Add to favorites
print version
The choice of paint and technology for painting wooden stairs inside the house
Painting
8 442 views
10 min to read
For the manufacture of stairs in individual houses, wood is most often used. The material is quite easily processed, it is given any shape. The surface retains its original properties for a long period. Flights of stairs usually occupy a central place in the building and serve as decoration of the premises. They focus on the main attention, create highlights and produce coloring that can highlight the most spectacular elements.
The choice of coating methods and coloring materials is quite an interesting task. The paint for the wooden stairs is selected by the owner of the building and the performers.
Paint for wooden stairs
What can and should be used to coat a wooden staircase
Several types of paint and varnish coatings are used to give the flight of stairs a finished look:
Wood varnish
Attention! If there is no coating on the treads, then the wear of the outer layer can go quite intensively. Unprotected wood, even hardwoods, are abraded by shoes and carried particles of sand and dust. They penetrate between the slats, dramatically worsening the appearance of the product.
 After a few years of intensive use, wear can be observed: in some places, the surface layer loses its original state. The paint coating gives active protection for many years to come.
 Paints
Painting balusters
Several types of colorants are currently used to provide an opaque finish. The concept of oil paint has long been gone, although some still sin with similar names. Paint for a wooden staircase in a house can be alkyd, acrylic or thicker.
Alkyd enamels are based on organic solvents. They contain:
- pigments that set the desired shade;
- solvents are substances that keep the working mixture in a liquid state. The most commonly used is butyl alcohol. It evaporates pretty quickly. In most people, vapors do not cause allergic reactions;
- bonding materials. In finished formulations, they are dissolved in alcohols or similar liquids. As the solvents dry, polymerization occurs. At the end of the process, a strong film is formed;
- fillers are inert ingredients. They contribute to the formation of a thick and durable film. Most often, chalk or quartz sand crushed to a powder state is used. The presence of filler contributes to better hiding power of alkyd enamel.
 They contribute to the formation of a thick and durable film. Most often, chalk or quartz sand crushed to a powder state is used. The presence of filler contributes to better hiding power of alkyd enamel.
 Alkyd paints are produced:
- for indoor use. These compositions use fillers that can swell in a humid environment. They are cheaper, but when used outside, they quickly lose their properties;
- for outdoor and indoor use. Such compositions do not absorb atmospheric moisture. The pigments included in the composition retain color saturation under the influence of ultraviolet light. The layer of paint resists temperature changes, as the binders remain elastic for several years.
Acrylic paints contain resins obtained by grinding acrylic resins. Such paints and varnishes are made water-dispersed. If necessary, they can be partially diluted with plain water.
These paints have a wide variety of fillers. Some, for example, latex, after painting and polymerization, can change the geometric parameters: stretch and shrink.
Painting stairs with acrylic paints
If you want to get an opaque finish, this will be the best paint for a wooden staircase. Its positive characteristics are:
- no smell during painting;
- high drying speed. After two or three hours, the layer is completely polymerized. After 6-8 hours, a fairly dense film is formed that can withstand abrasion and mechanical stress;
- forms a vapor-permeable coating. Air circulates through the paint layer;
- the user has the widest palette of shades. You can use white paint as a base, and then get the desired shade by adding the desired pigment. If necessary, use several different colors (usually no more than three, so as not to get dirt).
Wood paint RENOTON
Thick paints are made by mixing drying oil and pigments. Chalk is added as a filler. Usually this path is chosen if it is necessary to save on paint materials.
- Inexpensive drying oil is used.
- Add chalk.
- Pour in the coloring pigment.
- Then the paint is kneaded on special mixer grinders.

For a couple of hours of operation of the unit, several hundred kilograms of finished paint are obtained. For painting stairs, you can try similar compositions. But you should know that such a coating will not last long. In two or three years, the paint layer will be destroyed.
Lacquers
Lacquered stained wooden stairs
Varnishes are transparent and tinted solutions, after polymerization a film is formed. They can be:
- Matt. Surface will not reflect light that hits the surface;
- Glossy. Any beam hitting a machined surface will be completely reflected from it;
- Semi-gloss. Partially hit rays will be absorbed by the painted surface. Part of the light will be reflected.
As a basis for creating varnishes, use:
- Alcohols . Such coatings create reliable protection against dampness and biological damage by insects and fungi. Quite often, when creating multilayer protection, alcohol products are used as a primer. Subsequent layers will adhere more firmly to the surface.
 Quite often, when creating multilayer protection, alcohol products are used as a primer. Subsequent layers will adhere more firmly to the surface.
 Types of varnishes from St. Petersburg manufacturer Novbytkhim
- Alkyd and alkyd-urethane varnishes are created on the basis of aldehydes soluble in organic solvents. They have a slight cream or pale yellow tint. They form fairly strong bonds with wood, since some of the components penetrate into the pores of the base. Such transparent layers work well not only indoors, in the open air they are able to protect the tree from external influences for up to ten years.
Alkyd-urethane enamel for wooden stairs and floors
- Formaldehyde varnish has very significant wear-resistant properties. There are not only binders here. The presence of transparent resins contributes to the formation of a thick, durable and elastic film. Unfortunately, such materials have a persistent odor that persists for a long time.

Lacquering of stair elements
- Polyester lacquers are a two-component composition. They harden only in the presence of a hardener. Therefore, resin and hardener are mixed before use. The resulting consistency in a day at a temperature of 20 ⁰С or more will turn into a dense transparent mass.
Varnish PF-283
- Epoxy varnishes are also a two-component solution. The base contains resin. The hardener promotes rapid curing. It should be remembered that most hardeners are toxic. But once the polymerization is complete, the toxicity rapidly decreases. Harmful substances enter into chemical reactions and are completely converted into water-insoluble components. The mechanical strength of these compounds is the highest. However, the price often deters potential users.
Lacquered hardwood stairs
- Polyurethane lacquers are one-component structures. There is a feature, they acquire their strength in the presence of water. It is a catalyst to start the polymerization process. The setting speed surprises ignorant specialists. It often takes only a few minutes from the moment the varnish is applied to complete the process. But the layer thickness should be minimal. If this condition is not met, foaming of the structure is possible, the quality will be lost.
 It is a catalyst to start the polymerization process. The setting speed surprises ignorant specialists. It often takes only a few minutes from the moment the varnish is applied to complete the process. But the layer thickness should be minimal. If this condition is not met, foaming of the structure is possible, the quality will be lost.
 Yacht lacquer
- Yacht lacquer is based on butyl alcohol. The existing binders form a fairly strong film. It is insoluble in fresh and salt water. This is an expensive product, but professionals often choose it.
Impregnations and stains
Stains and stains are tinting solutions. They are created on a water, alcohol or alkyd basis. The difference from varnishes and paints is that there is a binder and a pigment. There are no fillers.
The main color palette of stains
Some craftsmen use not only well-known stains for work, they prepare their own solutions. Some experts prefer to take a solution of iodine in alcohol. Dilute it in water, achieving the need for saturation.
Others make tinctures of willow or oak bark. Soaking the bark for several days, they achieve the release of tannins. It turns out a dark brown solution that persists and does not fade for a long time.
To obtain the desired shade, the necessary stain is selected, and then applied to the surface of the wood. Use swabs, brushes or rollers.
Color recommendations
There are no uniform and general requirements. But you need to remember that stairs are used to move between floors. A person must clearly see the steps on which he has to walk, rising or falling on flights of stairs.
Tinted staircase
If quality wood is used, then there is no point in hiding it under a layer of paint. In inexpensive designs, it is possible to use inexpensive types of wood. Separate fragments can be assembled from small elements. Then apply an opaque coating.
In rooms where children are present, bright colors are used to paint stairs. Toddlers like to stomp on the steps, painted in different colors.
There are some general guidelines for painting with different colors.
- Start coloring with the lightest shades: yellow, pink, orange, light blue. More saturated colors are applied on top of light colors or next to them.
- Obtaining a dark shade is achieved by impregnation over light paint. The stain will definitely go inside the pores of the wood and give a darker color.
- Clarification is achieved using acids: citric, malic, acetic. It should be remembered that only solutions are required in which no more than 0.5 … 3.0% of acid is present. At a higher concentration, the destruction of the paint layer is possible.
Softwood stairs treatment
Softwood contains a significant amount of resins. It happens that the resin begins to stand out on the surface of the product.
To avoid this, the resins are washed off. Strong solvents are used here. Usually they are prepared on the basis of acetone.
- Dissolve about 100 ml of acetone in hot water (about 1 liter, temperature 60-70°C).
- Add 100 ml alcohol or 200 ml vodka (do not drink!).
- 50…80 g slaked lime.
- Mix everything.
- Then treat problem areas with this solution.
Usually the projecting resin dissolves in a complex solution. After removing the resin, rinse with cool water, allow the wood to dry.
The better to paint a pine staircase
Pine is a soft wood. Often it has a light texture. To enhance the existing pattern, impregnations can be used. Then a pine board may seem like a walnut, oak or other expensive tree.
Toning varnishes from Pinotex
The use of varnish (especially matte types of varnishes) gives the product a very spectacular look. Shiny coatings often do not allow you to see all the delights of a beautiful texture.
Some craftsmen brush wood, artificially giving it the look of an old product.
Should stairs and hardwoods be painted? The presence of a varnish coating will only improve the conditions for the operation of wood.

If possible, expensive types of varnishes are used. Products will last longer if you do not save when creating them.
Attention! If you want several generations to run up the stairs for a hundred years or more, use yacht varnish.
Epoxy varnish, two-component
In order to do the job well, you can invite specialists. Home craftsmen do this work with their own hands.
Preparatory work
- First remove all existing debris.
- If necessary, rinse steps and elements of flights of stairs.
- Dry.
- Assess the need for filling and sanding. If necessary, they are performed.
Prepare the surface for finishing work.
Attention! If puttying is performed, then you will have to wait at least 48 hours for the solution to fully set. Then, the excess is removed with abrasive materials and the surface is ground. It happens that such operations are performed several times.

Overpainting
For opaque finishes use pre-priming. Acrylic or alkyd primers will be very convenient here. They penetrate quite deeply into the wood and form strong adhesive bonds.
Subsequent paint will adhere firmly to the surface.
Apply by roller or brush. The roller makes it possible to quickly and evenly apply an even layer on steps and risers. It is convenient to paint balusters and railings with a brush.
For good coloring, the layer must be applied twice. The second staining is performed only after the previous layer has completely dried.
Lacquering
Before lacquering, small pieces are checked to see how each lacquer behaves. What shades are the most attractive.
Lacquer is applied cold and hot. Some types penetrate better if they are preheated to a temperature of 50 … 60 ⁰С (alkyd and alkyd-urethane). Of course, the process becomes more complicated, but the penetrating ability increases several times.
Some masters do not heat the varnish, they warm up the treated surface. Here you need not to overheat. Do not allow boiling in the surface layer. With the help of a hair dryer, heating is carried out to a temperature of 60 … 75 ⁰С.
Apply with a brush, roller, swab or spray. Everyone may have their own preferences.
Attention! When varnishing, the room is closed from the ingress of foreign objects and dust.
Most varnishes are harmful to the human body, so safety precautions must be observed:
- use gloves;
- wear respiratory protective equipment;
- Use safety goggles if necessary.
The first stage of drying is carried out with doors and windows closed. Dust particles or insects can damage the surface of the stairs. Only after drying until adhesion has ceased can the room be opened so that solvent vapors can escape.
Video on painting wooden stairs
 youtube.com/embed/-4jQ9oXCrTg?feature=oembed” frameborder=”0″ allow=”accelerometer; autoplay; encrypted-media; gyroscope; picture-in-picture” allowfullscreen=””>
Content
- 0.1 than you can and should be covered with a wooden staircase
- 0.1.1 Paints
- 0.1.2 Lucky
- 0.1.3 Survation and stains
9000
- 0.2 recommendations of recommendations by choice of color
- 0.3 Treatment of softwood stairs
- 0.3.1 What is the best paint for pine stairs
- 0.4 Should I paint hardwood stairs
- 1 Coloring technology
- 1.1 Preparatory work
- 1.2 Paint coverage
- 1.3 Lacca coating
- 1.3.1 Video on painting wooden stairs
How and what to paint the stairs to the second floor: Ideas and Instructions
Contents
- Tips for choosing a coloring agent
- What can and should be applied to a wooden staircase
- Paints
- Varnishes
- Morilka
- Recommendations for the choice of color
- Processing stairs of coniferous rocks
- The better to paint a staircase of pine
- Stual staircase instructions
- Stylish staircase options in the interior
9000
Any staircase structure from time to time from time to time needs a cover upgrade. And given that the staircase is also an element of the interior, it is extremely important to choose the right paint and varnish. Consider the most popular paintwork materials, and also analyze how to paint the stairs to the second floor without involving specialists.
Tips for choosing a coloring agent
Before you start to act, you need to mentally draw a picture for yourself, which should turn out in the end. This will help you choose the right paint or varnish. When choosing a product, you should also take into account the advice of professionals:
- If your staircase is made of high-quality wood with a beautiful natural pattern, then you should not paint over it. It is better to emphasize this advantage with a semi-gloss or matte varnish.
- Do not use primers to avoid damaging the texture of the wood. Buy “light” types of paints that allow the material to “breathe”.
- For indoor staircases, choose products that dry quickly and do not leave a persistent and pungent odor.
- Long-term protection of the stairs from external influences, as well as its beautiful appearance, can be ensured using only abrasion-resistant varnishes and paints.
- Use additional protection against fungi, mold, insects for processing.
- Steps are not recommended to be covered with glossy enamel. Otherwise, you will not walk on them, but slide.

What can and should be done to cover a wooden staircase
When you enter a building materials store, you start to get lost. Therefore, it is important to know not only the types of these products, but also their features. The most common options for paintwork for painting stairs are:
- paint;
- varnish;
- impregnations and stains;
- oil.
Paints
Today there are 3 types:
- Alkyd. These enamels are non-toxic. Their advantages are that they dry in a short time and protect the wood from fungi, mold due to the presence of antiseptics in the composition. A ladder covered with alkyd paint is not afraid of any mechanical damage. In terms of cost, these dyes are quite democratic and have a wide range of colors.
- Acrylic. Their advantages are the absence of a pungent odor, high drying speed, non-toxicity, long service life, wide palette of shades. Acrylic coating does not fade in the sun and allows the material to “breathe”.
- Oily. This type of paint for a wooden staircase in a house is not ideal. The advantages include low cost and low cost of funds. The reverse side of the medal is low wear resistance, the presence of harmful substances in the composition, and a long drying time. In general, we do not recommend.
 A ladder covered with alkyd paint is not afraid of any mechanical damage. In terms of cost, these dyes are quite democratic and have a wide range of colors.
 Varnishes
Varnishes are used to enhance the natural beauty of wood. When choosing the appropriate type, pay attention to the features of the material of construction and the conditions of its operation. Lacquer coatings, like paints, come in several varieties:
- Alcoholic. This coating protects the stairs from biological and mechanical damage. But its significant drawback is the low degree of moisture resistance. Therefore, it is better to use it as a base layer, to give the tree the desired shade.
- Alkyd and alkyd-urethane. They are used for outdoor and indoor structures. A hard transparent film with a subtle tint serves as a reliable barrier against moisture and other negative factors.
- Formaldehyde. The design will become more resistant to wear. The resins included in the composition improve the adhesion of the varnish to the wood. The only drawback is toxicity and a characteristic odor that quickly disappears, but requires wearing a respirator during application.
- Polyester. After hardening, they form a solid, durable film that protects the stairs from moisture and other negative influences. If you want to make your design shine, use polyester varnish.
- Epoxy. These are two-component solutions that are used with hardeners. They prevent the destruction of the structure under the influence of moisture, alkalis and provide it with mechanical strength.
- Polyurethane. They are distinguished by a high degree of wear and resistance to mechanical stress. The high price of varnish is justified by a long service life and high performance.
- Yachting. Hard and durable lacquer coating has good elasticity. This means that when the structure is deformed, the varnish layer does not peel off or crack. Due to its composition, yacht varnish is distinguished by wear resistance, good resistance to fungi, increased resistance to UV rays, and moisture resistance.
 This coating protects the stairs from biological and mechanical damage. But its significant drawback is the low degree of moisture resistance. Therefore, it is better to use it as a base layer, to give the tree the desired shade.
  They prevent the destruction of the structure under the influence of moisture, alkalis and provide it with mechanical strength.
 Mordants
This type of impregnation is characterized by antiseptic properties. Lacquer is often applied over the stain as an additional layer. But at the same time, you need to pay attention to the compatibility of these funds.
Under the influence of the stain, the natural color of the wood becomes more saturated, and the texture of the wood becomes more contrasting.

Wood stairs are best treated with an oil or wax based impregnation. Sometimes the composition of the stain may include a dye that gives the material a certain color.
Color recommendations
The palette of possible colors is very diverse and depends on the taste preferences of the owner of the house or cottage. But first of all, you need to build on the style of the interior.
Staircase can be of any shade, from muted to bright radiant colors. But most often they prefer a monochromatic color.
But sometimes there are more original designs, including up to five shades. They often experiment with contrasting colors, painting steps in one tone, and railings and handrails in another. It looks very impressive and unbanal.
In order to avoid mistakes when choosing a color, the following recommendations should be taken into account:
- when using several colors, it is recommended to paint each part before assembling the entire structure;
- to get a dark shade of the stairs, mix the impregnation with the top coat. This will allow the product to penetrate into the structure of the material, which will ensure the preservation of the color of the product for a long time;
- to lighten wood, translucent glazing compounds with light coloring pigments are used.
 This will allow the product to penetrate into the structure of the material, which will ensure the preservation of the color of the product for a long time;
 Processing of softwood stairs
Pine stairs differ from beech, larch, oak or other types of wood in that they require additional processing.
Before finishing a pine wooden staircase inside the house, it is necessary to deresin it for a number of reasons:
- The resin substance protruding from the wood forms a film on the surface of the material, which prevents the paint from penetrating into the fibers. As a result, layers of paint during operation will break off, worsening the condition of the stairs.
- Resin areas begin to darken over time.
- Coloring substances are deposited unevenly on the resin surface.
Resin removal refers to the process of removing excess resin from a surface. To carry out this procedure, you will need solvents.
For conifers, a 25% acetone solution is ideal. A brush is used to apply it. The surface of the material treated with the solution is washed with warm water and allowed to dry completely. If there are very tarred places on the structure, they should be removed with a knife. The recesses obtained as a result of this are leveled with putty.
To prepare the deresining solution, you need the following ingredients:
- 1 liter of hot water;
- potash – 50 g;
- baking soda – about 50 g;
- grated soap – 40 g;
- acetone – 1 glass;
- alcohol – 10 g.
Pine wood stairs are painted after the wood is completely dry. As a rule, 1-2 days are enough.
The better to paint a pine staircase
- Enamel paints, as well as alkyd and polyurethane yacht varnishes are considered to be the optimal means for coating a pine flight of stairs.
- To preserve the beautiful structural pattern of wood, diluted products are used.
- To hide defects in the material or give it a new shade, the paint is not diluted before application.
- In order for the colorant to lay down in a beautiful even layer, the surface must be cleaned of debris and dust.
- Pigmented dyes are used to mask defects on steps.
- For previously painted structures, use urethane-alkyd solutions.

Step-by-step instructions for painting stairs
Sometimes specialists from construction companies are used for painting. Of course, they know their business and do the work 100% efficiently, but you will have to fork out a lot for their services.
If you are not ready for this, then you can do everything yourself. Just be extremely careful and follow the instructions clearly:
- Before starting work, remove debris, dirt, wipe off dust not only from the structure, but also from the room in which it is located.
- Repair existing chips and cracks with wood putty.
- Let the putty dry completely for 1 day, and then smooth out any imperfections with sandpaper or a sander.
- Clean up debris and dust, as even the smallest dust particles will spoil the appearance of the stairs.
- Apply 2 coats of primer or stain to stairs at 24-hour intervals.
- Before applying the paint to the surface of the material, it must be mixed well – this will allow you to break up the clots and lumps formed there.
- Can be applied with a spray gun, roller or brush. Avoid the formation of hardened droplets of paint.
- To prevent cracks from forming on the stairs when the dye dries, the air in the room should be moderately humid.

If you are only going to varnish a fresh structure, you do not need to prime the wood. However, if we are talking about an old staircase, then a primer is still necessary. The varnish is applied in at least three layers.
 At the same time, the product is covered with a new layer after the previous one has dried. Read a detailed article about varnishing stairs.
 With these simple steps, you can easily update the stairs.
Stylish options for painting stairs in the interior
How to paint a wooden staircase in a house to the second floor
Practically in every private house today you can find stairs to the second floor. It is one of the main structural elements of the house and, in addition to the functional load, is of great aesthetic importance. However, due to heavy loads, the wooden staircase gradually loses its attractive appearance. If the wood is not processed in time with special compounds and paints, its structure may collapse, and the frame and steps will become unusable. When the need arises for painting, the questions of how to properly and most importantly how to paint a wooden staircase in a house to the second floor come to the fore. If the wrong tool is chosen or the painting is poorly done, this will affect not only the appearance of the stairs, but also its functional characteristics. 9Ol000
- 4.1 Preparatory work
- 4.2 Painting stairs
Need to paint stairs
Stairs inside the house are constantly exposed to both physical and mechanical stress. The quality of wood is negatively affected by temperature and humidity changes in the room, the sun’s rays falling on the steps contribute to the drying of the wood. All these factors lead to wear of the ladder elements.
Particularly affected are steps, spans and handrails, which get dirty and worn out due to the constant walking of the inhabitants of the house. Therefore, a wooden staircase cannot stay for a long time without appropriate processing and painting.
Requirements for coloring agents
The wooden staircase to the 2nd floor is located indoors, therefore, only products intended for interior work, which are safe, do not emit odors and toxins, are suitable for painting the structure.
To determine the best way to paint a wooden staircase with your own hands, you need to take into account the following factors:
- What breed is the staircase made of. Coniferous trees emit resins, which impairs adhesion with paints, in addition, the needles absorb varnishes and paint inhomogeneously, so several layers are required. Larch is a more plastic breed, and if there are no knots on it, it is very convenient to work with.
- Wood colour. When choosing what color to paint the stairs, it is worth considering the fact that the varnish retains the natural pattern of the tree, and in order to visually emphasize the beauty of the wood, it is advisable to choose a tone that is close to natural. Covering paint completely hides the wood underneath and forms a monolithic coating of a different color. Under the paint it is easier to hide small defects and irregularities.
- Location of the ladder structure. If it is located on the south side and is constantly under the sun’s rays, it is necessary to choose products that have increased UV protection.
- Ladder load. If the staircase to be painted is the main one in the house and it is used frequently, it is necessary to choose wear-resistant products.

If the question is how to paint the wooden steps of the stairs: glossy or lacquered, then, as a rule, the choice falls on matte or semi-matt dyes, which are more practical. The glossy coating is very quickly erased and loses its appearance.
Paints for wooden stairs
To give the staircase a finished look, you can use different types of coatings, which today are presented in a rich assortment:
- varnishes
- paints
- enamels
- impregnations
Varnishes
Clear varnishes create a transparent film on the surface that emphasizes the beauty of the wood pattern. There are also varnishes, which include coloring pigments, these products only slightly tint the surface.
- Water-based clear acrylic lacquers are non-toxic and safe. However, they do not withstand mechanical loads well and are subject to abrasion, so they are best used for painting small ladders and are not recommended for use on stairs with a high load intensity.
- Clear lacquers based on alkyd resin are well suited for wooden stairs. They form a transparent and water-resistant coating, so they are suitable for use even in damp areas.
- Oil varnishes are tinting varnishes and are used in cases where they want to change the shade of wood. An important parameter is the percentage of oil in the composition of the product. You can paint stairs if the varnish contains at least 65% oils. If 50% or less, then the agent can only be used for the primary coating, on which it is necessary to apply the finishing layer of another varnish.
- An excellent coating for stairs are polyurethane varnishes, which are resistant to temperature extremes, humidity, and abrasion. However, this coating may turn yellow after a while.
 However, they do not withstand mechanical loads well and are subject to abrasion, so they are best used for painting small ladders and are not recommended for use on stairs with a high load intensity.
 Paints
To cover the stairs to the second floor, you must use paints intended for interior decoration. To determine which paint is better to paint a wooden staircase, let’s take a closer look at their characteristics:
- One of the most popular are alkyd dyes. In addition to the coloring pigment, their composition includes antiseptics that protect the tree from the appearance of pests, fungus and mold.
- Acrylic paints are based on acrylic resins. They dry quickly, have no smell, do not interfere with the air exchange processes of wood, and retain their original appearance for a long time.
- Oil paints have a rich palette of colors, are distinguished by economical consumption and good covering ability. However, if the wood is painted with this paint, it loses its ability to “breathe”, in addition, the paint is quickly erased.
Enamels
Enamels have a denser texture than paints. They are based on two components – a colorless varnish and a coloring pigment. Enamel creates a durable color film on wood, which is distinguished not only by excellent decorative characteristics, but also has good protective properties. It protects wood from ultraviolet radiation, moisture, high temperatures.
Impregnations
Impregnation is a pigmented liquid that gives the wood a certain shade. The composition also has antiseptic and fire retardant properties. On top of the impregnations, a varnish coating can be applied. Wooden stairs are best treated with wax and oil based impregnations. They lay down well and are distributed over the entire surface in an even layer.
Do-it-yourself staircase painting
Many people are concerned about the question: how to paint the stairs in a wooden house? To create a beautiful and durable coating, it is necessary not only to choose the right coloring agent, but also to prepare the surface well. A wooden staircase, like any other wooden surface, requires careful preparation.
Preparatory work
Preparing the stairs consists of the following steps:
- If the stairs are made of softwood, excess resin must be removed before painting, which prevents the absorption of paint. There are special tools designed for this purpose.
- If there is an old paintwork, the stairs must be treated with a remover, and then remove the swollen paint with a spatula.
- The main structural elements are sanded first with coarse-grained and then with fine-grained sandpaper. You can use a grinder with a grinding nozzle. Initially, the surface is treated with an abrasive No. 60-80, then a nozzle No. 120-150 is used. Steps, railings and spans need to be sanded especially carefully – places that are rubbed faster than others and lose their appearance.
- After cleaning the surface of wood dust, it is necessary to putty all existing cracks and cracks. Putty is desirable to choose the color of the wood. If the gap is deep enough, you can close the hole with a piece of wood previously lubricated with PVA glue.
- Next, finish polishing with fine sandpaper. After grinding, you should get a perfectly smooth surface without knots and bumps.
- A primer is applied to the treated and cleaned surface with a roller or brush. A day after the first layer has completely dried, the staircase is re-treated with an antiseptic primer.
 There are special tools designed for this purpose.
  A day after the first layer has completely dried, the staircase is re-treated with an antiseptic primer.
 Staircase painting
Traditionally stairs are made in one color, the surface can also be painted in two colors. But in any case, the first layer, which covers the entire staircase, should be plain.
The stairs are painted from top to bottom. First, large areas are painted – steps, railings and stringers. If you need to use it, you can first paint not all the steps, but after one, and after drying, paint the rest.
If you have already got burned with a contractor and you need free legal advice under a work contract, we recommend that you contact our partners at Help Consulting.
Before applying the dye, it must be mixed well. If the paint turned out to be very thick, it can be slightly diluted with a solvent.
Thick paints adhere better with bristle brushes. Liquid products are best applied with flutes. When painting with a brush, it must be held at an angle of 45 degrees to the surface.
The stairs are painted in 2-3 layers. In some cases, at least 5 layers are required for a high-quality coating. A new layer is always applied after the previous one has completely dried.
Painting Options
We cannot display this gallery
DIY Mistakes
When painting a staircase with your own hands, it is not always possible to achieve a good result. And this is not surprising. Many home masters, having no experience and skills in coloring, carry out work in violation of technology, do not carefully prepare the surface, and apply coloring agents incorrectly. Because of this, quality suffers, the coating wears off very quickly and loses its original appearance.
The staircase is the main decorative and functional element of the house, which is constantly subjected to heavy loads. Even minor errors in coloring lead to a reduction in the life of the stair covering.
Professional staircase painting
Wooden staircase painting services include all the required surface preparation steps: sanding, puttying, priming and applying several layers of the chosen colorant.