Path brick: How to Build a Brick Walkway in the Garden
Brick Walkway: Learn How to Lay Your Own in 8 Steps
Project details
Skill
3 out of 5
Moderate
Requires stamina for digging and pounding, as well as an attention to detail
Cost
$2 to $15 per square foot
Estimated Time
Two 8-hour days
When crossing your muddy yard to fetch the daily paper turns into an obstacle course of slips and slides, perhaps it’s time to think about an alternative path — literally. How about taking a weekend to lay a brick walkway? The formal pavers will not only provide a clean and sturdy lane for visitors approaching your front door, but they’ll also add style to your landscape and value to your home.
As This Old House senior technical editor Mark Powers shows, in just one weekend you can turn a swath of dirt into a ribbon of elegance, able to withstand anything from a winter gale to a summer lawn mower.
Brick Path Layers: An Overview
Illustration by Gregory Nemec
Creating a successful path that can survive the elements depends on three things: the bricks, the border, and the base. For the bricks, choose ones that are rated for severe weather (SW), often referred to as “clay pavers.” These will not only stand up to the seasons but will also take a lot of foot traffic without cracking.
Brick Size
The size of the bricks is determined in part by the pattern you choose. Modern “modular” brick measures 8 by 4 inches, and a well-designed walkway is between 3 and 4 feet wide (allowing two people to walk side by side). There are also old-fashioned “standard bricks,” whose length is more than twice ¼ inch between—the tighter the better.
Brick Walkway Border
An integral part of every pattern is the border that keeps the bricks in place. Temporary 1×4 guide rails can hold everything in as you lay the bricks. But you still need a permanent border, traditionally created by bricks turned on end.
If they are positioned on their short ends (this is called a “sailor course” if they’re edge to edge, or a “soldier course” if they’re face to face like dominoes), they can be buried deep enough to provide the necessary support.
Turned on their long edge (called “drunken soldier”), however, as with the Colonial Williamsburg pattern shown in this process, the bricks won’t have enough purchase in the ground to hold the path together. In that case, you’ll need to keep everything in place with garden edging that extends at least 6 inches below grade.
Regardless of the shape of bricks you use, “a walkway is only as good as the base you put under it,” says This Old House landscape contractor Roger Cook.
Brick Path Location
Location is one factor in that base: Keep the path at least 2 to 3 feet away from trees with extensive root systems that could push the bricks up. But water is a more constant threat.
“If the water can’t drain properly, it will pool on the surface, and any freezing and thawing will cause the bricks to pop up,” says Roger. To redirect runoff, you’ll need to slope the walkway slightly to one side — 1/8 inch per foot across its breadth.
Beneath the bricks, layers of graded base (a mix of crushed stone and stone dust) topped with sand allow for proper drainage. Both layers need to be tamped down to create a solid base, a job that can be done by hand, though for longer paths you should consider renting a plate compactor for about $80 a day.
For More: Brick Path Pattern Guide; How to Lay the Base for a Brick Path
How to Lay a Brick Walkway
1. Excavate the soil
Photo by Kolin Smith
- Determine the desired width of your path and add 2 inches.
- Roughly mark out the positioning of the path at this width using a rope, garden hose, or spray paint.
- Using a spade, dig out the space between the markings to remove the top layer of soil. Dig until you see the color of the soil change (as shown).
- Place the excavated soil on a tarp to keep the area clean.
2. Fill with graded base
Photo by Kolin Smith
- Once the walkway is excavated, pour in 1 to 2 inches of graded base (as shown).
- Spray the base with water before tamping it to keep the dust down.


3. Compress and repeat
Photo by Kolin Smith
- Using a hand tamper, pound the layer of base evenly to compress it (shown).
- Add another couple of inches of the base and repeat the process until the tamped layer reaches 3 ½ inches below grade. (If you’re using a power tamper, work with 3- to 4-inch layers.)
4. Add Sand Layer
Photo by Kolin Smith
- Make a screed, which you can also use as a spacer when installing the side guide rails: Using a handsaw, cut down a 2×4 so it is 6 inches longer than the finished width of your path. Then cut notches at either end that are 3 ¼ inches wide and as high as one of your bricks laid flat.
- Using a spade, create narrow trenches along the edges of the graded base to fit lengths of 1×4 composite lumber turned on edge.
- Position the 1x4s along both sides of the walkway, then space them evenly by wedging the notched screed between them.
- Using a dead-blow mallet, pound the 1x4s in until they are level with the existing grade. Work your way down the path until both sides are lined.
- To hold these rails in place as you go, drive wooden stakes about a foot into the ground against the outside of the rails every 3 feet. Secure each stake to the lumber with two 1 ¼-inch deck screws, then cut it flush with the rail.

5. Grade the path
Photo by Kolin Smith
- To grade the path for drainage, cut a small scrap of wood to a thickness equaling 1/8 inch for every foot of the path’s width.
- Tape the scrap to the end of a 4-foot level. Rest the level across the two rails, with the scrap wood positioned on top of the rail on the lower side of the path. Using a mallet, tap the rail into the ground until the bubble reads level.
- Pour about 2 inches of masonry sand or stone dust into the space between the rails. Tamp the sand.
- Position the screed between the rails and pull it across the sand to even out the surface and fill in the low spots (as shown).
- If necessary, add more sand, tamp, then screed again.

6. Lay the brick edging
Photo by Kolin Smith
- Gouge out shallow trenches about 2 ½ inches deep inside both sides of the guide rails.
- Lay a brick on edge inside the trench and, using a dead-blow mallet, pound it flush with the top of the guide rail (as shown).
- Use the level with the scrap-wood attachment to check the slope of the brick as you set it.
- Continue setting bricks along the edge in this manner until the entire path is edged on both sides.
7. Fill in the field
Photo by Kolin Smith
- Widen the notches on either side of the screed so it fits between the edge bricks with about ¼ inch of wiggle room on either side. Use it to screed the sand again.
- Begin laying the pattern between the edging: Hold a brick above the sand, press it against the edge brick, and position it so it’s even with the start of the path.
- Once it’s in position, set it down directly in place. Using a mallet, tap the brick level with the edge course.
- Continue laying bricks in this manner, hitting each to set it (as shown), until the path is filled in.
- Check the slope of the bricks with the level and scrap-wood attachment as you work. When you lay the bricks, make sure not to drag them across the sand or your joints will fill with sand and they won’t be tight.

8. Fill the joints
Photo by Kolin Smith
- Shovel a thin layer of masonry sand or stone dust over the top of the bricks.
- Using a large push broom, sweep the sand into the joints between the bricks (as shown).
- Wet the path with a hose to settle the sand, then brush more wet sand into the cracks until they are packed tightly and filled to the surface.
- Let the sand settle for one week and refill any settled joints with more sand. After another week, unscrew the stakes and remove the guide rails. Finish the sides with garden edging set flush with the top of the brick.
 Finish the sides with garden edging set flush with the top of the brick.
Tools
Tools & Materials
-
Spade
-
Handsaw
-
Level – 4 foot
-
Hand tamper
-
Drill/driver
-
Dead blow hammer
-
Push broom
How to Build a Brick Path
When I moved from New England to Maryland, I was struck by all the brickwork. There are brick houses, brick sidewalks, and brick paths that lead to the brick barns. Even the streets in some of the towns are paved with brick. The warmth of its color, the strength of its material, the good feeling underfoot all appealed to me. My desire was born; someday I would have a brick sidewalk.
I spoke of it so often that one day I came home to find 300 old, handmade bricks tossed in a pile in my yard, a gift from a friend who said, “You wanted them. Now use them.”
There was no turning back. As I stacked the bricks, I began to wonder how on earth to begin such an ambitious project. Well, you look at your yard and lay garden hoses along the edges of the path-to-be, moving the hoses around until the curve and location please your eyes and you have a place to step on a rainy day. It’s best to put the path where you normally walk. It will look just right, and it will keep you on track and out of the mud.
My path would be 2 feet wide, and along each edge I’d run a course of bricks standing upright like sentinels, keeping their laid-flat fellows in line.
Still, I was a long way off from laying the first brick. Had I known how far away that moment would be, I might have given up.
There’s lots of work before the first brick is laid
A proper brick path has to be set on a good foundation of 4 inches of gravel, a layer of heavy-duty weed-barrier fabric, and then 2 inches of sand. The fabric lets water through, but it keeps the sand from sifting into the gravel.
I wanted the top of the 2-inch-thick bricks to be even with the ground level. The thickness of the brick combined with the sand and gravel layers meant I’d need to dig a trench 8 inches deep for the length of the path. So I picked up my spade, started to dig, and quickly ran smack into the next question. What would I do with all this topsoil? Digging an 8-inch deep, 2-foot-wide trench 50 feet long makes almost 2-1/2 cubic yards of dirt—about a half hundred wheelbarrows-full.
Mine was an easy answer. In the first 90 years of its life, my house had no gutters. Water running off the eaves washed away soil until too much foundation was bare and left swales under the roof’s drip line. I wanted garden beds under the eaves, and the beds needed lots of topsoil. Someone else might want soil for raised beds or to fill in holes. There is always a use for topsoil as long as you know it’s coming.
Every day that spring and summer, I shoveled out the bed of the path-to-be and hauled soil around my house. By now, the first pile of sand—I’d use it to set the brick soldiers—stood waiting in the backyard, and I had trundled my bricks in the wheelbarrow and stacked them neatly along the edge of the trench.
Set the soldier bricks, add gravel and sand
I learned many things in those months—for example, that I could wheelbarrow only 20 bricks at a time and that the soldier bricks must be held upright along the path’s edge by generous amounts of sand packed around them.
Like good marchers, the rows of soldier bricks must remain parallel. A row that strays in or out of line will throw off the pattern and the spacing of the flat-laid bricks that come later. The width of a path increases in increments of a little more than 4 inches—the width of a brick and the space between it and its neighbor.
I found it best to dig a rough trench, line one side with the soldiers, go back to measure the width with a stick as long as the width of the path, then line the other side. Lastly, after upright bricks lined both sides of the path, I adjusted the depth of the trench here and there with a flat shovel.
By now a fledgling mason, I discovered that I could use a trowel, straightedge and level all at the same time, then bop the bricks into their proper places with a rubber mallet. I got pretty good at it, too.
When the trench was done and the soldiers stood in line, it was time for the trucks to come with 3/8-inch gravel, and palletized bricks (called “cubes”). I’d shopped the Yellow Pages under both
“sand and gravel” and “bricks” for prices and delivery information. The free bricks from my friend went only so far.
Visiting a few brick suppliers taught me that bricks come in different colors and prices, and that some bricks are more irregular than others. Irregular-shaped bricks are harder to lay in a pattern because of differences in their dimensions. High-fired paving bricks are the best for paths.
I hired two strong men to load the gravel into the newly dug trench and rake it smooth. It takes many wheelbarrow loads to make a 4-inch bed. When all of the gravel was in place, I used a razor knife to cut heavy-duty weed-barrier fabric into strips and laid it on the bed. A 2-inch layer of sand went on top of the gravel, raked smooth and leveled with a board pulled across its width. After the sand was leveled, the trench was ready. Finally, I could lay the 2-inch-thick bricks on top.
By the way, if you live up north, in less temperate climates than the eastern shore of Maryland and want to build a brick path, you might want to tamp the sand and gravel with a power compactor from a tool-rental store. The compactor settles the sand and gravel, and might prevent heaving when the ground freezes deep.
Half-step running bond is an easy brick pattern to lay
Instead of a stylized pattern, like a herringbone or a basket weave, my bricks are laid in simple straight-ahead lines. The pattern—called a half-step running bond—is easy to remember, and the bricks are easy to manage. To start, you alternate a whole brick next to a half brick. Then it’s just a matter of laying one brick next to another, following along the length of the path.
Laying bricks through gentle turns is a matter of a little give and take: You might have to pack the inside edge of one brick a little closer to its neighbor and open up the spacing on the outside edge of another as you bend the rectilinear bricks into the rounded curves.
I shouldn’t have been surprised to find that the half-step pattern was thrown off a little by the curves. It makes perfect sense: the distance around the outside of a curve is greater than the inside distance. When the path straightened out, the pattern had fallen off. One brick didn’t end in the middle of the one next to it. But no mind—after a left-hand curve, my path made a right-hand curve and the pattern was regained. If your path turns only to the right or to the left, and you’re bothered by the way it disrupts your pattern, you might start cutting bricks to compensate, but I think you’ll open a bigger can of worms than if you just go with the flow. Remember—you’re building a brick garden path, and it’s a process that’s more organic than exacting.
Intersections where paths diverge take a little figuring out. You could use graph paper to plot the bricks, or you could spend some time on your hands and knees, working out the pattern. It’s a good idea to lay the bricks in the center of the intersection and then work out in all directions. If you work into an intersection from an ongoing path, you may end up cutting lots of bricks and shoehorning in lots of little pieces.
A sharp blow with a brick chisel and a 4-pound hammer cuts a brick in half.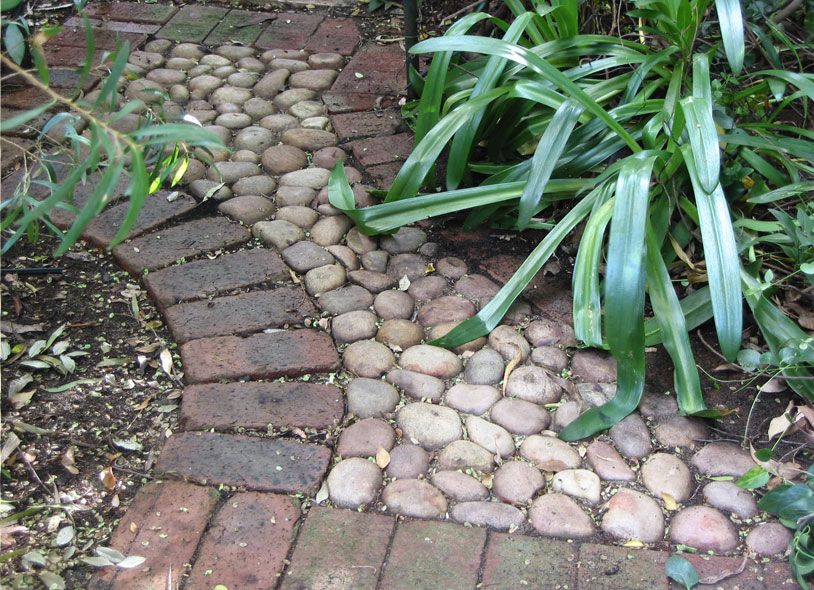 It takes some practice, and gloves are a necessity. A miss with the hammer … I don’t even want to remember.
As work, laying bricks was satisfying. I could see what I had done. As exercise, it was rewarding. I slimmed down one size.
Kneeling on a foam pad will save your knees. A rubber mallet bangs bricks in place without breaking them. Occasionally, you have to shift a little sand under a brick or sprinkle some here and there to keep adjacent brick edges even. A high corner will catch a snow shovel or a summer sandal.
More paths in the years to come
When the last brick was down, I covered the length of the path with a thick layer of sand, sweeping it into the spaces between the bricks, adding more every few days for two weeks. Then I swept it clean, and my path was done.
After this first path, I was far from finished with my bricklaying. The next spring, I started across the back of the house with a path to the deck. I do only 50 feet or so a season. I need time for social things and time to tend the gardens around my paths. In the coming years, I want a path from the deck to the shed.
On a trip to Vermont, I found a quarry that cuts marble into bricks, so my walk has white marble scattered along its length—not traditional, but I like it. Some are engraved with the year I finished a particular section, my personal log of the project.
Phyllis Gordon has retired from two careers. She now lays bricks, plays bridge, and writes stories in Cambridge, on the eastern shore of Maryland.
Brick Path – Bilder und Stockfotos
78.113Bilder
- Bilder
- Fotos
- Grafiken
- Vektoren
- Videos
AlleEssentials
Niedrigster Preis
Signature
Beste Qualität
Durchstöbern Sie 78.113
brick path Stock-Fotografie und Bilder. Oder starten Sie eine neue Suche, um noch mehr Stock-Fotografie und Bilder zu entdecken.
gemütliche keramik clinker es werden pflastersteine verlegt für eine terrasse. – brick path stock-fotos und bilder
Gemütliche Keramik Clinker Es werden Pflastersteine verlegt für…
satz von vektor-pflasterfliesen und ziegelmuster aus naturstein. – brick path stock-grafiken, -clipart, -cartoons und -symbole
Satz von Vektor-Pflasterfliesen und Ziegelmuster aus Naturstein.
leere pflasterstraße im park – brick path stock-fotos und bilder
Leere Pflasterstraße im park
geometrische design-brickwalk landschaft – brick path stock-fotos und bilder
Geometrische Design-Brickwalk Landschaft
geschwungener weg in form einer welle auf dem gras im park. gepflasterte mit fliesen unterschiedlicher form. – brick path stock-fotos und bilder
Geschwungener Weg in Form einer Welle auf dem Gras im Park….
gelbe brick road – brick path stock-fotos und bilder
Gelbe Brick Road
graues betonpflaster verlegen platten im haus hof zufahrt innenhof. – brick path stock-fotos und bilder
Graues Betonpflaster verlegen Platten im Haus Hof Zufahrt…
pflaster mit roten pflastersteinen. – brick path stock-fotos und bilder
Pflaster mit roten Pflastersteinen.
rote blöcke wanderweg mit drainage-system in einem park mit grünen wiesen und landschaftsgestaltung mit büschen und roten blüten. – brick path stock-fotos und bilder
Rote Blöcke Wanderweg mit Drainage-System in einem Park mit grünen
gehobenes haus – brick path stock-fotos und bilder
Gehobenes Haus
hintergrund aus grauen stein fliesen hintergrund – brick path stock-fotos und bilder
Hintergrund aus grauen Stein Fliesen Hintergrund
stone wall, stufen und planter auf bunten garten – brick path stock-fotos und bilder
Stone Wall, Stufen und Planter auf bunten Garten
set von top-view-vektor-straßenpflastern oder park-gehweg-straßenmuster straßenfliese. bodenfliesen mit stein-, ziegel- und kopfsteinpflasterstruktur. mosaik-bodenfliesen. steinboden architektur material block – brick path stock-grafiken, -clipart, -cartoons und -symbole
Set von Top-View-Vektor-Straßenpflastern oder Park-Gehweg-Straßenm
stadtgebäude außen- und gehweghintergrund – brick path stock-grafiken, -clipart, -cartoons und -symbole
Stadtgebäude Außen- und Gehweghintergrund
roter backsteinweg im park – brick path stock-fotos und bilder
Roter Backsteinweg im Park
park steinstraße – brick path stock-fotos und bilder
Park Steinstraße
treppe mit blockwand – brick path stock-fotos und bilder
Treppe mit Blockwand
verschachtelte pflastersteine in verschiedenen farben, um den rasen ist grün, schicke garten – brick path stock-fotos und bilder
Verschachtelte Pflastersteine in verschiedenen Farben, um den. ..
..
gelbe brick road-wide – brick path stock-fotos und bilder
Gelbe Brick Road-Wide
granit, gepflasterten boden hintergrund – brick path stock-fotos und bilder
Granit, gepflasterten Boden Hintergrund
moderne stadt quadratmeter boden textur hintergrund – brick path stock-fotos und bilder
Moderne Stadt Quadratmeter Boden Textur Hintergrund
füße in turnschuhen auf kopfsteinpflaster – brick path stock-grafiken, -clipart, -cartoons und -symbole
Füße in Turnschuhen auf Kopfsteinpflaster
gehobenes haus – brick path stock-fotos und bilder
Gehobenes Haus
straßenpflaster stein, ziegeloberflächen wege texturen. gehweg gepflasterte steine, gartenweg stein boden vektor illustration set. ziegel pflasterstein wege muster – brick path stock-grafiken, -clipart, -cartoons und -symbole
Straßenpflaster Stein, Ziegeloberflächen Wege Texturen. Gehweg…
keramik-lampe-straße in den garten gehweg in der dämmerung – brick path stock-fotos und bilder
Keramik-Lampe-Straße in den Garten Gehweg in der Dämmerung
backsteinwandraum – brick path stock-fotos und bilder
Backsteinwandraum
den garten – brick path stock-fotos und bilder
Den Garten
moderne stadt quadratmeter boden textur hintergrund – brick path stock-fotos und bilder
Moderne Stadt Quadratmeter Boden Textur Hintergrund
haus und garten in der stadt bei nacht – brick path stock-fotos und bilder
Haus und Garten in der Stadt bei Nacht
geschwungene gartenweg von backsteinen mit blumen und bäume – brick path stock-fotos und bilder
Geschwungene Gartenweg von Backsteinen mit Blumen und Bäume
verschiedene road oberflächen – brick path stock-grafiken, -clipart, -cartoons und -symbole
Verschiedene road Oberflächen
fuß schritt – brick path stock-fotos und bilder
Fuß Schritt
garten ziegel weg pflaster – brick path stock-fotos und bilder
Garten Ziegel Weg Pflaster
krümmung – brick path stock-fotos und bilder
Krümmung
s-curve cobbledstone weg – brick path stock-fotos und bilder
s-curve cobbledstone Weg
zauberer von oz. smaragd-stadtplatz. vektor-illustration – brick path stock-grafiken, -clipart, -cartoons und -symbole
Zauberer von Oz. Smaragd-Stadtplatz. Vektor-Illustration
arbeiter legen granit-kablesteinpflaster um das haus – brick path stock-fotos und bilder
Arbeiter legen Granit-Kablesteinpflaster um das Haus
arbeiter, der pflastersteine verlegt. steinpflaster, bauarbeiter legen kopfsteinpflaster steine auf sand. – brick path stock-fotos und bilder
Arbeiter, der Pflastersteine verlegt. Steinpflaster, Bauarbeiter…
gepflasterte stein weg mit einsame baum auf einem slope – brick path stock-fotos und bilder
Gepflasterte Stein Weg mit einsame Baum auf einem slope
stone road im garten, gangway vor, vektorgrafiken und illustrationen. – brick path stock-grafiken, -clipart, -cartoons und -symbole
stone road im Garten, Gangway vor, Vektorgrafiken und…
stone straße in sicht – brick path stock-fotos und bilder
stone Straße in Sicht
ein satz von alte ziegel wand nahtlose musterung – brick path stock-grafiken, -clipart, -cartoons und -symbole
Ein Satz von alte Ziegel Wand nahtlose Musterung
neue weg ebnen roten block – brick path stock-fotos und bilder
Neue Weg ebnen roten block
yellow brick road – brick path stock-grafiken, -clipart, -cartoons und -symbole
Yellow Brick Road
kurviger bürgersteig im park – brick path stock-fotos und bilder
Kurviger Bürgersteig im Park
gelbe red brick road – brick path stock-fotos und bilder
Gelbe Red Brick Road
set von graustufen nahtlose pflaster-texturen. schwarz-weiß wiederholt muster von straßenfliesen – brick path stock-grafiken, -clipart, -cartoons und -symbole
Set von Graustufen nahtlose Pflaster-Texturen. Schwarz-Weiß…
baumeister im freien pflastersteine verlegen – brick path stock-fotos und bilder
Baumeister im freien Pflastersteine verlegen
fertiger ziegel vektor – brick path stock-grafiken, -clipart, -cartoons und -symbole
fertiger Ziegel Vektor
park gehweg – brick path stock-fotos und bilder
Park Gehweg
gartensteinpfad mit rasen wächst – brick path stock-fotos und bilder
Gartensteinpfad mit Rasen wächst
gelbe brick road – brick path stock-grafiken, -clipart, -cartoons und -symbole
Gelbe Brick Road
löwenzahn-unkrautbekämpfung auf einer terrasse – brick path stock-fotos und bilder
Löwenzahn-Unkrautbekämpfung auf einer Terrasse
stock-muster-symbol – brick path stock-grafiken, -clipart, -cartoons und -symbole
Stock-Muster-Symbol
blickte auf ineinandergreifenden pflastersteine – brick path stock-fotos und bilder
Blickte auf ineinandergreifenden Pflastersteine
arbeiter verlegen, fliesen, bau von ziegel bürgersteig zu ebnen, nahaufnahme architektur hintergrund – brick path stock-fotos und bilder
Arbeiter verlegen, Fliesen, Bau von Ziegel Bürgersteig zu ebnen,. ..
..
graue sett hintergrund – brick path stock-fotos und bilder
Graue Sett Hintergrund
moderner block pflaster und vorgarten – brick path stock-fotos und bilder
Moderner Block Pflaster und Vorgarten
victoriam floor tiles seamless repeat pattern – brick path stock-grafiken, -clipart, -cartoons und -symbole
Victoriam Floor Tiles Seamless Repeat Pattern
holzmöbel und fliesenweg blick nach oben. set von bänken, pflanzen in töpfen und fliesen für die landschaftsgestaltung. sammlung von architektonischen elementen für projekte. tisch, stuhl, bank, topf, baum. vektor flach – brick path stock-grafiken, -clipart, -cartoons und -symbole
Holzmöbel und Fliesenweg Blick nach oben. Set von Bänken,…
von 100
DIY Brick Path
Although the path leads almost directly from gate to entry door, it has a picturesque jog near the front porch.
Bill Ticineto & Jill Chase
Leaving footprints in the new snow from her front door to the site of a planned garden gate, Jill Chase took advantage of a Connecticut winter’s day to map out a brick walk. Envisioning a tall planter as a focal point near the entry, she included a small jog around it in the path near the porch.
Jill and her husband, Bill Ticineto, later selected bricks to lay in a Flemish-bond pattern. Experts recommend using hard-fired paving bricks in good condition, either new or salvaged. (Remnant bricks found on the property may or may not qualify; test one to see if it crumbles or chips easily when tapped with another brick. Do not use face brick.)
As a design medium, brick is flexible; consider a variety of patterns before settling on running bond, basketweave, herringbone, or a more elaborate choice. To visualize the finished walk, lay out patterns on paper or with actual bricks. Once you’ve settled on a laying pattern, plan the whole walk on paper. Use the brick dimension plus joints to determine the width of the path, which should be visually pleasing for the site and minimize brick cutting and waste. (A minimum functional pathway width is 24″; 36″ is typical, and you need a minimum of 48″ for two people to walk or pass, as to a front door. ) Use actual bricks to lay out a section, to make sure the anticipated width accommodates mostly whole bricks and that any cut bricks are balanced on either side. Smaller pieces of broken or imperfect bricks can be used to fill the row ends where the pattern meets a single-brick-wide border.
Ideally, this is a two-person job: one levels and lays the bricks, the other cuts bricks to fit small voids in the pattern.
Bill Ticineto & Jill Chase
To estimate the number of bricks you’ll need, multiply the square footage of the walk by five (the approximate number of common bricks per square foot). Then estimate number of bricks for the border: calculate linear feet and divide by the size of the brick exposure as laid. Add about 10 percent more for breakage.
With the brick pallets stacked on site, mark the walk’s boundaries with stakes and a mason’s line, and create 1″ x 6″ forms at the edges, allowing for the border. A brick path should crown: “We deliberately laid the path with a very slight arch so it’s higher in the middle, to prevent puddles and ice patches,” says Chase. Allow about a ¼” per 1′ pitch.
Excavate the soil deep enough to accommodate layers of bedding material; depth will vary depending on whether you live in a frost-heave zone and with the thickness of the brick. Chase placed a layer of gravel in the path’s bed, topped by sharp sand. (As an alternative you can use 3″–4″ of stone dust as a base.) Working in sections of two or three feet at a time, level a section of the bed using a screed, a 2×6 board cut to the width of the walk. Screeds may be cut a few inches longer and notched at both ends to slide along the forms when pulled, to level the stone dust. Tamp down the top layer of sand or dust carefully, and wet it with a fine spray of water to harden it.
Screeds may be cut a few inches longer and notched at both ends to slide along the forms when pulled, to level the stone dust.
Bill Ticineto & Jill Chase
To lay the brick, set the edges or border bricks first in the desired pattern, then lay down the pavers, following the planned field pattern. Pack the bricks in tightly, tapping them into place with a rubber mallet. To create corners or half pieces, cut good pieces from imperfect bricks using either a masonry saw or a brickset—a broad bladed, sharp-edged chisel. To use the brickset, first score a line on the brick with the masonry saw. Hold the edge of the brickset firmly on the line (bevel facing away from the part to be used). Strike the brickset sharply with a hammer, and the brick should break cleanly.
Once all the bricks are in place, shovel fine sand over the entire walk until the cracks are filled to the top of the bricks. “That’s what really locks it together and keeps the walk from collecting weed seeds in the cracks,” says Chase. Then mist it through a hose nozzle. All set!
• Before settling on a design or selecting new brick, look for remnants of old brick paths or walks on your property. Even a few remaining bricks may suggest a pattern to guide decisions.
• Check old photos of the house for the existence and placement of old paths, brick or otherwise. If original plans for your home exist, brick walks may be detailed on the drawings.
• If the path will run perpendicular to the house in a rear or side garden, lay the walk on an axis with a prominent feature or entry point, or so that it visually bisects the house, to create a visual connection between structure and garden.
• Create focal points along the path to merge it with the landscape. For a small garden, add a fountain or sundial, or place a bench at the end of the path. In a larger lawn or garden, consider a sequence of visual “stops” toward the vanishing point.
Brick Walkway Ideas – Landscaping Network
Design ideas and pictures of brick paths
Swipe to view slides
-
View all brick walkway picturesGarden Studio Design in Newport Beach, CA
-
Fieldstone Design in Leominster, MA
-
Grace Design Associates in Santa Barbara, CA
-
Angelo’s Lawn-Scape of Louisiana in Baton Rouge, LA
-
Landscaping Network in Calimesa, CA
-
Terry Design Inc in Fullerton, CA
-
Milieu Design in Wheeling, IL
-
Liquidscapes in Pittstown, NJ
-
Nature’s Palette Landscape Designs in Duxbury, MA
A brick walkway is the perfect complement to a colonial or farm style home. Clay bricks have a traditional appearance that gives off a sense of age and refinement. Depending on the walkway width, shape and brick pattern you select your walkway can be formal or casual. Brick can be used with other paving materials such as concrete, natural stone and cobblestone in order to create a unique garden path.
Benefits of a Brick Walkway
- Easy repairs
- Timeless appeal
- Durable
- Variety of patterns possible
- Permeable if dry laid
- Can be used to resurface concrete
Brick Walkway Design Options
Straight Layout
This brick path, which leads to a swimming pool, draws the eye forward. The running bond pattern which was laid lengthwise creates an effect of movement along the path. Notice that the path is extra wide to allow plants to spill over its edges.
Curved Layout
Unlike straight paths, curved ones have a hidden destination that provides a sense of mystery. Here red bricks were laid in a running bond pattern with two sweeping curves. Granite Belgian block edging finishes off the path.
Mosaic Pattern
For a truly unique walkway bricks can be combined in a mosaic-like fashion with other materials. For this preschool entryway concrete hearts and pebbles were embedded in the center of the path. Notice how instead of cutting the bricks to create straight edges they were left whole creating a random effect.
Bordered Herringbone
Brick is a material that can appear casual or formal depending on how it is laid. For this home’s front entrance, a casual herringbone pattern was used to create a wide curved path. The addition of a precisely aligned border of bricks adds an air of formality.
Aged Brick
For a walkway that appears to have been around for years, Margie Grace of Grace Design Associates in Santa Barbara, CA suggests using salvaged or used brick that has been factory distressed. “Beware the cheesy-looking paint-splattered used brick – it’s not believable,” says Grace. Another option is to sandblast new brick walkway after it has been laid. Furthermore, using the dry laid installation method (brick set over sand) will make your walk more authentic. “The bricks tend to settle into the soil a little, adding just the right amount of wonkiness to look as though it’s been in place for a long time,” she adds. Finally, the width of the path can be decreased down to 28-32 inches wide. “We used to build things on a much smaller scale than we do now,” Grace notes.
Brick Walkway Patterns
There are a variety of different patterns for laying brick. Some patterns are very simple while others are complex and require extensive brick cutting. When selecting a pattern, consider whether you want your new brick walkway to be subtle or eye catching. Patterns that have continuous lines such as running bond draw less attention than those that have many broken lines such as herringbone or basket weave. Patterns can be mixed and matched along a walkway to designate transitions or places of pause. A good brick layer will be able to help you decide on the best pattern.
-
Pro Tip:
Running bond allows curves without having to cut bricks which saves money on labor. –Margie Grace, Grace Design Associates in Santa Barbara, CA
Cost of a Brick Walkway
Having any sort of brick paving laid will run between $10 and $25 per square foot depending on the type of brick, pattern, site conditions and other factors. Luckily, most residential walkways do not cover an excessive amount of space, meaning that the square footage will be low. Depending on your budget, this may make it possible to spend a little extra on customization. The cost of brick is comparable to the cost of concrete or interlocking pavers and they are installed in a similar fashion.
Return to Brick
Martha Stewart A03 Brick Path Precisely Matched For Paint and Spray Paint
70% of Orders Ship within 2 Business Days.
For guaranteed shipment within 1 business day, select ‘Expedited Production Fee’ during checkout.
Select Paint Type / Application
Spray, OEM, Bottles and Pens
House and Wall Paint
Specialty Paint
Spray, OEM, Bottles and Pens
House and Wall Paint
Specialty Paint
Select your paint type / application
with one of the above buttons
You need to select before you can add this to your cart.
Satisfaction Guaranteed
If you’re not satisfied with your paint color we’ll give you a do-over for free! Click here for details.
Description
How quickly will I receive my paint matched to Martha Stewart A03 Brick Path?
All paint is custom-made to order. While most orders ship within 48 hours, the lead-time for paint made to match Martha Stewart A03 Brick Path depends on the type of paint needed. Interior and exterior house paints usually ship within 1 to 3 days, while custom spray paint typically takes 3-5 days to ship. The transit time depends on your location and the shipping method you choose. If your need is immediate, select Expedited Production during checkout. Most expedited production orders ship within 24 hours on business days. Please contact MyPerfectColor if you are concerned about a specific deadline. We do our best to make sure you get your paint on time. Learn more about paint lead times at MyPerfectColor.
What are the RGB, HEX and LRV values for Martha Stewart A03 Brick Path?
The RGB values for Martha Stewart A03 Brick Path are 161, 91, 83 and the HEX code is #A15B53. The LRV for Martha Stewart A03 Brick Path is 15.76. The LRV stands for Light Reflectance Value and measures the percentage of light that a color reflects. Learn more about Light Reflectance Values and using RGB and Hex codes for paint.
Is Martha Stewart A03 Brick Path paint discontinued?
Martha Stewart no longer has paint made under its brand name, but the Martha Stewart A03 Brick Path color is still available from MyPerfectColor in a variety of paint types. Martha Stewart used to contract with various paint manufacturers to make and sell paint under the Martha Stewart name. In early 2012 Martha Stewart decided to completely exit the paint business. MyPerfectColor has all the original paint color specs which it uses to recreate the colors.
Does MyPerfectColor have the original formula for Martha Stewart A03 Brick Path?
MyPerfectColor matches Martha Stewart colors by recreating the colors in the original color books. This original color spec enables us to accurately recreate the Martha Stewart A03 Brick Path color. We use our materials (pigments and base paints) to create our own formulas for Martha Stewart colors. There is no “original formula” that anyone can use, because a formula is based on the specific ingredients. The original ingredients don’t exist anymore. Thankfully it doesn’t really matter because as long as we have the original color specs then we can accurately recreate the color.
How can MyPerfectColor match the Martha Stewart A03 Brick Path?
MyPerfectColor has an original sample of the Martha Stewart A03 Brick Path in its color archive. This enables us to make paint and verify that it matches the original.
Please note that if your material is not new then the paint may not work for touch up as your material has aged and is likely different than it was when new. Learn more about our color matching accuracy. If you need a touch up application, send us a part and we can create a touch up solution precisely matching the current color and sheen of your specific materials.
Learn more about our color matching service.
Can I buy Martha Stewart A03 Brick Path locally?
You would have to ask around locally. MyPerfectColor can make and ship the Martha Stewart A03 Brick Path in a variety of paint types, but we are not able to comment on what other suppliers can provide. MyPerfectColor is not just working off a formula in a database – we compare every batch against the original color to verify the color accuracy. MyPerfectColor has extensive color matching capabilities and more than ten times the number of pigments available to a typical paint store.
How do I find the same color as the Martha Stewart A03 Brick Path in a different company?
While MyPerfectColor can provide paint matched to the Martha Stewart A03 Brick Path, we don’t provide any crossover information because this is a subjective determination. Every paint company offers its own unique selection of colors and rarely does a color have an exact equivalent in another company’s color collection, so determining which color is the best approximation is a judgement call.
However, under the color image on a color page there is a link that says “Explore Related Colors”. Clicking this link displays colors with similar values and you can look for any colors from the company you want.
Keep in mind that this just shows similar colors based on the color values we have stored in our database. It doesn’t mean it is the same or give any approximation about how close the color is. You can play around with the Hue, Lightness and Chroma sliders to expand the selection.
About Martha Stewart Paint Colors
For many years, Martha Stewart provided paint and color collections through partnerships with paint manufacturers and sold them through various home centers. A few years ago, Martha Stewart decided to stop selling paint and as a result, Martha Stewart A03 Brick Path is no longer available anywhere.
MyPerfectColor is able to match all of the Martha Stewart paint colors including A03 Brick Path so you can still find and enjoy the colors you love. MyPerfectColor uses its expert capabilities to recreate the original Martha Stewart A03 Brick Path by matching the original Martha Stewart color books and swatches. MyPerfectColor is not using Martha Stewart paint as this is no longer available.
MyPerfectColor matches Martha Stewart A03 Brick Path based on Martha Stewart color publications. The colors shown on this website are computer video simulations of the Martha Stewart Color and may not match Martha Stewart Color standards. Refer to Martha Stewart Publications to obtain the accurate color.
Please know that MyPerfectColor is matching the original Martha Stewart color. If you intend to touch up paint that has been on your walls for years, know that your color has undoubtedly changed from the original due to exposure to light and age and the new paint may not match. You will achieve the best results by re-coating the entire surface.
MyPerfectColor does not offer matches of any Martha Stewart Specialty Finishes such as the faux or metallic finishes.
If you need more assistance, please feel free to contact us and one of our expert staff would be happy to help.
Do-it-yourself brick garden path
Valery Karpin
Bookmark ↑
facilitating access to plants in the garden to care for them. Actual arrangement of wide, comfortable and beautiful tracks. In other words, the path should also decorate the site.
Laying a brick path with your own hands is within the power of anyone, and following the instructions on our website, you will do it quickly and beautifully from an aesthetic point of view.
- We plan the location of the track and the work scheme ↓
- The necessary materials ↓
- Marking and preparing the base for the track ↓
- We lay out the borders ↓
- The paving process ↓
We plan to the location0006
When planning a garden brick path, it should be taken into account that:
- a loaded wheelbarrow should easily pass through it (sufficient width and smooth turns are needed).
- the path must provide access to all areas of the site, even in rain and sleet.
- The path should run from the trunks of large trees at a distance of at least 3 meters: the roots will easily lift the covering.
- the walkway must be adjusted to the irrigation system, at least adjusting the sprinkler nozzles so that no water enters the walkway. Irrigation water, impregnating the material of the track, erodes and destroys it.
- it is necessary to adjust the slope of the soil or make diversion grooves.
 Irrigation water, impregnating the material of the track, erodes and destroys it.
 Materials needed
Brick garden path can only withstand the load if you choose the right type of brick. Silicate and ordinary ceramic solid bricks are completely unstable. From water and constant freeze-thaw cycles, the brick cracks and begins to crumble after a few years.
Therefore, it is necessary to purchase waterproof bricks or clay paving slabs. They are more expensive, but more decorative and will last longer.
will also be needed by:
- Sand
- Cement
- Bottie Stone or boards
- Reinforcement for fixing limiters
- Kiyanka
- Tram, or in the form of a drum –
- scoop
- cord
Marking and preparing the base for the path
Marking the area of the path with pegs and cord
The easiest way to mark a garden path is using pegs and cord.
If you need an easy to dismantle raised walkway , then after marking the soil is leveled, cleared of weeds, along the border of the track on one side, boards or curb blocks driven into the ground with reinforcement are installed and fixed. The area of the path is covered with a membrane that does not allow plants to break through it, and covered with a layer of sand.
The required width of the path is made with one row of bricks, after which a limiting element is tightly placed on the other side of the path and also fastened with reinforcement. When a track’s width is determined, it is bridged within the bounds. Such a path serves for several years, then the boards and bricks become unusable and need to be replaced. However, it is easy, just like removing the path without harming the soil.
If you need a stationary path , dig a trench-bed 10-15 cm deep according to the marking, tamp the bottom and pour gravel in a layer of 5-6 cm, then a layer of sand 5-6 cm (or a layer of granite chips) , moisturize and tamp. The thickness of the pillow depends on the site. If it is important that the finished path is above the soil level, put guide boards-limiters.
The board is impregnated with an antiseptic. After two years, the path will finally “sit down”, and the board can be removed, the voids can be filled with stone chips or pebbles.
You will learn about laying paving slabs with your own hands from the article on independent paving of paths and platforms.
Keep your foundation and basement from leaking with a clay castle.
Laying the curbs
It is appropriate to use ordinary bricks as a curb
After tamping the sand, take out part of it along the guides to lay the side strips of bricks or curb stone. An ordinary brick is placed on the edge, and with not strong sharp blows of a mallet they are driven into the sand in order to level it at the desired height. Having laid out the ribbons of the curbs, they begin to pave the field of the track.
If you need the most durable track , then the base is dried and covered with a dry mixture of sand and cement, or poured with cement mortar. Then they put curbs on it and pave the field.
Paving process
- The bricks are placed on the sand cushion, pressing in and leveling.
- They check it with a board, laying it on bricks and tapping it with a mallet, then the brick sits “evenly”.
- If a brick has sunk, it is taken out, sand is added under it and the rad is leveled again.
Created many decorative ways of laying (dressing patterns), for example:
- Spoom dressing
- “Herringbone” 90 °
- “Palette”
- Disabilities, alternating vertical and horizontal ranks of the brick
- ”
- Herringbone 45°
Finishing step
Joints between adjacent bricks are rarely cemented with mortar. If you need to cement them, then a dry mixture of sand and cement is poured onto the surface of the track, rubbed into the cracks with a mop, and then watered. Although they are usually limited to filling the seams with sand and watering.
Was the article helpful?
0.00 (0 ratings)
Loading…
Like this article? Share with friends:
Author : Valeriy Karpin
Since 2007, an online journalist in the field of repair, interior design and private construction. Regular participant of exhibitions and conferences on new technologies in materials science and construction. I have experience in my own design studio and construction company. I love to write vividly about my own experience.
Adblock
detector
How to make a brick garden path with your own hands: step-by-step instructions and photos
Garden paths are a separate stage in the improvement of the territory adjacent to the household. As a rule, paving slabs, natural stone – plastushka or brick are used for this. Paths made of bricks have many advantages. After all, brick garden paths are distinguished by an inexpensive price and aesthetic appearance. At the same time, such garden paths can be made with your own hands. This will allow you to significantly reduce costs.
Contents:
-
Do-it-yourself steps for arranging garden paths
-
How to lay brick
-
What kind of brick can be used
-
Video: do-it-yourself brick garden path in the country house
Do-it-yourself garden paths
Making a brick garden path with your own hands takes place in several stages. Each of them can be done with your own hands, without resorting to the help of third-party specialists. At the same time, garden paths can be of any size and length. From bricks, you can create straight garden paths, winding, arrange small areas.
The work process itself should be divided into main stages:
- Ground preparation. It is necessary to remove a layer of soil with a thickness of at least 20 cm. Such a depth will make it possible to make a solid foundation for the path. If the soil is heaving and unstable, then it is better to prepare a recess of 25 – 30 cm. After all, brick garden paths on unstable soil will need to be further strengthened;
Planning a garden path made of bricks
- A path made of old bricks involves leveling the ground. If possible, the ground under the broken brick path should be level and firm. Therefore, having leveled the ground, it should be tamped;
- The base of the path will be created by a layer of gravel. You can use small gravel. The best material for a brick walkway in the country will be fine gravel.
It has a gray color and is also used to create a concrete mix. This is a very durable material, from which you need to make a layer of 10 cm. In this case, the finished layer of crushed stone will need to be leveled. It is necessary that the level of gravel along the entire length of the broken brick path is the same. To check the correctness of your work at this stage, you should use the building level. The permissible deviation will be a few millimeters per 3 – 4 meters of track length;
- Crushed stone should be compacted. The stones should be as close as possible to each other. This will prevent the spread of the entire structure under the influence of moisture and loosening of the soil in the spring. For compaction, you can use a rental hydraulic hand tool. But such equipment is very expensive and in the event of a breakdown, repair compensation will cost serious money. Therefore, you can use a wooden structure. Its base will be a solid shield of boards. It must be held by the handle and lowered with force onto a layer of rubble;
- Ways to make a path out of broken bricks necessarily involve the use of a sand cushion.
The layer of sand should be 5 – 7 cm. This is enough, since the main role of protection against moisture is played by a layer of rubble. The red brick path is covered with sand evenly. The slope requirements will be the same as for the gravel layer. When the sand layer is leveled, it is necessary to give it strength. For this purpose, it is best to water the sand with water. This will avoid a long and tedious thrombosis procedure. Moreover, pouring a brick path with your own hands will be more effective than using a clot tool.
Old brick paths should be watered for several days. In this case, it is recommended to water them with a new portion of water, immediately after the previous one has dried. This will ensure a tight fit of the grains of sand. They form a strong and very hard layer:
- Separately, it is necessary to indicate the need for a blind area. Along the edges of the structure, you should install bricks on the edge. They will create the border of the sand-lime brick walkway. Such a blind area does not allow the track to spread, while maintaining its shape;
- Bricks can be laid on the sand. Each brick should be flat. At the same time, you can create various decorative elements by alternating bricks of different colors.
 Such a blind area does not allow the track to spread, while maintaining its shape;
 If the bricks are tightly fitted, it is not necessary to use cement mortar. What to plant along the path in the country, read here.
back to contents ↑
How to lay bricks
Options for laying a path involve laying without the use of hand tools. A brick garden path can be laid out in a variety of ways. For example, many garden paths are laid with bricks placed horizontally to each other. You can arrange them in a Christmas tree or in any other way.
The main thing is that all the bricks are close to each other. Cracks and gaps should be avoided. After all, moisture can get into them. And in winter, when freezing, the water will simply break the bricks.
To ensure a tight fit, it is recommended to use a wooden mallet. They tap the bricks to each other, ensuring that there are no gaps.
Some experts recommend diluting the sand with a small amount of cement. It is believed that a brick path in the country with your own hands using this technology will turn out to be more durable.
When laying the material, it is important to remember that the height of a brick laid flat will be 5 cm. And installed on the edge, the brick will rise by 12 cm. These parameters should be taken into account when creating a path. After all, the edges should not be higher than the rest.
Laying a walkway
In addition, it is recommended to make a slope in one direction. A minimum slope of 1 mm will suffice. But the level should be the same throughout the entire length of the track. Thanks to him, moisture will drain and water will not get between the bricks.
In order to remove moisture, it is necessary to arrange grooves along the path.
back to contents ↑
What kind of brick can be used
Any kind of brick can be used for laying the path. The main thing is that the material does not have cracks and other defects. Moreover, each type of brick has certain features:
- There can be any options for making a garden path from silicate brick. It should be understood that silicate brick does not have high strength. It will easily withstand a pedestrian. But when moving garden carts with a load, they are able to break under their weight;
- Ceramic bricks are more resistant to stress. In addition, this material is available in a wide range of colors. You can purchase white, yellow or red brick;
- Broken brick will also be an excellent material. As a rule, after the construction there are a lot of remnants. And you don’t even have to throw them away. Broken brick will be a good solution for a garden path. No need to be afraid that it will break. In addition, such material does not cost anything.
 In addition, such material does not cost anything.
 - The main thing is to crush the bricks so that the diameter of each fragment is similar to the rest. If fairly long tracks are planned, then it is best to use a vibrating tool. With its help, it will be possible to crush the brick in a short time.
back to contents ↑
Video: do-it-yourself brick garden path in the dacha
how to lay paths in the dacha from old brick
An old brick dacha will always come in handy. Running a private economy is a rather complex and responsible process aimed at the constant care of buildings and maintaining their appearance. However, such work has many advantages, consisting in the ability to equip the site based on personal preferences and your own wishes. For the implementation of similar projects, a variety of materials and available tools can be used. Old brick is one of those products that are almost always available and can be reused for the construction of various objects.
The old brick left after dismantling the stove or the walls of the house can be useful for ennobling the suburban area.
Using old bricks: building a garden path with your own hands
To create a garden path, you can get by with recycled material, which is almost always available in a summer cottage. Demolishing an old barn, building an outbuilding, or renovating a house inevitably leaves behind a lot of surplus that can be useful for building garden paths.
The main material of such structures is the remains of bricks. Also, the garden path may include other waste materials left after construction work or dismantling of an object. It is not difficult to create this system with your own hands, and the result of the work will be an excellent coating that can not only ensure the practicality of moving around the site, but become its decoration.
How to lay a brick path? The procedure for creating such an object is time-consuming and responsible, containing many nuances. However, with knowledge of the matter and skillful handling of the tool, creating a path in the country will take a little time. Brick pavement is made in the following steps:
Scheme of a brick garden path.
- drawing up a building plan;
- site marking;
- tool collection;
- foundation preparation;
- curb shaping;
- brick laying;
- finishing.
Paths in the country house, made of old brick, must be carried out according to the above scheme. This is the only way to guarantee the receipt of a strong and durable coating that can become a decoration of the cottage and last for many years.
Preparatory work and collection of tools
Do-it-yourself country paths made of bricks are made on the basis of a building plan containing a drawing of the future object and its technical characteristics.
At the same time, the plan is of tremendous importance, since it is a visual representation of a building that previously existed only in thoughts. Having created a detailed drawing, a person imagines how such a sidewalk will look, and understands the feasibility of building on a particular site.
The next step after drawing up the construction plan is marking the area. As a rule, it is performed using wooden posts and a rope connecting them together. The delimitation of the garden plot makes it possible to see the contours of the future brick path, all its twists and turns.
Brick path laying tools.
As soon as the preparatory work is over, and the future brick garden paths have taken shape with the help of ropes and posts, you can start collecting inventory.
This process is of the utmost importance, as it makes it possible to significantly speed up and simplify the work. The following set of tools will help you make a red brick path:
- tape measure;
- pencil;
- hacksaw;
- rubber mallet;
- shovel;
- bucket.

Forming and finishing brick pavement
What can be done with recycled materials? You can independently build a brick border for a flower bed.
Brick paths for cottages are one of the most successful and striking objects in which the use of waste material is almost imperceptible.
The next step is to make the base on which the brick surface will be laid. Using a shovel, it is necessary to dig a hole up to 1 m deep over the entire area of the path. After that, a pillow of gravel is formed at its bottom, designed to ensure the removal of water from the surface. A layer of sand is poured onto the rubble and leveled, forming the basis for laying brick blocks.
A wooden board is laid along the contour of the future red brick path, which plays the role of a curb. Its appointment is conditional, since after completion of work it should be removed. However, during the construction process, it is simply irreplaceable, since it helps to obtain a flat plane.
Directly next to it, a boundary brick is placed, which is laid on the end. Such placement of it will allow the path in the country house not to blur and keep its shape.
The blocks themselves are placed between two curbs with a rubber mallet. At the same time, each of them is installed close to the other in such a way that the gaps between them are minimal. Their removal to the level and the formation of a monolithic surface is carried out using a rubber hammer. At the end, a layer of sand is poured over the finished red brick plane, designed to fill the gaps and complete the composition of the track.
Brick path: laying, ground preparation
Contents
- 1 Preparation
- 2 Brick path laying diagram
- 3 What materials are needed?
- 4 What materials are used?
- 5 Work steps
- 5.1 Marking the path
- 5.2 Preparing the base
- 5.3 How to lay the brick?
- 5.4 Laying curbs
A large part of the appearance of the yard in a country house is made by a path that connects all the buildings with the entrance and with each other. Most often it is a brick path. It is unlikely that anyone likes to walk through the mud, soiling clean shoes. To avoid such troubles, the paths in the yard should be paved. Laying the tracks yourself is a simple task, if you know the nuances and how to do it correctly. It is necessary to responsibly approach the preparation and installation – the main stages of work. Do-it-yourself brick paths are made after a pre-thought-out scheme for laying and selecting materials.
Preparation
In order to lay the brick paths properly, make sure you have the necessary tools:
- Shovels:
- scoop;
- bayonet.
- Rammer:
- manual;
- petrol.
- Saw.
- Measuring tool:
- tape measure.
- Pegs and thread.
- Building level.
To facilitate the work, you can take a grinder instead of a saw, and a gasoline instead of a manual rammer. Masonry pavement is easier to lay with automatic tools. The paths need to be level, so it’s best to make sure the building level is correctly calibrated and shows correctly.
Back to the Table of Contents
Brick Path Laying Scheme
Bricks are laid on a layer of compacted soil and bricks.
According to the laying rules, the first layer consists of compacted soil. The thickness of the compacted pillow should be at least 3 centimeters. A leveling layer of sand (about 2 cm) is applied over the compacted pillow. A curb lock should be installed on the leveling layer, which will be held by a layer of crushed stone (15-20 centimeters). To lay a broken brick path, a thicker layer of stone will be required. After that, another layer of sand is poured over the rubble, after which bricklaying and curbing are already installed.
Back to index
What materials do you need?
In order for a brick path to be laid out on a summer cottage, first of all, you need a brick. Further, to mix the cement mortar, sifted sand and a dry cement mixture will be required. To lay one of the underlying pillows, you will need gravel or crushed stone (there is not much difference), less brick chips are used. Optionally, additional geotextiles are used.
Back to index
What materials are used?
The materials used determine the budget.
Medium grade crushed stone can be used for paving.
To lay out garden paths in the country, use any kind of brick. Sand-lime brick paths are quite popular, as this is one of the most profitable ways to make a path. Often it turns out to lay out a path from the old brick left after construction work. Cement is recommended to use cement brand “PC 400”. Crushed stone or gravel is chosen in the middle fraction; brick crumbs can also be used. If it is decided to use geotextiles, then it is better to take a special one for paving slabs.
Back to the top
Stages of work
Marking the track
First determine the location and dimensions of the future track. To do this, you need a tape measure and pegs with a rope. The path is planned further than 5 meters from the nearest tree, as the root system of trees can gradually destroy the structure. Do not neglect the width either: 2 adults should freely diverge on the track without leaving the surface. When marking, make sure that the rope between the pegs does not sag, otherwise the brick will lie crooked.
Back to index
Preparation of the base
Dig a trench before laying. In depth, it should be more than 25-30 centimeters. Soil should not be thrown away, it will still come in handy. After the trench is dug, it is covered with sand and rammed, and geotextiles are laid on top. Do not neglect the use of geotextiles – this canvas will help maintain the integrity of the sidewalk and increase its durability. The thickness of the rammed pillow should exceed 3 centimeters.
The next layer is filled with sand.
Next, a leveling layer of sand follows, the thickness of which should not be less than 2 centimeters. After this layer is laid, a curb lock is installed on it. Parallel to the castle, the path is covered with rubble, after which it is tightly tamped. The thickness of the layer should be more than 25-30 centimeters. Crushed stone should not have sharp edges that can damage the geotextile, due to which it will lose its properties.
Back to index
How to lay a brick?
Paving is carried out on a sand cushion, compacting tightly, but we must not forget to ensure that the masonry is even, using a level. There are several types of brick laying:
- Chaotic placement of bricks in a happy order, not paying attention to detail.
- Offset placement. Its essence boils down to the fact that the joints are placed apart. Red brick paths look more pleasant.
- Herringbone – Forms a herringbone pattern. Under this pattern, paving stones or paving slabs are used, but with effort, it can also be made of brick.
- Braid. A pattern resembling weaving is created. Looks good in the garden.
- Chess. For this type, bricks of two colors are used, and they are laid out in a checkerboard pattern. It is better to build using white bricks.
 It is better to build using white bricks.
 Return to the top
Laying curbs
Instead of a curb, use bricks placed edgewise. There are also specially made curbs made of reinforced concrete or plastic. The border is guided with the help of fittings or special rings and hammered with a mallet. In the absence of a mallet, you can use a hammer by placing a bar under it. To enhance strength, the base of the curb is covered with cement mortar.
Do-it-yourself brick path: step by step instructions, mortar recipes | 5domov.ru
Over the past 5000 years, the methods of paving even surfaces with bricks have not changed, although now they are used in a slightly different way. Now such methods are used for the device borders of flower beds and pools. However, most often brick paving with or without mortar is used for arranging paths and platforms.
Table of contents:
- Brief description of work
- DIY mortar
- Four mortar recipes
- Preparation of mortar
- Curb types
- Straight line
- Smooth curve
- Sawtooth curb
- Wooden curb
- Path paving without mortar
- 1. Check stack
- 2. Excavation
- 3. Sand cushion device
- 4. Bricklaying
- 5. Working with vibrator
- 6. Filling joints with sand
- Completing the platform when working without a vibrator
- Mortar paving
- 1. Curb around an existing concrete slab
- 2. Brick preparation
- 3. Bricklaying
- 4. Filling joints with mortar
Job Description
For paving, a special brick is produced – clinker, which comes in different thicknesses, as a rule, thinner than usual, as well as different shapes and sizes. Similar results can be achieved when paving paths with concrete blocks specially designed for this purpose with the dimensions of standard bricks.
In warm areas, bricks can be laid directly on solid ground, however, to increase the durability of the path, it is better to lay the bricks on a layer of sand and check the levelness with a level. And even in this case, every few years you have to dismantle the path and lay the brick again.
A more reliable method of laying bricks without mortar is tamping with the rented vibrator (described below), which allows you to get a paved driveway surface that can even withstand the weight of cars. Flat vibrators can only compact bricks with a thickness of more than 50 mm, and such paths or platforms must have borders of bricks laid on concrete (item 2, below). If the surface is paved by hand, the curb may be made of bricks placed directly into the ground.
A durable surface can be obtained by laying mortar bricks on a concrete slab. The base may be old, such as an existing walkway or platform, or new, arranged in accordance with the rules for laying lightweight concrete slabs. In both cases, it is better to do this work in two stages: first, laying the bricks on the mortar, then, after the mortar layer has hardened, filling the joints with a thick mortar.
DIY cement mortar
Four mortar recipes
|
Lime-cement mortar |
Plasticised mortar |
|||
|
Normal solution |
Volumetric ratio |
Mortar yield per 50 kg of cement | Volumetric
ratio |
Mortar yield per 50 kg of cement |
|
1 part cement 1 part slaked lime 6 parts sand |
0. |
1 part cement 5-6 parts sand with plasticizer |
0.24 cu. m |
|
|
Robust solution |
1 part cement 0.5 part slaked lime 4-4.5 parts of sand |
0.19 cu. m |
1 part cement 3-4 parts of sand with plasticizer |
0.16 cc m |
 25 cu. m
 Mortar preparation
Pour the required amount of sand into a wheelbarrow (or other container), add lime or plasticizer. With a shovel, make a small indentation, add cement to it and mix until a homogeneous mass is obtained. Make a well again, add water and stir until all lumps disappear.
Approximately half a liter of water is needed per kilogram of cement. Add water gradually until a solution with the consistency of warm oil is obtained. To check the viscosity, make a curved furrow in the solution. If its edges do not blur and the solution slides freely off the shovel, then it is ready. If the furrow blurs, the solution is too wet – add some dry materials. If the solution does not slide off the shovel, it is too dry – add water little by little.
Curb types
Flat line
Flat line
The simplest of the curbs is a straight line of bricks set vertically with a wide edge to the masonry surface. If you lay the bricks with a narrow edge towards the surface, they will look more contrasting with the bricks that pave the site. However, this requires twice as many bricks.
Smooth Curve
Smooth Curve
Sector-shaped bricks can be purchased for the curve, but are expensive. A smooth curve can also be obtained from ordinary brick by laying it as shown in the figure and filling the seams with a strong mortar made according to one of the recipes above.
Sawtooth Curb
Sawtooth Curb
A row of bricks laid on a 45 degree edge creates an optical illusion that the curb appears to be made up of a row of triangular bricks. To increase this illusion, remove the soil a little less depth so that the curb is above the ground level.
Attention: when laying such a row, the lower ends of the bricks must be firmly held in the concrete, while the upper ends are set strictly on the same level.
Wooden curb
Concrete formwork fits perfectly into the construction of a brick-paved area. Install it just below ground level so that the boards and stakes are not visible.
Wooden curb
Pavement paving without mortar
1. Test laying
Measure and mark the area as for a concrete slab, then calculate the required amount of bricks for paving without mortar . Lay a row of bricks along the edge of the site and inside to estimate the final dimensions so that the soil can be removed. When marking out the site, allow a gap of 100 mm beyond the outer boundaries. If you decide to pave with a simple pattern, for example, a rectangular one without dressing, you can save time by laying out only the borders, and leave the middle empty. But the side rows should be laid out completely.
2. Excavation
Remove the brick you laid out for inspection and remove the soil layer 50mm deeper than the thickness of the brick. The depth is assumed to be the same everywhere, regardless of the terrain, and the walls of the recess should be as vertical as possible. Then, with a trowel, dig a trench along the borders of the paving area so that it is 100 mm wider than the bricks and deep enough to lay a layer of concrete 100 mm thick, on which the frieze bricks are laid, the upper edges of which should be flush with the rest of the bricks. Lay a 100 mm thick general purpose concrete layer in the trench and lay out a row of frieze (boundary) bricks while the concrete is ductile. They should form an even vertical wall around the site. Install a board to support the bricks on the site side and fill the trench at the outer edge two-thirds with concrete. Lay sod or soil on top and leave for three days to mature.
3.
 Sand pad assembly
Compact the base soil, place a pad of sharp-grained sand (which is used to make concrete) and level the sand. The level of sand relative to the curb should be such that the bricks laid on it are 10 mm higher than the curb before laying them with a vibrator. If you are going to lay the brick by hand, then after laying on the sand it should be flush with the curb. When laying the site, place two parallel bars on the ground and level the sand with the help of a rule board. To level a sandy walkway base, use the Concrete Pavement Base Leveling Method .
4. Placement of bricks
Lay the first two bricks in the corner of the site. After that, pull the cord for even laying of the entire row. Continue laying the next rows of bricks until you reach the edge of the site – there should be a gap of 10 mm between the last row and the curb.
If tamping with a vibrator is not provided, check with a level that each brick is laid horizontally. Knock down bricks with a mallet and, if necessary, add or remove sand. Then, if there is no vibrator, go to the shutdown instructions (below, after 5 and 6 points).
5. Working with the vibrator
Rent a gasoline powered flat vibrator and walk around the site two or three times to firmly place the bricks in the sand. They will drop approximately 10 mm and the surface of the site will be flush with the curb. Do not walk on bricks before ramming with a vibrator.
6. Filling the joints with sand
Sprinkle the area with a thin layer of sand and make two more passes with the vibrator to fill the joints. Work with a helper, whom you ask to put sand under the vibrator, as when tamping sand moves out from under the vibrator forward.
Finishing the site when working without a vibrator
Filling the joints with sand
After laying and leveling all the bricks, spread a bucket of sharp-grained sand on the site. Fill the joints between the bricks with sand (below left) using your hand or brush. After all joints have been filled, carefully sweep away any remaining sand by moving the brush diagonally (lower right), so as not to sweep the sand out of the joints. It may be necessary to fill the joints with sand twice after the sand has shrunk.
Pavement with mortar
1. Curbing around an existing concrete slab
When bricking an existing slab, check its condition and levelness. If you want to make a new concrete pad, make it with general purpose concrete without formwork, as described above. If the site is at ground level, there is no need to make a curb, but if its level is above ground level, you need to hide it with a beta and protect the bricks of the extreme rows from moisture and wear.
Make a groove along the perimeter of the slab, approximately twice the thickness of the brick and deep enough so that the brick placed on the end is flush with the surface of the finished site. (When calculating, add 10 mm mortar layer thickness to the brick thickness. ) Rinse the curb bricks thoroughly and set them in the groove with a 10 mm gap (use your index finger or a piece of wood of the appropriate thickness to set the gap). Press the curb bricks against the concrete slab by filling the groove with concrete and compacting it. At the same time, check the height of the bricks above the concrete platform with a level and a ruler; it, as already mentioned, should be equal to the thickness of the brick plus a layer of mortar 10 mm thick.
2. Preparation for laying bricks
Lay the bricks dry to check the width and length of the site, leaving 10 mm gaps between them. If necessary, you can slightly reduce or increase the gap in order to fit an integer number of bricks in each row. When laying on the mortar, you can leave one of the test rows for the sample.
Prepare a strong mortar (according to one of the recipes above) in batches of 0.02 cc. m for laying 2 sq. m of brick with a mortar layer thickness of 10 mm. If the total paving area is less than 4 sq. m, you can prepare a solution for the whole job at once. In other cases, cook no more than 0.02 cubic meters. m. This amount is enough for you for about an hour of work, after which the solution will begin to set. Level the mortar and make grooves in it with a notched trowel or the end of a trowel.
3. Laying the bricks
Wet the bricks and lay them along the cord on the mortar with the smooth surface facing up. Lay a full row and only after that start laying the next one. Press the brick into the mortar with your hand and slightly upset it with the handle of the trowel. Level check the horizontal position when laying each brick.
4. Filling the joints with mortar
One day, and preferably two or three days after laying the bricks on the mortar, prepare a hard mortar to fill the gaps between the bricks. The mortar must be drier than the mortar normally used for masonry. Mix 1 part cement with 3 parts sand and add just a little water. A ball of such a solution should break easily.
Moisten bricks and fill gaps between bricks with hard mortar. For work, you can use cutting or jointing, which you need to tightly push the solution. Fill the joints with mortar so that they are slightly overfilled. Use a trowel to remove excess mortar, being careful not to leave it on the surface. Expand the seams, deepening them by 1-2 mm, so that rainwater can drain through the resulting grooves. For deepening, you can use a stiff brush. Wipe off all traces of mortar with a damp sponge and spray the area with a spray hose. Leave to soak for a day or two.
DIY brick garden path
DIY brick garden path
Not every brick is suitable for a garden path that is constantly in adverse weather conditions. Buy only special clay paving stones. Yes, it’s expensive, but an attempt to save money – to use a simple solid brick is doomed to failure. Already after the first season, cracks will appear, and if the brick is not burnt or burned out, then it will generally fall apart after the first winter. It is possible to recommend laying a path with bricks in summer cottages in a northern climate only from proven manufacturers that have been working in this segment for a long time. The size of paving bricks is usually 20×10 cm.
A similar result can be obtained by laying out a garden path with ordinary paving slabs. But, in our opinion, such an area of \u200b\u200ba separate element looks more advantageous compared to small paving stone.
The path of paving blocks is too dotted with seams, which leads to a loss of visual integrity of the structure.
An important part of the garden path is the junction with the lawn. It depends on the strength of the joint whether the extreme bricks will not creep, and behind them the entire path as a whole.
Therefore, it is recommended to put the extreme bricks on the end, and from the outside, additionally support it with a board buried to the level of the lawn, which is fixed with wedges driven into the ground.
The board must be protected with an antiseptic. Two years later, when the paved path finally “settles”, it can be removed, and the void filled with granite chips.
The thickness of the board is 2.5 cm, the height is the size of the brick + the thickness of the sand layer of the pillow.
The board at the same time will act as a guide for the subsequent creation of a flat sandy plane on which the road brick will be laid.
When planning the location of the garden path, try to lay it so that it does not come close to large trees. Their roots will easily lift the brick, violating the integrity of the surface.
But still, the main threat is water. In addition to directly washing away the base, water accumulating around the brick will lead to its deep impregnation. In winter, the freeze-thaw cycle will tear the brick into pieces.
Therefore, if the relief of the site is not such that the water has a free opportunity to drain, be sure to dig an additional deep trench on one or both sides.
The track base consists of two layers. Lower – a mixture of pestle with gravel or granite chips.
After excavating the soil, fill in the gravel mixture and go through with a rammer. When manually tamping, for better compaction, it is necessary to water the surface with water.
The thickness of the gravel layer cannot be recommended “unambiguously”. It all depends on the relief, type of soil, the presence of complex drainage of the site.
It can only be said about the minimum layer. The initial backfill should be at least 5 cm thick for ideal conditions.
In practice, for an average suburban area, it is necessary to make a bedding of 10-15 cm. The thickness of the layer is equal to the difference between the height and the thickness of the brick, plus 2-4 cm.
Before laying the sand must be very well wetted with water.
The sandy substrate is leveled as shown in the photo. For better compaction, it is necessary not only to smooth the sand, pulling the excess towards yourself, but first to push through the arbitrarily poured sand with a rule, and then level it, pulling the rule towards yourself.
No need to try to level a large area at once. The push-pull cycle is carried out for 5-10 cm.
How much will have to be decided empirically. The width of the track, the moisture content of the sand and its granularity play a role.
Remember – you don’t need to apply much effort – the sand will be fully compacted at the next stage of brick laying.
After the sand has been laid, carefully remove some of the sand along the guide boards with a small scoop to lay the side lines of the bricks.
We start laying curb bricks. We put it in place, and with not strong, but sharp blows we drive it so that it is at the right level in height.
Once the curb stones are finished, you can start laying the main track surface.
The pattern should be thought out in advance, and try not to fall into the temptation of laying out a complex pattern.
For rectilinear brick elements, ornateness is simply contraindicated.
Level each brick. Drive slowly into the sand with a hammer. It is important not to overdo it here, otherwise, having squeezed out the sand, the brick will fall below the planning mark of the track. Of course, this is not fatal – you will have to remove the brick, level the sand and install it in a new way.
The last stage of construction is filling the vertical joints between the blocks.
This is the easiest and most enjoyable part of the job.
Sand is poured onto the finished path and “chased” with a mop over the surface until all voids are filled.
Then the only thing left to do is pour water over the path and return to the country veranda, where the pot-bellied samovar has already boiled.