Paint mdf: How to Paint MDF in 6 Steps (DIYer’s Guide)
How to Paint MDF
By
Lee Wallender
Lee Wallender
Lee has over two decades of hands-on experience remodeling, fixing, and improving homes, and has been providing home improvement advice for over 13 years.
Learn more about The Spruce’s
Editorial Process
Updated on 10/07/21
Reviewed by
Deane Biermeier
Reviewed by
Deane Biermeier
Deane Biermeier is an expert contractor with nearly 30 years of experience in all types of home repair, maintenance, and remodeling. He is a certified lead carpenter and also holds a certification from the EPA. Deane is a member of The Spruce’s Home Improvement Review Board.
Learn more about The Spruce’s
Review Board
Helin Loik-Tomson / Getty Images
Project Overview
Medium-density fiberboard, or MDF, is a building component used for so many things in the home: kitchen cabinets, bathroom vanities, bookshelves, baseboards, interior doors, nightstands—the list goes on. With so many pieces made of MDF, it follows that they will eventually wear down and become chipped, dingy, or just dated-looking.
Fortunately, you can paint MDF and bring these pieces back to life. You can even build new cabinets, shelves, and furniture from MDF and paint them—resulting in a smooth, glass-like finish.
Before You Begin
With its porous surface and flaky edges, MDF may not seem like a good candidate for a successful paint job. It’s true that paint applied directly to MDF can cause the surface to become swollen and distorted. Edges siphon up paint, no matter how much paint you apply.
But by treating the MDF with conditioner products first, you can paint MDF just like you would other, less-porous surfaces.
Surface Sealer
The large, flat surfaces of MDF are easier to paint than the edges because the compressed wood fibers form a tighter bond across the surface. It needs less sealing. Plus, you shouldn’t encounter large pits on the surface.
Use a one-step clear sanding sealer to condition the MDF before painting. Oil-based sanding sealers work well, but you can also use a water-based sanding sealer if you prefer.
Edge Filler
The edges of MDF can be conditioned with the same sanding sealer as you used for the surfaces. Because the edges are so porous, you’ll still need to apply multiple coats of sanding sealer and sand between each coat.
A better method is to fill the edges with an acrylic polymer-based filler. This filler requires only one or two applications and it takes care of the large pits that you sometimes encounter in MDF edges.
Safety Considerations
Always work in a well-ventilated area when using paints, fillers, or coatings. Wear latex gloves. When sanding, use breathing protection.
Equipment / Tools
- Roller and foam roller covers
- Brush
- Putty knife
- Sanding block
- Tack cloth
- Oscillating sander (optional)
Materials
- Paint
- Sanding sealer
- Polymer-based filler
- Paint tray and liners
- #220 and #320 sandpaper
-
Sand Surface and Edges
With #220 grit sandpaper on a sanding block, lightly sand the surface.
 If the 90-degree edges are bumpy or flaky, carefully sand those down as well. Your goal is to remove any wax coating and knock down any high spots or other anomalies rather than to achieve a smooth surface. Sanding uncoated MDF too hard will abrade it and make it more difficult to seal and paint.
-
Apply Sanding Sealer
Stir the sanding sealer to mix. Pour the product into a lined paint tray. Roll the product onto the surface.
-
Sand Surface
Let the sanding sealer dry for at least one hour. The sanding sealer likely has raised the surface of the MDF. With #220 grit sandpaper on the sanding block or oscillating sander, sand the surface of the MDF smooth. Be careful not to sand through the sanding sealer.
-
Clean MDF Surface
Clean off the surface of the MDF first with a shop vacuum, then with a tack cloth.
-
Apply Second Coat of Sealer
Roll on the second coat of sanding sealer, just as you did with the first coat.
-
Sand Second Coat of Sealer
After letting the second coat of sealer dry for at least one hour, sand the surface a second time. Since the surface should not be raised any longer, you should be able to switch to the finer grit #320 sandpaper.
-
Apply Filler to Edges
With the putty knife, apply the filler to the edges of the MDF. Press the filler deeply into the holes and cracks. Let dry for two to three hours.
Tip
Another way to apply filler to MDF edges is to rub it on with a finger. This application method is messier, so you’ll need to do more sanding of the MDF to get rid of ridges.
-
Sand and Apply Second Filler Coat
By hand, lightly sand the edges of the MDF with #220 sandpaper. Wipe down with a dry cloth. Add a second coat of filler. Let this second coat of filler dry longer—about four hours.
-
Final Sanding
Sand the second coat of edge filler with #320 grit sandpaper.
Move the sandpaper to the surface of the MDF again and sand that, as well. Pay special attention to the 90-degree angle between the edge and the surface.
-
Paint MDF
Wipe down the MDF with a tack cloth. Apply paint to the MDF by rolling, brushing, or spraying. Allow for about an hour between recoats. Recoat two or three times, if needed.
 If the 90-degree edges are bumpy or flaky, carefully sand those down as well. Your goal is to remove any wax coating and knock down any high spots or other anomalies rather than to achieve a smooth surface. Sanding uncoated MDF too hard will abrade it and make it more difficult to seal and paint.

 Move the sandpaper to the surface of the MDF again and sand that, as well. Pay special attention to the 90-degree angle between the edge and the surface.
Tips for Painting MDF
- When applying edge filler, you can round the edges if you wish. Simply bulk up the filler to about 1/4 inch, then sculpt it to a rounded contour by hand with sandpaper.
- Sanding sealer and polymer filler soak up paint at slightly different rates. To equalize, apply a thin layer of primer to the edges before painting.
- Avoid using drywall compound as an edge filler. Use only a polymer-enhanced product for greater strength.
- Sealed and filled MDF cannot be stained. It can only be painted.
How to Paint MDF – The Best Method for Priming and Painting MDF
This post may contain affiliate links. We may earn a small commission from purchases made through them, at no additional cost to you.
Medium Density Fiberboard, or MDF, is a popular wooden product consisting of small wood fibers mixed with wax and resin. The mixture is compressed under high pressure and heat to form the final product, which results in a solid wood-like product that looks similar to natural wood. MDF is not the same as hardwood, however. So, now that you know more about what MDF is, dive into a journey with us on its qualities, uses, and how to paint MDF.
Table of Contents
- 1 What Is MDF Used For?
- 2 How to Seal, Prime, and Paint MDF Successfully
- 2.1 Seal the Edges of Your MDF
- 2.2 Prime your MDF
- 2.3 Painting Your MDF
- 2.4 Applying Your Sealer
- 2.5 Things to Keep in Mind
- 3 Frequently Asked Questions
- 3.1 What Is MDF?
- 3.2 What are the Benefits of Using MDF?
- 3.3 What are the Disadvantages of using MDF?
- 3. 4 Why do I Need to Use a Specific Primer?
- 3.5 What Paint Type Is Most Recommended?
- 3.6 Can MDF Boards Be Stained to Look Like Wood?
- 3.7 How Strong Is MDF?
- 3.8 Is MDF Difficult to Paint?
 4 Why do I Need to Use a Specific Primer?
What Is MDF Used For?
MDF is widely used in different environments. It is often used for household furniture, as well as industrial industries. This product owes its popularity to the fact that it is significantly cheaper than solid wooden boards. Its size is sheets of 4 by 8 feet that can be anything from 1/4 to 1-inch thick. The boards do not have knots or wood grain like other wood products, making them convenient to cut. Therefore it is also often used for trimming and carpentry work. MDF has a smooth and hard surface, so painting and veneering its surface is quite easy. You might even find that many of the shelves in your bedroom or bathroom cupboards are, in fact, MDF!
Even though MDF is quite strong and hardy, it can still be shaped into angles, curves, and panels, making it a go-to for household furniture like kitchen cupboards, for example. MDF’s major drawback, however, is that it absorbs moisture extremely easily, and this leads to swelling, cracking, or splintering. If this happens, its shape and form will be changed permanently. You do not have to feel intimidated, though. We are here to guide you on how to paint your MDF like a professional. Bearing in mind this product is not a friend of damp air, water, or any water-based products, you will be able to seal, paint and prime your MDF to make it look professional, neat, and modern.
So, if you are wondering how to make the best use of your MDF and avoid any pitfalls, especially in rooms that are prone to have moisture in the air like bathrooms, read on.
How to Seal, Prime, and Paint MDF Successfully
If you are still wondering, the answer is “yes”. You can paint MDF! In fact, it is a great idea, because it protects the wood from absorbing any moisture. It is actually better to paint your MDF than to use it in its original form. You can paint your board without having to do too much expensive preparation work too. But before you start, here are some very important tips and tricks you need to know.
Remember to wear good safety equipment when sanding, painting, or cutting the boards to prevent any injuries or health problems. Double-check that you have all the necessary equipment before you start. If you are prone to allergies or breathing problems, consult your medical professional before working with your MDF or any paint products.
Here is everything you will need. Most of these can be acquired at a general hardware store.
- Coveralls or old clothes
- Gloves
- Mask or facial covering (for dust)
- Safety glasses
- Sandpaper
- Sanding pads
- Old cloths
- Your chosen sealer
- MDF-friendly paint
- MDF-friendly primer
- Paintbrushes
Before starting, make sure you protect your workspace with old fabric cloths or layers of newspaper. MDF produces high volumes of dust when sanded, so the mask and safety goggles are strongly recommended, especially if you are allergy-prone or have breathing difficulties. You will need a fairly large space to work in, so we recommend that you do your woodwork, sanding, and painting away from your indoor spaces.
It is always a good idea to have a clear picture in your head of what you want your end-product to look like. It might be helpful to go online for some inspiration. Browse idea board platforms like Pinterest if this is your first MDF project.
So, now that you have all the required items, here’s how to go ahead with the sealing, priming, and painting process.
Seal the Edges of Your MDF
The MDF’s edges are actually more porous than the surface is, so they can absorb moisture easier. So, sealing the edges is critical as it will prevent the board from swelling or deforming if it does get exposed to moisture. It will give your paint an optimal adhering surface, resulting in a smooth look. Remember, the edges are still visible and will also be painted, so they need to be sealed and primed too. Here are your different options to seal the edges.
Acrylic Paint Sealer
You can also use acrylic paint which is also suitable for all kind of wood as a sealer. Apply a very thin layer, to prevent it from running. Choose a color that matches the topcoat if possible. It would be best to use heavy-bodied paint so that one layer will be enough to seal the MDF. It might not look pleasing to the eye if you pile on the bottom coats too thick.
Drywall Sealer
For this technique, compound to the edges (using your hands is fine). After it has dried, sand down the edges with sandpaper. (Here, your trusty mask, goggles, and gloves come in again!). You can also conceal any unwanted marks or flaws on the flat surface of your board with any leftover compound. Next, sand down the entire surface, then wipe it down with a dry cloth to make sure there are no dust particles.
PVA Wood Glue
You can seal your edges with wood glue too if you already have some at home or you prefer not to use a paint-like acrylic. You can use an airbrush or spray bottle for an even effect. Remember not to use PVA glues that need to be mixed with water. An acid-neutral PVA glue (usually used for bookbinding) is a good option. When it has dried, sand down the edges until smooth.
Prime your MDF
After sealing the edges, you can’t start painting just yet. A primer is necessary as a base or foundation layer to make extra sure that no moisture reaches the MDF (yes, it really is that sensitive to moisture). A primer can act as a “background” or “canvas” for your final paint. Your primer needs to be exactly the right type, to avoid the paint forming a “skin” layer that will peel off. This part is essential to have a neat, finished-off end product.
Because MDF is so sensitive to different chemicals, you need to be even more particular about your primer, and we are here to help you choose the correct one.
You should never use a latex primer for your MDF because it will cause the wood to expand, and stay away from multi-purpose primers too. You should only use a solvent-based primer. This is because various adhesives and chemicals are used during the production of MDFs that could cause a reaction with the primer and damage your board.
Remember to use primer on your newly-sealed edges too! You can apply two or even three layers of primer to the board, and sand down the surfaces very gently between coats. Ensure your product is dry before you continue with the next coat. It pays off to display a little patience during this step of this process! Also, take care to wipe down all the dust particles after sanding.
Because MDF is so porous, we recommend that you prime both sides of the board, to avoid having your paint bleed through to the other side. This will act as a double layer of sealant.
Our Top Choice: ZINSSER Interior/Exterior Oil Primer
This Zinsser Interior/Exterior Primer can easily cover stains caused by water, for example. This product can adhere to nearly any exterior or interior surface without sanding needed beforehand. It also covers uneven colors and seals and penetrates all surfaces, so it really is a go-to for us.
This Zinsser primer can, however also be used with ease in personal projects. It penetrates exterior surfaces fully and results in a smooth end result. It is available in a tin as well as a spray can, so it depends on how much you need as well as your personal preference of how to apply it.
PROS
- Dries very fast
- Covers stains easily
- Covers redwood and cedar bleeding
- Adheres to most surfaces very easily
CONS
- Not always easy to apply due to consistency
Painting Your MDF
For painting your MDF, you really have numerous options. Now, the real fun begins! Look around at your different options and what is best suited to your item and needs, before you start.
Oil-based paint is usually best for painting MDF because it is most compatible with a solvent-based primer. However, you will also have to thin the paint with a paint thinner. (Remember, no water!).
When using oil-based paint, remember to use protective gear like goggles and a mask as they often emit strong fumes which could be dangerous to your health. We recommend that you apply this paint in an open-air environment. Another option is to use acrylic paint, which dries very fast.
Remember to use a non-water-based acrylic, as you do not want your MDF to get any moisture.
You can also use latex paint. However, these are water-based, and should only be used after careful consideration. Your board and edges will need to be sealed very thoroughly. One small area that is not sealed properly is enough to cause splintering or swelling. Latex paint is still popular though because of its fast drying time and low fume emissions.
The Base Coat
After settling on your type of paint, you will start by applying the base coat. This should be a very thin layer, and it should dry easily. Then, sand it down again gently, and continue doing this after each coat (and after making sure it has dried properly). If you rush between coats, some layers might never dry properly and will result in smudges or dents.
For the base coat, use a roller, brush, or a spray gun, whichever works the easiest and most convenient for you. Apply two or three coats of paint for a neat, finished-off look. Depending on your item, you might need a final sealing coat or topcoat. Household furniture like cabinets or shelves that are used frequently usually does need sealing or topcoats. Again, it depends on your vision for the end result.
Our Top Choice: INSL-X Semi-Gloss Cabinet Paint
INSL-X is an enamel paint ideal for products that will be used indoors. This paint gives an ultra-smooth and shiny finish. It adheres specifically well to MDF, meaning you might not even need a primer in some cases. However, unless you are fairly experienced, we recommend that you still apply the primer first.
It also has very good leveling and flow properties and is easily cleanable from stains. This product is high-quality and resistant to chipping, making it one of the more durable paints on the market. The ideal condition to apply the paint in is when the room temperature is between 50 and 90 degrees Fahrenheit. This paint is, however, not in the low-budget range and is relatively expensive.
PROS
- Can be used without primer
- Provides a very smooth finish
- Low volatile organic compound (VOC) levels
- Easy to clean
CONS
- Needs more coats than its competitors
- Relatively high-cost
Applying Your Sealer
A sealer or topcoat protects your board from water rings, scratches, discoloration, and is especially helpful for furniture that is handled a lot. It also makes the board very easy to clean, as you can just wipe any dirt or stains with a wet cloth. This could come in very handy with furniture such as kitchen tables finishes or coffee tables.
If your board is painted a dark color that can show dust stains and smudges easily, a sealer is a must. If your MDF is used in an area where it may be exposed to moisture, like a bathroom, the sealer is very important as it will add another layer of protection. Some say that latex paint does not require a topcoat, but we disagree. They can form bubbles if they get exposed to moisture, so the topcoat will prevent this.
Remember to also seal your edges as well as the surface when applying the topcoat. In other words, yes to a sealer!
Our Top Choice: MINWAX Polycrylic Protective Water-Based Finish
The Minwax Finish has a very clear and shiny look. This can be applied with a brush, roller, or spray can. It is not toxic and only needs water to be cleaned. However, it does not behave well in extremely high temperatures, so it might not be ideal for an item placed near a stove, for example. If your item will be placed in a room or environment that is only exposed to neutral room temperatures that do not fluctuate too often, like a table or bookshelf in a living room, this sealer is perfect.
This sealer is available in a range of options including semi-gloss, gloss, satin, and matte. It takes only one to two hours to dry, and within three hours, you can handle it. After about 24 hours, you can use the product. However, as painting circumstances vary, touch the item with caution and very gently at first to ensure it is completely dry. Rather err on the side of caution.
PROS
- Crystal clear finish
- Dries quickly
- Low odor
- Easy to clean
- Non-toxic
CONS
- Not suited for high temperatures
- Does not produce the matte effect
Things to Keep in Mind
Did you know that MDF is a fire retardant? Most MDF boards are made with a formaldehyde-free (NAF) adhesive system, which slows down the spreading of flames in the event of a fire. So, if you opt for Fire Retardant (FR) MDF, the contents of your furniture, as well as the item itself, will be less exposed to potential damage in the event of a fire.
This makes FR MDF a good option, especially for indoor use, or for industrial use such as paneling or insulations. It might be a safer option, whereas natural wood is known to catch and spread fire quickly. Note: Even FR MDF is by no means fireproof and should never be used as such.
Many people may shiver at the thought of painting MDF because it is somewhat of a mystery material. With our easy tutorial, you do not need to fear MDF anymore! All you need to do is follow our instructions and you will have a beautiful painted finish on your MDF fittings.

Frequently Asked Questions
What Is MDF?
MDF (medium-density fiberboard) is a wood product that contains wood fibers that have been mixed with wax and pressed together under heat and pressure. It is often used for household furniture but is also popular in industrial use.
What are the Benefits of Using MDF?
MDF has a smooth appearance with no wood grains or knots, making it very easy to paint. Furniture makers do not have to consider matching the wood grain, resulting in a well-finished look, yet it still has a similar appearance to natural wood. MDF is also relatively cheap and easily acquired in most countries. Most MDF is also fire retardant, meaning your furniture item and its contents are offered some protection in the event of a fire.
What are the Disadvantages of using MDF?
MDF is very handy for using as is in solid sheets, but it is not very compatible with nails, bolts or screws. This is because it is made up of fibers, so it might splinter when screws or nails are driven into it. It will therefore not withstand any drilling. This, unfortunately, brings down the durability of the product significantly. Another disadvantage, as discussed throughout this article, is of course its tendency to soak up moisture. This strongly affects the areas you can use it in and might limit its use.
Why do I Need to Use a Specific Primer?
MDF is porous, and any exposure to moisture will cause it to swell or distort its form. So, it is essential that you use a solvent or oil-based primer. Some primers also contain chemicals that might react with the resin or other substances that were used in manufacturing MDF, which could result in damage to your board.
What Paint Type Is Most Recommended?
We strongly recommend oil-based paint. However, you can also use other types like acrylic and latex, in fact, we name quite a few different options above. Remember to always ensure that your MDF is properly sealed. This product lends itself well for the use of a spray can, which will result in a smoother look than paintbrushes.
Can MDF Boards Be Stained to Look Like Wood?
MDF does not have natural grain. So yes, it can be stained but it might not look exactly like wood, and there is no guarantee. Wood stain will not be absorbed into the MDF as it would be with natural wood. We tend to say, embrace it for what it is and use its own unique look as its feature, instead of trying to resemble wood.
How Strong Is MDF?
MDF is relatively strong enough for small daily-use items, such as coffee mugs, cosmetics, or even books. However, it is not a heavy-duty product, so it can not be used to support large loads like metal pots and pans, building tools, or industrial appliances. If you require shelves or furniture that offer more support, opt for a more durable product, such as plywood.
Is MDF Difficult to Paint?
MDF is relatively easy to paint, if you apply a sanding sealer before painting. Because MDF is basically made from compressed wood fibers, the surface is dense and paint won’t sink in too much.
Thomas Faessler
I was born in 1984 and have been into woodworking since 2005 and woodturning since 2011. Because of my love for wood and woodworking, I started woodhappen.com to teach other enthusiasts about how to finish and seal wood, the best woodworking tools, the different types of wood, and everything else related to wood! See my full profile
Painting MDF – The Ultimate Guide
UK Delivery £5.99 under £50
Free UK Delivery over £50
UK Delivery £5.99 under £50
Free UK Delivery over £50
UK Delivery £5.99 under £50
Free UK Delivery over £50
UK Delivery £5.99 under £50
Free UK Delivery over £50
UK Delivery £5.99 under £50
Free UK Delivery over £50
When it comes to MDF there is a lot of confusion surrounding whether you can paint it or not. In this guide we are going to answer the most common questions regarding painting MDF so you can decide on the best course of action.
Can You Paint MDF?
Firstly, let’s answer the question of what exactly is MDF and whether you can paint it, as it is a question we receive a lot here at Painters World. MDF stands for ‘Medium-Density Fibreboard’, a commonly used material for the production of furniture and other building materials around the world. It consists of a combination of sawdust and resins that make it inexpensive and easy to cut. Common uses for MDF include kitchen cabinets and furniture such as dressing tables and wardrobes.
To answer the question of whether you can paint MDF, the answer is simple, yes you can paint MDF. As with any painting project, it must be properly prepared and painted with the most suitable paint for its particular composition. MDF has a 150 grit on the front and back sides while the edges are much more rough than this, making them highly porous This means that they must be prepared in order to create a uniform substrate ready to paint.
Benefits & Drawbacks of MDF
It is crucial to understand MDF before beginning the process of painting it. Here are the key benefits and drawbacks of MDF as a material:
Benefits
- The small fibres that make up MDF make it a very smooth surface on the face of the material, giving you a good surface to paint
- With no visible grain to the wood due to its composition, it has a uniform appearance
- It is less volatile to movement compared to a natural wood surface, which helps to prevent paint cracking
Drawbacks
- You must wear the appropriate safety gear as MDF causes a large amount of dust when sanding and sawing
- With no grain, it does not have the texture that many people want when staining wood
- MDF is porous and can absorb water, which is why many people recommend using oil-based paint over water-based paint, although you can use both on MDF if it is properly primed and sealed
What Is The Best Paint For MDF?
Primer
When painting bare MDF it is crucial to seal it using an MDF primer. We would highly recommend using Dulux Trade Quick Dry MDF Primer as it acts as a primer and undercoat in one that has been specially designed for use on MDF. It can be used on interior and exterior MDF and as a water-based primer is quick-drying and low odour.
Paint
With the water-based primer of Dulux Trade Quick Dry MDF Primer, we would recommend opting for Crown Trade Fast Flow QD Satin as the best paint to use on MDF. This is for a number of reasons, the first of which being that satin is the most popular paint finish for furniture. Further to this, using a water-based primer means that a water-based topcoat must be used, in which Fast Flow by Crown Trade Paint is one of the best on the market. As a water-based satin, it benefits from a quick drying time, being low odour and will not yellow, which is a problem with oil-based paints. It offers all this while ensuring an attractive oil-like finish.
Finally, it can be mixed in any colour, which means that no matter what look you want to achieve with your MDF furniture, it is possible. This includes British Standard, Crown and RAL shades, plus equivalents of all other major manufacturers colours, including designer shades. All you have to do is tell us the name of the shade and we do the rest.
2.5L Dulux Trade Quick Dry MDF Primer White
£37.49
exc. VAT
£44.99
inc. VAT
Dulux Trade Satinwood Tinted Colour
£23.33
exc. VAT
£27.99
inc. VAT
How To Paint MDF
So you now know what the best paint and primer to use on MDF are. Now let’s talk about how exactly to go about painting them!
Step 1: Cleaning & Sealing
One of the most important steps of any decorating project, as any professional decorator will tell you, is preparation.
Firstly, if the MDF has dirt or grime on it, this must cleaned before we begin priming and painting. A universal cleaner such as Zinsser Universal Degreaser & Cleaner can be used, which is then wiped down with a cloth ensuring that no residue is left.
As we have mentioned, the edge of MDF often has a much rougher edge that absorbs moisture more than the back and front of the substrate. These edges if they haven’t previously been sealed must be treated so it will accept the paint in the same way as the rest of the surface. This can be done by first sanding the edges using a 120-grit sandpaper to smooth the surface of the MDF. You must ensure that you are wearing protective goggles and a mask when sanding MDF as it contains dust and glues that hold the substrate together that can be harmful to health.
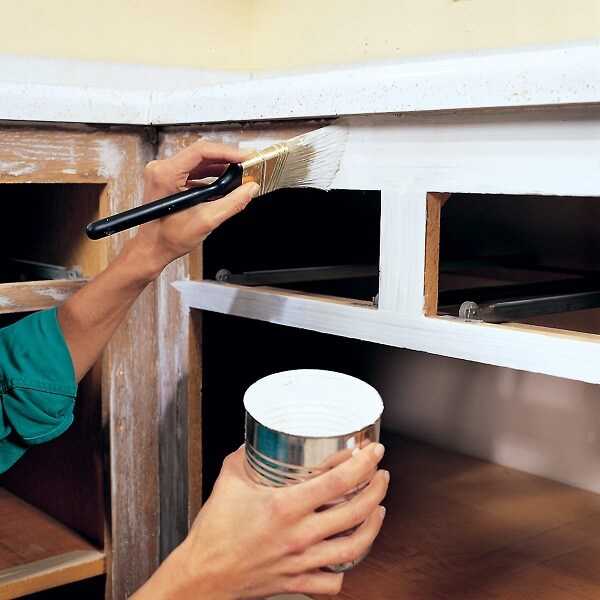
Once you have sanded down the edge, you can apply a number of layers of Dulux Trade Quick Dry MDF Primer to seal these edges, before the rest of the MDF is primed. This gives the corners an extra level of primer in order to prep them for painting. This is most easily done with a small paint brush.
Once this primer has dried sand down the edges of the MDF once again with a 120-grit sandpaper. The next stage is to apply primer to the rest of the MDF using Dulux Trade Quick Dry MDF Primer once again. You can use a mini-roller or a brush to apply the primer. Ensure you apply a generous but even layer of primer.
If you have previously painted and sealed MDF it is not necessary to prime this before painting. You can move straight to apply a first-coat of paint.
Step 2: Sanding
After you have primed and sealed the MDF, it is time to prepare the full surface for painting. Ensuring that you are wearing protective goggles and a mask, sand down the full MDF surface with a light key sandpaper (such as 120-grit).
Step 3: Priming
Once the MDF has had a light sand, you can apply a second coat of primer as evenly as possible, creating a final base that is ready to be painted. While this seems like a long-winded process, the preparation that goes into painting is what sets apart good results and perfect results.
Step 4: Painting
Now the important part, the painting. Using a brush or mini-roller again, apply a first-coat of paint to the MDF nice and evenly to create an excellent undercoat for finishing. Leave this to dry completely as per the manufacturers instructions. The chances are you will require a second-coat of paint, which you should apply so that the MDF has a good paint film applied.
It’s important to note that MDF is porous, which may mean that you will require more paint than you would expect.
Step 5: Finishing
If the MDF will be taking heavy-traffic and may be prone to scuffs, it is a good idea to preserve the finish using a final sealing finish such as Sadolin Extra Durable Clearcoat. This is optional, especially if you do not want to add an extra level of sheen to the MDF, which a gloss polyurethane can leave.
Frequently Asked Questions
Q. Does painting MDF make it waterproof?
By painting MDF like any surface, you help to create a film on the surface that can resist some level of moisture. While painting MDF doesn’t waterproof it, it does help to prevent water damage. To fully waterproof MDF especially if you are using it outdoors, paint it with a dedicated water-repellent.
Q. Does painting MDF prevent mould?
By providing some water resistance to MDF, painting it does help to prevent mould and damp. This is particularly helpful if you are keeping MDF furnishings in high moisture rooms such as garages or bathrooms where bare MDF will absorb moisture quickly.
Q. Can I paint MDF without primer?
As with any surface, you can apply paint without priming before hand, but the results will not be optimal. The MDF will absorb the paint quickly meaning you will use more paint than needed and the whole process will be more time-consuming. This will especially be the case with a water-based paint.
Q. Is it safe cut MDF?
As we have mentioned, MDF contains a mix of dust, fibres and glues that can all be harmful to health. This is why it is crucial if you are sanding or cutting MDF, you use a mask and eye protection to prevent any harm.
Q. Is oil-based paint or water-based paint better for MDF?
You can use both oil-based paint and water-based paint on MDF. In general, while oil-based paint has traditionally been higher quality than water-based paint, todays technology means that water-based paint is just as good.
Water based paints dry quicker than oil based, are low odour, do not yellow and contain less VOC’s. Oil-based paints can achieve a higher level of sheen, can achieve less brush strokes and offer higher durability. Overall, water-based paints are recommended for DIY’ers as they are much easier than oil-based paints to use and clean up, which is why we would recommend them.
We hope this has answered any questions you may have had regarding painting MDF. At Painters World we have a wide range of paints available, so no matter the job, we’ve got the right tools for you! Shop our huge range of products today & get FREE next working day delivery on all orders over £50.
Secure payments, cards we accept:
Newsletter – Sign up
Sign up now and be the first to know about exclusive offers, product updates, and announcements.
I have read and agree to the storage and use of my data in accordance with our
privacy policy.
Useful
Painters World
© 2020 Painters World Ltd.
eCommerce Website MadeByShape
How and how to paint MDF at home? • Trans Lok
Today, material such as MDF has a very wide application. It is a material of finely dispersed fractions. The production technology is very simple: medium-density wood particles are pressed under great pressure.
Various furniture is made from MDF, as well as interior doors, wall panels, laminate. And if you have such products in your house, you can repaint their surface with your own hands.
In this article you will learn from A to Z about how to prime MDF, how to paint MDF and what paints and varnishes are suitable for this purpose. And also about how to properly prepare surfaces for painting – this is the most important step that should not be skipped.
To answer this question, you need to understand why this might be required at all. The material itself has an average or low density, and over time, for many reasons, various defects may appear on the surface, such as scratches, fading in the sun, gloss is lost. All this spoils the appearance of the product. And then the owner thinks about how to correct the situation and at the same time not change the MDF completely.
There are a number of reasons why MDF needs to be painted at home:
-
Any mechanical damage. Any MDF products have a thin layer of laminated paper, which can burst on impact, exposing the core of the product;
-
Color fade. In conditions where the sun’s rays constantly fall on the MDF surface, it burns out. In addition, the surface loses its glossy sheen, appearance;
-
Degree jumps also have a negative effect on MDF. This is a material that consists of wood fractions, and wood, as you know, absorbs moisture well. Therefore, an MDF product can deform and swell. Conversely, in dry air, MDF dries and cracks. The adhesive substance in the composition of the material at high humidity loses its properties, which leads to detachment of paper, chips.
If you encounter such problems, you can fix it yourself. To properly paint MDF, you need to carry out a number of preparatory work. In addition, you should have the following devices:
- for applying the primer and paint on furniture facades, it is best to use an airbrush;
- brushes with soft but elastic bristles will also do an excellent job. Especially if there is MDF milling;
- for products without milling, a roller is suitable.
MDF primer for painting
MDF painting technology includes several stages. And the first is the primer. But before it is carried out, it is necessary to prepare the surface, grind, remove sharp edges and degrease the surface. If there are any cracks, they need to be puttied. After the material has dried, the surface must be sanded again.
How to prime MDF before painting? Priming is carried out in several stages. The first is an insulating primer, which is sprayed from an airbrush with a calculation of 100 grams per m2. But this applies to non-laminated products. Otherwise, this step can be skipped.
This step is necessary so that the paint or varnish is not absorbed and does not sag after some time. The primer, as it were, fills with itself all the small bumps and depressions. After it dries, the coating needs to be sanded again.
The second coat is a white polyurethane primer. Consumption – 150 grams per m2. At the same time, it dries for a long time – about 24 hours.
All this is done with a spray gun, but if you don’t have one, you can also use a brush. The first layer is made along, and the second – across the first.
How can MDF be painted?
Before you paint the MDF facade at home, you need to choose the right materials for this purpose. It is worth remembering that painting should be carried out at about + 20C and air humidity of 50-80%. All paints are not suitable for these works, because MDF is, in fact, a tree, and therefore the paint should be designed specifically for this material. This includes:
-
water-based formulations (water-based).
Often used for large volumes of work; -
compositions based on alkyd enamels. The coating is resistant to scuffs, but it can easily fade in the sun;
-
silicone materials. They are water-repellent and withstand high temperatures;
-
polyurethane enamels;
-
polyvinyl acetate materials – suitable only when the product is not subject to heavy loads or damage;
-
oil-based formulations – moisture resistant;
-
acrylic-silicone compounds. They withstand damage, and also do not allow the reproduction of harmful microorganisms;
-
special paint for MDF facades;
-
also many prefer powder coating – it is more durable, and the coating is more even.
 Often used for large volumes of work;
 Any paint for furniture facades and other MDF products must be of high quality and as harmless as possible to humans and the environment. So you can be sure that the product will serve you for a long time and retain its original appearance.
All this is applied with a spray gun, but if it is not available, brushes will do. However, with an airbrush, the coating is more uniform and even.
Applying paint
This step is actually very simple. First you need to prepare the paintwork material according to the instructions proposed by the manufacturer. Then you need to take the spray gun and set it up so that it sprays the material in small areas. So you can save paint, and the coloring itself will be of better quality.
MDF furniture and other products should be started from the most problematic places, such as cracks or damage. It is advisable to paint in several layers, allowing each of them to dry thoroughly.
Lacquering
The last step is
-
varnish is prepared according to the manufacturer’s requirements;
-
start varnishing from the ends and milling points;
-
the first coat of varnish must dry well, and then it is treated with sandpaper 1200;
-
dust must be carefully removed with compressed air from the compressor;
-
a second coat is applied;
-
some products must have a 0.
5 mm varnish layer, and therefore up to 4 layers may be required; -
after that, the final grinding is carried out with sandpaper 1500, 2000, 3000;
-
surfaces need to be polished with a special polishing machine and a special paste.
 5 mm varnish layer, and therefore up to 4 layers may be required;
 As you can see, painting MDF panels with your own hands is not such a difficult task. The main thing is to follow all the steps consistently, do not skip anything and use only high quality materials. And then your furniture, doors, laminate will sparkle with new colors, change, and the room will look new.
Share with friends:
Social buttons for Joomla
The right choice of primer and paint
Painting
31,193 views
6 min to read
Painted samples of MDF
MDF appeared relatively recently. This material is distinguished from others by a rather dense structure. The wood is turned into a finely dispersed state, and then glued into a homogeneous structure. The density is higher near water, it sinks.
You can find MDF from different manufacturers. Chinese plates have a density of 1050 … 1075 kg / m 3 European heavier, typically 1130…1160 kg/m 3 . The difference is not only in density. The quality of plates made in Switzerland or Poland is much higher than that offered by China. Such material is very fond of furniture makers and builders. European samples:
- almost do not swell in water, the dense structure is glued into a monolith that can withstand high loads;
- high surface quality can be achieved by machining;
- high-quality MDF can be used to produce complex profile products that will outperform solid hardwood products.
Unfortunately, Chinese MDF does not always meet the declared quality. Several factories for the production of chipboard and MDF in Russia have not yet reached the European level. Therefore, when using them, additional protection is necessary.
How to protect MDF panels
MDF boards have been used to manufacture door panels, some manufacturers even put door frames made of this material on the market. For consumers, they offer a variety of options for entrance and interior doors. With the help of a laminated film glued to the surface, wood of different species is modeled (Fig. 1). The material, which is extremely easy to machine, allows manufacturers to produce most types of glazing. Lots of room for creativity for designers.
Fig. 1 Samples of MDF doors
Furniture makers also saw an extremely convenient material in MDF boards. For cabinet furniture, kitchens, bedside tables and tables, a wide variety of furniture facades are made (Fig. 2). Combine solid and glazed products. Choice for every taste.
Fig. 2 Samples of furniture facades made of MDF panels
During construction, laminated panels are used for interior decoration, which produce full or partial decoration of rooms. The use of such material greatly simplifies the work of creating any interior. Thin panels are easily attached to the wall, and then can serve for decades without visible damage (Fig. 3).
Fig.3 MDF wall panels
In addition to cladding with film, painting with paints will be an excellent protection for a magnificent material. In order for the facade not to be saturated with moisture and remain dry in its entire mass, it is necessary to close all capillaries from possible penetration. Painting does the job.
How to paint MDF facades
For products containing wood, all types of coloring materials recommended for wood are suitable. There are only certain features:
- MDF structure is quite dense, no pores;
- same properties in all directions;
- contains adhesives.
The MDF must be impregnated before applying paint layers. If you just paint with enamel, then the coating will not be firmly held on the surface. Glue, which was used to glue fine particles, is reluctant to interact with paints. Therefore, pasting with films is easy, and painting is associated with certain difficulties.
At the first stage, a primer is required. Without it, one cannot count on obtaining a high-quality coating of MDF facades with paint.
Primers for MDF
Craftsmen know that to obtain a quality MDF surface, PaliWood UM 002 primer should be used (Fig. 4). With its help, they achieve not only penetration into the structure. A dense layer forms on the surface, which can be sanded to achieve a glossy sheen.
Fig. 4 Polyurethane primer for MDF
It is recommended to apply the primer in a certain sequence:
- Wipe the surface from dust and other contaminants.
- Apply a coat of primer to the surface to be treated. (The manufacturer recommends using rollers, but you can use a brush or spray gun).
- After drying, remove the build-up with a scraper and then use a fine-grained sandpaper to bring the surface quality to a shine.
In furniture production for MDF facades, alkyd primers are used (Fig. 5). They contain not only binders with high adhesion. There are also fillers available. They eliminate irregularities, penetrate into pores and capillaries. The main advantage is the formation of a dense film through which moisture will not penetrate inside. MDF panels can be installed not only indoors. Treated with moisture-resistant soils, they perform their functions, located in the open air. Only it is required to additionally coat them with alkyd-based enamel.
Fig. 5 Universal alkyd primer (not only recommended for MDF, has a wide range of applications)
fig. 6 Alkyd primer for outdoor and indoor use
Users especially note alkyd primers made in Finland or according to Finnish technology (Fig. 7). Tikkurila products are recommended for surface preparation in kindergartens, medical buildings and other places where the requirements for the quality of work are quite high.
Fig. 7 Alkyd primer for general use
Acrylic primers are available for indoor facades. They form a transparent film (Fig. 8). Acrylic primers also contain fillers, but their size is much smaller than polyurethane or alkyd materials. Therefore, the penetrating power is higher. Manufacturers claim that acrylic primers can serve outdoors. Here it is necessary to clarify that they can be used outdoors, but they do not allow moisture to enter. That is, it is possible to paint MDF facades only if further operation is under a canopy or other protection from rain and snow.
Fig. 8 Acrylic universal primer recommended for MDF
They make a pretty good primer that will satisfy many users. Here, with good quality, a very interesting price (Fig. 9).
Fig. 9 Acrylic primer for facades made of plywood, chipboard and MDF
How to paint MDF facades of a house
When I paint MDF facades, they pursue certain goals: , bedside tables and pencil cases;

Two pack polyurethane paints give excellent coverage. Even a thin layer covers the surface perfectly. Enamels that give a bright sheen are in great demand. For kitchen cabinets and bedside tables, it is recommended to use automotive enamel (Fig. 10).
Fig. 10 Autoenamel for painting metal, wood products. The best solution for MDF facades
One-component polyurethane acrylic enamel (Fig. 11) is also worthy of the attention of craftsmen. According to user reviews, the use of such paints for MDF panels gives an excellent result.
Fig. 11 Polyurethane acrylic enamel
Alkyd enamel is used for painting furniture in children’s rooms (Fig. 12). Furniture, in which MDF facades perform decorative and protective functions, looks great. Bright colors bring joy to the children’s room. A similar paint is recommended for medical institutions. Safety is guaranteed by manufacturer’s certificates.
Fig. 12 Alkyd enamel for MDF
Professionals use spray guns for painting. In skillful hands, a high-quality glossy finish is obtained on the surface of a dense structural material for furniture. At the request of consumers, it is also possible to apply a matte layer of paint, which will reliably protect the product and give it new consumer properties.
Video: Applying paint and varnish to an MDF furniture front.
Sayerlack paint and varnish.
Content
- 1 How to paint the facades of MDF at home
- 1.1 How to protect the panels from MDF
- 1.2 than paint the facades from MDF
- 1.2.1 primer for MDF
- 1.2.2 How to paint the MDF facades of the house
- 1.2.3 Video: Applying paint and varnish to an MDF furniture front.
mdf
MDF furniture paints: painting at home
A bench in the yard and wooden chairs in the house perform the same function, but are in completely different conditions.
Outdoor furniture has been exposed to precipitation, temperature and humidity fluctuations, direct sunlight and more. Interior items have other features of use: depending on the specific room, they must not only be in harmony with the rest of the situation, but also withstand detergents and cleaning, mechanical stress and humidity.
Therefore, materials for interior and exterior decoration differ from each other, because they have different tasks.
Outdoor work
The purpose of outdoor work is to protect the product from rot, insects and deterioration, exposure to ultraviolet radiation and weather conditions. Paints for outdoor wooden furniture must meet these requirements, and in order for it to last a long time, it is necessary to regularly care for it.
Oil
Oil is an environmentally friendly product for bare wood. Oil treatment does not form a film, but protects the wood from moisture and pollution, slows down aging and makes it a few shades darker. Wooden garden furniture will retain its appearance and strength for a long time if it is impregnated after purchase and repeated several times a year. Some manufacturers make oils that can be tinted.
Stain
Tinting fluid is based on alcohol, water or solvents. Like oil, wood stain is designed for uncoated bare wood. The wood becomes darker and its texture comes out. Stained wood must be varnished or waxed for durability.
Paint and varnish
Only paint can change the color of the coating. It is better to opt for special formulations designed for garden furniture, and treat the wood with an antiseptic or oil before use. Over time, the aging of the product is more noticeable in light colors, and dark ones hide its signs.
Interior work
The requirements for interior materials are somewhat different from those for facade materials. Indoors, temperature differences are not so strong, and exposure to direct sunlight does not threaten. The main priority is the safety of the composition, how it manifests itself when repainted, how compatible it is with other coatings and materials.
In our catalog you will find furniture paints that meet all requirements.
Safety
Interior materials must not be harmful either during painting or during the use of painted products. Paints and varnishes made on the basis of solvents and drying oil emit volatile organic substances, are toxic and flammable. It is better to refuse them when working indoors or strictly follow safety precautions, use protective equipment and thoroughly ventilate.
The store presents water-based paints and varnishes, which are made from natural ingredients. They are safe for health and the environment, odorless and do not cause allergies. They are suitable for painting children’s furniture and toys, and can also be used by people with special sensitivities.
The ability to cover the previous color
An opaque paint is called opaque. When repainting furniture, this quality becomes very important, the consumption of materials and the final result depend on it.
Surface compatibility
Paints for furniture made of MDF and other particle boards are difficult to find, almost no composition is applied to them.
Our paint is designed for the most difficult surfaces, so it adheres to any surface: wood and its derivatives, glossy and lacquered finishes, plastics and ceramics, stone, brick and many others.
Easy to use
Removing the old coating and preparing the product for painting is the most time-consuming and tedious part of painting. Our materials in most cases do not require special pre-treatment of the surface. It is only necessary to clean and degrease it, and in the case of glossy ones, lightly sand it with sandpaper to remove the shine.
Durable
The paint must withstand mechanical stress and be resistant to water and detergents.
Leaves the possibility of repainting
It happens that furniture is accidentally scratched or left a dent, or maybe the color is just tired and it’s time for a change. It should always be possible to restore and renew coverage.
Manual
You can choose and buy paints for painting furniture at home in our catalog. All materials are environmentally friendly and do not emit volatile organic compounds into the air. The composition of the paints includes milk casein, the most harmless base, porcelain powder gives strength, and natural dyes give a lasting color that does not fade or turn yellow over time. Paints and varnishes are odorless and do not cause allergies. Therefore, they are suitable for work in confined spaces and where people with special sensitivities live. You can even paint children’s furniture and toys.
The special formula of these materials makes it possible to paint complex surfaces. Wood and any of its derivatives (plywood and particle board), concrete and ceramics, plastic and glass can now be painted.
In most cases no special surface preparation is required. It is not necessary to prime or remove the old coating if it is still firmly attached.
The rich palette of colors is not limited, because all colors can be mixed with each other and with water-based colors.
Differences
A separate line of materials has been developed for each painting purpose. Perfect paint is designed for fast and high-quality painting. The paint combines a primer, a permanent color and a durable coating. Working with it allows you to forget about the preliminary and finishing processing for a while, and enjoy the process. It is intuitively clear how to use it, so even people who first encountered the painting business successfully cope with this.
The Shabby line is a real find for decorators. Creating multi-layer textures, picturesque effects and artistic aging – the breadth of techniques is not limited by anything. The metallics and pearlescent colors of effect paints for decorative elements and furniture bring the most daring ideas to life.
Sometimes the main task is not painting, but protecting or restoring the product. For such cases, there are special mastics. They help restorers fix defects in furniture, mask cracks and chips, and recreate lost details.
Varnishes and waxes protect the wooden surface and keep it natural. They are used both independently and as a topcoat for decorative staining.
Proceedings of work
The main rule that should be followed in any painting work: the surface must be clean and free of grease, both new and previously painted. New products are then ready for painting. Furniture that has already been varnished or painted will require a little more attention. Below is a step by step guide.
- The first step is to remove the old layer of paint if it comes off on its own, peels off or does not fit the texture. This can be done with sandpaper, a spatula, a solvent, or using a building hair dryer.
- Glossy or lacquered furniture should be lightly sanded to remove the gloss. This will ensure good adhesion of the paint to the surface.
