How to make a basement: Everything You Need to Know About Basement Construction
How To Build A Basement, Underground Room or House – Requirements, Foundations, Walls, Roof & Waterproofing
Spread the love
How To Build an Underground Room, House, Basement or Bunker
-
Preliminaries & Building Codes
-
Basement Design
-
Basement Earthworks
-
Basement Substructure & Superstructure
-
Basement Roof / Upper Floor
-
Underground Basement Roof Structure & Drainage Systems
-
Drain Pipes, Back-Filling and Waterproofing To Retaining Walls
Basement Below Grade / Ground Level
In residential and commercial construction, underground rooms or buildings are called basements. In military warfare, bunkers are usually built underground as a camouflaged fortified chamber that hides and protects people from bombs, missiles and bullets fired from enemy aircraft. In luxury and exclusive opulent homes of the rich and wealthy, it’s very common to find an underground cellar, a small underground room to store wine. However, cellars have humble beginnings dating back to 1700 BCE in the ancient Middle Eastern city of Tel Kabri, but they probably existed much earlier than that in various native cultures. Before the advent of refrigeration, cellars were dug and built by the common villager living in cold climates to store root crops, vegetables, fruits, meat and other farm produce.
Basement Building Codes
Before you embark on building an underground room on your residential or commercial lot, you have to be familiar with building codes in your city or town. Like any new dwelling, structural extension or addition, a building permit is required to build a basement whether it’s part of the house or not. However, area-specific zoning laws may prohibit underground buildings. Find out if basements are allowed in your location. The horizontal and vertical expansion of your residential property is governed by zoning laws which may prohibit or restrict underground buildings in a specific location, just as multi-storey buildings may be restricted in certain areas. If you do get a building permit, the basement cannot be built as you wish. There are rules and regulations that you have to follow to ensure safety and compliance with not just the structural design but also drainage, ventilation, plumbing, heating, waterproofing, insulation, moisture control, flooding risk, ceiling height, lighting, fire safety, wall openings (egress), access (stairs), party walls (underpinning), site preparation and finishes. Unlike normal above-ground buildings, you almost always need a permit to undertake basement finishing and remodelling.
Building a basement or underground room should involve a lot of planning necessitated by the numerous regulation codes attached to it. The biggest risk affecting a poorly built basement is the risk of flooding and moisture penetration. Thus, moisture/water control and drainage is a critical factor when designing a basement. Another critical factor is the walls and foundation. Basement walls are not like ordinary walls above ground level, they have lateral earth loads acting on them. Basement walls are subject to horizontal forces caused by soil and water pressure, making earth settlement more likely. The deeper the basement below ground level, the higher the lateral forces pushing on the walls. Thus, basement walls should be built like retaining walls to withstand lateral earth pressure.
Preliminary Site Investigations
Preliminary site investigations involving the engineer’s geotechnical site report and flood risk assessment should be done prior to producing basement designs, including checking the location of existing underground utility services, watercourses, adjacent buildings (party walls etc.) and so on. The subsurface soil profile of the area, ground terrain, topography, site drainage systems, water table, aquifers, local rainfall patterns, snowmelt and flood history are important in deciding whether you should build a basement or not.
The engineer should determine the depth of firm soil strata with a much higher load bearing capacity for basement foundations (e.g. crystalline/sedimentary rock bed, firm clay, silty clay and silty sandy clay).
Flooding Risks
Basements are vulnerable to flooding and damage from various water sources such as underground water, surface water, sewers and sewage backflow due to the fact that their floors are way below the base flood elevation (BFE). Structural defects such as cracks in the basement walls, floor, drainage and sewer pipes can allow groundwater to seep in, as well as leaking clean-out end caps and collapsed/clogged weep holes.
Window wells for basements are prone to flooding especially if the drains are clogged. If the drains are clogged, water will rise to window level, seeping in through the window cill and frames. Make sure that the vertical intake drain pipe and grating cover are not clogged or blocked by rubbish, debris, leaves and soil. To prevent rubbish and debris from entering the window well and clogging the drain, you should install a window well cover preferably a transparent cover that lets in sunlight into the basement. Window wells are not just built to drain away flood water, but they also provide an escape route via the egress window which should be big enough to allow an adult person to climb through in case of a fire emergency or other disaster.
Walkout Basement Plan View (2) CUT
How To Build An Underground Room or Basement
1 – Basement Design
Once you have familiarized yourself with the standard building codes and done site investigations (including flood risk assessments), you should go ahead and design your basement or underground room. The basic and functional features of a basement are:
- Structural retaining walls (built from cast-in-place reinforced concrete or grouted CMU blocks) including external perimeter HDPE perforated drainage pipes and filling.

- Reinforced concrete foundations
- Reinforced concrete floor slab
- Waterproofing to floor and walls
- Egress windows (window well / light well)
- Staircase and roof opening
- Outdoor stairway for walkout basement
- Roof: If the basement is under a single storey or multi-storey house, the upper floors will simultaneously function as roofs for the basement. Upper floors are either a reinforced concrete slab, timber joist floor or steel beam floor.
- Bunker Roof: If the basement is not attached to any upper floor (i.e. exposed basement), then you will need to build a bunker roof.
- Roof insulation and waterproofing
- Wall Finishes (Drywall, framing, thermal insulation and internal waterproofing)
- Floor Finishes
- Ceiling
- Walkout door / entrance cellar door
- Walkout basement outdoor stairwell drain
- Sump pump system
- Internal floor drain
- Combustion room / furnace room

When designing a basement, your structural engineering drawings as well as architectural plan should meet the following conditions prescribed by various municipal building codes prior to being approved. These are not the only code specifications that you have to comply with, there are codes for other elements, fittings, installations and situations that you have to comply with depending on your basement design.
Walkout Basement Plan View (3) CUT
Walkout Basement Plan View (5) CUT
Basement Floor Plan Requirements for Approval:
Your basement floor plan must be dimensioned and scaled, showing and identifying all rooms by name e.g. bedroom, bathroom, storage, living room and so on.
Using relevant electrical symbols, the plan must show the location of electrical switch board (distribution board), sockets, switches, light fittings, smoke detectors, fans and other installations.
Using relevant architectural symbols and schedules, the plan must show the position of doors and windows as well as their size. Stairs, fire escape routes, egress and window wells must be indicated on the drawings with their dimension detail.
Using relevant architectural/engineering symbols, the position of sanitary plumbing fittings and fixtures must be shown, as well as any HVAC installations like water heaters, furnaces, radiators and air conditioners. The position of stoves, fireplaces, exhaust fans, ducts, fire sprinklers, sinks, showers, bathtubs and W/C must be indicated.
Where alterations, additions and demolitions are being done, the position of existing and new doors, windows and walls must be indicated on the plan. New electrical, HVAC, mechanical and plumbing installations must be shown. Structural modifications like making openings in walls, floor and roof must be shown, as well as the location of beams, columns, lintels, headers, posts and floor joists.
All in all, architectural schedules and tables with item specifications should be provided on the basement plan. The floor to ceiling height should be indicated, as well as the size and product code of insulation in walls and ceilings.
Walkout Basement Plan View (2) CUT
Minimum Internal Room Size and Space:
Living space occupied by people in a basement should be a minimum of 70 square feet, measured within the room internal perimeter, and the minimum length of each side in the room should be 7 feet. Hallways, passages and stairways inside the basement should be at least 36 inches wide.
The ceiling in habitable rooms, corridors and hallways should be a minimum of 7 feet high. The ceiling in bathrooms, toilets, laundry and other non-living spaces should be at least 6.203 feet high.
A water closet shall be installed in the toilet room, providing a minimum clear space allowance of 15 inches from the centreline of the W/C and room to the side walls, as well as a minimum of 21 inches from the front of the W/C.
Shower cubicles shall have a minimum internal floor gross area of 900 square inches and base dimensions at least 30 x 30 inches, measured from wall to wall.
The stairway shall have a minimum headroom clearance of 6.203 feet high (2000mm) measured vertically from the ceiling to the bottom landing or from the tread nose to the imaginary pitch line parallel to and above the stair slope.
Basement Window Well Lightwell Detail_4
Egress Window Requirements:
Emergency egress is a means of escape or exit from the basement in the case of a fire or disaster. All basements are required to have an escape route provided by means of an egress window. If the basement has bedrooms separated by and enclosed by internal walls, each bedroom should have its own egress window. An egress window opens out into the window well, which should provide enough space for climbing out into the open air.
Egress Window Clear Opening Size
According to basement building codes in the USA, the minimum size for an egress window in a basement shall be 5.7 square foot, with a clear opening that is at least 20 inches wide and 24 inches high. In metric units, this converts to a clear window opening with a minimum size of 0.53 square metres, which is equal to a minimum width of 508mm and minimum height of 610mm. In Canada, some provincial and municipal codes may have different requirements, for example, in Alberta, the minimum size of an egress window opening is 3.77 sqft (0.35m2), with a minimum width of 15 inches (380mm) and minimum height of 592mm. In the United Kingdom, the minimum size of openable area for an egress window is 0. 33m2 and window dimensions should be a minimum of 450x450mm high (18×18 inches high). Just make sure the minimum area of the clear opening as well as the width and height are met. When designing the appropriate window size, adjust the width and height of opening accordingly until the minimum area is obtained.
Egress Window Sill
The window sill for an egress opening shall be no less than 44 inches from the finished floor level (USA basement codes). This is just about the same as UK codes which prescribe a minimum height of 1100mm (44 inches) from floor surface.
Basement Window Well Lightwell Detail_8
Window Well Requirements
If an egress window sill is situated the ground level or ground formation level, a window well must be dug and built in front of the window. The depth or height of the window well shall commence at least 6 inches below the window sill. In some county municipal codes, the minimum sill to well bottom depth is 3.5 to 4 inches. The enclosing side walls of the window well must project at least 4 inches above the ground level.
The bottom or floor of the window well must be at least 9 square foot. The floor dimensions (width as well as the longitudinal side) of the window well must be at least 36×36 inches in size. The width of the window well shall be measured from the outer side of the basement wall to the inner side of the window well wall.
A ladder shall be installed inside the window well on the side facing the window where the depth of the well exceeds 44 inches (1100mm). The minimum width of the ladder should be 12 inches (305mm) and it should have horizontal rungs spaced at no more than 18 inches (457mm) between them and from the bottom rung to the floor. However, according to OSHA, ladder rungs should be spaced at a minimum distance of 10 inches (250mm) center to center spacing and should not exceed the maximum spacing 14 inches (360mm) apart. The ladder should allow the occupants or escapees to make a footing on the rungs and climb out unhindered. Therefore, a spacing of 3 to 6 inches must be allowed between the face of the ladder and the window well wall. Awnings or any window well covering which cannot be opened from the inside without struggling, effort or making use of any key or tool are not recommended. The same applies to window screens, grills, burglar bars as well as basement doors. Doors and windows should be easily and effortlessly openable from inside without making use of any key, instrument, tool or complicated skill.
Basement Window Well Lightwell Detail_9
Basement Window Well Lightwell Detail_10
Basement Window Well Lightwell Detail_11
Basement Window Well Lightwell Detail_12 CUT
Basement Window Well Lightwell Detail_13 CUT
Basement Window Well Lightwell Detail_15
Basement Window Well Lightwell Detail_16
Smoke Alarms
Building codes state that dwellings should be protected against fire outbreaks using smoke detectors. This includes basements. Smoke alarms must be installed in each and every bedroom or sleeping room. The alarms should not be a plug-in device, but they should be permanently wired to the building electric circuit and interconnected to each other, so that when smoke is detected the sirens will go off at once. Where there is an appliance or furnace making use of solid burnt fuel (e.g. coal, wood, coke, charcoal or anthracite ), a carbon monoxide alarm should be installed.
Mechanical Ventilation and Heating
If windows are not installed in bathrooms and toilets, these rooms should be mechanically ventilated with an exhaust fan and duct system prescribed by building codes, usually a 50 to 80 cfm rated fan and 4 inch minimum diameter ducts. But the airflow measured in cfm (cubic feet per minute) will be determined by the size of your bathroom. Roughly, 1 cfm is needed per square foot of your floor. Multiply this rate with the square footage of your floor to find the required cfm rating of your exhaust fan.
Home heating systems such as furnaces, boilers, heat pumps, radiators, water heaters and hot water tanks should not be installed nor located in living spaces including the bathroom and toilet. They should neither be accessed from any living or habitable space such as bedroom, kitchen or living room. Heating systems should be located in their own separate room. The combustion room must be insulated, ventilated and secured with a fire-rated door.
Walkout Basement Plan View (3b) CUT
The furnace or heater inside the combustion room must be operated by a switch installed by the doorway (on the wall near the door jamb). The switch should easily shut off the system in case of an emergency. For safety and emergency purposes, it’s not a good idea to install the switch near the furnace or boiler. Another safe location for installing a furnace switch is under the basement stairs.
How To Build an Underground Room, House, Basement or Bunker
Once your basement plans are approved by the municipality or town council, you should go ahead and build your basement. The following is a step by step construction procedure or programme of work for a basement:
Basement Below Grade / Ground Level
1 – BASEMENT EARTHWORKS
Site Clearance
Clear site of all vegetation, rubbish, debris, shrubs, bushes and grass, including cutting down trees and grubbing up roots. Before digging the ground, call the local municipality inspectors or utility operators (Toll free phone number 811 in the USA) to come locate and identify underground utility services like water, gas and sewer pipes.
Setting Out Levels and Profiles
Once your building site is clear, proceed to set out levels on the ground using profile boards and strings. Find a reference point or datum line from which you can set out your measurements and mark the corners with stakes.
Setting out is basically transferring the building drawings (floor plan) to the actual ground where the house will be built. In this case, we are transferring the basement floor plan to the site. We will need to mark the position of the basement corners with stakes as well as outline the external walls with stringlines running between the stakes.
Setting out the building outline allows you to see where the site will be excavated. On flat and level ground, you can start excavating from any point along the stringlines. On undulating or hilly ground with medium and steep slopes, you have to set up stakes at the bottom of the slope as well as on the top edge and middle of the slope. You will need to start excavating from the lowest elevation (lowest ground) going towards the higher points. The aim of cutting the slope is to get flat and level ground from which you can dig foundations for a walk-out basement or excavate a huge pit if you are building an underground basement that is below strip level.
As you can see, mass excavation which may involve open-face excavation on a hillside is always required when building a basement. You will need to hire a bulldozer as well as an excavator to do the job.
Excavate Site To Reduced Level
When you are building a walk-up or walk-out basement situated on hilly or sloping ground, you will need to cut the slope and any elevated ground to reduced levels. Following the setting out lines and stakes on the site, start excavating from the lowest elevation with a bulldozer. Cut the slope until you reach the stakes on the higher edge. Cart-away and dump the excavated material on spoil heaps on the site. After cutting the slope, you should have a fairly level base (reduced level) from which you can start basement pit excavations.
Excavate Basement Pit
The depth of your basement pit will be determined by the design drawings as well as site conditions from preliminary investigations. Let’s say your basement floor-to-ceiling height is 2450mm and the basement is projecting 305mm above ground level. The basement retaining walls are 204mm thick x 2500mm high, resting on 380mm thick x 1220mm wide footings. The floor is a reinforced concrete raft foundation with 230mm edge thickening and 100mm thick slab.
Bulk Excavation – First Stage:
Your first stage of bulk excavation will be excavating from ground level to the bottom of RC retaining walls. Therefore, the depth of excavation will be 2500 – 305mm = 2195mm
Let’s say the gross floor area of your basement is 5372mm x 5054mm wide, and the retaining wall footings are projecting 178mm from the wall. You need to calculate the area based on the projection of foundation footings:
Length: 5372mm + 178(2) = 5728mm
Width: 5054mm + 178(2) = 5410mm
The surface area of the basement bulk excavation will be 5728 x 5410mm wide, and the cubic volume of bulk excavation will be 5728 x 5410 x 2195mm deep.
Excavate the pit using an excavator machine, and dump excavated material outside the pit in spoil heaps.
Earthwork Support to Excavated Pit:
Earthwork support also known as timbering or shoring is needed when your trench/pit excavations are 1500mm or deeper. Install earthwork support inside the pit around the perimeter. Trench boxes, raking shoring and hydraulic shoring systems will be suitable for a big and wider pit such as a basement excavation.
Foundation Trench Excavation – Second Stage:
Excavating the pit down to the bottom of RC retaining walls gives you a reference base (reduced level) from which you can start excavating foundation trenches with precision. These are the footings for the retaining wall. Excavate trenches for 380mm thick x 1220mm wide footings around the internal perimeter of the pit, dumping excavated material on spoil heaps in the centre of the pit.
Level and Compact Bottom of Trenches:
Level and compact the bottom of trenches to 95% Modified ASSHTO Density, breaking down oversized material and evenly distributing the excavated material on the surface. Apply some soil insecticide to the sides and bottoms of trenches.
Sand Blinding:
Add a layer of 50mm sand blinding on compacted surfaces of trench bottoms. If the soil is a weak type, spread a layer of weak concrete (soilcrete) of 10MPa strength or lower.
2 – BASEMENT SUBSTRUCTURE & SUPERSTRUCTURE
Formwork to Reinforced Concrete Footings:
Depending on the stability and cohesiveness of the soil, you may or may not need formwork. Install formwork for cast-in-place reinforced concrete footings. Formwork will be required on both sides of the footings and the height of the formwork should be equal to or slightly higher than the thickness of the concrete footings. Formwork should be left in place until the concrete has hardened.
Reinforced Concrete Footings
Before you pour concrete into the formwork for foundation footings, you must place some vertical reinforcement spacers on the surface, arranged in an appropriate way at suitable distances apart. Vertical spacers are used to suspend horizontal reinforcement bars or mesh wire at a suitable height above the ground or surface. This provides a clearance which will be filled by concrete cover. Concrete cover protects reinforcement against corrosion, weathering and damage. There are different types of reinforcement spacers also known as cover blocks, which among them includes plastic spacers and the commonly used concrete and wire chair spacers. Concrete block spacers are usually placed at a distance of 500, 600 or 700mm apart for RC footings and slabs.
The minimum concrete cover for RC footings is 50mm, so you should get vertical spacers that match this requirement.
Lay the Reinforcement Bars for Footings and Stub Walls:
After placing and setting up the spacers, you should lay the steel reinforcement bars over the spacers, tied at suitable points.
When laying steel reinforcement, remember to include L-shaped vertical steel dowels for concrete stub walls. These stub wall dowels will project from the footings and they must be placed in position at 16 inches o/c along the footing perimeter. For connecting the raft foundation edge thickening to the stub wall and footing, L-shaped horizontal steel dowels are positioned in place at 16 inches o/c along the footing perimeter, with a minimum lap of 24 inches into the raft slab.
Pour in Wet Cast-In-Situ Concrete for Footings:
Pour cast-in-situ ready-mixed concrete (25MPa + strength) under and over the reinforcement. The vibrated concrete should be able to flow easily filling the space under the reinforcement. Compact the wet concrete using an immersion needle vibrator. Alternatively, steel or wooden tamping rods can be used to compact the concrete, but mechanical compaction using a needle vibrator is the best. When using mechanical compaction, take precautions to avoid over-compaction. Compaction eliminates air bubbles, which is required to produce dense and impervious concrete.
RC Walkout Basement Underground Detail_5 CUT
RC Walkout Basement Underground Detail_3 CUTB
Formwork to Reinforced Concrete Walls:
Formwork To Stub Walls:
Stub walls also known as stem walls are built when the footings have been cast in place, dried and hardened. You should have stub wall steel dowels sticking out from the footings after the footings are cast in place. To built stub walls, you must first erect formwork around the basement footing perimeter. Double-sided formwork is needed to contain the concrete filling, and the internal spacing must match the width of the concrete wall (204mm). A typical stem wall is 1.65 to 4 feet high (500 to 1200mm), so your formwork should also be about this high.
Formwork To Superstructure Walls:
Once stem walls have been built, your next step is building superstructure walls, which is literally extending the wall height. Once again, you have to erect double-sided formwork up to the height of the basement (2500mm).
You also need to erect formwork for wall openings such as windows and doors:
- Smooth Formwork To Edges of Egress Window Opening (≤ 300mm), Not Exceeding 2000m Girth.
- Smooth Formwork To Edges of Door Opening (≤ 300mm), Not Exceeding 2000m Girth.
Reinforced Concrete Stem Walls
Pour in Wet Concrete Cast in Formwork for Stem Walls:
Pour cast-in-situ ready-mixed concrete (35MPa + strength) inside the formwork for stem walls. Vibrate and compact the wet concrete around the reinforcement using an immersion vibrator. Vibrated concrete is viscous, flows easily to fill space. Alternatively, a steel or wooden tamping rod can be used to compact the concrete, although mechanical compaction using a needle vibrator gives much better results. When using a mechanical compactor, take precautions to avoid over-compaction. Compaction eliminates air bubbles, which is required to produce dense and impervious concrete.
RC Walkout Basement Underground Detail_2 CUT
RC Walkout Basement Underground Detail CUT
Walkout Basement Side Elevation (1) CUT
Walkout Basement Side Elevation (2) CUT
Reinforced Concrete Superstructure Walls
The superstructure walls for the basement must have a minimum ground clearance of 1 foot (305mm) above the ground level.
Lay the Reinforcement Bars for Superstructure Walls:
Set up the horizontal as well as the vertical reinforcement steel bars for basement walls. Vertical steel dowels should be tied to stem wall dowels, and they should be spaced at 16 inches o/c along the wall perimeter. Horizontal steel dowels should be tied to vertical dowels and placed at 16 inches o/c along the wall height.
Pour in Wet Concrete Cast in Formwork for Superstructure Walls:
Pour cast-in-situ ready-mixed concrete (35MPa + strength) inside the formwork for basement walls. Vibrate and compact the wet concrete around the reinforcement using a poker vibrator. Vibrated concrete is viscous, flows easily to fill space. Alternatively, a steel or wooden tamping rod can be used to compact the concrete, although a mechanical compactor is more effective. When using a poker vibrator, take precautions to avoid over-compaction. Compaction eliminates air bubbles, which is required to produce dense and impervious concrete.
RC Walkout Basement Underground Detail_3 CUTA
Reinforced Concrete Raft Foundation Slab
Underground basements are built on a raft foundation, an RC slab with edge thickenings (beams) around the perimeter. The minimum thickness of a concrete surface bed or slab is 4 inches (100mm) but for a raft foundation 150mm is the recommended minimum. The thickened edge (beam) should have a minimum depth of 225mm to 305mm if it is load bearing, and at least 120mm if it is non-load bearing. The raft foundation for this basement will be non-load bearing, built within the inside perimeter of the RC retaining walls and resting on retaining wall footings which are load-bearing.
Level Compact the Excavated Surfaces Under Surface Beds:
Level and compact the soil under surface beds to 95% Modified ASSHTO density with a mini vibratory roller, breaking down oversized material and evenly distributing the excavated material on the surface, including wetting the soil and adding suitable material where necessary, compacting the soil in 150mm layers until the ground is firm and stable. Spray some approved soil insecticide or termite proofing on excavated surfaces.
Excess excavated soil from spoil heaps stored on site will be used to beef up ground formations under the surface beds.
Sub-base Coarse Filling (Hardcore Material):
After the excavated surface under floors is levelled compacted, you should proceed to add a layer of 150mm thick sub-base coarse filling (i.e. G5 material, gravel, crushed stone, bricks or concrete). Spread, level and compact the coarse filling in a single layer 150mm thick to 100% Mod AASHTO density at OMC, stabilised to attain UCS > 1,0 Mpa after seven days.
Sand Filling
Add a layer of 50mm sand blinding or levelling course over the gravel filling.
DPM
Over the sand, place some moisture-resistant underlayment known as a vapour barrier or damp-proof membrane (DPM). This can be a 10 mil PVC plastic film or one layer of 250 micron green polyethylene waterproof sheeting sealed at laps with PVC self-adhesive tape.
Reinforcement
In an above-ground surface bed on strip foundations, welded mesh wire is usually used to reinforce concrete slabs. This fabric reinforcement is rolled out and laid on top of the DPM. In underground basements and heavy-duty commercial structures, reinforcement bars (steel dowels) are laid out perpendicular to each other in a mesh pattern and tied to each other with mild steel wire ties. The steel dowels are laid crosswise, running both ways at a spacing of 16 inches (406mm) apart. One or two layers of steel bar mesh are usually installed in the surface bed before wet concrete is poured. The horizontal L-shaped dowels sticking out from the bottom of RC stem walls are tied to the slab dowels to create a rigid continuous basement structure that can withstand settlement caused by uplift, lateral and shear earth forces.
When setting up reinforcement on horizontal ground surfaces, the bars should be laid on vertical spacers as mentioned previously to allow for concrete cover as well as vertical height positioning (suspension).
Pour in Wet Cast-In-Situ Concrete for Surface Beds
Pour cast-in-situ ready-mixed concrete (30MPa + strength) under and over the reinforcement for surface beds. Vibrate and compact the wet concrete around the reinforcement using a poker vibrator. Vibrated concrete is viscous, flows easily to fill space. Alternatively, a steel or wooden tamping rod can be used to compact the concrete, although a mechanical compactor is more effective. When using a poker vibrator, take precautions to avoid over-compaction. Compaction eliminates air bubbles, which is required to produce dense and impervious concrete.
Finishing Top Surface of Concrete Slab:
While the concrete is still wet and viscous, level the surface with a levelling board. After at least 30 to 45 minutes when the surface has stopped bleeding, you can apply a 35mm to 55mm thick cement/sand screed (1:3 mix) or topping finished with a wood float or steel trowel according to your requirements. Allow the concrete surface to cure using a water based acrylic copolymer curing compound with minimum moisture retention rate of 90% over a 72 hour period.
BASEMENT WALKOUT STEPS & STAIRWELL DRAIN
Basement Walkout Steps Detail_3 CUT
Basement Walkout Steps Detail_4 CUT
Basement Walkout Steps Detail_5 CUT
Basement Walkout Steps Detail_6 CUT
Basement Walkout Steps Detail_8 CUT
Basement Walkout Steps Detail_10
Basement Walkout Steps Detail_12 CUT
Basement Walkout Steps Detail_13 CUT
Basement Walkout Steps Detail_14 CUT
Basement Walkout Steps Detail_15 CUT
3 – BASEMENT ROOF / UPPER FLOOR
In a multi-storey house, the first floor may be built on top of the basement whereby the first floor also functions as the upper floor and ceiling for the basement.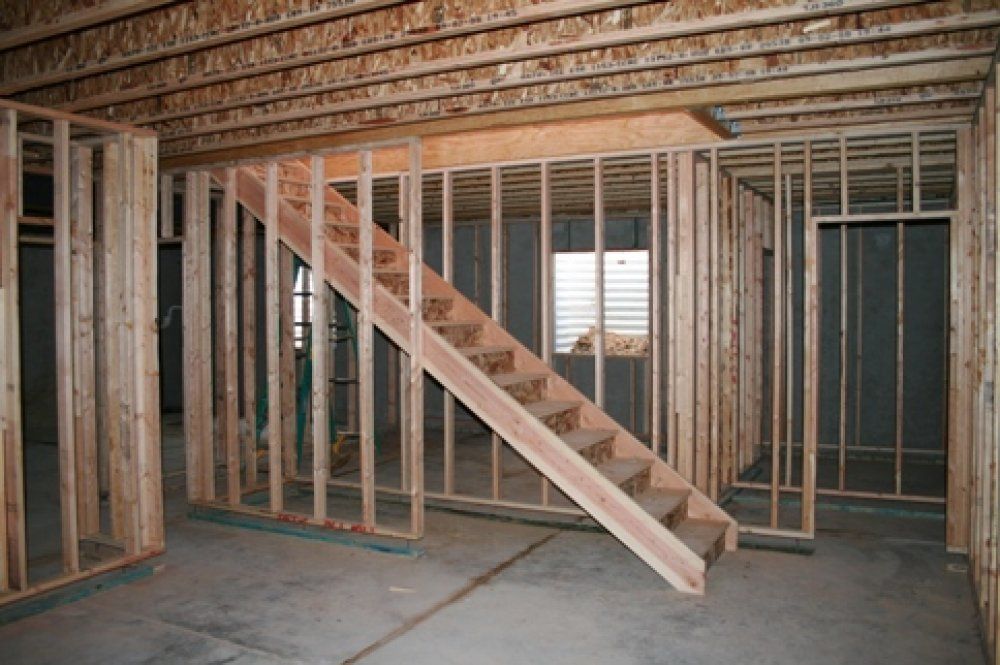 If the basement is a single storey structure, it will have its own roof which is usually an RC slab.
Reinforced Concrete in Suspended Slab
The wall structure of a basement requires a two-way RC slab (upper floor or roof). A two-way suspended concrete slab supported on all four sides of the basement walls is going to be built. Two-way slabs transfer loads in both directions perpendicular to each other.
Smooth Formwork To Soffits of Slab
Smooth Formwork To Soffits of Slab (≤ 300mm), Propped Up at a Height Not Exceeding 3000mm.
Smooth Formwork To Edges of Suspended Slab
Smooth Formwork To Edges of Suspended Slab Not Exceeding 300mm High.
Smooth Formwork To Edges of Staircase Opening
Smooth Formwork To Edges of Staircase Opening (≤ 300mm), Not Exceeding 2000m Girth.
Reinforcement To Suspended Concrete Slab
Place some vertical reinforcement spacers on the horizontal formwork, evenly distributed on the surface at a spacing of 500, 600 or 700mm apart.
Lay the main bars (tension steel) on top of the spacers along the shorter span of the slab. Lay the distribution bars across and on top of the main bars in the longer span of the slab. Tie the top and bottom bars where they intersect with mild steel wire ties.
Pour in Wet Concrete Cast in Formwork for Suspended Slabs
Pour cast-in-situ ready-mixed concrete (30MPa + strength) under and over the reinforcement for suspended slabs in formwork. Vibrate and compact the wet concrete around the reinforcement using a poker vibrator. Vibrated concrete is viscous, flows easily to fill space. Alternatively, a steel or wooden tamping rod can be used to compact the concrete, although a mechanical compactor is more effective. When using a poker vibrator, take precautions to avoid over-compaction. Compaction eliminates air bubbles, which is required to produce dense and impervious concrete.
Basement Below Grade / Ground Level
UNDERGROUND BASEMENT ROOF STRUCTURE & DRAINAGE SYSTEMS
An under-garden basement is a below-grade basement which has its full height submerged below the ground level, and it has no upper floor.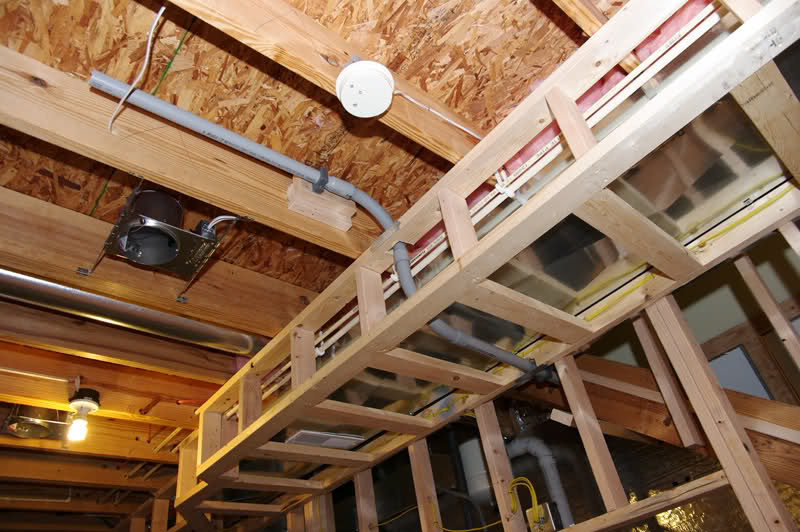 It’s roof is level with or slightly above the ground level. Building a roof for an under-garden basement is challenging and needs careful planning due to the fact that the roof is below the BFE (Base Flood Elevation), which exposes the basement to flooding.
The best way to plan for surface water flooding and drainage when building an under-garden basement is building it as a walk-out basement, with its external wall door leading out to an outdoor stairway made of concrete, bricks or stone. It’s not recommended to install the external door on the roof i.e. through the internal staircase opening.
Just outside the external door entrance on the bottom landing of the outdoor stairway, either a grated drainage channel (trench drain) or grated square drain is installed to collect and drain away surface runoff water to a sewer or catch pit during rainfall or flood incidence.
An under-garden basement also needs a sump pump system installed under the basement to collect excess water caused by a high water table and floods. The sump pump drains water from retaining wall weeping tiles, underfloor sub-surface drains, internal floor drains and any underground seepage. It is a good practice to install drains on the basement floor slab, especially where water leakages and condensation are more likely to happen, for example in the combustion room where home heating systems such as furnaces, boilers, heat pumps, radiators, water heaters and water tanks are installed. Internal floor drains can also quickly drain away water from the basement in case of flooding and heavy rainfall.
Waterproofing a Reinforced Concrete Flat Roof for Basement:
A modern flat roof makes use of a warm roof system instead of the traditional cold roof system. There are two types of warm roof systems, the normal warm roof and the inverted warm roof.
The normal warm roof has 4 layers excluding the ceiling and battens. These are, starting with the top layer:
- Waterproofing
- Thermal insulation
- Vapour control layer
- Concrete roof slab
- Ceiling and battens fixed under the slab
Just like the normal warm roof, an inverted warm roof has the waterproofing, thermal insulation and vapour control layer above the concrete roof slab, but the difference is the order of these layers. In an inverted warm roof, the thermal insulation is on top of the waterproofing and vapour control layer. Also, in an inverted warm roof, some ballast (heavy weights ) such as washed stones, self compacting concrete coat, concrete paving blocks, thin brick pavers (veneer bricks) or concrete tiles are placed on top of the thermal insulation to keep it in place and prevent it from being blown away by the wind. A geotextile fabric may be placed over the thermal insulation to prevent it from being damaged by the ballast.
Another important layer which may not be so obvious, but common to all types of flat concrete roofs is the cement screed or mortar which is applied on the wood floated concrete slab at an inclined / sloping angle to drain away surface runoff rainwater to a hopper head and downpipe. A scupper drain system is required for all flat roofs where a parapet wall is enclosing the roof structure.
DRAIN PIPES, BACK-FILLING AND WATERPROOFING TO RETAINING WALLS
HDPE perforated drain pipes (at least 4 inches in diameter) are laid under the surface beds and behind retaining wall foundations during construction. Drainage pipes under surface beds are laid before the RC slab is cast, and those behind retaining walls are laid near building completion before back-filling is done.
Before the HDPE perforated drain pipes are laid , a geofabric membrane or textile (filter fabric) is laid over the compacted subgrade. A layer of sand (at least 32mm thick) is placed over the filter fabric to function as levelling course or cushion to the drain pipes. The drain pipes are laid over the sand bed at a suitable slope and covered with gravel or 8mm stone sub-base filling, providing a cover of at least 6 inches (152mm) around and over the pipe. Once this is done, a filter fabric is wrapped around the gravel filling to prevent fine soil particles from clogging the free draining material.
Behind the retaining wall foundations, a granular backfill, gravel or any permeable backfill (about 12 inches wide) is placed over the geofabric textile, filling the working space up to the height of the basement at natural ground level. The sides of basement excavations must be compacted and backfilled with excavated material stored on site prior to filling in the working space with granular / permeable backfill. Compact the excavated surfaces to a minimum of 95% Mod AASHTO density, adding some excavated native soil stored on site and compacting the backfilling until the sides are firm and stable.
Remember that the purpose of granular/permeable backfill behind the retaining walls is to intercept sub-surface water from a high water table and drain it away via the perforated HDPE drain pipes laid underground. The external back-filled sides of basement at ground level must be sloped away from the walls at a minimum incline of 3 to 5% (3 to 6 inches per 10 feet). The sides can be paved with a layer of concrete slab, block pavers, asphalt or impervious material. The edge of the pavement should empty the surface runoff rainwater into a U-shaped drainage channel that sends the rainwater to a catch pit or sewer.
Waterproofing the External Sides of Basement Walls
Basement waterproofing also known as basement tanking in the UK is whereby the walls are waterproofed with a moisture-resistant barrier. There are different types of waterproofing materials or methods, the five main types being:
- Cement based binding materials (This is a special type of cement/sand screed, mortar or slurry mixed with additives that enhance water resistance and impermeability ).
- DPM sheets or plastic films (e.g. overlapped Polypropylene or Polyethylene sheets sealed with PVC adhesive tape at joints).
- Liquid based DPM (This is applied as a liquid on concrete walls using a brush or roller. Start by applying a primer coat that improves bonding, then apply two coats of liquid DPM. Allow the coat to cure and set into a solid protective rubber film.) Examples of liquid-based damp-proof membranes include Polyurethane and Epoxy-based liquids.
- Bituminous/asphalt coating – Commonly used on flat concrete roofs, this waterproofing method can also be used on concrete walls. Spray the surfaces with a liquid bituminous coating, then place sheets of bituminous membranes on top of the coating.
A bituminous coating should be covered to prevent damage by sunlight.
- Bentonite geosynthetic liners – This waterproofing method consists of a layer of water-resistant bentonite sandwiched with a geotextile membrane to withstand damage caused by mechanical and chemical corrosion/erosion under the ground. Bentonite clay liners are commonly used to provide self-healing water-tight seals in ponds, canals, lagoons, dams, reed beds, landfill liners and man-made lakes. Alternatively, a much better innovative form of bentonite like sodium bentonite can be used in place of clay liners. Hydration takes place when sodium bentonite comes in contact with water, absorbing water and swelling up to eight times its initial volume. The resulting colloidal sodium acts as an excellent underground hydraulic seal when it expands, creating an impermeable barrier that actively seals pores, holes, cracks and gaps wherever they occur.
Spread the love
How Long Does It Take to Build A Basement? – Basementing.
com
We all know that when building a house, it’s very common to start with a basement. It’s a good foundation, and there are many important uses such as making it as a cellar, utility space for the boilers, heaters, breaker panel, car-park, air-conditioning system. In some countries, it is used as a living space. We researched a wide scope of resources just to help answer every question you have.
When constructing a basement, it usually takes a month or between four to six weeks to complete. There are many factors to consider: how many people are working, the size of the basement, hiring a contractor, or doing it by yourself, among others.
Please keep reading as we delve into the timeline for new basement construction. We’ll cover the basics from preparation through finishing so you’ll know what to expect in the stages of the basement building.
Timeline for Basement Construction
Below is a step-by-step guide in the phases of constructing a basement. We’ve provided a brief overview of how long to anticipate for each step in the process.
Preparation
Before anything else, we need to make sure that we have all the things we’re going to need for this construction. From the permits to your materials, keep an eye out that it’s already crossed on your checklist.
Another important thing is to make sure that the area is not dammed and to check for humidity and moistness because that will determine how much you’re going to spend with waterproofing. If you are a handyman, now is the time to take out those tools, too, and prepare for some work.
Framing
The best way to start your basement is by establishing satisfactory framing. This step is the most time-consuming since it takes five to seven days to complete and is said to be the most crucial part of the process. In any construction, it’s always the framing that consumes most of your resources, especially the budget.
Check out “Should You Use Pressure Treated Wood in a Basement” when planning your framing project.
Installing utilities
Utilities in the basement include plumbing, electrical, and HVAC. In this step, you likely need professionals involved to assure every utility is safely and properly roughed-in. Installations could take between one and three days. You may need to allot time for a local inspector as well, depending on the building codes and procedures for your locale.
Insulation
Giving one day or two, whether you have hired contractors or DIY respectively, to install insulation is well worth the time as the insulation will take good care of regulating the basement temperature.
Mounting Drywall
It’s time to close the frames. This step may take one week to finish and includes drying time for mudding. Drywall installation varies due to the environmental factors influencing drying time between mud applications.
Painting
This step is the most straightforward and the easiest. You can even do it by yourself. When your basement is on the average size, painting it would take three to four days, including the drying.
Finishing
The finishing of a basement is a large project so you may want to contact the best contractor near you. In this step, you’ll complete the finer details including flooring, hardware for electrical and cabinetry or doorways, installing shelving, adding plumbing and lighting fixtures, and even brining in the furnature and decor. Finishing touches could take one to two days to five days, depending on the extent and expertice involved.
So there’s that! You should be able to get a bird’s eye view of how constructing a basement will look, as well as the timeline.
What is the most expensive part of finishing a basement?
We already covered this in the timeline, but framing really takes the cake when it comes to your basement budget — and for good reason, too. Since it’s going to make or break the whole thing, it’s important to not constrain yourself with the cost. Think long-term. Your future self will thank you for saving yourself a ton of maintenance fees in the next few years.
How deep is the average basement?
Basement depth is a critical factor in making a finished basement, If we’re going to be very broad, the average depth of a basement is 8 feet, but that would really depend on what the use is for you. On the other hand, old homes or existing homes with custom basement designs are usually less or more than average.
How much should I budget to finish a basement?
When you’re planning on buying or building a house and you want a basement, look over planning it first because adding it to the house can make you spend more than building it as a foundation. The average cost per square of constructing a basement as the house foundation is $33,000 and upwards of $50,000 total cost.
It also depends on the materials you’ll buy, the size of the area, the labor of the contractor and workers, style, and finishing. It may sound expensive, but finishing a basement is a good investment not just for you, but also for your home.
How much does a finished basement add to home value?
We need to know that appraisers don’t value the area below square footage as much as the area above square footage, so they usually get 50% of the above square footage value, which is not bad as the finished basement budget usually costs around 10% of the total property value.
Finished basements would resemble a normal livable space’. If you could offer a little bit of natural light from the outside and have a bathroom and toilet in it, then it could give a little boost to the property value.
There are certain buyers, though, who specifically want a finished basement, so you could find some markets where it is a specified feature. The consensus is that finished basements are for enjoyment, and it improves the quality of life. It is important to note that you should keep the budget of making a finished basement to an appropriate percentage to not overdo it.
In Closing
Constructing a basement may take well over a month and can strain your financial resources, but it is a worthwhile project to add value to a home with additional storage and potentially living space. Taking the timee to plan each phase of the project is essential to complete it efficiently.
Interested in refinishing a dirt basement? You should read: “Can You Finish A Dirt Basement”
6 Things to Consider When Building a Basement
Building a basement with Fox Blocks ICF walls provides durability, integrity, and insulation for below-grade walls. The thermal resistance of ICF also ensures a comfortable and healthy indoor environmental quality. In addition, ICF basements provide resiliency for natural disasters like tornados and floods. They are fast and straightforward to construct, which saves both time and money.
Millennials Want Multi-Use Finished Basements
When looking for a house, the majority of millennials – 73 percent – want the additional space of a habitable finished basement that can accommodate a home office, gym, media room, or even a rentable basement apartment. Therefore the design must create a warm, comfortable, and healthy space. Like all foundations, the basement must support and anchor the entire house and effectively transfer all the load from the house to the ground.
Building Codes are requiring above and below grade walls to have continuous insulation (CI). This means typically poured concrete or CMU foundation walls must have insulation and a vapor barrier installed, adding more labor and materials costs to basements.
In North America, 98 percent of basements constructed use a concrete wall system, like insulated concrete forms (ICFs) and poured concrete.
Things to Consider When Building a Basement
Before deciding which product to use for your new basement, consider these six important characteristics that are associated with basement construction and design.
1. Energy-Efficiency
When building a basement, builders should select products, like ICF walls that will keep the space comfortable in both winter and summer. Basement walls constructed with ICF exceed energy code requirements by reducing energy use by between 20 and 50 percent over other basement wall options, like poured concrete.
- ICF walls contain high thermal mass, provide a continuous air barrier, and have an R-value higher than 22 – much higher than the R-value of poured concrete walls with less than an R3 and must be strapped and insulated to meet code.
- ICF basement walls save money by using significantly less energy, which lowers the monthly heating and cooling bills. ICF walls also allow for smaller downsized HVAC equipment, which reduces new construction costs.
- ICF walls do not require strapping, additional insulation or a vapor barrier.
 ICF walls also allow for smaller downsized HVAC equipment, which reduces new construction costs.
2. Disaster Resistance
Disaster-resistant basements can lessen the impact of increasingly severe weather events and wildfires. Disaster-resistant design also reduces the ecological and financial cost of rebuilding and repairing.
- ICF wall systems are an ideal product for building disaster-resistant basement walls. The structural integrity and fire-resistance of ICF protects the home and family from tornadoes, hurricanes, wildfires, and other extreme weather events.
- ICF walls are reinforced concrete which can be designed to provide a safe room in the home.
3. Leak-Resistant Walls
For the home’s durability and the health of its occupants, basement walls must not allow water to infiltrate, which can cause mold and rot. Mold can pose serious health concerns, and rot can degrade the integrity of the home. Moreover, preventing moisture reduces a homeowner’s long-term maintenance and repair expenses.
- ICF Walls, along with a basement waterproofing membrane and a reliable drainage system, significantly reduce the possibility of moisture intrusion. ICF foundations also provide double the compressive strength (resistance to shrinking) of conventionally poured concrete foundations; therefore, ICF has less chance of moisture intrusion than poured concrete.
Moisture Problems with Poured Concrete Basements
Several problems may happen during the construction of a poured concrete basement that make the walls prone to water infiltration.
- Regular poured concrete can crack and leak if not prepared correctly.
- Moisture can leak through non-structural cracks in the poured concrete basement walls, like at the top of the walls, where the floor and wall meet, or through the porous concrete.
- Leaks may occur if the basement wall settles, drops, or sinks due to the soil below the basement foundation collapsing.
- Wood strapping on basement walls is organic materials that may be subject to mold and rot from condensation and/or moisture intrusion.

4. Good Acoustics
Building a basement with excellent acoustics optimizes the space for a media room, apartment, or home office. The design of a soundproof basement must consider the ceiling, walls, and floors:
- ICF offers an excellent basement wall product for achieving good acoustics. Most ten- or 11-inch ICF walls, with a six-inch concrete core, advertise STC ratings of 50 to 55. A Sound Transmission Class (STC) rating represents in decibels how much sound travels from one side of the wall to the other.
5. Wall Space
Most residential basements require 8″ poured concrete walls or 8″ to 10″ CMU walls. Generally, an ICF as reinforced concrete may be designed with a 6″ concrete core.
To meet certain building codes requirements for basements 2×6 strapping is required over the 8″ poured concrete walls, expanding the wall thickness and reducing interior space.
ICFs have built-in fastening strips that allow the gypsum board to be applied directly to the ICF.
6. Why You Should Consider Fox Blocks ICF for Your Next Basement Building Project
Fox Blocks ICFs provide an all-in-one wall assembly for fast and low-risk basement construction by combining five building steps into one; insulation, air barrier, vapor retarder, structure, and attachment. The all-in-one wall system lessens the need to coordinate multiple trades, which saves money and significantly hastens project delivery. Fox Blocks ICFs create energy-efficient, disaster-resistant, and durable basements with excellent IEQ:
- High thermal mass provides continuous insulation for energy-efficient basement walls. Fox Blocks’ basement walls exceed ASHRAE/ANSI 90.1 energy code requirements with an R-value of 23.
- Disaster-resistant ICFs can protect a family from severe wind events and fires.
- Steel-reinforced concrete can withstand tornado and hurricane winds exceeding 200 mph and projectile debris moving over 100 mph.
- Fire-resistant, with a fire-resistance rating (ASTM E119) of 4 hours for the 6-inch blocks and 2 hours for the 4-inch blocks.
- Steel-reinforced concrete can withstand tornado and hurricane winds exceeding 200 mph and projectile debris moving over 100 mph.

- They produce durable and healthy basement walls. The wall assembly includes a vapor retarder that contributes towards a moisture-resistant basement wall. However, for below-grade walls, the Fox Blocks system needs a dependable drainage system and waterproofing membrane to ensure moisture-resistance.
- Promotes a healthy basement because they contain little to no VOC.
- Contributes towards a durable basement because they lack organic materials – something termites like to eat. However, Fox Blocks recommends Polyguard Products, Inc. 650 XTM or 650 XTP membranes, to ensure protection against termites
- Provides high sound reduction. The Fox Blocks Series achieves a high ASTM E90 Sound Transmission Classification (STC) rating of greater than 50.
Fox Blocks, a division of Airlite Plastics Company, is available across North America. Find a local distributor on our website.
DOWNLOAD THIS RESOURCE
To download this file, please fill out this form. Don’t worry, once you’ve filled it out, we’ll never ask for your information again.
Sorry, there was a problem submitting your form.
How to make the most of your basement
Homes & Gardens is supported by its audience. When you purchase through links on our site, we may earn an affiliate commission. Here’s why you can trust us.
(Image credit: Future Publishing Ltd Photograph: Jonathan Gooch)
It offers excellent potential but the issue of how to make the most of your basement can also be a challenging one. Its area, potentially a low ceiling height and, frequently, the absence of windows mean that a basement needs thoughtful design.
But there are solutions to the potential problems that can make a remodeled basement a valuable extra floor of a house and a space that fits may needs – plus one that feels as practical and good looking as the remainder of a home.
Bring your basement ideas to life without compromise with this expert guide to maximizing its potential.
How to make the most of your basement
(Image credit: Morse Design Photograph: Heidi Harris)
The challenge of how to make the most of your basement has a number of aspects including its proportions, bringing light to it and, if it’s to be a series of rooms, how to divide it up.
Here, we’ve put together the insight you need along with expertise from Andi Morse, founder and principal designer of Morse Design .
Which rooms could you locate in a basement?
(Image credit: Sims Hilditch)
Part of making the most of your basement lies in choosing well when it comes to which rooms are located in the space.
‘The basement is ideal for a second family room with a very large TV for gathering with friends or family,’ suggest Andi. ‘If the space is available to you, I would recommend adding in a basement kitchen or mini kitchen to make food and drink easily accessible – even if it’s just a bar and mini fridge.
‘Alternatively, a playroom area with a designated space for homework is a great way to utilize your basement if you have kids. And the playroom area can easily convert to a teen room as children grow.
‘Extra basement bedrooms are always needed no matter the size of your house. If you have the option to create one in the basement, it’s a great space to give guests a sense of privacy during their stay.’
A basement might also be a suitable location for a home office, giving it physical separation from the rest of the house that can help enforce boundaries between work and the rest of life. Alternatively, it might prove a useful homework space for teens.
Other options include creating a home gym or yoga studio, or making it a movie theater or games room.
Locating kitchens and bathrooms in a basement
(Image credit: Albion Nord)
In contemplating how to make the most of your basement, it may be that a full kitchen is preferable to a mini version. Meanwhile, if it’s to provide guest accommodations, or is home to a gym, or even a basement bar, for example, looking at basement bathroom ideas makes sense. But are these difficult to design successfully when they’re in a basement?
‘Often there aren’t any windows in the basement,’ reminds Andi. ‘So when designing your bathrooms make sure to use light colors for paint, tile, etc. Keeping it light in a space with no windows will help the space feel warm and inviting, whereas making it too dark could result in a dungeon-like feel.
‘For basement kitchens opt for a fun color palette. Since it won’t be the first thing you see on the main floor, it’s the perfect place to go a bit bolder. Just be careful that your ceilings are not too low to implement this idea. If they are lower, it’s better to stick with lighter colors and make the area feel larger.’
Bear in mind that adding kitchens and bathrooms to a basement will increase basement conversion costs.
Make the most of a compact basement
(Image credit: Future Publishing Ltd Photograph: Mel Yates)
When base, there are a number of features that can pose problems when considering how to make the most of your space, including when it’s compact.
‘If the basement is small, it’s best to limit the rooms and instead divide up the space,’ advises Andi. ‘If there are too many rooms, it will make the area feel even smaller. I’m all for opening it up and creating zones such as a TV area, playroom, etc.
‘It’s always best to consult with a contractor or builder beforehand to investigate the potential issues with the house before beginning. You want to limit as many surprises as possible.’
Bringing light to a basement
(Image credit: Granit Architects/Andrew Beasley)
A basement might have few or no windows, presenting another potential difficulty. ‘Many times basements have limited windows and therefore limited light,’ agrees Andi. ‘Add as many canned lights as you can and put them on dimmers.’
It’s worth considering ways to borrow light from other areas – for example by installing a glass ceiling – or creating a light well or including open basement stair ideas that let light filter through the treads.
But introducing windows as part of the design could be well worth the investment. This might be achieved by stepping the yard, or building out into it, for instance. Take the advice of an architect on planning new windows into the design.
Basement decor choices
(Image credit: Bisca)
Carefully considered decor can help make the most of a basement. ‘I like painting basements on the lighter side,’ says Andi. ‘I feel people will gravitate towards the area more if it feels bright and airy.’
‘Paint the walls with light colors and paint any trim the same color,’ she continues. ‘It will make the space feel larger and brighter.’
However, dark colors aren’t out of the question. If the basement is a theater, for example, or entertainment space, deeper shades can be atmospheric. If that’s the case, though, a good lighting design is essential both for safety, and to ensure that all the room’s functions are sufficiently illuminated.
As for flooring, aim for a cohesive feel. ‘I recommend continuing whatever flooring is on the main floor of the home into the basement,’ Andi says.
‘One of my biggest pet peeves is going into a home and seeing a totally different color for the hardwoods in the basement than what is on the main floor. It makes the house seem disjointed while maintaining the wood tone in the basement will ensure that it feels like part of the home – not a place to send the kids and get them out of the way. Otherwise, I recommend carpet.’
Heating and cooling a basement
(Image credit: Future Publishing Ltd Photograph: Jonathan Gooch)
To ensure the basement is as comfortable a space as the rest of your home year round, heating and cooling options need attention.
‘Since many basements sit below ground, they typically run cool,’ says Andi. ‘Consult with a contractor and/or builder to ensure you have the proper systems set for warmth in the winter and vice versa in the spring and summer. There is nothing worse than going into a basement that is super cold in the winter: no one will want to stay down there no matter how great it might be. ’
’
How can I get the most out of my small basement?
To make the most of a small basement, design it with elements everyone in your home will appreciate. ‘Try to include items and improvements that are important to the entire family, such as a large TV, play area, and maybe a card table for games,’ says Andi. ‘If you have items or characteristics that work for everyone, they are more likely to go down and use it.’
To make more of limited space, consider opting for custom storage for the area under the stairs, which can otherwise go to waste. Being able to tidy the basement easily will make it feel more open, too.
While dividing up a small basement may not be possible, zoning it with an area rug, for example, can help it feel larger as well as making it more inviting. Don’t neglect classic decor strategies such as hanging mirrors to make it feel larger, either.
How can I make my basement feel more cozy?
To make a basement feel more cozy, consider the lighting. ‘Just like in the other rooms of your home, relying solely on overhead light is no recipe for a warm and welcoming space,’ says Lucy Searle, editor in chief of Homes & Gardens. ‘Make sure your lighting plan includes table or floor lamps, or both, to create more intimate pools of light.’
While light colors might be preferable for walls, avoid cold whites and look for those with warm undertones. Opt for warm accent hues, too, for pillows, as part of upholstery patterns, or in artwork or decorative accessories. Rich shades can be repeated in rugs as well, which will also make the floor feel cozier underfoot.
Sarah is a freelance journalist and editor. Previously executive editor of Ideal Home, she’s specialized in interiors, property and gardens for over 20 years, and covers interior design, house design, gardens, and cleaning and organizing a home for H&G. She’s written for websites, including Houzz, Channel 4’s flagship website, 4Homes, and Future’s T3; national newspapers, including The Guardian; and magazines including Future’s Country Homes & Interiors, Homebuilding & Renovating, Period Living, and Style at Home, as well as House Beautiful, Good Homes, Grand Designs, Homes & Antiques, LandLove and The English Home among others. It’s no big surprise that she likes to put what she writes about into practice, and is a serial house renovator.
How to Build a Basement in The Sims 4
BY MEG
Meg
Writer and Storywriter
PUBLISHED 8 MONTHS AGO
The Sims 4 has various building tools when it comes to customizing a house. You can freely manipulate the size of the walls, make a foundation, or build columns to achieve the ideal home you have always wanted. Another interesting tool that you can play with if you are going to, say, build a bunker or an underground lair for witches or vampires is the Basement Tool. This guide has everything you need to know about creating a basement in The Sims 4, so keep scrolling to find out more.
Making a Basement
Building a basement is just as easy as making a regular room. But there are some factors you should consider when making the perfect basement for your house.
- Enter Build/Buy Mode, select Walls and Empty Rooms, and click on the Basement Tool or the Custom Basement Tool. You can also look for their names in the search bar.
- Create your basement room the same way you usually build rooms. With the Basement Tool, simply head to the ground floor, drag your mouse to make a room, and release it until you are satisfied with the size. It is also plausible to make your basement bigger than the ground and upper floors.
- Before you start putting some items, you might want to place some stairs or ladders first. It would be impossible for Sims to access the basement without stairs.
- Add floor tiles between the basement walls. Keep in mind you cannot place any windows or doors on the outer basement walls since it’s underground.
- Put some lights to illuminate the rooms to clearly see the area. And finally, you can now design the room in any way you see fit for your basement.
 You can also look for their names in the search bar.
 The basement feature allows you to create a room underneath the ground floor without foundation. Adding a foundation to make a basement might be something you were accustomed to doing in The Sims 2 and the unpatched version of The Sims 3.
However, in The Sims 4, using the basement tool under an existing foundation may cause a lump on the ground floor and distort the terrain due to the height of the basement walls.
Going to the underground level and using the Wall Tool, Room Tool, or Custom Room Tool to build a basement will prevent that from happening. This method is a lot easier and preferred by most people. In addition to that, you can have a total of two basements in a house, making it possible for you to build a six-story mansion.
Personalizing your Basement
Most players would spend hours modifying their interior design and fiddling with the environment. If you are among those players, here are some suggestions on turning your ordinary basement into a room that may be tailored to your preferences.
Underground Pool
An underground pool paired with a bar can make a grandeur pool party fit for a Sim living in the city. Again, you can build a pool similarly to how you make it on the ground level, but you will not be able to stretch it out to the edge of the basement.
Styled Rooms
You may browse styled rooms in the Build/Buy Mode or navigate the Gallery to search for rooms created by other Sim players. Pre-made rooms can also be placed in the basement. Although, any windows or doors will disappear once you set them below ground.
Two-floored Basement
Thinking of building an underground laboratory? Or how about a teen hangout basement? Those would look good with split-level floors. To make a two-floored basement, follow these steps below:
- Create your first basement floor in any shape that you like. And then, add the sub-level room, which will later become an open area.
- Go back to the first basement level and draw a line that will divide the room into two.
- Click on Remove Floor to delete one of the floor’s rooms.
- Avoid removing the wall that connects the two rooms, as it will cause the floor you just deleted to reappear. Instead, replace the wall with fences or a spandrel.
- Lastly, add the stairs to link the two floors in your basement.

Open Basement
With an open basement, you can make a beautiful sunken garden or construct an underground entrance to your subsurface pad. To build a basement without a ceiling, you can follow the easy step-to-step guide below:
- Build a basement floor.
- From the underground, go up a level.
- A thick yellow outline will appear above the basement if you click on it. You may select Remove Ceiling to turn it into an open basement.
- Add some stairs and furnish the basement as you please.
Next Hogwarts Legacy Reveal Allegedly Coming to State of Play 2022
READ ARTICLE
16 Basement Ideas – Bob Vila
Better Your Basement
1/18
An unfinished basement, with its concrete floor and exposed joists, may seem dreary and cold. But in reality it is an enormous blank canvas just waiting for your inspired ideas and artistic vision. The fact is, you don’t really need niceties like drywall and recessed lighting to create an inviting space.
Before you begin, do what you need to do to make sure the space is dry and clean. Fix any water issues and apply waterproofing if necessary. Unfinished concrete flooring will produce fine dust if it’s not sealed, so you may want to consider applying a sealer. It’s an easy DIY project that will go a long way to making your unfinished basement a lot more comfortable and manageable to maintain.
Employ a few of these creative basement ideas—all of them low cost and low effort—to transform your unfinished room into a comfortable retreat everyone will be drawn to.
istockphoto.com
Lay Down Foam Mats
2/18
Most unfinished basements have a poured concrete floor. Soften it up for playtime or workout time with square foam floor mats, like these top-rated ProsourceFit Puzzle Mat from Amazon. Foam floor mats come in different sizes and colors (even in faux-wood finishes!), and join together like a puzzle—and they’re easy to pick up and move elsewhere or stack away and store when your needs change.
Related: 9 Inspiring Ideas for Basement Flooring
istockphoto.com
String Some Lighting
3/18
Most unfinished basements have very few electrical outlets and just a couple of naked bulb fixtures mounted in the ceiling. Bring more light to the space and create a playful ambience by hanging some string lights. With just one outlet, you can illuminate a large area with several strings of lights.
Related: The Best Basement Lighting of 2021
istockphoto.com
Advertisement
Throw Down Area Rugs
4/18
Area rugs can warm up a cold basement floor quickly. Depending on the size of your space, you could use one large rug or several smaller ones. You could even go for carpeting remnants—a low-cost, effective option that can both cozy up a basement and help define different functional areas in the space.
Related: 20 Area Rugs You Can Actually Afford
istockphoto.com
Paint Your Cinder Block
6/18
Basement walls of cinder block, brick, or even poured concrete can be transformed pretty quickly and simply with a coat of paint. Go for a solid color, or get wild and design a mural to brighten up that subterranean space of yours.
Related: How To: Paint Concrete
istockphoto.com
Advertisement
Hang Curtains
7/18
No walls? No problem! Put up a simple and inexpensive curtain system to divide space and add dimension to an unfinished basement. If you can’t install a track on the ceiling, try stretching picture wire taut across the room, then attach curtain hooks with clips, like these popular ones from Amazon, to flat sheets for an easy no-sew DIY project perfect for a beginner.
Related: Divide and Conquer—14 Room Dividers to Bring Order to Your Space
istockphoto. com
com
Create an Art Studio
8/18
The great thing about an unfinished space is you don’t need to be too fussy about getting it messy. So why not transform part of your unfinished basement into an art studio? If paint and glitter get all over the floor, they’ll just add charm and inspiration.
Related: Beautiful Basements: 13 Surprisingly Cool Underground Amenities in Real American Homes
istockphoto.com
Craft a Canopy for Your Ceiling
9/18
If the rafter ceiling in your unfinished basement feels too cold and industrial for your taste, soften it by hanging swaths of fabric to create a beautiful canopy ceiling.
Related: 15 Basement Ceiling Ideas to Inspire Your Space
istockphoto.com
Advertisement
Build a Workshop
10/18
Every do-it-yourselfer needs a place to make the magic happen. What better spot for a workshop than an unfinished basement? A sturdy concrete floor makes cleanup easier, and open studs and rafters provide excellent organization and storage space with the simple addition of pegboard and shelving.
Related: The Most Important Things to Keep in Your Tool Kit in 2020
istockphoto.com
Paint the Rafters
11/18
Painting the exposed beams of your basement ceiling can make the entire space feel more finished without heavy renovation. As a bonus, all of your utilities will remain completely accessible, in case you need to make repairs to your ceiling in the future.
Related: 11 Breathtaking Ideas for a Wood Ceiling
Zillow Digs home in Brentwood, MO
Create a Partition
12/18
Installing a small, temporary wall can help to delineate space without requiring permits and major planning. Once the curtain is drawn in front of the washer/dryer, this basement laundry room essentially disappears, letting the wet bar take center stage.
Related: Buy or DIY: 10 Room Dividers to Remake Your Space
Zillow Digs home in Mountain Brook, AL
Advertisement
Brighten Up the Floor
13/18
Your unfinished basement’s concrete floor is a blank canvas, and a coat of paint can make a huge difference. This straightforward DIY project will give you a big bang for your buck.
Related: 3 Key Steps to a Concrete Floor Refresh
istockphoto.com
Hang Up a Projector
14/18
The dim lighting and blank walls in your unfinished basement make it an ideal spot to hang up a projector. Throw down some soft rugs and grab cozy blankets, and you have yourself a fun new spot for family movie night.
Related: The Best Projector Screens of 2021
istockphoto.com
Turn It Into a Wine Cellar
15/18
At-home wine cellars sound like a luxury, but truthfully this is a basement idea that you can do yourself. Purchase a quality wine cooler, so your vino collection is stored at the perfect temperature, install shelving for your wine accessories, and then add some cushiony chairs or bar furniture for when you’re ready to sit back and enjoy your beverage.
Related: Why Go Out? 12 Bars You Can Build at Home
istockphoto. com
com
Advertisement
Set Up a Home Office
16/18
Need to find a space where you can work from home uninterrupted? Look no further than downstairs to your basement. Throw down a soft rug, pick out a sturdy desk and chair, add a desk plant, and then get to work. The temperature in your unfinished basement might not always be ideal, so consider adding a fan or heater depending on the season—of course, don’t forget to turn them off when you leave the area.
Related: 11 Ideas for Working Remotely When You Don’t Have a Home Office
istockphoto.com
Decorate It!
17/18
The best way to make your unfinished basement feel complete is by adding accents and decor just as you would to any other room in your house. In addition to the basement ideas above, like hanging string lights and adding area rugs, bring in other details that will add warmth, texture, and ambiance. Consider adding faux houseplants for greenery and fun furniture to make the drab space more interesting.
Related: 15 Lazy Ways to Make a Big Change in Your Home
istockphoto.com
See the Potential
18/18
The blank slate of an unfinished basement offers endless possibilities.
bobvila.com
Don’t Miss!
If you have the money to hire a handyman for every household woe, go ahead. But if you want to hang on to your cash and exercise some self-sufficiency, check out these clever products that solve a million and one little problems around the house. Go now!
Do-it-yourself basement – a phased construction technology
Of course, you can make a basement with your own hands. But it is worth considering the fact that you will have to spend a lot of time and effort on this process. Time costs will be associated not only with direct construction, but also with the study of all the nuances of arranging basements.
Naturally, there is no doubt that the basement is an extremely useful room in all respects. It can equip a workshop, make a sauna, billiards, a gym. In addition, very often basements and basements are made into an additional living room, which is no less comfortable to be in than in other areas of the house. Having made a spacious basement, you can turn a two-story house into almost a three-story house.
The main problem with the arrangement of the basement arises at the stage of its construction. First of all, these are additional financial costs. The money will be used to purchase building materials, tools, etc. Especially scrupulous should be those homeowners whose site is located in an area with a high level of groundwater. In this case, it is better to seek help from professionals who will help you correctly calculate the amount of material used and the degree of waterproofing. To understand how to build a basement correctly, you need to have complete information about the type of soil in your area.
In general, the choice of the type of basement construction, as well as other technical solutions, will depend on two main factors:
- The level of groundwater in the area.
- The owner wants a warm or cold room.

Since there are many ways to build a basement, you should collect as much information as possible.
Earthwork before construction
Content
- Earthwork before construction
- Foundation pouring and wall construction
- Insulation work
- Air exchange in the room
- What to do if the groundwater level is high?
Before you start building, you should accurately determine the dimensions of the basement. They can be very different and depend on the design decisions of the future home and the preferences of the owner.
When digging a pit, experts do not recommend deepening the basement into the ground to its full height. If, for example, the overlap is at a level of 50-100 cm above the ground, it will be possible to make small windows and air vents. This will ensure a high level of comfort while in the basement and additional ventilation.
In addition, it would be right at the initial stage to think about how the room will be insulated from moisture and temperature changes. The higher the basement is raised, the lower will be the possibility of contact between the base and walls with groundwater. When building a basement with your own hands, it is possible, if necessary, to deviate from the project and make additional insulating barriers.
Based on the foregoing, taking into account the height of the ceiling, as well as the thickness of the concrete base and sand cushion, the pit must be dug to a depth of about 200-220 cm. Of course, it is difficult to do earthworks on your own, so it is better to hire a team of workers or an excavator.
Preparation of excavation for construction.
Given that the basement will take more than one day to build, it is likely that it may rain. Because of this, the soil in the dug hole will liquefy, and its edges will slide, losing their strength characteristics. To prevent this from happening, you need to do the following: when you clean the pit, make small slopes from the edges of the pit to its bottom. Next, dig small grooves around the perimeter with a slope in one direction. At the lowest point of the pit, make a pit, in which all rainwater will be collected. Very often, builders dig a barrel into it, from which they then pump out water. When building basements, it is very important to remove all excess moisture in time.
As soon as the excavation is ready and cleaned, the foundation must be prepared. The bottom of the pit is covered with rubble. It is recommended to use a fine-grained stone. The thickness of the resulting layer should be about 10-15 cm. This is followed by the laying of the same layer of sand, which must be carefully compacted. If possible, it is recommended to use vibrating plates for this. If not, then tamping can be done by hand with a little moistening of the sand.
Any rolled insulator is laid on the obtained base in several layers. There should be no joints (when using roofing material, the joints are sealed with bituminous mastic). After that, the formwork necessary for the formation of the cement floor is installed. It is not worth making a high formwork – 20-30 cm is enough. If a basement with heating is planned for a one- or two-story house, then a heat insulator must be laid on the waterproofing layer. Extruded polystyrene foam boards are perfect. If you are not going to heat the basement, then laying the insulation is not mandatory (but in this case you will have to carefully insulate the floor).
Foundation pouring and walls erection
After the waterproofing and heat-insulating layers have been laid, it is necessary to mount the reinforcement network in increments of 15-25 cm. The reinforcement is laid in two layers. If subsequently the walls are also planned to be made concrete, then the ends of the reinforcement along the perimeter are bent upwards. This is necessary so that in the future it will be more convenient to tie the reinforcing cage of the wall to them. If you are building a basement yourself, then at this stage you will still probably need to use the help of partners.
Once the reinforcement of the base is completed, the mortar can be poured. The layer thickness should be at least 20 cm. After pouring, you need to wait some time (preferably 3-4 weeks) for the mortar to dry. If the walls are also made of reinforced concrete, then the installation of the formwork and the knitting of the reinforcement can be started the next day after the foundation is ready.
As already noted, the walls of the basement are also recommended to be made of reinforced concrete. If groundwater is below the base of the floor, then foam concrete blocks or red brick can be chosen for the construction of walls during the construction of basements. After the installation of the walls, it is imperative to create a high-quality waterproofing layer from the outside.
Basement walls.
Insulation work
Waterproofing can be done by applying bituminous mastic or gluing a waterproofing roll. A few days after the installation of waterproofing, it is recommended to insulate the walls of the basement using extruded polystyrene foam boards. A simple foam will absorb moisture, losing its characteristics. To avoid damage to the waterproofing layer, it is best to glue the insulation on the same bituminous mastic. In places where the wall protrudes above the ground, it is important to properly fix the insulation with special dowels.
Basement waterproofing and insulation from the outside.
Walls must be insulated in any case, regardless of whether the basement is heated or not, as well as a one-story house or a two-story house. The construction of a basement always involves the creation of a small, but high-quality layer of thermal insulation. A layer of insulation will protect the walls of the room from freezing. In addition, the insulation will close the waterproofing layer from possible mechanical damage.
As soon as the wall insulation is completed, the soil must be backfilled. When filling the free space on the outside of the walls, the soil must be properly compacted. To protect the basement from rainwater, you need to make a blind area, under which also lay insulation.
When building basements, it is also necessary to provide for a good ventilation system.
Air exchange in the room
The issue of ventilation during the construction of basements is often very acute. This is primarily due to the fact that many owners underestimate the importance of constant ventilation of underground spaces. But a humid environment will form there, which is dangerous not only for products, but also for building structures.
Vent pipes.
The ventilation system can be forced or natural. Of course, in 90% of cases, people choose natural ventilation, consisting of two pipes – supply and exhaust.
The supply pipe must be located at one end of the basement, the exhaust pipe at the other. The lower part of the supply pipe should be at the base of the room, at a distance of about 20-30 cm, and the upper part should go outside. This approach will allow fresh cold air to periodically enter the room, cooling it and displacing warm air masses. When a basement is built on its own, often only one pipe is installed for ventilation, which is often not enough.
At the opposite end there should be a chimney, the lower part of which is located under the cellar ceiling (at a distance of 20 cm), and the upper part (ideally) should go to the roof. It is known that warm air rises, so warm air masses through this pipe will gradually leave the basement. This will ensure that there is no condensation.
What if the GWL is high?
When constructing basements, it is often the quality of the waterproofing that plays the decisive role. This is especially important if the groundwater level is located above the basement basement. Very often, when the GWL is really high, homeowners simply refuse to build a basement so as not to waste extra money, time and effort.
At high GW, moisture comes close to the room.
With a high groundwater level, it is necessary to protect the basement in two directions:
- Waterproofing the walls and floor of the room.
- Lowering the groundwater level on the site.
In this case, the installation of a drainage system that will remove all excess moisture from the site helps a lot. Of course, this will result in additional costs, but the effect of this system is impressive. Before making a basement, it is imperative to provide for the possibility of drainage.
For waterproofing basement walls, it is better to use double-sided insulation technology: outside and inside. It would also be useful to use membrane insulation, which is presented in a variety on the market.
The construction of a basement is an important and responsible process that must be approached with skill. If you doubt your abilities, then discuss all the nuances of building a basement with specialists. We must not forget that minor miscalculations in construction and the use of incorrect building materials can turn into expensive repairs in the future.
do-it-yourself video installation instructions, building features under the house, sauna devices, price, photo
The presence of a basement allows you to expand the useful area of \u200b\u200bthe house and move a number of technical rooms from the residential part of the building to the basement. However, in addition to the advantages, the construction of the basement requires certain costs and responsibility, since an improperly built foundation will only bring trouble.
We will tell you how to build a basement under the house with your own hands.
If you wish, you can build a basement in the house with your own hands.
Contents
Stages of construction and their features
Design
The photo shows the plan of the basement floor, indicating the explication of the premises and their area.
Before you build a house with a basement, you need to get a competent project of this structure. In general, this could not have been taken out as a separate paragraph, but given the importance and decisive significance of a correctly drawn up work plan, we will nevertheless dwell on the design of the basement in more detail.
Foundation design (with or without basement) is a mandatory part of the overall building design. This document must be prepared by a competent and experienced civil engineer or architect. We categorically do not recommend trusting it to amateurs or doing it yourself, without the appropriate knowledge.
Design work can only be trusted to specialists.
So, you have several options:
- Order a project from a design organization. The price of such a service can be quite high, but the quality and reliability will meet the standards;
- Order the construction of a turnkey structure, then the contractor takes care of all the efforts to create the project, you just have to observe and control;
- Use the services of a private designer, which can be found on the freelance services exchanges on the net. This is cheaper than the previous options, but you run the risk of running into an unscrupulous or illiterate specialist;
- Use the ready-made standard project, which can be found and downloaded on our website. The simplest and cheapest option.
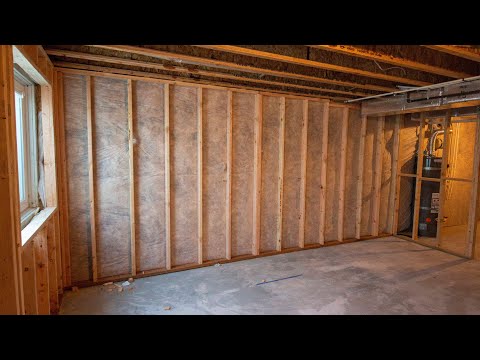 This is cheaper than the previous options, but you run the risk of running into an unscrupulous or illiterate specialist;
 Reference designs can be found on our website.
Important!
The presence of a project in the construction of any capital structure is absolutely necessary, without any exceptions.
Selection of structural parameters and materials
Reinforced concrete blocks are often used to build walls.
- To understand how to properly build a basement, it is necessary to conduct a geological survey of the area for the depth of soil freezing, the level of groundwater and soil composition . The type of structure, its depth, as well as the material from which the foundation walls will be built will depend on these characteristics.
Important!
If it turns out that the groundwater does not rise above the base of the foundation, then its walls can be built from blocks, bricks or other masonry.
If groundwater can rise higher, then it is better to build a monolithic reinforced concrete structure.

Basement walls can be built from blocks only if the groundwater level is low.
- The bottom plate of the foundation base must be below the frost level of the ground . You can determine this level with the help of a specialized service that reconnoits the soil, and you can also use information from open sources: ask neighbors who have recently been built in this area, search the net, read special literature.
- The choice of foundation design, its characteristics, depth, etc. will depend on the type of soil and its composition. . The bearing capacity of different types of soil is very different, and some varieties are not suitable for building certain types of foundations in them. In addition, its ability to accumulate moisture and swell in winter depends on the composition of the soil, which should also be taken into account when drawing up a project.

The composition and structure of the soil play a decisive role in choosing the parameters of the foundation design.
- Finally, the structure of the land section determines the direction and features of the movement of groundwater and sedimentary flows, places of accumulation of moisture, places of possible subsidence of soil, etc. . This is all very, very important when determining the parameters of the future structure.
Earthworks
Excavation of a foundation pit is an inevitable step in the construction of a foundation.
When the project is ready, you can start its practical implementation.
We start with excavation of the pit:
- In accordance with the project, we transfer the contours of the future structure to the area. To do this, we mark the territory with threads, adding 1.5 – 2 meters to the dimensions of the perimeter on each side for the convenience of subsequent work;
We mark the area in accordance with the drawings.
- To keep the threads out of the way, they can be removed by marking the lines with strips of sand;
Contours can be marked with normal sand.
- Next, we excavate the soil using an excavator or manually. It depends on your physical or financial capabilities;
We dig a pit according to the marking.
- We make the depth of the pit taking into account the addition of sand and gravel, and also, if necessary, taking into account the basement insulation layer;
We take into account the thickness of the sand cushion.
- We level the bottom of the pit and ram it, pour a layer of sand and gravel 20-30 cm thick on it, which we also ram.
We complete the work with gravel and sand bedding.
Base plate
To be more secure, start by pouring the bottom plate.
In case of shallow groundwater, as well as for greater reliability in general, it is better to first pour the base of high-quality reinforced concrete:
- For gravel and sand bedding, lay construction polyethylene in two layers. Film thickness – not less than 300 microns. We make overlaps on walls with a height of at least 35 cm;
 Film thickness – not less than 300 microns. We make overlaps on walls with a height of at least 35 cm;
 We cover the pit with polyethylene film in two layers.
- In accordance with the design parameters, we build a formwork 30 cm high. For this, it is convenient to use boards 150 mm wide, which can be knocked down in two pieces into panels, from which the sides will be obtained;
We assemble the formwork from the boards.
- We lay out the reinforcing cage in the formwork. To do this, we take reinforcement with a diameter of 12 mm and form a lattice from it, connecting the intersections of the rods with a knitting wire. The edges of the lattice do not reach the formwork by 5 cm. The size of the window is 15 cm, we put the lattice on the bricks, then we put the same lattice on it on new bricks or other supports;
Forming the reinforcing cage.
- We perform concrete pouring. We prepare the solution in a ratio of 1: 3: 5 (cement / sand / gravel) or buy ready-mixed concrete (preferably and of better quality). We level the concrete with a vibrating screed, fill the formwork to the brim;
 We level the concrete with a vibrating screed, fill the formwork to the brim;
 We pour concrete into the formwork and perform vibration smoothing.
Important!
If you plan to build monolithic walls, then the reinforcement for the reinforcement cage is taken a meter longer than the formwork size, and the edges of the rods are bent up on each side.
This is needed to connect the slab frame to the wall frame.
Before you build a sauna in the basement of the house, you should provide a foundation for the stove. This is best done in the process of building the foundation for the entire house.
Wall construction
Monolithic concrete walls are the most reliable.
After the base plate has gained strength, we can start building the walls of our basement. For these purposes, different materials are used: brick, concrete blocks, monolithic structures and natural stone. We advise you to opt for reinforced concrete blocks or a monolithic structure.
The construction of walls from blocks is carried out in the following sequence: two or three buckets of mortar are poured into the place where the block is laid, then the block is lowered with a crane and leveled. So spread the entire first row of masonry. The protruding mounting ears are bent with a sledgehammer or crowbar.
Lay out the first row first.
Then, according to the brick principle, the seams are shifted in a checkerboard pattern and the laying continues from the corners to the middle. In this case, the vertical and horizontal level of the structure should be constantly monitored. The solution is laid out under each block.
Blocks are displaced as if laying bricks and continue building.
After completion of the masonry walls, the seams between the blocks are coated with a mortar or a special water-repellent compound. The walls are made in such a way that the basement ceiling is 1–1.5 meters above ground level, this will make it possible to make windows in the basement and provide natural light to the basement. Window openings should be formed during masonry.
Window and door openings are formed during block laying.
At the upper end of the walls along the entire outer perimeter of the structure, a formwork with a reinforcement frame is installed, into which concrete is poured. This is how a grillage or armored belt is formed for laying floor slabs.
An armored belt is built on the upper end of the walls.
The final stage is the laying of floor slabs on the walls, which are also set horizontally and tied together with steel wire through special mounting holes or ears. The seams between the plates are carefully filled with mortar.
The foundation is covered with reinforced concrete slabs.
Important!
When working with a crane, safety precautions must be strictly observed.
Riding on transported slabs or blocks is strictly prohibited.
Waterproofing and insulation
The foundation must be insulated and waterproofed.
In order for all building structures to function properly, they must be protected from moisture and freezing. To do this, use bituminous mastic and polystyrene foam.
Basement walls are cleaned and primed with bituminous primer. This material penetrates into the pores and capillaries of concrete blocks and acts as a primer, increasing the adhesion of the insulating layer to the surface.
The walls are treated with a bituminous primer.
When the primer is dry, apply a layer of mastic to it using a brush, roller or spatula. After the mastic dries, the layer is carefully inspected and greased with bad places.
After the primer, the walls are opened with mastic.
After drying, the mastics begin to insulate. To do this, sheets of extruded polystyrene foam are glued to the walls of the structure with a special adhesive. It is impossible to arrive insulation sheets with dowels, as they will violate the integrity of the waterproofing.
Insulation is being installed.
Important!
For central Russia, a thickness of 50 mm polystyrene foam insulation is sufficient.
For the northern regions, this figure is doubled.
At the end of the basement construction, the walls are covered with a geotextile canvas and covered with clay, which is carefully rammed. This will create a reliable clay castle that will prevent water from penetrating the walls of the structure.
Conclusion
The construction of a basement is a responsible event that requires compliance with a lot of rules, regulations and requirements. Our instructions will help you understand the order of work and many of the nuances of construction. For complete clarity, we suggest watching the video in this article.
do-it-yourself video installation instructions, waterproofing features, how to build in a private house, price, photo
When planning the construction of a house, you should decide in advance what its basement will be. For example, if there is clay soil on the site, then the foundation will have to be deepened below the freezing level of the soil, and if you add a meter from the soil to the floor, you will get a whole floor. If groundwater is far away, then why not use this space to good use?!
Given that the strip foundation required for capital construction is carried out to almost the same depth as the basement, it is possible to get twice as much usable area at minimal cost.
Building a basement from concrete blocks
The only thing is that it must be built correctly so that it does not become an unnecessary problem for the house. Therefore, further we will consider how to build a basement with our own hands so that it turns out to be reliable, dry and warm.
Contents
Types of basements
Before moving on to construction technology, let’s consider the types of premises that are made under the house.
The fact is that not all of them are basements:
- Technical room – designed to accommodate technical structures in it, such as water-heating boilers, filters, etc. Technical room, according to SNiP 31-01-2003 , should not be higher than 1.8 m, otherwise it will be considered a basement.
- The ground floor of the house is an ideal solution for arranging an office or, for example, a billiard room. Unlike the basement, more than half of the walls of such a floor are located above the ground.
- Basement – room , the main part of the wall of which is below ground level. Most often, such rooms are used instead of sheds and other outbuildings. However, a properly executed basement can even be used as a living space, for example, to equip a relaxation room and a sauna there, or to come up with any other purpose for it.
- Often in a private house you can see such an underground room as a basement-garage. This solution will save living space in the house, however, in this case, you need to worry about convenient entry for the car.
 Technical room, according to SNiP 31-01-2003 , should not be higher than 1.8 m, otherwise it will be considered a basement.
 House with a basement
Basement construction technology
So, it’s decided – we’re building a basement with our own hands! However, before starting work, you need to find out if groundwater is flowing at the depth of the basement, and also determine the height of the building.
If the room will be used for technical purposes, then 1.9-2.2 m is enough. To make it comfortable, it is better to make the residential floor higher – 2.5-2.6 m.
Please note!
If groundwater flows close to the soil surface, it is better to build a basement from reinforced concrete.
Moreover, concrete must be used grade M500, which will ensure the greatest reliability of the structure.
Another important aspect of construction is building materials. Concrete blocks are excellent for building a basement. Their advantages include the fact that during the construction of walls you do not have to prepare a large amount of mortar, as well as wait for the concrete to harden.
Thanks to this, the structure can be erected very quickly. The only thing is that the blocks must be aligned horizontally and vertically. In addition, if the blocks are large, then it will be possible to lay them only with the use of construction equipment.
Reinforced concrete monolithic walls are an alternative to concrete blocks. Next, we will consider both of these options.
Preparation of the excavation
Construction of the floor
Work, of course, begins with digging the excavation. If you started construction in the spring, then it is quite possible that water will appear at the bottom of the pit. There are two solutions to the problem – pump it out or wait until it disappears by itself.
The next step is to build the floor, which will serve as the basis for the future basement.
The instruction looks like this:
- First of all, the bottom of the pit is covered with a pillow – a layer of crushed stone 15 cm thick is poured, then a layer of sand of the same thickness and all this is carefully rammed.
- The bottom of the pit is covered with a layer of waterproofing material. The traditional option is roofing material. When laying it, the joints must be soldered or smeared with bituminous mastic.
- Next, formwork is exposed, and it must be installed along the outer perimeter of future walls, since the slab serves as the basis for the walls.
- Longitudinal reinforcement must be made before pouring. Then concrete is poured, and work stops while it hardens.

Floor slab grout
Please note!
Wait for the floor to harden before building the walls, otherwise the blocks may push through the floor slab.
Wall construction
Before laying the blocks, it is necessary to carry out waterproofing, which will separate the concrete slab from the walls with waterproofing material. I must say that basement waterproofing during construction is carried out at almost every stage, including during the construction of walls, for this, the blocks are coated with a primer or other water-repellent material from the outside before laying.
Blocks should be laid from corners, try to do it as evenly as possible. The better they are laid, the easier it will be to plaster them later. In this case, it is necessary to provide a doorway, as well as openings for communications.
In the photo – laying concrete blocks
In addition, do not forget about the ventilation holes, which are located 15 cm above the ground. Subsequently, these holes are closed with nets. As for the height of the base, the best option would be 0.5 meters above the ground.
Experts recommend completing the construction of the above-ground part of the walls with a concrete monolithic belt.
This belt has two functions:
- Binds blocks, making structures stronger;
- Allows you to align the base and bring it “under zero”.
In some cases, brickwork is used instead of concrete, but concrete is a more reliable solution.
The work of erecting the concrete belt is carried out as follows:
- The surface of the blocks is covered with waterproofing material;
- Formwork is then installed and reinforcement is carried out.
- In the center of the formwork at the height of the future plinth, threads are stretched in one horizontal plane, which designate “zero”.
- The concrete is then poured.

Formwork for solid basement walls
Another option for building walls, as mentioned above, is pouring concrete.
The work is carried out in the following order:
- Even during the pouring of the slab, reinforcement bars are installed along the perimeter in a vertical position, which will serve as reinforcement for the walls.
- The formwork is then installed and reinforced with spacers and beams.
- Next, longitudinal reinforcement is performed. The rods are tied with wire to the vertical reinforcement. Walls must have at least three strapping belts.
- After reinforcement, you can start pouring the walls with concrete, it is best to do this operation in one go. If the filling will be done in layers, then the new layer is poured before the previous one grabs. Otherwise, concrete can be poured only three days after the setting of the previous layer.
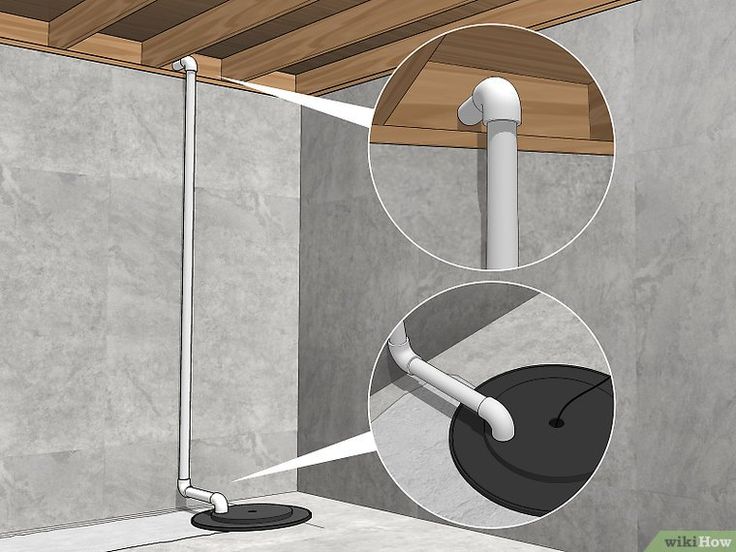 Otherwise, concrete can be poured only three days after the setting of the previous layer.
 Tip!
It is desirable to “raise” the walls 20 cm above the soil level, after which a waterproofing layer should be made.
Waterproofing
Even if the basement was built on a dry site, waterproofing it is extremely important, as precipitation is everywhere. Therefore, after the construction of the frame, all joints must be treated from the inside with mastic at least 2 cm thick. Then plaster can be applied to the walls. In addition, the floor slab must also be treated with mastic. Roofing material can be glued on top of the mastic.
Tip!
It is desirable to cover with a waterproofing layer not only the walls and floor, but also the ceiling.
For example, if a kitchen is being built above the basement, it is possible that liquid will leak into the basement.
Internal waterproofing
Thermal insulation
Now the room is protected from moisture, but if it will not be used as a cellar for storing vegetables, the underground floor still needs to be insulated. If possible, it is desirable to insulate the walls from the outside, using extruded foam for this.
This material has good thermal insulation properties, water resistance and durability. In addition, it is quite affordable price.
Thermal insulation
It is necessary to insulate the walls from the outside below the level of soil freezing, as a rule, this depth is 1.2-1.5 m. The plates should be glued to the walls and the joints should be treated with silicone. The outer surface of the insulation must be covered with a waterproofing material.
It is also important to insulate the basement floor. For this, a heater with a thickness of at least 10 cm is used, on top of which waterproofing is laid. Then a screed can be made over the insulation.
The field of all these manipulations in your house will be a dry and warm basement, where you can even live!
Conclusion
The construction of basements is a technologically complex process that requires a phased approach. However, all the advantages that a house with a basement acquires justify all the efforts and costs of its construction. The most important thing is to fulfill the construction conditions that are given above.
For more information on this topic, see the video in this article.
Do-it-yourself basement: construction technology
Contents:
Do-it-yourself basement: construction technology
Basement waterproofing: two technologies that will ensure a dry climate
How to insulate the basement outside and inside
How to make basement ventilation: main stages of work
Do not follow To think that the basement of a modern house can be used solely as a storage of unnecessary things – this room can come up with a lot of much more useful uses. In it you can arrange a cellar, workshop, garage, equip technical and even residential premises. And why is it worse than, say, the first floor? The same walls, floors and ceilings – the only thing that is not here is the windows. In this article, together with the site stroisovety.org, we will study the question of how to build a basement with our own hands and equip it according to modern residential requirements.
Do-it-yourself basement construction photo
Do-it-yourself basement: construction technology
Basement construction is the very first stage in the construction of a private house, unless, of course, the foundation and territory planning work are taken into account. In some situations, the construction of the foundation is just the beginning of the construction of the basement – this approach to business is chosen when erecting low and light buildings. The whole process of building basements can be divided into three main stages: excavation (ditching), pouring a concrete base and building basement walls, which in turn are an element of the foundation.
- Pit. Everything is clear here, and questions should not arise – an excavator is driven into the site and a huge hole is dug with its help.
- Concrete base. In fact, you will have to fill in the so-called slab foundation or, simply put, a concrete pad. At the bottom of the pit, a sand filling is made, then waterproofing is laid, on top of which a frame of reinforcement is installed, which in turn is poured with concrete about 250 mm thick.
- Walls – you can pour them out of concrete yourself, or you can lay them out with concrete blocks. Here, choose according to your taste and affordability – the blocks are more expensive, although if you take into account the installation of formwork, reinforcement and concreting, it will come out about the same. At this stage of work, two things should be taken care of – you need to remember about the openings connecting the basement rooms, as well as about the entrance. You will have to install a flight of stairs – you don’t want to get into residential or technical basements across the street, do you? In general, in a good way, the door to the basement must be made both from the inside of the room and from the outside.
- The ceiling completes this entire composition of concrete. On the walls, which, in fact, are the foundation, the basement floor is laid – usually concrete slabs. Recently, the technology of monolithic casting has been increasingly used.


How to make a basement photo
This is how the solution to the question looks like, how to build a basement in a private house? This is just a sequence of work – in fact, you will have to face a lot of difficulties. It will be necessary to resolve the issue of supplying communications, plan the premises in advance and decide on their purpose (one of them or even several in any case will have to be allocated for technical needs). In general, there is something to think about, and the main thing in this matter is not to rush, so that it doesn’t happen, as in the saying “a good thought comes after”.
How to make a basement with your own hands photo
Basement waterproofing: two technologies that will ensure a dry climate
Basement waterproofing must be approached with particular care – especially if you want to make living quarters in it, dampness in which is categorically contraindicated. As a rule, the issue of isolating basements from groundwater and simply moisture from the soil is solved by a set of measures that include external and internal waterproofing, as well as drainage of the foundation of the house. The latter is designed to remove excess moisture from the soil, and the first two prevent the penetration of its residues into the concrete.
External waterproofing of the basement is carried out using bituminous mastic and roll material, and internally with dry mixtures for waterproofing. In both cases, work must be done without violating technology – errors here are fraught with quite serious consequences and high costs for their elimination.
Basement waterproofing photo
How to insulate a basement outside and inside
Many have noticed that it is always much colder on floors below ground level, here the coolness comes from the ground. On the one hand, this is good, but on the other hand, when the soil freezes in winter, it’s not very good, since it is quite expensive to heat such a room. It is for this reason that the issue of basement insulation should be given due attention. There are two approaches to solving this problem – insulation can be performed outside or inside the room. The first is preferable.
External insulation of the basement is carried out using foam plastic with a thickness of at least 50 mm. The beauty of this technology lies in the fact that the sheets of this material practically do not need to be fixed. It is enough to glue them pointwise with the help of a special mounting foam, and the rest of the work will be done by the soil, which fills the space around the already completed basement.
Basement insulation photo
To enhance the effect of foam plastic, you can additionally perform internal basement insulation. How to insulate a basement from the inside? In the same way as the walls of the upper floors – with the help of mineral wool and drywall. In this case, the outer walls of the basement will have to be sheathed with drywall, and the space between it and concrete should be filled with mineral wool. In principle, if we are talking about saving space, then you can resort to the so-called insulated plaster – its efficiency is much lower, but in combination with external insulation, the effect will be quite sufficient.
Do not forget about floor insulation. Pour the reinforced screed over the foam, and everything will be in perfect order.
How to ventilate the basement: the main stages of work
Ensuring the supply of fresh air to the basement, even if a garage or a workshop is planned in it, is simply your responsibility. Without proper ventilation, mold will certainly settle in underground rooms, despite high-quality insulation and waterproofing. It will be necessary to calculate and assemble a full-fledged, branched ventilation system – install air ducts, equip their end parts with adjustable grilles and equip this system with forced fans. No matter how difficult it may seem, in fact, ventilation is done simply.
Basement ventilation in a private house photo
The simplest version of the ventilation system is two pipes led outside, one of which falls closer to the floor (through which air is supplied to the room), and the other is closer to the ceiling (its tasks include removal of polluted air in a natural way).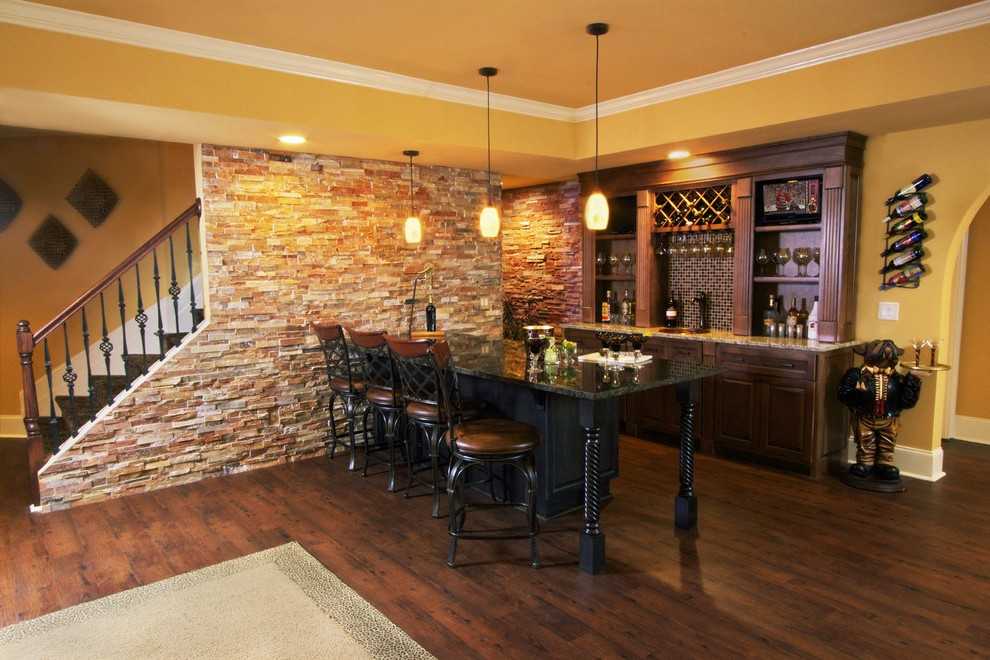 To remove air from all rooms at the same time, the upper pipe branches out with the help of tees and is carried out to each individual room. This is how the ventilation of the basement of a private house is done. As you can see, there is nothing complicated.
In conclusion of the topic, a few words about how to build a basement with your own hands in an already finished house. In principle, this task is feasible, although it will be difficult. It will be necessary to remove the floors, dig trenches along the load-bearing walls to the depth of the basement, fill them with concrete, after it dries, remove all the remaining soil, make the floor in the basement, and then build floors, not forgetting about the entrance to the basement. In general, it is difficult and time-consuming, and most importantly, one cannot do without the subsequent repair of the whole house.
Author of the article Alexander Kulikov
How to make a cellar with your own hands
Underground storage (external or bulk cellar), fully or half buried in the ground, an absolutely necessary element of the country economy. The most cost-effective option should be chosen based on the vertical section of the site, the physical properties of the soil, the level of groundwater, and the possibility of floods.
The distance from the surface to the upper and ground waters is a factor that determines the type of cellar. More or less accurately, it is determined after heavy autumn rains. But it is built in the summer. There is an exit.
There are maps of hydroisohypses and hydroisopieses in each region. It is not difficult to get data on your site: if the summer cottage was designed, then they should be an application to the project. But at any standing of the waters, the place of the cellar is the most elevated place.
Dimensions are selected based on the purpose, volumes of loaded gifts of nature, products of their processing. The rational size is 2 x 3 m. For a family of 4, stocks, including potatoes, will be enough for the longest winter.
Content of Article
- 1 What should be taken into account when designing the cellar
- 2 Materials for the cellar
- 2. 1 Cella of butt or brick
- 2.2 Concrete cellar
- 2.3 Pencoline
- 2.4 Plastic signs
- to a good cellar
- 3.1 Excavation
- 3.2 Foundation
- 3.3 Building walls
- 3.4 Waterproofing
- 3.5 Stairs
- 3.6 Ceiling
- 3.7 Ventilation
- 3.8 Electricity
-
What to consider when designing a cellar
In order for a cellar, built and equipped with your own hands, to provide comfortable conditions for vegetables and fruits, you need to know how to make a cellar correctly.
- Full temperature stability – regardless of the season – is achieved at a depth of about 3 m.
- Between the entrance and the stairs to a buried or semi-buried cellar, a vestibule is necessarily arranged. Entrance is desirable from the north side.
- Do not make a cellar near a large tree. Its roots are difficult to remove and can eventually destroy basement walls.
- Wooden racks, boxes, pallets inside are the norm, as wood does not conduct heat and cold as quickly as metal does.
- Circulation is the only way to resist damp air pockets, so shelves should be placed 3 to 8 cm from walls.
- For all basements, the preferred floor for proper thermoregulation is rammed earth. Concrete is recommended for high standing water.
- A thermometer and a hygrometer (to measure temperature and humidity, respectively) are installed in each underground cellar. In the first time after the launch of the basement, these indicators should be monitored, if possible, daily. This will help you quickly work out methods of maintaining the right atmosphere inside.
- The temperature is usually controlled by forced ventilation: autumn nights are an excellent source of cold air to lower the temperature.
The entrance to the cellar can be top (through a hole in the ceiling) or side (through an extension). The doorway is installed horizontally, obliquely or vertically.
The most ergonomic – with a side vertical entrance (cellar). The minimum area on the site, costs and time is the construction of a storage cellar with an upper horizontal entrance. Drawing of the future structure is required. As a basis, you can take your favorite project posted on the Internet or from manufacturers of plastic cellars. And you can also take a closer look at the experience of neighbors: the vast majority of them will gladly share their experience.
Cellar supplies
We select materials based on construction conditions and budget.
Cellar made of rubble or brick
Traditional, centuries-old natural materials. They allow you to create a cellar in the house with your own hands of any shape, up to vaults and arches. Brick is used only red, well-burnt, type “Ironstone”. Silicate brick is not used in underground construction.
It is recommended to lay out the thickness of the walls in brick.
When laying in half a brick, the sinuses between the soil and the masonry are filled with clay, followed by tamping. The brick partition, perpendicular to the long walls, will reduce the pressure on the walls. Strengthen the masonry cement plaster. Concrete cellar
Reliable construction that will last for decades and centuries – concrete. The unambiguous choice of this material is dictated by hydrographic conditions: a high level of groundwater, a tendency to swamp, melt water in the lowlands and on the slopes.
Do-it-yourself cellar in the ground – a monolith – will not give a chance to water, which moves in soils with free gravity, to penetrate inside. The use of reinforced concrete allows you to make a caisson from the cellar. In the event of a flood, it will remain dry.
Building a cellar with your own hands with a high level of groundwater from reinforced concrete is not an insurmountable task. The main thing here is to prepare a concrete mixture of the required strength class.
In such conditions, concrete B35 (M450) is used. It becomes impervious to water thanks to waterproofing additives. These additives are available at any hardware store. They, in addition to the main function, several times reduce the time for concrete to gain strength, increase the strength itself. The concrete mixture is ordered in mixers or prepared on site.
In difficult soils, the wall thickness should not be less than 100 mm. Such a scheme gives a good margin of safety.
- Floor – 200 mm.
- Walls – 150 mm.
- Overlap – 100 mm.
This is the most correct cellar: even heaving soils are not afraid of it.
In areas with dry soils, concrete is also preferred. But in this case it is easier to make a cellar in a country house with your own hands: you can use sand concrete with fiber reinforcement, and only reinforce the ceiling with reinforcement.
The walls of the cellar made of concrete blocks of the FBS type, road slabs, fragments of piles, pillars have proven themselves well.
There is no design component at the cellar, waterproofing will take a little more time. Foam block cellar
Cellar foam or gas blocks should only be used in dry soils. Brand – not lower than D 500 or D 600. The main disadvantage of these materials is the ability to absorb moisture. When frozen, a block saturated with water is destroyed.
Based on this, there is a need for high-quality waterproofing outside the walls. For its device, a technological corridor along the outer walls of at least 0.7 meters is required. The cost of an enlarged pit and modern waterproofing materials will block the economic benefits of buying and laying such blocks.
Plastic cellars
The question of how to build a cellar does not apply in this case. They are manufactured in the factory from 10 mm thick propylene. The strength of the products is given by stiffening ribs and an internal metal frame. For soils saturated with water, external concrete pouring of the walls and ceiling is provided.
The floor in the cellar can be wood or concrete over plastic. An undoubted advantage is the complete internal configuration.
- Wooden ladder.
- Shelves with wooden shelves.
- Exhaust and supply ventilation.
- Waterproof lamp.
- Temperature and humidity sensors.
Of course, you can order individual equipment. There are a lot of plastic models, including budget ones. The main advantage of such a cellar-tank is complete tightness.
You can make a cellar in the house with your own hands from such a tank in one day. The plastic underground cellar with a horizontal entrance is compact; during operation it does not require treatment with antifungal compounds.
Eight steps to a good cellar
A complete vision of how to build a cellar with your own hands step by step is half the battle. This will avoid many mistakes. Typical of them: failure to make technological holes for ventilation, power supply, incorrect marking, errors in determining the level of the cellar, violations of the waterproofing scheme, etc.
Excavation
A cellar in a country house begins with a foundation pit. It is most rational to arrange it with an excavator. Doing earthworks on your own is not only extremely time-consuming, but also dangerous. SNiP 12-04-2002 expressly prohibits work in pits with loose walls. At a depth of: 1.0 m – in bulk non-compressed and natural sandy soils; 1.25 m – in sandy loamy soils; 1.5 – in loamy soils and clays.
In practice, there are often hard plastic clays that cannot be taken with a shovel. Such walls will not slide into the pit even at a depth of 4 m. However, these figures must be known in order to avoid accidents.
Before making a cellar, the finished pit is left for at least a day. This is necessary to control groundwater. When they appear, increase the depth to half a meter and lay greasy clay, followed by tamping. In dry soils, they also make clay bedding up to 15 cm and cover it with a layer of sand.
Foundation
It is not recommended to build a cellar with your own hands in the ground without a foundation.
A drainage layer of crushed stone up to 15 cm is laid on the sand. Crumpled clay is placed on it and only then a tape or reinforced concrete slab with a thickness of not more than 10 cm is poured. At least a day later, a liquid or rolled waterproofing is installed and the second layer of the slab up to 15 cm thick is poured. The foundation must protrude beyond the outer dimensions of the cellar by 10-20 cm.
Building walls
When pouring or laying walls, the main thing is to comply with the thicknesses recommended above, the compliance of concrete, mortar and brick with the hydrotechnical properties of the soil. Modern additives make it possible to impart water-repellent properties to binders: they should not be neglected.
Masonry rules are similar to general construction. The only difference for rubble stone: the seams are made of a smaller thickness in order to prevent settlement. On the inside there should be a hollow for better plastering.
The walls from the inside should be ironed with a cement-sand mortar in a ratio of 1:1 or 1:0.5. Whitewashing is made with lime with the addition of copper sulfate.
Waterproofing
You need to understand that a good cellar with your own hands is a rather painstaking work. The result can be judged after the first winter. Dampness, condensation on the walls, and even water on the floor … As a rule, waterproofing fails. Troubleshooting is an extremely difficult task.
This is a mandatory operation: it determines how long the cellar for vegetables and conservation will last. Traditional types – coating, roll and membrane – are barrier types and are prone to damage during soil movements, destroyed by large roots. Require amplification. To eliminate errors, we advise you to read our detailed material on waterproofing in a cellar or basement.
The highest quality cellar waterproofing is penetrating. Produced from inside. A special composition fills the pores and cracks of the wall material almost to the entire depth of the wall.
Forms a waterproof gel in masonry and crystallizes in concrete. The most common mistake: do-it-yourself cellar in a private house is built with violations of waterproofing technology. This is exactly the case when you should strictly follow the manufacturer’s instructions and the conditions for applying a waterproofing coating.
In dry soils and low groundwater levels, stagnant water can be a hazard: precipitation accumulates in the sinuses between walls and soil and creates hydrostatic pressure. Insulation is also necessary in this case. To prevent stagnant water, a drainage groove is arranged around the perimeter.
Staircase
Steps or stairs are one of the main elements of the basement: vegetables, fruits, canned food will be brought in and out along it. A person with buckets or a bag on their shoulders will not be able to climb or descend stairs with a height of more than 200 and a tread of less than 100 mm. The recommended width is from 0.
6 to 1 meter. Slope from 30 to 45°. The height of the passage is 2 meters. The answer to the question of how to make a staircase to the cellar directly depends on its type. In cellars with a side entrance, concrete, brick, cinder blocks are used as the material for the stairs. The basis is the soil planned at the right angle. It is advisable to arrange a railing. A metal pipe 5 cm from the wall will help a lot when moving with a load.
In cellars with a horizontal hatch, a wooden or metal staircase without risers is installed. Railings should also be provided, since the angle of inclination of such a staircase will be 60 – 75 °. To facilitate the ascent, a goose step ladder is used.
Cover
It is made of wood, reinforced concrete, metal slabs and beams, poured with concrete along the formwork. Wooden beams, boards must be cleaned of bark residues, antiseptic. Before laying, the supporting sections of the wooden structure are waterproofed with bituminous coating or roofing material with an overlap of at least 10 cm.
Timber for flooring – due to its tendency to rot – has practically fallen out of use. The most common cellar floor is a monolithic concrete slab with a reinforcing cage. Its thickness depends on the covered area, the thickness of the soil layer on top, but not more than 30 cm.
It is desirable to pour such a slab in one run with the obligatory compaction with a deep vibrator or improvised means. After a full set of strength, the slab is isolated from moisture and heat: covered with bitumen, roofing felt, followed by laying polymer insulation or clay. A layer of soil and turf will complete the overlap.
Ventilation
Proper ventilation in the cellar is the key to preserving the crop. With the ubiquity of sewer plastic pipes and outlets to them (45 and 90 °) with a diameter of 100 mm or more, do-it-yourself cellar ventilation is not difficult.
The supply pipe is lowered by 20 – 50 cm from the floor, the exhaust pipe takes moist warm air from the cellar ceiling.
External exits are closed with fungi. To regulate the volume of air passed through, the pipes are equipped with valves or dampers. Power supply
How to make a cellar comfortable? Of course, hold the light. Cellar lighting is arranged only with waterproof lamps. It is forbidden to place sockets in the cellar. The switch must be located either outside at the entrance, or in a residential building.
It is recommended to carry out internal wiring with PR, PRG wire. Modern electronics will help turn on the lighting when moving in the cellar and turn it off after it stops.
In just eight steps, a plan is outlined on how to build a cellar with your own hands, basic concepts are given and typical mistakes are indicated. Elementary construction skills, high-quality materials and thorough work are the keys to success.
Maintenance of the cellar
Reduced to periodic cleaning and whitewashing, as well as maximum ventilation at the end of summer.
Periodically, the integrity of the structural elements should be checked (the ceiling in the cellar requires special attention), and cracks or rust should be repaired in a timely manner. How to make a basement under a house with your own hands
Contents
- Why is a basement under a house needed
- Where and how to make a basement
- Build the basement, how to make a basement with minimum costs
- How to make a foundation pit
- arrangement of a stone basement
- Two words about Radon
- Assembly of ceiling ceiling
- Conclusion
issues related there is always plenty of room in private houses, even when the construction of the basement is carried out simultaneously with the construction of the house. It is all the more difficult to lay down a basement under the house when the building is rented out for people to live in.
Why a basement under a house is needed
The idea of building a basement under a house usually arises when the reasons that prevented the arrangement of the basement during the construction of the house disappear or are eliminated, or it is simply impossible to do without a basement.
Most often, the owners agree to build a basement under the house:
- Water has left local aquifers close to the ground surface. The groundwater level allows you to make a basement or cellar without regard to the possibility of flooding the premises;
- There is simply nowhere to store the harvest, the existing cellar is small, and there is no way to upset or increase it, so you need to make a basement under part of the house;
- The forces of heaving and the level of freezing of the soil are quite high, the basement made will allow to partially insulate the foundation and reduce the threat of destruction of the structure of the base of the house.
Important! In any case, the construction of the basement will be hampered by the need to do a huge amount of earthwork with your own hands.
The best option would be to make a basement under a part of the house, for example, on the side of the utility or auxiliary rooms of the house.
Digging a pit from a living room will require transferring a large amount of excavated soil and dirt, and it is quite difficult to do this without consequences for the situation inside the house. The second, no less interesting way to build a basement is to make it with a separate entrance from the street. In this case, the residents of the house will be completely relieved of the problems associated with digging a pit.
Where and how to make a basement
For conventional strip foundations, building a basement is not a problem, except that most of the construction and finishing operations will have to be done in extremely uncomfortable cramped conditions. In this case, the main thing is to make a foundation pit for the basement with the dimensions of the walls, which do not reach the strip base of the foundation by at least a meter and a half.
The situation is much more complicated with shallow or slab foundation structures. In the first case, it makes no sense to make the basement small, and it is dangerous to go deep into the ground below the level of the supporting surface of the foundation tape, this can lead to the dumping of the concrete base of the house into the basement pit.
For slab foundation structures, there are practically no problems, how to make a pit correctly, if after the arrangement of the basement the specific pressure on the soil does not exceed its bearing capacity. The construction of any building is carried out with a certain margin of pressure on the ground, but a twofold decrease in the supporting surface of the slab after the construction of the basement can lead to a fracture of the slab array.
Therefore, before deciding where and how to make a basement under the house with your own hands, you should consult with experienced specialists in the field of foundation construction.
We build a basement, how to make a basement with minimal costs
In addition to the safety of building a basement, every owner wants to make a basement under the house with minimal effort, labor and materials. But in this case, saving on concrete or metal is inappropriate when it comes to the safety of the entire house.
The easiest and cheapest way to make a basement is if the house structure already has a semi-basement, for example, a brick caisson with pumping equipment for the well. In this case, it remains only to expand it and make the walls of normal height.
Arrangement of any basement is carried out in four stages:
- Initially, the position of the future basement under the building is determined, all elements are drawn on a sketch on a scale to understand where the entrance will be, and how difficult it is to make such an entrance;
- A pit is being dug – a foundation pit according to the size of the future basement;
- Brick or cast concrete walls, concreted floor slab;
- A ceiling covering is being installed, which must be done in the basement without fail. Otherwise, water vapor will break through the ceiling.
In addition to the correct choice of the layout of the basement under the building, you will need to think about how to make a convenient design of the stairs, which will allow you to go down to the basement.
In the easiest way, you can make a step ladder from two steel spans. Such a staircase can be easily made from a tubular profile and sheet metal with your own hands and installed in the basement. How to make a basement pit
Today there are two ways to dig a pit under the house. Both options are widely used for arranging underground rooms and galleries.
The first method involves horizontal excavation. Before starting work, it is necessary to make a pit with a section of 80×80 cm to the depth of the future basement. If there is no groundwater under the building, then you can do without a pit, otherwise you will need to make a small niche in the dirt floor, where to insert a drainage pump to pump out groundwater. If the hole remains dry for three days, the pump can be removed.
To make the process of digging a pit relatively safe, a ventilation pipe and lighting should be installed in the pit. To remove the soil, you can make a winch or invite an assistant, the second option is more expensive, but more reliable.
Digging a pit with your own hands alone will take at least a week. The second method provides for a radical acceleration of the digging process. To do this, the floors and insulation are removed on the first or basement floor, and the future basement is marked. The soil is drilled out with an electric drill to the required depth, after which the hole is cleared with shovels. In this way, a foundation pit under the basement can be made in 12-15 hours of work.
Important! The open method of digging a pit is safer and simpler, in addition, concrete work, wall finishing and laying the basement ceiling are greatly simplified.
Arrangement of the basement stone box
Regardless of whether there is water in the foundation pit of the future basement or not, it is necessary to make bottom drainage. You can save on an inexpensive drainage scheme, especially if the strip foundation has its own drainage system, but it is better to play it safe and lay a drainage pipe around the perimeter of the finished pit, pour rubble, sand, lay waterproofing and reinforcing mesh.
Only then pour the concrete slab. If this is not done immediately, then when water appears, the pressure on the bottom of the concrete box will be so great that moisture will seep through microcracks along with liquid clay. Experts recommend equipping the basement under the house in the form of a monolithic concrete box. Often, before casting a box of concrete, the soil walls of the pit are lined with ceramic bricks, on which rolled waterproofing is welded. This is followed by the installation of a reinforcing frame made of a bar with a diameter of 10-12 mm. First you need to install the vertical bars and connect them to the release of the reinforcement from the floor slab. After that, the horizontal threads of the reinforcement are laid out, which are tied up at the corners with the help of L-shaped bent rods 70-80 cm long.
Formwork for wall casting is best done immediately with shield spacers. This reinforcement allows you to simultaneously take the required amount of concrete from the automixer.
For the manufacture of a formwork frame, a timber with a section of 100×50 mm and an ordinary inch board are suitable. It is very long and inconvenient to pour concrete mortar in parts. At the same time, the concrete mass unloaded into the formwork must be punched with an electric vibrator, achieving the maximum quality of compaction.
Two words about radon
Experts recommend making a basement not only because of the high strength and good waterproofing of the walls. Concrete effectively restrains the penetration of radon into the basement. In rocky soils with a low level of groundwater, the owners prefer to lay out the basement with ordinary red brick, which practically does not offer any resistance to radon.
Given the deadly danger of radon and the extremely ineffective removal from basements using conventional supply and exhaust ventilation, it is still better to make the basement box in the form of a monolithic concrete casting.
Assembling the ceiling slab
Making a ceiling slab is considered to be one of the most difficult stages of construction.
Initially, supply and exhaust ventilation pipes are installed on the walls of the concrete box of the basement and wiring for lighting is brought in special hoses. Fasteners for mounting a metal ladder are driven into the walls. After that, the location of the entrance is determined and a steel or wooden frame of the door or hatch is installed.
Next, you need to make a steel reinforcing frame of the floor slab, for this, a standard reinforcing bar with a diameter of 12 mm is used. One of the ways to make a slab involves rolling a continuous row of asbestos-cement pipes onto concrete walls, after laying reinforcement and formwork, the entire structure is poured with a layer of concrete, 120-150 mm thick.
An easier way to make a slab is to cast it on the walls in parts, in separate slabs up to 50 cm wide. For this, a reusable adjustable metal formwork and four rack jacks are used. After completion of the work, the joints between the slabs must be filled with concrete mortar.
- 2.
 1 Cella of butt or brick
 The most ergonomic – with a side vertical entrance (cellar). The minimum area on the site, costs and time is the construction of a storage cellar with an upper horizontal entrance.
  When laying in half a brick, the sinuses between the soil and the masonry are filled with clay, followed by tamping. The brick partition, perpendicular to the long walls, will reduce the pressure on the walls. Strengthen the masonry cement plaster.
  In such conditions, concrete B35 (M450) is used. It becomes impervious to water thanks to waterproofing additives.
  There is no design component at the cellar, waterproofing will take a little more time.
  The floor in the cellar can be wood or concrete over plastic.
 A drainage layer of crushed stone up to 15 cm is laid on the sand. Crumpled clay is placed on it and only then a tape or reinforced concrete slab with a thickness of not more than 10 cm is poured.
 Forms a waterproof gel in masonry and crystallizes in concrete.
  6 to 1 meter. Slope from 30 to 45°. The height of the passage is 2 meters.
 External exits are closed with fungi. To regulate the volume of air passed through, the pipes are equipped with valves or dampers.
  Periodically, the integrity of the structural elements should be checked (the ceiling in the cellar requires special attention), and cracks or rust should be repaired in a timely manner.
 Digging a pit from a living room will require transferring a large amount of excavated soil and dirt, and it is quite difficult to do this without consequences for the situation inside the house.

 In the easiest way, you can make a step ladder from two steel spans. Such a staircase can be easily made from a tubular profile and sheet metal with your own hands and installed in the basement.
  Digging a pit with your own hands alone will take at least a week.
  Only then pour the concrete slab. If this is not done immediately, then when water appears, the pressure on the bottom of the concrete box will be so great that moisture will seep through microcracks along with liquid clay.
  For the manufacture of a formwork frame, a timber with a section of 100×50 mm and an ordinary inch board are suitable.
  Initially, supply and exhaust ventilation pipes are installed on the walls of the concrete box of the basement and wiring for lighting is brought in special hoses.