How much to convert a barn to a house: The request could not be satisfied
All You Need To Know About Converting A Barn Into A House
April 29, 2022
PennDutch
Design
Contemporary barn living is becoming the next big thing, and we can see why. Converting a barn into a house isn’t only a trendy and creative way to add value to your home, but it can also be beneficial to your lifestyle.
Whether you have an old barn that’s taking up space, or you’re interested in purchasing a new barn for your backyard, these barn remodel ideas are guaranteed to get you excited. In this blog, we’ll review what converted barn homes are and what you need to know to create one for yourself and your family.
Skip Ahead:
- What Are Converted Barn Homes?
- How To Convert A Barn Into A Home In 5 Steps
What Are Converted Barn Homes?
Converting a barn into a house is a trend that continues to grow. Known commonly as “barndominiums”, people have been attracted to renovating a barn to create a residential space to live in. Whether it’s used as a guesthouse, pool house, or even your primary residence, there are many benefits of turning a barn into a house.
Once you rid a barn of equipment and other supplies, you’re left with a spacious structure that offers a lot of design potential. While it may be a fairly big undertaking, many people are raving about their converted barn homes, making the projects become more and more popular in a variety of locations.
How to Convert a Barn into a Home in 5 Steps
Learning how to convert a barn into a residential space can seem daunting, which is why we’re here to help. Below, we’ve outlined a guide you can use to get your barn remodel project started in just 5 steps.
1. Determine Your Budget
Before you begin looking into any barn renovation ideas, you should determine your overall project budget. Setting a budget will help you stay in control of your costs and help you create a realistic vision of your final project.
You can start creating a budget by listing all the costs that will be related to your project. These will include any necessary repairs, installations, design elements, and any costs that may be specific to your structure or location.
On average, the cost of converting a barn into a home is about $10 – $50 per square foot. Some of the costs you can expect to incur include:
- New foundation: $4,000 – $12,000
- Insulation/weatherproofing: $900 – $2,000
- New roof: $5,000 – $10,000
- Fumigation: $10 – $20 per linear foot
- New doors/windows: $2,500 – $7,500
- New HVAC system: $5,000 – $10,000
- Structural engineering, plans, and permits: These costs will vary depending on the location
These prices will obviously vary depending on details like the size and current state of your barn, as well as your personal taste. Remember to be as realistic about your budget as possible, that way you won’t run into any surprises along the way, ending up with a project that costs more than you expected
2.
 Choose Your Style
Once you’ve decided on your project budget you can start planning the fun stuff. You want your converted barn home to be a place you can enjoy so it’s important you choose a style that resonates with your personality and is aesthetically pleasing to you.
One of the reasons people are attracted to converting barns into a house is because they offer a unique design, that being said, it’s imperative that you keep your specific style and vision in mind before and during the construction period.
There are many different styles you can browse for inspiration while deciding what you want your barn to look like in the end. Some of these could include:
- Rustic
- Contemporary
- Transitional
- Bohemian
When choosing your barn style, you also want to consider the type of barn you’re going to be working with. Based on popularity, you’ll usually see A-frame barns, Dutch barns, and pole barns converted into homes. Knowing the type of barn will help narrow down which style works best for you and the structure.
3. Research Your Area’s Building Regulations
Depending on where you live, you’ll need to research the building regulations that are required when converting a barn into a house. As you do this, you should make sure to look into your local zoning regulations as well as property lines. You may also want to check with your local zoning and planning department to ensure you won’t run into any issues after you begin your project.
4. Hire the Professionals
Unlike building a horse barn, converting a barn into a house requires a lot of additional complex tasks. Hiring professionals like contractors, plumbers, electricians, and engineers can give you peace of mind that the complicated and difficult tasks are being handled properly.
Below, we’ve listed some of the tasks that you’ll need to complete in order to properly turn your barn into a residential home.
- Pour a foundation: Most barns have dirt floors so you’ll need to create a more durable foundation.
 To do this, you’ll need to raise the barn a few inches off the ground and pour a cement foundation underneath. This process can be complicated and difficult, so you will most likely need to get a professional’s help.
 To do this, you’ll need to raise the barn a few inches off the ground and pour a cement foundation underneath. This process can be complicated and difficult, so you will most likely need to get a professional’s help.
- Rebuild the frame: If you’re renovating a barn that’s been around for a while, the frame may need to be strengthened, or in some cases completely rebuilt. Similar to the barn’s foundation, this process is strenuous and complex. It’s best to get the help of a professional to oversee the project.
- Reroof: Updating your barn’s roof may be necessary to ensure it withstands inclement weather as well as maintaining the proper temperature inside. You’ll want to look into your roofing options. We recommend using architectural shingles because of their high-quality performance and durability.
- Install plumbing/electricity/HVAC: Turning a barn into a house requires you to add elements that wouldn’t have originally been installed. You’ll want to make sure your barn is climate-controlled, has plumbing, and offers a number of electrical outlets for you to use. Any pipes, wires, and heating and cooling systems should be installed within the walls before the walls are insulated or closed off.
 You’ll want to make sure your barn is climate-controlled, has plumbing, and offers a number of electrical outlets for you to use. Any pipes, wires, and heating and cooling systems should be installed within the walls before the walls are insulated or closed off.
 - Insulate: In order to remain comfortable inside your converted barn, you’ll need to insulate your walls. Doing this will allow you to control the temperature and make sure that it doesn’t get too cold or hot when the weather changes. There are numerous insulation options available for you to choose from based on your specific needs.
- Interior finish work: Keeping your chosen style in mind, you’ll need to finish off any interior work you have planned. This work will include things like flooring, ceiling, walls, counters, cabinets, lighting, and more. You’ll most likely need the assistance of a professional for this part as well.
Hiring professionals will ensure your converted barn home is safe and can be comfortably used as a residential space. While it may seem costly, hiring these professionals will most likely save you time and money in the future.
5. Design Your Space
Once all of the technicalities are taken care of, you can move on to the fun part of converting a barn into a house. Depending on the purpose of your space, you can add specific furniture, accessories, and more. The barn remodel ideas you can use for inspiration are endless but don’t forget to put in your own personal touches.
Remember, you don’t need to originally own a barn to enjoy contemporary barn living. While many converted barns are older structures that people decide to renovate, there is also the option of purchasing a new barn and then beginning your remodeling process.
If you’re looking to speed up the remodeling process, you’ll want to consider this. Purchasing a new barn will allow you to skip the steps an older barn requires such as repairs and checking the durability of an older structure. Ready to bring your barn living dream to life? Check out our elite backyard barn styles today to find a structure that completes your vision.

Start From Scratch With A New Barn
If you’re looking to speed up the remodeling process, you’ll want to consider this. Purchasing a new barn will allow you to skip the steps an older barn requires such as repairs and checking the durability of an older structure. Ready to bring your barn living dream to life? Check out our elite backyard barn styles today to find a structure that completes your vision.
View All Backyard Barns
Two Story Elite Dutch Big Barn
Converting a Barn into a House — Costs & Helpful Tips
Old barns have fascinated both old and young alike for hundreds of years. For every child who has played in a hay-filled loft, there have been an equal number of urban city dwellers who, tired of office politics and a long commute each day, have looked wistfully at a 200-year old barn in a lonely pasture and said to themselves, ‘I wish I lived there.’
Converting a Barn into a House – this article will show you how to make that dream come true. We’ll walk through the cost breakdown, how to turn a barn into a house, and provide some before/after’s.
To start, you’ll need to put a new foundation under your new/old barn home ($5,000-$8,000). Then you’ll need interior framing to shore up old walls and trusses ($7-$16 per square foot), drywall ($20-$30 per linear foot) and finally, a new shake shingle roof ($16,000-$27,000).
It can add up. But is it cheaper than building a true barndominium or post and beam barn home? And is it worth it in the long run, to make your dream of living in a barn true?
It can be. Read on.
Get a FREE 18 Month Barndominium Planner
There are 39+ steps that must be taken before groundbreaking. Learn them all in this FREE checklist, available for immediate download.
Page Contents
Converting a barn into a house? How did this idea take hold?
No one can pinpoint with any accuracy how the term “barndominium” was born. We know for sure that it is an unlikely marriage between two disparate terms; barn and condominium.
Conventional wisdom has it that the term didn’t begin to gain traction until sometime in 2013 when Chip and Joanna Gaines burst onto TV screens with the reality TV series “Fixer Upper.”
That’s when they converted an old gambrel-roofed farmhouse into a barndominium with a rapt TV audience worldwide watching. It was quite a barn to house conversion, and the result was amazing.
Here’s a bit of trivia regarding their famous barndominium, shown here.
Get a FREE 18 Month Barndominium Planner
There are 39+ steps that must be taken before groundbreaking. Learn them all in this FREE checklist, available for immediate download.
According to some who have been through it, the elongated dining room with its huge farmhands table is actually on the second floor. An interesting design choice. We wonder if the kitchen is up there, too?
Barndominiums, Everywhere
Oddly enough, Texas, which is where the Fixer Upper barndo was featured, has without a doubt the highest concentration of barndominiums anywhere in the country. More than 190 were for sale in Texas when we checked recently on Zillow.
So, not only are a lot of people interested in building them lately, there is quite a resale market for them as well.
No word on just how well barndominiums hold their value or appreciate relative to more conventional housing
But we digress.
Get a FREE 18 Month Barndominium Planner
There are 39+ steps that must be taken before groundbreaking. Learn them all in this FREE checklist, available for immediate download.
People are looking for ways to turn old barns into homes
If you’re one of them, with a yen to have your kids literally make the old adage of “Did you grow up in a barn?” come true, then this article will answer most – if not all – of your questions.
According to an interview in This Old House, when art gallery owner Judith Racht acquired a lovely old farm in Niles, Michigan, 25 years ago, she knew the house was a bore.
But the romantic-looking barn out back? “I always had this idea I was going to do something with it,” she says.
She began planning and then brought architect Austin DePree on board. “He really put my ideas on paper,” she says.
The result? A fantastic combination of old world and new. (see the made over barn home below.)
The architect transformed the barn door openings into awe-inspiring works of metal and glass. and he harnessed the geothermal power of the earth by putting channels right into the floor to catch condensation.
The innovative young architect then forestalled the possible issue of too much snow on a new zinc roof by reinforcing collar ties with steel tension rods.
Then, the renovation team lined the original post and beam frame with reclaimed barn wood to create the stunning dining area shown below.
Modern day masons joined with metal workers and and structural engineers to combine the barn’s old elements with new purposes.
Get a FREE 18 Month Barndominium Planner
There are 39+ steps that must be taken before groundbreaking. Learn them all in this FREE checklist, available for immediate download.
For example, they repurposed on old support beam — once used to allow wagons enough room to turn around inside the big structure — with one made of strong metal. And the result is artful.
The master bedroom hovers over the kitchen now, mimicking a hayloft.
Adding the final touches
The entire barn home now positively glows with reminiscences of old combined artfully with the 21st century. And the result of Judith’s vision couldn’t make her happier.
And from another barn-to-home observer…
Ensley Caldwell is full of advice and arcane statistics on the subject of big barns turned into homes.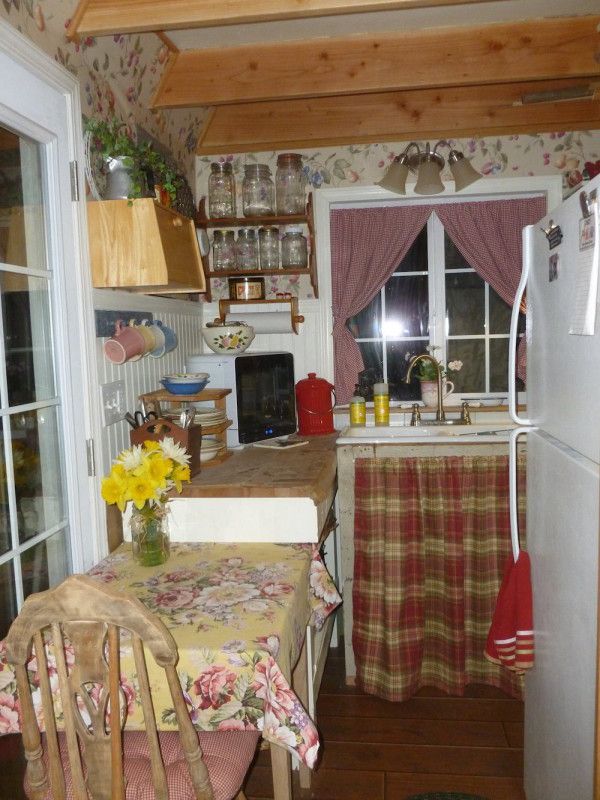
He has an answer for the Chip and Joanna Gaines question of why they put the kitchen upstairs. “It’s because that’s where the barn had plumbing and electricity already. Do I blame them? No. Do I like the layout? Also no.”
According to Caldwell, speaking in an article in the online critical blog TheBestPickReports.com, renovating an old barn will probably be cheaper than building a whole new one.
Get a FREE 18 Month Barndominium Planner
There are 39+ steps that must be taken before groundbreaking. Learn them all in this FREE checklist, available for immediate download.
But it may also get in the way of just how much you can renovate. “But the physical structure is already there, which saves you money,” he adds.
You should definitely be able to fit a master bedroom, closet, and bathroom in an already-existing barn. , he says. And, you’ll probably even have room for a living space. “But if you want a kitchen, a porch, or a garage/shop area, you may have to expand.”
Here’s the good news
The really good news? It will probably cost much less than building a new barndominium from scratch.
For one thing, the physical structure is already there. But it will need a few things you would have had to supply with a new barndo anyway.
The cost of converting a Barn Into a House – Barndominium-style
For instance, you’ll need to put a new foundation under your new/old barn home ($5,000-$8,000). Then you’ll need interior framing to shore up old walls and trusses ($7-$16 per square foot), drywall ($20-$30 per linear foot) and finally, a new shake shingle roof ($16,000-$27,000).
It can add up. But probably not to the extent new construction would entail.
Like this Post? Sign up for our email list!
 ..”>Be the first to see new posts about the best barndominiums, construction guides, floor plans, and more! Enter your information below to become a BarndominiumLife VIP.
5 things to know about barn conversions
Beginner’s guide to barn conversions
An old barn can provide the perfect shell to create your ideal home. These large and often very solid structures give the opportunity to create a house with huge expanses of space and high ceilings. Most importantly, by retaining the original form, materials or structure, it adds character, charm and history to your otherwise modern and light-filled home.
Here at Design for Me, we’ve helped thousands of homeowners all over the UK to find the best architect or designer for their project.
✓ Get matched within minutes and see who’s interested
✓ Get no obligation quotes
✓ It’s completely free.
1. Where can I find barns for sale?
The most comprehensive search engines for old or derelict barns for conversions:
On the market has a good list of barns for sale, both completed conversions and barns ready to be converted.
Barnsetc is a site dedicated to help you find your perfect barn or barn conversion.
3. How much does a barn conversion cost?
It’s almost impossible to put a ballpark cost to this, as it depends on so many factors. However, barn conversions are typically more expensive than new builds per square metre, so expect to pay upwards of £1500 per square metre. Retaining and carefully upgrading the existing structure and fabric of the building can be a costly exercise. However, the character and history it preserves can be priceless.
See our article on how much it costs to build a new house here:
How much does it cost to build a house?
4. How do I get building regs approval for a barn conversion?
Ultimately, there are three routes to obtaining building regulations approval for your barn conversion.
- A ‘building notice’ is where you or your builder gives notice to the council that works are about to start. This makes things much quicker, but there is more of a risk that you will be asked to change aspects of the design as you go. Also, there is less scope for appealing their decisions. This route is common for small extensions, but for a barn conversion, I’d recommend considering the other approaches below…
- A ‘full plans’ application to the council means that you submit plans and details for approval before work starts. This information is usually much more detailed than a set of planning drawings. Once submitted, the decision takes a minimum of five weeks. Once work starts on site, regular inspections will be made.
- Using an ‘approved inspector’. An approved inspector is a private individual or organisation employed by you to ensure that your project complies with the building regulations. They will check and inspect the work instead of the local council. Using an approved inspector can be invaluable, particularly if your proposals are out-of-the-ordinary, or push the boundaries of the ‘approved documents’. Your approved inspector will be on your side to make sure your proposals ultimately comply with regulations.
 This makes things much quicker, but there is more of a risk that you will be asked to change aspects of the design as you go. Also, there is less scope for appealing their decisions. This route is common for small extensions, but for a barn conversion, I’d recommend considering the other approaches below…
 Your approved inspector will be on your side to make sure your proposals ultimately comply with regulations.
4. Do I need planning permission for a barn conversion?
In 2014, permitted development rights were extended to allow agricultural buildings (e.g. barns) to be converted into homes (Class Q). Before this, it was necessary to apply for full planning permission. However, this concession in planning policy should not be viewed as a sure thing for every barn conversion project. There are certain rules, restrictions and hoops to jump through in every case, and there’s a possibility that permitted development rights won’t apply to your project at all.
Is it really a conversion or a ‘re-build’?
One issue is that a ‘re-build’ requires planning permission and a true barn ‘conversion’ may not.
Be aware that the local planning authority may classify the development as a re-build, even if much of the existing building remains. It’s worth having a look at this legal case here, but ultimately you will need to seek approval from the Local Planning Authority before starting work in any case.
Prior notification
One condition of permitted development for barn conversions is that prior notification should be given to the local planning authority before work starts. The council has the right to refuse the proposals if certain criteria are not met and can impose conditions on the development. It could be argued that this ‘prior notification’ procedure is essentially a planning application with another name!
We’d advise discussing your particular case with an architect, perhaps even before purchasing the plot. A good architect will help you navigate the complexities of the planning process during the design and development phase of the project. Here at Design for Me, we can help you find the right architect for your particular needs. Find out more…
5. How to stay in control of your barn conversion
As you’ve probably concluded, a barn conversion is not the easiest or cheapest route to creating your dream home. With this in mind, the most important decision you make as a client is to hire the right architect, preferably one with barn conversion experience. They can help you navigate the planning process, keep costs under control and design you a home that you’ll want to stay in for lifetime. Here at Design for Me, we specialise in matching clients with the best architect for your requirements.
Conversion and restoration architects
Below are just a few of the best conversion and restoration architects on Design for Me, where you can find and be matched with 100s more (and it’s free!):
- quickly see who’s interested in your job
- create a shortlist
- invite up to three for a no-obligation consultation
Lydia
Conversion and restoration architect in the Cotswolds, South-West
(click on her name above to view her full profile and shortlist her for your project)
“Lydia is the design director of an award-winning, innovative architecture practice based in the South West. Inspired by the unique context of each project, she enjoys creating thoughtful, site-specific designs and developments that enhance the urban or rural environment.“
Debbie
Barn conversion architect in Litchfield, West Midlands
(click on her name above to view her full profile and shortlist her for your project)
“We aim to provide good quality design and a full RIBA service at a reasonable cost. We guide throughout the whole process from planning, building control to site works and completion.”
Stuart
Barn conversion architect in Leeds, Yorkshire
(click on his name above to view his full profile and shortlist him for your project)
“Working closely with the client and their brief, we aim to create extensions, internal remodels and new build dwellings which surpass the client’s aspirations. Working throughout the residential sector, we have particular experience in working with existing properties, creating homes which meet both the functional and design needs of the client and brief. “
“
James
Barn conversion architect in Leeds, Yorkshire
(click on his name above to view his full profile and shortlist him for your project)
“We are a creative practice with a reputation for quality and imaginative architecture, interior and structural design. We have an open studio approach in Leeds and London that ensures each individual project receives thorough investigation and analysis, resulting in a bespoke solution specifically tailored to each scheme. Our ethos and attitude remains the same no matter the size or scale: to create exciting and interesting buildings and spaces that please, on budget and on time.”
Scott
Conversion architect in Manchester
(click on his name above to view his full profile and shortlist him for your project)
“I am lucky enough to design houses and house interiors as my job. I am deeply passionate about residential architecture and interiors and enjoy the process of helping clients to realise their dream project. ”
”
Mariona
Conversion architect in Camden, London
(click on her name above to view her full profile and shortlist her for your project)
“I’ve been working as an interior designer for 35 years, mainly on private home projects. I’m very interested in sustainability and organic or reclaimed materials. I’m originally from Barcelona, recently moved to London and now share a studio with architects and engineers at Ecos Maclean. I’m very experienced with managing projects and working with architects or builders. I don’t have a fixed style – I will work with the client and design to their tastes. Ultimately, it’s your house so I’ll adapt!“
If you are looking for a conversion or restoration architect for your project, we can match you with the best for your requirements. It’s completely free to use – just tell us what you’re looking for by clicking the link below:
- quickly see who’s interested in your job
- create a shortlist
- invite up to three for a no-obligation consultation
Emily Design for Me
Find your perfect design pro within minutes…
Here at Design for Me we match you with the right design professional, from thousands all over the UK. Get quotes & arrange up to three no obligation consultations. And it’s all completely free! Find out more here or get started below…
Posted
filed under Advice and tips, Conversions, Cost Planning, Legal Considerations.
How to convert a barn: 10 steps for a successful barn conversion
Real Homes is supported by its audience. When you purchase through links on our site, we may earn an affiliate commission. Here’s why you can trust us.
(Image credit: Andrew Halsam)
Join our newsletter
Get the best home decor ideas, DIY advice and project inspiration straight to your inbox!
Thank you for signing up to Realhomes. You will receive a verification email shortly.
There was a problem. Please refresh the page and try again.
By submitting your information you agree to the Terms & Conditions and Privacy Policy and are aged 16 or over.
Barn conversions are a popular option for renovators seeking a unique space to call home. While these projects require careful planning, flexible budgeting, good design and plenty of patience, the results are more than worth the investment, both time and money wise.
Our 10-step guide to tackling barn conversions is the perfect accompaniment to your house renovation project, guiding you through every stage of the process with help from barn conversion experts. We also take a look at how to convert a disused church or school, too.
Vintage finds, salvaged treasures and a spot of DIY helped Sophie and Bob Waiting convert their barn
(Image credit: Rachael Smith)
1. Find a barn to convert
This Grade II-listed stone barn in south Warwickshire was designed by architect Ben Parsons
If conversations with estate agents and your local council have proven fruitless, Plotfinder is a great place to find potential barn. You can also use it to look for potential school or church conversions. And for finished barn conversion ideas you can look to our edit.
- If you’re looking for a barn, try Barns Etc
- It’s also worth visiting English Heritage and Society for the Protection of Ancient Buildings .
2. Budget – how much does a barn conversion cost?
Church Hill Barn by David Nossiter Architects . Photography by Steve Lancefield .
(Image credit: Steve Lancefield)
Overall, you will probably end up spending more on your conversion as a rate per sq metre than you would if you were building from new. ‘Whereas your new house might have cost you £1,700 sq metre, rising to £2,500 sq metre for high spec, a barn conversion, for example, could be up to £3,000 sq metre for the same spec,’ says Oxford-based project manager and chartered quantity surveyor Jon Darnell. Expect the following possible costs:
- Underpinning can cost from £3,500 to £3,800 per metre, depending on the level of access available and the stability of the existing structure.
- Disposing of asbestos costs from £250 to £350 per tonne, which might be the equivalent of 25sq metres.
- Stone repointing, which makes a huge difference to the appearance of the building, might be between £25 and £30sq metre for cement lime mortar and another £20sq metre on top for pure lime mortar.
- Spraying timbers to protect them from damp is worthwhile once the source of dampness has been eliminated – expect to pay around £1,000 to £1,500 for a 2,000sq foot barn.

Before you make an offer, ask several local estate agents what the barn might be worth if you were to convert it, taking note of any advice they might offer to maximise value. The same advice stands if you are converting a school or church.
Ask a building surveyor – try Royal Institution of Chartered Surveyors – or structural engineer to survey the building to highlight any structural problems and to give you rough costings. If you have an architect in mind, it will also be worth asking for a site visit to talk through ideas and costs, too.
‘Planning and project management is key,’ says Luke Winham, who is director of Vision Residences and has 20 years’ experience of property development. ‘Whilst developing old buildings can be rewarding, it can be timely and expensive. Keep your eye on your budget as old buildings can sometimes unearth extra development costs which you may not have accounted for and can very easily cost a lot more than you initially thought.’
3. How to get planning permission for barn conversions
This living room is in a converted barn
(Image credit: Colin Poole)
Spotted a potential conversion project? Or perhaps you’ve noticed an abandoned church or empty school? Contact your local planning department to see if approval for ‘change of use’ is likely to be given. Bear in mind that you won’t be able to apply for outline planning permission because the council will want to look at a full planning application in great detail.
Check whether the building is listed, in which case you need listed buildings consent, and find out if the building is in a conservation area, which will further restrict what changes can be made. Finally, if it is a church, you will need permission from the church authorities.
Planners will be more likely to approve applications that are sympathetic to the original building’s external appearance, which will mean restoring windows and doors, and using reclaimed or like-for-like materials. You may find that the alterations you are allowed to make inside are limited, or have to be reversible, too.
Read our guide to planning permission for more information, and check out the advice below which might help you push an application through.
4. Upgrading the building’s fabric
Church Hill Barn by David Nossiter Architects . Photography by Steve Lancefield .
(Image credit: Steve Lancefield)
For best effect, use materials that are core to the original building’s character. Inside or out, it should still obviously be a barn – a conversion where the original architecture is hidden won’t be as successful.
David Nossiter the principal of David Nossiter Architects who specialises in barn conversions advises “Barn constructions fall into three main categories: Timber framed, masonry and metal-framed structures. Use local materials for repairs and re-use original materials where possible. If you introduce new materials, decide whether they are appropriate for an agricultural building. Consult with a structural engineer before undertaking work to structural elements and of course ensure you have the necessary permissions in place.”
5. Plan for natural light
Since you cannot usually add extra openings, install glazing into existing ones to make the most of the views. Where permitted, use the largest skylights – this works really well in double-height spaces.
Plan your layout carefully so the rooms without much natural light are those that don’t need it: a cloakroom, utility, larder, media room or snug.
6. Highlight special features
Make a feature of the staircase by using materials that contrast with the barn, such as steel and glass, or which complement it, such as timber.
Joining two barns together? See if the planners will agree to a sleek, glazed passageway. ‘I like to make the new work contemporary,’ says architect Ben Parsons. ‘This normally means glazed elevations and a lighter-looking structure, acting as a counterpoint to the (typically) heavy original building.’
7. Tackle roofing
“The roof is usually the largest element of a barn meaning that its renovation and upgrade will be a significant outlay. Large roofs shed large volumes of rainwater so do not skimp on drainage.” Advises David Nossiter .
8. Upgrade the flooring
Church Hill Barn by David Nossiter Architects . Photography by Steve Lancefield .
(Image credit: Steve Lancefield)
“Most barns do not have concrete
floor slabs to building regulations standards. Floors may be paved with bricks or a thin concrete oversite slab, laid to fall for sluicing out.”
“When breaking out an old slab, be careful not to damage the existing walls. Any services penetrating the floor will need to be coordinated before the slab is cast. The floor will also need to be insulated and a damp proof membrane installed. Work back from your finished floor level.” Advises David Nossiter .
9. Think insulation
Church Hill Barn by David Nossiter Architects . Photography by Steve Lancefield .
(Image credit: David Lancefield)
“It is difficult to seal insulation around old timber framed structures. The usual method is to insulate between the timber members with mineral wool and then add insulated plasterboard internally. However, insulating internally can cause condensation issues, you may need to incorporate a ventilation gap and a vapour barrier. Seek product manufacturer’s recommendations and professional advice ahead of the works.”
“An alternative is to add a new insulated layer externally. But, be aware that this approach requires thought at an early stage because such measures might have to be included as part of your planning application.”
“The aim in all cases is to create an airtight sealed continuous envelope that is not compromised around the irregular shaped timber structure.” David Nossiter .
10. And, heat recovery
Church Hill Barn by David Nossiter Architects . Photography by Steve Lancefield .
(Image credit: David Lancefield)
“Tall, lofty barns are difficult to heat effectively, suffering from the ‘stack effect’. That is, warm heated air emitted at low level rises and congregates in the apex of the roof space. One method of overcoming the issue is to install a mechanical ventilation and heat recovery system (MVHR). Warm air gathering at high level is extracted and ducted to a heat exchanger where it is used to warm incoming filtered air at low level.” Recommends David Nossiter .
Potential problems when converting a barn
‘Barn conversions can be expensive if the building’s condition is worse than appears on the surface,’ advises architect Ben Parsons. ‘They weren’t always built for longevity – very shallow foundations that will require underpinning are not an uncommon discovery.
‘Other structural defects, such as cracks in walls, rot that requires replacement timbers, failed roof structures that cause further stress on the rest of the property, and contamination within the building and around the site, all add to costs.’
(Image credit: Brent Darby)
‘Generations of farmers may have tried to keep their low-value barn safe and waterproof, but making it look pretty was not a priority,’ says project manager and chartered quantity surveyor Jon Darnell. ‘I have come across traditional oak roofs that have been replaced by corrugated steel or asbestos sheet.
‘Other patch-ups you might have to undo are blockwork sections instead of good stone repairs, and hard grey mortar used in an ugly attempt to stop stone erosion.’
David Nossiter also advises on the following repairs you may encounter when planning a barn conversion:
Timber Repairs:
“If your barn is constructed from timber it is highly likely that you will need to undertake some timber repairs. Most structural timber members can be repaired. If your building is Listed you will wish to retain as much of the original fabric as possible. Once adequately propped, decayed timber is removed and new sections scarfed in with matching wood.”
Masonry Repairs:
“Avoid cement renders as they seal in condensation and moisture. Breathability and flexibility are important considerations. Use lime based renders, which are vapour permeable and accommodate an amount of building movement. Lime based materials require protection from frost and execution is undertaken during warmer months.”
Reclaiming VAT on a barn conversion
This dining room is in a converted schoolhouse
(Image credit: Colin Poole)
As a DIY-er, you can reclaim the VAT paid for labour and materials on a barn conversion project without needing to register. When work is complete, all relevant receipts must be submitted with the paperwork to the central VAT offices, and a refund cheque will be sent.
If your builder is VAT-registered, they should invoice their labour and materials at a reduced rate of 5 per cent. The same stands for school and church conversions.
This kitchen is in a converted chapel
(Image credit: Rachael Smith)
Looking for more renovation advice?
- Building regulations explained
Lucy is Global Editor-in-Chief of Homes & Gardens having worked on numerous interiors and property titles. She was founding Editor of Channel 4’s 4Homes magazine, was Associate Editor at Ideal Home, before becoming Editor-in-Chief of Realhomes.com in 2018 then moving to Homes & Gardens in 2021. She has also written for Huffington Post, AOL, UKTV, MSN, House Beautiful, Good Homes, and many women’s titles. Find her writing about everything from buying and selling property, self build, DIY, design and consumer issues to gardening.
How To Take One Old Barn and Call It Home
This unrenovated barn is part of an 1849 farmstead in Carlisle, Mass. , the site of the current TOH TV show project. Here, it’s shown before construction to turn it into living space began last April.
Photo by Russell Kaye
Tom Silva adjusts his glasses, picks up a reciprocating saw, and makes a perfect Z-shaped cut through the bottom of a 150-year-old hand-hewn post. The massive timber is a major structural element in the barn portion of the classic New England connected farmhouse that is the subject of the current This Old House TV project in Carlisle, Massachusetts. But right now it’s dangling in midair, temporarily relieved of its duties while Tom performs surgery.
“About half the posts in here were five inches too short,” says TOH’s general contractor as he sets the saw aside. “They looked fine until we replaced the structure that would support the floor and started to lower the jacks holding up the barn. That’s when we noticed the problem.” The old barn floor had been built on two levels — no one is sure exactly why. But years of accumulated debris and patchwork repairs had hidden the step-down. To lengthen the posts, which will be visible once the barn is finished, Tom splices in additional sections of equally worn and aged timber salvaged from posts he’s replaced in the garage below. He uses a half-lap scarf joint, a beveled zigzag that’s fastened with construction adhesive and locked tight by the weight of the barn itself — no hardware needed.
The job isn’t that complicated. But it’s a reminder that creating modern homes from fallow barns involves a lot more than just hauling out the rusty junk, brushing aside some cobwebs and cow manure, and hanging drywall. Still, despite their often derelict condition, there’s a romance to these rustic structures that makes people yearn to reinvent them as habitable homes.
By August, the interior of the barn was nearly gutted, leaving its exposed timber frame and soaring ceiling intact.
Photo by Russell Kaye
The Appeal of Soaring Spaces
It’s not hard to see why old barns inspire the imagination. The high-peaked timber frame with its massive exposed posts and rafters is reminiscent of awe-inspiring Gothic churches or medieval castles. At the same time, the rough elegance of hand-shaped beams and the rich patina of centuries-old boards have a quintessentially American feeling, connecting us to our pioneer roots.
That rugged appeal is hard to find in any house, however old. Ken Epworth has dismantled hundreds of these derelict structures and brought them back to his workshop to be meticulously cleaned and readied for reassembly as homes. “You’re not going to live long enough to get that color out of new beams,” says Epworth, whose company, The Barn People, is based in Vermont.
Because barns have usually been nothing but barns throughout their life, they have aged both with use and with the slow-moving effects of time and weather. Tight-grained posts have darkened and dried out, critters have left behind scratches and holes. Most of Epworth’s projects involve early-19th-century barns that were originally shaped and assembled by hand. “People are going for that organic look,” he says.
Of course, one of the biggest draws of old barns is the lofty space they offer, dwarfing even the largest rooms in conventional homes. But incorporating all the elements of a house into what is essentially one big blank slate of a room, minus the stall walls and hayloft, presents particular challenges. Les Fossel, a Maine contractor who has restored at least 100 barns in New England over 30 years, says, “Barns make great barns, but they don’t always make great homes. Often someone falls in love with that wonderful open space — but then they realize they need bathrooms, and they want privacy in their bedrooms, and they start cutting it up and adding walls. Pretty soon, you go from a great barn to a bad house.”
Because there are only so many ways one can cut up a simple gable-end barn, Epworth says that many result in similar layouts: a great room with a fireplace at one end and bedroom loft areas up above. Kitchens and other common areas either open onto that great room or get tucked away under the loft spaces. Some barns become additions to existing houses, serving as a family area or recreation room, and others remain as separate buildings, often as guest houses or pool houses. In those cases, parceling out the space is less of a design dilemma.
At TOH’s Carlisle project, the barn is only a wing of the house, so architect Jeremiah Eck is leaving as much open space as he can, designating a two-story “living hall,” or gathering room, for about a third of the space, and creating private guest quarters on the second level. He also uses glass to maximize the open feeling of the floor plan: One corner of the living hall is glazed floor-to-ceiling, while some loft rooms have interior windows overlooking the great room below.
A rendering of the finished “living hall” as it will look in February.
Shoring It Up, Sealing It Tightly
Of course, the layout isn’t the only hurdle to overcome in converting a barn. Many are in poor shape because busy farmers of limited means struggled to maintain these massive structures. The biggest problems tend to be in foundations, typically made of loose-laid dry stone. Since barns rarely have in-ground drainage, wet soil gradually works its way between the stones, loosening them and causing the building to shift. The timbers themselves — particularly the rafters — are also vulnerable to water damage. Cracks in the roof boards let in rain, which runs into the walls and causes them to warp and bulge over time. Then there are the bugs, like the termites and powder post beetles that were discovered in the Carlisle barn. There, at least, the treatment was simple: Exterminators sprayed on a nontoxic borate, which poisons the insects’ food supply.
Another issue is how to create an energy-efficient and weather-tight home while preserving the barn structure’s character. A popular solution is to sheathe the exterior with structural insulated panels, sealing and insulating the barn from the outside. The original barn-board sheathing, posts, and beams can then be left exposed for the interior walls and ceiling, adding to the rustic feeling of the house; or, for a more finished look, the barn boards can be covered over with finished drywall between the exposed posts.
The energy-efficient plan for Carlisle, however, preserves both the barn’s interior and exterior. Tom Silva will install 2x3s turned flat, on 16-inch centers, between the posts and beams, spray between and behind them with polyurethane foam, then apply drywall on top. The resulting walls will leave 1 1/2 inches of the timbers showing.
While such challenges don’t necessarily rule out a barn or other outbuilding for conversion, they can add considerably to the cost. For a large barn like the one in Carlisle, treating an insect infestation runs about $500. But jacking up the structure, replacing its foundation, and adding an in-ground curtain drain around its perimeter can cost over $25,000 (and considerably more if the new foundation is stone). The good news is that if a barn qualifies as a historic structure, homeowners may be eligible for tax relief. The federal Rehabilitation Tax Credit offers a tax reduction based on a percentage of the money spent to fix up a historic structure. In addition, many states offer income-tax credits or property-tax abatements to homeowners who rehabilitate old buildings.
The rustic exterior of Roy Reardon and Patricia Hyne’s guest house was left intact in its conversion from horse barn to house, which was designed by Robert Dean Architects.
Photo by Olson Photographic
Saving a Part of the Past
The carpenters who built these barns would appreciate the care with which renovators like Tom convert these old buildings. (And they would certainly recognize his half-lap scarf joint.) They assumed that the barns — like the surrounding farms — would be around for centuries.
As modernization forces small farms to shut down, leaving their outbuildings to the elements, converting a barn is one way to save a disappearing vernacular form. And by turning these “agricultural cathedrals,” as Fossel calls them, into houses, Americans are also preserving their cultural heritage. “They recall a time when small communities gathered together for barn raisings and a self-sufficient farmer’s world reached no farther than the town border,” he says.
Ken Epworth, of The Barn People, says he is still enthralled each time he throws open the door to one of these relics for the first time and gazes up at the void. “You’ve got to give your eyes a few minutes to adjust,” he says. “But then you start seeing things. You see that beautiful honey color of the wood. You have a structure with integrity. You’ve got history, mystery, and charm. That’s hard to duplicate today.”
The interior shows off much of the original structure’s framework, including old loft beams in the kitchen. The fireplace in the adjacent great room was added in the conversion, mirroring one that already existed in the sleeping quarters.
Photo by Olson Photographic
Where to Find It
Architect:
Jeremiah Eck Architects Inc.
Boston, MA
617-367-9696
Barn restoration:
The Barn People
Windsor, VT
802-674-5898
Restoration contractors:
Les Fossel
Alna, ME
207-586-5680
www. oldhouserestoration.com
Borate-based termiticide:
Bora-Care, Nisus Corporation
Rockford, TN
800-264-0870
www.nisuscorp.com
For more information on tax credits for historic renovations, go to www.nationaltrust.org or contact your state’s office of historic preservation and your local tax assessor.
How Much Does a Barn House Cost?
U.S. News & World Report
February 13, 2022, 7:00 PM
While a barn house may bring to mind a classic barn set in the countryside, you don’t need to live on a farm to enjoy the roomy, rustic appeal of a barn house. Depending on where you live, the method of construction, size of the home and other amenities, a barn house could be an efficient and cost-effective home that allows for an open concept design with plenty of living space.
— What is a barn house?
— Common features of barn-style homes.
— Barn house styles.
— Barn house construction methods.
— How much does a barn house cost?
[Read: The Guide to Home Renovations.]
What Is a Barn House?
“Simply put, a barn house is a barn that’s been converted into a home or a home built in the style of a barn,” explains Suzanne Ennis, associate editor at Houzz. Barn houses come in all shapes and sizes, but the general characteristic look and spacious features of a barn are apparent in the design of the house.
“Barn houses promise the best of both worlds: They can have the nostalgia and rustic charm of a traditional home and the airy feel and flexible floor plan of a contemporary home,” she adds.
Common Features of Barn-Style Homes
“Although variations abound, hallmarks of barn-style house exteriors we see on Houzz include simple shapes, stone bases, gambrel or gable roofs, cupolas and rustic wood-plank siding, sometimes painted traditional red,” says Ennis.
The interior of a barn house can also vary, but Ennis says that typical features include customizable open floor plans, pitched ceilings, lofts, heavy sliding doors, stone or brick floors and exposed wood and timber elements.
[See: How Much Will Your Remodel Cost?]
Barn House Styles
Beyond barn-inspired homes and barn conversions, there are several types of barn houses based on traditional barn designs.
Dutch-style barn houses have steep gable-style roofs supported by beams and anchor beam posts. English barns are another popular style and tend to have a simple design and higher-pitched gable roofs.
There are also classic dual-pitched gambrel-roof barns, says Ennis. The gambrel roof is a symmetrical two-sided roof with two slopes on each side with the upper section being at a shallower pitch than the lower one. This is a popular and distinct barn house characteristic that provides the advantages of a sloped roof while maximizing interior space.
Other styles include the gothic-arched roof barn, which has an arched roof on top in the ogival shape of a Gothic arch on top of traditionally framed walls, and the monitor barn, which has a raised center roof.
“Any of these can be interpreted in a modern or rustic style,” says Ennis.
Barn House Construction Methods
Barn houses can be built using a timber frame or post-and-beam construction, which have a rustic appearance of exposed timber and are considered the most traditional barn house construction methods.
“Structures built with these methods are self-supporting, meaning they don’t require building internal load-bearing walls, which allows for the soaring, wide-open spaces prized by barn house fans. They generally have beautiful exposed beams, and they’re durable too,” states Ennis. “Timber-frame barns, which feature more complex joinery than post-and-beam barns, can stand for centuries.”
Ennis also notes that pre-engineered steel-framed barn kits that have been converted into living spaces, also called barndominiums, are another popular choice. Another option is a pole barn. The pole barn house uses post-frame construction where poles are either driven into the ground or secured above ground.
[See: 10 Home Renovations Under $5,000.]
How Much Does a Barn House Cost?
According to Fixr, the national average cost to build a pole barn is $50,000 to $100,000, with most people paying around $72,000 for a 1,600 square foot pole barn. The high cost is $300,000 for a 2,400 square foot pole barn house with luxury interior finishings, insulation and metal board and batten siding.
If you don’t want to buy all the materials on your own, you can also purchase a barn house kit. For example, barn home kits by DC Structures are generally $30 to $60 per square foot; however, your location and external costs may greatly affect the price of the finished product.
You can also convert a barn into a house, but the barn-to-home process can be more complicated and it could end up being more expensive, depending on the condition of the structure.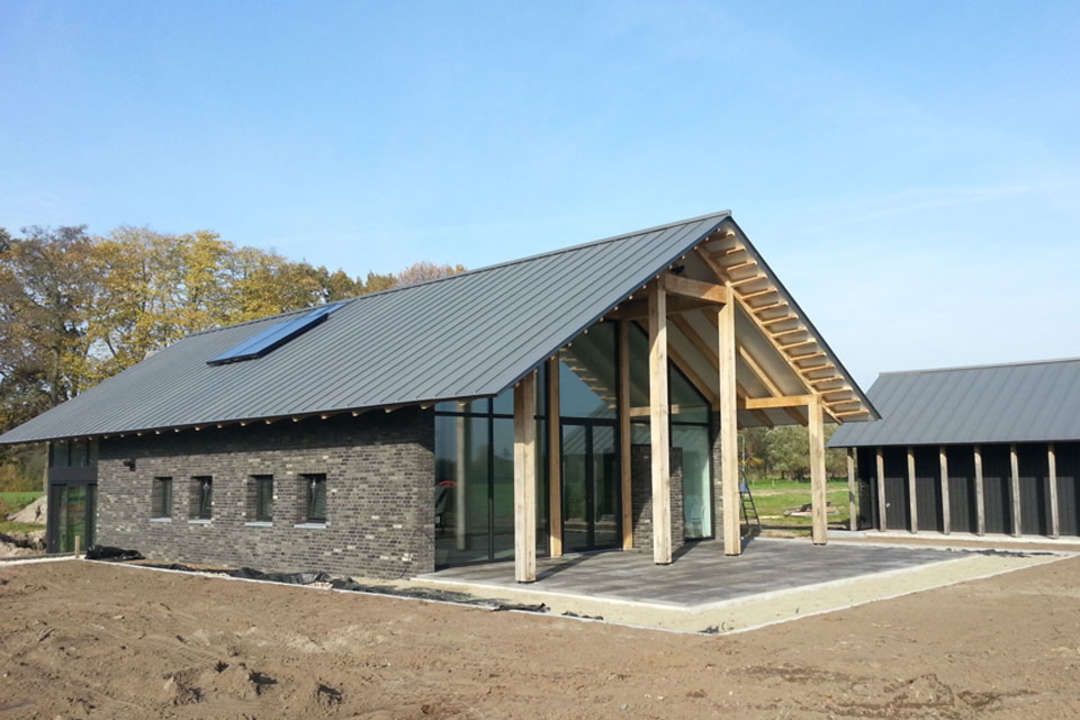 In many cases, you’ll need a new foundation to meet residential building codes, which ranges from $4 to $25 per square foot, interior framing, which costs $7 to $16 per square foot and replacing the roof, which can add up to $11,727. This doesn’t include refurbishing costs, windows, doors, running plumbing and electric, installing an HVAC system or finish details.
“Many factors influence the cost of both new builds and conversions, including the region in which you are building; the site; the size, complexity and scope of the project; the materials used; the kind of construction; and, in a conversion, the condition of the original structure,” explains Ennis.
“Working with a local industry professional, like a contractor, architect or designer, can help you get a better sense of budgets and timelines,” she adds.
More from U.S. News
How Much Does a Barn House Cost? originally appeared on usnews.com
Cloud Exchange 2022: DEA’s Nick Ward on driving mission technology modernization
2022 Sammies honors latest crop of federal unsung heroes
Air Force creates new office to settle internal ‘squabbles’ over ABMS
Martorana pressed about IT project oversight, role of Federal CIO by House lawmakers
More from WTOP
90,000 Readers ask: how much does it cost to turn a barn into a house?
Player’s Manual
ByBenjamin Noah
Without proper ventilation, dandruff can become prone to bacterial growth. Roughly speaking, turning a barn into a barn will not cost you much. $2,500 to $30,000 depending on your preference and the cost you can afford.
Is it legal to live in a barn?
You may live in a barn if permitted by city, state, county, and Homeowners Association rules. To make a barn habitable and you could live in it all day, you need planning permission to turn it into a small house; So technically you don’t live in a barn anyway.
Is it possible to make a house out of a barn?
Since warehouse refurbishment is commonplace in suburban areas, converting a barn into a farmhouse or building a new home based on a functional addition is a smart way to revive an outdated structure and create a home that brings the right attitude to the countryside.
How much does it cost to build a barn for a lifetime?
How much does it cost to earn a living? Converting a barn to living space can cost anywhere from $1,500 to $30,000 depending on the following factors: Material costs. The game.
Why can’t you live in a barn?
The biggest disadvantage of living in a tiny house is zoning issues. Zoning can limit the size of the barn or completely prohibit the use of the barn on the site. You must also ensure that you have obtained all permits prior to construction.
Can you live with addiction?
The big question is, can you live in it? The short answer is no when it comes to the traditional garden shed. A garden shed to be used as a grandparents’ apartment or as a regular sleeping area requires a building permit and must comply with applicable building codes.
Is it possible to put plumbing in the shed?
This can be a simple hand wash to provide water for a flower shop or craft shop. Here’s how you can improve the functionality and value of your workstation by installing pipes. If the installation of plumbing is done correctly, it will be a successful and relatively simple process.
How to make living in a barn worth living?
The best ways to turn a warehouse into a living space
- Supply electricity to a warehouse for lighting, electronics and air conditioning.
- Select only one air conditioning mode: heating and cooling.
- Seal cracks to keep out moisture and insects.
- Insulation and drywall for a clean look.
- Install permanent deck option.
- Use a bright color palette, good lighting and natural light.

How is a living shed insulated?
If the barn walls are already drywall, choose foam, loose fill, or spray insulation. You can make holes in the walls and blow the insulation into the frame. Choose reflective film insulation if you want insulation in a standard frame.
Is it cheaper to buy or build a warehouse?
For those of you who want more space and storage space in your home, you might be wondering if it’s cheaper to build or buy a barn. Finally, it is cheaper and easier to buy a barn already built by a professional.
Is it cheaper to build a warehouse?
Less Cost Approach While the average house costs $100,000, a warehouse can be built for as little as $10,000, and possibly up to $10,000. Forget about paying a 10-year mortgage or monthly rent year after year. Most people only need a few years of savings to pay for their own warehouse.
Is it cheaper to buy a stock kit or build from scratch?
If you’re wondering if it’s cheaper to build your own barn, you’ll find that building your own barn is cheaper than buying a prefabricated one. Usually, many special tools are not required to build a warehouse.
Is it possible to put a bathroom in the barn?
Yes, you can have a backyard bathroom. Of course, it takes up a little more space because you have to put it in the room. Alternatively, you can run the water and drain it into the office storage, or opt for the simpler option of a compost-free waterless toilet.
Is it illegal to live in a barn in Florida?
Warehouses in Florida do not have the same building standards as residential buildings. This means that the construction of walls, windows, doors, roofing material, etc. may not meet the requirements of your area’s housing laws, but with lower soprano standards.
Can I live in a barn on my land Qld?
Is it possible to live in a barn? No, it is illegal to live in a barn, garage or makeshift home as they are considered uninhabitable. According to building codes, residences or residences require a higher standard of construction than barns, especially in cyclone areas.
What can be done from a country shed: instructions and examples with photos | NGS24
All news
The President announced partial mobilization. Who will go to serve first?
Grabbed at the heart: how to deal with anxiety right now – 4 simple tricks and a rating of the best sedatives
It became known whether graduates of military departments fall under partial mobilization
Will those who have completed alternative service be called up? The lawyer answers
Who has the right to a delay – a squeeze from the federal law
“The Lord granted permission”: the metropolitan said that one of these days they will start building a temple on Strelka
Employees of defense enterprises can get a “reservation”. We look at vacancies at the factories of Krasnoyarsk
Who will be called up and who will be given a deferment: all about partial mobilization in Russia
To Dubai for 500 thousand: prices for international flights from Krasnoyarsk have risen sharply
What will happen to the mortgage of the mobilized? Lawyers answer
Nobody flies anywhere? We figure out whether it is possible to go on vacation in conditions of partial mobilization
Construction gurus shared life hacks on how to make repairs quickly and without nerves
Everything you need to know about partial mobilization in one video
Studying the military ID: what the specialty codes mean for those who are in reserve (full transcript) ? Lawyer explains who can be drafted into the army
The “reserves” called up for mobilization will receive the same payments as contract soldiers
“We have a complete…” here. The Krasnoyarsk Committee of Soldiers’ Mothers told about the flurry of appeals
Who is entitled to a delay in mobilization: infographics
“My daughter just flies on wings”. A touching video about how hospital clowns amuse children in a hospice
What should those who live in the city do not have a residence permit? Understanding the intricacies of a call to the mobilization service
The governor of the Krasnoyarsk Territory will hold a meeting of the draft commission due to the announcement of partial mobilization
BoAZ employees will be able to relax in a sanatorium until the end of this year
Will travel abroad be blocked due to partial mobilization in Russia? The lawyer answers
The Kremlin explained why the decision on partial mobilization was made
The State Duma explained whether men will be able to go abroad during partial mobilization
The market collapsed after the announcement of mobilization. The Economist on what to do with money
“Summons may start coming this week”: how exactly they will be called up for the mobilization service
Up to 10 years in prison for failure to appear. How can they be called up for service during partial mobilization
On Tatyshev Island, they decided to hold a music festival “Russian Summer. ZaRussia”
A doctor told how to understand that you are aging too quickly
In what order are they called up for service during mobilization: infographics
It’s time to start gardening: what fruit and berry crops should be planted in autumn and how to do it correctly
Military The Commissariat of the Krasnoyarsk Territory refused to comment on the partial mobilization of
300,000 people will be drafted into the army for mobilization
Shoigu spoke about the losses of the Russian army during the special operation
Vladimir Putin’s decree on partial mobilization: a document
What Putin said about partial mobilization: the president’s full speech .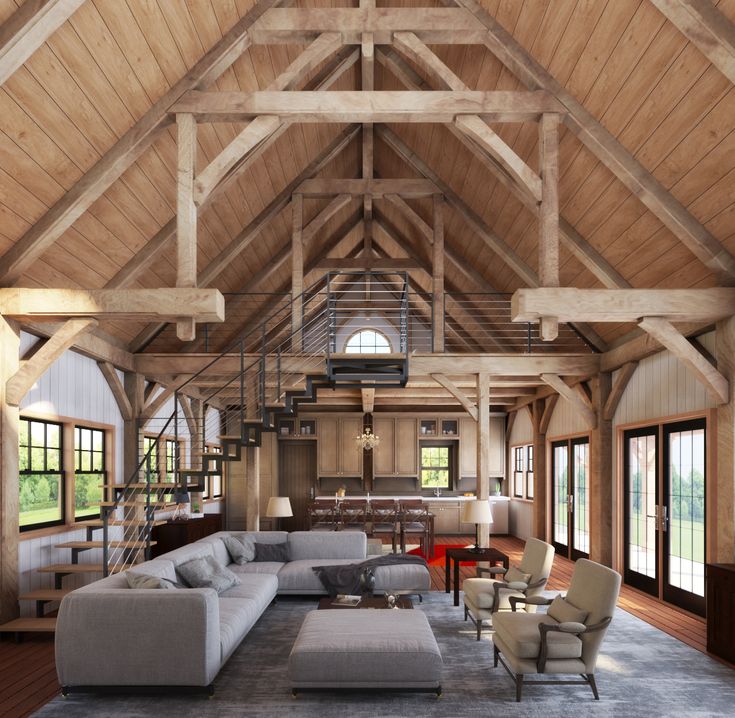 Who will be called up for military service?
All news No, this is a converted barn
Photo: Elledecoration.ru
Share
The summer season is in full swing, and we try to escape from the city to nature as soon as possible, and many have long settled down in a country house for the summer. So why not think about arranging your small barn? It can be used to store garden tools, lawn mowers and bicycles, turn it into a cozy summer kitchen or create a comfortable workplace there. And all the children will be delighted with the idea of their secret house in the back of the garden. In addition, it can become just a place to relax in silence, where you can take a nap after working under the hot sun. Our colleagues from Elle Decoration magazine have collected everything you need to know to decorate your garden house.
From an old barn you can make a quite nice and compact box for storing tools and other things
 org/Person”> Photo: Elledecoration.ru
Share
, any building without a foundation that is easy to move) does not need to be specifically approved and registered in the state register. If you decide to build a capital building, it must be entered into the USRN (and therefore, it must meet certain requirements, for example, you need to take into account the distance to other buildings and sites), but permits are still not needed.
Work in the country house from the barn? Why not
Photo: project by Forward Design
Share
A house in the garden is the perfect place to work alone for hours or dream when you want to escape from the hustle and bustle of a big house, but spend time in comfort. If it is not yet possible to arrange a separate office for yourself within the walls of a cottage, a converted barn is perfect for this purpose: it can easily be turned into a summer office for those who continue to work even in the country, a recording studio for musicians or a playroom for children.:no_upscale()/cdn.vox-cdn.com/uploads/chorus_asset/file/8902015/9F2BB0E7_665C_C407_CA60_649A33F2CFFF.jpg)
If you’re going for this option, you’ll need to consider running electricity and good thermal insulation to make the house habitable. First of all, the barn needs a concrete base. Double glazing is recommended for windows. As for walls and roofs, mineral wool should be used for proper thermal insulation. In matters of electrification, and we are talking about creating a full-fledged room, we advise you to consult with a professional.
Surprise your guests, settle them in a separate country house
Photo: Elledecoration.ru
Share
A house in the garden can easily turn into a guest room. Converting a barn into a small bedroom is much easier than expanding a large house and adding an extra room or attic. This option will also help save the budget, although some costs for insulation, insulation and finishing will also be required here. Relatives and friends will enjoy spending time in a secluded garden house, and you will have less daily hassle.
Building a detached house is easier than building an extension
Photo: Elledecoration.ru
Share
If you like to work with your hands, convert the barn into your workshop, where there is a place for all the necessary tools and materials. Building a separate small house out of wood, metal or PVC will again be easier than attaching a workshop to the main house.
Please note that such a barn should be relatively large in area. Over the years, you may need to increase the storage system, even if it seems doubtful now. Choose a place to place shelves, cabinets and a real desktop – when creating a workshop, do not skimp on comfort.
Children will have something to do in the country house
Photo: Elledecoration.ru
Share
One of the most creative options is to turn a barn into a playhouse for children. Here you can arrange a bedroom with camp beds and shelves for toys, decorate the walls with drawings of kids and come up with lighting from lanterns that will create a special coziness in the evening.
In this case, instead of a concrete slab, it is better to use natural wood in the base, and add a reed or bamboo carpet inside as a seasonal touch. In winter, this building can be used as a shed for storing children’s toys, sports equipment, an inflatable pool and, if dimensions allow, garden furniture.
Shed for those who are passionate about gardening
Photo: Elledecoration.ru
convenient shelves and glazing on a wooden frame to provide the necessary illumination for plants. And if you make a concrete slab at the base a little wider than the building itself, you can place a woodpile on it or arrange a mini-terrace with a seating area.
CottageSummerWorkshopConstructionCountry real estateBarn
- LIKE2
- LAUGHTER0
- SURPRISE0
- ANGER0
- saw the print? Select a fragment and press Ctrl+Enter
COMMENTS5
Read all commentsAdd a comment
Media news2
Media news2
29.
ru
All news
The President announced partial mobilization. Who will go to serve first?
“Not everyone will be called up!”: a deputy from Arkhangelsk explained who will be mobilized in the first place
Vacancies have been updated: how much they will pay the military under a contract from Pomorye
“greenhouses” appeared in the center of Arkhangelsk around traffic lights: what kind of structures are they
“My daughter just flies on wings.” A touching video about how hospital clowns amuse children in a hospice
It became known whether graduates of military departments fall under partial mobilization
Will those who have completed alternative service be called up? The lawyer answers
Who has the right to a deferral – a squeeze from the federal law
“I am a reserve officer”: Dmitry Morev said that he was ready to go to the front if necessary
United Russia Pomorye support partial mobilization: are there volunteers for the front?
Who will be called up and who will be given a deferment: all about partial mobilization in Russia
What will happen to the mortgage of the mobilized? Lawyers answer
No one is flying anywhere? Finding out whether it is possible to go on vacation in conditions of partial mobilization
The doctor told how to understand that you are aging too quickly
All you need to know about partial mobilization in one video
It’s time to start gardening: what fruit and berry crops it is necessary to plant in the fall and how to do it correctly
“My husband will run, but I worry about my son”: what the people of Arkhangelsk say about partial mobilization
We study the military ID: what do the codes of specialties mean for those who are in reserve (full transcript)
Do men need a certificate to fly from Arkhangelsk? They found out at the airport and the airline
What does voluntary surrender mean and who will be mobilized in the first place – an interview with the chairman of the State Duma Defense Committee
Alla Pugacheva asked for the status of a foreign agent, like her husband – the Russians reacted differently
category B? Lawyer explains who can be drafted into the army
Reservists called up for mobilization will receive the same payments as contract soldiers
Who is entitled to a delay in mobilization? Understanding the intricacies of a call to the mobilization service
Will travel abroad be blocked due to partial mobilization in Russia? The lawyer answers
The Kremlin explained why the decision on partial mobilization was made
The State Duma explained whether men will be able to go abroad during partial mobilization
The market collapsed after the announcement of mobilization.
The Economist talks about what to do with money Squares consider in autumn: how the public spaces of the region have changed this summer
“Summons may start coming this week”: how exactly they will be called up for the mobilization service
The police are looking for a person which may be involved in the fire in the old estate on Svoboda
The oldest is 92 years old: grandparents of Arkhangelsk are learning to resist cyber fraudsters
Bezdudny supported Putin’s decision on partial mobilization bitcoin
In what order are they called up for service during mobilization? No, this is a converted barn
Photo: Elledecoration.ru
Share
The summer season is in full swing, and we try to escape from the city to nature at the first opportunity, and many have long settled down for the summer in a country house. In Severodvinsk, for example, they do this even despite the invasion of vipers.
So why not think about arranging your small barn? It can be used to store garden tools, lawn mowers and bicycles, turn it into a cozy summer kitchen or create a comfortable workplace there. And all the children will be delighted with the idea of their secret house in the back of the garden. In addition, it can become just a place to relax in silence, where you can take a nap after working under the hot sun. Our colleagues from Elle Decoration magazine have collected everything you need to know to decorate your garden house. From an old shed you can make a quite nice and compact box for storing tools and other things
Photo: Elledecoration.ru
Share
any building without a foundation that is easy to move) does not need to be specifically approved and registered in the state register. If you decide to build a capital building, it must be entered into the USRN (and therefore, it must meet certain requirements, for example, you need to take into account the distance to other buildings and sites), but permits are still not needed.
Work in the country house from the barn? Why not
Photo: project by Forward Design
Share
A house in the garden is the perfect place to work alone for hours or dream when you want to escape from the hustle and bustle of a big house, but spend time in comfort. If it is not yet possible to arrange a separate office for yourself within the walls of a cottage, a converted barn is perfect for this purpose: it can easily be turned into a summer office for those who continue to work even in the country, a recording studio for musicians or a playroom for children.
If you’re going for this option, you’ll need to consider running electricity and good thermal insulation to make the house habitable. First of all, the barn needs a concrete base. Double glazing is recommended for windows. As for walls and roofs, mineral wool should be used for proper thermal insulation. In matters of electrification, and we are talking about creating a full-fledged room, we advise you to consult with a professional.
Surprise your guests, settle them in a separate country house
Photo: Elledecoration.ru
Share
A house in the garden can easily turn into a guest room. Converting a barn into a small bedroom is much easier than expanding a large house and adding an extra room or attic. This option will also help save the budget, although some costs for insulation, insulation and finishing will also be required here. Relatives and friends will enjoy spending time in a secluded garden house, and you will have less daily hassle.
Building a detached house is easier than building an extension
Photo: Elledecoration.ru
Share
If you like to work with your hands, convert the barn into your workshop, where there is a place for all the necessary tools and materials. Building a separate small house out of wood, metal or PVC will again be easier than attaching a workshop to the main house.
Please note that such a barn should be relatively large in area. Over the years, you may need to increase the storage system, even if it seems doubtful now. Choose a place to place shelves, cabinets and a real desktop – when creating a workshop, do not skimp on comfort.
Children will have something to do in the country house
Photo: Elledecoration.ru
Share
One of the most creative options is to turn a barn into a playhouse for children. Here you can arrange a bedroom with camp beds and shelves for toys, decorate the walls with drawings of kids and come up with lighting from lanterns that will create a special coziness in the evening.
In this case, instead of a concrete slab, it is better to use natural wood in the base, and add a reed or bamboo carpet inside as a seasonal touch. In winter, this building can be used as a shed for storing children’s toys, sports equipment, an inflatable pool and, if dimensions allow, garden furniture.
Shed for those who are passionate about gardening
Photo: Elledecoration.ru
convenient shelves and glazing on a wooden frame to provide the necessary illumination for plants. And if you make a concrete slab at the base a little wider than the building itself, you can place a woodpile on it or arrange a mini-terrace with a seating area.
By the way, in June, the deputies of the Arkhangelsk region adopted in the second reading the law on silence in summer cottages. Now there will be no noise at night.
Related
-
March 19, 2022, 10:00
Don’t touch anything on the full moon: when to sow cabbage for seedlings in 2022
-
March 17, 2022, 08:00 What has changed in dacha laws in 2022?0044
-
July 14, 2021, 17:28
“Neighbors mentioned the invasion of snakes”: vipers are found in dachas near Severodvinsk. Video
-
June 24, 2021, 16:40
Deputies of the Arkhangelsk region finally adopted the law on silence in summer cottages What summer residents themselves say about him
-
May 06, 2021, 10:00
Don’t dig here, don’t build there: evaluate your chances of going broke on summer fines
-
April 30, 2021, 09:06
Would you like to live here? How much does it cost to rent a summer house for May holidays in Arkhangelsk
-
April 20, 2021, 10:00
Roetian hole: for which summer residents risk getting a fine of
Dochaletomaster Constantaneous Real Estate 9,0003
-
- Laughter 9004
- SORRY0
 ru
ru
 The Economist talks about what to do with money
  So why not think about arranging your small barn? It can be used to store garden tools, lawn mowers and bicycles, turn it into a cozy summer kitchen or create a comfortable workplace there. And all the children will be delighted with the idea of their secret house in the back of the garden. In addition, it can become just a place to relax in silence, where you can take a nap after working under the hot sun. Our colleagues from Elle Decoration magazine have collected everything you need to know to decorate your garden house.


9004. 9004 900
See a typo? Select the fragment and press Ctrl+Enter
COMMENTS2
Read all commentsAdd a comment
Media news2
Media news2
What can be done from a summer cottage: instructions and examples with photos | 59.ru
All news
The President announced partial mobilization. Who will go to serve first?
OFAS opened a case against “T Plus”: thermal workers did not give the opportunity to install private heating points
Is Indian summer ending? Forecasters reported that the Kama region is waiting for the Arctic invasion0003
It became known whether graduates of military departments are subject to partial mobilization
The authorities will check the tariff policy of the “City Communal and Thermal Services”
Police paddy wagons appeared on the Perm esplanade. What is it connected with?
Will those who have completed alternative service be called up? The lawyer answers
Who has the right to deferral – a squeeze from the federal law
Perm residents can register a business directly at the bank office
In the center of Perm, a cyclist crashed into a tram – for an hour and a half the cars in one of the directions followed a detour
“Ready, just sad for my mother. ” What do Permians say about the announced partial mobilization
They say that tickets for international flights have risen sharply and there are almost none. And what about Perm?
Who will be called up and who will be given a deferment: everything about partial mobilization in Russia
How does the Ministry of Health of the Perm Territory comment on the mobilization of doctors? All of them are liable for military service
What will happen to the mortgage of the mobilized? Lawyers answer
Perm Motor Plant launched a mechanical engineering cluster
Nobody flies anywhere? We are looking into whether it is possible to go on vacation under conditions of partial mobilization
“My daughter just flies on wings.” A touching video about how hospital clowns amuse children in the hospice
Everything you need to know about partial mobilization in one video
Alexey Demkin, the head of Perm, checked the progress of the construction of the new building of gymnasium No. 17
17
A 33-year-old corporal from the Kama region died in Ukraine
Studying a military ID: what the codes of specialties mean for those in the reserve (full transcript) State Dumas for Defense
Do they mobilize with category B? Lawyer explains who can be drafted into the army
Reservists called up for mobilization will receive the same payments as contract soldiers
Perm residents began to receive messages on “Gosuslugi” that they are on the lists for partial mobilization
Who is entitled to a delay in mobilization: infographics
The doctor told how to understand that you are aging too quickly
What to do for those who live in the city without registration? Understanding the intricacies of a call to the mobilization service
Will travel abroad be blocked due to partial mobilization in Russia? The lawyer answers
The Kremlin explained why the decision on partial mobilization was made
In Perm, the penultimate box for receiving paper meter readings will be removed
“Documents have not arrived yet”: the military commissar of the Kama region is waiting for orders on partial mobilization in the region do
The State Duma explained whether men will be able to go abroad during partial mobilization
The market collapsed after the announcement of mobilization. Economist on what to do with money
“Summons may start coming this week”: how exactly they will be called to the mobilization service
A park will be built in the Vyshka-1 microdistrict. Showing how everything will look like
Prikamy products were presented at the international exhibition in Almaty
All news
Nice little country house? No, this is a converted barn
Photo: Elledecoration.ru
Share
The summer season is in full swing, and we try to escape from the city to nature as soon as possible, and many have long settled for the summer in a country house. So why not think about arranging your small barn? It can be used to store garden tools, lawn mowers and bicycles, turn it into a cozy summer kitchen or create a comfortable workplace there. And all the children will be delighted with the idea of their secret house in the back of the garden. In addition, it can become just a place to relax in silence, where you can take a nap after working under the hot sun. Our colleagues from Elle Decoration magazine have collected everything you need to know to decorate your garden house.
From an old barn you can make a quite nice and compact box for storing tools and other things
Photo: Elledecoration.ru
Share
, any building without a foundation that is easy to move) does not need to be specifically approved and registered in the state register. If you decide to build a capital building, it must be entered into the USRN (and therefore, it must meet certain requirements, for example, you need to take into account the distance to other buildings and sites), but permits are still not needed.
Work in the country house from the barn? Why not
 org/Person”> Photo: project by Forward Design
Share
A house in the garden is the perfect place to work alone for hours or dream when you want to escape from the hustle and bustle of a big house, but spend time in comfort. If it is not yet possible to arrange a separate office for yourself within the walls of a cottage, a converted barn is perfect for this purpose: it can easily be turned into a summer office for those who continue to work even in the country, a recording studio for musicians or a playroom for children.
If you’re going for this option, you’ll need to consider running electricity and good thermal insulation to make the house habitable. First of all, the barn needs a concrete base. Double glazing is recommended for windows. As for walls and roofs, mineral wool should be used for proper thermal insulation. In matters of electrification, and we are talking about creating a full-fledged room, we advise you to consult with a professional.
Surprise your guests, settle them in a separate country house
 org/Person”> Photo: Elledecoration.ru
Share
A house in the garden can easily turn into a guest room. Converting a barn into a small bedroom is much easier than expanding a large house and adding an extra room or attic. This option will also help save the budget, although some costs for insulation, insulation and finishing will also be required here. Relatives and friends will enjoy spending time in a secluded garden house, and you will have less daily hassle.
Building a detached house is easier than building an extension
Photo: Elledecoration.ru
Share
If you like to work with your hands, convert the barn into your workshop, where there is a place for all the necessary tools and materials. Building a separate small house out of wood, metal or PVC will again be easier than attaching a workshop to the main house.
Please note that such a barn should be relatively large in area. Over the years, you may need to increase the storage system, even if it seems doubtful now. Choose a place to place shelves, cabinets and a real desktop – when creating a workshop, do not skimp on comfort.
Children will have something to do in the country house
Photo: Elledecoration.ru
Share
One of the most creative options is to turn a barn into a playhouse for children. Here you can arrange a bedroom with camp beds and shelves for toys, decorate the walls with drawings of kids and come up with lighting from lanterns that will create a special coziness in the evening.
In this case, instead of a concrete slab, it is better to use natural wood in the base, and add a reed or bamboo carpet inside as a seasonal touch. In winter, this building can be used as a shed for storing children’s toys, sports equipment, an inflatable pool and, if dimensions allow, garden furniture.
Shed for those who are passionate about gardening
Photo: Elledecoration.ru
convenient shelves and glazing on a wooden frame to provide the necessary illumination for plants. And if you make a concrete slab at the base a little wider than the building itself, you can place a woodpile on it or arrange a mini-terrace with a seating area.
CottageSummerWorkshopConstructionCountry real estateShed
- LIKE1
- LAUGHTER0
- SURPRISE0
- ANGER1
- SAD TYPE2
- Select a fragment and press Ctrl + Enter
COMMENTS 4
Read all comments Add a comment
Media news 2
Media news 2
approval of the building from the relevant services. Therefore, you will have to create a drawing of a barn on paper or a PC, thanks to a suitable program, it is considered the easiest way. Some things to keep in mind while planning:0003
It is more profitable to create a building on the back of the site in order to hide from the eyes of guests and not interfere with neighbors;
The building must not block access to the garden, garden, create a shadow on the beds of neighbors;
To protect against spring or melt water, it is better to use a hill or foundation;
It is better to decide in advance on the purpose and additional extensions;
It is worth considering the design of the roof. Single slope on one side or double slope on two sides It is important that precipitation does not run off towards the exit or onto the neighboring area. In particularly difficult cases, a rain system is mounted on the roof and walls of the shed to drain water to the right place.
Gazebo, hozblok + barbecue
Barbecue at hand – it’s always convenient and practical. But when constructing a structure, important aspects must be taken into account:
- First, you need to select the area in which the brazier will stand.
- Plan the location of the hood in such a way that smoke and fumes are quickly removed from the room.
- If the gazebo is spacious, you can allocate space for storing firewood.
- Refractory materials are chosen for construction, which are not afraid of fire, practically do not burn.
The space of such a building will be conditionally divided into a utility block, a recreation area and a kitchen area
It is important to think in advance how electricity and water will be laid, what kind of drain will be
Choosing a roof
lean-to? The former has an exclusively aesthetic advantage.
Miasma is always released in the barn. Let’s be honest, even work clothes are not washed every day. And not even every week. And sweet apples and boiled potatoes exude far from harmless and safe ethylene in high concentrations. There is no need to talk about chickens and pigs. Shed ventilation with single and double pitched roofs
Single pitched roofs provide effective ventilation without any additional measures, on the left in fig. Suddenly the wind will blow in the forehead, the visor will become an air intake and squeeze out unnecessary fumes into the cracks. And under a gable roof, they will swirl for quite a long time before leaving for the portage window, on the right there. In addition, a shed roof is much simpler and cheaper. Therefore, it is highly desirable to build a shed barn. An exception is if there is a hayloft in his attic.
Projects
With an extremely acute shortage of space, it is possible to unite not only a gazebo and a shed under a common roof, but also connect them to the veranda of the house.
Practice shows that this is a very comfortable and convenient solution. In addition to the common roof, the building must have pronounced glazing elements. A simple combined outbuilding for a summer residence can also become an interesting option – its view is shown in the drawing below. The structure is 11 m long and 4 m wide; 20.32 m2 was allocated for the leisure zone, and 20.15 m2 for household needs. Importantly, this result is successfully achieved even in a small space. It is allowed to place corner structures in the very middle of the plot
In this case, two walls are usually made transparent (glazed), although placement on the corner of the plot or near the fence is much more common.
This design can be taken as the basis for a gazebo for a dacha along with a utility block. True, it will have to be somewhat modified, since the shed itself is shown here in its pure form – but this should not cause any problems. In the above image, the building contains 4 rooms at once, and, in addition to the utility block and a place for leisure, it will be possible to place more (optional):
For summer leisure, it is quite possible to equip an open gazebo with a utility block and a barbecue.
In this case, a slab foundation is usually formed under the building itself and under its furnace. The building usually looks something like this. In many summer cottages, they try to build a frame combined outbuilding. Its main advantages are as follows:
-
economy;
-
comparative ease of operation;
-
lack of special requirements for the skill and technical equipment of builders;
-
the ability to refuse complex materials with an ambiguous reputation;
-
best value for money.
Shed sheathing
Shed sheathing for various reasons:
- for a presentable appearance;
- for insulation;
- sometimes, for greater stability of the structure.
Rough shed cladding
Rough shed cladding may be required if further insulation of the building is expected. It is usually made from plywood or boards.
In this case, if it is assumed that there will be no external or internal wall decoration, then the plywood should be painted, and the boards should be sanded and varnished.
Arrangement of the roof of a barn
Roofs on barns, as a rule, are made of two types: single-pitched and double-pitched:
- for the construction of a single-pitched roof, when installing vertical racks, it is necessary to provide that on one side they are higher – this will give the roof the necessary slope , and will provide good water and snow removal;
- with a gable roof, rafters are attached to the upper trim, and the angle of inclination is leveled.
Next, roofing material is laid or boards are fastened. Roofing material is mounted on top, for this they use: slate, ondulin, metal tiles, etc.
How to sheathe a barn from the outside inexpensively: popular options
Finishing a barn from the outside is often a necessary measure, and not creating an aesthetic appearance of the facade. The use of facing coatings when ennobling the appearance of a farm building improves its performance.
With the right choice of outer cladding:
- protects the walls of the structure from the damaging effects of external factors such as: moisture, temperature changes;
- improves (in most cases) the level of thermal insulation of the barn, which significantly saves money on heating, if any;
- creates additional sound insulation, which is especially important if the outbuilding is used as a workshop;
- increases the level of fire safety of outbuildings;
- maintains the natural circulation of steam and air.
For an aesthetic appearance, after the construction of the shed, the question becomes – how to sheathe the utility block from the outside. The most popular and not expensive types of barn sheathing are:
- siding – it can be vinyl, metal or wood. Mounted on the crate or on special fasteners that are supplied with the material;
- lining is a more expensive material, but at the same time presentable. The material must be impregnated with special compounds (antiseptics), varnished or painted;
- unedged board – it is cut into boards of the required size, with which the outer skin is made;
- corrugated board – fastened to the frame with self-tapping screws, overlapped by 15-20 cm;
- pressed straw blocks – cavities in the frame are filled with bricks, therefore, intermediate racks are installed during its construction;
- sawdust concrete – for this, a flat formwork is erected from OSB sheets, which is mounted on the frame of the building. Next, a mixture of sawdust and cement mortar is poured in layers in a ratio of 2: 1.
What materials are suitable for interior sheathing
Before deciding on the material and how to sheathe the shed from the inside, you should look at the conditions of the room, and only then look for the right material inexpensively.
Let’s focus on the main ones:
- temperature and humidity inside the outbuilding;
- frequency of presence of people;
- the age of the shed, it makes no sense to sheathe the walls inside the room until the processes of shrinkage of the foundation and the frame of the structure have ended.
A cheap way to insulate a shed
A shed can be insulated both outside and inside.
Expanded clay is used for floor insulation. You can also insulate the floor with sand and gravel. Walls are insulated with foam or polyurethane foam – this is the cheapest and easiest option that does not require additional tools and skills.
Getting to work on the garage (shed)
The future building should not only become a convenient place to store tools and crops – it should also decorate the site, that is, look decent enough. Bought an old barn or garage, of course, is far from ideal. In order to bring it into the appropriate form, the following steps will be required.
Painting. The old surface is carefully cleaned of old paint, if any
At the same time, attention is paid to rust and cracks: if this is the case, such areas must be restored and sanded.
Only after that, paint is applied to the surface of the shed, which must be resistant to dampness and temperature changes If there are colored decor elements on the site, it is advisable to choose a paint that will match them in color. Bright colors are welcome – they make the building more attractive.
First of all, it is worth repainting the facade of the future house.
Window decoration. Beautiful window decoration will draw the attention of neighbors to your house. Specially selected wooden frames and crossbars will look extremely beautiful. You can hang flower pots or carved shutters on the cornice. Any detail used in the construction of the house makes it more well-groomed.
Roof renovation. This part of the house should be given special attention. If you do not take care of the roof, it can deteriorate over time and begin to leak. It is better to immediately make a pitched roof, covered with tiles or siding.
Particular attention should be paid to the roof – it is better to make a pitched one
Having decided on all the nuances, we start building
Foundation
First of all, clear the area of grass, remove debris.
If the building is wooden, for the construction of the foundation we use pillars made of asbestos pipes or bricks. We dig in the pillars to a depth of 1 m with a distance of about one and a half meters from each other. With the help of the level, we check whether the pillars are evenly located. Then we treat them with waterproofing mortar. Next, we fill the pillars with sand with the addition of gravel, pour concrete mortar. After the final solidification of the solution, we continue the construction of our barn.
Now let’s start building the walls
Lay the beams for the frame on the foundation. You can immediately mount the floor of the building. We strengthen the lower part of the strapping with the corner posts of the frame, which will hold the walls. We nail boards to the upper part of the racks (to strengthen the upper perimeter). Then we fix the intermediate racks and strengthen them with sheathing material.
It is best to use self-tapping screws or metal corners on nails to fix the beams.
We impregnate the bars in advance with an antifungal and moisture-resistant substance. Now you can start laying out the walls.
Level them with a plumb bob. If we take bricks or foam blocks to build walls, then we need a special solution (sand and cement grade 400 or 500). We carry out the work carefully using a spatula, without making thick seams. If the material is a brick, we also resort to a rubber mallet for leveling.
We make the roof single-pitched or double-pitched
Of course, a double-pitched roof is better, although it is more difficult to manufacture. We install the outer rafters (the thickness of the boards should be 40 mm), and the width of the intermediate rafters is -1 m. Then we lay a wooden crate and we can safely fix the roof. If a metal tile or profiled sheet is used for the roof, then the sheets are laid on top of each other with an overlap of approximately 10-20 cm. If the roof is gable, then if you wish, you can organize a small attic where you can arrange shelves and use it for storing old things, drying mushrooms, etc.
We complete the installation of the gable roof by installing the ridge. Next, we pay special attention to doors and windows.
If the walls are wooden, then we cut them out, and if the building is lined with bricks or blocks, then we lay out the places provided for windows and doors in advance. We install window and door blocks, hang doors, cut in the lock. The resulting gaps between the walls and window blocks are sealed with liquid foam concrete.
Now let’s move on to the design of the interior space
If the building is made of wood and it is planned to store inventory in it, then it is not necessary to insulate it much, although heat should still be everywhere, even in the barn. Therefore, we use a windproof film, we insulate the walls with special plates or mineral insulation.
An example of a simple and small shed:
Well, our shed is ready.
In principle, there is nothing particularly difficult in the construction of a barn. Put your hands on it, a little effort with patience, and you will definitely get a beautiful building that you can be proud of. And by connecting a little imagination to its external decoration, it will perfectly fit into the design of your site. Useful information:
Subscribe to the blog. Leave comments.
Materials
With your own hands, the easiest way is to build a combined outbuilding from boards. If they are of high quality, it will turn out no less durable than when using a log. The tree contributes to maintaining an optimal microclimate even on the hottest, humid or windy days. The relative lightness of the structure and its exceptional environmental friendliness testify in favor of such a decision. And in terms of design, the prospects are very great
A good alternative is the tubular profile (on its own or in combination with forged metal). Such elements are durable and reliable, not subject to fire.
However, they are quite heavy, and it is more difficult to process steel than wood. It is also necessary to pay attention to protection from adverse weather conditions. High-quality brick is relatively durable and stable. It can stand (without noticeable loss in quality and aesthetic properties) for several decades. And there is even a high probability that the building will get bored rather than begin to collapse. Of the alternative, less commonly used materials, it is worth noting:
Do-it-yourself wooden frame shed: step by step with photo
A 6*3 meter frame shed was built. The roof is shed, covered with ondulin. The height of the front wall is 3 meters, the rear wall is 2.4 m. Operation has shown that with such a difference in heights, snow does not accumulate much (Len. region).
Standard blocks FBS 600*300*200 were used as the foundation for the barn. They are laid on a sand and gravel bedding 25 cm thick. Cut-off waterproofing is laid on top of the blocks – a layer of roofing material, on bituminous mastic.
A layer of “hydrotex” is still glued on top of the same mastic. Such a cake was made because the groundwater level is high, it was necessary to protect the building from dampness. A beam with a section of 150 * 150 mm was laid on the waterproofing (all lumber processed). It was connected in half a tree, beaten with nails – 100 * 4 mm. For those who are unfamiliar with carpentry, you can join the bars end-to-end, nail reinforced corners to the joints from the inside, and a mounting plate from the outside.
In this version, the frame was not attached to the blocks. In regions with high wind loads, this is unjustified. You can fasten it with the help of studs: through them, through the beam, into the block, a hole of the same diameter is drilled (12-14 mm). A pin is driven into it, the bolt is then tightened with a key. To hide the hat, you can drill a hole under it.
The next step is to attach the floor joist. Installed on the edge of the board 150 * 60 mm.
They are attached to the harness with special brackets of the appropriate size. Fastened on nails 100 * 4 mm. The joists were aligned with the top edge of the tie bar. Everything must be even, otherwise the floor will be hard to lay. You may have to level with a planer or redo it.
The frame was assembled according to the “platform” technology: first, the floor was laid, and the walls were mounted on it. The wall frame or part of it is assembled on the floor. In some cases, they are immediately sheathed from the outside, if slab material is chosen for sheathing. And already in this form (with or without sheathing) they rise, stand vertically and are fixed.
There is a second balloon technology. According to it, the frame is mounted gradually: corner posts of the frame are mounted on the strapping or even immediately on the blocks. They are level in all planes. A rope is pulled between them, along which the rest of the racks are then put up. They are also nailed one at a time, fastened together with slopes and temporary crossbars.
In this case, the “platform” technology was chosen and OSB 18 mm thick was laid on the logs. In general, the floor can be made from boards, plywood (moisture resistant), OSB, etc. The board will need 20, plywood – 13-15 mm, but moisture resistant is needed (OSB is moisture resistant by default).
Then the assembly of the walls began. The frame is completely knocked down: the lower harness, racks, upper harness. In this form, it is installed exactly along the edge of the strapping beam, exposed, strengthened with safety struts, stops, and slopes. It is nailed through the flooring to the strapping beam. Nails were taken 200 * 4 mm.
To assemble the frame, boards 100 * 50 mm were used, the distance between the posts was 600 mm, the rafters were installed with the same pitch. The rafter system was assembled from 150 * 40 mm.
Window and door openings are reinforced – two boards are nailed, which are knocked together with nails in a checkerboard pattern every 20 cm.
The load here is greater, therefore reinforcement is required. Gates are provided in one of the ends – for loading / unloading bulky items. Therefore, in this wall (shown in the photo) there are only corner posts and reinforced ones for fastening the wings. Since the roof is shed, the rafter system is simple: they are laid on the edge of the boards that are selected for the rafters. Their length is greater, since a roof overhang is required. It is usually 30-50 cm on each side. In this embodiment, with a barn width of 3 meters, the length of the rafter legs (taking into account the slope) was 3840 mm.
They were nailed obliquely – two on each side. It can be strengthened by installing corners: this way it will withstand even significant wind and snow loads.
Next, a crate (100 * 25 mm) is mounted on the roof. The step of its installation – according to the recommendations of the manufacturer of “ondulin” – 40 cm. And the roofing material is laid (nails were bought together with the coating).
External walls sewn with OSB 9.5 mm thick.
Installed doors, made small steps.
The finishing touches were the wind board. Then the barn was sheathed with clapboard and painted to match the rest of the buildings on the site. A do-it-yourself barn on a finished foundation was built in two days off. Clapboard lining and painting were much later – almost a month later.
Unattractive foundation is sewn up with cut-to-size asbestos sheet. The shed turned out beautiful.
Interior design
The new building will not be usable unless it is thought out how the inventory and crops will be stored there. In addition, the house must have lighting.
- Arrangement of the working area. In any cottage there are things that require constant repair and maintenance. It is best if a special workplace is equipped for these purposes. You will need a table that will be equipped with a sufficient number of shelves and drawers – this is where various things will be stored. On the tabletop, you can install small boxes for storing small parts – screws, nails, etc.
-
Installing the instrument panel. A special panel attached to one of the walls will help you quickly clean up your new home. It is a shelf with holes drilled in it for tools. It is quite possible to make it yourself – especially for the tool that you have. Thus, everything you need will always be in a prominent place.
Can be mounted on the wall tool organizer – so you can get rid of chaos and always find the right item
- Hanging storage. If you plan to store bulky things like bicycles in your country house, a good solution is to build a few hooks into the wall to hang these things on them. Thus, it is easier to keep the house in order and free up space.
- Ceiling storage. The same can be done with the ceiling space – some things can be stored on hooks mounted in the ceiling.
- Use of magnetic holders. A convenient option for storing small metal parts is a wooden panel with a magnetic tape located on it. This design will allow you to instantly collect scattered nails and screws.
A good option – magnetic holders for screwdrivers, screws and other metal trifles
Drawings and diagrams of sheds
A shed is a capital structure, so the drawing is the basic basis for both calculating materials and for further construction
When drawing up, it is important to take into account, in addition to your wishes, the dimensions of blocks, sheets, measured products, so that during the construction there will be as little scraps and waste left as possible
The drawing must be drawn up in several projections, preferably all 4 facades, if there are any differences. Indicate the dimensions of the building along the axes, height, dimensions of openings, wall thickness. Designate the layout of the main structural elements and other technical details. You can use the scheme from the Internet, and then work it out in detail.
The layout can be quite simple.
If there are premises for different purposes under one roof, they must be separated by partitions. It is advisable to arrange at least one window This is especially important for raising animals, since sunlight favorably affects their behavior
Drawing examples:
Shed foundation and foundation, it is necessary to correctly calculate the length of the installed structure.
- Along the facade of the walls, the length of the pipe will be 2.6 m (2-m height of the walls of the barn + 0.60 m deep into the ground), 5.2 m of pipe will be required for this.
- On the rear wall, taking into account the slope – 2.2m (1.6m wall height + 0.60m in the depth of the earth), 4.4m in total;
- Total pipe consumption for construction will be 9.6m;
- At four right angles with a drill, you can manually shovel, we dig holes;
- We dig a borehole measuring 35 x 35 cm, so it will be more convenient to concrete, compact the concrete;
- The depth of our foundation will depend on the fertile layer of the earth, approximately 60 – 70cm. Sprinkle the bottom of the well with sand, install asbestos-cement pipes according to the level.
Using wooden plugs, we fix the position of the pipes, fill them with concrete, compact them with a rammer. After the concrete has hardened, we will fill the foundation with earth.
The foundation is made using the same technology as for the walls. After the foundation hardens, we additionally put concrete into the pipe, with ramming, and immediately place a profile pipe, square 10 x 10 mm in the amount of 4.0 m in level, this will be our base to which the door will be attached.
Design
Recently, the majority of city dwellers try to spend their free time in summer cottages. Therefore, the cottage should not only be comfortable for living, but also have an appropriate appearance, emphasizing the beauty of nature. This applies to both a residential building and all outbuildings adjacent to it. If you decorate the barn in an original way, then the dusty and tool-clogged pantry will easily turn into an attractive “room”.
This combination will harmoniously fit into the landscape of the backyard territory. In the case when the cottage is small, you can install neat structures, decorating their walls with weaving plants. So they will be invisible and will merge in an original way with other plantings.
The color of the barn finish should be selected depending on its size and the prevailing palette on the site. For small cottages, it is best to choose light shades, they will help to visually expand the space. In addition, decorative painting can be done on a white or pastel background of the walls, thanks to which the building will take on a fabulous look. To get the original design of the barn, it is advisable to use several types of building materials when finishing it. For example, combinations of wood, brick and metal look unusual.
Frequent problems during construction and their solution
Due to inexperience, many owners face some problems when building on their own.
Here’s how to avoid them: - Do not mount wooden or concrete elements closely. Even with periodic processing, the tree becomes unusable earlier. It is better to build a gazebo completely out of wood or combine concrete with metal.
- When planning a brick, stone or aerated concrete structure, consider the location of windows and doors. Even if you want to build a summer shed, over time you can convert it into an enclosed garden house.
- When constructing budget structures, do not spend money on paving the site or pouring the foundation. This is only necessary when it comes to creating a massive structure.
To avoid mistakes, take advice from experienced builders or do part of the work under their guidance.
A variety of styles and construction methods allow you to make a beautiful and comfortable gazebo even with minimal investment. The main thing is that it is comfortable and pleasant to spend time in it.
How to do?
The country shed is a simple structure, so it is quite possible to build it yourself.
The most important thing is that everything needs to be done in stages and worry about the availability of tools and materials in advance. Recently, wooden structures have been in great demand among summer residents; they can be easily installed by yourself at minimal cost. Before starting construction, you should make a plan of the structure and purchase the following building materials:
- brick;
- roofing felt;
- shaped boards with a section of 150 × 50 mm;
- slate;
- logs 25 mm thick;
- staples;
- nails.
If the work is carried out by a novice master, then the following step-by-step guide will help them complete the construction:
First of all, it is necessary to carefully prepare the site and clear it of debris and plantings. Then, in order to protect the lower part of the building from moisture, “brick chairs” are constructed, on which a layer of waterproofing material is necessarily laid and covered with a bar on top.
The next step will be the installation of racks. Their number is determined depending on the size of the barn. When installing the racks, a step of 1.5 m is observed. In the corners, the joints are fixed with nails and the supports are fixed with temporary struts.
Then the upper trim is prepared and the corners are fixed “to the floor of the tree”. All harnesses and racks are fastened with nails no less than 200 mm longAt the same time, attention should be paid to ensuring that the ends of the harness protrude from the back and front of the shed by 20-30 cm. A crate is installed on the upper harness, which is covered with roofing felt and slate.
Next, permanent struts and beams with a section of 50 × 50 mm are mounted. They should be placed diagonally on the corner postsIn the place where the doors will be installed, additionally place the post and attach the crossbar to it. The door frame is inserted into the prepared opening, after which boards are nailed to the uprights of the structure.
In the event that the boards are even, then they are laid tightly to each other, unedged boards are best nailed alternately.
The walls of the boards are covered on the outside with roofing material, this will protect them from the negative effects of the external environment. The roofing material should be nailed in such a way that its upper edges go beyond the lower ones.
The final stage of the work will be the flooring of the floorboards along the lower trim. They also hang the door itself and attach the lock.They must be placed diagonally on the corner posts. In the place where the doors will be installed, they additionally put a rack and attach a crossbar to it. The door frame is inserted into the prepared opening, after which boards are nailed to the uprights of the structure. In the event that the boards are even, then they are laid tightly to each other, unedged boards are best nailed alternately.
Walls made of boards are covered with roofing material from the outside, this will protect them from the negative effects of the external environment. The roofing material should be nailed in such a way that its upper edges go beyond the lower ones.
The final stage of the work will be the flooring of the floorboards along the bottom trim. They also hang the door itself and attach the lock.This instruction concerns the construction of a wooden shed for temporary use. If it is planned to install a permanent structure, then you must first lay a solid foundation, make a frame and sheathe it with any building material. For utility blocks, which will perform not only the role of a pantry, it will also be necessary to perform interior decoration.
How to close the roof of a barn
Nowhere to put a bike and a fishing boat? It’s time to finally set aside time and build a comfortable and functional barn right on your site. Moreover, we advise you to build a barn with a shed roof, which is more economical and easier to perform.
And for this you will first need to decide on the design of the building, the type of interior lighting and roofing.
So, let’s figure out how to build a convenient utility block! So why single slope? Such a roof is good because it has the following qualities:
- The low cost of the materials used and their availability.
- Simplicity and speed of construction of such a roof.
- Excellent wind resistance and reliability.
And all the disadvantages that are important in the practice of building private houses, for the construction of household buildings no longer matter: the lack of an attic space and an unusual appearance. After all, the main advantage of a shed roof for a barn is its low weight.
Usually the walls of such outbuildings are not made massive or heavy-duty, and it is impractical and unsafe to place a heavy complex roof on them. But the shed roof has a much lower weight, is easier to install and makes it easy to make the resulting gables with wind-transparent – you just need to sheathe them with ordinary polycarbonate. And you don’t need any windows.
Shed roof is the simplest type of roof. She has only two points of support – two walls, with the same or different slope. A shed roof consists of the following elements:
- Rafter system. This is a set of supporting elements that support the roof slopes.
- Gables. These are special sections of the walls, which are made in the form of a right-angled triangle and are limited on both sides by slopes and a cornice. As a rule, the gables of shed roofs are laid out from the same material as the walls, but they are often made translucent by inserting small windows or sheathing with polycarbonate.
- Overhangs. This is the protruding part of the rafter legs, which is extended beyond the perimeter of the structure. It is the overhang that protects the walls from getting wet.
- Insulation. It is not always used in shed roofs, mainly
How to Build a Sturdy, Functional Pole Shed Quickly and for Less than $600
If you buy from the links on this page, we may earn a commission.
Commissions do not influence the content of our editorial board. Read the full disclosure. This summer we moved to a new homestead. He had land, a smaller house, and a garage to store things.
But there was no barn there. If you own a homestead, you know how important it is to have a barn.
However, we did not have much money to invest in building this barn.
So we’ve gone through these pole shed ideas, found one that will work, and figured out how to make it cost-effective, efficient to build, and functional.
How to build a pole shed
Here’s how we did it:
What we wanted from a pole shed
I’ll repeat some of these statements in step 1 because it’s important to know what you want in a pole barn . This is a significant investment and you should use it regularly.
Not to mention that it will be yours forever.
So you want it to be functional and look the way you want it to. Here’s what we wanted from our pole stall:
1.
Economical
The first priority with our pole stall was to make it cost effective. We had just bought a new estate, there was a lot to be done, and there was not much money for each project.
So, I needed a barn that would work for our needs, but wouldn’t cost a fortune. As a result, we set a budget of $600. We felt that we could build this barn for this money and get what we needed.
2. Efficient assembly
The next step was to choose a shed that we could build quickly. As I said, we are on a new estate. Every day is filled with many projects that need to be completed in order for our homestead to function properly.
So we felt that with this post shed design we could build it quickly. Turns out my husband and our boys were able to build it in a day. It took about 4 hours in total. This even included a trip to the local hardware store for roofing material, which we realized we forgot. (Oops!)
3. Functional
We obviously needed shed!
We needed a shed on poles that would function.
Our pole barn is used to store tractors, lawn mowers, hay and beekeeping. But I also use it in winter to store garden furniture.
As you can imagine, I needed a bigger shed to store all this equipment that we don’t have room to store in our garage.
So when we built this barn, it had to be a decent size. Our barn ended up being 12×32, which is just about enough for what we needed.
4. Looks neat and clean
My final qualification is that I needed a shed that would last, look good, and still be tidy. This pole barn should last for years as we used pressure treated wood and metal roofing to complete the task.
But it also looks good. It’s a simple design that fits in perfectly with the look of the rest of our estate. We build everything we can with wood because it’s cost effective and wood is easy to work with.
Finally, I needed a shed that looked clean. While renovating our kitchen, I learned that openness usually means order, because nothing can hide.
If you’re like me and don’t like clutter, just leave everything in plain sight because it forces you to keep everything neat and tidy. Construction
Now that you know what we were looking for in our pole stall, you should stop and think about what you also need in your stall.
Also ask yourself about your level of carpentry skills. If you’ve never created big projects, ask someone who has done it for help. The last thing you want to do is take on a bigger project and use bigger tools than you’re used to and end up getting hurt.
So please use common sense before you take on this project. Once you’ve covered all of these points, you should be ready to start building.
- Roofing screws with rubber grommets
- Nail gun or hammer and nails
 Single slope on one side or double slope on two sides
  Miasma is always released in the barn. Let’s be honest, even work clothes are not washed every day. And not even every week. And sweet apples and boiled potatoes exude far from harmless and safe ethylene in high concentrations. There is no need to talk about chickens and pigs.
  Practice shows that this is a very comfortable and convenient solution. In addition to the common roof, the building must have pronounced glazing elements. A simple combined outbuilding for a summer residence can also become an interesting option – its view is shown in the drawing below. The structure is 11 m long and 4 m wide; 20.32 m2 was allocated for the leisure zone, and 20.15 m2 for household needs.
  In this case, a slab foundation is usually formed under the building itself and under its furnace. The building usually looks something like this.

 Next, a mixture of sawdust and cement mortar is poured in layers in a ratio of 2: 1.
 Only after that, paint is applied to the surface of the shed, which must be resistant to dampness and temperature changes
  If the building is wooden, for the construction of the foundation we use pillars made of asbestos pipes or bricks. We dig in the pillars to a depth of 1 m with a distance of about one and a half meters from each other. With the help of the level, we check whether the pillars are evenly located.
  We impregnate the bars in advance with an antifungal and moisture-resistant substance.
 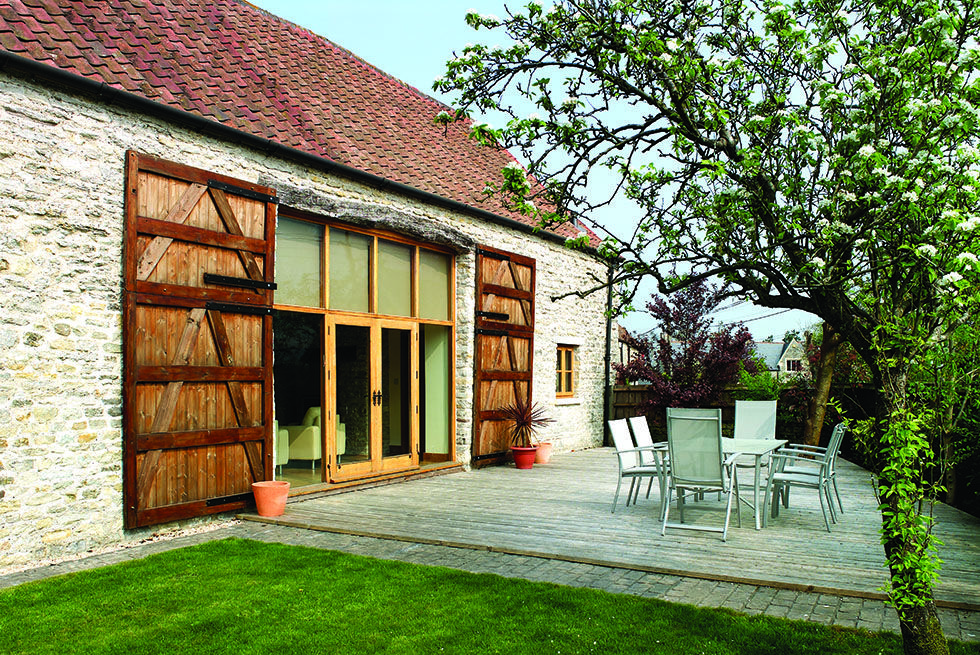 We complete the installation of the gable roof by installing the ridge.
  In principle, there is nothing particularly difficult in the construction of a barn. Put your hands on it, a little effort with patience, and you will definitely get a beautiful building that you can be proud of. And by connecting a little imagination to its external decoration, it will perfectly fit into the design of your site.
  However, they are quite heavy, and it is more difficult to process steel than wood.
  A layer of “hydrotex” is still glued on top of the same mastic. Such a cake was made because the groundwater level is high, it was necessary to protect the building from dampness.
 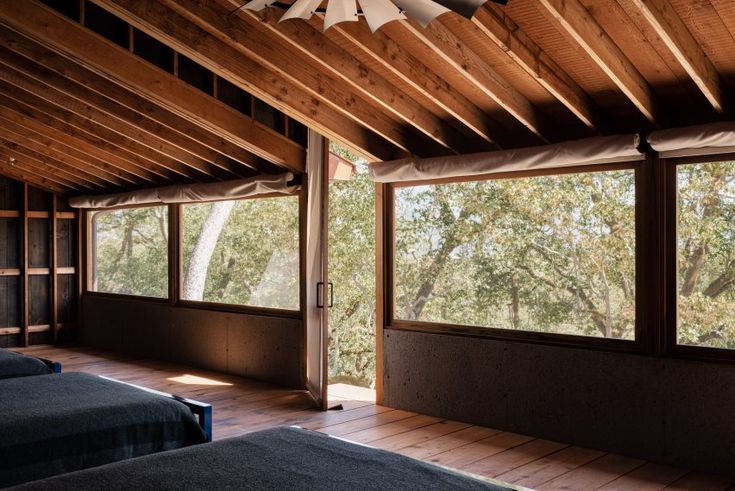 They are attached to the harness with special brackets of the appropriate size. Fastened on nails 100 * 4 mm.
 The load here is greater, therefore reinforcement is required. Gates are provided in one of the ends – for loading / unloading bulky items. Therefore, in this wall (shown in the photo) there are only corner posts and reinforced ones for fastening the wings.
 On the tabletop, you can install small boxes for storing small parts – screws, nails, etc.
  This design will allow you to instantly collect scattered nails and screws.
  If there are premises for different purposes under one roof, they must be separated by partitions. It is advisable to arrange at least one window
  Sprinkle the bottom of the well with sand, install asbestos-cement pipes according to the level.
 Here’s how to avoid them:
  The most important thing is that everything needs to be done in stages and worry about the availability of tools and materials in advance. Recently, wooden structures have been in great demand among summer residents; they can be easily installed by yourself at minimal cost.
 In the event that the boards are even, then they are laid tightly to each other, unedged boards are best nailed alternately.
  The roofing material should be nailed in such a way that its upper edges go beyond the lower ones.
  So, let’s figure out how to build a convenient utility block!
 Commissions do not influence the content of our editorial board. Read the full disclosure.
  Economical
 Our pole barn is used to store tractors, lawn mowers, hay and beekeeping.
  If you’re like me and don’t like clutter, just leave everything in plain sight because it forces you to keep everything neat and tidy.
 1. Move away from your shed size
Before you start building your shed, you will need to find the perfect spot. You will need a large enough area to accommodate the barn.
Also, you’d prefer it to be flat to make it easier to assemble and keep level.
However, you will also need your shed in a convenient location. You don’t want to constantly go back and forth to get something out of the shed if you can.
The ideal location for us was close to pasture, garden and right behind the garage. So it would be convenient to shed, but not in the center of the sight.
However, we had flat ground and plenty of storage space.
So once we found the perfect spot for our shed, we started by using fence posts to mark the exact location of the shed. This helps a lot so you can measure before you start to make sure everything lines up the way you want it and that you’re sure you like the layout. It definitely made the job a lot easier.
Once you’ve walked around the shed, marked, measured and made sure it’s exactly where you want it to be, then you’re ready to start the building process.
2. Plant the poles
The pole barn is exactly what it looks like. This is a barn supported by several poles. It has a roof, and if desired, it can be surrounded by walls.
Personally, I prefer my barn to be open so it doesn’t get cluttered. When you constantly see what’s going on, it becomes harder to clutter things up.
However, if you plan to store items there that you really don’t want to see, or if you plan to turn it into a shelter for your animals, then you will need to add walls to it.
So we started the process by creating our poles. We used 8-4×4 and put them in the ground. You’ll need one on each corner and then a few in the middle to keep things stable.
You will place them in the ground with a hole digger, auger or shovel to dig a hole. If you have a loose hole, you will need to use concrete to hold the posts in the ground. We used an auger, so the post fits perfectly into the hole and fits snugly.
When this work is completed, you are ready to move on.
3. Create the base of the roof
At this point, you need to decide how high you want the roof to be. We bought materials so that we don’t have to cut anything, because it will speed up the work a lot.
So we planned our roof to be very high. If you want it to be a little shorter, start this step a little lower.
Once you have decided how high you want your roof to be, you will place the 2x6x16 at the height you have chosen. You will need to place 2 of them on the front and 2 on the back. You will then use 2x6x8 shavings to join the pieces of wood together.
Now that this is done, you are ready for the next step.
4. Rafter Time
In this step you are designing the support for the roof. You will need your 2x6x12. You place them across the stringers about 2 feet apart.
So by doing this you’ll know you’re on the right track, because at this point you should have 4 poles sticking out of the ground.
Then you will have a large wooden rectangle on top of the posts.
After you complete this step, you will have small pieces of wood connecting each side of the wooden rectangle.
Once all of this is in place, it’s time to pull out the 16 pieces of battens. You must lay them perpendicular to the rafters. The whole point of this step is to give you something to screw the roof onto.
So, once you’ve completed this, you’re ready to move on to the last step of building the pole barn.
5. Treat with roofing sheet
Underside of roof when complete.
The last step is probably one of the easiest but least favorite. I like metal roofing because it looks good, it’s inexpensive and it’s pretty easy to complete a project with.
But I don’t like it because it’s sharp. Be careful when working with metal roofing, especially when you put it on your head. This material is sharp and you don’t want to cut your hands, arms, or worse, your neck.
Remember, safety comes first. Pay close attention to what you are doing all the time you are working with this roofing material and try to wear gloves.
Now that we have the security warning, let’s finish this project. The metal will need to be carefully lifted through the rafters.
Then lay it on the rafters. Using a hammer or screwdriver, you will use rubber-sealed roofing screws to hold the metal roof in place.
Don’t forget to screw it to the rafters and battens to keep it in place.
Then you will pull the next piece and cover it with the last one.
Finally, you will continue this process with the metal roofing overlay and screwing them into place. When this is completed, you will have a beautiful shed.
Well, now you know how to build your own pole barn on a smaller budget that will last for years and be functional. To reiterate, we were able to build this 12×32 pole barn in about 4 hours on a budget of around $600. We may have moved a bit after you included the tax.
We also didn’t do any deals anywhere. We went to our local hardware store to buy all of our supplies and I don’t think we could buy any items on sale.
However, we were given a discount on our roofing materials because they were dented.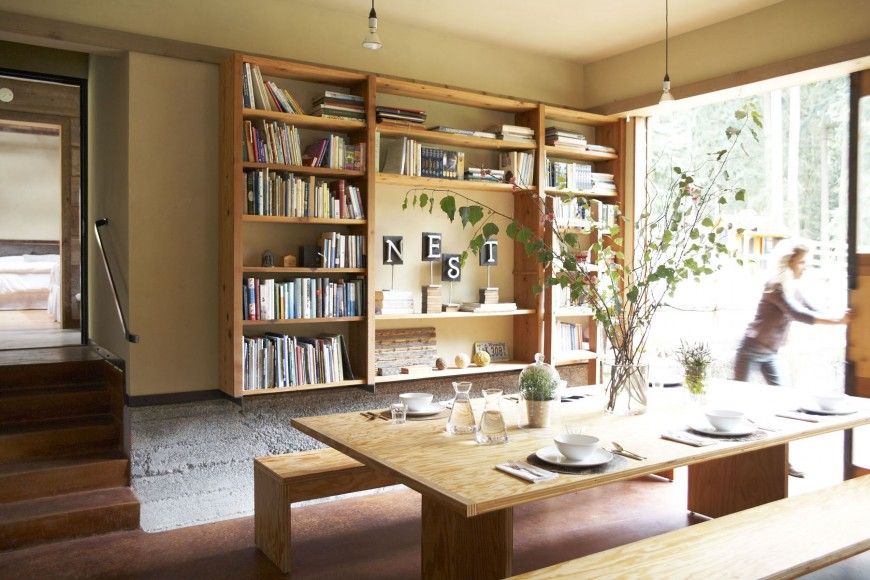 Since no one will be inspecting your roof, don’t be afraid to buy materials that are slightly cracked.
I hope you save money this way too.
But the great thing about the construction of this post barn is that you can add whatever you want to it. As mentioned earlier, you can add walls to it, animal stalls, and even add an attic if you want.
Now I would like to know what are you looking for in the barn? Have you ever built a barn? What was your budget and time frame? How was it? Do you have any advice for those who may be new to this type of building project?
We love hearing from you, so please leave us your comments in the space provided below.
.
How to draw a barn and a pond
homechevrons-leftemailspinner8facebookfacebook2instagramtwitteryoutube
| Building Construction
When it comes to barn conversions, if you follow only one rule, it must be “right for the building. ” Ignore this rule and you will lose the beautiful character and form that barn conversion offers.
Keep this rule in mind in all areas of design, from walls and windows to doors and interior layouts, and you’ll not only maintain the integrity of the form, but also delight your local government in the planning process.
Shed walls
Existing exterior walls, whether stone, brick or timber, should be repaired on a similar basis. To achieve a seamless combination of original mortar and repair/rework, the entire wall can be resurfaced using lime mortar to maintain air permeability and ensure minimal removal of the original mortar.
New partitions can be built of suitable brick or stone and left exposed, but an alternative and increasingly popular design ideal is to use contrasting materials for all new constructions and create a clear distinction between old and new.
This stone barn has been carefully restored by its owners to retain its rustic charm. (Image credit: Nigel Rigden)
Brick or masonry walls will invariably be of sound construction (no voids), so additional insulation will be required to comply with Part L of the Building Regulations. This is necessary for the inside of the outer walls to maintain the appearance.
Leaving some areas of brick or stone fabric exposed from the inside may be a desirable design feature; however, due to the insulation requirements, this is usually easier to achieve with internal partitions – although some portions of the internal surface of external walls can be clad in brick or stone, forming an insulated hollow wall that can be left as a feature.
Timber-framed sheds are less of a problem for fabricators, especially in terms of building envelope insulation. Existing cladding – usually wood – can often be removed and a layer of insulation added between and on top of the frame, as well as a breathable moisture-proof membrane. If possible, save and reuse as much of the original cladding as possible and balance using similar materials.
If the original floor and bottom of the wall studs are severely damaged by rot or infestation, you can trim the damaged wood and install a new floor at a slightly higher level, and raise the plinth wall. .
Repair and modification of the barn roof
The roof is the predominant element of the barn. In most cases, it will be necessary to remove the existing roofing to allow repairs or roof modifications to be made, and to add insulation and membrane to improve weatherproofing and airtightness.
Insulation can be applied between and below the rafters, but if the rafters are of interesting wood and considered to be worth leaving unprotected as an interior element, insulation between and above them will be necessary. This will increase the height of the roof by about 100mm .
Part of the charm of a barn conversion can be the irregular shape of the roof where the original logs could warp, warp and warp over time. While leveling the roof will help the roofing sit flush and waterproof, a completely symmetrical new roof with replacement tiles can lose character. With care, the roof can be repaired, but irregularities must be carefully maintained.
Introduction of more light with glazing
Dormers do not usually fit, so any new skylights will be skylights and, in most cases, conservation-style metal roofs that are flush with the roofline. Too many skylights usually look wrong and are best left on less important points.
It is also possible to introduce a larger area of glazing at secondary, less visible elevations by using a special roof lighting system or by glazing part of the roof between the existing rafters.
Glazed sliding doors and glazed lintels allow this converted barn to flood in with natural light. (Image credit: Simon Maxwell)
Traditional roofing, such as limestone or sandstone tiles, local slate, thatch roof, or local handmade clay tiles, is often integral part of the barn’s character. So it’s worth saving as much of this material as possible and finding a replacement to make up for any shortage.
If new and original roofing is mixed together, the original material can be used on the main “public” façades and the new material on the less visible, secondary roof planes, or alternatively in outbuildings. Such replacement is often a requirement for a listed building, but for less sensitive situations, designers may be more flexible, especially if the material is very expensive or unavailable.
Windows, doors and barn openings
On main facades, window and door openings are often limited to those that already exist. Additional window and door openings may be allowed on secondary floors.
If a new opening is to be inserted, appropriate proportions and detailing should be used, following existing building patterns or other similar agricultural structures in the area. In some cases, with careful design, new openings can be contemporary in style, although different local planning authorities will have different views on this matter.
For example, replacing some sections of horizontal wood paneling with transparent or translucent plexiglass, or glazing part of the gable between the wooden posts.
Barn joinery
Windows and doors should be simple, strong and functional in style. Installing windows back into walls also helps preserve the shadow lines of the original openings and limits reflections.
If any of the original windows are left intact, consider salvaging and repairing them, or at least using them as a replacement template. about tradition. Finished windows are unlikely to fit in size or design.
Narrow ventilation slots are common in agricultural buildings in some areas and can be glazed with fixed glazing. Other openings can also be fitted with fixed glazing as they can be perceived as unmodified open voids.
The combination of an impressive cantilever extension and a stone barn adds a splash of color to Paul and Elaine Huffy’s new home. (Image credit: Chris Hill)
Frameless glazing is an option that can be used to fill even the largest openings and – when installed deep into the opening – can be unobtrusive.
Barn doors are usually utilitarian, built from vertical wooden boards. The proportions are usually solid and the outside of the frame is wide and strong. New doors should follow this pattern with the same finish as doors and windows. Door furniture and other hardware such as hinges should also be utilitarian.
Conversion Extension
Large barn extensions are unlikely to be acceptable to planners in most cases, but smaller secondary extensions may be acceptable, especially at low elevations.
A good rationale for this addition is that it will accommodate objects such as a cloakroom, utility room, boiler room or other ancillary spaces, and thereby prevent too much division of the main space, avoiding the subsequent loss of character that this may entail. yourself.
- Simple shed roof extensions designed to look like an existing barn extension may be a good option this is acceptable, but as with a listed building, it would be difficult for planners to object to the construction of frameless glazing. A modest extension with green oak framing may be more acceptable. It may also be easier to get approval for an extension at a later date when the initial refurbishment is completed.
- Garage is best secured by retrofitting outbuildings or constructing new outbuildings with a structural design. They can be styled as shelters, open cart sheds, stables, or other farm buildings.
 A modest extension with green oak framing may be more acceptable. It may also be easier to get approval for an extension at a later date when the initial refurbishment is completed.
 Interior design with barn conversion
When it comes to interior layout, the key considerations are:0044
Layout options can also be limited by the position of existing internal partitions, especially if they are structural, or the location of pillars and beams. If the building is protected, sometimes a slight change in the original fabric or its complete absence is allowed.
Lorna and Chris Harrison’s design assignment was for a contemporary home full of modern design ideas that sympathized with the beautiful countryside of the barn. (Image credit: Jeremy Phillips) The layout of a room is largely defined by the separation of “private” and “public” spaces and the key relationships between different functions such as kitchen and dining areas, bedrooms and bathrooms.
Sheds are usually long and relatively narrow, so a central corridor is often the most efficient option for access and circulation. It is also the ideal place to have an open floor space up to the ridge, at least in part, so that the sense of volume – the barn’s most attractive characteristic – is immediately apparent upon entering the building.
The ground floor will generally need to be connected via an open central hallway – although some designs have two staircases or a separate staircase with the bedroom split in two, the master bedroom on one side and the family or guest bedrooms. to another, accessed from the landing gallery.
The key here is to avoid cutting through the main glazed doorway of the barn, so a “bridge” platform with a gallery with voids on both sides is a good solution.
In some cases, an inverted configuration may be the best solution, with an open-plan living room, kitchen and dining area on the top floor, under an open vaulted roof, and bedrooms and bathrooms on the ground floor, where there is more flexibility for layout options and fewer access issues associated with limited space. Such living spaces are often open-plan and feature a gallery overlooking the driveway.
Organizing open-plan living rooms helps make the most of borrowed light, as does widening window and door openings and rounding ridges (outside wall corners). A reflective color scheme will also help.
Adding floors
The options for horizontal division of space to create additional floors will depend on the height of the building. Sheds often combine sections into one, two, or even three stories to make the most of the available volume.
The use of this space can be limited by roof pitch, cross beams or truss gates. In some cases it may be acceptable to modify the trusses to create access between ground floor rooms, but if this is not possible, it may be necessary to design recessed flights of stairs.
It is usually necessary to excavate the existing floor to lay the new floor structure, and in this process additional volume can be created by excavating to a lower level.
Depending on load calculations, existing brick or masonry walls may be used to support new floor structures, but this may require reinforcement. In this case, a completely independent structure, such as an internal wood or steel frame supported by piers and columns, may be preferred.
Top barn remodeling tips:
- Retain the original shape and character of the building
- Make a light touch
- Reuse materials wherever possible
- Use similar materials and traditional methods
- Minimize dividing interior space into parts openness
- Keep the roof structure open and visible
- Use existing openings and minimize the formation of new ones
- Avoid home-style windows and custom joinery
- Minimize the addition of ceiling lights and use conservation models
- Avoid creating a country garden – observe appropriate boundary treatments
- Keep any new additions sensitive to scale and style
- keep any links transparent with frameless glazing
- Avoid laying floors that cross window openings
- Keep chimneys and ventilation pipes hidden or on a slight rise 90 080
Avoid filling –
.
How to Build a Barndominium: 6 Steps to Turn a Barn into a Home
If you’ve dreamed of building a barndominium – a barn turned into a living space for people – then join the club. The barn conversion is due in large part to Chip and Joanna Gaines’ famous upgrade to “Fixer Upper” (the term itself, a mix of “barn” and “condominium”, was coined over 20 years ago by Connecticut developers. Carl Nielsen ).
Anyway, it’s strange to think that there was a time when the phrase “barn born” was an insult. It’s a status symbol these days, because there’s a premium for such real estate (like the Gaines-designed barndominium, which is now on the market for $1.2 million). There is even a TV series on the DIY network that focuses on the reclaimed barn phenomenon called The Builders of Barnwood; it follows developers as they salvage old barns and turn them into beautiful homes.
“It’s not hard to see why old barns inspire the imagination,” says lifestyle expert Max Alexander .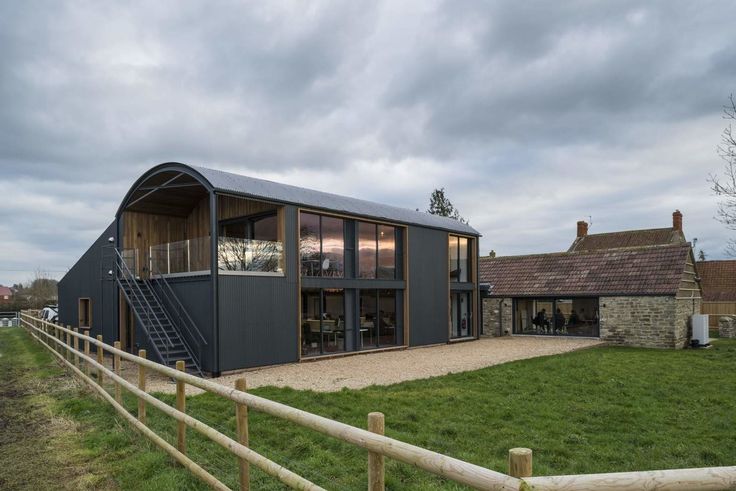 At the same time, the raw elegance of the hand-shaped beams and the rich patina of the centuries-old planks have a quintessentially American feel that connects us to our pioneers.”
But what does it take to build a barndominium? Reality shows often gloss over the hard work, but make no mistake, it’s a lot more than clearing counters and putting up modern fixtures. You’ll be shocked at how difficult it is to bring a barn up to the standards required for residential living. Here are the steps that are commonly followed when remodeling a barn.
1. Pour the foundation
The vast majority of old sheds have dirt floors. If so, the first step is to raise the barn a few inches off the ground – a complicated process using lifting jacks – and pour a cement foundation underneath. Wow! We are already tired.
This Cleveland barn needed to be straightened, stabilized and moved to a new location off the road to comply with local zoning requirements. Photo by Blackburn Architects, PC
2.
 Rebuild the frame
Most likely the original frame of the shed has warped over the years, so you will need to replace most of it. In fact, you’ll probably have to build a whole new frame that can support a second story if you ever hope to sleep soundly in those lofts.
Notice how this converted barn in Princeton, NJ retains farmhouse charm while incorporating contemporary materials and design features. Photo by Masmussen/Su Architects
The interior of this converted barn exemplifies the use of rustic wooden beams. Photo by Masmussen / Su Architects
3. Roof
Barn roofs are usually not as well built as house roofs, so most barn talk requires you to re-roof to seal leaks and prevent heat from escaping.
4. Install plumbing, electricity, and HVAC.
Once the foundation, structure, and appearance of the shed is solid, it’s time to install everything inside the walls, such as wiring, pipes, and heating and cooling systems.
Chances are the barn wasn’t climate controlled and you’ll be adding bathrooms, a kitchen and a lot more electrical outlets than there used to be, so this will require careful planning.
5. Insulate
It is rare to find a barn with insulated walls; you will have to do it yourself. Whatever you use will need to be carefully framed between the outer and inner walls.
Property Brothers Stars Drew and Jonathan Scott offer foam insulation that is hardy, durable and relatively economical.
Insulation and interior trim for a converted 1850s New England barn. Photo by Futuro
This converted 1850s barn is also energy efficient. Photo Futuro
6. Interior Finishing Work
Last but not least, you need to install cabinets, countertops, backsplash, flooring, ceilings and everything else you might need in your new home. The good news is that most people find this an interesting part of any building project, and you already have a theme! However, your new barndominium doesn’t have to be completely rustic or farmhouse in the dell.