Gable end cladding options: Cladding the gable: what to consider
A guide to exterior cladding: everything you need to know
Country is supported by its audience. When you purchase through links on our site, we may earn an affiliate commission. Here’s why you can trust us.
(Image credit: Andreas von Einseidel/Alamy)
Whether your property is country, coastal or more contemporary, there’s a multitude of attractive, sympathetic exterior cladding styles to suit different budgets and buildings, and enhance a modern or period home. What’s more, exterior cladding is often said to be one of the best ways to add value to a home, so you’ll want to make sure that you get it right – first time.
Do I need planning permission for exterior cladding?
Exterior cladding may fall under ‘permitted development’ provided the materials are of a similar appearance to those used in the construction but it depends on the extent of the work.
If you live in a townhouse or semi-detached property, you will need to consider the impact on your neighbors. So check with your local authority before starting any work. Apply for planning permission if you live in a Conservation Area, a National Park, or an Area of Outstanding Natural Beauty.
(Image credit: Andy Stagg/Alamy)
Will exterior cladding add value?
It is known to be an architectural feature that adds value to your home. ‘Great design always increases the value of a property,’ says Fanis Anastasiadis, Lead Architect, Facit Homes.
‘If the cladding material is functional, high quality and adds to the aesthetic, then the envelope of the house is better protected thus increasing the property value and reducing maintenance costs for the foreseeable future. However, without a great design even expensive materials won’t necessarily raise the value.’
What should I consider when it comes to cladding?
Firstly, is it necessary? The carbon footprint of building materials is receiving more attention, although not currently regulated. Will the cost and carbon contribution outweigh any potential benefits, such as insulation, lower energy bills or saleability?
Also, consider the period and style of your home, as well as the surrounding architecture, and any maintenance required. ‘Planning policies and the context of an area often dictate the material palette,’ says Fanis Anastasiadis, Lead Architect, Facit Homes.
‘There are two main approaches, especially in areas with a specific look; ‘blend in’ where the building aims to look a part of the scenery. Or the ‘distinct contrast’ approach where it will be obviously contemporary but with references to the existing built environment. Depending on the locality, a design might work, but could be refused because it would look out of place.’
(Image credit: Alamy)
What is the best material for external cladding?
Timber can be used as horizontal boards, or vertically or horizontally for a contemporary style. ‘A popular choice is to contrast sections in render with sections in silver timber cladding. Naturally durable timbers such as larch, cedar and oak require no treatment to maintain them and many customers find this beneficial,’ says Tom Barnes, Managing Director, Vastern Timber.
‘Locally-grown and modified timbers – processed to enhance durability – are an excellent alternative to imported hardwoods, which customers now avoid due to environmental concerns. ’
’
(Image credit: Vastern/Brimstone)
From the pale limestone of classical buildings to the dark flint of rural cottages, stone has been used for centuries as a building material and conveys a sense of permanence. Choosing a local stone will ensure its sympathetic to the area and reduce its ‘embodied energy’. However, stone is an expensive option, so consider a stone clad section or gable end instead of a full facade.
‘Natural stone is permeable and breathable, so great for letting moisture go from the building. It’s also robust and hardwearing making it a long lasting investment,’ says Daniel Wilson, Director, Stamford Stone. ‘If the right material is specified and installed correctly it can be enjoyed for many lifetimes.’
(Image credit: Scott Webb/Unsplash)
Treated metal (aluminium, zinc, steel) is low maintenance and offers the chance to create an individual design. However it has high embodied carbon due to the fabrication process, so consider the longevity of the design.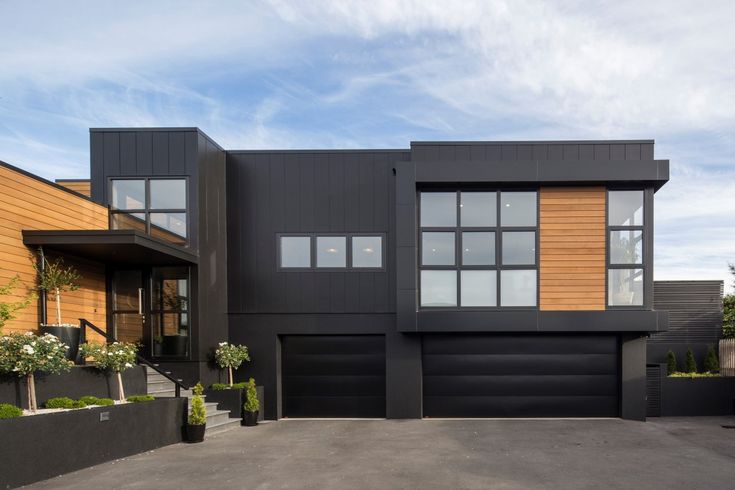
It’s available flat, corrugated, in panels or other profiles, and can be laid vertically, horizontally or diagonally to suit your tastes. It’s a specialist task, so consult an architect.
‘With its robust finish and sense of solidness and security, metal compliments timber and stone beautifully and can be coated with any RAL color to match a specific palette,’ says Fanis Anastasiadis, Facit Homes. ‘Untreated COR-TEN steel ages beautifully from dark brown to bright red to a reddish brown. It’s also low maintenance and compliments other natural materials.’
(Image credit: Facit Homes)
Tiles, particularly vertically-hung clay tiles, are a traditional feature on houses in parts of New England, usually on the upper storeys. With their array of decorative details, they can provide a sympathetic design, however will need fixings appropriate to the type of wall to prevent water ingress. Stone tiles such as split face slate offer a contemporary look and are often applied in sections as a feature. Maintenance-wise pointing or mortar fillets will need upkeep from time to time.
(Image credit: Dan Duchars)
The smooth painted finish of traditional sand and cement render is a popular choice on period homes, both for weather protection and its elegant appearance, however, it requires regular repainting.
Lime render has seen a resurgence and is the best option for old houses or conservation work, where a breathable finish is essential. Some renders, such as newcomer, monocouche, are available ‘through-colored’, and although more costly, you won’t have to repaint regularly.
(Image credit: Colin Poole)
Fibre-cement (weatherboards) resemble painted timber, and due to their composition are rot, fire and weather-resistant. Starting from around $40 (£30) per sq m, they’re an affordable option, can be used vertically or horizontally, are available in 20+ colors and do not require repainting.
‘For the classic New England look go for a lap wood-look exterior in white, cream or blue, with white trims,’ says Lisa Grosse, Cedral. ‘Beige is back in a big way in interiors and has also filtered to the exterior or property. Color choices also coming to the fore are sage-green, grey-brown, blue-grey and sand-yellow.’
(Image credit: James Hardie)
Are there any other exterior cladding styles?
‘On modern architecture, vertically hung cladding boards with shadow gaps using clean knot-free wood looks impressive,’ says Tom Barnes, Vastern Timber.
‘For a country home, rough-sawn feather-edge or waney-edge cladding offers a rustic aesthetic.’
Do I need professional installation for exterior cladding?
Yes, although timber or weatherboard cladding could potentially be undertaken by a skilled DIYer, who is prepared for a challenging task.
Jennifer is the Digital Editor at Homes & Gardens. Having worked in the interiors industry for a number of years, spanning many publications, she now hones her digital prowess on the ‘best interiors website’ in the world. Multi-skilled, Jennifer has worked in PR and marketing, and the occasional dabble in the social media, commercial and e-commerce space. Over the years, she has written about every area of the home, from compiling design houses from some of the best interior designers in the world to sourcing celebrity homes, reviewing appliances and even the odd news story or two.
House Cladding: How to Choose the Right Material
Homebuilding is supported by its audience. When you purchase through links on our site, we may earn an affiliate commission. Here’s why you can trust us.
(Image credit: Matthew Smith)
Your choice of house cladding is crucial to your home’s design. It will not only define the overall appearance of the property, but it will also determine how much maintenance will be required to keep your home looking its best.
There is a wealth of options to choose from. Your selection will depend on what materials are typically used in the local area, your home’s construction as well as your budget.
Our house cladding guide will explain everything you need to know in order to select the best products and fixing methods for your individual requirements.
This oak framed house, by Border Oak , has a combination of house cladding types, including timber weathboarding which will continue to weather over the years. (Image credit: Jeremy Phillips)
What is House Cladding?
Visit the Homebuilding & Renovating Show
Need more advice or inspiration for your project? Get two free tickets to the Homebuilding & Renovating Show .
House cladding can be used to describe any facing material – be it stone, timber cladding, brick or render, for instance – that is fixed to the exterior of a house. Its main purpose is to protect the underlying structural walls from the elements.
Although cladding has an important practical role, for many homeowners, it is the effect it will have on the final appearance of their house that is the main concern. Material, profiles, colours and even fixing methods will all play a part here.
Depending on the material, there are different ways to fix house cladding. Sometimes it is attached directly to the wall (as is the case with brick slips, render and stone cladding, for example) or nailed on to timber battens (as with timber cladding).
What’s more, some types of house cladding are also designed to incorporate insulation or can be used with external wall insulation when retrofitting an existing home.
The narrow horizontal western red cedar cladding used on this house serves to highlight its contemporary design. (Image credit: Simon Maxwell)
Exterior House Cladding Uses
All houses used to be built with solid walls, using materials that were available nearby, such as stone or brick. However, in the 20th century things began to change and standard wall-building practice began to use cavities between the inner and outer walls, often referred to as ‘leaves’ or ‘skins’.
This meant that the load-bearing duties were now carried out by the inner leaf, while the weatherproofing was the responsibility of the outer leaf, with heat retention achieved by adding insulation between the two leaves.
As the outer wall no longer had to rest on the ground, instead being hung off the inner skin, it could now be made of much thinner sections.
All of this means that the only requirement of the outer wall is to keep the weather out — and this is the purpose of house cladding.
Slate has been used to clad this striking contemporary self build — it creates a bold contrast with the crisp white render. (Image credit: Simon Maxwell)
Do You Need Planning Permission For Cladding?
Do you need planning permission for external house cladding? Not always. If you are replacing like for like on an existing home, most people re-cladding a house find that the job falls under Permitted Development.
However, this won’t apply to listed buildings or on any house on specially protected types of land, within a National Park or AONB.
If you live in a terraced or semi-detached house, whilst planning permission might not be a concern, you will need to think about how the new cladding will affect your neighbours.
The simple vertical timber cladding used here help to blend the structure in with its surroundings. (Image credit: Julian Abrams)
Types of House Cladding
This beautiful new oak frame home, by Oakwrights, features a combination of cladding materials, including cream-coloured render, brick and larch cladding. (Image credit: Oakwrights © Mark Watts)
When cladding a house, the main concern for many homeowners tends to be how it will impact on the appearance of their house and whether it will suit its overall style. That said, your choice may actually be dictated by local planners, particularly if you are taking on a self build project. Often you might be expected to choose a material that fits in with your surroundings or neighbouring properties.
The contemporary form of this self-build was enhanced by the use of unusual blue brick cladding and plenty of frameless glazing. (Image credit: Simon Maxwell)
It is also wise to consider how much maintenance will be required in the upkeep of the type of house cladding you choose, the cost of the materials and how they will be fixed, as well who will install your house cladding (some timber cladding can be fitted on a DIY basis, for example. )
)
When it comes to house cladding materials, your options include:
- timber
- brick
- stone
- render
- vertical tiling
- flint
- metal
- porcelain tile
- fibre cement
- PVCu
- Cladding alternatives like modern synthetic materials
What Are The Benefits of uPVC House Cladding?
uPVC house cladding is often one of the cheapest options when compared to other materials, although it should be noted that some of the top-quality versions may cost no less than timber.
PVCu cladding comes in many different colours and finishes. Here, Freefoam Building Products’ woodgrain effect PVCu cladding sits well next to modern grey windows (Image credit: Freefoam Building Products)
uPVC cladding comes in white, coloured and timber-effect versions and is made from cellular PVC using a process that creates two layers. The outer skin contains UV-resistant titanium-dioxide — meaning that good quality uPVC is long lasting and requires minimal maintenance.
It is easy to fit on a DIY-basis, thanks to its lightweight properties and being sold as interlocking boards.
The detailing is not always as delicate as that of timber and although lower maintenance than timber equivalents, uPVC can, over time, discolour — unless you are willing to pay more for those higher quality versions. These often come with up to 20-year discolouration guarantees.
(MORE: Exterior Makeover Design Guide)
Wooden House Cladding: The Advantages and Disadvantages
The owners of this home, a remodelled bungalow, originally considered cement fibre cladding but were worried the finished look would be too ‘perfect’ so opted for European redwood cladding instead. (Image credit: Simon Burt)
There are many different types of timber house cladding, ranging from softwood, to chemically or heat treated timbers.
Softwood timber cladding is good option for those on a budget. Low cost timbers include spruce and pine, with the very lowest prices starting between £5-8/m² for boards in their raw state, unfitted.
It is important to note that softwoods such as these will need priming and painting and regular maintenance in the form of preservative treatments and re-painting.
Due to their maintenance requirements they can, over time, actually work out to be more expensive than some hardwoods — although if you plan to move on quickly, this may not be your concern.
It is important to treat softwood cladding in order for it to withstand the elements. The timber cladding used on this new house has been treated using SiOO:X wood protection meaning it will weather evenly over time (Image credit: SiOO:X)
For those with a little more to spend on their house cladding, there are several other options — and these types of wooden house cladding need no initial or even subsequent staining in order to maintain their looks.
Recently, the use of unstained timbers has increased. These include cedar, larch and spruce, as well as oak and chestnut. These timbers can last for many decades without any surface coating and weather attractively, to a silver, over time.
Boards come supplied in various ways, but installing timber cladding is a job that is possible to carry out on a DIY basis should you wish to save some money. If you were to call in the professionals, you could expect to pay around £42/m² for the boards and fitting.
Heat-treated timbers, such as Thermowood, Kebony and Accoya , are also a good choice. The heat treatment reduces their moisture content and makes them more stable than untreated timber.
What is Shou Sugi Ban Cladding?
The current trend for charred timber cladding – also known as Shou Sugi Ban cladding – might seem like a new idea, but this is in fact a practice that has been around for hundreds of years in Japan.
It involves running a blowtorch across the surface of the timber boarding to blacken it, but not to burn it. The resulting look is a very attractive, black finish with lots of visual interest.
This striking extension to a Grade II listed barn conversion has been clad with vertical charred timber cladding. (Image credit: Jean-Christophe Godet and Soup Architects)
Vertical Hanging Tiles
Anyone aiming for a traditional finish should consider vertical hanging tiles — a prominent feature of many houses in the South-East of England.
However, tile hanging doesn’t come in cheap, at around £46/m², depending on the tiles (handmade clay will be considerably more expensive than concrete) but adds a great deal of character to a building.
There are contemporary tile hanging options too — large format porcelain tile cladding is also now available. Take a look at the range from Porcelanosa .
Handmade clay tiles have been used as a house cladding material for small sections of this house, by Oakwrights , to add character and interest. (Image credit: Oakwrights © Mark Bolton)
Rendering a House
There are many render options when it comes to external house cladding. As well as the standard cement-based renders there has been fresh interest in lime and clay plasters, as well as the latest ‘monochouche’ (French for ‘single layer’ or ‘bed’) renders.
Monocouche renders use white cement and are pre-coloured, so that what you are applying is as much a decorative finish as a weatherproofing layer. They can be applied in one coat (typically around 15mm thick) and so, even though more costly initially, are less labour intensive than traditional renders.
Render can look great used in conjunction with a number of other house cladding materials, including brick and timber. (Image credit: Chris Snook)
A monocouche render is supplied in bag form ready for mixing with water; it is then either applied by hand trowel or sprayed on.
At around £48/m² (installed), render works for both contemporary and traditional designs, covering any unsightly brickwork.
If you are willing spend a little more, through-coloured renders are a convenient, non-paint option. They’ll also mean lower maintenance in the long-run — you won’t need to re-paint them five to 10 years.
A combination of cladding types has been used in the design of this highly contemporary home, including timber, glass and render. (Image credit: Simon Maxwell)
Fibre Cement Cladding: What is it?
Pre-finished fibre cement board cladding is a long-lasting and low maintenance option. It is available in a wide variety of colours and finishes and has many benefits.
For some, the uniform, ‘perfect’ appearance of fibre cement cladding appeals, while others prefer the more natural, rustic appeal of real timber.
Glass reinforced concrete cladding panels are another option.
Fibre cement cladding from Cedral was used to finish off this striking contemporary extension. (Image credit: Simon Maxwell/Kemma Watts)
Brick Slips Cladding: A Hot Trend
Brick is often laid as a self-supporting, ground-bearing skin. However, there is an increasing use of brick skins or slips, hung off a metal base that is fixed to an inner wall.
Due to their thin profile, they can be a good option when installing external wall insulation to a home.
Although they are quick to lay, bear in mind that brick slips are an expensive house cladding option.
This contemporary self-build by architect Jake Edgley of Edgley Design features black-stained Southern Yellow Pine cladding — it looks great combined with brick and stone. (Image credit: Simon Maxwell and Richard Chivers)
Different Types of Stone Cladding
Stone house cladding is a popular choice with those after a warm, classic appearance, although, depending on the stone used, it can also create a very contemporary look.
Stone cladding is considerably cheaper than using solid stone for the construction of a house, with some types coming in at around the same price as render.
Stones suitable for cladding include sandstone, slate and even limestone. Often, local planners will dictate they type of stone that can be used depending on what the local stone is in the area you are building.
For this contemporary self build a combination of house cladding materials has been used, including zinc and iroko timber. The tumbled Great Tew ironstone cladding adds warmth and character. (Image credit: Fraser Marr)
How Much Does House Cladding Cost?
House cladding costs vary depending on the materials you choose, as outlined above.
At the lowest end of the scale lie untreated softwoods, such as pine, although you will need to factor in your own finishing and maintenance costs. uPVC cladding is also one of the cheaper house cladding options.
At the top end of the price scale lie stone, hardwoods, handmade hanging tiles and through-coloured renders, all coming in at between £40-£70/m² (installed).
If you want to save money on house cladding, consider going for an option that you can fit on a DIY basis, such as some tongue-and-groove timber types of cladding.
It is important to bear in mind, that cheapest is not always best — this is the material that will define the appearance of your home and protect it from the elements. It needs to be high quality in order to do this whilst weathering well.
The prices below do not include fixings or labour.
- uPVC: From £31/m²
- Softwood Cladding: From £5/m²
- Hardwood and treated timbers: From £40-£45/m²
- Render: Rendering using a sand and cement ‘scratch coat’ and a finer render topcoat, followed by two coats of external masonry paint: From £40/m², incl. labour.
- Fibre Cement Cladding: From 31/m²
- Hung clay tiles: From £45/m²
- Stone cladding: From £60/m²
What is Rainscreen Cladding?
A rainscreen is a term that applies to an integrated system, complete with a concealed steel framework on which the external cladding material is fixed. They are also known as curtain walling and can be made from metal, glass or a modern take on traditional materials, such as tiles.
Ask the manufacturer about warranties for the cladding, and check that the material is acceptable to your structural insurance provider, to ensure that you’re covered.
This house, in Aberdeenshire, designed by TAP Architects , has been clad in dark Siberian larch rainscreen cladding. (Image credit: David Barbour)
Exterior House Makeovers With Cladding
If you are looking to make a quick profit from your home or just want to update the look of your house on a budget, consider simply improving on what you already have.
There are several ways to improve the appearance of a house without fully cladding it. For instance, painting any ugly brickwork or dirty grey pebble-dash a fresh new shade may well suffice.
Bear in mind, too, that it may not be necessary to clad the entire house — often focusing on just the upper storey or including a feature panel will smarten up an exterior.
Check out these amazing external makeovers for some inspiration.
New cladding can smarten up and even transform a house. Here, new lime render cladding has been used in the renovation of a period cottage. (Image credit: Simon Maxwell)
Natasha is Homebuilding & Renovating’s Associate Editor and has been a member of the team for over two decades. An experienced journalist and renovation expert, she has written for a number of homes titles. She has renovated a terrace and is at the end of the DIY renovation and extension of her Edwardian cottage. She is now looking for her next project.
Homebuilding & Renovating Newsletter
Get the latest news, reviews and product advice straight to your inbox.
Thank you for signing up to Homebuilding. You will receive a verification email shortly.
There was a problem. Please refresh the page and try again.
By submitting your information you agree to the Terms & Conditions and Privacy Policy and are aged 16 or over.
Cladding and render: the ultimate guide to exterior finishes
Real Homes is supported by its audience. When you purchase through links on our site, we may earn an affiliate commission. Here’s why you can trust us.
(Image credit: Simon Maxwell)
Join our newsletter
Get the best home decor ideas, DIY advice and project inspiration straight to your inbox!
Thank you for signing up to Realhomes. You will receive a verification email shortly.
There was a problem. Please refresh the page and try again.
By submitting your information you agree to the Terms & Conditions and Privacy Policy and are aged 16 or over.
Adding cladding and render to your home is a fool-proof way to transform the exterior of your property. Not only will increase its kerb appeal and consequently raise its value, it can also protect your home from the elements.
If you’re not satisfied with the exterior of your home there are a wide range of cladding and renders to get the look you desire. Do you love the clean look of contemporary houses? Then a simple rendering could be your answer. Alternatively, if you want a traditional look, brick slips or wood cladding could add authentic appeal.
Take a look below at what options for cladding and rendering are on the market and find exactly what you need to fit your budget and create the look that you want.
Find out more about how to transform the exterior of your home in our practical guide – and then take a look at our guide to the best outdoor furniture to complete the transformation of your home.
What is cladding and render?
Cladding is a skin of material added to a structure for protection and decoration. Both manmade and natural materials are used as cladding, the former being chosen for usually being low maintenance. However, there are now a growing number of timber claddings that require little to no aftercare, too.
Your home may already have cladding, and replacing like for like is a way to maintain the character of your home. This is especially important where the cladding matches the local vernacular.
Otherwise, cladding or render can be used to improve a tired and dated home. Inappropriate materials might need replacing or you could use something that will not need to be treated every couple of years.
What is render?
We talk about render at the same time as cladding as it is a way of cladding your home. However, while most cladding materials are dry and fixed to the home with screws or fittings, render is a wet coat applied much like plaster.
Similar to render are roughcast and pebbledash. These are coatings where render is reinforced with pebbles, gravel or even shells, to create a hardwearing layer over the home. This is often seen on coastal homes as it stands up to the elements. It was also popular on local authority properties built in the 70s and 80s as it was cheap to add and maintain – perhaps why it is looked on less favourably now.
Do you need planning permission to add exterior finishes?
Changes to your home’s exterior appearance may be subject to planning rules set down by your local council – so always check with it first. However, it is possible that cladding changes fall under permitted development.
However, this does not apply on listed buildings and on any house on specially protected types of land, within a National Park or AONB – you will need to apply for planning permission in these cases.
Which cladding material is best for your home?
Your budget, the look of other houses nearby, or what your local council approves will all influence the material you choose for your exterior. Bear in mind that prices vary widely, depending on the intricacies of a particular job, and that many suppliers will only work directly with trade, meaning you may have to hire a building company or architect to achieve the finish you want.
You should also consider maintenance. Low-maintenance options tend to have a larger outlay, but think of the money you save on treatments/upkeep over time. If you are a keen DIYer you can save money with a cladding choice that is easy to install and maintain yourself.
Office S&M designed this extension for a terraced house in North East London, completing it in Prokol polyuria, a spray-on coating supplied by ESW , which was first developed for oil rigs.
(Image credit: French + Tye)
View the full Janus House project online.
(Image credit: French + Tye)
How much do different exterior finishes cost?
- Timber composite cladding – £105/m2
- Fibre cement weatherboarding – £65/m2
- Softwood timber cladding (painted or treated) – £50/m2
- Hardwood timber cladding – £90/m2
- Heat-treated timber cladding – £80/m2
- Tiles (concrete) – £40/m2
- Tiles (slate) – £100/m2
- Natural stone – 100/m2
- Artificial stone – £70/m2
- Metal – £50/m2
- PVCu cladding – £50/m2
- Brick – £60/m2
- Brick slips – £50-60/m2
- Rendering – £60/m2
- Masonry paint (three coats) – £15/m2
Can you install cladding by yourself?
A competent DIYer should have no problems fitting timber cladding themselves. This tends to be fitted to battens, screwed to the exterior of the home. PVCu systems can also be fitted on a DIY basis, with some being a click and clip design that is easy to work with.
Rendering can also be done by those willing to give it a go. As with plastering and other wet trades though, practise makes perfect so you might want to leave it to the pros if you have no prior experience.
Specialist cladding and renders are often only available as supply and fit. This may be because the techniques for installation are very specific, and DIY work can invalidate guarantees.
Cladding your home with brick slips
Exterior brick slips are lightweight, thin – usually 20-25mm – slices of brick, often fixed to a backing panel with adhesive. Mortar is then inserted into the gaps to create a realistic, pointed look. Ranges include reclaimed and handmade finishes, and you can expect to pay from £50 per square metre including metal lath substructure and mortar joints.
Choosing wood cladding for your home’s exterior
Whether in the form of shingles, or traditional-style weatherboarding for a classic New England look, timber cladding is a popular choice. There is a wide range, with hardwoods and softwoods, starting at around £10 per square metre for untreated pine, to £50 per square metre for something more durable (including treatment/paint).
Wood can be treated to lessen the colour fade that the weather inevitably brings, and to improve its thermal properties. Regular maintenance may be required for softwoods, so it is probably worth investing in one of the hardwood options.
Natural horizontal cladding was used on the exterior of this home in the New Forest
(Image credit: Nigel Rigden)
Wood effect cladding offers the same look as popular timber cladding options, but requires less maintenance. They are usually pre-painted fibre-cement boards, which are designed to look like wood. These are highly durable and are available in a wide range of colours. Expect to pay around £65 per square metre, fitted.
Rendering your home’s exterior
Render is an excellent wall finish when specified well and used in the right context. Render can be applied to create a smooth, textured or patterned finish, and comes in a wide range of colours. It can help improve your home’s insulation and can be applied to both old and new properties.
Consider the type of render you use carefully – lime render will suit old, historic buildings, while new, silicone-based renders are flexible, breathable and low-maintenance. Modern renders are a big improvement on the concrete renders widely used until recently. Prices typically start at just under £60 per square metre.
Crisp white render and brick have been used to clad this home by Selencky Parsons
(Image credit: Selencky Parsons)
The traditional way to render an external wall is with a sand/cement/lime mix. The problem with these on-site render mixes is that they can vary from plasterer to plasterer. The lime does help with flexibility, so where builders are using simply sand and cement, there is likely to be an issue over time with cracking. Typically people living with a poor render mix experience bubbling, too, and where render is applied to walls with limited direct sunlight (to help dry it out), black mould can appear, along with algae and lime bloom. In addition, the render will need repainting every five years or so. It’s hardly a happy picture, but there is a solution.
Over the past decade or so, the addition of silicone into pre-packed render mixes (from the likes of K-Rend and Baumit) has given extra flexibility to the finished render (reducing the likelihood of failure), is through-coloured (meaning no painting) and is largely resistant to moisture. Some of the products are even resistant to pollution and effectively become self-cleaning.
The best course of action for you is to talk to your builder about their plan for render, and if they are not considering one of the newer solutions, ask them to look into them for you. The higher additional cost, particularly on the relatively low surface area of extension walls, is almost certainly worth it in the long term.
Find out more about how to render walls in our guide. Use our guide to using lime mortar to find the right render solution for your period home.
Fixing PVCu cladding to your home’s exterior
PVCu cladding, whether it be in the style of larchlap or weatherboarding, is one of the cheapest cladding materials. It is available in both white and coloured finishes, but is prone to discolouration over time.
Investing in a high-quality version that comes with a fixed-period discolouration guarantee will ensure you have a durable and maintenance free exterior. Expect to pay around £50 per square metre including fitting.
Fitting metal cladding panels to your home’s exterior
Exterior cladding panels are ideal for contemporary homes to create a streamlined look and a low-maintenance finish. Available in a range of materials, including vitreous enamel or metal, they will cost anything from £50 per square metre, depending on the material and chosen finish.
Get Real Homes magazine delivered direct to your door and your device
Can’t get to the shops but don’t want to miss out on the latest issue of your favourite homes magazine? Don’t worry as when you subscribe today you’ll get every issue of Real Homes magazine delivered direct to your door and your device.
From stunning completed projects to the latest decorating ideas you can try in your own space, you’ll find plenty to keep you entertained and inspired inside each issue. Don’t miss our special deal – subscribe to our annual print and digital bundle offer today for just £39.99 – a massive saving of 52%.
Top tips for exterior cladding and render:
- Depending on the material you use, exterior cladding is usually fixed to a house with timber battens or a steel frame, which is attached directly to the structural walls.

- Applying cladding or render is the perfect opportunity to improve your home’s insulation. Using render to do this tends to be less expensive than using cladding.
- The cladding you choose may have a rainscreen, which is a breathable weatherproof system that allows water to drain away, reducing the chance of condensation building up behind it.
- Consider the finished look carefully. Do you need to clad or render the whole house? Treating just the upper or lower half of a property and painting the rest might be sufficient.
- Before you buy, check the warranties offered by the manufacturer, and that your building insurance provider is happy with your choice of material.
- Cladding comes untreated, pre-treated, stained or painted, with the unfinished options being the least expensive.
- Looking for a money-saving option? If you’re an experienced DIYer, you may be able to make a good job of fitting timber cladding or applying textured rendering yourself. Otherwise, look for a firm that offers an installation service for cladding and render.

 Otherwise, look for a firm that offers an installation service for cladding and render.
More on transforming your home’s exterior
- How to paint a house: everything you need to know
- A guide to rendering external walls
- How to give your home an exterior makeover
Lucy is Global Editor-in-Chief of Homes & Gardens having worked on numerous interiors and property titles. She was founding Editor of Channel 4’s 4Homes magazine, was Associate Editor at Ideal Home, before becoming Editor-in-Chief of Realhomes.com in 2018 then moving to Homes & Gardens in 2021. She has also written for Huffington Post, AOL, UKTV, MSN, House Beautiful, Good Homes, and many women’s titles. Find her writing about everything from buying and selling property, self build, DIY, design and consumer issues to gardening.
External wall cladding projects gallery & design ideas
In need of inspiration? You’re in the right place.
Browse our gallery of images and projects to see how others have used external wall cladding to transform their home. These include garden buildings, home extensions & new build projects using a range of cladding colours and textures.
Share your cladding project and receive a £10 Amazon voucher!
We would love to see photos of your cladding project. Simply click Submit a photo, fill in the form and send us your picture.
As a thank you, we’ll send you a £10 Amazon voucher on us!
We look forward to hearing from you! Terms and conditions apply.
Follow us on Instagram or Pinterest for cladding ideas…
MyCladding on Pinterest and Instagram has a range of design ideas on PVC external wall cladding – brought to you by one of the fastest growing roofline and cladding manufacturers in Europe.
4 Dormer Bungalow. Three Dormer cheeks at the front and one at read clad in Fortex Misty Grey Double Shiplap cladding
Shrewsbury
Refurbishment
Fitted 300mm Fortex embossed double shiplap cladding to porch, side house and above garage, excellent quality, supplied by GBP Ltd, and fitted by Lee Roberts of More Than Just Kitchens, Ampthill
Ampthill
Refurbishment
2. 5m x 3m garden room clad in FCD333E Slate Grey Double Shiplap cladding. Excellent quality, and easy to work with and install. Reveals and trims helped to produce excellent results.
Preston
Other
Misty Grey Fortex Cladding to replace rendering
CATSHILL, BROMSGROVE
Refurbishment
An individually unique Garden Room, out in wales, cladding Cream.
Carmarthen, wales
Other
Sumi-detached Property refurbishment of replacements over hang tiles with misty cladding fitted Horizontal.
Reading, Berkshire
Refurbishment
Single Storey Structure, which has be refurbishment from Vertical Wooden Cladding to Horizontal Cladding in Misty Grey.
Peterborough, Cambridgeshire
Refurbishment
A Cute and Unique Bungalow Refurbishment in 170 Weatherboard
Brierley Hill – West Midlands
Refurbishment
Total Renovation of Large detached Property somewhere in Nottinghamshire, using Cladding, gutters, soffit and fascia in Cream.
Nottingham
Refurbishment
I nice little bungalow refurbishment on the South Coast, in Freefoam 170 Weatherboard Misty Grey to complement the Anthracite Windows and Front Door.
Bournemouth
Refurbishment
Scunthorpe
Refurbishment
Oldham
Refurbishment
Side elevation shown in the beautiful refurbishment in Misty Grey Double Shiplap
Penryn
Refurbishment
Looe
Refurbishment
Dartford
Refurbishment
Tamworth
Refurbishment
Chichester
Refurbishment
A lovely dormer refurbishment by Ricky Romera at Professor Windows. Grey cladding to go with new doors and window.
Banbury
Refurbishment
We chose the pale gold cladding to cover up the aging grey bricks on our bungalow. We are pleased with the outcome; the property now looks much brighter and cleaner.
Heybrook Bay, Plymouth
Refurbishment
Double Gable End – Dormer Work in Misty Grey Weatherboard
Reading
Refurbishment
Worcester
Refurbishment
Unique Little Garden Room in Altricham
Altricham
Refurbishment
Dinas Powys
Refurbishment
Garden Room in Carmarthen, that has been transform using freefoam Weatherboard.
Carmarthen
Refurbishment
The unique shaped property shows off how to use Cappuccino Double Shiplap on gable end and side evalution Dorma Window.
Worcester
Refurbishment
I nice example of the double shiplap in colonial blue on a gable ended property in Chicester
Chichester
Refurbishment
A Refurbishment of a semi-datached Bungalow in the Gosport Area, replacing the rendering with a horizontally fitted cladding in Pale Blue.
Portsmouth Area
Refurbishment
New Extension on a Home in Canterbury, which has been clad.
CANTERBURY
Extension
Cladding Replacement on a dormer windows.
Leeds
Refurbishment
This detached property has had its dark brown hanging tiles, removed and replaced with Freefoam Fortex Weatherboard Cladding in ‘Misty Grey’, congratulations once to Academy Windows.
Brightlingsea
Refurbishment
Check out this fantastic transformation by Tru Plastics. Stunning Sage Green Fortex Double Shiplap cladding has been used to replace faded wood.
Coalville
Refurbishment
Stunning new home featuring Double Shiplap Fortex cladding in Cappuccino. Built by 11:11 Property Development
Stourbridge
New build
This house in sunny Cornwall gets a facelift with Colonial Blue Double Shiplap Fortex cladding. Fitted by Penryn Plastics, who have done a great job.
Penryn
Refurbishment
Why not clad a new Dormer extenstion. Ultra low mainteance, fit and forget! Fortex Slate Grey Weatherboard external wall cladding used on this property.
Wiltshire
Extension
Lovely new home using Freefoam PVC Sage Green Weatherboard cladding
UK
New build
Storm Grey Weatherboard exterior PVC cladding. Lovely with the cream colour render – good choice! Thanks to Trade Fit 4 U for fitting this.
Thanet
Refurbishment
Small but sophisticated. This homeowner chose gorgeous grey cladding for their garden room.
Wales
Refurbishment
Misty Grey Fortex Double Shiplap Cladding used to modernize this property in Leicestershire, installation by Tru Plastics.
Leicestershire
Refurbishment
Lovely revamp on this property. Using X-Wood Cladding in Anthracite Grey to match the new door. Fitted by the team at Tru Plastics, great work!
Ollington, Nottinghamshire
Refurbishment
Pale Gold Fortex Embossed Double Shiplap cladding used on Dormer Windows.
Portsmouth
Extension
A fantastic use of Misty Grey Fortex Weatherboard cladding by Ian Fenton Design & Build Ltd
Macclesfield
Refurbishment
What a great job by 4 Counties Home Improvements. Lovely grey cladding fitted to the front elevation of this detached house.
Chesterfield
Refurbishment
Great refurb of this property using Slate Grey Fortex Cladding to match the front door, fitted by Matthew Oliver Windows & Doors.
Northamptonshire
Refurbishment
X-wood Cladding In Antracite Grey used to transform this home in Derbyshire. Great work by Tru Plastics!
Derbyshire
Refurbishment
Lovely refurb completed by Trade Fit 4 U! Using Fortex Weatherboard Cladding In Misty Grey.
Margate
Refurbishment
Thanks to the guys at [email protected], created this lovely refurbishment using 151mm Shiplap Rosewood Cladding, great job from start to finish!
Crawley
Refurbishment
Amazing transformation of dated 1950’s semi to ultra modern and eye-catching styling with use of exterior cladding and rendering. Great job by the developer.
Weymouth
Refurbishment
Replacement of old White Shiplap Cladding with Misty Grey Weatherboard Cladding.
Luton
Refurbishment
Thanks to the team at Pilkington Plastics 01403 337701, black cladding that matches the new black door.
Horsham
Refurbishment
The guys at pilkingtonplastics. com suggested adding some colour so we chose Fortex Weatherboard cladding in Sage Green. Thank you for a great job I have and will continue to recommend them.
Brighton
Refurbishment
David and the team from Pilkingtonplastics.com did a fantastic job and the suggested use of colour in the gable really set it off. Highly recommend them.
Brighton
Refurbishment
Beautiful Sage Green weatherboard cladding used to renovate this little holiday home by the sea. Existing render removed and expertly replaced by www.s1buildersnorfolk.co.uk, great job!
Heacham, Norfolk
Refurbishment
Fortex Double Shiplap Cladding in sand, looks great with Rosewood Fasica and Soffit, fitted by First Class Fascia.
St Ives
Refurbishment
Colonial Blue Fortex Weatheboard Cladding by Trade Fit4U a Freefoam registered installer
Kent
Refurbishment
50+ year old asbestos sheeted garage was in need of some tlc. What a difference and very easy to erect. Supplied by SBS Workington
Maryport
Refurbishment
A beauitful transformation using Freefoam Cappucino Fortex cladding from one of our Freefoam registered installer in Oxfordshire, Premier Fascias & Property Maintenance Services.
Oxfordshire
Refurbishment
From cladding sample request to completing this lovley project using Freefoam Storm Grey cladding on a Garden Room and the back of the house.
A home owners journey with Freefoam.
West Sussex
Refurbishment
Dave from pilkingtonplastics.com has done a fantastic job. Listen to our need to solve a problem of water drip on to lower sill
Brighton
Refurbishment
What a great use of Storm Grey cladding, looks really good with the dark grey windows and doors. Fitted in Kent area by Freefoam Registered Installers Trade Fit 4 U.
Northamptonshire
Refurbishment
Lovely refurbishment of upper elevation using Misty Grey Weatherboard cladding. Contrasted to dark grey windows. Fitted by C W Fascia & Soffits
Leicestershire
Refurbishment
What a difference, the Freefoam Sage Green Fortex cladding made on this Bowls Club. Before and After pic.
Shropham, Norfolk
Refurbishment
Lovely Static Home manufactured by Presige Park Homes using Fortex Slate Grey Weatherboard cladding. Ideal for new or refurbished Static Homes
Static Home Show, Birmingham
Other
Lovely Image from Cherwell Design in Oxfordshire using the Fortex Weatherboared in Slate Grey on a Smart Dormer extension.
Oxfordshire
Extension
A fantastic job on this garden room by a Freefoam Registered Installer, NG Fascia Soffit and Guttering using Freefoam Storm Grey Weatherboard, White Fascia, Soffit and Black Round Rainwater products.
Nottingham
Extension
[email protected] David Has done a wonderful job highly recommend one of three gables
Bexhill
Refurbishment
A beautiful garden room using a Freefoam Fortex cladding in Slate Grey.
Rothwell, Northamptonshire
Extension
A Lovely Slate Grey Weatherboard fitted by a Freefoam Registered Installer, Tradefit4U
Ramsgate, Kent
Refurbishment
Thank you to David and the team from pilkingtonplastics.com. The time taken by Andy to explain so we could make the right choices. I wouldn’t hesitate to recommend if you are considering Cladding
Guildford
Refurbishment
Lovely sun room extension on house In Stirling featuring Storm Grey cladding
Stirling
Refurbishment
X-wood cladding in Oak used as feature on this sunning new home
York
New build
We have just had all the guttering, fascias, soffits & cladding replaced and we are absolutely thrilled with the finished result. Andy the salesman is a really nice friendly guy who was most helpful
Seaford
Refurbishment
Great use of Black Ash Single Shiplap cladding in South Wales on this window
click here to see the range
https://www. mycladding.com/woodgrain-cladding-range
South Wales
Extension
Freefoam X-Wood cladding in Anthracite Grey.
Belper, Derbyshire
Refurbishment
Misty Grey cladding fitted by Sol Home Improvements in Notthingham. Thanks for sharing.
Notthingham
Refurbishment
What a difference white cladding makes!! Give your home a modern look with a simple upgrade to the exterior. Many thanks to Conservatory renovation in Glenrothes for sharing this photo.
Whitburn, Edinburgh
Refurbishment
A stunning transformation to this beautiful home, using Frefoam Rosewood Cladding, Freefoam Fascia and Soffit. Many thanks to G J Booth Maintenance Serivces in Wiltshire, for submiting this image to showcase our product and his workmanship.
Amesbury, Wiltshire
Refurbishment
A beautiful transformation of a block of flats using Freefoam Fascia and soffit in Levenshume, installed by one of your registered installers Evoke Home Improvements.
Levenshume/ MANCHESTER
Refurbishment
To create a garden Gym / Chill out room by combining contemporary modern colours with Aluminium glazing products and maintenance free PVC claddings with a timber look
Norwich
Other
Many thanks to our Freefoam registered installerGutter Doctor for sending a phote of our White Cladding he used.
Colchester, Essex
Refurbishment
Why not give your dormer a facelift with our cladding. Here is a picture of Freefoams white cladding fitted on a dormer by our registered installer Eco Innovations.
Helensburgh, Dumbartonshire
Refurbishment
A beautifully fitted white cladding from our Freefoam reigstered installer Eco Innovations. What a difference this makes to this home.
Dairy, Ayrshire
Refurbishment
Stafford, West Midlands
Refurbishment
Here’s a picture of my new workshop cladded with the excellent ForeTex cladding from FreeFoam in ‘Sage Green’. Extremely pleased with the results and ease of installation – just finishing the roof
Ryde
New build
I would definitely recommend Pilkington Plastics Dave has done a great job. Andy the salesman was informing without being pushy
Brighton
Refurbishment
Excellent service from Andy @Pilkington Building Plastics
Saltdean Brighton
Refurbishment
Misty Grey Fortex Cladding
Pinchbeck
Refurbishment
Lovely Storm Grey Weatherboard cladding
Worcestershire
Refurbishment
X-Wood Cladding in white has been used to create a stunning exterior. Featured at the 2018 Ideal Home Show to showcase a contemporary extension to a traditional property.
London
New build
A lovely summer house in Cappuccino Double Shiplap Cladding
Wigan
Other
Old render removed and replaced with 170mm fortex weatherboard in sand first class job by Paul Mable Home Improvements
Derby
Refurbishment
What a difference this Colonial Blue Double Shiplap and Rosewood window trims have made to this home! Thanks to Simply Roofline for the great before and after photos.
Peterborough
Refurbishment
Thank you to Cheryl and Richard for sharing your Slate Grey Fortex Pro Double Shiplap installation with us! We love the way you have coordinated your door and our cladding, and we definitely love that you “are so pleased with it!”
Well done to Abbey Windows in Reading for the fantastic installation.
Reading
Refurbishment
Our Light Oak Open Vee shiplap cladding offers a natural wood effect to this dormer without all of the pesky problems that come along with wood cladding. No rotting, discolouring or cracking here! Thanks to Just Fascias for your photo.
Barnsley
Refurbishment
Try contrasting brick and cladding on different parts of your home. Here is an example of beautifully executed brick and Pale Gold Weatherboard Cladding mixture in Grays, Essex fitted by Merrydale Plastics.
Grays, Essex
Refurbishment
Our X Wood Premium Shiplap Cladding is perfect for commercial uses – see it here on a school in Belgium. They have cleverly used a mixture of Anthracite Grey, White, Cream, and Greyed Cedar woodgrain cladding to create a modern look.
Belgium
New build
James from East Kilbride used Fortex Render embossed boards in white to create render effect on a retaining wall where water penetration ruled out actual render. Well done James!
East Kilbride
Refurbishment
This Slate Grey self-installation from Rhys in Tonteg shows that you don’t need to stick to light, subtle shades! Try something bold like this dark shiplap cladding!
Tonteg
Refurbishment
This home looks like it was made for our Argyl Brown Double Shiplap Cladding! Thank you to Dorothy from Long Buckby for the lovely photo.
Long Buckby
Refurbishment
Thank you to Mike in Chepstow for this great picture of Colonial Blue double shiplap cladding! Looking good!
Chepstow
Refurbishment
Gables & Eaves Vinyl Weatherboard Cladding
Mitten Vinyl Australia offers a comprehensive range of Gables & Eaves vinyl cladding, perfect for both residential and commercial properties. Our vinyl cladding products are made to the highest quality standards, ensuring a durable and weatherproof finish that will last for years.
With a massive range of colours and textures to choose from, our Gables & Eaves vinyl cladding is sure to add value and style to your property. For more information on our Gables & Eaves vinyl cladding products, don’t hesitate to get in touch with us today.
Preserve your home’s functionality with our Vinyl Cladding Installation for Gables
Gables and Eaves products can be the most significant feature of a building. Choosing what material you use for your roofs is essential because it impacts how well these architecturally planned projects perform their function.
We offer vinyl weatherboarding cladding products that ensure that users receive all benefits offered by this type of roofing systems, such as increased insulation, visual appeal and various colours available.
Gables roofs are among the most efficient at shedding water due to their slope design, which helps prevent roof leaks and preserves functionality. Our CambridgeTM Horizontal Vinyl Cladding will add strength to your home as it carries BRANZ’s recommendation insulation with a maintenance-free exterior face layer made from 100% Polyurethane Plastic foam backed up by premium material.
Your home’s roof is an integral part of its design, and Gables offer great versatility in terms of style and durability. The slope design allows for optimal drainage while preventing leaks that could damage your home’s walls and internal structure.
Eaves Vinyl Cladding Installation The perfect finishing touch for a stylish home
To achieve a refined, stylish look for your home, you may also want to consider our Mitten Vinyl D5 Vertical Cladding. Like all of the high-quality materials we offer and because it’s durable with insulation that can be made climate controlled if needed- this product would blend in seamlessly without being too prominent on any roof gable shape!
The deep roof eaves of your home should be carefully designed to control the angle that the sun enters and regulate the interior temperature in the winter months. Our Mitten Vinyl D5 Eave Board (Soffit) exterior cladding is suitable for eave linings and will help you get all-year cool looks effortlessly.
We recommend the Mitten Vinyl D5 Vertical Cladding to give your home that polished look. This durable and stylish cladding is perfect for blending in with vertical walls or roofs while providing climate control as well!
This product is durable enough for any climate condition while also being an effective way of controlling temperature within the house through insulation – all these features make it one choice among many available options!
Cladding Service we provide:
Features
Benefits
Features
- Lightweight construction allowing easy installation.
- Convenient 5.84m and 8m lengths.
- Superior foam backing for optimal insulation.
- Superior wind resistance up to 250kph.
- Freshly painted subtle wood grain pattern appearance with a lightly textured finish.
- Available in a range of 11 contemporary vinyl cladding colours.

Benefits
- Roll-over nail hems for increased rigidity and resistance to bowing and buckling, enhancing durability.
- Low maintenance colour-rich formula
- Premium weathering performance that can withstand strong winds, heat and rainy weather conditions and will not rot.
- Energy efficient design saving you money on heating and cooling throughout the year.
Whether you’re looking to refurbish your home or business, Mitten Vinyl Australia has the perfect vinyl cladding product for any project. With a Lifetime Warranty and in compliance with Australian Standards we ensure that our customers will be satisfied every time! For economical yet durable solutions when it comes down to choosing what goes on top of buildings, look no further than Mitten Vinyl Australia.
Get in touch with us today for more information on our Vinyl cladding products.
Deep roof eaves control the angle of sun entering your home, to heat your house in the winter and alternatively keep the hot sun out in the summer. Our Mitten Vinyl D5 Eave Board (Soffit) exterior cladding is suitable for eave linings. All our vinyl cladding products are manufactured in accordance with Australian Standards and come with a Lifetime Warranty for your peace of mind.
Cladding Service we provide:
Features
Benefits
Features
- 254mm wide double profile in lengths of 3.66m.
- Suitable for squared or mitred corner finish.
- Superior wind resistance and premium weather performance.
- Available in a range of 10 modern vinyl cladding colours consisting of a lightly textured brush finish.
Benefits
- Cost effective option of insulated vertical vinyl weatherboard will save you money on your energy bills.
- Easy maintenance with minimal upkeep required in those ‘hard to reach’ areas
- Made from durable materials to withstand the extreme elements.
- Superior weathering performance that can withstand strong winds, heat and rainy weather conditions and will not rot
Walling or Cladding | Colorbond.
 com
com
Wall cladding made from COLORBOND® steel adds another dimension to your home. As a beautiful, long lasting exterior facade it creates depth and texture.
Available in 22 core colours, including 6 in a premium Matt finish, COLORBOND® steel wall cladding also delivers a lot of practical benefits. It is easy to maintain, long lasting, lightweight and extremely durable; providing resistance to paint chipping, flaking and blistering.
Weather tight and secure (when installed to Manufacturer’s specifications), COLORBOND® steel walling is available from an extensive network of suppliers. To find out more about using COLORBOND® steel wall cladding on your home, please contact us or use our supplier locator to find a local supplier.
Be inspired by COLORBOND® steel walling & cladding
test
Geelong house with a COLORBOND® steel roofing and walling in Surfmist® in a classic finish.
Products
Roofing
Walling
Material
COLORBOND® steel
COLORBOND® steel Surfmist® cladding
Products
Walling
Colours
Material
COLORBOND® steel
Credits
Photo by: Shannon McGrath
Architect: Tecture
Builder: Built By Wilson
COLORBOND® steel Basalt® Matt roofing and cladding in LYSAGHT ENSEAM® profile.
Products
Roofing
Walling
Colours
Material
COLORBOND® steel
Credits
Architect: Kreis Grennan Architecture
Photo by Douglas Frost
Builder: Home Impact
COLORBOND® steel Windspray® wall cladding in LYSAGHT ENSEAM® 265 profile and COLORBOND® steel Monument® roofing in Stramit® Monoclad profile.
Products
Roofing
Walling
Colours
Material
COLORBOND® steel
Credits
Builder and Designer: Bolden Constructions
Photo by Royce and Co. Photography
COLORBOND® steel Monument® Matt in the profiles LYSAGHT KLIP-LOK® (roofing) and LONGLINE 305® (cladding).
Products
Roofing
Walling
Colours
Material
COLORBOND® steel
Credits
Photo by: Jack Lovell
Designed by: Glow Design Group
COLORBOND® steel Windspray® wall cladding in LYSAGHT ENSEAM® 265 profile and COLORBOND® steel Monument® roofing in Stramit® Monoclad profile.
Products
Roofing
Walling
Colours
Material
COLORBOND® steel
Credits
Builder and Designer: Bolden Constructions
hoto by Royce and Co. Photography
COLORBOND® steel Night Sky® cladding in an interlocking profile.
Products
Roofing
Walling
Colours
Material
COLORBOND® steel
Credits
Designed by Holman Designs
Photo by Nick Stephens
Builder: Vand Builders
COLORBOND® steel Night Sky® cladding and roofing. An interlocking profile was used for all exterior vertical wall surfaces. The roofing profile is LYSAGHT CUSTOM ORB® and custom shingles were applied on the garage.
Products
Roofing
Walling
Colours
Material
COLORBOND® steel
Credits
Designed by Holman Designs
Photo by Nick Stephens
Builder: Vand Builders
COLORBOND® steel Night Sky® cladding in the profile Nailstrip 265mm by Metal Cladding Systems.
Products
Walling
Colours
Material
COLORBOND® steel
Credits
Photo by: Lisbeth Grosmann
Designed by Michael Roberts: Studio 40 Building Design
Owner and Builders: Daniel and Carly Hopper
COLORBOND® steel Monument® Matt in the profiles LYSAGHT KLIP-LOK® (roofing) and LONGLINE 305® (cladding).
Products
Roofing
Walling
Colours
Material
COLORBOND® steel
Credits
Photo by: Jack Lovell
Designed by: Glow Design Group
COLORBOND® steel Basalt® in Snaplock profile
Products
Walling
Colours
Material
COLORBOND® steel
Credits
Photo by: Katherine Lu
Architect: Sandbox Studio
COLORBOND® steel Surfmist® cladding and roofing
Products
Roofing
Walling
Colours
Material
COLORBOND® steel
Credits
Photo by: Pieter Naessens
Architect: Matthews McDonald Architects
Thanks to Berms and Barrels
COLORBOND® steel Monument® cladding in the profile Stratco Hiland Tray 380
Products
Walling
Colours
Material
COLORBOND® steel
Credits
Photo by: Sam Noonan
Built by: Lucent Constructions
Designed by: Design Vision Consulting
COLORBOND® steel Monument® cladding in the profile Stratco Hiland Tray 380.
Products
Walling
Colours
Material
COLORBOND® steel
Credits
Photo by: Sam Noonan
Built by: Lucent Constructions
Designed by: Design Vision Consulting
COLORBOND® steel Monument® for the roofing and cladding in the profile LYSAGHT DOMINION® from the ZENITH™ range
Products
Roofing
Walling
Colours
Material
COLORBOND® steel
Credits
Photo by: Ben Hosking
Architect: OMG Architects
COLORBOND® steel Monument® in a corrugated profile
Products
Walling
Colours
Material
COLORBOND® steel
Credits
Photo by: Tatjana Plitt
Designed and built by Archiblox
COLORBOND® steel Shale Grey™ wall cladding in LYSAGHT LONGLINE 305® profile
Products
Walling
Colours
Material
COLORBOND® steel
Credits
Architect: Chan Architecture
Photo by Tatjana Plitt
Builder: Kleev Homes
COLORBOND® steel Monument® in a corrugated profile.
Products
Walling
Colours
Material
COLORBOND® steel
Credits
Photo by: Tatjana Plitt
Designed and built by Archiblox
COLORBOND® steel Monument® for the roofing and cladding in the profile LYSAGHT DOMINION® from the ZENITH™ range
Products
Roofing
Walling
Colours
Material
COLORBOND® steel
Credits
Photo by: Ben Hosking
Architect: OMG Architects
COLORBOND® steel Night Sky® in LYSAGHT LONGLINE 305® profile
Products
Walling
Colours
Material
COLORBOND® steel
Credits
Photo by Luc Redmond
Architect: Alchemy Architecture (formerly Joshua Mulders Architects)
COLORBOND® steel Monument® Matt in the profile Stramit Longspan®
Products
Walling
Colours
Material
COLORBOND® steel
Credits
Photo by: Eddison Photographic Studio
Designed and built by: Better Building Services
COLORBOND® steel Monument® in LYSAGHT CUSTOM ORB® profile for the walling, and LYSAGHT KLIP LOK® for the roofing
Products
Roofing
Walling
Colours
Material
COLORBOND® steel
Credits
Photo by: John Krutop
Architect: Graham Jones Design
Built by: Excelcon
COLORBOND® steel Monument® in LYSAGHT CUSTOM ORB® profile for the walling, and LYSAGHT KLIP LOK® for the roofing
Products
Roofing
Walling
Colours
Material
COLORBOND® steel
Credits
Photo by: John Krutop
Architect: Graham Jones Design
Built by: Excelcon
COLORBOND® steel Monument® Matt in the profile Stramit Longspan®.
Products
Walling
Colours
Material
COLORBOND® steel
Credits
Photo by: Eddison Photographic Studio
Designed and built by: Better Building Services
COLORBOND® steel Monument® in a corrugated profile.
Products
Walling
Colours
Material
COLORBOND® steel
Credits
Photo by: Tatjana Plitt
Designed and built by Archiblox
COLORBOND® steel Monument® in LYSAGHT CUSTOM ORB® profile.
Products
Walling
Colours
Material
COLORBOND® steel
Credits
Photo by Tatjana Plitt
Architect: chan architecture
COLORBOND® steel Night Sky® in LYSAGHT PANELRIB® profile.
Products
Walling
Colours
Material
COLORBOND® steel
Credits
Photo by Tatjana Plitt
Architect: Kuzman Architects
Explore walling colours
Dover White™
Surfmist®
Evening Haze®
Classic Cream™
Paperbark®
Southerly®
Shale Grey™
Bluegum®
Windspray®
Gully®
Jasper®
Wallaby®
Basalt®
Woodland Grey®
Monument®
Night Sky®
Ironstone®
Deep Ocean®
Cottage Green®
Pale Eucalypt®
Manor Red®
Gable of the house – how to make the sheathing? 110 photos worthy options
The pediment is the upper part of the facade of the building, limited by the slopes of the roof. Most often it is triangular, although sometimes there are more complex shapes – a trapezoid, part of a circle, a polyhedron, and so on.
Historically, this surface was often filled with sculpture and other decorations. In combination with the expressive means of modern architecture, such excesses would look excessively grotesque. However, even now the design of the triangular completion of the house is a very important component of its appearance.
When it comes to how to make a gable at home, everything matters – the material used to cover this part of the facade, decorative elements, the presence or absence of a window and its shape, cornice.
Brief content of the article:
Types of gable lining
Faced with the problem of how to sheathe the gable of the house, you will find yourself in front of several basic options. At the moment, wood, brick, decorative stone, siding are used for these purposes. Of course, more exotic alternatives are also possible – however, these materials are now the most popular and affordable.
There are several factors to consider when choosing a particular type of cladding. Firstly, how these materials will be combined with the main facade cladding. They must complement each other well. The color of the pediment of the house should not stand out from the general style.
Secondly, it is important to take into account the protective properties of a particular type of skin. Attractiveness alone is clearly not enough. After all, the pediment, among other things, is also a fragment of the wall, exposed to wind, snow loads, and temperature extremes.
Thirdly and fourthly, the complexity of installation and the price of the issue follow. Here you have to evaluate your own capabilities.
House Siding Gables
Siding is considered to be an easy-to-work, weather-resistant, lightweight and durable material. It harmonizes well with wooden facades, worse – with brick or stone. However, due to the wide range of textures and colors, it can sometimes be used with these two types of skin.
If you want to clad the gable with your own hands, then siding in this case is the best option. You will need to calculate the required amount of material and purchase it along with the fittings needed for installation.
Next, prepare the surface on which you are going to attach the panels. To do this, it needs to be cleaned, rid of cracks.
This is followed by a batten, either wood or metal, your choice. The final step is to fix the siding panels on the crate using self-tapping screws.
Benefits of wood
Despite the many benefits of vinyl or metal siding, many prefer the less durable and more vulnerable wood. Sometimes – in the format of the same typical panels installed according to the scheme that has already been described above.
But more difficult wood cladding materials are often used. In other words, people continue to choose wood, despite its capriciousness, relatively low protective characteristics and high price. Why?
It’s all about how aesthetically pleasing this material is. It visually seems warm, alive, real. In addition, the tree goes well with all sorts of decorative details, stone, brick, glass surfaces. Fits well with almost any architectural style.
Vinyl siding cannot boast of such. That is why the tree remains relevant, despite all its imperfections and the emergence of new modern materials.
Advantages and disadvantages of brick
This material is often used for the gables of brick houses. For a wooden cottage or a building lined with siding, it will most likely not fit well, as it looks visually heavier.
To build a triangular completion of the house from this material, first install a rail in the center of the end wall to the entire height of the pediment of the house. In combination with a reinforcing mesh, it provides rigidity to the final result. They try to lay the brick so that there are as few gaps as possible.
Among the advantages of this material, I would like to note its good protective properties, strength, reliability, beauty. In addition, it, like wood, is well suited for most styles – both traditional and modern. All sorts of architectural details and decor work well together with a brick surface.
Decorative stone as facing material
This method of pediment sheathing is considered to be one of the most expensive and is rarely used. It’s quite difficult to deal with him. However, it can be found in the photo of the gables of houses designed by the world’s leading architects.
Decorative stone forms a very active and attractive texture, which, when properly combined with other materials, can look very impressive. It interacts well with different types of plaster, brick, elements of classical design.
Other ways to decorate the pediment of the house
Among the numerous types of decorating this part of the facade of the building, one can single out wood carving, openwork forged elements, gypsum stucco molding or more modern versions imitating it, painting, and so on. The choice in favor of one or another method depends on the style of your cottage and your preferences.
Russian style is compatible with woodcarving and painting, but not with stucco moldings and plaster rosettes. Art Nouveau is well complemented by figured forging with a floral pattern, but not carved platbands with ears of corn. And so on.
Very beautiful pediments of houses are obtained by using figured wood carving, however, it is quite difficult to work with, unstable to external influences.
Openwork forged elements are much more durable and wear resistant. They can be ordered from specialized companies.
Imitation of stucco is now relatively easy to do, from typical elements that are selected in the relevant catalogs. At the same time, it is possible to accurately depict the complex decor related to the solemn and refined classical styles.
There are different approaches to painting. You can, for example, using a stencil, create a simple drawing or pattern yourself. This could turn out to be a very effective solution. You can also use the services of a professional artist.
Photo of the gable of the house
 youtube.com/embed/4zSkfzllhvg?rel=0&controls=0&showinfo=0″ frameborder=”0″ allowfullscreen=”allowfullscreen”>
Save the article to your page:
Post published: 05.12
Join the discussion:
Scroll UpAdblock
detector
how to finish the gable of the house inexpensively and beautifully
The content of the article
How to sheathe the gable of the house cheaper and beautifully
The gable is the face of the house, so the issue of its facing is of particular importance. Experts suggest how to sheathe the gable of the house beautifully and cheaper.
Lining is installed horizontally, diagonally, vertically or herringbone on the pediment
The lining is distinguished by the texture of natural wood and pleasant color. At the same time, it is a relatively economical finishing material. The lining is fixed on a special frame made of wooden bars with the help of nails, self-tapping screws.
When lining the gable with clapboard, a number of features should be taken into account:
- It must be used in combination with protective materials that will prevent the formation of mold and mildew on the surface.
- It is important to use a paint that repels moisture. This will protect the material from negative external influences.
- The use of lining increases the risk of fire because it is highly flammable.
- Protective coatings must be systematically updated to prevent the negative effects of moisture, microbes. On average, work should be carried out once every six months.
It is easier for an inexperienced craftsman to implement planking vertically or horizontally. In addition, there will be much less scraps, which means that you can “fill your hand” at the lowest cost.
Siding sheathing is good because it is easy to level the surface of the finished gable with it.
This is the most inexpensive and at the same time practical material of all possible. The siding is installed on the pediment using a frame made of a metal profile.
Siding is durable. It does not change its technical characteristics and does not lose visual appeal for 50 years or more. The material can be dyed in absolutely any color. The texture of the paint also does not matter. This allows you to decorate the pediment in the same style with the walls, roof of the house.
Unlike lining, siding is resistant to moisture. This eliminates the need for systematic application of protective agents. To update the appearance of the coating, it is enough to wash it with soapy water as it gets dirty. You can do this with a hose.
The most economical siding options are plastic panels. They differ from more expensive models only in the limited color palette.
Decking
Decking is a lightweight material, which is a significant plus in terms of installation and movement to the installation site.
Large-format finishing materials are currently very popular. This is due to the convenience of their use. Only one sheet of product allows you to cover the entire surface area that needs to be sheathed. As a result, the number of joints and fastening points is reduced to a minimum, which has a positive effect on the functionality of the structure. The almost complete absence of places for moisture penetration does not allow corrosion to occur.
It is recommended to purchase material with a sheet thickness of at least 1.5 mm. Thinner corrugated board easily bends, changes shape. It is best to use a material with additional stiffeners and a reinforced structure.
Sheathing a pediment beautifully and inexpensively can be done in many ways. Each of them has its own advantages.
Decoration of gables of private houses + photo
It would seem that such an insignificant design detail as finishing the gable of a private house cannot seriously affect the appearance and change the perception of the building as a whole. In practice, insufficient attention to the gables turns into serious problems, especially if the ridge beam of the roof, according to modern fashion, was placed above the main entrance to a private house when designing. In this case, the pediment surface becomes one with the facade of the building, so the quality requirements for finishing the pediment of the house increase by an order of magnitude.
What is a gable
In order to understand how best to finish all the elements of the building, it is necessary to understand what gables actually are and where the most important part of the gable surface is located:
- The gable plane exists only in the construction of a gable or semi-hip roof;
- Gables or gable planes are called sections of a triangular or trapezoidal surface located between two roof slopes and being an organic continuation of the wall, as in the photo.
Schemes for finishing and decorating private houses
The traditional arrangement of gables is lateral, from the ends of the building, but in the case of using complex broken roof structures, with a deployed gable roof, architects have to look for and select the form of finishing the gables of private houses, photo corresponding to the color and texture to the overall design of the building.
Variants of the roof gable arrangement
The method and form of gable finishing to a large extent depends on the roof structure and the method of arranging the supporting part of the ends. There are three options for building gable structures:
- The support scheme is most often built as a continuation of the laying of a brick or foam block wall. In this case, the pediment sections of the masonry can be used as supports for the ridge run, holding the truss frame from transverse displacements;
- The prefabricated scheme of the gable is used in frame-panel, timber private houses, in the arrangement of attic rooms. The gable structure of the attic or residential attic at the same time serves as one of the walls of the room;
- Decorative version. In this case, an unheated attic space is closed with a pediment triangle from the penetration of rainwater, blowing out heat with drafts.
The last case can hardly even be called a gable finish. The under-roof space of outbuildings or utility buildings is simply clogged with the most accessible material – waste and remnants of unedged boards, remnants of lining, or even slabs.
Finishing the pediment of a wooden house
In numerous photographs you can see all sorts of options for finishing the gable part of the wall. There are many design schemes, but they all have one thing in common – only wood or its imitation with siding is used to close the gable sections. This is the only case where the manner and method of finishing is obvious. For a wooden lumber or log house, the material used for laying walls is traditionally used, photo. Thanks to this, the triangle or trapezoid between the slopes looks like an organic continuation of the crowns of the building.
For bathhouses and winter country houses made of timber and logs, the finish can be done artificially, stylized as lining, wooden shingles or even stuffed slabs, but in any case, the gable surface will look very neat and harmoniously combined with the structure of the roof and walls.
In the simplest case, the pediment can be sewn up with an ordinary coniferous clapboard or tongue and groove floor board, tinted in the color of the wooden material of the walls and roof. Unlike a conventional wooden plank, the lining has a thorn-groove lock, so when finishing, a very dense solid surface is formed, through which drafts and rainwater do not break through. The only condition for proper finishing is the installation of a horizontal board with a spike up – a groove down so that moisture does not flow through the seams.
To mount the lining on the fronton surface, the bearing plane is pre-assembled from vertical racks, in increments of 40-45 cm. Each plank is marked and cut along the slope of the slope so that there is a gap of 5-7 mm between the roof sheathing and the ends of the lining to compensate for the expansion of the material.
The wooden finish of the roof plane looks good with the design of houses with natural wood elements in the exterior design. Purely brick and block houses, in which only the pediment is sewn with wood, do not look the best.
For example, if the walls of the building are made of red or sand-lime brick, then the best solution would be to lay out the gable in the form of brickwork or ceramic tiles similar in color and texture.
Brick Building Gable Finishes
Surprisingly, finishing a brick building gable is much more difficult than a conventional wood or frame version for several reasons. The layout of the pediment in the form of a small brick wall is associated with the problems of strength and stability of a relatively narrow and high triangle of bricks.
Even with a slight settlement of the foundation, the brickwork of the pediment can “play” and deform, especially if the pediment section of the wall is used to strengthen the ridge roof run.
To avoid the stability problems of the brick pediment, an additional frame is assembled inside the roof from a beam, which is used to tighten and strengthen the pediment ends. Only after this procedure, it is possible to insulate and perform surface cladding.
Brick gables are usually used for warm and heated attics. Before laying, a rough wall of foam block, wood concrete or simply boards knocked down by a shield is initially laid out, then a layer of vapor barrier, heat-insulating mats, waterproofing, and then laying of facing bricks.
Often, according to the project, the gable part in a private house is combined with the facade, thus it is possible to increase the height of the ceilings and at the same time avoid water discharge over the entrance to the house. In this case, non-attic roof schemes are used with very sloping slopes and a low space under the roof, which is simply laid with facing or masonry bricks.
Finishing the gables of frame houses and buildings
The exception is wooden frame houses and buildings, the gables of which can be sewn up with a variety of materials:
- Block house;
- Siding;
- Plastic and ceramic panels;
- Decorative plaster.

The easiest and fastest way to complete the finish is with a plaster mix. To do this, you will need to assemble the frame of the gable, similarly to the walls, insulate the surface and sheathe the OSB boards. After that, you can apply the plaster in the usual manner. The advantage of this method is its versatility. Subject to the correct selection of colors, the decoration of the pediment with decorative plaster is combined with any walls – brick, wood, lined with siding and ceramics.
If you want to get the most effective and durable gable design, then it makes sense to use wood or ceramic facing material, provided that the house is finished at least 80% in the same way as in the photo.
In this case, the pediment plane merges in one pattern with the walls and does not visually stand out from the overall picture of the exterior finish of the building. White edging of window frames, gables, gutters only enhances and emphasizes the elegance of the use of wood in decoration.
The most affordable and, oddly enough, the most difficult is the use of plastic or metal-plastic siding. In this way, the entire surface of the walls and gables of the house is often trimmed. Technically, finishing the gable with siding is even easier than with any other material.
To do this, you need to assemble a supporting frame from a U-shaped metal profile, as in the figure. Next, you need to lay the insulation, waterproofing and dial the plane of the finished plastic panels. Facing can be done horizontally with rulers or installed in a vertical position.
Cladding with siding can rightfully be considered one of the most difficult ways for only one reason – you need to have a very good eye, understanding of the building architecture and design methods. Otherwise, you can turn a private house into a not very attractive building, reminiscent of a farm building or a warehouse. One example of a successful combination of decoration and architecture is shown below in the photo.
And here’s a misuse of wall and edge siding. The high roof, huge pediment and walls merge and are perceived as a building in which the proportions of the building are violated.
Below is a compromise solution in finishing the pediments and walls of a private house with vertical and horizontal panels, with a large pediment area, due to the use of thin panels, the building looks very organic.
Using a similar technique, you can finish only the gable part, and sheathe the walls themselves with any other material, for example, as in the photo.
In this case, the light siding and the dark colors of the roof successfully mask the plastic origin of the cladding. If you use a wider panel for finishing, then the space between the roof slopes will automatically look like a repair coating.
Conclusion
When choosing the material and type of cladding, they are most often guided by the ease of work and the low cost of the finishing material. However, as has been seen from the photographs, the same material on a gable can enhance the appearance of a building or make it look more primitive.
How to sheathe the pediment of the house cheaper and more beautifully?
In the final stage of construction, the outer skin of the house is the most important stage, on which the appearance, durability, and the ability of the house to store heat depend. To save on exterior decoration, you must carefully choose building materials.
The list of functions performed by the finishing of the roof and gables of the house includes thermal insulation, protection of load-bearing structures from moisture, and improvement of sound insulation in rooms. The building is not only covered with decorative panels, but also insulated. In the process, it is important to take into account such characteristics as finding the point of strengthening the structure of the house, the possibility of further updating the coating. There is a lot of work, and a person building a house for the first time can easily fall into a financial hole, spending extra money where it is not needed. Meanwhile, it is not so difficult to find options for how to sheathe the gable of the house cheaper and more beautifully.
The most popular materials for finishing facades are:
Each of them has its pros and cons, so you need to choose in accordance with the design of the house itself, the materials from which it is built, and external conditions.
Purpose of the gable
Particular attention must be paid to the finishing of corners, joints, roof slopes and the construction of the gable – they are especially susceptible to damage by water and other weather phenomena. The pediment is the structural part of the roof, its end sides are formed by slopes.
These elements are:
of complex shape (as far as the architect’s imagination allows).
Not only the strength and stability of the roof depends on the height and reliability of the pediment, but also the height of the attic, where many arrange another room. Its shape is laid at the design stage, so it is almost impossible to change the dimensions by the time of finishing. If it is insulated, the space under the roof will be dry and comfortable, while the sheathing of the gable is done quickly and is inexpensive.
Cheap cladding materials
The desire to save money on cladding at home is quite understandable and logical. The total cost of the work depends on the cost of the material and may well be reduced. Cheap cladding materials do not mean bad or poor quality. Their advantages are ease of installation, availability of finishes, easy reparability in case of damage, and the possibility of replacement in the future. The final outer skin of this element can be made of a variety of materials other than wall covering. There are private houses where the pediments are finished with glass – thanks to this, the attic becomes bright and looks spacious.
Question “What can be used to finish the pediment of a private house?” decided by domestic manufacturers. Local materials are cheaper, as there is no need to spend money on their transportation and customs clearance. With such external coatings as lining or siding, the gable of the house can be sheathed independently. At the same time, it can be distinguished by a coating of a different material or a different color – after all, it is this part that is responsible for the external attractiveness of the building.
Siding
One of the most popular and long used methods is siding. It is an economical, simple, stylish and fast way to finish. The best siding composition is vinyl. It is a durable and environmentally friendly material. The only thing that can spoil it is severe mechanical damage, but such risks are not characteristic of private houses, since cutting a wall with an ax is a pointless exercise.
Vinyl siding will not rust, burn or deteriorate from wind, sun or rain. The sheathing of the pediment is carried out in several layers, between the wall and the coating there is a layer of air, which helps to avoid moisture and keep the heat in the house. The shape of the siding panels contributes to the creation of such an air layer. Another plus when deciding the question “how to sheathe the gable of the roof” in favor of siding is its lightness, it practically does not weigh down the structure.
Clapboarding
One of the oldest techniques for creating a beautiful gable is clapboarding. There is no doubt about how to sew up the pediment of a wooden house. Lining – this is the same tree from which many private buildings are built, it is more than appropriate in such a situation. It is great for those who do not know how to close the gable above the terrace, decorate the walls of the extension or the porch.
The lining is painted after sheathing the house, this allows you to update your beautiful pediment at any time, even every spring. The painting process is very simple, does not require special skills and allows the use of a large selection of modern paints, including those with fire retardant characteristics. At the same time, siding solves the question “how to sheathe the gable of the house from the inside”. Indoors, such a coating on one of the walls helps to create an atmosphere of comfort, warmth and organically complete the design of a room with a sloping roof.
Sheathing with corrugated board
A convenient solution to the question “how to sew up the gable of the roof” is offered by corrugated board. Such a coating will help to make them in one color – a great option for sewing over a garage, furnace or technical room. On the other hand, the pediment above the façade, covered with a single panel without seams, also looks attractive.
Large-format finishing materials, which include corrugated board, are rapidly gaining popularity. When deciding how to sew up the gable of the mansard roof, choose corrugated board, since with just one sheet you can cover the entire area. The advantage of this method is that the number of joints and fastening points is significantly reduced, and hence the places for moisture penetration and corrosion.
Conclusion
Modern technologies for building and finishing private houses have become convenient, economical and affordable for independent use. There are so many options that everyone will choose the right one, according to their taste and wallet. Sheathing of roof gables is done in one day and is quite within the power of even a novice builder.
Siding, lining or corrugated board – how to close the gable of the roof depends on the size of the house, the material from which it is built, and your artistic taste. The financial side of the issue will not affect the choice, so all these methods are very economical.
what and how to sheathe with your own hands
According to the classical definition, a pediment is a part of a wall that borders on the sides with a roof, and at the base with a cornice. In modern low-rise housing construction, the base of the pediment in the corners coincides with the beginning of the cornices of the side overhangs, with the exception of the Dutch hipped roof. And the view, or shape, depends on the structure of the truss system.
Contents
Species
Gables are present in gable, multi-gabled and semi-hip roofs, and the following types are most common in shape:
Structure and features of gables made of different materials
The function of a gable, like any wall, is to protect the interior from wind and precipitation. And the preservation of heat, or thermal insulation, depends on the characteristics of the attic:
- If the attic is not inhabited, then the roof and gable, as a rule, are not insulated, limited to thermal insulation of the upper floor. In this case, the gable wall is made solid or with a small dormer window.
- Residential attics, or mansard floors, have high gables in which windows are arranged, and sometimes balconies. The insulation of the pediment depends on the seasonality of living in the attic and the presence of a heating system in it (in a private house of year-round use, the attic can be “summer”). But even in summer attics, gables are often insulated.
It is the need for insulation that has a significant impact on the choice of materials and technology for finishing the pediment.
Brick gables
According to the current norms of thermal protection of buildings, even two-brick walls are considered “unfavorable” for most regions of Russia. Gables, as a rule, are made even thinner – one or one and a half bricks, and even a layer of plaster (albeit “warm”) will not significantly improve the thermal insulation of the wall. If it is necessary to preserve the general appearance of a brick house, then for residential attics the following wall and gable finishes are used:0003
Gables made of foam or aerated concrete blocks
Gables made of cellular concrete blocks are installed near houses made of similar materials or bricks. To enhance structural strength and resistance to wind loads, vertical anchors are used that connect the last row of the wall and the first three rows of gable blocks.
The need for insulation depends on the thickness of the wall and the density of the blocks. When using grades D300-D400 and a block width of 300-400 mm, additional insulation in most regions of the European part of Russia can be omitted. Finishing the walls of foam or aerated concrete is required, and the materials depend on the architectural appearance and style of the building. The most popular:
When using aerated concrete blocks, “direct” painting of walls and gables is allowed (without a leveling layer of plaster).
Wooden gables
The male gable of a wooden house is not the only type where timber or logs are used. From the same materials, attic floors are built at combined houses of the type “ chalet “.
The method of finishing such a gable does not differ from finishing the facade of a house made of timber or logs and depends on whether there is additional insulation or not:
- transparent (translucent) paint on wood.
- When insulating the pediment, it is sheathed with clapboard, imitation timber or block house, which are then treated with a primer. Then a protective layer of varnish or paint is applied.
Imitation timber
Gables made of timber or logs serve as load-bearing elements of the truss system – the ridge beam of the roof rests on them.

When using materials of natural moisture, the wood shrinks, the active phase of which can last up to two years.
This reduces the height of the pediment, while the length of the rafters remains almost unchanged. Forces arise that literally squeeze out the upper crowns of the side walls. This is compensated:
- additional internal supports on jacks;
- sliding connection of rafters to Mauerlat;
- non-rigidly bolted rafter overlap on the ridge.
Such events lead to the complication and rise in the cost of the roof, and the builders themselves recommend arranging frame gables.
Frame gables
The gable frame is made from the same materials as the truss system. Most often, a board and a bar are chosen for private houses, but sometimes metal profiles are also used. Profiles are used for arched roofs and when sheathing the gable with metal siding or profiled sheet, in other cases, wood is preferred.
The production of the frame gable can be carried out already on site, with the installation of each element separately and with reference to the installed truss system. In this case, the sheathing and finishing of the frame is carried out from the scaffolding.
But there is another sequence when, in fact, one of the ways of building a frame house is repeated – the one in which the frame is first mounted “on the ground” and sheathed with a slab from the outside, and then assembled in place. But here, too, different options for the sequence of work are possible, and they relate specifically to finishing.
Fabrication and finishing of frame gables
Frame gables are classified by designers of frame houses as non-standard walls. All work on the assembly of the frame and sheathing with external plates is carried out on the so-called “working platform”. For the first floor – this is the draft floor of the first floor, for the attic or attic floor – the ceiling of the upper floor.
Making the gable frame
The following is the sequence for assembling and installing a non-standard wall, or gable:
- Clearing a place on the platform.
- Raise material.
- On the platform, draw the shape of the frame in full size, taking into account the angles of the roof. Mark the step of the layout of the racks and the location of the window opening.
- The lower transverse connection of the gable frame is cut to the size of the timber of the upper wall trim. Lay the cross bracing in place sideways so that the outer rib lies along the inner line of the edge of the end wall. Fasten with auxiliary nails from the inside obliquely, at an angle of 45 °.
- Fabricate studs by cutting to size to fit the roof pitch. Each is laid out according to its mark, the prepared window box is put in place. Racks are attached to the lower cross-link, window frame – to adjacent racks.
- Manufacture and attach to the uprights the upper frame links, having previously checked the correctness of the geometry of the entire structure.
- Sheath the frame with OSB boards (or similar rigid board material intended for outdoor use).

If the pediment is finished together with the wall, then the next step is to lift the “rough” frame and attach it to the top trim beam. At the same time, auxiliary nails work like loops and prevent the frame from slipping off the wall. So that a gust of wind does not overturn the pediment, before the completion of the construction of the roof, it is additionally fixed with spacers to the walls and ceiling.
During the construction of combined houses or when arranging the mansard roof of a brick house (instead of the usual one during the reconstruction of the building), the gable frame is sheathed with facade panels while still on the working platform.
Finishing the gable
Frame gables are usually not insulated from the outside – mineral wool thermal insulation boards, a waterproofing membrane and a vapor barrier film are laid inside the frame. In most cases, facade panels are used to finish the gables, which are mounted on the crate.
Depending on the type and arrangement of the panels, the materials of the lathing, dimensions (section) and laying direction are selected. The layout step for the vertical crate is tied to the distance between the racks. When using a horizontal crate, the layout depends on the finishing materials.
Below are the features of the fronton finishing with different wood materials.
The sequence of work when sheathing with a block house (imitation of timber) is as follows:
Finishing the pediment with a board is carried out in several ways: There is a kind of wooden lining, which is also called “American”. The difference from the “calm” or “collective farmer” types is that in the profile the panel thickens from the tenon to the groove. That is, the front side in relation to the wrong side is beveled outward. When mounting with a groove down, a complete illusion of wall cladding with an overlapping board is created.  They are attached to the crate with self-tapping screws obliquely through the base of the spike.
 Then the first board is laid on it with an edge, and fastened at two points to the crate: above the rail and at the top. The second board is laid with an overlap of 3-4 cm relative to the first, fastened at two points. Subsequent rows are mounted in the same way, observing the same overlap sizes and distances between attachment points. This herringbone sheathing is considered the ancestor of modern siding.
In conclusion. Installation of other types of facade panels on the gables takes place according to the standard technology for these materials. Even finishing with soft tiles, albeit on a vertical surface, does not differ from fastening on pitched roofs.

Siding
20.51%
IMMICATION OF BRUS
20.51%
CEO
7.69%
Lining
10.26%
panels for facade decoration
33.33% 9000% 9000 9000 2
Voted: 39
dizlandshafta
overview of the methods of embedding and cladding
A pediment is a significant component of a pitched roof that performs a protective and aesthetic function. Thoroughly think over the options for its arrangement and decoration should be at the design stage of the building.
In this article, we propose to get acquainted with the methods according to which the roof gable is sheathed and constructed. We will analyze and compare all the technologies and materials used in this case so that you can understand what you will face.
The pediment is the upper part of the wall of the building, limited from below by the ceiling, from above – by the planes of the slopes. These are the inevitable companions of the construction of a gable, broken, shed or Danish hipped roof.
They are built in a strictly vertical direction, most often they have a triangular or trapezoidal shape, less often rounded or polygonal.
Gable walls limit non-residential attic or attic space equipped for housing from the ends. Depending on the conditions of the planned operation, they can be insulated or not. Thermal insulation is laid between the racks of the gables of cold roofs or placed between the bars of the lathing of heated attics.
In general, according to house-building terminology, gables are triangular tops of load-bearing walls made of stone, foam concrete or brick. Similar elements made of wood are called tongs, because of which the roofs are called “gabled”.
However, in low-rise construction, both of these categories are tacitly combined into a class of gables. Similar materials are used in their arrangement, although there are differences in construction technologies.
According to technological features, the methods of gables arrangement can be conditionally divided into two groups:
- Sheathing of racks of the gable wall, erected according to the frame principle. The easiest to implement and budget method available to an inexperienced performer. It is actively in demand in private construction as the most acceptable option for constructing a light practical roof.
- Sheathing of a solid gable wall erected during the construction of a house from bricks, foam blocks, timber, logs. A method that requires at least the initial skills of a carpenter or a bricklayer. It is mainly used during the reconstruction of the building and repair work. It is sometimes used to improve the status of a house built from inexpensive building materials.
 The easiest to implement and budget method available to an inexperienced performer. It is actively in demand in private construction as the most acceptable option for constructing a light practical roof.
 In the field of sheathing the gables of the house, a lot of different materials appear. Among them are sheets of moisture-resistant plywood and drywall with subsequent painting, polymer finishing panels, corrugated board and even opaque polycarbonate.
However, the list is confidently headed by the good old board and vinyl siding, which is pushing lumber out of the market with enviable persistence.
Masonry with triangular tops of walls made of bricks or foam blocks is difficult for an inexperienced bricklayer to handle. Without skills, it will be difficult to build an even male – a kind of pediment over a log cabin.
On the other hand, a gable wall made of boards or timber will not cause any particular difficulties. Wood is easy to work with. Gables made of sawn timber weigh the building structure least of all, therefore they are the most popular.
Gables with lumber sheathing are arranged using frame technology. Those. first, a gable wall frame is constructed, on which a bar, edged or tongue-and-groove board is then sewn. Often, the gable racks serve as the basis for the installation of the crate, on which the installation of profiled sheets, siding and similar materials is carried out.
Roofs with frame gables are built not only over buildings of the Canadian type. They successfully complete stone, brick and concrete boxes, provide stability to the truss system, and due to their lightness, they do not force the supporting structures to be pre-strengthened.
Rules for the construction of frame gables
Depending on the material from which the walls of the box being built are made, frame gables are supported by the upper trim, mauerlat or floor beams. In the case of overhangs up to 30 cm wide, they are formed by the removal of the crate.
And in the case of the construction of overhangs greater than 30 cm, they are arranged by installing short cantilever beams located perpendicular to the rafters.
Design and construction of frame gables of low-rise buildings must meet the following requirements, regulated by SP 31-105-2002:
- The distance between the studs of the gable wall above the frame box must be equal to the distance between the studs of the main wall. They should be placed on top of each other. The gable elements are fastened to the upper trim of the frame structure.
- The step of installing gable posts over a brick, block, foam concrete foot depends on the wind load in the region. Varies mainly between 60 cm and 1 m.
- When installing warm roof gables, the distance between the gable supports determines the width of the thermal insulation slab or mat, which must be placed in the space between the support posts.
- When thermal insulation is used, its outer side is equipped with a waterproofing material, the inner side with a vapor barrier: a membrane or polyethylene.
- The outer rafters are used as the upper trim elements of the pediment, associated with an overhang of up to 30 cm. For reliability, twin rafters sewn from two boards are installed along the edges of the roofs.
- A strapping beam is used as the upper trim of the gables, docked with wide overhangs. It is mounted parallel to the rafter legs like this, but lower. It is necessary to shift the strapping beam down so that the upper edge of the cantilever beam installed on top is flush with the conditional plane of the truss system.
- Sheathing of the gable wall with an overhang of up to 30 cm is flush with the outer edge of the rafter legs.
- Sheathing of a pediment with a wide overhang is made flush with the outer outline of the auxiliary bar installed to fasten the sheathing.
 Varies mainly between 60 cm and 1 m.
Nail connections predominate in the construction of frame gables. To strengthen critical nodes, for example, when attaching supports to the Mauerlat, brackets, toothed plates and corners are used.
Workflow overview
Sheathing of the frame pediment of a house under construction can be carried out both before and after the installation of the lathing under the roof. Home craftsmen often choose the first option, because sheathed gable walls:
- Increase the rigidity of the building structure, providing convenience to roofers.
- They reduce the windage of the roof being built, which is very valuable in areas with high wind activity.
- Set the geometric parameters of the truss system, allowing you to identify and correct flaws in a timely manner.
An important argument in favor of installing gables before laying gratings is to increase the level of safety when working at height.
In order to competently sheathe the frame gable, you must first arrange the crate. It can be built from a metal profile or a corner, but a 40 × 50 or 50 × 50 mm bar is a priority due to ease of processing, affordable cost and compatibility with sheathing materials.
Those who decide to arrange a crate made of rolled metal should take into account the thermal differences in materials. Between the metal and wooden elements it will be necessary to lay waterproofing pads, for example, pieces of roofing material.
Differences in heating technology consistently lead to the appearance of condensate, which is destructive to both metal and wooden parts.
Lattices are installed in the cross to the elements of the future sheathing after 40 cm. Sheathing can be done both in vertical and horizontal directions. If you plan to horizontally seal the gable of a cold roof, there is no particular need for a batten. It is allowed to simply add a bar to the space between the uprights if the step of their installation was more than 80 cm.
It is permissible to use an unedged board in the sheathing, if you choose a quarter on both long sides in it. Grooved floorboards or lining will do if the owners are not too tight on funds. It is recommended to cut the comb of the starting board turned down before installation.
Facing the pediment starts from the lowest board, on houses with a pediment tide – from a bar installed along the junction line of the tide with the pediment wall. It is imperative to place the boards with the groove down, although it is inconvenient to fix it in a tongue and groove in this way. With the opposite arrangement, atmospheric water will easily flow into the joint and will contribute to decay.
Details of cladding before roof battens do not need to be accurately measured and drawn to size. Upon completion of the sheathing work, the edges protruding beyond the rafter system can be cut off corny.
Window and door openings in the gables of low cold roofs may be cut out after sheathing has been produced. However, the priority is preliminary arrangement. In insulated structures, window and door frames are installed before the gable walls are sealed.
Vinyl siding significantly eases the plight of facade finishers who are familiar with the gable wall upholstery segment. The weather-resistant material is easy to install and practically does not affect the weight of the building structure.
Facade siding is produced in a wide variety of species. They imitate herringbone boarding, stone tile laying, plank and log surfaces, etc. The panels include a similarity of two or three elements of a standard cladding, due to which the time for finishing works is noticeably reduced.
Lightweight, durable panels are connected by snapping locks located on long edges. Vinyl sheathing is attached to the wall or to the crate with screws, nails or staples.
For the formation of joints, corners, decoration of the edges of the finish, a number of additional elements are produced: starting, connecting and finishing profiles, moldings, corner parts, window trims, etc. Note that the cladding material and the extensions must be purchased from the same brand so that there are no offensive discrepancies in sizes.
Rules for fixing vinyl panels
Those who want to know how to sheathe gables of a house with siding panels need information about the specific features of the material. Because the polymer substitute for stone tiles and lumber has the ability to expand when heated and take on its original dimensions when cooled. Rigid fastening is strictly prohibited, otherwise the skin will warp or burst.
At the connection points, the siding panels need to leave a reserve for easy movement:
- The siding panel should be 1 – 1.5 cm shorter than the actual dimensions of the gable. The approximate value of the specified offset is applicable to panels up to 3 m long. It is advisable to calculate the offset yourself, focusing on the linear expansion parameters indicated by the “native” material manufacturer.
- There must be a gap of at least 1 mm between the head of the nail or screw and the vinyl sheathing. A tightly tightened screw must be loosened by half a turn. Staples and nails should not be finished to the limit.
- Fastening is carried out exactly in the center of the oval holes intended for fixing the panels.
 A tightly tightened screw must be loosened by half a turn. Staples and nails should not be finished to the limit.
 Fastening of vertically installed panels and additional parts of horizontal cladding is carried out according to different rules. The upper fixing points are set close to the upper border of the hole, the rest – as usual.
Vertical parts are considered to expand upwards by only 1/3 of the rate of linear expansion. This means that with a total expansion of 1.5 cm, it will be necessary to retreat only 0.5 cm from above, and leave a gap of 1.0 cm at the bottom.
Sheathing for polymer sheathing
Siding can be attached to the walls of a frame structure without prior preparation. True, provided that they are built impeccably.
When fastening polymer panels to brick, log, foam concrete walls, a crate is installed in front of the sheathing of the roof gables. It will even out imperfect surfaces and form a ventilation gap, which significantly extends the life cycle of the building materials used in the construction of the box.
Lathing uses:
- Dry timber with a moisture content of at least 12%. Siding manufacturers recommend that one of the sides of the bar be 60 mm so that the fixing points fall exactly into the center of the holes intended for them. The second side of the bar is from 25 to 50 mm, depending on individual strength requirements.
- Galvanized profiles produced for fastening drywall boards. The size is similar to a bar.
The construction of the lathing begins with the installation of the outer laths, between which the control cord is stretched. In accordance with the indications of the stretched reference point, ordinary bars are mounted.
The installation direction of the gratings is traditionally perpendicular to the installation direction of the panels. The optimal spacing is 40 cm, in areas with a characteristic wind load, the distance between the laths can be reduced to 20 cm. Lathing elements are attached to the gable wall every 50 – 70 cm. . First, waterproofing is arranged in the openings in the form of tin, aluminum or bituminous flexible aprons.
The thickness of the gable wall determines how the openings are arranged:
- Window and door blocks of cold roofs are made using special architraves or J-profiles.
- Openings of insulated roofs are framed with window profiles intended for facing slopes.
After arranging the openings, they start making templates required for cutting the siding according to the size and shape of the gable.
Preparation of fixing profiles
Template marking is carried out manually. Two arbitrary J-profile cuts are required to work. The first is applied along the floor line, the second is placed under the overhang. He will cut off on the first trim a line that repeats the slope of the slope. It is outlined with a pencil, then the excess is cut off according to the markup.
Mark out the left part of the J-profile. The bottom is marked and trimmed using an inverted template. The cut profile is applied to the installation site in order to mark the line of the next cutting in the area of \u200b\u200bthe ridge. For its clear marking, a plumb line is used, because. it should be perpendicular to the overlap.
The right part is then made using the template turned back over. At the right profile, only the nail strip is cut off, the front part does not need to be touched. When installing two profiles in their intended place, fixing is carried out according to the rules for fastening vertical parts. Attachment points are installed end-to-end with the top edge of the hole.
The uncut upper part of the right profile is inserted into the channel of the left profile to form a closed knot. Panels before installation in the profiles fixed along the perimeter are cut in fact.
The function of the J-profile when sheathing gables is extremely successfully performed by corner connecting analogues. This option is much more practical if at the same time it is planned to cover the gable overhangs. The corner profile allows you to attach elements from both sides: it is incredibly convenient to work and it turns out beautifully.
Panel Mounting: Horizontal and Vertical
To properly install the vinyl sheathing in the horizontal direction, again stock up on templates made using the method described above. With the help of two scraps of siding, you need to determine and mark the slope line of the slope.
For each side of the roof, templates are made separately, because there is always some difference even with ideal construction. To equip the pediment of a sloping roof, you will have to make four templates.
Templates are used for cutting ordinary siding. When cutting the panels, it is imperative to observe the temperature indent from the real edge of the gable. At the panel located at the very top, it is necessary to cut off the entire nail strip and drill a hole at the top for through fastening with a self-tapping screw.
The drilling point is determined empirically during application to the installation site. In any case, the hole should not be drilled close to the cut edges of the panel. It is necessary to step back from the edge by a minimum of 3 cm.
Vertical installation of siding is worth the trouble if you want to achieve a flawless result. You will need to be patient and regular templates.
Algorithm for vertical installation of vinyl sheathing:
- Corner or J-profiles are mounted along the perimeter of the gable.
- A plumb line is released from the top of the roof, according to which it is necessary to outline the central axis.
- On the drawn line, either two J-profiles are installed, deployed to each other, or one H-profile. The latter option is better because it does not have a leaky joint.
Installation of panels cut according to actual templates starts exclusively from the corner if the central axis was equipped with twin J-profiles. When using an H-profile in the center of the gable, vinyl panels can be mounted both from the corner and from the center.
The process of sealing a cold roof of a cold roof by an unspeakable board:
Technological nuances of the siding gable siding:
The final stages of the frontboard facing siding:
We presented proven options with detailed analysis than and how to better seal the pediments. The information we offer will help you choose the best way and implement your idea with your own hands.
Stay tuned!
Subscribe to the newsletter
Finishing the gables of private houses + photo
Contents
- Gable construction
- Cladding features
- Application of siding
Each owner wants to have a beautiful house that would be combined with other buildings on the site and fit well. It is important to pay special attention to the exterior of the building. Every detail in it should be well worked out. It is worth paying attention not only to the decoration of the facade of the house. Gables have an important function both in design and in practical terms. Their finishing is a must-have point that should not be underestimated. Photos of the decoration of the gables of private houses will help you choose the best plating option.
Device of the gable
First you need to understand what device the gable has and what function it performs. This element of the roof is formed by its slopes. Gables are called the ends of the roof. They are often called attic walls.
Finishing the end elements of the roof is a process that is very important for every owner. Thanks to such elements, not only reliable protection of the house from precipitation is ensured, but also the attractiveness of the building as a whole increases.
Features of the end structures:
- The shape of the gables depends on the design features of the roof. Most often, the end elements are triangular. Attic walls can also have a trapezoidal shape. If the walls of the house are built of brick, you can make the end elements of the roof from the same material. It’s practical and beautiful.
- If even a slight mistake is made in the design of the end elements, these elements may collapse. At the same time, it will be difficult to combine them with the truss system.
 Most often, the end elements are triangular. Attic walls can also have a trapezoidal shape. If the walls of the house are built of brick, you can make the end elements of the roof from the same material. It’s practical and beautiful.
 If the roof beams are supported by attic walls, special attention must be paid to their construction. There are several features of the construction of such elements:
- The design of the attic walls must be securely reinforced. To do this, lay out the pilasters. These elements will not only strengthen the pediments, but also become a decoration of the building.
- A transverse wall is required inside the attic space. This is necessary to stiffen the structure of the entire roof.
Gables of wooden buildings can be made of bricks. However, such work should be carried out only after the completion of the roof construction. In some cases, masonry is performed before the installation of the truss system. The design of the roof plays an important role in the choice of technology for the construction of gables.
Finishing of the end elements of the roof is carried out only after the complete completion of the roofing work. If these tips are taken into account when building such structures, you can not worry about the reliability of the roof.
Peculiarities of sheathing
If it is necessary to equip a residential attic, the sheathing of the gable begins with insulation. The subtleties of this work are determined by the material that is selected for insulation. The exterior cladding also requires some attention.
There are many options for finishing the end element of the roof:
- When laying out the end part of the roof of brick, you can make a small balcony or window in the gable. Additional decoration is not carried out. Most often, homeowners only insulate the attic from the inside.
- If the gables are made of foam blocks or simple boards, it is necessary to give them an aesthetic appearance by finishing with wood or siding.
- The sequence of work is quite simple – first you need to lay the waterproofing, then the insulation, and on top – to make a vapor barrier layer. Only after that, the attic wall can be sheathed with decorative material.
- If the base of the end piece is made of wood, the waterproofing barrier is created using a polymer membrane. For this purpose, you can choose one of the roll materials.
 Additional decoration is not carried out. Most often, homeowners only insulate the attic from the inside.
 Coated waterproofing is an acceptable option when creating a brick or concrete gable.
Cladding features:
- Specialists recommend not using mineral wool when working with gables. Basalt is more suitable for this purpose. Today there are quite a lot of such materials.
- To prevent the vapor barrier from having to be glued on top of the insulation material in the traditional way, a canvas with a foil surface can be purchased. If you work with such material, the vapor barrier does not have to be fixed with glue.
- When finishing the end elements, the insulation is first placed in the crate, and then covered with a facing material. Before installation, all wooden elements are treated with an antiseptic.
- Siding panels are quite popular for exterior cladding today. This material is great for mounting on a wooden frame. However, it can also be mounted on a metal profile.
- Everyone can finish the gable using siding panels. Before work, just read the instructions. Aluminum or vinyl panels are selected when a solid wall finish is required. At the same time, the roof overhangs will acquire a more aesthetic appearance.
- The pediments of a wooden building are not often sheathed. In this case, it is better to choose a lining board. You can prefer Block House or imitation timber.
 If you work with such material, the vapor barrier does not have to be fixed with glue.
 Previously, pediments were often decorated with wood carvings. Today, such a decision is chosen infrequently. However, this finish has several peculiarities:
- This version of the cladding of the end elements of the roof is the most expensive. The work is usually done by hand. The assembly of the roof element is carried out on the ground, and then the finished structure rises to the top.
- Stone is quite often used for sheathing such a roof element. It can be natural or artificial. With this material, the pediment can be finished completely or partially. The stone is great for mounting on window slopes. It is often used when it is necessary to perform a mosaic panel.
- Stucco molding is a rather interesting way of finishing gables. It is only necessary to purchase polyurethane trim elements. Stucco is resistant to mechanical stress, and also has a low price.
- To finish the gables, custom-made parts are often used. First you need to develop a drawing for a specific project.
- Customer’s idea is selected for the basis. Then all design decisions are coordinated with him.

Even when choosing polyurethane stucco moldings, you may encounter high prices. Original elements are developed individually, which requires a certain amount of time and effort. However, the result when ordering individual stucco justifies the high price.
Application of siding
The use of siding for gables is quite common. This decision has become widespread not only in Russia, but also in Western countries. Vinyl siding has many benefits. Therefore, such material is often used for sheathing gables.
Since this type of finish is resistant to high humidity and sunlight, it can be used to finish the gable without any worries. Before installing the material should be carefully prepared. Sheathing the gable with siding is quite simple, which ensures the popularity of this material.
The classic solution is to cover the gables with bricks. Today, a fairly large number of materials can be found for finishing gables, so you should not worry about choosing a lining.
-
Types of roofs of private houses
-
How to cover the roof with slate
-
How to cover the roof with corrugated board with your own hands
-
The device of a roofing pie under a professional flooring
Gable finishing options. Decorative finishes
Contents
- Gable finishes. Decorative finishes
- How to sheathe the gable. Gable options
- Sheathe the gable. How to sheathe the pediment of the house so that you do not regret it later
- What materials are currently in use
- Facing brick
- Plastered pediment
- Finishing the pediments of private houses. What material to sheathe the gable
Gable finishes. Decorative finishing options
Gable finishing means it is fully lined with decorative material, including window slopes. Various options for finishing the pediment are acceptable. First of all, this is the use of facing bricks. Work on its laying can be carried out both before the installation of the roof, and after. In the first case, it is necessary to be able to make the finish so that the roof rises evenly.
Finishing the pediment of the house (photo attached) with stone, artificial or natural, looks beautiful. For these purposes, tiles made from these materials are used. The result is a beautiful mosaic with a natural pattern, interesting coloring.
It is customary to finish the pediments of wooden houses with natural materials for insulation. A wooden beam or wooden siding (lining) can be used. Along the top, the pediments are additionally often decorated with overhead carved wooden elements. A similar decoration of the gables of private houses (photo below) looks very attractive.
Another variant of the design of the pediment is the application of facade plaster. An additional element of the bottom finish is stucco molding cut from polyurethane. It is inexpensive, beautiful items are sold in a wide sale. Meanwhile, such a decoration of the pediment of the house is durable and aesthetic. The stucco molding is painted to match the plaster or its natural color is left.
But the most popular decoration of the pediment of the house is siding. It looks aesthetically pleasing, beautiful, inexpensive. Siding is a versatile material, it is durable; plays not only a decorative, but also a protective role. Tightly fitted panels prevent precipitation from entering the attic, stop gusts of strong winds.
Any facade work is carried out by InnovaStroy. The company uses the best materials that meet all quality certificates. Employees of the company work smoothly, quickly. The beautiful appearance of the house corresponds to the level of work performed.
How to sheathe the pediment. Gable arrangement options
What is a gable – this is the upper end of the facade of the building, from the cornice to the roof slopes. When planning a rafter system, it is advisable to immediately determine the functionality of the under-roof space – whether the room will be residential or not.
If an attic is planned, general insulation work is inevitable. But for gables, there is an option that significantly improves the quality of the final result – rebuild it from the material of the bearing walls. The advantages of this approach are obvious:
· Simplifies the construction of the roof – the assembly of the elements of the truss system on the finished gables is much easier.
· The roof structure is strengthened – a wall with a load-bearing capacity is incomparably stronger than a frame structure, even designed for insulation.
· Reduced heat loss – it becomes possible to make a secure connection in corners. After all, their device from soft heaters is obviously a weak point.
As you can see, the construction of a gable made of load-bearing wall materials is useful even for a “cold” roof. The only downside is the price – frame gables of houses are significantly cheaper.
In exceptional cases – “capital”, and inevitably – frame gables – will require external finishing. In addition to sufficient strength and plausibility, there are no technical restrictions. Therefore, how to sheathe the gable of a house cheaper and more beautifully is often determined by the availability of materials.
Work will require accuracy in everything – from calculations to installation. The reason is the erroneous hopes that the structure is located high and some details are not visible. In fact, almost always any flaw is clearly visible.
Decorative elements are also perfectly visible, often this area is used as a place for self-expression of the master. The traditions are old, their decoration is an integral part of the traditions of wooden architecture.
A carved board on the pediment of a wooden house can also be found in a modern design. Once starting the decoration, it is already difficult for the master to stop. In this case, the sheathing of the roof gable, the options for its execution are also predetermined. Further, the theme of the ornament is supported by corners, architraves, cornices, smoothly passes to auxiliary buildings and a fence.
Sheathe the gable. How to sheathe the pediment of the house so that you do not regret it later
The question of how to sheathe the pediment of the house is far from idle, because on the facade the pediment of the roof is deservedly considered the most noticeable sector, and it will be used to judge the taste of the owner. There are enough elite materials now, but I want it to be beautiful and not very expensive. Let’s analyze the materials suitable for finishing, and at the same time I will show you how to sheathe the pediment with your own hands.
What materials are currently in use
Now a lot of good photos are “walking” on the net, and it is very difficult for an inexperienced person to decide. So, when choosing a gable lining, immediately decide for yourself 2 things:
- Who does the finishing? If you are going to sheathe with your own hands, then the emphasis should be on ease of installation, and for those who are going to hire specialists, it is better to look at the price. Because the higher the price of the material, the more you have to pay for the work;
- Cheaper does not mean worse. Now there are quite decent, durable and inexpensive materials that are easy to install and look great. Plus, not every finish is suitable for all types of walls.
 Because the higher the price of the material, the more you have to pay for the work;
 The simplest wooden gable is not for everyone.
Facing brick
The pediment made of facing brick looks solid, and you should not worry about its durability at all. Many believe that facing brick is not suitable for a wooden house, supposedly it was created only for block buildings, do not believe it.
A ventilated gap with insulation is left between the brickwork and the facade wall, and with such an arrangement, the material from which the walls are made does not matter.
Facing bricks require professionalism.
Pay attention to another point: 1 m² of facing brickwork weighs from 140 to 260 kg, and such a mass requires a solid reinforced concrete foundation. To fit a brick, insulation and ventilation gap, the width of the foundation should be about 200 mm.
Gable plastered
This option is not suitable for a wooden house. Of course, there are technologies that can be used to plaster the facades of wooden houses. But without preparation, you won’t be able to do it beautifully, and such work from professionals costs solid money. Plus now there are other materials that look just as good, cost less and are easier to install.
If you want to express gratitude, add a clarification or objection, ask the author something – add a comment or say thanks!
Finishing of pediments of private houses. What material to sheathe the gable
The decision depends on the type of material from which the gable is built. If wooden structures were used, then there are no restrictions for them, but a waterproofing membrane will have to be installed. Concrete and brick structures will require the following additional work:
- surface leveling;
- masking existing defects;
- installation of special purlins;
- fastening system installations.

If you need to sew up the gables of a wooden house, you can choose a block house finishing board for this. Its advantage lies in the fact that, imitating the material of the building, it creates a single whole with it, without violating the architectural appearance of the entire building as a whole. At the same time, such a finishing board has a number of advantages: moisture resistance, strength, long service life, beautiful appearance. Lovers of natural wood will love this type of finish as carving. This ancient art can make a modern building recognizable and different from dozens of its kind.
To change the color and give the elements of the thread a special color, processing methods such as bleaching, firing, etching can be used for this.
If it is necessary to sheathe the pediment of the roof of a house built of foam concrete blocks, bricks or concrete with plastered wall surfaces, relief stucco products can be used to finish the pediment surface, the style of which coincides with the general style of the housing. Today, multi-colored mosaic pieces or tiles of the correct form, but of different colors and shades, are used as decorative elements. They can transform the look of your home.
One of the attractive and so far rarely seen ways of finishing is the sheathing of gables with bituminous tiles in case the roof is covered with it. It is difficult to carry out installation on a vertical surface, but subject to its high-quality conduct, the appearance of the housing becomes very spectacular. Use for this tiles with a thin pattern or smooth. In addition to the aesthetic component, additional protection of the house from noise, ultraviolet radiation is provided, the tile is also used as an additional insulating layer.
It is possible to sheathe the gable surface with metal sheets, but due to their high cost, this type of finishing is rarely used. For this, aluminum panels with stiffeners are used. In some cases, galvanized steel sheets or titanium are used. Sheets of steel can be covered with a protective layer of polyurethane or polyamide.