Drilling thru tile: How To Drill Through Tile With Ease
7 Easy Steps for Drilling Into Tile
You better know how to drill through tile perfectly, even though you think you’ve completed yet another successful tiling project. The design is exquisite, the tiles are perfectly cut, and everything lays evenly. It’s quite the piece of art. But, your job is not ready yet. Now comes the part that could potentially damage all your hard work: drilling a hole through the tile to mount the accents. One slip or awkward move and you’ll end up with one cracked, ugly looking tile.
No pressure, though.
Before you pluck up your courage and start breaking through the smooth surface, make sure you know how to drill through tiles. It might seem like a pretty straightforward job, especially if you are a DIY-er who isn’t very familiar with the different types of tiles and their characteristics. But, even if you are a professional installer, the smallest mistake can ruin the tile.
Fortunately for you, we have plenty of tips up our sleeves that can teach you how to drill through tile without breaking it. Keep in mind, though, that these steps will not guarantee that your tile will not crack. They will, however, minimise this possibility significantly.
Without further ado, here’s how to drill tiles the right way.
Step 1: Know your tiles
One of the first things you need to pay attention to if you want to learn how to drill through tile is the type of tile you are working with. If you know the characteristics of the material you are trying to bore through, then you will have a better understanding of the size of the task at hand.
Frame of various decorative tiles samples.
Porcelain tiles, for instance, are harder to drill through than ceramic tiles since they are very dense. As a result, drilling through porcelain tiles will require more work and preparation than cutting through other types of tile. You will also need a specialised drill bit that can penetrate the hard surface of porcelain tiles. The same goes for drilling into stone tiles.
Now, that you know what you’re up against, let’s look at the tools you’ll need for drilling through tiles.
Step 2: Make sure you have the right drill bit
Regardless of the material you’re trying to drill through, never use an old and worn out drill bit for tile. Not only that they aren’t as efficient as new ones, but the chances of damaging the surface of the tile increase dramatically if the drill bit isn’t performing at optimal capacity.
Also, don’t use your regular drill bits for this task – they are not strong enough to penetrate the hard surface of the tile. Instead, you should opt for either diamond-tipped drill bits or carbide-tipped masonry drill bits. The first option, although a bit more expensive, is extremely durable and can drill through even the hardest tile surfaces, such as porcelain. More than that, they will not burn out as easily as the masonry bits.
Carbide-tipped masonry drill bits, on the other hand, are probably the most common type of drill bits for drilling through tile. However, although this type of drill bits will do the job on glazed ceramic tile and stoneware, they are not recommended for dealing with porcelain stoneware. For porcelain stoneware and harder materials, you will need tough diamond drill bits like our DRYGRES drill bit range.
If you don’t have the tools you need for drilling into tile, at RUBI you can find a complete range of drill bits that can help you tackle this task successfully. So, check them out.
Step 3: Measure and mark the area
If you’ve ever tried to drill a hole through tiles, then you probably know that the bits tend to slip around on the surface, making it difficult to hold them in place.![]() Now, that’s a big problem. One wrong move and you’ll scratch or, even worse, crack the tile.
Now, that’s a big problem. One wrong move and you’ll scratch or, even worse, crack the tile.
One simple trick that you can use to create some tension is to use masking tape over the area where you want to drill the hole. Measure the area, mark it with an X, and place the masking tape. Measure it again after placing the masking tape to ensure that you didn’t misplace the hole. That way, you will gain enough surface traction to grip the drill when you start drilling.
If you have more than one hole to drill and you don’t want to repeat this process over and over again, then you could create a template with a block of wood. Cut a hole through the wood, making sure it’s the same size as the drill bit you will be using. Place it over the drill hole and hold it firmly with your free hand.
Step 4: Start drilling
Now, this is where the fun begins. This is the part where you will really learn how to drill through tile. Once the surface is marked or you have your wood template in place, it’s time to start drilling.
The problem with tiles (although, we’re not sure if we can call this a problem) is that they are designed to withstand a lot of abuse, which also makes them resistant to drilling. If you rush through the process, you might end up damaging all of your hard work.
One of the most important things you need to keep in mind is that drilling through tile is a task that requires a lot of patience. Start drilling on low speed and slowly. Take your time – it might take a while before you penetrate the hard glazed surface. Don’t make the mistake of believing that going full-speed is more effective. In reality, you will only overheat everything and create vibrations that could damage the surface.
Apply constant pressure but not too much. Otherwise, you will break through the tiles instead of drill into it, which can result in cracks.
Step 5: Don’t forget to cool the drill
One of the secrets to drilling a hole through tile is keeping everything cool. Use a small wet sponge to cool down the drill bit and prevent it from overheating.
If you’re on your own and can’t hold the drill bit in one hand, the wood pattern in the other, and cool the drill bit at the same time, then you can stop from time to time and spray some water on it. Make sure not to pour water into the motorized section of the drill.
Another trick you could use to keep the drill cool is holding a wet sponge under it. That way, you’re not only preventing the drill from overheating, but you are also catching the dust and debris produced by the tile. Not to mention, you’re preventing the water from pouring down the wall and all over the floor.
A short note here: unlike carbide drill bits, which stop the second they overheat and need to be kept cool at all times, diamond bits are not as high-maintenance. They will continue to work even when they heat, as long as you allow them to cool down. But, if you want to increase the lifespan of your tools, then you need to drill slowly, don’t put too much pressure, and lubricate the drill with cool water.
Step 6: Change the bit when you hit the wall
You’ve cut through the tile and hit the wall surface without creating any damage. You can breathe a sigh of relief now. You’re almost there; all you need to do now is bore through the wall and then mount the accents.
Keep drilling slowly to avoid crashing into the wall surface. If the wall is blown apart, your anchor will not hold properly, and the accents will be loose. This is the time to change your drill bit to one that is suitable for the substrate being drilled. The secret, however, is to keep the drill slow and steady and you will achieve the perfect hole with no tile damage.
Step 7: Kick back and relax: You’ve just learned how to drill through tile
Take a step back and admire the result. You can even give yourself a pat on the back. You did well. No, scratch that! You did amazing! Now, you are prepared to tackle the next project from start to end with more confidence. Take a look at at how to use the RUBI DRYGRES 4DRILL:
There are a few main takeaways you should remember about how to drill through tile. First of all, you need to have the right tool. Without the appropriate drill bit for the job, the chances of screwing up increase significantly. Secondly, you need to be patient. Drilling holes through tile isn’t a race. You need to take your time and drill through the tile slowly and steadily. Also, don’t forget to keep everything cool. Overheating is one of the main factors that cause the tile to crack.
Last but not least, you need to be persistent. With practice, this task will only get simpler and drilling through tile will no longer be something that makes your heart drop to your stomach.
Know more tips on how to drill through tile? Did I miss something? Let me know in your comments below!
How to Drill Through Tiles Without Cracking Them
So you’ve completed your tiling work and it’s all looking wonderful – congratulations! But now you’re dreading potentially ruining that hard work by drilling tiles to install bathroom accessories, shelves, or other fittings. Fear not though as we’ve put together this step by step guide on how to drill through tiles that will ensure you do a great job and keep your tiles from cracking in the process…
Know Your Tiles
Before even thinking about drilling through your freshly installed tiles, make sure you know exactly what is is you’re going to be drilling through. Porcelain and natural stone tiles are a lot tougher than ceramic tiles, meaning that you’ll have to exert a little more effort to break on through to the other side. Not only that, you’ll also need a specialist drill bit that is designed to penetrate both the hard glaze and body material of porcelain.
Ensure You Have The Right Tools for The Job
It goes without saying that a power drill is required when carrying out this task, but the most important element in successfully and effectively drilling through tile is the drill bit itself. You should never use an old or worn out drill bit – they’re not as efficient as brand-new ones. If you use an old one, it’s less likely to perform at optimum capacity and you’re more likely to damage the surface of the tile whilst drilling.
It’s also a good idea to invest in some safety goggles and a dust mask before drilling through tiles as depending on the density of the material being drilled, quite a bit of debris particles can be kicked up into the air. Latex grip safety gloves are always useful to have also.
As mentioned earlier, drilling through tile requires a specialist drill bit – regular or even masonry bits simply won’t do the job as they’re not strong enough to penetrate tiles’ hard surfaces. Instead, you should opt for either carbide-tipped or diamond-tipped drill bits. Diamond tipped drill bits are the more costly of the two options but will stand up to the rigours of drilling through even the hardest tile surfaces and will not burn out as quickly as standard masonry drill bits.
Carbide-tipped masonry drill bits are the more common of the two and whilst they’ll do a perfectly serviceable job of drilling ceramic and all manner of glazed tiles, they are not recommended for use with porcelain stoneware. Harder materials such as porcelain, full-bodied porcelain, vitrified porcelain, and quarry tiles require not only a bit more elbow grease; you’ll need a diamond-tipped drill bit too.
Measure, Measure Again, Then Mark
Anyone who’s attempted to drill through a tile previously will know that the surface glaze makes it difficult to o keep the drill bit steady on the surface when you start. You’ll need it to grip into the tile and not skid around the surface. To create some tension, consider using masking tape over the area where you’ll drill. Measure (and then re-measure!) the area you need to drill and mark with an X over the masking tape. This will provide a surface that will allow the drill to grip when starting to drill your hole.
If you have quite a few holes to drill, you may also want to consider creating a small template with a small block of wood. Simply bore a hole through the wood that’s the same diameter as the drill bit you’ll be using and place this over the area on the tile, using the hole as a guide for the drill by holding it in place with your free hand.
Special accessories called drill guides can also be used to increase accuracy when drilling through tiles. A variety of tiling tool manufacturers produce these and they usually come in the form of a plastic casing that is attached to the tile and then drilled through (much in the same way as the wooden block method described above).
Other types involve a steel plate with guide holes that is attached to the surface to be drilled via a suction cup, allowing both horizontal and vertical holes of specific diameters to be drilled accurately. Whilst this type of accessory might involve a little monetary outlay, they can be used time and time again and so are a good investment if you are a keen DIYer.
Start To Drill Through Tiles
You’ve done all your prep, you’ve measured up, and you’ve got all the right gear – it’s time to start drilling! As we’ve already alluded to, tiles (especially porcelain and natural stone tiles) are really quite hardy and are designed to withstand all that domestic and commercial use has to throw at them. Whilst this is a good thing in general, it also makes drilling through tiles a pretty strenuous task if you don’t approach it with patience.
It might be tempting fire up your drill and go hell for leather to break through the glaze but this is a sure-fire way to overheat the drill bit and create vibrations that will most likely crack and ruin the tile. Take things slow and start on a low speed, applying even pressure until you have bored through the top layer of glaze. Once you’ve penetrated the initial layer you can then, you can gradually increase your speed and pressure as required (although not too much!) to drill through the tile to the wall.
Once you get through the tile and hit the wall surface, keep the drill slow and steady so as not to blow apart the wall as doing so may mean your wall anchor or rawlplug will not properly hold. You may want to change the drill bit to suit the material the substrate is constructed from.
Keep Your Bits Cool
The secret to successful tile drilling is to keep your drill bits cool. But how? We hear you ask. Well, rid your mind of images of ice cubes and small handheld fans because all you need to prevent your drill bits from overheating is a bit of good old h3o (that’s water, fact-fans). Simply wet a sponge and occasionally dab the bit with it to cool it down.
Alternatively, you can hold a wet sponge beneath the drill bit whilst it is in use – this will not only prevent the drill bit from overheating but will also catch dust and debris resulting from the drilling. If employing either of these methods however, be extremely careful not to expose the motorized section of the drill to water.
If you’re willing to splash a little cash then tools such as the Multidrill Spray System from leading tiling tools and accessories manufacturer Rubi include an integrated drill bit cooling system that works to keep the bit cool whilst in use.
This type of device comes in handy when using carbide tipped drill bits as they will stop as soon as they get too hot and need to be kept cool throughout. Diamond tipped bits will continue to work even when they heat, as long as you allow them to cool down periodically. The main thing to remember though if you want your drill bits to last is to keep things cool and don’t apply too much pressure.
Change Your Drill Bit To Suite The Substrate The Tiles Are Attached To
Once you get through the tile and hit the wall surface, keep the drill slow and steady so as not to blow apart the wall as doing so may mean your wall anchor or rawlplug will not properly hold.
It’s a good idea to change the drill bit to suit the material the substrate your tiles are attached to. So, if it’s concrete/stone you’ll want to use a suitable masonry drill bit, whereas fibre board or timber will require wood bits. Cement backer boards used behind tiles in wet areas such as showers and wetrooms can be drilled through using a standard drill bit or even the one you used to drill the tile.
It’s highly unlikely that tiles will have been installed atop of metal or alloys but there could be some metal struts or supports behind the substrate – if you need to drill into them then a standard high-speed steel (HSS) drill bit should do the trick. For stronger metals such as stainless steel or cast iron it’s advisable to opt for a black oxide or cobalt steel drill bit.
Key Takeaways
If you follow that advice then you’re well on your way to successfully drilling through tile. There are a couple of ultra-important things to to bear in mind and they are make sure you have the right drill bits, keep them cool, and go slow and steady! Drilling through tiles is not a race and the biggest quality you can have when performing this task is patience. Rush the job (and fail to prevent overheating) and you’re pretty much guaranteed to crack the tile you’re drilling.
Got any top tile drilling tips that we might have missed that you want to share? Leave us a comment or hit us up on Twitter, Facebook or Instagram and we’ll do our best to incorporate them into this article. If you have any further questions about drilling through tiles or any aspect of tile installation, call our friendly customer services guys on 01782 223822 and they’ll be happy to help.
You may also enjoy these posts on the Tile Mountain blog…
How To Set Out & Drill Holes In Tiles for Pipework
How To Tile A Wall: A Complete Guide To Wall Tiling
Essential Tiling Tools Checklist
Tile Mountain
Here at Tile Mountain, we not only have a huge range of tiles to suit every purpose, we also have a wealth of tiling knowledge gained from over 30 years in the tile industry, (which we’ll do or best to share with you across these very pages).
Whether you’re looking for the perfect tiles for your next home improvement project, are searching for some style inspiration, or simply need a bit of help and advice, you’re in the right place.
CategoriesFloor Tiling, Help Centre, How To, Installation Advice, Wall Tiling
TagsCeramic Tiles, Drilling, Glazed Tiles, Installation Advice, Porcelain Tiles
How to Drill Ceramic Tile
Ceramic Tile on Wood Floor
Please enable JavaScript
Ceramic Tile on Wood Floor
Bathrooms | Ceramic Tile text: Tim Carter
Drilling ceramic tile requires a sharp carbide or diamond drill bit. Drilling into tile requires a slow drill speed and a steady hand. © 2018 Tim Carter
“Real porcelain tile is very hard. Porcelain tile almost always has a high silica content and the tile is dense.”
How to Drill Ceramic Tile TIPS
- Drilling ceramic tile requires a carbide bit
- Porcelain tile is the hardest
- Drill slow – use special drill-bit cooling oil
- Diamond drill bits are inexpensive
- CLICK HERE to Get Tim’s FREE & FUNNY Newsletter!
DEAR TIM: Drilling ceramic tile just became a priority. My wife wants me to install several new towel bars and other accessories in an older bathroom.
I also need to install anchors for a new shower door. I tried drilling into the tile but got nowhere fast.
The drill bit smoked and turned cherry red. I need to get this job done before my wife comes back from her business trip. Help me, Tim, you’re my only hope. Jonathon O., Los Angeles, CA
Related Links
Cutting Ceramic Tile – Pro Tips
Ceramic Tile Snapping Cutter – Big Tile
DEAR JONATHON: Buddy, you are going to owe me big time. I am going to make you look like a home-improvement super hero. But to do so, you might have to buy a new drill and a few special drill bits.
Why is Ceramic Tile Hard?
Ceramic tile is hard because it’s artificial or man-made rock. Any geologist will tell you that some rocks are far harder than others. The same is true for ceramic tile.
Free & Fast Bids
CLICK HERE to get FREE & FAST BIDS from local tile contractors who can drill your tile for you.
What Tile is the Hardest to Drill?
Porcelain tile is the hardest tile to drill.
Real porcelain tile is very hard. Porcelain tile almost always has a high silica content and the tile is dense. If the manufacturer fires it at a hotter temperature for longer in the kiln, the silica-rich clay gets almost as hard as granite.
You might have tried to drill a hole in porcelain with the wrong drill bit and you were drilling far too fast.
What Makes Porcelain Tile So Hard to Drill?
The heating process inside a kiln makes the porcelain tile hard to drill. The high temperature in the kiln modifies the chemistry and crystallography of the silica-rich raw material.
Just like an oven changes liquid batter into cake, the higher kiln temperature transforms the putty-like clay into artificial stone. In the early stages of tile manufacturing, the clay that’s used to make the tile is a putty.
Some you can form with your hands but other clay can only be molded by a machine it’s so stiff. But when it get’s heated, the crystal structure changes and it transforms much like plastic concrete in a read-mix truck turns hard hours after it’s poured or cast.
Why Is Porcelain Tile Hard to Snap?
The high silica content of porcelain tile also makes it nearly impossible to cut with a snapper-type tile cutter. The tile often shatters with conchoidal fractures like glass.
Why Does the Tile Glaze Make Drilling Into Tile Difficult?
The shiny glaze on the tile is glass and glass is slippery. The tile drill bits slide around on the tile making it hard to keep the drill bit in place.
Many common ceramic tiles are made primarily with clay, but then coated with a thin glaze that is primarily silica. In the kiln, this silica coating turns into a hard, thin glass coating and the clay transform into a low-grade slate-like rock.
Once a drill bit penetrates the thin glass coating, it usually drills rapidly through the inner core of regular ceramic tile. The inner core of these tiles is fairly soft.
What Tile Drill Bit is Used?
The key to drilling regular ceramic tile is to use a brand-new carbide-tipped masonry drill bit and a drill that has a variable-speed trigger. You never want to drill ceramic tile with the drill at high speed.
What is the Best Tile Drill Bit Speed?
The lowest tile drill bit speed possible, say 100 or 200 revolutions per minute, is perfect to drill standard ceramic tile. Apply moderate even pressure to the drill so the bit grinds away at the glaze or the tile. If you drill fast, you’ll overheat the drill bit and ruin it.
Should I use a Hammer Drill Drilling Into Tile?
Never use a hammer drill for ceramic tile. You’ll shatter or crack a ceramic tile if you drill using the hammer function. Hammer drills are fine for brick or concrete, but not ceramic tile.
CLICK HERE to get FREE & FAST BIDS from local tile contractors who can drill your tile for you.
How Do You Prevent Scratching Tile?
You prevent scratches on tile by applying light pressure with the drill.
The biggest mistake you can make when first starting to drill into a tile is applying too much pressure. The drill bit can slip on the highly-polished glazed-tile surface, and the bit will slide possibly creating an ugly scratch.
I always placed a piece of duct tape over the spot where I want to drill. I then marked the hole center point on the tape, and begin to drill. The tape does a good job of controlling a wandering drill bit, and it offers scratch protection should the bit slide.
Why Does the Drill Bit Smoke and Get Hot?
Your drill smokes and gets hot because you were drilling too fast. This creates enormous friction which causes rapid heat build up. Slow drill speeds do not create as much heat.
IMPORTANT TIP: You can keep the drill bit cool by dipping it in a small container of fresh cutting oil every 15 – 30 seconds. After dipping the bit in the oil for a few seconds, wipe the bit off with an old rag to keep the tile and grout oil-free. You can buy this special oil at a plumbing supply house. Plumbers use it to keep pipe-threading dies cool.
This is a fantastic cutting oil that can keep your drill bit cool. Drill for 20 seconds then dip it in a small tube filed with the oil. CLICK THE IMAGE NOW TO BUY THIS OIL.
Is a Diamond Tile Drill Bit a Good One to Use?
Yes, a diamond tile drill bit is a great one. Diamonds are extremely hard and cut through the glass tile glaze fast.
If you do have to drill porcelain tile, buy special drill bits that have diamond tips. These bits must also be kept cool with cutting oil, and you must drill slowly to minimize heat buildup. Once the drill bit starts to cut a cone-shaped hole into the tile, the drill will make good progress.
Here’s a set of diamond drill bits that can drill holes of different sizes. You can also get much larger hole saw bits too. CLICK HERE TO ORDER THEM OR SEE OTHERS.
How Do You Cut Holes in Tile?
Large holes in ceramic tile can be created any number of ways. You can purchase hole saws that have diamond-cutting surfaces.
To drill into existing tile, the hole saw must be equipped with a pilot bit that drills a smaller hole into the center of the larger hole. This pilot bit keeps the larger bit from wandering.
Please enable JavaScript
How to Cut Ceramic Tile
If you have to drill a tile that has not been installed and don’t have the tools nor inclination to drill the large hole, take it to a shop that fabricates granite or marble countertops. They have all of the bits and equipment to drill any sized hole.
I used a service like this to drill holes into three pieces of granite tile for my daughter’s bathroom. To ensure the holes were drilled in the right places, I covered the face of the granite tile completely with wide masking tape. I then drew the perfect circles in the right locations on each piece of granite. The fabricators did a fantastic job of drilling the holes and all worked perfectly when I installed the granite.
CLICK HERE to get FREE & FAST BIDS from local tile contractors who can drill your tile for you.
Author’s Note:
In a Reader’s Comment, Mark asked about drilling a 1/2 hole in his kitchen sink for a water dispenser. His sink is porcelain with cast iron underneath.
Gregg W. of Stevens Point, WI, emailed a helpful answer to Mark’s question.
“Just happened to see your answer regarding drilling through a porcelain/cast sink to provide a faucet hole.
I’ve had considerable experience with all types of cast iron in an industrial setting. It isn’t hard to drill or tricky but bits do tend to wander in cast if not held rigidly.
My suggestion would be to start with a masonry bit as in drilling tile and then switch to a normal HSS bit after it is obvious you’re through the surface. Use the tape trick. I drilled the hole for, and installed a filter tap hole, this way first time without any problems. I used a 3/4 HSS bit with a 3/8″ shank. A hole saw might wander far and wide on this surface. Pilots for hole saws are usually HSS and not the best at that.”
Related Column:
Holes in Ceramic Tile
Column 674
Summary
SPONSORS /
How to Drill into Tile to Hang Things
Tile walls in bathrooms and kitchens are Totally Classic
and on trend right now, but how do you drill into tiles without cracking them? Learn how to drill through tile to hang mirrors, towel hooks, and more!
There are some things I know I love to use over and over in design (hello, Carrara marble!)… and others that I don’t even realize I’m repeating until I look back over pictures of spaces. Countertop-to-ceiling wall tile (or floor to ceiling, for that matter) is one of those things.
This post contains affiliate links. Click here to read my full disclosure.
In our daughter’s jack and jill bathroom, I took the glazed ceramic tile all the way to the ceiling and hung these mirrors. Three years later, I’m still in love.
And in our recent renovation at Little Pax Ranch, we built out the former attic space, adding that bathroom with the black tub that you saw in the first image (what do you think of the sneak peek?!). In this nook-filled space, fully tiled walls just felt right.
The tricky thing, of course, is drilling through tile to hang mirrors, toilet paper holders, and towel hooks. My home improvement partner in crime (aka my dad) and I worked out a pretty good little system now, though, so I thought I’d share a quick tutorial for you on how to drill into tile without breaking it. Wherever your tile – kitchen, bath, or bar – you can use this method to drill into tile backsplashes or walls.
Things to consider when drilling through tile
Generally speaking, the principles of hanging things in tile are the same as they would be for drywall: you want either to find studs or to use wall anchors to secure your screws. Most towel bars and hooks come with hanging hardware, which will work just fine with tile as long as you secure the screws properly with anchors.
The secret to drilling into tile without cracking it two
fold:
- Use a masonry bit for ceramic tile.
- Start your drill very carefully so that your drill bit doesn’t bounce, jump, or wander, which can lead to a cracked tile. The best way I’ve found to do this is to prep the spot with a small rotary tool (since it is easier to control than a drill), but a piece of scrap wood can work in a pinch (get full tutorial with images below).
How to drill through tile
Materials needed to hang hooks, mirrors, or holders on tile
- Marker
- Dremel rotary tool and cone-shaped grinder bit (optional)
- Scrap wood (if you don’t have a Dremel)
- Drill
- Masonry bits
- Hammer
- Anchors
- Screws
Note: this tutorial is limited to ceramic tiles as the pictures show. Similar methods should work for other kinds of tile surfaces, but I have only experimented extensively with ceramic tiles. Also, whatever kind of tile you are using, I recommend practicing on a scrap piece before you begin on your wall!
And how about a very warm welcome for my dad, my new hand model? 😉
How to drill into ceramic tile without cracking tiles:
- Mark your holes
Determine where you want to drill (using the hardware provided with the item, if applicable), and mark the spot(s) with a permanent marker.
- Grind a start through the top layer of the tile
To provide a secure spot for your drill bit (so it won’t wander), grind a tiny mark into the glazed layer of the tile using a cone-shaped grinding bit on your Dremel (see image above). If you don’t have a Dremel, read on for an alternative method.
- Drill through the tile
Drilling into tile requires a masonry bit.
 Using a masonry bit sized for your plastic anchors, drill straight through the tile carefully. Be sure not to apply too much pressure so you don’t break your tile.
 - Install the anchor
Gently tap the plastic anchor into the hole using a hammer. Again, gently, so as to not break the tile.
- Install the screws into the plastic anchor
If using provided hardware, be sure to install it with a level and tighten fully. If simply installing a screw (to hang a mirror, for example), drill in as far as needed, leaving the screw sticking out a bit out to hang wire or receive a sawtooth or d-ring hook.
- Secure the item
Whether it’s a mirror, a toilet paper holder, or a towel hook, install it over the anchor screws carefully and tighten any set screws to finish.
 Using a masonry bit sized for your plastic anchors, drill straight through the tile carefully. Be sure not to apply too much pressure so you don’t break your tile.
An alternative way to drill into tile
Don’t have a Dremel? No problem. Using a grinder to start your drill bit is my favorite way to ensure your drill doesn’t jump and potentially crack your tile, but creating a little guide for yourself out of scrap wood will work in a pinch.
To do this, drill a hole all the way through a piece of scrap wood before you go to your tile. Then, once you’ve marked your spot on the tile, line up the hole you drilled in your scrap over the spot marked on the tile. Hold the scrap wood tightly against the wall and drill carefully and slowly through the hole in the scrap wood. This will keep your bit from bouncing against the tile or wandering as it drills.
FAQs for drilling through tile
Can you drill through grout?
What if the spot where you want to hang your mirror or hook is right on a grout line? No problem. You can follow these same steps to drill into tile or grout.
What’s the best drill bit for ceramic tile?
You need masonry bits like these (usually marked for concrete,
cement, ceramic tile, and more).
Can you hang heavy things on tile?
In my experience, things in tile just need to be secured the same as in drywall. Be sure to use proper screws, anchors, and weight-bearing hardware.
Now go forth and feel free to tile away to your heart’s content. 😉 And don’t forget to pin it!
SHOP THE SPACES AND TOOLS FROM THIS POST:
Turn on your JavaScript to view content
How To Drill Through a Porcelain Tile in 5 Easy Steps
Porcelain tile has become a popular option, boasting scratch resistance and durability. While admirable, these qualities do complicate the process of drilling through porcelain. Drilling a hole in brand new tile can be nerve-wracking. You may be afraid to make a mistake and ruin your expensive tile, or to drill an unsightly hole. Drilling tile does not have to be scary because we’ve researched all the “how-to’s” to answer how to drill through porcelain tile.
Disclosure: We may get commissions for purchases made through links in this post.
When you’re drilling a hole through porcelain tile, adhering to a few simple rules will help to ensure success. Use the following steps as a guide:
- Collect your tools.
- Assess the drill site to ensure that conditions are safe for drilling.
- Measure and mark where the hole will go.
- Drill slowly, and be patient.
- Keep the tile cool by using water on porcelain.

These are the basics of drilling through porcelain tile. However, some specific tools and tips can help make your job easier. Read on to find a more in-depth discussion for details on how to do each step to drill porcelain tiles successfully.
1. Collect Your Tools
The tools that you use are crucial when it comes to successfully and efficiently drilling through porcelain tile. You will need:
- A drill; a battery-powered drill is ideal, especially if you will be working in a wet area.
- Drill bit.
- Sponge and water.
- Measuring tape.
- Marker or pencil.
What Is The Best Drill Bit For Porcelain Tile?
The very nature of porcelain tile makes it challenging to drill through because it is very dense and hard. For this reason, porcelain tiles require a particular drill bit. Traditional masonry drill bits (though they may be effective for regular ceramic tile) will skip, slide, and break if used for porcelain tile.
Look for either diamond-tipped drill bits or a bit specifically made for porcelain tile. Both of these options are slightly more expensive than other type bits, but are made for the job and will reduce the chances of breaking or damaging tiles during the drilling process.
Click here for these diamond-tipped drill bits on Amazon.
Click here for a porcelain tile drill bit on Amazon.
2. Assess The Drill Site
If you are drilling through a tile installed on a wall, for instance, before you start the project first, determine what is behind your drilling site. Pipes or wires might be hidden behind your wall, so be sure to choose a spot that is safe to drill through. Use a stud finder to determine if there is a wooden stud nearby. A stud can be useful if you are drilling through the tile to install hardware.
Click here to find this stud finder on Amazon.
3. Measure, And Mark Where The Hole Will Go
Carefully measure your project site and clearly mark where you want to drill the hole. Use masking tape t0 mark an ‘X,’ centering the drill site, and remeasure to make sure the location is exact. Masking tape not only helps designate your spot, but it also helps to increase surface tension when the drilling begins. The taped ‘X’ will reduce slippage and aid in creating a neater hole.
4. Drill Slowly, And Be Patient
Drilling through porcelain tile is not going to happen quickly. In fact, drilling too fast can result in overheating your bit and damaging or even breaking your tile. Take your time and plan on being there for a while, especially if multiple holes are needing drilling. Patient perseverance is key. Use consistent, firm pressure, but avoid pushing too hard as this can crack or chip the tile.
How Long Does It Take To Drill Through Porcelain Tile?
Expect to spend three to five minutes per hole, although it can take longer. Using the proper drill bit will help the process go faster and make the most efficient use of time. Don’t rush it; you will get through!
Tips To Keep The Drill From Jumping Around:
- As mentioned, use masking tape to mark the spot to help keep your drill focused on the drill site, instead of jumping around.
- Create and use a wooden template to keep your drill on track. To do this, use a regular drill bit to drill a hole through a piece of wood that is the same size as the diamond-tipped bit you will use for the tile. Use your free hand to press the template against the tile, or engage the help of someone else to do this while you drill through the template into the tile.
- Begin drilling at an angle, concentrating one edge of your drill bit to create a track or indentation. As the surface is penetrated, slowly lift your drill into an upright position for the remainder of the hole.
5. Keep The Tile Cool By Using Water On Porcelain
Should You Wet A Tile Before Drilling It?
Yes! Using water to drill through any tile is important, but especially with porcelain tile. As the drill bit and tile come into contact, vast amounts of friction are produced, and this generates lots of heat. Although diamond-tipped drill bits are tough, they are not invincible. Allowing the bit to overheat reduces the lifetime of the tool and lowers the quality of drilled holes. Several methods can be employed to keep your drill site moist and cool while drilling:
- If you are drilling through floor or countertop tile or if your tile is not yet installed, try using putty to create a small pool around your drill site to hold water. Fill this pool with a little bit of water that will continually cool your drill bit throughout the process.
- A spray bottle is a great tool to keep drill sites wet. Periodically mist the area around your drill hole with water.
- Consider using a sponge or wet cloth to wet down your drill bit and hole. You can even squeeze a little bit of water against the wall above your hole, and allow it to drip down and around the drill bit.
- A simple cup of water will also suffice. Occasionally dip your drill bit into the water to cool it off and remove any clinging particles of tile.

In Conclusion
Whether you are installing new porcelain tile or drilling through existing, installed tile, you now have everything that you need to begin drilling confidently. If you would like more clarification on any of the previously discussed steps or prefer a visual on how to drill through porcelain tile, check out this instructional video:
Do your bathroom tiles need help? Check out this article to learn how to clean those tiles right up easily: 7 Bathroom Tile Cleaning Hacks
Your tiles still won’t come clean? See this article to find out if your tile can be painted for a refreshed look: Can Bathroom Tiles Be Painted?
How To Drill Through Ceramic & Porcelain Tiles?
Drill Bits
Installing a towel bar or toilet-paper holder often requires drilling through glazed ceramic tile, which is no easy task. So where to start? Let’s walk through the steps to drilling through ceramic and porcelain tiles.
STEP 1: USE THE CORRECT DRILL BIT
In drilling through tiles safely, using the appropriate drill bit is very important. There are three types of drill bits recommended to drill through a tile without breaking it:
- Tungsten Carbide Smith & ARROW tile bits– are shaped to reduce the risk of shattering brittle materials. A new patented design, they have a 4 x spear pointed, double chamfered, Tungsten Carbide blade tip that drills through the hardest materials neatly and 10 times faster than anything else on the market. If you want success with drilling tile, Smith & ARROW tile bits, used on a slower speed, with water, stay on point and don’t wander, cut faster and last longer, and we believe are the best product on the market for the job. Find them here. The video of these bits in action can be seen to the below.
- Diamond-tipped drill bits– although quite expensive, this drill bit is very durable and known to be the second best after the tungsten carbide bit for drilling through tiles without shattering them. However, they have the major drawback of being very difficult to center, with the user really required to make a separate jig, like a hole in a piece of timber, to keep the bit from wandering.
- Carbide-tipped masonry drill bits– are designed for drilling into hard-rock surfaces. Although they are not as durable as the Smith & ARROW Tungsten carbide bit or the diamond-tipped drill bit, they can be just as effective, with patience and accuracy. The problem with these bits is their shape significantly increases the risk of shattering porcelain and other brittle tiles.
 However, they have the major drawback of being very difficult to center, with the user really required to make a separate jig, like a hole in a piece of timber, to keep the bit from wandering.
*Do not use regular twist-drill bits as they can’t cut through fire-hardened glaze. An ordinary steel drill bit may fail to penetrate the tile, or cause it to shatter.
*Do not use a Hammer drill, or the tile will almost certainly shatter the tile. Use a standard drill on slowest speed (or a hammer drill with the hammer function turned off), and with water as a coolant wherever possible and safe.
STEP 2: SUPPORT THE TOUGH SURFACE LAYER OF THE TILE
The hardest part of drilling into a tile is the start. Modern day tiles, especially porcelain tiles, often have a highly polished, very hard surface glaze – designed to be strong on the outside to withstand heavy impacts. Using the wrong bit, or pushing too hard, can cause the drill to slip or the tile to crack or shatter. As in most fabrication, construction and maintenance work, choosing the right tool for the job can make a huge difference both in terms of both the time required and the quality of the completed job.
To ensure this step runs smoothly, cover the area with masking tape. Tape over the area in an “X” shape, marking the site of the hole. This will help give the drill bit some traction, reducing the chance of it slipping. The tape also makes chipping less likely on the outer rim of the hole, and also ensures that if the drill were to slip from the marked “X”, it would not damage the tile but only the tape.
STEP 3: KEEP DRILL SPEED CONSISTENT, MAKING SURE THE DRILL BIT DOES NOT OVERHEAT
Once the bit is started, the rest is a matter of patiently boring through the tile until you break through. Hard tiles can take some time.
- Drill through the tile slowly. Set your drill to a low speed and apply modest pressure to the surface. Apply constant, firm pressure, but not too much or you will break through the tile rather than drilling into it. It is important to add water to keep the tip of the bit cool and prevent it from over-heating and burning out.A bit that is run on too higher speed or without water to keep it cool in this application can become almost complete ineffective if the tip is burnt out through heat – especially with tungsten carbide tips. Gradually increase the speed as appropriate, however, understand that drilling tile is not a question of speed, but persistence. Remember, slow speed and steady pressure.
- Lubricate / cool with water as you drill. Friction from drilling hard materials creates a great deal of heat, which can scorch the drill bit or even break the tile. The tip of the drill bit should be kept lubricated with water to keep from overheating, wearing down, or breaking. Water is the safest way to lubricate and cool the drill bit as you go, however, always be very careful of the potential for electrocution when working near and around electrical cords, powerpoints and outlets etc when working with water. Where safe, always protect your project and extend the lifespan of the drill bit with a constant trickle of water.
 Friction from drilling hard materials creates a great deal of heat, which can scorch the drill bit or even break the tile. The tip of the drill bit should be kept lubricated with water to keep from overheating, wearing down, or breaking. Water is the safest way to lubricate and cool the drill bit as you go, however, always be very careful of the potential for electrocution when working near and around electrical cords, powerpoints and outlets etc when working with water. Where safe, always protect your project and extend the lifespan of the drill bit with a constant trickle of water.
Important: Always check that the wall you are drilling through does not have water or electrical cables behind the tiles.
How and with what to drill ceramic tiles and porcelain stoneware?
When planning repairs in the bathroom, it seems that the most difficult thing is laying tiles, but the next difficulties await us when installing plumbing fixtures, shelves, cabinets, mirrors and other accessories on lined walls. To do this, you will have to drill holes in the tile flooring.
In this article you will learn how to properly drill a tiled wall, which drills to use for small and large holes. We will tell you some simple ways to protect tiles from chips and cracks. You will learn how to use masking tape for more precise drilling and what a tile ballerina is.
Ceramic tile is a hard and brittle material that is difficult to drill but easy to crack. One mistake or awkward movement can damage it, and you will have to read another instruction on how to replace a cracked tile. So before you start drilling, make sure you know how to drill tiles. Fortunately, we have a lot of tips for you to help you do everything neatly and accurately.
Step 1. Know your tiles.
The first thing you need to know is the type of tile you are working with.
It is important to understand that not all ceramic tiles are the same. It has a wide range of hardness. Porcelain stoneware is especially difficult to process due to its high density and hardness. It is more difficult to drill than conventional ceramics and tiles, so you will need special equipment for porcelain stoneware.
Ceramic tiles are often glazed. Glaze on its surface is nothing more than a thin layer of liquid glass, which is very difficult to break through. The tip of the drill slides over it, which makes it difficult to drill and can lead to scratches.
When you know what you are facing, you can start choosing a tool.
Step 2. Choose the right drill.
Regardless of the type of ceramic you are trying to drill through, never use old and worn drill bits. Not only are they ineffective, but they also increase the chances of damaging the surface. Ordinary concrete drill bits will not drill through the tile, but simply crumble it into pieces. To work with it, you will need a tool, the cutting part of which is much harder than ceramics and tiles.
To obtain holes of small diameter (under the dowel) use:
- Diamond-coated tubular drills.
- Carbide tip spear drills.
- Carbide-tipped twist drills.
Ceramic drill types
Diamond tube drills are very efficient, durable and easy to use, although they are much more expensive. Thanks to the diamond grit on the cutting part, they are able to pass through the hardest materials, such as porcelain stoneware and porcelain. However, it makes no sense to buy them because of the few holes, unless you have a desire to become a professional tiler in your plans.
Carbide drills for tiles have an easily recognizable spear shape and a maximum drilling diameter of 12 mm. Hard tip due to the special sharpening of the cutting edges reduces the likelihood of cracking and splitting. Its hardness is so high that even porcelain stoneware can be drilled, but after five holes, sharpening drops sharply.
Tip! For a small amount of work in porcelain stoneware, it is more profitable to purchase lancet drills with a pobedit tip, despite the fact that they quickly become blunt in hard material. Diamond tooling costs about 5 times more, so it is worth buying for large volumes of work.
Twist-type drills with pobedite solder are often used by home craftsmen instead of a special drill for ceramics due to the high availability of this tool. They are designed for drilling concrete and stone, but they can also easily cope with ceramic tiles. Before starting work, lightly strike the surface with a hammer on the drill, and drill at minimum speed with extreme caution.
How to drill large holes in tiles?
For drilling large sockets with a diameter of up to 150 mm, for example, under socket boxes, lamps, mixers, pipes, use:
- diamond drill bits
- circular adjustable drill (ballerina)
Equipment for making large holes in ceramics
Diamond-tipped hole saws are sometimes referred to as diamond hole saws. For them, there are no restrictions on the hardness of the tiles, they will drill through everything that you put in front of them – tiles, ceramics, porcelain stoneware, porcelain, tempered glass, reinforced concrete. Due to the exceptional wear resistance of industrial diamonds in their working segment, more than 100 cuts can be made with one bit. To extend the service life of such equipment, water is supplied to the working area; in extreme cases, the crown is periodically dipped into a container of water.
A circular drill with adjustment or in the common people “ballerina” is used in all existing types of non-solid ceramic and tile. Its cost is low, and the service life is quite long. The advantage over crowns is that the “ballerina” allows you to set any non-standard diameter within the specified values, as a rule, it is from 30 to 90 mm. Her spear-shaped cutter with a victorious soldering lends itself to sharpening.
Tip! If you want to achieve a smooth cut without chipping the glaze, choose a diamond hole saw. If the cleanliness of the cut is not required, for example, under the switch, then – “ballerina”.
Step 3. Prepare the surface for drilling.

To prevent the drill from sliding on the smooth surface of ceramics at the beginning of drilling, you can use ordinary masking tape. Glue two strips of adhesive tape crosswise over the applied markings. Then redraw the mark on duct tape to make it clearer. Masking tape will improve traction and prevent the drill from drifting to the side.
Step 4. Start drilling at low RPM.
Tile drilling is carried out in hammerless mode . Start at the lowest speed possible and slowly work your way into the material. Many people make the mistake of believing that increasing speed and pressure on the tool will increase productivity. In fact, you will only overheat the cutting edges and increase vibration. After you have passed the hard glassy coating, start to gradually increase the speed and apply constant, but not strong pressure.
Step 5. Don’t forget to cool down the tool.
To extend the life of the drill, the cutting ability of the nozzle and reduce the risk of cracking, accompany the drilling process with water cooling. If you cannot constantly water the drilling site during operation, then stop from time to time and spray some water on the drill. Make sure that water does not get on the motor part of the drill. Another way you can use to keep your drill from overheating is to keep a damp sponge under it.
Step 6. Replace the drill when you hit the wall.
After the special drill for ceramics has completed its task, it should be replaced with another one suitable for the wall material – a drill for concrete, a drill for brick or wood. Its diameter should be slightly smaller so as not to damage the ceramic and not to chip the glaze. If necessary, you can turn on the shock mode, make sure that the nozzle does not deviate from the axis.
Step 7. Install dowel or anchor bolt.
It remains to install dowels or anchors in the holes obtained. When driving them with a hammer, apply light blows with the utmost care. Make sure that their expansion part is located only in the wall material. If it gets on the tile or mortar layer, there is a high probability of cracking the tile at the time of anchoring the fasteners. To obtain a hole of the desired depth, make a mark on the drill with a marker.
To summarize:
You have learned the theory of how to drill a tile. Let’s highlight the 5 most important points that will help you get the job done efficiently:
- Understand the characteristics of your tile (hard or soft).
- Choose the right tool to increase your chances of success.
- Apply masking tape to prevent slipping.
- Drill through tiles slowly with no impact.
- Periodically cool the tooling with water.
When drilling ceramic tiles, patience, perseverance, a steady hand and the right tools are essential. If you’ve never done this before, it’s best to experiment on the remaining scraps first. Skill comes with practice. With the acquisition of certain experience, drilling tiles will no longer seem impossible to you.
Helpful Hints
Updated: 29.09.2020 13:25:19
How to drill a hole in ceramic tiles
If you follow the recommendations and use the appropriate tool, you will cope with the task quite quickly and efficiently. The recommendations of experienced builders accurately describe the procedure, so it’s not difficult to get confused in the steps. The easiest action is to buy a special drill for glass or ceramics. It can be feather or tubular. The spade bit on the tip features a carbide tip that resembles a spear. The advantage of such a drill is in the price. The tubular drill works with the help of diamond chips, therefore it copes with the hardest materials.
1. Tools for work
To correctly make a hole in the wall without deforming it, you need to choose the right tools. You should have on hand:
If you need to make a hole in a tile on a wall of large diameter, a ballerina drill is often used.
They also use round drills with cutters, which are set at the same distance from the center using a hexagon. The incisors move at different distances, so you can easily make a hole of the desired size. Mark the required parameters and, firmly pressing the tile, drill at low speeds. The price of such a tool is low, you can buy it at any hardware store.
Important! It is necessary to work with a ballerina drill at low speed, holding the tile tightly so that possible fragments from under the drill do not hurt you. At the time of drilling, try not to jerk the working tool, you can use a special tripod to strengthen the position.
2. How to properly drill a tile?
The process of drilling tiles has its own characteristics, little secrets, the knowledge of which simplifies the task and allows you to give an exhaustive answer. You can not make a hole along the edges of the tiles and at the intersections. At the time of drilling, when periodically turning off the drill, you need to regularly lower the drill into the water, so that the tool does not overheat. If suddenly the required drill was not on the counter, you can use a drill. If it is necessary to make a hole at low speed, a steel drill is used.
3. How to work?
The drilling method is used to obtain a small hole. Before this, you must first knock on the tile: if the sound is deaf, you can safely start the process, in other situations, the tile can be deformed. It is necessary to determine in advance where the hole should be, and make a mark. Make sure that the drill does not slip off a smooth surface. This problem can be solved in several ways:
-
In the center of the hole, you need to beat a little enamel with a drill at low speeds
-
The drilling site must be sealed with tape to keep the drill at the desired level.
-
If you can’t see the mark through the tape, then mark the designation on it. Sometimes an anti-slip conductor is used – a massive board made of wood or steel with holes of different sizes. It is applied to the tile in the required place, pressed or drilled through the hole
-
Before drilling tiles, you need to make sure that the impact option is disabled on the tool
-
Then start the drilling process slowly
-
Gradually increase the speed
-
We advise you to immediately remove the appeared dust with a vacuum cleaner.
It is better if you have a second person to help you. Once you get to the base of the tile, change the bit according to the material and drill to the required depth. If you need to make a hole in a non-glued tile, first make sure that it lies on a level base.
 It is better if you have a second person to help you. Once you get to the base of the tile, change the bit according to the material and drill to the required depth. If you need to make a hole in a non-glued tile, first make sure that it lies on a level base.
The tile is a demanded material for finishing rooms, and it is necessary to know how to process it, since the installation of furniture is inevitable.
There is another method for making a hole in a large tile. But you need to use it if you did not have time to lay the tile. To do this, the tile must be lowered into the water, then specify the parameters of the circle and drill a hole through it. After that, the center of the circle is removed, you get the required hole. Rough edges are processed with a file. A hole in the tile can be drilled by anyone – just follow the recommendations of experts. It is necessary to choose a suitable drill, do not take it to the side at the time of work and regularly treat the surface of the tile with water.
Popular Items:
Kerama Marazzi
Russia
Tile Accord white edge 8.5×28.5
Article
9010
Format cm
28×8
1 471 ₽
Watch
Kerama Marazzi
Russia
Blanche tile white edge 9.9×20
Article
19040
Format cm
20×9
1 234 ₽
Watch
Kerama Marazzi
Russia
White Buranelli 20×23.1
Article
24001
Format cm
23×20
1 163 ₽
Watch
Kerama Marazzi
Russia
White Gran Pale porcelain stoneware 50.2×50.2
Article
SG457100R
Format cm
50×50
1 505 ₽
Watch
Kerama Marazzi
Russia
White Grand Palais 25×40
Article
6343
Format cm
40×25
980 ₽
Watch
Kerama Marazzi
Russia
White Buranelli porcelain stoneware 20×23. 1
1
Article
SG23000N
Format cm
23×20
1 383 ₽
Watch
Kerama Marazzi
Russia
Tile Baccarat beige 20×30
Article
8290
Format cm
30×20
764 ₽
Watch
Kerama Marazzi
Russia
Tile Accord beige light edge 8.5×28.5
Article
9011
Format cm
28×8
1 471 ₽
Watch
Kerama Marazzi
Russia
White Gragnano 7.4×15
Article
16000
Format cm
15×7
1 719 ₽
Watch
Kerama Marazzi
Russia
Tile Avellino white 15×15
Article
17006
Format cm
15×15
1 462 ₽
Watch
4.
 How to drill a hole for a dowel?
Steps for drilling a hole for a rod:
-
The place where the hole will be, cover with tape and mark with a marker
-
Choose the right drill
-
Must work at low speeds
-
After drilling, replace the drill with a simple one for concrete
Important! To get a hole of the required depth, use a special limiter or seal the drill with tape. Drill the hole to the end, blow it out of the dust. Insert the dowel, while it should get into the tile by 1-2 mm. This method allows you to drill a hole up to 14 mm.
If you carefully read the recommendations, you can make a hole in the tile correctly and without consequences. It is extremely important to choose the right working tool.
How to drill tiles on a wall without cracking: video
- Tile drilling equipment
- Drill selection
- How to drill a dowel hole in a tile
- Forming large diameter holes
- What other tools can be used
The answer to the question of how to drill a tile so that it does not crack is of interest to many home craftsmen who are independently engaged in the repair of their homes. The main difficulty of such a procedure as drilling tiles is that this product is very fragile and can easily burst even from a slight mechanical impact.
We drill tiles ourselves at the level of professionals
How to drill a hole in a tile without breaking it? To do this, it is recommended to use the appropriate tool and strictly adhere to all technological recommendations. Practically any specialist in tile work, when asked how to drill tiles correctly, will advise you to perform such a process at low speeds of the drill: after all, the drilling efficiency largely depends on the speed of rotation of the latter.
For those who do not like to read long articles and go into subtleties and nuances, we suggest watching an informative video that answers most of the basic questions on the topic of correct tile drilling.
Tile drilling equipment
When wondering how to drill through tiles to get a good result, you should carefully choose the right equipment for this. In this case, special attention should be paid to the range of revolutions in which it can operate. Drilling a tile so that it does not crack should be done at a drill speed in the range of 200–1000 rpm. It is problematic to set the rotation speed of the cartridge on a conventional household drill to 200 rpm, although such equipment may well reach the upper limit (1000 rpm). In this regard, for drilling high-quality holes in ceramic and tile, it is better to use a cordless or corded screwdriver, the upper limit of the cartridge rotation speed is 800–1000 rpm.
It is also possible to drill a tile so that it does not crack with a hand drill if it is not possible to use an electric one. Of course, it will not be possible to quickly drill tiles in a bathroom or toilet using a hand drill, however, the result will be accurate and accurate. It should be borne in mind that a hand drill will not allow you to drill a large hole in the tile, since such a device cannot work at high speeds.
How to drill tiles? To work with such a hard and brittle material that can easily crack, you need to choose the right drill. The recommendations given in the next section of the article may help in resolving this issue.
Drill selection
When choosing equipment, special attention should be paid to which drill bit to drill ceramic tiles. If you choose the wrong tool, you can use it only a few times, after which it can be thrown away, as it will become completely unusable. To drill tiles without such negative consequences, you need to choose the right drill.
Spear-shaped
It is possible to drill a hole in ceramic tiles with high quality using a spear-shaped drill, which has a long service life. If you are thinking about how to drill a tile under a dowel, choose a tool of this type. It is also important that spear-shaped drills are distinguished by an affordable price.
When drilling tiles with a lance drill, use a household vacuum cleaner to remove dust
Carbide with one-sided grinding
How to drill tiles to get a good result? For this purpose, a drill with a carbide insert sharpened on one side is often used. Sharpening the cutting part at an acute angle not only reduces the risk of overheating of the drill, but also allows it to more easily drill through tiles, which are characterized by high strength and brittleness.
Diamond-Tipped Hole Type
It is quite common to drill into tiles to get a large diameter hole in the tile for mounting pipes and electrical outlets. Such a hole in the tile can have a diameter of 10 to 70 mm. In this case, it is best to use core drills, on the working part of which diamond coating is applied. A tool with a center drill can be used in conjunction with a hand-held electric drill, and without it – only with the help of stationary drilling equipment.
Diamond crowns are often sold in sets with one backing plate for several bits
When drilling ceramic tiles with a diamond drill, keep in mind that this tool is quite critical to overheating, so it must be subjected to water cooling during processing.
Diamond-coated core drills are used at 200-500 rpm, while they must be cooled well with water. The resource of such a tool, if you follow all the rules for its use, is enough for 20–50 drilled holes, which is a fairly good indicator.
By the way, diamond crowns are also available in small diameters
Tungsten Carbide Coated Slotted
How to drill ceramic tiles without defects? Core drills of this type make it easy to solve this problem. They can also be used to process porcelain stoneware, marble and brick. The most significant disadvantage of such a tool is its high cost, but given its versatility and high efficiency, such a price is fully justified.
Tungsten tile and tile bit set
With adjustable cutters (ballerina)
When deciding how to drill a tile in the bathroom in order to obtain a large diameter hole, many home masters choose the so-called ballerina. This drill can drill holes with a diameter in the range of 30–90 mm.
Ballerina includes a central drill and a bracket along which the clamps with cutters move. With the help of the latter, a groove is cut on the surface of the workpiece. The ballerina is most often used when it is required to drill a hole of a non-standard diameter on the surface of a tile in a bathroom or toilet. If you decide to use a ballerina, keep in mind that the hole obtained with it has uneven edges, which will later need to be covered with something.
“Ballerina” although it does not provide the ideal quality of the holes, it always helps out in the absence of crowns of the required diameter
How to drill a dowel hole in a tile
Before you fix any object on a surface finished with ceramic or tile, you need to know how to drill a small diameter hole in such material in which the dowel element will be fixed. This procedure is performed in the following sequence:
- To prevent the drill from slipping on the surface of the tile, a plaster or masking tape is glued to the location of the future hole.
- The center of the future hole, which should be located at a distance of at least fifteen millimeters from the edge of the tile, it is advisable to mark with a dot using a regular marker.
- Insert a suitable drill bit into the electric drill that will be used to drill holes in ceramic tiles.
- The drill is installed strictly perpendicular to the tile being processed (in this case, the device is preliminarily set to the minimum speed).
- When you drill through the tiles on the wall, finish the concrete or brick base with a hammer drill using the impact mode.
- The resulting hole must be cleaned of dust, pieces of concrete or brick, and only then insert the dowel.

Forming large diameter holes
There are several ways to solve the problem of how to drill ceramic or tile to form a large diameter hole in them.
- You can drill through tiles with a ballerina. If you do not know how to drill ceramic tiles with a ballerina, practice on unnecessary pieces of ceramic, previously soaked in water.
- You can also drill a large hole in a tile with a hole saw, which even a non-professional can use. Using such a tool and exerting medium pressure on it, you can drill a large hole in a tile in just five to seven minutes.

As a last resort, you can use a small diameter drill, marking the desired circle and making a series of holes
For high-quality drilling, tiles can be soaked in water, which will make the material of its manufacture softer and more pliable. In order for the drilling of tiles to end with a satisfactory result, it is enough to follow the following rules when performing this process.
- Select the correct tool to be used for machining.
- The drill used for drilling must be set to minimum speed.
- To avoid overheating of both the tool and the tile, the treatment area must be constantly moistened with water.
- A hole in a tile or ceramic tile must not be placed too close to the edge of the workpiece.

A simple plywood template helps you quickly make a neat hole
What other tools can be used
You can also drill through ceramic and tile to prevent cracking with other tools. One of them is a core drill, the working part of which is equipped with cutting teeth from pobedit plates. The main disadvantages of such a tool are a small resource of work and uneven edges of the formed hole (they always have chips, no matter how carefully the processing is performed).
Alternative – hole cutting with a grinder with a circle of small diameter
In some cases, when there is no special tool at hand, it is also possible to drill a hole in a ceramic tile using a concrete drill bit. Using this tool, which is not designed to work with tiles, it is necessary to sharpen its cutting part as sharply as possible and be extremely careful so as not to damage the workpiece.
Did the bit diameter not match the hole size? This is not a reason to run to the store, there is a way out – watch the video.

How and with what to drill ceramic tiles and porcelain stoneware?
Not a single repair of an apartment, cottage or summer house can do without ceramic tiles and porcelain stoneware. It is used for wall and floor decoration. If for laying on the floor, in most cases, it is enough to simply trim, then on the walls you will need mounting holes for plumbing fittings, mirrors, cabinets and other accessories. In such a case, it is important to know how to drill ceramic tiles and make holes in them correctly so that they do not get damaged.
Common mistakes
Chips and cracks on the tiles look very ugly on the wall, they are always striking and spoil the entire repair. This happens due to the fact that the master is not confident in his abilities or does not know how to drill a tile so as not to damage it. Consider common mistakes that lead to unsatisfactory quality of work:
-
incorrect drilling mode, resulting in a directed impact of great force from the tool;
-
high speed of the drill, as a result of which both the cutting equipment itself and the ceramic tile overheat;
-
high pressure on the tool from the master while drilling tiles;
-
changing the angle of entry of the drill in the process of drilling holes;
-
wrong choice of cutting equipment;
-
“jumping” of the drill on a slippery surface.
Another fatal mistake – many craftsmen try to drill the tile immediately after laying it. Correctly wait two days and only after that make the necessary mounting holes. It is desirable, if possible, that they be closer to the center of the tile, and not near the edge.
How to choose a drill?
To choose what exactly to drill a tile with, you must first study what kind of tile it is, because each type has its own characteristics. Manufacturers produce many different collections that vary in hardness and not every drill that works well with “soft” material will also drill through harder material well. And if porcelain stoneware is used, then a conventional ceramic tile drill will not work; special equipment for heavy-duty porcelain stoneware will be required. Many collections are available with a glazed surface. Glaze is a thin layer of glass that is difficult to cut through with a drill, it begins to “jump” over the surface, scratching it and creating numerous chips.
When thinking about how to drill tiles in the bathroom, kitchen or bathroom, you should remember that it is strictly forbidden to do this with old drills. Also, do not use drills for concrete and brick, they will never drill through the tile normally, but only crumble it. The cutting equipment must have a hardness much higher than that of the processed ceramics, tiles or porcelain stoneware.
In order to drill holes of small diameter, choose the following drills for ceramic tiles:
-
tubular, having a diamond coating;
-
spear-shaped, at the end of which there is a carbide tip;
-
spiral, having a hard-alloy soldering.
Tubular diamond drills are the most efficient and durable, although they cost more than others. Diamond coating makes it easy to cope with the processing of hard materials such as tiles and porcelain stoneware.
Carbide drills are also highly effective in hard materials such as porcelain stoneware, but they wear out very quickly.
Spiral drills, due to their low cost, are widely used for domestic use when you need to make several holes. It is not recommended to use them as professional equipment.
In addition to the mounting holes, you need to know how to drill the tiles in the bathroom under the pipes to which the faucet, faucet, and heated towel rail will be attached. In this case, the mounting hole will be much larger and a completely different tool will be required. For holes with a diameter of up to 150 mm, the following types of cutting equipment are used:
Surface preparation
It is important not only how to drill tiles in a bathroom or other room, but also how to do it. The main point is the preparation of the surface, because damage often appears at the start of drilling, nothing can be fixed further.
The surface is very slippery, which causes the drill to move to the side. To prevent this, it is recommended to seal the place where the hole is planned to be sealed with masking tape. Two strips glued crosswise are enough. Markings should be transferred to the strips in order to navigate where to drill. The masking tape is slightly rough, which will improve adhesion and prevent the drill bit from moving along ceramic tiles in different directions.
How to drill tiles without cracks?
There are several important recommendations that will allow you to answer the question of how to drill a tile so that it does not crack or remain damaged:
-
do not work with an electric drill at a speed higher than 1000 min -1 ;
-
if you have to drill a tile that has not yet been laid on a wall or floor, it is recommended to soak it in water for an hour;
-
before you start working with a drill, you need to make sure that the impact function is disabled in it;
-
drilling holes in the tile should be started at low speeds, gradually increasing them, but not exceeding the recommended 1000 rpm;
-
if you need to make a hole very close to the edge, it is recommended to move the drill into the seam and start drilling it from there; otherwise, the drill will slip and damage the edge;
-
you can not switch the drill to reverse mode.

If in doubt about how to properly drill a certain type of tile, you can first practice on a separate piece. This will help to choose the optimal mode of operation of the tool, the frequency of rotation of the drill, the effort on the drill by the master.
How to drill ceramic for dowel installation?
To fix furniture, a mirror or some accessory in the bathroom on the wall, you will have to make a hole in the tile and install a dowel in it. Only after that you can use the screw and screw it into the wall, otherwise it will not hold and the fastening reliability will be very low. Consider how to properly drill a hole in a tile so that it remains intact.
The drilling process must be started at low speeds, gradually increasing them and slowly delving into the material. Work must be performed only in shockless mode. A serious mistake is to increase the speed during drilling and pressure on the tool. This not only does not increase productivity, but also leads to overheating of the cutting edge of the drill and an increase in vibrations, which is highly undesirable.
An important point is the cooling of both the drill itself and the cutting equipment. The cooling process will extend the life of the tool, maintain the cutting ability of the drill and reduce the risk of cracks and chips. If it is not possible to constantly moisten the drilling site, it is recommended to periodically stop work to moisten it, as well as cool the drill and drill bit.
It is impossible to work with the same drill both on the tile and on the wall that follows it. As soon as ceramics are drilled and it will be necessary to work in brick or concrete, the drill is changed to a tool of the appropriate type. The drill is selected with a slightly smaller diameter so as not to damage the edges of the tile and not to chip off pieces of its glaze.
After the hole has been made, a dowel or anchor bolt is installed in it. You need to hammer it very carefully so as not to hit the tile. You also need to control that the dowel does not burst the edges of the hole – this can provoke the appearance of cracks and chips.
How and what is the best way to drill ceramic tiles | House of tiles
Why drill ceramic tiles? There are a lot of options: hang something, fix it, install a socket or pipe. Do not count on a suspended object to cover up flaws. First, unless it’s a large painting or closet, sloppy work will still be visible. Secondly, with the wrong tools, even hard porcelain stoneware can crack, fall off or scratch you with a sharp edge. We understand the nuances of how to drill a hole quickly and efficiently.
Drilling holes in ceramic tiles: what may be required?
Let’s list all the possible cases when drilling ceramic tiles is really necessary and highlight those goals that can be achieved without a drill.
You will have to drill the tiles:
-
To make a hole for installing dowels and hang cabinets, posters or shelves. 1
- To prepare a large gap for a pipe, faucet or outlet.2
- To connect a new appliance – washing machine or dishwasher, e.g. 3
 1
1 Drilling the tiles is not necessary if:
- You want to hang a picture. There are special self-adhesive hooks for this purpose.1
- You need to hang something else not very heavy on the wall – a mirror, a frame, a small shelf. A good double-sided tape will not violate the integrity of the ceramic surface and will allow you to safely outweigh the item, if necessary. It is important to take into account the weight of the object and observe safety precautions, for example, do not hang a mirror over the bed.2
How to drill ceramic tiles
There are a lot of options. Some are good for making a neat little dowel hole, others are for cutting tiles for utility installations. In the arsenal of a home master will always come in handy:
- electric drill,
- hand drills,
- screwdrivers,
-
perforators.

To cut tiles over a larger area, a grinder, a tile cutter, a glass cutter will come in handy: we talk more about these tools in the article “How to cut porcelain stoneware and ceramic tiles at home”.
The choice of tool depends on the area of work and the hardness of the material: keep in mind that the glaze on the tile makes the process difficult, but it is easier to break through the fired clay tile without glaze. For drilling high-quality holes in ceramic tiles, it is better to use a cordless or corded screwdriver, the upper speed limit of which is 800–1000 rpm. And a hand drill, for example, will not allow you to drill a hole in a large area, since such a device cannot work at high speeds.
To make a quality hole in ceramic tiles, choosing the right drill is especially important – we will talk about it below. Remember about safety: in no case should you work with broken or blunt tools, choose inappropriate and dangerous options like a saw and a hammer.
Drilling tiles with a drill
An electric drill is suitable for drilling a small hole. A big plus: it is in almost every household. The procedure is as follows:
- First of all, make sure that the ceramic tile you are drilling is firmly attached to the wall and will not crack. To do this, tap on it and listen: if the sound is deaf, everything is in order.
- Make a mark. The point drawn with a marker may not be enough, it is better to mark the place with paper tape. At the same time, it will prevent the drill from slipping when drilling.
- You have to make sure that the drill does not slip. Sometimes a conductor is used for this – a thick plate of steel or wood with templates of different diameters. You can make this one yourself.
- Make sure your drill is set to impact mode to avoid cracking the tiles.
- Start drilling at a 90 degree angle and at minimum speed. Gradually, the speed can be increased.
-
It is important to remove dust immediately so that it does not interfere with drilling. It is better to ask an assistant to stand next to the handheld vacuum cleaner.
- Having reached the base, it is better to change the drill to one that suits the wall material – concrete, wood, and so on. The second drill must not be larger than the first, otherwise damage is inevitable.
- If you need to drill a ceramic tile that is not glued to the wall, it is worth laying it on a flat surface.
 It is better to ask an assistant to stand next to the handheld vacuum cleaner.
 Is it possible to drill ceramic tiles with a screwdriver
Many corded and cordless screwdrivers work in drill mode, so they can drill a hole in ceramic tiles. The method has several disadvantages:
- may not have enough power to drill,
- a screwdriver will not be able to drill through concrete and strong brick. It will cope with tiles on foam block or drywall, but something more powerful is needed for a solid wall.
- the drill will most likely need to be cooled periodically.
How to drill tiles with a rotary hammer
A hammer drill is useful when a hole has already been made in the ceramic tile and you need to drill a solid wall under it. He is very likely to split or damage the tile: too powerful a tool. Even if the process goes smoothly at the first stage, at the “exit” the perforator drill can literally crumble porcelain stoneware. However, experienced builders sometimes work out neatly: we do not advise a home master to take risks.
What kind of drill to drill ceramic tiles
The choice of drill bit is critical when drilling through hard material such as tile. Some are suitable for small holes, others are easier to make large. Not everyone can handle the pressure. And, of course, the selected drill should not be rusty and blunt.
Why is the wrong choice dangerous? In the best case, you use the drill once and throw it away. At worst, get hurt by cracked ceramic tiles while drilling.
What are the drills for porcelain stoneware? For a small dowel hole, these options are best.
-
Tubular drills with a diamond dusting. They cost a lot, but thanks to the diamond chips on the cutting part, they are able to pass through the hardest materials, including porcelain stoneware.
- Carbide tipped spear drills. The maximum diameter of this is 12 mm. The hard tip, due to the special sharpening, enters the ceramic surface without damaging it. The adaptation is not eternal: after a few holes, the quality of drilling will inevitably fall.
- Twist drills with carbide tip. Designed for drilling concrete and stone, but can also easily cope with ceramic tiles. Be careful: so that it does not slip, the surface must be “nailed” – carve a hole, a small indentation, with a light hammer blow on the drill. Operate at minimum speed.

How to choose a drill? Diamond ones are several times more expensive, so buy them only if the amount of drilling work to be done is large. Most often, in order to hang a locker, one spear-shaped tip is enough for you.
How to make a big hole in ceramic tiles
To install a socket or pipe, you will need a larger hole, which a simple drill may not be able to handle. You will need a special tool: a diamond crown or a ballerina.
As a last resort, if there is no way to use tools specially designed for drilling large areas, you will have to cut a hole in the ceramic tile around the perimeter with a small-diameter drill or grinder with a diamond blade. But we do not recommend doing this if you do not have experience.
Drilling ceramics with diamond core bit
This bit is similar to those used for drilling in wood, but is made from a harder material.
A big plus: guarantees a hole with even edges in ceramic tiles, which is important if you are laying a pipe. They will break through anything: tiles, ceramics, porcelain stoneware, porcelain, tempered glass, reinforced concrete. They will last a long time.
Minus: it heats up in the process, so it needs to be watered. It costs a lot: a crown with victorious teeth will be a cheaper alternative. True, with it the edges will not be so smooth.
Crown sequence:
-
Put a mark where you want to make a hole, stick masking tape in the center so that the drill does not slip. 1
- Start at low speeds. Hold the crown perpendicular and do not press too hard.2
- Moisten the tile while drilling to avoid overheating and prolong the life of the diamond bit. At the same time, this way you will wash off the dust.3
 1
1 How to drill with a ballerina on tiles
Ballerina is a spear-shaped drill on a bracket. A big plus: the diameter can be adjusted, and the tool itself is inexpensive.
Algorithm of actions when working with a ballerina:
- Extend the bracket to the desired length along the radius of the hole. Remember to mark the center before drilling.1
- Set the drill to the mark. Start drilling slowly and carefully. Keep the ballerina straight, don’t let it swerve.2
- Wet the tile surface to remove dust and cool the tool.3
How to drill ceramic tiles without cracks
I would like to drill ceramics neatly, but it does not always work out.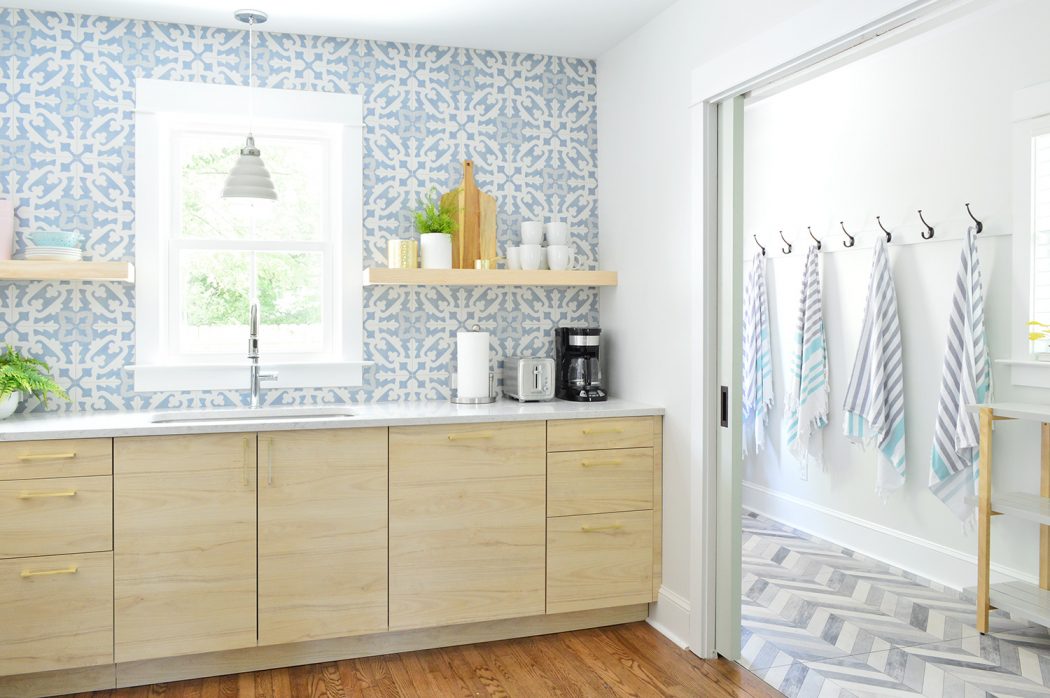 Here are the main mistakes of the home master:
- Great impact force. They did not turn off the impact mode in the drill, took a powerful hammer drill, or overdid it when punching.1
- Drilling at the joint. Or even worse: at the crossroads of joints. It’s so easy to damage four tiles at once.2
- Wrong drill. A dull tool is not suitable for jewelry work.3
- Errors in the course of work. For example, too high RPMs increase the risk of cracking. And an overheated drill or screwdriver will quickly dull and damage the ceramic surface.4
Here are some tips:
- Choose a place in the center, at a distance of 15-50 mm from the edge.
- Use a power tool with a low RPM when drilling. Not a single porcelain tile can withstand sharp pressure and heating.
- Remember to cool the drill and remove dust with a vacuum cleaner or water.
Conclusion
Worth remembering:
-
Before you start drilling, make sure that it is really necessary.
- Assess the hardness of the tile in advance. If you have a spare, practice on a tile that is not glued to the wall.
- Choose the right tool. If in doubt, consult a specialist.
- Apply masking tape to prevent slipping when drilling. It’s good if someone will help you with your work.
- Work slowly, periodically cool the surface with water.
- Mindset is as important as a firm hand: Don’t drill a hole in ceramic tile if you’re not feeling well or if you’re nervous.

How to drill tiles so that they do not crack on the wall and floor: tips
Ceramic granite or tiles are often used to finish bathrooms and toilets, floors in the hallway and kitchen. It is a durable, wear-resistant material with excellent performance characteristics. Often it needs to be drilled to attach an anchor, plug, or other element. Here another property is manifested – brittleness during drilling. She might crack. Therefore, you need to know the rules of how to drill a tile so that it does not crack.
Contents
Description of tiles
Finishing material based on a mixture of clay, sand, mineral binders, fired in a kiln at high temperature. It comes in a square or rectangular shape. The top layer is especially durable, made of glaze of various colors and textures.
Tiles are used for wall cladding in bathrooms, toilets and kitchens. Floors are finished with ceramic granite. It is a versatile material with a number of useful properties:
- Wear resistance. The main positive property. With proper installation on the floor and walls, it will last more than a dozen years.
- Moisture resistant. Suitable for protecting walls and floors in damp areas. The low-porosity structure of the outer protective layer does not absorb water.
- Low electrical conductivity. Tiled surfaces do not accumulate static charges.
- Variety of designs. Production technology allows to obtain a finishing material of any color, texture of the front surface.
 Production technology allows to obtain a finishing material of any color, texture of the front surface.
 - Environmentally friendly. Manufactured from organic materials.
There is one negative feature – ceramic tiles are difficult to drill. If you work with a conventional drill, it will crack. This is due to the high density, and, consequently, brittleness under point impact.
How to drill correctly
If you need to drill a tile for cabinet fixing or piping, you can do it yourself. The main thing is to follow the rules of how to drill tiles so that they do not crack.
Preparation
Consists of selecting an electric or mechanical tool, as well as drills:
- Electric drill or cordless screwdriver. There are two required parameters. The first is acceptable weight. The second is to adjust the rotation speed of the cartridge.
- Hand drill. Can be used as a last resort when there is no electrical counterpart at hand. Heavy to handle. Low chuck rotation speed.
 Can be used as a last resort when there is no electrical counterpart at hand. Heavy to handle. Low chuck rotation speed.
 - Universal nozzle. Suitable for drilling in the most fragile tiles.
- Specialized drill (nozzle). Spear tip. Used for small holes.
- One-sided sharp-edged bit. Designed for drilling hard porcelain stoneware. Long service life.
- Drill bits. Professional tool. Suitable for large diameter drilling in hard porcelain stoneware. They differ in coating on the working edge: diamond, tungsten carbide, corundum.
- Disposable ballerina drill. Designed for large holes.
General rules, useful tips
After choosing a tool, you need to figure out how to drill tiles so that they do not crack. There are a few general rules:
- First pass. Performed on a prototype. This makes it possible to understand the principle of operation of the nozzle, the features of its behavior.
 Performed on a prototype. This makes it possible to understand the principle of operation of the nozzle, the features of its behavior.
 - Marking. Marked with a pencil or marker. For convenience, so that the label does not “fly off”, masking tape is glued to the tile. It is more convenient to mark the drilling point on it, the marker will not be erased, the mark will not move.
- Drill or screwdriver speed adjustment. The tile/ceramic edge is drilled at a speed of 100-400 rpm. This is enough to pass through a strong top layer without damaging the tile.
- Underlay. If you are drilling a tile that has not yet been laid, then the underlying surface must be flat. If you do not follow the rule, then when you press the tile, it may burst.
- Drilling time. The tool head gets very hot. Therefore, the speed of work is small, without strong pressure on the drill. In extreme cases, the working area is wetted with water.

Video: Drilling tiles carefully
Small diameter
If you need to drill a small hole (up to 20 mm) on the wall , then use special nozzles with a tip in the form of a spear or one-sided sharpening 907. Suitable for multiple use.
Tape the area where the hole will be. Marking is applied to it. It is not recommended to drill closer than 15 mm from the joint. The edge may chip off. In this case, it is better to select a point directly between neighboring elements.
A special drill is used to penetrate the hard top layer of porcelain stoneware. The remaining thickness and body of the wall is drilled with a concrete drill or a universal nozzle.
Drill diameter 2-3 mm larger than than dowel or plug. When working with an electric tool, you must carefully monitor its position.