Concrete slab for house extension: Can a Concrete Slab Be Extended? – What Blueprint
Can a Concrete Slab Be Extended? – What Blueprint
Concrete slabs are one of the most used types of foundation and horizontal structural components of any structure. It is cost-effective to build, and it is efficient in its purpose.
Since it is so common and knowing that the function of buildings changes over time, the question now is if a concrete slab can be extended.
Yes, a concrete slab can be extended. This will involve a lot of changes in your current home since concrete slabs have many requirements, and a change in the slab entails a lot of additions to utilities, fixtures, and other building components.
In this article, we’ll be going more into what concrete slabs do and what concrete slabs need. It’s important to know these concepts first before going into how the extension actually works so that you can understand why things are done the way they are.
Read on if you plan on extending your concrete slab or if you plan on doing any renovations that might affect your concrete slab.
What are the functions of a concrete slab?
A concrete slab is the horizontal structural member that allows for activity and space within a building. Concrete slabs can either be suspended or on the ground level. The former means that it is on the building’s upper levels, while the latter means that it is in contact directly with the ground.
Concrete slabs are used in conjunction with beams and columns to support the weight of the building, fixtures, and users. Even in foundations, ground-level slabs are supported by a structural system of beams and columns to ensure that the load of the building is evenly distributed and transferred to the grounds.
What makes slabs so essential is the fact that the majority of the loads will come from this component of the buildings. Columns, walls, beams are all relatively light compared to the amount of force that comes from the slabs. In fact, it’s common practice in the industry to calculate forces based on the surface area of the slab and the columns and beams that support that area.
This is why proper construction and the structural planning of the slabs of the building are a must for the building to stand properly.
When to extend a concrete slab
The necessity of extending your concrete slab comes from the need to have a new space. This type of renovation is one of the longest and most expensive types as it entails building new walls, columns, beams, roofs, windows, utilities, etc.
Since a slab is such a fundamental part of a building’s structure, extending it entails extending the entire building itself. Changes in the upper levels will also require changes on the ground level unless you plan on adding a small veranda.
A concrete slab may be extended when you need new floor space, specifically for the upper levels, as there can be no floor without a slab. There is a big difference as to how concrete slabs are made depending on their usage.
One key component that will always remain true for anything that involves concrete is the need for rebars.
Rebars make up for an aspect that concrete lacks in, which can handle tension forces. In this sense, the rebar and the concrete could be considered equally important when considering extending a concrete slab.
A brief explanation of concrete during construction
Concrete during construction, especially in the case of concrete slabs, will probably require a concrete factory to deliver the wet concrete to the site.
This is because, since you are extending a concrete slab, it’s assumed that there is already a built structure, which entails that there is limited space to work around with. This will require an entirely new approach compared to how you would go about constructing a house from scratch.
How concrete is poured in this situation is usually with a hose. As soon as the rebars and the ground is prepared, as well as the formworks, the extension can begin.
Concrete takes 28 days to reach its full strength. During this period of curing the concrete, it must be regularly wet to ensure that the concrete does not become too brittle when it finally sets.![]()
During this period, while the concrete is still somewhat workable at around the 7th or 14th day, depending on the mixture for the concrete and the type of concrete it is, other structural components are then added. Usually, the only things that should be attached to the slab at this stage are the columns and the walls.
How to prepare for a concrete slab extension
Since extending a concrete slab is a structural renovation, this entails that it will require a lot of preparation work and a lot of additional construction. Since you’re having a slab constructed, it is automatically assumed that you will have everything that comes with a slab also constructed: the columns, walls, beams, roofs, and the finishes and utilities.
Make sure that you have allotted enough space for such a construction project to proceed. This includes making sure that there is enough space for materials to fit through and enough space for storage for materials that should ideally be kept on site.
DIY Concrete Slab extension
There are scenarios where you can actually extend a concrete slab that does not require help from a contract or an architect. Although, it does help to have an expert to make sure nothing goes wrong and the quality of the extension will be great. This could only be done if you plan on extending the ground floor concrete slab of your house and if there will be no structurals above your house.
This can be labeled as adding a pavement around your house, but it still technically extends your concrete slab on the ground level. This can also be labeled as a Patio once the extension has reached a certain size. Simply adding the formwork, pouring in the concrete, and adding the finishes on top can already be considered a renovation.
The reason you can do this without an architect or an engineer is that there are no structural loads involved with this type of renovation, and it won’t affect your home’s structural planning in general. This, of course, will depend on the complexity and the importance of the extension to your house. It will always be highly recommended to hire professionals when making any changes to your house to avoid making mistakes and ensuring that everything goes well.
Conclusion
Concrete slabs are an essential part of a building. Without a slab or any proper structural component, it would be impossible to perform activities inside a structure, especially in the upper levels.
A concrete slab extension is an arduous task but the benefits and future utility that it provides is definitely worth the cost and effort. Again, any renovation made to a house can be seen as a future investment as the prolonged use of the added spaces and functions make it worth the expenses.
Extend Concrete Patio – How to extend an existing concrete slab
If you have a concrete slab or concrete patio in your backyard that you wish you could extend, you are a lot like me two years ago. When I bought my most recent fixer-upper, there was a super small concrete slab/patio in the backyard that was too small and in too much disrepair for any practical use.
In order to get a usable backyard concrete slab, I decided to take on the challenge of extending the existing concrete patio slab by roughly four feet. Although you might think that four feet of extension is hardly worth it, it was absolutely necessary in order to have a safe landing for my deck.
Before this project, I had ZERO concrete experience. However, after a lot of research and a can-do attitude. I took the existing concrete slab you see below (it was horrible, wasn’t it..)
My Existing Concrete Slab (Before it was extended) – Yea, it was bad
And I turned it into this extended concrete patio:
The extended concrete patio
This article will outline both the successes and failures that were experienced as part of this existing concrete slab extension. I definitely made some mistakes, and I hope that you can learn from them. At the very end of this article, I will answer the question of How much does it cost to extend concrete patio.
If you are more of a visual learner, you can watch my step-by-step Youtube Video That shows every step in the process of extending a concrete patio (including many of my lessons learned):
 youtube.com/embed/URTGmSfBxeg?feature=oembed” frameborder=”0″ allow=”accelerometer; autoplay; clipboard-write; encrypted-media; gyroscope; picture-in-picture” allowfullscreen=””> Learn How to extend a concrete patio through my Youtube Video: How to extend an existing concrete slab
I have broken down the process of extending a concrete patio into the following steps:
- Step 1: Plan out your project
- Step 2: Prepare the sub-base for your slab extension
- Step 3: Install concrete forms
- Step 4: Install steel reinforcement
- Step 5: Mix up and Pour your Concrete
- Step 6: Finish your Concrete
- Step 7: Conclusions and Lessons Learned
Now, let’s get into the nitty-gritty of how to extend an existing concrete slab.
Step 1: Plan out your project
Before you even start thinking of mixing any concrete, there is a lot of planning that needs to be done in order to extend a concrete patio.
Will you reuse your existing concrete slab? Will you put a re-surfacing skim coat on your existing slab? Will you raise the patio or slab? Will you demolish and remove your existing slab because the condition is so poor? How thick will your new concrete slab be? Will it match the thickness of your existing slab?
These are just a few of the questions you will need to ask yourself as you plan to extend an existing concrete slab.
Although my existing concrete patio was in pretty bad condition, I decided to poor a new 2” concrete layer on top of the existing concrete instead of ripping out all of the concrete and starting with a clean slate. In hindsight, it would have been WAY smarter to demolish the existing concrete slab and start from scratch – but you live and you learn. Once I decided that I was going to be putting a 2” concrete topper layer on top of my existing concrete, I started thinking about how I was going to actually extend the slab.
Because the primary reason for extending my concrete slab was to allow for an adequately sized landing for my stairs, I determined that extending my existing concrete slab by 4’ would be sufficient. Once I decided how much larger I was going to make my slab, it was time to start thinking about preparing the sub-base for my concrete patio extension.
Step 2: Prepare the sub-base for your slab extension
Based on the research I performed, I decided that I was going to have 4″ thick slab with a 4” sub-base of gravel. Therefore, I started excavating the area where I was going to extend my slab. After excavating down approximately 8”, I compacted the soil using a hand tamp.
Excavate the area for your slab and then compact the dirt
If you have a larger excavation area, you may want to consider renting a gas powered or electric compactor from your local hardware store.
After compacting the soil, you will want to pick up a load of 57 stone (or crusher run) from your local stone supplier. You could also use crushed stone for the sub-base since it generally compacts a little better. Add a bit of water to the stone (to help with compaction) and then compact it.
Backfill your concrete slab excavation with 57 stone or crusher run gravel
Step 3: Install concrete forms
Once the sub-base of stone has been compacted, you will need to set up your “concrete forms”. For my concrete forms, I simply used a 1”x6” pieces of lumber and arranged them in a rectangle as needed to get my shape for the new section of slab. You will need to adjust the forms to the desired height (you might need to rearrange some of the stone), and then secure them in place using stakes on the backside of the form. Refer to photo below:
Set up your concrete forms
Installing concrete forms takes a bit a patience to make sure that everything is lined up, square, and at the right height (i.e. level). You are basically creating a mold for the concrete. Installing the concrete forms properly is imperative to successful slab extension project, so take your time to get it right!
Make sure that you take drainage into account when you are setting up your forms. You want to ensure that your newly extended concrete patio will drain AWAY from your home. Check out my Youtube Video for additional info and tips on drainage and establishing your form slope.
Step 4: Install steel reinforcement
Although concrete has outstanding compressive strength, it is actually quite weak when subjected to shear and tension forces. In order to compensate for this, steel rebar or wire mesh is typically added to the center of slabs to provide additional strength to the concrete.
Because my extended concrete slab is only going to be exposed to foot traffic, I decided to use steel mesh instead of rebar for the majority of my slab extension. I cut the steel mesh using metal snippers and performed a dry fit within the concrete forms to make sure that everything fit properly.
Cutting and installing my wire rebar mesh
To try and minimize the possibility of a crack forming where the new concrete slab meets the existing concrete slab, I decided to drill into the existing concrete and insert a piece of rebar. I understand that this is hard to explain, so refer to the photo below:
I embedded a piece of rebar into the existing concrete patio in order to join my existing patio into the concrete slab extension
To do this, I used a 5/8” carbide tipped masonry bit to drill about 6” into the existing slab. A hammer drill will make this much, much easier. Once the 6” hole was drilled, I injected some epoxy into the hole and then inserted a 12” piece of rebar (1/2” diameter) into the existing slab about 6” – leaving 6” to extend into the new concrete.
Although this may have been overkill, my logic was that this piece of rebar would help to tie the existing slab into the new slab – minimizing the possibility for a concrete crack along the joint.
Step 5: Mix up and Pour your Concrete
Before you start mixing up your concrete, calculate the approximate amount you will need. Concrete is typically measured in cubic yards (CY). In order to calculate the CY of concrete you will need, multiply the length of you slab extension (ft) by the width of your slab extension (ft), by the depth of your new concrete slab (ft). This will give you the Cubic Feet of Concrete you need. To get Cubic Yards, divide your cubic feet by 27. There are also many online calculators that will calculate your volume of concrete for you. I recommend this one.
Once you have your CY of concrete calculated, you can either order concrete to be delivered by a concrete truck or you can mix the concrete by hand using bags. Obviously, I do not recommend mixing a bunch of concrete by hand, but this will likely be your cheaper alternative (and the one that I went with).
We needed 85 Concrete Bags to extend our concrete patio
For my project, we rented a concrete mixer from our local box store and mixed around 85 bags of concrete. It was pretty brutal.
Here is a look at the concrete mixer we rented from Home Depot
In hindsight, I would have called in a truck delivery. We continued to mix the concrete, bag after bag, and then dumped the concrete on top of the prepared sub-base.
Here we are dumping the mixed concrete onto the prepared gravel sub-base and wire rebar mesh
Step 6: Finish your Concrete
After applying all of the mixed concrete to the extended concrete patio area, I placed a piece of lumber across the top of the concrete forms and used it to “screed” the surface of the concrete. This screeding step removed any of the large lumps and filled any of the voids.
Use a board to screed the surface of your concrete slab extension
After screeding, it was time to move on to concrete “finishing”, which is where things started to go down hill. Finishing concrete is difficult and is an art…
I am not an experienced concrete finisher and I made a lot of mistakes during this process. I highly recommend that you perform some research on how to finish concrete properly. However, I will outline my mistakes so that you can hopefully avoid them yourself.
First, because we were mixing bag after bag, the first batches of concrete mixed were setting up rather quickly by the time we had had mixed the last bag. This is another reason why having a concrete delivery truck may be a good idea.
Second, I did not rent the necessary finishing tools in order to give myself a good chance of providing a smooth finish. I did not rent a bull-float, which was a huge mistake looking back. Instead, I tried to finish the entire area of concrete using a hand trowel. It did not go very well…
Me attempting to finish the concrete with a hand trowel
In order to provide a rounded edge, I used a concrete edger tool and ran it along the edge of the concrete forms. Overall, the roundover edge turned out pretty well.
After doing my best to make the slab as uniform and smooth as possible, I used a broom to give the surface of the concrete a “broom finish” texture and then I let it dry overnight.
Step 7: Conclusions and Lessons Learned
As you may have guessed from my tone in Step 6, the extended concrete slab surface looked really rough. It was not a smooth finish at all. I ended up having to apply a concrete surface coating to get a more uniform and smooth finish. In order to do this, I used a product called “Newcrete” and I applied it over the whole concrete surface. This definitely helped to improve the look of my slab and gave me a final result that I was happy with.
Overall I learned the following from my concrete patio extension project:
- Make sure that you do your research ahead of time – there are a lot of nuances to concrete
- Be sure to rent the right tools – renting a bull float would have been a game changer for my concrete patio extension project
- Consider having your concrete delivered by a a concrete truck – mixing concrete by hand is strenuous and can be difficult to finish once the first few batches start to cure.
Overall, this was a pretty difficult DIY project. I learned a lot, but I would definitely think twice before attempting this one on on your own.
How much does it cost to extend concrete patio
As promised, here is a breakdown of how much it costs to extend a concrete patio:
- The 85 bags of concrete cost $358
- The concrete mixer rental cost $48 (for a 4 hour rental)
- Allowance for Misc. tools, rebar mesh, etc: $100
Therefore, the approximate cost for my ~55 square foot concrete patio extension was around $500.
Thanks so much for checking out ATImprovements! If you learned something from this project, you might also like these other DIY Projects:
How to Build a Fire Pit: How to Build a DIY Fire Pit Table (And save hundreds of dollars in the process!) – (atimprovements.com)
How to Install a DIY wire / Cable Railing: DIY Cable Railing – How to Install Cable Railing Step-by-Step – (atimprovements.com)
How to Build Hexagon Shelves: DIY Hexagon Shelves (Honeycomb Shelves) – (atimprovements.com)
How to Patch a Hole in Concrete Foundation: How to Patch a Hole in Concrete Foundation – (atimprovements.com)
Thanks!
DISCLAIMER: This is a reference guide only. Links included in this article might be affiliate links. If you purchase a product or service with the links that I provide I may receive a small commission. There is no additional charge to you! Thank you for supporting ATimprovements so I can continue to provide you with free content each week!
How to build a Slab-on-Grade
Slab-On-Grade Construction – Technical Guide
Deciding to build your home with a slab-on-grade foundation instead of a conventional basement or raised crawlspace foundation can greatly reduce your environmental impact during construction, and has the potential to offer significant financial savings as well.
By replacing concrete with lower-impact and better performing building materials like high performance insulation, you can eliminate many tons of greenhouse gas emissions from your building materials as well as during the future operation of the home.
Slab-on-grade construction is a somewhat uncommon method of home building that replaces the conventional foundation wall and basement or crawl space with a concrete slab that rests directly on grade. The technique lends itself to most types of terrain, with the exception of heavily sloped sites, and increasing the performance of slab on grade floors is simply done by adding insulation – yep, we have a guide for how to insulate slab on grade floors when building, here.
Why build on a slab instead of a basement?
To save money and carbon emissions, and have a healthier and more durable house. For a detailed guide on choosing between a Slab on Grade or a Basement for a home foundation see here, but we’ll give conclusions below.
Typically, the construction of a single family home in Canada & North America starts with a poured concrete footing followed by an 8-inch thick foundation wall, generally 8 to 10 feet in height.
In a cold climate zone a basement foundation counts on being buried at depths of between four and five feet to protect the footing and basement floor from freezing temperatures. Since this creates additional floor area underground, it is a natural desire to claim that space, and so born is the basement rec room or man-cave – and it’s important to understand how to choose between a crawlspace or a slab foundation too.
Whether you start construction with a slab-on-grade or a foundation, in the absence of bedrock both will be resting on dirt. So one is not more ‘stable’ than the other, or more suceptible to frost heave than the other, if it is properly insulated around the perimeter.
In the case of a ‘walk-out basement’ you effectively have a slab, only with a very expensive and poorly insulated wall. Envision a slab-on-grade as a four-sided walk-out basement with much cheaper and better performing walls, though if you do need to build a basement to optimize sqft on your building plot, then learn best practice for insulating when building a new basement here, or if you have a basement and need to learn how to finish a basement & insulate correctly to avoid mold, see here.
In cold climates, a slab-on-grade can easily avoid frost heave with the simple addition of skirt insulation, which protects the perimeter of the footing so that it will never be subjected to the freeze/thaw cycle, and instead remain close to the relatively constant 8 -10 degrees Celsius temperatures of the earth. You can find a step by step detailed guide to building a frost protected slab on grade foundation here.
|
Skirt insulation around slabs and foundations prevents concrete from freezing © CMHC |
Skirt insulation is a very simple and cost-effective solution that could (and should) be applied to basement foundations as well, as it would help reduce heat loss by keeping basement walls at a much higher temperature.
In addition to significant cost savings during construction, a slab-on-grade will reduce the risk of problems caused by humidity and water infiltration, which are typical challenges faced by basements.
What’s wrong with basements?
The costs – ecological and financial:
Concrete is very expensive to purchase and extremely energy intensive during manufacturing. The process of building a basement requires 3 costly visits from a team of concrete trucks; once to pour a footing, again to pour walls, and a third time to pour a basement floor. For every ton of concrete produced, one ton of greenhouse gases is released into the atmosphere.
Once a basement foundation is completed, a subfloor must be built on top. This is another cost that will be incurred in order to create a surface on which living space is built, compared to a slab which is ready for construction.
* A home built on a slab-on-grade has a lower risk of flood damage, which is favourably looked upon by insurance companies and can be reflected in your premiums. Basements can also be susceptible to Radon gas infiltration, so to learn how to prevent Radon gas levels being high in homes, see here – or to specifically find out how to remove Radon gas form basements and crawl spaces, see here.
Health, durability and comfort:
Despite how common finished basements are, there is a general lack of understanding of the additional challenges posed by building underground. This can mean that in a lot of cases, the proper building techniques are not being followed, according to the principles of building science.
Poorly constructed basements are subject to rot and mold.
Case in point: walls need to be able to dry in at least one direction. In a cold climate, the walls above ground should be designed to dry predominantly to the outside. But, since soil is for all intents and purposes ‘water’, basement walls need to dry to the inside.
Common building practice does not account for this, and a disturbingly high number of homes have moisture damage and mold, which is in part blamed for an increase in respiratory illnesses.
This happens for a number of reasons, the first of which is that we finish basements too soon. Concrete is largely made up of water, and with soil on the exterior a foundation requires a minimum of 2 years to fully dry to the inside.
Secondly, as the National Building Code now requires basements to be insulated and new home buyers usually want the space finished, the cheapest way for developers to do this is to treat them as they do above ground walls. So basements are generally insulated on the inside, long before unwanted moisture has left, and in the same manner that we build above ground where walls can dry to the exterior.
By sealing moisture sensitive materials (wood and fibreglass insulation) between a wet concrete wall and a polyethylene vapour barrier, we are inviting mold. A slab-on-grade foundation avoids this all together.
Why we like slab-on-grade construction
Quality of life:
Polished concrete slab-on-grade floor © Bala Structures
In comparison to a basement, building above ground has the advantage of providing more natural light. It also helps maintain clean interior air quality as it reduces the possibility of mold.
What’s more, slab-on-grade construction can make your living space more comfortable. Thermal mass within the conditioned living space has the ability to absorb and store heat, greatly helping to regulate interior temperatures. Homes with significant thermal mass inside the building envelope are also easier to keep cool in summer.
Affordability:
Bringing a building project to the point where it is ready for main floor framing can be done much cheaper with a slab-on-grade than a basement. With a slab, the same milestone is reached without having to build an 8-foot concrete wall, nor do you have to build a wooden subfloor on top.
Comfort and efficiency:
In the absence of 5 feet of dirt, a slab-on-grade in cold climate zones requires additional measures to avoid frost heave, so it includes levels of insulation that otherwise seem to be omitted from basement construction. That insulation can be paid for with the thousands of dollars that would have gone into purchasing concrete for a foundation wall.
Slab floors also easily accommodate radiant floor heating, which offers a very balanced and comfortable environment, transforming the concrete mass into one big radiator.
One of the great advantages of radiant floor heat is that the further you get from anything radiating heat (imagine a woodstove), the cooler it gets. So heat is concentrated at ground level where we are rather than collecting in the highest points of our house, where we aren’t. This facilitates an overall lower temperature, without sacrificing comfort. Warm feet are happy feet!
Reducing your environmental impact:
The slab-on-grade building method reduces your impact on the environment in two different ways: by greatly reducing the amount of CO2 produced in the manufacturing and transportation of materials, and by providing – dollar for dollar – a wall with much better insulation.
By building a slab-on-grade home, you are choosing to substitute foundation walls with above-ground walls. In other words, you are replacing concrete walls with a much more affordable and energy efficient wall assembly.
This is why Slab-on-Grade foundations are frequently chosen for Passive House certification in North America, Passive Solar Homes & LEED certified homes.
|
Slab on Grade Foundation © Yanni Milon for Ecohome |
Sacrifices, challenges and solutions:
In order to be able to make an informed decision about this type of foundation, there are several precautionary steps that must be taken and challenges to be addressed.
Your state or municipality may require plans that have been approved by an engineer, and some may not be familiar with slab-on-grade homes. Be sure to check with your municipality or state before beginning construction, and even before getting too far into your building plans.
While we are firmly in favour of slab-on-grade construction as a concept, we recommend carefully considering your options before moving ahead with any plans. There are many legitimate reasons to begin construction with a basement foundation:
- A slab-on-grade will require more above ground space, so in order to have the same size of home you will need to build either out or up. You may run into height restrictions where you choose to build, meaning you may have to build out instead of up. This is not always possible, certainly if your site is an urban infill lot, leaving you two options: a smaller house or a basement.
- Despite their disadvantages, basements are often very practical since they provide a significant amount of storage space. Without a basement, everything that would have been down there must fit into the rest of the house or in the garage or shed.
- Basements usually house mechanical rooms. Keep this in mind during the design phase should you choose a slab, as mechanical systems will now need to be housed on the main floor.
 And don’t be stingy with that space – think about everything that may potentially need to go there: a furnace, boiler, water heater, air exchanger, water softener, septic pump, sulphur tank, central vac, etc.
 And don’t be stingy with that space – think about everything that may potentially need to go there: a furnace, boiler, water heater, air exchanger, water softener, septic pump, sulphur tank, central vac, etc.
Slab-on-grade design:
Given that you are committing a certain area of the main floor to mechanical systems, this is as good a time as any to plan some storage, and maximize the efficiency of that room. Along with some space for storage, you could consider including laundry facilities, or even a pantry in that space.
With the amount of action going on in a mechanical room, it will be a bit noisy. In order to mitigate that, those walls should include sound reducing measures.
Plumbing systems are normally accessible from the basement or a crawl space, but not so with a slab. The nature of a slab-on-grade means plumbing systems will be permanently fixed in the concrete and not easily modified.
Installing a second toilet on an existing drain pipe is virtually impossible in this situation, so plan ahead. Worth investigating is the concept of ‘flexible housing design’ where future changes are anticipated so that the necessary infrastructure can be put in place at the time of initial construction.
Insulated slab-on-grade waiting for vapour barrier installation © Ecohome
Floating slab / Monolithic slab:
The term floating slab refers to a two-stage slab construction, where footings are individually
poured, and the centre floor of the slab is poured after footings have cured. The forms of a monolithic slab are designed so that both footing and slab floor are poured at the same time.
We have found no great advantage to support either method – the main reason for a pouring a monolithic slab would be to reduce the visits by the concrete trucks to one only.
To learn more about Slab on Grade foundations enjoy the EcoHome Video Guide for a
Slab on Grade Foundation with Solar Powered Radiant Heating below, or discover many more articles about Design, Insulation, Forming, Heating & Pouring of Slab on Grade by Clicking HERE all from the EcoHome Green Building Guides
Or, you can watch all the EcoHome Slab On Grade Videos in this Playlist
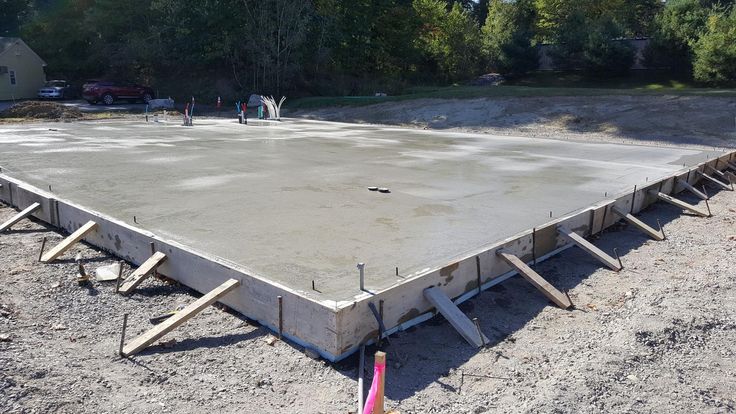
pouring a concrete slab to an extension before or after weather tight.

Thepenetrator1
-
-
#1
Hi all,
I’m currently self-building an extension to my property. I’m adding an 8m x 6m single storey extension with steel work to possibly take a second storey in the future (when I win the lotto!) I’m wondering can I put the concrete floor slab, insulation and screed in once the roof is on and weather tight. I was thinking of overlapping the DPC with the DPM and taping the seams when it comes to it. I already have my hard core down as the clay was pretty messy with the dog forgetting to wipe his paws! My main concern is as I’m doing it weekend to weekend if it rains once the DPM is down I will be creating a massive swimming pool with floating insulation lilo’sl. I have a soil pipe which runs through the site at an awkward height meaning once the insulation is needed to go in the soil pipe will have to be moved meaning I will have to move out as the toilet will be relocated. I also have an existing kitchen extension which will be demolished and the floor will continue through at this height giving me my finished floor level with the final screed. The steels will go in once the walls are up to height and the concrete will cover the base of the steel column support bolted down to the pad foundation rather than shuttering this off and back filling at a later date. So I’m wondering is this common practice with something of this nature?
Thanks all
Please see photos thanks
Sponsored Links
noseall
-
-
#2
The floor slab can go in later, yes. As long as you make provision for the DPM to lap onto the DPC with some slices of poly DPM left hanging out of the joint for future lapping.
How are you going to ‘move’ the soil pipe? Are you relocating it along with the bathroom and cloak suite onto a proposed outside wall? Bit baffled by this.
We don’t let stuff like that hinder us from getting our slab down. We often have to run temporary waste pipes above slab level and out of say a doorway and into a relocated drain.
Also the screed can deal with any discrepancies once you demolish the old kitchen structure and give you a scar free finished floor.
Thepenetrator1
-
-
#3
Thanks noseall,
Im relocating the downstairs toilet and the toilet in the bathroom. They will both be located on the side wall of the property and a new soil stack teed into the sewage line. Can I use the wide dpc left sticking out of the brickwork as the skirt or is it better to better a skirt of the Dpm?
Thanks
noseall
-
-
#4
Use a wide strip of DPM, it will be easier to manipulate. We tack ours to the wall once it is built.
Sponsored Links
-
-
#5
Bit late as your levels might be wrong but you could have forgone the screed and just made the concrete base as you ff. Infact stick an extra 50mm of eps down and you’ll have still saved yourself money. If you can borrow or buy a bull float the finish you get would be fine for any floor finish, or you could get someone to power float it and use that as your finish.
I’ve just done an internal floor with a colour hardener and power floated that in, it looks quite good!
Depending on your orientation you may find it a bit dindgy at the back of the extension have you considered some roof lights?
DIYnot Local
If you need to find a tradesperson to get your job done, please try our local search below,
or if you are doing it yourself you can find suppliers local to you.
Select the supplier or trade you require, enter your location to begin your search.
Plumber / Gas EngineerElectricianBuilderDecoratorBuilders’ MerchantPlumbers’ MerchantTile SupplierFlooring Supplier
Are you a trade or supplier? You can create your listing free at DIYnot Local
How to Pour a Concrete Slab Successfully — The Family Handyman
Building a shed this spring? Before you can even think about raising the walls, it’s imperative to have a solid foundation.
 Learn how to pour a concrete slab successfully here.
1
/
32
Zurijeta/Shutterstock
How to Pour a Concrete Slab: The Basics
The bulk of the work for a new slab is in the excavation and form building. If you have to level a sloped site or bring in a lot of fill, hire an excavator for a day to help prepare the site. Then figure on spending a day building the forms and another pouring the slab.
2
/
32
How Much to Pour a Concrete Slab: Estimate a Concrete Order
Here’s a brief rundown of what you need to know about concrete and concrete prices. We’ll use a 10 x 10 ft. slab as an example:
Calculate the volume you need in cubic yards. Multiply the length (10 ft.) by the width (10 ft.) by the depth (.35 ft., or 4 in.) and divide it by 27 (the number of cubic feet in a cubic yard). You get 1.3 cu. yds. Then add 10 percent to allow for spillage and slab depth variations to help determine the concrete cost per yard.
Don’t overspend on your next masonry job. Here’s how to estimate a concrete order:
3
/
32
How to Pour a Concrete Slab: Prep the Site
Before you get started, contact your local building department to see whether a permit is required and how close to the lot lines you can build. In most cases, you’ll measure from the lot line to position the slab parallel to it. Then drive four stakes to roughly indicate the corners of the new slab. With the approximate size and location marked, use a line level and string or builder’s level to see how much the ground slopes. Flattening a sloped site means moving tons of soil. You can build up the low side, or dig the high side into the slope and add a low retaining wall to hold back the soil. Note: Before you do any digging, call 811 or visit call811.com to arrange to have your local utilities locate and mark buried pipes and wires.
4
/
32
Get more expert tips for pouring a concrete slab yourself in this video:
5
/
32
Choose Boards for the Form
Start by choosing straight form boards. For a 5-in.-thick slab with thickened edges, which is perfect for most garages and sheds, 2×12 boards work best. For a driveway or other slab without thickened edges, use 2x6s. If you can’t get long enough boards, splice them together by nailing a 4-ft. 2×12 cleat over the joint. Sight down the boards to make sure they’re aligned and straight before nailing on the cleat.
7
/
32
Finish the Form
Cut a second board to the width of the slab. Nail one end to the braced form and use the calculated length of the diagonal to set the form at 90 degrees. Drive a stake at the end. Level, straighten and brace the second form board. Add the third side.
Note: Cut the two side form boards 3 in. longer than the length of the slab. Then cut the end boards to the exact width of the slab. You’ll nail the end boards between the side boards to create the correct size form. Use 16d duplex (double-headed) nails to connect the form boards and attach the bracing.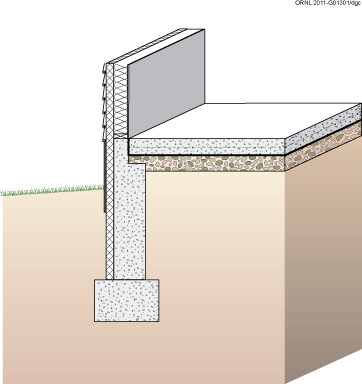 Nail through the stakes into the forms.
8
/
32
Krashenitsa Dmitrii/Shutterstock
Calculate How Much Fill You’ll Need
The key to crack-resistant concrete is a firm base that drains well. Unless you have sandy soil, this means adding a layer of gravel.
With the forms in place, you can estimate how much fill you need. To calculate the amount of fill needed, stretch a string across the top of the forms and measure down to the ground. Do this in three or four spots and average the results. Subtract the thickness of your slab. Then use this depth to calculate the cubic yards of fill needed. Be sure to ask what your supplier recommends for fill under slabs. Crushed concrete compacts and drains well.
For smaller concrete projects, follow these tips for mixing concrete to the perfect consistency.
9
/
32
Fill and Level the Base
Spread the fill in layers no more than 3 in. thick and tamp each layer with a rented plate compactor. Leave a 12-in.-deep by 12-in.-wide trench around the perimeter for a thickened edge. If you’re building a heated structure on the slab, cover the ground inside the concrete forms with 6-mil polyethylene sheeting. Otherwise you can leave it uncovered.
10
/
32
Peangdao/Shutterstock
Reinforce with Rebar
Concrete needs reinforcement for added strength and crack resistance. It’s well worth the small additional cost and labor to install 1/2-in. rebar (steel reinforcing bar). You’ll find rebar at home centers and at suppliers of concrete and masonry products (in 20-ft. lengths). You’ll also need a bundle of tie wires and a tie-wire twisting tool to connect the rebar.
11
/
32
Lay Out the Rebar Grid
Cut and bend pieces of rebar to form the perimeter reinforcing. Splice the pieces together by overlapping them at least 6 in. and wrapping tie wire around the overlap. Wire the perimeter rebar to rebar stakes for support. Then cut and lay out pieces in a 4-ft.-on-center grid pattern. Wire the intersections together. You’ll pull the grid up into the center of the concrete as you pour the slab.
12
/
32
Dampen the Base to Lengthen Finish Time
To extend your finish time on hot, sunny days, spray bone-dry ground with water to keep the base from sucking the water out of the concrete. A water spray also slows down curing, which makes for a stronger slab. If there’s no hose bib nearby, you can use the water and hose that are onboard the truck. If you don’t have water on site, also use the truck hose to fill a couple buckets of water for cleaning your tools after the truck leaves.
13
/
32
Photo: Courtesy of Jackson Professional Tools
Pouring Day Prep
Have at least two contractor-grade wheelbarrows on hand and three or four strong helpers. Plan the route the truck will take. For large slabs, it’s best if the truck can back up to the concrete forms. Avoid hot, windy days if possible. This kind of weather accelerates the hardening process—a slab can turn hard before you have time to trowel a nice smooth finish. If the forecast calls for rain, reschedule the concrete delivery to a dry day. Rain will ruin the surface.
14
/
32
Family Handyman
Safety Gear
- Wet concrete on skin can cause everything from mild redness to third-degree, permanently disfiguring chemical burns. You and your helpers should take these steps:
- Wear eye protection. Sandy concrete splashes can wreak havoc with your eyes. Wear long pants and long sleeves to protect your skin.
- Wear tall rubber boots if you have to wade in wet concrete.
- Wear gloves (rubber gloves are the safest bet).
Plus: Safety gear every DIYer should own.
15
/
32
Drier Mix is Better
Adding water to the concrete makes it flow down the chute and fill your forms more easily, but it also weakens the final slab. A drier mix is more difficult to pack into your form, especially around the edges, but makes for a stronger, more crack-resistant slab.
16
/
32
Pour in Sections
Pour the concrete in small sections, spreading the concrete by moving the chute back and forth and by having the driver pull forward as you go. Once the truck has reached the end of a section, spread the concrete out evenly, and a touch higher than the form, with a concrete placer/rake. Don’t fill the whole form or giant sections because the mound of extra concrete you’ll drag back with the screed board will get too heavy.
17
/
32
Concrete Pouring Communication
Here are some basic hand signals to help you communicate with the truck driver. Make sure you can see the driver’s face in the side-view mirror—if you can’t see him, he can’t see you.
18
/
32
Initial Leveling
Drag a straight 2×4 (screed board) across the top of the concrete forms to level the concrete. Make multiple passes if needed to create a flat, evenly filled area. Have a helper add or remove concrete in front of the screed as you pull it. Check out the detailed steps for pouring a perfect concrete slab here.
19
/
32
Screed Board Basics
Pull back the excess concrete with the screed board. As you pull, slide the screed board back and forth to help you prevent voids in the surface. Have a mucker (that’s what they’re really called) pull the excess back and fill in low spots during the screeding process. You want enough concrete to fill all voids, but not so much that it’s difficult to pull the board. About 1/2 to 1 in. deep in front of the screed board is about right. It’s better to make several passes with the screed board, moving a little concrete each time, than to try to pull a lot of concrete at once.
20
/
32
Screeding Tip
A slight crown (bow) in the screed board is not only OK; it’s preferred. Just make sure the crown side is facing up. That will create a slight hump down the middle of the slab, so water will drain off. If the crown faces down, you’ll end up creating a trough in the slab where water can pool.
21
/
32
Bull Float to Smooth the Surface
Start bull-floating the concrete as soon as possible after screeding. The goal is to remove marks left by screeding and fill in low spots to create a flat, level surface. Bull-floating also forces larger aggregate below the surface. Keep the leading edge of the float just slightly above the surface by raising or lowering the float handle. If the float angle is too steep, you’ll plow the wet concrete and create low spots. Three or four passes with the bull float is usually sufficient. Too much floating can weaken the surface by drawing up too much water and cement.
22
/
32
Bull-Float Tip
Larger aggregate (chunks of gravel) near the surface may cause spalling (chipping). Our expert pushes the larger rocks deeper into the mix. He does this by making small stabbing motions with the float on the first return pass. Start floating the slab immediately after the pour is complete
23
/
32
Float in Two Directions When Possible
In addition to pushing the aggregate down under the surface, a bull float helps level the slab, so start floating right after you screed, while the concrete is still wet enough to shape.
Whenever possible, run the bull float perpendicular to the direction you pulled the concrete with the screed board (this slab was too long to do that). That will help to smooth out the ridges, troughs and valleys created by screeding. Our expert likes to float in both directions when he can.
Need to remove a concrete slab? Here’s what you need to know.
24
/
32
Round the Edges
Round the edges of the slab with an edging tool after any surface water disappears. Work the edger until the edge is solid and smooth. The concrete should be firm before you start edging. If the edger is leaving behind large wet grooves, wait awhile before you continue. Longer strokes will result in straighter lines.
25
/
32
Hand Float as Needed
Run a hand float over the ridges left behind by the edger. A hand float is also a good tool for dragging small amounts of material or moisture (cream) into any voids or dry spots near the edge.
26
/
32
Add Grooves
Grooving creates a weakened spot in the concrete that allows the inevitable shrinkage cracking to take place at the groove rather than at some random spot. Cut in control joints to create individual sections no larger than 8 x 8 ft. for a 3-1/2-in.-thick slab, and no larger than 10 x 10 ft. for a 5-1/2-in.-thick slab.
Want a change for your old concrete patio? Cover it with pavers.
27
/
32
Nonslip Surface Ridges
A broom finish creates a nonslip surface for wet conditions. The harder the concrete, the less rough the broom will leave the surface. Try to achieve a surface rough enough for traction but not so rough that it hurts to walk on barefoot. If the broom starts to bounce as you pull, lower the angle of the handle. If possible, broom perpendicular to the direction that the slab is most visible. Wavy, crooked broom lines are less noticeable that way.
Plus: Learn how to stain concrete for a beautiful finish.
28
/
32
Post-Pour Prep
The slab can be walked on and the forms pulled in 24 hours. Wait at least 10 days to drive on it, and avoid spreading any ice melting chemicals for the first two years. Ask your neighbors to keep an eye on their pets before you pour, and use caution tape around the area to warn the pesky neighbor kids.
Plus: Learn how to remove stains from concrete.
29
/
32
Dampen to Cure Slowly
Keep concrete moist after it’s poured so it cures slowly and develops maximum strength. The easiest way to ensure proper curing is to spray the finished concrete with curing compound. Curing compound is available at home centers. Follow the instructions on the label. Use a regular garden sprayer to apply the compound. You can lay plastic over the concrete instead, although this can lead to discoloration of the surface.
Plus: How to fix cracks in concrete.
30
/
32
How to Pour Concrete Steps
Cutting away the damaged concrete and pouring a new concrete cap on the step can often repair badly broken concrete steps. The fix will be durable and you avoid the high expense of a complete tear-out.
31
/
32
Family Handyman
Leftover Concrete Project
Add a touch of charm to your front yard by creating oversized concrete house numbers. Watch the video to see how this project comes together; then follow the simple steps included to make some for your front yard.
32
/
32
Family Handyman
Build a Table with a Concrete Top
Here’s another idea for using leftover concrete: Create a polished concrete table with a solid wood base, with inlays of glass, leaves, tile or other materials. This project is simple enough for even beginning woodworkers to tackle.
Originally Published: August 29, 2019
2022 Foundation Costs | Build Concrete Basement Cost Calculator
Foundation Cost
A typical 1,200-square-foot house foundation costs $6,900 to $16,200 for a concrete slab, or about $40,000 for a full basement (unfinished). A floating slab for a mobile home runs $4,600 to $14,000, while a standard 24’ x 24’ (2-car) garage foundation costs $3,100 to $4,800.
| National Average Cost | $9,260 |
| Minimum Cost | $4,600 |
| Maximum Cost | $26,750 |
| Average Range | $5,128 to $19,350 |
The main types of foundations are slab-on-grade, which is the most common and least expensive; a crawl space foundation that has short walls, pier and beam, or a full basement foundation with 8’-10’ walls for living or storage.
| Foundation Type | Average Cost Per Square Foot | Average Total Cost |
|---|---|---|
| Monolithic Concrete Slab | $5 | $4,600 – $20,000 |
| Stem Wall Concrete Slab | $6 | $7,000 – $20,000 |
| Pier and Beam | $9 | $7,200 – $13,500 |
| Crawl Space | $13 | $10,300 – $19,400 |
| Basement | $33 | $26,800 – $50,300 |
A correctly installed foundation holds the weight and load of the house in place, keeps moisture out, insulates against the cold, and resists the movement of the surrounding earth.
Table of Contents
- Foundation Cost
- Foundation Cost Calculator
- Per Square Foot
- Concrete Slab
- Pier and Beam
- Full Basement
- Crawl Space
- Monolithic
- Stem Wall
- Raft
- Footings
- Excavation
- Building For New Home
- Adding To Existing House
- Daylight or Walkout Basement
- Digging & Pouring
- Poured Walls
- Block Foundation
Foundation Cost Calculator
Foundation installation prices include the cost of excavation, grading, and the number of footings. The type of foundation and depth dictate the cost of materials and labor. Calculating your house foundation cost depends on:
- Site and ground conditions, including local flooding, earthquake, frost heave, wind, and termite prospects.
- Design factors imposed by the buyer, lender, and local building codes.
- Construction practices.
| Square Feet | Concrete Slab | Pier and Beam | Basement (Unfinished) |
Crawl Space | Raft |
|---|---|---|---|---|---|
| 800 | $4,609 – $10,816 | $7,200 | $26,811 | $10,320 | $6,000 |
| 1,000 | $5,750 – $13,520 | $9,000 | $33,506 | $12,920 | $7,500 |
| 1,200 | $6,936 – $16,224 | $10,800 | $40,239 | $14,480 | $9,000 |
| 1,500 | $8,670 – $20,280 | $13,500 | $50,299 | $19,350 | $7,500 |
| 2,400 | $13,872 – $32,448 | $21,600 | $80,478 | $30,960 | $12,000 |
Foundation Cost Per Square Foot
A foundation costs $5 to $33 per square foot depending on the type. A poured concrete slab costs between $5 and $14 per square foot, while an unfinished basement foundation averages $33 per square foot.
| House Foundation Types | Cost Per Square Foot |
|---|---|
| Monolithic Concrete Slab | $5 – $14 |
| Stem Wall Concrete Slab | $5 – $6 |
| Pier and Beam | $7 – $11 |
| Crawl Space | $7 – $14 |
| Raft | $5 – $10 |
| Basement (unfinished) | $33 |
Get free estimates from foundation pros.
View Pros
Concrete Slab Foundation Cost
A concrete slab foundation costs $5.75 to $13.52 per square foot, with most homeowners spending between $5,750 and $20,280. The total cost depends on the size, condition of the soil, location, and whether it’s a monolithic slab, stem wall slab, or a raft foundation.
The average cost to build a 1,350-square-foot concrete slab foundation for a one-story home is $8,600. If extra footings are required, add $6.53 per square foot to the cost.
| Pros | Cons |
|---|---|
|
|
Concrete slabs are used as foundations for houses at an average thickness of 6 inches, but also poured 4” to 8” thick for mobile homes, garages, workshops, driveways, and patios.
Pier and Beam Foundation Cost
Pier and beam foundations cost between $7 and $11 per square foot, averaging $7,200 and $13,500 total. The more uniform shape the house is, the lower the cost. When different sections of the house start projecting off from a central shape, with sloping in the site, it’s more expensive.
| Pros | Cons |
|---|---|
|
|
- Piers – Concrete piers are drilled about 12 inches below the frost line and poured first. Piers are spaced 5 to 10 feet apart depending on the condition of the soil, the design of the home, and the weight load.
- Joists & Grade Beams – Then, wood or concrete joists are run horizontally every 12 feet along the top of the piers. Some companies use steel jack stands or masonry blocks, or even hardwood posts, rather than concrete. The foundation (whether wood or concrete) rests on the beams.
Basement Foundation Cost
Installing an unfinished basement foundation costs $33 per square foot on average, while the cost to finish a basement adds $32 and $47 per square foot. Most homeowners spend $26,000 to $80,000 to build their full basement foundation with adequate moisture prevention and drainage.
| Pros | Cons |
|---|---|
|
|

Crawl Space Foundation Cost
A crawl space foundation costs $7 to $14 per square foot, or between $10,320 and $19,350 total. Framing a house on a crawl space foundation costs 30% more than one over slab-on-grade. Many contractors recommend building a basement over a crawl space due to the ROI on extra living or storage space.
The cost is somewhat higher than a pier and beam home due to the additional excavation costs and concrete perimeter walls, but also protects against water damage. Homeowners can install ventilation areas throughout the perimeter, or completely close off the crawl space.
| Pros | Cons |
|---|---|
|
|

Hire a foundation expert today.
View Pros
Return to Top
Concrete Foundation Cost
The average concrete foundation costs $5,100 to $15,400, or between $6.83 and $10.32 per square foot for both materials and installation. Your final cost will depend on the size and thickness of the slab, and if you add any special reinforcement such as wire mesh or rebar.
This is the easiest and cheapest foundation for a home. One solid slab is poured for the entire house, and it doesn’t require deep excavation.
| Square Feet | Pouring Labor | Materials (6″ Thick) | Average Total |
|---|---|---|---|
| 400 | $1,040 | $1,524 | $2,564 |
| 500 | $1,300 | $1,905 | $3,205 |
| 576 | $1,498 | $2,195 | $3,692 |
| 600 | $1,560 | $2,286 | $3,846 |
| 800 | $2,080 | $3,048 | $5,128 |
| 1,000 | $2,600 | $3,810 | $6,410 |
| 1,200 | $3,120 | $4,572 | $7,692 |
| 1,500 | $3,900 | $5,715 | $9,615 |
| 2,400 | $6,240 | $9,144 | $15,384 |
Monolithic Slab Foundation Cost
A monolithic slab foundation costs $5 to $14 per square foot installed. Monolithic slab is a concrete slab that is poured once at least ½ a foot above the ground and is thicker around its perimeter. Within this category are one-way beam and two-way beam slabs.
| Square Feet | One-Way Beam | Two-Way Beam |
|---|---|---|
| 800 | $7,840 | $10,816 |
| 1,000 | $9,800 | $13,520 |
| 1,200 | $11,760 | $16,224 |
| 1,500 | $14,700 | $20,280 |
| 2,400 | $23,520 | $32,448 |
- Monolithic one-way beam – costs $9.80 per square foot on average. This type of foundation pours the beams (or footers) at the same time as the slab.
- Monolithic two-way beam – runs about $13.52 per square foot. A one-way beam supports the foundation on two edges, while the two-way beams support all four edges at the same time, providing a more stable base.

Stem Wall Foundation Cost
The cost of a stem wall foundation is $51 per linear foot installed, averaging $7,000 to $20,000 total. A 37’ x 8’ tall wall costs about $1,900 each. The cost to build a 1,350-square-foot stem wall foundation is $7,550 on average.
After the rebar is set and the footings are poured, polysteel or masonry stem walls forms are insulated with polystyrene blocks, and the stem walls are poured. All rough-in plumbing is set up, and then the concrete is pumped in using a boom pump over a compacted area filled with structural sand fill.
A stem wall foundation works well when building on a slope, as different sections can be built to different heights. The slab can be elevated to accommodate septic systems based on gravity flow. Stem walls add stability to homes and buildings in areas where earthquakes may happen, or soil may become unstable.
Average Cost of a Raft Foundation
Raft foundations cost from $5 to $10 per square foot. The cost to build a 1,350-square-foot raft foundation is an average of $10,125. Reinforcing the concrete with rebar costs an additional $1 to $2 per square foot.
Mat or raft foundations are used where there are poor ground conditions, such as soil that is unable to bear any loads. The concrete slab rests on steel-reinforced soil, columns, or walls. The load or the weight of the house is stabilized through the raft foundation and dispersed to the earth.
Labor Cost to Pour a Concrete Foundation
The total cost to pour a concrete foundation $6.41 per square foot on average. The labor cost to pour concrete is $2.60 per square foot, while the cost of concrete is $3.81 per square foot. Concrete contractors charge $45 per hour with additional concrete delivery fees of $60 or more.
To pour a 1,200-square foot foundation, $3,120 would be attributed to labor, and $4,572 in concrete costs. It typically takes three workers a full 8 hours to pour a foundation.
Concrete slab foundations for homes should be 6” thick with 3,000 PSI concrete. After the lot is graded with sand and crushed gravel, and footings are poured, one solid slab is poured for the entire house, usually inside a wooden frame filled with rebar—iron mesh—to strengthen the concrete slab and prevent cracking.
Get free estimates from foundation pros.
View Pros
Return to Top
Basement Foundation Cost Calculator
The cost to build a basement is $26,000 to $80,000. The cost to pour a basement averages $33 per square foot, which is lower than the cost of adding a room at $86 to $208 per square foot. Basement installation cost depends on excavation, grading, materials, labor, size, style, and finishing.
| Square Feet | Excavation | Flooring | Stem Walls | Total (Unfinished) |
|---|---|---|---|---|
| 800 | $12,000 | $4,609 | $10,202 | $26,811 |
| 1,000 | $15,000 | $5,750 | $12,756 | $33,506 |
| 1,200 | $18,000 | $6,936 | $15,303 | $40,239 |
| 1,500 | $22,500 | $8,670 | $19,129 | $50,299 |
| 2,400 | $36,000 | $13,872 | $30,606 | $80,478 |
Once excavation work is complete, a typical unfinished basement is built in three steps – footings, walls, floor.
- The footings are poured and the ground graded.
- A drainage system is set up around the exterior of the footings to carry water away from the foundation.
- The walls are poured into grooves cut into the footings, so they are fastened to the footings.
- The forms are then removed, and the dirt backfilled.
- A vapor barrier is laid.
- The concrete floor is poured last.
- The exterior walls are waterproofed.
- Precast concrete steps are usually dropped in place with a crane.
| Item | Percent of Budget | Cost Per Square Foot |
|---|---|---|
| Excavation (10’ – 12’ depth) |
45% | $10 – $20 |
| Foundation Floor | 17% | $5.75 |
| Stem Walls | 38% | $12.75 |
Basement Excavation Cost
Basement excavation costs for a foundation range from $10 to $20 per square foot, or between $1. 65 to $3.31 per cubic yard. Prices can vary significantly based on the condition of the soil (light, wet, or rock), and the type of equipment used.
| Soil Condition | Cost Per Cubic Yard |
|---|---|
| Light Soil | $1.65 – $2.18 |
| Moist Soil | $1.96 – $2.64 |
| Wet Soil, Loose Rock | $2.48 – $2.69 |
| Blasted Rock | $3.31 |
| Depth & Difficulty | Cost Per Square Foot |
|---|---|
| 12’ – 18’ Depth | $10 – $12 |
| Deeper Footings | $12 – $15 |
| Difficult Soils | $15 – $20 |
While a basement is one of the most expensive foundations to build, it’s the most versatile; giving additional living and storage space without the expense of a complete add-on to the home. Building a basement as part of new home construction can greatly increase the value of your home.
Building a Basement for a New Home
Basement installation for new construction costs $26,000 to $50,000 on average. Excavating at least eight feet deep then grading the land will be the most significant expense followed by materials, drainage systems, sealing, and waterproofing.
There are three main types of basements to choose from based on your specific location, soil, and groundwater conditions. Standard full basements typically have 8′-10′ walls and can only be accessed from inside the house.
- Standard Full Basement
- Walk-out Basement
- Daylight Basement
Daylight or Walkout Basement Cost
A typical walkout basement costs $47,000 to $100,500. A walkout basement costs about $20,000 more than a regular full basement and requires extra excavation and grading.
If your home is built on a hillside, you have the option of creating a daylight basement, which allows for full-size doors and windows that let natural light into the area through exposed walls. The cost to build a daylight basement is higher than a full basement, due to:
- More extensive underground footings.
- Higher foundation walls on the low side.
- Higher construction costs from building on a slope.
- Additional excavation.
- More site preparation on hillsides because of the complexity of working on them and getting materials to and from the site.
- Breaking the basement slab to reach the sewer line.
Finished or Unfinished Basement?
During construction, you have the option to build a finished basement for an additional $22,000 to $46,000 to make it into a livable space with rooms. If you plan to finish your basement, there are few things you can do now, at the foundation stage.
- Dig deeper and get higher basement ceilings than the typical 8 feet in height to make room for the pipes and ductwork. Ideally, excavate to give your basement 9’ or 10’ ceilings.
- With higher walls comes the need for thicker walls, as they need to be strong enough to safely support both the lateral load and the load above the house. Upgrading to 3,500 PSI concrete is recommended for this purpose.
- Prevent potential moisture and soil gas problems with vapor barriers and adequate ventilation.
 Upgrading to 3,500 PSI concrete is recommended for this purpose.
Hire a pro to install your foundation.
View Pros
Cost to Add a Basement to an Existing House
The average cost to raise a house to add a basement is $40,000 to $50,000, or about $4o to $100 per square foot. Almost 20% of that amount goes toward raising the house. A structural engineer determines if the home is structurally sound enough to lift above the foundation.
There are risks in raising a house and repairs that should be factored into the total cost. A room addition may be more cost-effective (and easier on your home) than adding a basement.
| Square Feet | House Raising | Foundation | Total |
|---|---|---|---|
| 800 | $8,000 – $14,400 | $26,811 | $37,811 |
| 1,000 | $10,000 – $18,000 | $33,506 | $47,506 |
| 1,200 | $12,000 – $21,600 | $40,239 | $57,039 |
| 1,500 | $15,000 – $27,000 | $50,299 | $71,299 |
| 2,400 | $24,000 – $43,200 | $80,478 | $147,678 |
| Level | Cost Per Square Foot | Description |
|---|---|---|
| Level 1 | $10 – $18 | House elevation service only. It does not include installation of a new foundation system, reconnecting plumbing or electrical systems, or other finishing tasks. It does not include installation of a new foundation system, reconnecting plumbing or electrical systems, or other finishing tasks. |
| Level 2 | $30 – $60 | House elevation and installation of the new foundation system. |
| Level 3 | $60 – $90 | House elevation and all elements of the architectural, engineering, and structural design tasks. |
Basement Extension Foundations Cost
When building an extension, you’ll find that you might have to dig the foundation deeper than the existing foundation to match updated building codes. If your house is old, you might have to underpin the existing foundation to avoid possible structural damage from attaching the extension to it.
Cost To Dig A Basement
The cost to dig a basement for new construction is $12,000 to $36,000. Basement excavation costs $10 to $20 per square foot and takes 2 to 4 weeks to dig-out and build. Digging a basement under an existing house averages $47 per square foot because the house must be raised first.
An engineer’s survey is required before digging to make sure there are no underground utilities in place. Also, many houses built on a slab foundation have their plumbing under the slab, which has to be rerouted and pushes the price up.
If grading is required to direct water away from the house, fine grading and leveling land costs $0.40 to $2.00 per square foot. Installing a yard drainage system costs $1,000 to $4,000.
Cost To Pour A Basement
The concrete and labor cost to pour a basement depends mostly on how deep the excavation work needs to be and the condition of the soil. Homeowners report spending $14,811 to $44,478 or an average of $18.52 per square foot to pour their basement foundation and walls. A monolithic slab will cost more to pour than a regular slab because the footings have to be set in place before the pour.
| Square Feet | Stem Walls | Concrete Floor | Total |
|---|---|---|---|
| 800 | $10,202 | $4,609 | $14,811 |
| 1,000 | $12,753 | $5,750 | $18,503 |
| 1,200 | $15,303 | $6,936 | $22,239 |
| 1,500 | $19,129 | $8,670 | $27,799 |
| 2,400 | $30,606 | $13,872 | $44,478 |
Cost of Poured Concrete Foundation Walls
Most basement and concrete foundation walls are a minimum of 8” thick. An 8-inch poured concrete wall costs $12.75 per square foot, or $1,224 poured, on average.
Ready-mix concrete costs $119 to $147 per cubic yard, and an 8-inch thick basement wall measuring 12’ x 8’ will use 2. 37 cubic yards of concrete, so concrete alone costs $282 to $348 per average wall. Walls taller than 8 feet should be 10 inches thick rather than the standard 8 inches for shorter walls—to withstand the pressure of lateral soil movement.
Poured concrete foundation walls are preferable to block foundations because they are stronger, hold heat better, are more fire-resistant, and are more watertight. And although cracks can happen in any piece of concrete, a poured concrete wall is more waterproof than a block foundation, which has many seams. One of the few cons is that they must cure on-site, so water or freezing temperatures might affect the cure.
Block Foundation Cost
A block foundation costs between $7,950 and $41,600, priced at $12 to $18 per square foot. Materials alone cost $7 to $9 per square foot for walls using 8” x 16” blocks, without the footings. A concrete block wall has an exterior concrete form with reinforcing steel and filled with concrete or cement grout.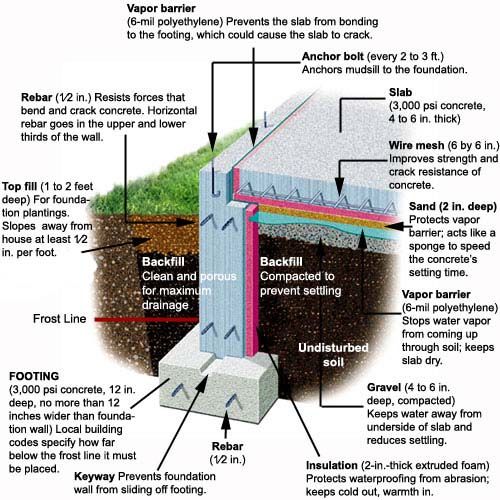
| Item | Average Cost |
|---|---|
| Building Permit | $500 – $1,500 |
| Excavation and Grading | $1,150 – $15,000 |
| Forms and Finishing | $1,600 – $5,000 |
| Concrete Reinforcement | $150 – $500 |
| Concrete | $2,500 – $12,000 |
| Waterproofing and Sealing | $1,900 – $6,300 |
| Inspection | $150 – $1,300 |
| Total | $7,950 – $41,600 |
Block foundations cost more than a poured foundation because of the skilled labor needed to lay the blocks, but blocks incur a big leak risk via all the seams between blocks and mortar. Mortar doesn’t last as long as the blocks and will start to chip away after 20 – 30 years. However, they can hold up more compression weight than poured walls.
Return to Top
Best Foundation For A House
The best foundation for a house depends on the soil, groundwater conditions, and frost line of the ground in the area—the depth to which the groundwater in soil freezes. The foundation has to go below the frost line because freezing water expands 9% and disturbs the foundation’s structural integrity.
To choose the best type of foundation and to calculate the house foundation cost, you’ll need to know:
- The condition of the soil on the lot.
- How much grading and excavation work will be required.
- How deep the footings need to go and how many are required.
- If there are any flooding or moisture concerns.
- How deep the foundation needs to be to go past the frost line.
Shallow vs. Deep Foundations
Home foundation construction is either considered shallow or deep. Deep foundations cost more and require additional excavation, materials, and labor.
- Shallow Foundation – A shallow foundation, slab-on-grade, or floating slab is a concrete slab that is formed from a mold set into the ground below the frost line. Shallow foundations transfer the building loads to the earth through a slab of concrete. This type of foundation is often used in warmer climates where ground freezing and thawing is less of an issue.
- Deep Foundation – A deep foundation is typically used in poor soil conditions, unlevel ground, or if the structure needs to be raised to prevent flooding. Deep foundations are constructed from steel, wood, or reinforced concrete, and require the assistance of a structural engineer.
 Shallow foundations transfer the building loads to the earth through a slab of concrete. This type of foundation is often used in warmer climates where ground freezing and thawing is less of an issue.
Return to Top
Cost To Rebuild or Replace Foundation
For concrete slabs, the cost to rebuild a foundation is $16 per square foot, with the average homeowner spending $20,000 to $40,000 on foundation replacement. Foundation repairs cost from $600 to repair minor cracks, up to $10,000 or more for major repairs that require hydraulic piers.
The cost of demolition of the old slab foundation runs about $21 per cubic foot, and a new typical 6″ thick concrete slab costs $6. 83 to $10.32 per square foot.
| Square Feet | Demolition | Poured Concrete and Labor | Total |
|---|---|---|---|
| 800 | $8,420 | $4,609 | $13,029 |
| 1,000 | $10,525 | $5,750 | $16,275 |
| 1,200 | $12,630 | $6,936 | $19,566 |
| 1,500 | $15,788 | $8,670 | $24,458 |
| 2,400 | $25,260 | $13,872 | $39,132 |
Consult with foundation pros today.
View Pros
Foundation Replacement Cost Factors
- Structural Report – An engineer’s report may be required before you can begin work, which costs $750 to $1,500. The engineer will give an unbiased recommendation on the best kind of foundation replacement for the house which could end up saving you money.
- Raising the House – The cost to lift a house and replace the foundation depends on the size of the house and the numbers of stories. Expect to spend $10,000 – $40,000 to raise a house to replace the foundation with a concrete slab or piers.
- Excavation – The cost of excavation is $10 to $20 per square foot or $2.51 to $2.68 per cubic foot. Excavation may be required if the previous space for the old foundation, once demolished, isn’t deep enough. The soil will need to be moved away from the old foundation to build new forms for the new foundation.
- Rebuilding – The cost of the new foundation is the same as if you were doing new construction. A simple slab concrete foundation costs $6.41 per square foot and will be the most economical decision after paying for the house to be raised.

Replacing Different Foundation Types
- Crawl Space – Crawl space repair and cleaning costs $1,500 to $15,000 for mold removal, ventilating, insulating, and reinforcing or replacing the foundation joists. Remove and replace any wet wood, insulation, or posts. Install a new moisture barrier sheet to keep it dry.
- Pier and Beam – Replacing or stabilizing piers under your house due to shifting soil or the need for a stronger foundation, costs from $950 – $1,600 per steel pier or $1,400 to $2,100 per helical pier. A high-end repair of piers and beams will cost about $10 per square foot.
- Concrete Slab – A typical reinforced 6” slab concrete foundation costs $6.41 – $10.32 per square foot. If you need to correct drainage problems at the same time (which can often be the cause of cracks), it can cost $1,100 – $5,500.
 Remove and replace any wet wood, insulation, or posts. Install a new moisture barrier sheet to keep it dry.
Return to Top
Average Mobile Home Foundation Cost
A permanent foundation for a mobile home costs between $3,000 to $36,000 depending on the type. A floating slab costs $4,600 to $14,000, while a crawl space runs $4,900 to $16,800. To put a basement foundation under your mobile home costs $23,000 to $36,000.
| Foundation Type | Average Cost |
|---|---|
| Pier and Beam | $3,000 – $8,000 |
| Floating Slab | $4,600 – $14,000 |
| Crawl Space | $4,900 – $16,800 |
| Basement | $23,000 – $36,000 |
- Pier and Beam – A pier and beam foundation for manufactured and mobile homes is common. They are secured to the sill of the foundation with a nailing strip. Ground anchors attached to the home with steel straps can help resist wind uplift, and they can be used in conjunction with stabilizer plates.
- Floating Slab – A slab foundation for a mobile home is one of the best options for colder climates. They don’t need to be measured precisely to the base of the house. Slab foundations need to be insulated around the perimeter to keep the ground under the home warmer, or they tend to shift with soil movement during frost heave. Mobile homes must be anchored to the foundation with anchors embedded in the concrete.
- Crawl Space – One of the difficulties with moving a manufactured home onto a crawl space foundation is that the foundation has to match the exact dimensions of the house. If the foundation site isn’t accessible from the street to place the home with rollers, a crane will be required, directing the chassis beams onto the installed concrete, wood, or steel piers.
- Basement – Installing a manufactured home onto a basement foundation is difficult. The outside walls of the foundation must be the exact length and width of the mobile home, and not many contractors have enough experience to do the job correctly. Part of the difficulty is attaching the shearwalls and chassis properly to the foundation system, and all the rough-ins to go under the floor must be designed before the house goes in. Foundation bolts are usually used to secure the home.
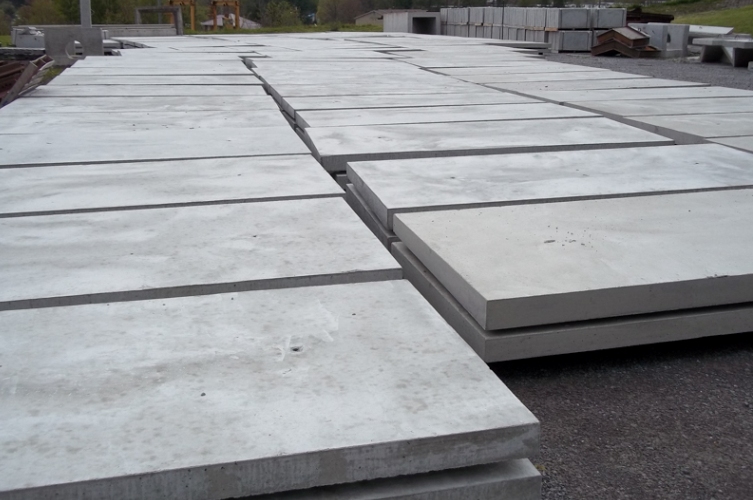 They don’t need to be measured precisely to the base of the house. Slab foundations need to be insulated around the perimeter to keep the ground under the home warmer, or they tend to shift with soil movement during frost heave. Mobile homes must be anchored to the foundation with anchors embedded in the concrete.
 Foundation bolts are usually used to secure the home.
It’s always best to check with the manufacturer of the home for their recommendation of the best type of foundation to go with the home you purchased.
Return to Top
Garage Foundation Cost
A 24’ x 24’ (2-car) garage foundation costs $3,059 to $4,787, while a 16’ x 24’ (1-car) slab costs $2,039 to $3,191 installed. Prices range from $5.31 to $8.31 per square foot for a 4” reinforced concrete slab, and $6.83 to $10.32 per square foot for a 6” slab installed.
| Size (4” Deep) | Square Feet | Average Cost |
|---|---|---|
| 16’ x 24’ | 384 | $2,039 – $3,191 |
| 20’ x 20’ | 400 | $2,124 – $3,324 |
| 24’ x 24’ | 576 | $3,059 – $4,787 |
| 20’ x 30’ | 600 | $3,186 – $4,986 |
| 36’ x 24’ | 864 | $4,587 – $7,179 |
You may need to have the land graded which carries a $3,000 minimum job charge. You’ll also need excavation done at $2.51 to $2.68 per cubic foot, which costs $482 to $515 for a 24 x 24 garage slab, but this should be included in the quote from your contractor.
If you’re building a garage slab right beside the home and sharing a wall, you could run into a lot of structural damage if the new slab starts to shift. An engineer can design it with expansion joints to offset this possibility.
Return to Top
Additional Foundation Estimates
Below are average overall cost estimates by structure.
| Structure | Average Cost |
|---|---|
| Concrete Slab | $5,000 – $15,000 |
| Full Basement | $26,000 – $80,000 |
| Garage | $2,000 – $5,000 |
| Mobile Home | $3,000 – $14,000 |
Cement Foundation Cost Factors
Cost factors that increase or decrease the cement foundation cost are
- Required prep work on the lot
- Grading
- Concrete thickness
- Moisture barrier
- Forms and reinforcements used
- Delivery and pouring or pumping costs
- Finishing methods
Concrete Footing Cost
Concrete footings cost $6. 53 per square foot or $154 per cubic yard. Footings add $5,224 to $15,672 to the cost of the foundation, with prices growing as the footings go deeper and wider. The estimated cost for footings and a foundation is usually quoted together by contractors.
Footings must extend below the surface of the earth, deep enough to get past the unstable soil that exists in many locations. Usually, footings are poured separately from the slab, except in the case of monolithic slabs.
Cost of Pilings for Foundations
The cost of pilings for securing your foundation costs $15,000 at minimum, plus site testing, which could add $20,800. It’s expensive because of the steps involved—soil study, excavation, concrete, capping beams, rebar, design, and project management—possibly more expensive than a solid column base.
The cost of driving in the pilings can vary based on the materials used.
| Type | Minimum Cost |
|---|---|
| Wood – Treated or Untreated | $20,000 |
| Steel Pipe Piling | $20,000 |
| Prestressed Concrete Piling | $28,000 |
| Steel HP-share Piling | $20,000 |
| Concrete-filled Steel Piling | $15,000 |
In the case of unstable soil, pilings are used in conjunction with piers—they go even deeper beneath the piers to provide additional security and spread the weight load of the building. Sometimes you can dig out tunnels for the pilings around piers with an auger yourself, saving the excavation costs.
Pilings are sometimes necessary when the soil is soft, and when a solid base is not available at the proper depth. Also, it may be required when constructing a building near the seashore or riverbed.
Planning and Permit Prices
Some cities will charge $30 to $150 flat fee for your permit, while in other cities, building permits are generally figured as a percentage of the total job averaging $500 to $1,500. Your contractor should take care of the permits.
Building a foundation will always require a permit, but if you’re adding an extension or building a house, the permit for the entire project will cover the foundation.
| Total Price of Job | Price of Building Permit |
|---|---|
| $500 – $2,000 | $79 |
| $2,000 – $25,000 | $143 |
| $25,000 – $50,000 | $787 |
| $50,000 – $100,000 | $1,292 |
Foundation Inspections
Foundation inspections cost about $145 an hour, with most homeowners spending $150 to $1,300 total. Inspections verify that the new foundation meets all code requirements and will support the weight of your home.
The inspections will take place before you pour concrete and after the work is done. The pre-work inspection should take about 90 minutes, and you will receive a written report which will outline any changes that must take place before pouring.
Drainage and Radiant Heat
When installing a new concrete foundation, there are things you can do now that will be more difficult, if not impossible, to do after the foundation is poured.
Radiant heat adds $3 per square foot with most homeowners paying $4,800 to $10,000 on average. Drainage systems such as French drains and sump pumps cost between $2,500 and $12,000 to install.
| System | Average Cost |
|---|---|
| French Drain System | $6,000 – $12,000 |
| Sump Pump | $500 – $1,200 |
| Sump Pump System | $2,500 – $5,500 |
| Radiant Heat | $16 – $26/SF |
- French drains are installed around the foundation to drain water away from the house. The drained water is often directed to the sump pump, which forces the water away from the house. It’s easy to install while the house is under construction, but much more expensive to connect to an existing home.
- If your basement might be prone to water problems, a sump pump can help alleviate that.
- Radiant heat is a luxury item where all pipes need to be laid under the foundation, and the concrete is poured over them. You cannot install radiant heat under a concrete foundation at a later date. If you miss the boat, another option is to place it under your flooring.
- To provide better protection against moisture issues, install a gutter system, and invest a lot in the grading of the land before work begins.
 The drained water is often directed to the sump pump, which forces the water away from the house. It’s easy to install while the house is under construction, but much more expensive to connect to an existing home.
Foundation Insulation
Foundation installation costs about $2,000 on average. Many homeowners install skirting and vents around the crawl space or pier and beam foundation to allow for proper airflow, preventing moisture, and keeping critters out. Otherwise, they install a vapor/moisture barrier and dehumidifier. Homeowners who want more insulation under the floor will add spray foam, foam board, or batts between or across the bottom of the joists.
Cost To Seal Concrete
The cost to seal a concrete foundation professionally with an acrylic spray-on cure and seal will cost about $0.53 per square foot. Contractors typically charge a minimum fee of $100 to $200 regardless of project size and add 50% more to your total cost if two coats are required.
DIY costs range from $0.20 to $0.75 per square foot. Some decorative sealers will need to be reapplied every few years, while a penetrating sealer will need to be applied every 5 – 10 years.
The main reason you’ll want to seal your concrete is to keep water from eroding it and causing cracking. The cracks enlarge, and the water carries damaging salts and chlorides to the metal reinforcements damaging them as well. Applying a sealer will densify the concrete, giving it years of additional, crack-free life.
Cost to Lay A Precast Foundation
The cost to lay a precast foundation is $11 to $13 per square foot with more than 50% of the costs coming from labor. Prefab concrete slabs are poured and cured offsite then delivered to your job site and laid down over a prepared area.
Precast foundations are used for a shed or garage, but they are not strong enough for a home foundation. The most common use for pre-poured slabs is in the form of pavers installed in patios, driveways, and courtyards.
Return to Top
Hiring A Foundation Contractor
Before hiring a concrete contractor, be sure to get at least three formal bids. You want the best local contractor for the project at a price within your budget, but it’s usually not a good idea to take the lowest bid without verifying the following:
- Are A/A+ rated members of the Better Business Bureau.
- Have been pouring foundations for at least five years.
- Are insured and bonded.
- Are rated highly on HomeGuide and Google and can provide references from past work.
- Include all cleanup in the quote.
- Offer exact begin and end dates.
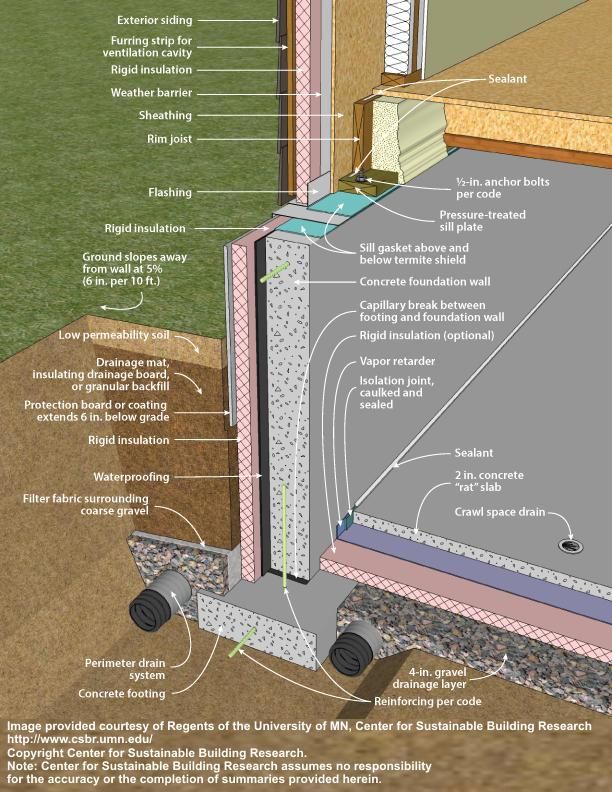
Get free estimates on HomeGuide from trusted foundation specialists:
Get free estimates
10 Sources
-
Pray, Richard. “2019 National Construction Estimator.” 2019. PDF file.
-
Guide to Foundation and Support Systems for Manufactured Homes. (2002).
huduser.gov/portal/Publications/PDF/foundations_guide.pdf
-
Foundation Requirements. (n.d.).
hud.gov/sites/documents/49303GC5GUID.PDF
-
Lowe’s Concrete Footings Calculator. (n.d.).
lowesforpros.com/l/concrete-footings-calculator.html
-
Foundations – State of Michigan. (2003).
michigan.gov/documents/Vol2-28UIP1Foundations-Frames_121070_7.pdf
-
Basement – Minnesota Sustainable Housing Initiative. (n.d.).
mnshi.umn.edu/kb/scale/basement.html
-
Elevating Your House. (n.d.).
fema.gov/pdf/rebuild/mat/sec5.pdf
-
Cost Effectiveness of Several Types of Foundation. (2016).
ijarsmt.com/docs/issues/dinesh-spatilprofanil-schander-58.pdf
-
Cost of Elevating A House Above The Floodplain. (2017).
dawsonfoundationrepair.com/cost-elevating-house/
-
Getting a Structural Engineer’s Report for Foundation Repair. (2018).
granitefoundationrepair.com/structural-engineers-report-foundation-inspection/
 (n.d.).
How to pour the foundation for an extension to the house: expert advice
Any extension, with the exception of country sheds, needs the construction of a reliable bearing foundation. Before making a foundation for an extension to a house, it is determined with its type, taking into account many factors.
Contents
- Types of extensions and their features
- What features of building materials should be taken into account when choosing the type of foundation?
- Choosing the type of foundation
- The most economical foundation is columnar
- Pile foundation
- The use of pile-grillage foundations is recommended in the following cases:
- The best choice of foundation is a monolithic slab
- How to properly pour the foundation for an extension
- Installation of an expansion joint
- Technology for building a strip foundation for an extension
Types of extensions and their features
The choice of foundation for an extension is largely determined by the type of future structure and the materials from which it will be built. Regulatory documents refer to extensions as part of the main building, built outside its outer walls and having at least one common main wall with it. Kitchens, living quarters, verandas, garages, terraces, etc. are being built as an extension. The main points in the construction of such objects are the correct construction of the foundation and its attachment to the old foundation.
What features of building materials should be taken into account when choosing the type of foundation?
Aerated concrete is a lightweight material that does not require a strong foundation. But it can give cracks during precipitation. Therefore, under it, as a rule, a tape base is constructed.
It is recommended to build an extension to the house from sip panels only on non-rocky soils with good bearing properties. Buildings made of such panels can settle faster than an old house.
Outbuilding brick is not the best material. The design will turn out to be heavy, massive, and during the draft it will pull the main house along with it.
Experienced builders recommend using the same material from which the house was built for the extension. Along with this, it should be borne in mind that the material of the annex should not be stronger, or rather, heavier than the structural material of the main building.
Choosing the type of foundation
The foundation is a load-bearing building structure. Its main function is the perception of the entire load from the building and its distribution over the base, which protects the building from subsidence and warping. The service life of not only the extension, but also the main building depends on the correct choice and calculation of the base. When choosing, we also take into account the composition and properties of the soil, the presence of groundwater on the site.
The following types of foundations are used for extensions:
- tape;
- columnar;
- pile;
- slab.

The strip base looks like a closed reinforced concrete strip built under the load-bearing walls of the building. It transfers the load from the structure to the soil. The strip foundation should be poured below the freezing point of the soil and above ground level by at least 0.5 meters.
There are monolithic and prefabricated foundations and the depth of pouring: it can be shallow or deep. Used for the construction of various buildings: from wooden to monolithic buildings. Suitable for all types of outbuildings. 9Ol000 Escalled logs
3.53%
Monolithic house
3.95%
House from foam blocks
3.72%
House from SIP panels
3.31%
voted: 3598
The most economical foundation is columnar
Another popular type of foundation is more economical – columnar. Along with low cost, it attracts with its simplicity of construction. Even a novice builder can make it with his own hands for an extension.
The foundation consists of a certain set of pillars in the form of supports that transfer the load from the object to the ground. It is used on dense soils. On sandy soils, peat bogs and similar unreliable grounds, it is not used.
One of the disadvantages of a column base is the ventilated space underneath. Eliminated by the arrangement of all kinds of protective shields.
Pillar foundations are suitable for wooden frame extensions to the house. Sometimes they are built under heavy brick walls, when it is necessary to deeply deepen the foundation, and it becomes unprofitable to fill in the tape.
Can be used on very heaving soils, since less forces are applied to the supports than to the belt. It is not recommended to use (except for weak soils) foundations on pillars with a height difference in the area of more than 2 m.
Pile foundation
Pile foundation is a certain number of piles dug up to the bearing layer. Such foundations are used on soils with poor bearing capacity. They pass unstable layers and transfer the load from the structure to solid layers of soil. Due to the special design, which does not allow the load from the construction to be redistributed between the piles, this type is rarely used. For this reason, it is mainly placed under log cabins, frame buildings. These structures are able to redistribute the load themselves.
In addition to the above, there is a more advanced type – a pile foundation with a grillage. Here the piles are connected by a strip of metal or reinforced concrete into a single device. This strip is called the grillage. It serves as a support for the walls, receives and redistributes the pressure from them, giving it to the piles.
This type of construction can also be used for brick extensions. Moreover, if low grillages are used, this type of foundation becomes even more reliable. Low grillages are usually made of reinforced concrete below ground level. It turns out, as it were, a finely ruined strip foundation. This technology allows you to provide a rigid connection with the piles, which makes the design almost perfect.
It is recommended to use pile-grillage foundations in the following cases:
- If the depth of weakly bearing soils (karst, forest soils, peat bogs, quicksand, vegetative and fertile soils) reaches more than 1.5 meters.
- For large elevation differences in the area.
- When building a frame extension. Putting it on the tape does not make sense – it turns out an excessive margin of safety, which is useless here. It is more profitable to make a pile or pile-grillage foundation with your own hands.
More often, choosing the type of foundation, they simply proceed from the lowest price of the issue. However, one must always take into account that any type of pile foundation is less reliable than slab and strip foundation, since it is impossible to know exactly what kind of soil is under each of the piles. As a result, when calculating the base, an increased margin of safety is included in the structure. Not 1.2 m, as usual, but not less than 1.4 m. At the same time, no one will give any guarantees anyway.
The best foundation choice is a solid slab
One of the most reliable foundations is a monolithic slab. It is a reinforced concrete mass poured under the entire area of the object, forming a large slab. Under it, you need a sand and gravel cushion. On unstable, loose soils, such a foundation can be the best solution.
The design of the slab itself is simple and reliable, but its construction requires a large amount of rebar and high grade concrete. Therefore, due to the high price for the construction of extensions to the house, it is rarely used.
Sergey Yurievich
Construction of houses, extensions, terraces and verandas.
Ask a question
After choosing the type of foundation, you need to calculate the volume of materials. Comparing the costs, choose the appropriate option.
Next, we make an accurate calculation of the elements of the selected base.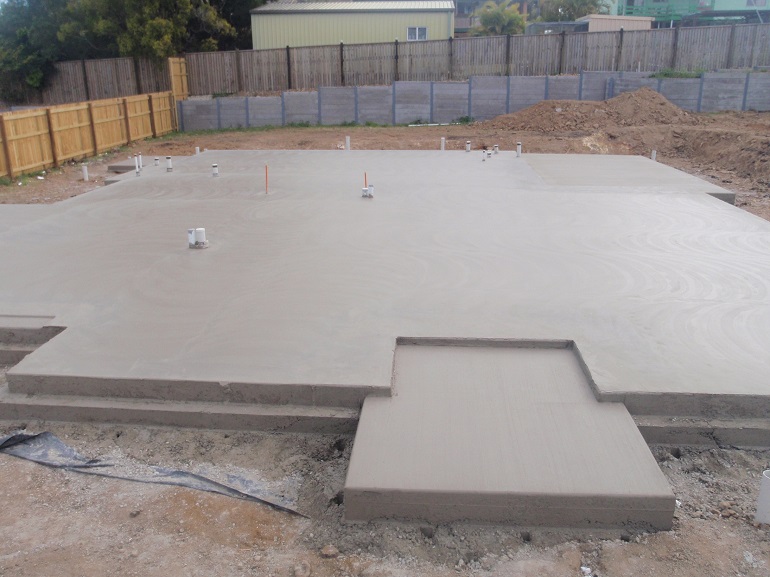 Depending on the geology at the site and the future load from the object, we determine the scheme and volumes of reinforcement.
How to properly attach an additional structure to the house
To determine how to correctly attach a new element to the house, the following factors should be taken into account:
- Soil properties – the old house on the foundation has already settled, but the extension is yet to be.
- The choice of technology for connecting the extension to the main house. A common roof over a house and an extension can only be erected on rigidly connected foundations.
To make the foundation for an extension to the house with your own hands correctly, you need to determine which foundation is used under the house, the depth of its occurrence. Then determine the composition of the soil, specify the point of its freezing.
It may be necessary to dig a hole in the area where the house will connect to the outbuilding. To determine the width of the base, a metal rod with a hook at the end is used.
Connecting the extension to the house
The most important moment in the construction of the extension is the choice of the option for connecting the extension to the house.
There are two options to choose from:
- Independent structure. It is selected if the construction site has unreliable soil with poor bearing properties. It is better to build an independent structure that will not be connected in any way with the main house. A technological gap is determined between the two buildings, which is filled with heat-insulating and waterproofing materials.
- Attachment of an extension directly to the house. This option is more time-consuming and involves compliance with all the necessary technologies and a lot of calculations and research. First of all, it will be necessary to properly build and connect the foundation of the extension to the base of the house using reinforced rods.

The roof of the annex is built under the roof of the house. The wall located between the extension and the house must be protected from water ingress through the joint between the two structures.
Ways of pairing foundations
Based on the choice of options for connecting the extension to the house, there are two ways to pair the bases:
- Rigid connection with reinforcement. It is acceptable if the house has been standing for at least 15 years and the foundation is well established. It is used in the presence of dense soils.
- Application of expansion joint. A simple and economical option. Can be used on all types of bases. As an insulating material, mainly roofing material is used.
 It is used in the presence of dense soils.
 Experienced builders make a continuation of the foundation for the extension at the time of construction of the main housing. This greatly facilitates the further construction of the extension.
In Russian conditions, it is recommended to pair the foundations of the house and the extension with a tooth and anchors. A pillow is made under the foundation of the extension: 15 cm of gravel and 15 cm of sand. The tooth is reinforced in 2 levels with steel reinforcement. The anchors connecting the foundations are made from the same reinforcement. Holes are drilled in the old foundation under the anchors, into which the anchors are immured. Anchors are connected with the reinforcing cage of the foundation of the extension by wire tying, without welding.
How to properly pour the foundation for an extension
The foundation is poured in such a way that it has time to gain 75% strength before the temperature drops to +15 degrees. The tape for the extension is first poured with a gap between it and the old foundation. At the ends of the reinforcement of the tape and anchors in the old foundation, elastic loops are bent and then welded. After the concrete has hardened, the initial gap is filled, and after the concrete plug has gained strength, you can build further.
Construction of an expansion joint
An expansion joint with a thickness of 2 to 5 cm is arranged from the bottom of the base and along the entire wall. To create a joint that is the same along the entire length, boards wrapped with roofing material are used.
The space between the walls is filled with insulation, and the seam itself is sealed or covered with flashing boards.
Technology for construction of a strip foundation for an extension
A monolithic strip foundation is prepared using concrete mortar and reinforcement. Formwork is placed in a dug pit. The reinforcement is laid and fastened, then poured with concrete. The manufacture of such a foundation takes several weeks, therefore, a prefabricated foundation is more often used, consisting of reinforced concrete reinforced blocks. They are connected with reinforcement, and the gaps are filled with mortar. The work takes several days, but lifting equipment is needed to complete them. In addition, the strength of the prefabricated foundation is lower than the monolithic one.
You can ask your question to our author:
How to make a foundation for an extension to a brick or wooden house with your own hands
Contents
- Foundation requirements
- Is it possible to connect the new foundation to the main one
- How to choose a foundation for an extension
- Preparatory work before pouring
- Required materials and tools for work
- Concrete preparation
- How to make a foundation for an extension to the house with your own hands
- Features of the formation of attached plates and strips
- How to attach a pile foundation
- The main nuances of work
- How to avoid errors
- Conclusion
With the advent of new family members, its head will certainly face the problem of obtaining additional residential meters. Having a house, you can solve it radically and quite economically in several ways: make a residential attic under the roof, or, if the size of the plot allows, attach a full-fledged room to the house (summer kitchen, veranda, workshop, garage). The second option is easier to implement and requires less expenses – the main thing is to make the right foundation for an extension to the house.
There are no special requirements for the construction of extensions – they are erected on the same basis as any other building. However, in the buried part, you can do without studying the soil, but simply navigate by the depth and design of the existing foundation. The material of the walls from which the extension is being built is also of decisive importance.
Autoclave gas-blocks are ideally suited for capital outbuildings, because:
- due to the enlarged format, the walls of them are built quickly;
- aerated concrete has a low thermal conductivity, so the room is warm;
- construction costs are moderate – especially if you choose an economical foundation.

Expert opinion
Vitaly Kudryashov
builder, aspiring author
Ask a Question
Important: The low mechanical strength of porous stone does not allow aerated concrete masonry, for example, on a metal foundation, as is done in the construction of frame structures. So that cracks do not appear in the walls, they must be based on a solid foundation: tape, slab or bored.
The main requirement for the extension is the absence of a rigid connection with the foundation and other structures of the house, since the difference in loads and the degree of shrinkage will certainly affect the integrity of the masonry and its finish. That is, it is necessary to fill in a new foundation without a reinforcing ligament with an existing monolith. Between them, along the entire height of the extension, a deformation seam is provided – a gap of 50 mm, filled with an elastic heat-insulating material (foam plastic).
Styrofoam is installed between the old and new foundations
It is easiest to focus on the structure of a house when choosing a foundation. However, if the house stands, for example, on a ribbed slab, it is almost impossible to reproduce the same option on your own and for little money. Every owner wants to get by with the least expenses, and this desire is quite understandable.
Expert opinion
Vitaly Kudryashov
builder, aspiring author
Ask a Question
Please note: Due to the point deep-laid supports, the grillage can be poured under the extension in a U-shaped version (only under the outer walls), while the perimeter of the tape, based on unevenly subsiding soil, must be looped. It turns out that the bored foundation is most beneficial as a base for an extension.
Foundation pouring is preceded by a preparatory stage, which includes the following operations:
- Clearing the building site of vegetation or hard cover.
- Drilling wells, digging an earthen trough or trenches (depending on the design of the foundation).
- Anti-rock cushion device made of sand.
- Installation of formwork (possibly with expanded polystyrene as an insulating layer).
- Assembling and laying the frame into the formwork.

Before starting work, stock up on the required materials, tools and fixtures. The specific set depends on what kind of foundation will be poured, but general construction tools should be at hand in any case.
Most popular designs of the FH series:
Project FH-90 Windows
Total area:
90 m²
Read more
Project FH-114 Optimus
Total area:
114 m²
Read more
House project FH-115 Status
Total area:
115 m²
Read more
For reinforcing the foundation, working profile reinforcement made of A400 steel with a diameter of 12 mm is used. For the transverse ligament of working rods, you can take reinforcement of a lower class (A240), with a diameter of 8 mm. If composite rods are used, then the diameter can be taken one step less.
In addition to general construction tools: a screwdriver, a grinder, a water and bubble level, a marking cord, a square, a tape measure, a hammer and shovels, three issues need to be resolved:
It is best to pour the foundation from concrete class B20 (M250) – it is not only durable, but also has a fairly high water resistance. The mass composition of such concrete on M400 cement has the following proportions: 2.1 parts of sand and 3.9 parts of crushed stone per 1 part of cement. With an increase in the brand of binder to M500, the proportion of fillers in the concrete mixture increases (1:2.6:4.5). The water-cement ratio for concrete of this brand is 60-65%.
If you have a concrete mixer at your disposal, it must be installed on a level ground to avoid tipping over, provide an approach and an arrangement of components convenient for laying in the drum. The bookmark order is usually:
- part of the water is poured;
- cement is added and stirred until smooth;
- introduce sand and add some water;
- introduce coarse filler;
- add the rest of the water.
Mixing is carried out for no more than 2.5 minutes – depending on the motor power and the design of the concrete mixer.
So, the new foundation is not rigidly connected to the existing monolith, but is formed separately, with a gap. In this case, the sedimentary (deformation) seam must be organized so that:
- independent parts of buildings did not jam during settlement, but could move freely relative to each other;
- to avoid blowing, the joint must be filled with elastic damping material;
- the joint must be protected from being clogged with earth by an asbestos-cement sheet.

If the foundation is slab or strip, with a floor laid on the ground, the vegetative soil layer is removed over the entire extension area. If this is not done, voids will form over time in place of the plant roots remaining in the soil, which can provoke uneven subsidence.
Expert opinion
Vitaly Kudryashov
builder, aspiring author
Ask a Question
If the plinth is raised high and covered with beams, the fertile soil layer can only be removed directly under the base of the foundation.
Using a grillage, you can raise the level of the finished floor to a considerable height, but if desired, it can be slightly deepened and brought flush with the strip foundation or slab to which it is attached. At the same time, significant savings are obtained on the volume of poured concrete, which is why the reinforced concrete grillage on piles is chosen as a foundation not only for an extension to an already operated building, but also to a new one.
According to the official construction standards, the grillage must be located at least 20 cm above the planned ground level, which is associated with the need to protect the base of the house from the effects of frost heaving forces. There are, of course, effective methods of protection, but they all increase the cost of the foundation, so the grillage is easier to raise.
In individual construction, the master is his own master, and he may well decide on the installation of a non-buried grillage. At the same time, under the grillage beam, as under the strip foundation, a bulk cushion of sand / crushed stone is formed, on top of which a dense and durable polyethylene membrane with a profile height of 6-8 mm is laid. In cold regions, under the sole and on the sides, the grillage can be insulated with extruded polystyrene foam.
Installation of bored piles for the extension
But first you need to make a pile field correctly. If it is not necessary to raise the grillage above the ground, the piles can be poured in a formless way, directly into the wells. But this can be done only if the soil on the site is sufficiently dense and does not crumble.
In other cases, asbestos-cement pipes are planted in wells, which, playing the role of fixed formwork, provide two tangible advantages. Firstly, it is an excellent protection for reinforced concrete from groundwater. Secondly, the pipes, which take on part of the loads, will make it possible not to wait for the concrete to fully gain strength for a whole month, but to start further work in a few days.
For casting piles by casing, concrete can be taken of a lower grade than for a slab or tape – but not lower than B15 (M200). Piles are reinforced with three-dimensional frames of the appropriate shape, pre-assembled from three or four longitudinal working rods connected by transverse jumpers. The reinforcement is used the same as for other foundations – we have already talked about it. If desired, you can also buy ready-made frames – you only need to know the diameter and height of the bored piles.
The size of the section of piles and grillage is determined by the calculation, it all depends on the loads. But the extension is usually light, so it is quite possible to make an average design option for it:
- pile diameter 300 mm;
- depth of piles (for the middle strip) 2000 mm;
- grillage section 400*600 mm;
- , the depth of the grillage into the ground may vary, depending on the level at which the basement of the main structure is located.
Drilled foundation example
Expert opinion
Vitaly Kudryashov
builder, aspiring author
Ask a Question
A grillage width of 400 mm is enough to support a 450 mm thick gas-block masonry (50 mm block overhang is allowed). If this is not enough – for example, you want to insulate the walls of the extension or brick it, the base will need to be made wider. That is, before deciding what size the basement part of the foundation will have, you need to know exactly what thickness and layering the walls resting on it will be.
The piles are placed along the perimeter of the load-bearing walls, evenly, but not further from each other than 2 m. If the house is small and one small room with a frame floor is attached to it, the piles are placed in a horseshoe shape, and the foundation can not be closed around the ring.
The most popular designs of the FH series:
Project Windows Villa FH-90WV
Total area:
90 m²
More details
Project Master Dom FH-144 with master bedroom
Total area:
144 m²
Read more
Project FH-150 Full HDom
Total area:
150 m²
Read more
- Even if the grillage will not go deep, you will have to dig a small trench under the sand cushion – and already at the bottom of the trench they begin to drill wells for piles. For this purpose, you can use a garden drill, or use a motor drill on gasoline.
- The diameter of the holes should be slightly larger than the diameter of the pile – by the total thickness of the pipe walls, which will allow it to be firmly planted in the ground. The most important thing at this stage of work is that the axis of the well does not deviate from the vertical.
- It is advisable to fill the bottom of the pit with sand and tamp it well in order to level the base as much as possible. The sand around the pile heads is immediately filled up and compacted – the rest of the trench space will be filled after the grillage is filled.
- The laying of the reinforcement frame in the well is carried out in such a way that the reinforcing outlet is on top, which must be embedded in the grillage.
- It is unlikely that someone will hire a concrete pump to build an extension to an old house, so piles are concreted more often with a piece of plastic pipe of the appropriate diameter. Having immersed it in the well, they begin to fill the cavity with concrete, gradually lifting and compacting the mixture with a deep vibrator.
- The work must be planned so that all the piles are cast on the same day and gain strength at the same time. After the concreting of the piles is completed, it can be taken as a formwork for the grillage.
- First, expanded polystyrene sheets are mounted along the existing foundation of the house, due to the thickness of which (50 mm) the necessary sedimentary seam will be provided.
- Pre-assembled shields are set up and fixed to the ground with stakes. The bottom and walls of the formwork are lined with a profile membrane or other waterproofing material.
 For this purpose, you can use a garden drill, or use a motor drill on gasoline.
  Having immersed it in the well, they begin to fill the cavity with concrete, gradually lifting and compacting the mixture with a deep vibrator.
 Reinforcement of the grillage part of the foundation
Like the strip foundation, the grillage is reinforced with a three-dimensional frame made of bar reinforcement with a diameter of 12 mm, connected by crossbars with a diameter of 8 mm. The frame is placed in the formwork so that the working rods can be tied with wire to the reinforcing bars from the piles. The requirements for the thickness of the containment are the same: 70 mm at the bottom and 35 mm at the top and sides. Concreting is carried out in layers of 15-20 cm, with consistent compaction of the poured mixture at each stage.
It just so happened that the Internet has become the main training ground for amateur builders who are looking for answers to all burning questions on sites. In particular, some users are interested in: why does the earth shake after pouring? What lies under this question, one can only guess – but we think that the people who ask it are faced with the phenomenon of frost heaving.
- It occurs due to differences in the volume of moisture present in the soil, which first turns into ice, reducing the volume, and then, again increasing it during the melting process, begins to displace solid particles. And it’s good when thawing occurs only in spring – otherwise, in the southern regions, the surface layers of the earth can freeze every night and thaw during the day.
- This phenomenon is very insidious and quite powerful, it is difficult, and sometimes even impossible, to fight it after construction is completed. Soils capable of swelling are most susceptible to heaving: silty clays and sandy loams. The problem is relevant not only for permafrost soils, but also for regions with seasonal freezing.
- The main signs of heaving are swelling of the soil from a minimum of 2 cm to half a meter. It is because of them that the earth “walks with a shake”, which can lead not only to the appearance of cracks on the foundation, but also to its fracture. And what is surprising if the heaving force can be calculated in tons? That is why it is so important to bring the sole of the foundation below the freezing limits, or to provide it with protection from heaving by installing anti-heaving layers.
- The smaller the area of contact of the foundation parts with the ground, the less heaving force acts on it. In this regard, pile foundations are the most reliable, so in the north almost everything is built on them. In particular, not only tape structures, but also slab and glass ones (under columns) are supported on piles.

 In particular, not only tape structures, but also slab and glass ones (under columns) are supported on piles.
 Foundation tapes suffer most of all in conditions of frost heaving: if it is still possible to protect oneself from vertical heaving forces by deepening below the UPG mark, then there are still lateral forces acting tangentially. And the vertical surfaces of the tapes are large enough so that the impact of lateral forces is significant and there is a need for additional protection in the form of heat-insulating plates, wall drainage. As a result, the foundation of the “wall in the ground” type is too expensive.
Ideal in terms of reliability (although not the cheapest) foundation for heaving soils is a surface slab or grate. We do not take factory reinforced concrete piles into account, since heavy driving equipment cannot be used near the existing foundation.
The cheapest version of the shallow tape – it is she who is most often given preference in low-rise construction. True, to protect against heaving, the tape must be completely insulated, which eats up part of the savings.
If we take into account the ability of the foundation to resist heaving and correlate them with construction costs, we can easily make sure that this ratio will be the most optimal for the grillage on monolithic piles.
Foundation for an extension to the house
Foundation
Author Georgy Rusiev Reading 4 min Views 72 Published
The owners of their houses and owners of apartments need to increase their living space. The extension, with all the simplicity of the design, must be carried out competently and efficiently, to ensure its reliability and durability. One of the first problems that arise in this case is the construction of the foundation.
In order to understand how to make a foundation for building an extension, you need to find out what it is under the house and how it is made. If tape, then what is the width, if columnar, then the dimensions of the pillars, and you also need to know its depth.
If everything is known, then it remains to purchase materials and begin construction. If there is no information, then it is necessary to find it out. This must be done in the following way:
- dig a hole near the wall of the house so that its foundation can be seen;
- measure all the necessary data and define the design.
Depth measurement is quite simple, but to measure the width, you need to take a metal rod and bend it at an angle of 90 °. After that, we hold the bent part in our hand in a horizontal position and thread it under the foundation. We turn so that the hook is hooked on the opposite side. Then we make a mark on the rod and take it out. By serif, we measure the width of the base.
- separate from the building;
- with a rigid connection to the house.
When choosing one of them, you need to start from the soil indicators on the construction site and the severity of the structure. If the constructed building did not give much shrinkage and the soil is uniform, then the extension can be connected to the base of the house in a solid form. In other cases, it is better to make a separate base, which will be combined with the house with an expansion joint.
It is necessary to deepen the foundation to the same depth as the foundation of the house (taking into account shrinkage – a little higher), while there must be a sand cushion.
Rigid connection
When building with your own hands, the most difficult construction option is the extension-building rigid connection. This option is used for weakly heaving or non-heaving soil, when it is not difficult to predict the shrinkage of a new structure or when building two or more floors.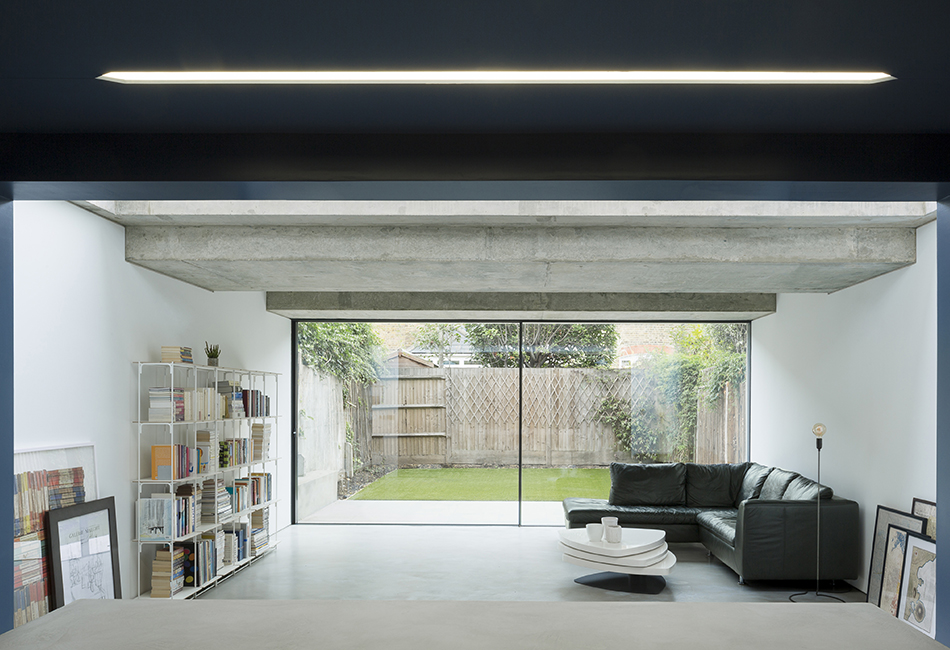 After the construction is completed, a single structure is obtained.
“Tape-tape”
Attaching one strip foundation to another takes place in stages:
- a trench is dug as deep as under a building. Its length is 1.5-2 m. A sand cushion is being made;
- holes are drilled in the base of the structure in a checkerboard pattern for the middle part and 500 cm for the corner parts. Holes with a reinforcement diameter and a depth of ¾ of the tape width;
- , a reinforcement containing a longitudinal slot is driven into the finished holes drilled ¾. A wedging insert is placed in this slot, for example, a wooden one is suitable. Reinforcement with a periodic profile is driven into half-meter holes by 14 mm;
- , the carcass is then formed using the cast-in rebar. For joining the subsequent parts, the ends 300 – 400 mm long are left, which are subsequently welded.
“Slab-slab”
Such a rigid connection is relevant if the thickness of the base is from 40 cm or if there is a protrusion of the slab from the basement of the constructed building at the base of the structure. Typically, such a protrusion is used in the construction of extensions for houses made of aerated concrete, where the foundation – a monolithic slab – protrudes at least 300 mm. This will allow you to get the reinforcement and weld or tie it to the frame of the future structure.
Building a detached base
This is the simplest and most common foundation for an extension to a house. It consists in the formation of a separate base, located in close proximity to the structure. The most reliable in this case is a closed circuit of operation (with a tape version), when a full-fledged reinforced concrete grillage is formed. Between the slabs of the building and the extension, for waterproofing, sheets of roofing material are placed. You can also use thermal insulation material or ordinary tow. The bottom line is to create a layer (expansion joint), which, when shrinking, will protect the structure from damage.
When calculating the connection of elements by means of an expansion joint, it is necessary to focus on the properties of the soil and the load received from the extension. Thus, the calculation is carried out in the same way as in the construction of a tape buried or shallow. Taking into account future shrinkage, the new foundation is laid a little higher than the old one, and over time it should settle to the depth of the base of the house.
For the construction of a frame extension, a columnar foundation is used, due to the low weight of the structure. As an option – put an extension on concrete pillows. They are easily molded on the spot. Finished piles, pre-impregnated with waterproofing material, mastic or other impregnations for protection, are installed in molds and poured with concrete. The resulting pillars are placed at a distance from each other from about one to one and a half meters, depending on the size and weight of the extension. Determined by the height at which the floor will be located, cut them to the required size. Next, they attach the strapping of the building. Even after two days, construction can begin, which significantly reduces construction time.
How to pour the foundation for an extension with your own hands
Over time, the owner of a private house or cottage may need to expand the total area of home ownership. The extension to the house is a full part of it. The construction of the extension begins with the construction of the foundation. Before you start pouring the foundation for the extension with your own hands, you need to go through several stages of building the foundation.
Contents
- 1 Selection of foundation type
- 1.1 Ribbon foundation
- 1.2 Column foundations
- 1.3 Pile foundations
- 1.4 Buronaby piles
- 1.5 Plaet foundations
- 2 Preparation for filling the foundation
- 9000 2.1 Preparation of a concrete mixture for filling
- 3.1 Concrete maintenance
- 4 Should the foundations of the house and extension be combined
9000 9000 3 extension
Foundation type selection
The type of foundation is determined based on the total weight of the extension, the composition of the soil base, the depth of freezing and the level of groundwater. Consider the main types of foundation structures.
Strip foundation
The foundation of an extension on a strip foundation
According to the depth of laying, the foundations are divided into shallow and deep.
Shallow foundations are designed for houses made of light structures, in the absence of the threat of heaving of the soil. A shallow foundation is a monolithic reinforced concrete beam on a sand cushion with a continuous reinforced belt. When building such a foundation, a mandatory drainage device.
The sole of the deep foundation is below the freezing depth to avoid deformations from heaving of the frozen soil.
Concrete strip foundation in its design can be monolithic, prefabricated and combined.
Reinforced concrete tape monolith is the strongest and most reliable foundation.
Prefabricated base erected from precast concrete blocks, beams and slabs.
Combined structures are built from prefabricated blocks and concrete. This type of foundation is used for a complex configuration of the house in terms of.
Pillar foundations
Foundation of an extension on a columnar foundation
Columnar supports are brought under light extensions. Pillars are placed in all corners of the base plan, at the junction of load-bearing walls and at points of load concentration. The distance between the centers of the pillars is from 1.2 to 2 meters. Between the supports, a strapping (reinforced concrete or metal rand beams) is made from above, connecting the entire structure into a single support system.
Pole laying brings significant material savings compared to strip monolith.
Pile foundations
Screw piles are sometimes used for outbuildings. Screw piles are metal pipes with large threads cut or with blades at the lower end. The process of installing supports is similar to screwing a screw into a tree.
The advantage of mounting such a base is a quick installation that does not require excavation and concrete work.
Bored piles
Extension foundation on bored piles
A reinforcing cage is inserted into the drilled holes in the ground and poured with concrete. Such supports are called bored piles.
The complexity and high cost of work determine the feasibility of using bored piles on loose and flowing soils, where the installation of other foundations is impossible.
Slab foundations
The foundation slab is made in the form of a monolithic platform or from intersecting monolithic strips. Such foundations are erected on all types of soils. A monolithic reinforced concrete slab is a structure with powerful spatial rigidity. On uneven, highly compressible soils, only this type of foundation is laid.
The advantage of a monolithic reinforced concrete slab is its versatility, reliability and independence from the groundwater level.
This foundation design is not applicable on terrain with a vertical drop of more than one meter.
Foundation preparation
After the owner of the house has chosen one or another type of foundation, he does the axial marking of the base of the extension with his own hands. Then they carry out earthworks, the device of a sandy, crushed stone pillow. A waterproofing layer is laid on the pillow in the form of two layers of roofing material or one layer of a polymer film.
Foundation pit for extension
The width of the trenches and the outer boundary of the pit should be wider than the foundation as much as it would allow for the installation and dismantling of the formwork without hindrance.
Formwork can be made of wooden panels, metal panels and other materials. They carefully check whether the verticality of the formwork walls is maintained, the reliability of fastening stops, clamps, spacers, ties and other fasteners. Correctly exposed formwork should not have gaps. Carefully look through all the connecting seams. If gaps wider than 4 mm are found, they are immediately closed.
Any leakage of concrete from the formwork can significantly weaken the foundation. Properly executed geometry of the fence allows the difference in the length of the diagonals between the opposite corners of the formwork to be no more than 20-30 mm.
Check the integrity of the waterproofing surface before pouring the concrete. The internal space of the formwork is cleaned of debris and foreign objects. The installed reinforcement frame must not come into contact with the formwork surface. To do this, special clamps are installed at the points of conjugation of the reinforcement elements with the fence.
Concrete preparation for pouring
In order to correctly fill the formwork, the developer needs to organize the process of preparing the concrete mixture and its continuous supply to the unloading points. Watch the video on how to properly prepare the concrete mixture.
If an extension of small dimensions will be built by hand, then, depending on the volume of concrete work, one or two concrete mixers can be installed. In the case of a very small size of the base, you can get by with a construction trough or any suitable container and improvised tools.
The owner of the house needs to know what brand of concrete he will prepare with his own hands. Therefore, it is necessary to prepare a supply of cement, sand, solid filler (crushed stone, gravel) and a container of water. Determine how many materials will be needed for one batch.
Foundation pouring for extension
Let’s consider the process of pouring concrete into the formwork of a strip foundation for an extension with our own hands.
Casting must be done by at least three people. Ready-mixed concrete is loaded into the formwork in layers 200 mm thick. Each layer is compacted with a hand vibrator or, in the absence of such, rammed with a piece of reinforcement or a similar device. They tamp until “cement milk” appears on the surface of the concrete. Under the influence of the vibrator, the concrete is evenly distributed over the entire volume of the formwork, allowing the air to escape. Watch the video on how to fill the foundation tape.
If the presence of air pockets in the body of concrete is allowed, this will lead to a loss of the bearing capacity of the foundation and the appearance of deep cracks in it.
Pouring is done continuously and at one time. A break in work can be allowed, but not more than two hours.
Concrete care
Properly organized care of hardening concrete will not allow the monolith to lose its bearing capacity due to increased evaporation of moisture from the concrete surface or freezing of the base mass for the extension.
In the summertime, the concrete is covered with a moisture-proof material and moistened periodically.
In winter, measures are taken to heat both the side surfaces of the formwork and insulate the upper surface of the concrete.

Is it necessary to combine the foundations of the house and extensions
Combining foundation strips
The owner of the house must know what type of foundation his house has, what brand of concrete was used for pouring, what quality the soil foundation of his dwelling has. If the owner of the house is not the first, then he may not know anything about the condition of the foundation. Then, if possible, you need to dig a small hole in the place where the foundation is laid and analyze the nature of the foundation, the depth of its laying, the amount of its settlement over the entire period of operation of the building.
For example, the house stands on a reinforced concrete base of a tape type – shallow. The settlement for all the years of the existence of the structure is insignificant.
In this case, the foundation of the extension is laid, similar to the foundation of the house. At the junction of the bases, the ends of the old monolith are exposed and connected to the reinforcement frame of the extension foundation with the bare reinforcement of the old tape. The extension and the house will behave as a single integral structure.
When laying a free-standing tape monolithic base, it is necessary to arrange expansion joints, both at the junction of both foundations, and along the entire transverse perimeter of the connection between the structures of the extension and the house.
The same applies to other types of foundations.
How long should the foundation stand – terms, standards, recommendations
At first glance, everything is simple and clear: we choose the appropriate type of foundation based on the type of soil, the design and weight of the house, and our own preferences.
When starting to build a house, it is important immediately, from the very beginning, to do everything with high quality and conscientiously, and this especially applies to the foundation. A solid, high-quality foundation is a guarantee that the building will stand for a long time, and the walls will not warp or crack.
Then we lay the foundation in accordance with accepted norms and standards. However, already at this stage, situations may arise that require an immediate decision. One of these questions concerns the time of standing the foundation.
Let’s start with the fact that not every foundation requires this: for example, a pile, pile-screw foundation allows you to build walls immediately after installing the piles. But here the tape, columnar or block foundations must stand, this is due, firstly, to the fact that concrete (cement) must gain optimal strength, allowing further construction.
And secondly, the foundation must settle, because any soil without sufficient compaction will shrink, and if construction continues, there is a risk that the house will “lead” along with the foundation after a while. Therefore, almost all experts agree that the foundation should be allowed to stand, but they differ in determining the timing of standing.
Find out where to start right
Foundation – the basis of your house
Different approach to maintaining the foundation
The folk method of construction suggests leaving the foundation for a year, or even a year and a half. They say that it is during this time that concrete gains suitable strength (although it gains its full strength for several decades), but the grade (necessary for testing a concrete sample) is 28 days, the structure itself goes through the entire cycle of “tests” by soil movements, as well as temperature changes and frost (forces of frost heaving).
Many argue that it is possible to build a house almost a week after pouring the foundation: supposedly by this time the concrete is gaining strength sufficient to withstand the walls. However, they forget that after the winter the foundation may settle unevenly, which means that not only it will crack, but also the walls, and all work will have to start all over again.
There is a lot of information on this issue, there are builders who consider it sufficient to stand the foundation for a period of three to six months, but only on condition of “good soils”, and not swampy or heaving ones. That is, before laying the foundation, you need to do all possible geological surveys so as not to risk it. And it is better then to lay the foundation before winter, because it is in the winter months that concrete has to withstand the most serious loads in the form of temperature changes and soil expansion. In the spring, the foundation is leveled, reinforced if necessary, and, in principle, walls can be built. But if there is an opportunity not to rush, it is better to wait a year. This approach cannot be called erroneous; rather, it is more pragmatic, but blurs the deadlines.
Maintaining the foundation on time from the company Optima Synergy.
The Optima-Synergid company is guided by the regulatory indicators, subject to the technology and checking all stages of preparing the foundation base, drainage for draining the soil, using high-quality materials, it is possible to start loading the foundation with the first rows of wall masonry in a time frame at which the concrete strength reaches at least 50-70 % (usually it is 1-2 weeks after laying the concrete mix). The table below shows the conditions under which this is best done without affecting the reliability of the design.
|
Concrete grade |
Curing time in days |
Air temperature |
|||||
|---|---|---|---|---|---|---|---|
| -3 | 0 | +5 | +10 | +20 | +30 | ||
| Strength of concrete, % of grade | |||||||
| M200-M300 | 1 | 3 | 5 | 9 | 12 | 23 | 35 |
| 2 | 6 | 12 | 19 | 25 | 40 | 55 | |
| 3 | 8 | 18 | 27 | 37 | 50 | 65 | |
| 5 | 12 | 28 | 38 | 50 | 65 | 80 | |
| 7 | 15 | 35 | 48 | 58 | 75 | 90 | |
| 14 | 20 | 50 | 62 | 72 | 90 | 100 | |
| 28 | 25 | 65 | 77 | 85 | 100 | ||
| – normative-safe strength | |
| – safe strength of concrete | |
| – total strength of concrete |
Curing time of concrete for foundation under various weather conditions
The optimal conditions for concrete to gain strength are created at a temperature of +20°C. Under such conditions, the process is very active in the first 7 days. During this time, concrete gains about 50-70% strength. With these parameters, it is already possible to continue construction further. The design strength, which is taken as 100% during design, is gained under such conditions in 28-30 days, in fact, this is the grade strength that concrete must correspond to in laboratory tests of a batch sample.
See photos of foundation work
Monolithic slab construction calculator
How to make a foundation for an extension to a house? — Everything about concrete
- How to make the foundation of an extension to the house? v
- How to determine the characteristics of the base of the house in the absence of building documentation? v
- Reliability definition v
- Foundation design guidelines v
- How to make a foundation for an extension to a house with rigid reinforcement? v
- Separate foundation for an extension to the house v
- How to make a columnar foundation for an extension? v
- Screw pile foundation v
- Tips for building an extension with your own hands v
Building an additional building to the house is no less important step than building a separate house. There is a certain risk of structural displacement here. To avoid this, you should take the design of a new building and the proper arrangement of the foundation with all seriousness.
Perhaps you need to contact specialists. If you are confident in your abilities and decide to do it yourself, then consultation will not hurt you when choosing the best foundation. In this article, we will try to deal with the nuances during the construction of the base.
How to make the foundation of an extension to the house?
Owners of apartments or a private house come to the decision to increase the living space. For this, an extension is being erected, the purpose of which can be different: a bedroom, a kitchen, a bathroom or a separate area.
And regardless of its purpose, the building must fit into the landscape and not spoil the overall picture with an existing house. It must be built with high quality and reliability. And the first thing they face in this decision is the construction of the foundation.
But it should be done correctly so that there are no problems in the future. First of all, it is worth deciding on the foundation of the main building. If the house was built with his own hands, this question is no longer. But what to do if there is no information? To do this, you need to dig near the main building and decide on the type and depth of the foundation.
The skeleton can be made separately from the building or as a rigid connection to the house. The choice of any type is dictated by the severity of the structure and the soil index. A solid view with an extension is selected with uniform soil and without strong shrinkage. In other cases, a separate base is made, which will be connected to the main structure with an expansion joint.
How to determine the characteristics of the base of the house in the absence of building documentation?
A built building with their own hands will give an answer to the appearance of the skeleton. But it happens that the building is unknown to you, and the documentation was simply not maintained or not preserved.
Then you should do some actions yourself, namely:
- Dig a hole to the depth of the foundation where an additional building is planned with dimensions of 100 x 100 cm;
- Decide on its type , width, possible presence of a sand cushion, reaching the sole of the skeleton;
- Decide on the parameters of the supporting part of the foundation of the house;
- Take samples of soil to conduct a laboratory analysis and determine the physical and mechanical characteristics, the calculated resistance of the base of the skeleton and the degree of its heaving.
With a strip foundation, its width is determined by a metal rod. At the end, its angle is bent at 90 °. The rod is driven in to the depth of the skeleton, then the hook is turned to a vertical position and pulled up to the stop, a mark is made on the rod. To pull it out again, turn it horizontally and pull it out. The depth level is determined.
In the columnar version, the dimensions of the posts and the depth of their insertion are determined. Only then can you begin to choose the backbone.
Reliability determination
A very important characteristic of a building is its reliability, both for the building and for its adjacent parts.
When the soil is non-rocky and the penetration does not depend on the size of the freezing layer, the reliability of the skeleton is ensured in this case by calculating the parameters of the supporting part, when the resistance of the soil at the level of its occurrence and the load of the structure are taken into account. The fulfillment of such conditions will lead to normal shrinkage of the skeleton.
Non-rocky soils include:
- coarse soil;
- coarse and medium sand;
- gravelly earth.
Construction in such conditions results in a small foundation settlement. As soon as the work is over, precipitation also stops.
Heaving soils:
- dusty sandy loam;
- sands;
- clay;
- loams.
This soil tends to expand when frozen, and shrink when thawed. And this causes damage to the base. For the structure to be considered reliable, it is necessary that the deformation of the heaving of the earth be equal to zero at the calculated depth during the freezing of the soil.
When calculating the size of the supporting part, the following parameters should be taken into account: the resistance of the soil under the sole of the foundation and the load of the building. The use of buried skeleton in such soils only causes deformation of the sediment.
And reliability with a shallow skeleton will be ensured when three points are met:
- When the soil freezes, the heaving deformation below the sole of the base does not exceed the allowed standards.
- Sand cushion resistance and structural loads will be used when calculating the parameters of the supports.
- Freezing of the soil to the depth of the laid foundation will not lead to heaving deformation under the influence of tangential forces.

Foundation Design Guidelines
According to experts, the right choice of foundation is the identity with the main building. After all, the interaction of different types of foundation with the soil is very different, hence the shrinkage will be different.
There are two options for joining two bases:
- Rigid connection;
- Construction of a separate foundation.
Each option deserves special attention. Heavy buildings and quality indicators of the soil, here, are of decisive importance. For example, if over time the house has received little shrinkage, has a uniform ground, a rigid connection can be used. In other cases, the second option should be used.
The house can stand on a concrete slab, then for future development it is necessary to use a slab and apply a rigid connection. But it can be called relevant in the case of a base size of 0.4 meters and the presence of a slab protrusion from the basement of at least 0.3 meters.
How to make a foundation for an extension to a house with rigid reinforcement?
Consider the technology of the base device:
- The depth of and the dimensions of the old base are determined;
- Trench being prepared base depth;
- Holes are drilled in the old skeleton for the rebar diameter . Then, rods are driven into them, to a depth of 35 diameters of the pin itself and the same size remains on the surface. With insufficient width of the old base, the rods are simply driven in. Only then it will be necessary to make a longitudinal cut at the end of the rod and insert a wedged insert, which makes the fastening more reliable.
- If the closed loop pattern is used, the rods must be staggered and have two levels. The reinforcement has an anchor wedging at one end, and a welded washer at the other. You will need 20 pins per 1 sq. m base. Cutting is done with a grinder or an emery machine.
- When using the open loop circuit, the number of pins is dictated by the width of the future base and is calculated separately.
- When the bars are full , formwork is made, where all the rods are placed and poured with concrete mortar. When the fill is completely hardened, you can proceed to the next stage of construction.

Separate foundation for an extension to the house
The most common option is a separate base for additional construction. A separate base is formed here, which is located close to the main building, built on the principle of a closed circuit (using a tape version). A full-fledged grillage is being formed.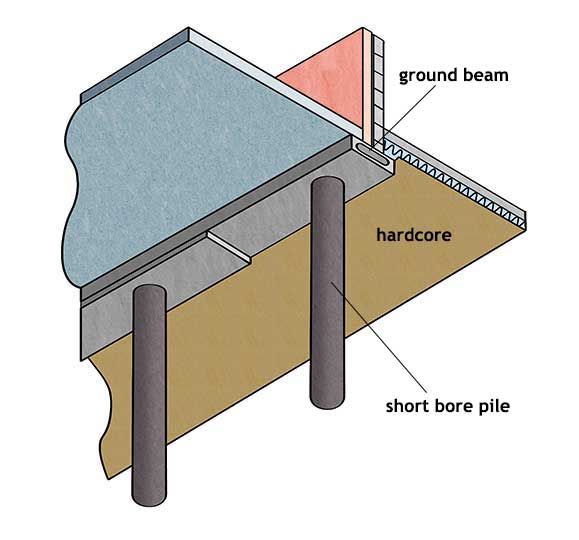
Tow or sheets of roofing material are used for waterproofing between the slabs of the extension and the building. The expansion joint will protect the structure from any damage during shrinkage.
When joining elements with an expansion joint, take into account the properties of the soil, as well as the load from the additional structure.
The calculation is made in the same way as a shallow or strip foundation. Since the new structure will shrink over time, it is worth doing a little higher than the old one. After a while, it will line up with the main building.
Key points to consider:
- The distance between the two buildings must be 5 cm.
- For single storey extension, expansion joint may be 2 cm thick.
- It is possible to fill the joint with thermal insulation material , such as polystyrene foam or polystyrene foam. It is masked by a decorative overlay on the outside.

Uneven shrinkage can cause cracks in the main building and extension. The reason for this incident lies in the incoherence of the two buildings.
To avoid an error, let’s consider this on the example of the construction of a tape base with a reinforced concrete grillage:
- We make markings for future development and dig a trench for a shallow tape base up to 60 cm. It is laid a little less than the old base, since shrinkage is taken into account.
- Lay several layers of waterproofing sheets or roofing felt between two bases . This is the main feature of this method.
- Preparing the sand bed and mounting the formwork.
- Reinforcing with metal pins with a diameter of 1.2 cm.
- Filling formwork with concrete mortar.
In this way, a separate base was obtained. To prevent deformation and reduce shrinkage, we lay the pipes of the drainage system around the entire perimeter of the additional housing. Groundwater is drained through a special well.
The correct calculation of the design parameters is a reliable guarantee of future construction, so you should pay attention to:
- the whole mass of walls and roofs;
- loads from insulation and finishing materials.
- new design size;
How to make a columnar foundation for an extension?
The operation of the column base is as follows:
- Drill holes around the perimeter , with a step of no more than 2 m below the freezing level. They can be done with a hand drill or with the help of equipment.
- Further, a sand cushion is made in the recesses and compacted, a layer of gravel and liquid bitumen is poured.
- Support legs can be metal pipes pretreated with bituminous mastic. Supports are installed in wells.
- For a more reliable fastening of , reinforcement is used, which is inserted into the middle of the pipes and poured with concrete.
- Now we need to make the formwork for grillage . One level with the existing building is preserved.
- Place grillage reinforcement after formwork and weld to the embedded reinforcement of the base of the main building, thereby making a tight fastening of the two foundations.
- Pour concrete into formwork.
- After two days the formwork can be dismantled and construction can continue.

To ensure that the concrete mortar dries evenly and does not crack, the concrete must be moistened or covered with a plastic film.
Screw pile foundation
The simplest option for an additional building is a base on screw piles. The only disadvantage of this type is the susceptibility to corrosion.
This is done in the following sequence, if the main structure is wooden:
- Piles (diameter 108 mm) are installed with a step of no more than three meters. The first piles are placed at a distance of 400 mm, then, according to the design scheme.
- The pipe cavity is filled with cement-sand mortar.
- Steel heads should be placed at the same level on the piles, where the beam is attached through the holes in them. The base is ready for future construction.
 The first piles are placed at a distance of 400 mm, then, according to the design scheme.
 An additional skeleton is erected for a brick structure, identical to a wooden one.
If an additional skeleton is connected to a stone structure, a channel is used as a tie-down of the piles. The channels are scalded over the heads. It is not recommended to make a rigid binding of the old and new bones. Since the main building could have shrinkage, and the binding can lead to the skew of the building.
The choice of pipe height is influenced by the relief of the selected section. For example, there is some slope of the earth, then the pipes will be of different lengths. In any case, the height above ground level must be equal to the main building.