Brick landscape border: Brick Garden Edging: Beautify Your Outdoor Space in 12 Steps
Brick Garden Edging: Beautify Your Outdoor Space in 12 Steps
Install clay pavers to form a tidy garden border to separate your lawn from plantings.
By
Paul Hope
Share this story
Project details
Skill
1 out of 5
Easy
Just know that cutting bricks is very dusty business.
Cost
$185
Estimated Time
Two days to set 30 feet
An artfully arranged band of bricks handsomely defines the boundary between grass and garden. And if you install the bricks flush with the ground, they also serve as a handy mowing guide: You can run the wheels of a push mower right on top of the border edging and pretty much dispense with the string trimmer.
Some people set the pavers in concrete, but there’s no need if you make a proper dry bed. That means digging down past the loamy topsoil to prevent frost heave from disrupting the bricks come winter; once you do, laying a bed of compacted paver base and stone dust gives the bricks a solid foundation and provides drainage while preventing weeds or roots from coming up.
Follow along as This Old House senior technical editor Mark Powers guides you through the installation of this functional yard accent.
Overview of Brick Garden Edging
Illustration by Gregory Nemec
- SATURDAY: Form the trench (Steps 1–7).
- SUNDAY: Set the bricks (Steps 8–12).
Steps for Landscaping Bricks for Edging
1. Order the Bricks
Photo by Kolin Smith
- Lay a length of rope along the edge of your garden bed, following its contours.
- Mark the rope at the end of the bed with tape, pull it taut, and measure the rope up to the mark.
 Divide that length in inches by the width of the bricks to calculate the number you’ll need, then add 10 percent to your order. For example: 324 inches ÷ 4 inches (brick width) = 81 bricks + 10 percent = 89 bricks.
 - Make sure to buy clay pavers, sometimes called severe-weather-rated bricks.
 Divide that length in inches by the width of the bricks to calculate the number you’ll need, then add 10 percent to your order. For example: 324 inches ÷ 4 inches (brick width) = 81 bricks + 10 percent = 89 bricks.
 2. Scout the Curves
Photo by Kolin Smith
- Line the edge of the bed with bricks, tight against the grass line—close to one another but not quite touching, leaving a gap for the sand.
- To work around soft curves, fan them out slightly; for tight curves, find the center or peak of the curve and leave a triangular gap, as shown. The widest point of the gap should be no wider than a brick.
3. Mark the Bricks
Photo by Kolin Smith
- You’ll make angled keystone bricks to fill the triangular gaps in the curves. Center a brick over a gap, and use the masonry pencil to mark its end where it overlaps its neighboring bricks, as shown. Mark the opposite end of the brick in the same way.
 Mark the opposite end of the brick in the same way.
4. Transfer the Marks
Photo by Kolin Smith
- Flip the brick over, and transfer the marks from each end onto its face. Use the masonry pencil, and a straightedge if necessary, to draw lines connecting the marks at each end of the brick to form your cutlines.
5. Cut the Keystones
Photo by Kolin Smith
- With the brick marked, rest it on a work surface with the cutlines faceup. Fit the circular saw with the segmented diamond blade. Adjust the depth of the blade so that it will just barely cut through the brick in a single pass.
- To minimize dust, trickle water onto the brick as you cut; use the nail to puncture the bottom of the water bottle to create a steady trickle. Set the cut keystone brick into the opening to make sure it fits.
6. Dig the Trench
Photo by Kolin Smith
- Place the tarp over your grass to collect soil as you dig.
- Using the spade, dig a trench with straight sides along the length of the bed, working from the grass line into the bed. Make the trench several inches wider than the length of your bricks.

7. Check the Depth
Photo by Kolin Smith
- Dig until the soil changes color, indicating that you’ve gotten past the topsoil.
- Measure the depth of your trench, as shown; it should be at least 6 inches deep to allow for a 2- to 3-inch layer of paver base, 1 inch of stone dust, and the bricks set flush with the ground.
8. Pack the Paver Base
Photo by Kolin Smith
- Spread the paver base evenly throughout the trench, stopping periodically to pack it down with the tamper, as shown.
- Continue to add the material in small batches until it forms a base that’s at least 2 to 3 inches deep.
- If you had to dig deeper than 6 inches to reach past the topsoil, continue to add and pack the paver base until the depth of the tamped trench is equal to the thickness of a brick, plus 1 inch for the stone dust.

9. Mix the Stone Dust
Photo by Kolin Smith
- In a large wheelbarrow, mix together stone dust and portland cement in a 6:1 ratio, using six shovelfuls of stone dust for every shovelful of cement.
- Use the garden hose to mist (but don’t soak) the mixture to activate the cement and make it easier to mix and shovel into the trench.
10. Lay the Bricks
Photo by Kolin Smith
- Working in stretches several feet long, use the trowel to cover the paver base with the stone-dust mixture.
- Press the bricks into place one at a time, tapping them down with the rubber mallet.
- Make the face of each brick flush with the ground on either side of the trench and with the brick preceding it. Continue, brick by brick, and set the cut keystones at curves, maintaining a consistent gap.
- Use any leftover stone dust to backfill along the back edge of the bricks, then cover it with soil.

11. Fill the Gaps
Photo by Kolin Smith
- With the bricks set, pour polymeric sand over them and use the brush to sweep it into the spaces between them, as shown.
- Working your way down the bed, whack the bricks with the rubber mallet to force the sand to pack itself tight.
- Continue to fill the gaps until the sand is flush with the faces of the bricks and won’t settle any farther.
12. Hose off the Edging
Photo by Kolin Smith
- Brush away any excess polymeric sand or dust; either one can stain the bricks if it gets damp.
- With the hose, wash the edging with a gentle spray, dampening the sand between the bricks without dislodging it. As the sand absorbs water, it will set, acting like grout to lock the bricks in place for years to come.
Tools
Tools & Materials
How to Lay Brick Garden Edging · Chatfield Court
Disclosure: As an Amazon Associate and member of other affiliate programs, I earn from qualifying purchases.
Jump to How-To
How to lay brick garden edging the easy way using leftover bricks, a lawn edger and paver sand.
I’m all for using up what you have so while I was sprucing up our disaster of a backyard, I decided to find a spot for a pile of old bricks that was laying around.
Let’s start at the beginning…
Our backyard is in need of desperate help.
We have a ton of trees in and around our property so getting anything to grow, especially grass, has been a tough task.
Last year, when I built my raised garden beds, I decided to go all the way and cover the part of the yard that was just dirt and weeds.
OUR EMAILS ROCK!
Subscribe to get the latest in DIY Projects and exclusive subscriber access to our Resource Library!
Your Email
By subscribing, I consent to receiving emails.
A bit of pine straw (what we use in place of mulch) did the trick.
I loved having the dirt and weeds covered up and looking neat and tidy but the edge of the bed looked undone.
The grass and weeds kept encroaching into my new bed and I just couldn’t stay ahead of it.
This is where the old brick pile comes into play. I had just enough to create a garden edge to keep the pine straw in and the grass and weeds out.
Table of Contents
How do you lay a brick border in a garden?
Actually it was quite easy and just took about an hour to complete. I didn’t have to use any power tools or mortar.
Supplies
- lawn edger
- rubber mallet
- bricks
- paver sand
- level
Installing brick edging
The first thing that I did was to lay the bricks out along the edge of the garden.
I did this to get an idea of the shape of the edging and I wanted to be sure that I had enough bricks to get the job done.
You could also use a hose or a piece of rope to create the shape of your garden border.
When I was happy with the placement, I moved the bricks back a few inches each and used the lawn edger to dig a trench for the bricks.
I didn’t move a lot of dirt, just enough so that the bricks would be halfway underground.
Of course you could have them raised higher or lower according to the look and feel you are going for.
To make sure that my edge was wide and deep enough, I would lay a brick in it every few feet.
What do you put under brick garden edging?
Once the edge was completely dug I spread some paver sand along the length of the border.
After I got started laying the brick I found that this step wasn’t really necessary, though (more on that in a bit).
You could also use crushed stone for this step. I already had the sand so that’s what I used.
Now I was ready to start laying my brick.
How to install brick border edging
I started laying the bricks at the far end, next to the veggie garden.
I would put a bit of sand down, tamp it down with the end of the rubber mallet, and then lay the brick.
I would do this for each brick.
Spread enough sand for that one brick, tamp it down with the rubber mallet, and lay the brick.
Once I laid a few of the bricks I used the level to make sure they were, um…level.
I didn’t stress if they were off a bit but the level did help keep them looking good.
If I found a brick was too high, I would tamp it down with the rubber mallet.
If it was too low, I would put a bit more sand, tamp the sand with the mallet, and lay the brick again.
This is the reason why it was better for me to lay the sand that was needed for each brick.
Of course you can do it how you want but it was helpful for me and if I had not spread it out first, I would have used less sand and saved a step.
Once I finished laying all the bricks I spread some of the dirt I had dug up on either side of the bricks and moved my pine straw back to the edge of the garden.
It was the perfect solution!
Now when we trim the grass we won’t hit the pine straw and knock it out, and the weeds and grass won’t creep into my garden.
Not only did it solve a problem but I was able to use up leftover supplies, which means that this project was free.
You can’t argue with free!
Check out more garden ideas
- DIY Raised Garden Beds with Scrap Wood
- Easy and Cheap DIY Garden Markers
Active Time
1 hour
Total Time
1 hour
Difficulty
Easy
Estimated Cost
free!
Materials
- bricks
- paver sand
Tools
- lawn edger or shovel
- rubber mallet
- level
Instructions
- Lay bricks where you want to place your edging
- Move bricks back and use edger or shovel to dig trench for bricks
- Check to make sure edge is deep and wide enough using a brick
- After edge is dug start at one end to lay bricks
- Add a bit of paver sand to edge, tamp down firmly with the rubber mallet and lay brick
- Repeat for each brick
- Once you’ve laid your first few, use a level to make sure brick are level. Use sand or tamp brick with mallet to raise or lower brick
- After the bricks are laid, fill gaps on either side of bricks with dirt from edge
37 Garden Border Ideas To Dress Up Your Landscape Edging
This collection of garden edging ideas will help you define garden borders, highlight an area, add texture and dress up your landscape.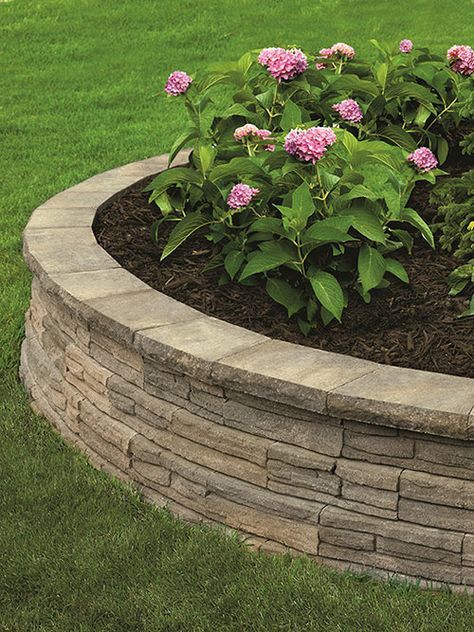
Often overlooked, lawn and flower bed edging can play an important role in your landscape design plan to improve your property’s overall curb appeal. Edging comes down to simply separating two distinct areas.
Pin
Not all of these landscape edging ideas will fit your garden. You may love the look but they simply are not practical, affordable or the style of your garden.
Keep in mind as with many things in the landscape and garden there are NO RULES. Landscape edging comes down to your style, creativity, materials and budget.
The materials used for edging come in a wide range of choices and combinations: stone, concrete, brick, wood, tiles, metal, plates, glass, gabion, logs, and all kinds of things recyclable items.
Let’s face it, upcycling is popular for use in the garden. Many of the garden edging ideas below incorporate some type of upcycled material and most of the ideas include sources to tutorials. Let’s get started!
Concrete Edging And Curbing
PinBroken concrete makes for great garden edging.
The word “concrete” can sound very hard and cold, but a concrete edge offers lots of design opportunities.
Pinsource: plantedwell.com
The arrangement of these flat stone or “broken concrete” garden diveders around the corner of the house draws attention to the hostas and other foliage planted against the foundation border edge of the house. It’s always a good idea to install landscape fabric and edging in that order.
Poured Form Concrete Garden Border
Pinsource: pinterest
This edging comes uses concrete to form a curbing. The construction of these concrete landscape borders is made onsite and very permanent. The concrete can also be stained or painted. It’s a nice way to edge around a tree.
If you’re curious on “how much does concrete curbing cost per foot”? HomeAdvisor estimates $4-5 per square foot.
Brick Garden Edging
When we think of edging materials in most yard landscaping projects we think of brick edging and as you’ll see, bricks and pavers can be used to create a landscape edge in many ways.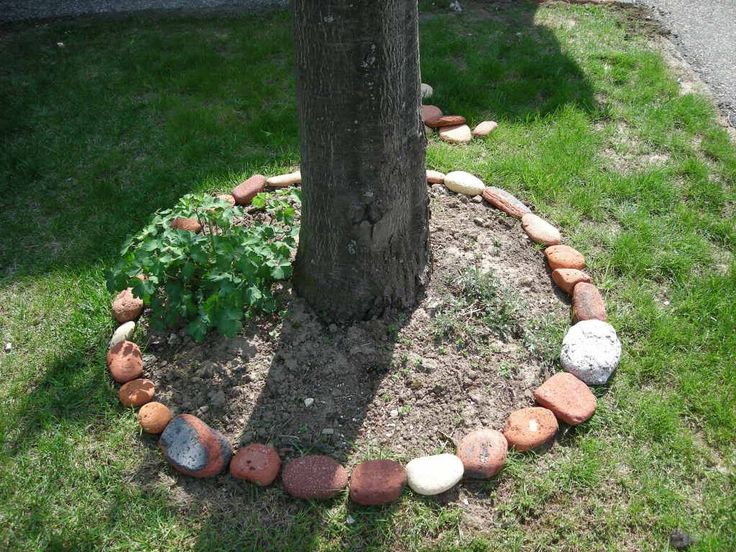
Pinsource: gardeenworld.blogspot.com
Neatly assembled stone tiles placed flat in a shallow trench make a garden edging which forms a nice barrier between the garden bed and grass. A neat clean look which provides uniformity to the landscape. A way to edge a flower bed with bricks that makes mowing easier.
Pinsource: flickr
What’s interesting about this garden edging idea is that it is very symmetrical. The square shapes made of 4 bricks makes the edging look clean and distinct. However, the center of each “square” carries a different design.
Pinsource: buzzfeed
How can you dress up brick edging during the evening hours is by having a rope lighting strip tucked away on the inside of a rock lawn edging. This is a very simple way to bring a lot of style to the garden. It looks almost mystical in the way that it seems to generate light from nowhere.
Pinsource: thechicsite.com
We see bricks used as edging all the time to separate the lawn edge from flower beds. Turning the bricks on their side creates an entirely different look in the garden design and give yet another way to lay brick edging for front yard and backyard landscaping.
Pinsource: ny times
It is an old style look that has a new style when it comes to the brick. It almost looks like a wave that is leading the way for you.
Pinsource: pinterest
A beautiful eye-catching brick garden edging idea due to the symmetrical shape. The tiny blocks inside the edging give it a very suburban look.
Metal Landscape Edging For A Rustic Look and Feel
Pin
Photo by OLIVINE Land – More contemporary landscape ideas
By raising the height of the garden and installing metal landscape edging this winding “rusty” steel edging gives a contemporary look that calls your attention.
Corrugated Steel Panels Installed Vertically As Garden Edging
Pinsource: homeimprovementpages.com.au
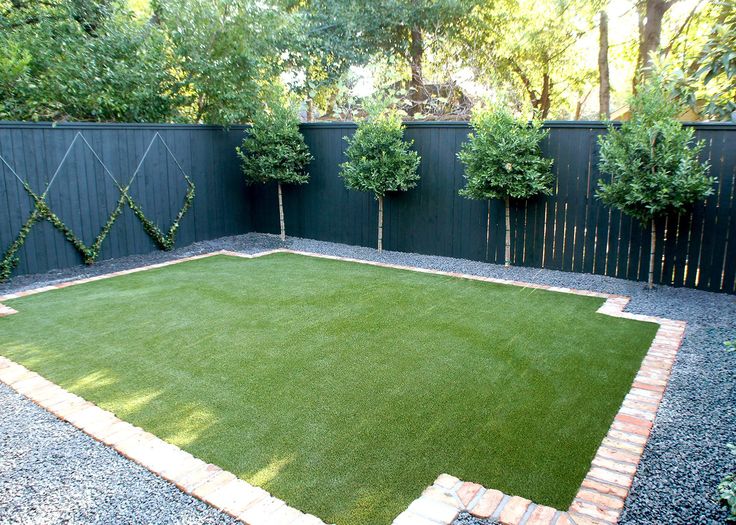
I love the neat look of this landscape edging idea. It gives a very minimalist garden feel, looks clean and simple. The colors are not too busy and makes the yard feel peaceful. As a bonus the panels used full size did not require any cut of the metal landscape edging.
Metal Edging Laid In A Zig Zag Pattern
Pinsource: smallgardening.com
The short and long metal edge gives it a very simple look. It’s nothing extravagant or eye-catching, but it gets the job done. Paint the thin steel edge sheets if desired.
Gabion Wall Used As Edging
Pinsource: greenlandscapestoenvy.com
This kind of garden edging called “gabion” offers lots of possibilities. It looks natural yet structured but blends in well with the natural environment. It’s also quite sturdy, and should hold up well.
Pinsource: plantedwell.com
This gabion garden wall edging works as a retaining wall holding plants and soil. This edging serves as a garden focal piece.
Garden Edging Stone
Stone edging ranks right up their with brick edging as a popular material to separate areas. Generally, stone carries a low cost but does require some “heavy” labor to get it all in place. However, stone edging does produce impressive results.
Stone and rocks come in so many shapes, sizes, colors, looks and textures. This allows the use of stone as a stand alone in edging or combined with different stones to achieve interesting looks.
Stacked Flat Edging Stones
Pinsource: hoselink
This shows a nice way to edge a flower bed using short flat tiled rocks stacked on top of each other. A simple design with a casual look and feel separates the lawn edge from the mulch and flower bed.
Garden Stones Used As Simple Clean Edging Of A Deck
Pinsource: amazing gardens.co.uk
This uncommon way to differentiate the deck from where the garden starts, but adds a “polish” to the design. The small garden stone rock border makes a world of difference when stepping out to take in the view.
Crushed Rock Filling In Between Bricks
Pinsource: belmanliving
This lawn edging idea provides a contrast with brick and a wide strip of crushed rock. The small height of the stone but the sudden change of color makes it a clear boundary but doesn’t intrude in the landscape design.
Pinsource: modernindenver. com
com
The contrast of light and dark stones along with different sizes complement each other quite well next to the concrete stepping stones. It gives a concrete definition of where the walkway ends and where the border begins.
Stones Combined with Brick Edging
Pinsource: pinterest
This edging made up of smooth rocks and bricks gives off a very natural but not too manicured and perfect look. Simple yet the way it spirals gives it an impressive flair. As you can see… no complicated “install stone landscape edging” instructions. The stones were laid edged right up to the bricks and followed the garden path.
Pinsource: homebn.com
The graduated stone bed is an excellent contrast. The small stones create a nice transition border, while the large stones make up the bed. It’s a very pleasing way to implement a natural border.
Pinsource: secretgardenlandscaping.com
Bowling ball size garden edging stones or rocks compose this landscape edging design. The rocks and plants make you feel walking to or from a beach!
Wood Landscape Edging
Wood like brick and stone comes in many form. The most common edging using wood is the raised garden bed but as you’ll see… more types exist!
Railway Ties As Garden Borders
Pinsource: gardeningschool.org
This garden edging happens to be one of my favorites. Railroad sleepers placed at angles to the fence and ONLY one plant (like a sago palm) in each “growing area.” The biggest issue I see comes with maintaining the grass.
Vertical Railway Sleepers
Pinsource: kilgraney.com
These railroad ties cut at uneven lengths make this garden edging unique. It adds a casual look and feel.
Pinsource: pinterest
We often think of the garden edging being the accent. In a twist, this edging gets an accent with stones resembling two small feet next to each other. It shows how using the resources around you can turn simple into beauty.
Pinsource: farmandfoundry.com
This garden edging looks like a miniature fence. It does serve as a symbol saying keep out of my plants but in a playful way.
Pinsource: growingdesigns. co.uk
co.uk
This garden bed looks similar to the uneven railroad ties, but uses a landscape timber and this edging does not vary in height but also deliver a very attractive and natural feel.
Scrap Treated Wood As Garden Edging
Pinsource: theownerbuildernetwork.co
The mini boards from possibly a pallet of this garden edging are high enough to define the garden bed. Not my style but that’s OK.
Cut Tree Trunks Laid Out As Edging
Pinsource: hometalk
This edging you don’t notice due to the bottle walkway. Lots of detail when into the walkway bit the edging looks to me like an afterthought.
Garden Edging Made From Pallets
Pinsource: lovelifesimplified
The look of this garden edging looks very “homey” as though the creation appears to be part of a project. The cut apart pallets give a very western feel.
Woven Garden Hoses Used As Edging
Pin
Pin
source: karapaslaydesigns.com
A unique and beautiful way to create a one-of-a-kind fence. The best part is breathing new life into old garden hoses destined for the dump.
Braided and Woven Vines
Pinsource: sad.co.ua
This woven garden edging gives off a rustic feel. A lot of work involved in thing edging idea.
Manufactured Landscape Edging
For some the easiest method to edge the flower bed or lawn sits on a shelf down at the local garden center. Pre-made, usually manufactured plastic edging makes for quick installation. All come with “how to install landscape edging” instructions.
EasyFlex No Dig Edging
Pinsource: amazon
This manufactured plastic edge material delivers a simple, minimalist look. Perfect for a quick fix and barely noticeable in any garden.
Inexpensive Garden Edging Ideas: Grey Cobbled Stone Plastic
Pinsource: pinterest
This manufactured garden edging is thin, made of a plastic material with a brick edge design face. The extra room allows you more space to plant flowers and shrubs. The color does not take away from the beautiful colors of the plants and is easy to install.
Flexi-Curve Garden Edge
Pinsource: menard’s
The edging in this garden makes it look spotless. The beautifully crafted designs are very eye catching.
Pinsource: haddonstone.com
This manufactured garden edging looks beautiful in white. It almost looks as though it is made from marble. It has a bit of a slope where the plants lay on top.
Border Landscape Edging Ideas We Can Only Call Unique!
Glass Bottles Recycled Into A Garden Border
Pinsource: thegreenbacksgal.com
Glass bottles catch the eye and help provide a landscape border to keep certain pests out of the yard. It’s a good craft if you have multiple, uneven-sized bottles – any size or shape can easily fit the wall! Not sure about the safety level though!
China Plate Garden Edging
Pinsource: 33barefootlane
These dinner plates make a very uncommon way to set up a garden border. Using plates that would otherwise sit in a china cabinet is an excellent way to make use of items that usually remain “off limits. ”
”
Terra Cotta Pots Fashioned Into A Garden Border
Pinsource: om mig
This garden edging is very different from others. The terra cotta pots laid out make for an interesting, whimsical look. The tubular shape also adds a nice effect.
Collected Bowling Balls Used As An Edging
Pinsource: beth evans ramos
Not much to say about this landscape edging design. Just an excellent example of quirky garden edging with no rules.
Collected Hubcaps Made Into Edging
Pinsource: beth evans ramos
This edging made from hubcaps is a great way to reuse and recycle. These hubcap flowers offer another idea. A fun conversation starter, and unique design. Not sure how much work it would take to collect them all!
Recycled Bicycle Wheels Used As Garden Edging
Pinsource: reciclaedecora.com
The bicycle wheels provide a great use for older bikes. They also ensure that plants along the border get enough exposure to the elements needed to grow. This edging would be a difficult “assemble” in many areas to acquire the bike rims.
Border FAQ’s
What are some good perennials for planting along the front of the border?
- Alyssum saxatile compactum
- Dianthus plumarius
- Statice longifolia
- Plumbago larpentiae
- Dwarf Asters
- Veronica spicata nana
- Arabis alpina
- Silene maritima
- Tunica saxifraga
- Veronica rupestris
- Nepeta mussini
What are some medium-height perennials to use on the center of the border?
- Campanula persicifolia (Peachleaf Bellflower)
- Artemisia Silver King
- Achillea ptarmica
- Aquilegia coerulea
- Paradisea liliastrum major
- Dicentra eximia
- Eupatorium coelestinum (syn. Conoclinium coelestinum)
- Veronica longifolia subsessilis
- Gypsophila paniculata compacta
Which are some of the best tall-growing perennials for a border?
- Macleaya cordata
- Thalictrum aquilegifolium (meadow rue)
- Phlox paniculata hybrids
- Helenium autumnale
- Rudbeckia purpurea
- Delphinium hybrids
- Asters (tall named varieties)
- Cimicifuga racemosa (Black Cohosh)
- Campanula pyramidalis
These edging ideas are only the tip of the iceberg… just use your imagination!
15 Best Garden Edging Ideas
Type keyword(s) to search
Today’s Top Stories
1
Easy, Cheap, 30-Minute (or Faster!) Dinner Recipes
2
The Best Apples for Cooking and Baking
3
6 Best Dog Beds as Tested by Our Editors
4
Apple Cider Donut Bundt Cake
5
Dad Jokes To Keep the Whole Family Laughing
Country Living editors select each product featured. If you buy from a link, we may earn a commission.
More about us.
Don’t skip this crucial step!
By
Arricca Elin Sansone and Hannah Jones
JenniferPhotographyImaging
There are few things in life as wonderful as spending a gorgeous, sunny afternoon relaxing and enjoying your beautiful garden. The catch? You have to create that beautiful garden first, which will be all the prettier when set off by one of our smart-looking garden edging ideas.
Depending on where you live, spring may already be settled in. Or, you may still be waiting for the last frost to move the seedlings you started in your home or greenhouse to the garden. But however far along spring is, there are some fundamental steps to creating a garden that have nothing to do with plants.
First, plan your garden’s layout—a crucial component often forgotten by homeowners. Next, you’ll want to make sure you’re fully stocked on tools. Consider adding a potting bench if you’re looking to spruce up your potted plants this year. Next, prep your soil to make sure your plants have proper nourishment. And, of course, we can’t forget the final step: edging your beds.
Edging your garden beds is an essential step that many people skip, which leads to a garden that looks unfinished and bare. Your plants might be blooming beautifully, but if the bed they are in looks unkept, it can ruin the entire look. Edging your garden takes a little extra dirty work, but it’s worth it in the end. There are a variety of edging materials you can choose that range in price, installation difficulty, and durability. Here are a few of our go-tos.
1
Metal
SHOP AT AMAZON
2
EcoBorder
Recycled Rubber Edging
$77 AT AMAZON
3
Plastic
klosfotoGetty Images
Plastic isn’t glamorous, but it’s relatively easy to install. It’s available in short individual sections you pound into the ground or long rolls of edging, which require you to dig a trench in which to sink the edge.
SHOP PLASTIC EDGING
4
Paver Stones
Wicki58Getty Images
Pavers made from concrete are nearly indestructible. But they’re heavy to handle and time-consuming to install, so plan on a few days of heavy carrying and digging. You can make paths with pavers, or just use them for edging beds.
SHOP PAVER STONE EDGING
5
Woven Willow
kievithGetty Images
Also called “wattle,” this natural edge is perfect for English or country gardens. It’s used extensively in Europe.
SHOP WOVEN WILLOW EDGING
6
Natural Rock
Getty Images
Rocks are available in an array of sizes, colors, and shapes, and creeping flowers look amazing tumbling over them! Simply line the edges of each bed, but opt for rocks that are the size of a soft ball or larger for the most visual impact. Visit a nursery or garden center for options.
SHOP GARDEN EDGERS
7
Flagstone
mtreasureGetty Images
Flagstone comes in many different shades and thicknesses. Set the flat pieces along the garden edge, or stack them for a classic look in a cottage or country garden. Check with your local nursery or garden center for options.
SHOP GARDEN SHOVELS
8
Brick
ozgurcoskunGetty Images
Lay bricks in a shallow trench on their side with the wide side down, or stand them upright. The hardest part is getting everything level. Hint: Use a rubber mallet and line level on a string.
SHOP BRICK EDGING
9
Poured Concrete
JenniferPhotographyImagingGetty Images
This is typically not a DIY job for newbies, as you must build a form, then mix and pour concrete into the mold. Consider hiring an expert, because mistakes are not easily fixed.
SHOP GARDENING GLOVES
10
Shovel Edging
tagphotoGetty Images
Here’s a great idea if you don’t like the look (or expense) of edging: Use an edging shovel, spade, or electric edger, to cut the grass away and create a sharp edge, which keeps grass from creeping into beds.
SHOP LANDSCAPING EDGERS
11
Landscape Timber
lubilubGetty Images
If you’re handy with a saw, landscape timbers are a cost-effective method of edging. They’re often pressure-treated to prevent rotting. You’ll need to level the ground and cut sections as needed.
SHOP LANDSCAPE TIMBER
12
Cedar
ntmwGetty Images
Small cedar shingles or cedar shake “fences” are simple to hammer around the perimeter of beds. They last for several years, but not forever, as they’re easily damaged by string trimmers or lawn mowers.
SHOP CEDAR LAWN EDGING
13
Decorative Fence
DmyToGetty Images
Small sections of fence are super-easy for lining a garden perimeter. Many different types and sizes exist including metal, wood, and plastic, so you’ll find the one that suits your garden’s style.
Pros: Easy to place
Cons: Easily damaged, doesn’t hold mulch in place
SHOP GARDEN FENCING
14
Bosmere
Edging Weed Mat
Amazon
$33 AT AMAZON
15
Bamboo
SHOP AT HOME DEPOT
Arricca Elin Sansone
Arricca SanSone has written about health and lifestyle topics for Prevention, Country Living, Woman’s Day, and more.
Hannah Jones
Hannah Jones is the Associate Commerce Editor for Country Living, where she covers gift guides and other product recommendations.
11 Best Spring Flower Bulbs to Plant In the Fall
Pretty Purple-Flowering Vines, Shrubs, and Borders
Our Best Container Gardening Ideas
Red Flowers to Add Bold Color to Your Garden
These Are the Best Grow Lights for Your Plants
15 of the Best Air-Purifying Plants
8 of the Best Vegetables to Grow in Containers
10 Best Hummingbird Feeders to Buy in 2022
14 Lawn Sprinklers to Water Your Entire Garden
24 Low-Maintenance Plants for the Lazy Gardener
DIY Brick Garden Edging in a Weekend
Sharing is caring!
5549
shares
As a gardener, and someone who likes things to look pretty, I love the thought of edging. Garden edging, whether used to separate a flower bed from the lawn or the garden area from the lawn, is incredibly helpful. Not only does it serve a functional purpose, but garden edging can be beautiful.
Creating your own brick garden edging isn’t incredibly difficult, but it certainly will be a weekend project. Our project began last spring when we took up our old brick patio. The old patio was over 50 years old, and was making “waves.” So the brick came up, and we had a new concrete patio poured. In the process, we made our patio area larger and created a curve. I knew I wanted a flower bed along the curve for some gardenias, as well as perennial herbs. My problem arose though when the grass began creeping into my new flower bed, and the lack of definition on one side of the bed. You can see what I mean here:
Apparently, I like structure, and this bed seemed to be spilling out onto the lawn. Lucky for me, the old patio bricks had been stacked onto a pallet and were waiting to be used. Lucky me. The project of creating the brick garden edging took a weekend, but I wasn’t working full days. Here’s what you’ll need to complete the project.
DIY Brick Garden Edging Supplies
Bricks (how many depends on how long of an edge you’re creating)
Flat Head Shovel or a Square Garden Spade with a long handle
Sand
Level
Landscape fabric or newspaper (optional)
Garden Kneeler (for the the sake of your knees, ha!)
How to Install a Brick Garden Edge
- First, determine where you want your edging to go, and using the corner of your shovel, create a line along the outermost edge of where the bricks will be placed. We initially marked our line with the shovel, and then went back over the line with the weed eater to make it even more prominent. This will allow you to get a good idea of the shape of your edging before you start digging and laying down the brick.
- Once your line is completed, use your flat shovel or garden spade and begin digging a trench from the line you created and in toward your bed or garden. I knew I’d be using a brick lengthwise and then another brick widthwise for our brick garden border, so I measured the brick length and width and used this measurement to know how far in to dig. Only dig a few feet of edge at a time. This will give you a chance to work with and place the bricks and determine if you like how the edging is laying.
- Once you have dug the trench and it is the appropriate depth and width for the bricks, place a thin layer of sand in the bottom of the trench. (You could also add newspaper or landscape fabric beneath the sand to prevent weeds and grass from popping up.)Then begin laying your bricks. We chose to have an inner edge of bricks on their side with bricks running lengthwise coming off of those. You could choose to have a single row of bricks to make things more simple. Have a small garden spade handy to ensure small pockets of soil aren’t causing your bricks to be uneven. A level is also a great way to ensure your bricks are even. With yards and soil, unevenness is to be expected to a degree, but it helps to get as close as you can.
- Once your entire edge has been laid, go back and tweak any bricks that aren’t in line with the others. Then you’ll take the leftover sand, and begin filling in the cracks between the bricks. This will help to smother out any weeds/grass that will try to creep up between them. A paver sand or regular sand can be used. Once the cracks are filled with sand, use a broom to sweep away the excess.
- Then stand back and enjoy your new brick garden edging! We went on to create a brick path from the patio to our garden area as well. There are so many uses for leftover brick! We have had the edging in place for over a year, and it has held up well. No bricks have fallen out of place, and this includes even when our kids walk along them.
 I knew I’d be using a brick lengthwise and then another brick widthwise for our brick garden border, so I measured the brick length and width and used this measurement to know how far in to dig. Only dig a few feet of edge at a time. This will give you a chance to work with and place the bricks and determine if you like how the edging is laying.
Mortar or Not?
The option is always there to mortar the bricks in this particular brick garden edging, but we opted against this. First, I wasn’t sure how long I wanted to edging in place. Mortaring these bricks together would have made it much more permanent. Our neighbors have a similar brick edging in their front yard, and it is mortared together. It looks lovely, but it was much more work. Secondly, the brick patio (50 years old at least), hadn’t been mortared together and had managed to stay in place all those years. We went with the less labor intensive option, and we are very pleased with the results.
I’d love to know what you use to edge your garden and flower beds. Do you have any other ideas for using up extra brick? Comment below and let me know!
Have a great week and happy gardening!
Other Articles You May Enjoy
How to Plant a Vegetable Garden
DIY Raised Bed Garden Fence
How to Plan a Gorgeous Cutting Garden
Like this:
Like Loading…
Garden & Lawn Edging Ideas and Install Tips (DIY)
Updated: Sep. 17, 2021
Three simple, attractive, low-maintenance garden and lawn edging ideas to inspire.
Next Project›
Family Handyman
We show you how to edge a lawn with simple and attractive tips that keep grass from invading your garden and eliminate the need for edge trimming.
By the DIY experts of The Family Handyman Magazine
- Time
- Complexity
- Cost
- A full day
- Beginner
- Varies
Lawn Edging: Metal: A Nearly Invisible Garden Border
Lawn Edging: Metal garden borders
Metal lawn edging subtly separates the lawn from the garden.
Lawn Edging: Photo 1: Dig the trench
Cut a narrow, 4-in. deep trench with one vertical side along the lawn edge. Shave the vertical edge to smooth out curves. Follow a string line for straight landscape border edging.
Lawn Edging Photo 2: Place the garden edging in the trench
Snap together the 8-ft. landscape borders, drop the garden edging into the trench and lay it against the vertical edge. Cut the final section to length with a hacksaw.
Lawn Edging Photo 3: Support the landscape edgers with stakes
Drive stakes to set the depth at about 1/2 in. above the soil level of the lawn. If the garden edging drops too low, pry it up with the tip of your shovel.
Lawn Edging: Photo 4: Backfill along the garden edging
Backfill the landscape edging with soil from the garden bed and compress it firmly. Leave room on top for mulch.
The simplest and most subtle landscape borders that effectively separate your lawn from a garden are 4-in.deep strips of steel, aluminum or plastic. The metal lawn edging bends easily into smooth, graceful curves and stops the spread of grass roots. However, painted aluminum and steel offer the sleekest, most refined garden edging look because they almost disappear against the grass and garden bed. The plastic types of garden edging have a prominent black bulge along the top edge. All work best on fairly even terrain; if you have a lot of dips and rises, it’s easier to install a paver border.
Plus: You may want to consider flower bed fencing, if there are pests you need to keep out.
Although aluminum and steel landscape edging cost about the same, we chose aluminum because it was much lighter. It weighs about 41 lbs. per 100 ft., while steel weighs about 225. With aluminum landscape edging, you get a professional look without the heavy lifting.
Plan to set the garden border with the top edge about 1/2 in. above the soil level to maintain the lawn/garden separation and keep roots from crossing over the top. This makes the garden border almost invisible and allows you to mow right over the top. However, be aware that the top of the thin lawn edging can hurt bare feet. After cutting it, make sure you round off any sharp edges with a file.
Follow the photos for the basic garden edging installation techniques. The key to setting this garden border is to cut a clean vertical edge along the grass with a square spade (Photo 1). Then you can lay the garden border tightly against the edge when you stake and backfill it. There’s no rule for shaping the edge. Simply follow the edges of your lawn, making smooth, gradual curves.To make smooth, sharp curves, bend the metal lawn edging around a circular form.
The thicker landscaping edgers better withstand those inevitable bumps and hard knocks that go with lawn mowing.
CAUTION
Call your local utilities or 811 to locate underground lines before you dig and install all edging.
Buying Lawn Edging
Steel landscape edging is the most common metal garden edging, although you might not find it at local nurseries. Look for it at larger garden centers or at landscape suppliers, which is where most pros get it. (Search “Landscape Equipment and Supplies” online.) Steel garden landscape edging comes in 4-in. wide by 10-ft. long strips in a variety of colors. Keep in mind that it’ll eventually rust, especially in a salt environment. It’s heavy, floppy stuff and needs almost full support when you transport it.
Aluminum garden landscape edging, besides being lighter and stiffer, won’t rust and is also available in a wide variety of colors. Look for it through landscaping suppliers, although it might be difficult to find. You might have to order it. Be sure stakes are included with your purchase.
You’ll find black plastic landscaping edging at every garden center and home center, sometimes in both regular and heavy-duty thicknesses. Buy the thicker landscaping edging material. The thicker landscaping edgers better withstands those inevitable bumps and hard knocks that go with lawn mowing.
A Paver Garden Border: Edging Stones
Paver border
Pavers provide a wide lawn edging border that keeps grass out of the garden.
Concrete and brick pavers
Pavers are available in a variety of colors and shapes.
Photo 1: Identify the garden border
Lay out the border of the lawn edging with a garden hose, using the brick pattern as a spacer. Make curves gradual and smooth.
Photo 2: Dig a wide trench
Dig a 4-in. deep trench about an inch wider than the brick pattern, using a square spade. Cut the edge along the grass smooth and square.
Photo 3: Fill the trench with fabric and sand
Cut landscape fabric to fit the bottom and sides of the trench and dump in about 2 in. of sand. Smooth and flatten the sand with a block of wood.
Photo 4: Lay the edging stones on the sand
Set the bricks tightly together so the tops and front edges are even and about 1/2 in. above the soil. Sweep sand into gaps and pack soil against the back side of the lawn edging.
If you’re having trouble deciding between various lawn edging ideas, consider concrete or brick pavers. They make a simple, handsome border and work well as lawn edging material too. They’re ideal when you want a wide border that keeps grass out of the garden, yet allows flowers and other plants to spill over without intruding onto the grass. You’re less likely to chop them up with the lawn mower.
The paver design shown here also provides a nice, flat surface for the lawn mower wheel to roll along and make a clean cut. You shouldn’t have to trim the edges after mowing. Concrete pavers are designed for rugged outdoor use. Brick pavers are too, but don’t confuse them with regular bricks, which are typically softer and more likely to break down. Set the pavers in a bed of sand for easier positioning and leveling (Photo 3).
The sand bed that you lay over landscape fabric keeps most grass types from sending roots under the lawn edging and getting into your garden. Paver borders work well for straight, formal gardens but even better for informal yards with gradual curves and varying slopes. You can easily adjust them to follow the contours of an uneven yard. But they won’t fit as well on tighter curves unless you alter the design and are willing to cut them to fit with a diamond blade saw.
Use a garden hose to mark the shape and gradual curves of your lawn edging (Photo 1). Don’t hesitate to trim the trench a bit here or there as you cut the edge to smooth curves or alter the garden bed shape. For straight borders, follow a tightly stretched string line. Follow the photos for installing the pavers. It’s important to set the front edge of the pavers about 1/2 in. above the soil in the lawn so the lawn mower can cut the grass cleanly. We also leveled our pavers from front to back to keep the row from dipping and rising, but it’s not necessary and on slopes might look better if set on an angle. Just make sure the top of each paver sits flush with its neighbor and that the front edges create a smooth line. You can go back later and whack them perfectly flush with a block of wood and a hammer or a rubber mallet. The pavers we set on edge are primarily decorative, but they also raise the garden bed slightly and help retain mulch. Set them higher or lower to fit the needs of your garden.
A Raised-Bed Border
Raised-bed border
A raised border adds depth and texture to the garden.
Stacking edging stone
You can choose from a variety of attractive stone for your border.
Photo 1: Dig a trench
Mark the path of the border with paint, then dig a 4-in. deep trench along the line. Make the width the stone width plus 6 in.
Photo 2: Fill the trench with gravel
Pack in and level a bed of gravel. Keep the height at or below the soil level. If necessary on slopes, plan to step the stone up or down.
Photo 3: Set the first row of stone
Lay the first row of stones about 4 in. back from the grass edge. Push in more gravel or dig it out to align and level them. Wear goggles when chipping stones.
Photo 4: Lay the second row
Stack the second row of stones onto the first, overlapping the joints. Test several stones to find the most stable fit.
Photo 5: Fill the raised bed with topsoil
Lay a strip of landscape fabric against the back of the stones and fill the planting bed with topsoil. Trim off excess fabric later.
Photo 6: Install plastic edge along the front
Scoop out 4 in. of gravel in front of the wall and install plastic lawn edging. Pack mulch into the gap between the plastic and stone.
A stone wall does more than make a clean border along your lawn. It’s a handsome visual statement in itself, a great way to add depth and texture to a flat, featureless yard. It’s practical, too.
When looking at paver lawn edging ideas, be sure to explore the variety of stone materials, sizes and shapes to create your ideal landscape border. It also provides good drainage, making it a great solution for low-lying, soggy gardens. And it’s a good way to terrace a sloped yard and create nice, flat gardens.
To reduce maintenance we added a 4-in. deep trench that we lined with plastic edging and filled with mulch. The lawn edging keeps grass roots from creeping into the stone wall, and the mulch provides a mowing track for lawn mower wheels. With taller types of grass, you can mow right over the plastic border and cut the lawn edge cleanly. There’s no need to trim the grass.
This project doesn’t require any special skills, just a strong back. For metal lawn edging you’ll need a hacksaw, and for stone lawn edging you’ll need a cold chisel. Remember to wear safety googles when installing your landscape edging. Design your raised bed to blend into the contours of your yard like a natural feature. You can handle slopes in one of two ways. Either let your wall follow the slope of the yard for an informal look, or level the stones as we did and step the wall up or down as the slope requires to maintain approximately the same height.
The exact size of stacking stone for walls varies considerably by region. Visit a local landscape supplier to check types. (Ours is Chilton limestone.) For lawn edging, limit the height of your wall to two courses so you won’t have stones falling out. Measure your wall length and make a sketch.
The stone dealer will help you figure out the quantities of all the materials you need. The stone will probably be sold by the ton or pallet and it’s heavy. Have it delivered and dropped as close to the wall location as possible. And have gravel or sand delivered to use as a setting bed for the stone (Photo 2) as well as topsoil to fill behind the wall (Photo 5). The stone or landscaping dealer will help you calculate how much of these you need.
Follow the photos for step-by-step instructions on how to edge a lawn with stone. Get started by laying out the border with a garden hose or paint. We drew a curve by setting a string at a center point and marking an arc with paint (Photo 1). The trench width will vary depending on the width of the stone. Add 6 in. to the stone width (2 in. for the mowing edge plus 4 in. extra).
Generally it’s best to keep the bottom row of stone an inch or so below the original soil level, but this will vary if you keep the stones level and the yard isn’t level (what yard is?). If you’re considering this lawn edging idea, just know that you may need to step the stones up or down, or use thinner or thicker stones depending on aesthetic and fit. There’s no rule here. Experiment when you lay the stones for the best appearance.
Lay the stones that have the most irregular faces in the first row so you can place the irregular face down in the gravel and level the top (Photo 3). Vary the sizes and colors for the best look. Chip off irregularities with the maul and chisel. Then add the second row (Photo 4). Make this row as stable as possible so the stones won’t rock and fall off. As a last resort, stabilize the stones by shoving stone chips into the gaps.
Lay landscape fabric against the back of the wall before backfilling to keep dirt from washing out through the stone (Photo 5). Then install the plastic edging in front. Add organic mulch to finish up the mowing edge.
Originally Published: June 24, 2019
Similar Projects
Popular How-To Videos
ⓘ
Brick border: how to make, stages of construction
Garden paths are an integral part of landscape design. They are built from different building materials: stone, concrete, brick, wood, and so on. This article will talk about brick paths. Or rather, about the technology of their paving.
Brick path on the garden plot
How to lay a path in the garden from ordinary brick
So, let’s start with the fact that this requires a solid brick, that is, without any holes and voids. It must be of high quality, because the long-term operation of the garden alley will depend on this.
Sand and geotextile are also required. Instead of sand, you can use gravel, crushed stone or a mixture of sand and crushed stone in a ratio of 1: 1.
Solid bricks are best for paths
-
The first stage – determine the width of the track and apply its contours to the area. If this is an alley from the gate to the house, then its width can be torn up to 2 m. If this is a garden path, then within 80 cm.
-
Marking is carried out or chalk powder, or pegs, between which a twine (twine) is pulled. In this case, the path itself does not have to be straight. Bends, bends, turns, connections with two or three paths are common in landscape design.
-
The second stage of the construction of brick garden paths – earthworks . Their volume depends on whether the brick will sink into the ground or remain on the surface.
In the first case, the depth of the ditch under the path is 15 cm, plus the thickness of the brick. In the second case – only 15 cm. -
The bottom of the trench is leveled and compacted . Then they fall asleep with a 15-centimeter layer of coarse-grained sand, which is also leveled and compacted. Better with water.
-
Third stage – laying bricks . If it is not recessed into the ground, then you will first have to install limiters along the borders. These can be temporary items or permanent ones.
The bricks themselves, laid on edge, are temporary. Or metal or wooden pins driven into the ground. You can even use boards.
That is, with the help of these elements, the border of the alley is formed, plus stops that will not allow the bricks to “disperse” in different directions.
 In the first case, the depth of the ditch under the path is 15 cm, plus the thickness of the brick. In the second case – only 15 cm.
 Permanent stops (limiters) should be discussed separately.
Brick path trench
How to form a garden path border
There are several options.
The first is the simplest . The borders are formed from the bricks themselves. In order for them to have a high bearing capacity, brick blocks are installed vertically in length. That is, half is buried in the ground, the second half will stick out above the ground. No bonding solutions and additional materials. The main thing is to accurately calculate the required amount for both the track and the curbs.
Of course, the vertical position of the bricks in the thrust device is optional. They can be laid in length horizontally or with a slight slope. In the latter case, the corners of the blocks will drink outward, which will significantly distinguish them from the bulk of the building material laid on the plane of the path. The photo below shows just such an option.
Brick garden path borders
The second option is to use ready-made borders made of concrete or stone. On the market, you can pick up these elements of landscape design in length, width and thickness, which is very convenient. For example, massive curbs are suitable for wide alleys, miniature ones for narrow ones.
Brick alley with painted concrete curbs
The third option is a cast curb . It is made from concrete mortar, which is poured into the installed formwork. Usually pouring is done to the entire depth of the excavated pit.
The height of the projecting part can be greater than the thickness of the brick being laid. The width is within 5-10 cm. Subsequently, the concrete border is painted or lined, for example, with ceramic tiles.
If the concrete product is well sanded, then it is not necessary to cover it with anything for decoration. Concrete and brick themselves look good in a bunch.
The fourth option is special corner bricks. They are laid in the masonry of the garden path. However, they must be mounted along the edge of the structure. It is with their short side that they are held in the ground, preventing the finishing elements from moving apart.
Corner-shaped bricks on the border of a garden path On our website you can get acquainted with the most popular sites in the Moscow region for building a country house. In the filters, you can set the desired direction, the presence of gas, water, electricity and other communications.
The fifth version is a special small size posts made of concrete . They can be round, rectangular or polygonal. For example, the diameter of round products varies in the range of 10-12 cm, the length is up to 30 cm. They are simply installed on the border of the path, often “planted” on a concrete solution. Be sure to align everything in height.
Concrete bollards for forming the borders of garden paths
In principle, there are a huge number of options for forming the borders of brick country paths. Let’s add to the already indicated:
- stone ;
- butobeton , this is when the stones are poured with concrete mortar;
- paving slabs mounted on edge;
- paving stones ;
- plastic pipes closed with plugs.
Brick installation
So, the ditch for the path is ready, the boundaries are formed. It remains only to lay the brick itself. First of all, you need to decide on the layout of the masonry. There aren’t many options here. The simplest – according to the type of bandage, when the elements of the cladding are laid with an offset of half the stone. And other schemes:
- herringbone ;
- interspersed a whole brick and a half;
- parquet installation;
- figured .
We will not discuss which option is better or worse, easier or more difficult, cheaper or more expensive. Just mark them in the photo below. And already each owner of a suburban area decides for himself what he likes.
Schemes for laying bricks on the garden path It might be interesting! In the article on the following link read about garden decor: original ideas for your garden, approximate prices for materials.
And one more thing. Which brick to choose for this in terms of its color. Here again, the owner of the cottage decides.
But keep in mind that red brick garden paths look bright, they well divide the site into zones.
It is difficult to hide them even with vegetation, but it is this fact that makes it possible to focus on the layout of the paths. This option enhances the functionality of landscape design.
Many designers try to diversify their approach to the design of alleys. Therefore, bricks of different colors are combined. But here you have to be careful. Especially the paths of the local area. This element should not become the main design. It should emphasize the architecture and decoration of the house, and not set it off.
So, let’s go directly to the section of laying a path in a brick cottage. Immediately make a reservation that the main tool for this process is the building level. Because each brick must be placed on the horizon. At the same time, it should be in the same plane with the rest of the stones.
Laying bricks for a garden path
Laying can be started at either end of the path. Exactly according to the chosen scheme, each brick is installed. Finishing elements are installed close to each other or leave a small gap between them.
There is no need to reinforce the material with masonry mortar. If some brick is laid above the rest, then it is removed, the layer of sand bedding is removed and set in place.
If, on the contrary, it turned out to be lower, then a little more sand or gravel is poured under the block.
If the width of the path is large, then the process of laying bricks can be carried out according to the level, which is a thread stretched between two pegs.
That is, they hammer two pegs along the edges of the ditch, tie a thread to one of them, pull its free end to the opposite peg, set it horizontally using a level and tie it.
It is along this stretched thread that bricks are laid in one row.
When the entire garden path is bricked up, sand is sprinkled on its surface to fill the seams between the trim elements.
 Gradually sweep the sand from one edge to the opposite with a broom or brush. After that, it is better to pour plenty of water over the entire path. And then again fill it with sand so that it complements the shrunken layer.
 Video showing how to build a garden brick path:
This might be interesting! In the article on the following link, read about the design of the garden plot – from design to design, + ideas on photos and videos.
English path
There is such a term in landscape design. In fact, these are paths made of old brick. They are laid without borders and other limiters. That is, a path is formed in the form of a ditch, where sand is poured, and old bricks are laid on top of it. Their upper plane should be located on the level of the ground or be slightly higher.
This is the simplest option that does not require much money and time. The only requirement is no vegetation that would grow between the cladding elements.
Therefore, the bottom of the excavated ditch is covered with geotextile. This material will not allow plants to break through, but it passes water through itself well.
The geotextile is laid in such a way that it also covers the walls of the excavation.
If this non-woven material is not available, then a gap of 1-2 cm is left between the bricks, which is subsequently filled with cement-sand mortar. Just such an option is shown in the photo below.
English brick path It might be interesting! In the article at the following link, read about the top 10 stairs in the Art Nouveau style: complex in simple.
Conclusion on the topic
So, we figured out the bricks for the paths in the country, considered the options and technologies for forming alleys, and also identified several ways to make the boundaries of the paths. It should be noted that brick alleys are not the most durable, say, like stone or concrete.
Under the influence of water, sub-zero temperatures, ice and snow, the brick quickly fails. It starts to crack, flake and break. This is especially true for material from the “used” category. But even from an old brick, the path will last at least 10 years.
And this is with small financial investments.
Read later
We will send the material to the post office
- The author of the article
- Designer-decorator and blogger, with 9 international experience0022
- Ulyana Matveeva
Source: https://m-strana.ru/articles/dorozhki-iz-kirpicha/
How to make a decorative border for a flower bed with your own hands from wood. brick, plastic
It is difficult to imagine a summer suburban area without a lushly flowering garden.
Tall velvet roses and peonies peek through the windows, small daisies and pansies are scattered in the thickets of grass, asters and hyacinths create unusual patterns on the flowerbeds.
To frame bright flower arrangements, use borders for flower beds – low fences made of various materials. Let’s figure out how to make plastic, wood and brick fences.
What options are available for fencing?
Even before you set up a flower garden, you should think about how to make a beautiful border for the flower bed. It should not only serve as the border of the flower structure, but also correspond to the general style of the surrounding area.
Border mosaic looks elegant and noble, which has one attractive quality – it is unique. With the help of glass and tile fragments, you can create a unique, author’s drawing or ornament, and you can be sure that you will not find another such frame for a flower garden. Instead of fragments, you can use ordinary or painted pebbles.
The flowerbed itself and the base of the bench are decorated with colorful mosaics. Pieces of ceramic facing tiles were used for the work – a few pieces always remain after repairs
Creating a Mediterranean or English style in your garden, you can opt for fences made of natural stone: granite, shell rock, limestone, sandstone.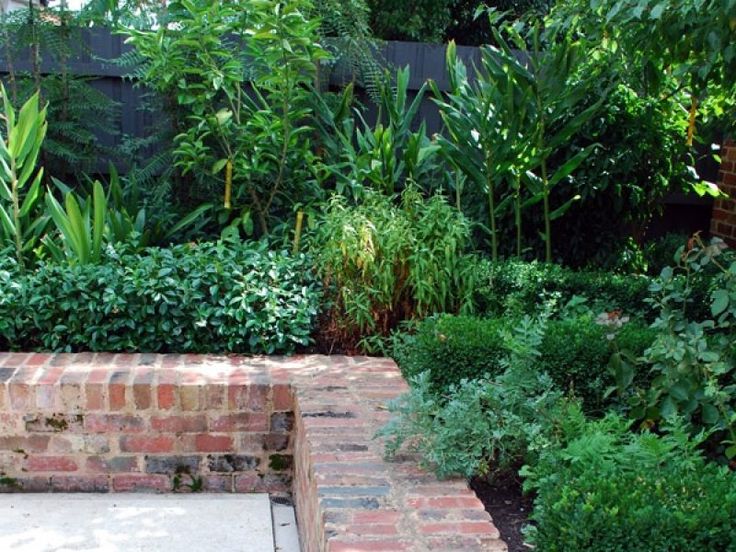
They are equally good for decorating free-standing plants and large landscape flower beds.
Strong and durable, stone structures will last for decades, and besides, they are easy to make yourself using cement mortar for construction.
A stylish look is easy to create by matching the stone for the border with the color of the surrounding buildings. Instead of natural material, you can use decorative tiles
Those who are seriously involved in gardening are familiar with this type of flower garden fencing, like an excavated border. This is a kind of groove dug between the flower bed and the lawn (or path). The dimensions of the dividing trench depend on the density of the soil and the root system of the plants.
An excavated border needs regular maintenance: mulching with peat or crushed wood chips, leveling, cutting off overgrown sod roots with special scissors. For its manufacture, ordinary willow twigs are used, fixed on posts driven into the ground. Weaving is a traditional old-fashioned method that our ancestors used to create village fences – wattle.
A lively border of low ornamental plants looks natural. In addition to herbs and flowers, undersized shrubs are successfully used. The height of the fence can be any, but usually it does not exceed 40 cm, otherwise the fence will close the flower garden.
Low-growing green perennials can be replaced with any bright flowers with small inflorescences, thus creating beautiful compositions in an unusual frame
Option # 1 – a wooden fence made of pegs
and outbuildings, and a bathhouse, and a gazebo, and even benches in the garden are made of wood.
This is not surprising, because wood is a natural material that blends harmoniously with green spaces, flowers, stone paths and ponds.
It is excellent for creating any country decorations, including the production of a decorative border for a flower bed.
Wooden elements of various sizes and shapes are used to design flower beds: small stumps, pegs from branches, old boards, remnants of bars
One of the simplest options available even to an amateur is a low fence made of pegs of various lengths. We take as a basis light wooden posts of a small size, the color of which, if necessary, can be changed to a darker or brighter one. The steps for creating a fence from pegs are extremely simple.
Preparing building material
The blanks can be either wooden blocks of the same section, or thick straight branches that must be prepared in advance. We remove the bark from the branches and cut them into elements of various lengths. The dimensions of the products depend on the shape of the fence. In our case, these are alternating high and low bars. Let one part of the blanks be 0.30 m long, the second – 0.35 m.
We measure the length of the border and calculate the approximate number of products. Each detail is carefully treated with an antiseptic or a special protective varnish – so the border will last much longer.
Blanks for a wooden fence are easy to find: if there are no fallen trees on the site, you can use the materials left after the construction of the fence
Digging a trench around the perimeter of the flower bed
0. 15 m. To maintain accuracy, we first outline the contour of the fence – we draw a line on the ground with a sharp object.
When digging a trench, do not make it too wide: in a narrow trench, the pegs will be fixed more firmly and firmly
Installing the stakes
Place the fence elements one by one into the trench and immediately bury them, carefully tamping down the soil. We alternate – first a short peg, then a long one. If the elements differ in thickness, then we try to alternate different blanks so that the fence as a whole looks more uniform.
Alternating the placement of the pegs makes it possible to carefully secure each workpiece on all sides. No special tool is required to compact the soil, just trample it with your feet
Once all the pegs are in place and secured, you can slightly change the height of the pieces using a hammer. The pegs don’t have to be different in height – many people like even fences made of the same elements
Final decoration of the border
If light wood does not blend well with the design of the surrounding objects, it must be covered with paint of the desired shade: any tone of brown, yellow or gray. An excellent option is a special protective impregnation, which simultaneously preserves the wood structure.
To preserve the natural texture of the wood, you can use a clear varnish or similar oil that prevents the wood from swelling, mold and mildew
Option #2 – build a brick border
If a country cottage is built of brick, do not even think about it over the device of the curb for the flower bed with your own hands. You can quickly and easily make a brick edging of flower beds that looks quite natural, especially against the background of a fence or paths made of a similar material.
Brick border is ideal for matching walls or sidewalks, as well as any trees, shrubs or flowers (if the shape of the object is strictly geometric – for example, rectangular or hexagonal).
Preparing the trench
Directly along the marked contour, we dig a shallow trench, the depth of which is about 0.15 m. The width of the trench should be slightly larger than the width of the brick – about 0. 25 m.
25 m.
An ideally straight curb line can be replaced with a freer one – curved or zigzag, but taking into account a different laying of bricks
Filling the trench with concrete several days.
Dry cement mix can be purchased from the store for concrete foundations. The surface must be free of debris before laying bricks
Laying bricks
In our case, the bricks are placed on a concrete base in the direction along the border of the flower bed, but they can also be laid across or diagonally.
The height of the border for the flower bed can be adjusted in two stages: while digging a trench and directly in the process of laying bricks
Leave a small distance (about 0.1 m) to the lawn if a lawn mower is used on the site. To fix the curb, the remaining 1-2 cm and the gaps between the bricks are filled with concrete.
The advantage of a brick border is that a strong and durable fence can be created at any stage of the flowerbed arrangement: before planting plants or during their flowering
We fill the surrounding soil with earth – a neat brick border is ready.
Option #3 – two types of plastic railings
There are two ways to create a plastic border for a flower bed: buy ready-made products in a store or create an original fence from plastic bottles.
Plastic borders are made of durable modified plastic, which serves well for many years, does not fade and does not change shape under the sun
.
Plastic fences are modular, that is, they are assembled from many identical elements. At the end of the season, they can be easily dismantled and stored in back room
But you can use your imagination and make a fence of empty plastic bottles, which usually sell lemonade, beer or kvass.
This is easy to do: a trench is dug around the perimeter of the flower bed, about ½ of the used containers deep. The bottles are placed in the prepared groove with their bottoms up and buried, tamping the soil around the edges.
For a change, the above-ground part of the fence can be painted in cheerful shades, combined with the flowers growing in the flower bed.
Fences made of plastic bottles, tightly fixed, are not inferior in functionality to wooden borders: they perfectly keep the shape of the flower bed and do not allow the soil to crumble
Thus, flower beds can be fenced in any way, the main thing is that the material for the border is combined with the surrounding objects.
Source: https://diz-cafe.com/dekor/bordyur-dlya-klumby-svoimi-rukami.html
What are brick and natural stone borders, their purpose and construction
Owners of country houses and suburban areas are trying to ennoble the landscape, so they plant flower clubs on the plot, which are framed with decorative borders made of stones, bricks, plastic bottles, wooden pegs and other materials. In the article we will talk about how to make borders for flower beds with your own hands. But first, let’s talk about the purpose of the decorative element.
Appointment of border fences
Creating a border fence for a flower garden will give the area an attractive look. Such elements perform decorative and protective functions, delimit the territory into several separate zones, prevent plants from mixing and protect flower beds from weeds propagating by the root system.
The border is also a restriction for the soil, protects against spillage outside the flower bed and protects garden paths from soil contamination.
Brick border
Another important function of the border fence is to protect the flower beds from pets and small children.
Stone fencing
What are fencing
Before answering the question of how to make a border for a flower bed or lawn, you need to decide on the type of fencing element for flower beds. Form – any, as well as materials for arrangement.
Everyone approaches the choice based on tastes, territory design and financial component. They use brick, concrete, stone, plastic and glass bottles, wood, plastic, metal and other materials.
The main thing is to show your imagination and create an original protective border.
Natural stone for flower beds
Brick borders are laid out in suburban areas and in the yard of residential buildings. This option of fencing is convenient in that a minimum of effort and money is expended for the arrangement. Getting old bricks is not a problem.
But you need to understand that the brick is not very resistant to low temperatures, so when laying, follow a special technology.
When it is not possible to use facing bricks with high frost resistance characteristics for the construction of a flower bed, concrete blocks can be laid instead.
Another option for creating borders is the use of natural stone: marble, granite, shell rock and others. In order for the stone curb to be strong, reliable and last longer, the gaps between the laid stones should be sealed with concrete.
To build a stone wall around a flower garden, you will have to spend money, because marble, granite and other natural materials are more expensive than ordinary bricks. Plus, you will have to spend money on concrete.
Round flower bed
Low cost solution for creating protective elements for flower beds can be called concrete pouring into formwork or special forms. This approach allows you to make a border with beautiful patterns and even mosaic. To create a pattern on the curb, ready-made decorative forms are used, and with the help of stamps, make prints on raw concrete.
To finish a concrete curb with a mosaic, you can use glass from bottles, broken dishes, pebbles. Lay out the glass trim after the concrete is poured into the formwork or decorative forms, then the blanks are sent to dry.
Various forms of fences for garden plantings
How to make a border with natural stone
Stone borders are attractive. For the manufacture of such a border, limestone, sandstone, granite and so on are used. For laying stone fencing, dry masonry technology or concrete mix is \u200b\u200bused.
Seal all gaps between stones with cement mortar to block weeds. Before erecting a border for a flower bed, decide on the shape.
Having solved the problem with the form, remove the sod around the flower bed, marking the border of the desired width. Next, concrete is poured and stones are laid. It is important that they fit snugly together. Fill voids with small pebbles or seal with a solution of concrete mix. The work on the construction of a stone border is a laborious process, but the result will please.
A simple version of a border fence on a garden plot
How to make a brick border
Construction of brick borders is the most affordable way to decorate the landscape of a garden plot and adjacent territory. For the arrangement, red brick is used, and the borders are beautiful.
Often, facing bricks of different colors are used to decorate flower beds, more often a combination of white and red. To create a rustic style in the garden, lay out the borders with masonry bricks, and if an old atmosphere is needed, then old bricks that have served for many years or artificially aged will do.
This curbing material can be installed in a variety of ways. A simple solution is to lay bricks while standing with a slight tilt to the left or right. Products are dug into the soil or planted on concrete, which is poured into a dug groove.
You can also lay out bricks in rows on edge, this option will create a border of various heights and thicknesses. Brick borders harmoniously look near the house with cladding made of the same material.
0003
Source: https://laminatepol.ru/23695-bordyuryi-iz-kirpichey.html
Equipping a brick border
Works and research are devoted to the arrangement of landscape space. It is necessary not only to carefully perform the work, but also to achieve beauty in combination with harmony. An important place in landscape design is given to flower beds and lawns. Planting flowers and sowing grass is only half the battle, but making a beautiful brick border for a flower bed is a business.
Brick border
In order to give the design a finished look, equip sidewalks and paths, frame flower beds and lawns with a border. Fencing can be made from various materials:
- concrete;
- savage stone;
- tree;
- metal;
- plastic.
Such construction material as brick deserves special attention. With its help, it will be possible to obtain an exquisite appearance not only of single flower beds or flower beds, but also of the surrounding landscape as a whole.
Landscaping and borders made of bricks
Main features of brick flower beds
If the fence in a country house is built of bricks, you should not bother yourself with the choice of material for framing flower beds. A great solution is to make a brick border for the flower bed. It will be combined with the walls of the cottage and complement them harmoniously. The brick edging of paths and alleys looks natural and fits perfectly into the natural landscape.
Immediately before laying out the front garden, it is necessary to determine the type of construction. It could be:
- multi-level building;
- dedicated area;
- elementary fencing of a flower bed.
The owner of the household chooses the shape and height for the flower garden, it depends only on his fantasies and preferences. The most popular is the round flower bed. It, as the main design element, is placed in the center of the site, the surrounding design is formed from it. They try to plant the most spectacular varieties of flowers that will create a great impression of the entire estate:
- Roses.
- Hydrangeas.
- Ampel begonias.
- Gladiolus.
- Orchids.

Often a multi-level design is used for the central flower bed. It allows you to show the beauty of the flower garden in the best possible way. Brick is well suited for creating such a structure. Undersized flowers are planted in the upper floors, while the lower ones are occupied by voluminous gifts of flora.
Brickwork border visually expands the area. Chipped stone is used as a material. The reception gives the site a certain mystery and romance. In the front garden, you can plant undersized bushes that will complement the overall exposure.
Advantages and disadvantages
The most popular framing of flower beds in summer cottages and suburban areas has gradually become a brick border. Compared to other types, this design has significant advantages:
- Excellent landscape solution.
- The diversity of design.
- Possibility of ideal zoning of the manor space.
- The versatility of a material that fits well into any architectural style.
- Low cost brick.
- Ease of construction.
- Structural strength and durability.
- Weed barrier.

The only drawback of a flower bed with a masonry border is the constancy of form. Once built, it remains in this place forever; moving the flower garden to another zone is troublesome and impractical.
How to make
The first step in any construction is to determine the location of the flower garden. The process is creative. The owner of the site will quickly find a place for a flower bed. At the same time, it is important not to miss the main points:
- Access to sunlight. Most flower plants are photophilous, so the flower bed should be located away from shady areas.
- General review. The flower garden is the highlight of the site, it is desirable to place it in a central place accessible for viewing.
- The contents of the flower bed should be bright throughout the season. You need to think about the order of planting plants in order to get a constantly flowering front garden.

The next step is to determine the shape of the flower bed. The variety of forms is conventionally grouped:
- Round or island. They are located in a central place, filled with annual plants or sprawling shrubs.
- Square, usually located at the edges of recreation areas.
- Rectangular, in the form of a rabatka placed on two sides of the patio. This design creates a visual effect of increasing the estate.
- Multi-stage occupies a small area of the yard. The cascading flower garden looks spectacular, able to decorate any garden design.
Before you make a border for the selected flower bed, you need to stock up on the necessary tools and materials. For construction you will need:
- Brick.
- Sand.
- Cement.
- Bayonet and shovel.
- Milestones.
- Fishing line or thin rope.
- Hammer or small sledgehammer.
After the nuances are taken into account, you can start building a flower bed with a brick border with your own hands.
Curb installation: trench preparation
The construction of the structure is divided into several stages, the main ones are: marking – trench – base – curb.
Work order:
- In the corners, milestones are driven in and the line is pulled, marking the contour. This method is suitable for marking a flower garden of a strict geometric shape, for example, a square or a honeycomb. Designs with curved lines are easier to mark with a garden hose or medium thickness rope.
- A trench 15–20 cm deep and 22–25 cm wide is prepared along the marked contour.
- Mix the cement mortar in a ratio of 1:3.
- Base device.
- Leave for three days to solidify and harden.
Setting the curb: laying bricks
After the foundation has gained the necessary hardness, it remains to lay the bricks:
The process of laying the brick curb
- Perform laying on the finished base with cement mortar M50. The stone can be laid in the direction along the border of the flower garden, transversely or diagonally. If a lawn mower is used on the site, it is necessary to maintain a distance of 10 cm from the lawn.
- The curb is fixed by filling the remaining space with mortar to the ground level. The flower bed is sprinkled with fertile soil.
 If a lawn mower is used on the site, it is necessary to maintain a distance of 10 cm from the lawn.
 Using the same algorithm, a curb is installed along the garden paths and sidewalks on the estate. A two-row design would be an excellent solution.
The use of brick as a border for the construction of fences for flower beds, flower beds, alpine hills and rose gardens, decorative zoning of recreation areas has become widespread due to the durability of the structure. Having spent a little time on the arrangement of the site, the owner receives a magnificent surrounding landscape to the envy of friends and neighbors.
The financial aspect is of great importance. The costs are minimal. Materials, as a rule, remain after the construction of the cottage. Their consumption is insignificant, from 1 cu. m. brick can be laid out up to 100 meters of curb. Structures made of metal, wood and plastic are not as reliable as bricks. Their service life is much shorter, they require constant care.
Summing up, we can conclude that a flower bed with a brick border is beautiful, durable and inexpensive. It is enough to build fences for a flower garden once in order to admire flower arrangements in an ideal frame for many years.
Source: http://sdelayzabor.ru/prochie-ograzhdeniya/bordyury/bordyur-iz-kirpicha.html
How can you make a brick border?
How can I make a brick border? This question interests many owners of a summer cottage. After any construction, building materials remain, in particular bricks. Where to put them? A good way is to make a flower bed.
Brick border is perfect for home from the same material.
A brick border will really help to elegantly distinguish a flower bed against the backdrop of lawns and paths. It will not let the flowers crawl out of the flower bed, and will give a beautiful look. And the cost of such a border, made by hand, will be much cheaper.
How to make a brick border yourself
If your house is made of bricks, then you should not even think about the material for arranging the flower bed.
It is very easy to make a very aesthetic brick border, which will go well with the main building, especially against the background of the fence and paths of the same material.
We have decided on the material, now we will consider how to make a brick border with our own hands. There are several ways to arrange.
First you need to stretch the twine and dig a trench in a straight line.
Sawtooth curb. The first way is a sawtooth curb. Consider step by step how to lay it out with your own hands.
- The first thing to do is to stick the pegs in the corners of the flower bed and pull the rope.
- On a stretched rope we dig a trench about 20-25 centimeters wide and 10-15 deep, after that we raise the rope to a height of half a brick.
- On one side of the trench we throw a little mortar and lay the first brick at an angle of 45 degrees, after which we wait until the mortar dries a little.
- After that, we lay the second brick at an angle of 45 degrees, while making sure that the edge of the brick is at the level of the middle of the previous one, do not forget to fill the voids between the bricks with mortar, as they create a support, without which such a border will not last for a long time and will settle at the first or rain.

After you have laid the curb, wait until the mortar has hardened, after which you can cover with earth or pebbles (depending on the surface of the paths and the flower bed) to a level where only the sawtooth curb is visible. Level the ground and you’re done. And most importantly, done quickly and with high quality with your own hands.
This is the most common way, but there are many others, let’s look at a few of them.
Flat borders. The most elementary way is the usual fence. A trench is provided in which the brick is laid out with short and long sides, laid in length and sideways. At the same time, be sure to fix both the side parts and, of course, the bottom of the bricks.
Looks great when the structure is laid out in 2 rows. The first row is laid out along the edge, the second row is laid flat next to the first.
This prevents the grass from growing too close in the area of the fence, which is very convenient when using the lawn mower, and thanks to this design, additional lawn mowing work in the curb area is not required, since the lawn mower handles everything perfectly.
Usually a large amount of brick remains after construction, so a much more complex structure can be envisaged.
Bricks must be laid in the resulting trenches.
Consider how to lay out such a border:
- Mark the outline of the flower bed. For this, any material at hand, rope, cord, etc. will do.
- Preparing the trench. According to the marked contour, we dig a trench 15-20 centimeters deep and 25-30 centimeters wide.
- Filling the trench with concrete. We place the prepared solution in a trench, leaving 1-2 centimeters to the top.
- Laying bricks. For this trench along the flower bed. It can also be provided across or diagonally. For fixing, the remaining 1-2 centimeters and the gaps between the bricks are sealed with mortar.

Making a border for a flower bed
Decorating a flower bed. Another way is the direct design of the flower bed, since with the help of such material you can give it any shape, or even raise it above the ground to the required height.
This design method is very convenient when arranging paths and flower beds in the yard, the area of which is made of paved stone.
Very often you can see, for example, three-tiered flower beds in paved yards, it looks very nice and pleases the eye of the owner.
Also one of the simple options is to design a flower bed in the form of a well. In this embodiment, a round flower bed up to one meter high is built and filled with earth.

Very well, this design can help, if desired, to build a flower bed under a tree. First of all, this will help create all the conditions for the growth of flowers that love shade. The tree will give the very shade that the flowers need, and artificial soil (if required), or special soil for flowers, will help ennoble them, because. not all flowers can survive in the standard soil of the site.
And it will help very well, given that usually flowers do not survive under trees because of the many roots. This design moves the flowers away from them, and this saves the plants from death.
//www.youtube.com/watch?v=mhX5_xuy8lM
Thus, using ordinary building bricks, you can get a good interior on the site in the form of borders and flower beds.
These railings last much longer than their wood and plastic predecessors. It is possible to use the old brick.
In addition, if you have animals on the site, then such an arrangement will suit you, as it will calmly withstand all the loads from their running around.
Source: https://kubkirpich.ru/zabor/sdelat-bordyur-kirpicha.html
for do-it-yourself paths made of concrete, brick and stone
in general. Depending on the type of track, soil composition and design requirements, the solution may be different.
Path curbs – what are they?
There are a large number of options and specific designs for garden path borders. When deciding what a border can be made of, it makes sense to get acquainted with the range of possible.
Some borders merge with the path, others protrude above the canvas
Concrete fences are the most popular, which is due to a number of positive factors:
- reliability, strength and durability;
- relatively low price;
- availability of a wide range of factory products;
- the ability to make borders with your own hands;
- easy installation;
- acceptable appearance.
Pedestrian barriers made of natural stone are no less reliable than concrete ones, they are in perfect harmony with the landscape, but at a considerable price. Stone is used to frame paths made of brick, stone, paving slabs and crushed stone. It can be laid at the level of the coating or above it.
As you can see from the photo, a brick curb can be installed on the edge of the path in different ways. A clinker brick fence will last a long time. In the simplest case, the brick can simply be laid along the edges of the finished coating. When installing a path made of bricks or paving slabs, it is placed on the sand along with the laying of the main canvas.
To organize a permanent brick border, a groove is dug under it, crushed stone and sand are laid, and then the brick is laid on the cement mortar. The structure can be strengthened by placing reinforcement under the brick.
The wood border matches well with the country style landscape, suitable for wooden and unmade paths. You can use timber, board and log. The option of wood fencing can be budgetary. At the same time, the service life of a wooden curb is limited even with serious processing.
Metal corner and profile are successfully used in the arrangement of paths. It performs the functions of a curb, remaining almost invisible. The craftsmen managed to adapt even scraps of metal pipes to fence the path.
Very easy to use plastic curbs, curb tape and a special plastic track profile. The listed elements cannot perceive a large mechanical load, however, they perfectly perform decorative functions.
Fences for garden paths made of plastic have a number of positive properties:
- are not afraid of frost and moisture;
- have a long service life;
- there is a wide range of plastic fences;
- low cost;
- are not afraid of mechanical movements of the soil.
Small bushes are successfully used as a “green” fence: cotoneaster, boxwood and others. The roots of plants fasten the edge of the path, and the plants themselves serve as a wonderful decoration.
A variety of available materials can be used as a curb for a path in the country. Bottles, both glass and plastic, can serve as an unusual decor and fence for a long time. Old slate will perfectly fulfill the role of formwork and curb for a concrete path. A low wattle fence will enliven the woodchip path and prevent the latter from flying apart.
Making a concrete curb with your own hands
It’s probably easier to buy a ready-made curb stone. If you want to save money or make a non-standard version of the fence for concrete paths, you can do it yourself.
Curb stone can be made using commercially available plastic or metal molds that can withstand a large number of cycles. With your own hands, you can make a wooden formwork for casting curbs. The material can be plywood, OSB, boards and timber. In this case, the internal surfaces of the structure must be smooth.
To do this, both profile shelves are cut with a grinder opposite each other and a metal plate is inserted into the gaps formed. A wonderful form for the curb is obtained from the channel
Two such jumpers form the ends of the form. The curb is made using a mold in the following order:
- The inner surfaces of the mold are lubricated with used car oil so that the casting does not stick to the walls.
- If the wheels of the car will pass along the curb, a reinforcement frame is inserted inside the formwork. It is set on pebbles and should not touch the walls of the matrix.
- A mortar is prepared, which consists of three parts of sand, two parts of crushed stone and one part of cement. If necessary, a plasticizer and dye are added to the concrete. The consistency of the solution should correspond to thick sour cream.
- The composition is poured into a mold. To remove air bubbles, the solution is pierced, and the formwork is tapped with a hammer. The workpiece is covered and kept for two days.
- The product is carefully removed from the mould. The border will be ready for use in 20 days, after the cement has completely cured.
 The workpiece is covered and kept for two days.
 Pour the fence for the path directly on the ground
You can make your own border for the path by pouring concrete directly into the formwork set on the ground. For this kind of work, you will need the following tool:
This option is noticeably simpler, but the quality of the fence may not be the best. The installation of the curb with formwork is carried out according to the following scheme:
- A trench is being prepared in accordance with the dimensions of the concrete fence and the height of the cover. The bottom of the groove is rammed.
- Sand is poured into the trench in a layer of 5-7 cm, which is moistened and rammed.
- Plain board formwork is exposed. The structure is fixed with stakes, cross rails and nails. In places of smooth bends, you can use plywood, plastic, sheet metal, OSB and even fiberboard.
- In those places where increased loads are expected, a reinforcing cage is laid in the formwork at a distance of at least 2 cm from the bottom and walls.
- A mortar is prepared, which consists of three parts of sand, two parts of crushed stone and one part of cement. If necessary, dye is added to the concrete. The consistency of the solution should correspond to thick sour cream.
- The composition is poured into a mold, while every 1-2m transverse separators from any rolled waterproofing are laid into the concrete. This will help to avoid cracking of the border during solidification and temperature movements. To remove air bubbles, the solution is pierced, and the fence boards are tapped with a hammer.
- The curb is covered and the formwork is not touched until the cement has set.

Installing curbs on walkways
Concrete products are heavy, so it is difficult to work with a curb longer than 0.6m. To install a concrete curb on your own, you may need the following tool.
The installation of the finished fence is carried out according to the following plan:
- The location of the curbs is marked with twine and pegs. The distance between the inner planes of the fences on both sides of the track corresponds to the width of the cover web.
- Digging a trench according to the dimensions of the curb and the height of the path surface. It is necessary to take into account the height of the layers of sand and mortar, in total about 8 cm. As a result, the depth of the groove should be about 20 cm. The bottom of the trench is leveled and rammed.
- Sand is poured into the trench in a layer of 5-7 cm, which is leveled, moistened and rammed.
- A cord is exposed for the correct installation of the fence in height and direction. It is convenient to place it from the side of the smoothed corner of the curb.
- A mortar is prepared, which consists of three parts of sand and one part of cement. According to the consistency, it should not blur when laying.
- Spread the mortar in an even layer on the bottom of the trench.
- The concrete curb is carefully lowered onto the mortar and aligned with the cord by tapping with a rubber mallet.
- The groove next to the installed curb can be carefully filled with soil without touching the concrete fence. The operation will provide comfortable conditions for the cement to set.
- The border is not touched until the solution is fully ripe, that is, 10-20 days.
- As soon as the fence is ready, the soil next to the curb is leveled and rammed.

Thus, we have armed you with all the necessary knowledge tools for self-assembly of the border in the garden and in the country. I hope this video will answer any questions you might have.
Source: https://SamoDelino.ru/dorozhki-vo-dvore/border-iz-kirpicha.html
Any owner of a dacha or a private house wants his land to look beautiful at minimal financial cost. The presence of a garden path can show the well-groomed and unique exterior of a summer house or a private house. From the point of view of landscape design, it is necessary to additionally make borders in order for the path to look harmoniously on the site. In this article, we will talk about how to make curbs for tracks.
The need for garden path borders is closely related to the function they perform. These include:
- Decorative . The border is a stylish decoration of the appearance of the site.
- Protective . The design prevents grass from sprouting, prevents runoff of water during irrigation or rain on the track, and also contributes to its long service life.
Contents
- Species
- from concrete
- Tools and materials
- Complexation sequence
- Production of a monolithic border
- of plastic
- of Metal
- Video
9002 9002 9002 9002 9002 9002 2 border
Views
You can decorate a garden path with any of the available materials, depending on the author’s imagination. But when choosing materials, their advantages and disadvantages should be taken into account. Borders for garden paths are:
- concrete;
- plastic;
- metal;
- brick;
- wooden;
- green;
- braided;
- made of stone.
Concrete
This type of material for garden paths is considered the most practical of all its varieties. The main advantages of a concrete curb are durability, ease of maintenance, resistance to weather conditions.
There are two ways to make such a structure with your own hands. The first method is to cast curb blocks using special shapes. It is not recommended to buy a special form because of its standard sizes, which are not always suitable for arranging home-made tracks.
Tools and materials
To make your own mold, you need to use the following materials:
- drill driver or screwdriver;
- non-counterhead screws;
- long, even, planed bars;
- a clean and even sheet of metal or plywood at least 5 mm thick.
Due to the rough surface, it is not recommended to use chipboard and OSB sheets. If you want to use OSB, it is advisable to wrap it with dense polyethylene to hide uneven surfaces.
For the manufacture of a concrete curb, the following materials must be available:
- water;
- crushed stone;
- cement grade 400 or 500;
- sand;
- decorative elements;
- rebar or wire from 4-6 mm thick.
Sequence of work
To make such a structure, follow these steps in sequence:
- Fasten the bars on the surface of the sheet or plywood, which will correspond to the size of the future block, using screws.
- If the sheet is large, then several formworks with adjacent sides can be made.
- It is desirable to make a curb mold with a length that varies between 1000–1200 mm. Otherwise, there is a high risk of breaking the block.
- Width and height should be approximately 1/2-1/4.
When making a concrete curb, the following sequence of operations should be performed:
- Immerse the crushed stone in water or pour it so that it is saturated with moisture and sets well with the mortar.
- Mix dry cement and sand in a ratio of 1:4 or 1:3 until a homogeneous mass is formed . It is advisable to use a construction mixer.
- Add crushed stone and water to dry mix.
- Mix everything again. When mixing, there should be no lumps of dry sand with cement .
- Use a spirit level to set the shape.
- Lubricate the bottom, formwork with oil or working off so that it is easy to remove the workpiece from the mold.
- Half fill the prepared mold with concrete.
- Lay reinforcement afterwards. To do this, pre-tie the connection points with wire.
- Fill the remaining space in the mold with concrete mix.
- Level the surface of the future block with a trowel.
- Moisten the concrete with water for 2-3 days during the drying period, especially if the weather is hot.
- After drying, the form can be dismantled.
- When completed, the formwork is cleaned and reassembled.
Making a monolithic curb
Monolithic is another option for a concrete curb. This design is used for the manufacture of flower beds and flower beds. In the future, it cannot be changed, but when casting, you can make a bend, an oval or a smooth rounding. Making such a border is much easier, because there is no need to prepare a mold.
Production steps:
- Dig a trench in the construction site, the depth of which will be one third of the total height of the curb. The bottom of the excavated trench should be flat .
- Prepare formwork. For the manufacture of formwork, it is enough to use wave slate, metal sheets, plywood, corrugated board.
- From the outside of the wall, drive steel pins into the ground to hold the formwork.
- Prepare the concrete mixture and pour it into the formwork.
- To prevent voids in the concrete, a construction vibrator or conventional rebar can be used by inserting it into the poured mass.
Having made the border, you need to close it from direct sunlight on it during the drying process. Also every day you should moisten the curb with water to prevent cracking.
Plastic
Plastic fencing is considered one of the cheapest options compared to other designs. The use of such a fence will ideally fit into any type of garden landscape design due to the severity of the contours.
The main advantages of a plastic border:
- Easy to assemble and dismantle.
- High durability.
- High strength.
- Ease of use.
- Resistance to minor mechanical stress.
- Possibility to create winding contours for the track.
In order to install such a structure, it is not necessary to dig trenches, prepare the foundation and use special fasteners. To fix the plastic curb, it is enough to use anchor pins that are firmly connected to each other.
Metal
Metal borders made of copper, aluminum and stainless steel in the form of a band. They protect garden paths from damage and prevent grass from sprouting. This design is ideally combined with gravel paths. The main advantages of metal borders are ease of installation, strength and durability. A design feature is the presence of tapes that are buried in the soil along the contour of the garden path.
When installing a metal curb, the tape should be buried 10–15 cm into the ground so that no more than 2 cm of the metal structure remains on top.
Brick
This type of construction is popular because it can withstand severe frost and humidity. Ideal, from the point of view of landscape design, is the use of facing bricks. The brick structure is considered a traditional decoration of the garden path in country and English-style plots. Most often, this design of the border is used to determine the boundaries of reservoirs and the construction of flower beds.
The advantages of using such a design are:
- simplicity;
- the ability to adjust the height of the curb.
Manufacturing technology
In order to build a brick border for a garden path on your own, follow these recommendations:
- Mark the borders of the border. You can do this with a rope, and on smooth turns you can use a garden hose.
- Dig a trench 15 cm deep and 25 cm wide.
- Fill the trench with mortar almost to the top and leave for a few days for the mortar to dry.
- After that, the bricks are laid out on a small poured foundation. You can lay them the way you want, for example, along, across, in two layers or in another way.
- When laying bricks on the outside of the border from the flower bed, leave a small indent of up to 100 mm. It is necessary in case you mow the grass with a lawn mower. It will be possible to put mower wheels on this indent and carefully mow the lawn.
- There must be a mortar between the bricks. Also, fill the indentation of 100 mm with mortar at the same level as the ground.
- Finally, from the side of the flower bed, the border is covered with earth, which is well compacted.
Wood
This design is ideal for country landscapes. But such borders have the only drawback – fragility. The service life of wooden borders does not exceed ten years, provided that the wood is treated with special antiseptic agents.
There are many ways to install a wooden curb:
- Drive in pegs of the same length.
- Lay planks along the path.
Green border
This type of border is universal for any style of yard. Due to systematic care, this type of fence is considered quite difficult, although it looks very beautiful visually. The most suitable plants for this are cotoneaster, boxwood and undersized shrubs.
When using this type of fence, it is important to draw a clear outline, according to which the plants should be planted at a distance of 20 to 35 cm from each other.
Made of stone
This design is ideally combined with a garden path made of paving slabs, pavers and stones. The installation of such a border requires large financial costs, because the stone is considered an expensive material. However, if you live near a river, then rounded stones can be collected for free.
When building a stone border, decorative gravel, pebbles, marble, sandstone, shell rock, granite, limestone are used.
To make a stone curb, you need to do the following:
- dig a foundation pit;
- lay mulching material (spunbond) in the trench to protect the curb from grass sprouting;
- pick up small stones that are similar in size and lay them close to each other;
- the gaps formed between them are covered with dry cement.
When making a border, it is important to select stones of the same size and lay them close to each other. When gaps are formed between the stones, it is advisable to fill them with small stones.
Braided border
Such a border is considered aesthetic, since natural materials are used in its manufacture. In order to make such a border on your own, you need:
- Prepare thin blocks of wood, willow twigs, even planed sticks.
- Remove bark from twigs.
- Cover them with a special solution for better preservation.
- Along the perimeter of the flower bed, insert sticks into the ground, in increments of 3–5 cm.
- Wrap willow sticks around the sticks.
As you can see, there are many options for a beautiful and harmonious addition to garden paths in the form of borders. If you have imagination and desire, you can decorate the site yourself and enjoy the beauty.
Video
In this video you can learn more about the principle of making a curb for tracks:
Brick edging
Garden edging made of bricks and paving stones
Very often, after construction, there are a lot of bricks or paving stones (paving slabs) and here is a good opportunity for you to make garden edgings to decorate a flower bed or path.
Contents:
This border will beautifully separate your flower bed from the lawn or path, preventing plants from spreading. In addition, it is easier and cheaper to do this than with stone products.
How to Install a Sawtooth Brick or Square Paving Garden Curb ↑
Step 1. Insert pegs into the corners of the flower bed and string string around the entire perimeter. This is to ensure that your trench is level.
Step 2. Dig a trench along the rope about 20 cm wide and 10 cm deep and then raise the level of the stretched string to the height of half a brick.
Step 3. At one end of the trench, place some grout and place the first brick on it at a 45° angle. Let the cement set a little. After that, put a little mortar on its lower half and closely attach the second brick so that its upper edge falls exactly in the middle of the long side of the first brick. In this case, the solution will not only fix them together, but also fill the void under it, thereby creating a support at an angle of 45 °.
Without concrete, this structure will quickly collapse under the influence of water or voids in the soil. To make it easier, you can mark the middle of the long side of each brick, then the markings will be more accurate, and the fence will look even and neat.
Step 4. Wait until the concrete is dry before backfilling the trench with earth so that only the ribbed solid curb is visible on the surface. Level the soil and you’re done!
How else can you lay out a garden border ↑
Option 1. Fencing a flower bed or walkway with bricks or paving stones can also be made in the usual way, installing them in a trench with short or long sides. In this case, it is desirable to fix with concrete not only the bottom of the bricks, but also the side parts in contact with the soil.
The option looks great when two rows of bricks or paving slabs are laid out – one along the edge, the other flat next to it. Such a barrier does not allow grass to grow close to the fence, which is very convenient when using a lawn mower. Then the edge of the lawn does not require additional cutting at the curbs.
This scheme is shown in the photo below.
A new building usually leaves behind a large amount of new bricks that can be used to create complex curb designs.
Option 2. Bricks can be used to decorate a flower bed of any shape or even raise the flower bed itself above the general surface level. This is handy if you are creating a flower bed on a paved yard.
In the example shown in the photo below, white silicate bricks were used to create a small pond and a three-tiered flower bed in the yard, and even their halves were used.
Option 3. A round flowerbed in the form of a well looks good – in this case, you just need to raise the brickwork in the form of a circle to a height of half a meter to a meter and fill it with soil for flowers.
This option is also good if you want to create a flower bed under a tree. Raised by masonry to a height, the flower bed can be filled with good soil for shade-loving flowers and plants. At a high level, planting under a tree is much easier than planting directly on the ground with roots close to the surface.
As you can see, using simple building materials, you can get excellent garden borders in the design of flower beds. Such a fence made of bricks or paving slabs, unlike wooden and plastic ones, will serve you much longer. In addition, if you have dogs, then such curbs will withstand their crazy running around without any damage.
What are brick and natural stone borders, their purpose and construction? other materials. In the article we will talk about how to make borders for flower beds with your own hands. But first, let’s talk about the purpose of the decorative element.
Appointment of border fences
Creating a border fence for a flower garden will give the area an attractive look. Such elements perform decorative and protective functions, delimit the territory into several separate zones, prevent plants from mixing and protect flower beds from weeds propagating by the root system.
Border – a restriction for the soil, protects against spillage outside the flower bed and protects garden paths from soil contamination.
Brick border
Another important function that the curb fence performs is to protect flower beds from pets and small children.
What kind of fences are there
Before answering the question of how to make a border for a flower bed or lawn, you need to decide on the type of fencing element for flower beds. Form – any, as well as materials for arrangement. Everyone approaches the choice based on tastes, design of the territory and the financial component. They use brick, concrete, stone, plastic and glass bottles, wood, plastic, metal and other materials. The main thing is to show imagination and create an original protective border.
Natural stone for flower beds
Brick borders are laid out in suburban areas and in the yard of residential buildings. This option of fencing is convenient in that a minimum of effort and money is expended for the arrangement. Getting old bricks is not a problem. But you need to understand that the brick is not very resistant to low temperatures, so when laying it, follow a special technology. When it is not possible to use facing bricks with high frost resistance characteristics for the construction of a flower bed, concrete blocks can be laid instead.
Another option for creating borders is the use of natural stone: marble, granite, shell rock and others. In order for the stone curb to be strong, reliable and last longer, the gaps between the laid stones should be sealed with concrete. To build a stone wall around a flower garden, you will have to spend money, because marble, granite and other natural materials have a higher price than ordinary brick. Plus, you will have to spend money on concrete.
A cost-effective solution for creating protective elements for flower beds can be called pouring concrete into formwork or special forms. This approach allows you to make a border with beautiful patterns and even mosaic. To create a pattern on the curb, ready-made decorative forms are used, and with the help of stamps, make prints on raw concrete.
To finish a concrete curb with a mosaic, you can use glass from bottles, broken dishes, pebbles. Lay out the glass trim after the concrete is poured into the formwork or decorative forms, then the blanks are sent to dry.
Various forms of fences for garden plantings
How to make a border with natural stone
Stone borders are attractive. For the manufacture of such a border, limestone, sandstone, granite and so on are used. For laying stone fencing, dry masonry technology or concrete mix is \u200b\u200bused.
Seal all gaps between stones with cement mortar to block weeds. Before erecting a border for a flower bed, decide on the shape.
Having solved the problem with the form, remove the sod around the flower bed, marking the border of the desired width. Next, concrete is poured and stones are laid. It is important that they fit snugly together. Fill voids with small pebbles or seal with a solution of concrete mix. The work on the construction of a stone border is a laborious process, but the result will please.
A simple variant of a border fence on a garden plot
How to make a brick border
Construction of brick borders is the most affordable way to decorate the landscape of a garden plot and adjacent territory. For the arrangement, red brick is used, and the borders are beautiful.
Often, facing bricks of different colors are used to decorate flower beds, more often a combination of white and red. To create a rustic style in the garden, lay out the borders with masonry bricks, and if an old atmosphere is needed, then old bricks that have served for many years or artificially aged will do.
This curbing material can be installed in a variety of ways. A simple solution is to lay bricks while standing with a slight tilt to the left or right. Products are dug into the soil or planted on concrete, which is poured into a dug groove.
You can also lay out bricks in rows on edge, this option will create a border of various heights and thicknesses. Brick borders harmoniously look near the house with a lining of the same material.
Garden border: an overview of the types of fences and the process of building them with your own hands (100 photos)
An integral part of landscape design is the fencing of paths, lawns or flower beds – curbs. They give conciseness and completeness to the suburban area. This edging helps to avoid weeds that constantly grow around the paths.
Types of fences
For any flat fence, you need to pull a tight rope (string, twine). Let’s figure out what to make a border in the garden of a country or private house:
A concrete border is suitable for all surfaces, it is not afraid of huge loads. This is the strongest and most reliable protector of flower beds and paths. You can create it yourself from blocks or a monolith to make soft curves. On sale there are curbs with right angles or semicircular posts with recesses for smooth fences.
Brick fencing is the easiest and fastest method available. Experts advise using only good quality brick so that it does not get damaged after showers and winter frosts.
Spread better with cloves, after digging the trench to a depth of 10 cm (width about 20 cm). Concrete mortar must be poured on 1 side of the bricks, which are laid out more beautifully at an angle of 45o. After that, it is good to compact the fence and cover it with earth.
Natural stones as garden fences are becoming a fashionable material: these are granite, dolomite, sandstone, limestone and tuff. You can also choose large pebbles or basalt. They are almost eternal, but the price is high.
Width of excavated trench according to large stones. The bottom of the trench is covered with geotextiles and 1/3 covered with sand. The gaps must be sealed with earth.
Plastic blanks are great for fencing, they can be ribbons or shaped. The polymer is resistant to temperature extremes and precipitation. Who needs an economy option – this is the best solution, and there are orange, green or chocolate colors. They need a groove of 2-3 cm, a tape is inserted into it, then compacted.
It is possible to strengthen the strip with plastic pegs. Plastic sections are convenient for smooth transitions, curly tracks. Tapes deepen into the ground, and comfortable teeth hold the edges of paths and flower beds.
Metal borders are made of aluminium, galvanized steel or copper. The tapes are half driven into the ground, they are almost invisible. For strength, a lock is made of metal at the end of the strip. Such tapes are durable, they are more often used for tracks made of crushed stone.
Wood fencing is easy to make with your own hands, but can quickly rot. The blanks must be installed on the sand (about 5 cm thick), driven into the ground conveniently with a mallet. The fence can be flat boards or round polished logs.
Boards should be approximately even in width and length, it is better to sand. For strength, the tree needs to be treated with bioprotection preparations. It is recommended to soak blanks-blocks, lowering 2/3 of their length into the solution.
Machine oil is suitable for processing. When the boards dry out, the raw part must be painted, it can be varnished.
Unusual borders from improvised means
You can create an original and beautiful garden border from different materials, of which there are many at hand:
Old tires are also easy to use as a fence, but environmentalists are against such material. Whole tires are used, up to half of them are buried in the ground, carefully compacted around.
If you take cut strips from tires, they are firmly fixed to the bars driven into the ground. These bars should be as wide as the tire tape. To add strength, you should put the bars on a mixture of concrete.
Plastic bottles are often used in country fences, but this is not a durable material, but a temporary one. They are suitable for a flower bed fence for a short time. The bottles are cut in the middle and lowered into the ground, to add beauty, you can paint on top.
Fences made of glass bottles, they are half covered with sand, you can use small gravel to close the neck. We are preparing a trench, where the depth is slightly more than 0.5 of the height of the bottle itself.
Align the height with the stretched rope. The bottom of the trench must be filled with concrete mixture, and the bottles should be immersed in slightly cooled concrete (preferably upside down).
Garden borders made from different plants
Many people decide how to make a garden border in their own way. A spectacular frame for the country path will be low shrubs, especially flowering ones.
Perennials are used for the “green” border, but annuals can also be used. More often it is boxwood, cotoneaster and geyhera. Look good: spirea, barabris, lavender or argeratrum, unpretentious marigolds.
With a little imagination, even novice gardeners can create original borders from materials that are optimal in price and taste.
Beautiful and unusual photos of a garden border made of various materials.
Beautiful and modern options for borders for flower beds
What you need to create a border
Garden borders are used to frame flower beds, lawns, paths and paths. They are designed to limit the growth of plants beyond a certain area, prevent washout, protect the edges of the paths from overgrowing with grass, prevent the spread of paved paths, etc. They must also have an aesthetically pleasing appearance.
Borders for flowerbeds, lawns and paths logically complete the composition. At the same time, it is important that they fit perfectly into the overall design of the site, in harmony with the surrounding vegetation, the decor of garden paths and the decoration of buildings. It should also be noted that some borders are a hidden element. At the initial stage, you should decide on the areas that need to be fenced, and on the amount of money that you plan to spend for this. You can then proceed to select a specific fencing option from a wide variety of shapes, sizes, colors and materials. Each of them has its own advantages and functional limitations, so you need to be guided by their future purpose.
A ready-made plastic border will perfectly protect flowers in flower beds, vegetation of garden beds or lawn from damage. It is quite strong and durable, but almost invisible and does not have decorative properties. Also, this edging is combined with any version of the tracks on the site. Similar properties have a fence in the form of a metal tape.
Wooden railings have a beautiful decorative look. However, they do not differ in durability. Brick borders will look spectacular on an English-style or country-style suburban area. For lovers of the natural landscape, natural stone fencing is an excellent choice. Installing borders on their own is within the power of almost any owner of a suburban area. Moreover, in addition to ready-made structures, it is quite possible to make them from improvised materials with your own hands. Such fences will give the surrounding landscape completeness and well-groomed appearance.
Options
One of the easiest to install and most affordable are ready-made plastic borders. They are able to harmoniously fit into any style of landscape design of the site. You can use them to fence paths and paths of the most bizarre winding shape, use them to frame beds and border flowers in multi-tiered flower beds.
Sold plastic borders in the form of a tape wound into a roll or broken into fragments. For installation, it is not required to dig a trench and equip drainage. Such a tape is fixed in the ground with the help of special anchor pins. The texture of the type of natural stone, garden boards, etc., as well as the variety of colors allows you to choose tapes for any situation.
To preserve the shape of the paths, to prevent the soil from being washed out of flower beds and beds, a metal border is also used. Like plastic, it is an element of protection, not decoration. Such a fence is made in the form of a flexible tape from inexpensive alloys of copper, aluminum or steel. To install it, a narrow trench is dug about 10 centimeters deep, into which the tape is placed and covered with the extracted soil. At the same time, a part of the tape about 1.5–2 cm high should protrude above the ground. Such a border is reliable and quite durable.
You can make the design of the site original with the help of available materials. The most popular for making DIY borders is the use of plastic or glass bottles. Plastic does not rot, moisture or frost, so the fence from such bottles will be durable. The border of such bottles is equipped very simply and quickly. It is necessary to cut off the neck of each of them and stick it upside down into the ground. The fence with the same height of the bottles will have a particularly attractive look. Also, to increase the aesthetic perception, it is possible to use bottles of different colors.
In addition to plastic, glass bottles can be used for fencing. They also dig into the ground upside down, but in this case, you should be careful not to accidentally break the glass. Bottle borders are a cheap way to decorate the yard and protect the flowers in the flower beds and the vegetation of the beds.
It is easy to make concrete curbs with your own hands. For this, special plastic stencil molds are used, which are filled with a mixture of cement, sand and a fine fraction of crushed stone. After drying, the resulting curbstone is placed in a previously dug trench, at the bottom of which there is drainage from layers of rubble and sand. The addition of special plasticizers and dyes allows you to make beautiful and durable concrete garden borders.
Fencing a flower garden or path made of natural stone will always have a decorative look and will serve as a worthy decoration of a suburban area.
Beautifully shaped gravel, fragments of shell rock, sandstone, limestone, granite or marble are used for its arrangement. Despite the considerable cost of materials, investments in a stone border will pay off in full. To equip the fence with your own hands, you should dig a trench, on the bottom of which lay drainage and a layer of agrofibre, which prevents the germination of weeds. Then the elements of the fence are laid. Masonry can be either “dry” or with the use of cement mortar poured into the trench.
An elegant option would be to enclose a flower bed, beds or lawn with a wicker fence. It will not only protect flowers, grass and other vegetation, but also give the landscape home warmth and comfort. Such a border is not difficult to make with your own hands. To do this, you will need a set of such improvised materials as logs, sticks and willow twigs of the same length. Churbachki are dug in along the entire perimeter of the fence at a distance of the length of the bars. Sticks are installed between them every 5–10 cm. The rods are cleaned of bark, treated with a protective antiseptic and woven between sticks and logs.
Eco-friendly and elegant is the wood border. For its manufacture, you can use boards or bars. Such a fence is perfectly decorated with paint, firing or carving. It is installed in a previously dug trench with a drainage layer of rubble at the bottom. The bars are located end to end and, as a rule, at the same height. But sometimes the fence is made at different levels. To increase the service life, the tree is treated with a special antiseptic.
Brick
Brick fencing can successfully protect flowers in a flower bed, vegetation of beds or paths on a site. This type of border is traditional and quite popular. For its arrangement, a trench is dug, the bottom of which is covered with a cement-sand mixture, after which bricks are laid upright, flat or at an angle. Then, to increase the decorative effect, the fence can be painted with special paint.
Border mosaic will be an original option for framing flower beds. It is made by hand from such improvised materials as glass fragments, pebbles, pebbles, pieces of ceramic tiles, etc. The mosaic is fixed on fresh cement mortar applied around the perimeter of the flower bed. It is also possible that the base is made of boards on which the elements are glued. Such a border not only protects the flowers, but also is a unique decoration of the site.
Border in the form of a trench
The simplest and not requiring any material costs will be a fence in the form of a U-shaped trench dug around the perimeter of a flower garden, beds or lawn. Its depth is determined by the type of soil and the root system of plants. The bottom of the trench is cleared of remnants of roots and pebbles and mulched with wood chips or peat.
Making the perfect border in the country: 4 interesting options
Any self-respecting summer resident always makes paths on his site to make it easier to walk, and with his own hands. And in order for such a garden design to look complete, it is necessary to lay a garden border. If we draw a parallel, then it can be compared with a frame for a picture, without which the latter is not fully perceived.
What is the curb for?
Framing flowerbeds or paths is not only aesthetic, but also functional. It divides the entire plot into several zones, whether it be vegetable beds, paths or flower beds. The height of the border is usually 10-30 cm, if necessary, it can be more, depending on how tall the vegetable crop is. The main thing is that the border frame does not cover the plants from the sun.
In addition, the curbs themselves must be sufficiently dense to prevent soil from entering the paths. And do not forget about the appearance, after all, beauty should be in everything and the garden is no exception.
What can be used to make a border in the country?
Almost any material can be used to make a border. That is, they can be made from:
In addition to natural material, a garden border can be made from such improvised things as plastic bottles, car tires and other items. It is worth noting that plastic borders are inexpensive, and their shape can be very diverse. In addition, when installing a plastic curb, there is no need for preparatory work.
Let’s take a look at some of the most common options for flowerbed or road fences that you can easily make with your own hands.
Stone edging
This is the perfect option to spruce up your summer cottage. Such a border is able to bring a special flavor when framing flower beds or fruit trees. For its manufacture, the following types of natural stone can be used:
Stone border
Stones can be laid “dry” or on cement mortar. When using the first method, it is desirable to lay the stones on a sand cushion so that they can be leveled. But the second method is more reliable, because it allows you to get a strong and durable frame. In addition, you can thereby avoid the need to constantly get rid of weeds.
Before laying, you should decide on the shape of the frame. Then dig a shallow trench, which will immediately mark the boundaries.
The stones should be placed as close to each other as possible, while filling the gaps with mortar or small pebbles. The work takes effort, but the end result is worth it.
Concrete framing
A border made of concrete, like stone, is durable and strong. You can build such a border in different ways. To begin with, you can pour ready-made sections, this will require molds for borders, and then assemble them together. Or make a formwork, which is then poured with concrete to obtain a solid structure.
Segmented railing
To create a frame from precast concrete sections, you need a mold to cast them. It can be purchased at the store, or you can make it yourself. There is only one caveat. The finished form is solid, that is, non-separable, from which it is very difficult to remove the finished segment without damaging it. And if special means are used in production for this purpose, then in the country, except for oil, there is nothing. Since most often the form may lie unevenly, the oil will not be distributed over all surfaces. Then it makes no sense. Therefore, it is best to make the form with your own hands.
Excellent choice of concrete curb section
To ensure strength, segments should not exceed 2 meters. In this case, it is desirable to observe the ratio of height to length in the range from 1:2 to 1:4. Also, do not make the border too thin or thick. In the first case, the section will break, and in the second it will look like a beam, which is not aesthetically pleasing.
Monolithic railing
Do-it-yourself one-piece edging is easier to do, since you do not need to separately pour sections from concrete. To do this, you need to dig a trench to a depth of 1/3 of the planned curb height. The bottom needs to be well leveled, then make a sand cushion or fill it with gravel. After that, you can start creating formwork. It can be built from wave slate, corrugated board, metal or plywood sheet. So that the formwork does not break and the concrete mixture does not leak out, it should be reinforced with reinforcing bars on both sides, distributing them at a certain distance from each other.
Stages of creating a monolithic garden border
Prepared cement mortar is poured into the formwork and leveled. With the help of a metal rod or pipe, concrete should be compacted in order to exclude the formation of unwanted voids. To do this, each time, immersing the rod or pipe in the solution, swing them in different directions. Walk in this way along the entire length of the edging, slowly. After pouring, the mixture must be closed from sunlight and moistened daily. The complete drying of the concrete mixture will take five days, no less, and only then the formwork can be dismantled.
In the end, the handmade monolithic border looks just fine!
Brick edging
A handmade brickwork edging that will fit seamlessly into any style of garden landscape. It will look especially good against the background of a brick country house. You can lay a brick both on the end and on the edge, it looks equally attractive. In some cases, the bricks are slightly deepened into the ground at an angle. In this case, such a decorative border for a flower bed will be in the form of teeth.
Framing from improvised materials
Almost everyone in the country can find almost a whole warehouse of plastic bottles. But you should not immediately get rid of such material, since it will also fit to create a border with your own hands.
White plastic bottles must be painted. This makes them look more attractive. Any waterproof paint will work for this. If necessary, you can show a little imagination and cover them with different colors or even paint them. After paint, plastic bottles need to be given time to dry well, preferably at least a day. But if you are too lazy to do this, then you should use dark plastic bottles.
First you need to mark the flower bed and dig a groove along its perimeter to a depth of half the height of the bottle. It is good to clear the bottom of debris and weeds, and also, if possible, remove all the roots so that the grass does not germinate later. In this groove and lay plastic bottles close to each other with the bottom up, simultaneously filling them with earth and tamping well. The ground near the bottles can be sprinkled with a little sand or laid out with small pebbles. In this case, it will be more difficult for weeds to find their way out, and the flower bed itself will take on an interesting and complete look.
You may be interested in our following articles:
Borders in the garden – garden curb in landscape design
Spacious garden with a fountain and a gazebo
Photo from the portfolio of completed landscape works from the Garden Labyrinth team. Here you can see photos of the spacious space we have created…
Read more
Our garden “Fairytale world on the outskirts of Orel…
With the kind permission of the Houzz editors, we are reprinting this wonderful work by HouzzRU’s regular contributor, art historian and interior decorator…
Read more
Townhouse garden. Our work
Photos of the garden near the townhouse from the Garden Labyrinth Landscape Portfolio. Here are the photos of the townhouse garden we have created…
Details
The zest of the garden – stream zone with decking, patio…
We would like to bring to your attention Portfolio from the Garden Labyrinth team. The highlight of this garden is the stream area with decking, patio and construction…
More details
Garden with cascading ponds. Our work
Portfolio work from “Garden Labyrinth” – Garden with cascading ponds on three levels.
We have created communicating cascading multi-level gardens on the plot…
Details
There is a place for everything in a large garden
We offer you a photo from the Portfolio of the Garden Labyrinth team. In the large garden we found a place for a pond and a pool paved with clinker bricks…
More
Garden labyrinth with pergola and fire. Our…
Photos from our Landscape Portfolio. We offer you a photo of the garden labyrinth created by us with a pergola with girlish grapes …
Read more
Garden display for Lorberg Nursery…
Our Garden Company completed the concept development and landscaping of a garden mini-exhibit at the international Moscow Flower Show…
Read more
Our garden is the winner of Moscow Flower…
Our garden “Labyrinth of Dreams” – the winner of the Moscow Flower Show 2013 and the winner of the Best in show award. A few photos of the garden, and awards that…
Read more
Moscow Flower Show 2013
Garden “Labyrinth of Dreams” – the winner at the exhibition of gardens Moscow Flower Show 2013. Our landscaping work was awarded the gold medal and the Best in Show prize …
More details
Designer gardens “Garden Labyrinth”. Growing crops in your own garden is very exciting and rewarding…
Details
Pond for contemplation
Photo of one of our works “Pond for contemplation”. Two-level pond on butyl rubber film with a cascade was created using pond equipment …
More
Landscaping. Introduction
Elaboration of the general concept of landscaping and proper zoning of the garden is the first step on the way to proper landscaping and landscaping of the site…
Read more
What is landscaping?
Fashion term or true art?
Since ancient times, people have depended on nature and in order to survive, it was necessary to live in accordance with its laws. 0057
It is with the landscaping work that the implementation of the garden project begins. Terrain work, marking paths and areas, installation of small architectural…
Most often, wild stone, brick or concrete is used for retaining walls. When choosing a stone for cladding…
More
Retaining walls. Our work
We invite you to look at the photos of some of our work related to the design and construction of retaining walls.
Retaining walls are used…
Read more
Golf Courses
Everyone spends their free time differently, but today more and more people talk about the benefits of outdoor activities. Many people try to the best of their ability…
More
Ponds and reservoirs
What can be more attractive than water? The noise of a waterfall and the murmur of a stream, the majestic surface of a large pond and the clear waters of a small pond…
Details
Construction of a pond in the garden.
Steps and materials…
Building a pond on the site: learning to avoid mistakes
A garden pond will surely become a real decoration of the garden and will give a lot of positive emotions in…
More
The process of creating a pond on film
Photos of the process of building an artificial film reservoir with a large wooden patio and a gazebo in the forest. Stages of creating a large promenade…
Details
How we build ponds and ponds
The process of building ponds and ponds in photographs. Garden company “Garden Labyrinth” has extensive experience in the construction of natural and artificial…
More
Ponds and reservoirs. Our works
Ponds, reservoirs, water cascades, waterfalls and fountains created by the Garden Labyrinth team. Our work on the improvement of gardens and parks for various …
More
Garden fountains
According to the definition of the Great Soviet Encyclopedia, a fountain is “a structure that serves as a base or frame for jets beating up or flowing down . ..
More details
garden
How to create a garden waterfall with your own hands
Near water, any person feels peace and tranquility. Psychotherapists prescribe to their patients…
More
Paving garden paths
The overall impression of landscape design depends on many factors, and the right material for creating paths and alleys will give the garden a unique…
More
Garden paths. Our works
Paving of garden paths with various materials. Photos of the works of the “Garden Labyrinth”.
If you are interested in the topic of garden paving, you will find an interesting …
More
Paving with clinker bricks. Our works
Paving of paths and platforms with clinker bricks.
More
Decking – wooden decking
Decking – wooden decking in garden design
Wooden flooring is traditionally used for terraces and decks, patios and patios…
More
Patios, terraces and decking.
Our works
A patio, terrace and decking on a country plot or in a townhouse can become an indispensable landscape node of the territory.
Read more
Garden steps
Usually steps in the garden appear as a necessary constructive element of landscape design, associated with the features of the relief and if applied to…
Read more
Garden stairs. Our work
Practically in any garden or park with a difference in relief, it is necessary to design and build garden stairs and individual steps. Stairs in gardens are not…
More
Garden borders. Our works
Borders or curbs help the landscape designer to separate areas with different textures from each other, to mark the boundaries between different surfaces …
More
Mulching and decorative backfilling
Decorative mulching was widely used in their parks and gardens by Eastern nobles and European nobility.
Read more
Small architectural forms
For prudent and competent use of the territory of your site, our architects offer different options for zoning the designed garden…
Read more
Small architectural forms of our production…
Portfolio of small architectural forms (SAF) from the Garden Labyrinth team. Here you can see some of our design and…
Read more
Small architectural forms. Our works
Small Architectural Forms (SAF), designed, built and installed by the Garden Labyrinth team. If you are interested in the topic of design…
More
Garden pavilions and arbors from Germany
We present to your attention garden pavilions and arbors from Germany. We supply gazebos and pavilions for the garden with a one-day installation period.
Order…
Read more
Arrange a garden gazebo
How to arrange a gazebo in the garden
Decided to create a cozy shady corner on the site? Is your imagination already drawing secluded gatherings with a cup of mint tea? So…
More
Selection of garden furniture
Choose garden furniture wisely
When choosing garden furniture for your site, remember that it will be exposed to moisture. Give away…
Read more
Outdoor Fireplaces and Barbecues
Our Gardening Company has elaborated the theme of outdoor cooking and outdoor recreation. The architects of the Garden Labyrinth…
Read more
Braziers, barbecues and outdoor ovens made of bricks…
Braziers, barbecues and outdoor ovens made of bricks. Our architects and designers think over places for recreation, gatherings of large companies and street cooking…
Read more
Photo of construction of a barbecue and outdoor stove…
Construction process of a kitchen complex in the garden, consisting of a stationary outdoor barbecue, a hand-moulded Dutch brick oven, a comfortable working…
Read more
Sports grounds
Sports ground both financially and in size. Regardless of the choice of surface for the sports ground, it is carried out…
Read more
Portfolio of sports fields
We present you the photos of the sports grounds we have built. A sports ground in a suburban area can be a universal facility, where it is always…
More
Children’s playgrounds
The need to arrange a children’s or sports ground on the backyard territory is due to the presence of children and or sports activity of the inhabitants…
More
Rock gardens. Our works
In this selection of photos you will see some of the rock gardens created by the Garden Labyrinth team.
We mainly design rock gardens…
Read more
10 ideas on how to make the garden a place of relaxation for…
If you want to spend time on your plot with the whole family, getting real pleasure from it, you should think over all the details in advance and lay out the plot…
Read more
Landscaping
Plants are the backbone of a garden, and landscaping plays a central role in landscape design. Green spaces allow you to create harmony between nature…
Read more
Lawn
Choosing and creating a lawn – three main rules
The first rule is a harmonious combination of the lawn with other design elements of the site and located…
Details
Lawns. Our works
The lawn is an integral part of the garden and park ensemble. Our gardening company produces work on the manufacture of lawns for various purposes. Among…
Details
Flower Garden
Beautiful flowering plants have been used by people since ancient times. Palaces and temples were decorated with flowers, they were used at holidays and in ritual…
Read more
Flower beds. Our works
A flower garden is an excellent decorative and compositional tool for creating a special atmosphere of an exquisite garden. On this page you can see…
Read more
Flowerbed
Flower beds are called flower beds, which have a geometrically regular shape. Flower beds are round, square, oval, etc. Very often flower beds…
Read more
How to arrange a flower bed
A beautiful flower bed that blooms from May to October
Do you want to arrange a flower bed that attracts attention with its colors from May to October? It’s not difficult, you have to …
More
Mixborder
The most famous type of flower garden is a mixborder (mixed border)
Mixborders are mixed plantings of flowering and decorative leafy plants…
More
Mixborders. Our works
Mixborder (mixed border) – the most popular type of garden flower bed. This selection of photos shows some of the mixborders created by the team…
More details
Rosary
Rosary – the “royal” highlight of the garden
Roses have one wonderful quality: to give nobility and graceful severity to everything they touch . ..
More
Rosaries. Our works
Roses in the garden – a feeling of constant celebration. The rose is the only perennial plant that has such a long flowering period. Variety…
More details
Hedge
Hedge – protection and decoration of the garden
A high stone or log fence, of course, looks impressive and solid. But, you must admit, it is unlikely…
Read more
Hedge. Our works
Photo of hedges created by us from plant seedlings and finished trees and shrubs.
Hedges come in both deciduous and coniferous varieties, such as…
Read more
How to build a hedge
Gardening Tip: How to build a low hedge?
Even a small, well-kept garden plot is hard to imagine without man-made…
More
Wild grape wall
Wild grape fire in autumn
Autumn gardens amaze with an abundance of colors and shades. Want to add passion and fire to this diversity? Then the idea…
Read more
Ornamental grasses
Read more
Rhododendrons and azaleas. Our works
In this Portfolio work we offer to look at the photos of plantings of rhododendrons and azaleas created by the Garden Labyrinth team.
Read more
Winter gardens from Germany, England and Denmark
We bring to your attention a lot of photos of stand-alone greenhouses and attached premium quality winter gardens. We supply winter…
Details
Winter garden
To build a winter garden Grigory saved up his life and the garden turned out to be famous It was a pity that the house was not enough
Winter lasts in Central Russia…
Details
Garden engineering
Modern garden construction is impossible without engineering solutions. Even in ancient times, when creating gardens and parks, a lot of attention was paid to…
More details
Automatic watering
Shiny sprinkler over the lawnRise and the jet rushedThink scary how blindly I trustAutomatic watering
We live in an interesting time. Time,…
Read more
Automatic watering. Our works
A selection of photos of automatic plant watering systems designed and installed by our team.
We design and install automatic…
Read more
Even though I’m doing the landscaping of the site I’ve been a professor for many years There is a word that scares me “Drainage” it sounds normal
In central Russia, especially…
Read more
Garden lighting
Methods for garden lighting at night
Emergency garden lighting
Isn’t it much easier to insert the key into the lock of even a dimly lit gate than to do…
More
Garden lighting device.
Our work…
Night shots of a garden equipped by the Garden Labyrinth team. In this garden night lighting project, we managed to find the right one…
Read more
Garden lighting. Our work
Garden lighting is an indispensable element of landscape engineering, whether it is six acres or fifty-six hectares.
More details
Night garden design
How to design a night garden design
Being engaged in the design of the garden, we think through to the smallest detail and the night nuances of landscape design. A beautiful garden is quite possible…
Read more
Music in the garden
The garden company “Garden Labyrinth”, in addition to landscape design, can offer you a unique service – music in the garden
Read more
Style of gardens
Historical review of garden styles
Landscape gardening art was born far from today and even more than one thousand years ago, it is rooted in a deep . ..
More details
Avant-garde garden style
Avant-garde garden – an experiment for the brave
Do you want to surprise your neighbors and delight your guests? Arrange an avant-garde garden on your plot…
Read more
Monastic garden style
Monastic style garden – a return to the roots
The monastic style in garden design in recent years is experiencing a surge of interest among the owners of country houses.0057
Urban style garden – an island of peace
Original, dynamic and mobile are the main characteristics of an urban style garden.
Original –…
More details
Rustic garden style
Rustic garden – rustic charm
The basis of a rustic garden landscape is naturalness and simplicity, which…
The era of geographical discoveries of the 5th – 7th centuries led to the fact that the greatest maritime empires of that time …
More details
Dutch garden style
Dutch garden
The Dutch garden has its own unique traditions. As a rule, this is a small garden with a well-groomed lawn in the center. In a classic…
More
Art Nouveau style
Art Nouveau garden – laconic luxury
Modern is one of the world’s most popular styles in architecture, interiors and landscape design. And that’s quite…
More
Regular style
Regular style – handmade chic
If the landscape styles of gardens allow nature to rage and grow, then the regular style reflects the power of man …
Read more
Regular Garden
Photos of a regular garden from the Garden Labyrinth landscape portfolio.
Front area with a central flower bed decorated with bonsai. Indoor…
More
Japanese garden
Japanese garden is a very popular solution for decorating a small space. An original miniature garden with bridges and umbrellas, lanterns…
More details
English landscape style
Free and unpredictable English landscape style
At the beginning of the 18th century, the famous English architect Sir John Vanbrough, building…
Details
Gardens of Italy
Italian style — variations on the regular style theme. The Italian garden is restrained and laconic, which makes it quite suitable for the Russian landscape…
More details
Modern landscape labyrinths
Traditional regular and landscape gardens have been replaced by complex openwork forms, unusual combinations and an innovative approach. Modern landscape…
Details
Green corn labyrinths
Dedicated to fans of mystical crop circles and “Children of the Corn”: huge labyrinth drawings laid in corn thickets. Farmers are tired…
Details
Classical garden labyrinths
Classical labyrinth is built according to the same principles as any classical building. This is symmetry, conciseness, geometricity, clarity …
Read more
Green labyrinth – a classic gardening…
It is not known for certain who, when, and why decided to create a labyrinth of garden shrubs, but there is a piquant legend that the first green…
Read more
vegetables
Don’t have room for a flower bed in your small garden? Or maybe you decided to amaze your guests with your originality and invention? Or you…
More details
10 interesting ideas for your garden
Useful garden tips for every taste and budget. Original and fun gardening ideas that will turn your garden into a favorite…
Read more
How to make beautiful flower beds: using a garden border
Share
A beautiful collection of contemporary backyard design ideas that will help you decorate your flower beds, highlight areas in your garden, and add interest to your landscaping with a garden border.
It is often forgotten that the design of flower beds and beds with garden fences can play a significant role in landscape design, although this simple technique significantly improves the attractiveness of our summer cottage. Fencing comes down to simply and clearly dividing two areas with a variety of types of garden fencing.
Not all of these landscaping ideas are right for your garden. You may like the general look of the cottage design in the photo, but for your conditions, such a garden border may simply be impractical, unavailable, or simply not suitable for your garden.
Be aware that landscaping often does not follow strict rules. The use of this or that garden border is determined by your style, imagination, materials and budget.
CONTENTS
Modern garden border.
The materials used to decorate the borders of flower beds and beds in garden design are presented in a fairly wide range – these are stone, concrete, brick, wood, tile, metal, gabions, logs and all kinds of items that can be used as improvised materials.
Clearly delimiting areas in the garden, the modern garden border most often forms curvilinear lines that smoothly flow into one another and give our garden a modern look that attracts your attention.
Such a garden border can be made from individual metal plates or from a flexible rolled plastic border.
The use of these garden fences gives a clean and neat visual effect. The color of the border is almost invisible, and all attention is paid to the flower garden. So a minimalistic modern border creates a concise, simple, but very effective element in landscape design.
Sometimes, those flower beds without a border that seem to be made in a natural style actually have one.
If in the simplest case, such a flower bed is protected from weeds by an agrofilm dug in front of the flower bed and sprinkled with soil or mulch, then there are simply artistic options for using agrofibre as a garden fence.
There is an agrofibre with a superficial fine layer of artificial mulch or stone. While retaining its useful property of letting moisture through, such agrofilm allows you to create flower beds of amazing beauty. By digging the ends of the film into the ground and decorating the edges with stones, you will get a luxurious garden border.
Such borders in the far corner of the garden are especially beneficial – they look spectacular, but this design option is not as expensive as it seems.
How to make a concrete garden border.
Concrete may sound cold and heavy, but the use of concrete in a garden offers many different design possibilities.
The flexible garden border is the most wonderful part of modern landscape design.
Concrete garden edging is made on site. Concrete is extruded in a continuous strip into a small trench (just cut off the top of the turf with grass). To strengthen such a curb, you can additionally lay reinforcement. Using a plastic template, various types of curb profiles are formed.
Then, every 60-70 cm, expansion joints are cut, giving each segment the desired shape – square, rounded, concave. After that, with the help of a stamp, the desired texture is applied to them – under a brick, tree bark, natural stone, etc.
This concrete garden border can be painted over. In order for the color to last longer, it is coated with a water-repellent primer on top.
You can use this garden border for garden lighting by providing a groove for the LED strip.
Flexible concrete garden border designed for long-term and permanent use in the same place. But it is this type of garden border that allows you to create modern forms of flower beds with smooth curves.
How to properly install a wooden garden border.
The most common type of wood garden border is the raised bed, but you’ll find there are many more options!
Wood, like any material, has a different shape – logs, boards, branches, all kinds of trimmings. I always want to put them into action, but the question immediately stops how long such a curb will last. If you dig a tree into the ground – not for long.
But there is another, more practical way to keep your wood edging happy for years.
The wooden elements of the curb are fastened together on the back side with wire. This garden border is not dug into the ground, but is attached to pegs.
Using this method, you can make an impromptu “log border”. Of course, even in this case, the tree must be treated with anti-rotten impregnations and agrofibre laid under the curb.
Beautiful stone garden border.
Stone curb for really amazing results.
In any case, this type of garden fence requires low cost stone and a lot of manual labor.
Although you can always minimize costs by using the economy option of such a border. Not so pretentious, but still beautiful.
Landscape designers also often use stone gabions as modern garden fencing. Although such a garden border looks structured and durable, but this is an option for an amateur.
It is not necessary to use only natural stone as a material. Small stone blocks give the flower bed a very attractive look.
Brick garden border in the country house.
When we think of beautiful garden railings for a flower bed, the first thing that comes to mind is brick. Let’s see how you can use brick as a garden border in a country house in different ways.
A neat border placed in a small trench forms a beautiful border for the flower bed, in addition, it creates a reliable barrier between the lawn and flowers. Thus, clean beautiful lines are created in landscape design. It is easier to care for such flower beds and it is convenient to mow the lawn next to them.
Another interesting idea for a brick border. Brick platforms create a calm rhythm, and the interesting texture inside each platform creates a kind of intrigue.
We see that bricks used as a border not only separate the lawn from flower beds, but can also be perfectly combined with paths, terraces and patios in the garden. The curvature of the bricks creates a completely different look in garden design and provides another way to create a beautiful backyard design anywhere in the yard.
In order to install a garden border made of bricks, first, using a hose and chalk, we make markings for a beautiful line of the border, then we dig a small trench to the height of the brick, lay geotextiles and bricks in it, then raise another row of bricks, which we lay on the end perpendicular to the general line of the curb.
This garden border makes any flower garden in your summer cottage look perfect. Along with the real practical benefits of such a border, flower beds and paths decorated with a border have a very attractive and neat look.
Modern garden fences do not detract from beautiful flowers, are easy to install, have a good lifespan and make flower gardens easier to care for. The garden border will not only protect the flower bed from the penetration of weeds from the lawn, but also give an interesting whimsical look to any corner of your garden.
How to create an interesting landscape in the garden with borders
In the process of designing a garden plot, quite often the problem arises of how to arrange flower beds and lawns, how to separate them from each other and from paths. Of course, the aesthetic component plays a major role in this action, but the material costs are also important. What will be discussed? Oh curbs!
A border is a small height fence that is used to shape flower beds, lawns, to frame paths, playgrounds. Moreover, the function of the borders is not limited to aesthetics. Also, the curb performs a protective purpose: it protects against destruction, washing out, etc. The variety of their shapes, configurations, price ratios will allow you not only to equip the territory with high quality, but also to realize your ideas exactly, and, possibly, to discover new design solutions landscape.
As mentioned above, the direct purpose of the border is to limit, underline, frame. Therefore, in the process of designing territories that need separation, borders cannot be dispensed with.
It should be noted that the height of the curbs may vary depending on their purpose and the final idea of the landscape designer. So, most often there are curbs protruding above the surface of the earth. They can be quite small, or they can be tall. But a size of more than 25 cm is considered to be no longer a border, but a fence or a fence. In order to emphasize the shape of a lawn or site, borders recessed into the ground are used (the depth of their location does not exceed 20 cm). In garden plots, it is most convenient to place borders that are flush with the ground. They retain all their protective and aesthetic functions, and at the same time do not interfere with the movement and movement of equipment on the surface.
When choosing a suitable border, you need to focus on the layout of your site. As you know, sometimes even the most unexpected materials can serve as a border material. Therefore, it is very important to think about the combination in advance.
As practice shows, the most popular is the geometric arrangement of lawns, in which it is comfortable to mow the grass. In such cases, the curb used is laid only along strict lines. Its color, texture should be in accordance with the general appearance of the site or house. It is even better when the border and finishing materials of the building have the same features. In this case, the landscape will have a harmonious and natural look. For such options, a standard concrete curb is suitable, which can be of different colors, have rounded or rectangular edges, etc.
Concrete curb
You can use a long, curved border to create a sense of movement in your landscape.
Snake border
If you prefer to visually make your garden look older, then curbs can be made from old bricks or limestone. These materials are quickly overgrown with moss, which undoubtedly creates the effect of antiquity.
Curbs made of rectangular concrete blocks of various sizes are widespread. Their laying can be done both on the edge and on the wide part. It is worth noting here that the combination of rectangular blocks looks best with regular shaped lawns. For a variety of this design, you can use pebbles, which are poured into the gaps between the blocks.
An ordinary concrete border is well suited for decorating areas of regular shape, with straight lines. But what if you want something elegant, unusual? Here various materials will come to the rescue, which are successfully used in the practice of landscape design. For example, very often you can find a mosaic border. It is made from broken tiles, ceramic dishes, glass, which are added to the mortar for making borders. Of course, in this case, you need to carefully consider the combination so that in the future your border does not have an unsightly appearance, but becomes a real masterpiece.
Mosaic border
In addition, an interesting solution is the manufacture of a brick border, which is dug into the ground. The brick can be arranged in different sequences, at different angles, with different heights. At the end of the work, you can resort to using paint and add even more color to your exterior.
Brick border
Also, creative designers suggest using wicker borders. For example, from willow twigs. Yes, the work is not easy, but the view will be amazing.
Wicker borders
Also curbs are made of boulders and sandstone. This material has a very organic look. Its only drawback is that weeds grow in the cracks between the sandstone slabs and are quite inconvenient to weed out. Although there is a solution here: the gaps can be filled with a cement mixture or the use of special materials under the base. As for boulders, when laying such a curb, it is advisable to select flat stones of identical size and make the gaps between them as small as possible. If the border is made from natural stone, then it is better to choose specimens of approximately the same size. Firstly, it is more convenient to work with them, and, secondly, such a fence will have a more harmonious look.
Natural stone border
A common material for a garden border is metal. It well protects against the growth of the root system of some plants, which often leads to the destruction of paths and decor. It is made of steel, copper, aluminum, stainless steel in the form of a tape, which is 10-15 cm in the ground and 1-2 above the surface.
Recently, a new invention has appeared for arranging garden areas. This is a plastic border. This is very convenient in the sense that such a border can be given any shape. This is its first advantage. Secondly, the service life of such a curb, as you understand, is quite longer than even a concrete structure. In the installation of a plastic curb, everything is also simple: it is fixed on anchors buried in the ground.
Plastic curb
Well, the simplest border is wooden. Of course, ordinary boards can be used for its installation, but after a while this is fraught with a loss of appearance. The tree can rot, blacken, various insects can start in it. Therefore, it is preferable to choose a wooden beam with a special antiseptic impregnation. Also on sale are special logs that are already interconnected. Such designs are specifically designed to reduce the time spent on installing wooden curbs. An interesting solution here is the use of “stumps”. These are sawn logs, which can have either the same or different heights. When making it yourself, do not forget that wood, like no other material, is exposed to external factors. Therefore, do not save on processing from bugs and decay.
Stump border
Well, one cannot help but recall that the plants themselves can serve as a border. The protective function from them will not be enough. But here, as for the exquisite appearance, here they are the first assistants. The most popular representatives of flora for landscape design are: decorative onions, basil, tarragon, mint, parsley, sage, etc. They will not only be a means of decoration, but with proper care they will provide you with a good harvest.
Summing up, I would like to say that the choice of design options for your garden plot or house territory is limited only by the flight of fancy. Thousands of solutions, which often do not require huge financial costs, but only a little skill, patience and knowledge, will allow you to create a cozy corner of your dreams.