Kitchens with subway tile: 19 Ways to Use Subway Tile in the Kitchen
19 Ways to Use Subway Tile in the Kitchen
By
Ashley Knierim
Ashley Knierim
Ashley Knierim is a home decor expert and product reviewer of home products for The Spruce. Her design education began at a young age. She has over 10 years of writing and editing experience, formerly holding editorial positions at Time and AOL.
Learn more about The Spruce’s
Editorial Process
Updated on 03/29/22
The Spruce / Christopher Lee Foto
When it comes to backsplashes, subway tile is the holy grail of kitchen decor. It’s classic, affordable and works with a variety of kitchen styles. With a little creativity, it can easily become a show-stopping element of your kitchen, or it can be laid in a way that is subtle and highlights the rest of the space’s beauty. Either way, we don’t see subway tile going out of style anytime soon.
-
01
of 19The Classic Subway Tile
The Lily Pad Cottage
This classic kitchen from The Lily Pad Cottage uses a traditional offset pattern.
Though subway tile works amazingly well with all colors of cabinetry, it’s also a beautiful way to complete an all-white kitchen look.
-
02
of 19Experiment With Grout
Neptune
This kitchen from Neptune proves that grout doesn’t have to be boring. We’re obsessed with this black-and-white look that creates a hip, dramatic, restaurant-like feel. The brass accessories give the space an uber-modern touch, while the black grout makes the subway tile stand out and take center stage.
-
03
of 19A Pop of Subway Tile
Remodelista
It’s obvious that subway tile works well as a narrow backsplash or covering a full wall, but we also adore this alcove stove from Remodelista. Not only does the pop of subway tile surrounding the vintage farmhouse stove lend a bit of surprise to the space, it’s also incredibly useful (splashed spaghetti sauce is no match for this tile).
-
04
of 19Lay It Chevron Style
Samantha Kayla / Pinterest
This kitchen spotted on Pinterest uses a chevron-style pattern for its subway tile, creating a feminine and whimsical feel.
 The rest of the kitchen is understated, but the chevron pattern adds another focal point to the space and creates a bit of dimension.
-
05
of 19Try New Accessories
Fresh Mommy Blog
Subway tile is universally beautiful, no matter what you pair with it. This bright and airy kitchen from Fresh Mommy Blog feels fresh and modern. Though the subway tile takes a background role in this look, it is the perfect canvas for the rest of the space, and the whimsical string of cafe lights gives the kitchen a Parisian patio look.
-
06
of 19Go Vertical
Bicker Design
If you think subway tile is boring and overly traditional, think again. We’re in awe of this kitchen from Bicker Design that utilizes a vertical lay pattern for its subway tile backsplash. The result is clean, crisp lines that work well in a contemporary kitchen.
-
07
of 19Try a Faux Panel
Worthington Court
If you want a faster and easier job than laying individual subway tiles, this cozy kitchen from Worthington Court proves a faux look can be just as beautiful.
A peel-and-stick backsplash can be installed in an afternoon, and is a great choice for quick renovations or house flips.
-
08
of 19Rustic and Modern
Jenna Sue Design
This kitchen by Jenna Sue Design has a few trendy elements (reclaimed wood beams, gray cabinets, shiplap ceiling) so the classic subway tile provides a great, neutral way to bring them all together. The designer used a soft black grout to make the tiles stand out, which lends itself well to the deeper-colored cabinets.
-
09
of 19Go Colorful
Home Bunch
This deep blue kitchen from Home Bunch proves subway tile can work with any kitchen palette. The modern design is sophisticated, but the dark blue cabinets and dark grout lines give it personality and a unique flair.
-
10
of 19Subway Tile Works With All Sizes
katemarkerinteriors / Instagram
By now, it’s pretty clear that subway tile is incredibly versatile.
This open concept kitchen from katemarkerinteriors is proof of that—and it’s big on space and style. The shaker cabinets and hewed barn beam lend this kitchen a modern farmhouse feel that’s definitely Joanna Gaines approved.
-
11
of 19Narrow and Modern
Almost Makes Perfect
This contemporary kitchen by Almost Makes Perfect is all about clean, straight lines. The subway shown here is laid in a stack bond style, with each tile placed directly on top of the next. It gives the kitchen its modern feel, and looks purposeful and spotless.
-
12
of 19Perfect for Pops of Color
Jenna Burger Design
While we love the colorful backsplash tile look, this kitchen from Jenna Burger Design proves that classic subway tile is the ideal blank canvas for pops of colorful accessories. If you’re one to mix up your kitchen look every once in a while, a clean subway tile backsplash is a great choice.
-
13
of 19Consider a Herringbone Style
Decorpad
This kitchen spotted on Decorpad features a straight herringbone pattern in its backsplash.
This look is one of the most eye-catching ways to lay subway tile. The tile shown here is slim and narrow, which adds to the zig-zag look.
-
14
of 19Subway Tile Works in Small Kitchens, Too
Duchess of York
Blogger Duchess of York may not have a lot of space to work with, but this kitchen packs a big punch. It’s cozy, and features a vintage farmhouse style, with a classic deep sink that acts as a focal point for the room.
-
15
of 19Quaint and Stunning
myinterior / Instagram
This kitchen from myinterior is even smaller than the one before, but it is one of the most stylish and personality-filled kitchens we’ve seen. The kitchen is placed in an alcove, but the bright subway tile backsplash and penny tile flooring make it feel open and airy. The reclaimed wood breakfast bar pulls the whole look together and reminds us of a hip coffee shop.
-
16
of 19Open Cabinetry
Studio McGee
Studio McGee featured this modern black and white kitchen with a simple, classic subway tile backsplash we love.
The subway tile looks clean and orderly, which works incredibly well with an open shelving look in the kitchen.
-
17
of 19Classic and Rustic
Alice Gao
Photographer Alice Gao captured this rustic kitchen from a New York City restaurant, and it’s everything we love about subway tile. The classic subway pattern, the full backsplash and the vintage-inspired accessories create a welcoming and friendly vibe.
-
18
of 19Try a Beveled Edge
Studio McGee
This kitchen from Studio McGee features subway tile with a twist: It has a beveled edge. The rest of the kitchen is classic and modern, but the beveled subway tile adds a welcome dose of surprise. It gives the kitchen texture, and works well with the understated cabinets.
-
19
of 19A Striking Herringbone
Design to Inspire
The subway tile in this kitchen from Design to Inspire is clearly the showstopper of the kitchen. The herringbone style is eye-catching, and when paired with dark grout the tile becomes the focal point of the whole room.
This is a great look to pair with a neutral kitchen to keep the space from feeling overwhelming.
 The rest of the kitchen is understated, but the chevron pattern adds another focal point to the space and creates a bit of dimension.
 A peel-and-stick backsplash can be installed in an afternoon, and is a great choice for quick renovations or house flips.
 This open concept kitchen from katemarkerinteriors is proof of that—and it’s big on space and style. The shaker cabinets and hewed barn beam lend this kitchen a modern farmhouse feel that’s definitely Joanna Gaines approved.
 This look is one of the most eye-catching ways to lay subway tile. The tile shown here is slim and narrow, which adds to the zig-zag look.
 The subway tile looks clean and orderly, which works incredibly well with an open shelving look in the kitchen.
 This is a great look to pair with a neutral kitchen to keep the space from feeling overwhelming.
17 Fresh Subway Tile Kitchen Ideas
It’s no surprise subway tiles are popular for kitchen backsplashes. They’re cheap, easy to clean, endlessly versatile, and arguably the most timeless option on the planet—no matter what environment they’re in, subway tiles never seem to look dated. Whether you’re renovating your kitchen, or you’re just hungry for interior design inspiration, this batch of subway tile kitchen ideas and backsplash ideas will do the trick. From creative layout ideas to colorful variations, cool grout trends, and classic looks, you’ll find something to recreate or Pin ahead.
1
Try Allover Tile
Annie Schlechter
Subway tile on all of the walls (and up to the ceiling!) makes for easy cleanup in this kitchen by designer Philip Mitchell. The unlacquered brass hood and butcher block countertop add warmth to the space.
2
Extend to Your Pantry
In this entryway by designer Jim Dove, tiles extend to the mini staircase and onto the walls for a seamless look. Double pantry pullouts on one wall allow for sleek kitchen food storage.
3
Hide Your Subway Tiles
Regan Baker Design
In this kitchen by Regan Baker Design, the floor-to-ceiling wood facade conceals the cabinets and countertops. If you want to use tiles as a backsplash but have something more sleek and modern in mind, too, consider a similar design concept. That way, you can feature both materials.
4
Only Go Half Way
deVol Kitchens
In this space designed by deVol Kitchens, deep turquoise lower cabinets ground the spaec while the sage walls add a touch of levity. Between them, the subway tiles feel like a natural addition, thanks to the dark green grout instead of a classic white option.
5
Be Eclectic
ETC.etera
Here’s proof that subway tiles can even blend in with an industrial, modern environment. This kitchen designed by ETC.etera features edgy concrete floors, a retro red stool, classic black stained-wood cabinetry, an ultra-sleek island, and simple subway tiles. All together, they create an eclectic yet cohesive whole.
6
Switch Up the Pattern
Janis Nicolay
If you were looking for ways to switch things up, look no further than this kitchen designed by Janis Nicolay. She went the traditional route with classic white subway tiles, but then opted for a chevron pattern for an understated but fun twist.
7
Reach for the Ceilings
Catherine Kwong Design
Though subway tiles are most popular as a backsplash in the kitchen, they can also stretch all the way to the ceiling. In this Catherine Kwong-designed space, the subway tiles complement both the formal, sophisticated elements as well as the more casual and approachable parts.
8
Color-Block
Chango & Co.
Subway tile offers tons of room for creativity in the kitchen. Here, Chango & Co. created two stripes of olive green to add color and break up the white backsplash. They’re placed under the white floating shelves, playing up the linear motif further.
9
Stay Neutral
Chango & Co.
Subway tile is great for going grayscale. In this kitchen designed by Chango & Co., the black grout pops against the white tiles. The graphic and geometric repeating bond pattern lends itself nicely to the monochrome color scheme.
10
Switch Up Your Grout
Jenn Feldman Designs
For this Los Angeles kitchen, Jenn Feldman Designs chose a tonal grout to blend in with the navy tile, which is set in a refreshingly unexpected chevron pattern.
11
Mimic Natural Stone
@amuneal
If you love the look of marble and other natural stones but don’t want to splurge on a marble slab for the entire kitchen wall, opt for marble tiles instead. As you can see in this kitchen from @amuneal, it boasts that same coveted look.
12
Protect Your Wallpaper
Jenn Feldman Designs
If you can’t resist a good wallpaper moment and want it in every room in the house, we support you. But one thing to keep in mind when decorating with wallpaper in the kitchen is how well it will resist moisture. It’s best to just keep it out of splashing range all together. That’s where subway tile comes in.
13
Try a Fun Color
Regan Baker Design
Color variation in your subway tiles will give the entire room a more artisanal aesthetic. Designed by Regan Baker, the mint green wall feels fresh, soothing, and cheerful—the perfect recipe for a happy family kitchen.
14
Give Them a Gloss
KATIE NIXON
A glitzy kitchen calls for glitzier subway tiles. Interior designer Caitlin Wilson opted for a glossy finish, which goes perfectly with the pristine natural stone countertops, crisp white paint job, and pops of periwinkle throughout.
15
Hide Appliances
House Beautiful
How clever is this setup? With tiles stretching seamlessly from wall to wall, the hood blends right in for a clean visual flow. No bulky appliances here!
16
Ease the Transition
deVol Kitchens
If you’re worried about the transition from subway tile backsplash to paint looking awkward or abrupt, take note. The strategically-placed artwork and a hanging plant in this deVol kitchen instantly captures our eyes, and thus, diverting attention away from the switch in material.
17
Add Texture
Catherine Kwong
So you know you want to use a bold color for your kitchen walls, but have you thought about texture? Subway tiles inject a room with so much more dimension than a flat paint, as evidenced in this kitchen designed by Catherine Kwong.
Hadley Mendelsohn
Senior Editor
Hadley Mendelsohn is House Beautiful’s senior design editor and the co-host and executive producer of the podcast Dark House.
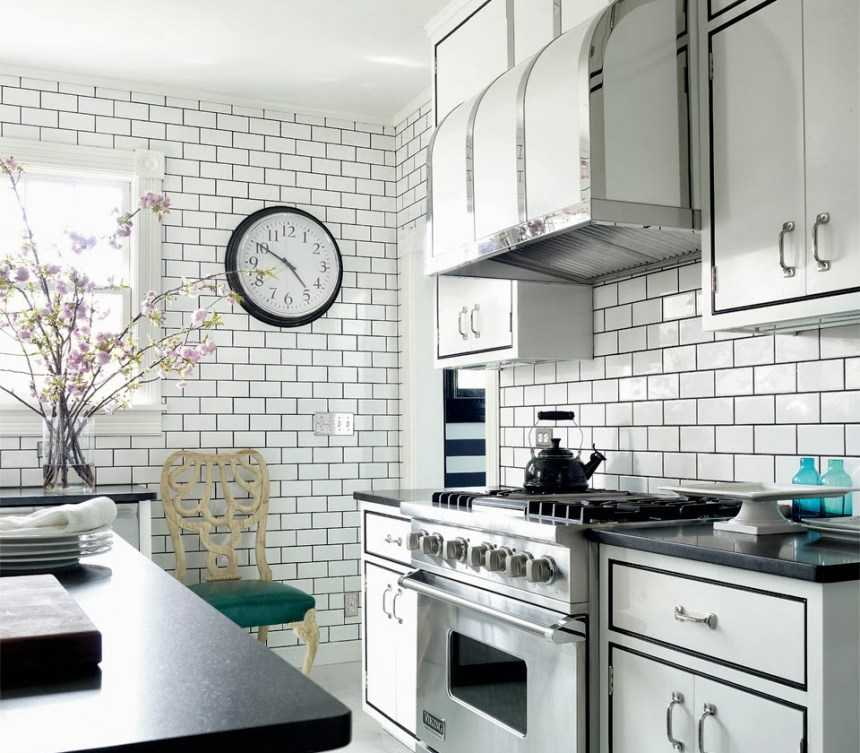
15 Most Beautiful Kitchens With A White Subway Tile Backsplash
Bring a refreshing look to your kitchen with the super trendy white subway tile backsplash, creating a clean and attractive aesthetic to impress your guests. For those who spend a lot of time in the kitchen, the heart of the home, it is important to create a stylish look that you will love for years to come.
The achieve the white subway tile look in your kitchen, it really doesn’t matter the size, though the classic white ceramic is 3″x6″. To step away from traditional subway tile, alternatives include beveled, glossy, matte, crackle, square, herringbone, brick, handmade, or even marble, natural stone, or glass. If you are looking for a twist on traditional, try switching up the size to a 2×6 or 2×8 or 2×4 — the proportions can really change the aesthetic of your kitchen… so can the grout color!
Note: Have a look below for some fabulous ideas that include resource and designer information and even a kitchen that includes a floor plan! For more kitchen inspiration, may we suggest: 30+ Beautiful and inspiring light-filled kitchens with white countertops and 24 Sensational white dream kitchens you must see.
Tell Us: Which one of these white subway tile backsplash ideas most inspired you and why in the Comments below!
1. In this light-filled kitchen, the cabinet paint color is Navajo White 947 | Benjamin Moore. The backsplash tile is a 3″x6″ tile – Pratt & Larson C609 metallic glazed ceramic tile. (LDa Architecture & Interiors)
2. In this elegant kitchen, the cabinets are painted in White Dove OC-17 | Benjamin Moore with a dry oyster glaze by Elmwood Kitchens. They are complemented by Calcutta Gold marble countertops and a 3 x 6 Crackle White subway tile backsplash. Grout is Delorean Gray h260 by Laticrete.
The hardware is Amerock Rochdale Collection in graphite. Under-cabinet LED lights add energy efficiency. The sink is a Kohler Indio under mount cast iron sink with a Danze Parma spring faucet. The island was purchased at an antique shop in Virginia. The pendant light fixture is from The Home Depot. The floors are Red Oak. Dimensions: 14 ‘ x 13′. Island 2.5′ x 4’. (via DesignLine Home Transformations)
3. All the cabinetry (besides the island) is painted in White Dove OC-17 | Benjamin Moore. The Island color is Graystone 1475 | Benjamin Moore. The countertop material is Bianco Carrara Marble. The backsplash is a white subway tile from Waterworks. Kitchen faucet: Dornbracht – Tara Classic.
The counter stools are from the Holly Hunt showroom. The range is a BlueStar #5000-Violet Blue, 48-inch RNB series with Pro-Line. The hood is the Pyramid hood Model number BS-PC48240. The dimensions of the island are 7′-6″x3′-6″. The pendant lights are the Slender Glass Cylinder from DK Living. The flooring is Southern Yellow Pine. (via Siemasko + Verbridge)
4. This elegant white kitchen features a backsplash of white subway tile mixed with a herringbone subway tile. Countertops are Silestone quartz with inset cabinets and stainless steel appliances. (via 7 Sisters Interiors)
5. A country house in New York State features custom cabinets painted in Decorator’s White CC-20 | Benjamin Moore. The countertops are soapstone and Carrara marble. The integrated drainboards are a great added feature. The white subway backsplash has a glossy finish. The tile dimensions are roughly 3″ x 6″.
The dishwasher brand is Bosch. Stools are from Ballard Designs. The flooring is a Natural Finish, wide-planked white Oak flooring in varying widths. Dimensions: The refrigerator wall is 16′-3″ And the depth of the room is 17′-8″. (via Crisp Architects)
6. In this beautiful kitchen, the 3’x8′ island is Storm Gray in Dura Supreme. The hardware has an antique brass finish, from TopKnobs. The 4.25″ x 8.5″ white matte subway backsplash tile pops with charcoal gray grout lines. The countertops are Silestone Quartz in Cemento Suede and Promenade in a matte finish. The floating wood shelves are Knotty Alder from Dura Supreme Cabinetry. The hanging hardware is from Etsy but serves just as decor. The shelves are actually mounted to the wall.
Hood: ZLKF1-Wall Mount Range Hood, 30″, Standard Chimney. Pendant lights are by Thomas O’Brien, found on Horchow. The wall paint color is Conservative Gray by Sherwin-Williams. The ceiling is tongue and groove planks, painted white. This kitchen is approximately 15′ x 25′ including the breakfast area. (via Advance Design Studio)
7. This craftsman-style kitchen spotlights the perfect balance of shape and pattern. The white square subway tile is 4″x4″ in Calcite. On the floor, an 8″ Hexagon in Antique. Both are from Fireclay Tile (eco-friendly, handmade tile). (via Fireclay Tile)
8. The highlight and the starting point of this kitchen is the original hex tile flooring in white and gold. The countertop is honed Calacatta Gold marble, sealed with Dupont Bulletproof sealer. The handmade 3″ x 6″ white subway tiles are glossy, placed on the entire wall for a vintage, yet updated feel.
The grout is similar to Custom Building Products (CBP) Rolling Fog, #544. The countertops are walnut wood. The fridge is a Sub-Zero, while the sink is Rohl. The gorgeous sconces were manufactured by Visual Comfort. The pendant lights are the Thomas O’Brien Gale 1 Light 11-inch. (via Bradshaw Designs)
9. In this elegant kitchen, the cabinetry is from Signature Custom Cabinetry in traditional white paint. The 115″ x 50″ island is from Signature Custom Cabinetry in traditional ebony paint. Hardware: Manufacturer: Classic brass Model: 1019-SN. The perimeter countertops are Caesarstone, polished “Lagos Blue”, the island countertop is Polished Quartzite, “Supreme White” and the bar countertop is Polished Granite, “Supreme White”.
The backsplash is a 3″x6″ white beveled subway tile. Appliances include a Subzero Refrigerator – Model BI-48S/S, Wolf Double Oven – model DO30F/S, Best by Broan (hood), model K260A42SS, and a 424 Free-Standing Wine Storage. The light fixtures are the Pelham Pendant by Hudson Valley. Wall paint is Storm AF-700 | Benjamin Moore. The floors are Stained oak, while the area rug is a GISLEV Rug, low-pile. (via Venegas and Company)
10. A large island, with seating for five, houses a prep sink and microwave. The island countertop is Silverwater Quartzite. The cabinets are by Woodharbor, the color is Flint AF-560 | Benjamin Moore. The white is White Dove OC-17 | Benjamin Moore. The subway tile is a 3″x6″ rectangle field tile in White Gloss, from Adex. Kichler Pendant lights can be found at Walmart.
The range hood is a GE Monogram 48” Stainless Steel Professional Hood. The floor is a field-installed and finished tongue in groove oak floor. Try Minwax Jacobean for a similar look. Dimensions: 20′ x 15′ and the island is 120″ x 48″. (via The Kitchen Studio of Glen Ellyn)
11. This beautiful kitchen features an oversized built-in Subzero fridge, Kohler Whitehaven self-trimming Apron Front Single Basin Sink, a Brizo Tresa Single Handle Kitchen Faucet, Chrome, a Bosch SHV68TL3UC 24 Inch Fully Integrated Dishwasher, and a KitchenAid Fully Integrated Trash Compactor. The range is Wolf 48″ Dual Fuel Range with grill. The cabinet color is Maple wood with the Glacier painted finish and the GO20 sheet top coat by Grabill Custom Cabinetry. The pulls are the Acsendra line from Top Knobs.
The perimeter countertops are Caesarstone 5110 Alpine Mist with a 3×6 white subway tile from Market Collection. The grout is Custom grout brand #386 Oyster Gray. The island countertop is from Grothouse. It is Edge Grain Cherry with Sapwood, JFK stain with hand-rubbed black glaze, distressed, and a Durata matte finish. The walls are painted in Revere Pewter HC-172 | Benjamin Moore. (via MainStreet Design Build)
12. The stain on this Reclaimed Chestnut cabinetry is a Honey stain, over a Van Dyke glaze. The appliance integrated into the cabinetry is a microwave drawer. The countertops are marble, while the subway tile backsplash is from the Grove Brickworks line from Waterworks. The cup pulls are in an Oil Rubbed Bronze finish. Dishes are displayed on three floating shelves, fabricated from Reclaimed Chestnut. A similar light fixture is the Hatteras Bay collection from Kichler. (via Crown Point Cabinetry)
13. The island is Super White Quartzite (polished) and the counters are Cambrian Black Antiqued Granite. The cabinets are White Dove OC-17 | Benjamin Moore and the walls are pure white 3×6 subway tile to the ceiling. Hardware: Chatham pulls from Restoration Hardware. The floor is a sand-in-place white oak wide plank floor.
It was stained with Minwax dark walnut and finished with a Bona Traffic top coat. The counter stools are weathered oak from Restoration Hardware. The lights are the Aspen Pendant in Black Rust from Visual Comfort. The reproduction wooden sign came from an Antique Marketplace in Portland, OR. Island Dimensions: 4’4″ x 9′ 8″. (via Tracy Herbert Interiors)
14. The countertop is Carrara marble, honed. The sink is a Rohl C3018WH Shaws – Fireclay Apron Front – White. The sconces above the windows are the Monroe Wall Sconce No. 771. The island lights are the Yoke Pendant, while the semi-flush mount fixtures are the Short School House Flush Mount. At the island, the Tolix metal counter stools can be found at Walmart. Lining the back of the cabinet on the right wall is the Silvergate wallpaper from Farrow & Ball. (via KitchenLab Interiors)
15. The cabinets in this gorgeous kitchen are custom. The perimeter countertop is Caesarstone 4030, and the color is called Pebble. The island is a granite, color Bianco Carrara. The backsplash tile is a polished Carrara marble. Above the range is a Carrara marble herringbone “picture frame” edged with a chair rail. The grout color is Silverado. The cabinetry hardware is by Belwith Keeler.
The microwave is a Sharp, model number KB6524SS. The light fixture is by Crystorama and can be purchased at Horchow. The walls are painted in Benjamin Moore’s Chelsea Gray, while the trim is painted Paper White by Benjamin Moore. The stools are the Lem Piston Stool – Design Within Reach. The island is 78″ x 36″. Floors are natural maple hardwood. (via Normandy Remodeling)
You are reading an article curated by https://onekindesign.com/
33 Subway Tile Backsplashes – Stylish Subway-Tile Ideas for Kitchens
Every item on this page was curated by an ELLE Decor editor. We may earn commission on some of the items you choose to buy.
Get a classic kitchen vibe in a snap.
By
Brittany Cost | Chairish
Stacy Zarin Goldberg; Richard Powers
It doesn’t matter what your design aesthetic is or how much space you have, one thing’s for sure: Subway tiles are a failsafe addition to virtually every kitchen. Inspired by the tiles that line New York City subway stops, subway tiles have been on the rise ever since they were discovered in 1904—and for good reason. Beloved for their versatility, their rectangular shape is simple enough to act as a blank canvas, yet can make a statement when reimagined in a fun color.
That being said, subway tiles are far from boring. With the right design cues, the design staple can be the perfect finishing touch to any space. Have a look at the awe-inspiring kitchens below. From rustic rooms to modern marvels, these spaces prove just how versatile subway tiles can be.
Alyssa Rosenheck
1 of 33
Modern Marvel
Nestled on Bainbridge Island, designer Taylor Ogle gives this subway tile-clad kitchen a modern spin with open shelves, marble countertops, and sleek, wooden cabinets.
Eric Piasecki
2 of 33
Contrasted Corner
In this 1890s Southampton home, the black subway tiles give this contrasted kitchen an elevated edge. A crisp white hood and geometric floor tiles complete the look.
Mikkel Vang
3 of 33
Tile Takeover
As this New Jersey kitchen proves, subway tile shouldn’t be restricted to behind your stovetop. Nannette Brown added American Olean tiles to the ceiling, stove’s backsplash, and a curved wall.
Stacy Zarin Goldberg
4 of 33
Colorful Cabinets
In this modern Washington, D.C. home, interior designer Zoe Feldman gives the classic subway tile backsplash an updated twist with Farrow & Ball’s Card Room Green. Brass fixtures, a marble countertop, and steel farmhouse sink bridge the gap between old and new.
Richard Powers
5 of 33
Classic Canvas
If your personal style leans more to the maximalist end of the spectrum, a crisp set of subway tiles is a clever way to add some decorum to your kitchen. The backsplash in this Hollywood Hills home breaks up the custom-made cabinetry painted in Farrow & Ball’s Hague Blue and Granada Tile’s patterned flooring.
Annie Garner
6 of 33
Pop of Color
Contrary to popular belief, white isn’t the only hue for subway tiles. This Maren Baker-designed space offers a fresh take on this beloved kitchen trend by pairing soft green tiles with white cabinets.
William Waldron
7 of 33
Go Big With Grout
Looking for a way to make a statement in a simple black and white kitchen? Create contrast with your tile grout. In this Hamptons home, the juxtaposition between the crisp white subway tiles and black grout make a statement in all the right ways.
Dominique Vorillon
8 of 33
West Coast Flair
Mark D. Sikes infused a California cool aesthetic into this Portola Valley kitchen by juxtaposing a soft gray backsplash with crisp white cabinets. Roller shades, woven chairs, and several textured area rugs round out the space.
Meghan Beierle-O’Brien
9 of 33
Unique & Timeless
In this kitchen from Cooper Pacific Kitchens, glossy white subway tile pairs seamlessly with artful accents, including orb-style light fixtures.
Tony Soluri
10 of 33
Gold Standard
The team at Lisa Berman Design used subway tile as a backdrop for standout details.
Brandon Barré
11 of 33
Cornflower Hues
For this classic kitchen, Laura Stein Interiors included cornflower subway tile for a creative vibe.
Michael Robinson
12 of 33
Southwest Style
In this space from Alan Design Studio, white glass subway tile allows the mesquite butcher block counters to pop.
Eric Piasecki
13 of 33
Farmhouse Eclectic
The subway tile in this kitchen from Dunn Designs, Inc. livens up the farmhouse chic aesthetic.
Werner Straube
14 of 33
Urban Glam
In this black-and-white kitchen from Eva Quateman, the tile pattern adds an interesting detail while allowing the contrasting floors and furniture to shine.
Tessa Neustadt
15 of 33
Warm Woods
Natural materials and two different tile styles elevate the look of this unconventional kitchen from Stefani Stein Inc.
Lisa Ross
16 of 33
Soft Classic
A crisp style with contemporary touches dominates in this kitchen from J. Patryce Design.
Lori Hamilton Photography
17 of 33
High Contrast
Charcoal subway tile creates a moody ambience in this posh kitchen from CK Interior Design.
Ed Asmuse Photography
18 of 33
Dark Classics
A design by PepperJack Interiors features glossy wood cabinets that blend well with gray subway tile.
Dean J. Birinyi
19 of 33
Romantic Tendencies
Green marble and glass subway tile get along perfectly in this kitchen from Alison Whittaker Design.
Brett Beyer
20 of 33
Clean & Modern
Neutrals reign in this kitchen from Matthew Yee Interiors.
Anthony Peres Photography
21 of 33
Mediterranean Chic
A Mediterranean kitchen from Everage Design, Inc. features cool green tones and a shiny backsplash.
Michael J Lee Photography
22 of 33
Rustic Meets Contemporary
In a New England farmhouse kitchen from Kathy Marshall Design, sea green paneling, marble counters, and subway tile complete a look that mixes contemporary and traditional influences.
Michael J. Lee
23 of 33
Sophisticated Charm
For this kitchen by KMID | Kate Maloney Interior Design, high-contrast details provide a touch of contemporary elegance to a sophisticated, rustic kitchen.
Gilmore Photography
24 of 33
Contemporary Accents
A bright white kitchen from Gilmore Design Studio features black stools and a metal light fixture that feel ultra-contemporary.
Neil Landino
25 of 33
Warm Neutrals
Cream subway tile is glamorous in a kitchen with warm details from Terri Ricci Interiors.
John Gruen
26 of 33
Pop Eclectic
In a Brooklyn townhouse, Hendricks Churchill created an eclectic atmosphere that’s complemented by standout lighting and art.
Angie Seckinger
27 of 33
Burst of Blue
Soft blues and romantic details come together in a kitchen from Celia Welch Interiors.
Andrea Cipriani Mecchi
28 of 33
Dark Magic
Olive green cabinetry is the perfect match for this glossy subway tile in a design by Michele Plachter Design.
Greg Premru Photography Inc.
29 of 33
Ultra Marine
In Boston, a contemporary kitchen from JN Interior Spaces features blue glass subway tile and a wine refrigerator.
Jerry Kalyniuk
30 of 33
Upscale Neutrals
In this kitchen by Studio Brunstrum, neutral colors, marble countertops, and glossy countertops are a perfect combination.
These are the Best Creative Bathroom Tile Ideas
Brittany Cost | Chairish
Brittany Cost is an editor at Chairish who writes about beautiful objects, unique interiors, and the impact of history on contemporary design.
21 Subway Tile Backsplash Ideas
Pure Salt Interiors
Sure, your kitchen needs to be practical, but it should also make you happy. Subway tile is a lovely choice for nearly any kitchen design—and it’s a timeless choice for a reason. It’s affordable, works with nearly any color palette, and though it’s a fairly traditional option, there are many trendy ways to use subway tile, too.
Though all elements of your kitchen are important, your backsplash can really make or break a beautiful kitchen design. Whether you opt for an eye-catching pattern that elevates a traditional white kitchen or you keep it simple with a standard subway tile, the backsplash is the cherry on top of any kitchen design.
If you’ve ever thought subway tile is boring, think again. Read on for some of the best subway tile backsplash ideas we’ve ever seen.
01
of 21
Naked Kitchens
If your kitchen has colorful cabinetry, you may want to consider a simple subway tile to act as a wonderful canvas to let the rest of your kitchen shine. Here, a traditional subway tile with white grout is a perfect neutral backsplash against the blue cabinetry.
02
of 21
Interior Impressions
One of the best things about subway tile is that it comes in so many different colors. If you’re looking for a way to add some depth to your kitchen, but still want to keep a neutral look, consider a gray subway tile. Gray lends a touch of depth and color to your kitchen, but still allows the space to feel open and airy.
03
of 21
Cathie Hong Interiors
Though most subway tile is glossy, we can’t get enough of this matte stacked bond subway. Matte subway adds a modern twist to a traditional look and pairs wonderfully with rich walnut wood tones. This look would look amazing with deep tile colors such as blue or black.
04
of 21
D Burns Interiors
White kitchens are popular for a reason: they’re versatile, classic, and provide a crisp, clean look. If you’re going for an all-white aesthetic, a classic subway tile can be a timeless choice.
05
of 21
Naked Kitchens
Rethink your design when it comes to subway tiles. While most subway tiles are laid horizontally, vertical subway tiles can make a space feel taller and more open. Here, a creamy marble stacked bond subway creates a warm, cozy vibe, especially when paired with wood tones.
06
of 21
Gray Space Interior Design
Mint green is one of those colors that can act as a neutral depending on the rest of the look. Consider a subway tile with a hint of green if you want to add a touch of color without creating an overly trendy look in your kitchen.
07
of 21
Rebecca Rollins
Black grout lines are a wonderful way to add a lot of visual interest to your kitchen. It gives a space a modern, industrial vibe and can create a rich, eye-catching pattern against a simple white kitchen.
08
of 21
Maite Granda
If you want to play around with a bold cabinet color such as blue, consider keeping your backsplash simple and classic. A standard horizontal subway tile with white grout acts as an understated canvas for the rest of the look in this space.
09
of 21
Ashley Webb Interiors
Brown kitchens are back in a big way. Embrace the Scandi look with a rich wood island or cabinets, and keep your backsplash traditional to avoid any competing tones.
10
of 21
Ashley Webb Interiors
Marble backsplash instantly elevates any kitchen and gives it a high-end look and feel. Consider a simple marble subway tile for the best of both worlds.
11
of 21
Ashley Montgomery Design
A beveled edge can add more depth to a standard subway tile and is a great way to add a touch of texture to your kitchen. If the rest of your space is neutral and understated, consider opting for a beveled edge subway to tile to keep your space visually interesting.
12
of 21
Burchard Design Co.
Black is a bold, modern choice for kitchens and is a great option if your space is full of light. A black subway tile can be a great way to add depth to an open-concept kitchen and can help define a space.
13
of 21
Brophy Interiors
Neutral doesn’t have to mean boring. Though a stark white subway tile can instantly lighten up a space, consider a beige or off-white color instead if you want to add a hint of warmth to your kitchen.
14
of 21
Calimia Home
Open shelving is trendy for a reason—it can instantly elevate your kitchen and give it a designer look and feel. White subway tile is a great backsplash for open shelving because it won’t look overly busy next to your dishes and kitchen gear.
15
of 21
Charlie Interior Design
One simple way to mix up the subway tile look is to change up the design. Here, a standard white subway tile is laid in a chevron-style pattern to upgrade the look and give it a modern flair.
16
of 21
Charlie Interior Design
Black cabinets are a beautiful way to upgrade any kitchen and we love pairing them with a simple white subway tile laid either horizontally or vertically. White subway tile can create a wonderful contrast against a rich, moody cabinet color.
17
of 21
Victoria Bell Design
If you want to create a focal point in your kitchen, consider adding an accent tile behind your range. If you opt for a simple white backsplash, you can play around with fun patterns and colors behind your range without overwhelming the space.
18
of 21
Sarah Fultz Interiors
Want to get a clean and classic look in your kitchen? Instead of laying your subway tiles in a traditional running bond pattern, consider a horizontal bond instead.
19
of 21
Two Gals Interiors
On the other hand, if subway tiles don’t give you the visual interest and dimension you’re looking for, consider laying various shades of white and light gray tiles to create a simple pattern.
20
of 21
Victoria Bell Design
It’s easy to make a case for a lovely gray kitchen, but if you can’t part with your white cabinets, consider going gray on your backsplash instead. Gray subway tiles can add a lovely touch of warmth and texture without taking away from a neutral look.
21
of 21
Whittney Parkinson
Instead of picking a crisp white subway tile, consider one with a little edge to it. These speckled subway tiles add a lovely rustic feel to this beautiful butler’s pantry but still keep the look classic.
This is How to Rock a Beautiful Subway Tile Backsplash
35+ Kitchens That Prove We’re Not Over Subway Tile
Decorating & Design
February 5, 2021
There’s a reason why decorating with subway tile is perpetually popular, especially in the kitchen. Not only is it a timeless and classic look, but subway tiles are also hard-wearing and well-priced. Here are some of House & Home‘s best kitchen designs that incorporate the beloved tile.
To keep all the attention on the luxurious Lacanche range and matching vent hood, Emily Griffin opted for open shelving and white subway tile with a contrasting grout, which are both très Parisian.
Photographer: Sian Richards
Source: House & Home November 2019
Designer: Emily Griffin
Subway tile is a classic for a reason, and in designer Luke Havekes’ New England-style country kitchen, wheat-colored tile on the wall and vent hood is so simple but makes a big impact.
Photographer: Maxime Desbiens
Source: House & Home September 2019
Designer: Luke Havekes
“I wanted the kitchen to look like it had always been in the house,” says H&H‘s Kai Ethier of her sister’s stylish apartment. Kai created a vintage vibe with a porcelain, apron-front sink, muted mint cabinets and subway tile.
Photographer: Ashley Capp
Source: House & Home Makeovers 2018
Designer: Kai Ethier
Dare to go dark? Black subway tile with matching granite countertops create a moody look in this kitchen. A trio of rift-cut white oak shelves adds warmth.
Photographer: Colin Way
Source: House & Home October 2020
Designer: Mark Cayen, Empire Kitchen & Bath & Wiseman and Gale
Elegant white subway tile makes the richly veined wood cabinets really stand out. The combination of white and wood with rustic elements evokes farmhouse flair.
Photographer: Janis Nicolay
Source: House & Home March 2019
Designer: Kyla Bidgood & Kris Hageland, Bidgood + Co
In this storybook country home‘s kitchen, glossy subway tile with a contrasting grout feels right at home with the trad cabinets and handsome wood island.
Photographer: Janet Kimber
Source: House & Home November 2020
Designer: Philip Mitchell
For a touch of French bistro flair, designer Elle Patille added an industrial, Edison-bulb fixture and open shelving overtop of classic white subway tile. Her selection of ceramics, spreads and artwork really pops!
Photographer: Robin Stubbert
Source: House & Home December 2018
Designer: Elle Patille
From the wicker light fixture to the butcher-block countertops and tasseled rug, bohemian vibes abound in designer Judith Gougeon’s compact kitchen. A bold subway tile backsplash with dark grout adds even more interest.
Photographer: Maxime Desbiens & Angus McRitchie
Source: House & Home June 2018
Designer: Judith Gougeon
Why not defy expectations with a bright-colored subway tile? The homeowners’ love of sea glass was the inspiration behind the frosted-glass backsplash in this P.E.I. kitchen.
Photographer: Alex Lukey
Source: House & Home July 2019
Designer: Architecture by David Lopes
Panelled rift cut oak cabinetry and subway tile bring textural interest to this white, wood and black kitchen. Benjamin Moore’s Black Beauty (2128-10) on the built-ins feels undeniably modern.
Photographer: Kiely Ramos
Designer: Collective Studio
Floor-to-ceiling subway tile not only looks beautiful but is easy to clean in this restaurant-style kitchen! Industrial elements, like the vent hood, graphite storage and black track lighting, amp up the cool factor.
Photographer: André Rider
Source: House & Home December 2018
Designer: Camille Daher
The 12-foot-long kitchen island is wrapped in Neolith, while white lacquered cabinets and subway tile act as a clean slate.
Photographer: Stephani Buchman
Source: House & Home April 2020
Designer: Architecture & design by StudioAC; Interior decorating by Quinn Cooper
Glass uppers double as window frames to the subway tile backsplash — plus, highlight colorful cups and ceramics. “It’s nice to see pieces that would otherwise be hidden,” says homeowner Ali Yaphe.
Photographer: Stacey Brandford
Source: House & Home February 2019
Designer: Ali Yaphe & Mazen El-Abdallah
Subway tile is a great option for small spaces — just look to designer Alanna Dunn’s cool Calgary condo for inspiration. It’s anything but builder-basic, thanks to the backsplash, gilt hardware, and wicker and rattan bar stools.
Photographer: Phil Crozier
Source: House & Home August 2019
Designer: Alanna Dunn, Reena Sotropa In House Design Group
For a look that is still timeless, try gray subway tile instead! In this coastal kitchen, the cool-toned backsplash ties in the contoured vent hood and hardworking countertops.
Photographer: Virginia Macdonald
Source: House & Home May 2019
Designer: Tommy Smythe & Lindsay Mens Craig, Sarah Richardson Design
This Edinburgh kitchen is an eclectic mix of old and new. The Saarinen pedestal table is a modern foil to the classic bistro subway tiles, Aga cooker and rush-seated wood chairs.
Photographer: Chris Tubbs
Source: House & Home December 2014
Navy subway tiles are a nod to signature maritime colors — an appropriate choice for a Halifax kitchen.
Photographer: Janet Kimber
Source: House & Home March 2017
Designer: 31 Westgate
This kitchen has the timeworn look of an old French country house, thanks to hand-hammered 2” x 9” tiles.
Photographer: Adrien Williams
Source: House & Home October 2016
Designer: Blazys Gérard
Go bold with black subway tiles. The dramatic inky tile in this kitchen makes white dishes and stainless steel pop, while the glossy finish keeps the look stylish, not sombre.
Photographer: Alex Lukey
Source: House & Home October 2016
In this Victoria, British Columbia, kitchen, a diner-like banquette looks handsome below classic white subway tiles. The large-format 4” x 12” bevelled tiles are substantial and look original to the home.
Photographer: Janis Nicolay
Source: House & Home March 2017
Designer: Bidgood + Co.
The vintage fridge might be the star of this kitchen but the tile’s not too shabby, either. This grey subway tile, grouted in white, picks up light and creates dimension by adding depth.
Photographer: Janis Nicolay
Source: House & Home September 2013
Designer: Joanna Vagelatos
Classic silhouettes, luxe finishes and contemporary elements help make this kitchen warm and comfortable. Sixty square feet of hard-wearing white subway tile is grouted in a contrasting grey to pick up on the room’s color palette.
Photographer: Alex Lukey
Source: House & Home March 2016
Designer: Rachel Fox
Here, an entire wall, including the range hood, is clad in a classic white subway tile. The idea was borrowed from hardworking restaurant kitchens that often hose down the walls at the end of dinner service.
Tour this kitchen on H&H TV.
Photographer: Valerie Wilcox
Source: House & Home March 2016
Designer: Qanuk Interiors
When new white cabinets, counters and subway tile were added to this loft kitchen, the room’s footprint felt more open. The barstools and pendants have a striking presence against the white finishes.
Photographer: Sarah Murray
Source: House & Home September 2013
Designer: Jamie Hamilton & Greer Nelson
This kitchen, featuring a fireplace oven, is nothing less than a showstopper. Ceiling-height subway tiles and open shelving create the feel of a European bistro kitchen.
Photographer: Michael Graydon
Source: House & Home September 2011
This edgy kitchen is modern but not stark or spare. The wall of subway tile combined with unique cabinetry styles and materials make this room one of a kind.
Photographer: Virginia Macdonald
Source: House & Home November 2016
Designer: Connie Braemer
In this cottage’s bright and open kitchen, watery blue subway tiles nod to Hamptons style — a look that’s perfect for breezy summer living.
Tour this cottage on H&H TV.
Photographer: Jason Stickley
Source: House & Home
Designer: Emily Griffin
Grey cabinets and marble subway tile are an elegant, muted backdrop for the punchy brass accents in this kitchen.
Photographer: Angus Fergusson
Source: House & Home February 2016
Designer: Allison Willson
The white walls and subway tile in this airy Birmingham kitchen provide the perfect neutral envelope for a stunning collection of industrial pendants, vintage accessories and period-style hardware.
Photographer: Courtesy of deVol Kitchens
Source: House & Home October 2016
Designer: Helen Robson
The full-height subway tile walls in this Tommy Smythe–designed kitchen are a unique envelope for elegant accessories and an oversized red lantern.
Photographer: Angus Fergusson
Source: House & Home January 2012
Designer: Tommy Smythe, Sarah Richardson Design
The indigo lower cabinets in this Vancouver kitchen play nicely with clean white uppers and glossy white subway tile.
Photographer: Tracey Ayton
Source: House & Home July 2015
Designer: Kenny & Michelle Gemmill
The bold colors and gutsy patterns in this kitchen are offset by the more neutral tones of the plank ceiling and the subway tiles. Together, the mix is both classic and cutting-edge.
Photographer: Angus Fergusson
Source: House & Home January 2015
Designer: James Davie
In this West Coast kitchen, vintage-inspired signage and a weathered step stool offset pristine white cabinets, a white subway tile backsplash and the oversized island.
Photographer: Tracey Ayton
Source: House & Home May 2016
Not only does bringing the white subway tile to the ceiling keep this kitchen light and bright, but it makes the sleek vent hood pop. A bold patterned tile floor and runner add global character to this sophisticated space.
Tour this kitchen on H&H TV.
Photographer: Brandon Titaro
Source: House & Home October 2016
Designer: Reiko Caron
Polished white subway tiles defined with dark grout give this kitchen an ageless European sensibility, while modern appliances and accessories keep the room grounded in the present.
Photographer: Angus Fergusson
Source: House & Home October 2011
Designer: Ingrid Oomen, Qummunicate
Up Next
12 Table Lamps That Will Help Your Space Shine
Advertisement
Tiles boar in the interior | Domfront
What is a “boar”? This is a small-format rectangular ceramic tile. The size of the boar varies from manufacturer to manufacturer, from collection to collection. The range of tile length is from 12 to 30 cm, width – from 6 to 10 cm. As a rule, the length of the “boar” is exactly two or three of its width. The surface, lined with such tiles, is distinguished by a resemblance to brickwork. It is for this that the “boar” is valued.
One of its characteristic features is the presence of a chamfer – a beveled end edge. This makes the tiled surface voluminous and textured. However, in reality, the bevel is not a mandatory component of the boar tile. Produce facing material and without a beveled edge. In this case, to emphasize the rhythm characteristic of brickwork, a contrasting grout is used.
Why “boar”? It is believed that this name appeared due to two through holes on the end surfaces of the blank, which was used to make tiles. For some, the side view of the blank caused an association with a piglet’s snout. The name went to the people and stuck.
In the West this cladding material is known as subway tile . The fashion for brick-like rectangular tiles originated in the Art Nouveau era at the very beginning of the 20th century. At that time, it was widely used for cladding the facades of buildings and finishing subway stations. Going down, for example, in the subway of Paris or New York, we will certainly find rectangular tiles on the walls, laid apart. Hence the name.
The tile, of course, was different in terms of size, quality, and edge type. All these samples were related by the invariable similarity with brickwork.
Boar tiles in the interior
1. In the Art Deco bathroom
As already mentioned, brick tiles began to be used at the dawn of the 20th century for cladding facades and subway stations. She got into the interior a little later – in the twenties and thirties. At that time, the art deco style reigned in the world of art, architecture and design. Subway tiles fit well into the concept of this style, because orderliness and geometry are its key features.
Usually, only white and black “boar” is used for cladding surfaces in an Art Deco style bathroom, less often gray. Contrasting tiles can be used to form an edging around the room. This emphasizes the interior geometry, which is a typical Art Deco element.
Tiled areas adjacent to painted surfaces. A waterproof paint of noble gray tones is used, in which greenish, pinkish and other notes can be heard.
Boar can be completed with black and white mosaic or large checkerboard tiles.
It is obligatory in such a bathroom to have a spectacular mirror that acts as a compositional center. Symmetry, which is an axiom for Art Deco, is created by wall lamps located on two sides of the mirror.
All plumbing and sanitary ware should be of good quality and expensive, with a vintage touch.
Today, Art Deco style in the bathroom is extremely relevant. Many do not even realize that they decorate their bathroom in this style. They just fall in love with the picture and strive to repeat it. Well, it’s hard not to fall in love with Art Deco, because classic and modern, austerity and decorativeness, monumentality and conciseness have merged in it.
2. Scandinavian interior
The Scandinavians have made a significant contribution to the revival of mass interest in “metro” tiles. Scandinavian style has a lot in common with trends such as loft or industrial. All these styles are characterized by a contrasting combination of smooth and rough textures. For example, a wall pasted over with elegant wallpaper can be adjacent to concrete or brick surfaces.
Inspired by lofts, the Scandinavians began to decorate the interiors of ordinary apartments with facing bricks or authentic brickwork. For those areas where there was neither masonry nor conditions for the installation of facing bricks, the boar tile was perfect.
Scandinavian design has conquered all of Europe. Today, in many modern interiors in the so-called European style, you can find boar tiles.
3. In the loft style
The prerequisites for the use of “metro” tiles in such interiors are described above. Its demand is explained by its similarity with brickwork, which gives the room an urban, industrial, industrial character.
If in an Art Deco style bathroom the boar looks classically elegant, then in an industrial environment it appears as a brutal, rough and urban dynamic element. This is a vivid example of how the perception of the material changes depending on the environment.
In the loft-style bathroom, light subway tiles are combined with medium and large dark heavy tiles. Light boar seams can be finished with dark grout for a rougher look. Dark beams, an abundance of metal, glass and wood, a large number of light sources and modern plumbing are relevant here.
Quite popular for the kitchen retro-industrial direction : home space is designed like a huge restaurant kitchen or a food production workshop. Signposts and large wall clocks, similar to street clocks, are hung on the walls. The interior is decorated with many shiny metal utensils and crockery. All “dirty” areas are lined with “boar”.
4. In a classic kitchen
This is a solid kitchen with neutral wooden fronts. Here we see tall cabinets, retro faucets, elegant decor and a spectacular countertop. Household appliances are hidden out of sight. In such an environment, a “boar” tile with a chamfer is more than appropriate. Yes, this kitchen does not look modern. But after all, the “metro” tile is already more than a hundred years old.
Since the palette of such kitchens is scarce, you can line the apron with a bright “boar”. This will make the imposing interior livelier and more fun.
Note
Installation templates. “Boar” is traditionally laid horizontally apart, that is, like brickwork. This makes it easier to keep the lines straight. However, other layout options are also possible. Since the tile is shaped like small rectangles, it is very flexible, almost like a mosaic, and allows you to create a variety of patterns. “Boar” can be laid vertically, herringbone, ladder, diagonally, etc. The main thing is to find a good master.
Subway tiles outside wet areas. Not only bathrooms and kitchens are finished with this material. Tiles are also suitable for decorating fireplace portals, wall openings and even wall fragments – for example, in halls and hallways made in an industrial style.
Author: Tatyana Kapic
20 kitchen and bathroom design ideas
As you know, the apron primarily performs a practical function, protecting the walls from splashes of water and soap, but at the same time it is able to make the kitchen or bathroom more stylish.
A huge variety of tiles will allow everyone to find the tile that is best suited to embody the intended image, and thanks to the relatively small area of \u200b\u200bthe apron, many will be able to lay the tiles themselves.
— A white tile backsplash reflects light well, creating a clean feeling and a bright atmosphere.
2021 TILE APRON DESIGN TRENDS
The small area of the backsplash allows you to create a unique surface without much effort and effort, which, nevertheless, has a significant impact on the overall impression of the kitchen or bathroom. Approach this task creatively: even choosing a classic tile, but laying it in a non-standard way (for example, herringbone pattern), you can get an interesting result.
The main secret of a good apron is to combine it with other design elements and fit harmoniously into the interior. Recently, spectacular surfaces (for example, from mosaics) have been relevant, which immediately attract attention and become the main focus.
Try to come up with something interesting and create an apron that would decorate the kitchen or bathroom. Take a non-standard approach – create the effect of wallpaper by increasing the height of the surface to be lined to the ceiling. Experiment with color, patterns, and even different textures.
Nowadays, the range of tiles is so rich that you can embody almost any look. This versatile finishing material provides endless possibilities for interior design.
– Handmade imitation tiles look very artistic.
— Small hexagonal mosaics in neutral tones create a spectacular surface with an interesting geometric pattern.
— Subway tiles can be the perfect backdrop for an accent glass panel artfully framed with shaped tiles.
– Wallpaper effect achieved with gray and white chevron mosaic tiles. Such a chic surface immediately attracts attention.
– Delicate blues add color to a predominantly plain white bathroom interior.
METRO BOAR TILE APRON
Subway tiles have a classic look and are always on trend. It was first used to decorate New York Subway stations at the beginning of the last century, and since then, due to its versatility and simple design, it has remained one of the most sought-after on the market.
Typically, subway tiles have a strict width to length ratio of 1:2 and a standard size of 3×6 inches (or approximately 7.5×15 cm). However, there are other varieties of “metro” tiles with dimensions of 2×4 inches (or 5×10 cm) or 4×8 inches (10×20 cm). To create a modern atmosphere, its elongated samples will be more appropriate, with sizes such as 2×8, 3×12, 4×12 and 4×16 inches (or 5×20, 7. 5×30.5 and 10×40.5 cm).
Large format tiles have become more common in smaller spaces, where they create a feeling of space. Today, subway tiles come in a wide range of styles and colors. It is made from different materials with different finishes.
An apron made of stone or glass “metro” tiles will look original. Look for tiles with a craquelure effect or tiles with a matte finish. For a more dramatic look, arrange the tile vertically or lay it in a checkerboard or herringbone pattern.
– Consider using tiles with an intricate pattern to add depth and dimension to a crisp white bathroom.
— Made from shiny penny mosaic tiles, this unusual apron makes a lasting impression.
— Tiles in shades of grey, herringbone pattern. A great example of how you can make an apron more interesting with an unusual styling method.
- BOAR TILE “METRO” – 221 COLLECTIONS and 1 357 PRODUCTS IN THE CATALOG KERAMOGRANIT.
RU
MOSAIC APRON TILE
Give the room a unique character by creating an apron from mosaic tiles. Creatively connected on a single surface, small tiles in complementary colors will enliven any dull kitchen, bathroom or laundry room.
Create your own pattern from ceramic, glass or stone mosaic tiles to showcase the benefits of your chosen tile. Small round tiles in the “singing” or hexagonal style have classic shapes that will help to add elegance to both vintage and modern rooms.
– The choice of mosaic tiles today is very wide – you can easily pick up elements of the desired shapes, colors and sizes.
— This white and gray chevron framed apron looks great against a wall tiled in blue and blue.
- MOSAIC FOR APRON – 134 COLLECTIONS and 2 376 PRODUCTS
VARIOUS STYLES OF APRON DESIGN
Properly selected tiles will allow you to create such an apron that is perfect for any style of decoration, and neat thin lines will add elegance to the interior.
The main rule of modern design is to keep the appearance simple. However, that doesn’t mean you can’t draw attention to a particular surface, such as with a tiled pattern that brings some visual energy to a kitchen or bathroom and brightens up their space.
Thanks to the variety of designs available today, you can choose a backsplash tile that not only harmoniously fits into the finished interior, but also complements it favorably, beats the surrounding design elements or helps create an accent surface.
— This herringbone tiled mural adds variety to the look of a wall, creating a sense of depth and dimension.
— Tiles with the appearance of heat-treated wood give the space the character and charm of a country house.
— And this arabesque-patterned framed panel is an example of how white tiles can accent even a white surface.
- CERAMIC APRON TILE – 875 COLLECTIONS and 12,723 PRODUCTS
DETERMINING THE MATERIAL FOR THE APRON
You can choose tiles made from the material that best suits your design. The most popular, of course, are ceramic and porcelain tiles, because they not only have excellent moisture-resistant properties, but also come in a huge variety of shapes, colors, patterns and finishes, which expands the choice.
Glass tiles have a glossy look and reflective surface, so they will help to create a brighter image, while metal or copper tiles (especially with a matte finish) will give the room a special character and personality. If you want to design your kitchen in a Tuscan style, take a closer look at natural stone tiles (for example, travertine).
Stenciled concrete tiles give a historic look to a room, but can also be used in a modern kitchen to create a dramatic contrast. Be careful with the choice of tile material, as it can significantly affect the appearance of the room.
– Glass tiles can be an ideal finishing material when creating a backsplash.
– This gorgeous ceramic tile covered the entire wall above the kitchen stove.
– Use copper “penny” tiles to create an splashback – this accent splashback will make your kitchen literally shine.
CHOOSE THE COLOR FOR THE KITCHEN APRON
The choice of color for the apron is also of considerable importance. The easiest way is to choose a tile color that goes well with the shade of the cabinets. For a luxurious look, use dark-colored tiles, such as black or charcoal gray.
If your room is decorated in a neutral palette, a white or beige apron would be appropriate. You can experiment with less familiar colors like red or yellow. Blue is considered the most popular color because it evokes a feeling of coziness and helps to create a relaxed atmosphere.
If you want to use white tiles, you can make the backsplash less boring by adding one or two rows of colored tiles (or randomly placing individual colored tiles). For an eye-catching surface, try using a contrasting color grout.
— A backsplash made of dark subway tiles with white grout makes the kitchen especially stylish.
— This unusual tile in various shades of blue draws the eye to a stylish backsplash.
– An apron is the perfect place for a bold pattern that will stand out against a white kitchen wall.
- KITCHEN PORCELAIN – 1,396 COLLECTIONS and 17,908 ITEMS IN CATALOG KERAMOGRANIT.RU
You can already see samples of the collections at the stand in our company showroom KERAMOGRANIT.RU
Attentive to your needs, sellers who are well aware of the huge assortment of the salon will be happy to provide you with qualified advice and full support for the order.
SALON ADDRESS: MOSCOW, STR. NOVOGIREEVSKAYA, BUILDING 10, BODY 1. TELEPHONE: +7 495 988 26 05
What is a subway tile?! We explain in detail
It goes without saying that subway tiles are actively used on different continents and there, just like here, they are very popular. As soon as we pass by, it immediately catches the eye and pleases us with its unsurpassed appearance. But the legacy of these great pieces is very short: subway tiles have come a long way from reinforcing old busy subway station walls to creating modern branded walls! And, I must say, in its modern version, it looks more than beautiful! This article is not only a material, but an attempt to provide a rough guide to using these beauties in your homes or commercial projects. From picking the perfect design to picking the right manufacturer, we’ve rounded up every question you could think of when thinking about subway tile! In general, make yourself comfortable, you will really like our material! Take coffee, tea, and enthusiastically read this material, we will try to make it interesting for you!
Why is the subway tile design so amazing?
Before we dive into the subject, let’s first understand the heritage of the subway tile. Taking a new step forward in the development of urban travel, world designers developed unique underground structures at the beginning of the twentieth century. The walls of these new metro stations were not lined with traditional square tiles, but with a slightly different material. Uniquely sized 3 x 6 rectangular tiles, along with some mosaics, were used in the very first New York City subway station in 1904, and this style has been replicated all over the world, in particular in London Underground stations! These products have gained immense popularity and are in incredible demand!
In general, created out of necessity, subway tiles first gradually became a fashion phenomenon and penetrated into modern homes. So what’s the reason? These tiles are very durable, people love the look of them and that they are easy to use and clean. Ideal as floor and wall coverings, these pieces add a lot of visual interest while enhancing the overall look of any setting!
While tile is a popular choice for meeting the aesthetic demands of a wide range of schemes, it is incredibly versatile, making it a top choice for kitchens and bathrooms. Whether you’re looking for a timeless modern design or want to complement a vintage setting, subway tile is sure to brighten up any theme!
Subway tile ideas for the kitchen!
Great tile ideas
As they say, “life can be created in the bedroom, but it’s lived in the kitchen”! The heart of every home, the kitchen is the place where meals are prepared, important discussions are held and where loved ones gather to have fun after a busy day! Due to the fact that this part of the house is constantly visited by people, the use of tiles that are stylish, versatile and easy to clean becomes a very important point! No wonder metro tile continues to be popular and one of the most sought-after kitchen design options. Metro tile offers an endless number of options, from modern to traditional to minimalist kitchens, depending on your style! In addition, the wide selection of colors and finishes offers something for any design scheme. Also, you can always unleash your creativity by using different laying patterns and grout colors. Depending on your tile preferences, you can choose between matte and glossy, flat or focus, brick or herringbone pattern, formation or any other style for that matter!
Subway tile design!
Consider a beveled subway tile design in a softer or more neutral color palette such as white, vanilla, taupe or even bluish green or navy blue for a classic look in your kitchen. These exquisite tile colors bring a vintage feel to the brickwork while creating a comfortable, almost brooding nostalgic vibe that you’ll love!
Likewise, use a non-beveled edge with a glossy bold color for a more modern setting, or keep it stylish with a black and white block pattern. Subway tile makes the perfect backdrop for your style when paired with sleek cabinetry and trendy polished chrome hardware.
Industrial style aficionados can opt for subway metal tiles with a chrome finish to create the perfect urban kitchen. If you like a more vintage look, white subway tiles with black grout add a touch of imperial elegance. If your kitchen doesn’t have a lot of natural light, you can pair your lighting options with dark-toned subway tiles to create something smart and inviting.
Beautiful subway tiles in a stylish design
Subway tile ideas for bathrooms!
The popularity of METRO TILES is not limited to the kitchen, its versatility, variety of finishes, endless colors and beautiful installation options have made their way into modern bathrooms!
The bathroom is the perfect place for creative use of subway tile, whether you choose a bright color scheme or a relaxing neutral setting. For bathrooms in particular, we recommend using them vertically to get some visual height, which can make a big difference in this small area. By choosing a vibrant color against the subway’s dazzling white tile and letting it flow down the length of the wall and across the floor, you can create a unique effect. Or, by pairing plain subway tile with a large statement floor, you can bring out an eclectic design that adds extra appeal to what would otherwise be considered a mere functional space. By pairing subway tile with a separate bathtub, you can achieve a unique style in this space that would otherwise be considered too small to make a statement. You can install light-colored texture tiles to create a salon effect. Or, to create a calm and pleasant atmosphere, you can simply add fresh white towels and natural accents. Also, you should consider installing subway tiles in a herringbone pattern for a stylish touch that turns an inexpensive alternative that feels significantly more luxurious!
In terms of colors, white remains popular, but meter tiles are more affordable in a wide range of colors, allowing you to create anything from monochrome designs to vibrant pops of color for a more poppy look! Gray subway tiles can be used to create a stylish backdrop for just about any style. Sure, the classic soft beige subway is still popular, but as discussed above, you can always get creative when it comes to subway tile. So, try mixing creams and browns for a sophisticated taste!
Subway tiles in a stylish and fashionable interior
Grouts play an important role in determining the aesthetics of subway tiles! From plain white grout to colored grout, you can use a variety of fillers to create a truly custom and creative bathroom. If you’re looking for something glamorous, consider using a glittery grout, or use darker grouts in black and gray to make the design really scream!
As you can see, a lot of these beautiful options make subway tiles very useful in your homes, especially in kitchens and bathrooms.
We hope you enjoyed our material!
In our online store you can buy SVP on the best terms! Call or write, we will be glad to mutually beneficial cooperation! See you!
tilers’ reviews of Gracia Ceramica (Grace Ceramics)
Subway tiles are one of the traditional coatings. Its creator was the French architect Hector Guimard, who used the newly created material for facing the famous French subway. To date, the described coating is used not only for external, but also for internal finishing work – they decorate kitchens and bathrooms. Due to the form imitating brickwork, such tiles are often used in loft or art nova interiors.
Content
- 1 Features
- 2 Manufacturers
- 3 varieties and characteristics
- 4 Reviews of customers
- 5 Secrets of the choice of tiles for the bathroom: video
- 6 Conclusion
realized by one of the founders of the Art Nova style, Hector Guimard, back in 1900. Over time, this material has become an indispensable component of this interior trend.
Today, in addition to Art Nouveau, metro tiles are actively used in other modernist design areas, such as loft or art deco.
The coating got its unusual name thanks to the same Hector Guimard, who used it to cover all the Paris metro stations. The latter were subsequently recognized as one of the most beautiful in the world.
The classic subway cover is glazed. It has a rectangular shape and looks like brickwork. Drawing on such material is rarely applied. Most often, the tiles themselves can be painted in all sorts of shades (from white to lemon or red). Standard material size 7.5×15 cm.
Another important feature of the coating is its three-dimensionality. Due to the faceted sides on the surface of the material, light reflections are easily traced, which creates a sense of dynamism.
Initially, the described material was used exclusively for facade work, however, over time, subway tiles began to be used for interior cladding. For laying sidewalks, polymer sand tiles are most often used.
This coating is particularly resistant to moisture, steam and temperature changes. The above allows you to apply subway tiles to finish almost any room, including the kitchen or bathroom.
The surface of such tiles can be damaged by abrasive compounds, so it is advisable to use neutral detergents that do not contain such components for cleaning.
Manufacturers
Traditionally, France was the first country to start mass production of metro tiles.
Among French manufacturers of ceramic coatings, the following companies deserve special attention:
- Diffusion Ceramique is one of the oldest French manufacturers of ceramic coatings. The company was founded back in 1982, and for more than a quarter of a century, it has been selling its products all over the world. The leading production facilities of the brand are located in Brignoles, in the south of France. In the manufacture of tile materials, modern technologies and techniques are used. Plus, the company is developing and implementing its own unique techniques into production.
In addition to production technology, a lot of attention is paid to the environmental friendliness of materials.
![]()
- Josse – the described factory is located in the department of Brittany in the northwest of France. The firm produces many varieties of both floor and wall tiles, including clay, glazed and hand-painted models. The company began its activity in the 60s of the 20th century as a small family business (the company still bears the name of its founders). For the most part, Josse specializes in the production of traditional and artificially aged coatings.
Among the models made by her, there are often tiles stylized as antique samples or craquelure material.
French trends were quickly taken up by Spain and Italy. The products of these countries were in no way inferior to their French counterparts in terms of their characteristics. It is worth noting such modern companies as:
- Gracia Ceramica is a joint brand of Italian and Spanish masters. In the process of development and release of each type of coating, not only leading technical specialists, but also well-known European artists and designers take part.
Such measures make it possible to make the material not only technically perfect, but also aesthetically attractive. The production of tiles for the Russian market is carried out at the factories of the UNITILE holding located in Russia. Unique author’s ideas allow the company to produce both classic and innovative tiles of any format.
- Cevica – the described factory was founded in 1986. The company became famous mainly due to the production of small-format tiles. Today, the company is focused on the manufacture of high-quality ceramic coatings for the middle price segment.
Subway tiles are a rarity for domestic manufacturers. Russian companies rarely undertake the production of such a specific material, while for European brands it is the basis of the assortment. Budget options for subway tiles are quite difficult to find, but in the middle price segment there is a considerable choice.
Varieties and characteristics
Diffusion Ceramique offers traditional subway tiles. The described collection, in addition to the specific brick form, also has a characteristic faceted relief, which makes the tiles brighter. The collection contains both the usual glazed versions and models with the effect of craquelure (artificially aged material, on the glazed surface of which there are characteristic cracks). The described series includes more than 29 different colors, including borders, skirting boards, internal and external corners. Despite the changed appearance, they are all produced using authentic technology and are extremely durable. Porcelain tiles are also very popular.
Josse’s subway tiles are featured in the Tabaco collection. The latter includes 12 material color options and plain embossed borders. The surface of such a cladding is covered with glossy enamel, which gives it a shine. The edges of the tiles are decoratively uneven. This gives the finish an aged vintage look.
Gracia Ceramica’s Metro series consists of 10 shades of background tiles. The latter can be freely combined with each other to create unique interior solutions. The collection includes two decorative lines – Lacroix and Gzhel. Lacroix is a tile with neat geometric patterns. As for the Gzhel line, it imitates the traditional coating of the same name and is distinguished by its catchy and colorful ornament.
Cevica metro tile has a plain glossy surface. The coating is presented in white, beige, black, red, blue and yellow shades. The manufacturer has retained the traditional format of the coating 75×150 mm, which allows you to easily imitate brickwork. All tiles in this series have beaded edges. The latter make it possible to noticeably diversify the interior. In addition to the options described above, the line also contains two decorative models, made in golden and platinum colors.
Customer reviews
Marina, 28 years old
I took a Diffusion Ceramique tile to design a kitchen backsplash.
Initially, I wanted something unusual, so in the end the choice fell not on subway tiles in a delicate cream color. The tile itself is very beautiful and looks perfect on the wall. No chips or scratches were found on the coating. She did not lay the material herself – she hired a master. All work was done very quickly. I didn’t hear any complaints about the quality. The only downside is the range. Even when buying through an online store, in fact, not all the colors that appear in the catalog are present, so I had to look for the right shade.
Oleg, 34 years old
I have long wanted to make myself an unusual bathroom. I thought about the interior and decoration for a long time. As a result, I settled on a subway tile from Gracia Ceramica. The quality of the material, of course, pleased. It is easy to lay, I did not find any special discrepancies in size, irregularities or chips. With it, the wall really looks like glazed brickwork. I won’t say that such tiles can be classified as cheap, but they are worth their money.
![]()
Narrow room design.
How to calculate wallpaper for a room, see here.
Tile the subway is a native French material. Originating back in 1900, the described coating has become widely known throughout the world. Many companies, including Spanish and Italian manufacturers, have been producing this type of tiling for decades. Often, such a lining has a characteristic elongated shape and is covered with a bright glossy glaze. The latter makes even plain tiles bright and dynamic.
We also recommend that you familiarize yourself with the Retro style in the interior.
installation rules and bright design ideas
What is a wild boar tile
Boar tile on an apron also has a second name – subway. It is a small format ceramic tile, from which you can lay out a small island of surface. As a rule, they use a glossy variety of this tile, but there are also matte, mirror varieties.
It has small bevels along the perimeter, which gives it uniqueness and volume.
However, on sale there are also the most simple models without bevels and with a much smaller volume.
Tile sizes are standard, as a rule, the length is 2-3 times greater than the height. Different manufacturers may have slightly different parameters, this must be clarified for a particular type.
Benefits of the “boar”
It is not for nothing that such tiles are used in common areas. Laying the boar tile does not require special skills, it lasts a long time and looks beautiful. Among the advantages of such a tile are the following:
- Glazed ceramic tiles are water resistant;
- Tile lasts for many years;
- Due to the small size of the tiles, there is no need to level the walls to perfection. It is enough to level holes with a depth of more than 5mm;
- “Boar” tiles in the kitchen are able to withstand high temperatures;
- Glazed ceramic easily withstands small impacts and, due to its shape, rarely breaks.
![]()
Types of hog tile
A distinguishing feature of the boar is chamfers – beveled edges along the perimeter.
Beveled
Bevels (or bevels) give the product volume. The glazed surface looks especially impressive with them.
The photo shows a kitchen in chocolate shades, lined with convex tiles with facets.
Without chamfer
Flat products without chamfer look concise and are used if the space does not want to be overloaded with relief textures.
Standard dimensions of the horn
- width – from 60 to 100 mm;
- length – from 120 to 300 mm;
- are the most common: 100×200, 75×300, 150×300 mm.
Stylized bricks are ideal for finishing the backsplash area, moreover, this material is affordable and can be purchased from many manufacturers.
Color solutions
The color, shade, and texture of the tiles must harmoniously fit into the design of the room, complement other elements of the interior and meet the individual preferences of the owner of the room.
Boar wall tiles are chosen from a variety of colors, focusing on the following:
- Black. Looks great in large rooms. When using it, visual accents are well placed with light tones.
- White. Considered a universal color. It can complement other colors, such as black, blue, pink, shades of dark colors. But it can act as an independent primary color.
- Black and white gamma. Classic. Used in many styles of interior design. White tiles with splashes or a black (gray) belt look great.
- Red. Decorating a section of the wall with this color focuses the attention of those present. But the color is somewhat aggressive. Therefore, it is recommended to use it in combination with other bright colors, such as light turquoise, olive, green or blue.
- Blue. The color of calm and tranquility. Mainly used for finishing baths and toilets. When used in the ornament of panels with other colors, the gloss softens the composition. Successfully complements purple, turquoise and lilac colors.
![]()
- Compositions of soft tones (burgundy, turquoise, milky, brown and dark shades of other colors) are important to combine with other elements of the premises – furniture, curtains, wall decorations and more.
Tip! When choosing a tile color or determining a combination of shades, it is recommended that you familiarize yourself with photos of the executed compositions on the Internet. Many well-known manufacturers offer ready-made original solutions, for example: Kerama Marazzi boar tile, Ege Seramik catalogs, Absolut Keramika, Serenissima Cir and others. Before making a direct purchase, you should try to combine colors on exhibition tile samples.
Diverse design
Continuing to describe the technical characteristics of the boar tile, it should be noted that there is a variety of designs. Traditional tiles, as mentioned above, have chamfers along all edges, it is thanks to their presence that the tile looks voluminous.
But the shape of the chamfers can be different: have clear pointed lines or smooth rounded edges. The choice of this or that product largely depends on the design concept of the renovated premises.
The traditional “boar” always has a monochrome color, but modern manufacturers, releasing new collections, offer consumers surfaces that imitate natural marble or brick. There is a tile for sale that looks like wood in texture. As the latest know-how, a glass tile “boar” is presented. With the help of it, exclusive interiors are created that can boast a special zest.
Please note! It is better to use a decorative tile “boar” for accentuation, highlighting any one functional area. Otherwise, the interior will turn out too bright and saturated.
One more important circumstance should be noted: the entire boar tile is divided into two large groups. It comes in matte and glossy. Gloss, behind the light of the presence of a reflective surface, helps to create ceremonial elegant interiors.
The steles lined with it become lighter, which is very important for small bathrooms and plumbing units. Matte tiles are most often used for lining toilets; they can often be found in the interior of a living room made in a loft style. Using this solution, designers highlight functional areas.
Which style is suitable for a boar apron?
The boar-shaped kitchen backsplash matches many design styles:
- In a classic interior.
The tile is eye-catching while highlighting other interior details;
- Nordic, Scandinavian style.
It is a combination of glossy and rough textures (such a tandem can be achieved by decorating the backsplash with textured tiles, and the walls with elegant wallpaper, or vice versa).
- Simple, deliberately uncomplicated country style (or Provence).
The design of the room can be advantageously emphasized and refreshed by laying the wall with “brick” tiles.
Lamels complement the “rustic” image of the room;
- Interior in an urban, industrial style.
(with a lot of details, metal and glass furniture) will look more complete if you make the laying of not only the apron in the kitchen, but also a small section of the wall;
- Art Deco
The restraint and monumentalism of the art deco style is perfectly combined with the geometric and strict lines of the tiling; a good result can be achieved by combining white lamellas with bright interior items, a black apron with light-colored furniture, or using tiles and decorative plaster for decoration;
- the colors of the slats are relevant for high-tech design: in this case, the seams are processed using grouting in dark shades, emphasizing the deliberate roughness of the style.
WARNING! When choosing lamellas, think about what texture materials will prevail in the room and how tiles will be combined with them.
Beige or white products are universal for finishing the kitchen – they will complement any style and will be combined with the color of other interior items. Consider also the size of the room: dark tiles will visually reduce the space, light ones will increase it.
What are the installation methods?
The traditional “metro” apron imitates a brick wall, so it is most often placed in a run-up with different offsets or “seam to seam” (on the right in the photo). In the latter case, the emphasis in the design of the apron is placed on the seams, so most often the grout is chosen in a contrasting color, and the seams themselves are made very neatly and evenly.
Which grout should I choose?
Grout (also called fugue) for tile backsplash joints can be chosen: in the tone of the “boar”, universal white, beige, gray or black.
- Whatever color of grout you choose, it must be waterproof, designed to withstand frequent washing and temperature changes.
Choose a quality grout – cheap mixes darken quickly.
- To avoid darkening of the joints, you can buy an epoxy-based grout that does not darken, as it hardly absorbs dirt and water. But it quickly freezes, so you need to work with it quickly and deftly.
Laying process
Proper laying of the boar tile on the backsplash is a difficult but doable task. The main thing here is the competent conduct of calculations and compliance with a number of requirements, which we will discuss later.
Interesting! Another name for the boar tile is “metro”. This name came from the UK, where this method is quite common in wall cladding at metro stations.
Surface preparation
The maximum leveling of the base will facilitate subsequent installation. On a flat surface, not only is it easier to stick tiles, but it will also require less glue and time spent on it.
To prepare the surface for laying the hog tile on the backsplash of the kitchen, tile adhesive can be used (with differences in the plane of not more than 5 mm.
) Or a cement-sand mixture (with large values of irregularities). Before proceeding with the alignment, you should carefully inspect the site. If necessary, do the following:
- Old decorative coatings (tiles, wallpaper, other facing materials) are removed.
- When flaking elements are found, the latter are removed until a solid surface appears. This can be done with a trowel, trowel, spatula, puncher or other tool.
- Before leveling, the wall is treated with a deep penetration primer. This will provide better adhesion (adhesion) of the composition to the surface, strengthen the extreme particles of the wall, and reduce the absorption of moisture from the dry mix used.
- Work with a dry mix begins only after the primer has completely dried. The time it takes to do this depends on the temperature of the room, the abundance of soil application, and the performance characteristics of the composition used.
Other preparatory work
Surface marking is an obligatory stage of work.
The procedure will create a more accurate and aesthetically attractive surface. To do this, you can measure the distance from the floor, adjacent walls to the extreme row. Taking into account the result obtained, marks are made along which a horizontal profile is established, which serves as the basis and support for the first row.
Helpful! A galvanized profile fixed to self-tapping screws or dowel-nails will ensure the rigidity of the structure and will not allow it to “sag” under the weight of subsequent rows. It is dismantled only after the adhesive has completely hardened, not earlier than a day later.
In addition to marking, when laying the hog tile on the kitchen backsplash, it is recommended to perform a few more actions:
- Make a preliminary layout of the tiles on the floor. At this stage, try to select individual elements according to the color and texture. Inspect for chips, cracks, or other mechanical damage.
- Prepare adhesive according to manufacturer’s instructions.
You can find it on the packaging. It is not necessary to dilute large volumes, it is enough to knead the amount that will be produced in 40-60 minutes. work. Over time, the composition begins to harden, dry and lose its original adhesive properties.
Important! When purchasing a boar tile, buy it with a margin of 10% of the required amount. This will create a certain margin for chips that may appear as a result of transportation, trimming, shifting.
Installing the backsplash
Laying the boar tile on the kitchen backsplash is done as follows:
- Spread the adhesive evenly over the back of the tile. For this, a special notched trowel is used, after passing through, with which even, neat grooves of the mixture with gaps, 3-3.5 mm wide, remain on the surface of the tile.
- Spread the adhesive on the wall surface. The boar tile is much thicker and heavier than a standard tile, so the adhesive composition is applied both to the treated plane and to the lamellas themselves.
At one time, the amount of the mixture is laid out, sufficient for gluing no more than 3-4 pieces.
- Press the “brick” firmly against the base. Lightly knock it out with a mallet, fixing it in one plane. The lower part at this moment should fall on a horizontal, insuring profile.
- Laying the boar tile on the kitchen apron is carried out according to the previously selected layout method. To maintain even gaps between the elements, special plastic crosses are used.
- Every 5-10 min. it is necessary to check the correspondence of the vertical plane. This can be done with a plumb line, level or level.
- Laying the last and extreme row may require trimming of individual elements, the features of which will be discussed below.
- After 1-1.5 hours after laying the boar tile on the kitchen backsplash, remove the plastic crosses and clean the gaps between the “bricks”.
- Grouting of tile joints is carried out no earlier than one day after installation.
![]()
Important! There are layout options without gaps. In them, the tiles are closely adjacent to the neighboring ones. Crosses and grouting of tile joints are not needed here.
Basic nuances
The technology of laying boar tiles on a backsplash differs significantly from working with ceramic or porcelain tiles. The work is complicated due to the texture and the presence of beveled, rounded corners (not on all models).
How to cut boar tiles
As already mentioned, cutting is necessary when laying edge rows and framing protruding objects (eg gas pipes). Trimming can be done with a tile cutter or grinder with a diamond blade. The latter should operate at the lowest possible speed, which will reduce the number of chips.
Machining inside and outside corners requires cutting the back of the tile at 45°. After marking the element and sawing it off, the edges are polished with sandpaper. In addition, pay attention to a number of features:
- After cutting the corner tiles without a chamfer, align them with each other and make sure that the resulting corner edges are even.
![]()
- Installation of tiles with facet is carried out with an additional trapezoidal cutout, repeating the profile of the lamella.
Helpful! The easiest way to frame corners with hog tiles is to purchase and install a ready-made (assembled) ceramic corner.
Tile joints
To process the gaps between the hog tile on the backsplash, special mixtures of different compositions are used. Each of them has its own disadvantages and advantages.
- Epoxy. They have excellent performance characteristics, absolutely waterproof, durable, inert to prolonged exposure to aggressive detergents. Service life reaches 50 years.
- Polyurethane. They are distinguished by high elasticity and the presence of fine-grained components. In most cases, they are used for processing thin seams. Often used for surface treatment, where the base is sheets of drywall or other material prone to cracking. The disadvantage is the relatively high price.
![]()
- Acrylic. The best choice for bathrooms, bathrooms, work aprons – places that are subject to frequent contact with water. They provide 100% tightness of the joints, but are not able to withstand mechanical loads.
- Latex. They have high elasticity, do not crack under prolonged mechanical and thermal impacts. Are applied to processing of wide (more than 5 mm.) gaps.
- Silicone. They have excellent waterproofing properties. The disadvantage in this case is the tendency to destruction when exposed to high temperatures (the area behind the gas or electric stove).
Important! Cement-sand grouts are among the simplest types; they are not used with glossy coatings, therefore they are not considered in this case.
Pay attention to the color and style of the room’s interior when choosing a grout for the joints between the hog tile on the backsplash. For example, a neutral grout with a woody tint is suitable for treating beige walls.
Finishing of the combined composition is carried out by means of shimmering joint mixtures.
Disadvantages of coating
When choosing a boar tile for an apron, you need to take into account some disadvantages that you will have to face. First of all, such a tile is distinguished from the standard square options by the price. Hog is always more expensive due to the fact that it is more difficult to produce (beveling takes longer). It should also be borne in mind that although the small sizes of the tiles simplify the laying process, it will take more time than laying standard ceramic tiles. And if you choose an unusual way of laying, then it will require even more time.
Caring for the boar tile
An apron made from this tile needs no more care than other ceramic tiles. On a light tile, stains, water stains and dust will practically not be noticeable. But dark tiles will have to be wiped more thoroughly and more often. The situation is more complicated with tile seams.
![]()
Chamfer gives volume and texture to the wall, but dirt will accumulate more in these places. Due to the pronounced grooves, it will be more difficult to wash such an apron. If you do not want to make an effort, you can choose a smooth boar without chamfers.
Tips and tricks for tile masters
Making your own backsplash from metro tiles in the kitchen or pasting walls in the bathroom with it is not something difficult. There are no special tricks here. Self-adjustment of plastic windows according to the season or expansion of the opening for non-standard sizes of interior doors can cause big problems.
The main thing in the sticker of the tile in question is the perfect evenness of the seams. Any inaccuracy in leveling it will be clearly visible on the wall. This is far from wallpaper or PVC tiles, which forgive small flaws in the original layout. Otherwise, the gluing of the boar is carried out according to the technology common to all ceramics.
![]()
Original tile layout will transform the interior
[spoiler title=”Sources”]
- https://kuhnidizajn.ru/plitka-kabanchik-na-fartuk/
- https://kyhni.guru/plitka-kabanchik/
- https://design-homes.ru/komnaty/kukhnya-i-stolovaya/plitka-kabanchik-na-fartuk-kukhni
- https://remont-volot.ru/767-15-idey-kak-oformit-fartuk-plitkoy-kabanchik.html
- http://otdelkasam.ru/materialy/plitka/keramicheskaya-plitka-kabanchik.html
- https://oblicovshik.ru/vybor/plitki-kabanchik.html
- https://PlitkaHelp.com/vybor/plitka-kabanchik-na-fartuk-kuhni
- https://kitchendecorium.ru/remont/backsplash/fartuk-iz-plitki-kabanchik-v-interere-kuxni.html
- https://m-strana.ru/design/ukladka-plitki-kabanchik-na-fartuk-kukhni/
- https://ukuhnya.com/remont/fartuk/plitka-kabanchik.html
- https://sdelat-dom.ru/remont/poly/plitka/kabanchik/
Pig tile for kitchen backsplash: design photo and layout options
10/18/2018
1 star 2 stars 3 stars 4 stars 5 stars
One of the most popular options for finishing a kitchen backsplash is a boar tile.
We tell you how to lay it beautifully and correctly.
Features of unusual cladding
Pig tile on the backsplash of the kitchen is very common. An unusual name was given to plates that imitate brickwork. Initially, it was only a facade decoration. For ease of transportation, two holes were made on the reverse side of each plate, which made it look a bit like a pig’s snout. This is where the evocative name comes from. However, it is not alone.
Europeans call this tile “metro”, because it is she who is faced with many stations in the subways of different cities. This form turned out to be very successful and quickly migrated to the interior decoration. The decoration of the cladding has also become more diverse. A modern boar resembles a brick only in shape. It is painted in a variety of colors, signed and glazed.
Instagram tur4enkodesign_
Boar tile on the wall
The edges of the product are most often chamfered, which gives it a bulge and volume.
The lining is available in several sizes. The most popular of them is 75X150 mm. This tile in mini format looks very good. It is used quite rarely, because it is especially difficult to lay. A feature of the cladding is considered to be a large thickness, which must be taken into account during installation.
Kitchen
Choosing an apron for a white kitchen: 5 popular options and successful color combinations
Difficulties when laying material
Mounting the horn is quite difficult, especially if the tile has a chamfer. Models without it are easier to paste. That is why imitation cladding is so popular. It is a product of standard sizes, divided by beveled chamfers into fragments. However, the imitation does not look so impressive. If you plan to lay the boar yourself, you need to be prepared for the following difficulties.
![]()
Careful preparation of the wall
Every subfloor needs some preparation before tiling, but in the case of the boar, the preparatory work is carried out especially carefully. This is explained by the fact that, despite their compact size, the plates are quite weighty and thick. For high-quality laying, the wall will have to be leveled and dried. It is also desirable to degrease it, and then primed. This will significantly increase the adhesive characteristics of the base, which is necessary for heavy tiles.
Instagram remont_spb
Corner lined with boar
Kitchen
Choosing a tile apron for the kitchen: useful tips and cool design ideas (100 photos)
Clean trimming of cladding
The dimensions and shape of the plates require a fairly large amount of trimming.
The difficulty here lies in the presence of a chamfer. Trimming so that even corners and joints are obtained is very difficult. The cut of the tile has to be sawn at an angle of 45 ° or, as the masters say, “cut down with a mustache”. For this reason, it is desirable to avoid such joints.
For example, if it is necessary to lay out a corner, a normal trimming is performed. Then the tile is laid so that the cut edge is turned inside the row, and the whole one is turned to the corner. If there is no chamfer on the lining, and such varieties of wild boar exist, then trimming it does not have any particular difficulties. True, such a tile does not look as impressive as chamfered plates.
Instagram vremyaperemen_nsk
Horizontal installation
Compliance with strict horizontal laying
Very often such lining is laid “in a row”. Different laying options are possible: with an offset of the next row by 20%, 30%, 50%.
It is extremely important in this case to maintain the same distance between the plates. Otherwise, the horizontal will “crawl” down and beautiful masonry will no longer work.
The size of the tile joint
The presence of a chamfer on the lining imposes special requirements on the quality of the joint. Convex plates draw attention to it. No matter what color grout is chosen, the tile joints should be perfectly even and as narrow as possible. The optimal gap width is 2 mm, especially if the boar is laid in the classical way without displacement.
Instagram nepotrebnaya
When laying standard cladding, a joint of 5 mm is considered normal. This helps, if necessary, to mask small errors in the size of the gap, their value can reach up to 1.5 mm. This is unacceptable for a pig, all flaws will be very noticeable. For the same reason, narrow crosses for seams should be prepared in advance, ordinary ones will be large.
![]()
Mounting accessories
If you need to install sockets, holders or some kind of buttons on the apron, it is important to choose the right place. It must be a horizontal seam. Moreover, the edge of the part should not overlap the chamfer, otherwise the product will “hang” in the air.
Instagram sama_sebe_designer
Boar apron
Marking vertical seams
The edge of the furniture or skirting board will not lie flat on the cladding if it hits the central part of the element. In order for the gap to be minimal and the fit to be tight, the plinth or cabinet edge must be on the lower or upper chamfer of the cladding. Therefore, it is necessary to accurately calculate the number of rows and, if necessary, make adjustments.
7 options for laying out the boar tile on the backsplash of the kitchen
Various methods can be used for laying the cladding. Consider the most popular.
![]()
1. Horizontally staggered or offset
Workpieces are laid in rows in a horizontal direction. In each subsequent row, the elements are shifted relative to the previous one. It is extremely important to maintain the exact laying horizontal, otherwise the rows will “move out”.
Instagram fine_interiors_en
Boar Apron
Instagram Studioardo_
kitchen apron
Instagram Remont_Vannoy
Horizontal styling
Instagram Santa_Keramika. Horizontal Laying
29 2 Horizontal without mixing
2. Horizontal without mixtures. This arrangement is also called stacked. It is quite simple to make and looks especially good with grout in a contrasting color.
Instagram lleohousel
4. Vertical without offset
Another stacking style, stylish and uncluttered. Elements are placed strictly one above the other. It is extremely important to observe the accuracy of the seams, which is within the power of an experienced tiler.
The layout looks good with grout in a contrasting color.
Instagram santa_keramika
Vertical laying
5. Diagonal
The elements are laid diagonally on the base at an angle of 45°. Pretty easy to do option. Very good for small kitchens, as it visually expands the space. Looks best with grout to match the material.
Instagram gretafoto_ru
Diagonal installation
6. Angled
This layout is also called zigzag or herringbone, because the facing is laid at an angle of 90° or 45°. It turns out a very beautiful pattern. It looks good with grout of any tone: both close to the color of the material, and contrasting.
6
Instagram tdimperia.
ru
Schemes for laying the boar
Instagram mashishka_dezigner
Schemes for laying the tile boar
Finishing materials
9 different options for laying boar tiles (for any interior!)
How to prepare the wall for installation
If you try, you can lay out the apron from the hog tile in the kitchen yourself. You should start with a thorough preparation of the base.
- We determine the place where the cladding will be laid. If there is an old finish, carefully and without residue, remove it. We clean the wall from dust and dirt, repair defects. We putty the uneven base so that possible differences are not higher than 2-3 mm per linear meter.
- Waiting for the wall to dry. Then we take a suitable primer and apply it to the base. We adhere to the manufacturer’s recommendations and, if necessary, apply several layers of primer.
![]()
- Marking the wall. Depending on the chosen layout, we perform several vertical or horizontal lines, or we outline a diagonal. During the subsequent installation, we will focus on these lines.
- We outline the lower edge of the future apron. We fix here a metal profile or a wooden rail. This is the support that will hold the first row of cladding, which is necessary until the glue dries.
Prepare the tiles before starting work. It is laid out on the floor, choosing the optimal sequence. If necessary, cut the elements and adjust them to fit one another.
Instagram kareltiler
Mounting the boar tile
Laying the boar tile on the apron in accordance with all the rules
For cladding, you will need an adhesive that is selected according to the type of substrate. It is sold as a dry mix. Dilute it immediately before starting work in small portions. The solution quickly hardens and becomes unusable.
Then proceed to laying:
- Starting at the bottom edge of the apron. We take a spatula and apply adhesive to the wall. With a notched trowel, carefully distribute the mixture so that a cushion of glue with small indentations is formed. Its dimensions should correspond to the area of 2-3 elements, no more.
- We take the tile, put it in place so that its lower edge “lies” on the support rail. We press it with our hand or tap it with a rubber mallet. The part must be securely held by the adhesive.
- Similarly, we lay the rest of the plates, placing plastic crosses between them, which regulate the size of the gap. After the next 10 elements are laid, we check the horizontal and vertical masonry using a plumb line or level.
When the mortar has set, ie about an hour after the row has been laid, remove any remaining adhesive from the backsplash. This can be done with a dry soft cloth. You can immediately remove the crosses and carefully clean the tile joints.
![]()
Instagram remont_vannoy_
Grouting the boar tile
Start grouting only after the glue has dried. Not earlier than the next day after installation.
The procedure is as follows:
- Take a soft plastic spatula. It is better not to use a black tool, it can leave marks that are difficult to remove. Gently rub the solution with a spatula into the gap between the elements.
- Unfold the spatula and embroider the seams. That is, as if we take out a small amount of grout from the seams with the corner of the tool. This gives them an attractive look.
- After the mixture has dried, about half an hour after grouting, take a sponge and remove the remains of the mixture.
It is necessary to wait until the grout is completely hardened, after which the apron can be washed and polished with a dry cloth. It remains only to remove the support rail, and the kitchen apron is ready.
![]()
Instagram sama_sebe_designer
Wild boar kitchen apron
5 original ideas for using tiles
There are a lot of beautiful and unusual solutions for which a wild boar is used. Let’s consider some of them.
1. Bright color
The tile with the simplest layout option will “sparkle” if you choose not the traditional white color, but any bright and attractive shade. Glossy finish, contrasting grout – all this enhances the effect. 9Ol000 square or rectangular. This solution allows you to painlessly solve the problem of decorating corners, since trimming may not be required. Especially stylish is an apron made of tiles of different types, but of the same shade.
Kitchen apron
3. Use of color rhythm
If you pick up elements of different colors and lay out a pattern from them, you get an attractive apron.
You can use sharp color contrast or smooth transitions. It will be interesting to “play” with glossy and matte details.
9
Instagram santa_keramika
Boar tile
Instagram roomba_interior
Kitchen backsplash
4. Alternating with smaller tiles
With a 2:1 aspect ratio of parts, it becomes possible to lay like a checkerboard. It looks beautiful as a monochrome apron with such styling, as well as a multi-colored decor of the working area.
Instagram gretafoto_ru
Kitchen apron
5. Laying tiles in mini format
The manufacturer offers a mini boar. These are small products with a standard aspect ratio. Available in various colors and designs. Any laying scheme is chosen. Due to its small size, the mini-boar looks very impressive, however, it is as difficult as possible to install.