How to restore floorboards: How to restore Victorian floorboards
How to restore Victorian floorboards
*Disclaimer alert!* this one was not a DIY, I repeat, this one was not a DIY! ‘Why not?!’ I hear you cry! ‘You are all about DIY Mel!’ Absolutely right – I love to save money whenever we can and do the job ourselves. I like the satisfaction of knowing it was my hard work that paid off. But Oli hates DIY and we have just remortgaged the house, taking a little extra borrowing to get some of the outstanding jobs done in the house. One of those jobs was to restore our Victorian floorboards. I would now recommend that if you can afford to pay someone to do this particular job, you should. Read on and I will explain exactly why.
The fully restored boards in the hallway. The skirting boards need repairing and we will be repainting the hallway to better suit the colour of the ‘new’ floors.
How the floors were
Our floors were not in a bad condition. The previous owners had put down solid wood floors, on top of overlay, directly on top of the original boards. They probably did this 15 – 20 years ago and it would have cost upwards of £3k, given the space the floors covered and that they had used good quality flooring.
Our floors before restoring the original Victorian floorboards
The main reason I wanted to restore our Victorian floorboards is quite simply because I love original boards. I love them with their beautiful imperfections, their knocks and bumps and their glorious wood grain. There were other reasons though. The floors were two inches higher than the kitchen. We have huge statement lights that hung a little too low. The floorboards were also quite damaged in places: scuffed, scratched, marked with paint. At the very least they needed sanding back anyway. So why not just get rid and sand back the actual floorboards?
I am also pleased to report that our solid wood floor was carefully removed and has been re-homed via a lovely lady I met on Instagram (@greenhousetodreamhouse) who will be laying it, sanding it, staining it and generally giving it a new lease of life. So be assured, no floorboards were harmed (or sent unnecessarily to landfill) during this project.
Pros and Cons of Restoring Victorian Floorboards
The obvious question was ‘why did the previous owners not just restore the Victorian floorboards themselves?’ and there’s all sorts of reasons, not least fashion. The solid wood floors they installed back in the early 2000s would have been really top of the range and all the rage. I expect this is the reason. However, there are other things to consider before you start ripping up your floor.
Restored and stained Victorian floorboards in the living room
The cons
What lies beneath
This is the biggie and this is the scary bit (scarier even than the film). And I will be totally honest, we got lucky. If you decide to restore your Victorian floorboards, you need to hope they are worth restoring! Our floorboards were in near perfect condition. You may not be so lucky. The floorboards could be rotten from water damage or woodworm. They may have been concreted over in areas. They may have been replaced for some reason and not be original boards at all.
All is not lost in this situation and damaged areas can be replaced with reclaimed boards, but it will make the job a lot more expensive. Think thousands.
Luckily only a few of our boards needed to be replaced, saving us a lot of money
Draughts
Personally this doesn’t bother me. I think old houses should be allowed to breathe and I own a stellar collection of woolly jumpers for winter. But whilst documenting the restoration on my Instagram account, I received dozens of messages warning me about how cold it would be. I have grown up in Victorian houses, complete with exposed floorboards and I have never noticed this, but clearly it is something that bothers a lot of people.
Again, there are ways to solve this potential issue. You can use strips called DraughtEx which slot in between the gaps in your floorboards. Gaps can also be filled with a mix of the sawdust and resin which then matches the colour of your boards and can be stained or otherwise finished as usual.
Noise
Some people worry about noise. Personally, I like the comforting pitter patter of my cat walking into the living room. We had wooden floors anyway so it isn’t that different (though there is no underlay so noise is no longer absorbed). I can say with my hand on my heart that noise is not an issue. It might be for you though, so something to consider.
The pros
They are beautiful
The restored Victorian floorboards are just beautiful. They make the house feel expensive (ironic considering the floors we ripped up would have cost more than we paid to restore our boards). Plus I feel that the craftsmanship of these beautiful old houses should be cherished and not hidden away under something less exciting.
Ultimately, this was the key reason for me. They just look so much better.
The natural grain of our floorboards is beautiful. These have been stained dark oak and finished with matte lacquer
You gain height
It might not sound much, but we gained an extra two inches ceiling height by removing the old floor. The rooms are therefore instantly bigger, they look grander and no one bangs their head on our hallway light anymore.
How to restore Victorian floorboards
First, you need to remove your current floor. I would suggest checking the likely condition of the boards underneath in an inconspicuous area first. The were able to check the boards in our under-stairs cupboard and also where the dining room met the kitchen by removing some beading that edged the existing floors. At least this should tell you if you even have boards at all!
First the solid wood floors and underlay are removed
Once your existing floor has been removed, you can assess costs much more accurately. I will come on to that.
Black paint / Bitumen
When you embark on your project to restore your Victorian floorboards, you will likely be met with at least a partially black floor. Many Victorian houses have pine floorboards. The edges were often painted black to improve the look of the boards that were visible beyond a rug in the middle of the room (this was before the time of fitted carpets folks). As far as I am aware, it was just a fashion to paint the boards black and I made the assumption they painted only the bits you could see to save money.
Thick black bitumen painted around the edge of our dining room
If you have oak floorboards, they are less likely to be painted black. Again, as far as I am aware, this is down to fashion and oak simply being a more attractive wood. I haven’t been able to find any information to the contrary, though I must confess I have not spent a great deal of time researching this! If anyone has more wisdom on this, I would love to know – please leave a comment!
Sanding any surface is not without potential health hazards, as breathing in fine particles is never good for you. This is even more so when we are considering lead paint or asbestos. If you have any concerns at all that your floor may have been treated with something containing asbestos, you should have it checked by a professional.
Another reason it is sometimes better to leave these things to the professionals is because they come with all the gear to keep their lungs safe and they clean up properly afterwards. Please don’t put yourself at risk to save a few hundred pounds. Too many DIYers are unaware of the hidden hazards an old home presents and it pains me to see people ripping up floor tiles fixed with asbestos-containing adhesives and stripping lead paint without any safety equipment.
Remember: Safety first, always.
Damaged boards
Chances are at least some of your boards will be damaged. These can be easily replaced using reclaimed boards purchased from a reclamation yard.
The boards should be cut away on a joist so that there is somewhere for the replacement board to be affixed. If you are doing this yourself (we didn’t) you will need to use a multi-tool to cut away the damaged board. Use a mitre saw or hand saw to cut the reclaimed boards to size and nail (don’t screw – the Victorians didn’t have electronic screwdrivers!) the boards to the joist.
Sanding the floorboards back
Keeping in mind what I have mentioned above about checking the safety of the surface you are sanding, the hard work can begin.
It took three full days (8am to 4pm) and five different types of sander to sand our living room, dining room and hallway.
The main areas were sanded using a Bona Professional Belt Sander. This is not as easy as it looks and takes a long time.
The edges were sanded with a Bona Professional Edge Sander.
The difficult bits were sanded using a random orbital sander, a sanding mouse and a corner sander for getting into – you guessed it – corners.
The floor was sanded three times: a coarse grit was used to get all the black paint off, then a medium grit to clean up the boards and finally a fine grit to leave them smooth. A buffing machine was also required to finish them beautifully.
View this post on Instagram
A post shared by Mel | Interiors & DIY (@littleterracedhouse)
Sanding the floorboards
Staining the floorboards
As we have pine boards, we opted to stain them. The fact is pine will go orange over time and although it looks lovely freshly sanded, this colour won’t last. We decided to go for a very dark stain to make a dramatic impact and contrast against our light decor. It is also a nod to the Victorians and their love of black paint.
We tested various stains before settling on Dark Oak Fast Stain from Mylands (the bottom option). Other options were (from top to bottom), English Brown Oak, Mid Oak and Light Oak)
The stain we used was Mylands Fast Stain in Dark Oak. This was a good option for us as it dries quickly and we couldn’t get all the furniture out of our rooms, so we needed to be able to move it around. It would have been completely impractical to use a slower drying product.
Dark Oak Fast Stain from Mylands
Priming the floorboards
Next, sealer was applied to prime the boards. Again this is fast drying – about 30 minutes to an hour on a hot day. It’s recommended to leave the sealer for about four hours to dry properly. You can walk on it with socks once touch dry.
The primer/sealer is applied after staining but before lacquer
Applying Lacquer to the floorboards
Finally, the floorboards were finished with three coats of lacquer. We originally opted for a satin finish and quickly decided this was too shiny. So we switched instead to a matte finish. This still has a very slight sheen (just a few percent) but looks more modern.
The matte lacquer finish provides a subtle, modern level of sheen
Should you restore your Victorian floorboards yourself?
To DIY, or not to DIY, that is the question.
I love DIY. And my preference was to save money and do the work ourselves. We only went professional because we could afford to this time and my other half just couldn’t face weeks of DIY, which is fair enough.
And having gone for the professional option, I am really glad we did. Here’s why.

com/reel/CRhJpbvqKiw/?utm_source=ig_embed&utm_campaign=loading” data-instgrm-version=”13″>
View this post on Instagram
A post shared by Mel | Interiors & DIY (@littleterracedhouse)
Preparing the floorboards
Doing it yourself isn’t as cheap as you think
When you actually factor in the hire costs of up to five sanders, a buffing machine, an industrial vacuum to attach to your sanders, the sandpaper sheets (you will get through a lot), the stain, primer and lacquer, you will see the costs really begin to mount up.
To restore our Victorian floorboards, we paid just over £2,000. This fee included all materials. Had we needed lots of boards replaced, the cost would have been greater.
If we had hired all those machines for a week, it would have cost about £500. We would then have needed to pay for all the sanding sheets additionally. The stain, primer and lacquer is an extra £100 or so. Replacement boards were a couple of hundred pounds. So basically we paid about an extra £1,000 than had we DIYed it. But….
We saved so much time
If we had done it ourselves we would have needed a full week off work (what a way to spend your annual leave) or we’d have had to spend a good few weeks doing it in the evenings (cue additional hire fees). It took a full five days to do our living room, dining room and hallway. Also….
There was no mess
I had so many warnings from people about this being a really messy job with dust everywhere. There was no dust. I have no idea why DIYers end up with loads of dust as I’ve never done it myself, but maybe it’s because our professional floor restorer attached an industrial vacuum to the back of the sanders. If you do go down the DIY route, keep this in mind and make sure you hire an industrial vacuum. This isn’t a job for your everyday hoover! And if you do DIY it, keep in mind that….
It’s much more strenuous work than you realise
Pushing a sander around looks easy enough, but it’s actually really hot, tiring work, especially in the summer. I know I would have come away from the week exhausted and totally over it. And finally….
The professionals do it really well
Hiring someone specialised to restore Victorian floorboards is worth it. I know that we have a better result for paying someone. Applying the stain evenly isn’t as easy as it looks. Cutting the boards to size isn’t as easy as it looks (in fact I don’t even think it looks easy when the professionals do it!) Filling the gaps is time consuming.
All in all, for us, paying a bit extra was totally worth it. I absolutely love the floors and the whole house feels more considered and luxurious. I am so pleased we did it and I am sure you will be if you decide to, too.
Reviving Wood Floors | Homebuilding
Homebuilding is supported by its audience. When you purchase through links on our site, we may earn an affiliate commission. Here’s why you can trust us.
(Image credit: Ben Field)
Varnished wooden floors are great in a busy family home: they’re attractive, easy to keep clean and pretty tough, too. Exposing the floorboards in older houses is still a popular alternative to carpet. The result, after a heavy-duty floor sander has been used, is a startling improvement and floors are often varnished without further work being done to the boards.
But floorboards were designed to be covered with a heavy layer of carpet and underlay, so draughts, squeaks and unsightly gaps are a common side effect of going back to basics. In this feature we’ll show you how to deal with these problems.
Heels, pets and toys mean scratches are inevitable in softwood floors, and while a little patina adds character to a wooden floor finish, it all starts looking rather ugly if the varnish peels away. This is particularly true if a coloured varnish comes off to reveal bright pine beneath. The simple solution is to daub some more varnish on top, but with a bit more preparation you can create a much longer-lasting finish. Overleaf, we’ll describe a proven procedure.
Talking of finishes, running a mop over your wooden floor may give the surface a temporary shine, but use a dedicated cleaning fluid followed up with a quality floor polish (try Bona or Stikatak) and you’ll get a finish so good, you’ll always remember why you chose wood.
FAQs
How Long Will it Take? It depends on the floor area, but for a standard 16² room you should be able to do this in a weekend Where Should I Buy Varnish? The market leader in top-end varnishes is Bonakemi (available through online dealers) — it’s water based and leaves the wood as close to natural as possible. A 4.5-litre bottle, which will be enough for two coats, each covering 16m², will cost you around £100
How Long Will it Last? It depends on the usage of the floor in question. A busy hallway might last five years in top-quality condition, a bedroom nearer ten. You’ll be able to extend the life of your wooden floor with regular cleaning, as the dust and grit wears down the varnish and gets into the gaps
How Much Will DIY Save Me? Professionals will charge in the region of £20-35/², meaning a typical 16² dining room might cost in the region of £400 (without the top-of-the-range varnish we mentioned above). If you have the tools (see below) you should be able to do this job for £150.
Tools & Materials Needed
- Wood plane
- Electric sander
- Brushes
- Hammer and nails
- Screwdriver and screws
- Wet and dry sandpaper
- Gapseal (0800 088 7311)
- Strips of wood for filling
- Replacement floorboards
- Wood dye
- Varnish
- Drill and bits
- Wood filler
- White spirit and cleaner polish
Step-by-Step Guide
(Image credit: Ben Field)
1. Make good simple gaps. Gaps between floorboards allow draughts and dirt through. The traditional solution is to force papier mâché into the gaps. This is fine, and particularly effective if you mix some wood stain into the papier mâché so it matches the colour of the boards. The modern solution is to use a product like Gapseal. Position it over the gap and then push in with an object like a credit card, forming a V-shaped barrier between the boards.
2. Fill in bigger gaps with new wood. Coat both sides of a suitably sized piece of wood with wood glue and then tap it in between the two boards. Once the glue has dried, plane the top off so it comes flush with the board before sanding and treating with varnish. If any of the boards look like this, you’re much better off…
(Image credit: Ben Field)
3. …cutting a new board section from scratch and replacing the worn-out piece entirely. You’ll find that a new piece of board will differ in colour from even a recently stripped board coated in clear varnish. Dye to match.
4. Eliminate squeaks. One reason that they may have developed is that the old floor covering would have helped to both hold down loose boards and deaden the sound of any that did start moving. Before sanding the floor you probably knocked down the nail heads a bit with a punch to stop them tearing the sanding sheets to shreds. This sometimes loosens the grip of the nail, the board gets loose and the squeaking starts. The obvious solution is to bang in another nail or two to secure the board but you’ll get a much more secure (squeakproof) fixing by drilling a small pilot hole through the board and into the joist and following this up with a screw. If you countersink the pilot hole with a larger drill first, the screw head will disappear below the surface when it is tightened up.
(Image credit: Ben Field)
5. Repair varnishes. They do provide a tough finish, but over time the constant battering from shoes, toys and scrabbling pet claws causes this sort of damage.
6. To repair, start by rubbing down the area with 400-grade wet and dry sandpaper (used wet) until the edges of the scratches have feathered out and the area feels smooth. Wipe away the residue and clean with white spirit.
(Image credit: Ben Field)
7. Brush a coat of floor varnish onto the damaged area, lifting the brush gradually away from the surface as you meet the undamaged section of the board. This helps to blend the repair in. If you are using a coloured varnish, compare the colour of the repaired section with the rest of the floor once it is dry. It’s tempting to add extra coats, but a coloured varnish will get darker with every coat, so you’re better off going over the repair with a couple of coats of clear varnish.
8. Deal with scratches. Deeper ones in the wood should be filled with a little wood filler before being rubbed down and treated as in the previous step.
(Image credit: Ben Field)
9. Make good any ‘cupped’ edges. Softwood floorboards that were designed to be exposed from the outset probably won’t have had the attention of a floor sander and are likely to have developed a small amount of curvature across the width of the board. This ‘cupping’ is attractive and adds character, but it does expose the edges of the floorboard to extra wear. Damage like this will usually occur in busy areas. Just treat these areas, as shown in the next step, rather than the whole of a cupped floor.
10. Use a sanding block or an electric sander to take the high point off the edges of a cupped board that’s showing wear. In some cases the edges of cupped boards begin to splinter, so wearing gloves is a sensible precaution. You’ll only need to do a couple of passes with your sanding method of choice to bring the edges down. After that, finish off the board as described in step 7.
Homebuilding & Renovating Newsletter
Get the latest news, reviews and product advice straight to your inbox.
Thank you for signing up to Homebuilding. You will receive a verification email shortly.
There was a problem. Please refresh the page and try again.
By submitting your information you agree to the Terms & Conditions and Privacy Policy and are aged 16 or over.
How To Sand And Restore A Victorian Wooden Floor — Alice de Araujo
Major DIY Projects, Before and After, Period Property Reno TipsAlice NestFlooring, Renovation, Victorian House45 Comments
Major DIY Projects, Before and After, Period Property Reno TipsAlice NestFlooring, Renovation, Victorian House45 Comments
It’s funny to think that less than two years ago, we didn’t have a clue how to refinish a Victorian floor. Sure, we’ve done some pretty fierce DIY projects in the past. For example, installing a scarlet gloss kitchen in our first house (that’s a link to my very first blog post, by the way!) that looked like this:
(It used to look like this):
And transforming our first bathroom from this:
To this:
And our first garden from this:
To this:
So, DIY we knew. Tiling, carpentry, plumbing, landscaping – no problem. But renovation? Sensitively and carefully restoring the elegant bones of an older property? We had no clue. I remember talking to the guy from the local hire shop about floor sanding. “D’you think we could do two rooms in a weekend?” I asked hopefully. “Depends how much prep work you need to do, love”, he replied. Err, prep work? What exactly did we need to prep?! Yeah. Clueless.
Having now restored the flooring in three decent sized rooms, plus three staircases and three landings, we’ve pretty much figured out how to do it. So, here’s the Simply The Nest guide to sanding and refinishing Victorian wooden floors that I wish I could have read two years ago. If you have any tips or advice to add, please go ahead and leave a comment!
Choose the right power tools
You have a couple of options here – either hire a floor sander from somewhere like HSS Hire, or buy your own hand-held belt sander. Here’s some advice on to decide which option is right for you.
- Are you sanding one room only, or a small number of rooms?
- Are you able to dedicate an entire weekend (or week) to getting the job done?
- Are your floors a nice even height across the room, ideally parquet or tongue and groove?
Then you should probably hire the equipment. You’ll need a belt sander and an edger.
Underage sanding assistant
Alternatively…
- Do you have quite a few rooms to do?
- Do you have kids or other commitments that make it harder to devote significant chunks of time to DIY? Is it easier to break projects down into small chunks and do a couple of hours at a time whenever you can fit the work in?
- Are your floors uneven? Our plank floors are all slightly different heights, and we found the hired belt sander only sanded an inch at a time on each side, even though the belt was nearly a foot wide.


Then you should seriously consider buying your own sander.
We initially hired a floor sander from HSS Hire, but it just didn’t work on our uneven floors. It also worked out insanely expensive – the hire charge was fairly reasonable, but we spent almost double that on sandpaper. Due to the design of the big floor sanders, the belts rip extremely easily and we got through LOADS.
So we did a ton of research and eventually bought a Makita belt sander and a DeWalt detail sander. You can read more about why we chose the Makita here. We buy sandpaper for each sander on Amazon for significantly less than HSS Hire charged us. And we can use the sanders for as long or as little as we like, with no time pressure to get the job done by the end of the hire period. To give a cost estimate, we paid around £200 to do the first pass only of two rooms. We then paid around £300 for the two sanders plus approximately £20 in sandpaper per room to finish these rooms (two more coats), do a third room, and then the entire three storey staircase. So it’s worked out much, much cheaper for us to buy our own equipment.
It’s not that dusty
Honestly, it’s not. OK, so it’s dustier than sitting on the sofa with a box of Milk Tray watching Strictly, but it’s much less dusty than the horrible mess created through brick or plaster work, or the nasty prickly dust that goes absolutely everywhere when you’re cutting Celotex insulation boards and really, really hurts when you inevitably get it in your eye. And whether you hire or buy a sander, they mostly all come with attached dust bags that contain the worst of it. Some even connect to your vacuum cleaner.
To contain the dust, all you need to do is tape off the room you’re working in. When you’re ready to start, go in the room (take a bottle of water with you, its thirsty work!), close the door behind you, and then use masking tape to tape all the way round the door-frame on all four sides (even if the gap is minimal). Tape the keyhole too, if there is one.
If you plan to repaint the woodwork on the doors or frames, then you can go ahead and use regular cheapo masking tape. If you’ve already painted the woodwork (which isn’t ideal to be honest, as you’ll inevitable ding the skirting boards while sanding, so you’re best off leaving this till last) you should use Frogtape to make sure you don’t accidentally pull the paint off when you remove the tape. When you need to leave the room for a break, wait five minutes for the dust to settle, and ideally remove dusty clothes (shoes at the very least) before leaving – and of course you’ll need to tape the door up again from the inside when you go back in.
It’s a good idea to take a bin liner inside a plastic bag in with you. When you’re finished, take the clean bin bag out of the now-dusty plastic bag, chuck your dusty clothes inside the bin bag, and carry it through the house to the washing machine. You don’t want to be wandering around in dusty clothes as they’ll be saturated with 100 year old dust.
If you’re working in an open area like a staircase or hallway, it’s probably easiest to clear the house of inhabitants for the day and tape up every single room from the outside. If you’re doing individual rooms, we find the dust is imperceptible outside the room being sanded, but of course it’s your call as to whether you want everyone out while the work takes place.
All old wood is beautiful
Don’t be alarmed by what you might find when you pull the carpet up. This is how our floors looked originally on the stairs:
Terrifying. Yet this is how they look now:
You’d think we’d laid brand new flooring. Here’s an example of a corner on the landing where we found a dodgy patch job using newer wood. We had a bunch of random reclaimed planks in the cellar – some from our floors, some we rescued from neighboring skips. I created a patchwork of planks to fit:
Don’t they look awful? All horrible different colors and nasty and splintery. Well, here’s how they looked after sanding:
And after oiling:
Yep, they’re beautiful. And honestly, you don’t remotely notice the different plank lengths – we have quirky patch jobs and joins all over the place, and it just adds to the charm and character. I thought we’d have to replace half the floorboards but we’ve salvaged 95% of them, even though some are cracked and chipped with knot holes (that Eva likes to post things down) and oddly spaced gaps and random cuts from when the central heating was installed. Once they’ve been sanded and oiled, they just look gorgeous.
Prep work takes a really, really long time
At least as long as the actual sanding, we find, although of course it depends on the state of your floors. Here’s what you have to do.
Remove and dispose of the current floor covering – we have carpets, underlay, carpet tack strips and in some cases, old newspaper. You absolutely must wear sturdy shoes for this (and all) floor renovation work – standing on an ancient floor nail is no fun at all, believe me.
Penny casually ignoring the shoe-wearing rule
If you find paint on the floors, whether splotches or painted planks, and your house is older than, say 1980, you’ll need to test the paint to see if it’s lead, using a simple test kit. If the paint is lead, you’ll need to use a product like Homestrip to remove it safely – sand it off, and you’ll send large amounts of poisonous (and invisible) lead dust into the air, which is extremely harmful if breathed in or ingested via skin contact, especially for children, pets and pregnant women. Seriously, don’t risk it. Using a heat gun is even worse because then you release toxic vapours throughout the house. You can read more about the dangers of lead paint here. Scraping it off safely using Homestrip will add potentially several days of effort to your project, but it’s the safest way of dealing with lead paint.
Next, pull up as many staples as you can find using a staple removing tool, and either hammer in or pull out as many nails as you can find. Our sander is powerful enough to sand the heads off nails so if you miss a few it probably won’t be a disaster, but it’s likely to rip your sandpaper and of course you risk damaging the sander. This step can take several hours – in fact we do it over the course of a few days as it’s easy to miss nails and staples depending on the light and how tired you are!
You’ll probably need to do some repair work. Squeaky planks will need to be screwed into place on the joists (you’ll be able to see where the joists are through the small gaps between the planks). Just use a regular screw (not a nail – you may need to be able get the floorboard up easily at some stage) and countersink it with a countersink drill bit so it sits flush with the wood.
You may need to glue some split planks together. We use wood glue plus plastic chocks wedged between the gaps to hold the wood in place while it dries. You can also cut new pieces of wood and glue them in place.
A repaired board in Natalia’s room
Sometimes, we use wood filler. It’s not ideal because although you can oil over the top of it, it does take a bit of artistry to blend it in with the original plank. But it’s possible, if you need to fill a hole in the wood.
You may need to replace entire planks. It’s hard to find reclaimed wood that exactly matches your width and thickness, although you may find a supplier who will cut it to size. You can also plane or cut it yourself. You can replace with new planks (we did this in Eva’s room) – the oil sits on the new wood differently at first, but after a year of solid toddler-use it’s starting to look nicely dinged up, so I’d say new wood is definitely an option, although our preference now is to repair the original planks by any means possible – I find that cracked, chipped wood with odd cuts is really more beautiful once refinished than perfect new wood.
You’ll need clean out the gunk between the planks. It’s totally gross but really quite satisfying. A flathead screwdriver is good for this, or a credit card. Once you’ve got the gunk out, use a folded piece of sandpaper (40 grit or thereabouts) to sand any splinters from the sides of each plank.
And you’re done!
Time to sand
You’ll need to wear goggles, a proper respirator, ear defenders and gloves. Invest in the good DeWalt stuff – you don’t want goggles that mist up every two minutes. By proper respirator I mean the Darth Vader kind with replaceable filters, not the cheapo hospital kind. They’ll work to an extent, but having tried both I’ll never use the cheap ones again – the difference in ease of breathing and comfort both during and after is remarkable. I find my arms get shaky after half an hour or so, so I make sure to take regular breaks.
We do one pass of 40 grit, followed by one at 80, and a final one at 120. I wouldn’t really recommend going much smoother than that, or you may find yourself slipping around on the wood as if you were on an ice rink. The first pass takes the longest as you’re sanding years of grime from the floors – the other two coats are much faster. It won’t be super-smooth after 40 grit, but 80 and 120 will take care of any splinters. Use the edging or detail sander to take care of the edges, corners, and any stubborn spots that the main sander can’t deal with.
Progress on the top landing – carpets up and first pass at 40 done – edging still to do and lead paint to be removed
You don’t have to get the wood perfectly white, especially if you’re planning to use a tinted finish. In fact, a few grey patches here and there will add character once the oil’s down.
Once you’ve finished with the main and detail/edging sander, use the folded sandpaper again to sand inside the edges of the planks. You can use 80 this time, rather than 40.
Finishing the wooden planks
If you plan to use the room shortly after sanding, you need to get oil or varnish on it straight away. Otherwise, it will get dirty and you’ll need to sand it again before oiling. We let a year elapse between sanding our spare room and oiling it, and had to do another 120 coat to get the accumulated dirt off.
First, you need to clean the floor thoroughly. Vacuum every inch, ensuring you get every last speck of dust and Jack Russell hair from between the cracks and under the skirting boards. Then, use a soft brush to sweep it by hand. Then, use a damp towel to clean it. You’ll still need to re-clean each plank just before you oil it because some dust from the air settle on it, but the vacuum/sweep/wipe method will deal with most of it.
We use Osmo Polyx Oil on our floors. Accept no substitutes – this is the industry benchmark product and it’s amazing. You can read more about our love for Osmo here. We use the tinted oil in Amber 3072 – it’s a warm honey color that glows beautifully in the sunlight. We occasionally need to repair the odd patch that gets scratched by the dogs so it’s not a zero-maintenance product (although it meets the same durability standard as Ronseal varnish) – but for us, the beauty of the finished floors makes up 1000 over any inconvenience of occasional refinishing. Each tin costs around £60, but I calculated that eventually worked it at £2.50 per metre, which is cheaper than a less-expensive product that you need to use more of.
We use big Purdy brushes to apply the oil, and wear proper respirators. I prefer to have the window closed while applying oil as I find dust comes in from outside and sticks to the wet oil. We do one tinted coat followed by two clear satin-matt coats, with 24 hours of drying time in between each. It then takes a month to cure and harden fully, although I’d advise putting felt pads underneath your furniture to avoid any unnecessary scratching hazards. We do all our oiling while the kids are in the house – either with the door closed or, if working in a communal area, while they’re asleep at night with their doors closed. This is, of course, down to personal choice.
I’ve written before about the specific technique for applying Osmo oil, but effectively you need to buff it into the wood. It’s not a stain, and you don’t paint it on. If you can see brushstrokes in the oil, you’ve put too much on. I do less buffing with the clear coat, however – the color looks gorgeous when buffed in, but the clear can be painted on to a slightly greater extent.
Phew, I think that’s it. Have I forgotten anything? Any tips, advice or questions? Let me know in the comments and I’ll update the post accordingly.
Happy sanding!
Alice Nest
0 Likes
Beginner’s Guide To Refinishing Hardwood Flooring — Inner Space Flooring
Guide created by the experienced team at Inner Space Flooring. With many years of supplying and installing quality Hardwood flooring and Parquet flooring to clients within their homes or commercials spaces throughout Birmingham, Solihull and the West Midlands.
Need to discuss a wooden floor project, or perhaps a wooden floor refurbishment?, the team can be contacted here
VIEW FLOORING
No matter how much you look after your hardwood floors, it can’t escape the everyday wear and tear that flooring experiences. If you have children or pets, then your floor is likely to suffer some scratches, and if you have a high volume of traffic, then your floor will undergo a lot of pressure over time. Even sun exposure can change the colour of the wood.
Though regular maintenance and cleaning can prolong the original beauty of your hardwood floors and keep them in good condition, they will, eventually, need to be refinished.
Refinishing a floor is something that you can do yourself if you have the time or are on a budget, but we would always recommended that you use a professional in order to ensure that it is done correctly the first time.
Either way, if you have invested in hardwood flooring, or are considering doing so, then you should make sure that you are well informed on the process of refinishing; from why it’s necessary to how it’s done…
Why do hardwood floors need refinishing
The purpose of refinishing hardwood floors is to restore the planks of wood back to their original colour and condition. This may be because you are planning on reselling your home and want it to look good for potential buyers, or you may just reach a point, after a number of years, where your hardwood floors need a bit of TLC.
The actual act of refinishing hardwood floors is the sanding the surface to remove the layer of worn down, scratched or damaged wood to reveal a fresh new layer of wood and then re-applying a new coat of lacquer or oil.
It will be clear when the time comes to refinish your hardwood floors as there are a few telltale signs. If your flooring has a large number of scratches, boards are starting to grey or lose their colour, or there has been water damage of some sort to the wood, then it’s time for a refinish.
Another common situation that new buyers may find themselves in when they have purchased a period home and which leads them to invest in a refinishing service, is the discovery of aged hardwood flooring under carpet, vinyl or newly installed wood flooring.
With a little work, the flooring can be made to look as good as new, instead of investing in the time and cost of getting brand new hardwood flooring installed.
Hardwood floors should not be refinished too often – and they shouldn’t need to be if they are well-maintained. Each time hardwood floors are refinished, a thin layer of the surface of the wood is removed which means that, eventually, the structural integrity of the wood will be compromised after being refinished a number of times.
How many times you can refinish your hardwood floors will depend on a few things; one of those being whether the floor uses engineered wood or solid wood. For example, solid 20mm hardwood floors can be refinished up to ten times before they need replacing, making them one of the longest lasting types of wood you can use on your floors.
On average, hardwood floors only need to be refinished every 7-10 years, so, if you do the maths, solid hardwood flooring can last at least 70 years from the date of installation which is more than the lifetime of a homeowner.
How to prepare your hardwood floors for refinishing
Whether you are doing the whole process yourself, or hiring a professional, there are steps that need to be taken to prepare your floors for refinishing.
In fact, most of the job is the preparation and it can take a whole day to get your floors in the right shape for the actual refinish.
You should start by cleaning your hardwood floors to remove any dust, dirt or stains – this will make it easier to carry out a thorough inspection of the floors which is what you would need to do next.
Following the inspection, you should fill any cracks, replace or repair any damaged boards and make any exposed nails or protrusions flush with the surface of the flooring. This will prevent any damage being done to the tools and equipment that will be used to refinish the floors.
The next step is to sand down the flooring, which is where many people feel it’s best to hire a professional as it does require the use of large machinery.
The room being refinished should be closed off to keep any dust or debris within that space and away from the rest of the house.
You should run a belt sander over the floor up to five times with increasingly finer grit sandpaper. It’s really important to be careful not to hold it in one place for too long, otherwise it will make the floor uneven.
Any tight/small or hard to reach areas should be tackled with an edge sander or sandpaper.
Finally, you’ll need to sweep and vacuum the floor to remove the dust caused by sanding. Once the surface coat has been removed you must avoid any water on the boards at this can cause deep stains which cannot be removed. The floor then needs to be buffed, which cleans the floor, as well as relaxes the wood fibres ready for final coat of lacquer or oil.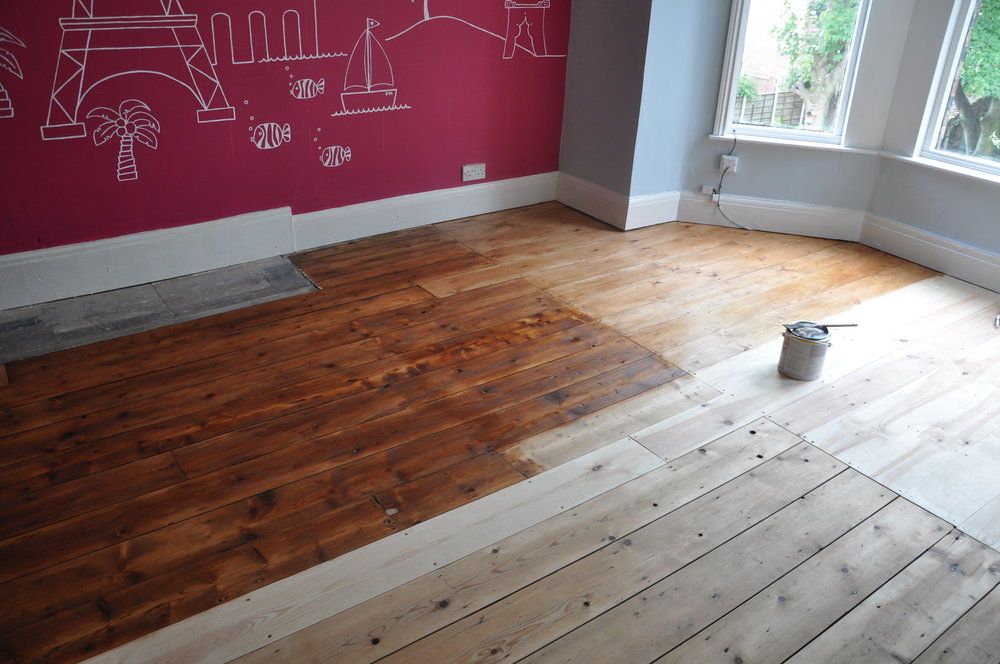
How to refinish a hardwood floor
After you have prepared your hardwood floors, by sanding, cleaning and buffing, if you want to change the colour of the floor, now is the time to apply a stain to the wood. Pick a stain that best suits your needs and allow 12 hours to dry once it has been applied before you add the finish.
If applying a final lacquer, we recommend a primer first, which helps the lacquer to stick to the surface of the floor. Each coat of lacquer takes up to four hours dry sufficiently before the next coat is applied. It will then be another 24 hours (whilst the finish dries) before you can bring your furniture back into the room and start using the hardwood floor again.
Though there are a lot of steps involved and it can take a couple of days, the process of refinishing your hardwood floors is worth the time and effort. It will lengthen the life of your hardwood floors and restore their beauty and, as a result, increase the value of your home.
At Inner Space Flooring, we don’t just supply and install hardwood flooring, but we also offer an expert hardwood floor refinishing service. If you don’t feel confident enough to refinish your wood floors yourself, or you just don’t have the time, then our professional service is your best option.
We can do everything from preparing the floor to advising you on the best stain and finish for your floors, so all you have to do is sit back and wait for the room to be ready.
Call us now on 0121 684 4772 to find out more about this service. Or use our contact form
Rob Patwary,
Director of Inner Space Flooring
Rob Patwary7 Comments
0 Likes
Insight: Restoring Historic Wooden Flooring – The Correct Way
Imagine if you will an exquisite Georgian bureau – think about its colour, the dinks and the scratches all of which tell a thousand stories about its past, how it’s been used and how it’s been treated. The intrinsic value of the piece is in its character.
If you owned such a piece of furniture you would preserve it, treat it with the utmost care and restore it sympathetically, likely with the help of an expert. The one thing you would probably not do is take a sanding machine to it. And yet, that is what often happens to period wooden floors; sadly the first instinct of people when faced with dirty, marked wooden floorboards is to sand them, removing layers of paint, varnish and wax quickly and, in the process, also destroying all traces of the floor’s history and character.
I am passionate about changing the way people treat the restoration of period wooden floors. I approach the restoration of historic wooden flooring the same as you would a piece of antique furniture to preserve every undulation and character mark, and therefore maintain an important part of a building’s history.
I have been exceptionally fortunate to have worked on the restoration of beautiful wooden flooring in some of the country’s most prestigious historic buildings – see here for examples of some of my favourites.
It really is not at all necessary to sand wood, whatever state of (dis)repair it is in. I’m often asked if there is anything I wouldn’t tackle and the simple answer is “no, there isn’t”. There is nothing that can’t be conserved, restored or replaced using non-aggressive traditional methods.
The restoration process is a painstaking but very important one. I work only by hand, using traditional tools and methods. Initially I decide whether any of the boards need to be replaced – typically a room will need a small percentage of replacement boards. I always use reclaimed wood, which has a good patina and has not been previously sanded, as a replacement. Finding wood that has never been sanded isn’t easy but it can be done and I always take the time to find the best patina for each floorboard I’m working on. When I can, I prefer to repair a board and this is possible if, say, it has only a few small cracks at one end.
The main part of the restoration is removing the existing finish – whether that’s paint, varnish or carpet adhesive. Each project requires its own sympathetic cleaning method, all of which rely on the use of hand tools to prevent any damage to the wood.
To begin, I gently remove the first layer, taking care of any carpet tacks or staples as I go. Once this top layer is removed, I repeat the process over and over again, one layer at a time, slowly slowly until I get to the bare wood. I then use a soft nylon abrasive to remove any residual remnants of the finish that may still be left on the floor.
I liken this part of my job to being an archaeologist working on a dig site. The work has to be done slowly, methodically and carefully so as not to cause any damage. If this is all done correctly, the bare wood should feel silky smooth to the touch whilst still displaying every dent and scratch.
You will always see a lot of reference to patina on my website and in my writing, and for me, retaining this is crucial. If you think of a 400 year old antique oak wooden armchair, with the ends of its arms worn down from the dozens of hands that have held onto them over the years, these are the marks that give the chair its character. It’s this type of wear that we refer to as patina and it is this, often caused by canes, shoes, instruments or machinery that I seek to preserve in the wooden floors I restore.
After the floor is properly cleaned, I apply stain, wax or acrylic floor lacquer according to the client’s specification. Every finish I apply is reversible, the golden rule of any conservation or restoration project. For example, I never use man-made glue as it can’t be removed; instead I use animal glue which is easily removed with hot water.
Of course, some projects are more complex than others. Sometimes I work on projects where all the floorboards have shrunk, leaving gaps between each one of them. This often occurs because the wooden boards were laid before buildings had central heating, when houses were damper and had a higher moisture content. Central heating removes a lot of moisture from the air and this drier atmosphere impacts on the boards, causing them to shrink. Once moisture levels have settled, however, and the heating system is retained, there should be no further shrinkage.
One way of dealing with the problem of shrunken boards is to put fillets in between the gaps. This is, however, only a short-term fix as, over time, these tend to pop out as the wood expands and contracts. How I address the problem, whilst time-consuming, is a long-term fix. I re-lay the floor by taking up each board and pushing it to one side thereby reducing the size of the individual gaps. Once each original board is re-laid, the room has one large-ish gap down one side, which I then re-fit using reclaimed wooden boards.
The restoration of wooden flooring is one of the favourite parts of my job. Each floor represents a time capsule, a piece of history, that helps us to unlock the secrets of a bygone age.
Tags: acrylic, animal glue, character, historic, history, patina, sanding machine, stain, wax
Restoring Wooden Floorboards — detailed guide — 9 Easy to Follow Steps
Written by Construction Experts in Blog,Floors,Remodeling Last Updated May 4, 2022
Varnished wooden floors in a period house are tough in character, easy to clean, and look really attractive, which is the reason they work great in any busy family home. It is still popular to expose the floorboards instead of carpeting in many of the older houses. So restoring floorboards is a good way to go. Using a heavy-duty floor sander brings about a startling improvement when restoring wooden flooring and most of the time, the heavy-duty floor sander results in the floorboards being finished enough for use, without requiring any further work.
Restoring Floorboards
But remember that these floorboards are meant to be covered with a thick carpet layer and some underlay. Therefore, without any carpeting, squeaks, gaps, and draughts are exposed. We provide below some useful tips on dealing with these particular problems when restoring wooden flooring.
You cannot stop scratches on softwood floors as toys, pets, and shoes are going to make scratches, no matter what you do. Also, even though the patina adds to the finishing of a wooden floor, it looks really bad when the varnish is peeled away. The look is especially bad when the colored varnish is peeled off, revealing the pinewood lying underneath. Most of the time, you would be inclined to put some varnish on the particular area. But use the process below, and this will result in a much longer-lasting wooden floor finish with a little bit of more preparation.
A tip – do not use a wet mop to clean and get a temporary shine on the wooden floor. Instead, use a dedicated cleaning fluid and follow it with a quality floor polish (such as Bona or Stikatak). The finish is much better and far more long-lasting.
A few points to note:
- Time to finish the polishing depends on the floor area but to give you an idea; a standard 16 x 16 room would be completed in a weekend.
- One of the best varnishes is Bonakemi. This water-based varnish provides a finish very close to natural wood. A 4.5 L bottle of this varnish will set you back by around £100, and this quantity is enough to have two coats with each coat covering an area of 16 m².
- The durability of the finish depends on the usage of the wooden floor. A bedroom may stay good looking for approximately ten years, whereas a busy hallway may last only five years. To extend the life of the flooring, you need to clean it regularly as dirt and grime are one of the biggest reasons for varnish wear-off.
- Check your attic – while modern houses will usually need boarding over before you can use them, period houses often have floorboards – and sometimes fireplaces! This can be a fantastic space to utilize – a good loft ladder (I recommend Fakro) can provide access if there is no room for stairs.
- Doing all of it yourself will also save you a ton of money. Normally, a 16 x 16 room will cost you approximately £400 (without the varnish) whereas you will be able to finish the same area for approximately £150 with the help of the below tools.
- Once you’ve restored your floorboards, it’s important to choose the right vacuum for them, to minimize the risk of damage. This is so important that we would go as far as to say that a separate vacuum is advisable – especially if the one you have already has rough plastic or vinyl bristles. The Furniture Connoisseur has produced a really good guide to choosing a hardwood floor vacuum with reviews of many of the top brands.
 A bedroom may stay good looking for approximately ten years, whereas a busy hallway may last only five years. To extend the life of the flooring, you need to clean it regularly as dirt and grime are one of the biggest reasons for varnish wear-off.
 The Furniture Connoisseur has produced a really good guide to choosing a hardwood floor vacuum with reviews of many of the top brands.
Restoring floorboards or Wooden Flooring: Necessities
- Brushes
- Drill and bits
- Electric sander
- Gap seal
- Hammer and nails
- Replacement floorboards
- Screwdriver and screws
- Strips of wood for filling
- Wood filler
- Wet and dry sandpaper
- White spirit and cleaner polish
- Wood dye
- Varnish
- Wood plane
These floorboards have been filled using Old Pine Sliver, another alternative to traditional filler – http://oldpinecompany.co.uk/
Restoring floorboards: a step-by-step guide
- The first step is to fix the smaller gaps. Because the gaps allow the dirt and draughts through, which lead to wearing down of the varnish, it is important to take care of these. There are two ways to do it. The traditional way is to use papier mache to fill the gaps. If you mix some color into this to match the color of the floorboards, the traditional way is a very effective way of filling in the gaps. The other solution is to use something like Gapseal. You just need to place it over the gap and then push it through the gap with the help of a very thin strip, like a credit card. This will create a V-shaped barrier in the gaps which will prevent any dirt or grime from getting in.
- If there are big gaps, these need to be filled in with wood. Take a piece of wood that fits in nicely in and cover both sides of this piece with wood glue. After placing it in the gap, tap it lightly to fix it completely between the two boards. Now, wait for the glue to dry off. Take a planer to flush the new piece with the existing floorboards and then sand the new section of wood. Now treat this with varnish, and your gap is filled up completely.
- If there is a completely worn out piece in the floorboards, use a fresh piece of wood to fix it. You will need to use a matching dye to make it look similar to the existing floorboards’ color.
- To eliminate the squeaks, you will need to use a drill bit to drill a pilot hole into the joist through the wooden board. Follow this pilot hole with a screw. Now tighten the screw to fix the board. This will result in a much more secure board as compared to banging in nails directly into the floorboard.
- Varnish provides a hard-wearing durable top finish to the wooden floor, but it does get damaged with constant usage of toys, pet claws, and shoes over time. To repair the varnish, you need to follow these steps.
- First of all, the area needs to be sanded with 400 grade wet and dry sandpaper (used wet). This needs to be done until the area feels smooth. Now you just need to clean the residue and put the white spirit on the surface.
- Now start brushing the varnish on the damaged area. The polishing should be done in a way that lifts the brush away from the damaged area when it meets the undamaged section of the board. Brushing in this way will help in blending the repaired area. You need to be extra careful with colored varnish as adding more coats of colored varnish will result in darker colors. Therefore you need to be careful.
- It is very easy to take care of the scratches on the surface. Just take a little bit of wood filler to fill in the scratches. Then just rub them down and treat as described in the previous steps.
- If there are any cupped edges, those need to be made good. Sometimes, softwood is warped and forms a cup shape in the middle. This cup shape leads to a bit of curvature across the board. This also leads to exposing the floorboard edges. To take care of these cup edges, you just need to use an electric sander to sand down the edges. It will just take a couple of passes. Once you are finished, just use the varnish to finish it. That’s all for Restoring Floorboards Restoring Wooden Flooring. Comment below and let us know your opinion! Check out our article – Restoring a Tiled Floor.
 If you mix some color into this to match the color of the floorboards, the traditional way is a very effective way of filling in the gaps. The other solution is to use something like Gapseal. You just need to place it over the gap and then push it through the gap with the help of a very thin strip, like a credit card. This will create a V-shaped barrier in the gaps which will prevent any dirt or grime from getting in.
 You need to be extra careful with colored varnish as adding more coats of colored varnish will result in darker colors. Therefore you need to be careful.

Go Here For a Wood Floor Restoration Course!
Period house wooden floorboards – the finished item
Image source: RealEstateCom.Au, The Wood Flooring Specialist
Recent Posts
link to 11 Best Wood Fillers For Decks – Detailed Buyers Guide
11 Best Wood Fillers For Decks – Detailed Buyers Guide
Wood filler is a crucial part of woodworking that helps you repair wood professionally.
You can use it to repair minor defects such as scratches, holes, cracks, etc.
The primary purpose of…
Continue Reading
link to Deck Sealers for Pressure Treated Wood – 9 Best Products
Deck Sealers for Pressure Treated Wood – 9 Best Products
Just like many other tools, chemicals and equipment are a critical concern for casual and professional woodworkers, focusing on getting top-quality deck sealers can become equally challenging for…
Continue Reading
How to repair a wooden floor yourself
Despite the fact that wooden floors are quite strong and reliable, over time they have to be repaired, and sometimes even completely replaced. The fact is that wood, no matter how moisture resistant they may be, is hygroscopic, therefore it swells at high humidity. At high temperatures, the wood, on the contrary, gives up moisture and dries out, which leads to the formation of cracks between the floorboards.
Repairing a wooden floor can be associated with the appearance of rot in the boards or due to the appearance of dents and scratches on their surface. Mechanical damage is usually associated with rearranging furniture and walking on the floor in shoes with thin heels. It is not uncommon for a floor to deteriorate as a result of spilled chemicals, resulting in the need for a full or partial restoration of the surface. In old houses, there are such dilapidated floorings that it’s scary to walk on them, and in this case you can’t do without a major overhaul.
Is it possible to repair a wooden floor with your own hands and, if so, where should you start? Such questions are most often asked by people when faced with the above problems. Read this article to the end and you will learn how the process takes place, which means you can decide whether to repair the flooring yourself or entrust the work to a specialist.
Floor diagnostics
Even if you have identified all the surface damage, do not rush to start repairs, because it is possible that, in addition to visible defects, there are hidden ones. It is necessary to start work with a diagnosis that will allow you to assess the condition of the entire floor, and not just its individual sections. Ignoring the diagnostic inspection will lead to the fact that soon the wooden flooring will have to be repaired again.
To detect rotten boards, it is necessary to tap the entire floor with a hammer. A dull sound indicates the presence of rot in this place, and it is extremely important to assess the size of the damage, since this determines the amount of work and the amount of materials you need.
The easiest way to repair the top flooring, the most difficult is the rough one, and the most difficult repair is the replacement of rotten logs. In the first two cases, you need to remove and replace the damaged boards, in the last one, you will have to disassemble the flooring, cut out the rotten sections of the base and replace them with new ones.
Types of wood floor failures
Common signs of wood floor damage include:
- floor deflections;
- creaks;
- gaps between boards;
- unaesthetic appearance of the coating;
- damage to lamellas and lag.
To understand the causes of these symptoms, you should analyze each of them separately. The deflection of the floorboards is caused by the occurrence of gaps between the supporting structure and the board. This is mainly due to loose fastening or damage to internal parts. If the wooden floor creaks, then there are gaps between the boards or the fasteners do not hold well. The cracks themselves are the result of the shrinkage of the wood, which, due to the loss of moisture, is somewhat reduced in size.
In the process of long-term operation, even a floor made of larch (one of the most durable types of wood) wears out. This manifests itself in the abrasion of the outer layer, as a result of which the appearance of the floor covering deteriorates. Damage to lamellas and logs includes cracks (due to excessive loads or low-quality boards) and the destruction of lumber by fungus and mold.
How to make a simple repair
To eliminate squeaks, you first need to identify creaking boards and determine the cause of unpleasant sounds. If this is a loose fit of the floorboards to each other, the gap should be cleaned of dirt and dust, and then a wooden wedge previously planed and smeared with glue should be driven into it. After that, this place must be sanded.
If the gap is small, you need to tighten the floorboards with self-tapping screws or sprinkle the flooring with talcum powder, which is a kind of lubricant for wood, and therefore eliminates creaking. The creaking floor is the result of not only the appearance of gaps between the boards, but also the loosening of the fastening, and in order to eliminate the unpleasant sound, you should twist the floorboards and beams with self-tapping screws twisted at a slight angle.
“Playing” wooden flooring is the result of the destruction of boards or logs. With minor damage, you can cut out part of the floorboard (logs) and replace it with a new one. If cracks or rot have spread to the entire length of the lamella, you will have to change the whole board.
The unsightly appearance of the floor covering is eliminated by grinding, followed by the application of varnish or paint. Sanding is necessary to remove bumps and roughness, ensuring a perfect fit of the dye, and to prevent decay and the spread of microorganisms, the flooring should be treated with an antiseptic.
Overhaul of timber decking
If during the diagnostics extensive damage was revealed, it will be necessary to carry out a major overhaul, which involves replacing the log and floorboards. Before starting work, it is necessary to carry out preparatory measures. If a wooden floor is installed in an apartment (in many Khrushchev houses, floor coverings were made of wood), it was laid on concrete, which means that after dismantling the log, it is necessary to check the base for cracks. When overhauling, it is best to make a new screed using a self-leveling mixture.
Before dismantling the boards, you need to remove the skirting boards around the entire perimeter of the room, clean and number the floorboards. Only after a thorough inspection of each of them will it become clear which lamellas require replacement, and which can be used for new flooring.
The scheme for the overhaul of a wooden floor is approximately as follows: replacing the logs or their parts, laying insulation and vapor barrier, laying the boards according to the numbering (if a new floorboard is installed, it must be identical to the numbered one), fixing the flooring by level. After the above work has been done, it is required to fix the floorboards with self-tapping screws with a hat deepening into the wood by 4-5 mm. The next step is scraping and painting the flooring.
Do-it-yourself repair of the wooden floor in the apartment: we fix everything ourselves
Wooden floors are considered to be quite durable and reliable coating. However, due to its hygroscopicity, wood is exposed to moisture. In summer, at elevated temperatures and humidity, it swells. And it dries up in winter. This leads to the formation of cracks between the floorboards. Over time, boards rot. Due to the furniture, dents and scratches form on the surface of the wooden floor. The paint is peeling off. Spilled chemicals leave a trail. Therefore, the coating has to be periodically restored. And what can we say about old houses in which the repair of wooden floors has not been carried out for a long time. How to start this process and what is needed for this? Here are the first two questions that confront a person who decides to renovate a wooden floor.
Table of Contents
-
1 How do I start repairing a wood floor?
-
2 Parsing of private situations
-
2.
1 Replacement of halts -
2.2 Holding between the floorboards
-
2.3 Elimination of the fraud 9,0002
- 9000 2.4 Office wood floors?
If you are repairing a wooden floor with your own hands, do not rush to get to work right away. Perhaps, in addition to those areas with damage that are clearly visible, there are hidden defects. They need to be found and eliminated. Otherwise, over time, repairs will have to be carried out again. Therefore, the first step is to conduct a comprehensive inspection of the flooring and its components. After a thorough inspection, you can decide whether the floors can be repaired or if they need to be completely replaced.
To find rotten boards, go over the entire floor with a hammer. This is the only way to find a hidden defect. A dull sound indicates the presence of rot. Rusty nails in the floorboards will tell about the same. The amount of work depends on the size of the damage. The easiest way to replace the top floorboards.
Subfloor boards are more difficult to replace, but not as hard as logs. To repair rotten logs, you will need to disassemble the floor above them and cut out a defective piece. Then replace it with a new one. Replacing rotten wooden floor boards
It is much more difficult to repair the floor in a wooden house. Here, in addition to a thorough check of the upper floorboards, the subfloor and the log, you will have to inspect the beams and embedded crowns. It is necessary to inspect from all sides: from the inside, outside, from the underground. Inspection must be carried out in good light, so as not to miss the beginning of rot. When checking underground, it is advisable to use a powerful flashlight.
Sometimes small defects in embedded beams are not visible “by eye”. To find them, use an awl or a knitting needle with a sharp end. With piercing movements they pass the entire beam, checking for the presence of rotten areas. In this case, punctures are made as often as possible.
Having found a damaged beam, it is replaced with a new one. Sometimes, in order to replace a beam in a wooden house, you have to raise the building with a jack. Case study
Old apartment buildings still have wooden floors. Their device is slightly different from the floors in private homes. If in a private building the logs are laid on the ground, then in the apartment the laying is done on concrete. Therefore, the repair of a wooden floor in an apartment is different from the repair in a private house. After removing the lag for replacement, it is necessary to clean and check the concrete base for cracks.
If a complete replacement of the floor is carried out, after dismantling and cleaning it is necessary to carry out a cement screed. You can use a self-levelling compound. After that, the base is primed and the waterproofing material is laid. Heat and sound insulating material is placed on top, and then floor boards.
Replacing floorboards
Consider a situation where only one or a few floorboards need to be replaced.
Having found the damaged area of the floor, remove the rotten floorboard. According to its size, we cut out a new board. Having treated it with an antiseptic, without affecting the ends, we put it in place of the old fragment. Replacing a small section of floorboard
Tip! It is impossible to treat the ends of the board with an antiseptic. Otherwise, after a while the board will begin to rot.
Using self-tapping screws, we fix the board in place of the old one, screwing it to the joists. This is how every rotten floorboard is replaced. If a small area of rot is found on the board, you can not change the entire floorboard. It is enough to cut out only the damaged area. Using it as a template, cut a replacement out of new wood. Fasten it to the lags using self-tapping screws. In this case, the ends of the new section should reach the middle of the lag.
Sealing gaps between floorboards
Before you start filling gaps in a wooden floor, clean the flooring.
Remove excess furniture so that it does not interfere. For more thorough cleaning of crevices, use a brush with stiff bristles. In order not to miss anything after the inspection, mark all areas requiring repair. Prepare the composition for work. There are special putties for wood. But you can make the composition yourself. If you mix PVA glue with sawdust to the density of sour cream, you get an excellent putty. Filling gaps between floorboards with putty
Once all gaps have been carefully treated, leave them to dry completely. Then clean with sandpaper. This repair method is suitable for small cracks. Wide and deep cracks are eliminated differently – wooden bars are prepared for them. In length, they should correspond to the length of the slot, and in diameter they should look like a cone.
Having planted on glue with sawdust, the workpiece is hammered into the slot with a sharp edge down. Excess is removed with a planer and polished. At the end of the repair, the wooden floor is varnished or painted.
Filling a wide gap with a piece of wood
Repairing floorboard squeaks
Sometimes repairing a floor in a private house comes down to fixing minor defects, such as floorboard creaking. As time passes, any wooden coating begins to creak. The main reason for the squeak is the loosening of the fastening. If the house has a basement, the cause of unpleasant sounds can be easily eliminated. To find out which floorboards will hold together, find a partner. While he walks on the floor, you will have to determine where the defect is.
Eliminate creaking floorboards by hammering in nails
After calculating the creaking floorboard, drive a wooden wedge into the gap between the beam and this board. Do not overdo it so that the board does not rise above the base. If it is impossible to get into the underground, repairs are made from above. Drill holes in the creaking floorboards above the beams. Secure the screws by driving them into the beams at a slight angle, changing the direction of the angle.
You can fix the board with nails. Unsightly update
It happens that the floor covering does not have the above problems. The only drawback comes down to its unsightly appearance. Or after eliminating the remaining defects, it is necessary to bring the base into proper form. Any repair of old wooden floors ends with its painting or varnishing. But before doing this, you need to prepare the foundation. Remove old paint that does not adhere with a spatula. Wash the floor with detergent to degrease the surface.
Sanding the old floor before painting
If you are going to repair old floors according to the rules, it is advisable to sand the old floor. This will help smooth out the inconspicuous bumps and depressions. The more carefully you prepare the surface, the smoother the paint will lie. The cleaned and dried floor is primed with drying oil. After that, you need to let the floor dry and only then apply a layer of paint. Do not try to immediately paint over everything with a thick layer of paint.
It is better to apply two or three layers carefully shading and allowing each to dry. With proper care, a wooden floor will last for decades. Wood does not like moisture, so try not to flood the floors with water when cleaning. To prevent furniture legs from scratching the surface, stick protective caps on them. Don’t let your pets scratch floors with their claws or use the toilet in the wrong place. Such measures will help delay the next floor repair for a long time.
- Author: Alexey
Rate the article:
(37 votes, average: 3.9 out of 5)
Share with your friends!
How to repair the floor with your own hands
After a long period of use, any floor needs repair and restoration.
In our article, we will consider the repair of floors: - from boards or planks;
- made of parquet or parquet;
- floor covered with linoleum;
- in ceramic or plastic tiles.
How to repair a plank floor
You can repair a plank floor with your own hands:
- if the floor is dry and there are gaps between the floorboards;
- the floor boards are worn out and “springy”;
- floor boards creak.
What to do if the floorboards are dry and cracked;
- Remove old putty from cracks. Fasten the floorboards with screws. Screw the screws into the gaps between the floorboards, and drown the heads by about 5 mm.
Important! Choose screws for wood with a diameter of 4-5 mm and a length of 30-50 mm, perfect for fastening floorboards.
- Then blot thin rope or twine with wood glue until the rope is completely saturated. Use a screwdriver, chisel, or knife to push the rope through the gap and let it dry for at least 24 hours
- Prepare thick putty or putty. For 1 kg of drying oil, take 100 g of a 10% glue solution. Add 2 kg of putty to this mixture.
When the cord embedded in the crack dries, putty the cracks. After drying, clean the floor first with a large, then with a small sandpaper. - Paint the floor.
What to do if the floorboards creak
Take an electric drill with a 6mm bit and drill a hole between the floorboards at an angle of 45°C to the floor. Hammer a wooden pin, pre-lubricated with wood glue, into the hole. Cut off the protruding part of the pin with a chisel or a sharp knife and putty the surface.
How to repair a parquet floor
With constant use, the parquet floor wears out, individual rivets fall out, the floor swells, cracks appear between the rivets. cut off protruding parts. If cracks have formed in the parquet floor, it is necessary:
- Clean the slots with a sharp knife or fine wire.
- Seal cracks with putty and a knife.
Putty is made by hand from fine birch or oak sawdust and wood glue.
The cracks in the parquet floor are also sealed with a paste of sawdust sifted through a sieve mixed with an oil varnish with a viscosity similar to window putty. Also a good gap putty is obtained from epoxy resin, in which sawdust and dry pigment are added.- Sand the repaired floor areas first with coarse sandpaper, then with fine sandpaper.
- Then the parquet is tinted in the desired color with floor dye and dried.
- After restoration, the parquet is smeared with mastic and rubbed.
How to repair a linoleum floor
To properly care for a linoleum floor, study the characteristics of this material. Linoleums shrink, warp, expand, swell and crack. Colloxylin and polyvinylchloride linoleums are sensitive to temperature changes. If the room temperature is high, then such materials shrink more. If the linoleum is cracked, these places can be filled with hard paraffin and smoothed over with a dry woolen cloth. Carefully cut out places with severe damage with a sharp knife and remove along with the lining and glue.
Put a piece of linoleum of the same shape and size on the place cleaned and smeared with glue, press it with a load until the glue dries. Let’s consider three recovery options if the linoleum is swollen: - Burn the swollen area with an awl to release the air, put paper on top and iron with a hot iron.
- Cut the swollen place with a knife and pour in the solvent that is included in the composition to soften the mastic, and iron it with a hot iron.
- If the first options did not help, then there is no mastic under the linoleum. Then add mastic under the swollen place.
When peeling linoleum over a large area, re-lay it. To do this, remove the linoleum, clean its inside with a spatula and leave it spread out with the back side up. Clean the base under the linoleum from the old mastic, prime the floor surface and lay the linoleum. If small dents and damage have formed on the linoleum, they are repaired with mastic and cleaned with sandpaper.
How to repair a ceramic or plastic tile floor
The floor can be made of ceramic or plastic tiles. If the work is not carried out correctly, the tiles may lag behind, crack or break. Plastic tiles that have lagged or swelled from the floor can be easily put back in place:
- clean the floor;
- put the tile in its place;
- cover with a sheet of clean paper and iron with a very hot iron.
In the first stroke, quickly run the iron over the entire area of the tile and then slowly heat the inflow to straighten and weld the tile into place.
Broken ceramic tiles need to be replaced. The remains of the tile are removed along with the old cement with a hammer and chisel.“Important! When removing old cement, do not damage adjacent intact tiles.
After removing tile residue, rinse the subfloor with water.
Lay the new tile in the vacant space with ceramic tile mortar or cement mortar mixed with one part cement and two parts sand. Fill the gaps between the tiles with grout. We have selected for you interesting articles about flooring:
- Parquet or laminate flooring for royal palaces and ordinary apartments;
- Wood floor scraping technology.
Tips
In apartments, floorboards most often have, albeit slight, but fluctuations. The existing method of puttying unstable floors is imperfect. Practice has shown that in these cases putty of the following composition has proven itself well: linoleum and acetone with the addition of 1 cup of chalk, or coated whitewash, or tooth powder per 1 liter of putty. Thus, the putty is more elastic and has a slight expansion. You can use this putty when repairing an apartment, and when building a garden house.
After all, in a garden house, as a rule, the floor “walks” (the underground collapses), but thanks to the use of this putty, not a single seam, not a single crack has come apart in 10 years. This putty is just an excellent tool, designed for unstable floors.
You can temporarily use it when filling gaps between the wall and skirting boards, between the wall and door jambs. But, unfortunately, over time, everything falls out of instability and fluctuations. In this case, it is best to use strips of material up to 4-5 cm wide. They must be smeared with emulsion whitewash (paint) and the gap sealed. Holds up well. And in the bathroom, you can stick tiles on emulsion whitewash for trees. True, the unpleasant smell will stand for a long time. You might think that the tile will fall behind quickly, in fact – no, it lasts for years. This is how the new method of puttying tiles turned out.
features and procedure for work
Wood is considered to be a fairly durable floor covering, which is often used in a country private house. However, under the influence of aggressive external factors, the presented material often fails and loses its functionality, as a result of which the repair of wooden floors becomes inevitable. This event should be approached with all responsibility, otherwise the quality of work will leave much to be desired.
Contents:
- Where to start?
- Replacing one or more floorboards
- Getting rid of gaps in the floorboards
- Floorboard creaking: how to fix it?
- Appearance restoration
- Laminate repair
Where to start?
Do-it-yourself wooden floor repair begins with the identification of hidden defects that must be eliminated in a timely manner. Therefore, the first step is a thorough inspection of old coatings, after which a decision is made to partially or completely replace the floor base. So, for example, rotten boards are easy to detect by tapping with a hammer, when a dull sound indicates the destruction of the wood material.
In the event that only the upper floorboards are rotten, you can only repair them, and do not touch the logs themselves. If the damage touched the base, then most likely it will be necessary to completely dismantle or cut out a piece unusable. It would also be useful to inspect the embedded crowns or beams in a private wooden house, and if a defective area is found, replace it.
All these measures make it possible to strengthen the structure, increasing the durability of the floor covering. Replacement of one or more floorboards
As a rule, minor floor repairs in a wooden house involve the replacement of only one or more floorboards. To carry out this work, you need to perform a number of simple operations, the first of which will be the dismantling of the rotten floorboards. After that, a fitting and sawing of a new product is carried out, which is later processed with a special antiseptic composition. It is important to remember that it is strictly forbidden to cover the ends of the board with an antiseptic, otherwise this place will inevitably rot.
Prepared boards are fixed in place of old dismantled analogues with screws or self-tapping screws, which are carefully screwed to the joists. It is not recommended to use ordinary nails, since the metal oxidizes over time, and the resulting corrosion adversely affects the integrity of the floor material.
Usually, boards fixed with nails to joists serve no more than 5-10 years, while screws are able to firmly hold such a product for at least 10-15 years. Removing gaps in floorboards
Often, in a private house, the wooden floor dries out, after which cracks of various sizes form on the coating. Their sealing requires a thoughtful approach and preliminary cleaning of the surface from dirt, dust, small particles. For these purposes, a brush with hard bristles is ideal, which can be used to treat hard-to-reach places on the floor. Further, the areas where the main repairs will be carried out are indicated with a pencil or marker.
The next step is to prepare the wood putty. You can buy it at a specialized store or make it yourself from sawdust and PVA glue. These two ingredients are mixed together to a thick state, and the marked gaps are filled with the resulting putty. The composition dries within a few minutes, and then it can be covered with ordinary putty to match the color scheme of the floor.
In conclusion, the cracks are cleaned with fine-grained sandpaper. Floorboard creaking: how to fix it?
Repairing a wooden floor with your own hands often involves eliminating the creak that appears after several years of use of the material. The main reason for the appearance of extraneous sounds when walking on the floor is the weakening of the fasteners. However, when a private house has a basement or subfloor, then such a problem can be eliminated in just a few hours.
To eliminate squeaks, two people will be needed, one of whom will walk on the floor, while the second will observe from below which floorboards are creaking. Defects are immediately marked with a pencil or a waterproof marker, after which wooden wedges are driven into the marked gaps between the boards. The main thing here is not to overdo it, otherwise the board will rise above the base.
If there is no subfloor in the house, then all repair activities are carried out not from the back, but from the front side of the board.
To do this, it is necessary to drill small holes in places above the beams, and then fix the screws there at a slight angle. Often the board is fixed to the beams with nails, however, in this case, the structure may last much less than the expected period. Appearance restoration
After many years of intensive use, wood flooring inevitably loses its novelty and aesthetic appearance. To return it will help varnishing or painting the surface with special compounds. Before proceeding with such repairs, the foundation should be properly prepared. Using a spatula, the old paint is removed, and then the surface is protected with sandpaper. At the final stage of preparation, the repair of a wooden floor in an apartment involves washing it with chemically neutral means. As soon as the material dries, you can start painting.
Floor grinding can be done with special equipment that helps to get rid of bumps or depressions on the floor. The more thorough this type of work is done, the smoother the paint and varnish composition will lie on the floor.
Before painting the wood is recommended to be additionally primed. You should not try to immediately paint over the material with a thick layer, since in this case visually noticeable oil stains cannot be avoided. Experienced repairers always paint the floor surface in 2-3 layers, waiting for each of them to dry. Repair of laminate flooring
Very often, a laminated board is used as a floor in a country house or a modern apartment. It also develops various defects over time, including scratches, scuffs or stains. You can get rid of stains, for example, with acetone, and remove scratches with a wax pencil. Dents or small deformations of the board can be eliminated with repair pastes, which, after drying, merge with the color scheme of the floor covering.
The most vulnerable point of a laminated floor is rightfully considered to be lock joints, which tend to dry out over time. If moisture regularly gets into these cracks, then soon the board will become unusable.
When a laminate begins to rot, the only solution to the problem is to immediately replace the damaged element. Laminated elements, interconnected not with locks, but with glue, change completely, that is, it will not be possible to dismantle individual damaged sections of the floor. Thus, you can repair the wooden flooring in the house with your own hands with a thoughtful approach. Only in this case it is possible to guarantee the excellent quality of work, the wonderful appearance of the material, as well as the durability of its subsequent use.
Do-it-yourself repair of an old wooden floor
Wooden floor is the best option for building a country bath. They arrange it based on economic, aesthetic and environmental considerations. However, organic material is gradually losing the height of technical priorities due to uneven loads, moisture changes, temperature fluctuations. To extend the life of the structure, the owner needs to regularly repair the wooden floor with his own hands in a cosmetic amount.
For neglected, badly damaged, partially rotting floors, global restoration measures will be required. Let’s look at how to identify the causes, how to prevent emerging problems, and how to fix small and large defects. Video example: repairing the floor while keeping the floorboards
Signals for the start of repairs + diagnostics
The list of reasons for the need for restoration includes not only the well-known sensitivity of wood to temperature and moisture fluctuations. Periodically shrinking and swelling, the material loosens the fasteners. Foci of decay appear if antiseptic treatment was not carried out during the construction period or if antifungal protection was not renewed after 2 years prescribed by the standards.
It often happens that after long-term use, the floorboards begin to wobble and sag menacingly when moving over them, or even grouchily creak when meeting the feet of the owners. Often, cracks or chips appear on the floorboards and between them, favoring the settlement of bacteria and rot spores. Any of these signals notifies the owner of the need for repair work, a significant part of which he can perform on his own.
Before repair, it is necessary to examine and evaluate the condition of the floors, then, based on the audit, draw conclusions about the amount of work to be done:
- If only the surface is damaged and movement on the floor is not a concern, you will need to tighten or change fasteners, cut and seal small gaps with putty;
- If the floorboards respond with a dull sound to hammer blows, you will have to remove and replace the rotten floor parts. It is possible that these will be not only boards or their fragments, but also logs and embedded beams. It all depends on the area affected by rot or damage by bark beetle. It is recommended to disassemble and shift the floor in such situations, which is much cheaper than the loss of a completely rotten structure;
Please note. The presence of damage and the development of rot will also help determine the rust of a nail hammered into the board and the “blue” of the wood.
- If the boards creak, it means that the wooden structural elements are not cohesive enough in the area where the floorboards join each other or in the area where the joists join. Those who fail to eliminate the cause of the creak from the underground or from the surface will have to disassemble the floor, repair or improve the lag system;
- If there is a disgusting smell of rot in the bathhouse, a fine, rough coating, logs, beams, and often embedded crowns must be changed immediately. It is better to hire a team of carpenters to work if you need to remove the lower part of the log house in parts, lifting the entire floor with a jack, then change the embedded beams for new lumber;
The rotten sections of the lag can be cut out on their own and the timber can be built up on both sides with boards.
- If the floor sags, serious restoration work is coming with the obligatory disassembly of the structure and the replacement of rotten elements. If the cause of sagging is the deformation of logs or beams undamaged by rot and bark beetle, supports are installed under them.
Can be supported by:
- special metal device with screw-down adjustment system;
- steel pipe with cement poured into its cavity,
- foam concrete blocks;
- wooden beams;
- brick posts.
Any of the indicated options requires pouring a small local foundation 0.5 × 0.5 m and the presence of a roofing material between itself and the wooden element. The lack of height of the support post is covered with a lining of board scraps. The direction of the upper row of brickwork of the supports should be perpendicular to the direction of the lag.
Another reason for floorboard sagging is insufficient frequency of joist installation.
So, you need to parse the floor and upgrade by installing an additional beam. Visually it can be difficult to determine whether a cosmetic or major repair of wooden floors is currently required. It is necessary to check the condition both from the inside, and from the outside of the building, and from the underground.
Attention. Be sure to carefully inspect the ends of the lag. Unprotected wood in this place very quickly becomes infected with rot from the embedded beam and transmits the “infection” to the rest of the wooden elements.
For examination in the twilight of the underground, do not forget to stock up on a flashlight and an assistant who will move around the floor during the diagnostic period. You will also need an awl, which will need to periodically try to pierce the embedded timber or logs. We make “injections” even in those places that optically do not raise doubts about suitability. If the awl rod went into the wood freely, we study the size of the damaged area using the same method, cut it out and replace it, substituting a jack for insurance under the “cut off” section of the building.
Analysis of the 3 most common problems and their solution
It is not worth it for an owner inexperienced in the field of wooden construction to replace crowns and embedded beams with his own hands. However, information about the probable causes will help him control the work of the team. But to perform simple work, it is not necessary to part with personal savings. What can be repaired and how?
Getting rid of the “senile” squeak
Exploring the “vociferous” part of the floor. We found out that unsweetened tunes are heard due to loose fasteners, then we screw, hammer and supplement the fastening with galvanized self-tapping screws designed to work with wood.
We deal with more complex “squeaky” problems using other methods:
- A common cause of squeaking is a tongue ridge that is not firmly seated in the groove. To eliminate it, we will disassemble the floor, first carefully dismantle the plinth, then remove the extreme board, and behind it all the rest to the squeak area. We use a spatula, a lever and linings from rail scraps. We knock out the nails from the dismantled boards and plinth with a hammer or the butt of an ax, striking from the side of the point of the fastener, after which we pull it out with a nail puller. We check the logs, if necessary, we make a complete or partial replacement of the damaged components and put them back. We fasten with self-tapping screws, stepping back from the “old” fixation point 3 cm.
It is more reasonable to remove the grooved floor in blocks, especially if they were fastened through 4 boards. The block will be easier to disassemble without damaging the locking system. To avoid difficulties when collecting the boards in reverse order, we number the floorboards and the plinth.
- The squeak of a floorboard that is loosely attached to the joist is eliminated by lining a wedge, a piece of roofing felt or cardboard, brought under the board from the side of the subfloor. Perhaps it will be enough just to screw in two additional screws, located indoors. We drill holes for screws in the creaking board at an angle both to the floor and to each other. We putty the heads, recessed by about 0.5 cm, grind the repair area after hardening the putty.
- The easiest way to get rid of squeaks is to fill the problematic gap between the floorboards with graphite powder or talcum powder.
We remove large and small gaps
Close large gaps with wedges. For their manufacture we use trimming rails or boards. We will process the wedge-shaped side with carpentry glue and hammer it into a longitudinal hole. Let’s wait until the glue hardens, and cut off the excess protruding above the floor surface with a planer.
The gap can be filled with glued rope or twine. After waiting a day, the place of repair must be puttied with a home-made composition of linoleum softened in acetone, which did not have a substrate.
Small cracks can be repaired with:
- wood putty;
- mounting foam;
- with a mixture of fine sifted sawdust and carpentry or casein glue, taken in equivalent proportions;
- hot water softened newspaper mixed with paste and wood glue;
Recipe.
The mass, crushed into pieces, poured with boiling water from old newspapers, should be infused for a day. Then you need to cook a liquid paste, cool it and add wood glue. This solution must be introduced into the strongly wrung out newspaper mass and mixed until a homemade putty with a consistency resembling window putty is obtained. Cracks and small crevices are covered up after floor scraping. By the way, during this period there is a sufficient amount of sawdust used for embedding. Repair of cracks is completed with puttying.
Replacement of whole grooved floorboards
A board without interlocks or part of it can be removed without completely disassembling the floor, because it is not in a “hard bond” with adjacent elements. To replace the entire floorboard, the plinth will still need to be removed; for partial repairs, it will be necessary to accurately determine the location of the lag and underground communications.
Completely remove the board as follows:
- pick up the floorboard with a crowbar from the edge and, placing a wooden block under the crowbar-lever, gently lift;
- under the raised board we put wooden trimmings to fix the gap, and saw off an unnecessary segment;
- in the same way we move to the opposite edge of the floorboard.
For those who intend to re-lay the floor, turning it upside down with a slightly worn side, it is necessary to act according to the described algorithm, but it is not necessary to saw off the pieces from the boards.
Important. Do not forget to treat the wood with antiseptic impregnations before laying the wooden floor back.
To replace a board fragment, only the damaged area will need to be sawn out. When cutting, engineering networks and logs should not suffer. If the cutting line is supposed to cross them, you need to increase the size of the repaired part. The section to be replaced must be supported by at least two joists, the line joining the patch and the old board must be located above the joist.
We make a new part according to the cut-out template, put it in place and fasten it to the joists. Fasteners can be supplemented by driving nails into adjacent boards at an angle of 45º.
So, the repair of old wooden floors can be considered complete, now it’s time to take care of aesthetics and prevention.
We will sand again, cover the restored floor with a decorative and protective layer of varnish or paint. Outside, along the perimeter between the base and the embedded beam, we will install an apron made of a strip of sheet lead 20 cm wide. It will prevent the penetration of atmospheric moisture and subsequent damage to the embedded crown.
That’s all for today, all questions and feedback – in the comments! Thank you.
- Author: Vladimir
Rate this article:
(8 votes, average: 3.5 out of 5)
Share with friends!
How to repair the floor in the apartment: wooden, concrete
In the interior of an apartment, the floor is far from the last place in terms of importance. Once in any room, our gaze first of all stops on it.
Although it may seem to many that floor repair is the lot of professionals, however, amateurs can do a lot – at least how to repair the floor in an apartment.
So, it’s decided, we do the repairs ourselves.
To make a good repair, you need:
- first, know the relevant rules;
- secondly, strictly observe them.
If your house is an old building, then the floors in it are standard, that is, they consist of the following layers:
- concrete screed poured over them;
- thermal insulation – most often it has already fallen into disrepair by this time;
- wooden floor.
It creaks, flexes under your weight, gaps show between the floorboards. Everything points to the urgent need to repair it. Just do not think that just by covering the floor with linoleum, you can thoroughly solve the problem of old floors.
New flooring can make the floor beautiful and attractive, but before that, you need to level and strengthen the old one, which will serve as the basis for the new one.
Floor repair options are as follows:
How to repair a wooden floor
If the subfloor is in good condition, then the repair work is limited to reinforcing the floor.
Schematically, the process looks like this:
- floorboards are cleaned of applied paint or varnish – it is recommended to use a grinder, as this will remove all layers up to the tree;
- carry out an examination of the boards – all damaged, rotten, dried out, etc. must be replaced with new ones;
- check the fastening of the floorboards to the joists – for greater reliability of fixation, it is advisable to put the floorboards on self-tapping screws;
- small gaps, pits from nails and self-tapping screws are covered with wood putty;
- the wider ones are closed with a chopstick and putty;
- all treated areas are rubbed with sandpaper.
It remains to carefully remove debris and dust and apply varnish, paint or cover with parquet, laminate or other more fashionable flooring material on the renovated floor.
But it may also happen that most of the floorboards are thrown away, then another repair is required – replacement of the floor.
Today, laying a wooden floor has become much easier and safer thanks to modern solid wood planks with a special locking system. On the one hand, they have a tongue-and-groove, and on the other, a comb, which allows you to connect the boards one to another tightly and without gaps. Such masonry can be further strengthened by gluing the joints. These floors of all wood are the most durable and environmentally friendly, but they are not cheap.
For laying a floor of another material, it is recommended to completely dismantle the old floor and make a concrete base.
How to repair a concrete floor
In order for a floor covering to have a long life, the base on which it is laid must be absolutely smooth and even. Today, a durable concrete floor with such characteristics can be obtained in several ways, using:
- ordinary cement-sand mortar;
- levelers – ready-made dry cement mixtures;
- gypsum fiber sheets (“dry screed”).
Any of these options requires preparatory work, which, by the way, are the same:
- completely remove the floor covering, wooden floor boards and logs;
- having completely cleared the underground space, they expose floor slabs or screed;
- waterproofing is laid – most often an overlapped polyethylene film;
- glue a damper tape around the perimeter of the room, which should compensate for the deformation of the screed during temperature fluctuations;
- lay guide beacons;
- if a dry screed is laid or there are large differences in the base of the floor in height, the site is covered with expanded clay, expanded clay sand or another type of dry mix recommended for a concrete floor;
- grouting with cement mixtures can be reinforced (reinforced) by laying a metal mesh.
Floor screed made of cement-sand mixture is quite time-consuming and labor-intensive. Today it is possible not only to speed up, but to simplify the process of installing the subfloor using modified building mixes.
Their use is in itself a guarantee of the high quality of the screed, that is, the stability of its strength in any area.
Dry mixes , unlike cement screed, require incomparably less days to harden – up to ten, and the pouring process itself is much easier. In a diluted state, it is a semi-liquid mass, which is easily leveled over the surface of the base. And if you use self-leveling mixtures, then the complexity of pouring is reduced to a minimum.
The secret to a flawless flooring surface lies in professional installation and a well-prepared substrate. Of particular difficulty is the installation of a combined floor, since in this case it is inevitable to solve the problem of the difference in the heights of the coatings. For example, tiles are laid directly on the screed, and parquet is laid on a plywood substrate.
There is a relatively easy way to bring them to the same level.
- Pour a single screed.
-
 1 Replacement of halts
  Subfloor boards are more difficult to replace, but not as hard as logs. To repair rotten logs, you will need to disassemble the floor above them and cut out a defective piece. Then replace it with a new one.
  Having found a damaged beam, it is replaced with a new one. Sometimes, in order to replace a beam in a wooden house, you have to raise the building with a jack.
  Having found the damaged area of the floor, remove the rotten floorboard. According to its size, we cut out a new board. Having treated it with an antiseptic, without affecting the ends, we put it in place of the old fragment.
  Remove excess furniture so that it does not interfere. For more thorough cleaning of crevices, use a brush with stiff bristles. In order not to miss anything after the inspection, mark all areas requiring repair. Prepare the composition for work. There are special putties for wood. But you can make the composition yourself. If you mix PVA glue with sawdust to the density of sour cream, you get an excellent putty.
 You can fix the board with nails.
  It is better to apply two or three layers carefully shading and allowing each to dry.
  In our article, we will consider the repair of floors:
  For 1 kg of drying oil, take 100 g of a 10% glue solution. Add 2 kg of putty to this mixture.
 Put a piece of linoleum of the same shape and size on the place cleaned and smeared with glue, press it with a load until the glue dries. Let’s consider three recovery options if the linoleum is swollen:
 Fill the gaps between the tiles with grout.
  You can temporarily use it when filling gaps between the wall and skirting boards, between the wall and door jambs. But, unfortunately, over time, everything falls out of instability and fluctuations.
 All these measures make it possible to strengthen the structure, increasing the durability of the floor covering.
  Usually, boards fixed with nails to joists serve no more than 5-10 years, while screws are able to firmly hold such a product for at least 10-15 years.
  In conclusion, the cracks are cleaned with fine-grained sandpaper.
  To do this, it is necessary to drill small holes in places above the beams, and then fix the screws there at a slight angle. Often the board is fixed to the beams with nails, however, in this case, the structure may last much less than the expected period.
  Before painting the wood is recommended to be additionally primed. You should not try to immediately paint over the material with a thick layer, since in this case visually noticeable oil stains cannot be avoided. Experienced repairers always paint the floor surface in 2-3 layers, waiting for each of them to dry.
  When a laminate begins to rot, the only solution to the problem is to immediately replace the damaged element. Laminated elements, interconnected not with locks, but with glue, change completely, that is, it will not be possible to dismantle individual damaged sections of the floor.
  For neglected, badly damaged, partially rotting floors, global restoration measures will be required. Let’s look at how to identify the causes, how to prevent emerging problems, and how to fix small and large defects.
 It all depends on the area affected by rot or damage by bark beetle. It is recommended to disassemble and shift the floor in such situations, which is much cheaper than the loss of a completely rotten structure;
 So, you need to parse the floor and upgrade by installing an additional beam.
 We use a spatula, a lever and linings from rail scraps. We knock out the nails from the dismantled boards and plinth with a hammer or the butt of an ax, striking from the side of the point of the fastener, after which we pull it out with a nail puller. We check the logs, if necessary, we make a complete or partial replacement of the damaged components and put them back. We fasten with self-tapping screws, stepping back from the “old” fixation point 3 cm.
  Perhaps it will be enough just to screw in two additional screws, located indoors. We drill holes for screws in the creaking board at an angle both to the floor and to each other. We putty the heads, recessed by about 0.5 cm, grind the repair area after hardening the putty.
  The mass, crushed into pieces, poured with boiling water from old newspapers, should be infused for a day. Then you need to cook a liquid paste, cool it and add wood glue. This solution must be introduced into the strongly wrung out newspaper mass and mixed until a homemade putty with a consistency resembling window putty is obtained.