Flooring screeding: What is Floor Screed? Its Types, Materials, Construction and Uses
What is Floor Screed? Its Types, Materials, Construction and Uses
🕑 Reading time: 1 minute
Floor screed is composed of cementitious materials and sand blended based on a suitable mix design and applied to provide a leveled surface for the floor finish which is introduced to the surface of the floor screed.
So, floor screed is the base for the floor finish and greatly influences the performance of floor finish. In this article, different aspects of floor screed will be explored.
Fig.1: Details of Floor Screed
Fig.2: Floor Screed Construction
Contents:
- Following points regarding flooring screeds are discussed:
- Types of Floor Screed
- Materials for Floor Screed
- What are the Requirements that a Floor Screed Should Meet?
- Procedure of Floor Screeding
- How a Successful Screed Floor can be Constructed?
Following points regarding flooring screeds are discussed:
- Types of floor screed
- Floor screed materials
- What are the requirements that a floor screed should meet?
- Floor screeding procedure
- How a successful screed floor can be constructed?
Types of Floor Screed
There are different types of floor screed that is specified based on the requirements and applications and the functionality of the floor:
- Unbonded screed floor (Figure 3 and Figure 6)
- Bonded screed floor (Figure 3 and Figure 4)
- Floating screed floor (Figure 3 and Figure 5)
- Heated screed floor (Figure 3 and Figure 7)
Fig. 3: Different Types of Floor Screeds; (A) Bonded Screed, (B) Floated Screed, (C) Unbonded Screed and (D) Heated Screed
Fig.4: Bonded Screed Floor
Fig.5: Floated Screed Floors
Fig.6: Unbonded Screed Floors
Fig.7: Heated Screed Floor
Materials for Floor Screed
Following are the materials used for construction of floor screeds:
- Cement
- Clean and sharp sand
- Water
- And occasionally additives are added to obtain specific properties. Polymer materials or metal mesh or glass are likely to be introduced to reinforce the screed.
The above components are adequately blended based on the prepared material proportions. If the thickness of the floor screed does not exceed 40mm, then the recommended mix is 1 Portland cement: 3 sands or 1 Portland cement: 4.5 sand.
However, 1 cement: 1.5fine sand: 3 coarse aggregate (10 mm maximum aggregate size) should be considered if the floor screed thickness is greater than 40mm.
It should be known that drying shrinkage gets reduced as the proportion of cement to sand is decreased.
Suitable amount of water should be specified to provide required workability since excessive water would reduce floor screed strength and inadequate water quantity lead to poor compaction.
What are the Requirements that a Floor Screed Should Meet?
Floor screeds should have adequate thickness which is based on the screed type and application frequencies. Recommended floor screed thickness based on the type of the screed floor and the construction conditions are provided in Table-1.
Table-1: Recommended Floor Screed Based on the Type of Screed and Construction Condition
| Recommended floor screed thickness, mm | Floor screed type and construction condition |
| 12 | For monolithic construction. In this case floor screed will be placed no longer than 3 hours after the placement of concrete.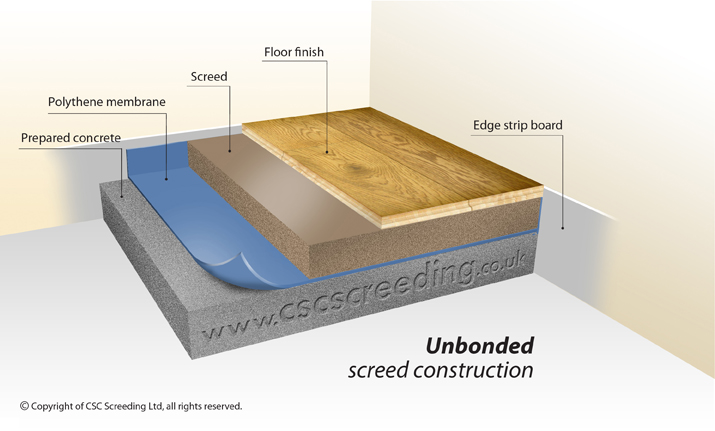 This will guarantee a satisfactory bond between floor screed and placed concrete beneath it. This will guarantee a satisfactory bond between floor screed and placed concrete beneath it. |
| 40 | For screed floor placed on hardened concrete. The concrete should be cut by appropriate means then cleaned, wetted and finally screed is placed. Not only will this ensure good bond but also make the screed to dry slowly and prevent cracks. |
| 50 | For floor screed placed on impermeable damp proof membrane. In this case a bond between the screed and the layer below it would not exist and hence shrinkage is unrestrained. |
| 65 | For screed installed on compressible course of sound or heat insulation material. This is recommended for domestic application only, otherwise the thickness of the screed should be increased. Lesser thickness will suffer from crack development. |
| 75 | For screed installed on compressible course of sound or heat insulation material. This is advised for applications other than domestic utilization. Lesser thickness will suffer from crack development. This is advised for applications other than domestic utilization. Lesser thickness will suffer from crack development. |
- Floor screed strength should be 20MPa for domestic application and 30MPa for industrial utilization
- It should be solid and compact so as to provide satisfactory base for the floor finish
- It should be curried properly to prevent shrinkage and rapid drying which lead to cracks. So, it should undergo almost all shrinkage, which floor screed might experience, prior to applying floor finish. This will lead to prevent the initiation of cracks.
- Finally, floor screed surface should be flat and smooth.
Procedure of Floor Screeding
- Evaluate the surface of the base
- Estimate materials used for screeding
- Prepare the base
- Prepare the floor screed mixture
- Apply bonding agents such as water or bonding slurry
- Place the floor screed mixture
- Finally, properly cure the placed materials
How a Successful Screed Floor can be Constructed?
- Choose right and suitable screed contractor
- Select suitable screed floor type
- Produce right and suitable floor screed mixture
- Construct floor screed using appropriate and acceptable screed placement process
- Consider right approaches for floor screed protection
Read More:What is Screed in Concrete Construction? Properties and Composition of Screeds
Basics of Screeding For Concrete and Masonry
By
Lee Wallender
Lee Wallender
Lee has over two decades of hands-on experience remodeling, fixing, and improving homes, and has been providing home improvement advice for over 13 years.
Learn more about The Spruce’s
Editorial Process
Updated on 05/03/22
Reviewed by
Deane Biermeier
Reviewed by
Deane Biermeier
Deane Biermeier is an expert contractor with nearly 30 years of experience in all types of home repair, maintenance, and remodeling. He is a certified lead carpenter and also holds a certification from the EPA. Deane is a member of The Spruce’s Home Improvement Review Board.
Learn more about The Spruce’s
Review Board
elenaleonova / Getty Images
When you’re pouring concrete or laying pavers or stone for patios or walkways, everything has to be perfectly flat and level. With concrete, one of the final stages is screeding. With masonry, paver, brick, or stonework, screeding happens toward the end of the project, before the hardscape materials are laid.
Screeding refers to any action of smoothing out a pliable material into a flat, smooth, and level layer. There are tools manufactured expressly for screeding, but you can also make use of any straight board to do the job.
What Concrete Screeding Is
With concrete work, screeding is the action of flattening poured concrete into a smooth, flat layer prior to finishing the surface.
Screeding is only the first step in finishing concrete, and it is not intended to produce a completely smooth final surface. Screeding fills in large gaps and removes high spots in the concrete material being installed. The final finish will be created by floating the concrete with one or more smooth-faced tools that are designed to draw up fine aggregate and cement to the surface of the slab. For large slabs such as driveways or garage floors, the surface is floated with a large tool known as a bull float.
Smaller wood and metal hand floats are used for sidewalks and other surfaces, but whatever tools are used, they can create a smooth surface only if the concrete has first been screeded to create a uniform layer.
How to Screed Concrete
In the process of pouring concrete, a screed is usually a long length of straight two-by-four board or an aluminum bar manufactured for the purpose. Whatever object is used, screeding is done by drawing the tool across the wet surface of the concrete.
The screeding tool is generally long enough so that the ends can rest on opposite sides of the concrete form. The screed is drawn toward the workers with a sawing, scraping motion that simultaneously smooths the surface and pushes excess concrete into any gaps or hollows.
It helps to have two workers, one on each side of the screeding tool, especially for large slabs. Aluminum screeds are often used where precision is needed, as they provide a straighter edge.
For more professional, faster screeding action, a motorized screed may be used. The tool has a long handle to eliminate laborious bending and tugging.
What Masonry Screeding Is
Screeding also describes the action of flattening out a layer of mortar, sand, or gravel underlayment beneath a surface in preparation for laying pavers.
In this context, screeding is done to help a subsequent upper layer (the concrete pavers, stone, or brick) rest firmly on a smooth, flat layer.
Another context where screeding is used is with leveling compounds. You might have an uneven sub-floor that needs to be filled in with leveling compound. If the compound is not self-leveling, then you must drag a screed across the top to flatten and level the compound, prior to laying the floor covering.
How to Screed a Masonry Base
For masonry items like bricks or pavers, a layer of 1-inch coarse bedding sand is first dumped and shoveled evenly across the area. Since this is the last bedding layer before laying the masonry product, it’s important to get this as smooth and perfect as possible.
One trick to keep screeding consistent is to lay out 1-inch PVC pipes before dumping the sand. As you screed the sand across the pipes, the pipes act as guards to prevent you from screeding any deeper.
After screeding, carefully remove the PVC pipes and fill in the depressions with loose sand. It’s always a good idea to trowel the loose sand to smooth out the filled-in areas.
Screeding With an Assistant
Working with an assistant is critical for perfect screeding. If not, you’re kneeling in the sand layer ahead of the screed tool. The screed tool will help to smooth out your knee and shoe depressions. But it’s best not to kneel in the sand in the first place. When you work with an assistant, both of you can remain outside of the project area.
In addition, screeding tools can be hard to handle. Screeding a 3-foot-wide walkway is manageable by one person. But when the screeding tool is a full-length two-by-four (8 feet or even longer), it is very difficult for one person to effectively handle the tool. You’ll need two people—one at each end—to control this heavier, larger tool.
How to do all the work without mistakes and “for centuries”
What is a floor screed? This is the layer that serves as the basis for the flooring, in simple terms. It is necessary for the perfect leveling of the floor and giving a certain rigidity to its surface, the desired slope and hiding utilities. But sometimes screeds can also be a finishing surface, as in technical rooms.
We can say that the screed is an intermediate layer of floors between the finish coating and the subfloor. And the better and more professionally it is made, the more durable the floor itself will be. Therefore, floor screeds are different in terms of the method of adhesion to the floor, the method of installation and composition. Now we will take a closer look at how they differ from each other and for which flooring which is better.
Contents
-
1 Types of screeds by bonding method
-
1.1 Bonded floor screed
-
0003
-
1.3 Floating screed
-
-
-
2.1 Solid screed
-
2.2 Semi-dry screed
-
2.4 Screed assembly
-
-
3 Types of screeds according to material composition
-
03
-
3.3 Industrial screed
-
3.
 4 Plasticizer screed
 -
3.5 Semi-dry screed with fiberglass
-
-
4 Types of screeds by purpose
 4 Plasticizer screed
 Types of screeds by the method of adhesion
, on the separation layer and floating. About each – in more detail.
Bonded floor screed
This screed is placed directly on the work surface and adheres to it by adhesion. There is no hydro or thermal insulation between the layer and the floor. A screed tightly coupled to the floor is made in such cases:
- when there is no possibility to raise the level of the floors – otherwise the doors will not close later or the ceiling will become too low;
- when the screed needs to be very light;
- when the base is perfect;
- when the screed area is too large.
In general, a monolithic interlocking screed is ideal for rooms where massive pieces of furniture and equipment, partitions or warehouse objects will stand. This is a heavy screed, the square meter of which weighs up to 150 kg.
When arranging such a screed, remember: floor beacons are not placed on the base, but are “suspended” on pieces of hard mortar or self-tapping screws. Then these slats remain in the body of the screed. Here is the process of making such a screed:
Screed on a separating layer
In this case, the screed is separated from the lower layer by thermal insulation or waterproofing, but at the same time it does not come into contact with the walls of the premises.
So, thermal insulation is placed under the screed in order to reduce heat loss. It usually consists of rigid mineral slabs, the thickness of which is from 30 to 90 mm – everything here already depends on the heat loss of the room and its heating mode. So, for the first floor of a private house, 30 mm of thickness is enough, and for the basement floors, 90 mm. Often, foam boards with foil are used today as an insulator for a screed.
The main task of such waterproofing is to protect the entire screed cake from moisture. A screed with a waterproofing layer is indispensable for arranging the floor in bathrooms, a bathroom, a basement, an attic under a roof and floors on the first floors. Here is a detailed master class:
Floating screed
Floating screed is so called because it is located on a certain cushion of an insulating layer, heat, sound or hydro. This type of screed is only suitable for laminate, linoleum and parquet boards. But for parquet – no longer.
Floating screed is most relevant when your floor needs to be insulated or you plan to install good sound insulation. In general, a floating screed is indispensable for such premises:
- where, for various reasons, it is impossible to properly prepare the base or it is difficult to remove dust, for example;
- where underfloor heating is installed;
- in apartment buildings where it is vital to waterproof, heat and soundproof the floor;
- where the risk of cracking is high;
- where the screed needs to be made quickly and inexpensively.

But keep in mind, if you use additional plasticizers for the floating screed, then the screed itself will need to be reinforced. And when making a screed on an electric floor, be sure to put a heat insulator under it – so as not to heat the lower floor.
And, finally, the floating screed rarely gives cracks – because it is not tightly linked to the base itself, and it does not “drive”. As for its device, such a screed is necessarily separated from the walls by insulation – this avoids unnecessary stress in the building structure. And this is especially important if you are equipping a warm floor – it has a significant coefficient of thermal expansion. In addition, damper tape, which is commonly used as such insulation, can significantly reduce heat loss through walls.
By the way, experienced builders do not glue the damper tape separately on the walls – but build it from the film (up to 20 cm). Excess film is then not difficult to cut off.
We also note that even a screed on only one polyethylene film is also called “floating”, because. without it, she already behaves differently. And another tip – when arranging a floating screed, do not overdo it with water – it will intensively come to the surface, thereby diluting the cement milk. And this will weaken the rigidity.
Types of screeds according to the way they are laid
So, in each case and for different floor coverings, the screed is made either solid, or self-levelling, or semi-dry. Let’s see what and why.
Solid screed
This screed is made by hand and then carefully leveled with a special tool. Everything is quite simple: stir the mixture in a gravity mixer. Add water until you hear the characteristic “flopping” of the solution. When pouring the screed, please note: if water came out on top, it means that there was too much of it, and shrinkage will be significant. Outcome: cracks. Here, the freshly prepared mixture is poured over the entire base and leveled with a special tool. The surface of the screed hardens quickly, evenly and adheres well to the supporting base.
Semi-dry screed
Semi-dry screed is gradually replacing the classic liquid method. And all because such a screed does not require additional alignment with special self-leveling floors and the process itself is not complicated.
This screed is usually arranged in order to reduce the cost of the overall process. Here you can save a lot on consumable material or on the amount of water for the sake of quick drying. And in order for such a screed to be durable, special polymer compounds are added to it, accelerating the adhesion processes and improving the final quality of the screed.
A semi-dry screed also has many valuable advantages:
- the ability to withstand significant loads;
- perfectly flat surface;
- minimal risk of cracking;
- the ability to easily equip a warm floor;
- minimum costs and excellent final quality.
This screed is also called dry, because the leveling of the floor in this case occurs due to loose material (usually claydite crushed stone) and the laying of durable slabs. Process itself:
Self-levelling screed
This screed has a more fluid composition. It is applied to a sealed base, and under its own weight, it creates a perfectly flat surface. For more details see the photo instructions:
Prefabricated screed
Modern prefabricated screeds are ready-to-install elements. They are mounted from large-sized plates: plywood, fiberboard, chipboard, GVL and the like. By their weight, they are quite light, and therefore even one person can arrange such a screed. Moreover, there are no “wet” processes here, and therefore on the same day you can start laying the front floor covering.
However, the screed is not suitable for all floors. There is an important point here: if a construction team will arrange a dry screed for you, then clearly discuss with them in advance what the allowable deviations will be. So, for laying a laminate, such an error should be no more than 2 mm! But, if the work team takes responsibility, or you make such a screed with your own hands and are confident in your skill – go ahead! Also, it is worth noting that a dry screed is arranged where it is impossible for water to come into contact with the base (namely, cement is diluted with water when arranging other types of screed).
We can say that such a prefabricated structure is only conditionally called a screed, because it is a crate with a variety of filling and coating materials. As the latter, edged or tongue-and-groove boards, chipboard, DSP, OSB or modern bulk floors, like Knauf, are usually used. The legs are adjustable so that the floor is perfectly flat. And a dry screed of GSP boards consists of two layers, the second being connected to the first PVA glue and self-tapping screws. Moreover, in recent years, GSP boards for dry screeds have become more and more popular – and even more in demand, like GVL. They are environmentally friendly and durable, and their only negative is the dust when cutting and a noticeable weight.
It is worth noting that prefabricated floors have approximately the same number of supporters and opponents around the world. So, a dry floor screed is great for concrete floors, and for earthen, and for hollow slabs. Even on wooden boards, after some modifications, you can arrange a screed using this technology. Draft floors on a dry screed are durable, warm, do not collapse, do not collect dust, are not afraid of moisture or fire, have excellent sound insulation and are strong enough. For tiles, carpet, linoleum, parquet and parquet boards – a wonderful base!
Another advantage of modern prefabricated floors is that in case of improper laying, you can easily dismantle them again, but the dismantling of the cement screed is extremely time-consuming and expensive. See how the process of installing a dry prefabricated screed looks like:
And we note one more important point: a prefabricated screed can be called without exaggeration the most soundproofing of all those listed. And it’s all about its structure. The fact is that a homogeneous thin layer for sound is a wonderful conductor, but a multilayer floor with materials with different densities is already an obstacle. Moreover, the lower density of the layers themselves – the better. So, polystyrene foam, polyethylene foam, and the same mineral wool absorb sound almost completely. Therefore, if your downstairs neighbors are constantly complaining about the noise from your apartment, or you are choosing a floor for a children’s room, a prefabricated screed is the best choice.
But keep in mind that it is difficult to make a prefabricated screed in an apartment that is not on the ground floor. Gypsum-fiber, cement-shaving, wood-shaving and gypsum boards are completely inconvenient to lift to the upper floors. But in a private house in the middle of winter it is convenient to use them and they are easily assembled on self-tapping screws, while another type of screed at sub-zero temperatures can no longer be organized. And, finally, the prefabricated screed is never settled where there is high humidity. And, no matter how the manufacturers assure that such plates are not afraid of moisture – this is not so.
Types of screeds according to the material composition
Screeds also differ in the materials they are made of. It is on this that their strength, quality and other important characteristics depend. For example, according to SNiPs, an asphalt concrete screed can only be under piece tongue-and-groove parquet.
Cement-sand screed
There is an opinion among builders that nothing better than a conventional cement-sand screed has yet been invented. It is durable, understandable in technology and suitable for almost all types of coatings.
Under such a screed, it is desirable to put hydro and noise insulation. She will never let water down – such is her structure. But in the process of its construction itself, the situation is quite dangerous when water from the solution is sucked into the floor slab – repairs will have to be made in the apartment on the floor below. That is why for residential multi-storey buildings it is possible to make a screed only using semi-dry or dry technology.
Yes, not many people know how to make a cement screed correctly, and therefore you can often see gross violations of technology. Such a screed is no longer suitable for use, because cracks and air bubbles are not a cosmetic defect, but a sure guarantee that any floor covering will not last long. Dismantling a defective screed is expensive.
Therefore, when installing such a screed, it is important to completely exclude the possibility of local suction of water (through other materials). Otherwise, this will lead to uneven drying of the surface, internal stresses, and, as a result, cracking. That is why an EPP substrate is almost often placed under a cement-sand screed – a wonderful sound insulator and water protection.
See how the process of making such a screed looks like:
It is also quite problematic to make a cement-sand screed in the city – it is difficult to find clean sifted sand there. In addition, a lot of dust is formed from cement, and it is quite difficult to carry it to the second or fifth floor.
Plaster screed
This type of screed is also popular today. After all, gypsum, unlike cement, is absolutely environmentally friendly. Thanks to this material, it is much easier to provide the desired humidity and temperature in the room, which is what you need for a residential building.
Industrial screed
Here concrete grades with special strength are already used, reinforcement is required and special measures are taken to prevent cracks. After all, the industrial operation of floors is always heavy loads, both static and dynamic, falling heavy objects and sometimes a serious abrasive effect.
In the production of industrial floor screeds, the technology of slab separation is also used – this is necessary in order to prevent cracks from appearing under significant loads. Industrial screed is also treated with special impregnations to give additional strength and chemical resistance.
As for the reinforcing mesh, which serves to reinforce the concrete screed, it is used once or twice – “double reinforcement”. Look at this photo instruction:
Screed with plasticizers
Today, special plasticizers are often added to concrete screed. They increase the level of thermal conductivity and strength, reduce the surface tension of water and contribute to an increase in the volumetric mass of the coating. The amount of plasticizer is 10% by weight of pure cement.
But keep in mind that plasticizers, especially of the second efficiency group, at maximum dosages prevent the cement from setting and hardening. This is especially true for those containing lignosulfonates or their modifications. This means that the screed work can take a long time, and the final strength will be 20% less.
And in general, plasticizers in the screed are good because they allow you to use less water, improve the adhesion of the screed to the base, and the mass itself turns out to be more plastic, it is easier to lay. As a plasticizer, builders often take ordinary PVA glue – 150 g per bucket of cement.
Semi-dry screed with fiberglass
This cement-sand screed is made according to semi-dry technology, but with the use of synthetic fiber. To do this, you will need mechanical mixers, in which plastic or metal fibers are added. They are necessary to give the screed strength – higher or similar to reinforced concrete. Here is what the process itself looks like:
Types of screeds by purpose
Also, according to their purpose, screeds are divided into leveling and leveling-heat-insulating. So, the first view is arranged only in order to give the base the necessary parameters: evenness, height and a certain slope (it can be equal to zero). The second type, in addition to its primary function, also performs a secondary one – it creates the effect of thermal insulation of the room.
Now you understand why it is impossible to say which screed is better – each type exists for certain floor requirements. Therefore, when choosing, proceed from what the flooring will be like, calculate future loads, assume humidity and temperature changes in the room, the possibility of further repairs and environmental requirements (for example, if we are talking about a children’s room).
Have you chosen? And now study on our website how to make the variant of the screed you need with your own hands!
- Author: Alexey
Rate the article:
(26 votes, average: 3.9 out of 5)
Share with your friends!
Leveling layer (screed) for floors and ceilings
Application of screed
Any floor covering that is used indoors as a finishing layer must have a solid and even base under it. To do this, the upper side of the floor is leveled using special mortars or structures. Such a layer that eliminates irregularities, closes communications, creates the necessary slope and distributes loads, is called a screed.
A screed must be provided when necessary:
- leveling the surface of the underlying layer;
- pipeline cover;
- distribution of loads on heat and sound insulation layers;
- ensuring normalized heat absorption of floors;
- creating slopes on floors along slabs.

Screeds are made as a final surface or as an intermediate layer on which a topcoat is applied.
Classification of screeds
Screeds, by type of construction
By type of construction screeds are:
- monolithic single-layer;
- monolithic multilayer;
- prefabricated.
Monolithic single-layer screeds
Monolithic single-layer screeds are laid in one layer throughout the entire thickness. As a rule, these are cement-sand mixtures or cement-based mortars.
These ties are simple and are made according to the technology known to most builders. It is important that such screeds can be performed on uneven surfaces.
Monolithic multi-layer screeds
Monolithic multi-layer screeds are made in the same way as single-layer screeds, but at the same time they consist of several interlocking layers, which are made in series.
Prefabricated screeds
Prefabricated screeds are prefabricated elements that are ready to be installed.
Prefabricated screeds are coverings consisting of elements that are ready to be laid and are designed to be mechanically connected to each other. Installation is made from sheets ACL, TsSP large size. Boards made of plywood, chipboard, fiberboard, gypsum-fiber (GVL) or glass-magnesite sheets can also be used.
When working with precast screeds, there are no “wet” processes, which makes it possible to lay face coverings immediately after installation. However, such screeds must be arranged on a flat surface in order to avoid deformations and cracks in the screed during operation.
Ties according to the method of engagement with overlap
Types of ties according to the method of adhesion to overlap exist:
- connected to the base;
- on release layer;
- on an insulating layer (“floating”).
Bonded ties
Bonded ties are those that are firmly attached to the base. In other words, there are no separating layers between the base and the screed.
This type of screed can withstand heavy loads, but the shrinkage of bonded screeds is uneven, therefore, during operation, these types of screeds are more prone to deformation and cracking. To avoid them, it is necessary to perform expansion joints in the screeds.
Screeds on the release layer
Since the moisture content of the screeds depends on how wet the floor is, it is recommended to use screeds on the release layer to prevent the screed from adhering to the floor.
A waterproofing material can be used as a separating layer, which will simultaneously protect the structure from moisture.
In order for such a screed to be sufficiently strong, its thickness must be at least 30 mm.
Ties on the insulating layer (“floating”)
“Floating” ties on the insulating layer do not bind to the base. This is an independent building structure. Such screeds can be found most often in new construction. The design of the screed in this case is less prone to cracking during operation.